


 Loading...
R E F E R E N C E M A N U A L
N A I M U N I T I 2 A L L - I N - O N E A U D I O P L A Y E R
E N G L I S H

Contents
Section |
|
Page |
|
Contents |
|
1 |
NaimUniti 2 Introduction |
1 |
1.1 |
The Integrated Amplifier |
1 |
1.2 |
The CD Player |
1 |
1.3 |
The Multi-mode Radio |
1 |
1.4 |
The UPnP™ Audio Interface |
1 |
1.5 |
The USB/iPod Interface |
1 |
2 |
NaimUniti 2 Installation and Connection |
2 |
2.1 |
NaimUniti 2 Rear Panel |
2 |
2.2 |
Mains Power Connection |
2 |
2.3 |
FM/DAB Aerial Connection |
2 |
2.4 |
Audio Signal Connections |
2 |
2.5 |
Speaker Outputs |
3 |
2.6 |
Headphone Output |
3 |
2.7 |
Signal Ground Switch |
3 |
2.8 |
USB/iPod Interface |
3 |
2.9 |
Network Connections |
3 |
2.10 |
Control Sockets |
4 |
3 |
NaimUniti 2 Operation |
5 |
3.1 |
Front Panel Features |
5 |
3.2 |
Front Panel Buttons (normal play mode) |
5 |
3.3 |
Front Panel Buttons (list and setup modes) |
5 |
3.4 |
Front Panel Display (normal play mode) |
6 |
3.5 |
Front Panel Display (list mode) |
6 |
3.6 |
Front Panel Display (setup mode) |
6 |
3.7 |
NaimUniti 2 Remote Handset |
7 |
3.8 |
NaimUniti 2 Text Entry |
8 |
3.9 |
The n-Stream Control App |
8 |
4 |
NaimUniti 2 Setup |
10 |
4.1 |
The Setup Home Menu |
10 |
4.2 |
The Language Menu |
10 |
4.3 |
The Inputs Menu |
10 |
4.4 |
The Speakers Menu |
11 |
4.5 |
The Headphones Menu |
12 |
4.6 |
The Network Settings Menu |
12 |
4.7 |
The Front Display Menu |
13 |
4.8 |
The Clock and Alarm Menu |
13 |
4.9 |
The Handset Keys Menu |
14 |
4.10 |
The Factory Settings Menu |
15 |
5 |
NaimUniti 2 Integrated Amplifier |
16 |
5.1 |
Selecting Inputs |
16 |
5.2 |
Volume Control |
16 |
5.3 |
Amplifier Display |
16 |
5.4 |
Signal Outputs |
16 |
5.5 |
Amplifier Fault Warnings |
16 |
6 |
NaimUniti 2 CD Player |
17 |
6.1 |
Disc Loading |
17 |
6.2 |
CD Transport Control |
17 |
6.3 |
CD Display and Track Selection |
17 |
6.4 |
CD Track Playlist Programming |
17 |
6.5 |
CD Player Maintenance |
18 |
7 |
NaimUniti 2 Multi-mode Radio Tuner |
19 |
7.1 |
FM Tuner – Seeking Stations |
19 |
7.2 |
DAB Tuner – Seeking Stations |
19 |
7.3 |
iRadio Tuner – Seeking Stations |
19 |
7.4 |
Adding iRadio Stations |
20 |
7.5 |
Storing Radio Presets |
20 |
7.6 |
Using Radio Presets |
20 |
8 |
NaimUniti 2 UPnP™ Audio Interface |
21 |
8.1 |
UPnP™ Servers |
21 |
8.2 |
Audio File Compatibility |
21 |
8.3 |
Scanning Servers and Playing Files |
21 |
9 |
NaimUniti 2 |
USB/iPod Interface |
22 |
9.1 |
USB Media and File Compatibility |
22 |
|
9.2 |
iPod Compatibility and Charging |
22 |
|
9.3 |
Browsing and Playing USB Files |
22 |
|
10 |
NaimUniti 2 |
Specifications |
23 |
Note: This manual is issue No. 6 and describes the operation of NaimUniti 2 units running software release version 3.13.xx. NaimUniti 2 units running earlier software will not operate fully in the manner described in this manual. The software running in a NaimUniti 2 is displayed in the Factory Settings menu.
The “Made for iPod” logo indicates
that this product has been designed specifically to work with iPod.
The manufacturer certifies that this accessory has been made in
accordance with the high standards of quality and performance that you expect from iPod and Apple.
Apple is not responsible for the operation of this device or its compliance with safety and regulatory standards.
iPod, and iTunes are trademarks of Apple Inc., registered in the U.S. and other countries. Windows Media is a trademark of Microsoft Corporation.

NaimUniti 2 Introduction
1 NaimUniti 2 Introduction
NaimUniti 2 is a highly capable product that will repay time and effort spent on installation and setup. We strongly recommend that you read this manual. NaimUniti 2 effectively incorporates five separate elements. Each of these is introduced in the following paragraphs and subsequently described in full detail in Sections 5 to 9. The NaimUniti 2
elements are: |
|
An Integrated Stereo Amplifier |
Introduced below and fully described in Section 5 |
A CD Player |
Introduced below and fully described in Section 6 |
A Multi-mode Radio |
Introduced below and fully described in Section 7 |
A UPnP™ Audio Interface |
Introduced below and fully described in Section 8 |
A USB/iPod Audio Interface |
Introduced below and fully described in Section 9 |
Prior to the sections describing NaimUniti 2’s elements, Section 2 covers its installation, Section 3 describes its operation and Section 4 describes its setup.
1.1 The Integrated Amplifier
1.1.1 Inputs
NaimUniti 2 incorporates an audio preamplifier that provides five analogue and five S/PDIF digital audio external inputs. The preamplifier also accepts internal inputs from NaimUniti 2’s integrated CD player and FM/ DAB tuner.
In addition to conventional analogue and digital input signals, the NaimUniti 2 preamplifier can accommodate the following external peripheral inputs:
•iPod models and USB memory via a USB interface.
•Internet radio and universal plug and play (UPnP™) servers via an Ethernet network socket or wireless network connection.
1.1.2 Signal Outputs
The NaimUniti 2 preamplifier provides the following analogue signal outputs:
•A line output (pre volume and balance controls).
•Two mono unfiltered subwoofer outputs
(post volume and balance controls).
•A preamplifier output
(post volume and balance controls).
•A headphone output
(post volume and balance controls).
1.1.3 Controls
1.2 The CD Player
NaimUniti 2 incorporates a CD player based on the same swing-out CD drawer and transport used in other Naim CD players. The transport is able to play standard “Red Book” CDs and CDR discs. CD track order can be programmed or tracks can be shuffled (played randomly).
1.3 The Multi-mode Radio
The NaimUniti 2 multi-mode radio combines an FM/DAB (Digital Audio Broadcasting) tuner and an internet radio (iRadio) player. A total of 40 radio stations across all three modes can be stored as presets. In FM and DAB mode stations are tuned by NaimUniti 2 scanning the respective transmission bands. In iRadio mode NaimUniti 2 receives data streams and a list of available radio stations from
a dedicated internet server. iRadio requires broadband internet access via a home network connection.
The NaimUniti 2 DAB module incorporates full broadcast and station display capabilities. The FM module is fully RDS (Radio Data System) capable.
Note: DAB and RDS broadcasts are not available in all territories.
1.4 The UPnP™ Audio Interface
NaimUniti 2 can connect to a home network and play audio files stored on UPnP™ drives.
1.5 The USB/iPod Interface
The NaimUniti 2 preamplifier provides volume, balance, input selection and mute control from either the front panel or the supplied remote handset.
1.1.4 Speaker Outputs
NaimUniti 2 incorporates a stereo power amplifier rated at 70 Watts per channel into 8 Ohms. The power amplifier is designed to drive one pair of speakers via the sockets on the NaimUniti 2 rear panel.
NaimUniti 2 incorporates a front panel USB interface socket that enables audio files stored on USB memory sticks and Apple iPod models to be selected and played.
Note: 5th generation and later, and all iPod touch models, are compatible with the NaimUniti 2 USB interface.
Note: Earlier iPod and other portable music players may be connected from their headphone sockets to NaimUniti 2’s front panel analogue input using a 3.5mm stereo jack cable. Player control via NaimUniti 2’s user interface will not however be possible.
1

NaimUniti 2 Installation and Connection
2 NaimUniti 2 Installation and Connection
NaimUniti 2 should be installed on an equipment stand intended for the purpose. Do not stand it directly on top of another item of equipment and ensure it is well ventilated. Care should be taken to ensure that it is level. It should be installed in its final location before connecting cables or switching on. NaimUniti 2 has no standby mode and is intended to be left switched on.
A transit screw on the underside of the NaimUniti 2 case should be removed before use and replaced if the unit is to be moved. This transit screw must not be used in any other Naim product. Handle NaimUniti 2 with extra care once the transit screw is removed.
Connecting NaimUniti 2 to mains power and to a variety of audio peripherals and sources is described in the following paragraphs. Diagram 2.1 illustrates the NaimUniti 2 rear panel connection sockets.
2.1 NaimUniti 2 Rear Panel
|
|
|
|
|
|
|
|
network socket |
|
|
USB update interface |
|
FM/DAB aerial |
|||
|
|
|
|
|
|
|
|
|
|
|
||||||
|
|
|
|
|
|
|
|
|
|
|||||||
|
power switch |
|
left |
|
right |
wireless network (Wi- |
|
|
|
remote |
|
|||||
|
|
speaker |
|
speaker |
Fi) antenna socket |
|
|
|
|
|
input (RC5) |
|
socket |
|||
|
|
|
|
|
|
|
|
|||||||||
|
|
|
|
|
|
|
|
|
|
|
|
|
|
|
|
|
|
|
|
|
|
|
|
|
|
|
|
|
|
|
|
|
|
|
|
|
|
|
|
|
|
|
|
|
|
|
|
|
|
|
mains input |
signal ground switch |
|
|
|
|
|
|
|
|
|
|
|
|
|
|
|
|
|
|
|
|
|
|
||
|
|
|
|
|
|
|
|
|
|
|
||
|
|
|
|
|
|
|
|
|
|
|
||
preamp output |
|
|
|
line |
analogue |
phono |
digital |
|||||
and fuse |
subwoofer outputs |
|
|
output |
inputs |
input inputs |
||||||
|
||||||||||||
2.2 Mains Power Connection
Connect NaimUniti 2 to a mains power socket using either the mains cable supplied or a Naim Power-Line.
2.3 FM/DAB Aerial Connection
In order to enable high quality FM and DAB radio, NaimUniti 2 requires a strong, interference-free radio signal. Its rear panel FM/DAB Aerial socket must be connected, via 75 Ohm low-loss coaxial cable, to a suitable aerial. The aerial should be mounted clear of large obstructions and as high as possible; ideally on a roof.
Note: Your local retailer should be able to offer advice on a suitable aerial and aerial installer.
2.4 Audio Signal Connections
2.4.1 Audio Signal Inputs
NaimUniti 2 provides five stereo analogue inputs and five S/PDIF digital inputs including one combined analogue/ digital input socket. Connection to the inputs is made via a variety of socket types. The following table lists the inputs and their socket types:
Input |
Type |
Socket |
an. 1 |
Analogue |
RCA phonos |
an. 2 |
Analogue |
RCA phonos |
an. 3 |
Analogue |
RCA phonos |
phono |
Analogue |
240° 5 pin DIN |
front panel |
Analogue |
3.5mm jack |
|
Digital |
3.5mm mini-TosLink jack |
dig. 1 |
Digital |
Coaxial (RCA phono) |
dig. 2 |
Digital |
Optical (TosLink) |
dig. 3 |
Digital |
Coaxial (RCA phono) |
dig. 4 |
Digital |
Optical (TosLink) |
Note: The Phono DIN socket carries a power supply output intended to power a Naim phono preamplifier. A turntable cannot be used with NaimUniti 2 without an external phono preamplifier.
Note: The front panel analogue/digital jack socket can accept both conventional analogue 3.5mm plugs and mini-TosLink optical digital plugs. It will automatically identify the type of plug inserted and handle the signal appropriately.
Always use high quality interconnect cables to connect sources to NaimUniti 2 inputs.
2

NaimUniti 2 Installation and Connection
2.4.2 Audio Signal Outputs
NaimUniti 2 provides audio signal outputs for a variety of applications. Connections to the outputs are made via the socket types listed in the following table:
Output |
Type |
Socket |
Preamp out |
Analogue stereo |
4-pin DIN |
Sub out 1 |
Analogue mono |
RCA phono |
Sub out 2 |
Analogue mono |
RCA phono |
Line out |
Analogue stereo |
RCA phonos |
Note: The preamp output is intended for connection to an upgrade or second power amplifier. The output is taken after the NaimUniti 2 volume and balance controls so a power amplifier connected to it will respond to NaimUniti 2 volume and balance control changes. The output always reflects the selected input signal.
Note: The two subwoofer outputs are mono and unfiltered. They are taken after the NaimUniti 2 volume control so subwoofers connected to them will respond to NaimUniti 2 volume control changes. The outputs always reflect the selected input signal and can be switched on or off in the Speakers setup menu.
Note: The stereo line output is intended to be connected to a recording device. It is taken before the NaimUniti 2 volume and balance controls so does not reflect volume or balance control changes. The output always reflects the selected input signal.
2.5 Speaker Outputs
A set of stereo speaker connection sockets is provided on the NaimUniti 2 rear panel. Custom Naim Audio loudspeaker connectors are supplied to make the connection and in order to comply with current European safety regulations these should always be used. Naim
Audio speaker cable will provide the best results, however, a range of speaker cable types may be used without
risk of damage to the amplifier. Contact your local Naim retailer for further advice. Use equal lengths of speaker cable for each channel.
Ensure when connecting speakers that they are “in phase”. That is, the positive and negative connection orientation at both the speaker and amplifier ends of the cable is the same for both channels.
2.6 Headphone Output
NaimUniti 2 is fitted on its front panel with a 3.5mm stereo headphone socket. Insertion of a headphone plug will mute the speaker outputs.
Note: NaimUniti 2 controls and stores volume settings separately for headphones and speakers.
2.7 Signal Ground Switch
NaimUniti 2 is fitted on its rear panel with a Signal Ground switch offering two positions: Chassis or Floating. Select the Chassis position unless NaimUniti 2 is connected
in a hi-fi system incorporating another earthed source component, or mains “hum” is audible through the loudspeakers. Contact your retailer, distributor or Naim for advice if necessary.
Note: “Connected” in the context above means an analogue audio signal cable that includes an earth connection.
Note: All Naim CD players are earthed so the Signal Ground switch should be set to floating if one is connected in the system.
No damage will be done if the wrong Signal Ground position is chosen, however the system sound quality may be compromised.
2.7.1 General Audio Connection Notes
The NaimUniti 2 negative analogue input and output connections for each channel are common. The mains earth (ground) should always be connected regardless of what other equipment is used. The mains earth primarily grounds the case and the electrostatic screen within the transformer, and is only connected to the signal negative if the Signal Ground switch is set to Chassis. In order to avoid hum loops, the signal negative of the whole system should be connected to the mains earth in one place only.
2.8 USB/iPod Interface
NaimUniti 2 is fitted with a front panel USB interface intended for the connection of Apple iPod models and USB memory sticks carrying audio files. The USB interface should not be used for any other purpose.
Depending on the setup options chosen (see Section 4.3.6), iPod batteries will be charged when connected to the USB interface.
2.9 Network Connections
2.9.1 Wired Network Connection
NaimUniti 2 is fitted on its rear panel with a standard RJ45 Ethernet socket. This socket enables NaimUniti 2 to join home networks via a network router to access
internet radio data streams or to play audio files stored on appropriately configured UPnP™ servers.
Ethernet-over-mains hardware may be used and provides a simple and convenient method of wired home network connection. However, depending on mains wiring factors specific to each home environment, the presence of network data on the mains supply may compromise overall system sound quality. If any sound quality compromise is found to be unacceptable, dedicated network cabling should be installed or wireless networking should be employed.
3

NaimUniti 2 Installation and Connection
2.9.2 Wireless Network Connection
If NaimUniti 2 is to connect wirelessly to the home network the supplied Wi-Fi antenna must be fitted to the rear panel wireless antenna socket. Wireless configuration will also
be necessary before NaimUniti 2 is able to connect to the network. See Section 4.6.1 of this manual.
2.9.3 Network Settings
NaimUniti 2 is set up when originally shipped not to require any on-site network configuration but to connect to a network automatically (it uses DHCP by default). However, if your NaimUniti 2 has been previously used, its network configuration may have been altered leaving it unable to connect automatically. If this appears to be the case ensure that DHCP is selected in the Network Settings menu
and re-start NaimUniti 2. If problems still persist contact your retailer, installer or Naim Audio directly. See Section 4.6.
Note: Before reporting network connection problems carry out a Factory Reset operation and try again. Select Reset All Settings from the Factory Settings setup menu. See Section 4.10.
Note: A NaimUniti 2 switched on without a working wired network connection will only be able to connect to
a home network wirelessly. To use an Ethernet (wired) connection, switch NaimUniti 2 off, connect the network and switch it on again.
Note: For internet radio to operate NaimUniti 2 requires connection to a broadband internet service via a router/ modem with a built-in firewall.
2.10 Control Sockets
The NaimUniti 2 is fitted on its rear panel with a 3.5mm jack
Remote In socket and a mini-USB interface socket.
The Remote In socket can be used for RC5 remote control of the NaimUniti 2 via a wired connection or a remote IR repeater.
The mini-USB socket enables firmware upgrades and diagnostic tests to be carried out. Contact your Naim retailer for more information if required.
Note: The mini-USB interface is not intended for the connection of USB memory devices.
4

NaimUniti 2 Operation
3 NaimUniti 2 Operation
NaimUniti 2 can be operated from either its front panel controls or from the supplied remote handset. In either case, setting up and operating NaimUniti 2 requires navigation through a menu-driven user interface. The general principles of the interface are carried across each of NaimUniti 2’s elements so this section of the manual describes and illustrates those general principles.
3.1 Front Panel Features
CD |
headphone |
USBinterface |
frontpanel |
frontpanel |
drawer |
output |
|
display |
buttonmatrix |
handle |
combined |
|
|
|
|
analogue and |
|
|
|
|
digital input |
|
|
|
3.2 Front Panel Buttons (normal play mode) 3.3 Front Panel Buttons (list and setup modes)
OK
3.2.1 Normal Play Mode
In normal play mode the NaimUniti 2 front panel buttons perform the operations described by their legends:
mute |
silences NaimUniti 2 |
-vol |
decreases volume |
vol+ |
increases volume |
input |
sequentially selects inputs |
list |
switches NaimUniti 2 to list mode |
stop |
stops play |
play |
starts play |
prev |
selects previous track or audio file |
next |
selects next track or audio file |
3.3.1 List and Setup Mode
In list and setup modes the NaimUniti 2 front panel buttons (except mute) reconfigure. The reconfigured buttons are illustrated in the diagram above and their operation is described below:
-vol |
navigate up menu or list |
input |
go to previous menu or list (or previous |
|
character) |
play |
go to next menu or list (or next character) |
prev |
navigate down menu or list |
stop |
OK (confirm selection) |
list |
exit list mode |
mute |
silences NaimUniti 2 |
next |
non-operational |
vol+ |
non-operational |
5
NaimUniti 2 Operation
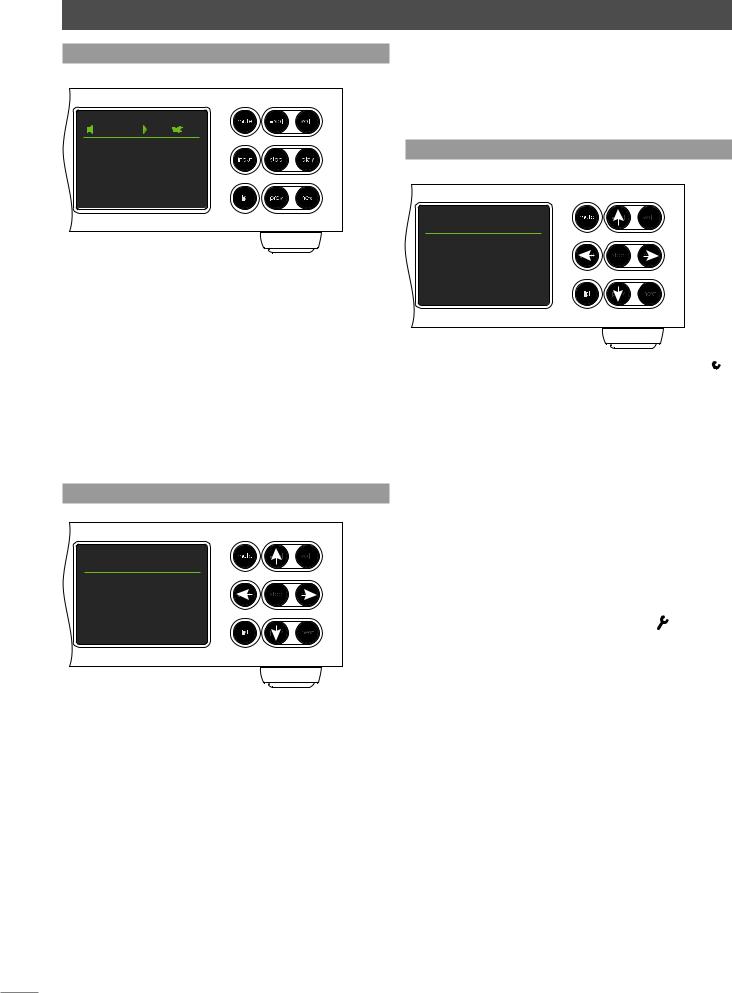
3.4 Front Panel Display (normal play mode)
42 |
CD |
02 04:47
In normal play mode the NaimUniti 2 screen provides a variety of information on the current setup, the input
selected and the material playing. A typical normal play mode screen is illustrated above showing track two of a CD has been playing for four minutes forty-seven seconds.
At the top left of the screen the volume level is displayed along with a “speaker” icon that shows NaimUniti 2 is not muted.
At the top of the screen the “play” icon is displayed to show that the play is underway and the “shuffle” icon is displayed to show random play has been selected. “CD” shows that the CD input is selected.
3.5 Front Panel Display (list mode)
DAB Stations |
1/28 |
4BBC R1 |
OK |
BBC R2 |
|
BBC R3 |
|
BBC R4 |
|
List mode is entered by pressing the front panel list button or handset ok/list key. List mode is used where sources provide data that can be browsed: a list of radio stations or tracks for example.
Lists displayed will depend on the input selected and data available. A typical list mode screen is illustrated above showing the DAB radio stations available with BBC R1 selected.
At the top right of the screen, “1/28” denotes that the selected item is number one of twenty-eight.
To scroll up and down lists and select items use the front panel or handset up (5) and down (6) keys and ok/ list buttons or keys. To return to normal display press the handset exit key or front panel list button.
Note: The right (4) key duplicates the ok/list key when navigating list mode menus.
In long item lists the handset numeric/text keys can be used to jump through the list alphabetically.
3.6 Front Panel Display (setup mode)
Uniti Setup |
1/9 |
4Language |
OK |
Inputs |
|
Speakers |
|
Headphones |
|
Setup mode is entered by pressing the handset setup ( ) key or pressing and holding the front panel list button.
It provides access to all user-configurable NaimUniti 2 parameters.
The screen illustrated above is the setup home screen that is always displayed when setup mode is entered. The “1/8” at the top right denotes that the selected item is number one of eight.
To navigate around the setup menus and make selections use the front panel or handset up (5), down (6) and left (3) arrow keys to navigate around menus and the ok/list button or key to confirm a selection.
Note: The right (4) key duplicates the ok/list key when navigating setup mode menus.
To exit setup mode press the handset setup ( ) key a second time or press the exit key or front panel list button.
NaimUniti 2 setup is covered in Section 4.
Note: If programme material is playing when NaimUniti 2 enters setup mode it will continue to play. The volume, mute and transport (play, pause, stop etc.) keys on the handset will remain operational.
6
Loading...