

Naim Audio NDX User Manual
REFERENCE MANUAL
NDX and ND5 XS NETWORK AUDIO PLAYERS
E N G L I S H

Contents
Section Page
Contents
1 Introduction 1
1.1 The Multi-mode Radio 1
1.2 The UPnP™ Audio Interface 1
1.3 The USB/iPod Interface 1
1.4 The Digital to Analogue Converter 1
2 Installation and Connection 2
2.1 NDX Rear Panel 2
2.2 NDX Connected To Optional
555PS Power Supply 2
2.3 ND5 XS Rear Panel 3
2.4 ND5 XS Connected To Optional
XP5 XS Power Supply 3
2.5 Mains Power Connection 4
2.6 Power Supply Upgrade 4
2.7 FM/DAB Aerial Connection 4
2.8 Audio Inputs and Outputs 4
2.9 USB/iPod Interface 4
2.10 Network Connections 4
2.11 System Automation 5
2.12 External Control and Update Sockets 5
2.13 Signal Ground Switch 5
5 NDX/5XS Multi-mode Radio Tuner 17
5.1 FM Tuner – Seeking Stations 17
5.2 DAB Tuner – Seeking Stations 17
5.3 iRadio Tuner – Seeking Stations 17
5.4 Adding iRadio Stations 18
5.5 Storing Radio Presets 18
5.6 Using Radio Presets 18
6 NDX/5XS UPnP™ Audio Interface 19
6.1 UPnP™ Servers 19
6.2 Audio File Compatibility 19
6.3 Scanning Servers and Playing Files 19
7 NDX/5XS USB/iPod Interface 20
7.1 USB Media and File Compatibility 20
7.2 iPod Compatibility and Charging 20
7.3 Browsing and Playing USB Files 20
8 NDX/5XS Specifications 21
Note: This manual is Issue No. 3 and describes the operation
of NDX or ND5 XS units running software release version 3.9.xx.
Units running earlier software may not behave as described in
this manual.
3 NDX/5XS Operation 6
3.1 NDX/5XS Front Panel Features 6
3.2 Front Panel Buttons 6
3.3 Front Panel Display (normal play mode) 6
3.4 Front Panel Display (list display mode) 7
3.5 Front Panel Display (setup mode) 7
3.6 NDX/5XS Remote Handset 8
3.7 Handset Text Entry 9
3.8 The n-Stream Control App 9
4 NDX/5XS Setup 11
4.1 The Setup Home Menu 11
4.2 The Language Menu 11
4.3 The Inputs Menu 11
4.4 The Analogue Outputs Menu 12
4.5 The Network Settings Menu 12
4.6 The Digital Output Menu 14
4.7 The Front Display Menu 14
4.8 The Handset Keys Menu 14
4.9 The System Automation Menu 15
4.10 The Factory Settings Menu 16
“Made for iPod” and “Made for iPhone” mean that an electronic
accessory has been designed to connect specifically to iPod or iPhone
respectively and has been certified by the developer to meet Apple
performance standards. Apple is not responsible for the operation of this
device or its compliance with safety and regulatory standards.
iPod and iPhone are trademarks of Apple Inc., registered in the U.S. and
other countries.
Windows Media™ is a trademark of Microsoft Corporation.
UPnP™ is a trademark of the UPnP™ Forum.

Introduction
1 Introduction
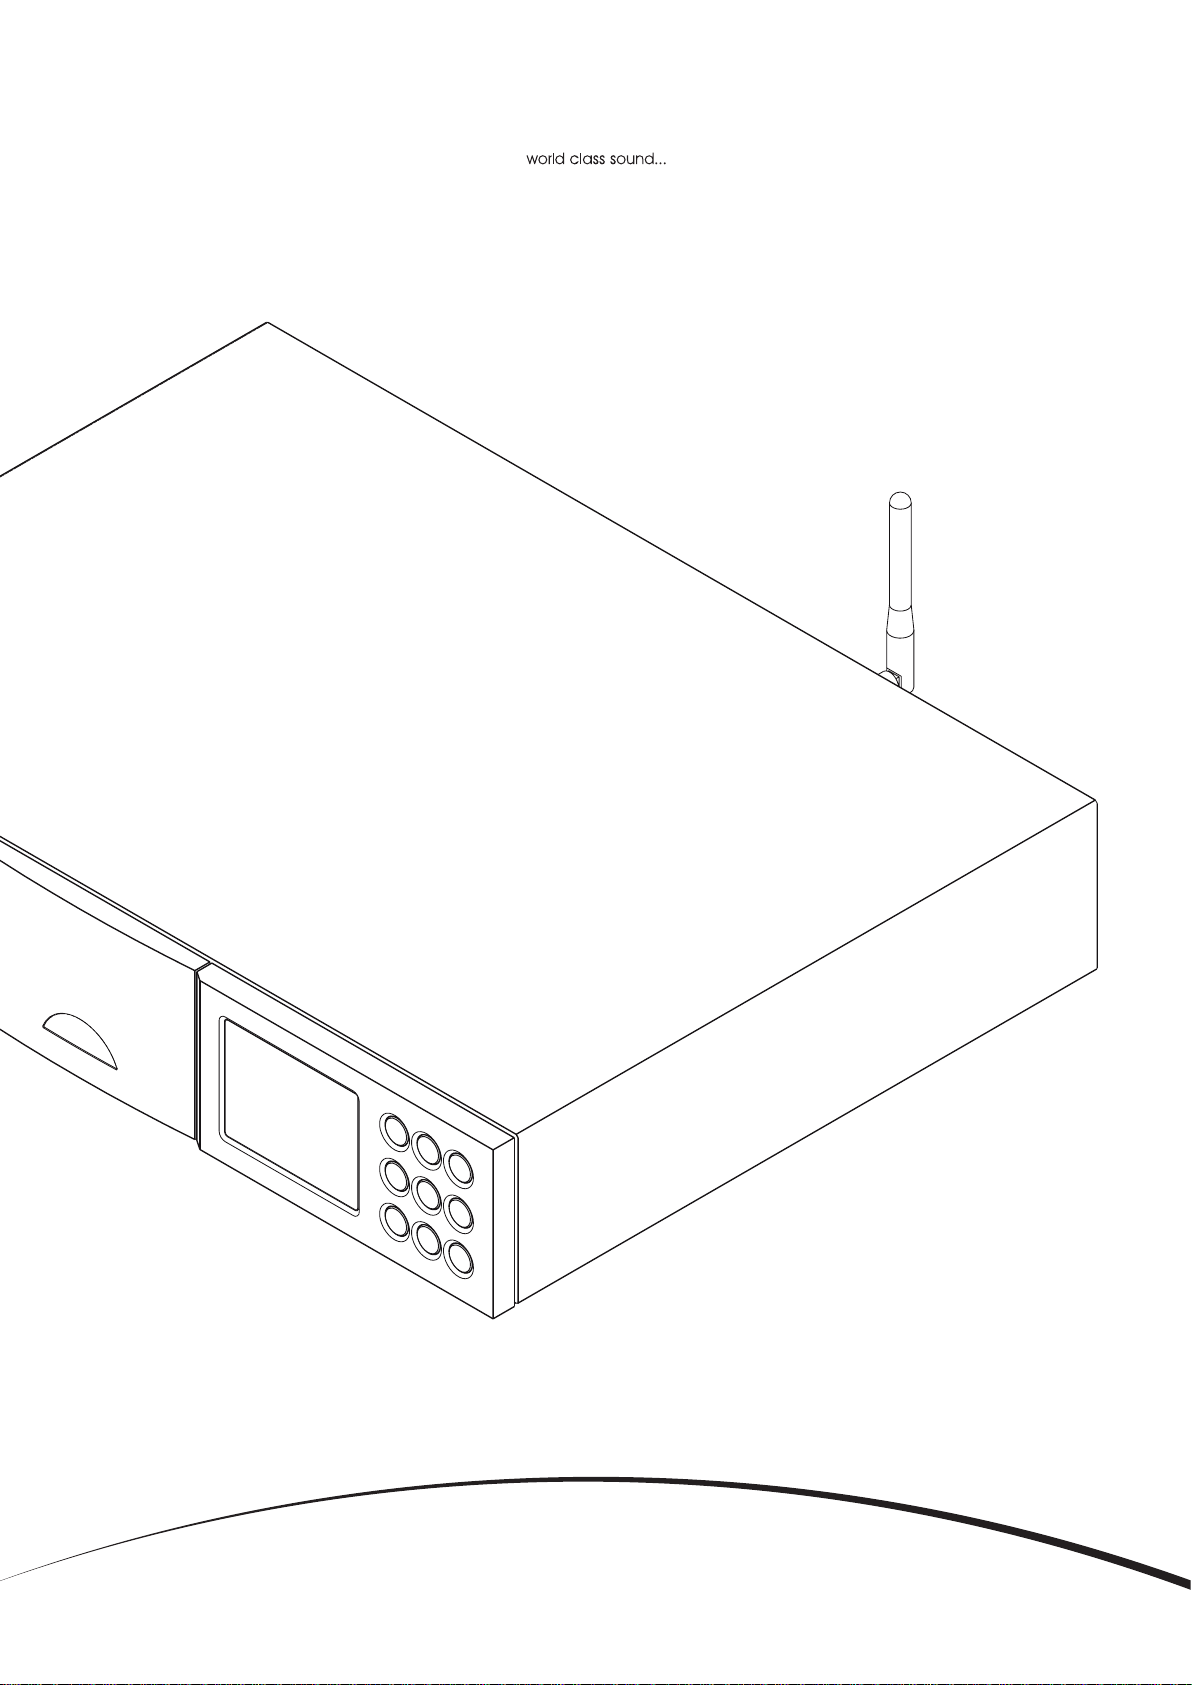
The NDX and ND5 XS (NDX/5XS) are highly capable network and digital audio players
that will repay time and effort spent on installation and setup. We strongly recommend
that you read this manual.
The NDX/5XS incorporates four distinct audio components, each routed to analogue
or digital outputs intended for connection to an appropriate preamplifier input. Each
component is introduced in the paragraphs below and subsequently described in full
detail in Sections 5 to 8. The components are:
A Multi-mode Radio
A UPnP™ Audio Interface
A USB/iPod Audio Interface
A Digital to Analogue converter
Prior to the sections describing NDX/5XS components, Section 2 covers installation,
Section 3 describes operation and Section 4 describes setup.
1.1 The Multi-mode Radio
The NDX/5XS multi-mode radio combines an internet
radio (iRadio) player and an optional FM/DAB (Digital
Audio Broadcasting) tuner. A total of 40 radio stations
across all three modes can be stored as presets. In FM
and DAB mode, stations are tuned by NDX/5XS scanning
the respective transmission bands. In iRadio mode the
NDX/5XS receives data streams and a list of available
radio stations from a dedicated internet server. iRadio
requires broadband internet access via a home network
connection.
The NDX/5XS DAB module incorporates full broadcast
and station display capabilities. The FM module is fully RDS
(Radio Data System) capable.
Note: DAB and RDS broadcasts are not available in all
territories.
1.2 The UPnP™ Audio Interface
NDX/5XS can connect to a home network and play audio
files stored on UPnP™ drives such as the Naim UnitiServe or
on PC and Mac computers.
1.3 The USB/iPod Interface
NDX/5XS incorporates a front panel USB interface socket
that enables audio files stored on USB memory devices
and Apple iPod and iPhone models to be selected and
played.
The NDX/5XS is compatible with the iPod and iPhone
models illustrated below.
1.4 The Digital to Analogue Converter
NDX/5XS incorporates a three input digital to analogue
converter able to handle S/PDIF format digital audio at
up to 24 bit and 192kHz resolution. The three DAC inputs
comprise one coaxial BNC socket, one coaxial Phono
socket and TosLink optical socket.
1
Installation and Connection
2 Installation and Connection
Your NDX/5XS should be installed on an equipment stand intended for the purpose. Ensure
it is well ventilated, and do not stand it directly on top of another item of equipment. It
should be installed in its final location before connecting cables or switching on. The
NDX/5XS has no standby mode and is intended to be left switched on.
Connecting the NDX/5XS to mains power and to a variety of audio peripherals and
sources is described in the following paragraphs. Diagrams 2.1 and 2.3 respectively
illustrates the NDX and ND5 XS rear panel connection sockets.
Both the NDX and ND5 XS can be upgraded through the use of an Naim 555PS, XPS or
XP5 XS power supply. Connection of external power supplies is illustrated in Diagrams 2.2
and 2.4 and described in Section 2.6.
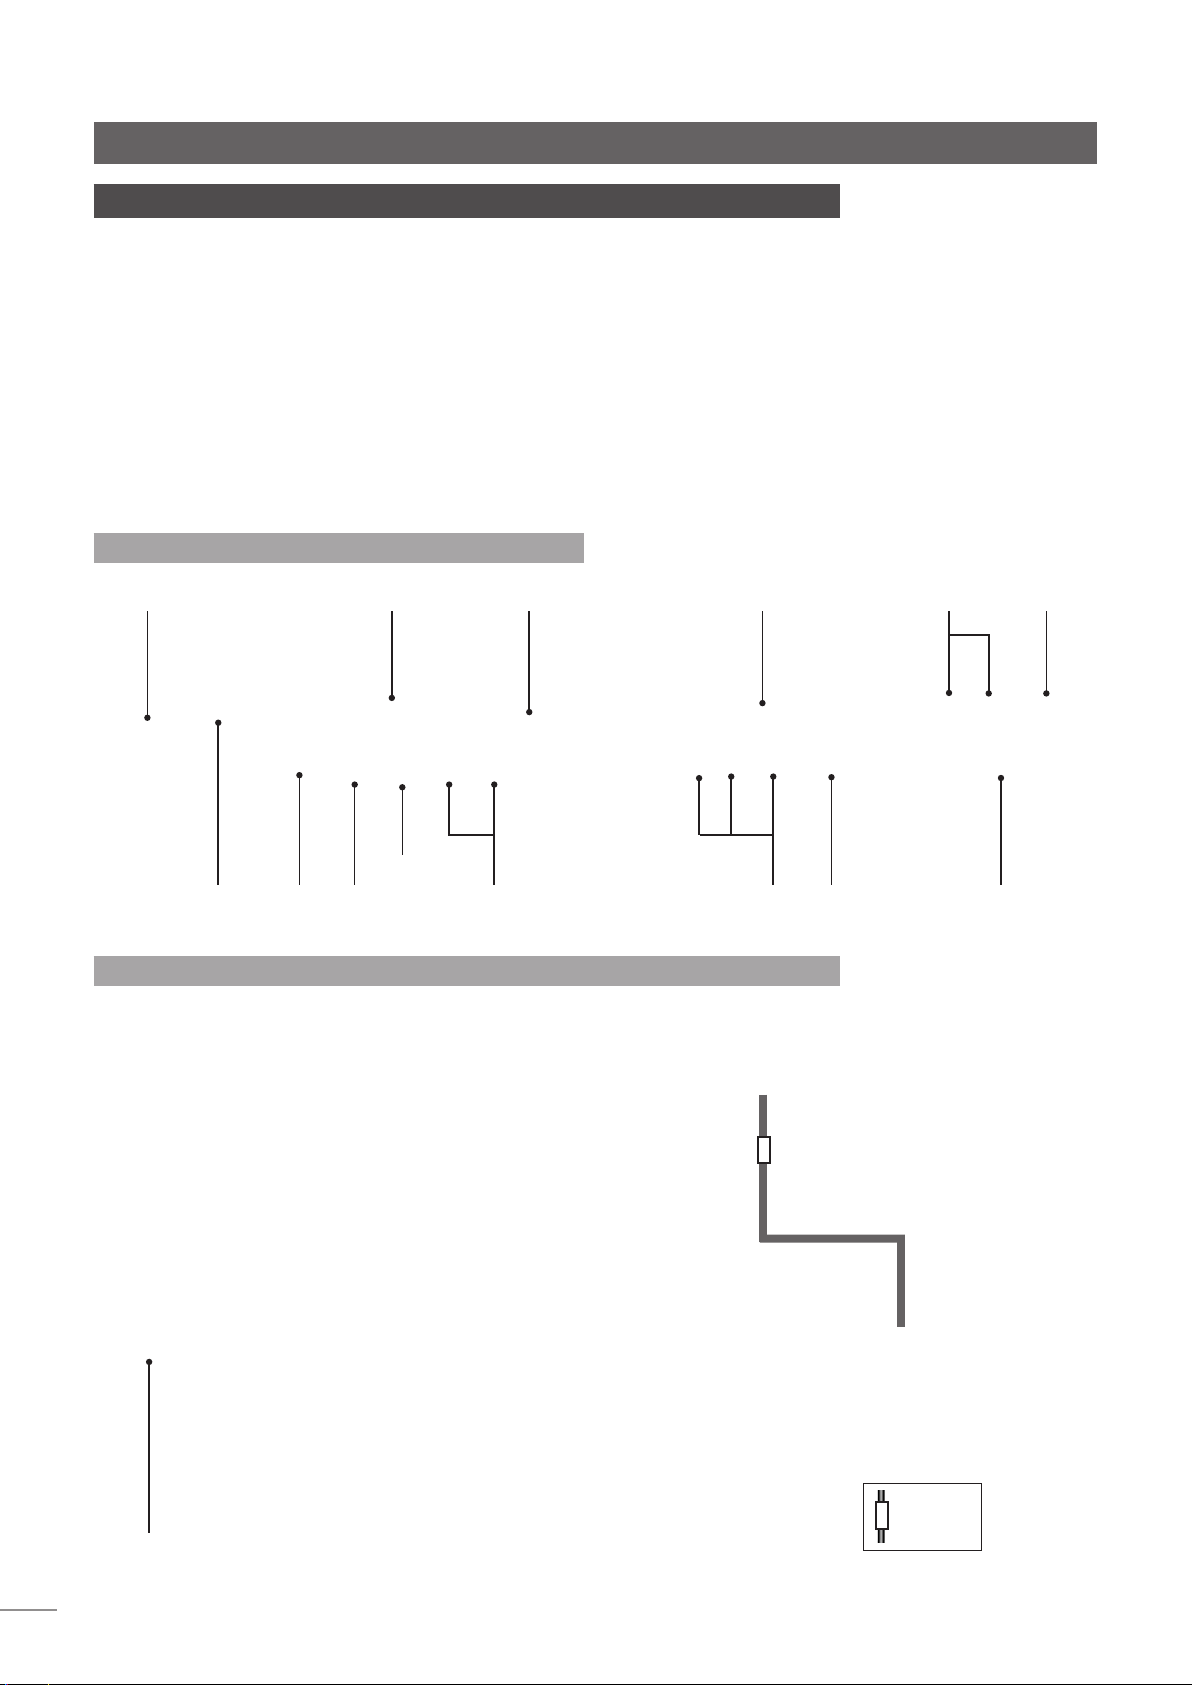
2.1 NDX Rear Panel
power switch
wireless network
(Wi-Fi) antenna
socket
DAB/FM aerial
socket (if option
tted)
power supply
upgrade socket
(link plug tted)
Important: XPS power
supplies with serial
numbers below 188015
are not compatible with
the NDX or ND5 XS and
should not be used.
Contact your local retailer
or distributor for more
information.
analogue
output
(phono)
analogue
output
(DIN)
USB update
mains input
and fuse
network
socket
interface
remote
in
remote
out 1 & 2
digital inputs
2.2 NDX Connected To Optional 555PS Power Supply
THE NDX MAINS CABLE SHOULD BE REMOVED AND
ITS POWER SWITCH TURNED OFF WHEN AN EXTERNAL
POWER SUPPLY IS USED.
3, 2 & 1
digital
output
SXPS Burndy
Cable
signal ground
switch
Cable
mains input
and fuse
2
THE SXPS BURNDY CABLE ONLY MUST BE USED TO
CONNECT THE EXTERNAL POWER SUPPLY.
direction
marker
Installation and Connection
2.3 ND5 XS Rear Panel
wireless network
power switch
mains input
and fuse
network
socket
remote
in
(Wi-Fi) antenna
socket
USB update
interface
DAB/FM aerial
socket (optional)
remote
out 1 & 2
upgrade socket
(link plug tted)
digital inputs
3, 2 & 1
2.4 ND5 XS Connected To Optional XP5 XS Power Supply
power supply
digital
output
analogue
output
(phono)
signal ground
switch
analogue
output
(DIN)
power
switch
Note: Connection of
an XPS power supply is
carried out in exactly
the same manner as
connection of an XP5 XS
power supply.
mains input
and fuse
THE ND5 XS MAINS CABLE SHOULD BE REMOVED AND
ITS POWER SWITCH TURNED OFF WHEN AN EXTERNAL
POWER SUPPLY IS USED.
THE SXPS BURNDY CABLE ONLY MUST BE USED TO
CONNECT THE EXTERNAL POWER SUPPLY.
SXPS Burndy
Cable
Cable
direction
marker
3

Installation and Connection
2.5 Mains Power Connection
Connect the NDX/5XS to a mains power socket using either
the mains cable supplied or a Naim Power-Line.
2.6 Power Supply Upgrade
The NDX/5XS can be upgraded through the use of an
external Naim power supply.
IMPORTANT: XPS POWER SUPPLIES WITH SERIAL NUMBERS
BELOW 188015 ARE NOT COMPATIBLE WITH THE NDX OR
ND5 XS AND SHOULD NOT BE USED. CONTACT YOUR LOCAL
RETAILER OR DISTRIBUTOR FOR MORE INFORMATION.
If an external power supply is to be used, the link plug on
the rear panel of the NDX/5XS should be removed and the
power supply connected in its place using an SXPS Burndy
cable. See Diagrams 2.2 and 2.4.
THE SXPS BURNDY CABLE ONLY MUST BE USED TO CONNECT
THE EXTERNAL POWER SUPPLIES.
The NDX/5XS power switch should be off and the mains
power cable removed when an external power supply is
used. The NDX/5XS is then switched on using the external
power supply power switch.
2.7 FM/DAB Aerial Connection
If the NDX/5XS FM/DAB tuner option is fitted it will only be
able to provide high quality FM and DAB radio if a strong,
interference-free radio signal is available. The NDX/5XS rear
panel FM/DAB Aerial socket must be connected, via 75
Ohm low-loss coaxial cable, to a suitable aerial. The aerial
should be mounted clear of large obstructions and as high
as possible; ideally on a roof.
Note: Your local retailer should be able to offer advice on
a suitable aerial and aerial installer.
2.8 Audio Inputs and Outputs
Always use high quality interconnect cables to connect
sources to NDX/5XS inputs.
The digital inputs are configured via the NDX/5XS Digital
Inputs setup menu. See Section 4.3.6.
2.8.2 Audio Signal Outputs
The NDX/5XS provides analogue and digital audio signal
outputs intended for connection to an appropriate
preamplifier or digital to analogue converter input.
NDX/5XS output connections are made via the socket
types listed below:
Output Socket
Analogue stereo 5-pin DIN
Analogue stereo RCA phono
S/PDIF digital stereo BNC Coaxial
Note: Output sockets are selected and configured via
the NDX/5XS Analogue Outputs and Digital Output setup
menus. See Sections 4.4 and 4.6.
2.9 USB/iPod Interface
The NDX/5XS is fitted with a front panel USB interface
intended for the connection of Apple iPod and iPhone
models and USB memory hardware carrying audio files. The
USB interface should not be used for any other purpose.
Depending on the setup options chosen (see Section
4.3.5), iPod and iPhone batteries will be charged when
connected to the USB interface.
2.10 Network Connections
The NDX/5XS can be connected to a TCP/IP network via
either a wired or wireless connection. Network connection
enables the NDX/5XS to play internet radio data streams
or play audio files stored on UPnP™ servers such as the
Naim UnitiServe and HDX, and appropriately configured
computers and network drives.
2.8.1 Audio Signal Inputs
NDX/5XS provides three S/PDIF digital inputs. Connection
to the inputs is made via a variety of socket types. The
following table lists the inputs and their socket types:
Input Socket
dig. 1 Coaxial (BNC)
dig. 2 Coaxial (RCA phono)
dig. 3 Optical (TosLink)
4
2.10.1 Wired Network Connection
The NDX/5XS is fitted on its rear panel with a standard
Ethernet socket. For wired network connection this socket
should be connected to a spare Ethernet socket on your
network router.
Note: Ethernet-over-mains hardware may be used and
provides a simple and convenient method of wired home
network connection. However, depending on mains wiring
factors specific to each home environment, the presence
of network data on the mains supply may compromise
overall system sound quality. If any sound quality
compromise is found to be unacceptable, dedicated
network cabling should be installed or wireless networking
should be employed.
2.10.2 Wireless Network Connection
If NDX/5XS is to connect wirelessly to the home network
the supplied Wi-Fi antenna must be fitted to the rear panel

Installation and Connection
wireless antenna socket. Wireless configuration will also
be necessary before NDX/5XS is able to connect to your
home network. See Section 4.5.1.
2.10.3 Network Settings
The NDX/5XS is set up when originally shipped not to
require any on-site TCP/IP configuration but to connect
to a network automatically (it uses DHCP by default).
However, if your NDX/5XS has been previously used, its
network configuration may have been altered leaving
it unable to connect automatically. If this appears to be
the case ensure that DHCP is selected in the Network
Settings menu (see Section 4.5 of this manual) and re-start
NDX/5XS. If problems still persist contact your retailer,
installer or Naim Audio directly.
Note: Before reporting network connection problems carry
out a Factory Reset operation. Select Reset All Settings
from the Factory Settings setup menu. See Section 4.10.
Note: A NDX/5XS switched on without a working wired
network connection will only be able to connect to
a home network wirelessly. To use an Ethernet (wired)
connection, switch the NDX/5XS off, connect the network
and switch it on again.
Note: For internet radio to operate, the NDX/5XS requires
connection to a broadband internet service.
Note: NDX/5XS System Automation is switched off by
default. A full description of its configuration and use can
be found in Section 4.9.
2.12 External Control and Update Sockets
The NDX and ND5 XS are fitted with a 3.5mm jack Remote
In socket on their rear panels. The Remote In socket
can be used for RC5 remote control via a fully wired
connection or a remote IR repeater.
The NDX and ND5 XS are also fitted with a rear panel mini-
USB socket. This socket enables firmware upgrades and
diagnostic tests to be carried out. Contact your retailer for
more information if required.
Note: The rear panel mini-USB socket is not intended for the
connection of USB storage hardware and cannot be used
for audio playback.
2.13 Signal Ground Switch
The NDX/5XS is fitted on its rear panel with a Signal Ground
switch offering two positions: Chassis and Floating. Select
the Chassis position unless NDX/5XS is connected in a hi-fi
system incorporating another earthed source component,
or mains “hum” is audible through the loudspeakers.
Contact your retailer, distributor or Naim for advice if
necessary.
2.11 System Automation
NDX/5XS control can be linked using System Automation
to the control of some Naim preamplifiers, CD players and
the Naim DAC. System Automation enables for example,
preamplifier inputs to be selected via the NDX/5XS, or for
n-Stream transport functions to control a CD player. To take
advantage of System Automation, connect one of the
NDX/5XS rear panel Remote Out sockets to a preamplifier,
CD player or DAC Remote In socket. Use a cable
terminated with a 3.5mm jack plug at one end and a
3.5mm jack or phono plug as necessary at the other end.
Using both NDX/5XS Remote Out sockets, for example, one
connected to a preamplifier and one connected to a CD
player enables comprehensive system control via just one
user interface (handset or n-stream iPhone app).
Note: Stereo and mono 3.5mm jack to 3.5mm jack can
be used for System Automation. If a stereo 3.5mm jack to
phono plug cable is used, connect the left channel phono
plug.
Note: “Connected” in the context above means an
analogue audio signal cable that includes an earth
connection.
Note: All Naim CD players are earthed so the Signal
Ground switch should be set to floating if one is connected
in the system (unless a digital signal connection is used).
Note: The Signal Ground switch setting is not affected by
the use of an external power supply.
No damage will be done if the wrong Signal Ground
position is chosen, however the system sound quality may
be compromised.
2.13.1 General Audio Connection Notes
The NDX/5XS mains earth (ground) should always be
connected regardless of what other equipment is used.
Note: If an external power supply is used the NDX/5XS
mains earth is connected through the Burndy connection
cable to the power supply mains earth.
A mains earth grounds the chassis and the electrostatic
screen within the transformer, and is only connected to the
signal negative if the Signal Ground switch is set to Chassis.
In order to avoid hum loops, the signal negative of the
whole system should be connected to the mains earth in
one place only.
5
 Loading...