

Naim Audio NAC-N 272 User Manual

Reference Manual – English
NAC-N 172 XS
NAC-N 272

Contents
Section Page Section Page
Introduction 1
1. NAC-N preamplier Components and Audio Sources 1
1.1 Preamplier 1
1.2 Multi-mode Radio 1
1.3 USB Audio Interface 1
1.4 UPnP™ Audio Interface 2
1.5 Spotify® Connect 2
1.6 Multiroom Streaming 2
1.7 Bluetooth® Streaming 2
2. Installing and Connecting 3
2.1 Mains Power Connection 3
2.2 Audio Signal Connections 4
2.3 Headphone Output 5
2.4 DAB/FM Aerial Connection 5
2.5 Signal Ground Switch 5
2.6 USB Interface 5
2.7 Network Connections 5
2.8 Bluetooth 6
2.9 System Automation 6
2.10 Control and Update Sockets 6
2.12 Connections 7
2.13 Diagram Icons 8
5. Preamplier 21
5.1 Selecting Inputs 21
5.2 Volume Control 21
5.3 Preamplier Display 21
5.4 Signal Outputs 21
6. Multi-format Tuner 22
6.1 FM Tuner – Seeking Stations 22
6.2 DAB Tuner – Seeking Stations 22
5.3 iRadio Tuner – Seeking Stations 22
6.4 Adding iRadio Stations 23
6.5 Storing Radio Presets 23
6.6 Selecting Radio Presets 23
7. USB Audio 24
7.1 USB Media and File Compatibility 24
7.2 iOS Device Compatibility and Charging 24
7.3 Browsing and Playing USB Files 24
8. Network Audio Streaming 25
8.1 UPnP™ Streaming 25
8.2 Spotify® Connect Streaming 26
8.3 Multiroom Streaming 27
3. Operation and Control 9
3.1 Front Panel Buttons 9
3.2 Front Panel Display 9
3.3 Remote Control Handset 11
3.4 The Naim App 12
4. Set Up 14
4.1 The Setup Home Menu 14
4.2 The Language Menu 14
4.3 The Inputs Menu 14
4.4 The Rooms Menu 16
4.5 The Analogue Outputs Menu 16
4.6 The Headphones Menu 16
4.7 The Network Settings Menu 16
4.8 The Front Display Menu 18
4.9 The Digital Output Menu 18
4.10 The Clock and Alarm Menu 18
4.11 The Handset Keys Menu 19
4.12 The System Automation Menu 20
4.13 The Factory Settings Menu 20
9. Bluetooth Streaming 28
10. Specications 29
11. Acknowledgements and Declarations 30

Introduction
Welcome to Naim and congratulations on your purchase. This manual covers the NAC-N preampliers: NAC-N 172 XS and
NAC-N 272. The NAC-N preampliers are highly capable products that will repay time and eort spent on installation and
conguration and we strongly recommend that you read this manual in full. The manual provides comprehensive information
on all NAC-N features and facilities and will enable you to set up your product either to integrate with your existing music
systems and media, or to form the heart of a new system.
NAC-N preampliers incorporate separate components and can play audio from a variety of sources. Each of the
components and sources is introduced in the following Section 1 paragraphs and subsequently described in full detail in
Sections 5 to 9. Sections 2 to 4 cover installation and set up.
NAC-N preampliers can be controlled from their front panels, the supplied remote control handset, and from the Naim app
freely available from the Apple iTunes App Store and the Google Play Store.
1. NAC-N preamplifier Components and Audio Sources
1.1 Preamplifier
1.1.1 Inputs
NAC-N preampliers provide external analogue and digital
audio inputs. The number of external inputs provided varies
with each product.
In addition to the conventional analogue and digital inputs,
NAC-N preampliers can also play audio from the the
following external sources:
• Internet radio via a wired network socket or wireless
network connection.
• DAB and FM radio via an external aerial.
• iOS (iPod, iPhone and iPad) and UMS (Universal Mass
Storage) USB memory devices via a USB interface.
• Universal plug and play (UPnP™) servers holding audio
les via a wired or wireless network connection.
• Spotify® streams via a wired or wireless network
connection from the Spotify® Connect feature
incorporated in some Spotify® player apps.
1.1.2 Signal Outputs
NAC-N preampliers provide a variety of signal outputs.
The number and type of signal outputs varies with each
product. They are tabulated in Section 2.2.1.
1.2 Multi-mode Radio
The NAC-N preamplier multi-mode radio combines an
internet radio (iRadio) player and optional DAB/FM tuner.
A total of 40 radio stations across all three modes can be
stored as presets. In DAB and FM mode, stations are tuned
by scanning the respective transmission bands. In iRadio
mode, a list of available radio stations is automatically
downloaded from a dedicated internet server. iRadio
requires broadband internet access via a home network
connection.
The DAB tuner incorporates full broadcast and station
display capabilities. The FM tuner is fully RDS (Radio Data
System) capable.
Note: DAB and RDS broadcasts are not available in all
territories.
• Bluetooth® audio streams from Bluetooth equipped
hardware such as iOS, Android and Windows Phone
mobile devices running a suitable music player app.
Bluetooth is only available on the NAC-N 272.
• Music streams from other Naim streamer products
connected to the same network.
1.3 USB Audio Interface
NAC-N preampliers can play audio les stored on USB
memory hardware such as iOS mobile devices or memory
sticks. See Section 7 for more information.
Note: Compatible audio le formats are listed in Section
7.1 .
1

1. NAC-N preamplifier Components and Audio Sources
1.4 UPnP™ Audio Interface
NAC-N preampliers can connect to a home network and
play audio les stored on appropriately congured UPnP™
servers. See Section 8.1 for more information.
Note: Compatible audio le formats are listed in Section
8.1.1.
1.5 Spotify® Connect
NAC-N preampliers can connect to a home network and
play Spotify® Connect audio streams from devices running
an appropriate Spotify® app. A Spotify® Premium account is
required. See Section 8.2 for more information.
Note: Spotify® Connect is not available in all countries.
For a list of availability by country visit the support pages
at www.spotify.com/connect.
1.6 Multiroom Streaming
NAC-N preampliers can play audio streams from other
Naim streamer products connected to the same home
network. Similarly, NAC-N preampliers can simultaneously
broadcast audio playing from their UPnP™, iRadio, or USB
inputs to a maximum of four other Naim streamer products
connected to the same network. See Section 8.3 for more
information.
1.7 Bluetooth® Streaming
NAC-N 272
The NAC-N 272 can play Bluetooth audio streams from
Bluetooth devices running an appropriate audio playback
app. See Section 9 for more information.
2

2. Installing and Connecting
Your NAC-N preamplier should be installed on an equipment stand intended for the purpose. Do not stand it directly on top
of another item of equipment. Ensure it is well ventilated. Care should be taken to ensure that it is level. It should be installed
in its nal location before connecting cables or switching on. NAC-N preampliers have no standby mode and are intended
to be left switched on.
Connecting your NAC-N preamplier to mains power and to a variety of audio peripherals and sources is described in the
following paragraphs. Diagram 2.12 illustrates connection sockets and control features.
2.1 Mains Power Connection
NAC-N 172 XS
Connect your NAC-N 172 XS to a mains power supply using
either the mains cable supplied or a Naim Power-Line.
NAC-N 272
The NAC-N 272 can either be connected directly to a mains
power supply or, for improved performance, powered by an
external XP5 XS, XPS or 555PS power supply.
If your NAC-N 272 is to be connected directly to a mains
power supply, insert the supplied power supply upgrade
link plug in the rear panel Burndy socket and connect the
NAC-N 272 to the mains supply using either the mains
cable supplied or a Naim Power-Line. Do not switch on the
NAC-N272 until all its other connections are made.
If your NAC-N272 is to be powered by an external power
supply, the power supply upgrade link plug is not required.
Instead, connect the external power supply to the
NAC-N 272 power supply upgrade socket using a Naim
SXPS Burndy power supply cable.
Note: Your local local Naim retailer or distributor will be
able to supply an SXPS Burndy cable if required.
The power supply should be switched o while connection
is made and remain switched o until all other NAC-N
272 connections are made. The NAC-N 272 should not be
connected directly to mains power when an external power
supply is used.
Important: XPS power supplies with serial numbers below
188015 are not compatible with the NAC-N 272 and
should not be used. Contact your local Naim retailer or
distributor for more information.
The NAC-N 272 rear panel mains switch has no function
when an external power supply is connected.
3

2. Installing and Connecting
2.2 Audio Signal Connections
Table 2.2.1 lists the audio inputs and outputs provided
on each NAC-N preamplier. Always use high quality
interconnect cables to connect inputs and outputs.
Note: Post volume control output signals are aected
by volume and balance adjustments. Pre volume control
output signals are unaected by volume and balance
adjustments and must be routed via a volume control
before reaching a power amplier.
2.2.1 Audio Signal Inputs and Outputs
NAC-N 172 XS
Type Name Format Notes
Input an. 1 Analogue 5-pin DIN Fixed volume capable
Input an. 2 Analogue RCA phonos Fixed volume capable
Input Front Analogue 3.5mm jack Combined auto-switching analogue/digital socket
Digital 3.5mm miniTosLink S/PDIF (to 96kHz/24bit) format
Input dig. 1 Digital coaxial (RCA phono) S/PDIF (to 192kHz/24bit) format
Input dig. 2 Digital optical (TosLink) S/PDIF (to 96kHz/24bit) format
Input dig. 3 Digital coaxial (RCA phono) S/PDIF (to 192kHz/24bit) format
Input dig. 4 Digital optical (TosLink) S/PDIF (to 96kHz/24bit) format
Output Preamp Analogue 4-pin DIN Post volume control
Output Preamp Analogue RCA phonos Post volume control
Output Line Analogue RCA phonos Pre volume control
Note: The NAC-N 172 XS Series front analogue/digital jack input socket can accommodate both conventional analogue
3.5mm plugs and miniTosLink optical digital plugs. It will automatically identify the type of plug inserted and handle the
signal appropriately. See Section 4.3.9.
NAC-N 272
Type Name Format Notes
Input an. 1 Analogue 5-pin DIN Fixed volume capable
Input an. 2 Analogue RCA phonos Fixed volume capable
Input an. 3 Analogue RCA phonos Fixed volume capable
Input dig. 1 Digital coaxial (BNC) S/PDIF (to 192kHz/24bit) or DSD64 formats
Input dig. 2 Digital coaxial (RCA phono) S/PDIF (to 192kHz/24bit) or DSD64 formats
Input dig. 3 Digital coaxial (RCA phono) S/PDIF (to 192kHz/24bit) or DSD64 formats
Input dig. 4 Digital optical (TosLink) S/PDIF (to 96kHz/24bit) or DSD64 formats
Input dig. 5 Digital optical (TosLink) S/PDIF (to 96kHz/24bit) or DSD64 formats
Input dig. 6 Digital optical (TosLink) S/PDIF (to 96kHz/24bit) or DSD64 formats
Output Preamp Analogue 4-pin DIN x 2 Post volume control
Output Preamp Analogue RCA phonos Post volume control
Output Line Analogue RCA phonos Pre volume control
Output Line Digital coaxial (BNC) Pre volume control. S/PDIF (to 192kHz/24bit) format
Note: NAC-N preamplier outputs are intended for connection to a power amplier or a subwoofer. Preamplier outputs
always reect the selected input. Your local Naim retailer will be able to supply appropriate cables for power amplier or
subwoofer connection if necessary.
4

2. Installing and Connecting
2.3 Headphone Output
The NAC-N 172 XS and NAC-N 272 are equipped on their
front panels with 3.5mm and 6.3mm stereo headphone
sockets respectively. Insertion of a headphone plug will
mute the preamplier outputs. Removal of the plug will
restore the outputs.
Note: NAC-N preampliers control and store volume and
balance settings separately for headphones and speakers.
2.4 DAB/FM Aerial Connection
The NAC-N preamplier DAB/FM tuner module requires a
strong, interference-free signal to enable high quality DAB
and FM reproduction. The rear panel DAB/FM Aerial socket
should be connected, via 75 ohm low-loss coaxial cable, to a
suitable aerial. The aerial should be mounted clear of large
obstructions and as high as possible; ideally on a roof.
Note: Your local Naim retailer should be able to oer
advice on a suitable aerial and aerial installer.
2.5 Signal Ground Switch
Your NAC-N preamplier is tted on its rear panel with a
Signal Ground switch oering two positions: Chassis and
Floating. Select the Chassis position unless the NAC-N
preamplier is connected in a hi- system incorporating
another earthed source component, or mains “hum” is
audible through the loudspeakers. Contact your retailer,
distributor or Naim for advice if necessary.
Note: “Connected” in the context above means an
analogue audio signal cable that includes an earth
connection. The digital inputs are isolated from the mains
earth regardless of the Signal Ground switch.
Note: All Naim CD players are earthed so the Signal
Ground switch should be set to oating if one is
connected in the system.
No damage will be done if the wrong Signal Ground position
is chosen, however the system sound quality may be
compromised.
Note: NAC-N preamplier analogue input and output
negative connections for each channel are common.
The mains earth (ground) should always be connected
regardless of what other equipment is used. The mains
earth primarily grounds the case and the electrostatic
screen within the transformer, and is only connected to
the signal negative if the Signal Ground switch is set to
Chassis. In order to avoid hum loops, the signal negative
of the whole system should be connected to the mains
earth in one place only.
2.6 USB Interface
NAC-N preampliers are tted with a front panel USB
interface intended for the connection of iOS devices and
USB memory sticks carrying audio les. The USB interface
should not be used for any other purpose.
Note: Most UMS (Universal Mass Storage) USB memory
sticks are compatible with the NAC-N preamplier USB
audio interfaces. Other UMS devices might include
portable digital music players, smart-phones, tablet
computers and memory card readers. Non-UMS USB
devices, such as older MP3 players, may be connected
to a NAC-N preamplier analogue audio input from their
headphone sockets. See Section 7 for more information.
Depending on the setup options chosen (see Section 4.3.6),
iOS device batteries will be charged when connected to the
USB interface.
2.7 Network Connections
2.7.1 Wired Network Connection
NAC-N preampliers are tted on their rear panels with a
standard RJ45 Ethernet socket. This socket enables them to
join home networks via a network router to access internet
radio data streams, to play audio les stored on UPnP™
servers, to play Spotify® streams, and to play from or
broadcast to other Naim streamers on the same network.
Note: Ethernet-over-mains hardware may be used and
provides a simple and convenient method of wired home
network connection. However, depending on mains wiring
factors specic to each home environment, the presence
of network data on the mains supply may compromise
overall system sound quality. If any sound quality
compromise is found to be unacceptable, dedicated
network cabling should be installed as the preferred
option, or alternatively wireless networking can be
employed.
2.7.2 Wireless Network Connection
If your NAC-N preamplier is to connect wirelessly to the
home network, the supplied Wi-Fi aerial must be tted to
the rear panel Wi-Fi aerial socket. Wireless conguration
will also be necessary before network connection can be
made. See Section 4.7.1.
Note: The Wi-Fi aerial is the longer one if two are
supplied.
Note: An optional high-gain Wi-Fi antenna, the WA5,
is available. The WA5 may improve Wi-Fi connection
reliability in some installations. Contact your Naim retailer
for more information.
5

2. Installing and Connecting
2.7.3 Network Settings
NAC-N preampliers are set up when originally shipped
not to require any network conguration but to connect to
networks automatically (DHCP is used by default). However,
if your NAC-N preamplier has been previously used, its
network conguration may have been altered leaving it
unable to connect automatically. If this appears to be the
case ensure that DHCP is selected in the Network Settings
menu and re-start the unit. If the problem still persists
carry out a Factory Reset operation (by selecting Reset All
Settings from the Factory Settings setup menu) and try
again.
Note: Wireless conguration data and user radio presets
will be deleted during the Factory Reset operation.
2.8 Bluetooth
NAC-N 272
The NAC-N-272 is able to play Bluetooth audio streams from
Bluetooth capable devices incorporating an appropriate
audio playback app. The Bluetooth aerial supplied must be
tted to the rear panel Bluetooth aerial socket.
2.10 Control and Update Sockets
NAC-N preampliers are tted on their rear panels with
remote control and update interface sockets.
• In addition to System Automation (see Section 2.9) the
Remote In and Out sockets can be used for RC5 remote
control via a wired connection or a remote IR repeater.
• The Mini-USB socket enable rmware upgrades and
diagnostic tests to be carried out. Contact your Naim
retailer for more information if required.
Note: The mini-USB interface is not intended for the
connection of USB memory devices.
Note: The Bluetooth aerial is the shorter of the two
supplied.
2.9 System Automation
NAC-N preampliers can be linked using System
Automation to control some Naim CD players. This enables
a Naim CD player to be controlled from the Naim iOS and
Android app.
To take advantage of System Automation, connect the
NAC-N preamplier rear panel Remote Out socket to the
CD player Remote In socket. Use a cable terminated with a
3.5mm jack plug at one end and a 3.5mm jack or phono plug
as necessary at the other end.
Note: Stereo and mono 3.5mm jack to 3.5mm jack can be
used for System Automation. If a stereo 3.5mm jack to
phono plug cable is used, connect the left channel phono
plug.
Note: System Automation is switched o by default. A full
description of its conguration and use can be found in
Section 4.12.
6
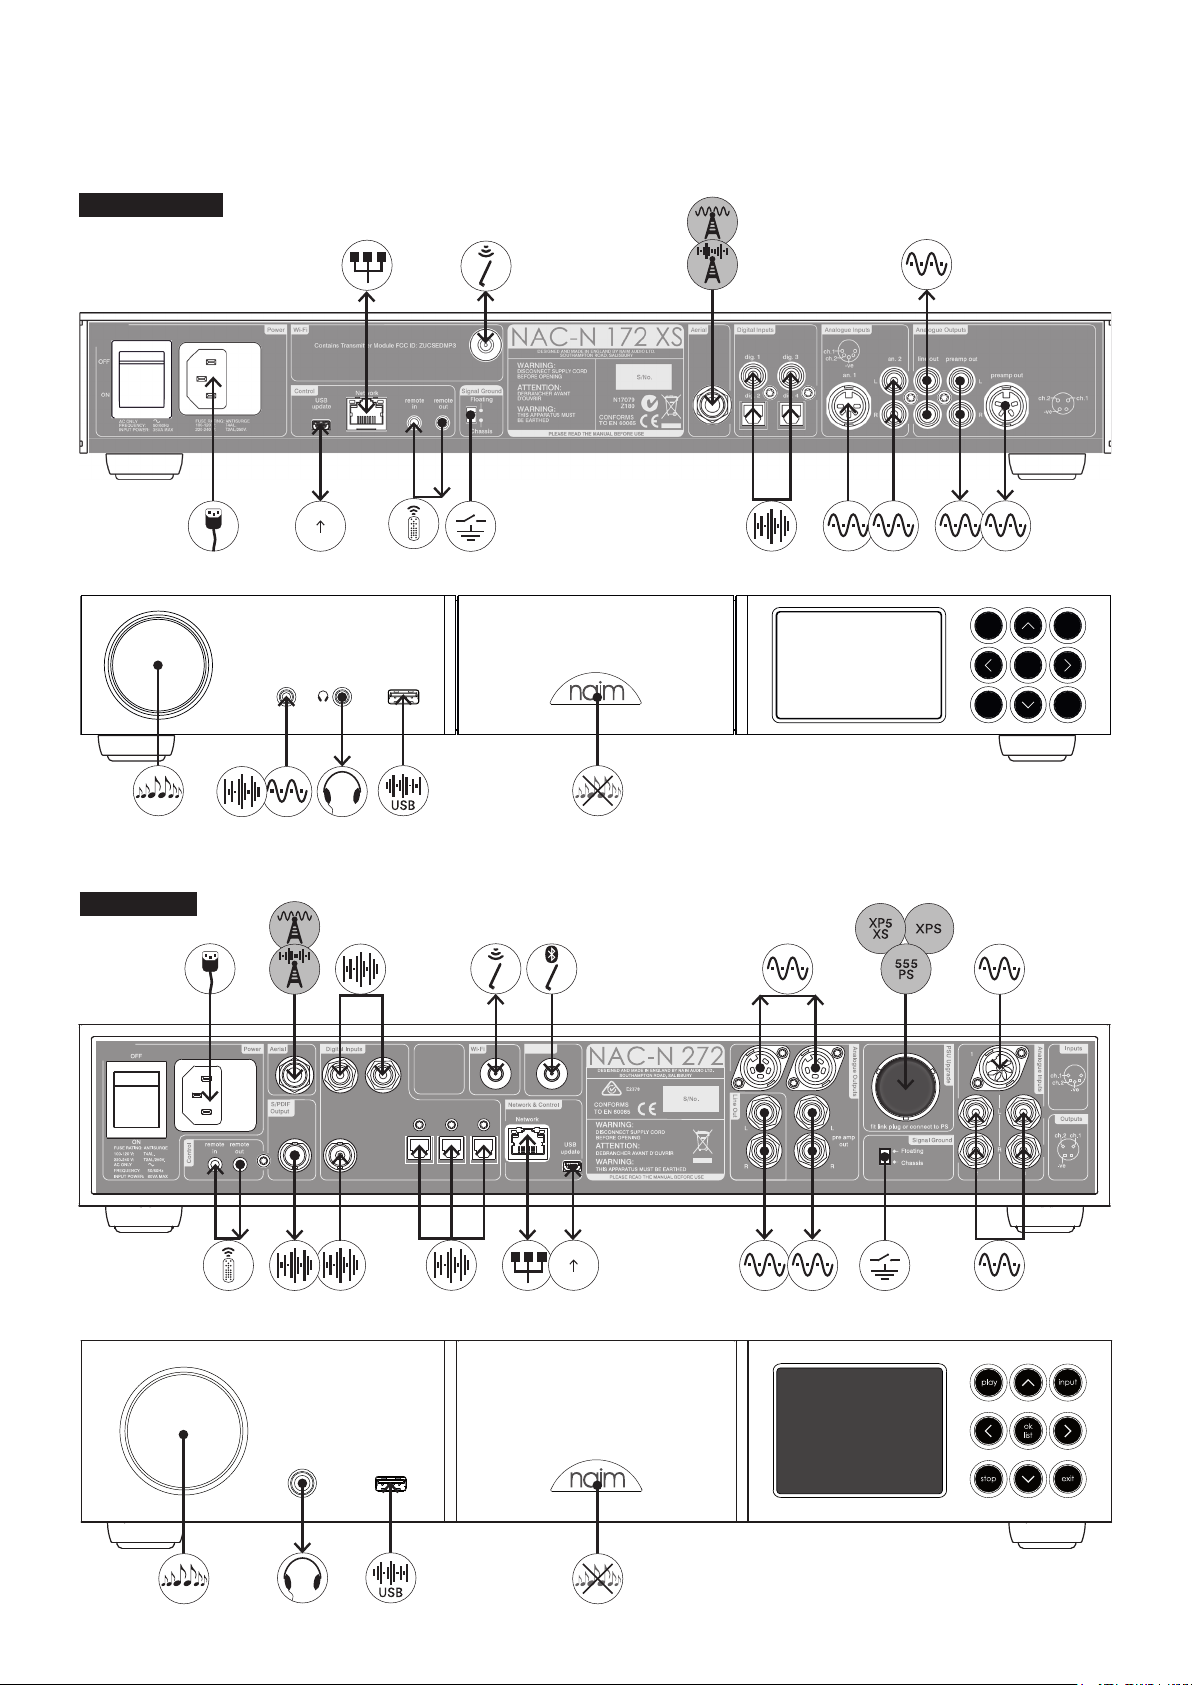
2.12 Connections
NAC-N 172 XS
2. Installing and Connecting
2.0
1.0
NAC-N 272
input
play
stop
Contains
Transmitter
Modules FCC ID:
ZUCSEDMP3
2ACURBLUE
IC:12217A-BLUE
dig. 3
dig. 2
dig.1
dig. 4
dig. 5 dig. 6
Bluetooth
input
ok
list
exit
2.0
1.0
7
2.13 Diagram Icons
Analogue signal
S/PDIF digital audio signal
USB audio data
Optional FM radio
Optional DAB radio
Headphones
IEC mains supply
Signal Ground Switch
2. Installing and Connecting
W-Fi aerial
Bluetooth aerial
Wired network
RC5 remote control signal
2.0
Firmware upgrade socket
1.0
Optional 555PS power supply
Optional XPS power supply
Optional XP5 XS power supply
Volume control
Logo touch mute and un-mute
8
 Loading...