

Page 1
Portable DVD Player
User Guide
Playable Disk Format:
DVD/VCD/CD/MP3/CD-R/CD-RW/MMC/SD card
PortuguêsEspañol FrançaisEnglish
82-184-00110
Page 2
Table of Contents
FCC and Safety Information...................................................................................... 4
Important Safety Instructions................................................................................... 5
Precautions......................................................................................................... 6
Selecting the type of disc for the type of TV connected.................................................... 7
Chapter 1. DVDChapter 1. DVD
Chapter 1. DVD
Chapter 1. DVDChapter 1. DVD
1-1 DVD Playback...................................................................................................8
Basic Playback.......................................................................................................................... 8
Stopping Playback and Returning to The Menu Screen (If a Menu Is Available on The Disc)................................8
Stopping Playback...................................................................................................................... 9
Rapid Advance and Rapid Reverse....................................................................................................9
Skipping Ahead or Back to Chapters................................................................................................ 9
Still Picture (PAUSE).................................................................................................................... 9
Repeat Viewing........................................................................................................................10
1-2 Convenient functions...................................................................................... 11
Displaying Scene Information....................................................................................................... 11
Changing Audio Soundtrack Language............................................................................................ 11
Clearing/Displaying Subtitles (A)................................................................................................... 11
Changing Subtitle Language (B).................................................................................................... 12
Viewing From Another Angle................................................................................. ........................12
Mute the DVD Player..................................................................................................................12
Using a DVD Menu..................................................................................................................... 13
Using the Menu Function............................................................................................................ 13
Chapter 2. Audio CDChapter 2. Audio CD
Chapter 2. Audio CD
Chapter 2. Audio CDChapter 2. Audio CD
2-1 Audio CD Playback..........................................................................................14
Basic Playback......................................................................................................................... 14
Stopping Playback.....................................................................................................................14
Rapid Advance and Rapid Reverse.................................................................................................. 14
Skipping Ahead or Back to Tracks.................................................................................................. 15
Pause.....................................................................................................................................15
Displaying Track Information....................................................................................................... 15
Chapter 3. Special FChapter 3. Special F
Chapter 3. Special F
Chapter 3. Special FChapter 3. Special F
unctionsunctions
unctions
unctionsunctions
3-1 Playing Kodak Picture CDs................................................................................ 16
Basic Playback......................................................................................................................... 16
Slide Show...............................................................................................................................16
Thumbnail Mode....................................................................................................................... 17
3-2 Playing JPEG picture CDs................................................................................. 18
Basic Playback......................................................................................................................... 18
File Manager........................................................................................................................... 18
Playing Mode.......................................................................................................................... 19
Thumbnail Mode....................................................................................................................... 19
3-3 Playing MP3 Music Discs.................................................................................. 20
Basic Playback......................................................................................................................... 20
3-4 Playing a CD containing JPEG pictures and MP3 music..............................................21
Basic Playback......................................................................................................................... 21
Playing Mode.......................................................................................................................... 21
Thumbnail Mode....................................................................................................................... 22
2
Page 3

Table of Contents-continued
Chapter 4. SetupChapter 4. Setup
Chapter 4. Setup
Chapter 4. SetupChapter 4. Setup
4-1 Language Setup.............................................................................................23
On Screen Display (OSD) Language Setting...................................................................................... 23
DVD MENU Language Setting.......................................................................................................24
AUDIO Soundtrack Language Selection [DVD]................................................................................... 25
SUBTITLE Language Selection [DVD]...............................................................................................26
4-2 Screen TV Tuner............................................................................................ 27
TV Type Setting........................................................................................................................27
Screen Saver Setting................................................................................................................. 28
TV System Setting.....................................................................................................................29
Video Out Setting.....................................................................................................................30
4-3 AUDIO Setup................................................................................................. 32
Digital Out Setting................................................................................................................... 32
Analog Out Setting....................................................................................................................33
4-4 Custom Setup............................................................................................... 34
MMC/SD Setting...................................................................................................................... 34
Parental Control Setting [DVD]..................................................................................................... 35
Password Setting [DVD]............................................................................................................. 36
Angle Mark Setting [DVD]........................................................................................................... 37
Default Setting........................................................................................................................ 38
4-5 LCD Setup................................................................................................... 39
Panel Setting.......................................................................................................................... 39
Color Setting...........................................................................................................................39
Bright Setting..........................................................................................................................40
Chapter 5. FChapter 5. F
Chapter 5. F
Chapter 5. FChapter 5. F
or Yor Y
or Y
or Yor Y
our Rour R
our R
our Rour R
eferenceeference
eference
eferenceeference
5-1 Troubleshooting........................................................................................... 41
5-2 Disc Handling and Maintenance........................................................................ 42
5-3 Defintion of Terms........................................................................................ 43
3
Page 4
FCC and Safety Information
CAUTION:
This unit employs a laser. Due to possible eye injury, only qualified service personnel should remove the
cover or attempt to service this device. Use of controls or adjustments or performance of procedures other
than those specified herein may result in hazardous radiation exposure.
NOTE:
This equipment has been tested and found to comply with the limits for a Class B digital device pursuant to part 15 of the FCC
Rules. These limits are designed to provide reasonable protection against harmful interference in a residential installation. This
equipment generates, uses and can radiate radio frequency energy and, if not installed and used in accordance with the
instructions, may cause harmful interference to radio communications. However, there is no guarantee that interference will
not occur in a particular installation. If this equipment does cause harmful interference to radio or television reception, which
can be determined by turning the equipment off and on, the user is encouraged to try to correct the interference by one or more
of the following measures:
– Reorient or relocate the receiving antenna.
– Increase the separation between the equipment and receiver.
– Connect the equipment into an outlet on a circuit different from that to which the receiver is connected.
– Consult the dealer or an experienced radio/TV technician for help.
This product incorporates copyright protection technology that is protected by method claims of certain U.S. patents and
other intellectual property rights owned by Macrovision Corporation and other rights owners. Use of this copyright protection
technology must be authorized by Macrovision Corporation, and is intended for home and other limited viewing uses only
unless otherwise authorized by Macrovision Corporation. Reverse engineering or disassembly is prohibited.
Since it is usual for DVD movies to be released at different times in different regions of the world, all players have region codes
and disc can have an optional region code. If you load a disc of a different region code to your player, you will see the region
code notice on the screen. The disc will not play, and should be unloaded.
(Possible region codes:)
There are 6 regions (also called “locals”). Each DVD player and disc will be played in one region ONLY.
1: Canada, U.S., U.S. Territories
2: Japan, Europe, South Africa, Middle East (including Egypt)
3: Southeast Asia, East Asia (including Hong Kong)
4: Australia, New Zealand, Pacific Islands, Central America, Mexico, South America, Caribbean
5: Former Soviet Union, Indian Subcontinent, Africa (also North Korea, Mongolia)
6: China
Never make or change connections with the power switched on.
CAUTION VISIBLE AND INVISIBLE LASER RADIATION WHEN OPEN. AVOID EXPOSURE TO BEAM
(WARNING LOCATION: INSIDE ON LASER COVERSHIELD)
For DVD Players with 525p, but not 625p, progressive scan output:
‘CONSUMERS SHOULD NOTE THAT NOT ALL HIGH DEFINITION
TELEVISION SETS ARE FULLY COMPATIBLE WITH THIS PRODUCT
AND MAY CAUSE ARTIFACTS TO BE DISPLAYED IN THE PICTURE.
IN CASE OF 525 PROGRESSIVE SCAN PICTURE PROBLEMS, IT IS
RECOMMENDED THAT THE USER SWITCH THE CONNECTION TO
THE ‘STANDARD DEFINITION’ OUTPUT. IF THERE ARE QUESTIONS
REGARDING YOUR TV SET COMPATIBILITY WITH THIS MODEL
525p DVD PLAYER, PLEASE CONTACT OUR CUSTOMER SERVICE
CENTER.’
Manufactured under license from Dolby Laboratories. “Dolby” and the double-D symbol are trademarks of Dolby Laboratories.
Confidential Unpublished Works. ©1992-1997 Dolby Laboratories, Inc. All rights reserved.
4
Page 5
Important Safety Instructions
1. Read these instructions.
2. Keep these instructions.
3. Heed all warnings.
4. Follow all instructions.
5. Do not use this apparatus near water.
6. Clean only with a damp cloth.
7. Do not block any of the ventilation openings. Install in accordance with the manufacturer’s instructions.
8. Do not install near any heat sources such as radiators, heat registers, stoves, or other apparatus (including amplifiers)
that produce heat.
9. Do not defeat the safety purpose of the polarized-type plug. A polarized plug has two blades with one wider than the
other. The wide blade is provided for your safety. When the provided plug does not fit into your outlet, consult an
electrician for replacement of the obsolete outlet.
10. Protect the power cord from being walked on or pinched particularly at plug, convenience receptacles, and the point
where they exit from the apparatus.
11. Only use attachments/accessories specified by the manufacturer.
12. Unplug this apparatus during lighting storms or when unused for long periods of time.
13. Refer all servicing to qualified service personnel. Servicing is required when the apparatus has been damaged in any
way; such as when the power-supply cord or plug is damaged, liquid has been spilled or objects have fallen into the
apparatus, the apparatus has been exposed to rain or moisture, does not operate normally, or has been dropped.
14. Ambient Temperature 0~400C.
Outdoor use or wet location applications:
An apparatus that does not comply with the requirements in Appendix A# (Outdoor Use and Wet Location Apparatus) shall be
marked or the instruction manual packed with the word “WARNING” and the following or equivalent: “To reduce the risk of fire or
electric shock, do not expose this apparatus to rain or moisture.
A Class II APPARATUS shall be permanently marked with the words “DOUBLE INSULATION” or “Double insulated” and “When
servicing use only identical replacement parts.”
WARNING: To reduce the risk of fire or electric shock, do not expose this apparatus to rain or moisture. The apparatus shall not
be exposed to dripping or splashing and that no objects filled with liquids, such as vases, shall be placed on the apparatus.
5
Page 6

Precautions
Please read these precautions before operating this unit.
Power cord protection
To avoid any malfunctions of the unit and to protect against electric shock, fire or personal injury, please observe the
following.
Hold the plug firmly when connecting or disconnecting the AC power cord.
Keep the AC power cord away from heating appliances.
Never put any heavy object on the AC power cord.
Do not attempt to repair or reconstruct the AC power cord in any way.
Placement
Avoid placing the unit in areas of:
Direct sunlight or heating radiators, or closed automobiles.
High temperature (over 35
Much dust as the internal parts may be seriously damaged.
Non-use periods
Turn the unit off when not in use. When left unused for a long period of time, the unit should be unplugged from the
household AC outlet.
No fingers or other objects inside
Touching internal parts of this unit is dangerous and may cause serious damage to the unit. Do not attempt to
disassemble the unit.
Do not put any foreign object on the disc tray.
0
C) or high humidity (over 90%).
Keep away from water/magnet
Keep the unit away from flower vases, tubs, sinks, etc. If liquids are spilled into the unit, serious damage could
occur.
Never bring a magnet or magnetized object near the unit.
Stacking
Place the unit in a horizontal position, and do not place anything heavy on it.
Condensation
Moisture may form on the lens in the following conditions:
immediately after a heater has been turned on
in a steamy or very humid room
when the unit is suddenly moved from a cold environment to a warm one
If moisture forms inside this unit, it may not operate properly. In this case, turn on the power and wait about one hour
for the moisture to evaporate.
If there is noise interference on the TV while a broadcast is being received
Depending on the reception condition of the TV, interference may appear on the TV monitor while you watch a TV
broadcast and the unit is left on. This is not a malfunction of the unit or the TV. To watch a TV broadcast, turn off the
unit.
6
Page 7
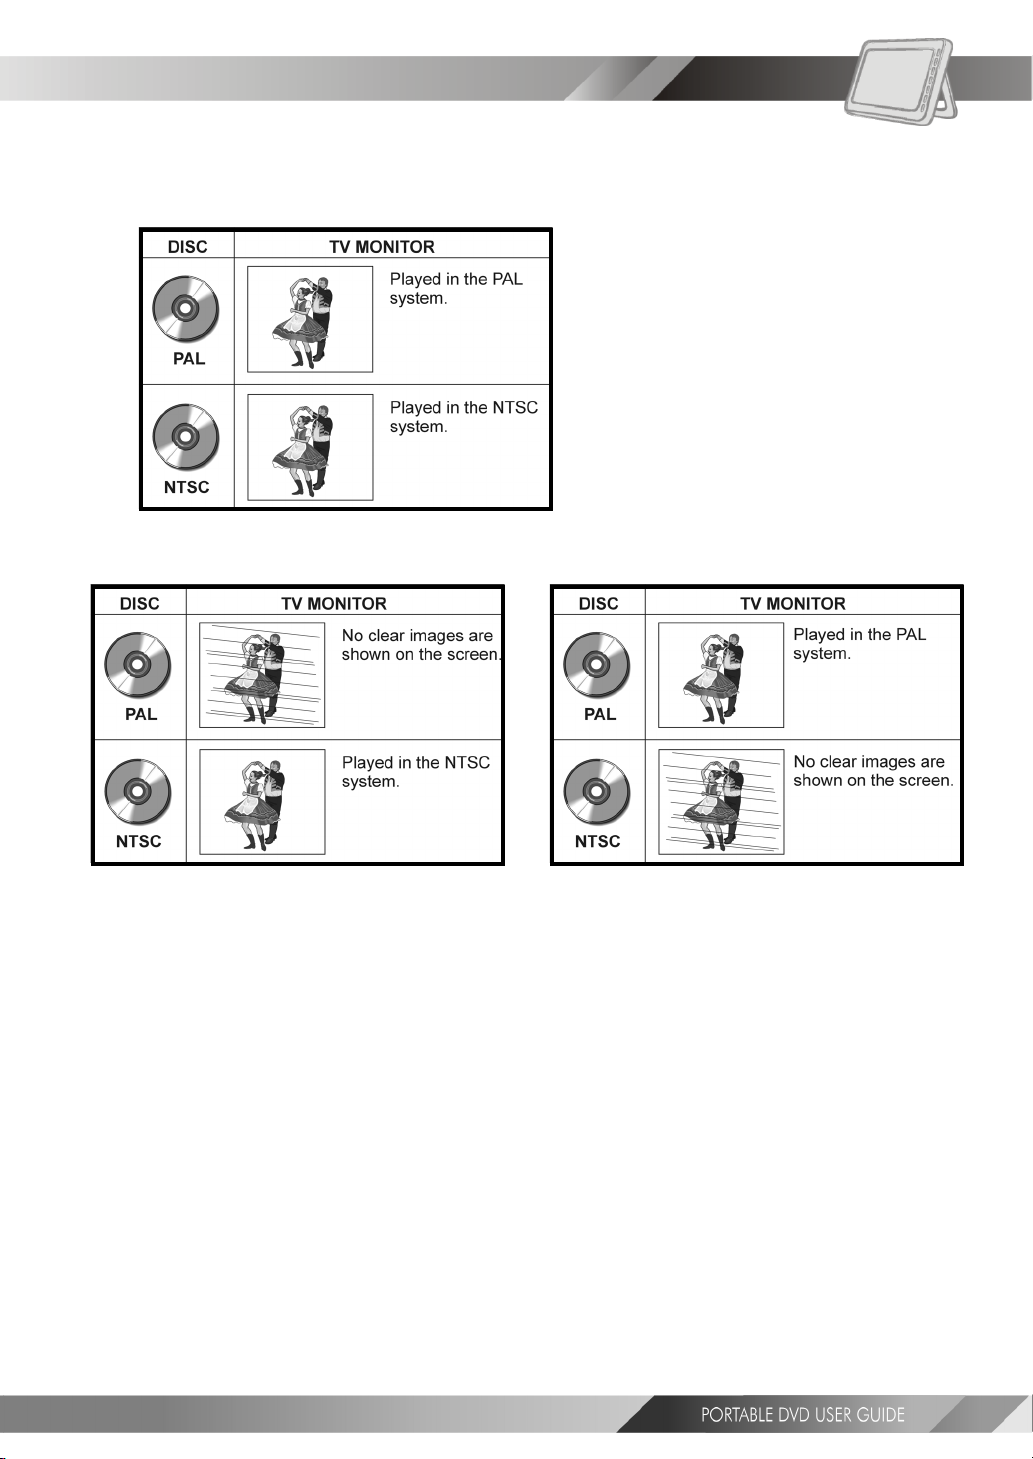
Selecting the type of disc for the type of TV connected
DVDs are recorded in PAL or NTSC formats. Please refer to the table below to find the appropriate format for your
region.
Connecting to a multi-system TV
Connecting to a NTSC TV
Connecting to a PAL TV
7
Page 8
DVDDVD
DVD
DVDDVD
1-1 DVD Playback
Preparation
Attach the battery or connect the portable DVD player to a wall outlet. If connecting to external
equipment, please perform the following:
Press on the power button of the TV set, and select “Video” as the TV input.
Press on the power button of the stereo system if the player has been connected to one.
Push the AV OUT/IN silde switch to AV OUT.
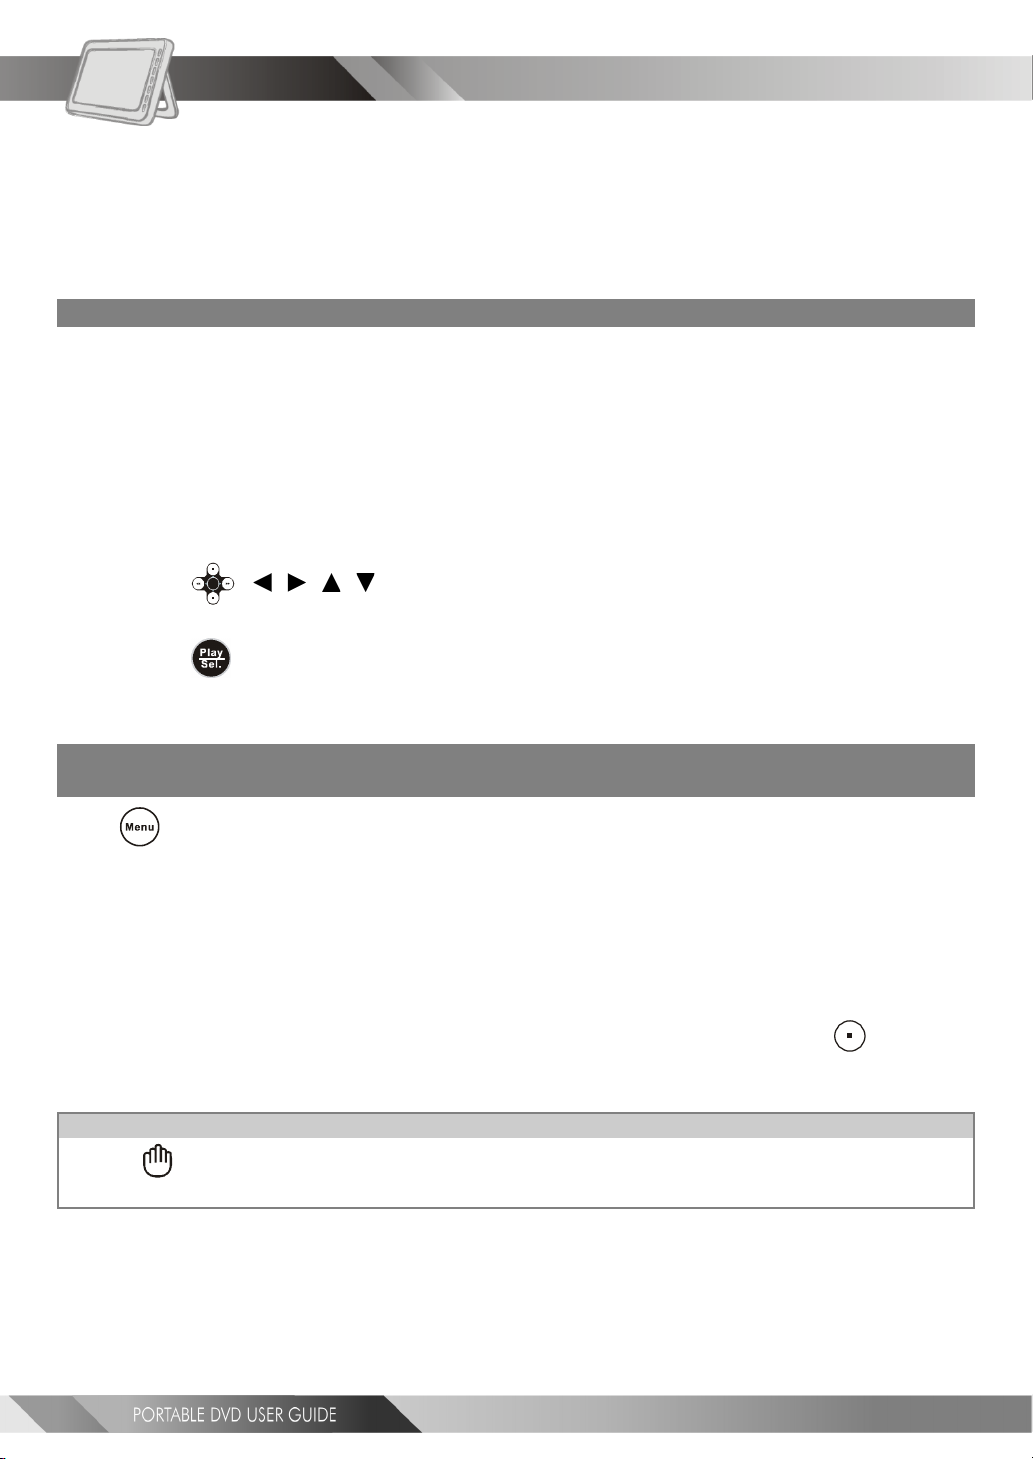
Basic Playback
1 Press POWER on.
2 Press <OPEN> to open the disc cover.
3 Hold the edge of the disc to put it in the center with the printed side up.
Hold the disc without touching its surfaces, position it with the printed title side facing up, align it with the
guides, and place it in its proper position.
4 Close the disc cover.
Close the disc cover and the portable DVD player starts playback if the disc does not have any
If the disc has one or more titles recorded on it, a menu screen will appear on the screen.
menus recorded on it.
5 Press < / / / > or the number button(s) to select the preferred title.
<< NOTE: To select a title, input the number, i.e. 1 for chapter 1, 10 for chapter 10, and etc. >>
6 Press <PLAY/SEL.> .
The player now starts playing the selected item.
Stopping Playback and Returning to The Menu Screen (If a Menu Screen Is Available on The
Disc)
Press <MENU>.
The portable DVD player stops playback, and then displays the menu screen.
After operation
When the portable DVD player is not in use, remove the disc and press POWER to turn off the player. Then close the
display panel.
<< NOTE >>
The disc continues to rotate while the menu is displayed even after the player has finished playing a
particular disc. When no further selections are to be played, be sure to press the <STOP>
button to clear the menu screen.
If the disc is placed in upside down (and it is a single sided disc), the player will display “NO DISC”.
For your reference:
When “ ” appears while a button is being operated, it means that the corresponding operation is prohibited by
the player.
8
Page 9
1-1 DVD Playback-continued
DVDDVD
DVD
DVDDVD
Stopping Playback
Press <STOP> once to prestop. Press <STOP> twice to stop.
Rapid Advance and Rapid Reverse
Press <F.BWD> or <F.FWD> during playback.
Normal playback is resumed when you press <PLAY/SEL.>.
The speed of advance ( x2, x4, x8, x16, x32) or reverse ( x2, x4, x8, x16, x32)
changes with each press of the <F.FWD> or <F.BWD> button.
Skipping Ahead or Back to Chapters
You can skip a specific chapter or track.
Skipping Ahead
Press
Skips a chapter each time you press the button.
Skipping Back
Press
When you press the button once midway through a chapter, the portable DVD player returns to the beginning of the
chapter being played back. The player skips a chapter each time you press the button.
<NEXT> during playback.
<PREVIOUS> during playback.
Still Picture (PAUSE)
Press <PAUSE> during playback.
The screen is paused.
*To return to normal playback
---Press <PLAY/SEL.>.
9
Page 10
DVDDVD
DVD
DVDDVD
1-1 DVD Playback-continued
Repeat Viewing
Press <1/ALL REPEAT> during playback.
Each time you press the button, the disc will repeat a chapter or title.
Press once: Chapter (Repeat chapter)
Press twice: Title (Repeat title)
Press three times: Disc (Repeat disc)
Press four times: Off (Repeat cancelled)
*To return to normal playback
---Press <1/ALL REPEAT> several times until “ Off” appears on the screen.
<< NOTE >>
Repeat playback works only with discs for which the elapsed playing time appears on the player’s
Repeat playback may not work correctly with some DVDs.
display during playback.
10
Page 11
1-2 Convenient functions
DVDDVD
DVD
DVDDVD
Displaying Scene Information
Press <INFO.> during playback.
Press <INFO.> a number of times, the title number, chapter number, and other information will show on the
screen.
*To stop displaying scene information
---Press <INFO.> a number of times until the information disappears.
Changing Audio Soundtrack Language
You can change the audio language from the one selected at the initial settings to a different language. (This operation
functions only with discs on which multiple audio soundtrack languages are recorded.)
1 Press <AUDIO> during playback.
2 Press <AUDIO> a number of times until the preferred language is selected.
For your reference:
When the preferred language is not selected even after pressing the button several times, it may indicate that
language is not available on the disc.
When you turn on or remove the disc, the portable DVD player will playback the language which is selected at the
initial setting. If you select a language which is not recorded on the disc, the portable DVD player will playback a
prior language programmed on the disc.
Clearing/Displaying Subtitles (A)
If a disc provides subtitles, you can choose to hide or display them. (This operation works only with discs that provide
subtitles.)
Press <SUBTITLE> during playback to display subtitles or hide them.
When you press <SUBTITLE> once, the first subtitle recorded on the disc will display. The rest of the subtitles
recorded will display in sequence as you press the button.
You may change to another language with this function, or you can clear the subtitle by pressing this button until
“SUBTITLE OFF” appears on the screen.
11
Page 12
DVDDVD
DVD
DVDDVD
1-2 Convenient functions-continued
Changing Subtitle Language (B)
You can change the subtitle language with the initial settings. (This operation works only with discs on which multiple
subtitle languages are included.)
1 Press <SUBTITLE> during playback.
When no subtitles are recorded, “ ” will display instead of the language number.
2 Press <SUBTITLE> a number of times until the preferred language is selected.
<<<<
<< NOTE
<<<<
In some cases, the subtitle language may not change immediately to the selected one.
For your reference:
When the preferred subtitle language is not selected even after pressing the button several times, it may indicate
that the language is not available on the disc.
When you turn on or remove the disc, the portable DVD player will playback the subtitle language which is selected
at the initial setting. If you select a subtitle language which is not recorded on the disc, the portable DVD player
will playback a prior subtitle language programmed on the disc.
>>>>
>>
>>>>
Viewing From Another Angle
Some DVD discs may contain scenes which have been shot simultaneously from a number of different angles. For these
discs, the same scenes can be viewed from each of these different angles using the <ANGLE> button. (The
recorded angles vary depending on the disc programmed.)
1 Press <ANGLE> during playback.
2 Press <ANGLE> a number of times until the preferred viewing angle is selected.
Press <ANGLE> button a number of times to change the viewing angle.
<< NOTE >>
The viewing angles are shown on the player’s display and you can select one from them for viewing.
Mute the DVD Player
Press <MUTE> button during playback.
When “MUTE” appears on the screen, the portable DVD player is mute. To resume the sound, press the button until
“MUTE OFF” appears on the screen.
12
Page 13
1-2 Convenient functions-continued
DVDDVD
DVD
DVDDVD
Using a DVD Menu
Some DVD discs have unique menu structures. For example, DVDs programmed with complex contents provide
guide menus, and those recorded with various languages provide menus for audio and subtitle language. Although
the DVD menu’s contents and operation vary from disc to disc, the following explains basic operation when this
feature is used.
1 Press <TITLE> in stop mode.
The DVD menu available on the disc now appears.
2 Press < / / / > to select the preferred item.
3 Press <PLAY/SEL.>.
You now enter to the selected item.
*To enter other menu screen
---Repeat steps 2 and 3.
*To return to the previous menu screen
---Press <TITLE>.
Using the MENU Function
1 Press <PLAY/SEL.>.
2 Press <MENU>.
A DVD chapter menu with brief broadcast of each paragraph now appears. You may see the introduction
of each chapter and then decide with which chapter to start first.
3 Press < / / / > or number button(s) to select the preferred item.
<< NOTE >>
The menu details vary.
13
Page 14
Audio DVDAudio DVD
Audio DVD
Audio DVDAudio DVD
2-1 Audio CD Playback
Preparation
Attach the battery or connect the portable DVD player to a wall outlet. If connecting to external
equipment, please perform the following:
Press on the power button of the TV set, and select “Video” as the TV input.
Press on the power button of the stereo system if the player has been connected to one.
Push the AV OUT/IN SWITCH button to AV OUT.
Basic Playback
1 Press POWER on.
2 Press <OPEN> to open the disc cover.
3 Hold the edge of the disc to put it in the center with the printed side up.
Hold the disc without touching its surfaces, position it with the printed title side facing up, align it with the
guides, and place it in its proper position.
4 Close the disc cover.
For audio CDs without playback control:
The portable DVD player starts to playback.
For audio CDs provided with playback control:
A menu appears after a few seconds.
Stopping Playback
Press <STOP> once to prestop. Press <STOP> twice to stop.
Rapid Advance and Rapid Reverse
Press <F.BWD> or <F.FWD> during playback.
Normal playback is resumed when you press <PLAY/SEL.>.
The speed of advance ( x2, x4, x8, x16, x32) or reverse ( x2, x4, x8, x16, x32)
changes with each press of the <F.FWD> or <F.BWD> button.
14
Page 15
2-1 Audio CD Playback-continued
Skipping Ahead or Back to Tracks
Skipping Ahead
Audio DVDAudio DVD
Audio DVD
Audio DVDAudio DVD
Press
A track is skipped each time you press the button.
Skipping Back
Press
When you press the button once midway through a track, the portable DVD player returns to the beginning of the
track being played back. The player skips a track each time the button is pressed.
<NEXT> during playback.
<PREVIOUS> during playback.
Pause
Press <PAUSE> once during playback.
The player will pause playback.
To return to normal playback
Press <PLAY/SEL.>.
Displaying Track Information
Displaying Track Information
Press
Press <INFO.> a number of times, the elapsed time, track number and other information will show on the
screen.
<INFO.> during playback.
*To stop displaying track information
---Press <INFO.> a number of times until the information disappears.
15
Page 16
Special FSpecial F
Special F
Special FSpecial F
unctionsunctions
unctions
unctionsunctions
3-1 Playing Kodak Picture CDs
Basic Playback
You can play Kodak picture CDs for viewing on the screen.
Load a kodak picture CD.
After few seconds, the portable DVD player starts to play back the pictures in a slide show automatically.
OR
You can press the number buttons corresponding to the order of the picture, then press
<PLAY/SEL.>.
Press <INFO.>, the current picture number and total picture numbers will show on the screen. And press the
number buttons corresponding to the order of the picture, then press <PLAY/SEL.>. The portable DVD player
will begin the slide show.
*To pause slide show
---Press <PAUSE>, the slide show will pause.
*To stop slide show
---Press <STOP>, then enter Thumbnail mode.
<<Note: Press <TITLE> to enter Thumbnail mode.>>
*To resume slide show
---Press <PLAY/SEL.> again.
Slide Show
1 Press <NEXT> to view the next picture or <PREVIOUS> to view the previous
picture.
2 Press <RIGHT> button or <LEFT> button to rotate the picture.
Press <RIGHT> button to rotate right by 90 degrees.
Press <LEFT> button to rotate left by 90 degrees.
*To pause slide show
---Press <PAUSE>, the slide show will pause.
*To stop slide show
---Press <STOP>, then enter Thumbnail mode.
16
<<Note: Press <TITLE> to enter Thumbnail mode.>>
*To resume slide show
---Press <PLAY/SEL.> again.
Page 17
Special FSpecial F
Special F
3-1 Playing Kodak Picture CDs-continued183-2 Playing JPEG picture CDs
Thumbnail Mode
Special FSpecial F
unctionsunctions
unctions
unctionsunctions
1 Press <TITLE> to enter Thumbnail mode.
While in Thumbnail mode, there are 20 pictures per page for viewing.
2 Press < / / / > to select the picture in thumbnail. If you want to view the
selected picture in its original size, press
When you view the picture in its original size, you can press <STOP> to view the pictures in thumbnail.
<PLAY/SEL.>.
3 Press <NEXT> or <PREVIOUS> to view the next or previous thumbnail page.
17
Page 18
Special FSpecial F
Special F
Special FSpecial F
unctionsunctions
unctions
unctionsunctions
Basic Playback
You can play JPEG pictures CDs for viewing on the screen.
Load a JPEG picture CD.
After few seconds, the portable DVD player starts to play back the pictures in a slide show automatically.
OR
You can press the number buttons corresponding to the order of the picture, then press
<PLAY/SEL.>.
Press <INFO.>, the current picture number, total picture numbers and other information will show on the screen.
Press the number button corresponding to the order of the picture, then press <PLAY/SEL.>. The portable DVD
player will begin the slide show.
*To pause slide show
---Press <PAUSE>, the slide show will pause.
*To stop slide show
---Press <STOP>, then enter the File Manager.
*To resume slide show
---Press <PLAY/SEL.> again.
File Manager
1 Under File Manager Menu, press < / / / > to choose the preferred picture,
then press
<PLAY/SEL.> to playback the picture.
2 Press <NEXT> to skip for the next six pictures or <PREVIOUS> to skip to
the previous six pictures.
Page 19
3-2 Playing JPEG Picture CDs-continued
Special FSpecial F
Special F
Special FSpecial F
unctionsunctions
unctions
unctionsunctions
Playing Mode
1 Press <NEXT> to view the next picture or <PREVIOUS> to view the previous
picture.
2 Press <RIGHT> button or <LEFT> button to rotate the picture.
Press <RIGHT> button to rotate right by 90 degrees.
Press <LEFT> button to rotate left by 90 degrees.
*To pause playback
---Press <PAUSE>.
*To stop playback
---Press <STOP>, then enter to the File Manager.
<<Note: Press <TITLE> to enter Thumbnail mode.>>
*To resume playback
---Press <PLAY/SEL.> again.
Thumbnail Mode
1 Press <TITLE> to enter Thumbnail mode.
While in Thumbnail mode, there are 20 pictures per page for viewing.
2 Press < / / / > to select the picture in the thumbnail. If you want to view
the selected picture in its original size, press
When you view the picture in its original size, you can press <STOP> to view the pictures in the
thumbnail.
<PLAY/SEL.>.
3 Press <NEXT> or <PREVIOUS> to view the next or previous thumbnail page.
19
Page 20
Special FSpecial F
Special F
Special FSpecial F
unctionsunctions
unctions
unctionsunctions
Basic Playback
1 Press POWER on.
2 Press <OPEN> to open the disc cover.
3 Insert the MP3 disc and close the cover.
Playback will start automatically after approximately 5 seconds.
MP3 files will begin to playback automatically. To play a specific file, find the file using the up and
*To pause playback
---Press <PAUSE>.
*To resume playback
---Press <PLAY/SEL.>.
*To stop playback
---Press <STOP>.
down buttons and once selected, press the play button.
3-3 Playing MP3 Music Discs
20
Page 21
3-4 Playing a CD containing JPEG pictures and MP3 music
Special FSpecial F
Special F
Special FSpecial F
unctionsunctions
unctions
unctionsunctions
Basic Playback
1 Load a disc containing JPEG pictures and MP3 music.
After few seconds, the unit will enter File Manager.
2 Under File Manager Menu, press < / / / > to choose the preferred file.
3 Press <PLAY/SEL.> to playback the picture or MP3 music.
*To pause playback
---Press <PAUSE>.
*To resume playback
---Press <PLAY/SEL.>.
*To stop playback
---Press <STOP>, it will enter File Manager.
Playing Mode
1 Press <NEXT> to view the next picture or playback the next track.
2 Press <PREVIOUS> to view the previous picture or playback the previous track.
For JPEG pictures only
Press <RIGHT> button or <LEFT> button to rotate the picture.
Press <RIGHT> or <LEFT> button to rotate right or left by 90 degrees.
*To pause playback
---Press <PAUSE>.
*To resume playback
---Press <PLAY/SEL.>.
*To stop playback
---Press <STOP>, the unit will enter File Manager.
21
Page 22
Special FSpecial F
Special F
Special FSpecial F
Thumbnail Mode
unctionsunctions
unctions
unctionsunctions
3-4 Playing a CD containing JPEG pictures and MP3 music
1 Press <TITLE> to enter Thumbnail mode.
While in Thumbnail mode, there are 20 pictures per page.
2 Press < / / / > to select the picture in the thumbnail. If you want to view
the selected picture in its original size, press
When you view the picture in its original size, you can press <STOP> to view the pictures in the
thumbnail.
<PLAY/SEL.>.
3 Press <NEXT> or <PREVIOUS> to view the next or previous thumbnail page.
22
Page 23
SetupSetup
Setup
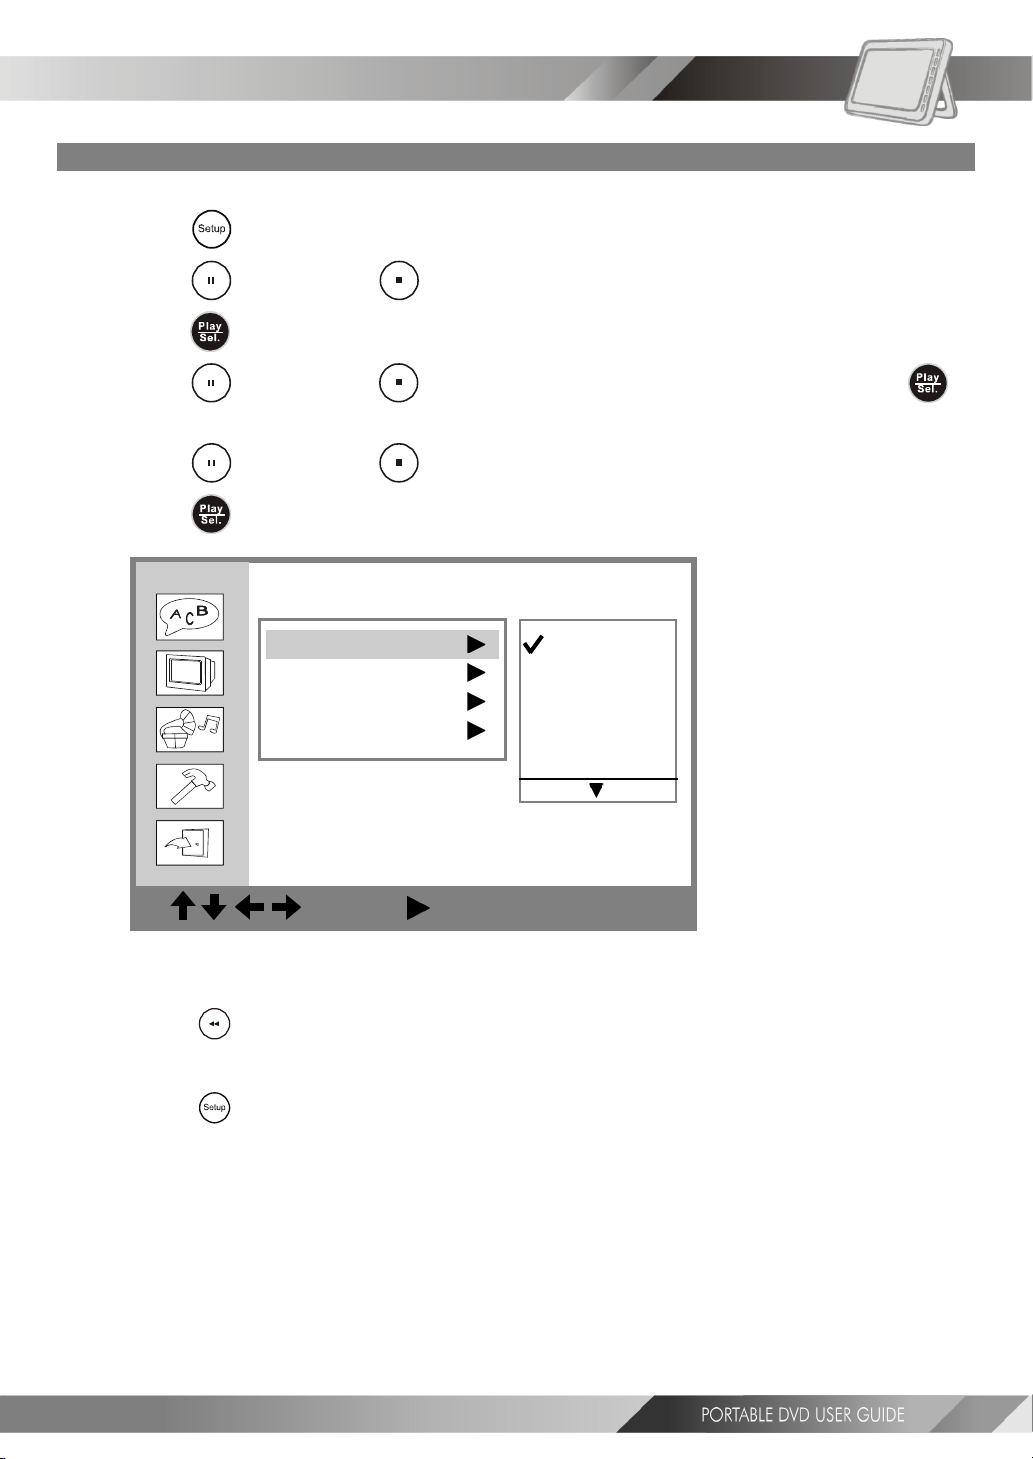
4-1 Language Setup
On Screen Display (OSD) Language Setting
Allows you to set various languages for the on screen display (OSD).
SetupSetup
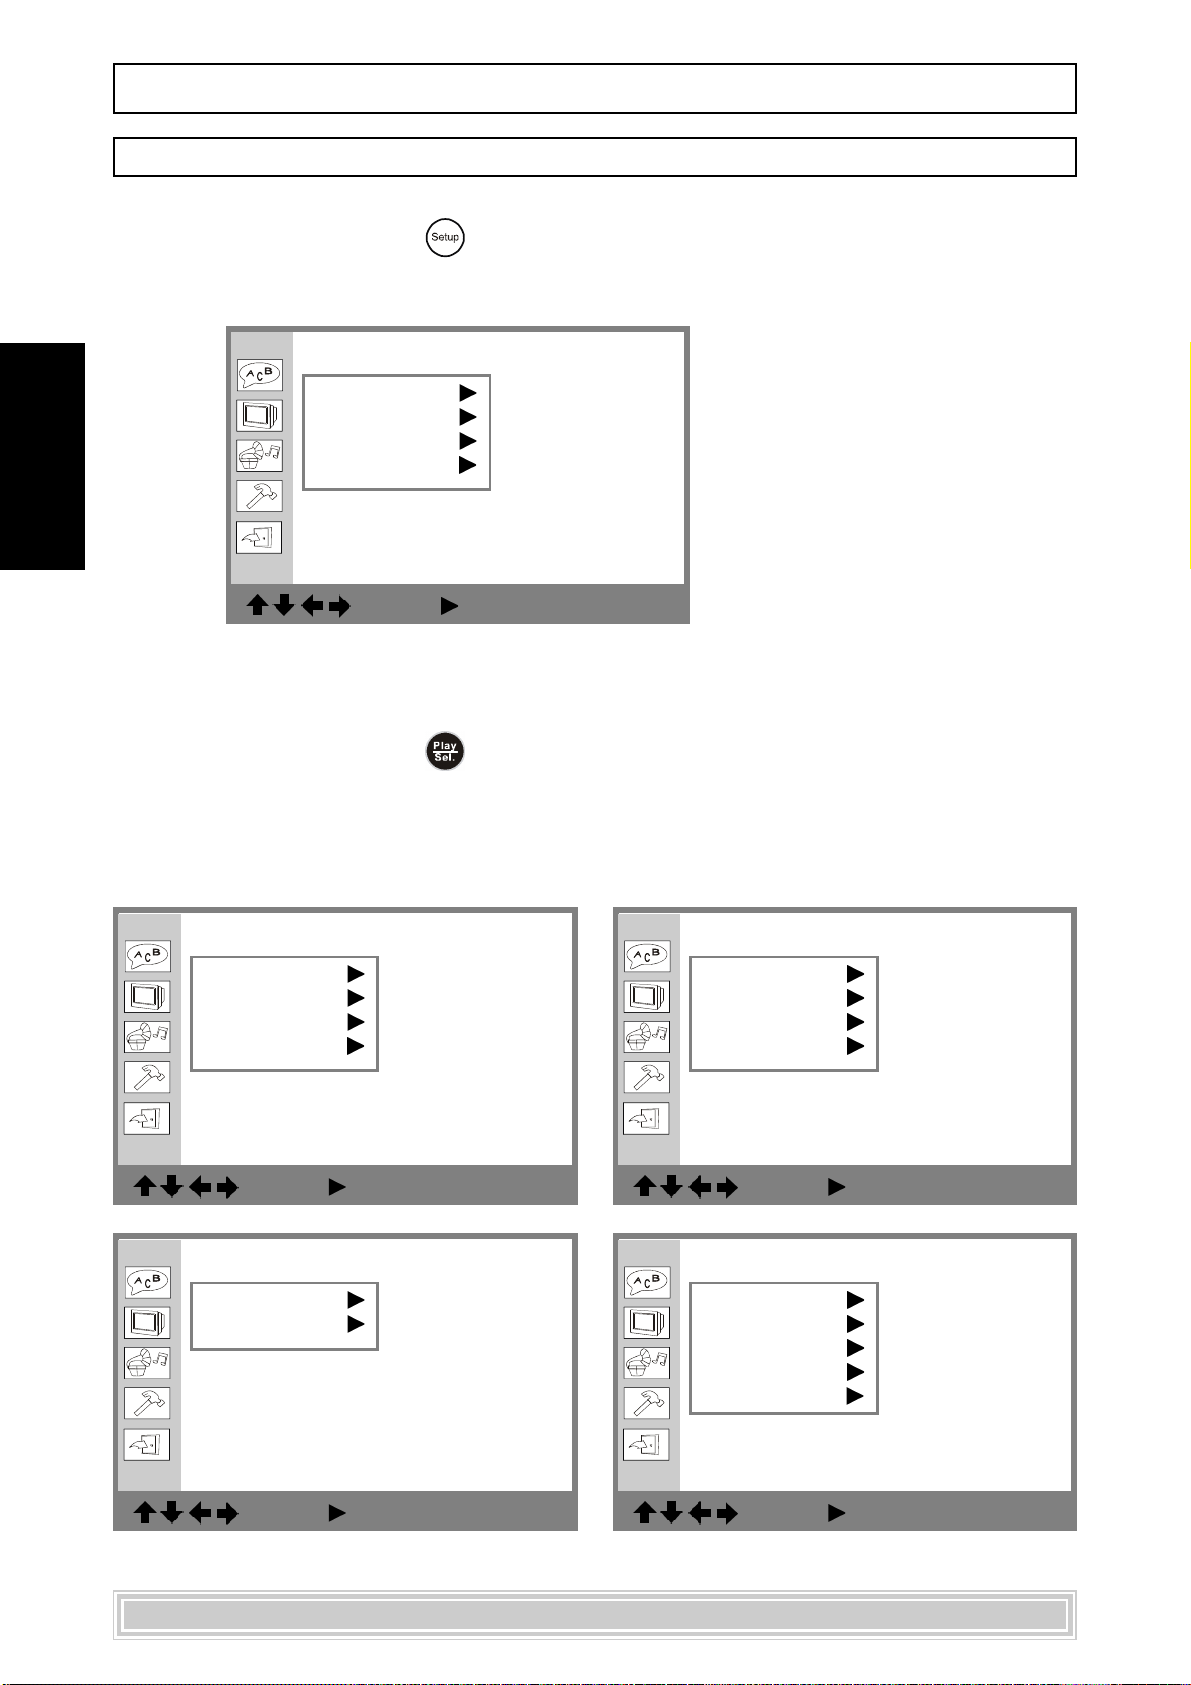
1 Press <SETUP> in the stop mode.
2 Press <UP> button / <DOWN> button to select “Language Setup”, and then
press <PLAY/SEL.>.
3 Press <UP> button / <DOWN> button to select “OSD”, and then press
<PLAY/SEL.>.
4 Press <UP> button / <DOWN> button to select the preferred language.
5 Press <PLAY/SEL.>.
Language Setup
OSD
Menu
Audio
Subtitle
: Move : Select SETUP: Quit
*To return to the SETUP MENU screen
---Press <LEFT> button.
*To finish the setup operation
---Press
<SETUP> to exit or select EXIT from SETUP MENU screen.
English
French
German
Italian
Spanish
23
Page 24
SetupSetup
Setup
SetupSetup
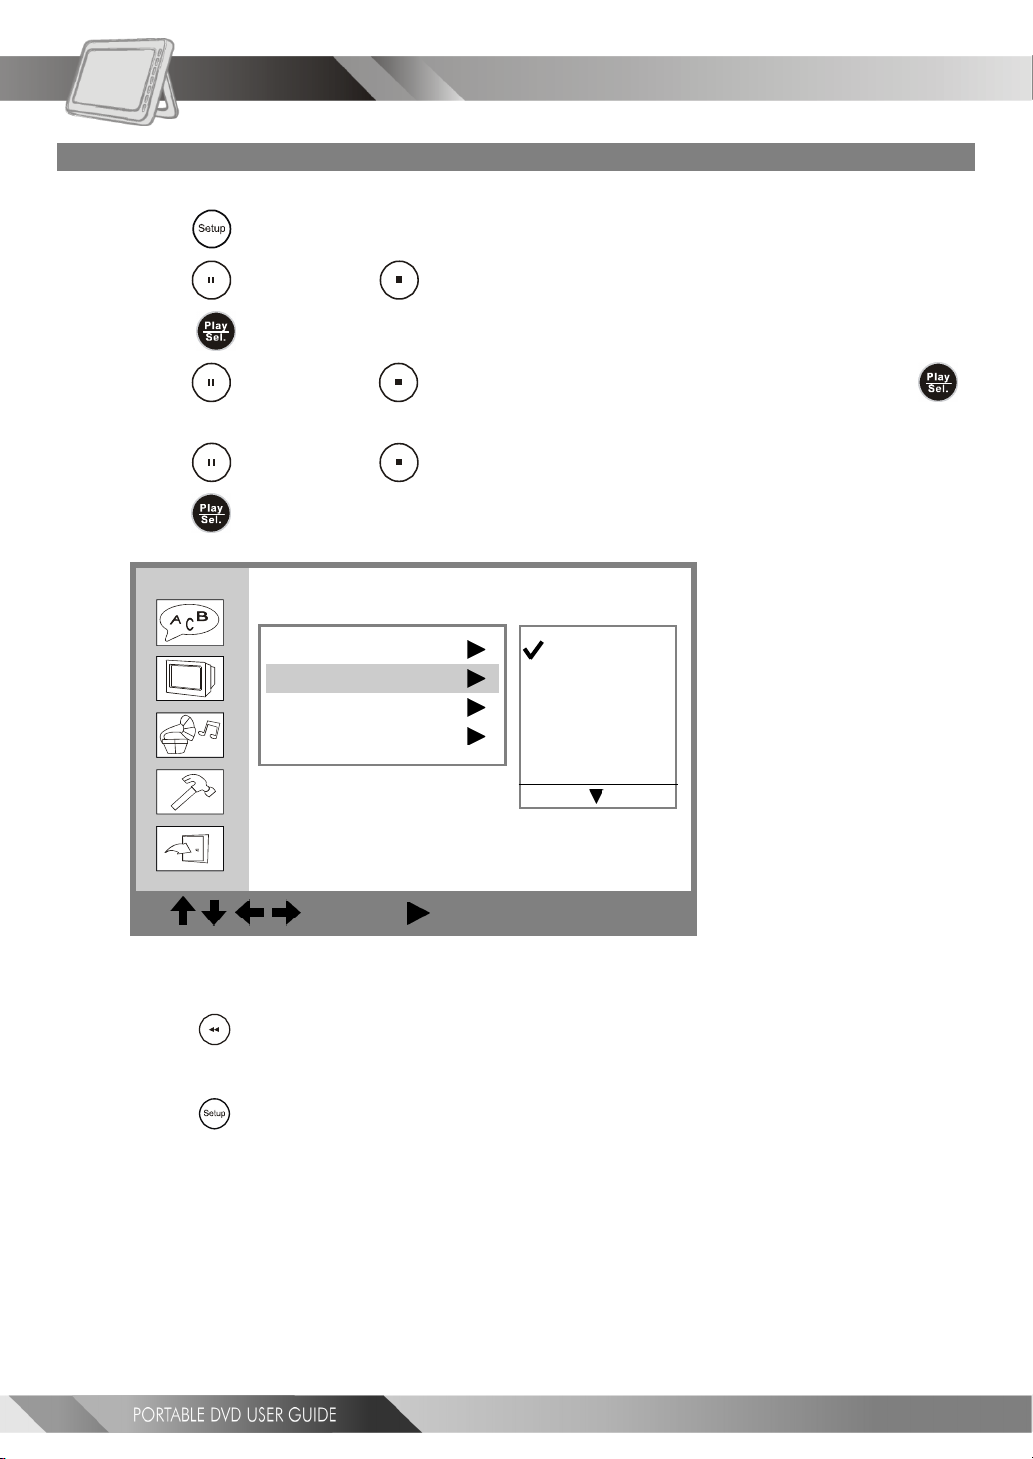
DVD Menu Language Setting
You can select a language that has been recorded on the disc menu.
4-1 Language Setup-continued
1 Press <SETUP> in the stop mode.
2 Press <UP> button / <DOWN> button to select “Language Setup”, and then
press <PLAY/SEL.>.
3 Press <UP> button / <DOWN> button to select “Menu”, and then press
<PLAY/SEL.>.
4 Press <UP> button / <DOWN> button to select the preferred language.
5 Press <PLAY/SEL.>.
Language Setup
OSD
Menu
Audio
Subtitle
English
Chinese
Japanese
French
German
: Move : Select SETUP: Quit
*To return to the SETUP MENU screen
---Press
*To finish the setup operation
---Press <SETUP> to exit or select EXIT from SETUP MENU screen.
<LEFT> button.
24
Page 25
SetupSetup
Setup
4-1 Language Setup-continued
SetupSetup
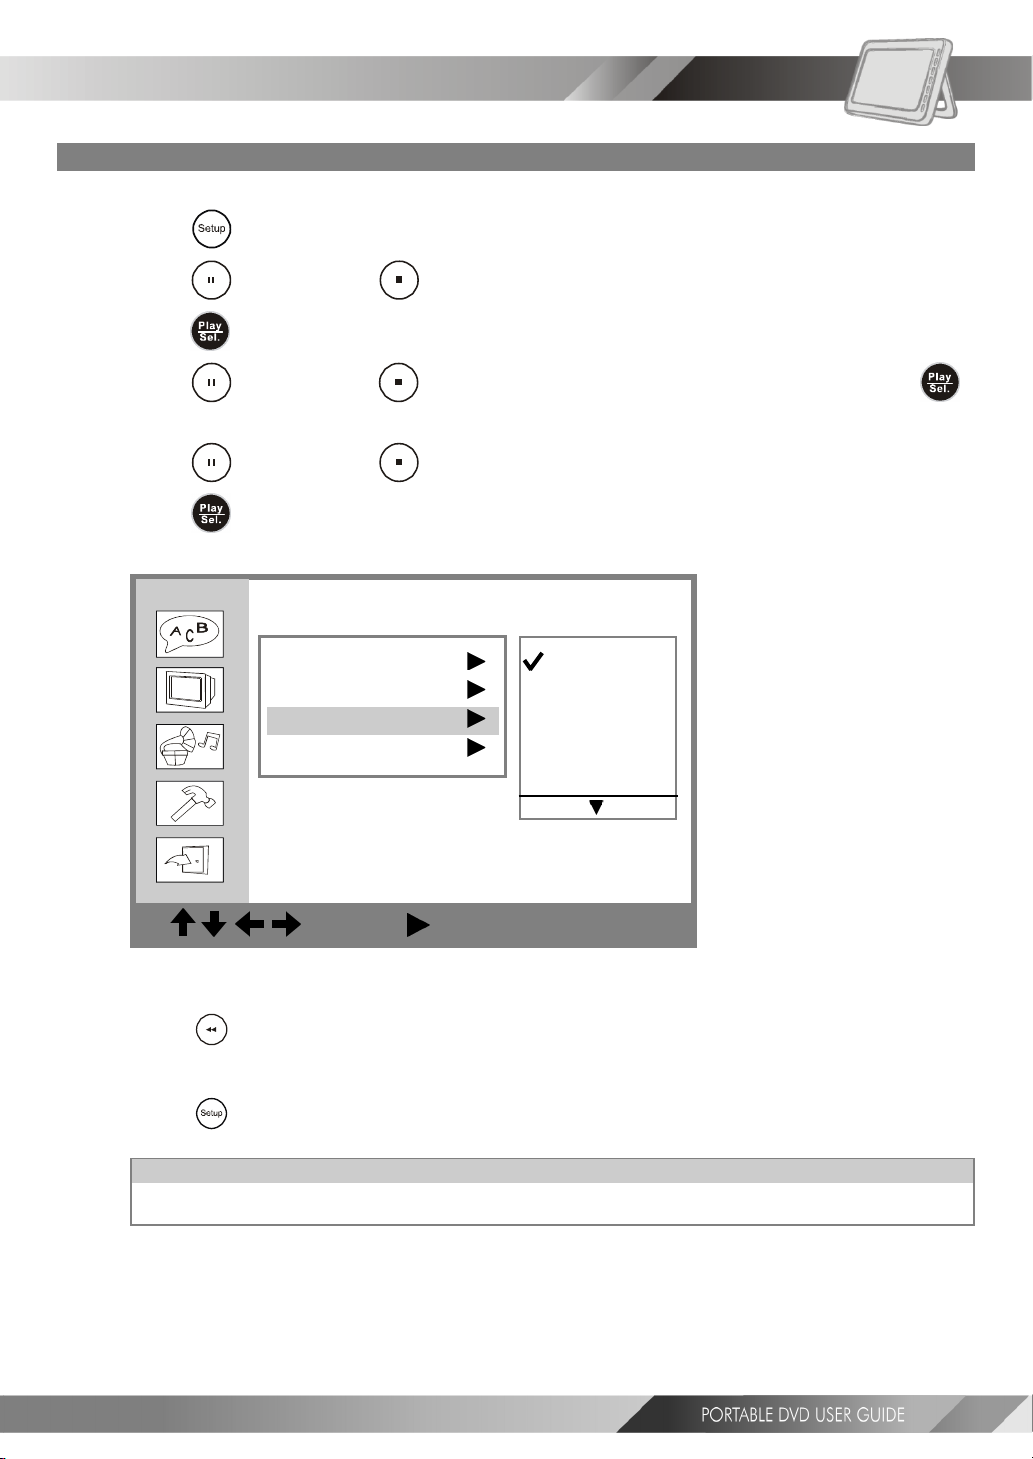
AUDIO Soundtrack Language Selection [DVD]
You can select a preferred soundtrack language that has been recoreded on the DVD discs.
1 Press <SETUP> in the stop mode.
2 Press <UP> button / <DOWN> button to select “Language Setup”, and then
press <PLAY/SEL.>.
3 Press <UP> button / <DOWN> button to select “Audio”, and then press
<PLAY/SEL.>.
4 Press <UP> button / <DOWN> button to select the preferred language.
5 Press <PLAY/SEL.>.
ORIGINAL: The top-priority language of each disc will always playback first.
Language Setup
OSD
Menu
Audio
Subtitle
English
Chinese
Japanese
French
German
: Move : Select SETUP: Quit
*To return to the SETUP MENU screen
---Press
*To finish the setup operation
---Press
For your reference:
If the language selected is not recorded on the disc, the portable DVD player will playback the top-
<LEFT> button.
<SETUP> to exit or select EXIT from SETUP MENU screen.
priority language of the disc.
25
Page 26
SetupSetup
Setup
SetupSetup
4-1 Language Setup-continued
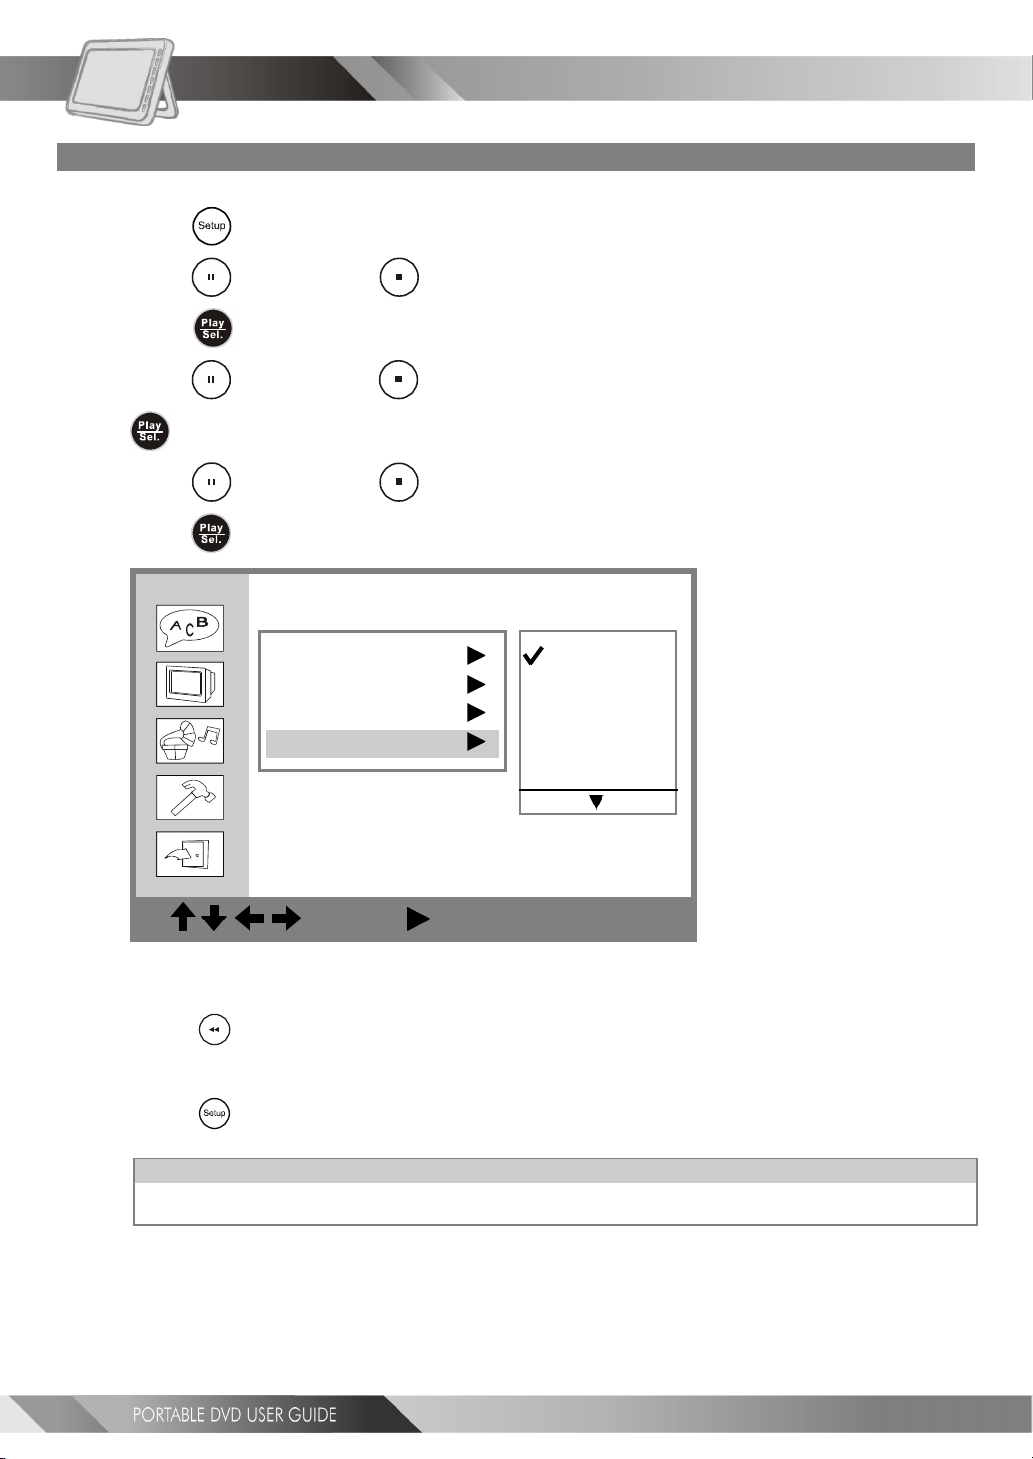
SUBTITLE Language Selection [DVD]
You can select a preferred language that has been recorded on the DVD.
1 Press <SETUP> in the stop mode.
2 Press <UP> button / <DOWN> button to select “Language Setup”, and then
press
<PLAY/SEL.>.
3 Press <UP> button / <DOWN> button to select “Subtitle”, and then press
<PLAY/SEL.>.
4 Press <UP> button / <DOWN> button to select the preferred language.
5 Press <PLAY/SEL.>.
Language Setup
OSD
Menu
Audio
Subtitle
English
Chinese
Japanese
French
German
26
: Move : Select SETUP: Quit
*To return to the SETUP MENU screen
---Press
*To finish the setup operation
---Press
For your reference:
If the language selected is not recorded on the disc, the portable DVD player will playback the top-
<LEFT> button.
<SETUP> to exit or select EXIT from SETUP MENU screen.
priority language of the disc.
Page 27
4-2 Screen Setup
SetupSetup
Setup
SetupSetup
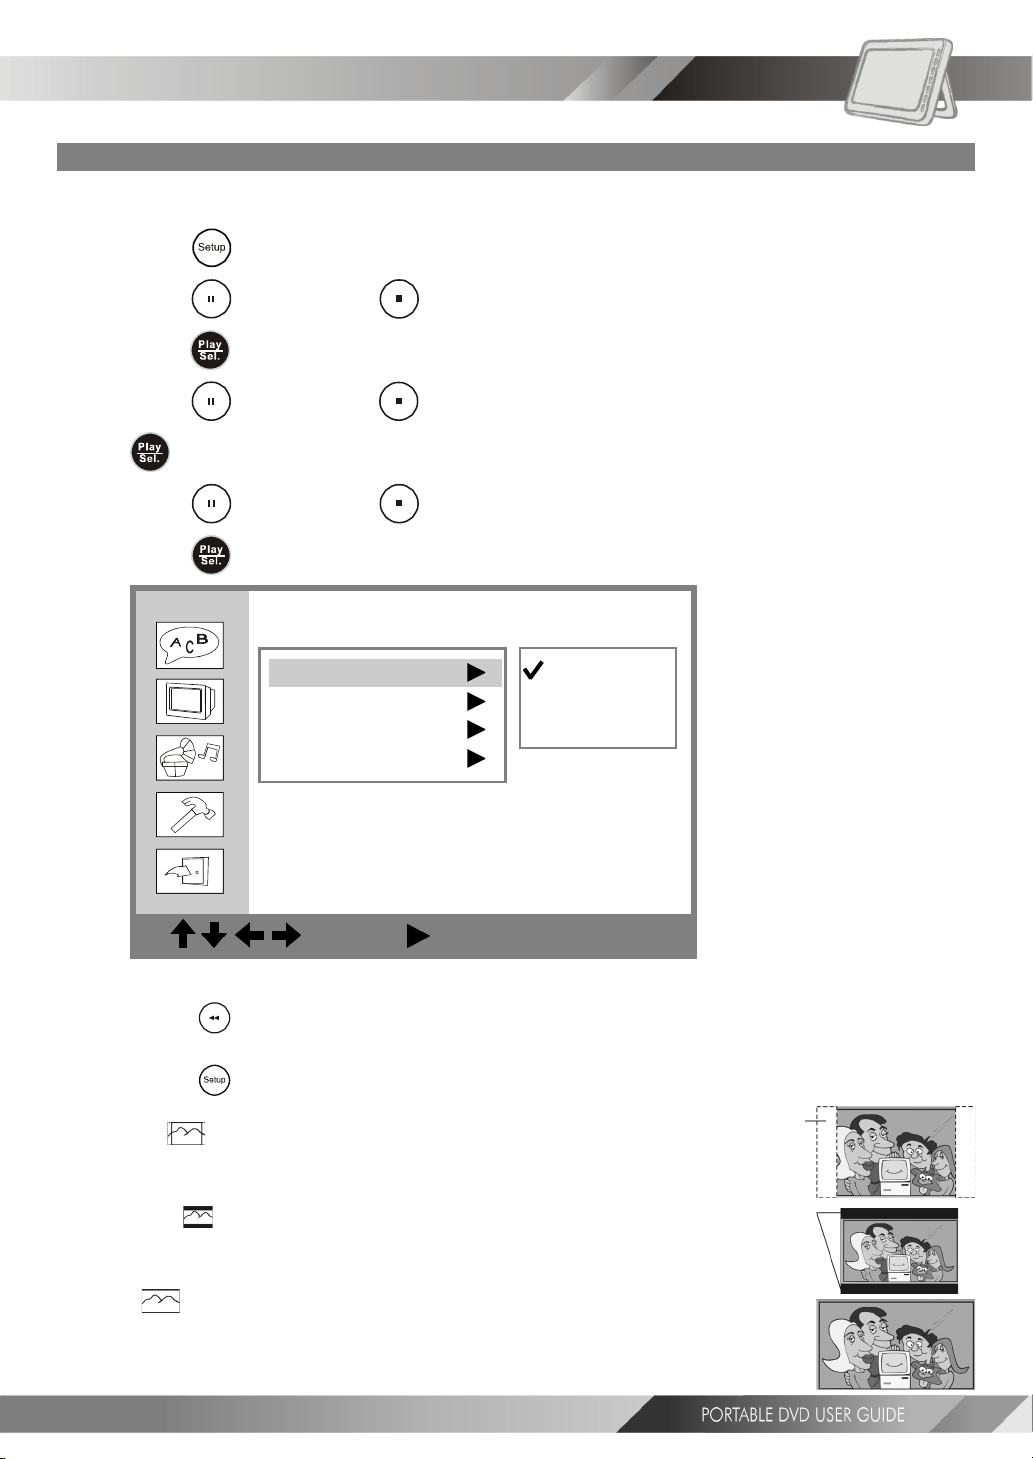
TV Type Setting
The kind of TV set (4:3 or 16:9) connected to the player and a wide-screen picture type for a 4:3 TV can be
selected.
1 Press <SETUP> in the stop mode.
2 Press <UP> button / <DOWN> button to select “Screen Setup”, and then
press
<PLAY/SEL.>.
3 Press <UP> button / <DOWN> button to select “TV Type”, and then press
<PLAY/SEL.>.
4 Press <UP> button / <DOWN> button to select a preferred TV display.
5 Press <PLAY/SEL.>.
Screen Setup
TV Type
Screen Saver
TV System
Video Output
4:3 PS
4:3 LB
16:9
: Move : Select SETUP: Quit
*To return to the SETUP MENU screen
---Press <LEFT> button.
*To finish the setup operation
---Press
4:3 Pan Scan
Select 4:3 PS for a conventional size TV set. Video material formatted in the pan & scan style has
the left and right edges trimmed.
4:3 Letter Box
Select 4:3 LB for a conventional size TV set. Black bands appear at top and bottom of screen
(letter-box style).
16:9 Wide
Select 16:9 for a wide-screen TV set. Played in “FULL” size.
Setting the wide-screen TV to “FULL” mode is also necessary.
Each screen shows an example when the video material for a wide-screen is played.
<SETUP> to exit or select EXIT from SETUP MENU screen.
27
Page 28
SetupSetup
Setup
SetupSetup
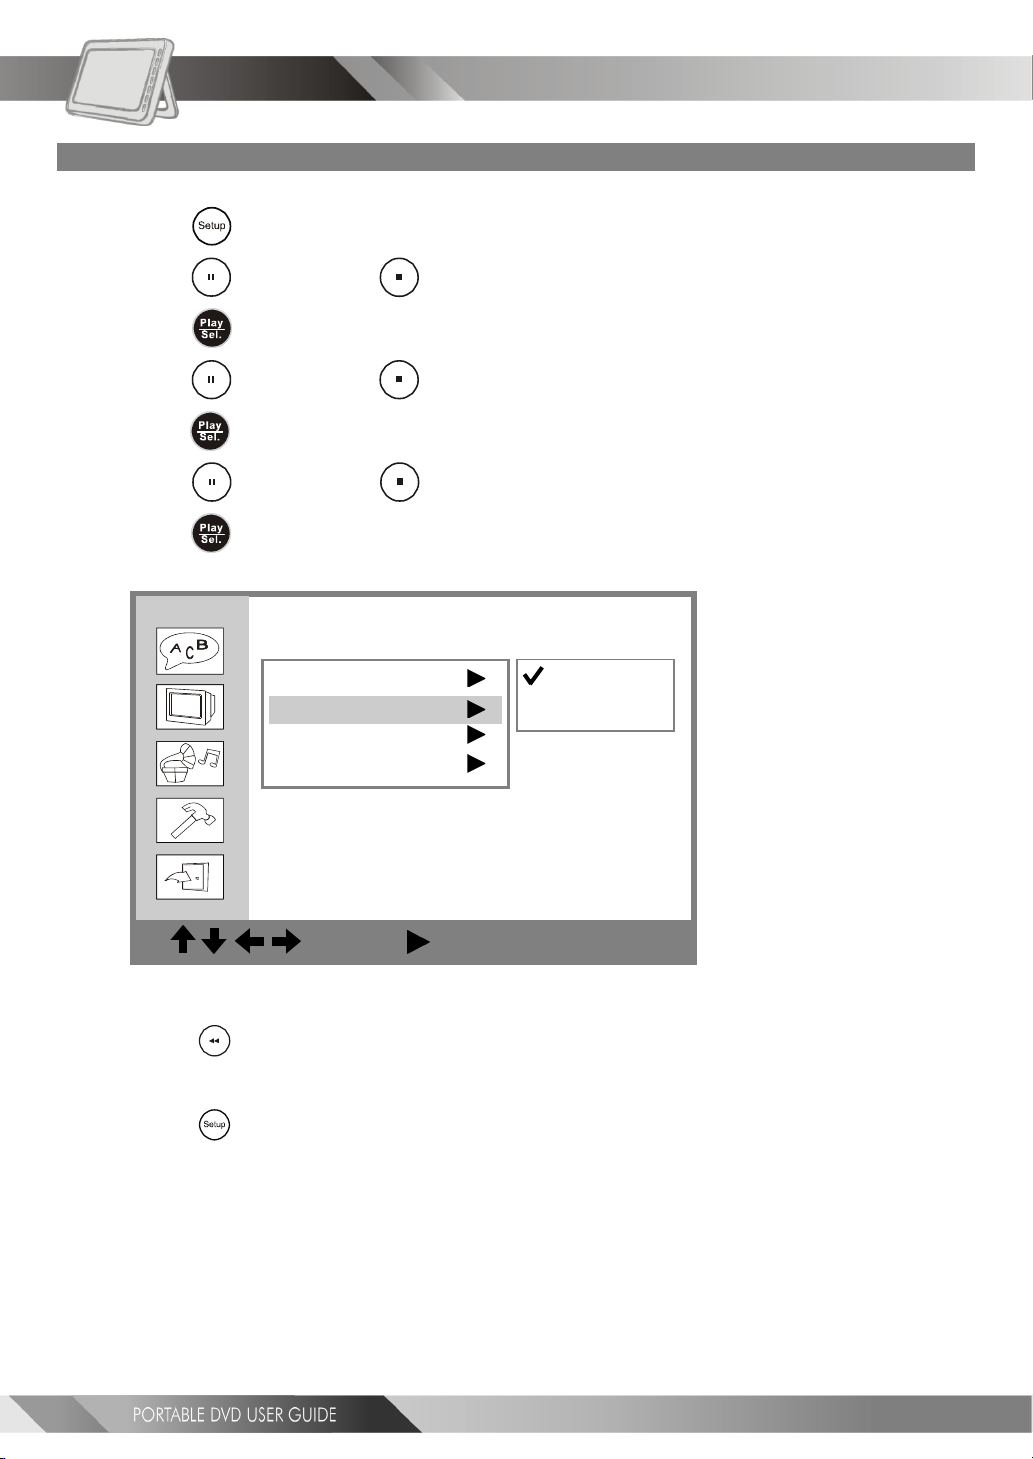
Screen Saver Setting
This function will only work when the player is stopped.
4-2 Screen Setup-continued
1 Press <SETUP> in the stop mode.
2 Press <UP> button / <DOWN> button to select “Screen Setup”, and then
press
<PLAY/SEL.>.
3 Press <UP> button / <DOWN> button to select “Screen Saver”, and then
press <PLAY/SEL.>.
4 Press <UP> button / <DOWN> button to select “On” or “Off ”.
5 Press <PLAY/SEL.>.
The waiting time of the screen saver is set to 10 minutes.
Screen Setup
TV Type
Screen Saver
TV System
Video Output
On
Off
28
: Move : Select SETUP: Quit
*To return to the SETUP MENU screen
---Press
*To finish the setup operation
---Press
<LEFT> button.
<SETUP> to exit or select EXIT from SETUP MENU screen.
Page 29
4-2 Screen Setup-continued
SetupSetup
Setup
SetupSetup
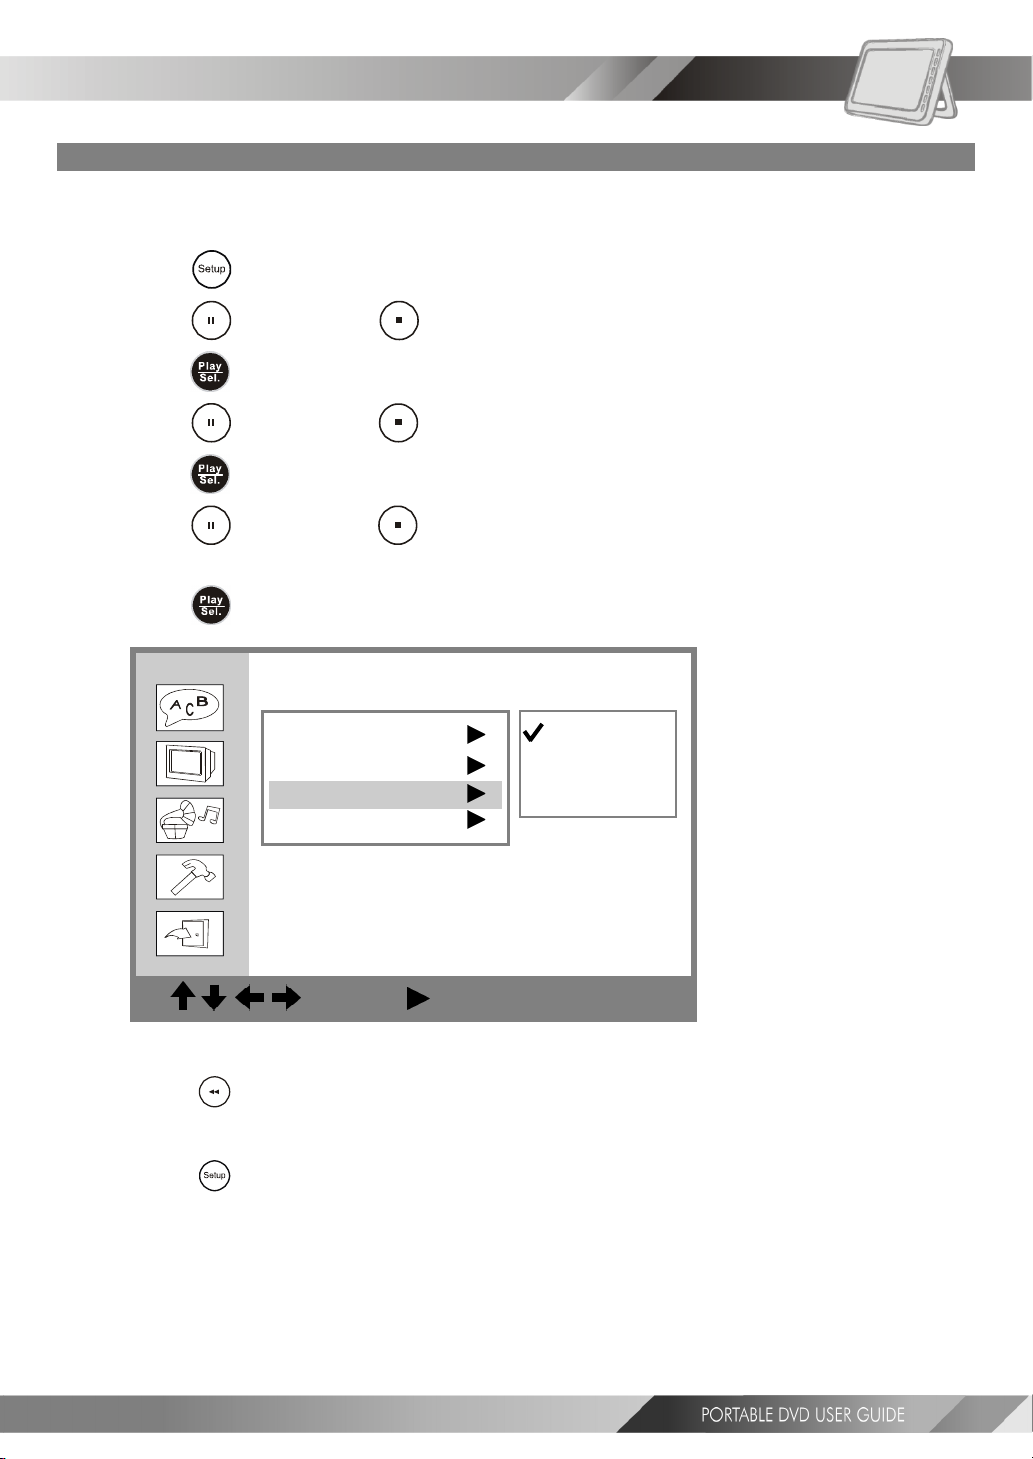
TV System Setting
The player provides “PAL”, “NTSC” and “AUTO” settings for your selection. When connecting the portable
DVD player to your TV, set the “TV SYSTEM” from the on-screen display to the format that is compatible
with your TV’s system. Set to "AUTO" if your system is a multi-TV system that supports both PAL and NTSC.
1 Press <SETUP> in the stop mode.
2 Press <UP> button / <DOWN> button to select “Screen Setup”, and then
press
<PLAY/SEL.>.
3 Press <UP> button / <DOWN> button to select “TV System”, and then
press <PLAY/SEL.>.
4 Press <UP> button / <DOWN> button to select the appropriate TV system
for your clearest view.
5 Press <PLAY/SEL.>.
Screen Setup
TV Type
Screen Saver
TV System
Video Output
NTSC
PA L
Auto
: Move : Select SETUP: Quit
*To return to the SETUP MENU screen
---Press
*To finish the setup operation
---Press
<LEFT> button.
<SETUP> to exit or select EXIT from SETUP MENU screen.
29
Page 30
SetupSetup
Setup
SetupSetup
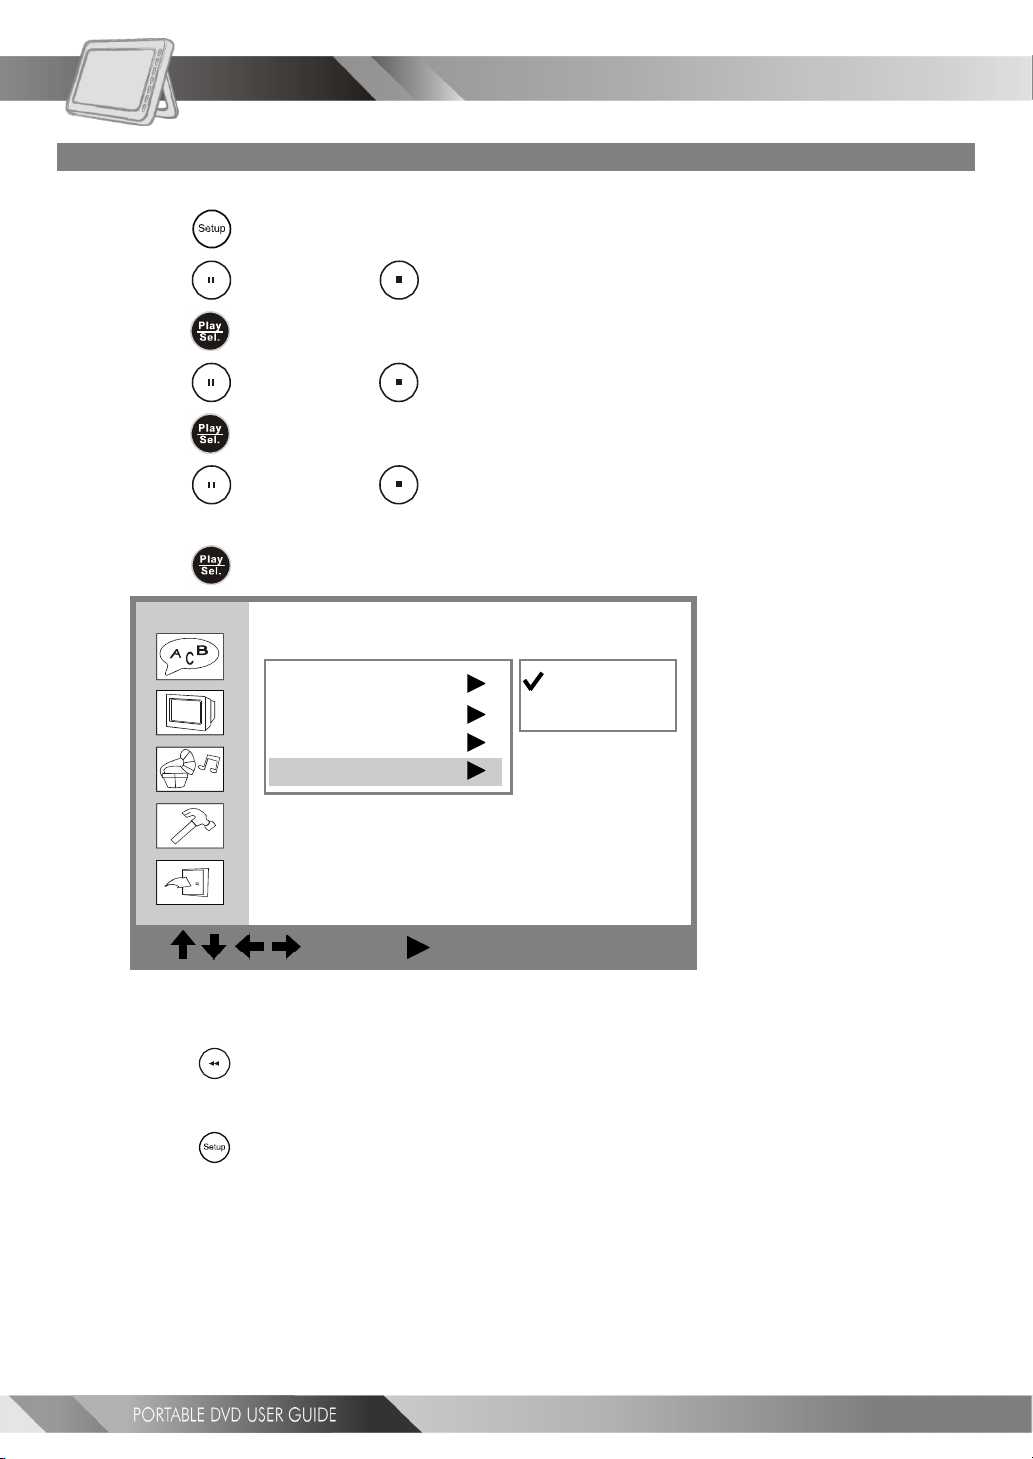
Video Output Setting
Please choose the preferred video output supported by your equipment.
4-2 Screen Setup-continued
1 Press <SETUP> in the stop mode.
2 Press <UP> button / <DOWN> button to select “Screen Setup”, and then
press <PLAY/SEL.>.
3 Press <UP> button / <DOWN> button to select “Video Output”, and then
press <PLAY/SEL.>.
4 Press <UP> button / <DOWN> button to select the preferred video output
setting.
5 Press <PLAY/SEL.>.
Screen Setup
TV Type
Screen Saver
TV System
Video Output
: Move : Select SETUP: Quit
*To return to the SETUP MENU screen
---Press
*To finish the setup operation
---Press
<LEFT> button.
<SETUP> to exit or select EXIT from SETUP MENU screen.
S-Video
P-SCAN
30
Page 31
4-2 Screen Setup-continued
Video Output Setting-continued
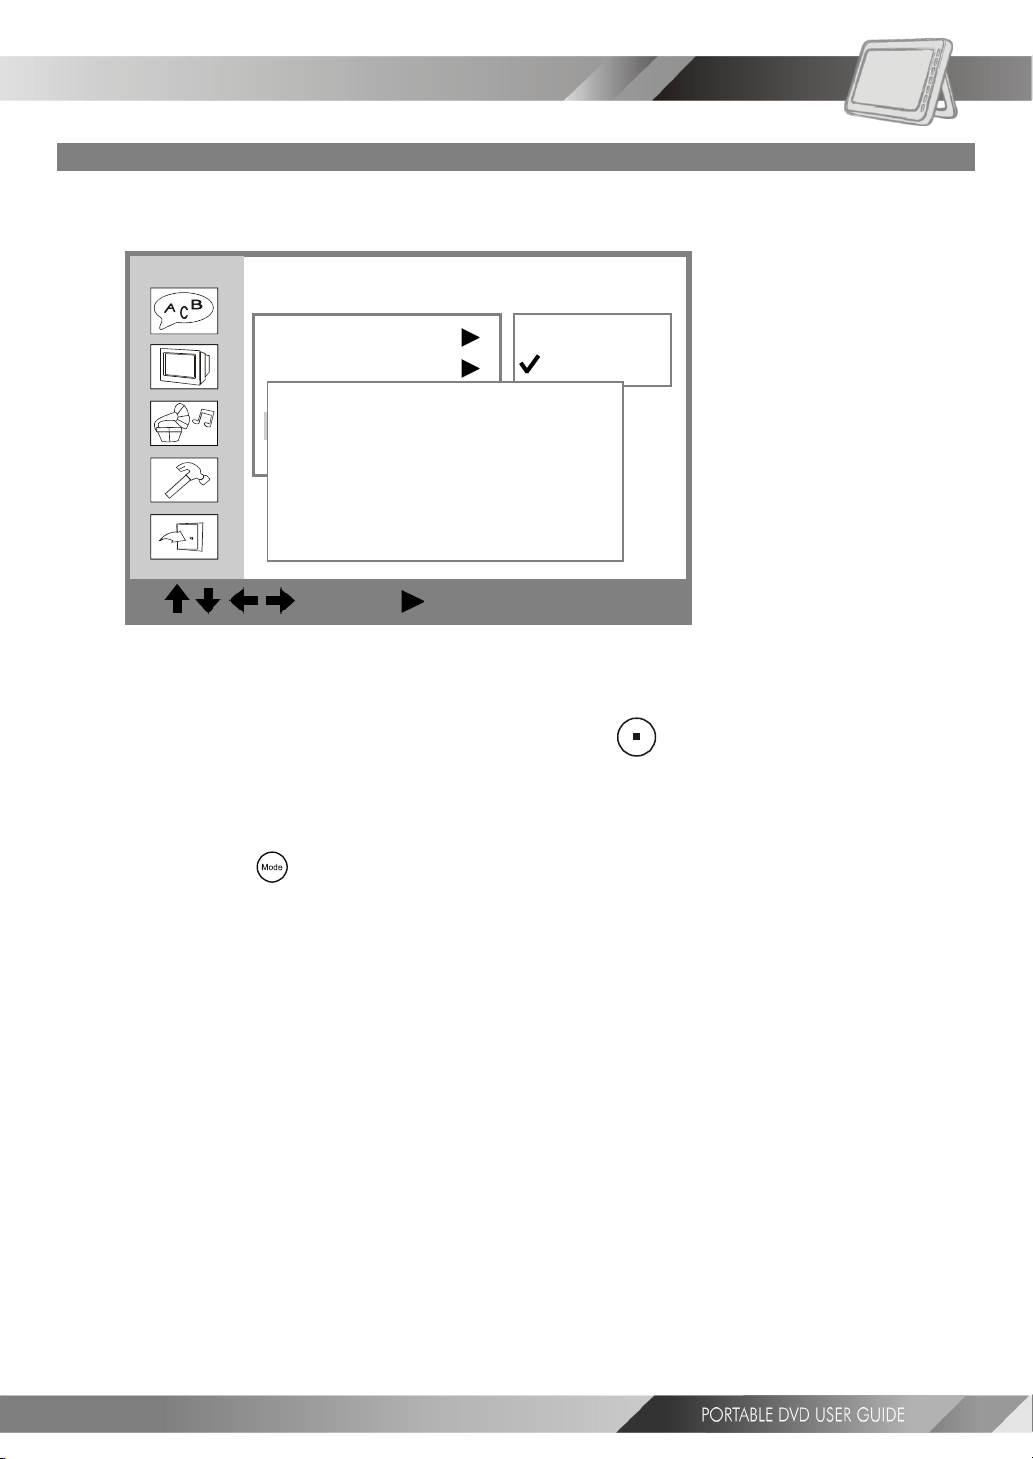
If you choose “P-Scan”, the following will show on the screen as a reminder.
Screen Setup
SetupSetup
Setup
SetupSetup
TV Type
Screen Saver
TV System
Please make sure your
Video Output
S-Video
P-SCAN
TV support P-Scan
Continue Press PLAY
Stop Press STOP
4
: Move : Select SETUP: Quit
<< NOTE >>
If you choose “P-Scan” as the video output setting, make sure your TV set supports P-Scan input
feature and the YUV cable be properly connected to your TV and the portable DVD player.
If your TV doesn’t support P-Scan feature, press <STOP>.
<<Troubleshooting>>
What if the screen turns black while operating...
Solution: Press
<Mode> to switch to “S-Video” mode.
31
Page 32
SetupSetup
Setup
SetupSetup
4-3 Audio Setup
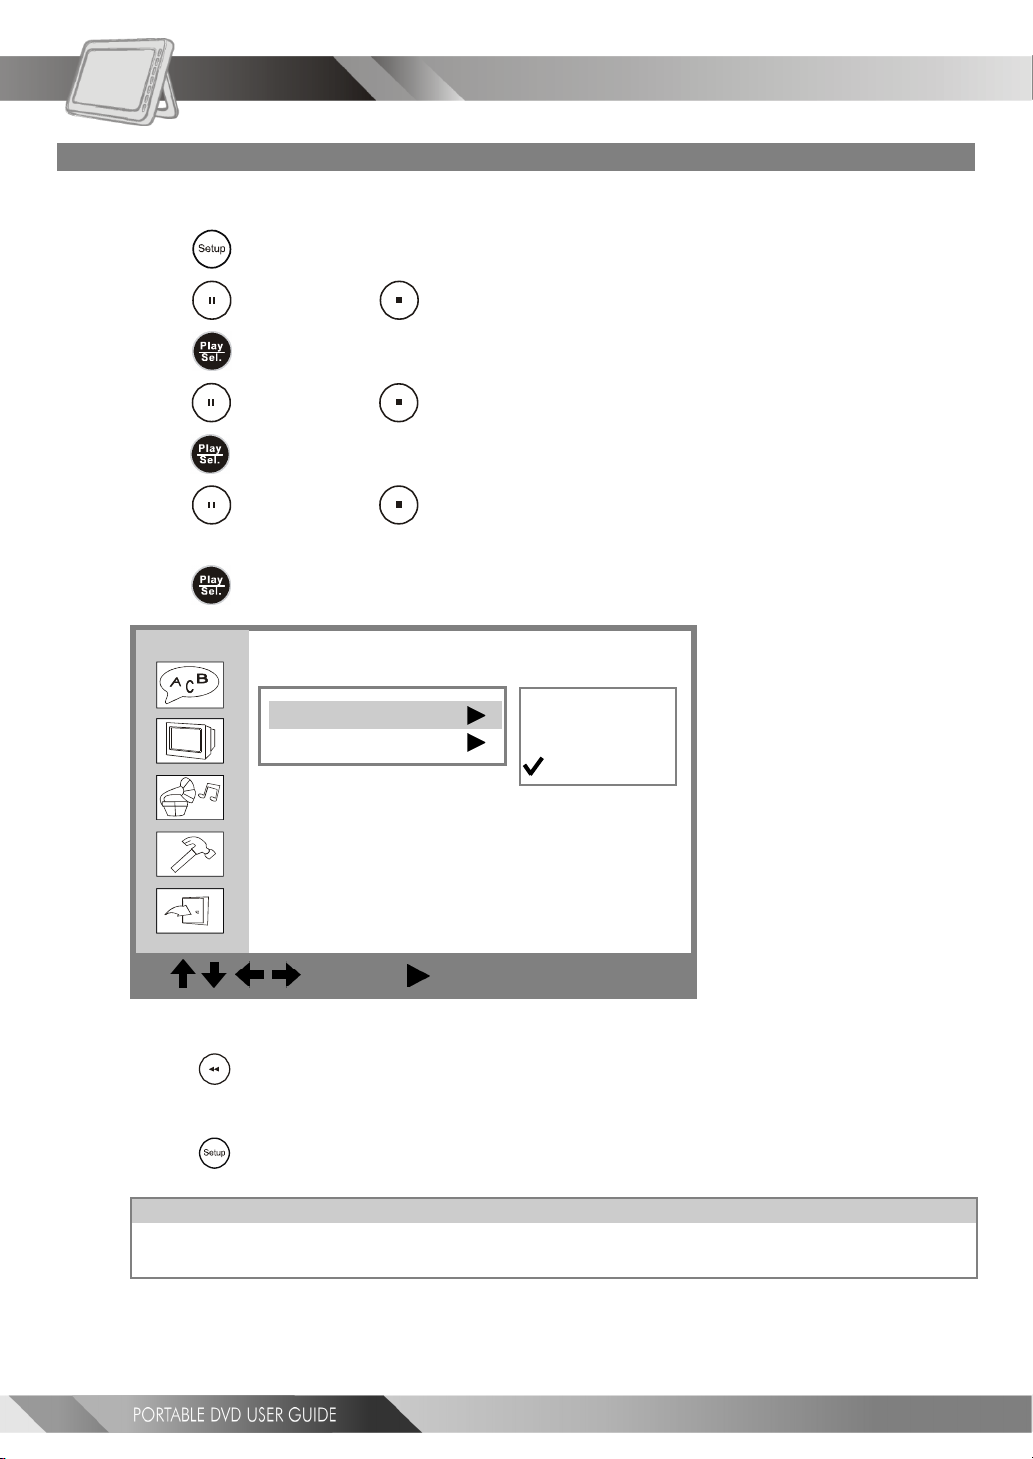
Digital Out Setting
The portable DVD player provides three options, “SPDIF/PCM”, “SPDIF/RAW” and “Off” for the digital out
setting.
1 Press <SETUP> in the stop mode.
2 Press <UP> button / <DOWN> button to select “Audio Setup”, and then
press
<PLAY/SEL.>.
3 Press <UP> button / <DOWN> button to select “Digital Out”, and then
press <PLAY/SEL.>.
4 Press <UP> button / <DOWN> button to select the preferred digital out
setting.
5 Press <PLAY/SEL.>.
Audio Setup
Digital Out
Analog Out
SPDIF/PCM
SPDIF/RAW
Off
32
: Move : Select SETUP: Quit
*To return to the SETUP MENU screen
---Press
*To finish the setup operation
---Press
For your reference:
If you have a Dolby Digital 5.1 or DTS capable amplifier, you must set the audio output to SPDIF/RAW.
<LEFT> button.
<SETUP> to exit or select EXIT from SETUP MENU screen.
If you have a 2-channel Dolby Digital amplifier, you must set the audio output to SPDIF/PCM.
Page 33
4-3 Audio Setup-continued
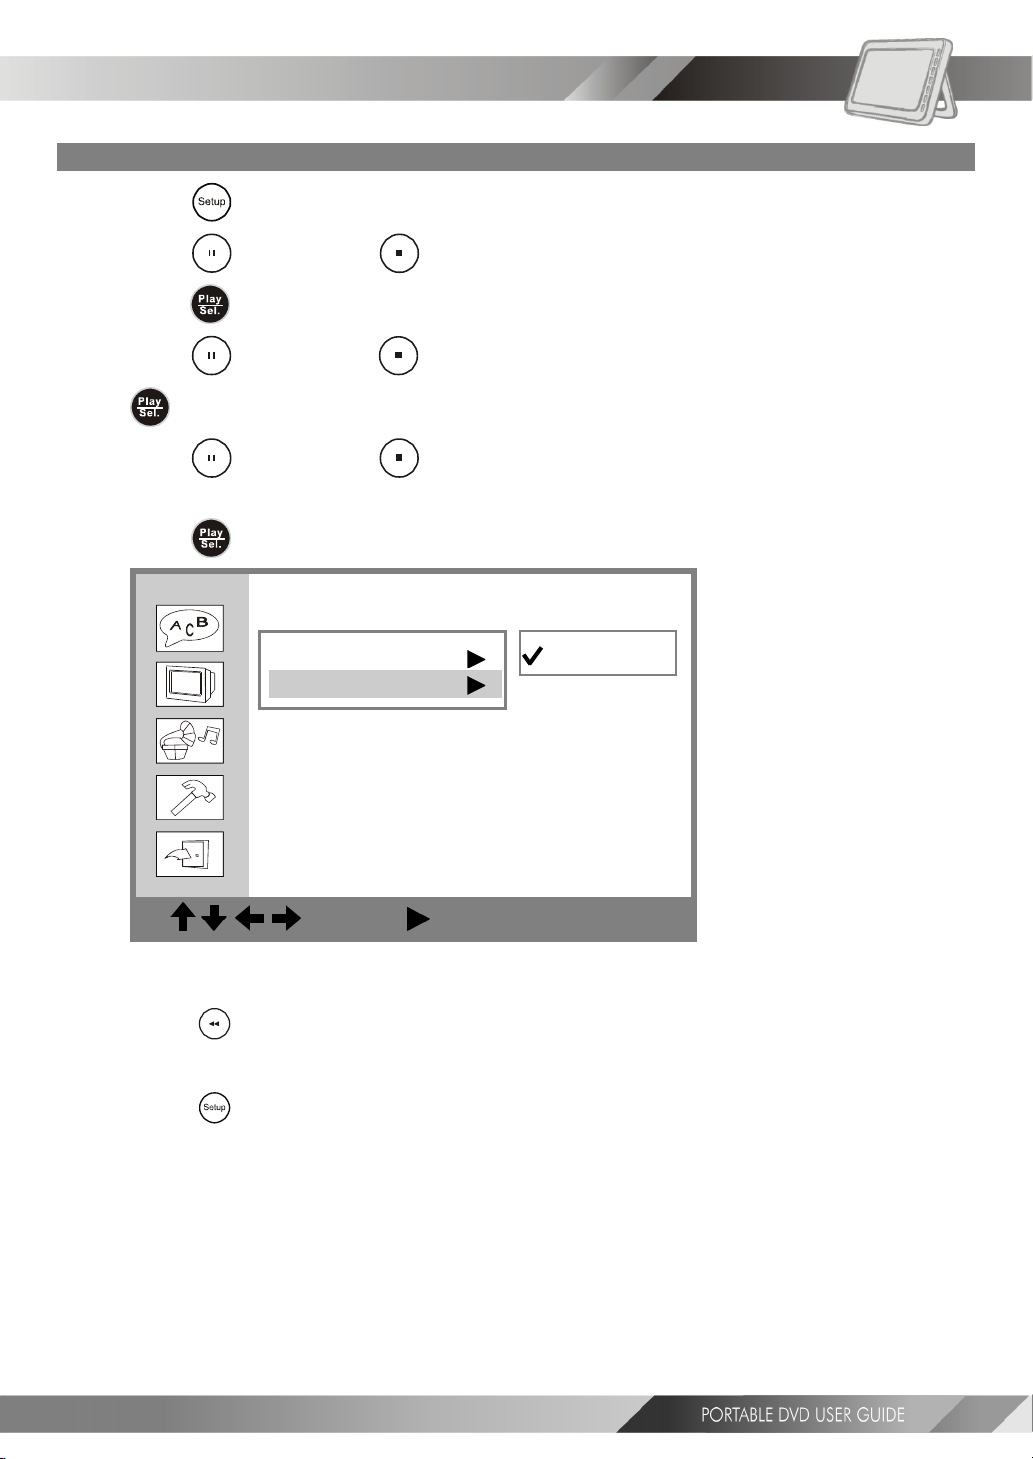
Analog Out Setting
SetupSetup
Setup
SetupSetup
1 Press <SETUP> in the stop mode.
2 Press <UP> button / <DOWN> button to select “Audio Setup”, and then
press
<PLAY/SEL.>.
3 Press <UP> button / <DOWN> button to select “Analog Out”, and then press
<PLAY/SEL.>.
4 Press <UP> button / <DOWN> button to select the preferred analog out
setting.
5 Press <PLAY/SEL.>.
Audio Setup
Digital Out
Analog Out
2 Channel
: Move : Select SETUP: Quit
*To return to the SETUP MENU screen
---Press
*To finish the setup operation
---Press
<LEFT> button.
<SETUP> to exit or select EXIT from SETUP MENU screen.
33
Page 34
SetupSetup
Setup
SetupSetup
4-4 Custom Setup
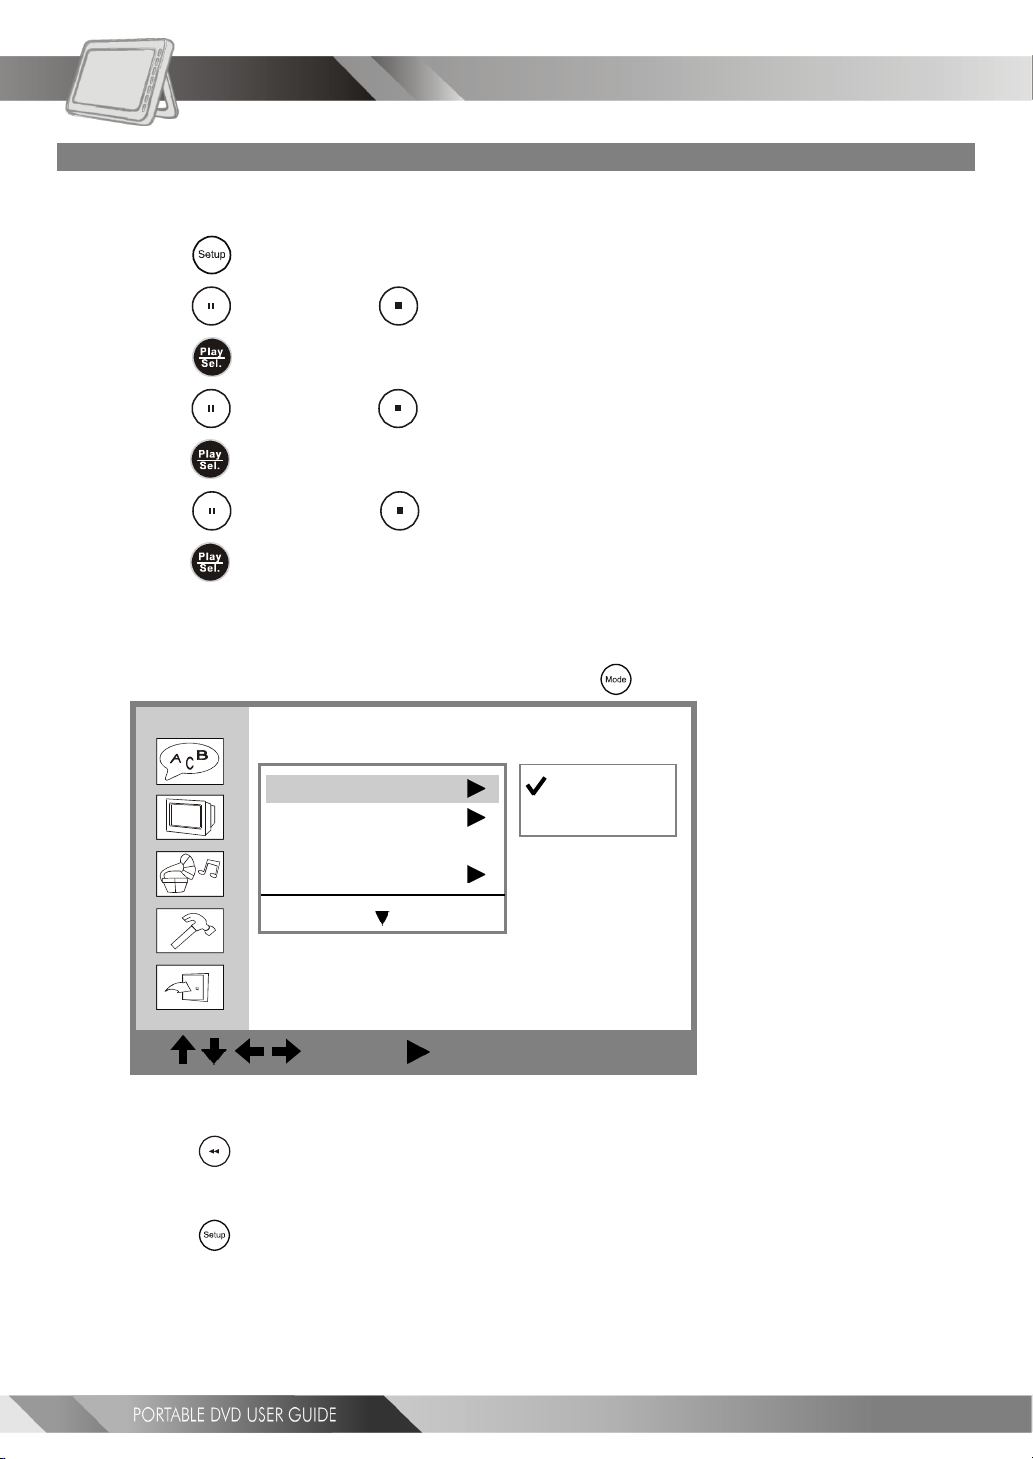
MMC/SD Setting
Note: You can only change the MMC/SD setting to “On” or “Off” while there is no disc inside
the DVD player.
1 Press <SETUP> in the stop mode.
2 Press <UP> button / <DOWN> button to select “Custom Setup”, and then
press
<PLAY/SEL.>.
3 Press <UP> button / <DOWN> button to select “MMC/SD”, and then
press <PLAY/SEL.>.
4 Press <UP> button / <DOWN> button to select “On” or “Off ”, and then
press <PLAY/SEL.>.
<< Important >>
If you set the MMC/SD setting to “On”, the portable DVD player can only read MMC/SD card. The
While the disc is played back, you can only press the <Mode> button to switch to MMC/SD mode.
portable DVD player can’t playback any discs.
Custom Setup
MMC/SD
Parental Ctrl
Password ...
Angle Mark
On
Off
34
: Move : Select SETUP: Quit
*To return to the SETUP MENU screen
---Press
*To finish the setup operation
---Press
<LEFT> button.
<SETUP> to exit or select EXIT from SETUP MENU screen.
Page 35
4-4 Custom Setup-continued
SetupSetup
Setup
SetupSetup
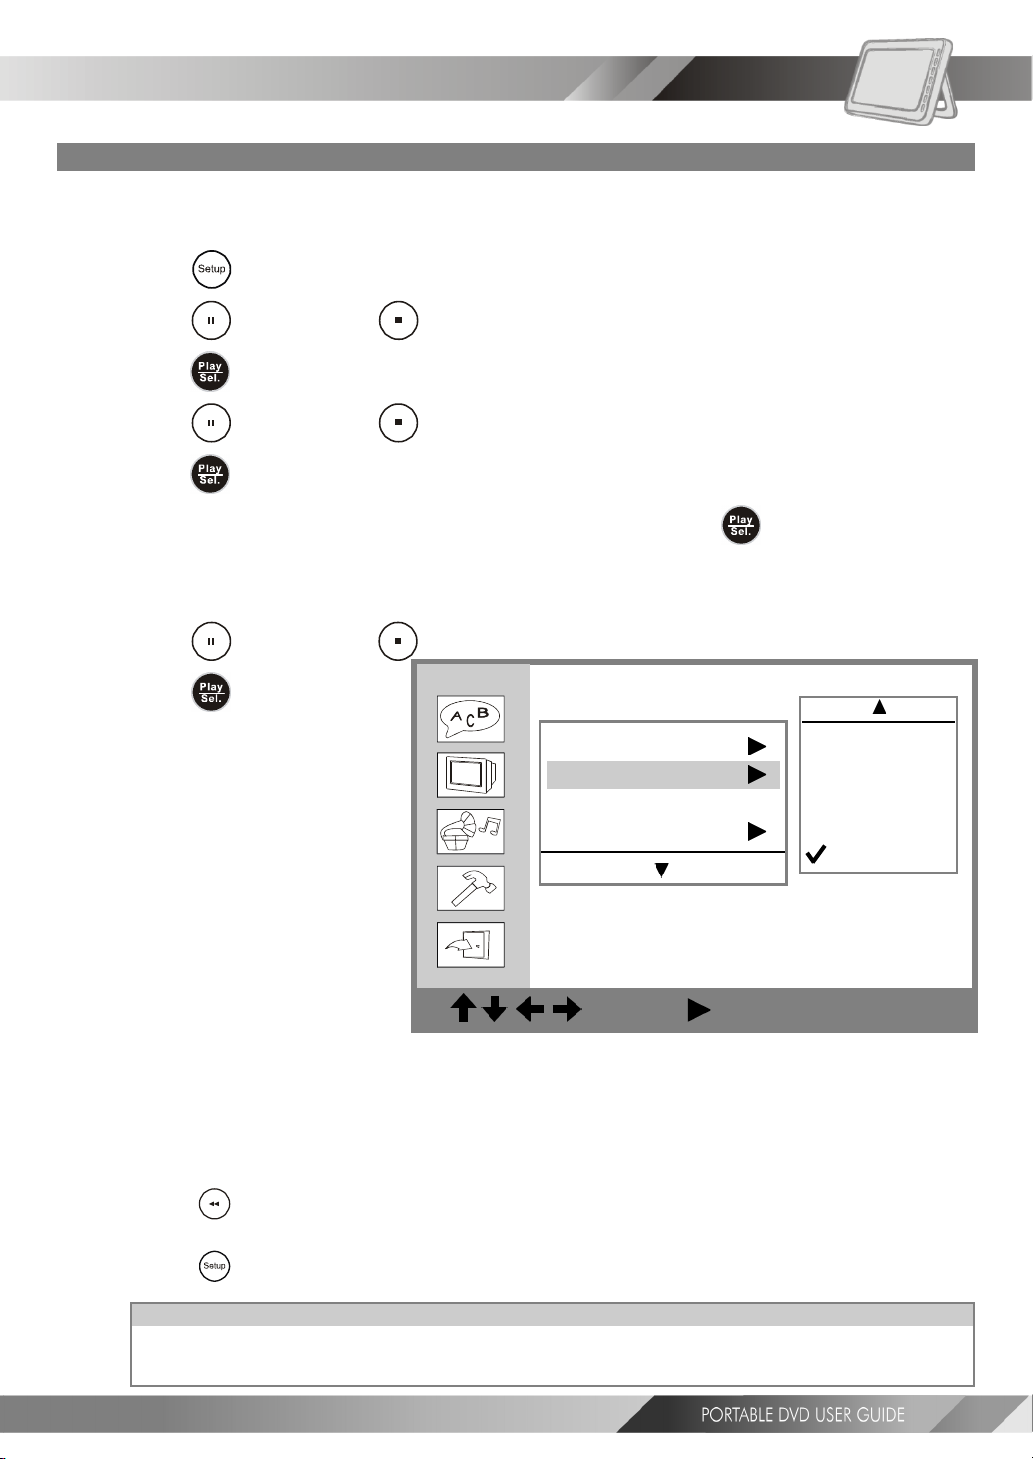
Parental Control Setting [DVD]
A built-in viewer rating setting enables you to lock the videos that you do not want children to view. For
example, setting the ratting limit to PG-13 will prevent the unit from playing video rated R, NC-17 or X
unless the correct password is entered.
1 Press <SETUP> in the stop mode.
2 Press <UP> button / <DOWN> button to select “Custom Setup”, and then
press
<PLAY/SEL.>.
3 Press <UP> button / <DOWN> button to select “Parental Ctrl”, and then
press <PLAY/SEL.>.
4 Enter a 4-digit password before selecting ratings and press <PLAY/SEL.>.
Factory pre-set password: 0000
You need to enter “0000” to set the rating for the first time when purchasing your DVD from the
store.
5 Press <UP> button / <DOWN> button to select the preferred ratings.
6 Press <PLAY/SEL.>.
Custom Setup
MMC/SD
Parental Ctrl
Password ...
Angle Mark
4: PG13
5
6: R
7: NC 17
8
<< Rating Explanations >>
3.PG: Parental Guidance suggested.
4.PG13: Material is unsuitable for children under the age of 13.
6.R: Restricted, children under 17 would not be admitted without an accompanying parent or adult guardian.
7.NC17: No children under the age of 17, not recommended viewing for children under age 17.
*To return to the SETUP MENU screen
---Press <LEFT> button.
*To finish the setup operation
---Press
For your reference:
You can use the parental control lock ONLY with DVD discs featured with the parental lock function.
Please keep in mind that discs not encoded with rating lock protection will play regardless of rating
<SETUP> to exit or select EXIT from SETUP MENU screen.
and content.
: Move : Select SETUP: Quit
35
Page 36
SetupSetup
Setup
SetupSetup
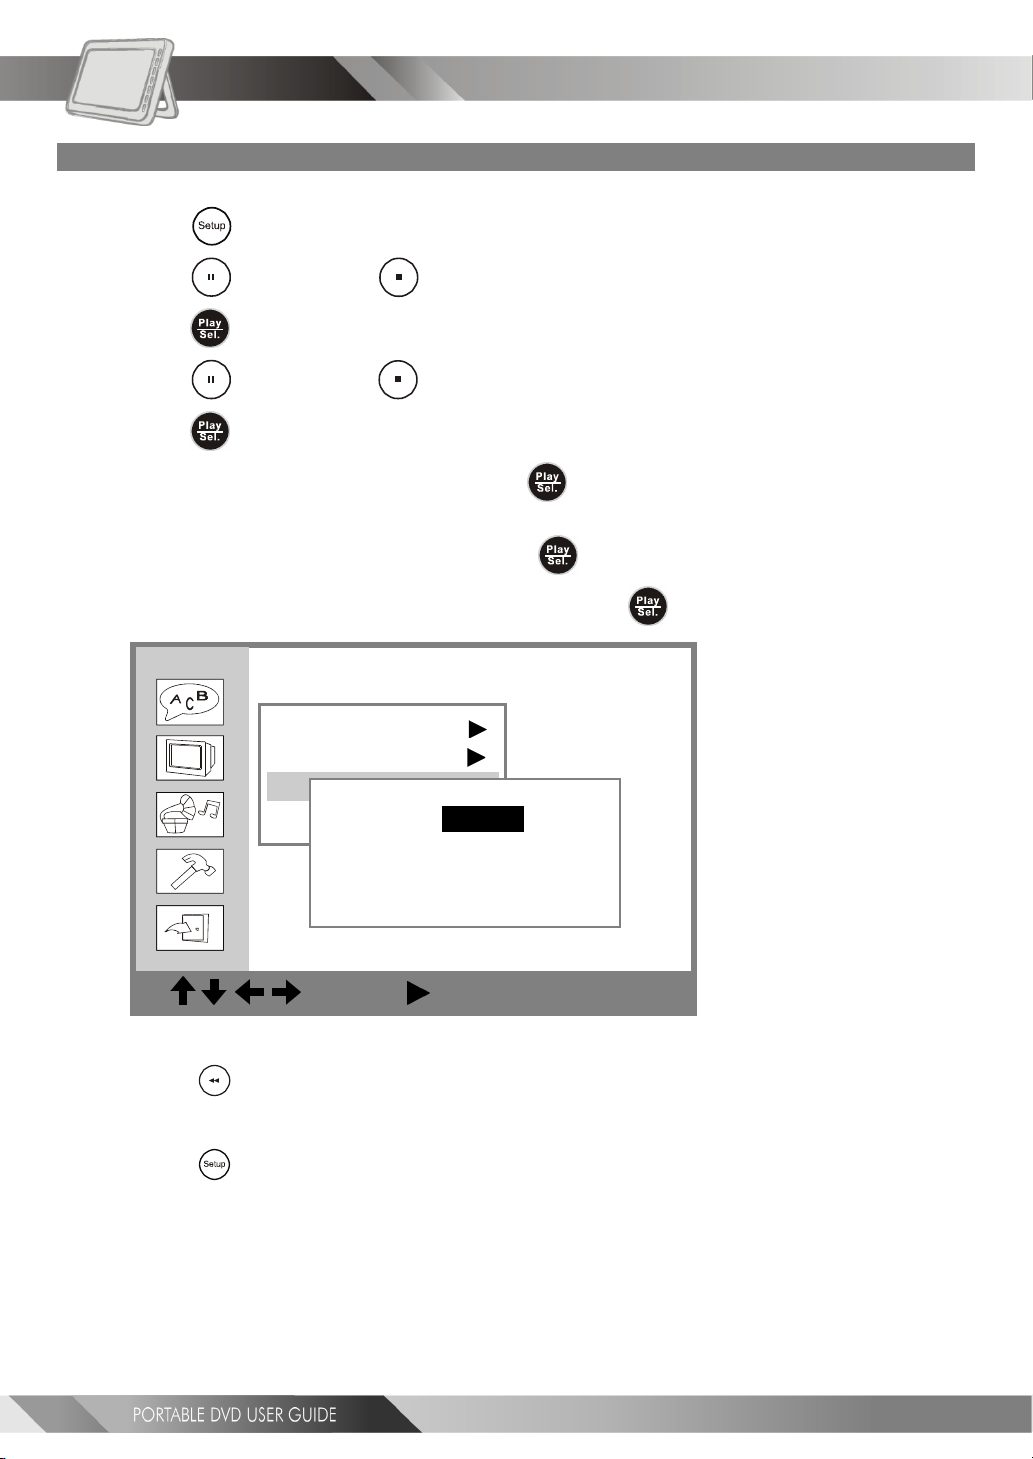
Password Setting [DVD]
You can change the password to the portable DVD player.
4-4 Custom Setup-continued
1 Press <SETUP> in the stop mode.
2 Press <UP> button / <DOWN> button to select “Custom Setup”, and then
press
<PLAY/SEL.>.
3 Press <UP> button / <DOWN> button to select “Password”, and then
press <PLAY/SEL.>.
4 Enter your old password and then press <PLAY/SEL.>.
Factory pre-set password: 0000
5 Enter your new password and then press <PLAY/SEL.>.
6 Re-enter your password to verify it and then press <PLAY/SEL.>.
Custom Setup
MMC/SD
Parental Ctrl
Password ...
Old: _ _ _ _
Angle Mark t
New: _ _ _ _
Verify: _ _ _ _
36
: Move : Select SETUP: Quit
*To return to the SETUP MENU screen
---Press <LEFT> button.
*To finish the setup operation
---Press
<SETUP> to exit or select EXIT from SETUP MENU screen.
Page 37
4-4 Custom Setup-continued
SetupSetup
Setup
SetupSetup
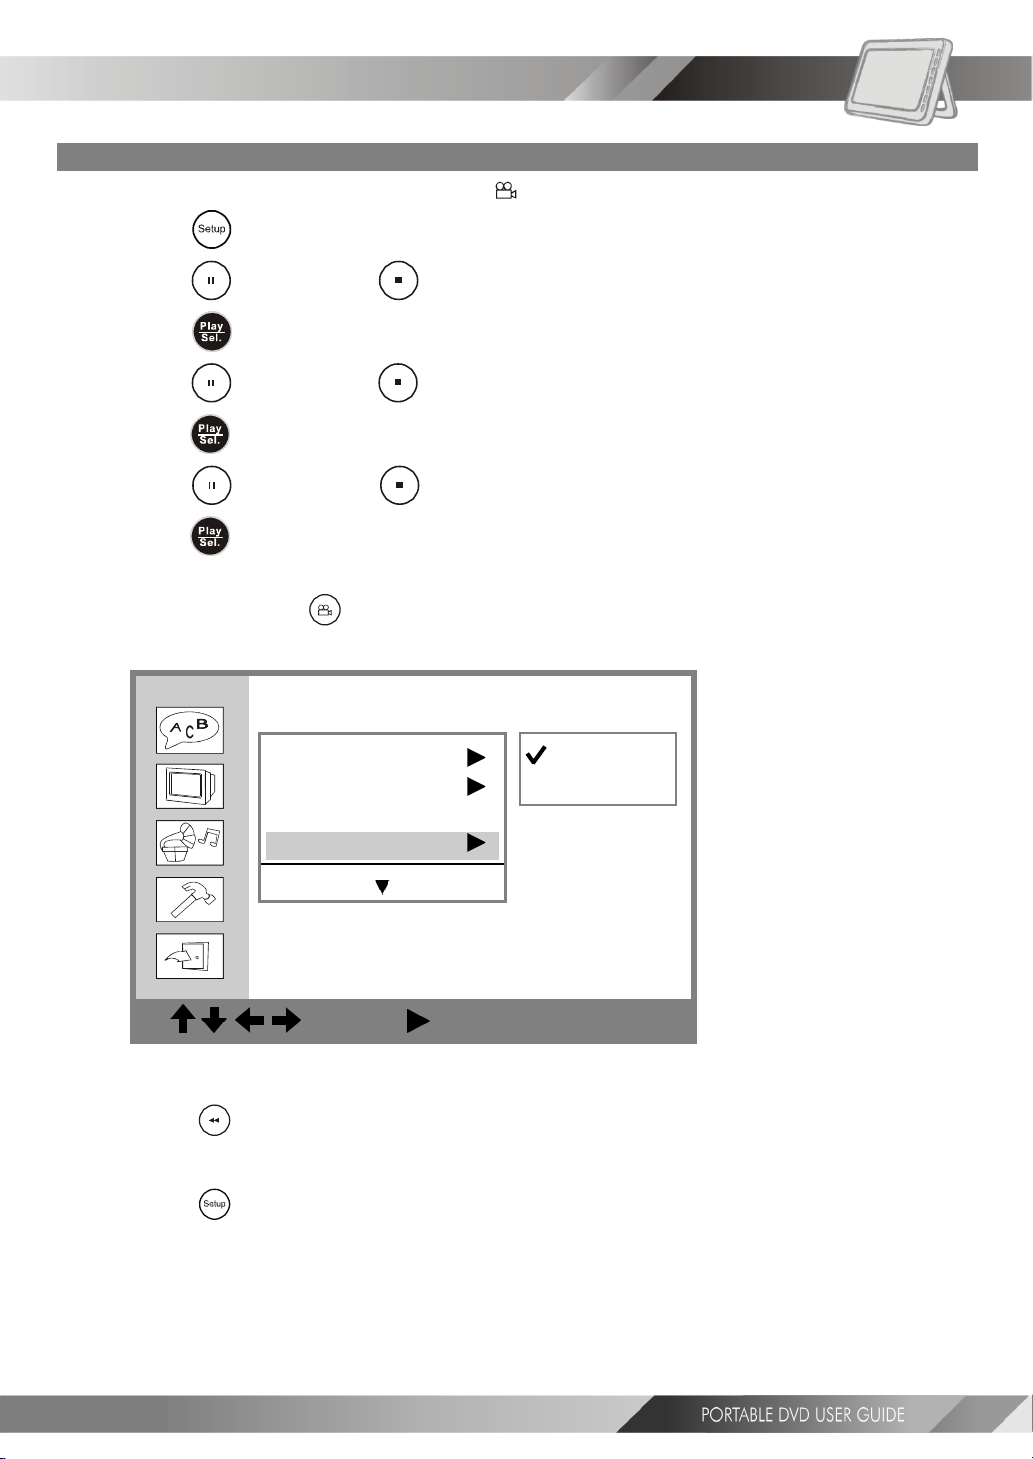
Angle Mark Setting [DVD]
You can choose to display or hide the angle mark “ ” on the screen.
1 Press <SETUP> in the stop mode.
2 Press <UP> button / <DOWN> button to select “Custom Setup”, and then
press <PLAY/SEL.>.
3 Press <UP> button / <DOWN> button to select “Angle Mark”, and then
press
<PLAY/SEL.>.
4 Press <UP> button / <DOWN> button to select “On” or “Off ”, and then
press <PLAY/SEL.>.
<< NOTE >>
Pressing the <ANGLE> button will change camera angles for movies that support this
feature regardless of whether the ANGLE MARK feature is "On" or "Off".
Custom Setup
MMC/SD
Parental Ctrl
Password ...
Angle Mark
On
Off
: Move : Select SETUP: Quit
*To return to the SETUP MENU screen
---Press
*To finish the setup operation
---Press
<LEFT> button.
<SETUP> to exit or select EXIT from SETUP MENU screen.
37
Page 38
SetupSetup
Setup
SetupSetup
4-4 Custom Setup-continued
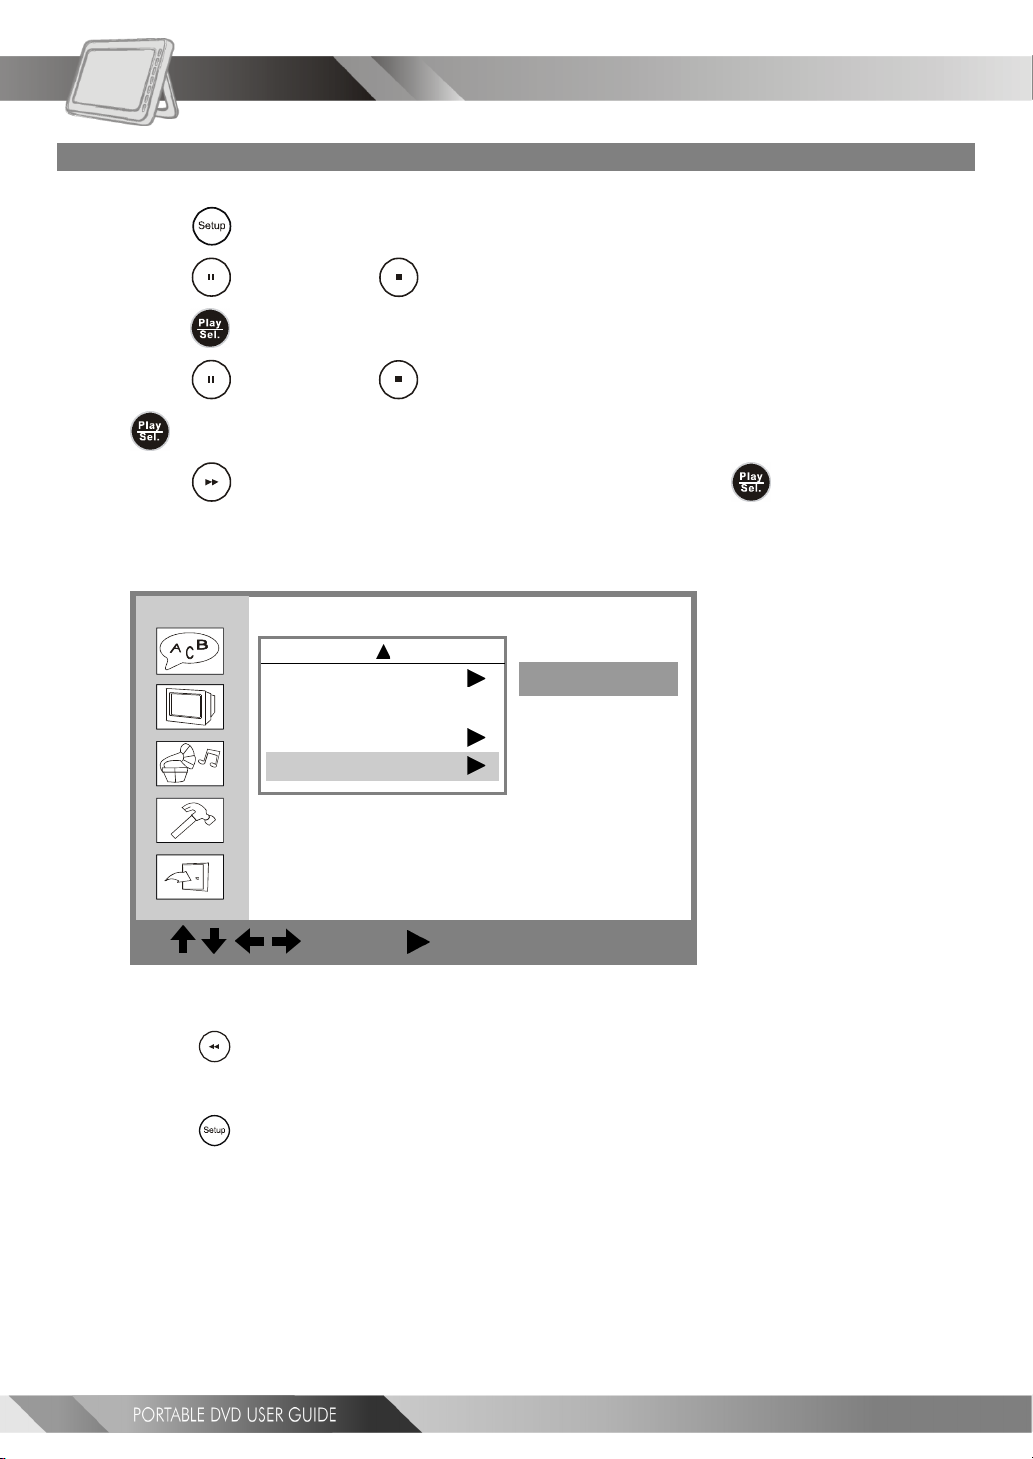
Default Setting
You may re-set the previous settings in CUSTOM SETUP to the default setting.
1 Press <SETUP> in the stop mode.
2 Press <UP> button / <DOWN> button to select “Custom Setup”, and then
press
<PLAY/SEL.>.
3 Press <UP> button / <DOWN> button to select “Default”, and then press
<PLAY/SEL.>.
4 Press <RIGHT> button to select “Read”, and then press <PLAY/SEL.>.
<< EXCEPTION>>
The viewer rating and the password setting will NOT be changed even though you re-set
to the default setting.
Custom Setup
Parental Ctrl
Password ...
Angle Mark
Default
Read
38
: Move : Select SETUP: Quit
*To return to the SETUP MENU screen
---Press
*To finish the setup operation
---Press
<LEFT> button.
<SETUP> to exit or select EXIT from SETUP MENU screen.
Page 39
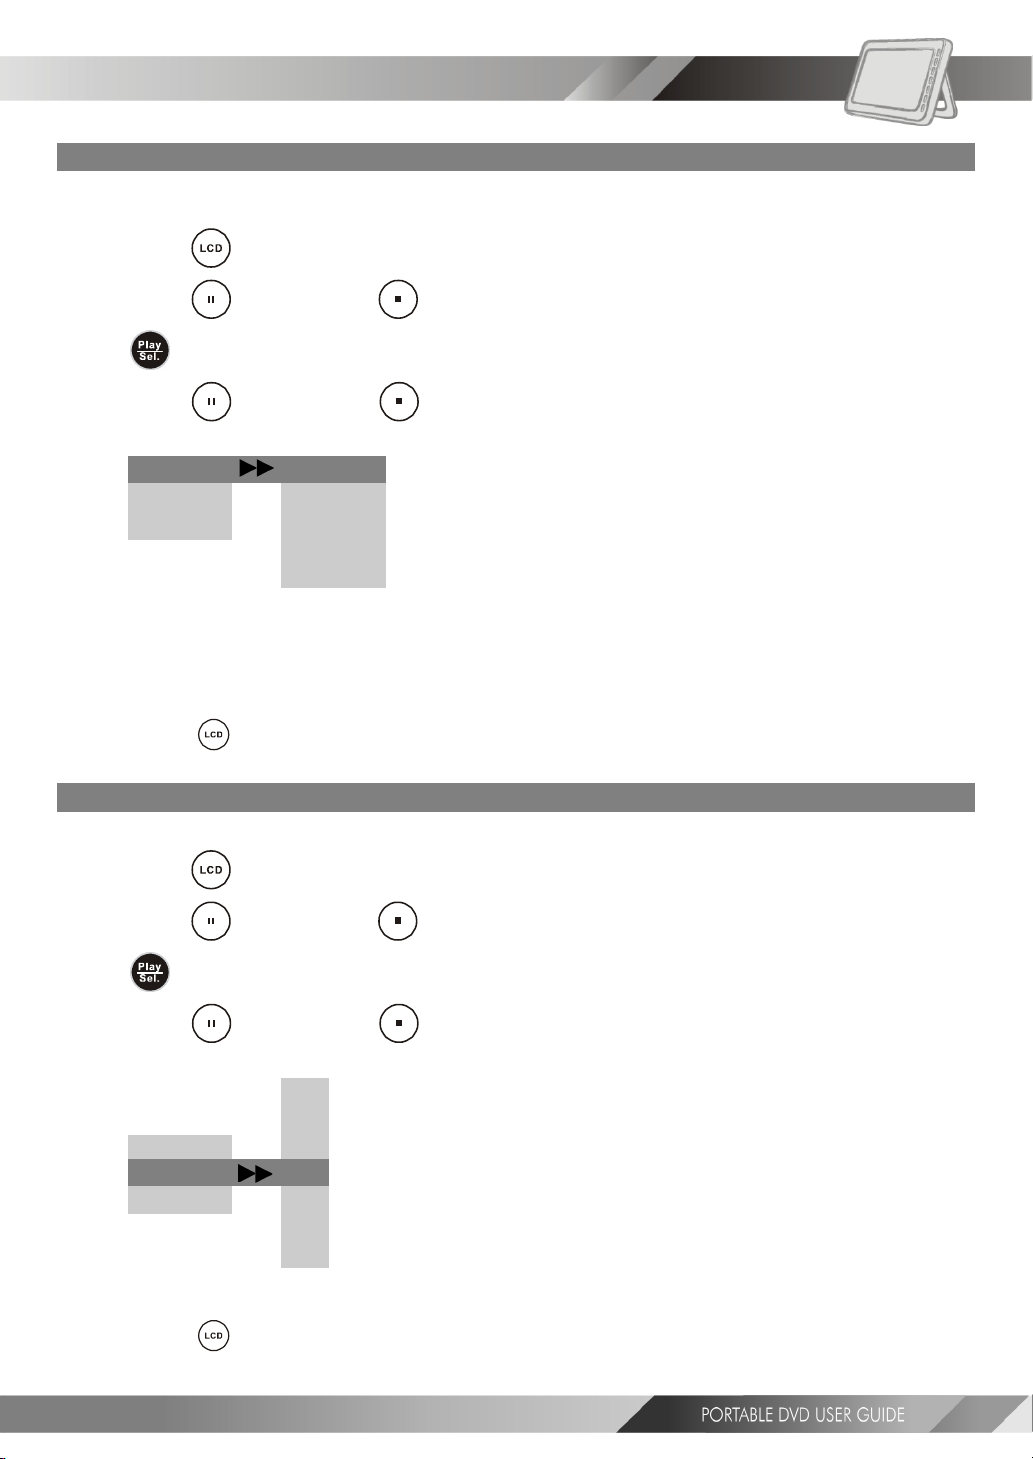
4-5 LCD Setup
Panel Setting
The portable DVD player provides five panel adjustment options: “Normal”, “16:9”, “4:3”, “Zoom” or
“Close”.
SetupSetup
Setup
SetupSetup
1 Press <LCD>, the LCD setting box show on the screen.
2 Press <UP> button / <DOWN> button to select “Panel”, and then press
<PLAY/SEL.>.
3 Press <UP> button / <DOWN> button to choose the preferred panel
setting. The panel will change to the selected setting.
Panel Panel
Panel
Panel Panel
ColorColor
Color
ColorColor
BrightBright
Bright
BrightBright
<< NOTE>>
When you choose “Zoom” in the panel setting, the up and down edges are cut off.
When you choose “Close” in the panel setting, the LCD turns off and the power indicator will
*To finish setup operation
---Press
Color Setting
blink in yellow light.
NorNor
malmal
Nor
mal
NorNor
malmal
16:916:9
16:9
16:916:9
4:34:3
4:3
4:34:3
ZoomZoom
Zoom
ZoomZoom
CloseClose
Close
CloseClose
<LCD> again until the LCD setting box disappears.
1 Press <LCD>, the LCD setting box show on the screen.
2 Press <UP> button / <DOWN> button to select “Color”, and then press
<PLAY/SEL.>.
3 Press <UP> button / <DOWN> button to choose the preferred color
setting. The panel will change to the selected setting.
+3+3
+3
+3+3
+2+2
+2
+2+2
PanelPanel
Panel
PanelPanel
Color Color
Color
Color Color
BrightBright
Bright
BrightBright
*To finish setup operation
---Press
+1+1
+1
+1+1
0 0
0
0 0
--
11
-
1
--
11
--
22
-
2
--
22
--
33
-
3
--
33
<LCD> again until the LCD setting box disappears.
39
Page 40
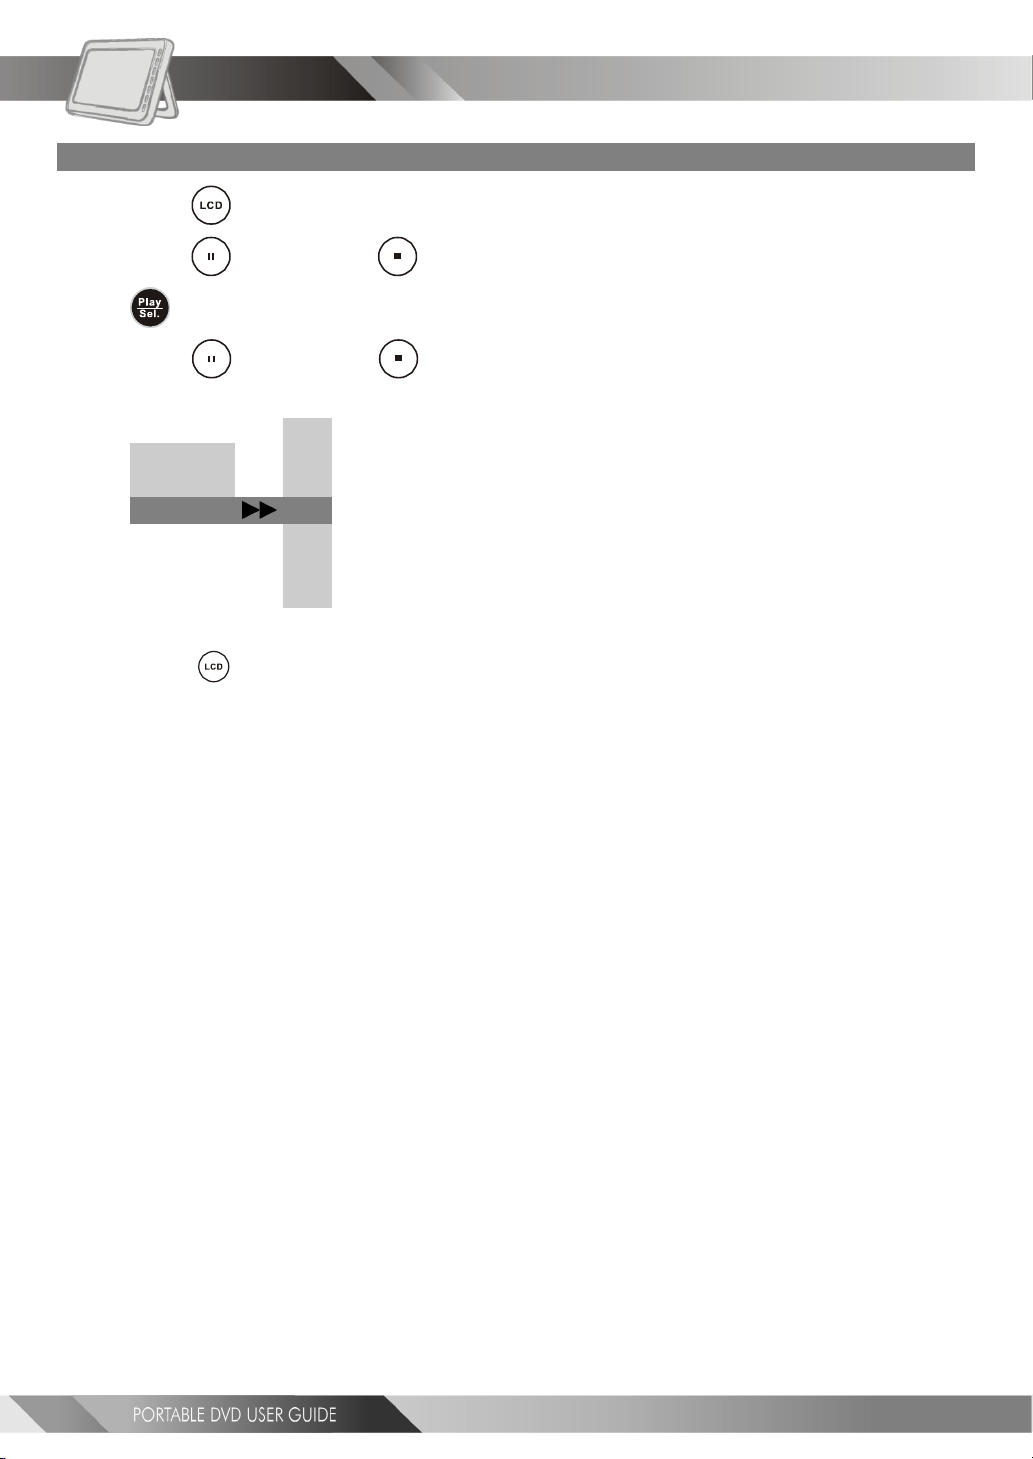
4-5 LCD Setup-continued
Bright Setting
SetupSetup
Setup
SetupSetup
1 Press <LCD>, the LCD setting box show on the screen.
2 Press <UP> button / <DOWN> button to select “Bright”, and then press
<PLAY/SEL.>.
3 Press <UP> button / <DOWN> button to choose the preferred bright
setting. The panel will change to the selected setting.
+3+3
+3
+3+3
PanelPanel
Panel
PanelPanel
ColorColor
Color
ColorColor
Bright Bright
Bright
Bright Bright
*To finish setup operation
---Press
+2+2
+2
+2+2
+1+1
+1
+1+1
00
0
00
--
11
-
1
--
11
--
22
-
2
--
22
--
33
-
3
--
33
<LCD> again until the LCD setting box disappears.
40
Page 41
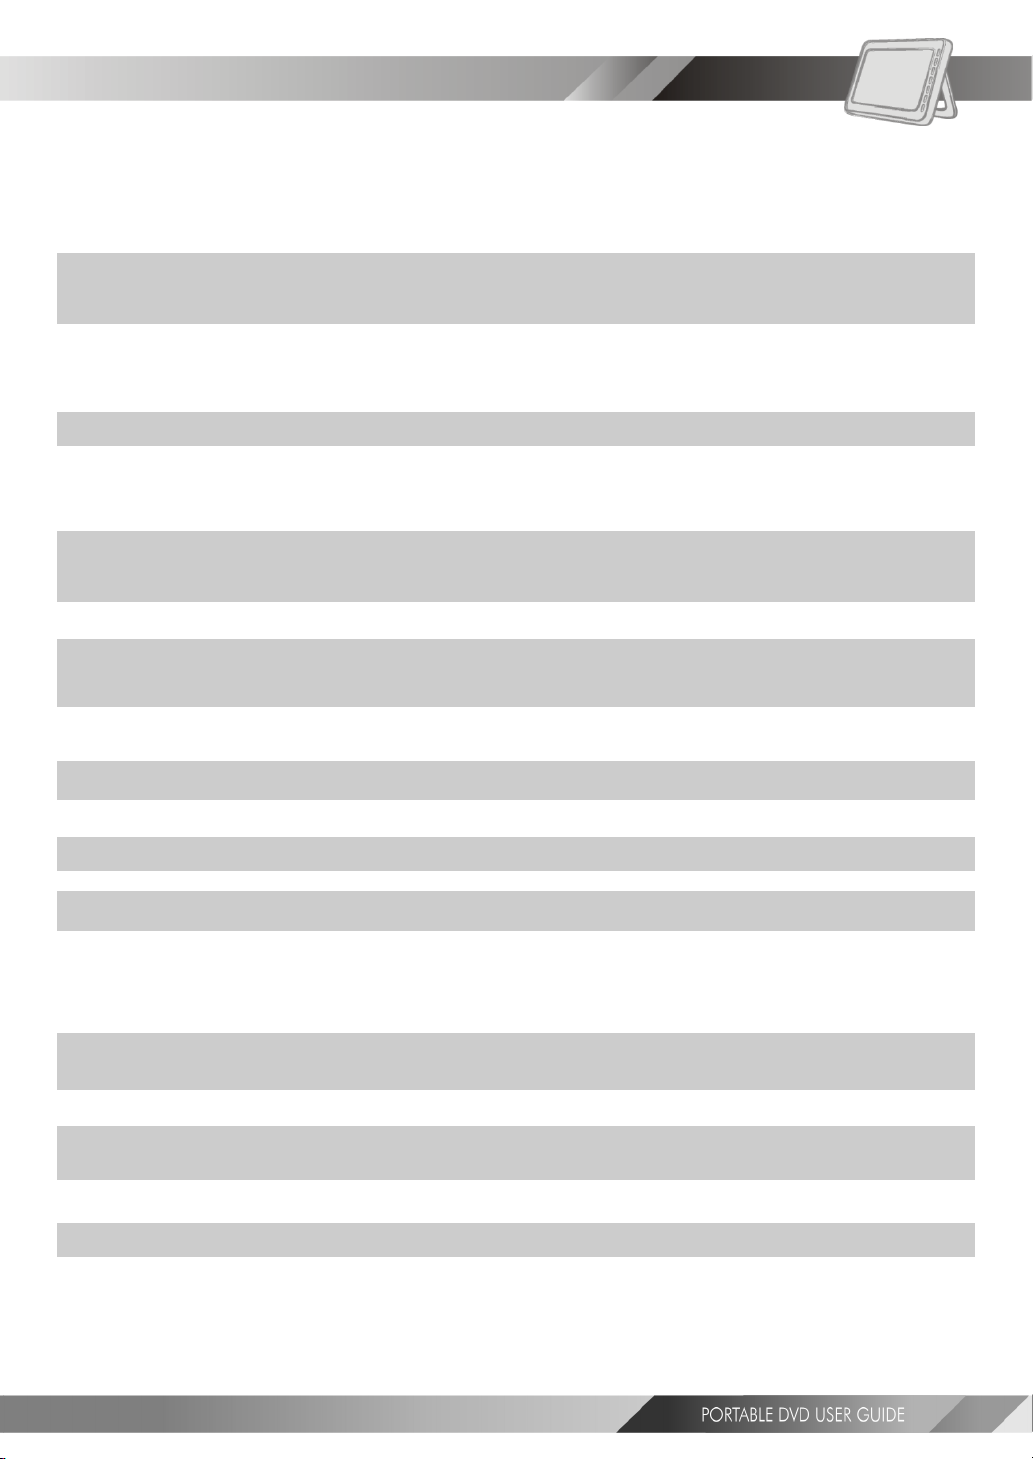
5-1 Troubleshooting
FF
or Yor Y
F
or Y
FF
or Yor Y
our Rour R
our R
our Rour R
eferenceeference
eference
eferenceeference
Before requesting service for your portable DVD player, check the chart below for a possible cause of the problem you
are experiencing. Some simple checkups or a minor adjustment on your part may eliminate the problem and restore
proper operation.
SYMPTOM (COMMON) REMEDY
No power. · Insert the power plug securely into the power outlet.
The player does not start playback · Condensation may have formed. Try again in 1 to 2 hours to ensure that the condensation
when PLAY is pressed. has evaporated.
The player starts playback but stops · The disc may be dirty and may require cleaning.
immediately. · Ensure that the disc is installed with the label side up.
No picture. · Ensure that the equipment is connected properly.
No sound. · Ensure that the equipment is connected properly.
Distorted sound. · Ensure that the input settings for the TV and stereo system are proper.
No audio at Digital Output. · Check the digital connections.
capabilities.
Distorted picture. · Check the disc for fingerprints and clean it with a soft cloth, wiping it from center
Completely distorted picture or no color · The disc format is not compatible to the TV-set used (PAL/NTSC).
in picture.
Picture is distorted during rapid · The picture will be somewhat distorted at times: this is normal.
advance or rapid reverse.
No rapid advance (or rapid reverse) · Some discs may have sections which prohibit rapid advance (or rapid reverse).
playback.
No 4:3 (16:9) picture. · Choose the correct setup “TV DISPLAY” item which matches the TV set used.
Picture is distorted during rapid · The picture will be somewhat distorted at times: this is normal.
advance or rapid reverse.
No operations perform with the · Check the batteries are installed with the correct polarity (+ and –).
remote control. · The batteries are depleted: replace them with new ones.
No key operation (by the DVD player · Turn the unit off and then back on. Alternatively, turn off the unit, disconnect the AC
power and/or the remote control) is cord and then re-connect it. (The player may not be operating properly due to
effective. lightning, static electricity or some other external factor.)
PLAY does not start playback even · This may be a result of the parental lock function that has been set.
when title is selected. Confirm the “PARENTAL” setup.
Audio soundtrack and/or subtitle · If the audio soundtrack and/or subtitle language does not exist on the disc, the
language is not the one selected language selected at the initial settings will not be seen/heard.
at the initial settings.
No subtitles. · Subtitles appear only with discs that contain them.
Alternative audio soundtrack · An alternative language can not be selected may result of no more than one language
(or subtitle) languages cannot be selected. available.
Angle cannot change. · This function depends on software availability. Even if a disc has a number of angles
recorded, these angles may be recorded for specific scenes only.
· Check if the ON/OFF button on the right of the player is set to on.
· Check if no power at the AC outlet may be the fault by plugging in another appliance for a
test.
· Ensure that the disc format is supported by your DVD player.
· Check if the disc is defective by trying another disc.
· Check the region (local) code.
· Ensure that the input setting for the TV is “Video”.
· Check if external equipment is on.
· Select the same channel and source on the TV as on the player.
· Check if the LCD is on.
· If using a HiFi amplifier, try another sound source.
· Check the Audio Output Setting menu to make sure that Analog Output is selected.
· Check the Volume Adjustment.
· No sound is heard during still picture (pause).
· Check the settings menu to make sure that the digital output is set to on.
· Check if the audio format of the selected audio language matches your receiver
to edge.
· Sometimes a small amount of picture distortion may appear. This is not a malfunction.
· Point the remote control unit at the remote control signal sensor and operate.
· Operate the remote control unit at a distance but no more than 6 meters from the
remote control signal sensor.
· Remove obstacles between the remote control unit and remote control signal sensor.
· Subtitles are hidden from the TV screen. Press SUBTITLE to display the subtitles.
41
Page 42
FF
or Yor Y
F
or Y
FF
or Yor Y
our Rour R
our R
our Rour R
eferenceeference
eference
eferenceeference
5-2 Disc Handling and Maintenance
Handling Precautions
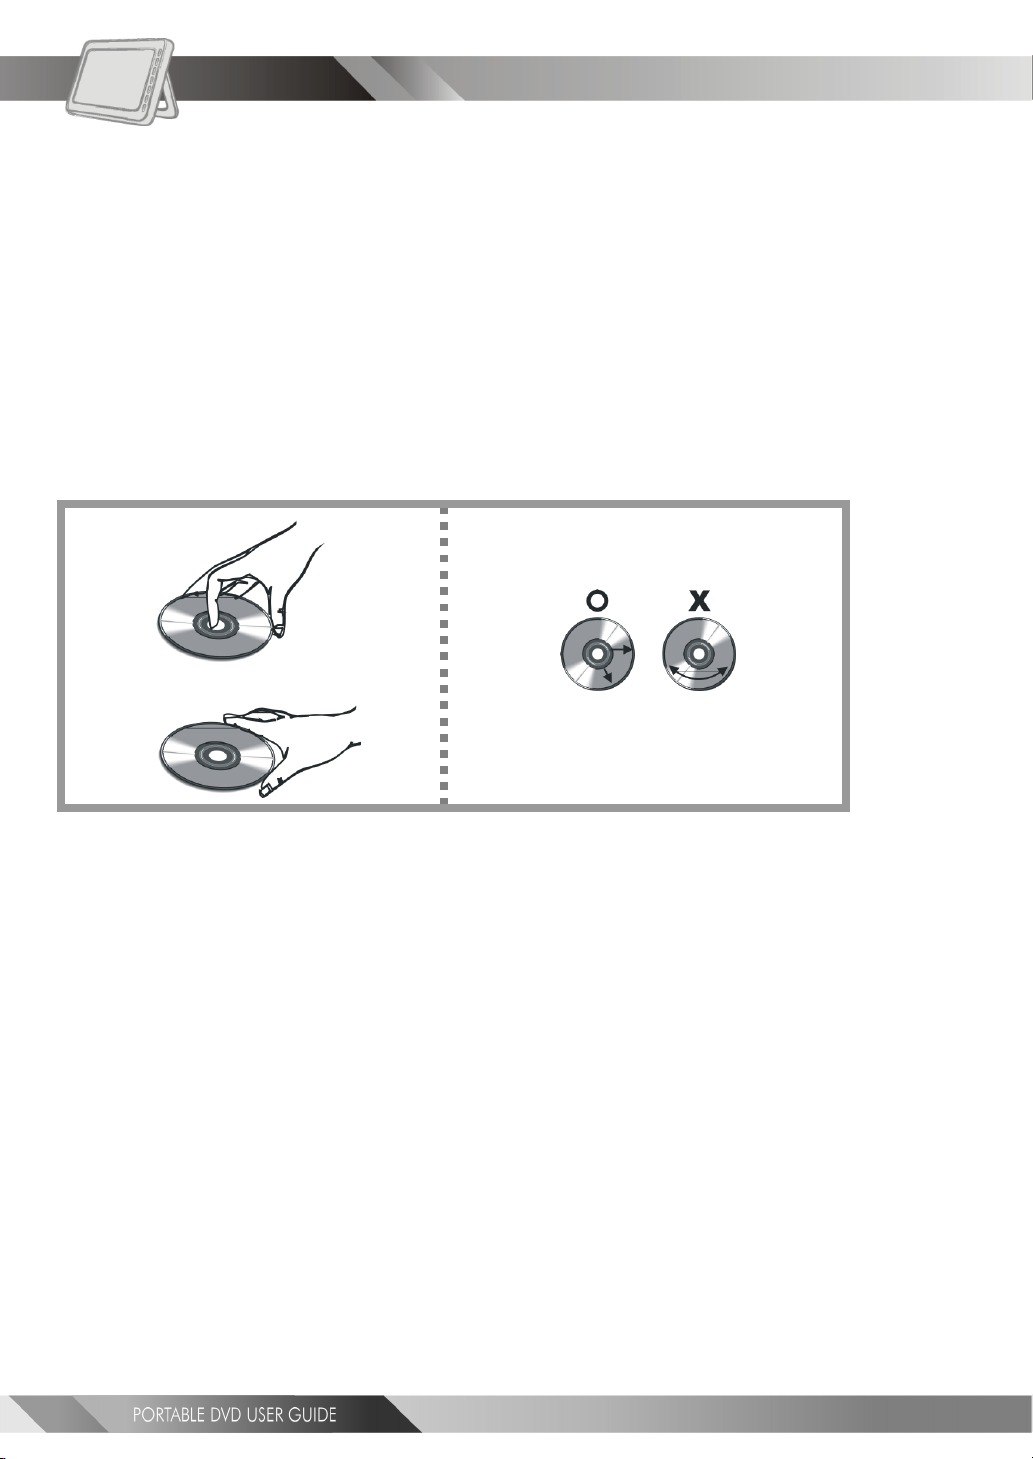
Hold the disc by the edges so the surface will not be soiled with fingerprints. (A)
Fingerprints, dirt and scratches can cause skipping and distortion.
Do not write on the label side with a ball-point pen or other writing utensils that can leave indentations or scratch
the surface of the disc.
Do not use record cleaning sprays, benzene, thinner, static electricity prevention liquids or any other solvent.
Be careful not to drop or bend the disc.
Do not install more than 1 disc on the disc tray.
Do not try to close the disc cover when the disc is not installed properly.
Be sure to store the disc in its exclusive case when not in use.
If the surface is soiled (B)
Wipe gently with a soft, damp (water only) cloth.
When wiping discs, always move the cloth from the center hole toward the outer edge.
(If you wipe the discs using a circular motion, circular scratches are likely to occur and may cause noise or skipping.)
(A) (B)
If the disc is brought from a cold to a warm environment, moisture may form on the disc
Wipe this moisture off with a soft, dry, lint-free cloth before using the disc.
Improper disc storage
You can damage discs if you store them in the following places:
Areas exposed to direct sunlight
Humid or dusty areas
Areas directly exposed to a heat outlet or heating appliance
Disc which cannot be played with this player
CD-ROM (Application Program)
CVD
CD-G
DVD with a Locale No. other than that shown on the DVD unit’s Region Code Label on the rear panel
Maintenance
Be sure to turn the unit off and disconnect the AC power cord before performing maintenance on the unit.
Wipe this unit with a dry soft cloth. If the surfaces are extremely dirty, wipe clean with a cloth which has been
dipped in a weak soap-and-water solution and wrung out thoroughly, and then wipe again with a dry cloth.
Never use alcohol, benzene, thinner, cleaning fluid or other chemicals. Do not use compressed air to remove dust.
42
Page 43

5-3 Definition of Terms
FF
or Yor Y
F
or Y
FF
or Yor Y
our Rour R
our R
our Rour R
eferenceeference
eference
eferenceeference
Angle
Recorded onto some DVD discs are scenes which have been simultaneously shot from a number of different angles (the same
scene is shot from the front, from the left side, from the right side, etc.). With such discs, the ANGLE button can be used
to view the scene from different angles.
Chapter Number
These numbers are recorded on DVD discs. A title is subdivided into many sections, each of which is numbered, and specific
parts of video presentations can be searched quickly using these numbers.
DVD
These refer to a high-density optical disc on which high-quality pictures and sound have been recorded by means of digital
signals. Incorporating a new video compression technology (MPEG II) and high-density recording technology, DVD enables
aesthetically pleasing full-motion video to be recorded over long periods of time (for instance, a whole movie can be
recorded).
DVD has a structure consisting of two 0.6 mm thin discs which are adhered to each other. Since the thinner the disc, the
higher the density at which the information can be recorded, a DVD disc has a greater capacity than a single 1.2 mm thick
disc. Since the two thin discs are adhered to each other, there is the potential to achieve double-sided play sometime in
the future for even longer duration play.
Subtitles
These are the printed lines appearing at the bottom of the screen which translate or transcribe the dialogue. They are
recorded on DVD discs.
Time Digit
This indicates the play time which has elapsed from the start of a disc or a title. It can be used to find a specific scene
quickly. (It may not work with some discs.)
Title Number
These numbers are recorded on DVD discs. When a disc contains two or more movies, these movies are numbered as title
1, title 2, etc.
Track Number
These numbers are assigned to the tracks which are recorded on audio CDs. They enable specific tracks to be located
quickly.
43
Page 44
Reproductor DVD portátil –Manual del usuario
Ajustes iniciales
1. Pulse el botón <SETUP>.
2. En pantalla aparece el menú CONFIGURACIÓN.
Español
3. Pulse las teclas <ARRIBA> <ABAJO> <IZDA.> <DCHA.> para
4. Pulse el botón
Para los ajustes:
Repita el procedimiento descrito arriba y véanse las instrucciones del OSD para
efectuar los ajustes siguientes.
Conf. Idioma
OSD
Menú
Audio
Subtítulo
: Move : Select SETUP: Quit
seleccionar la opción deseada.
<PLAY/SEL.>.
Conf. Idioma
OSD
Menú
Audio
Subtítulo
: Move : Select SETUP: Quit
Conf. Audio
Salida Digital
Salida Analógica
Conf. Pantalla
Tipo TV
Salvapantallas
Systema TV
Salida Video
: Move : Select SETUP: Quit
Conf. Personalizada
MMC/SD
Ctrl Paterno
Contraseña
Marca Ángulo
Predt.
: Move : Select SETUP: Quit
: Move : Select SETUP: Quit
44
Page 45
Esquema del menú Configuración
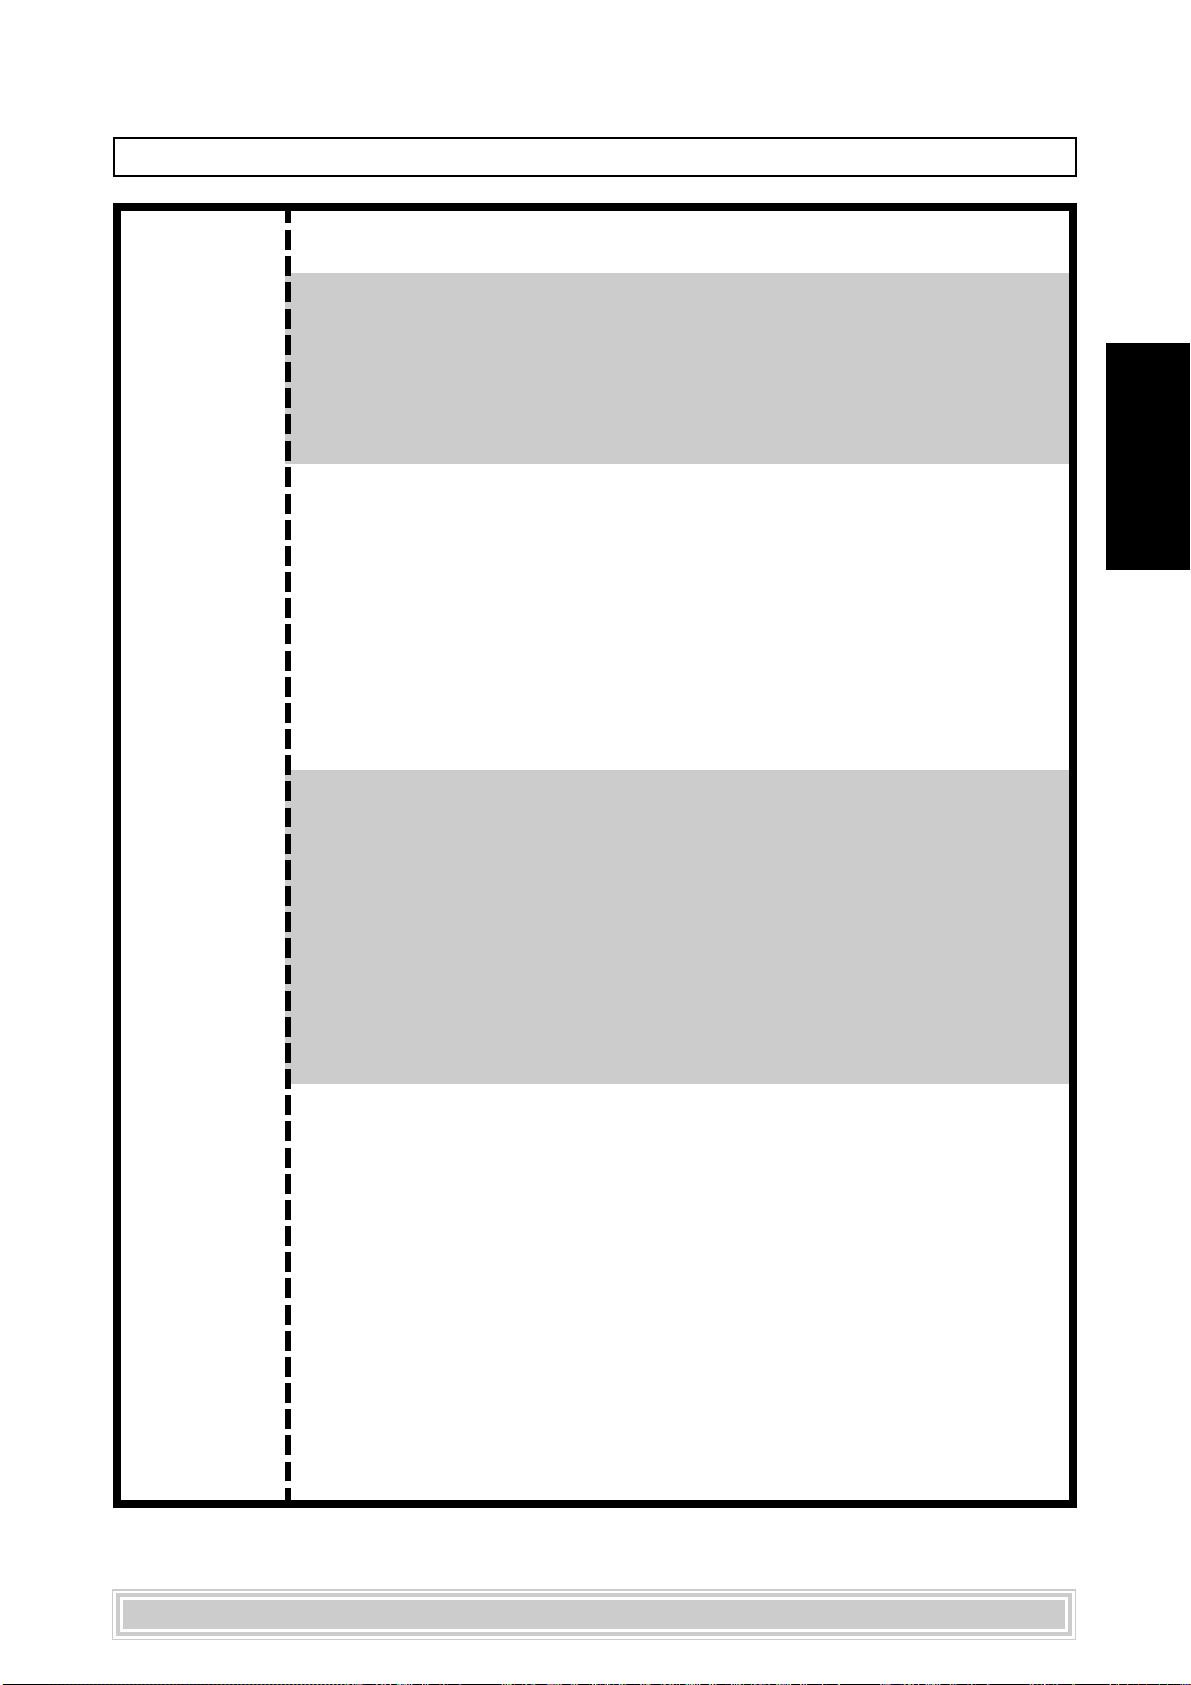
Idioma (Las opciones de idioma sólo se dan como referencia. Para la
información adecuada, véase el reproductor DVD portátil.)
OSD
Menú Inglés
Audio Inglés
Subtítulo Inglés
Inglés
Francés
Alemán
Italiano
Español
Portugués
Chino
Japonés
Francés
Alemán
Italiano
Español
Portugués
...
Otros
Chino
Japonés
Francés
Alemán
Italiano
Español
Portugués
...
Otros
Chino
Japonés
Francés
Alemán
Italiano
Español
Portugués
...
Otros
Off
Español
45
Page 46
Esquema del menú Configuración - continuación
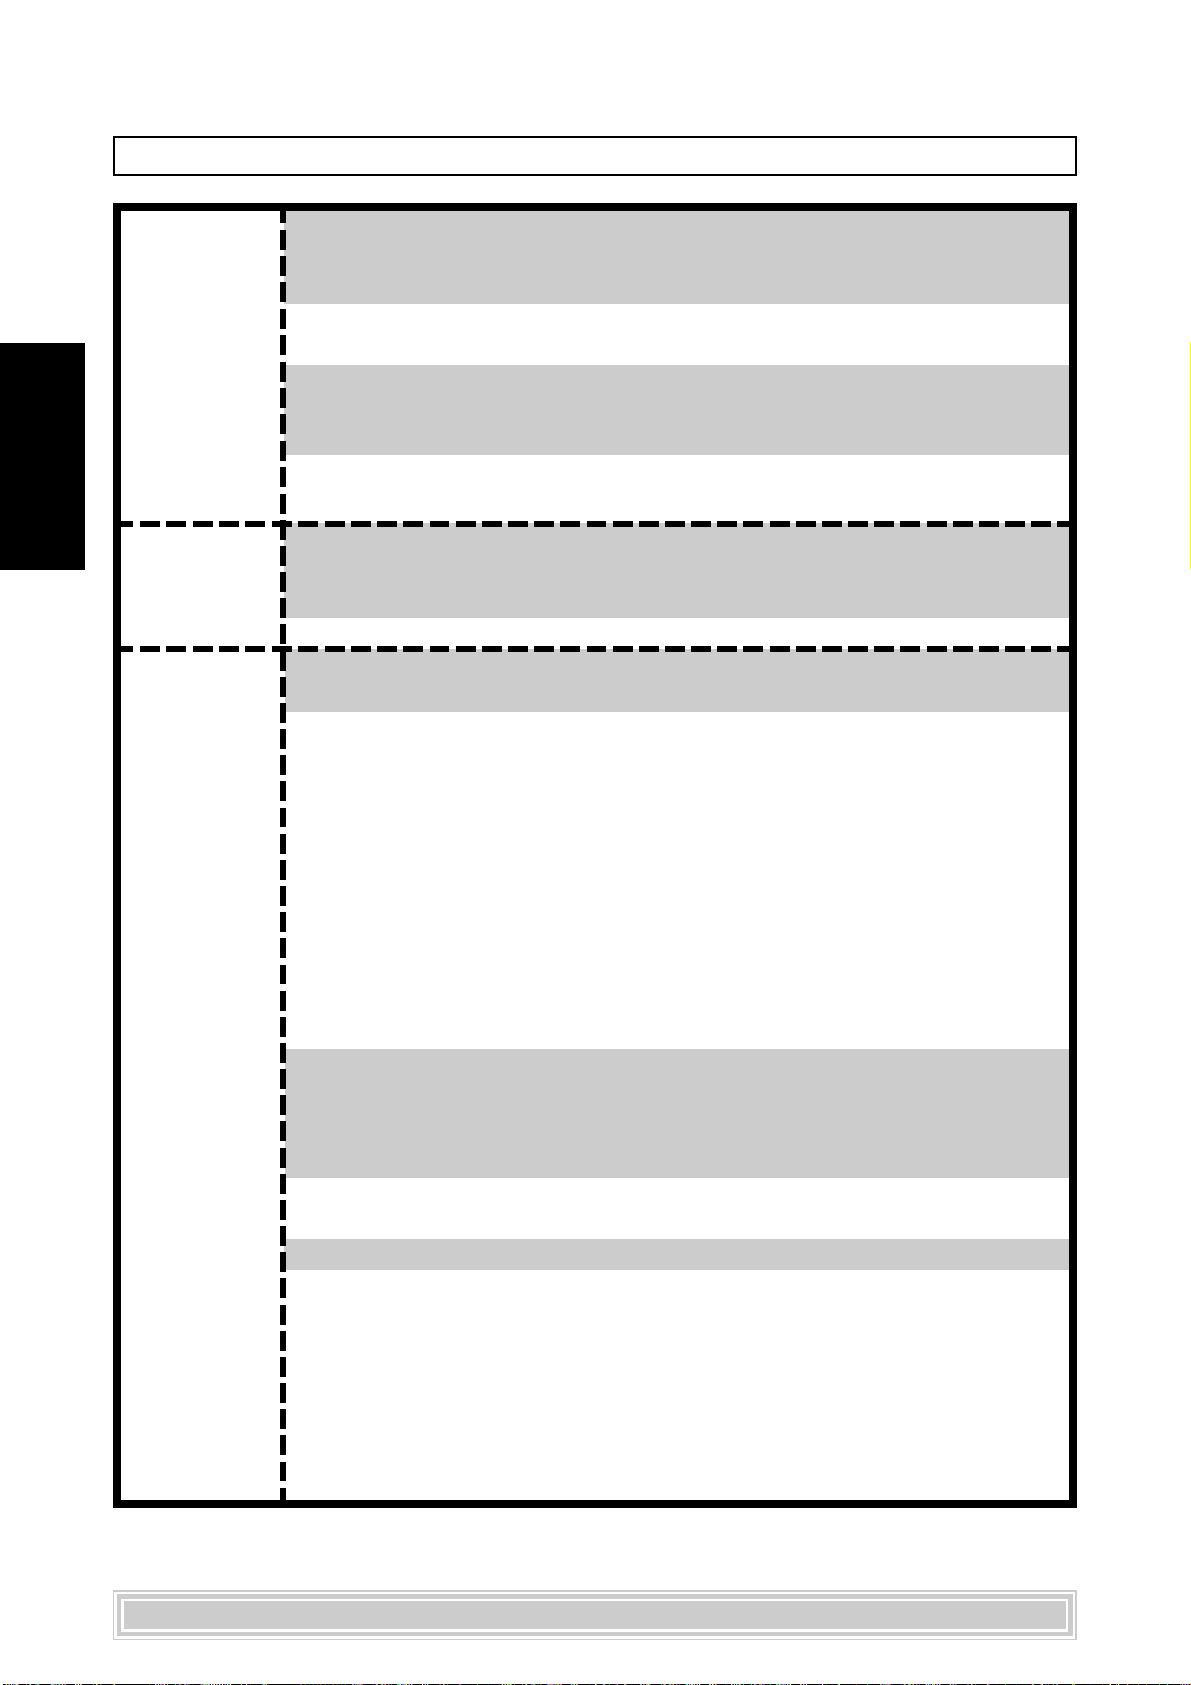
Pantalla Tipo TV 4:3 PS
Español
Audio Salida Digital SPDIF/PCM
Personalizada
4:3 LB
16:9
Salvapantallas On (Activado)
(Tiempo de espera para el protector de pantalla: 10 minutos)
Off (Desactivado)
Systema TV NTSC
PAL
Auto
Salida Video S-Video
P-SCAN (véase figura 1-1)
SPDIF/RAW
Off (Desactivado)
Salida Analógica Canal 2
MMC/SD On (Activado)
Off (Desactivado) (ver figura1-2)
Ctrl Paterno (Antes de poder cambiar el nivel, debe escribir
una contraseña de 4 dígitos.
Contraseña predeterminada: 0000)
1.
2.
3. PG (ver la NOTA siguiente)
4. PG13 (ver la NOTA siguiente)
5.
6. R (ver la NOTA siguiente)
7. NC-17 (ver la NOTA siguiente)
8.
Contraseña Indique la contraseña (Contraseña
predeterminada: 0000)
Indique la NUEVA contraseña
Indique la contraseña otra vez
Marca Ángulo On (Activado)
Off (Desactivado)
Predt. Leer
NOTA:
1. PG: se recomienda el acompañamiento por parte de los padres.
2. PG-13: el contenido no es apto para menores de 13 años.
3. R: acompañamiento de los padres – restringido; se recomienda
que los padres no dejen que los niños menores de 17 años vean
el contenido o que éstos al menos sean supervisados por los
padres o una persona adulta.
4. NC-17: No apto para menores de 17 años.
46
Page 47
Esquema del menú Configuración - continuación
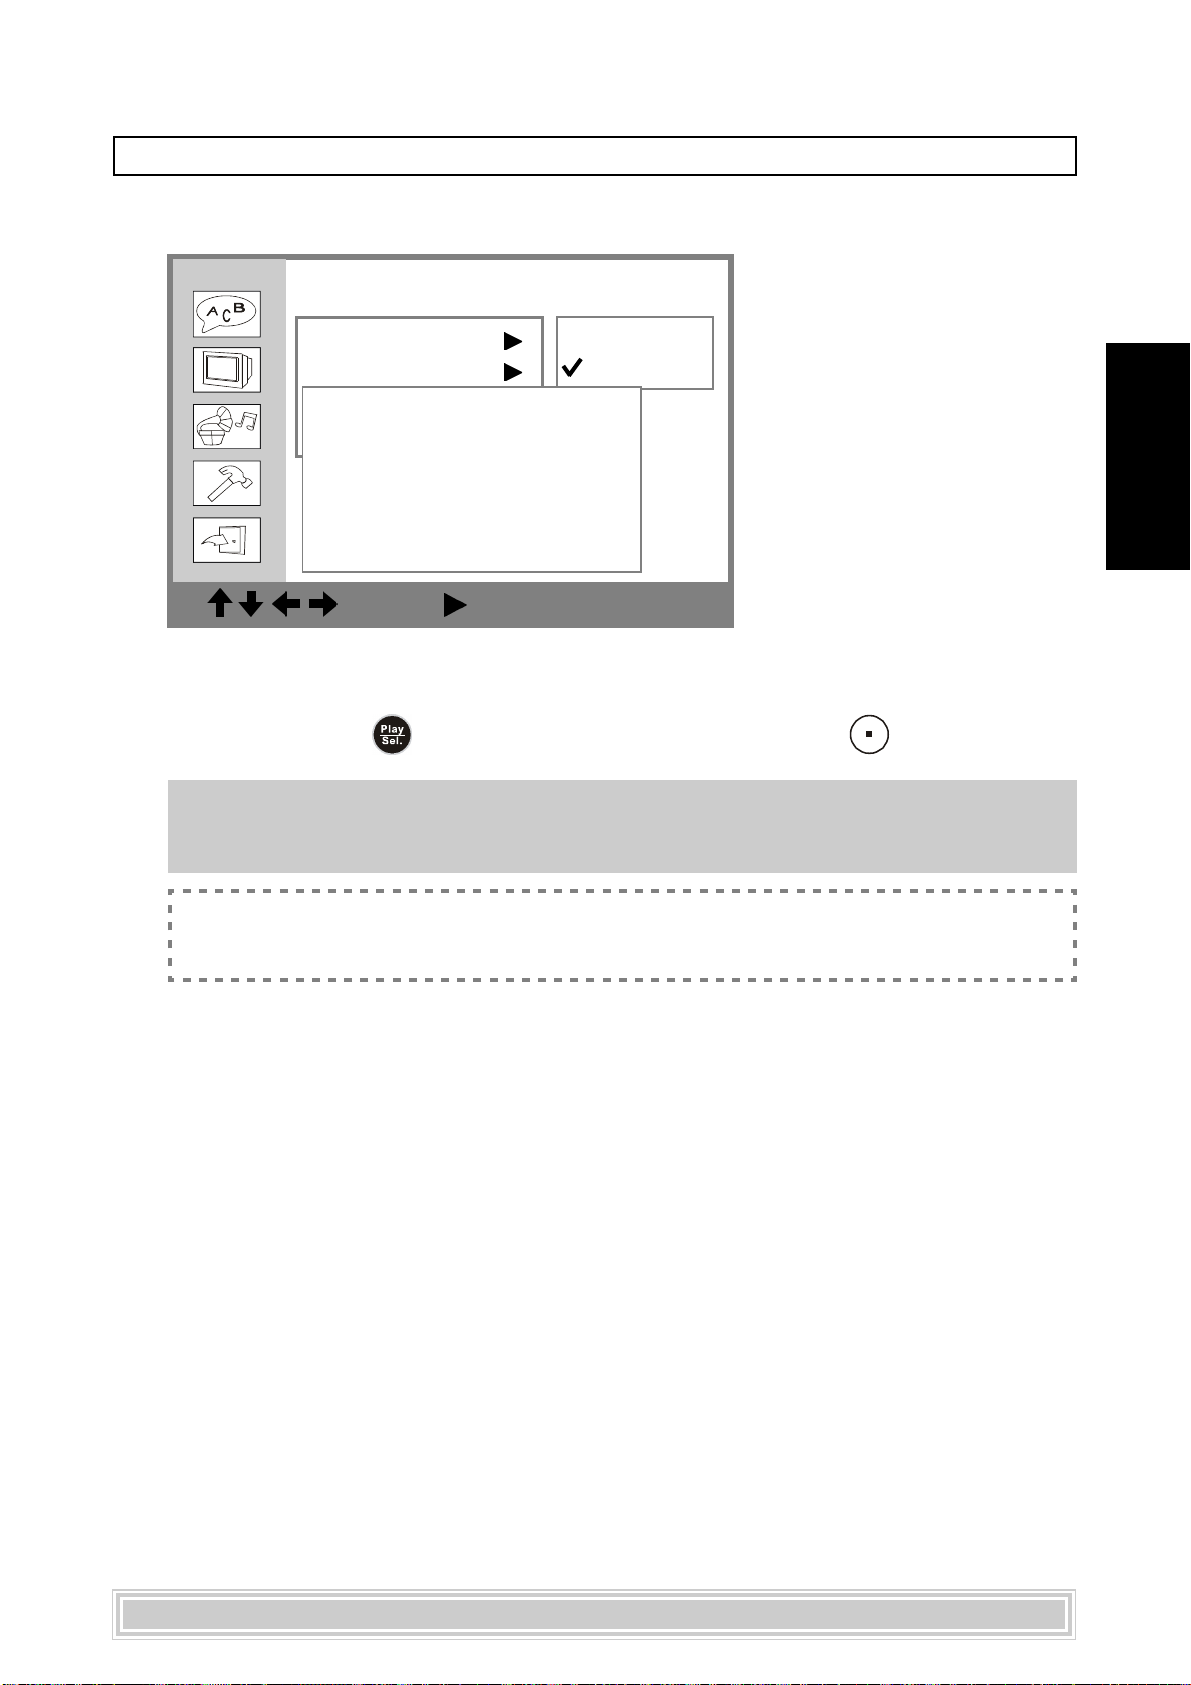
FIGURA 1-1
Conf. Pantalla
Tipo TV
Salvapantallas
TV System
Please make sure your
Video Output
TV support P-Scan
Continue Press PLAY
Stop Press STOP
4
S-Video
P-SCAN
: Move : Select SETUP: Quit
Si selecciona la opción “P-SCAN” (Barrido progresivo), los datos anteriores se
mostrarán en pantalla como recordatorio. Si su televisor admite el barrido
progresivo, pulse <PLAY/SEL.>. De lo contrario, pulse <STOP>.
Nota: Si selecciona “P-SCAN” (Barrido progresivo) para la señal de vídeo, asegúrese de
que su televisor admite esta norma y de que tiene el cable YUV correctamente
conectado al televisor y al reproductor DVD portátil.
<<Resolución de problemas>>
Si desaparece la imagen durante la operación...
Solución: Pulse el botón <MODE> para cambiar al modo de “S-Video”.
Español
47
Page 48
Esquema del menú Configuración - continuación
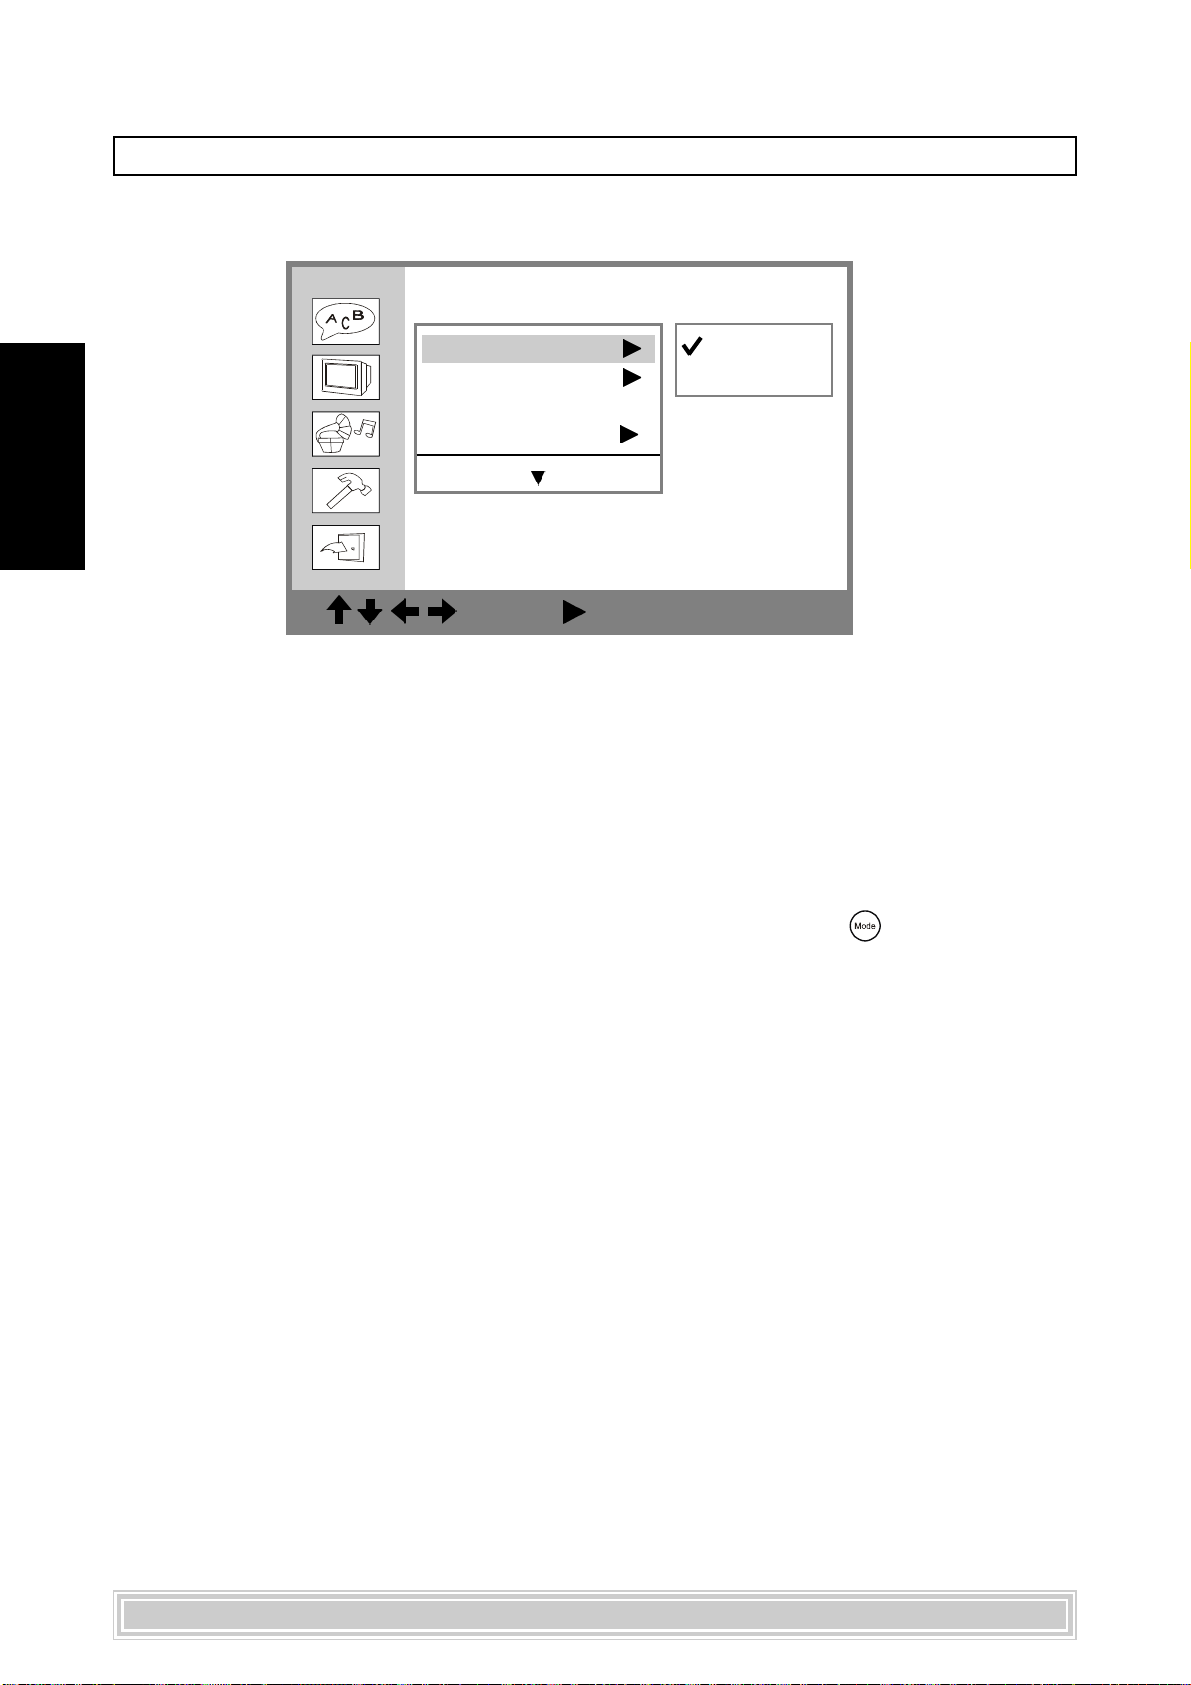
FIGURA 1-2
Conf. Personalizada
Español
<< Nota >>
Sólo puede activar o desactivar el ajuste MMC/SD si no hay ningún disco insertado en
el reproductor de DVD.
<< Importante >>
Si activa la opción «MMC/SD», el reproductor de DVD portátil sólo podrá leer
tarjetas MMC/SD, eso es, no podrá reproducir ningún disco.
Durante la reproducción del disco, sólo puede pulsar el botón <Mode> para
pasar al modo MMC/SD.
MMC/SD
Ctrl Paterno
Contraseña ...
Marca Ángulo
On (Activado)
Of f (Desactivado)
: Move : Select SETUP: Quit
48
Page 49
Preparación
Conecte la batería o conecte el reproductor de DVD a una toma eléctrica. Si lo conecta a
equipos externos, haga lo siguiente:
Encienda su televisor y seleccione “Vídeo” como entrada de señal de TV.
Encienda su sistema de alta fidelidad si el reproductor está conectado a un sistema alta
fidelidad.
Coloque el conmutador AV OUT/IN en la posición AV OUT.
Reproducción básica
1. Pulse el botón <POWER>.
2. Para abrir la bandeja, pulse el botón
3. Coja el disco por el borde y colóquelo con cuidado en la bandeja con la
cara impresa hacia arriba.
4. Cierre la tapa de discos.
Cierre la bandeja de disco. El reproductor de DVD inicia la reproducción si el
disco no tiene ningún menú grabado en él.
Si el disco tiene uno o más títulos grabados en él, aparecerá un menú en la
pantalla.
5. Pulse <ARRIBA> <ABAJO> <IZDA.> <DCHA.> o las teclas
numéricas para seleccionar su título favorito.
Nota: Para seleccionar un título, teclee el número, p.ej. 1 para el capítulo
1, 10 para el capítulo 10, etc.
<OPEN><OPEN>
<OPEN>.
<OPEN><OPEN>
Español
6. Pulse el botón <PLAY/SEL.>.
El reproductor DVD portátil inicia ahora la reproducción del elemento
seleccionado.
Detener la reproducción
Pulse <STOP> una vez para detener la reproducción temporalmente. Pulse
<STOP> dos veces para detenerla definitivamente.
Avance y Rebobinado rápido
Pulse el botón <F.BWD> o <F.FWD> durante la reproducción.
La reproducción normal se reanudará cuando pulse el botón <PLAY/SEL.>.
La velocidad de avance o rebobinado rápido cambia cada vez que se pulsa el botón
<F.BWD> o <F.FWD>.
49
Page 50
Saltar capítulos (hacia adelante o hacia atrás)
Saltar hacia adelante
Pulse el botón <SIGUIENTE> durante la reproducción.
Salta un capítulo cada vez que pulsa el botón.
Español
Saltar hacia atrás
Pulse el botón
Salta un capítulo cada vez que pulsa el botón.
<ANTERIOR> durante la reproducción.
PAUSA
Pulse una vez el botón
La pantalla se detiene en modo de pausa.
*Para reanudar la reproducción normal
---Pulse el botón <PLAY/SEL.>.
<PAUSE> durante la reproducción.
Repetir la reproducción
Pulse el botón <1/ALL REPEAT> durante la reproducción.
Cada vez que presiona el botón, el disco repite un capítulo o un título.
Si lo pulsa 1 vez: capítulo (Repetición capítulo)
Si lo pulsa 2 veces: título (Repetición título)
Si lo pulsa 3 veces: disco (Repetición disco)
Si lo pulsa 4 veces: off (Repetición apagada)
*Para reanudar la reproducción normal
---Pulse el botón <1/ALL REPEAT> varias veces hasta que aparezca
la indicación “ off” ( apagada).
50
Page 51
Visualización en pantalla de la información sobre la escena
Pulse el botón <INFO.> varias veces hasta que aparezcan el número de
título, número de capítulo y otros datos en pantalla.
*Para dejar de mostrar la información sobre la escena
---Pulse <INFO.> repetidamente hasta que desaparezca la
información.
Seleccionar el idioma de la pista de audio
Puede cambiar el idioma de la pista de audio del disco si dicha opción está disponible
en su disco. Para seleccionar el idioma:
Español
1. Pulse el botón
2. Pulse varias veces el botón
esté seleccionado.
Nota: Si después de haber pulsado varias veces el botón, el idioma no
aparece todavía, puede que no esté disponible en el disco.
<AUDIO> durante la reproducción.
<AUDIO>
hasta que el idioma favorito
Seleccionar el idioma para subtítulos
Puede cambiar el idioma de los subtítulos si dicha opción está disponible en su disco.
Para seleccionar el idioma:
1. Pulse el botón
2. Pulse varias veces el botón
favorito esté seleccionado.
<SUBTITLE> durante la reproducción.
<SUBTITLE>
hasta que el idioma
Nota: Si no queda seleccionado el idioma deseado, es posible que éste no
esté disponible en el disco.
51
Page 52
Función de silencio
Pulse el botón <MUTE> durante la reproducción.
Español
Seleccionar ángulos de perspectiva
Con ciertos discos, se pueden visualizar las mismas escenas desde puntos de vista
diferentes.
Nota: Cuando en pantalla aparezca el mensaje “Silencio”, el reproductor
DVD portátil no emite ningún sonido.
*Para restablecer el sonido
---Pulse de nuevo el botón <MUTE> hasta que aparezca en pantalla el
mensaje “Silencio OFF”.
1. Pulse el botón
2. Pulse varias veces el botón
<ANGLE> durante la reproducción.
<ANGLE> hasta que la perspectiva
deseada esté seleccionada.
Nota: Esta función sólo está disponible en los discos que disponen de varios
ángulos grabados. Si la función no está disponible, aparece el icono
de error “ ”.
Ajustes del panel LCD
Este reproductor DVD portátil permite cinco ajustes para el panel de visualización:
“Normal”, “16:9”, “4:3”, “Zoom” o “Close” (Cerrar).
1. Pulse el botón
LCD.
2. Pulse los botones
<LCD>. Se mostrará la información sobre los ajustes
<ARRIBA> / <ABAJO> para seleccionar
“Panel” y pulse
3. Pulse los botones
ajuste de panel deseado.
Panel Panel
Panel
Panel Panel
ColorColor
Color
ColorColor
BrightBright
Bright
BrightBright
NorNor
Nor
NorNor
16:916:9
16:9
16:916:9
4:34:3
4:3
4:34:3
ZoomZoom
Zoom
ZoomZoom
CloseClose
Close
CloseClose
<PLAY/SEL.>.
<ARRIBA> / <ABAJO> para seleccionar el
malmal
mal
malmal
52
Page 53
Ajustes del panel LCD - continuación
<<<<
<< Nota
<<<<
Si utiliza el Zoom con el ajuste del panel, los bordes superior e
Si selecciona “Close” (Cerrar) para el ajuste del panel, la pantalla
*Salir de las operaciones de configuración
---Pulse el botón <LCD> nuevamente hasta que la información sobre
los ajustes LCD desaparezca.
>>>>
>>
>>>>
inferior aparecen cortados.
LCD se apagará y el indicador de alimentación parpadeará de
amarillo.
Ajustes de color del LCD
Puede ajustar el color de vídeo para obtener una representación más agradable para
sus ojos.
Español
1. Pulse el botón
LCD.
2. Pulse los botones
“Color” y pulse
3. Pulse los botones
ajuste de panel deseado.
+3+3
+3
+3+3
+2+2
+2
+2+2
PanelPanel
Panel
PanelPanel
Color Color
Color
Color Color
BrightBright
Bright
BrightBright
*Salir de las operaciones de configuración
---Pulse el botón <LCD> nuevamente hasta que la información sobre
los ajustes LCD desaparezca.
+1+1
+1
+1+1
0 0
0
0 0
--
11
-
1
--
11
--
22
-
2
--
22
--
33
-
3
--
33
<LCD>. Se mostrará la información sobre los ajustes
<ARRIBA> / <ABAJO> para seleccionar
<PLAY/SEL.>.
<ARRIBA> / <ABAJO> para seleccionar el
53
Page 54
Ajustes de brillo del LCD
Puede aumentar o reducir el brillo de la imagen de vídeo manualmente.
1. Pulse el botón
Español
2. Pulse los botones
3. Pulse los botones
<LCD>. Se mostrará la información sobre los ajustes
LCD.
<ARRIBA> / <ABAJO> para seleccionar
“Bright” (Brillo) y pulse
<PLAY/SEL.>.
<ARRIBA> / <ABAJO> para seleccionar el
ajuste de brillo deseado.
+3+3
+3
+3+3
PanelPanel
Panel
PanelPanel
ColorColor
Color
ColorColor
Bright Bright
Bright
Bright Bright
*Salir de las operaciones de configuración
---Pulse el botón <LCD> nuevamente hasta que la información sobre
los ajustes LCD desaparezca.
+2+2
+2
+2+2
+1+1
+1
+1+1
00
0
00
--
11
-
1
--
11
--
22
-
2
--
22
--
33
-
3
--
33
Reproducción de CDs de imágenes de Kodak y CDs de
imágenes JPEG
Puede reproducir CDs de imágenes de Kodak o imágenes JPEG para visualizarlas en
pantalla.
Inserte un CD de imágenes Kodak o JPEG. Al cabo de unos instantes,
automáticamente se iniciará una representación de diapositivas del contenido del CD.
O
Pulse los botones numéricos correspondientes al número de la imagen y pulse
<PLA<PLA
<PLA
<PLA<PLA
Y/SEL.>Y/SEL.>
Y/SEL.>.
Y/SEL.>Y/SEL.>
*Para detener la reproducción temporalmente/completamente
---Pulse <PAUSE> para detener la reproducción temporalmente;
pulse <STOP> para detenerla por completo.
54
Page 55
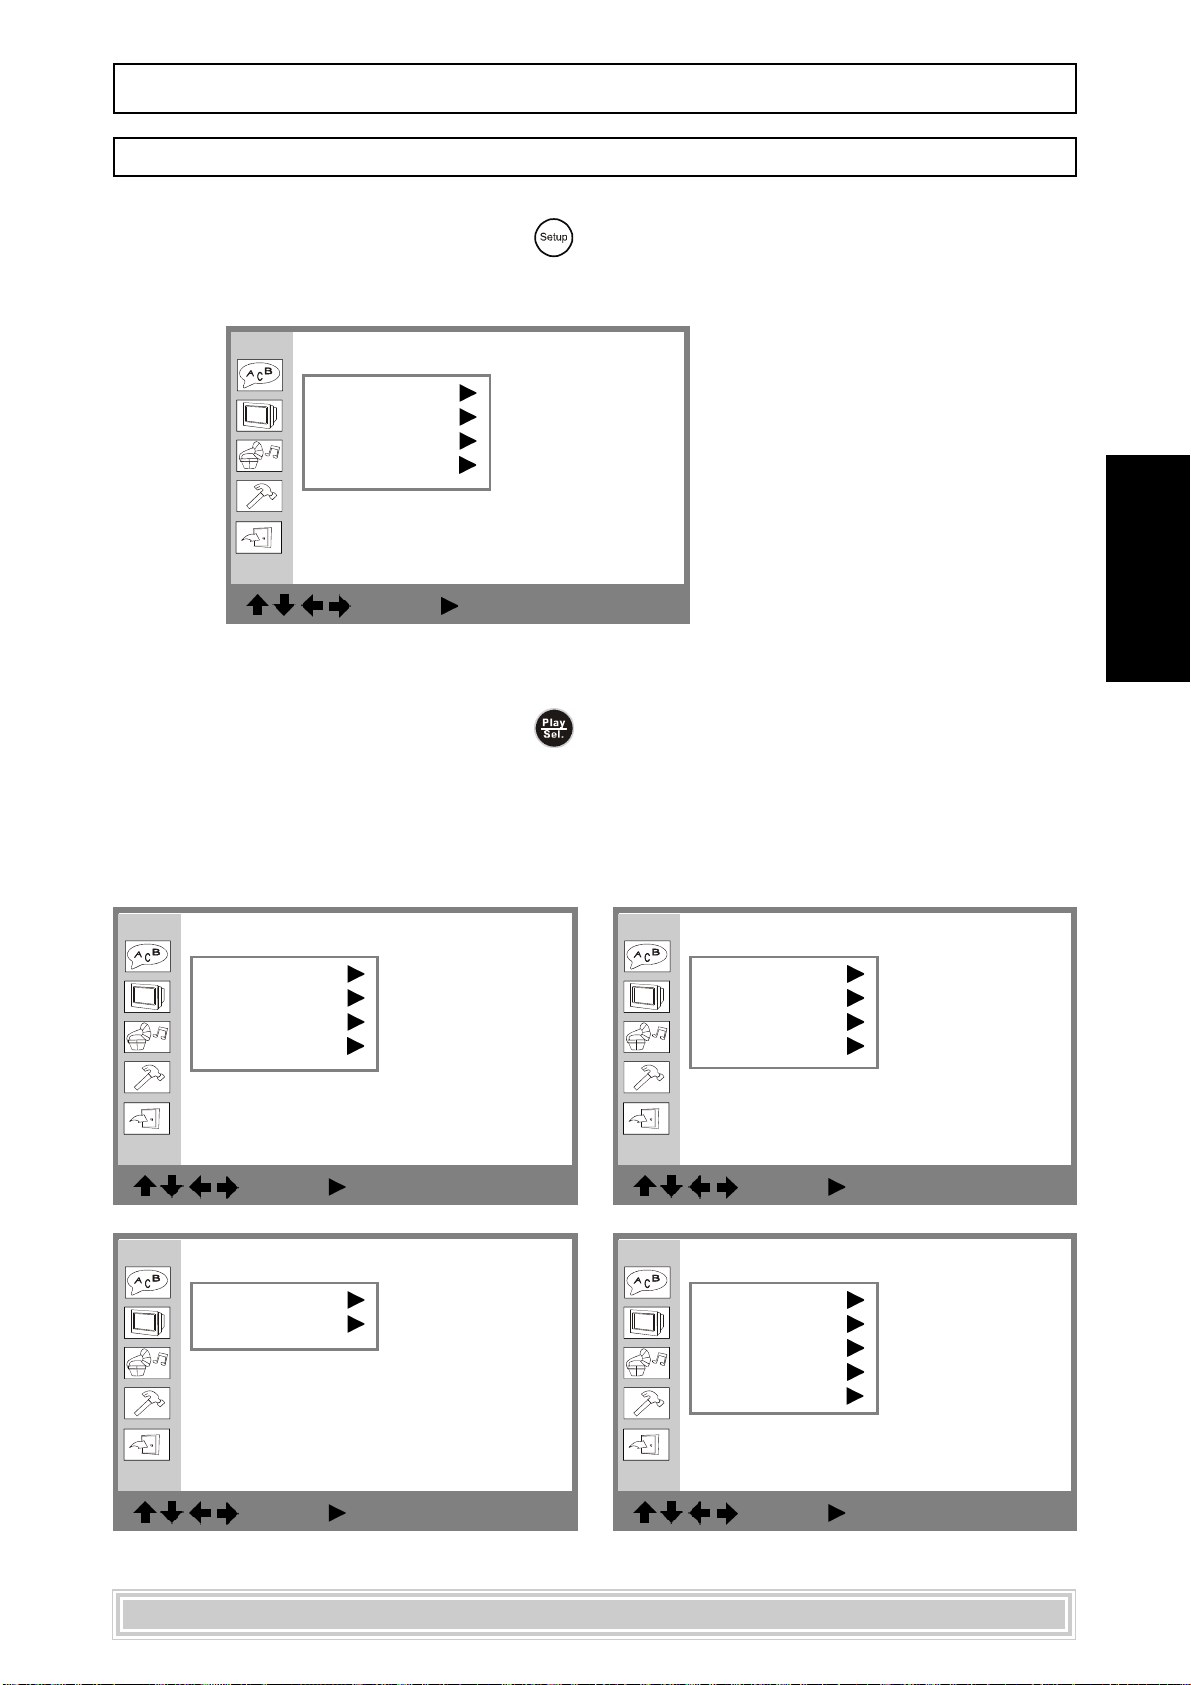
Manuel de l ’utilisateur du lecteur DVD portable
Paramètres initiaux
1. Appuyez sur le bouton <SETUP>.
2. L’écran MENU CONFIG. s’affiche.
Config. Langue
OSD
Menu
Audio
Sous-titre
: Move : Select SETUP: Quit
3. Utilisez le bouton <HAUT> <BAS> <GAUCHE> <DROITE> pour
sélectionner l’option désirée.
Français
4. Appuyez sur le bouton
<PLAY/SEL.>.
Pour les paramétrages :
Répétez la procédure décrite ci-dessus et suivez les instructions OSD pour effectuer le
paramétrage ci-après.
Config. Langue
OSD
Menu
Audio
Sous-titre
: Move : Select SETUP: Quit
Config. Audio
Numérique
Analogique
Config. Écran
TV Type
Écran veille
Système TV
Sortie vidéo
: Move : Select SETUP: Quit
Config. Personnalisée
MMC/SD
Ctrl Parental
Mot de passe
Marque Angle
Défault
: Move : Select SETUP: Quit
: Move : Select SETUP: Quit
55
Page 56
SCHÉMA DU MENU DE CONFIGURATION
Langue (Les options de langues servent uniquement de référence.
O.S.D. Anglais
Français
Menu Anglais
Veuillez consulter votre lecteur DVD portable pour les
informations correctes.).
Français
German (Allemand)
Italian (Italien)
Espagnol
Portugais
Chinois
Japonais
Français
German (Allemand)
Italian (Italien)
Espagnol
Portugais
...
Autres
Audio Anglais
Chinois
Japonais
Français
German (Allemand)
Italian (Italien)
Espagnol
Portugais
...
Autres
Sous-titre Anglais
Chinois
Japonais
Français
German (Allemand)
Italian (Italien)
Espagnol
Portugais
...
Autres
Arr
56
Page 57
SCHÉMA DU MENU DE CONFIGURATION - suite
Écran Type TV 4:3 PS
4:3 LB
16:9
Écran Veille Marche (temps d’attente de l’écran de veille :
10 minutes).
Arr
Système TV NTSC
PAL
Auto
Sortie Vidéo S-Video
P-SCAN (voir figure 1-1)
Audio Numérique SPDIF/PCM
SPDIF/RAW
Arr
Analogique 2 Chaines
Personnalisée MMC/SD Marche (voir figure 1-2)
Arr
Ctrl Parental (Avant de sélectionner les niveaux, tapez un mot
de passe à 4 chiffres.
Mot de passe par défaut : 0000)
1.
2.
3. PG (reportez-vous à la REMARQUE ci-après)
4. PG13 (reportez-vous à la REMARQUE ci-après)
5.
6. R (reportez-vous à la REMARQUE ci-après)
7. NC-17 (reportez-vous à la REMARQUE ci-après)
8.
Mot de passe Indiquez un mot de passe (mot de passe par
défaut : 0000)
Indiquez un NOUVEAU mot de passe
Indiquez le mot de passe à nouveau
Marque Angle Marche
Arr
Défaut Lecture
Français
REMARQUE :
1. PG : Surveillance parentale recommandée.
2. PG-13 : Ce matériel n’est pas approprié pour des enfants de moins de 13 ans.
3. R : Surveillance parentale -restreinte ; il est recommandé que les parents
restreignent aux enfants de moins de 17 ans de regarder ou autorisent
les enfants à regarder uniquement lorsqu’ils sont surveillés par un
parent ou une personne adulte.
4. NC-17: Aucun enfant de moins de 17 ans; il n’est pas recommandé que
les enfants de moins de 17 ans regardent.
57
Page 58
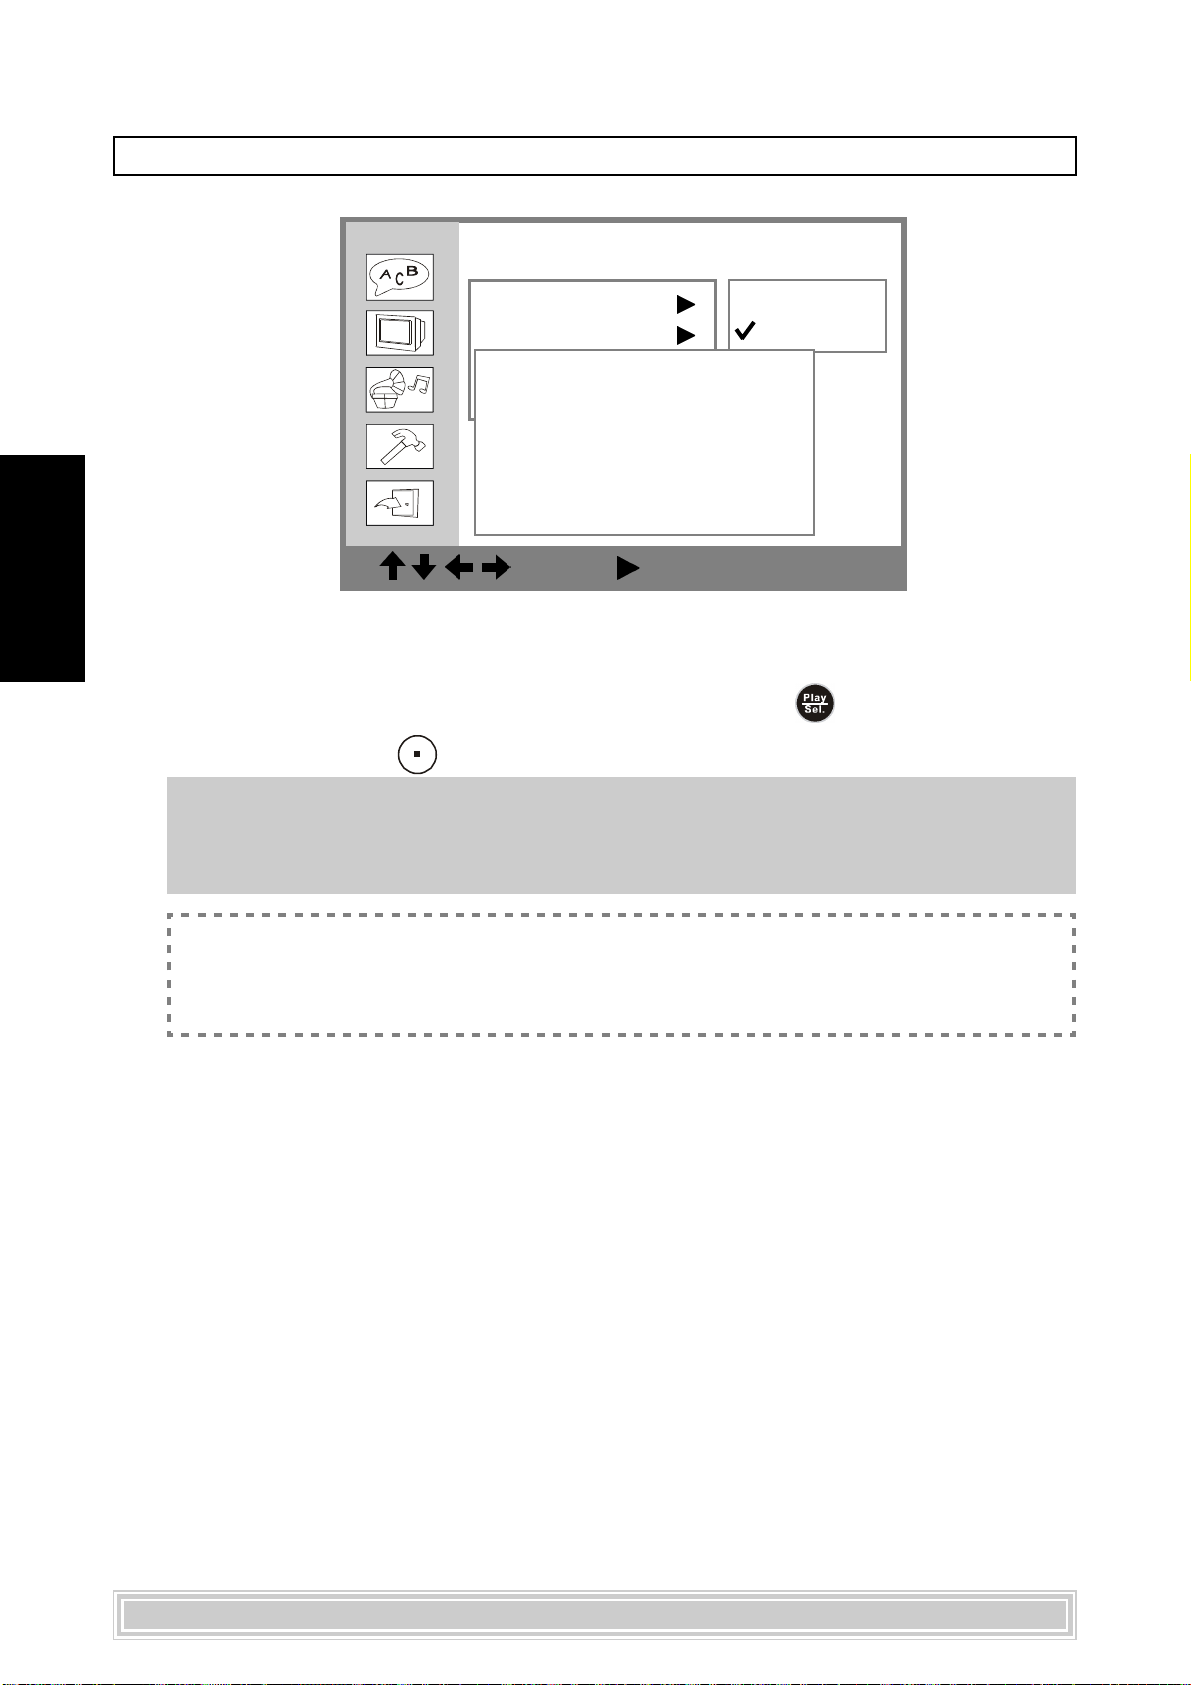
SCHÉMA DU MENU DE CONFIGURATION - suite
FIGURE 1-1
Français
Si vous sélectionnez le balayage progressif (P-Scan), les options ci-dessus
s’affichent sur l’écran comme rappel. Si votre téléviseur prend en charge la
fonction de balayage progressif (P-Scan), appuyez sur <PLAY/SEL.>.
Sinon, appuyez sur <STOP>.
Remarque : Si vous choisissez le balayage progressif “P-Scan” comme paramètre de
Config. Écran
Type TV
Écran Veille
TV System
Please make sure your
Video Output
TV support P-Scan
Continue Press PLAY
Stop Press STOP
4
S-Video
P-SCAN
: Move : Select SETUP: Quit
sortie vidéo, vérifiez que votre téléviseur prend en charge le balayage
progressif et que le câble YUV est correctement connecté à votre
téléviseur et ce lecteur DVD portable.
<<Dépannage>>
Si l’écran devient noir en cours d’utilisation…
Solution : Appuyez sur le bouton <MODE> pour passer au mode de balayage
progressif “S-Video”.
58
Page 59
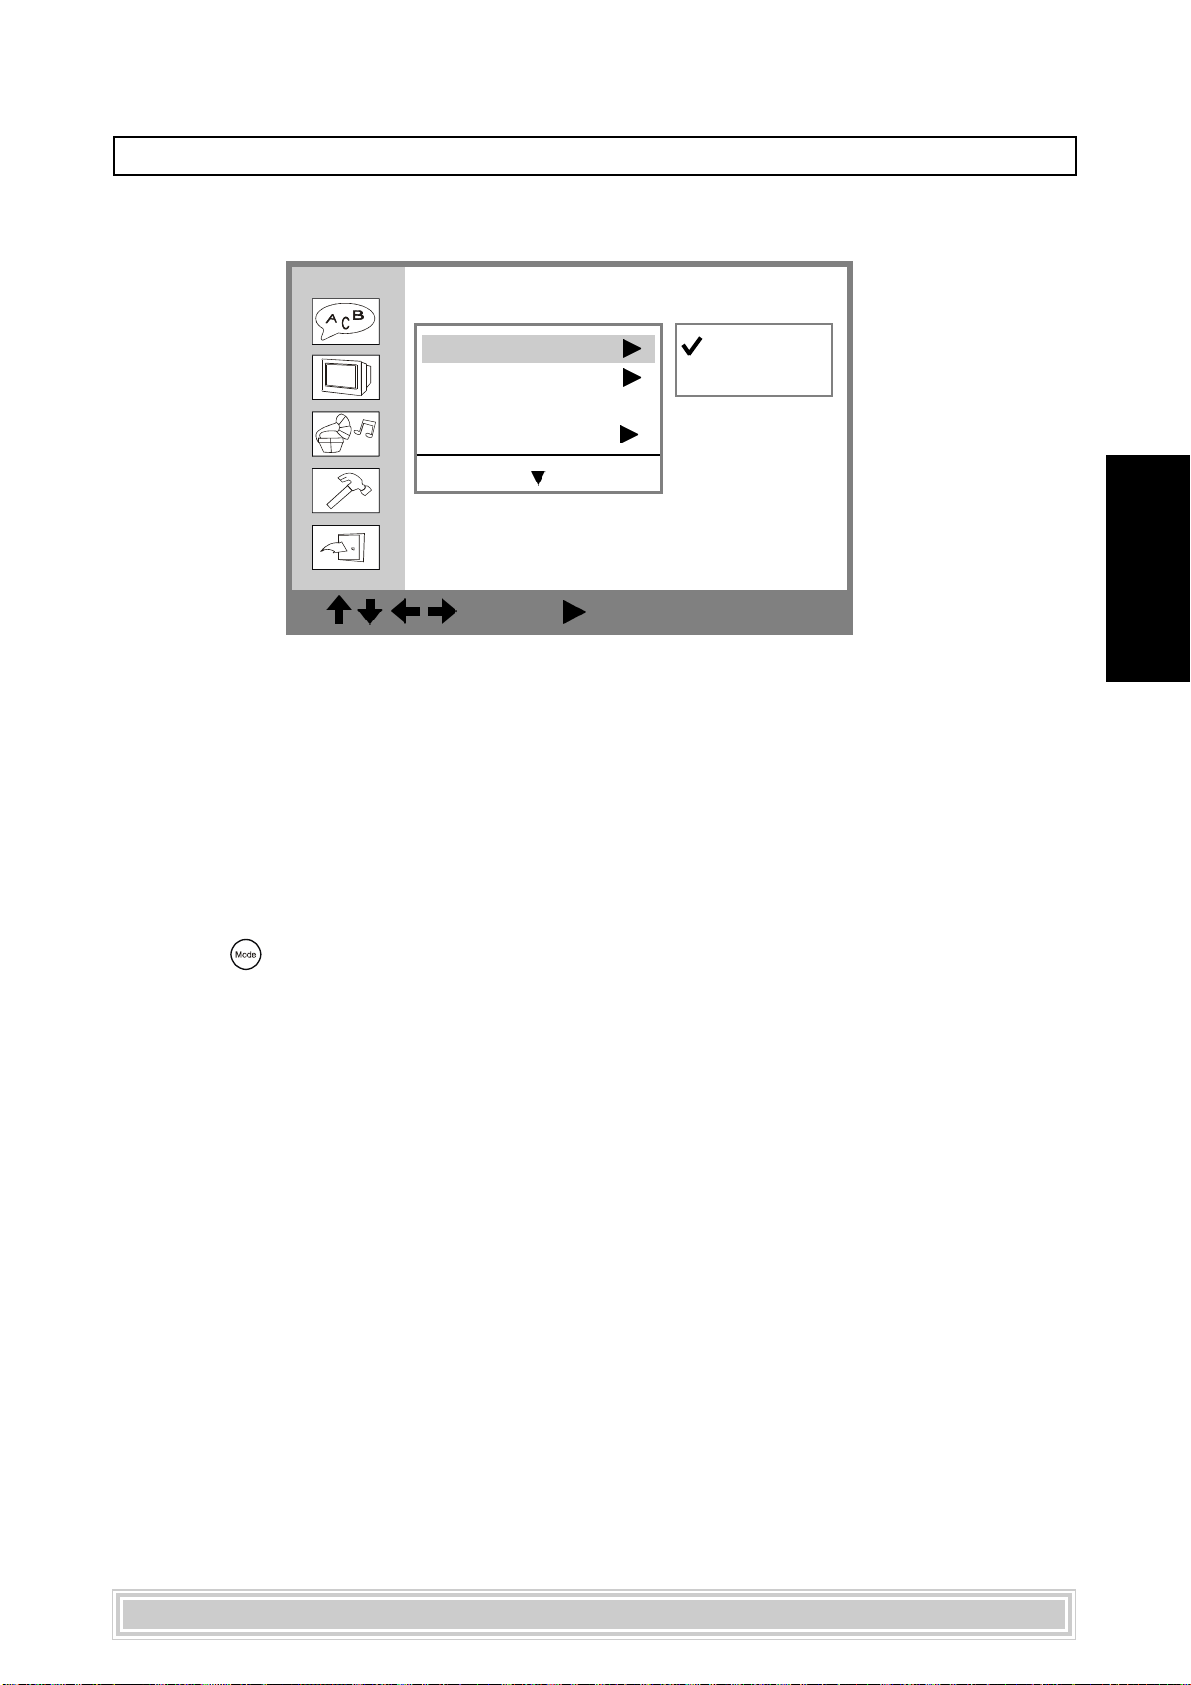
SCHÉMA DU MENU DE CONFIGURATION - suite
FIGURE 1-2
Config. Personnalisée
MMC/SD
Ctrl Parental
Mot de passe ...
Marque Angle
Marche
Arr
: Move : Select SETUP: Quit
<< Remarque >>
Vous ne pouvez qu’activer ou désactiver le paramètre MMC/SD lorsque le lecteur de
DVD ne contient pas de disque.
<< Important >>
Si vous avez activé le mode MMC/SD, le lecteur de DVD portable peut uniquement
lire les cartes MMC/SD et il ne peut donc pas lire les disques.
Lorsqu’un disque est en cours de lecture, vous ne pouvez appuyer que sur le
Français
bouton <Mode> pour passer en mode MMC/SD.
59
Page 60
Préparation
Connectez la batterie ou le lecteur de DVD portable au secteur. Si vous le connecter à un
matériel externe, procédez comme suit :
Allumez votre téléviseur et sélectionnez “Video” comme entrée TV.
Appuyez sur le bouton d’alimentation du système stéréo si vous avez connecté le lecteur
de DVD à ce type de matériel.
Mettez le bouton AV OUT/IN sur AV OUT.
Lecture de base
Français
1. Appuyez sur le bouton <POWER>.
2. Appuyez sur le bouton <OPEN> pour ouvrir le couvercle.
3. Maintenez le bord du disque pour le placer au centre avec le côté
4. Refermez le couvercle.
5. Appuyez sur le bouton <HAUT> <BAS> <GAUCHE> <DROITE>
Remarque : Pour sélectionner un titre, vous devez entrer le numéro, par
imprimé vers le haut.
Refermez le couvercle. Le lecteur DVD portable démarre la lecture si le
disque ne possède pas de menus enregistrés.
Si le disque a un ou plusieurs titres enregistrés dessus, une page de menu
s’affiche sur l’écran du téléviseur.
ou sur les touches numériques pour sélectionner votre titre préféré.
exemple, 1 pour le chapitre 1, 10 pour le chapitre 10, etc.
6. Appuyez sur <PLAY/SEL.>.
Le lecteur DVD portable démarre la lecture de l’élément sélectionné.
Arrêt de la lecture
Appuyez sur <STOP> pour un pré-arrêt. Appuyez sur <STOP> deux
fois pour arrêter.
Avance rapide/ Retour rapide
Appuyez sur <F.BWD> ou <F.FWD> pendant la lecture.
La lecture normale reprendra lorsque vous appuierez sur le bouton <PLAY/SEL.>.
La vitesse de l’avance rapide ou du retour rapide change chaque fois que vous appuyez sur le
bouton
<F.BWD> ou <F.FWD>.
60
Page 61
Saut avant ou retour aux chapitres
Saut avant
Appuyez sur le bouton
Vous sauterez un chapitre à chaque fois que vous appuierez sur le bouton.
Saut arrière
Appuyez sur le bouton
Vous sauterez un chapitre à chaque fois que vous appuierez sur le bouton.
<SUIVANT> pendant la lecture.
<PRÉCÉDENT> pendant la lecture.
Image immobile (PAUSE)
Appuyez une fois sur le bouton
L’écran est suspendu.
*Pour retourner en mode de lecture normale
---Appuyez sur <PLAY/SEL.>.
<PAUSE> pendant la lecture.
Français
Répétition
Appuyez sur le bouton <1/ALL REPEAT> pendant la lecture.
Chaque fois que vous appuyez sur ce bouton, le disque répète un chapitre ou un titre.
Appuyez une fois : chapitre (Répétition chapitre)
Appuyez deux fois : titre (Répétition titre)
Appuyez trois fois : disque (Répétition disque)
Appuyez quatre fois : Arrêt (Répétition annulée)
*Pour retourner en mode de lecture normale
---Appuyez plusieurs fois sur <1/ALL REPEAT> jusqu’à ce que “ Arrêt”
s’affiche à l’écran.
61
Page 62
Affichage des informations sur la scène
Appuyez plusieurs fois sur <INFO.> pendant la lecture jusqu’à ce que le
numéro du titre, le numéro du chapitre et autres informations s’affichent à l’écran.
*Pour arrêter l’affichage des informations sur la scène
---Appuyez plusieurs fois sur <INFO.> jusqu’à ce que les informations
disparaissent.
Français
Sélection de la langue des pistes sonores
Vous pouvez changer la langue des pistes sonores du disque si cette option est
disponible sur votre disque. Pour sélectionner la langue souhaitée :
1. Appuyez sur le bouton
2. Appuyez plusieurs fois sur
préférée soit sélectionnée.
Remarque : Si la langue préférée n’est toujours pas sélectionnée après
avoir appuyé plusieurs fois sur ce bouton, cela signifie que
cette langue n’est pas disponible sur ce disque.
<AUDIO> pendant la lecture.
<AUDIO> jusqu’à ce que votre langue
Sélection de la langue de sous-titrage
Vous pouvez sélectionner la langue du sous-titrage du disque si cette option est
disponible sur votre disque. Pour sélectionner la langue souhaitée :
1. Appuyez sur le bouton
2. Appuyez plusieurs fois sur
langue préférée soit sélectionnée.
<SUBTITLE> pendant la lecture.
<SUBTITLE> jusqu’à ce que votre
Remarque : Si la langue préférée n’est pas sélectionnée, il se peut que la
langue en question ne soit pas disponible sur ce disque.
62
Page 63
Fonction Muet
Appuyez sur le bouton <MUTE> pendant la lecture.
Remarque : Si l’indication “Silence” s’affiche à l’écran, cela signifie
que le lecteur DVD portable est désactivé.
*Pour restaurer le son
---Appuyez à nouveau sur <MUTE> jusqu’à ce que le message
“Arrêt Silence” s’affiche à l’écran.
Sélection des angles
Pour certains disques, les mêmes scènes peuvent être visualisées sous différents angles.
Français
1. Appuyez sur le bouton
2. Appuyez plusieurs fois sur
<ANGLE> pendant la lecture.
<ANGLE> jusqu’à ce que votre angle de
prise de vues préféré soit sélectionné.
Remarque : Cette fonction n’est disponible qu’avec des disques sur lesquels
ont été enregistrés plusieurs angles de prise de vues. Si cette
fonction n’est pas disponible, l’icône d’erreur “ ”
s’affichera.
Paramétrage du panneau LCD
Ce lecteur portable DVD offre cinq options sur le réglage du panneau : «Normal»,
«16:9», «4:3», «Zoom» ou «Close» (Fermer).
1. Appuyez sur
l’écran LCD s’afficheront à l’écran.
2. Appuyez sur le bouton
<LCD>. Les informations sur le paramétrage de
<HAUT> / <BAS> pour sélectionner
«Panel» (Panneau), puis appuyez sur
3. Appuyez sur le bouton
paramétrage de panneau préféré puis le panneau adoptera le
paramétrage sélectionné.
Panel Panel
Panel
Panel Panel
ColorColor
Color
ColorColor
BrightBright
Bright
BrightBright
NorNor
malmal
Nor
mal
NorNor
malmal
16:916:9
16:9
16:916:9
4:34:3
4:3
4:34:3
ZoomZoom
Zoom
ZoomZoom
CloseClose
Close
CloseClose
<PLAY/SEL.>.
<HAUT> ou <BAS>
63
pour choisir le
Page 64
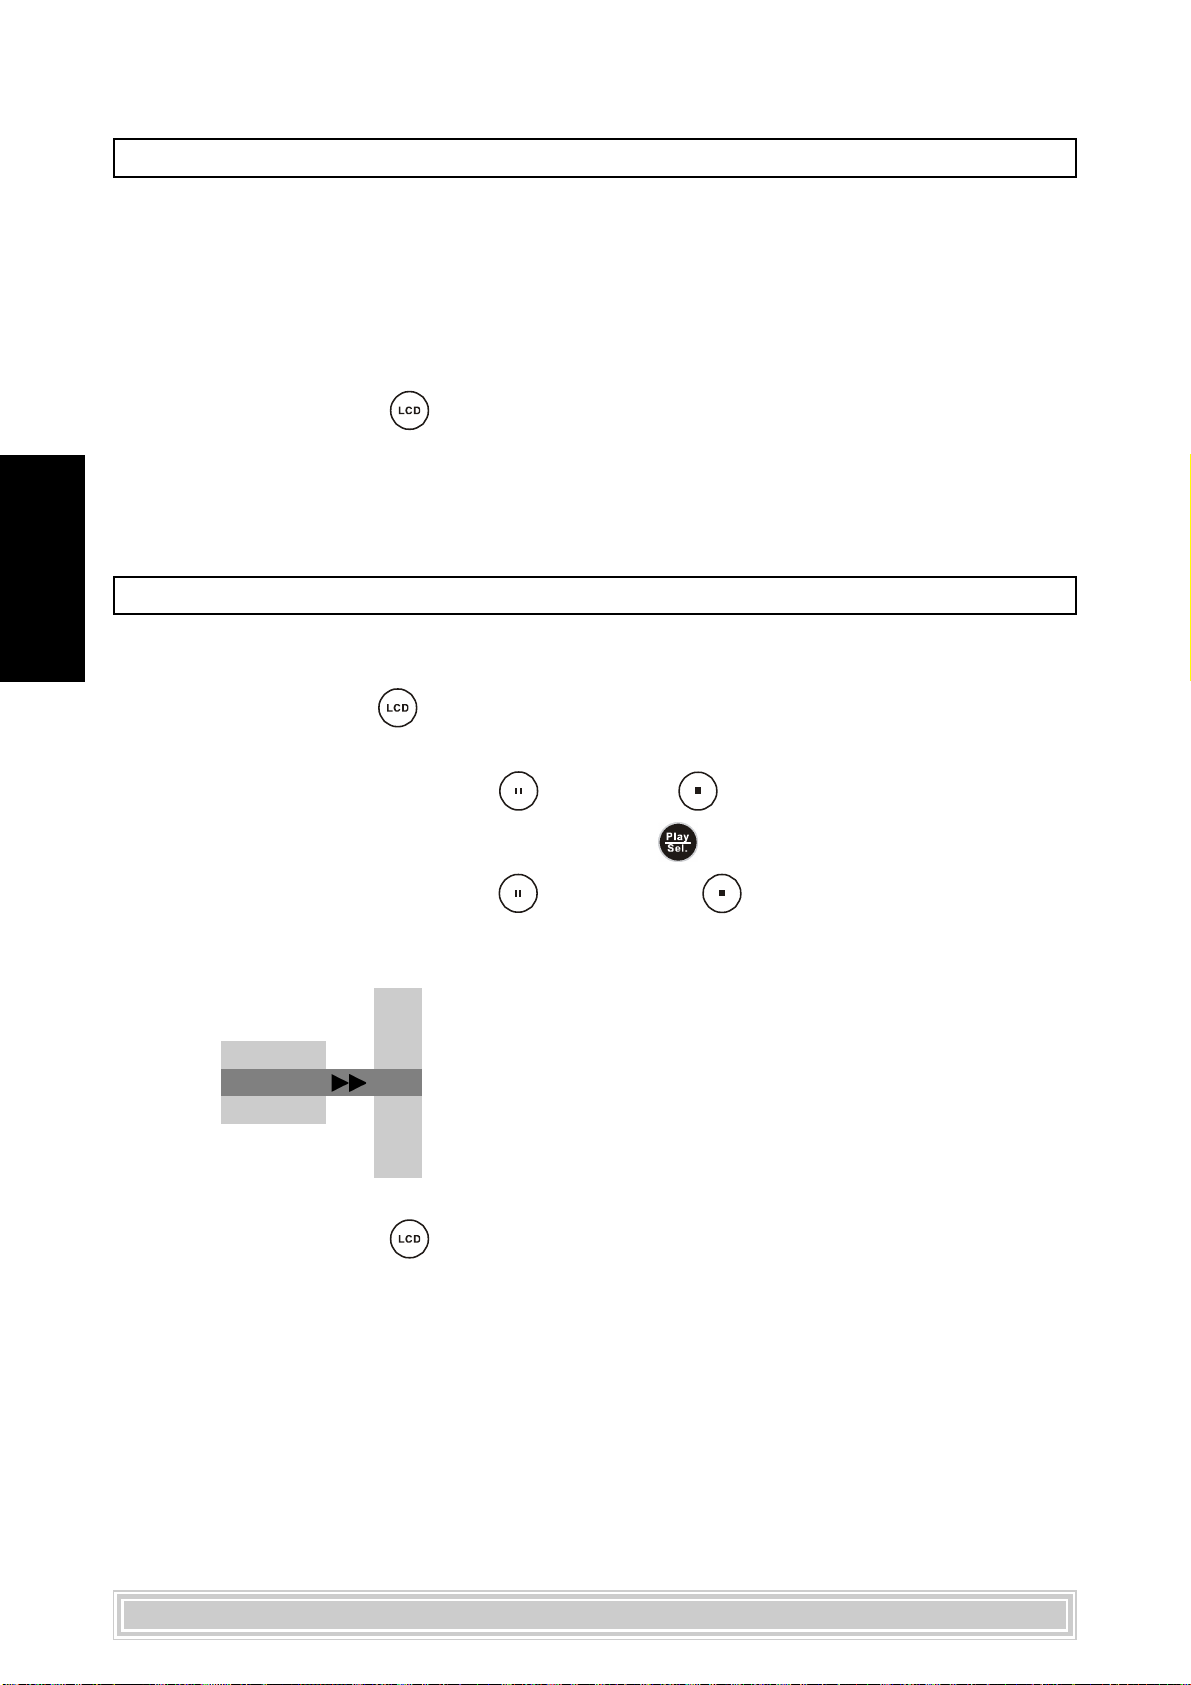
Paramétrage du panneau LCD- suite
<<<<
<< Remarque
<<<<
Lorsque vous choisissez « Zoom » dans le paramétrage du panneau, les
bords supérieurs et inférieurs sont coupés.
Lorsque vous choisissez « Zoom » (Fermer) dans le paramétrage du
panneau, les bords supérieurs et inférieurs sont coupés.
*Pour terminer l’opération de configuration
>>>>
>>
>>>>
---Appuyez sur
LCD disparaissent.
Français
Paramétrage couleur de l’écran LCD
Vous pouvez régler la couleur de l’image avec ce paramétrage pour votre confort visuel.
1. Appuyez sur
2. Appuyez sur le bouton
3. Appuyez sur le bouton
<LCD>. Les informations sur le paramétrage de l’écran
<LCD>. Les informations sur le paramétrage de l’écran
LCD s’afficheront à l’écran.
<HAUT> / <BAS>
«Color» (Couleur), puis appuyez sur
<HAUT> ou <BAS>
<PLAY/SEL.>.
pour sélectionner
pour choisir le
paramétrage de panneau préféré puis le panneau adoptera le
paramétrage sélectionné.
+3+3
+3
+3+3
+2+2
+2
+2+2
PanelPanel
Panel
PanelPanel
Color Color
Color
Color Color
BrightBright
Bright
BrightBright
+1+1
+1
+1+1
0 0
0
0 0
--
11
-
1
--
11
--
22
-
2
--
22
--
33
-
3
--
33
*Pour terminer l’opération de configuration
---Appuyez sur <LCD>. Les informations sur le paramétrage de l’écran
LCD disparaissent.
64
Page 65
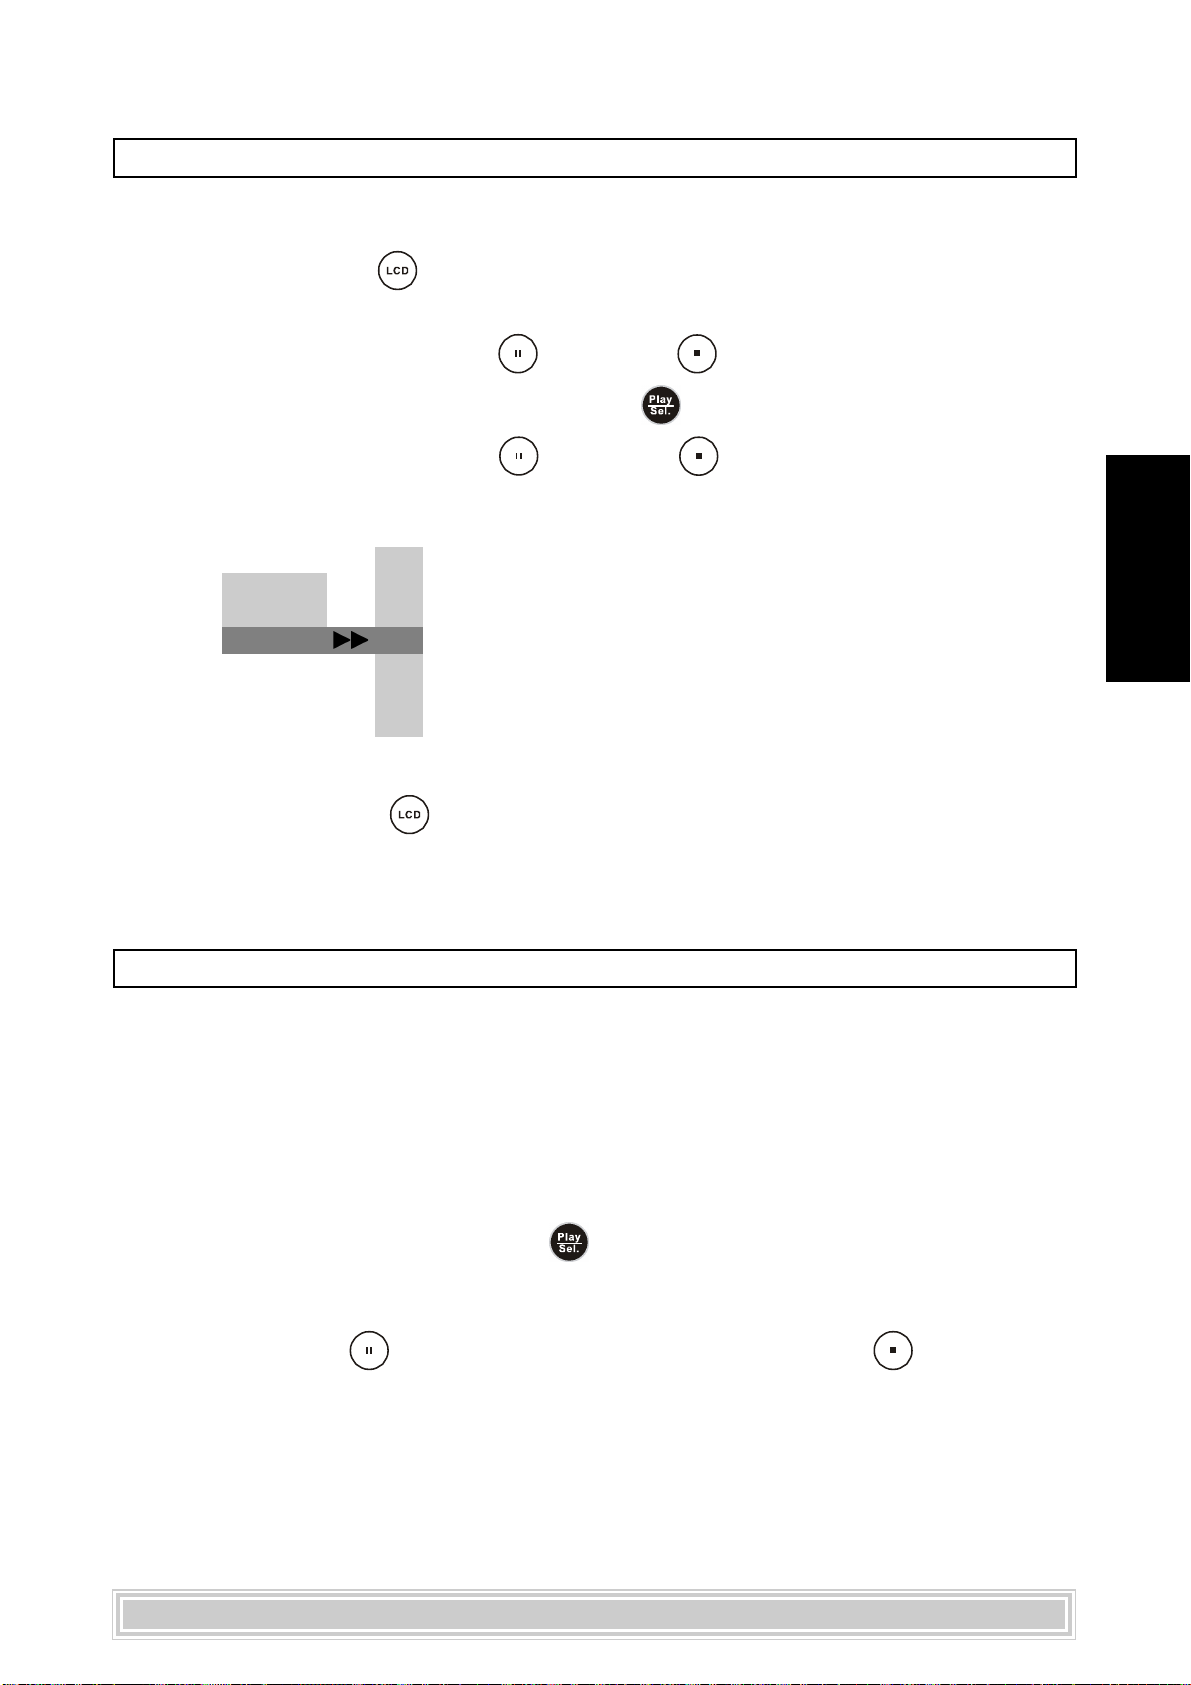
Paramétrage de la luminosité de l’écran LCD
Vous pouvez augmenter ou diminuer manuellement la luminosité de l’image.
1. Appuyez sur
<LCD>. Les informations sur le paramétrage de l’écran
LCD s’afficheront à l’écran.
2. Appuyez sur le bouton
«Bright» (Claire), puis appuyez sur
3. Appuyez sur le bouton
paramétrage de luminosité préféré. Le panneau adoptera le paramétrage
sélectionné.
+3+3
+3
+3+3
PanelPanel
Panel
PanelPanel
ColorColor
Color
ColorColor
Bright Bright
Bright
Bright Bright
*Pour terminer l’opération de configuration
---Appuyez sur <LCD>. Les informations sur le paramétrage de l’écran
+2+2
+2
+2+2
+1+1
+1
+1+1
00
0
00
--
11
-
1
--
11
--
22
-
2
--
22
--
33
-
3
--
33
<HAUT> / <BAS> pour sélectionner
<PLAY/SEL.>.
<HAUT> / <BAS>
pour choisir le
Français
LCD disparaissent.
Lecture des CD d’images Kodak et JPEG
Vous pouvez lire les CD d’images Kodak et JPEG et les visualiser à l’écran.
Chargez un CD d’images Kodak/JPEG. Après quelques secondes, le lecteur DVD
portable commencera automatiquement à lire les images les unes après les
autres.
Ou
Vous pouvez également appuyer sur les touches numériques correspondant au
numéro d’ordre des images puis sur
*Pour suspendre/arrêter la lecture
---Appuyez sur <PAUSE> pour suspendre la lecture et sur <STOP>
pour arrêter.
<PLAY/SEL.>.
65
Page 66
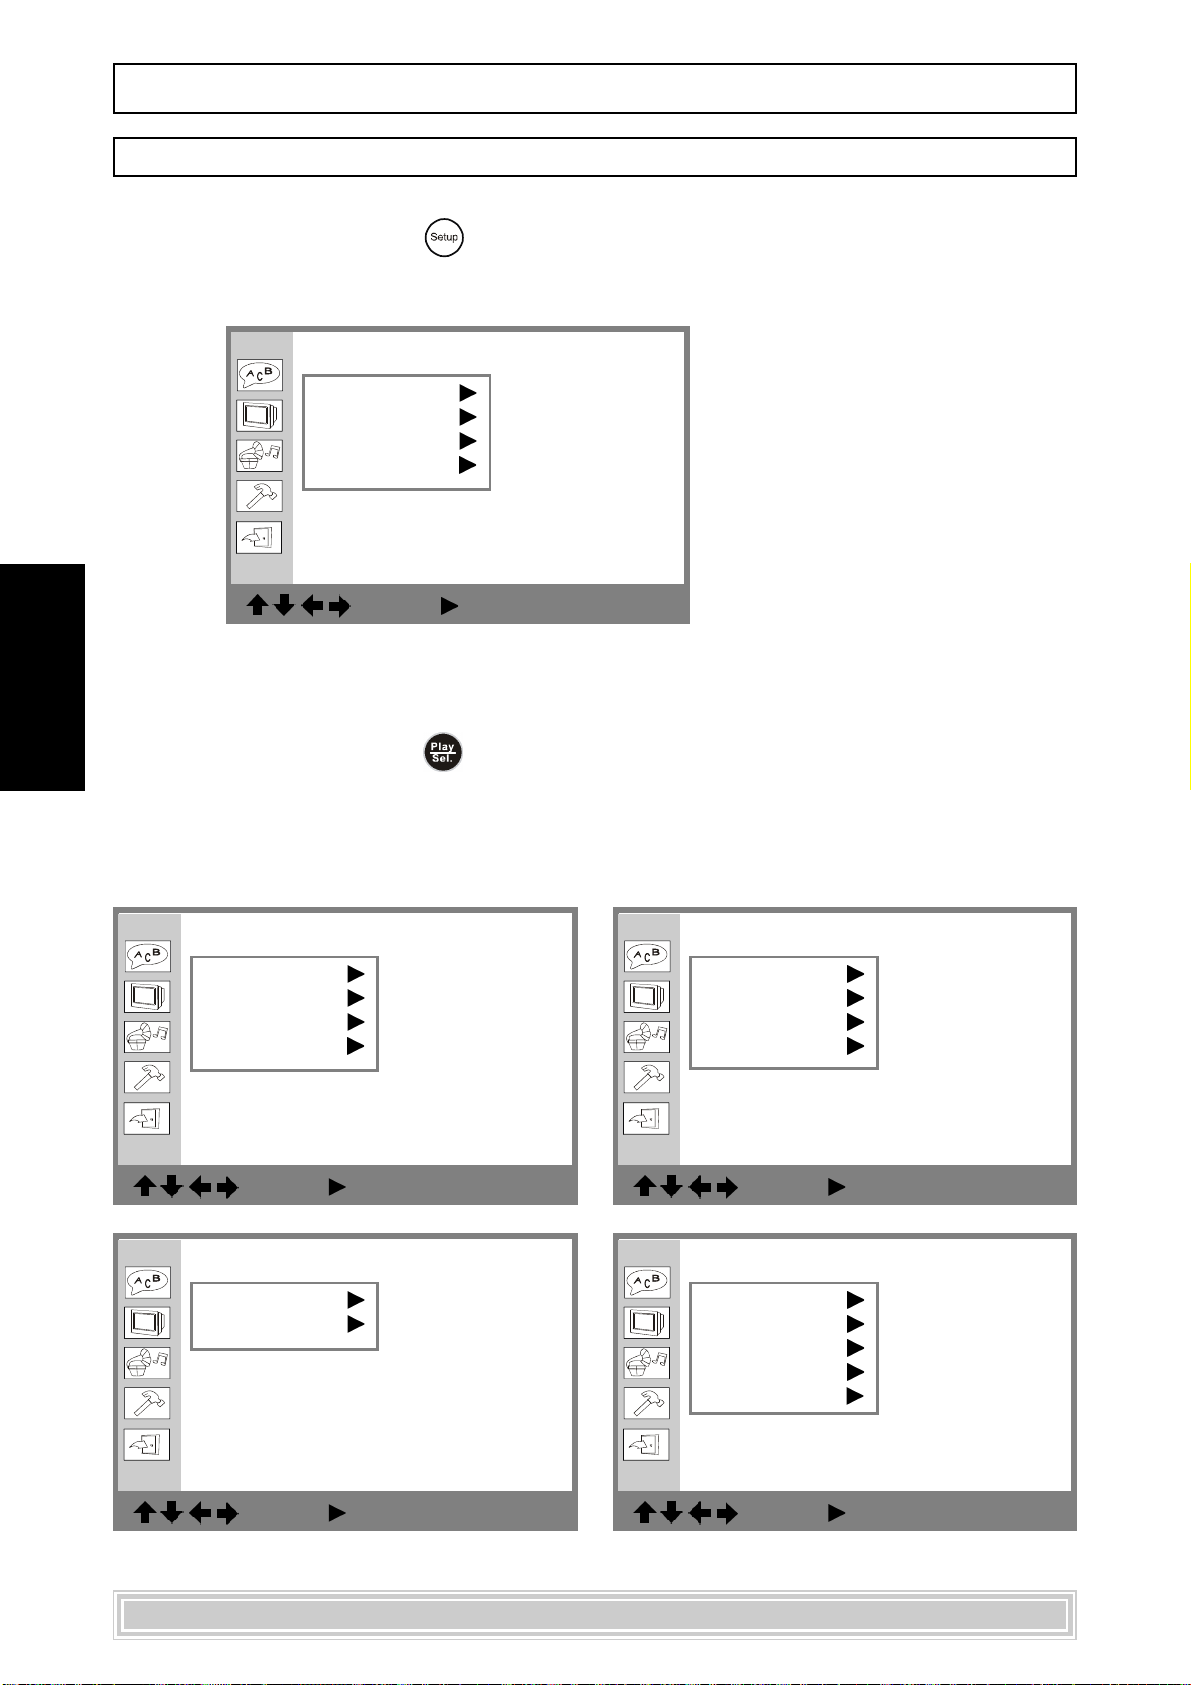
Manual do utilizador do leitor DVD portátil
Definições iniciais
1. Prima o botão <SETUP>.
2. Apresentação do ecrã do MENU SETUP.
Português
3. Utilize o botão <CIMA> <BAIXO> <ESQUERDA> <DIREITA>
Conf. idioma
OSD
Menu
Áudio
Legenda
: Move : Select SETUP: Quit
para seleccionar a opção pretendida.
4. Prima o botão
<PLAY/SEL.>.
Para as definições:
Repita o procedimento acima e consulte as instruções do OSD para realizar a seguinte
definição:
Conf. idioma
OSD
Menu
Áudio
Legenda
: Move : Select SETUP: Quit
Conf. Áudio
Saída Digital
Saída Analógica
Conf. Ecrã
Tipo de TV
Protec. ecrã
Sist. TV
Saída Vídeo
: Move : Select SETUP: Quit
Conf. Personalizada
MMC/SD
Parental Ctrl
Password
Marca Áng.
Predef.
: Move : Select SETUP: Quit
: Move : Select SETUP: Quit
66
Page 67
DIAGRAMA DO MENU CONFIGURAR
Idioma (As opções do idioma são apenas para referência, para obter
as informações correctas, consulte o seu leitor de DVD portátil.)
OSD Inglês
Francês
Alemão
Italiano
Espanhol
Português
Menu Inglês
Chinês
Japonês
Francês
Alemão
Italiano
Espanhol
Português
...
Outros
Áudio Inglês
Chinês
Japonês
Francês
Alemão
Italiano
Espanhol
Português
...
Outros
Legenda Inglês
Chinês
Japonês
Francês
Alemão
Italiano
Espanhol
Português
...
Outros
Desligado
Português
67
Page 68
DIAGRAMA DO MENU SETUP - continuação
Ecrã Tipo de TV 4:3 PS
Português
Áudio Saída Digital SPDIF/PCM
Personalizada MMC/SD Ligado
4:3 LB
16:9
Protec. ecrã Ligado
(Trata-se do tempo de espera do protector de
ecrã: 10 minutos.)
Desligado
Sist. TV NTSC
PAL
Auto
Saída Vídeo S-Video
P-SCAN (consulte a figura 1-1)
SPDIF/RAW
Desligado
Saída Analógica Canal 2
Desligado (consulte a figura 1-2)
Parental Ctrl (Antes de seleccionar as classificações, introduza uma
palavra-passe com 4 dígitos. a palavra-passe
predefinida pelo fabricante é: 0000)
1.
2.
3. PG (veja a NOTA abaixo)
4. PG13 (veja a NOTA abaixo)
5.
6. R (veja a NOTA abaixo)
7. NC-17 (veja a NOTA abaixo)
8.
Password Introduzir palavra-passe (palavra-passe
predefinida pelo fabricante é: 0000)
Introduzir palavra-passe NOVA
Voltar a introduzir palavra-passe
Marca Áng. Ligado
Desligado
Predef. Ler
NOTA:
1. PG: Sugere-se Parental Guidance (Orientação Parental).
2. PG-13: O material não se adequa a crianças com idade inferior a 13 anos.
3. R: Orientação Parental – Restricted (Limitada); recomenda-se que os
pais impeçam a visualização por parte de crianças com idade
inferior a 17 anos, ou que tal aconteça apenas quando vigiadas
por um dos pais ou por um guardião adulto.
4. NC-17: No Children (Não para Crianças); não se recomenda a
visualização por parte de crianças com idade inferior a 17 anos.
68
Page 69
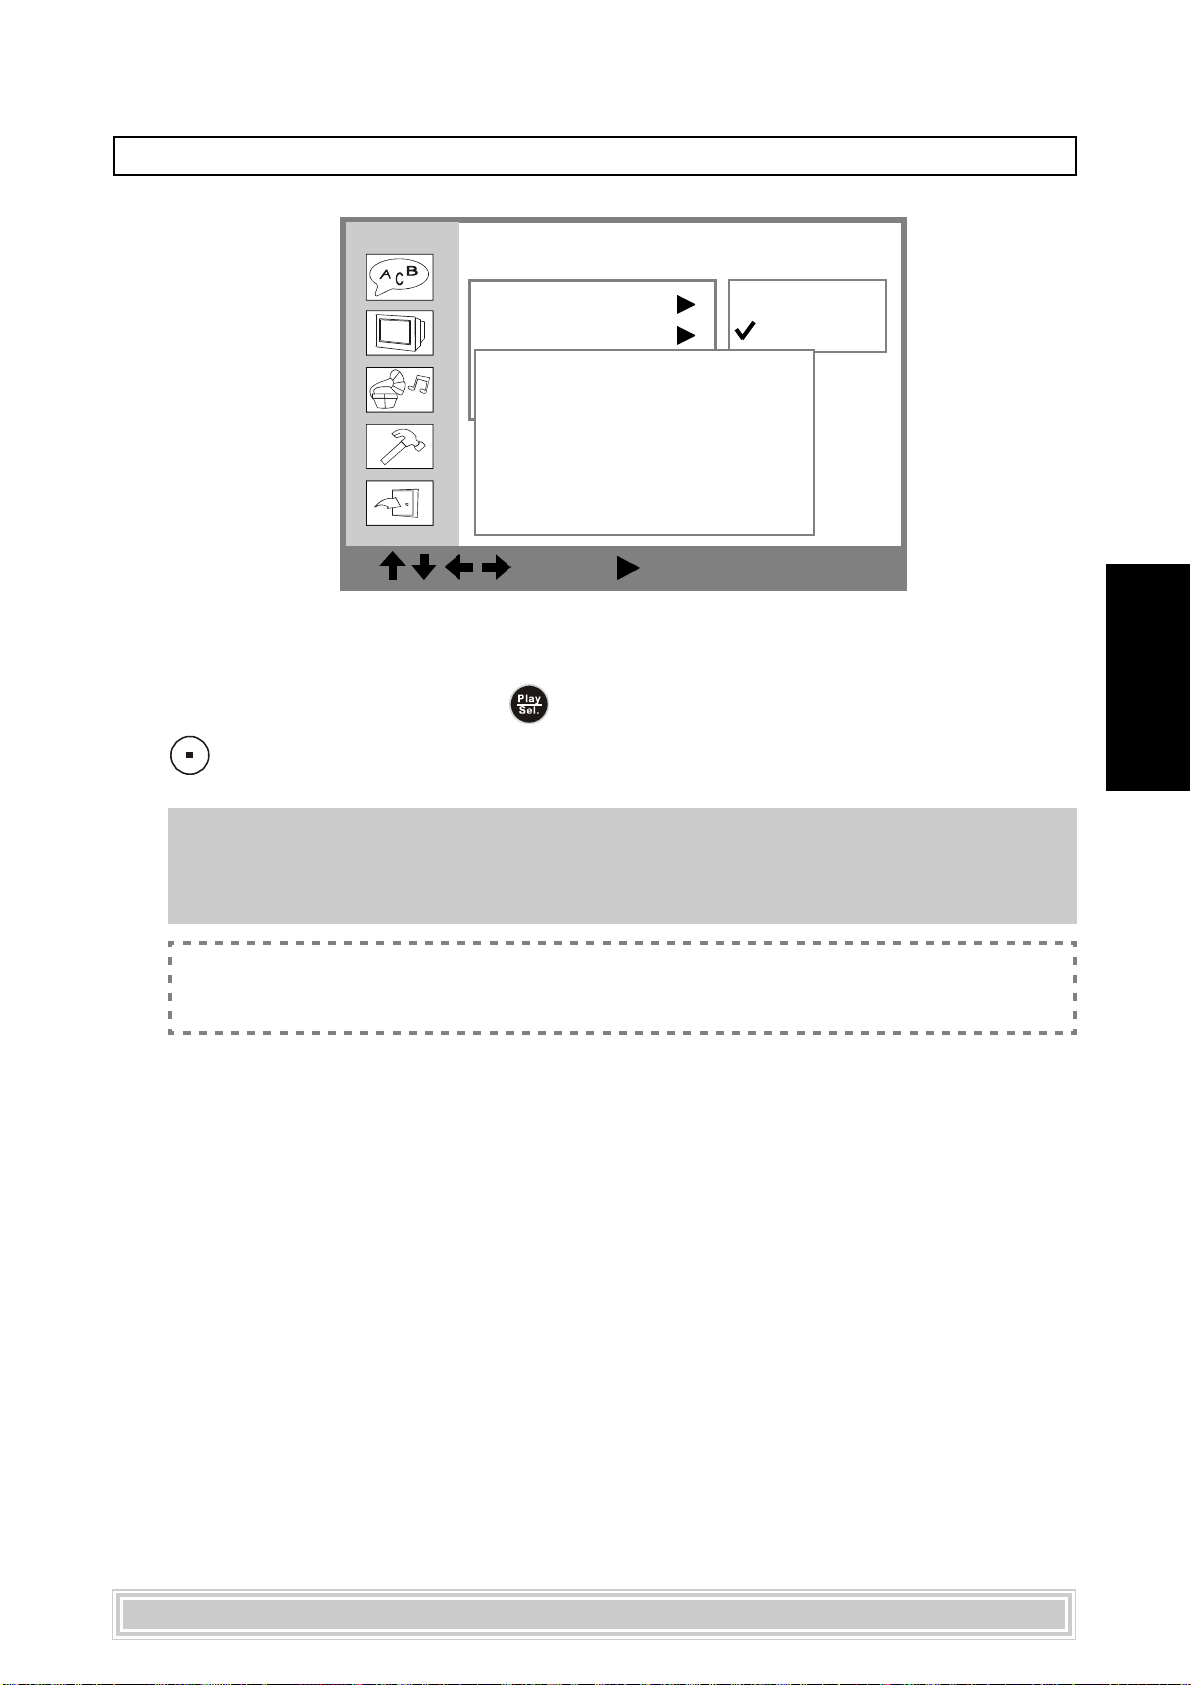
DIAGRAMA DO MENU SETUP - continuação
FIGURA 1-1
Conf. Ecrã
Tipo de TV
Protec. ecrã
TV System
Please make sure your
Video Output
TV support P-Scan
Continue Press PLAY
Stop Press STOP
4
: Move : Select SETUP: Quit
Se seleccionar “P-SCAN” (Varrimento-P), a mensagem acima aparece no ecrã
como lembrete. De seguida, se a sua TV suportar a opção “P-SCAN”
(Varrimento-P), prima o botão <PLAY/SEL.>. Caso contrário, prima o botão
<STOP>.
S-Video
P-SCAN
Português
Nota: Se seleccionar “P-SCAN” (Varrimento-P) como a definição da saída de vídeo,
certifique-se de que a TV suporta a função de entrada “P-SCAN” (Varrimento-P)
e de que o cabo YUV está correctamente ligado à TV e a este leitor de DVD
portátil.
<<Resolução de problemas>>
O que é que se deve fazer se o ecrã ficar em branco com o dispositivo ligado?
Solução: Prima o botão <MODE> para mudar para o modo “S-Video”.
69
Page 70
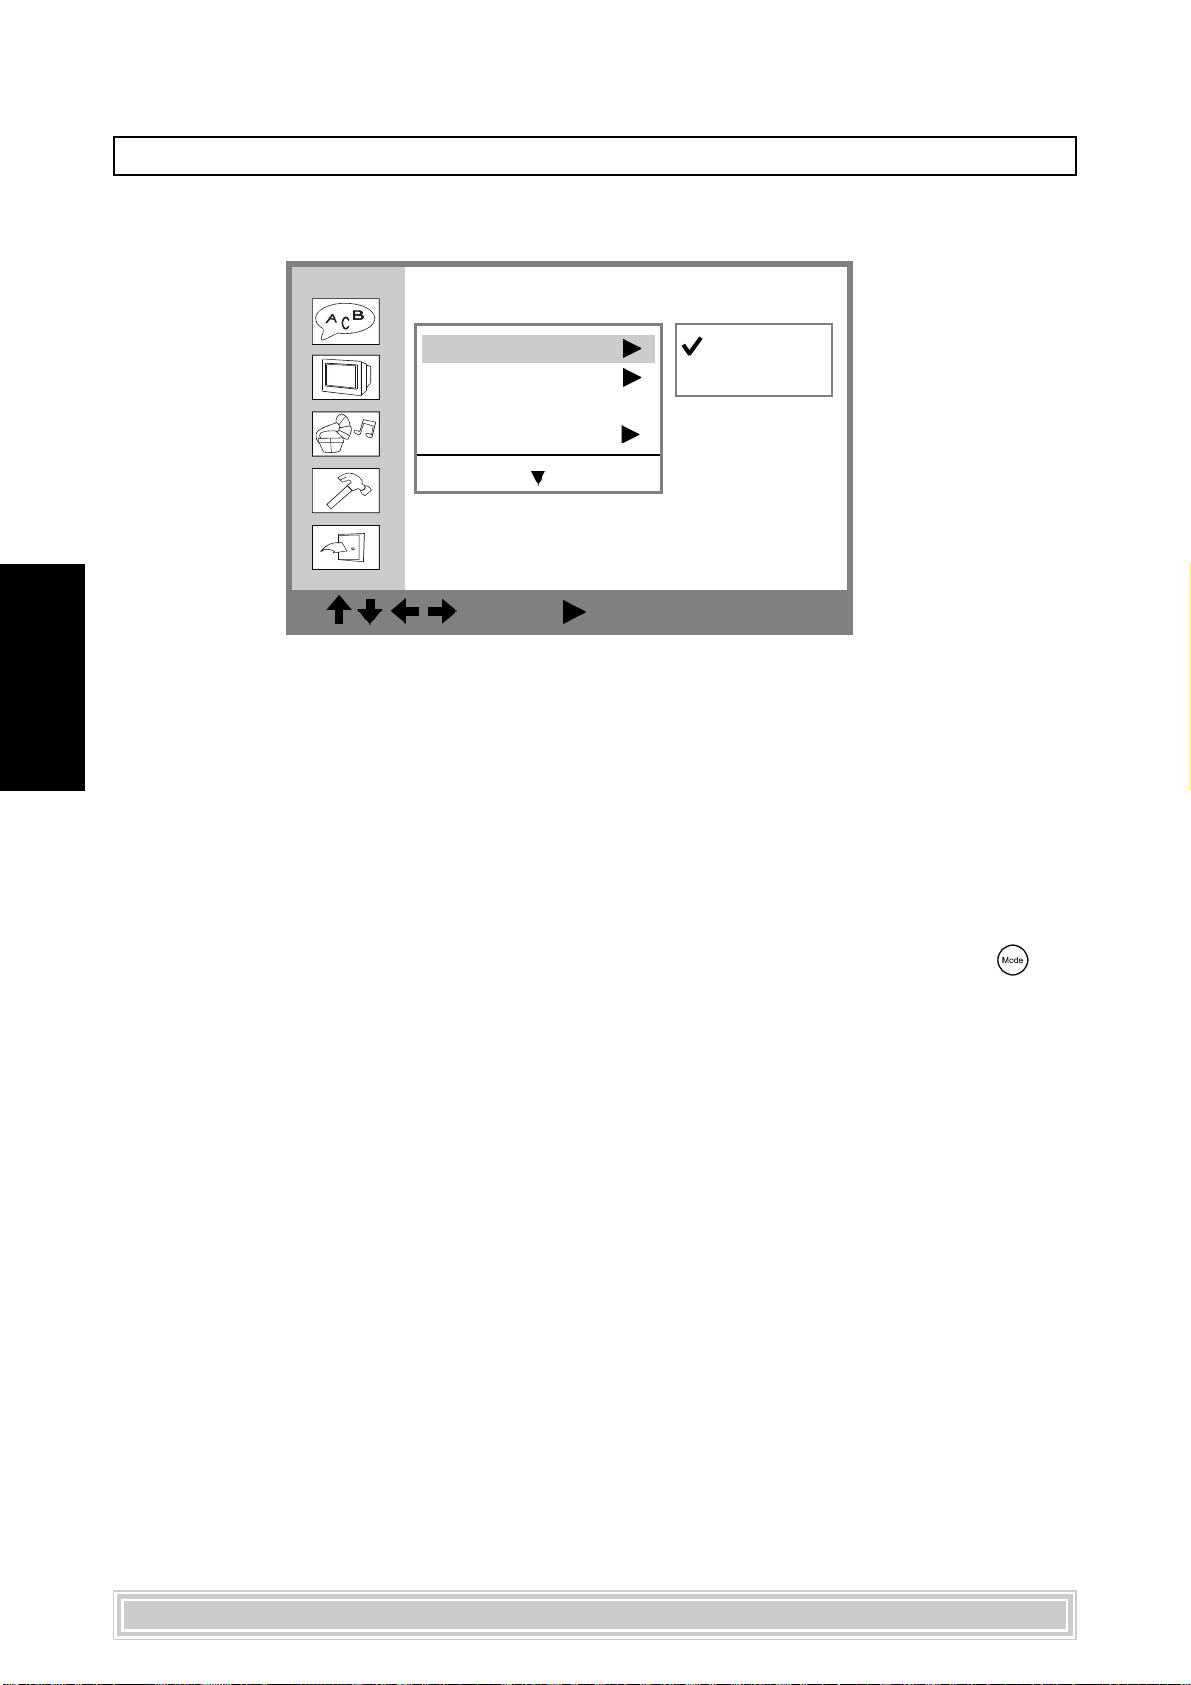
DIAGRAMA DO MENU SETUP - continuação
FIGURA 1-2
Conf. Personalizada
Português
<< Nota >>
Só pode alterar a definição de MMC/SD para “Ligado” ou “Desligado” se não estiver
nenhum disco inserido no leitor de DVD.
<< Importante >>
z Se colocar a definição do MMC/SD em "Ligado", o leitor de DVD portátil não pode
senão ler o cartão MMC/SD. Isto é, o leitor de DVD não pode reproduzir quaisquer
discos.
MMC/SD
Parental Ctrl
Password ...
Marca Áng.
Ligado
Desligado
: Move : Select SETUP: Quit
z Enquanto um disco estiver a ser reproduzido, apenas pode premir o botão
<Mode> para mudar para o modo MMC/SD.
70
Page 71
Preparações
Insira a bateria ou ligue o leitor de DVD portátil a uma tomada eléctrica. Se estiver a ligar
equipamento externo, faça o seguinte:
z Prima o botão de alimentação da televisão e seleccione “Vídeo” como a entrada da
televisão.
z Se tiver sido conectado um sistema estéreo ao leitor de DVD, ligue o sistema estéreo.
z Faça com que a AV OUT/IN deslize para a AV OUT.
Reprodução básica
1. Prima <POWER>.
2. Prima <OPEN> para abrir a tampa do compartimento dos discos.
3. Segure com cuidado a extremidade do disco e, de seguida, coloque-o ao
centro com o lado impresso virado para cima.
4. Feche a tampa do compartimento dos discos.
z Feche a tampa do compartimentos dos discos e o leitor de DVD dá início à
reprodução do DVD, se este não tiver menus gravados.
z Se o disco tiver um mais títulos gravados, aparece um ecrã menu no ecrã da
televisão.
5. Prima o botão <CIMA> <BAIXO> <ESQUERDA> <DIREITA> ou o(s)
número(s) numerado(s) para seleccionar o título pretendido.
Nota: Para seleccionar um título, introduza o número, por exemplo 1 para o
capítulo 1, 10 para o capítulo 10, etc..
Português
6. Prima o botão <PLAY/SEL.>.
O leitor de DVD dá início à reprodução do item seleccionado.
Paragem da reprodução
Prima o botão <STOP> uma vez para realizar a paragem prévia. Prima o
botão
<STOP> duas vezes para parar.
Avanço rápido/recuo rápido
Prima o botão <F.BWD> ou <F.FWD> durante a reprodução.
z A reprodução normal é reposta quando prime o botão <PLAY/SEL.>.
z A velocidade do avanço rápido ou na reprodução de recuo é alterada cada vez que toca no
botão
<F.BWD> ou <F.FWD>.
71
Page 72
Saltar capítulos para a frente ou para trás
Saltar para a frente
Prima o botão
Prima este botão para saltar um capítulo.
Saltar para trás
Prima o botão
Prima este botão para saltar um capítulo.
Português
Imagem fixa (PAUSAR)
Prima o botão
O ecrã fica imóvel.
<NEXT> durante a reprodução.
<PREVIOUS> durante a reprodução.
<PAUSE> uma vez durante a reprodução.
*Para voltar para a reprodução normal
---Prima o botão <PLAY/SEL.>.
Nova visualização
Prima o botão <1/ALL REPEAT> durante a reprodução.
Sempre que premir este botão, o disco repetirá um capítulo ou título.
Premir uma vez: capítulo (Repete o capítulo)
Premir duas vezes: título (Repete o título)
Premir três vezes: disco (Repete o disco)
Premir quatro vezes: desligado (Repetição cancelada)
*Para voltar para a reprodução normal
---Prima <1/ALL REPEAT> diversas vezes até aparecer “ desligado”
no ecrã.
72
Page 73
Apresentação das informações relativas a uma cena
Prima o botão <INFO.> diversas vezes, número do título, número do
capítulo e outras informações aparecem no ecrã.
*Para parar a apresentação das informações no ecrã
---Prima o botão <INFO.> diversas vezes até as informações
desaparecerem.
Selecção do idioma da faixa de áudio
O idioma da pista sonora pode ser alterado, se esta opção estiver disponível no DVD.
Para seleccionar o idioma pretendido:
Português
1. Prima o botão
2. Prima o botão
sido seleccionado.
Nota: Quando não se consegue seleccionar o idioma pretendido, mesmo
depois de premir o botão várias vezes, isso significa que o idioma
não está contido no disco.
<AUDIO> durante a reprodução.
<AUDIO> diversas vezes até o idioma pretendido ter
Selecção do idioma das legendas
O idioma das legendas pode ser seleccionado, se esta opção estiver disponível no DVD.
Para a seleccionar:
1. Prima o botão
2. Prima o botão
<SUBTITLE> durante a reprodução.
<SUBTITLE> diversas vezes até o idioma
pretendido ter sido seleccionado.
Nota: Quando o idioma pretendido não é seleccionado, poderá indicar que
o idioma não está disponível no disco.
73
Page 74
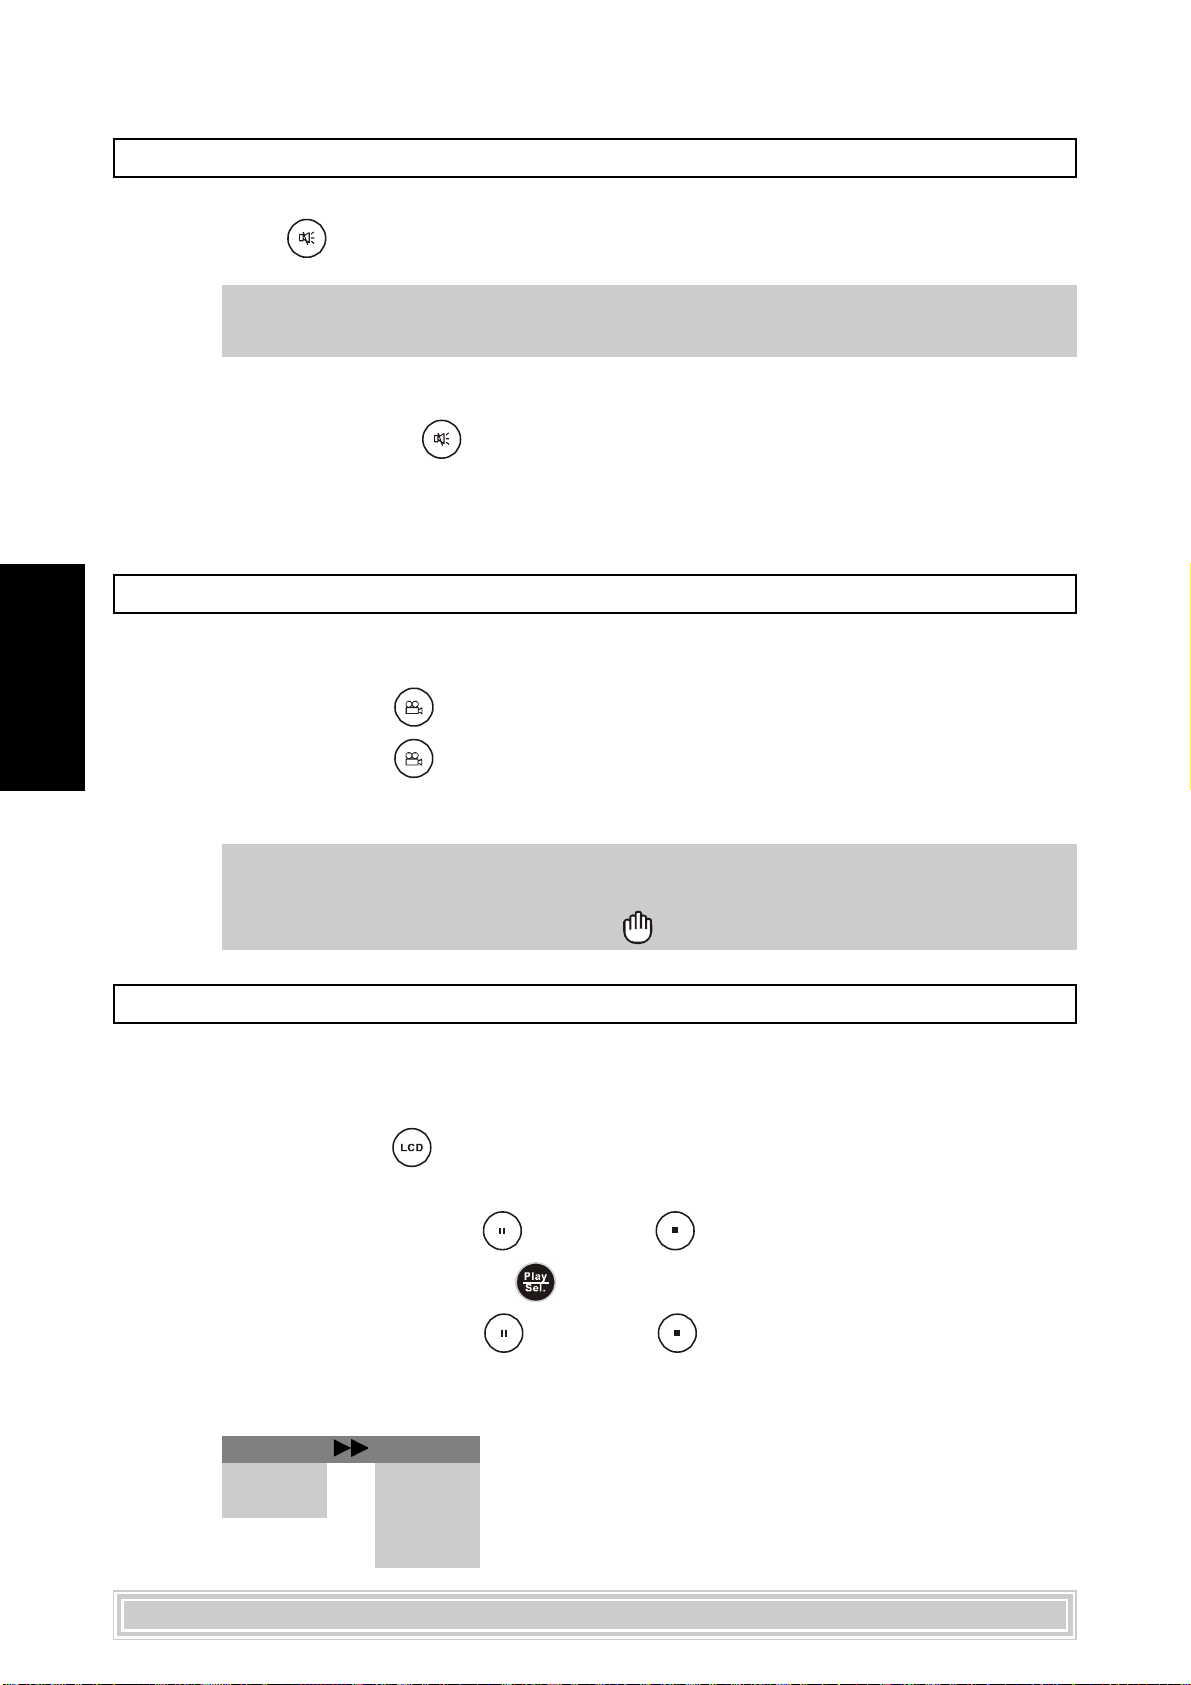
Função de corte do som
Prima o botão
*Para repor o som
---Prima o botão <MUTE> novamente até “Opção Mute Des” aparecer
Português
Selecção dos ângulos
Em alguns discos, as mesmas cenas podem ser visualizadas a partir de diversos ângulos.
1. Prima o botão <ANGLE> durante a reprodução.
2. Prima o botão
<MUTE> durante a reprodução.
Nota: Quando a opção “Opção Mute” aparece no ecrã, é porque este
leitor de DVD portátil não tem som.
no ecrã.
<ANGLE> diversas vezes até o ângulo de
visualização pretendido ser seleccionado.
Nota: Esta função só funciona em discos onde foram gravados ângulos de
visualização diferentes. Se esta função não estiver disponível,
aparece o ícone inválido “ ”.
Definições do Painel de LCD
Este leitor de DVD portátil dispõe de cinco opções relativas ao ajuste do painel:
“Normal”, “16:9”, “4:3”, “Zoom”, ou “Close” (Fechar).
1. Prima o botão
LCD aparecem no ecrã.
2. Prima um dos botões
“Painel”, e depois prima
3. Prima um dos botões
definição do painel que prefere. O painel muda para a definição que
seleccionou.
<LCD>, as informações relativas às definições do
<CIMA> / <BAIXO> para seleccionar
<PLAY/SEL.>.
<CIMA> / <BAIXO> para escolher a
Panel Panel
Panel
Panel Panel
ColorColor
Color
ColorColor
BrightBright
Bright
BrightBright
NorNor
malmal
Nor
mal
NorNor
malmal
16:916:9
16:9
16:916:9
4:34:3
4:3
4:34:3
ZoomZoom
Zoom
ZoomZoom
CloseClose
Close
CloseClose
74
Page 75
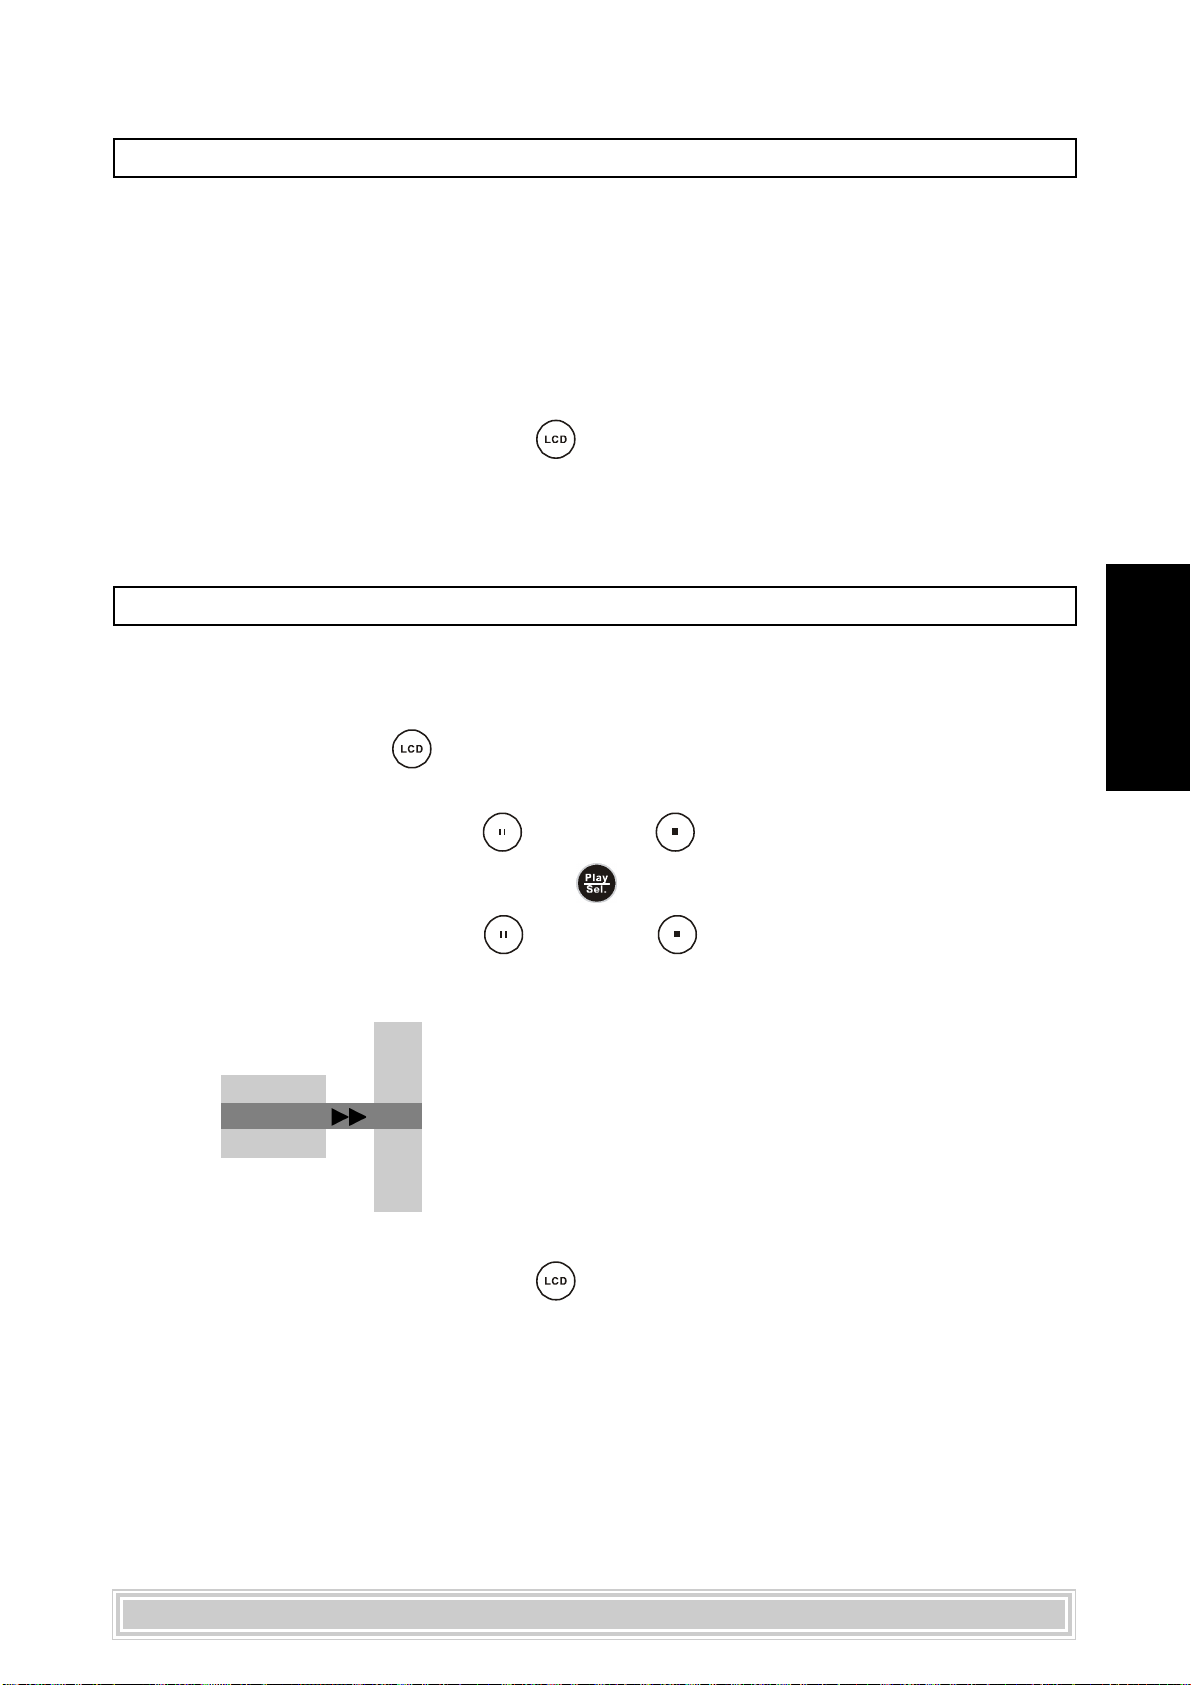
Definições do Painel de LCD – continuação
<<<<
<< NOTE
<<<<
z Quando escolhe “Zoom” na definição do painel, as margens superior
z Quando escolhe “Close” (Fechar) na definição do painel, o LCD
*Para concluir a operação de configuração
---Volte a premir o botão <LCD> até as informações da definição do
LCD desaparecerem.
>>>>
>>
>>>>
e inferior são cortadas.
desliga-se e o indicador ligado / desligado pisca com uma luz
amarela.
Definição das cores do LCD
Pode utilizar esta definição para ajustar a cor do vídeo para um valor confortável para
os seus olhos.
Português
1. Prima o botão
<LCD>, as informações relativas às definições do
LCD aparecem no ecrã.
2. Prima um dos botões
“Color” (Cor), e depois prima
3. Prima um dos botões
definição do painel que prefere. O painel muda para a definição que
seleccionou.
+3+3
+3
+3+3
+2+2
+2
+2+2
PanelPanel
Panel
PanelPanel
Color Color
Color
Color Color
BrightBright
Bright
BrightBright
*Para concluir a operação de configuração
---Volte a premir o botão <LCD> até as informações da definição do
LCD desaparecerem.
+1+1
+1
+1+1
0 0
0
0 0
--
11
-
1
--
11
--
22
-
2
--
22
--
33
-
3
--
33
<CIMA> / <BAIXO> para seleccionar
<PLAY/SEL.>.
<CIMA> / <BAIXO> para escolher a
75
Page 76
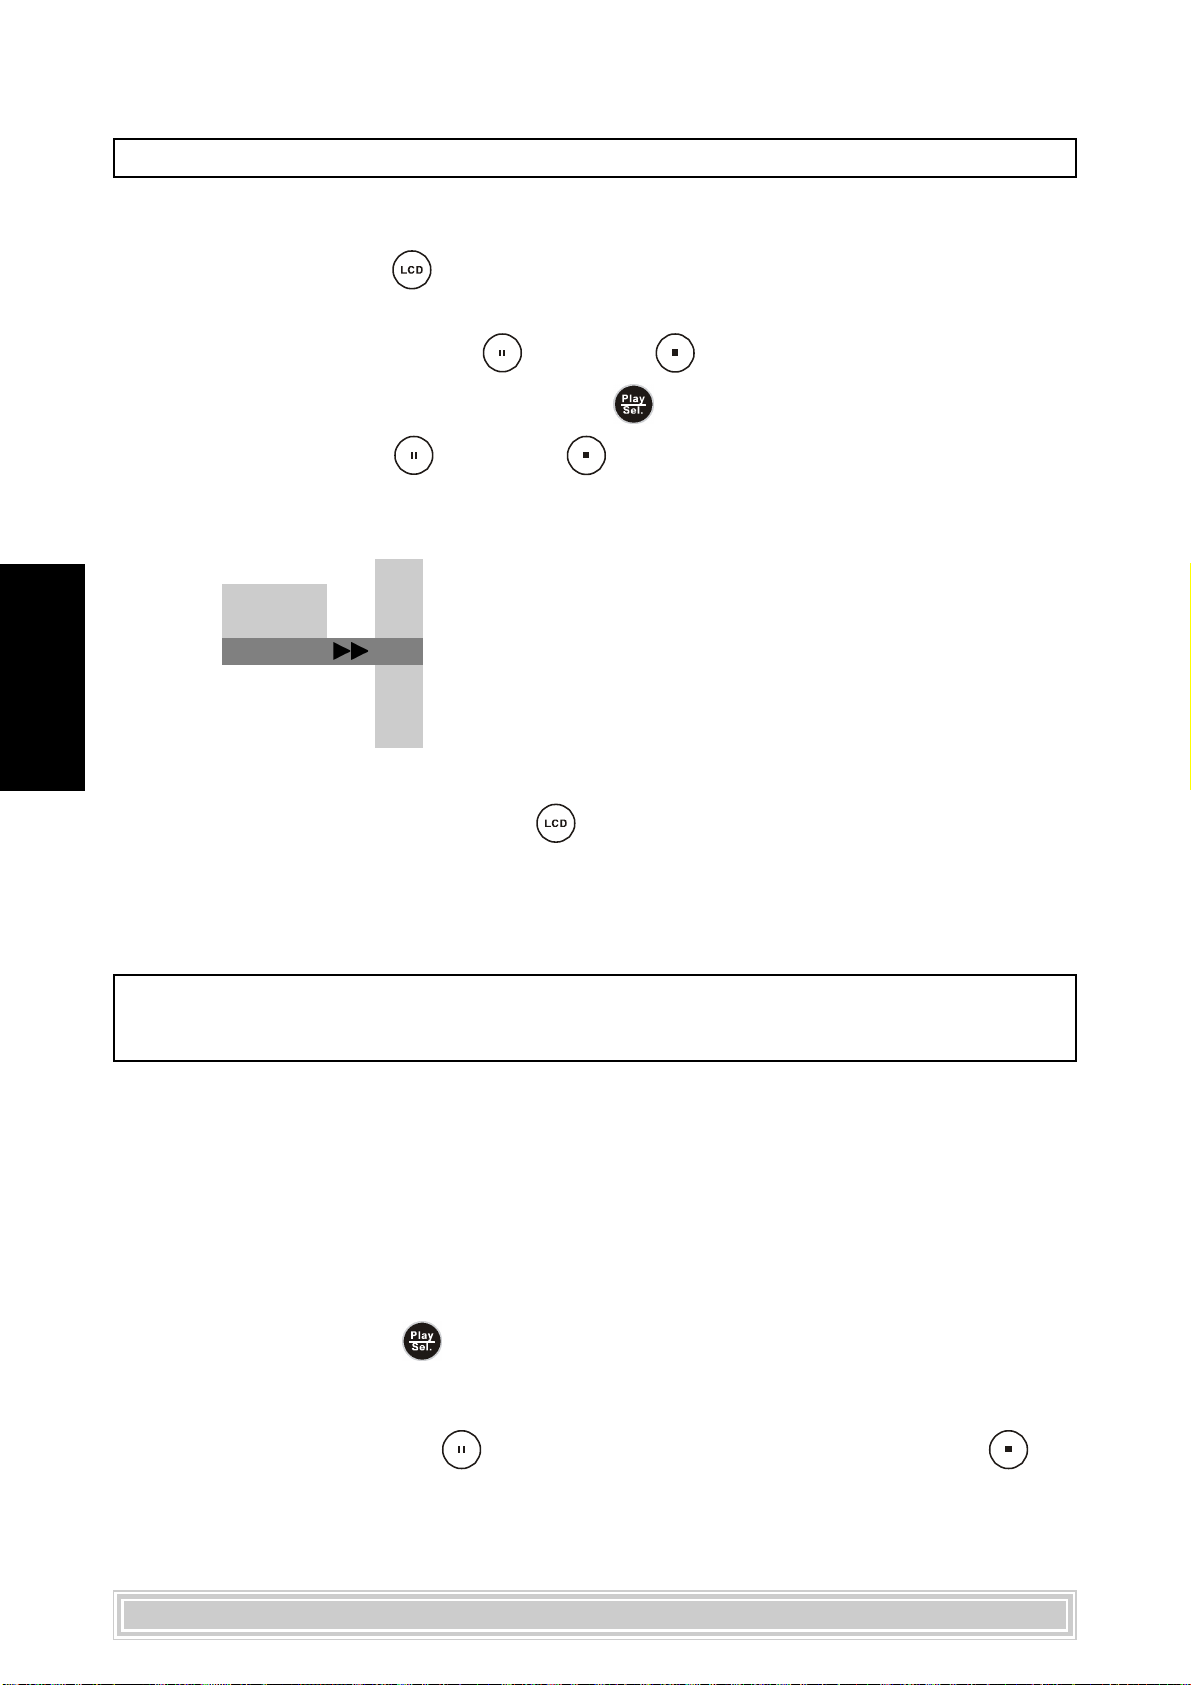
Definição da luminosidade do LCD
Pode aumentar ou diminuir a luminosidade do vídeo.
1. Prima o botão
2. Prima um dos botões
3. Prima o botão
Português
<LCD>, as informações relativas às definições do
LCD aparecem no ecrã.
<CIMA> / <BAIXO> para seleccionar
“Bright” (Brilho), e depois prima
<PLAY/SEL.>.
<CIMA> / <BAIXO> para seleccionar a definição
preferida da luminosidade, e de seguida, o painel muda para a definição
seleccionada.
+3+3
+3
+3+3
PanelPanel
Panel
PanelPanel
ColorColor
Color
ColorColor
Bright Bright
Bright
Bright Bright
*Para concluir a operação de configuração
---Volte a premir o botão <LCD> até as informações da definição do
+2+2
+2
+2+2
+1+1
+1
+1+1
00
0
00
--
11
-
1
--
11
--
22
-
2
--
22
--
33
-
3
--
33
LCD desaparecerem.
Reprodução de CD com fotografias da Kodak e com
fotografias em formato JPEG
Pode reproduzir CD com fotografias da Kodak e com fotografias em formato JPEG para
visualizar no ecrã.
Introduza um CD com fotografias da Kodak e com fotografias em formato JPEG,
após alguns segundos, este leitor de DVD portátil inicia automaticamente a
reprodução de fotografias sob a forma de diapositivos.
Ou
Pode premir os botões numerados correspondentes à ordem da fotografia, e de
seguida, premir o botão
*Para pausar/parar a reprodução
<PLAY/SEL.>.
---Prima o botão <PAUSE> para pausar a reprodução e prima
<STOP> para parar.
76
 Loading...