


82-179-01021
Portable DVD Player
Quick Guide
Welcome to this Portable DVD Player Quick Guide. Please carefully follow the
instructions to set up your portable DVD player.
Getting to Know Your Portable DVD Player
FRONT VIEW DIAGRAM
LCD screen
SPEAKERS
F.BWD/LEFT button
POWER indicator/Battery charge indicator
LEFT SIDE DIAGRAM
DC IN jack
POWER button SD/MMC card slot
SPEAKERS
LCD button
SETUP button
MODE button
MENU button
PAUSE/UP button
F.FWD/RIGHT button
PLAY/SEL. button
NEXT button
STOP/DOWN button
PREVIOUS button
Remote Sensor
OPEN button
Antenna/Cable TV
signal Input jack
1

RIGHT SIDE DIAGRAM
123456 87
1. Volume Adjustment scroll wheel
2. Headphone jack
3. Headphone jack
4. Coaxial output jack
REMOTE CONTROL DIAGRAM
1
2
3
4
5
6
7
8
9
5. AV out/AV in switch button
6. Audio output/input jack
7. Video output/input jack
8. S-Video/P-Scan output jack
10
11
12
13
14
15
16
17
18
19
1. INFO. button
2. Auto Search/SETUP button
3. MODE button
4. PAUSE/UP button
5. F.BWD/LEFT button
6. PLAY/SEL. button
7. PREVIOUS button
8. STOP/DOWN button
9. Number buttons
10. LCD button
2
11. TV Source/MENU button
12. SUBTITLE button
13. TITLE button
14. ANGLE button
15. F.FWD/RIGHT button
16. AUDIO button
17. NEXT button
18. REPEAT 1/ALL button
19. MUTE button

BATTERY INSTALLATION FOR THE REMOTE CONTROL
Insert the battery and match the (+) and (-) on battery to the marks inside the
battery compartment.
First-time use:
Remember to remove the insulating Mylon piece
from the battery.
CR2025
+
+
OPEN
PUSH
Service life of battery
1. The battery normally lasts for about one year although this depends on how
often and for what operations the remote control is used.
2. If the remote control unit fails to work even when it is operated near the
player, replace the battery.
3. Use a 3V lithium battery.
REMOTE CONTROL OPERATION RANGE
Point the remote control unit no more than about 6 meters from the remote
control sensor and within 600 of the front of the unit.
remote sensor
30
The operating distance may vary according to the brightness of the room.
Note:
1. Do not point bright lights at the remote control signal sensor.
2. Do not place objects between the remote control unit and the remote
control signal sensor.
3. Do not use this remote control unit while simultaneously operating the
remote control unit of any other equipment.
3
Quick Operation Guide
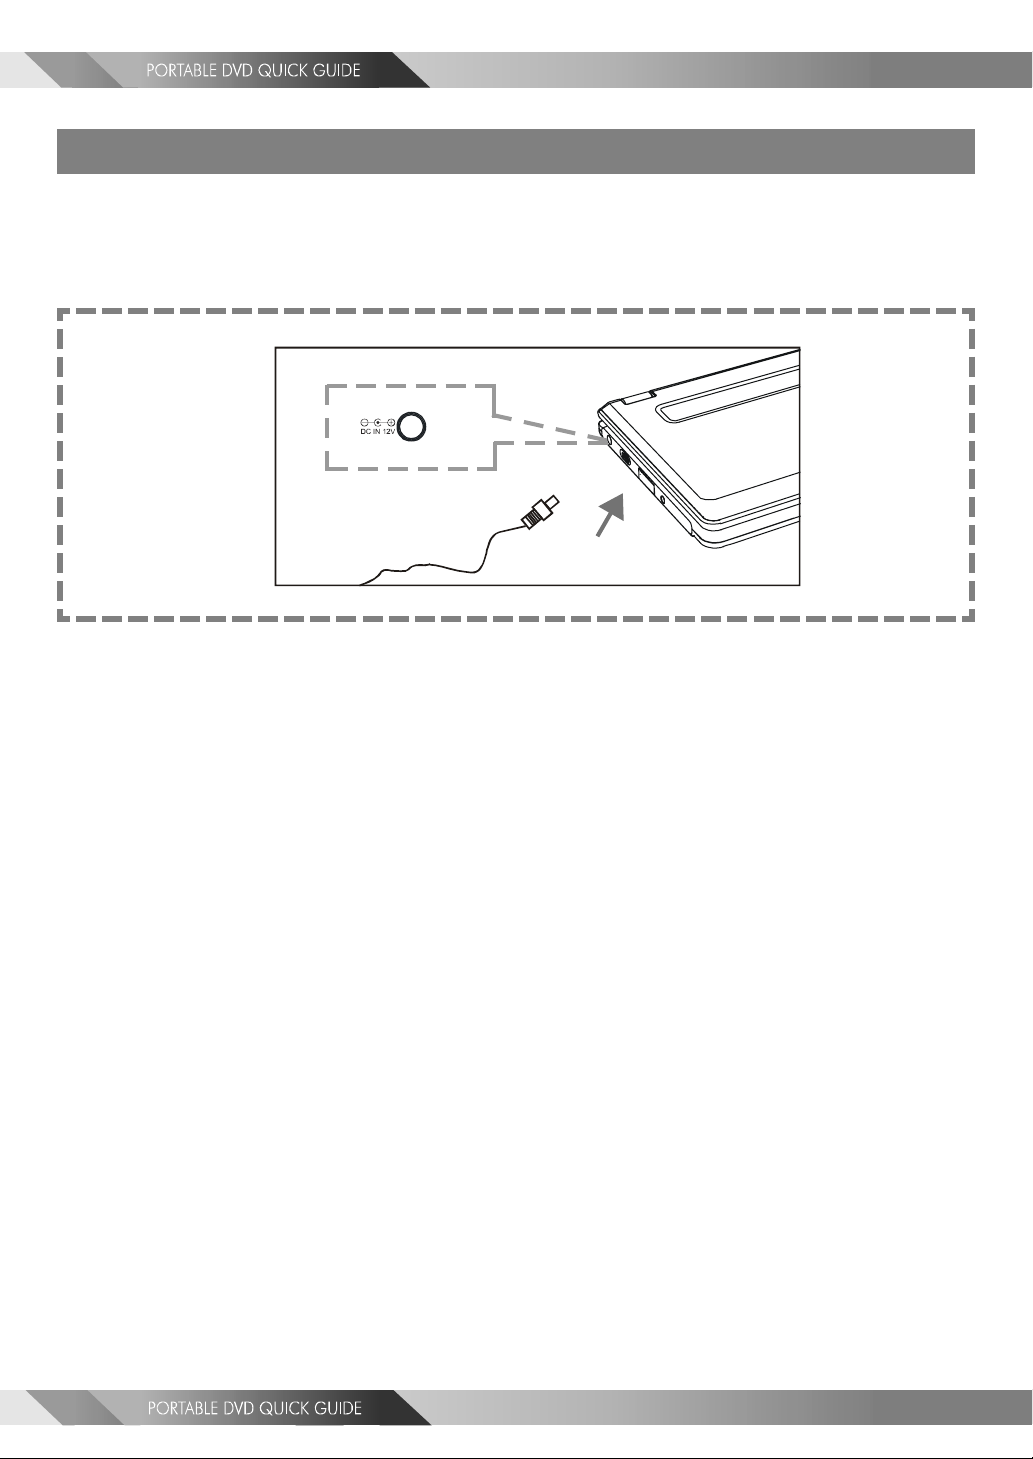
STEP 1. Connect to Power (A)
Please connect the supplied AC adapter to the DC IN jack on the left side of the
portable DVD player.
(A)
STEP 2. Connect earphones or connect to external equipment.(B)
If you want to enjoy a better listening and viewing quality, you can connect the
portable DVD player to external equipment, such as a TV or an amplifier.
Note:
1. Before connecting, make sure to turn off the power on the portable DVD
player and external equipment.
2. Make sure to slide AV OUT/IN switch to AV OUT.
4

(B)
(White)(Red) (Yellow) (Blue) (Red) (Green)
1 2 3
4
Note: Make sure the external equipment supports
the audio/video input feature.
Back/front panel of external equipment
L
1
2
3
4
(White)
(Red)
R
TV
Video input
TV S-Video input
S-Video
P-Scan TV
Pb
(Blue)
(Red)
Pr
(Green)
Y
Audio input
Video input
5

STEP 3. Open the display panel. (C)
(C)
STEP 4. Press POWER to turn on the portable DVD player. (D)
(D)
STEP 5. Press <OPEN> to open the disc cover. (E)
(E)
STEP 6. Gently hold the edge of the disc, then put it in the
center with the printed side up.
STEP 7. Close the disc cover.
STEP 8. Press
6
<PLAY/SEL.> to play the disc.

INPUT FROM EXTERNAL EQUIPMENT
You could input images and sound from external equipment by connecting the portable DVD player to external equipment with Audio cable or
Video cable.(F)
Note: Make sure to slide AV OUT/IN switch to AV IN.
(F)
(White)(Red) (Yellow)
1
Note: Make sure the external equipment supports the audio/
video output feature. External equipment with external
output jack (example: audio output and video output)
Back/front panel of external equipment
L
R
TV
(White)
(Red)
Audio output
Video output
1
2
2
7

Using the Battery Pack
Note: The shape of the following pack is only for reference; the actual shape may differ.
Battery connectors
Before using the battery pack, make sure to charge it. You can only charge the
battery pack while the battery pack is attached to the portable DVD player.
Battery Pack Information (Charge & Playback Time)
Charge Time(hr) DVD Playback Time(hr)
NiMH 4500mAh 4.5 2.5
Li-ion 6300mAh 5.5 3.5
A. How to charge the battery pack
STEP 1. Please align the portable DVD player’s battery connectors with the
battery pack’s battery connectors. Attach the battery pack to the
portable DVD player as shown in figure (A).
(A)
Note:
1. Please turn Power off when attaching or removing the battery pack.
2. If you want to remove the battery pack, refer to “B. How to remove the
battery pack from the portable DVD player.”
8

STEP 2. Connect the AC adapter(12V, 1.25A) to the DC IN jack on the left
side of the portable DVD player and a household power outlet as
shown in figure (B).
(B)
STEP 3. The battery charge indicator will turn red and start charging.
STEP 4. When the battery pack is fully charged, the battery charge indicator
will be off.
Note:
1. The battery pack is not charged while the portable DVD player is turned on.
2. Please use the specific power adapter (12V, 1.25A) to charge the battery pack.
B. How to remove the battery pack from the portable
DVD player
STEP 1. Please follow the instructions on the back of the portable DVD
player and slowly remove the battery pack from the unit as shown
in figure (C).
(C)
Step 1
Step 2
9

MMC/SD Card Operation
Note: You can only change the MMC/SD setting to “On” or “Off” while there
is no disc inside the DVD player.
<< Important >>
z If you set the MMC/SD setting to
“On”, the portable DVD player can
only read SD/MMC card. That is to
say, the portable DVD player can’t
playback any discs.
z While the disc is played back, you
can only press the
button to switch to MMC/SD mode.
<Mode>
Custom Setup
MMC/SD
Parental Ctrl
Password ...
Angle Mark
: Move : Select SETUP: Quit
On
Off
STEP 1. Insert the card as shown in figure (A).
STEP 2. After a few minutes, the unit will enter File Manager mode.
Press
specific file.
STEP 3. Press
<UP> button or <DOWN> button to select the
< <
<PLAY/SEL.
< <
> >
> to view the the preferred picture or
> >
playback the selected MP3 file.
<<<<
<< NOTE
<<<<
*Playable format: MP3/JPEG
*If the JPEG file size is over 1.5MB, the portable DVD player needs more time to read it.
<<<<
<< For JPEG pictures only
<<<<
Press
*Press <LEFT> button to rotate left by 90 degrees.
*Press <RIGHT> button to rotate right by 90 degrees.
>>>>
>>
>>>>
>>>>
>>
>>>>
<LEFT> button or <RIGHT> button to rotate the picture.
To remove the MMC/SD card
Push the card as shown in figure (B). The card will pop out.
(A)
10
(B)

TV Tuner Operation
Preparation
In order to receive a TV signal, please connect the unit to the supplied antenna,
to cable, or to satellite.
STEP 1. Connect the RF coaxial cable or Aerial cable to Antenna/Cable TV
signal input jack on the left side of the portable DVD player as
shown in figure (A).
(A)
4
2
5
3
1
Antenna/Cable TV signal input jack Aerial cable
1
3
RF coaxial cable Receive Antenna TV signal
Receive TV signal from cable
5
2
4
For using RF coaxial cable ONLY
Before connecting the RF coaxial cable to Antenna/Cable TV signal input jack on
the left side of the portable DVD player, remember to connect the RF coaxial cable
with cable transfer as shown in the following diagram.
NOTE: There are two kinds of cable transfers: one is for NTSC, the other is for PAL.
(PAL)
(NTSC)
11

For using Aerial cable ONLY
After connecting the Aerial cable to Antenna/Cable TV signal input jack on the left
side of the portable DVD player, remember to place the Aerial cable in proper
position to receive the best TV signal.
HOW TO USE TV TUNER
Note: TV reception quality might differ from area to area.
Quick operation guide
STEP 1.
Press Power on.
STEP 2. Press <Mode> to switch to “TV Tuner”.
Press <Mode> a number of times. You can toggle between
“S-Video”, “P-Scan”, “MMC/SD” or “TV Tuner”.
STEP 3. Press <TV Source> to choose the TV source from “Cable”
or “Antenna”.
STEP 4. Press <Auto Search>. The tuner search starts automati
cally and allows the channel lineup to be confirmed.
This process may take several minutes.
<<Note>>
1. While doing Auto Search for the first time, the portable DVD
player will select available TV channels. Yet, if more channels
become available in your area, you may need to repeat the Auto
Search to update the available channels.
2. While conducting an Auto Search, all stored programs will be
erased and a new lineup will be written.
*Before doing Auto Search, make sure to set the correct country
setting in the Screen Setup.
STEP 5. Press <LEFT> button to previous channel, or press
<RIGHT> button to advance to the next channel.
12

To select preferred available channels
Press <NEXT>
or <PREVIOUS> to choose the preferred avail-
able channels.
<<<<
<< NOTE
<<<<
>>>>
>> This function only works with available channels.
>>>>
To select specific channel
Press <LEFT> button or <RIGHT> button to select the specific
channel; or press the number button(s) to specify the specific channel.
<<<<
<< NOTE
<<<<
1. You can use this function to select a specific channel. All channels are
2. Example: Select Channel 25 by pressing “2” and “5” on the remote control.
>>>>
>>
>>>>
available.
Mute function
Press <MUTE>, the “ ” icon appears on the screen and the portable
DVD player is muted.
To resume sound
Press
<MUTE> again until the “ ” icon disappear on the screen.
13

Country Setting
1
Press <SETUP> in the stop mode.
2 Press <UP> button / <DOWN> button to select
“Screen Setup”, and then press
<PLAY/SEL.>.
3 Press <UP> button / <DOWN> button to select “Country”,
and then press
<PLAY/SEL.>.
4 Press <UP> button / <DOWN> button to select the
correct country setting.
5 Press <PLAY/SEL.>.
Screen Setup
TV Type
Screen Saver
TV System
Video Output
Country
USA
Japan
14
: Move : Select SETUP: Quit
To return to the SETUP MENU screen
Press
To finish the setup operation
Press
<LEFT> button.
<SETUP> to exit or select EXIT from SETUP MENU screen.
NTSC TV Tuner
Canada, Japan, Korea, Panama, U.S., etc.
 Loading...