

Page 1

Paragon 600 II EP
with
TWAIN Data Source (for PC)
User's Guide
Page 2

2 Paragon 600 II EP Scanner User's Guide
Copyright Information
All rights reserved. No part of this publication may be reproduced,
transmitted, stored in a retrieval system, or translated into any language in
any form by any means, mechanical, optical, electronic, recording, or
otherwise, without the written permission of Mustek, Incorporated.
Mustek Incorporated reserves the right to revise this manual and to make
changes to any or all parts at any time, without obligation to notify any
person or entity of such revisions and changes.
Mustek is a trademark of Mustek, Incorporated. All other brand or product
names mentioned in this manual are trademarks or registered trademarks of
their respective owners.
Copyright © 1996 Mustek, Incorporated.
Printed in Taiwan, August 1996.
FCC Statement
This digital equipment has been tested and found to comply with the limits
for a Class B digital device, pursuant to Part 15 of the FCC Rules. These
limits are designed to provide reasonable protection against harmful
interference when the equipment is operated in a residential installation.
This equipment generates, uses, and can radiate radio frequency energy
and if it is not installed and used according to the instruction manual, it may
cause harmful interference to radio communications. However, there is no
guarantee that interference will not occur in a particular installation. If this
equipment causes harmful interference to radio or television reception,
which can be determined by turning the equipment off or on, you are
encouraged to try to correct the interference by one or more of the
following measures:
• Reorient the receiving antenna
• Increase the distance between the equipment and the receiver
• Connect the equipment into an outlet on a circuit different from that to
which the receiver is connected
• Consult the dealer or an experienced radio/TV technician for help
NOTE
1. The changes or modifications not expressly approved by the party
responsible for compliance could void the user’s authority to operate
the equipment.
2. Shielded interface cables and AC power cord, if any, must be used in
order to comply with the emission limits.
Page 3

3
Contents
Installation 4
Unpacking the Scanner Package ...................................................................................... 4
The Scanner Parts ........................................................................................................... 4
Connecting the Scanner to the PC and Printer ................................................................. 5
Installing the PC Driver and Software ................................................................... 6
Operating the Scanner ..................................................................................................... 7
Power Up Procedure ............................................................................................ 7
Document Positioning ......................................................................................... 8
Using the Printer............................................................................................................. 9
Scanning Tips .................................................................................................................. 9
Scanning an Image 10
Acquire the Mustek F/B Scanner Dialog Box ................................................................ 10
To Scan an Image........................................................................................................... 10
Prescan the Image ............................................................................................... 11
Set the Image Size ............................................................................................... 11
Set the Scan Mode............................................................................................... 11
Set the Resolution .............................................................................................. 12
Execute the Scan ................................................................................................ 12
Doing Batch Scans ........................................................................................................ 12
Tonal Adjustment .......................................................................................................... 13
Appendices
Appendix A: Specifications ......................................................................................... 15
Appendix B: Technical Support .................................................................................... 17
Page 4
4 Paragon 600 II EP Scanner User's Guide
Installation
This chapter covers the scanner parts and describes how to
connect the scanner to your computer and printer. You will also
find information useful in operating the scanner.
Unpacking the Scanner Package
Carefully unpack the contents of the scanner package. Inspect the
items closely and if you find any item damaged, please contact
your dealer immediately. Also, save the box and packing material
for future use in case you have to ship the unit.
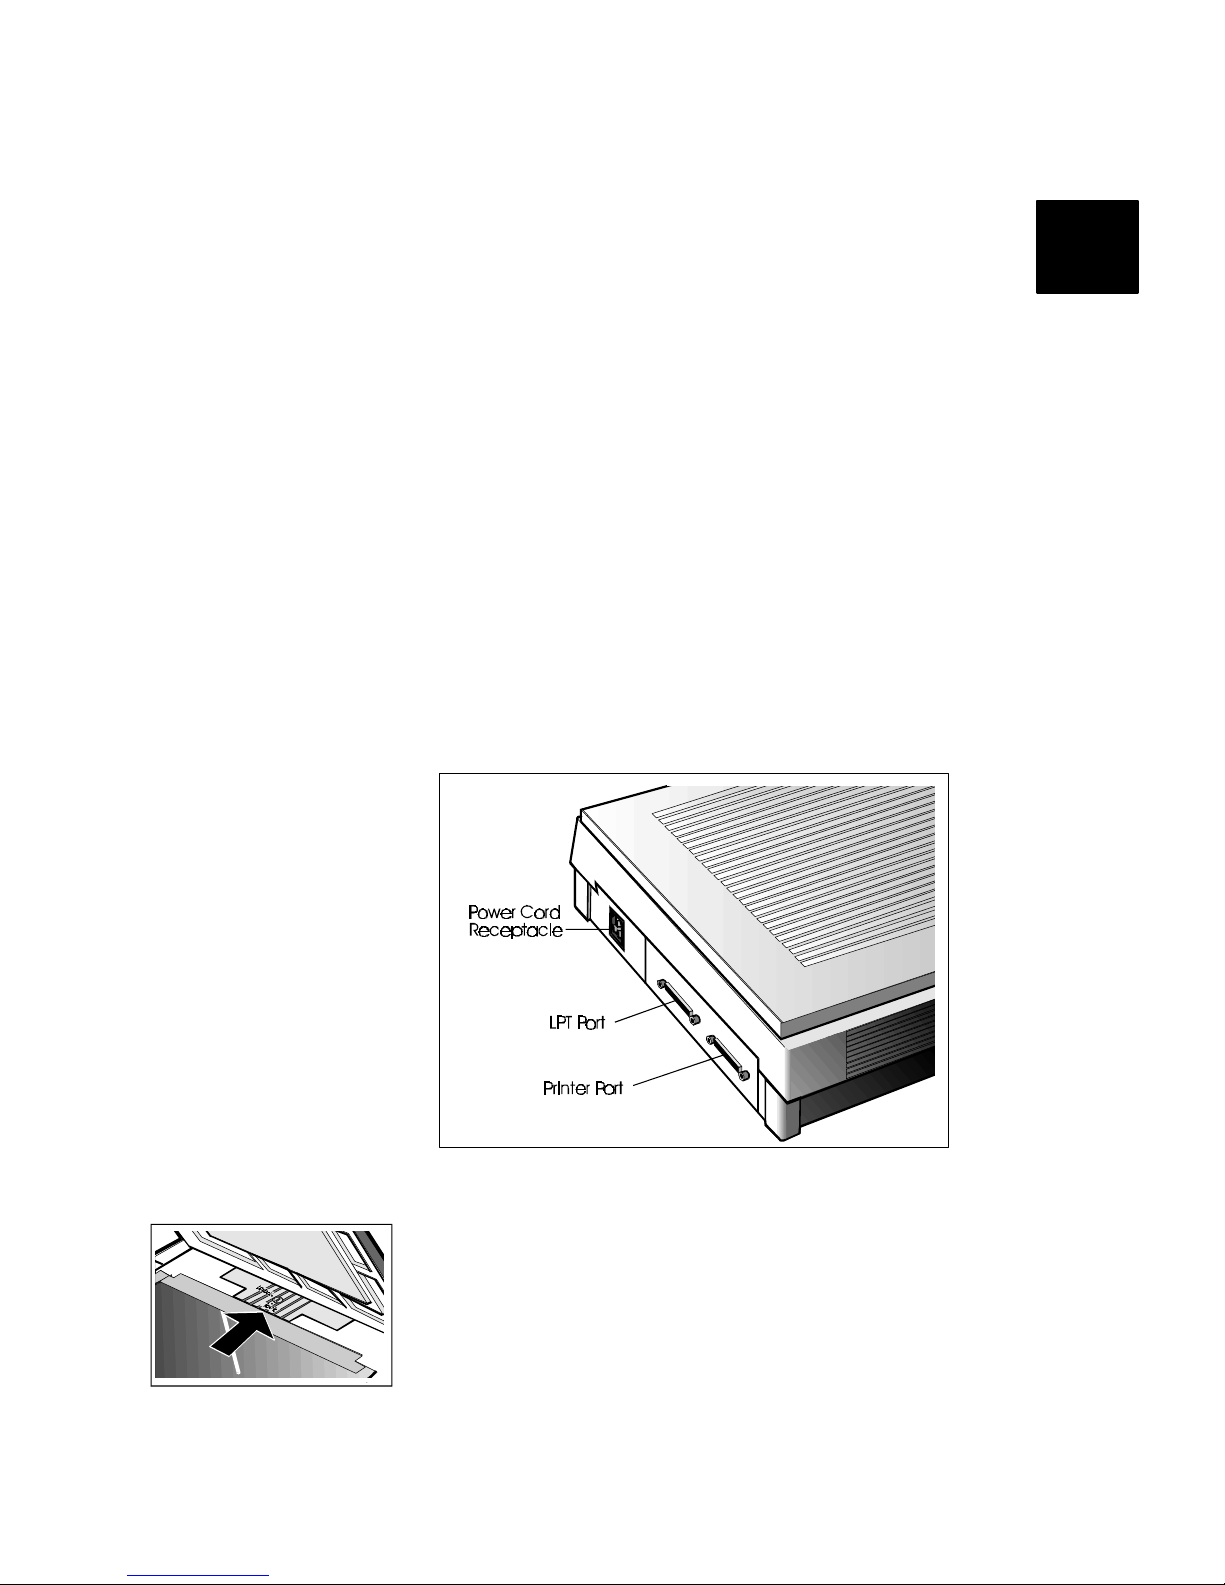
The Scanner Parts
The following illustration shows the major parts of the scanner.
The Flatbed Scanner
Note: The screw lock located above the scan window glass
protects the scanning mechanism during shipping. It is important
that you unlock the carriage before operating the unit to prevent
causing damage to the scanner. Using a screwdriver or a small
coin, point the arrow on the screw to "unlock."
1
Page 5
5
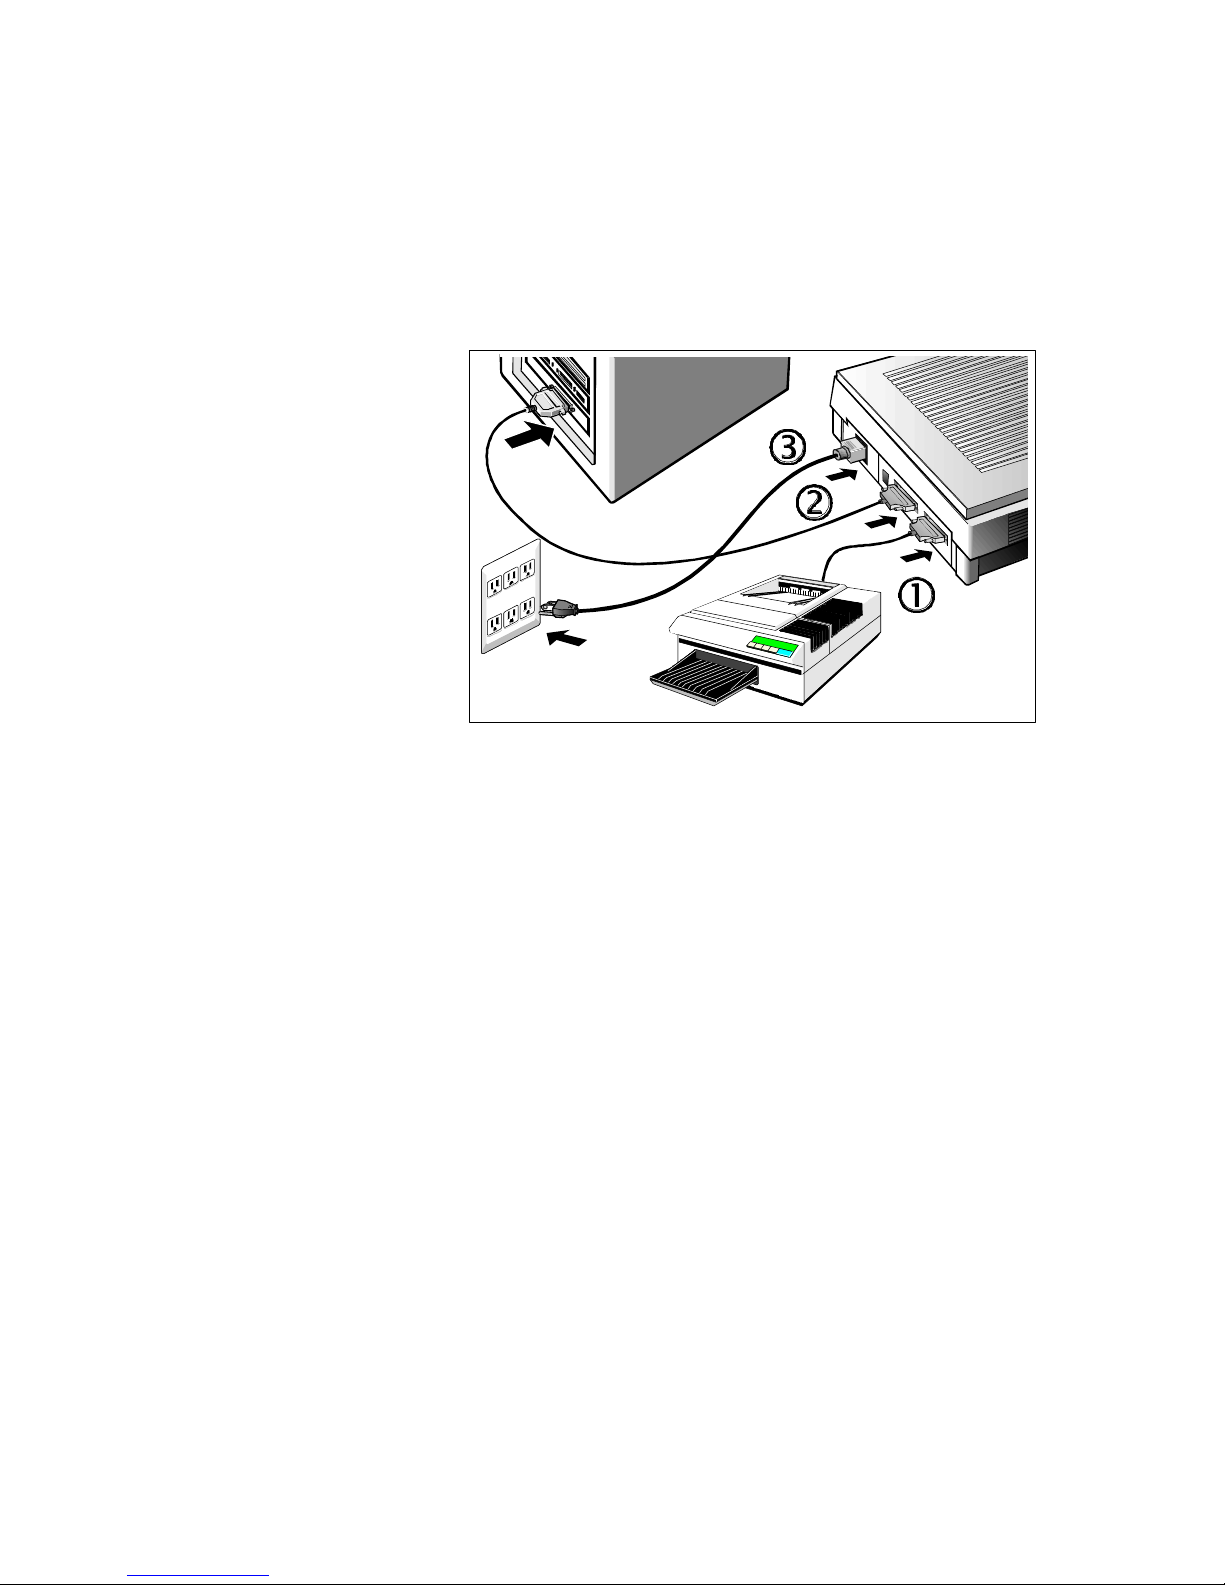
Connecting the Scanner to the PC and Printer
Refer to the following illustration and steps to install your
scanner.
1. Power off the computer and any devices that are connected to
it (e.g., monitor, printer, modem).
2. Disconnect the printer cable from the printer port in the back
of your PC.
3. Take the disconnected end of the printer cable and attach it to
the port in the back of the scanner marked Printer. Tighten
the retaining screws.
4. Connect one end of the scanner cable to the printer port in the
back of your PC and tighten the retaining screws.
5. Connect the other end of the scanner cable to the port in the
back of the scanner marked Host.
6. Connect the power cable to the scanner and plug it into an
appropriate power outlet.
7. Power on the computer and wait for the computer to finish
booting.
8. Power on the scanner and wait until the ready light stops
flashing and remains lit.
9. Install the scanner driver and software by referring to the next
section.
Page 6

6 Paragon 600 II EP Scanner User's Guide
Installing the PC Driver and Software
Under Windows 3.1x:
1. Start Windows.
2. Insert the Mustek Scanner Solutions CD into your CD-ROM
drive.
3. From Program Manager, open the "File" menu and select the
"Run" command. The "Run" dialog box will be displayed.
4. In the "Run" dialog box, type "drive:\setup31" where drive is
your CD-ROM drive.
5. Click "OK."
6. Follow all onscreen instructions.
Note:
• In the "Select Components to Install" dialog box, select your
scanner model and Manual files
• Complete installation will include the scanner driver and the
bundled software
Under Windows 95:
1. Turn on your computer, allowing it to start Windows 95.
2. Insert the Mustek Scanner Solutions CD into your CD-ROM
drive.
3. Click on the "Start" button and select "Run" from the pop-up
menu.
4. In the "Run" dialog box, type "drive:\setup95" where drive is
your CD-ROM drive.
5. Click "OK."
6. Follow all onscreen instructions.
Note:
• In the "Select Components to Install" dialog box, select your
scanner model and Manual files
• Complete installation will include the scanner driver and the
bundled software
Warning: Do not install the Windows 95 driver under 3.1x.
The Windows 95 driver is backward compatible with Windows 3.1
programs, but is not backward compatible with the Windows 3.1 x
operating system.
Page 7

7
The Windows 95 driver has been successfully tested using the
following Windows 95 programs: Adobe PhotoShop 3.0.5,
CorelDraw 6, Micrografx Picture Publisher 6.0, and Microsoft
Imager.
Configuring the Software
In order to scan with TWAIN Data Source, you must first
configure the TWAIN-compliant application software that came
with your scanner or which was purchased separately.
Configuration involves setting up the application software as a
“host” program for TWAIN Data Source and selecting the scanner
as an image source for the application software.
The configuration process only has to be done once. After the
configuration process is complete, the TWAIN Data Source will
control all interactions between your scanner and the host
program. To configure the software:
1. Make sure your scanner is still on.
2. Launch Windows.
3. Launch the host application software that came with the
scanner.
4. Open the host application’s Select Source command (usually
under the File menu) and choose Select Source to display the
Select Source dialog box.
5. From the list of sources, choose “Mustek F/B Scanner
(EPP)” as your image source and click Select. You will return
to the main screen of the host application. Software
configuration is now complete.
Operating the Scanner
Power Up Procedure
1. Power on the computer and wait for it to finish booting.
2. Turn on the scanner by flipping the power switch from 0 to |.
When turned on, the scanner undergoes a series of self-
diagnostic tests. The LED indicator on the front panel of the
scanner flashes briefly and then remains lit, signifying that the
scanner is ready.
Page 8

8 Paragon 600 II EP Scanner User's Guide
Document Positioning
For the best possible image scans, it is important that you
position your documents correctly and carefully.
1. Lift the document cover.
2. Place the document face down on the glass and in the upper
right corner where the alignment marks are located:
3. Slowly lower the document cover, making sure the document
remains in position.
4. In your scanning program, set up the scanning parameters such
as scan mode, resolution, etc. See Chapter 2 for more
information.
5. Execute the scan command.
6. Remove the document after scanning is complete.
Using the Printer
Unless you want to scan, it is not necessary to turn on your
scanner when you wish to use the printer.
Page 9

9
Scanning Tips
The following tables provide helpful information you can use
when setting the scan mode and/or resolution. Recommended
scanning resolutions for various output devices are listed as
follows:
PRINT ER TYPE
INPUT
MATERIAL
SUGG ESTED
SCAN MODE
RESOLUTION
600-dpi Las er or
B/W Inkjet
Printer
Color
Grayscale
Halftone
Line Art/Text
Grayscale
Grayscale
Halftone
Line Art/Text
150 dpi
150 dpi
600 dpi
600 dpi
300-dpi Las er or
B/W Inkjet
Printer
Color
Grayscale
Halftone
Line Art/Text
Grayscale
Grayscale
Halftone
Line Art/Text
75 dpi
75 dpi
300 dpi
300 dpi
Color Inkjet
Printer
Color
Grayscale
Halftone
Line Art/Text
Color
Grayscale
Halftone
Line Art/Text
Chec k with
manufacturer for
recommended
resolution
Dye Sublimation
or Color Laser
Printer
Color
Grayscale
Halftone
Line Art/Text
Color
Grayscale
Halftone
Line Art/Text
Scan at
maximum
resolution of
printer in all
modes
Space requirements for different scan modes:
4" x 4"
scan
100 dpi 150 dpi 300 dpi 600 dpi
Line Art 19.5 Kb 44 Kb 175 Kb 703 Kb
Grayscale 156 Kb 352 Kb 1.37 Mb 5.5 Mb
Color 469 Kb 1 Mb 4.12 Mb 16.5 Mb
Page 10

10 Paragon 600 II EP Scanner User's Guide
Scanning an Image
Acquire the Mustek F/B Scanner (EPP) Dialog Box
Open the host application’s File menu and click the Acquire
command. (In some software programs the Acquire command
will appear in a submenu under the Import command.) The
Mustek F/B Scanner (EPP) dialog box will appear.
The F/B Scanner dialog box is where you set up your scanner and
perform the scanning and enhancement functions. Setting up your
scanner involves adjusting the image size, scan mode, and
scanning resolution.
Single Scan icon Batch Scan icon Zoom Tool icon
Tonal Adjustment icon
To Scan an Image
The steps to follow when scanning are:
1. Prescan the image.
2. Set the desired scan image size.
3. Select the desired scan mode.
4. Select the desired resolution.
5. Click Scan.
These steps are explained in detail in the following sections.
2
Page 11

11
Prescan the Image
A Prescan is a quick low-resolution scan of the entire original
image. From this low-resolution scan you can get a clearer idea
of the image area you want to include when you click Scan. To
Prescan, the steps are:
1. Place the document face down on the scan window glass.
2. Click the Prescan button in the Mustek F/B Scanner (EPP)
dialog box. After the scanner has scanned the document, the
scanned image will appear in the Preview Window. From the
Prescan image, you can now set the exact image area you wish
to include in your final scan.
Set the Image Size
Use the Crop Frame in the Preview Window to outline the image
area you wish to scan. Click one of the sides or corners of the
Crop Frame and drag it out or in to the desired length and width.
To move the entire Crop Frame, position the mouse cursor inside
it and drag with the (left) mouse button. Only the area inside the
Crop Frame will be included in the resulting scanned image when
you click Scan. The size information at the bottom of the dialog
box is automatically updated when the Crop Frame is resized.
Using the Zoom Tool
The Zoom tool doubles the magnification of the image area. In
magnified view, you can then drag the Crop Frame to the exact
area you want to scan.
Set the Scan Mode
The Scan Mode determines how the scanner will read the image.
Select Color to capture images in 24-bit color (16.7 million
colors). Select Gray to capture images in 256 grayscale. Images
scanned in Halftone are produced by dithering. When you wish to
scan text for OCR or line art, select Line Art.
Page 12

12 Paragon 600 II EP Scanner User's Guide
Set the Resolution
Resolution is a measure of how much image detail information
the scanner is to capture in a scan. Resolution is set by dragging
the scroll bar to the desired resolution, clicking the arrow at the
end of the slider until you have reached the desired resolution, or
by clicking inside the resolution box and typing in the resolution.
Execute the Scan
When you click Scan , the Mustek F/B Scanner (EPP) dialog
box displays the progress of your image transfer. The image will
be displayed in the main screen of the host software behind the F/
B Scanner dialog box. This provides the option of doing multiple
scans without re-acquiring the Mustek F/B Scanner (EPP) dialog
box each time.
Doing Batch Scans
Batch scanning is an easy way to multi-scan any part of your
document using different scan modes and resolutions (however,
certain application programs do not support this function). In
batch scanning, you can specify up to a maximum of 10 scan
regions or you can scan a single region several times using
different combinations of scan modes and resolutions. To do a
batch scan, the steps are:
1. Click the Batch Scan icon. The Batch Scan dialog box appears.
2. Create a scan region:
(a) Move the cursor inside the preview window.
(b) Hold down the Shift key, press the (left) mouse button
and drag the mouse to create a crop frame.
(c) Reposition or resize the crop frame if necessary.
Page 13

13
3. Set the desired scan mode and resolution for the current scan
region.
4. Repeat the steps if you wish to create more scan regions. You
can have up to 10 scan regions. If you want to duplicate the
current scan region, simply hold down the Shift key and click
the Batch Scan icon.
5. Click Scan. The scanner will begin to scan the scan regions
one after the other.
Tonal Adjustment
Once you have scanned an image and viewed the results, you can
use the Tonal Adjustment commands to improve the quality of
succeeding scans and thereby optimize your scanner’s output.
These commands are brightness, contrast, and gamma. To use
Tonal Adjustment, the steps are:
1. Click the Tonal Adjustment icon. The Tonal Adjustment dialog
box appears.
2. Open the Master menu box and select the channel you wish to
modify. Choose Red, Green, or Blue. Choosing Master means
changes will be applied to all three channels equally and
simultaneously.
3. Drag the scroll bars or type into the entry boxes to modify:
• Brightness - measures the overall amount of white in an
image.
• Contrast - measures the range of gray shades in an image.
Page 14

14 Paragon 600 II EP Scanner User's Guide
• Gamma - selectively adjusts brightness in the hilight,
shadow and midtone areas of an image. Values of 0.1 to
2.0 will primarily affect the shadow areas of your image.
Values of 2.1 to 6.0 will primarily affect the midtone
areas and values of 6.1 to 7.9 will primarily affect the
hilight areas.
4. Click Preview to see the effect of your changes to the
preview image. Readjust the settings if necessary. Click Reset
if you want to discard the changes and go back to the original
image.
5. Click OK when you're finished making adjustments. The Tonal
Adjustment dialog box closes and you can proceed to scan the
image.
Page 15

15
Appendix A: Specifications*
Model Name 600 II EP
Scanner Type Flatbed
Scan Modes True Color; 24bits/pixel (16.8 million colors)
256 Gray Scale; 8 bits/pixel
Halftone; 1 bit/pixel (2 levels)
Text/Line Art; 1 bit/pixel (2 levels)
Scan Method 1 scanning pass
Scan Area 216 x 297 mm
(maximum) 8.5 x 11.7 in.
Resolution Optical: 300 dpi (H) x 600 dpi (V)
Maximum: 4800 dpi x 4800 dpi (through software interpolation)
Resolution Control 72 - 4800 dots per inch (dpi) (1 dpi per step)
(controlled by software)
Scanning Data Buffer 128 KB (maximum)
Gamma Correction Downloadable by software
Halftone Cell Size 8x8
Brightness Control 255 adjustable steps (software controlled)
Contrast Control 255 adjustable steps (software controlled)
Interface EPP and SPP (Parallel Port)
Light Source Cold Cathode lamp
Dimensions 410mm x 290mm x 101mm (L x W x H)
(16.1 x 11.4 x 4.0 inches)
* Product specifications are subject to change without notice.
Page 16

16 Paragon 600 II EP Scanner User's Guide
Weight 4.8 kg (10.6 lbs)
Voltage Requirements 100 Vac ~ 250 Vac, 47 ~ 63 Hz
Power Consumption 30W (maximum)
Operating Temperature 10 to 40 degrees Centigrade (50 to 104 degrees Fahrenheit)
Operating Humidity 35% to 80% RH, noncondensing
Storage Temperature -10 to 60 degrees Centigrade (14 to 140 degrees Fahrenheit)
Storage Humidity 20% to 80% RH, noncondensing
Page 17

17
Appendix B: Technical Support
If you need help installing or using the scanner, please call
Technical Support.
Mustek, Inc. Mustek Computer GMBH Mustek Systems, Inc.
1702 McGaw Avenue Hellersbergstr. 2a No. 25 R&D Road 2
Irvine, CA 92714 41460 Neuss Science-Based Ind'l Park
USA Germany Hsinchu, Taiwan, R.O.C.
TEL: 1-714-247-1300 TEL: 49-2131-162840 TEL: 886-3-5779373
BBS: 1-714-247-1330 BBS: 49-2131-167104 FAX: 886-3-5784139
www.mustek.com BBS: 49-2131-130052
To bring you the best possible service, please have the following
information ready when you call:
• Which scanner model do you have?
• Which computer model are you using?
• What version of scanning software (and firmware) do you
have?
• What other application programs are you using?
• What other components are in your system? (For example,
FAX card, sound card, SCSI card and so on.)
• What are the problems/symptoms you encounter?
Product Returns
For Product repairs or returns, please follow these steps:
1. Call the technical support department for a Return Material
Authorization (RMA) number.
2. Write the RMA number clearly on the outside of the package.
3. Refer to this RMA number in all future calls.
Page 18

18 Paragon 600 II EP Scanner User's Guide
Note:
• Mustek cannot be held responsible for any product returned
without an RMA number
• Users must return the products to their point of purchase for a
refund or credit, according to the dealer's policy
• Products returned to Mustek must be sent postage paid,
prepared and packaged appropriately for safe shipmentIf you
need help installing or using the scanner, please call Technical
Support.
 Loading...