

Page 1
S
E
T
Digital Video
Quick Guide
82-170-00030
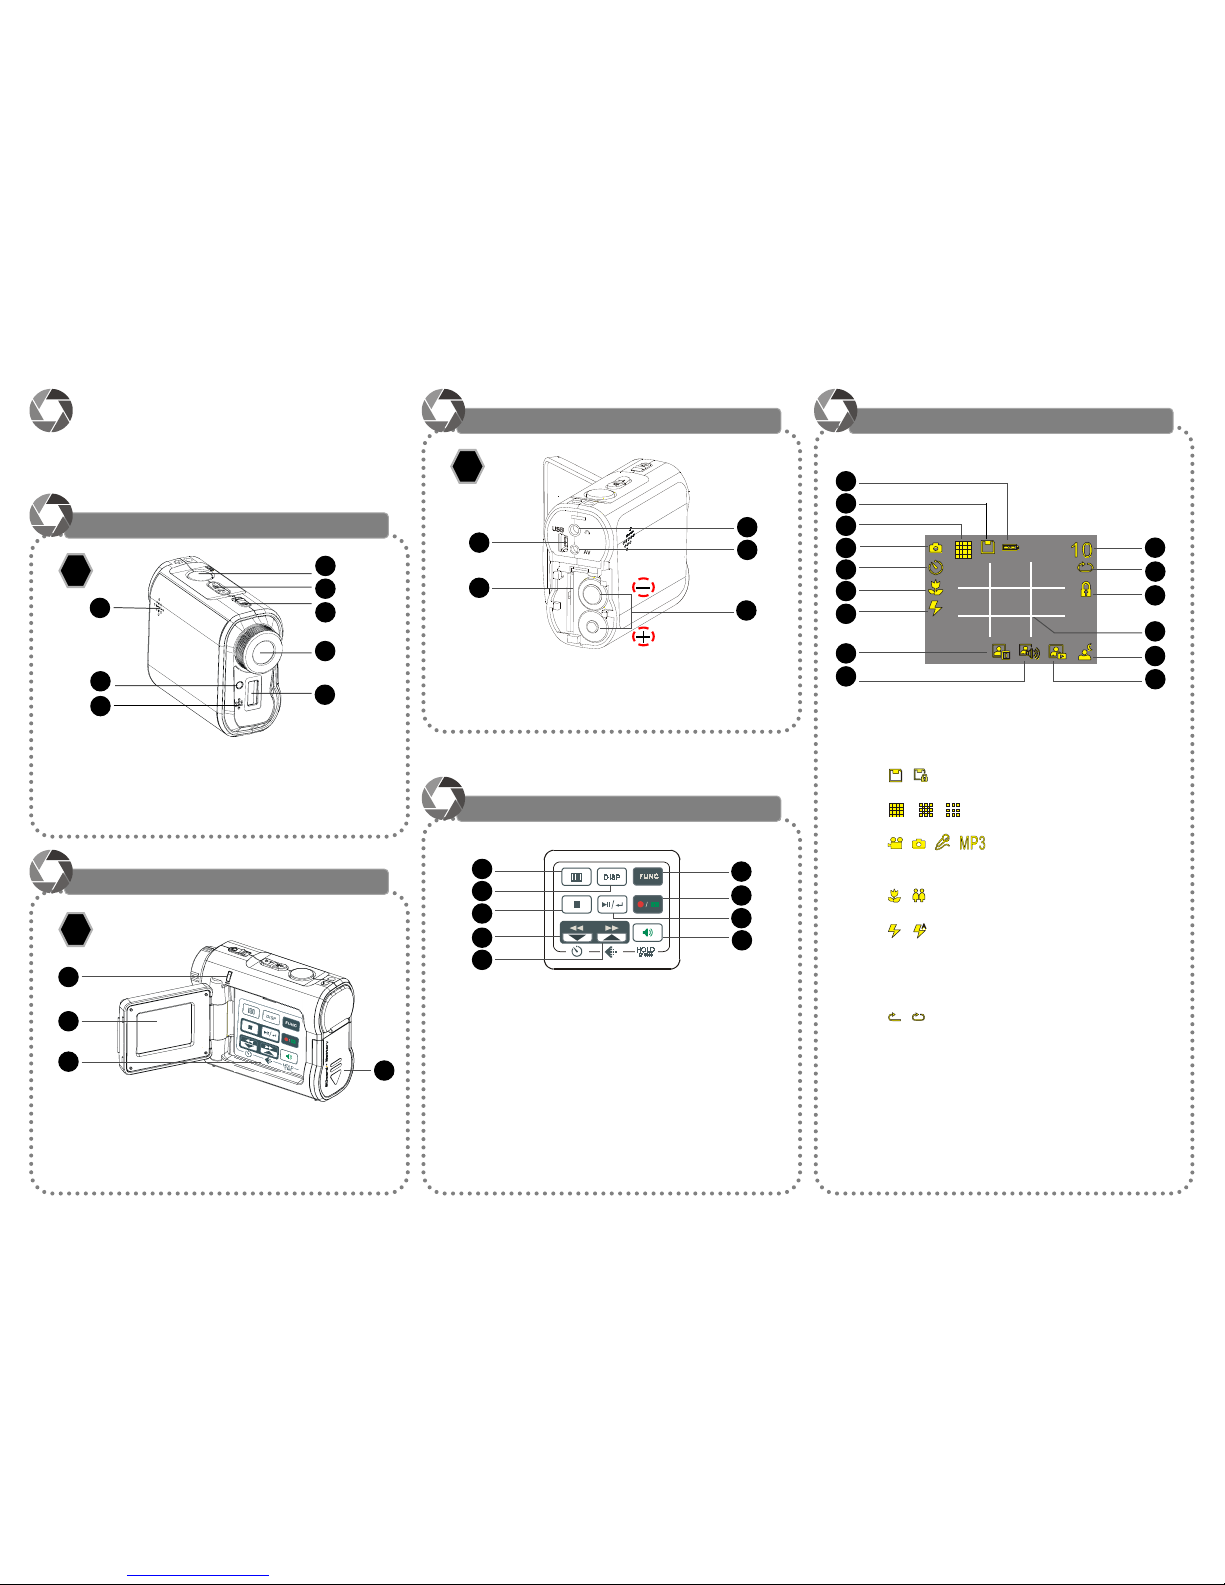
1. Speaker 2. Front LED 3. Microphone
4. Shutter 5. Zoom 6. Power button
7. Lens 8. Flash Light
7
6
4
1
5
8
S
E
T
1
2
3
4
1. Status LED (Power On/USB)
2. LCD Viewfinder
3. Panel
4. Battery/SD/MMC Cover
1. USB Port 2. SD/MMC card Slot
3. Earphone jack 4. AV out
5. Battery Slot
1. Menu
2. Display
3. Exit/Stop
4. Back/Down/Self-timer
5. Next/Up/Resolution
6. DV/DSC/DVR/MP3 Mode Switch
7. Record/Playback Mode Switch
8. Play/Pause/Enter
9. Volume/Hold(Press 2 Sec.)
3
2
9
4
6
8
7
5
12
13
1. Battery Indicator
2. Memory Card / Card Lock Indicator
( / )
3. Resolution (Fine/Normal/Economic) Indicator
( / / )
4. Mode Indicator
(
/ / / )
5. Self-timer Indicator
6. Macro / Normal Indicator
( / )
7. Flash Light (On/Auto/Off) Indicator
( / )
8. Attach Date Indicator
9. Attach Voice Indicator
10. Picture Counter
11. Repeat (One/All) Indicator (MP3 only)
( / )
12. Hold Indicator
13. Guide Line Indicator
14. Night Shot Indicator
15. Quick Review Indicator
A
B
Identifying the PartsIdentifying the Parts
Identifying the PartsIdentifying the Parts
Identifying the Parts
Identifying the PartsIdentifying the Parts
Identifying the PartsIdentifying the Parts
Identifying the Parts
4
1
5
3
2
Identifying the PartsIdentifying the Parts
Identifying the PartsIdentifying the Parts
Identifying the Parts
C
1
2
4
6
5
8
3
9
7
Panel IntroductionPanel Introduction
Panel IntroductionPanel Introduction
Panel Introduction
LCD IntroductionLCD Introduction
LCD IntroductionLCD Introduction
LCD Introduction
14
3
2
1
10
11
15
Page 2
PLAYBACK mode
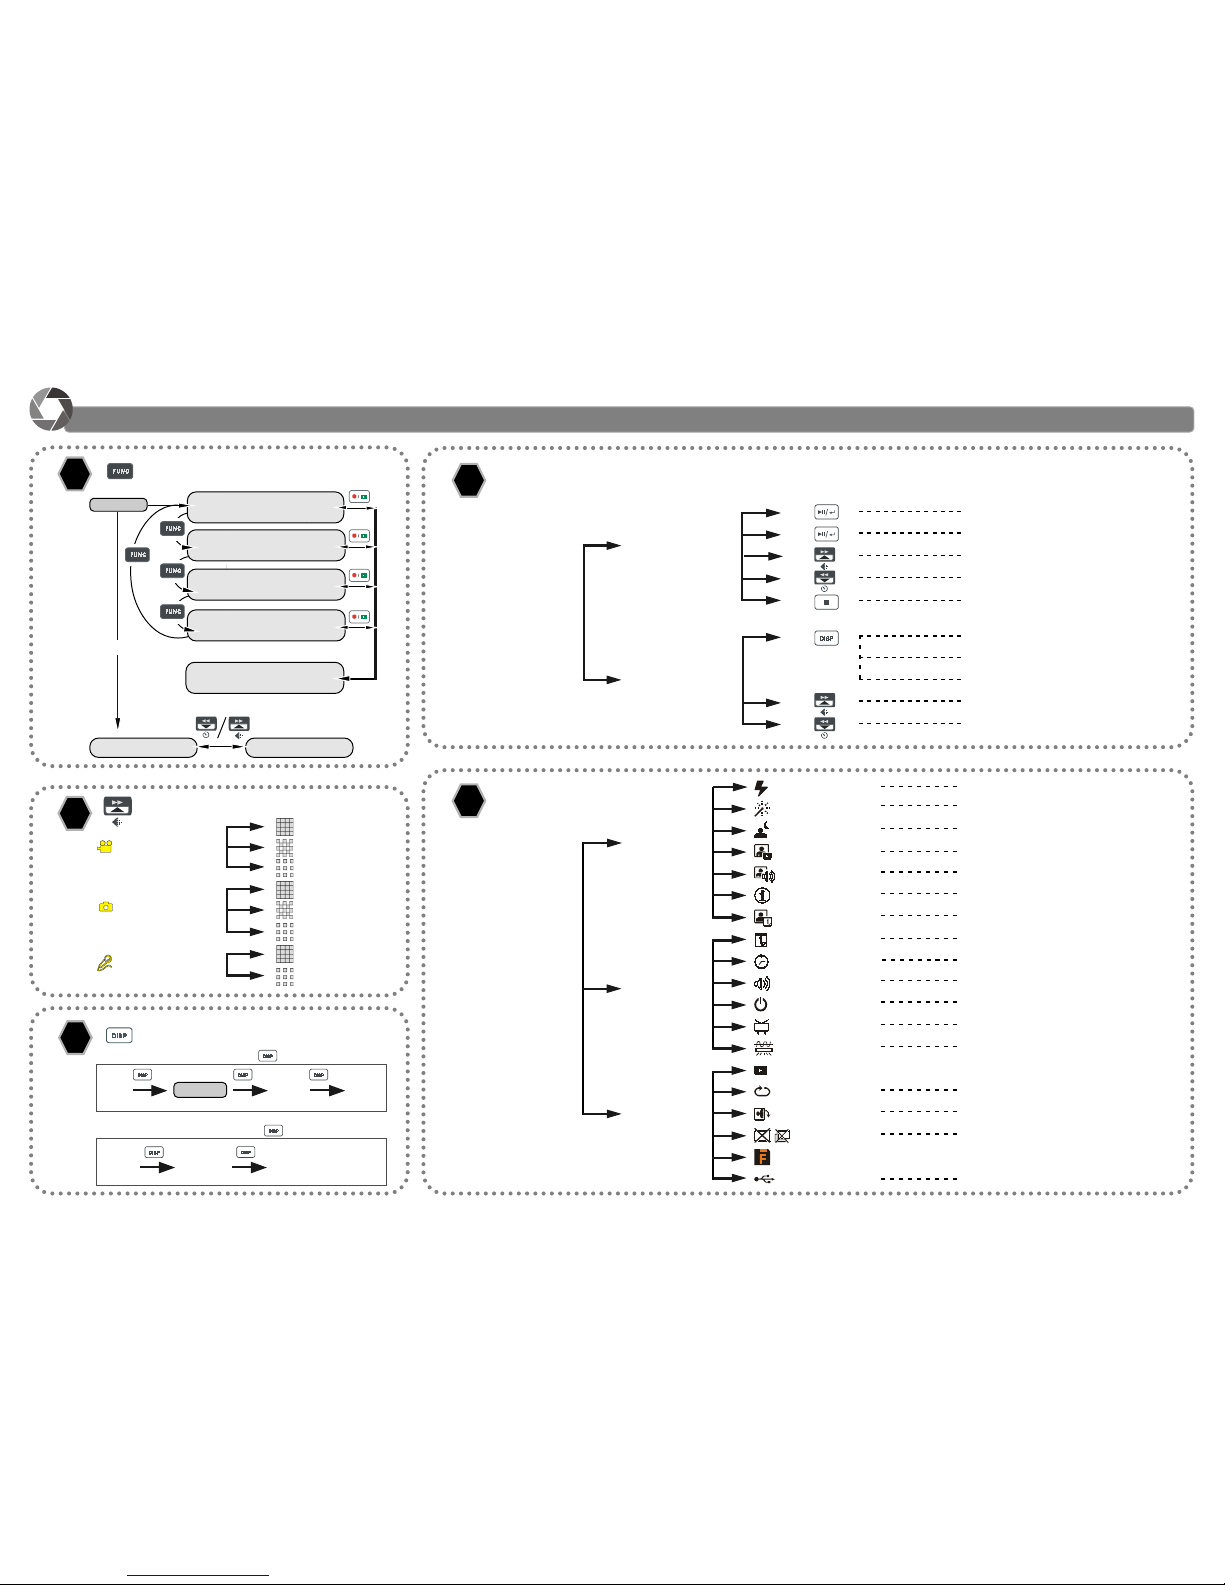
Basic playback
Advanced playback
Play
Pause
Fast-forward/Next
Fast-backward/Back
Stop
Preview in Single View
Preview in Multiple View
Hide the Information
Quick Search forward
Quick Search backward
QUALITY SWITCH FUNCTION
DISPLAY FUNCTION
PLAYBACK MODE
MENU FUNCTION
DV Record mode
Fine quality
Normal quality
Economic quality
Fine resolution
Normal resolution
Economic resolution
Standard quality
Long time
DSC Record mode
DVR Record mode
MENU Function
Digital Effect
Night Shot
Quick Review
Attach Voice
Information
Attach Date
Date
Time
Beep
Auto-Off
NTSC/PAL
50Hz/60Hz
Slide Show
Repeat
Rotate
Delete
Format
OFF, SEPIA, B&W, MOSAIC
OFF, ON
OFF, ON
OFF, ON
OFF, ON
OFF, ON
OFF, ON
OFF, 1 Min, 2 Min, 5 Min
NTSC, PAL
60Hz, 50Hz
OFF, One, All (MP3 only)
ROTATE 0, 90, 180, 270
Delete One, Delete All
Operation GuideOperation Guide
Operation GuideOperation Guide
Operation Guide
C
B
A
MODE SWITCH FUNCTION
D
E
Flash Light
OFF, On, Auto (DSC only)
For DV and DSC mode (While pressing the button repeatly)
Guide LineLCD On LCD Off LCD On
For DVR and MP3 mode (While pressing the button repeatly)
LCD On LCD Off LCD On
(Press it
Repeatly)
Power On
DV Record Mode
DSC Record Mode
USB connected
PC Camera Mode Mass Storage Mode
DVR Record Mode
MP3 Mode
PLAYBACK Mode
00.00.00 (DD.MM.YY)
00.00.00 (HH.MM.SS)
(Record
Status)
(Set items)
(PLAYBACK
Status)
DPS
Not work until connecting the printer
Page 3
Step 1. Press the menu button .
Step 2. Use the Up/Down Arrow to scroll to the night shot icon .
Step 3. Press the the play/select button to turn on the night shot mode.
4. You can playback and record any data either within your inserted memory
card or the built-in internal memory. (It is not available for using these
various memories at the same time.)
*We have included this convenient quick guide to help with the basic operations. For more detail on the different functions and operations please see the printed manual.
How to take Videos, Pictures and Record Voice Messages.How to take Videos, Pictures and Record Voice Messages.
How to take Videos, Pictures and Record Voice Messages.How to take Videos, Pictures and Record Voice Messages.
How to take Videos, Pictures and Record Voice Messages.
C
B
A
D
S
E
T
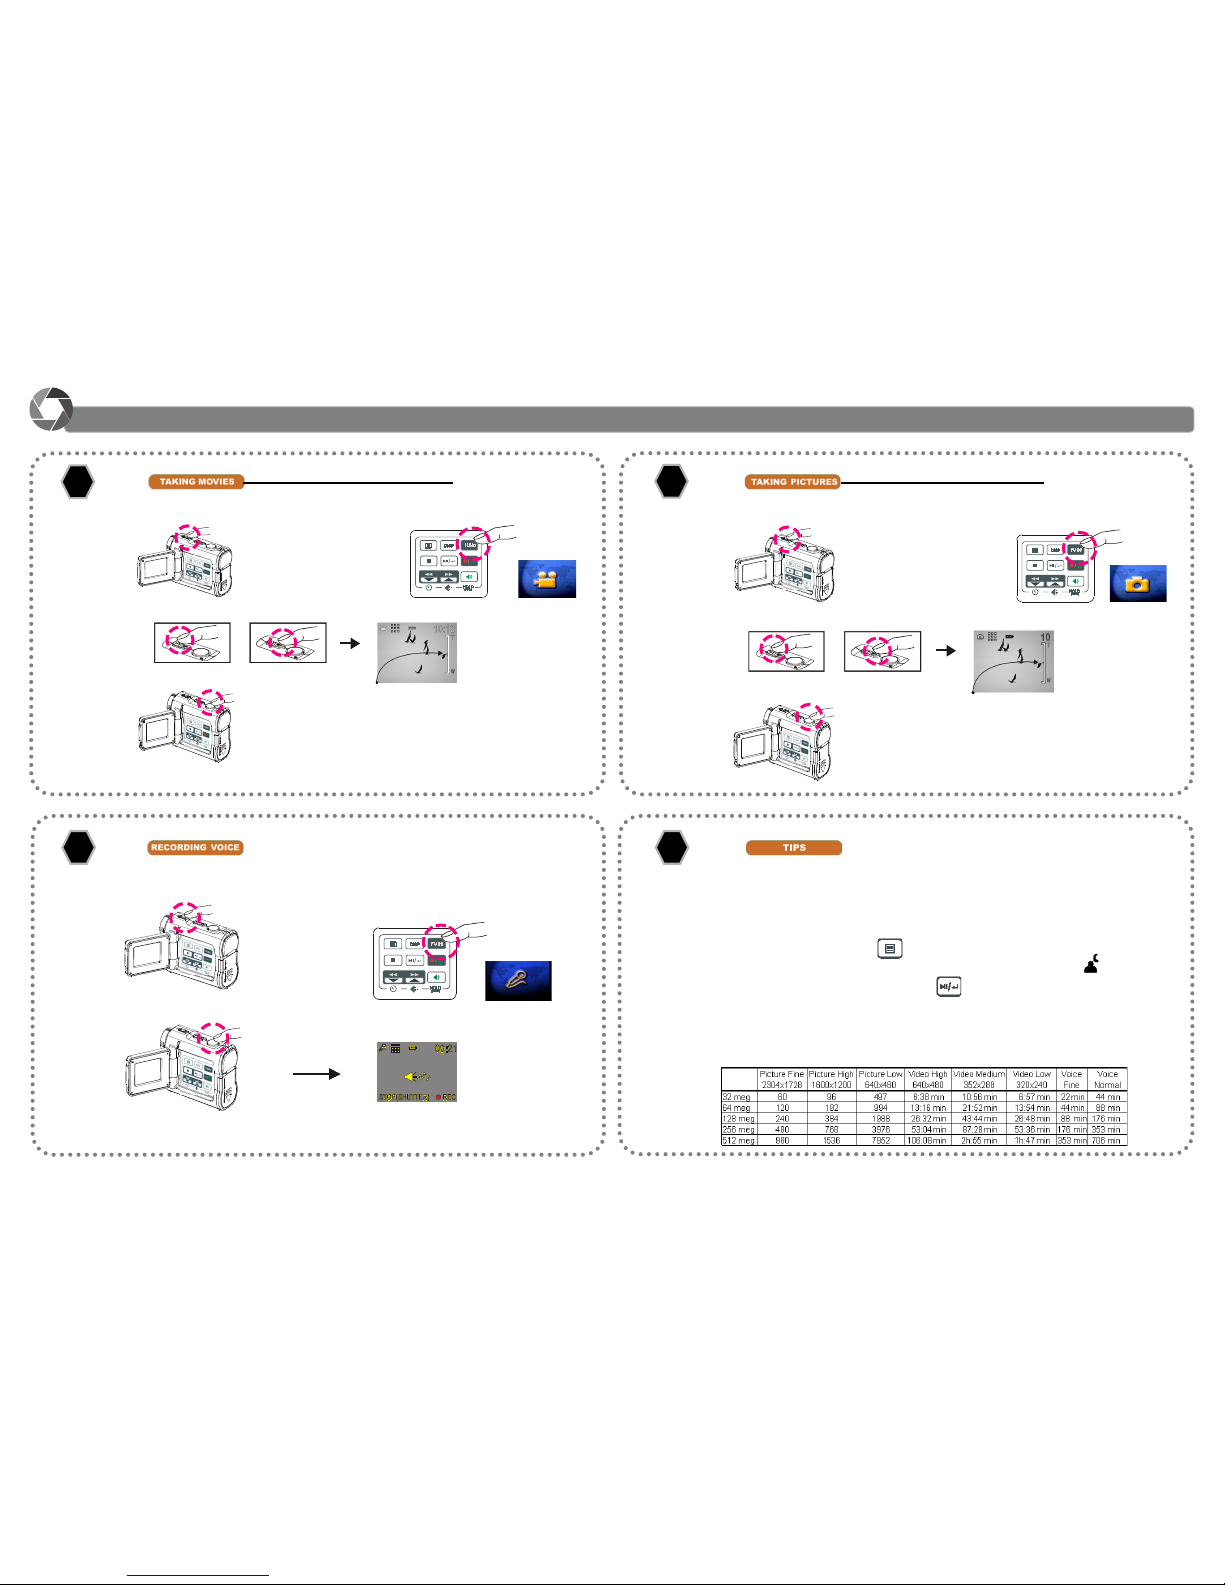
Taking your first movie
1. Power on the Camera.
3. Press Zoom-in or Zoom-out to frame your picture.
4. Press the shutter to start recording.
5. Press the shutter again to stop recording.
Zoom in or Zoom out
2. Press the Function Button FUNC to switch to
Video Mode (DV).
S
E
T
Taking your first picture
3. Press Zoom-in or Zoom-out to frame your picture.
4. Press the shutter to take a picture.
Zoom in or Zoom out
2. Press the Function Button FUNC to switch to
Picture Mode (DSC).
1. Power on the Camera.
S
E
T
S
E
T
3. Press the shutter to start recording.
4. Press the shutter again to stop recording.
1. Power on the Camera.
2. Press the Function Button FUNC to switch
to Voice Mode (DVR).
S
E
T
S
E
T
1. Hold the camera steady or use a tripod to get the sharpest picture.
2. Make sure you are at least 24 inches from your subject.
3. In low light situations you can change to a longer exposure by following
these steps:
Estimated Image Capacity for Different Memory Cards
DV
Page 4
How to View, Playback, and Transfer files and MP3’s.How to View, Playback, and Transfer files and MP3’s.
How to View, Playback, and Transfer files and MP3’s.How to View, Playback, and Transfer files and MP3’s.
How to View, Playback, and Transfer files and MP3’s.
CB
A
D
E
Windows 98 SE – Driver Required:
1. Put the installation CD in your CD-Rom drive*.
2. Follow the onscreen instructions for installation
3. Reboot the PC.
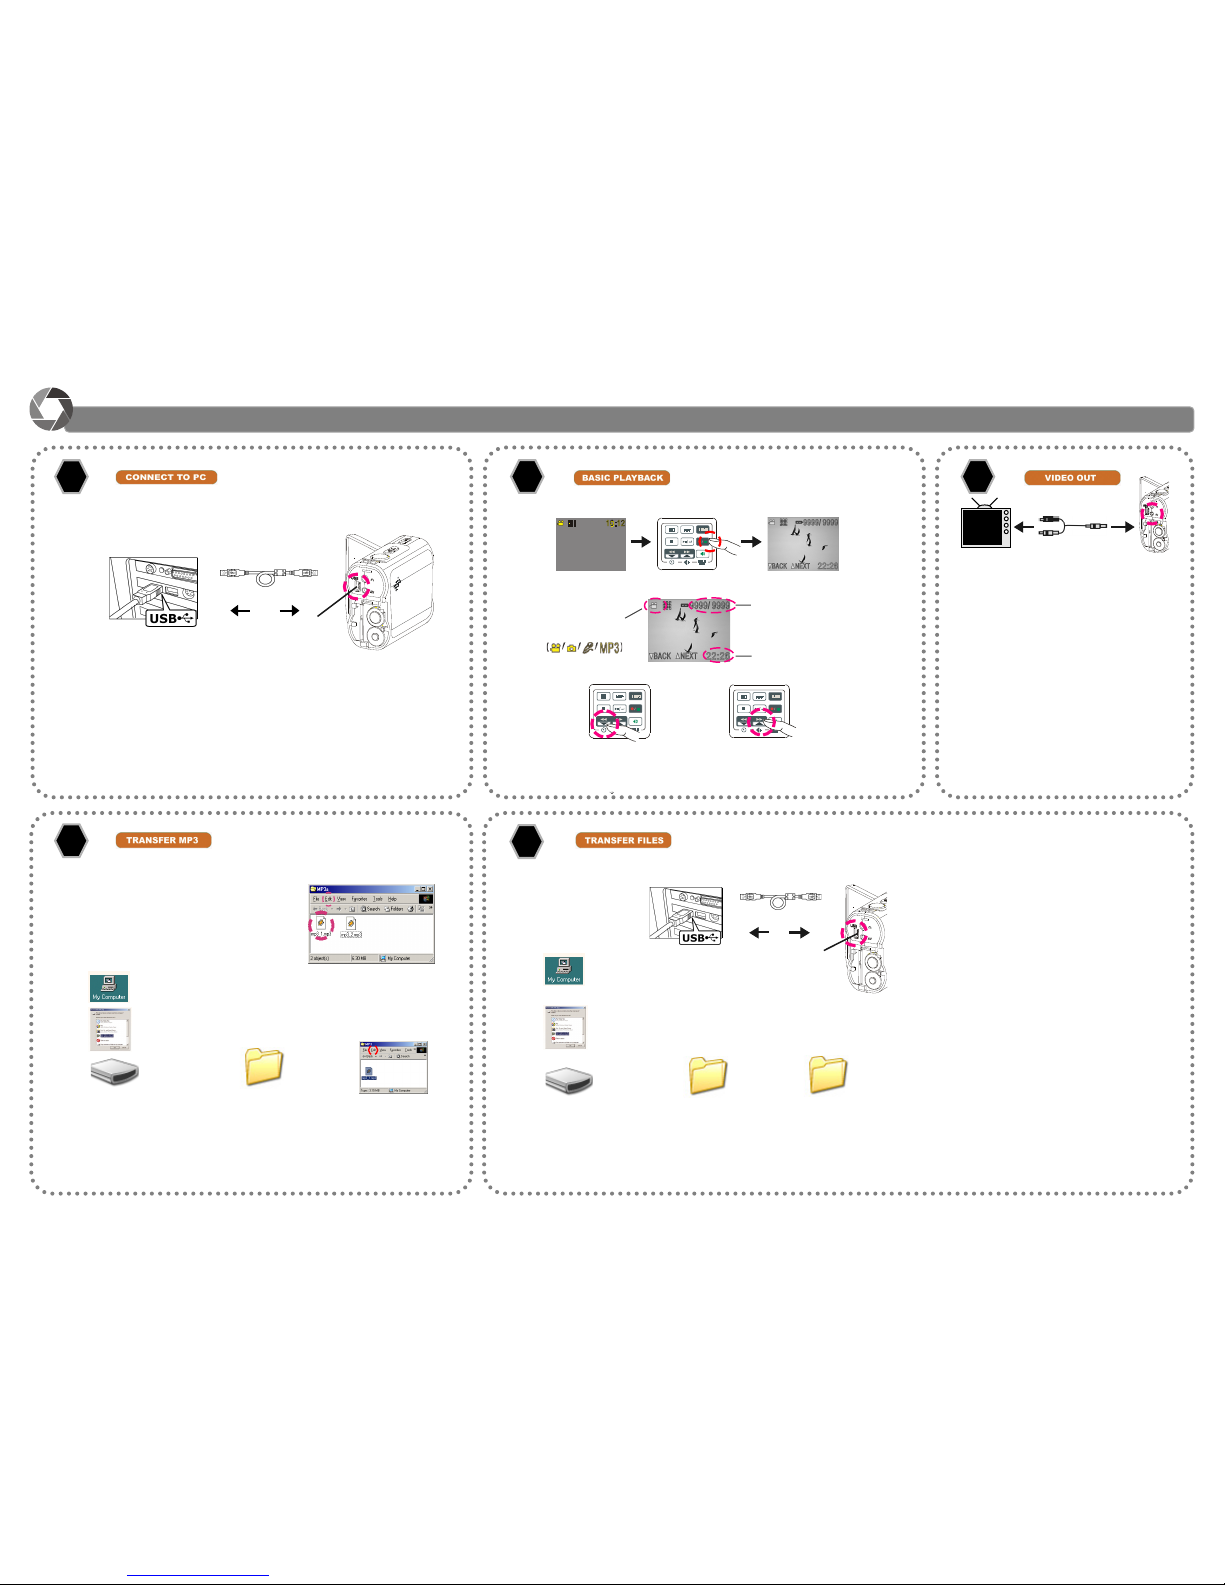
4. Connect the camera to the PC (see illustration)
5. Power on the camera
Windows ME/2000/XP – No Driver Required:
1. Connect the camera to the PC (see illustration).
2. Power on the Camera.
*If installation does not start automatically:
1. Right-click the Start button, and then choose Explore.
2. Right-click the letter for your CD-ROM drive (often D:), and then choose Explore.
3. Double-click run.exe and then follow the onscreen instructions.
USB Cable
Note: To Playback MP3 files you must first press the function button FUNC until
you are in the MP3 mode, then press the Play/Select button to playback.
* Before you can playback MP3 files, you have to copy MP3 files from your
computer to the camera. (see 2-4)
1. Press the Playback Button to switch to Playback mode.
3. Press BACK or NEXT to scroll thru your pictures, videos and sound
files.
2. The information of the selected file will show on the LCD.
The Mode of the
selected file
The selected file number / The total files
number
The time of the
selected file
This device can connect to other
consumer electronic devices such
as TV, VCR or DVD Recorder by
using the included A / V cable.
To connect the camera to other
devices follow these steps:
1. Connect the A / V Cable to this
device.
2. Connect the Video (yellow) con nector to the Video Input (yel low) jack of the device.
3. Connect the Audio (red and
white) connectors to the R and
L Audio Input (red and white)
jacks of the device.
S
E
T
1. Locate the desired MP3 files on your
computer that you wish to Transfer.
2. Select the desired files and then click
on “Edit” and select “Copy”.
3. Connect the USB cable between this
device and the computer.
6. Double click on
“MP3” Folder to
open.*
7. Click on “Edit” then
select “Paste”.
*If there is no MP3 Folder, turn on the camera and press the function button FUNC
until you get to the MP3 Mode. This will automatically create the MP3 Folder for you.
Now you may transfer your MP3 files to this folder by starting back at step 6 above.
Windows XP:
Select “Open Folder to view files using Windows Explorer”
and click “OK”.
Windows 98SE/ME/2000:
Double click “My Computer” Icon on the Windows Desktop.
5. Double click on
“Removable Disk”
icon to open.
Copy MP3 files from your PC to your camera:
Removable Disk (E:) MP3
4.
Windows XP:
Select “Open Folder to view files using
Windows Explorer” and click “OK”.
Windows 98SE/ME/2000:
Double click “My Computer” Icon on the
Windows Desktop
1. Connect the USB
cable between
this device and
the computer.
6. Follow the Drag and Drop method to copy
the files to your computer.
For Single Files:
1. Click a file to highlight it.
2. Hold down the left mouse button.
3. Drag the file to a folder of your choice.
4. Release the left mouse button.
For Multiple or All Files:
1. Click and hold down the left mouse button
to highlight the desired files and drag to
the folder of your choice. Release the left
mouse button.
2. To move all images at once, click Edit,
select all.
To Reuse Your Memory:
After you copy the files to your computer, you
can now delete the selected file or files from
the camera so you can clear and reuse the
internal memory or memory card.
4. Double click on
the Dcim folder
to open.
5. Double click on
the 100media
folder to open.
3. Double click on
the Removable
Disk folder to
open.
100mediaDcimRemovable Disk (E:)
2.
USB Cable
USB Port
S
E
T
Copy files from your camera to your PC:
USB Port
 Loading...