

Page 1
Adventure DV3
10:12
10:12
Digital Video Camera
Quick Guide
We have include this convenient
quick guide to help with the basic
operations. For more detail on the
different functions and operations
please see the enclosed manual.
How to Contact Us
Website:
http://www.mustek.com
Customer Service:
(General Info)
Email: cservices@mustek.com
Fax: (949) 788-3670
Technical Support:
(Technical Info)
Email: tsupport@mustek.com
Phone: (949) 788-3600
Address:
15271 Barranca Parkway,
Irvine, CA 92618
Package Contents
y Adventure DV3
y USB cable
y AV cable
y 2 AA Alkaline batteries
y 2 Straps (Head / Hand)
y User Guide
y Quick Guide
y Camera Bag
y Earphone
y Installation CD x 1
y Application CD x 1
Software Include
y Video Studio SE
y PhotoExpress SE
y Cool 360
y Acrobat Reader
y Camera Driver
y Video Capture Driver
1
1-1
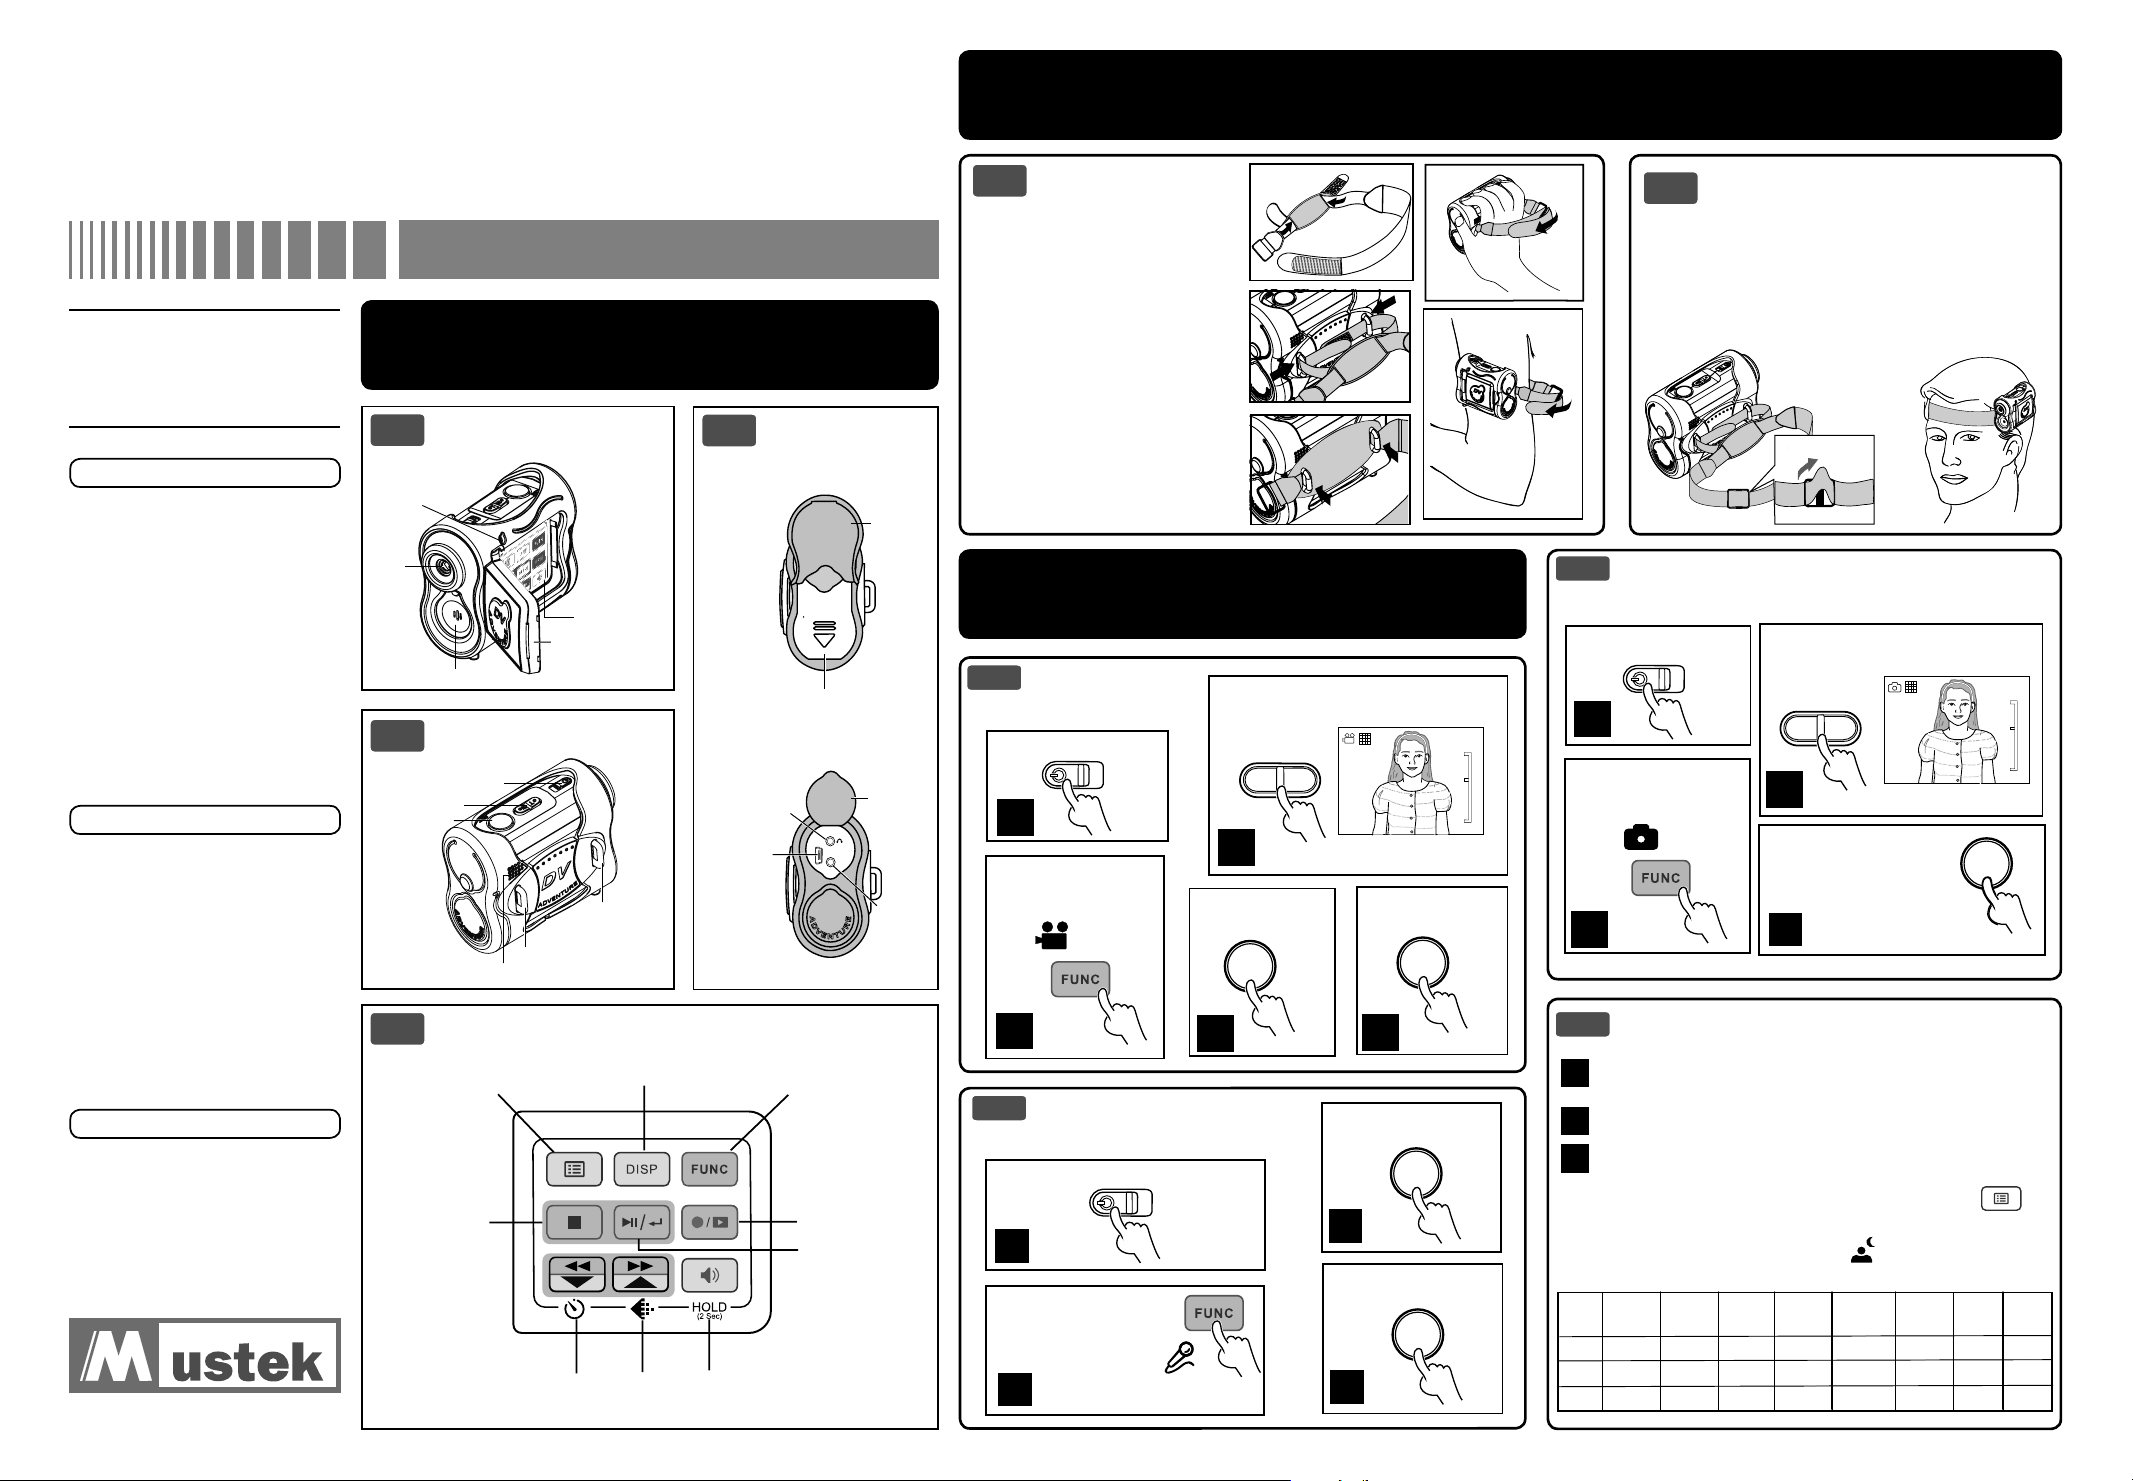
Status LED
(Power On/USB)
Lens
1-2
Shutter/Set
1-4
Identifying Controls and
Parts
Front View
Microphone
Side View
Power
Zoom
Strap holder
Speaker
Display Panel
Menu
Exit/Stop
Back/Down
/Self-timer
Panel
LCD Viewfi nder
Strap Holder
Display
Next/Up
Resolution
1-3
Earphone
USB Port
Volume/Hold
Back View
Battery
card
SD
MMC/SD Card and
Battery compartment
USB
Function Mode
Record
/Playback
Play/Pause
/Enter
AV
Rubber
Cover
Rubber
Cover
AV Out
2
How to Attach the Straps
Attaching the
2-1
Hand Strap
1. Thread both strap ends
through the pad holes.
2. Thread both ends through the
strap holder, and fasten the
Velcro strip under the pad.
3. Secure the pad by pressing it
down until the holders poke
through the pad holes.
4. Insert your hand, thread the
strap through the strap eyelet,
then fasten the Velcro.
5. You may put the DV on your
arm as you wish.
How to Take Videos, Pictures
3
3-1
Taking your fi rst movie.
Power on the DV.
Press the Function
Mode button to
switch to Video Mode
(DV)
3-2
Recording your fi rst sound clip.
Power on the DV.
1
Press the Function
Mode button to switch
to Voice Mode (DVR)
and Record Voice Messages
Taking Movie
1
Press the Shutter
.
to start recording.
2
Recording Voice Messages
.
2
1
2
3
Press Zoom-in (T) or Zoom-out (W)
to frame your picture.
10:12
W
T
W
T
3
4
Press the Shutter
to stop recording.
SET
Press the Shutter to
start recording.
SET
5
SET
3
Press the Shutter to
stop recording.
SET
4
Attaching the Head Strap
2-2
1. Thread both strap ends through the pad holes,
strap holder, then fasten the Velcro strips. (Refer
4
to illustration 1, 2, and 3 at 2-1 Attaching
the hand strap section)
2. Put the head strap on your head.
3. Adjust the stopper to fi t your head comfortably .
1
2
3
5
3-3
Taking Pictures
Taking your fi rst picture.
Power on the DV.
1
T
W
Press the Function
Mode button to
switch to Picture Mode
(DSC) .
2
3-4
Tips
Hold the DV steady or use a tripod to get the sharpest
1
pictures.
Make sure you are at least 24 inches from your subject.
2
In low light situations you can change to a longer exposure
3
by following these steps:
Step 1: In Picture Mode, press the Menu button (
enter the menu.
Step 2: Select the Night Shot (
and select ON to turn on the night shot mode.
Memory
Picture
Fine
48
96
192
Picture
High
80
160
320
Size
(M-Pixel)
32
64
128
Press Zoom-in (T) or Zoom-out
(W) to frame your picture.
W
T
W
T
3
Press the Shutter to
start taking pictures.
4
) mode in the menu
Picture
Low
480
960
1920
Video
(min.)
6:30
13:00
26:00
High
Video
Medium
(min.)
11
23
46
Video Low
(min.)
12
24
48
Voice Fine
(min.)
22
44
87
10:12
SET
T
W
) to
Voic e
Normal
(min.)
44
88
174
82-163-00060
Page 2
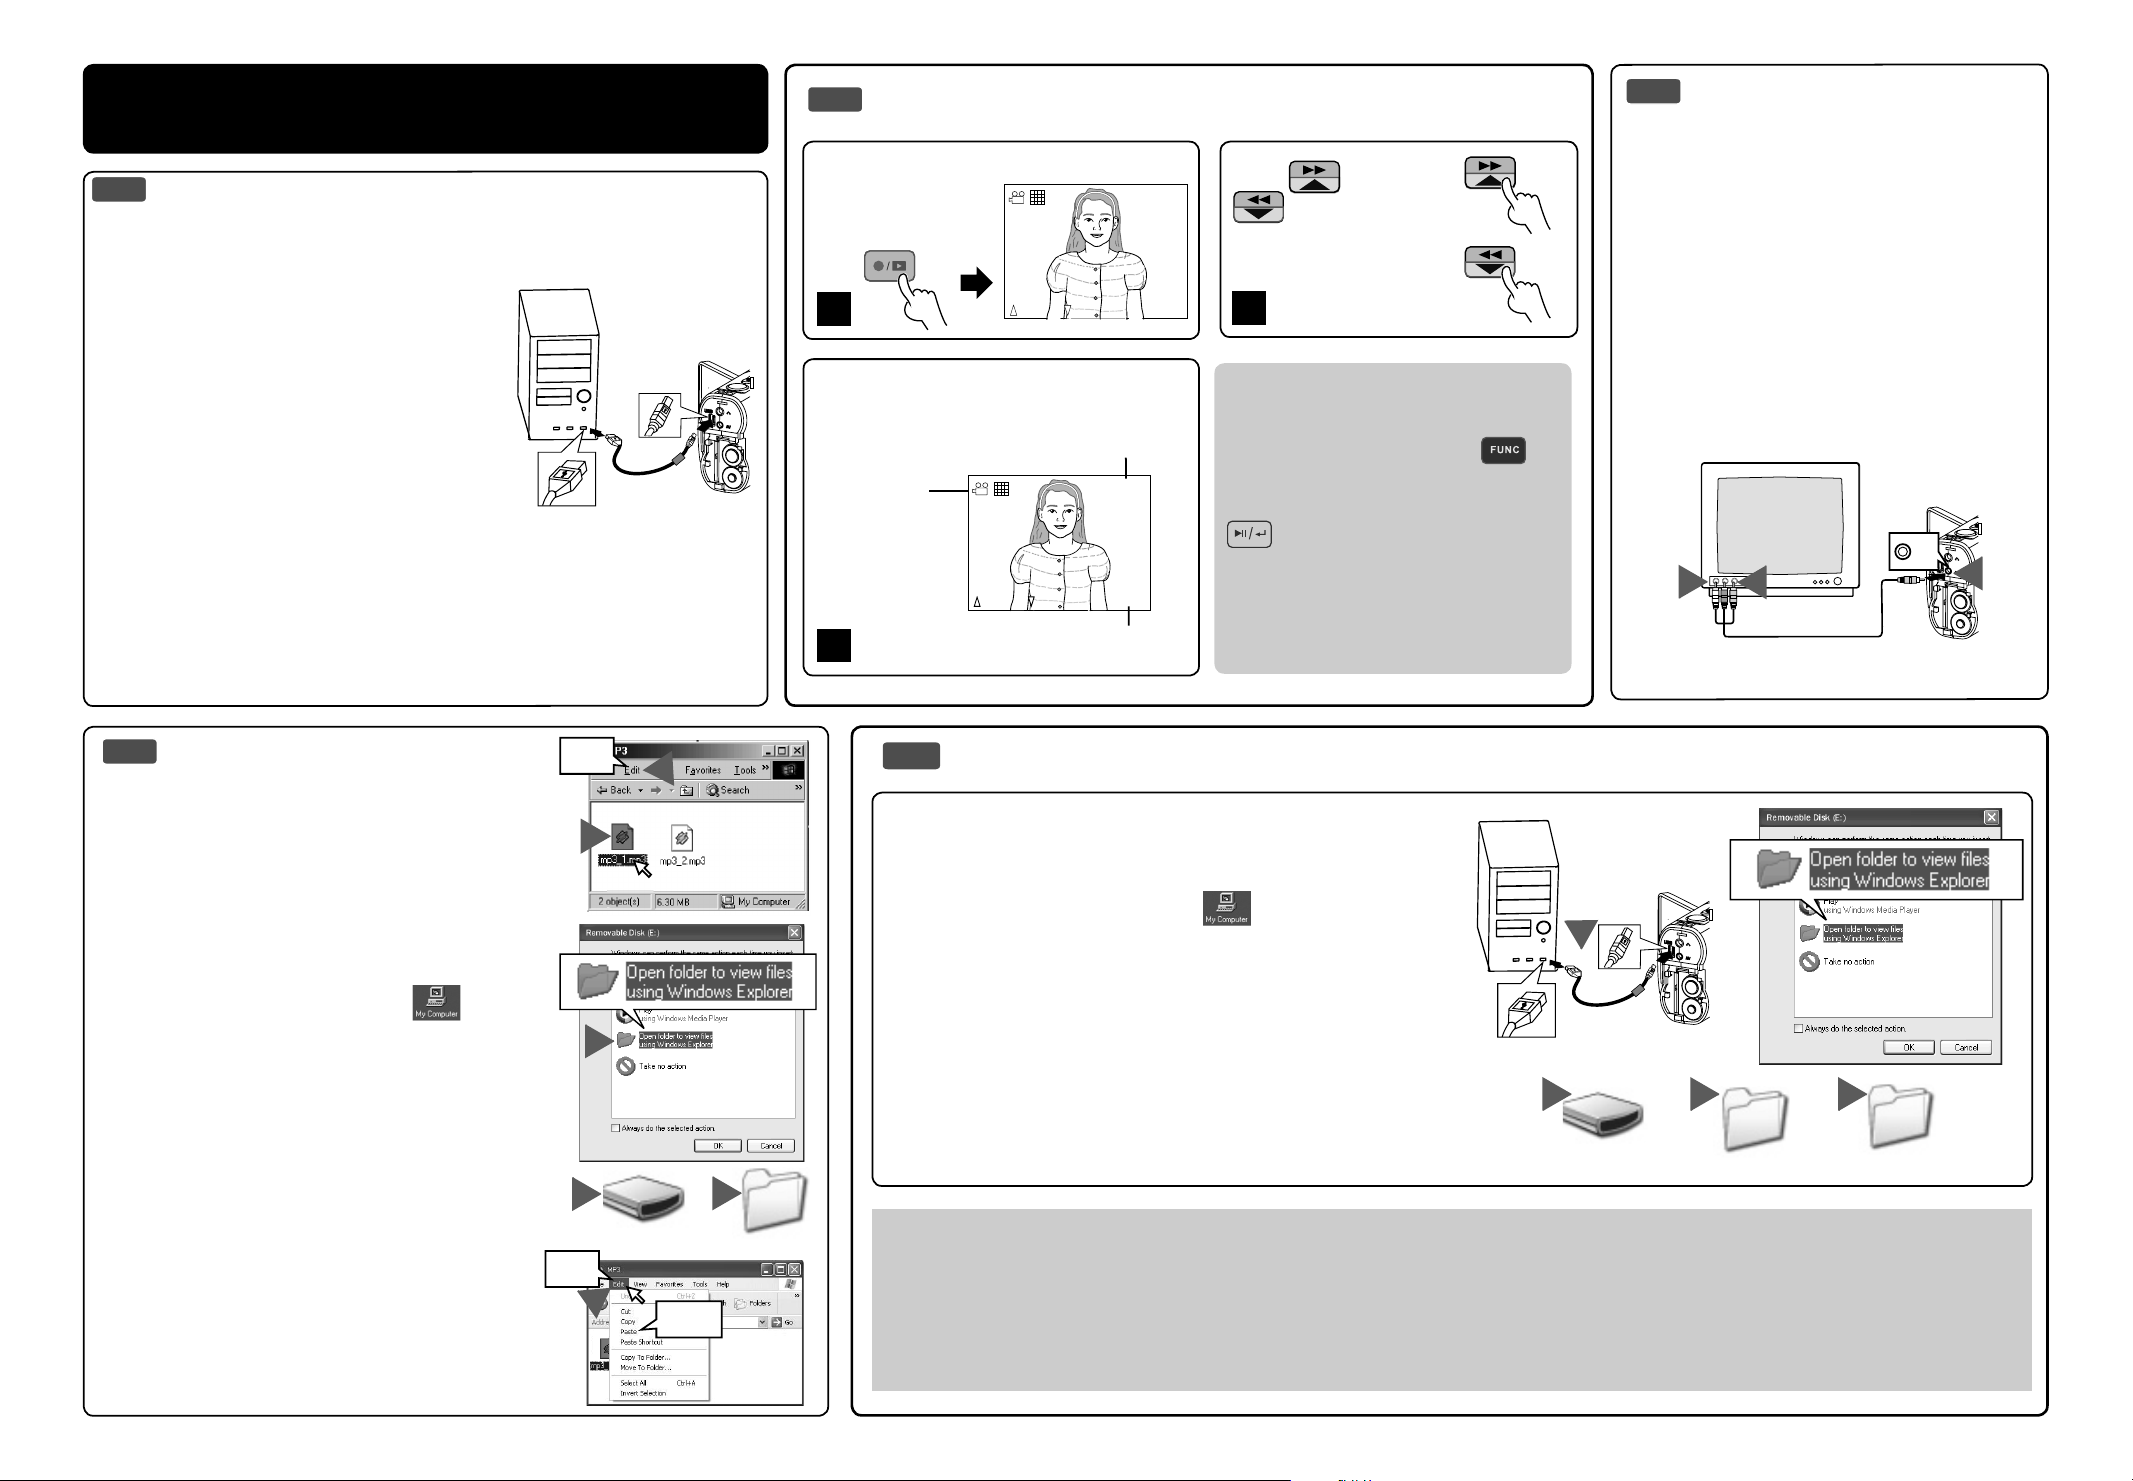
How to View, Playback, and
04 :2 6
BACK
05/10
NEXT
04 :2 6
BACK
05/10
NEXT
4
4-1
Windows ME/2000/XP - No driver required.
1. Connect the DV to the PC (
2. Power on the DV.
Windows 98 SE - Driver required.
1. Put the installation CD in your CD-Rom
drive*.
2. Follow the onscreen instructions for
installation.
3. Reboot the PC.
4. Power on the DV.
5. Connect the DV to the PC (
illustration
*If installation does not start automatically:
1. Right-click the Start button, and then choose Explore.
2. Right-click the letter for your CD-ROM drive (often D:), and then
Transfer Files and MP3s
Connecting to PC
See illustration
See
).
choose Explore.
)
4-3
4-2
Basic Playback
Connecting to External
Device Using AV Cable.
Press the REC/
PLAYBACK
button to switch
to Playback Mode.
05/10
Press NEXT or
BACK to scroll
through your pictures,
videos and sound fi les.
BACK
1
S
E
T
The information of the
selected fi le will show
on the LCD display.
The Mode of the
selected fi le to
playback.
The selected fi le
number / The total
fi les number
NEXT
05/10
3
Note
To playback MP3 fi les you must fi rst
press the Function Mode (
button until you are in the MP3 mode,
then press the Play/Pause
) button to playback.
(
)
04:2604:26
Before you can playback MP3 fi les,
04:2604:26
BACK
2
NEXT
The time of the
selected fi le
you have to copy MP3 fi les from your
computer to the DV. (Refer to
Transferring MP3”
)
“4-4
This DV can connect to external devices
such as TV, VCR or DVD recorder using
included AV cable. To connect the DV to
other devices follow these steps:
1. Connect the AV cable to the DV.
2. Connect the Video (Yellow) connector to
the Video Input (Yellow) jack of the device.
3. Connect the Audio (Red and White)
connectors to the R and L Audio Input
(Red and White) jacks of the device.
S
E
T
AV
3
2
1
4-4
Transferring MP3
Copy MP3 fi les from your PC to the DV.
1. Locate the desired MP3 fi les on your
computer that you wish to transfer.
2. Select the desired fi les and then click on
Edit and select Copy.
3. Connect the USB cable between the DV and
the computer. (
Refer to 4-1 illustration
)
4. Windows 98SE/ME/2000:
Double click My Computer (
) icon on
the Windows Desktop.
Windows XP:
Select “Open folder to view fi les using
Windows Explorer” and click OK.
5. Double click on “Removable Disk” icon to
open.
6. Double click on “MP3” Folder to open.*
7. Click on Edit then select Paste.
*If there is no MP3 Folder, turn on the DV
and press the Function Mode button
until you get to the MP3 Mode. This will
automatically create the MP3 Folder for
you. Now you may transfer your MP3 fi les
to this folder by starting back at step 6
above.
Edit
2
1
4
5
Removable Disk (E:)
Edit
7
Paste
4-5
Transferring Files
Copy fi les from the DV to PC
1. Connect the USB cable between the DV and the computer.
2. Windows 98SE/ME/2000:
Double click “My Computer” ( ) icon on the Windows
Desktop.
1
S
E
T
Windows XP:
Select “Open folder to view fi les using Windows
Explorer” and click OK.
3. Double click on Removable Disk icon to open.
4. Double click on “DCIM” Folder to open.*
5. Click on “100MEDIA” to open.
Follow the Drag and Drop method to copy the fi les to your
3 4 5
computer.
Removable Disk (E:)
DCIM
100MEDIA
6
MP3
For Single Files
1. Click a fi le to highlight it.
2. Hold down the left mouse button.
3. Drag the fi le to a folder of your
choice.
4. Release the left mouse button.
For Multiple or All Files
1. Click and hold down the left mouse
button to highlight the desired fi les
and drag to the folder of your choice.
Release the left mouse button.
2. To move all images at once, click
To Reuse Your Memory
After you copy the fi les to your
computer you can now delete the
selected fi le or fi les from the DV so
you can clear and reuse the internal
memory or memory card.
Edit, select all.
 Loading...