

Page 1

OfficeBridge Online
User’s Guide
for
MFX-1300
MFX-1700
Page 2
Safety precautions
• Please read “Before using your Muratec fax machine” in the Operating Instructions of the fax main unit.
• The following notations are used to alert the user to harm or damage that could result from mishandling due
to neglect of warnings.
Warning
Caution
This notation alerts the user to the potential for serious injury or death.
This notation alerts the user to the potential for bodily harm or damage to hardware.
• The following symbols are used to distinguish the types of alerts. (Shown below are the examples.)
This symbol indicates warning or caution. An illustration will give a concrete description.
This symbol indicates prohibition in handling. An illustration will give a concrete description.
This symbol indicates mandatory handling. An illustration will give a concrete description.
Warning
Never attempt to disassemble, repair or
modify the equipment.
Do not place anything on the equipment that
contains water or chemical drug.
It may cause electric shock or machine failure.
Request repairs from the Customer Information
Center.
Caution
When any of the following occurs, stop
operation immediately, unplug the power cable
of the fax main unit from power outlet, and
call our Information Center.
◆ Smoke generation or an unusually heated
machine housing
◆ Abnormal noise
Do not place articles on the equipment such as
flower vases, potted plants, beverage cups,
cosmetics, containers of chemical drugs or water, or
small metallic articles. These substances, once
overturned and dropped inside of the equipment,
may cause a fire or electric shock.
Never attempt anything other than what is
specified in this manual.
It may cause unexpected accidents or machine
failure.
Page 3

Acknowledgement
Preface
Thank you for purchasing Muratec OfficeBridge Online. This User’s Guide describes the operation procedures of the fax main unit, as well as the procedures for installing, registration and adjusting the settings on
your PC. Before getting started, review the entire User’s Guide and Follow the procedures apply to you.
This manual presupposes that its reader understands the basic operation and concepts of PC’s, operating
systems, networks and application software. Please refer to each manual respectively for details of operation.
Note: The information contained in this User’s Guide is subject to change without notice.
For details of the fax main unit operations, please refer to the Operating Instructions that comes with the
fax main unit.
Trademarks
Muratec, the Muratec logo and all Muratec product names contained herein are trademarks of Murata
Machinery, Ltd. Windows®95, Windows®98, Windows®NT®, Windows®Me, Windows®2000 and Windows®XP
are the registered trademarks of Microsoft Corporation in the U.S.A. and/or other countries.
IBM, OS/2, NuOffice are the registered trademarks of IBM Corporation in the U.S.A. and/or other countries.
Adobe®, Adobe Acrobat®, Adobe Acrobat Reader®are registered trademarks of Adobe Systems Incorporated.
All other brand names and product names mentioned in this User’s Guide are trade names, trademarks or
registered trademarks of their respective owners.
Screen shots in this manual are shown under permission of Microsoft Corporation.
If problems arise
In the event your machine requires service or repairs, please contact your authorized Muratec dealer.
Users in the U.S.A.
Contact the Muratec Customer Support Center at 800-347-3296 (from U.S. only)
Fttp://www.muratec.com
Users in the other countries
Contact your authorized Muratec dealer.
Copyrights© 2003 Murata Machinery, Ltd. All right reserved.
1
Page 4

Contents
Safety precautions
Acknowledgement . . . . . . . . . . . . . . . . . . . . . . . . . . . . . . . . . . . . . . . . . . . . . . . . . . . . . . . . . . . . . . . . . . . . . .1
Preface . . . . . . . . . . . . . . . . . . . . . . . . . . . . . . . . . . . . . . . . . . . . . . . . . . . . . . . . . . . . . . . . . . . . . . . . . .1
Trademarks . . . . . . . . . . . . . . . . . . . . . . . . . . . . . . . . . . . . . . . . . . . . . . . . . . . . . . . . . . . . . . . . . . . . . .1
If problems arise . . . . . . . . . . . . . . . . . . . . . . . . . . . . . . . . . . . . . . . . . . . . . . . . . . . . . . . . . . . . . . . . . .1
Contents . . . . . . . . . . . . . . . . . . . . . . . . . . . . . . . . . . . . . . . . . . . . . . . . . . . . . . . . . . . . . . . . . . . . . . . . . . . . . .2
About the Manuals . . . . . . . . . . . . . . . . . . . . . . . . . . . . . . . . . . . . . . . . . . . . . . . . . . . . . . . . . . . . . . . . . . . . .4
User’s Guide (on the CD) (this book): . . . . . . . . . . . . . . . . . . . . . . . . . . . . . . . . . . . . . . . . . . . . . . . . . .4
Reference Manual (on the CD): . . . . . . . . . . . . . . . . . . . . . . . . . . . . . . . . . . . . . . . . . . . . . . . . . . . . . . .4
Administrator’s Manual (on the CD): . . . . . . . . . . . . . . . . . . . . . . . . . . . . . . . . . . . . . . . . . . . . . . . . . .4
Summary of Major Features
What is the OfficeBridge Online? . . . . . . . . . . . . . . . . . . . . . . . . . . . . . . . . . . . . . . . . . . . . . . . . . . . . . . . . . .6
PC-FAX Transmission & Reception . . . . . . . . . . . . . . . . . . . . . . . . . . . . . . . . . . . . . . . . . . . . . . . . . . . . . . . .7
Network Scanner . . . . . . . . . . . . . . . . . . . . . . . . . . . . . . . . . . . . . . . . . . . . . . . . . . . . . . . . . . . . . . . . . . . . . . .9
Bulletin Board . . . . . . . . . . . . . . . . . . . . . . . . . . . . . . . . . . . . . . . . . . . . . . . . . . . . . . . . . . . . . . . . . . . . . . . .10
Circular Board . . . . . . . . . . . . . . . . . . . . . . . . . . . . . . . . . . . . . . . . . . . . . . . . . . . . . . . . . . . . . . . . . . . . . . . .11
Processing Request . . . . . . . . . . . . . . . . . . . . . . . . . . . . . . . . . . . . . . . . . . . . . . . . . . . . . . . . . . . . . . . . . . . .12
Network Printer . . . . . . . . . . . . . . . . . . . . . . . . . . . . . . . . . . . . . . . . . . . . . . . . . . . . . . . . . . . . . . . . . . . . . . .13
Internet transmission & reception . . . . . . . . . . . . . . . . . . . . . . . . . . . . . . . . . . . . . . . . . . . . . . . . . . . . . . . .14
InfoMonitor . . . . . . . . . . . . . . . . . . . . . . . . . . . . . . . . . . . . . . . . . . . . . . . . . . . . . . . . . . . . . . . . . . . . . . . . . .15
Machine configuration
Setting the IP Address, Subnet mask and Gateway Address . . . . . . . . . . . . . . . . . . . . . . . . . . . . . . . . . . .17
Setting your Time Zone . . . . . . . . . . . . . . . . . . . . . . . . . . . . . . . . . . . . . . . . . . . . . . . . . . . . . . . . . . . . . . . . .18
Confirming the MAC Address . . . . . . . . . . . . . . . . . . . . . . . . . . . . . . . . . . . . . . . . . . . . . . . . . . . . . . . . . . . .19
To confirm the MAC address: . . . . . . . . . . . . . . . . . . . . . . . . . . . . . . . . . . . . . . . . . . . . . . . . . . . . . . .19
OfficeBridge Online screen
Startup the OfficeBridge Online . . . . . . . . . . . . . . . . . . . . . . . . . . . . . . . . . . . . . . . . . . . . . . . . . . . . . . . . . .21
Access to an Administration tools . . . . . . . . . . . . . . . . . . . . . . . . . . . . . . . . . . . . . . . . . . . . . . . . . . . . . . . . .22
Login the Personal screen . . . . . . . . . . . . . . . . . . . . . . . . . . . . . . . . . . . . . . . . . . . . . . . . . . . . . . . . . . . . . . .23
User Registration . . . . . . . . . . . . . . . . . . . . . . . . . . . . . . . . . . . . . . . . . . . . . . . . . . . . . . . . . . . . . . . . . . . . . .25
PC-FAX Transmission & Reception
PC-FAX Transmission . . . . . . . . . . . . . . . . . . . . . . . . . . . . . . . . . . . . . . . . . . . . . . . . . . . . . . . . . . . . . . . . . .27
Send the document from the software application . . . . . . . . . . . . . . . . . . . . . . . . . . . . . . . . . . . . . .27
Send the document from specified box . . . . . . . . . . . . . . . . . . . . . . . . . . . . . . . . . . . . . . . . . . . . . . . .30
PC-FAX Reception . . . . . . . . . . . . . . . . . . . . . . . . . . . . . . . . . . . . . . . . . . . . . . . . . . . . . . . . . . . . . . . . . . . . .33
View the received fax . . . . . . . . . . . . . . . . . . . . . . . . . . . . . . . . . . . . . . . . . . . . . . . . . . . . . . . . . . . . . .33
“Received Fax forwarding” setting . . . . . . . . . . . . . . . . . . . . . . . . . . . . . . . . . . . . . . . . . . . . . . . . . . .35
Network Scanner
Network Scanner . . . . . . . . . . . . . . . . . . . . . . . . . . . . . . . . . . . . . . . . . . . . . . . . . . . . . . . . . . . . . . . . . . . . . .39
Setting Scan parameter . . . . . . . . . . . . . . . . . . . . . . . . . . . . . . . . . . . . . . . . . . . . . . . . . . . . . . . . . . . . . . . . .40
Setting Scan mode . . . . . . . . . . . . . . . . . . . . . . . . . . . . . . . . . . . . . . . . . . . . . . . . . . . . . . . . . . . . . . . . . . . . .41
To set the Save Method: . . . . . . . . . . . . . . . . . . . . . . . . . . . . . . . . . . . . . . . . . . . . . . . . . . . . . . . . . . . .41
To select subject for scanned document . . . . . . . . . . . . . . . . . . . . . . . . . . . . . . . . . . . . . . . . . . . . . . .41
To set the Scan mode prompt: . . . . . . . . . . . . . . . . . . . . . . . . . . . . . . . . . . . . . . . . . . . . . . . . . . . . . . .43
Scanning the document . . . . . . . . . . . . . . . . . . . . . . . . . . . . . . . . . . . . . . . . . . . . . . . . . . . . . . . . . . . . . . . . .44
Download the scanned image from the Personal screen . . . . . . . . . . . . . . . . . . . . . . . . . . . . . . . . . . . . . . .47
Download the scanned image from application software . . . . . . . . . . . . . . . . . . . . . . . . . . . . . . . . . . . . . .49
Access to the OfficeBridge Online TWAIN connector . . . . . . . . . . . . . . . . . . . . . . . . . . . . . . . . . . . .49
2
Page 5

Bulletin board / Distribution / Processing request
Bulletin board . . . . . . . . . . . . . . . . . . . . . . . . . . . . . . . . . . . . . . . . . . . . . . . . . . . . . . . . . . . . . . . . . . . . . . . .53
Post the document to the Bulletin board . . . . . . . . . . . . . . . . . . . . . . . . . . . . . . . . . . . . . . . . . . . . . .54
View the posted document . . . . . . . . . . . . . . . . . . . . . . . . . . . . . . . . . . . . . . . . . . . . . . . . . . . . . . . . . .55
Distribution . . . . . . . . . . . . . . . . . . . . . . . . . . . . . . . . . . . . . . . . . . . . . . . . . . . . . . . . . . . . . . . . . . . . . . . . . .56
Distribute the document to registered users . . . . . . . . . . . . . . . . . . . . . . . . . . . . . . . . . . . . . . . . . . .57
Processing request . . . . . . . . . . . . . . . . . . . . . . . . . . . . . . . . . . . . . . . . . . . . . . . . . . . . . . . . . . . . . . . . . . . . .58
Network Printer
Network Printer . . . . . . . . . . . . . . . . . . . . . . . . . . . . . . . . . . . . . . . . . . . . . . . . . . . . . . . . . . . . . . . . . . . . . . .63
Printing the document . . . . . . . . . . . . . . . . . . . . . . . . . . . . . . . . . . . . . . . . . . . . . . . . . . . . . . . . . . . . .63
Canceling a printing job . . . . . . . . . . . . . . . . . . . . . . . . . . . . . . . . . . . . . . . . . . . . . . . . . . . . . . . . . . .65
Acceptable paper size . . . . . . . . . . . . . . . . . . . . . . . . . . . . . . . . . . . . . . . . . . . . . . . . . . . . . . . . . . . . . .66
Paper Mismatch error . . . . . . . . . . . . . . . . . . . . . . . . . . . . . . . . . . . . . . . . . . . . . . . . . . . . . . . . . . . . .67
Internet FAX Transmission & Reception
Setting the Internet Parameters . . . . . . . . . . . . . . . . . . . . . . . . . . . . . . . . . . . . . . . . . . . . . . . . . . . . . . . . .69
Pre Installation information . . . . . . . . . . . . . . . . . . . . . . . . . . . . . . . . . . . . . . . . . . . . . . . . . . . . . . . .69
Setting the IP Address, Subnet mask and Gateway Address . . . . . . . . . . . . . . . . . . . . . . . . . . . . . .70
Setting the network environment . . . . . . . . . . . . . . . . . . . . . . . . . . . . . . . . . . . . . . . . . . . . . . . . . . . .70
Setting the e-mail environment . . . . . . . . . . . . . . . . . . . . . . . . . . . . . . . . . . . . . . . . . . . . . . . . . . . . .71
Internet Fax sending . . . . . . . . . . . . . . . . . . . . . . . . . . . . . . . . . . . . . . . . . . . . . . . . . . . . . . . . . . . . . . . . . . .72
Sending the document from your machine . . . . . . . . . . . . . . . . . . . . . . . . . . . . . . . . . . . . . . . . . . . .72
Send the document from specified box . . . . . . . . . . . . . . . . . . . . . . . . . . . . . . . . . . . . . . . . . . . . . . . .80
Send the e-mail from application software . . . . . . . . . . . . . . . . . . . . . . . . . . . . . . . . . . . . . . . . . . . .83
Internet Fax Reception . . . . . . . . . . . . . . . . . . . . . . . . . . . . . . . . . . . . . . . . . . . . . . . . . . . . . . . . . . . . . . . . .86
View the received fax . . . . . . . . . . . . . . . . . . . . . . . . . . . . . . . . . . . . . . . . . . . . . . . . . . . . . . . . . . . . . .86
“Received Fax forwarding” setting . . . . . . . . . . . . . . . . . . . . . . . . . . . . . . . . . . . . . . . . . . . . . . . . . . .87
Forwarding received e-mail to fax . . . . . . . . . . . . . . . . . . . . . . . . . . . . . . . . . . . . . . . . . . . . . . . . . . . .88
Installing the OfficeBridge Online Printer & Fax driver
Installing Printer & Fax driver . . . . . . . . . . . . . . . . . . . . . . . . . . . . . . . . . . . . . . . . . . . . . . . . . . . . . . . . . . .91
Uninstalling Printer & Fax driver . . . . . . . . . . . . . . . . . . . . . . . . . . . . . . . . . . . . . . . . . . . . . . . . . . . . . . . .93
Installing the OfficeBridge Online Utilities
Installing the OfficeBridge Online Utilities . . . . . . . . . . . . . . . . . . . . . . . . . . . . . . . . . . . . . . . . . . . . . . . . .95
Uninstalling the OfficeBridge Online Utilities . . . . . . . . . . . . . . . . . . . . . . . . . . . . . . . . . . . . . . . . . . . . . .99
Installing Reference Manual
Installing the Reference Manual . . . . . . . . . . . . . . . . . . . . . . . . . . . . . . . . . . . . . . . . . . . . . . . . . . . . . . . .101
Uninstalling the Reference Manual . . . . . . . . . . . . . . . . . . . . . . . . . . . . . . . . . . . . . . . . . . . . . . . . . . . . . .104
Troubleshooting
Trouble with screen operation . . . . . . . . . . . . . . . . . . . . . . . . . . . . . . . . . . . . . . . . . . . . . . . . . . . . . . . . . .106
Trouble with InfoMonitor . . . . . . . . . . . . . . . . . . . . . . . . . . . . . . . . . . . . . . . . . . . . . . . . . . . . . . . . . . . . . .108
Trouble with a printer . . . . . . . . . . . . . . . . . . . . . . . . . . . . . . . . . . . . . . . . . . . . . . . . . . . . . . . . . . . . . . . . .109
Appendix
Specifications . . . . . . . . . . . . . . . . . . . . . . . . . . . . . . . . . . . . . . . . . . . . . . . . . . . . . . . . . . . . . . . . . . . . . . . .111
Basic specifications . . . . . . . . . . . . . . . . . . . . . . . . . . . . . . . . . . . . . . . . . . . . . . . . . . . . . . . . . . . . . .111
Internet fax . . . . . . . . . . . . . . . . . . . . . . . . . . . . . . . . . . . . . . . . . . . . . . . . . . . . . . . . . . . . . . . . . . . . .111
PC-FAX . . . . . . . . . . . . . . . . . . . . . . . . . . . . . . . . . . . . . . . . . . . . . . . . . . . . . . . . . . . . . . . . . . . . . . . .112
Network scanner . . . . . . . . . . . . . . . . . . . . . . . . . . . . . . . . . . . . . . . . . . . . . . . . . . . . . . . . . . . . . . . .112
Network printer . . . . . . . . . . . . . . . . . . . . . . . . . . . . . . . . . . . . . . . . . . . . . . . . . . . . . . . . . . . . . . . . .112
Printer & Fax driver operational environment . . . . . . . . . . . . . . . . . . . . . . . . . . . . . . . . . . . . . . . .113
OfficeBridge Online Utilities operational environment . . . . . . . . . . . . . . . . . . . . . . . . . . . . . . . . .113
Reference manual operational environment . . . . . . . . . . . . . . . . . . . . . . . . . . . . . . . . . . . . . . . . . .113
3
Page 6

About the Manuals
User’s Guide (on the CD) (this book):
This User’s Guide describes the basically operation procedures of the OfficeBridge Online, as well as the procedures for installing, registration and adjusting the settings. For detail information of using the OfficeBridge
Online on your computer, read the Reference manual on the OfficeBridge Online Installation Disk.
Reference Manual (on the CD):
This manual describes the details of using the OfficeBridge Online interface on your PC.
The Reference manual is made with the HTML file format. You can view this manual using the web browser
such as Microsoft Internet Explorer or Netscape Communicator. (See “Installing the reference manual,” page
100.)
Administrator’s Manual (on the CD):
This manual describes administrator registration, forced printing of the received document and clear logon password, etc.
4
Page 7

Summary of
Major Features
What is the OfficeBridge Online? . . . . . . . . . . . . . . . . . . . . . . . . . . . . . . . . . . . . . . . . . . . . . . . 6
PC-FAX Transmission & Reception . . . . . . . . . . . . . . . . . . . . . . . . . . . . . . . . . . . . . . . . . . . . . 7
Network Scanner . . . . . . . . . . . . . . . . . . . . . . . . . . . . . . . . . . . . . . . . . . . . . . . . . . . . . . . . . . . . 9
Bulletin Board . . . . . . . . . . . . . . . . . . . . . . . . . . . . . . . . . . . . . . . . . . . . . . . . . . . . . . . . . . . . . 10
Circular Board . . . . . . . . . . . . . . . . . . . . . . . . . . . . . . . . . . . . . . . . . . . . . . . . . . . . . . . . . . . . . 11
Processing Request . . . . . . . . . . . . . . . . . . . . . . . . . . . . . . . . . . . . . . . . . . . . . . . . . . . . . . . . . 12
Network Printer . . . . . . . . . . . . . . . . . . . . . . . . . . . . . . . . . . . . . . . . . . . . . . . . . . . . . . . . . . . . 13
Internet transmission & reception . . . . . . . . . . . . . . . . . . . . . . . . . . . . . . . . . . . . . . . . . . . . . 14
InfoMonitor . . . . . . . . . . . . . . . . . . . . . . . . . . . . . . . . . . . . . . . . . . . . . . . . . . . . . . . . . . . . . . . 15
5
Page 8
What is the OfficeBridge Online?
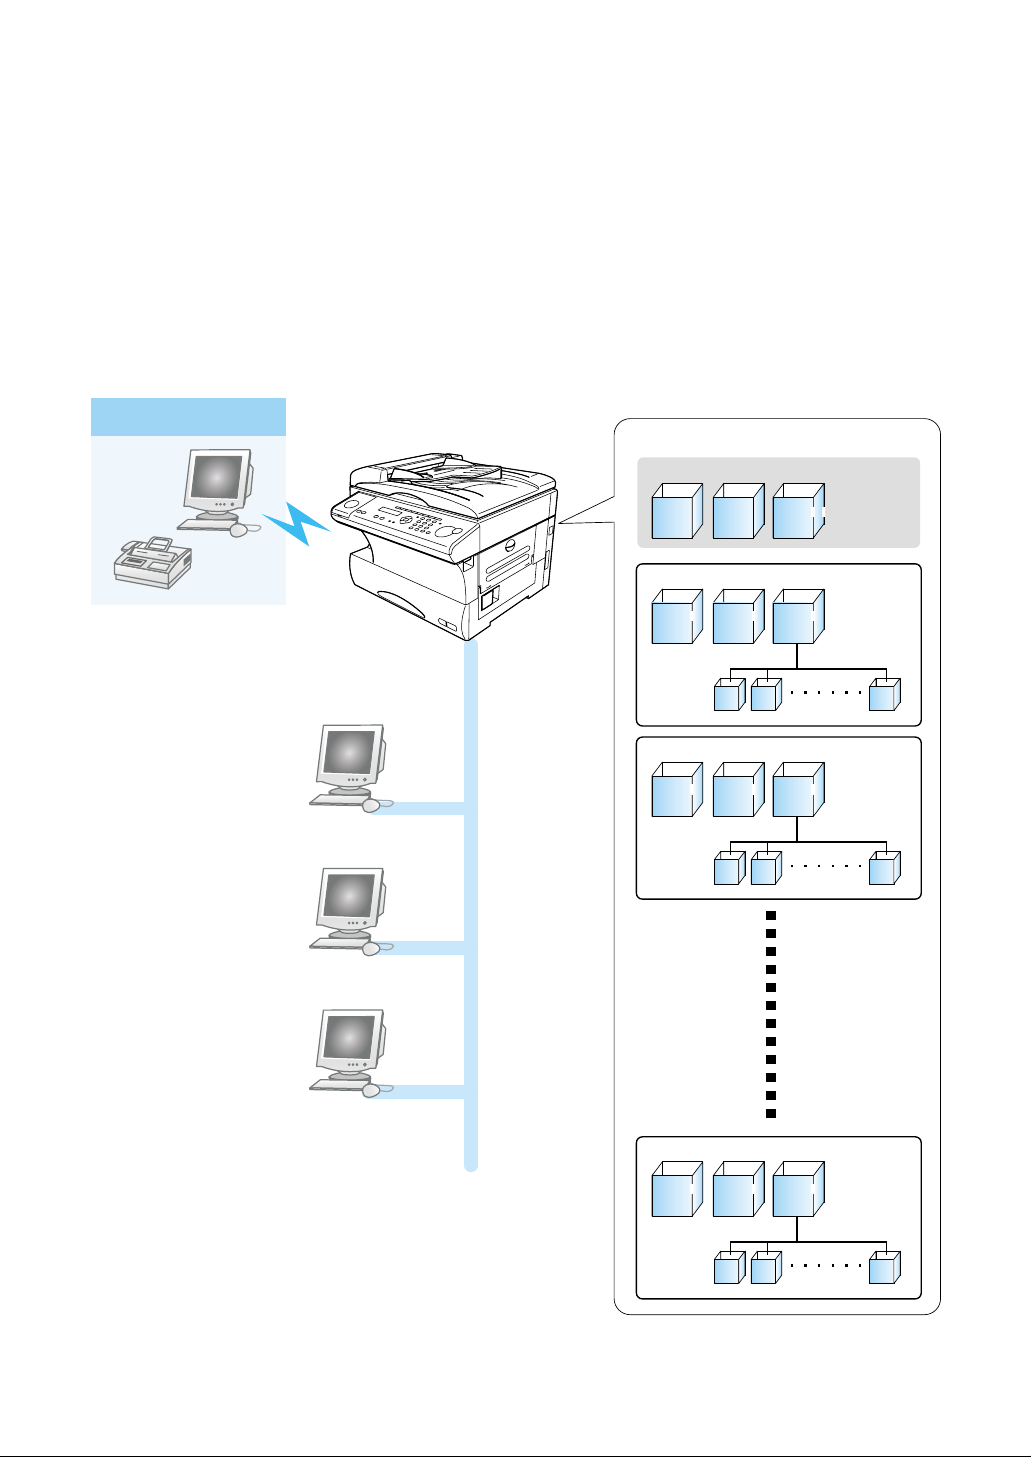
OfficeBridge Online is a system that allows documents that have been sent or received to be handled as electronic data by the browser without needing to use a dedicated fax server.
With OfficeBridge Online functions, such as PC-FAX transmission/reception, network scanner, bulletin board,
circular board, processing request, and network printer can be used.
Office BridgeOnline provides a prepared bulletin boards and special boxes, such as an Inbox. Registering the
users that will use this system not only allows them to use the special boxes, but also provides them with an
individual box to allow individual management of faxes, etc.
The received faxes and scanned documents are put in the OfficeBridge Online special boxes.
External
OfficeBridge Online special boxes
Shared Boxes
User 01
User 02
Bulletin
Board
Public
Inbox
Registered User 01
Personal
Inbox
Personal
Outbox
Sub
Box 01
Registered User 02
Personal
Inbox
Personal
Outbox
Sub
Box 01
Sub
Box 02
Sub
Box 02
Completed
Box
Storage
Box
Storage
Box
Sub
Box 16
Sub
Box 16
User 03
Registered User 50
Personal
Inbox
Personal
Outbox
Sub
Box 01
Sub
Box 02
Storage
Box
Sub
Box 16
6
Page 9
PC-FAX Transmission & Reception
Outline
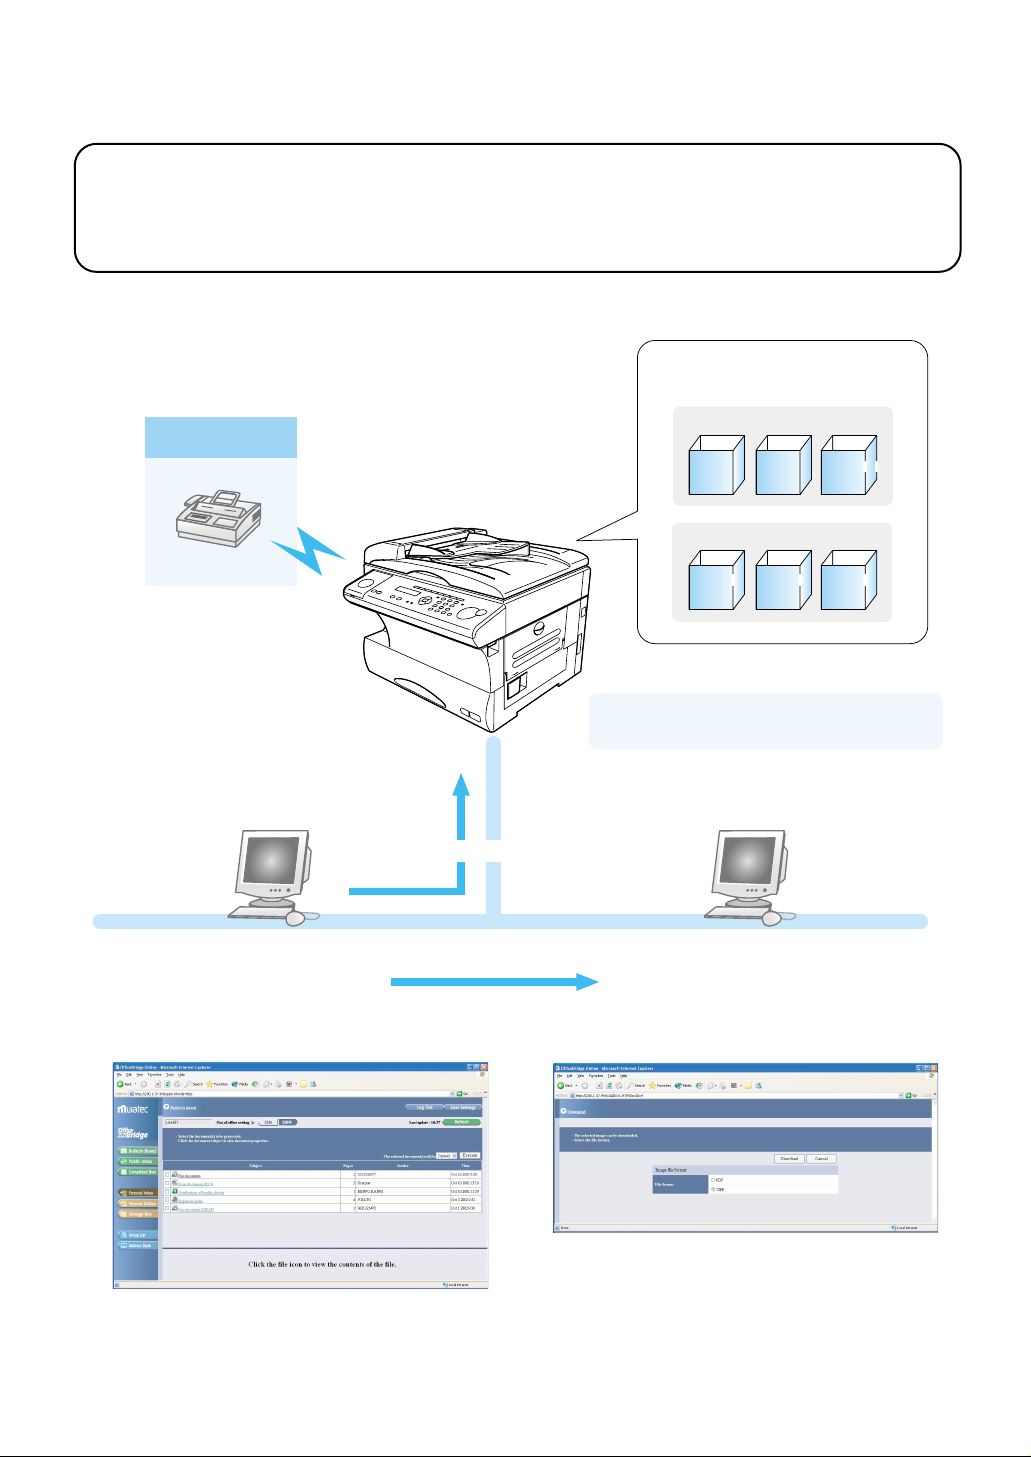
Fax transmission/reception is a function that allows faxes sent from an external location to be accessed via
the browser and transmitted and the received fax document manipulated.
OfficeBridge Online
(1) Automatic Distribution
Shared Box Area
External
Bulletin
Board
Individual Box Area
Public
Inbox
Completed
Box
(6) Send/Distribute
User A
(5) Distribution
(2) Confirmation (3) Browser Operation
Personal
Inbox
Personal
Outbox
Storage
Box
What is an individual box?
This is a box possessed individually by a
registered user to store fax documents etc.
User B
(4) Download
7
Page 10

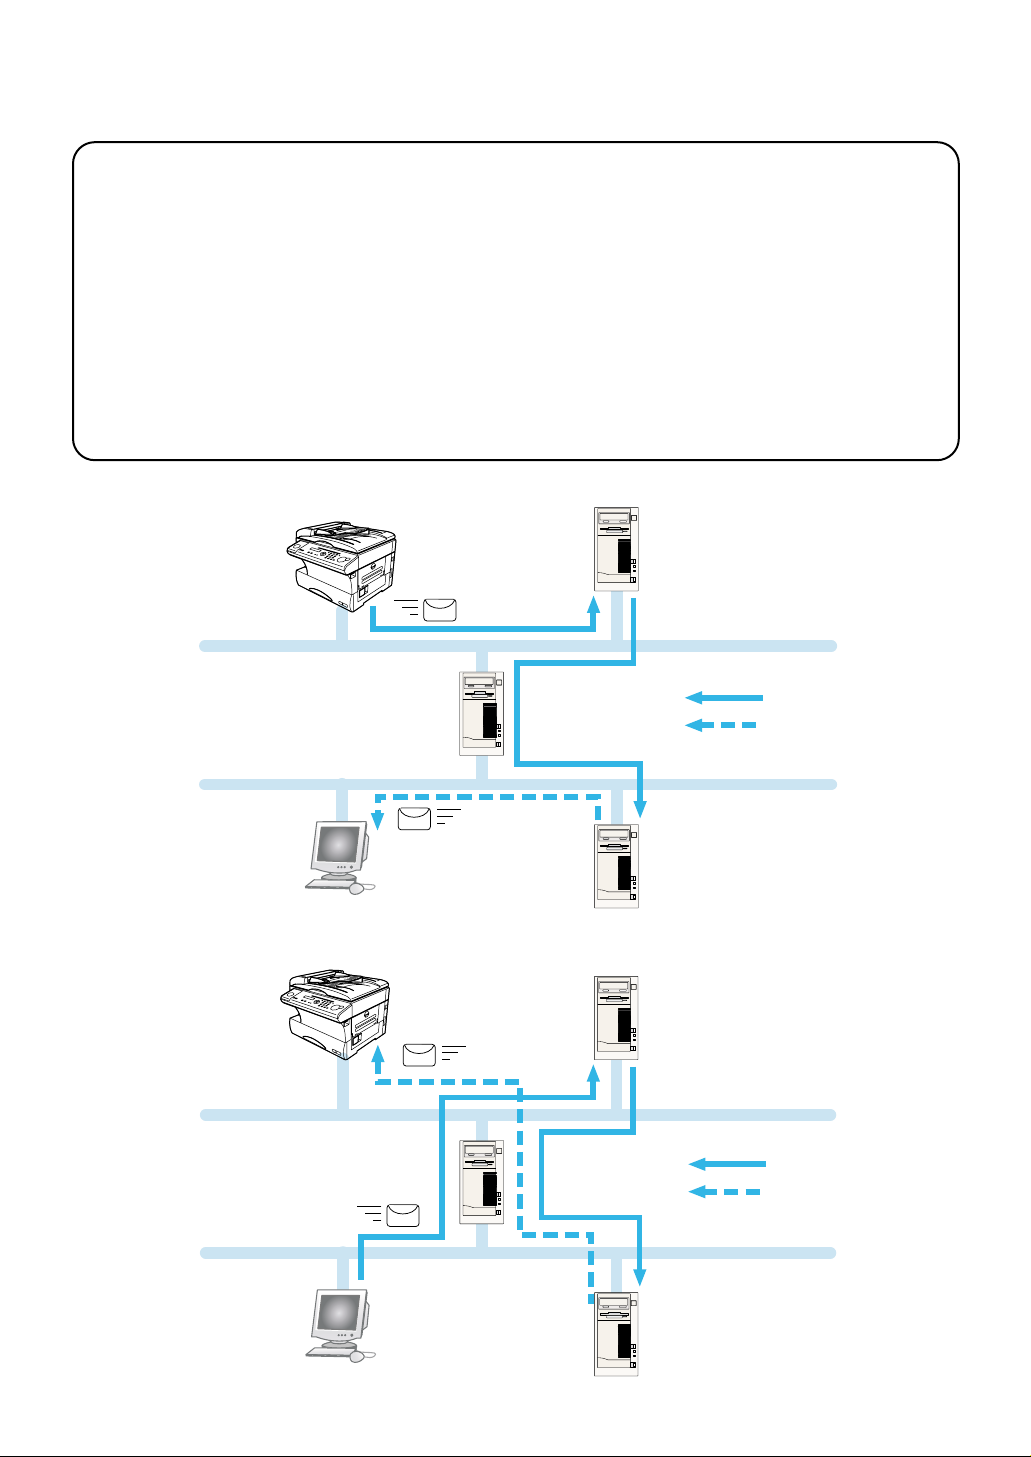
(1) Automatic Distribution
The received fax documents are not printed but instead are automatically stored in the individual boxes of
users registered in accordance with the distribution settings set in advance. There is no need to distribute the
fax to the person in charge.
Note: Refer to the “Received fax forwarding” settings on the “Admin tool” screen.
(2) Confirmation
The received fax document can be previewed on your computer. This conserves paper and toner.
Note: A new document arrival notice is sent to the users on the distribution list.
The new document arrival notice is only given when the InfoMonitor is running.
For information on the installation, refer to “InfoMonitor,” on page 95.
(3) Browser Operation
The processing of received faxes (download, forward, delete) can be done using the browser with the same feel
as when accessing the Internet.
(4) Download
The received fax document can be downloaded to the specified location in TIFF or PDF format.
(5) Distribution
The received fax document can be distributed to other users (from user A to user B) and distributed to e-mail
addresses.
(6) Send/Reply
Documents created on your computer and replies to received fax documents can be sent as a fax directly to an
external location from your computer.
8
Page 11
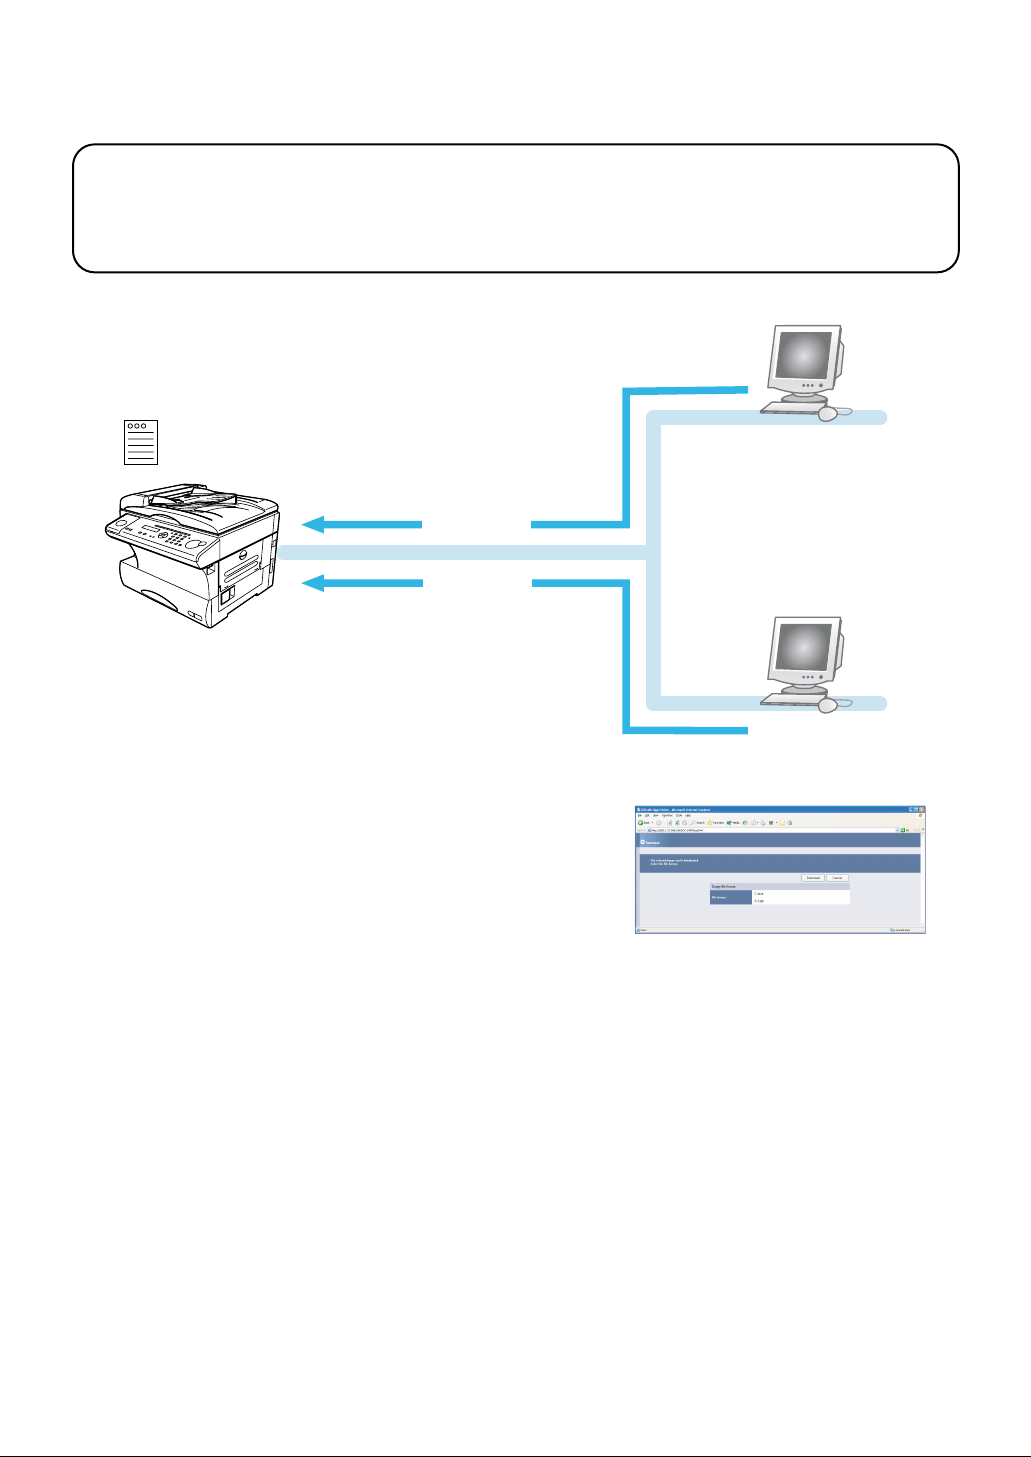
Network Scanner
Outline
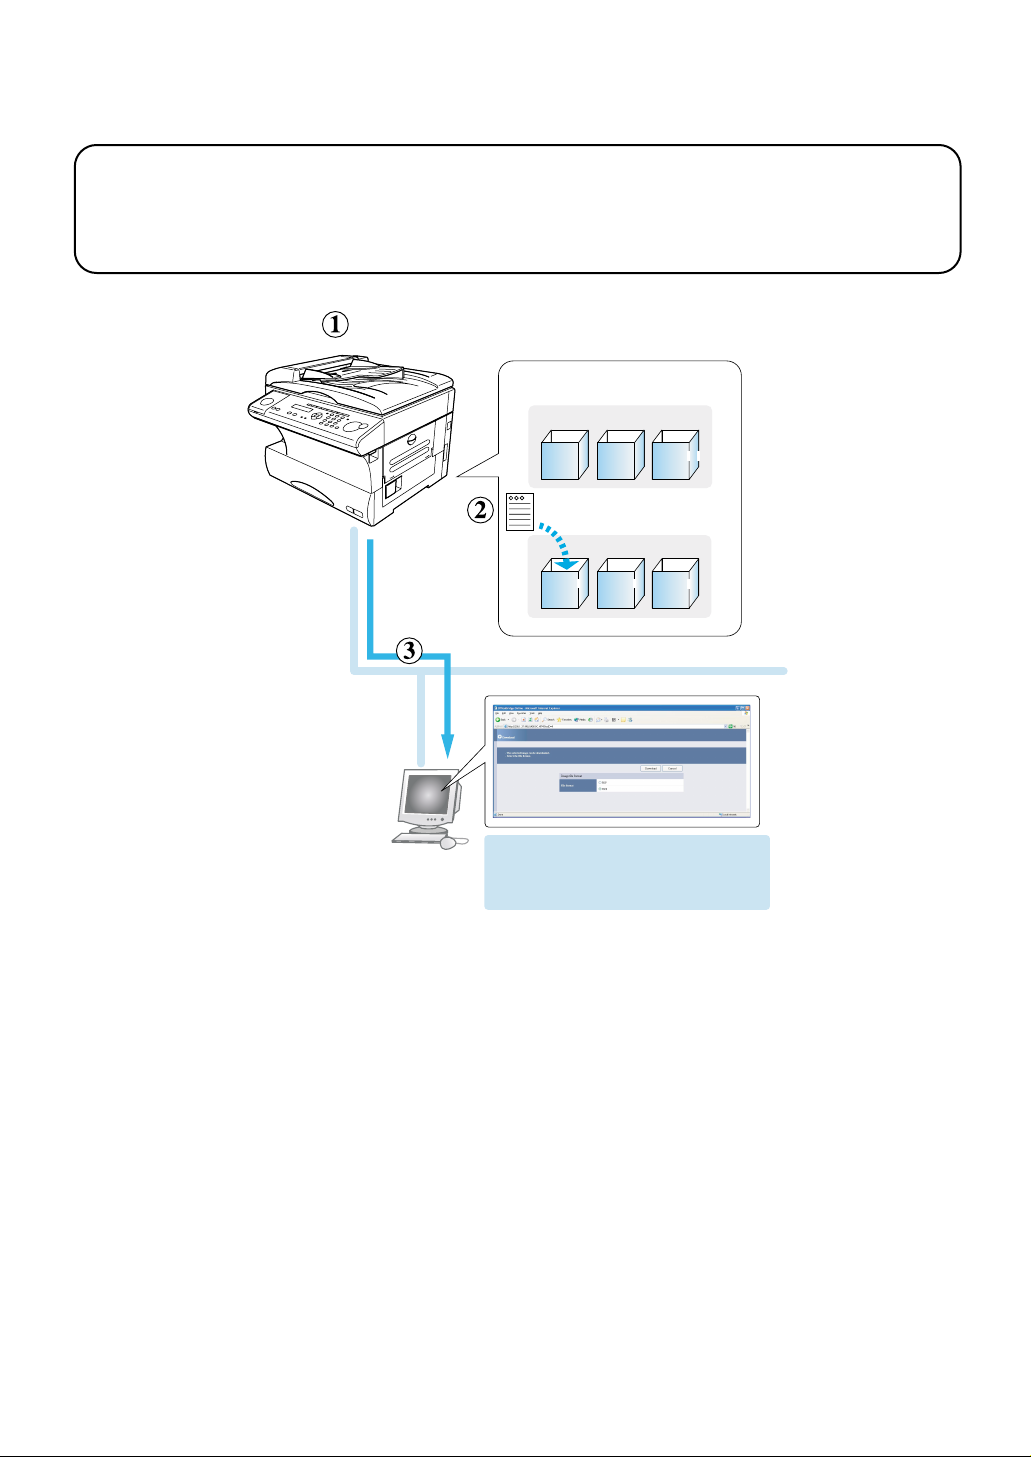
Network Scanner is a function that internally stores the image read by the unit and reuses the images
when necessary.
OfficeBridge Online
Shared Box Area
Bulletin
Public
Board
Inbox
Individual Box Area
Personal
Personal
Inbox
Outbox
The scanned image can be downloaded
from the Personal Inbox in the PDF or
TIFF format.
(1) Scan the document
Change the main unit to the Scan mode by pressing
Enter the User ID then load the document in the unit and scan it.
FAX/COPY/SCAN
key.
Completed
Box
Storage
Box
(2) The scanned image is stored in the Personal Inbox
The scanned images up to Letter (or A4) in size can be stored to the Personal Inboxes (Individual) of the registered users.
(3) Confirmation & Download
The scanned image can be previewed on your computer.
If you want, download the scanned image (select the TIFF or PDF format), and save it in your computer.
The image can be read and edited using an image editing application that supports TWAIN. In addition, the
scanned document can be managed with a commercially available document management application.
[TWAIN Standard]
This standard applies to the exchange of data between an image input device, such as a scanner, and an image
editing application. The image input by a TWAIN standard scanner can be read by the computer using an image
editing application that supports the TWAIN standard.
9
Page 12
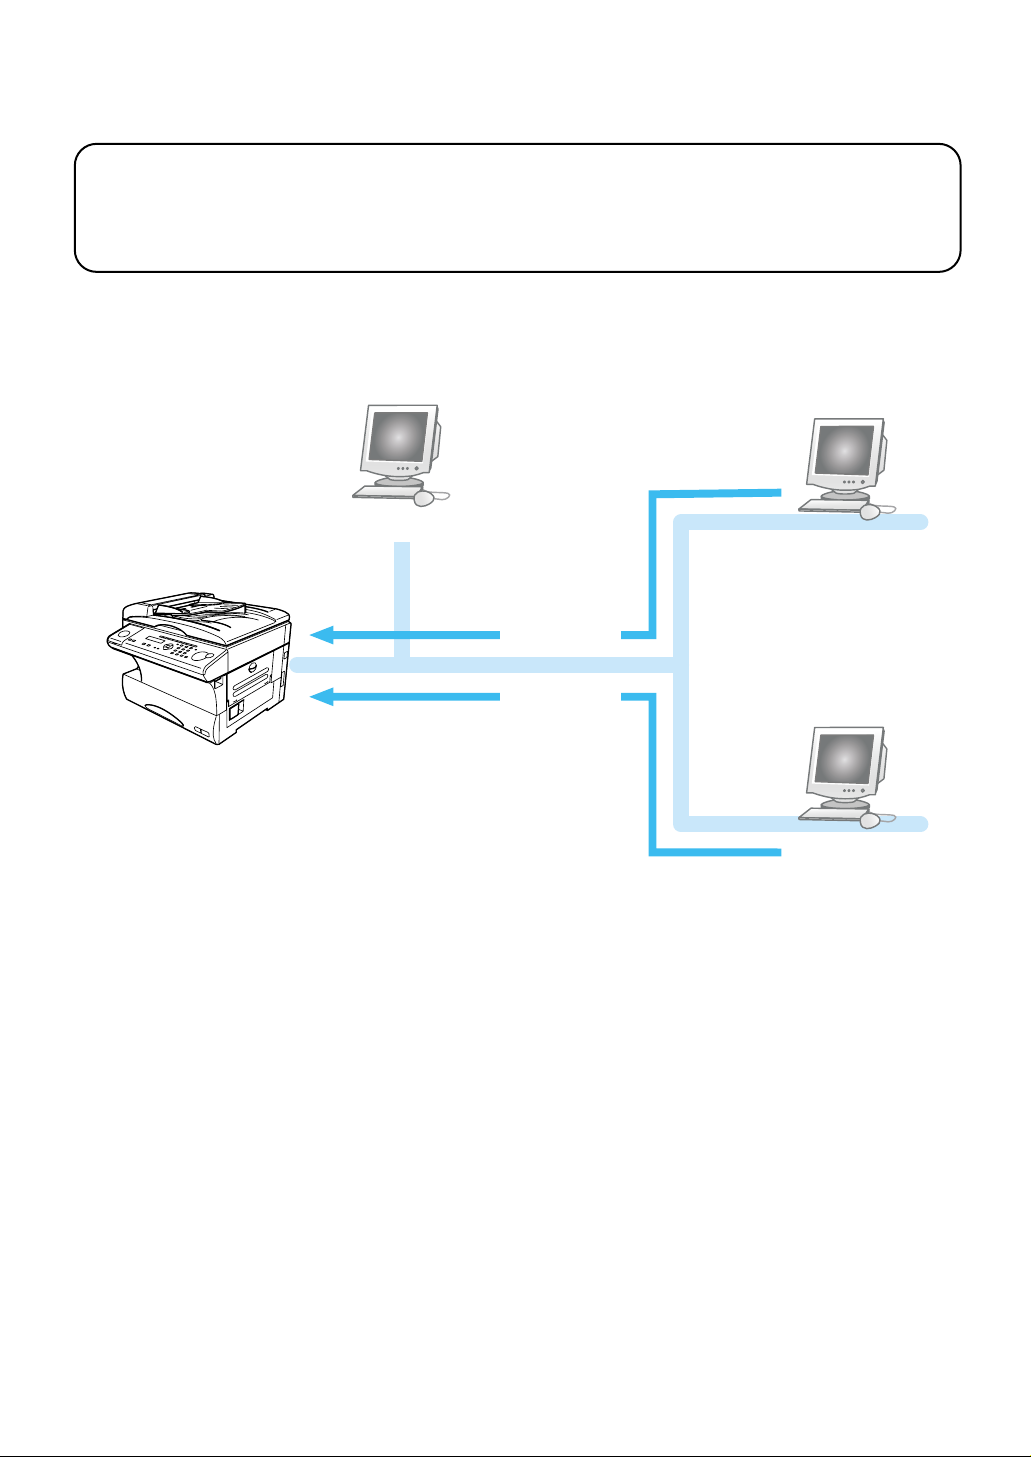
Bulletin Board
Outline
Bulletin Board is a function that makes it possible to share brief information among registered users.
(1) Registration
(2) Viewing
(2) Viewing
(3) Download
(1) Registration
A document or image can be posted on the Bulletin Board as a shared document with comments attached.
There is no need to print the posted document and hang it on the wall.
User A
User B
(2) Viewing
Registered users can use the browser to view a posted document.
Registered uses can use the browser to share information.
* If InfoMonitor is left running, it will automatically notify users when a new bulletin board document is
posted.
(3) Download
When necessary, a posted document can be downloaded to your computer or sent via e-mail.
10
Page 13
Circular Board
Outline
This function specifies the users and circulates a document for viewing among users registered in the
Circular Board.
(2) Distributive Settings
User A
(1) Scan
(3) Viewing
(3) Viewing
(1) Scan
A received fax document or scanned image can be circulated among registered users.
The circular document does not need to be printed.
(2) Circular Settings
The issuer can specify the subjects (users) to whom the circular will be sent to allow efficient circulation.
(3) Viewing
The contents of the circular can be viewed when a notice is received from the issuer. In addition, the issuer
can check if the circular subjects (users) have read the circular.
User B
User C
11
Page 14
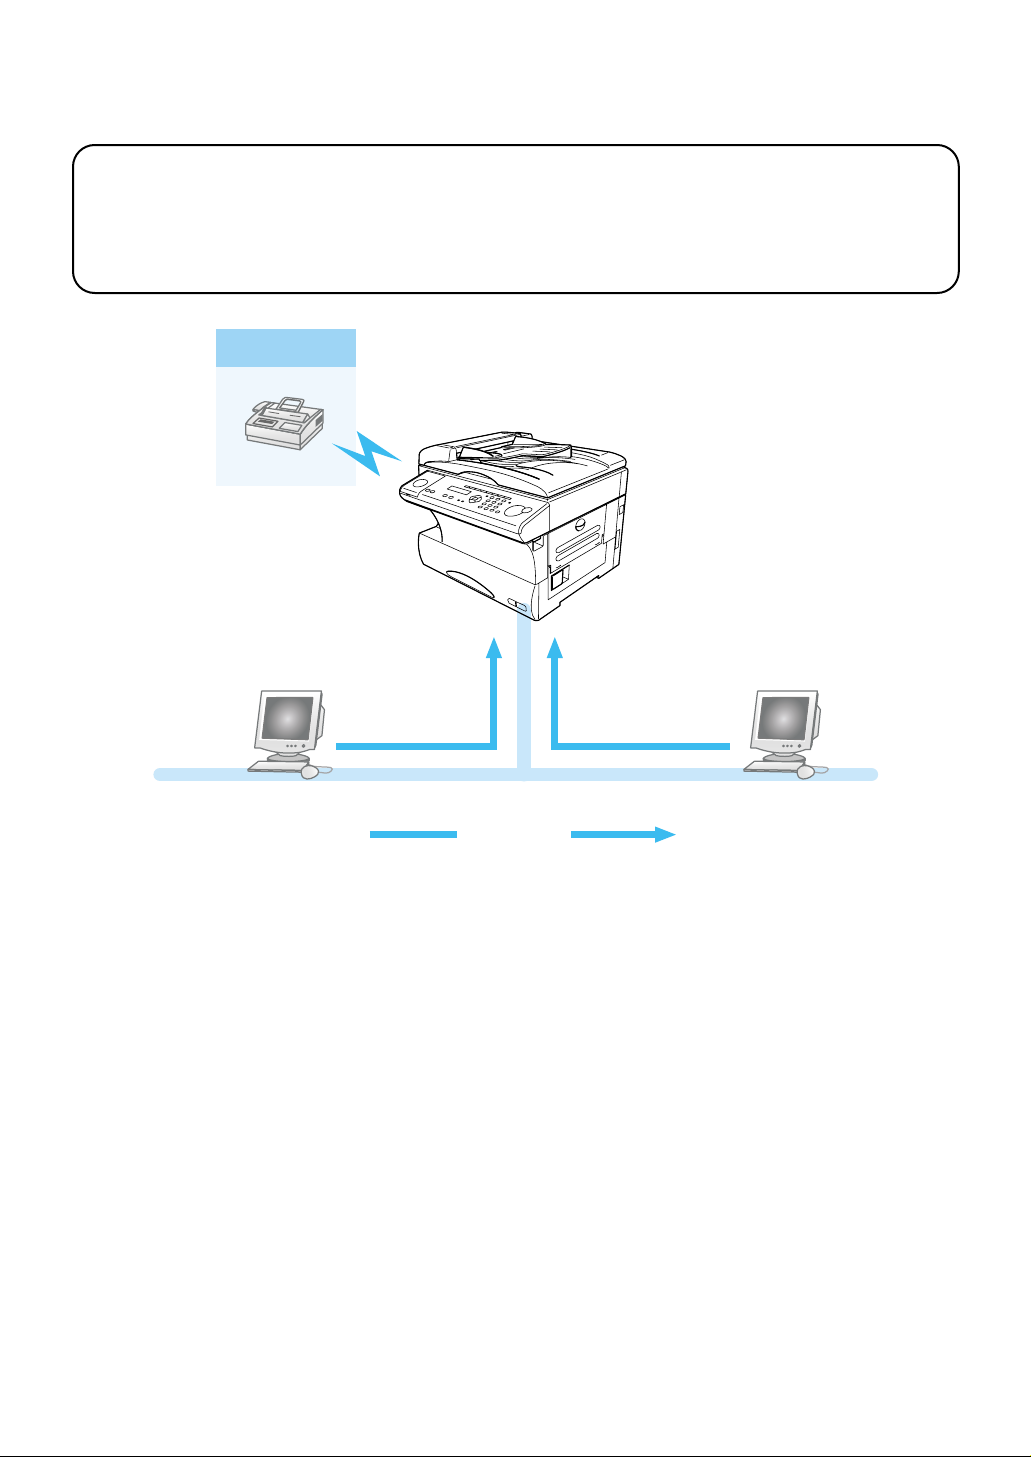
Processing Request
Outline
Processing Request is a function that attaches deadlines and comments to information read using the unit
and then requests processing of them by other users. The requester can check the processing status of the
person in charge of the processing.
External
(5) Completion
Check
(3) ForwardProcessing Requester
(1) Deadline Settings
(2) Comments
(4) Processing
Completed
Person in Charge
of Processing
(1) Deadline Setting
When the processing requester makes a request to the person in charge of processing, he can set a processing
deadline. Documents that are not processed by the deadline are printed to prevent them from remaining
unprocessed.
(2) Comments
The process requester can write comments when making a request to the person in charge of processing. This
allows the requester to accurately communicate the processing request.
(3) Processing request
A processing request can be sent to the user in charge for documents that require processing, such as forwarded orders and invoices.
(4) Processing completion
Person in charge of processing completion process specifies processing completion setting after the processing
has been completed.
(5) Completion Check
The process requester can check if the person in charge of processing has completed the processing by checking the “Completed Box”.
12
Page 15
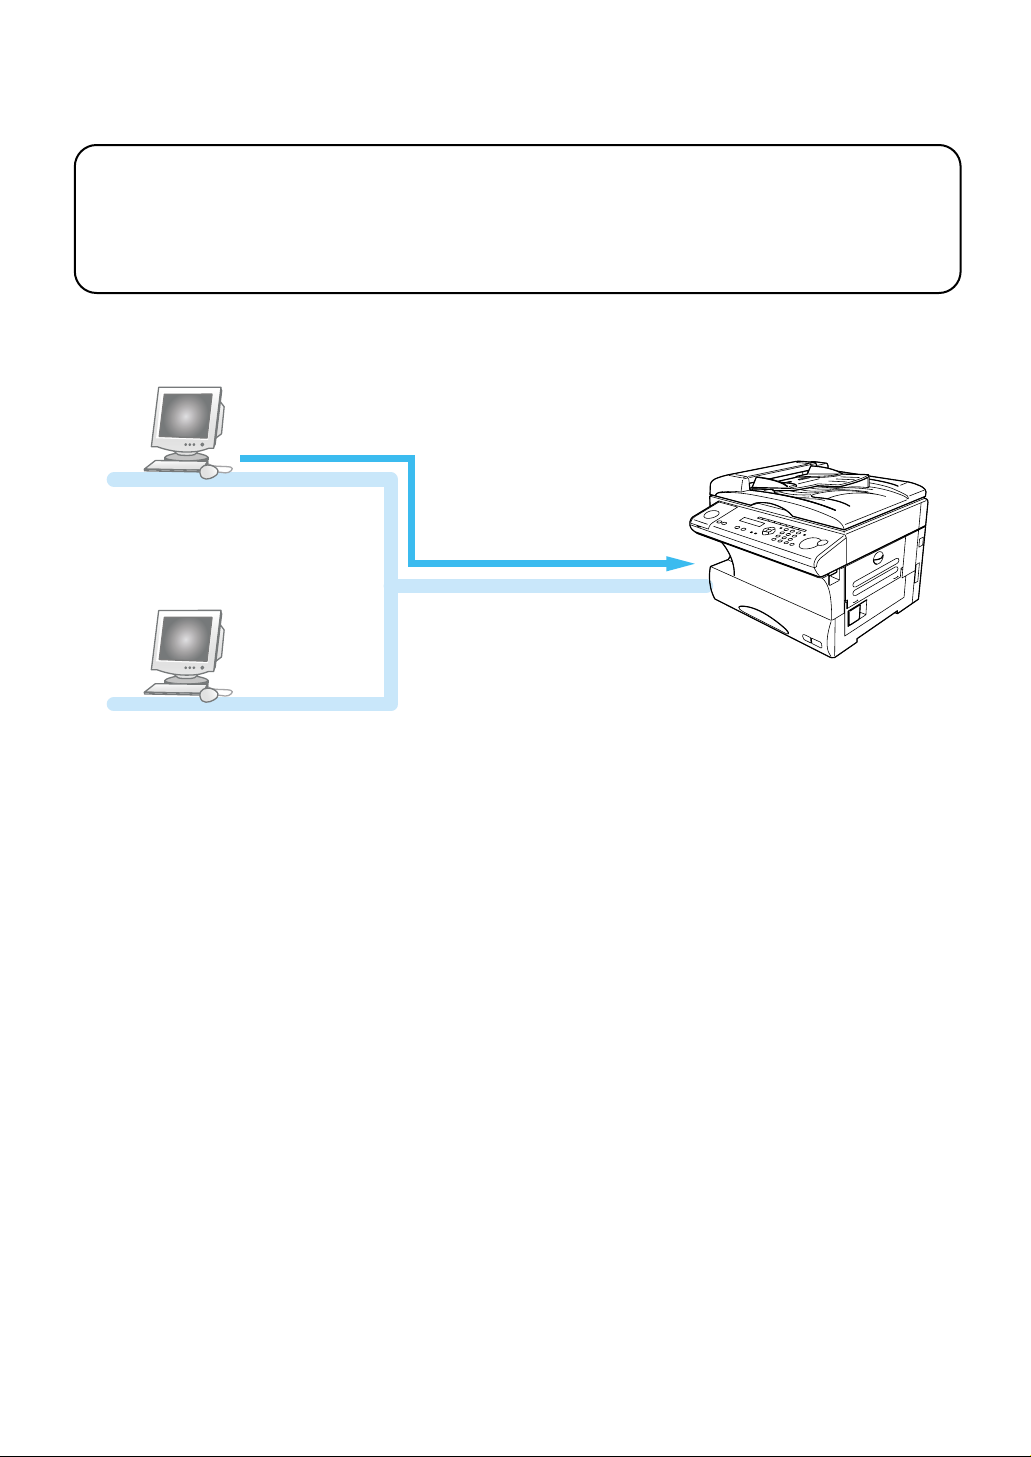
Network Printer
Outline
Network Printer is a function that uses the unit on the LAN as a network printer. Printouts with a maximum size of Letter (or A4) and resolution of 600 dpi can be printed.
(1) Printing Instruction
(2) Print
(1) Printing Instructions
You can use the unit as a printer from your computer.
(2) Print
This allows you to print documents created using various applications at a resolution of 600 dpi.
13
Page 16
Internet transmission & reception
Outline
Internet fax transmission:
OfficeBridge Online allows you to transmit documents over the Internet to another Internet Fax or a PC.
The scanned document data sent by e-mail as an attachment file.
When you send an e-mail message, OfficeBridge Online uses Simple Mail Transfer Protocol (SMTP) to
transfer your outgoing mail to your SMTP mail server, which in turn uses SMTP to send your mail to the
Internet.
Internet fax reception:
OfficeBridge Online allows you to receive and print a PC transmitted e-mail automatically or manually,
depending on its setup configuration.
E-mail transmission
SMTP server
E-mail reception
Router
Router
SMTP
POP3
POP server
SMTP server
SMTP
POP3
POP server
14
Page 17
InfoMonitor
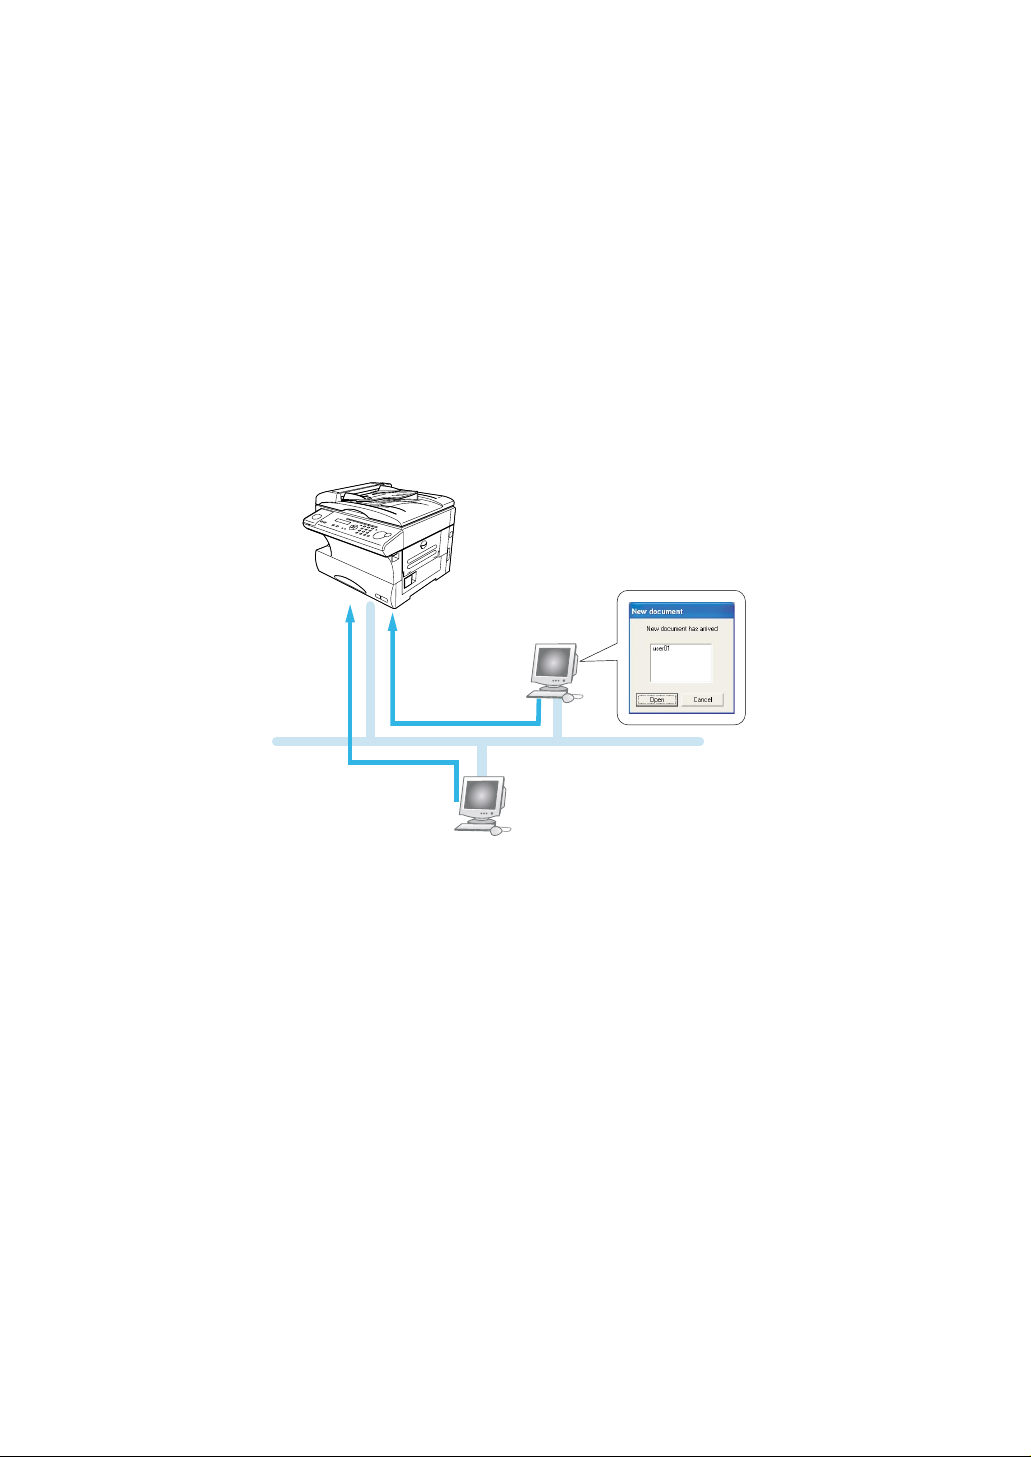
What is the InfoMonitor?
“InfoMonitor” is an application that is connected to “OfficeBridge Online” and monitors and downloads New documents from the specified box of the “OfficeBridge Online” to your computer. To monitor documents with
“InfoMonitor,” users need to be registered on each computer.
When started up, “InfoMonitor” monitors “OfficeBridge Online.” When new fax, e-mail or scanned data arrives at
specified box of the “OfficeBridge Online,” “InfoMonitor” notifies the registered users. The UserIDs of New documents are listed on your computer screen.
Note: For information on the installation, see page 95 on this manual.
Note: For information on the setup method, refer to the Online help of the “InfoMonitor.”
OfficeBridge Online
Monitoring
When new document arrived.
InfoMonitor
Install
InfoMonitor
Install
Monitoring
New document not arrived.
15
Page 18

Machine configuration
Setting the IP Address, Subnet mask and Gateway Address . . . . . . . . . . . . . . . . . . . . . . . . 17
Setting your Time Zone . . . . . . . . . . . . . . . . . . . . . . . . . . . . . . . . . . . . . . . . . . . . . . . . . . . . . . 18
Confirming the MAC Address . . . . . . . . . . . . . . . . . . . . . . . . . . . . . . . . . . . . . . . . . . . . . . . . . 19
16
Page 19

Setting the IP Address, Subnet mask and Gateway Address
To use the OfficeBridge Online on the Web browser such as “Microsoft Internet Explorer” (4.0 or later) or
“Netscape Communicator” (4.5 or Later), you must do the following procedure to enter the correct IP address and
subnet mask in advance. If you need any help, contact your network administrator.
Note: Dynamic Host Configuration Protocol (DHCP) is not supported.
Press Program, G, 1, 0, 2.
1
Network Settings
02 TCP/IP Setting
Press ENTER.
2
Set IP Address
. . .
Enter the IP address using the numeric keypad.
3
Note: To enter numbers less than 2 digits between the dots, use the cursor key to move the entry point.
To correct a wrong number entry, move the cursor with the cursor key and overwrite it.
Press ENTER.
4
Set Subnet Mask
. . .
Enter the subnet mask address using the numeric keypad.
5
Note: To enter numbers less than 2 digits between the dots, use the cursor key to move the entry point.
To correct a wrong number entry, move the cursor with the cursor key and overwrite it.
Press ENTER.
6
Gateway IP Address
. . .
Enter the Gateway IP Address if necessary. If you do not wish to set the Gateway IP address, do not enter
7
any characters.
Note: To clear the number, press
Press ENTER.
8
Turn Off/On
To Active
To reflect the settings, turn the power off and then on according to the following order.
9
9-1. Turn the fax unit off.
9-2. Unplug the DC cable from the OfficeBridge box.
9-3. Plug the DC cable to the OfficeBridge box.
9-4. Turn the fax unit on.
CANCEL
.
17
Page 20

Setting your Time Zone
“Time Zone” setting is added to the “User Install” by pressing Program, I.
The Time Zone is required as part of the E-mail header information when sending Internet faxes.
Press Program, I.
1
= Program =
I User Install
Press ENTER repeatedly until the following display appears.
2
Time zone
+09:00
Using the cursor key and numeric keypad, enter the Time Zone.
3
To change “+” or “—”, press or of the cursor key.
Example of Time Zone:
-
-
11:00 Midway Island
GMT
-
-
GMT
10:00 Hawaii
-
-
GMT
09:00 Alaska
-
-
GMT
08:00 Pacific Time (US & Canada)
-
-
GMT
07:00 Mountain Time (US & Canada)
-
-
GMT
06:00 Central Time (US & Canada)
-
-
GMT
05:00 Eastern Time (US & Canada)
-
-
GMT
04:00 Atlantic Time (Canada)
-
-
GMT
03:30 Newfoundland
GMT(Greenwich Mean Time): Dublin, Edinburgh, Lisbon, London
GMT+01:00 Amsterdam, Berlin, Bern, Rome, Stockholm, Vienna
GMT+01:00 Brussels, Copenhargen, Madrid, Paris
GMT+10:00 Guam
Press ENTER to save the setting. The LCD will show the next setting of “User Install”.
4
Press STOP to exit.
5
18
Page 21

Confirming the MAC Address
MAC Address is the hardware address, often refered to as MAC (Media Access Control) address that is assigned
to the equipment. MAC address is hard-coded and is not configurable. The MAC address consists of 6 hexadecimal numbers separated by colons.
To confirm the MAC address:
Press Program, G, 1, 0, 3.
1
Network Settings
03 MAC Address
Press ENTER.
2
MAC Address
00:50:81:20:03:A6
Press STOP to exit.
3
19
Page 22

OfficeBridge Online screen
Startup the OfficeBridge Online . . . . . . . . . . . . . . . . . . . . . . . . . . . . . . . . . . . . . . . . . . . . . . . 21
Access to an Administration tools . . . . . . . . . . . . . . . . . . . . . . . . . . . . . . . . . . . . . . . . . . . . . . 22
Login the Personal screen . . . . . . . . . . . . . . . . . . . . . . . . . . . . . . . . . . . . . . . . . . . . . . . . . . . . 23
User Registration . . . . . . . . . . . . . . . . . . . . . . . . . . . . . . . . . . . . . . . . . . . . . . . . . . . . . . . . . . . 25
20
Page 23
In this section, we describe only how to access to the OfficeBridge Online
screen. For details of using the OfficeBridge Online screen on your PC,
please refer to the Reference Manual on the CD.
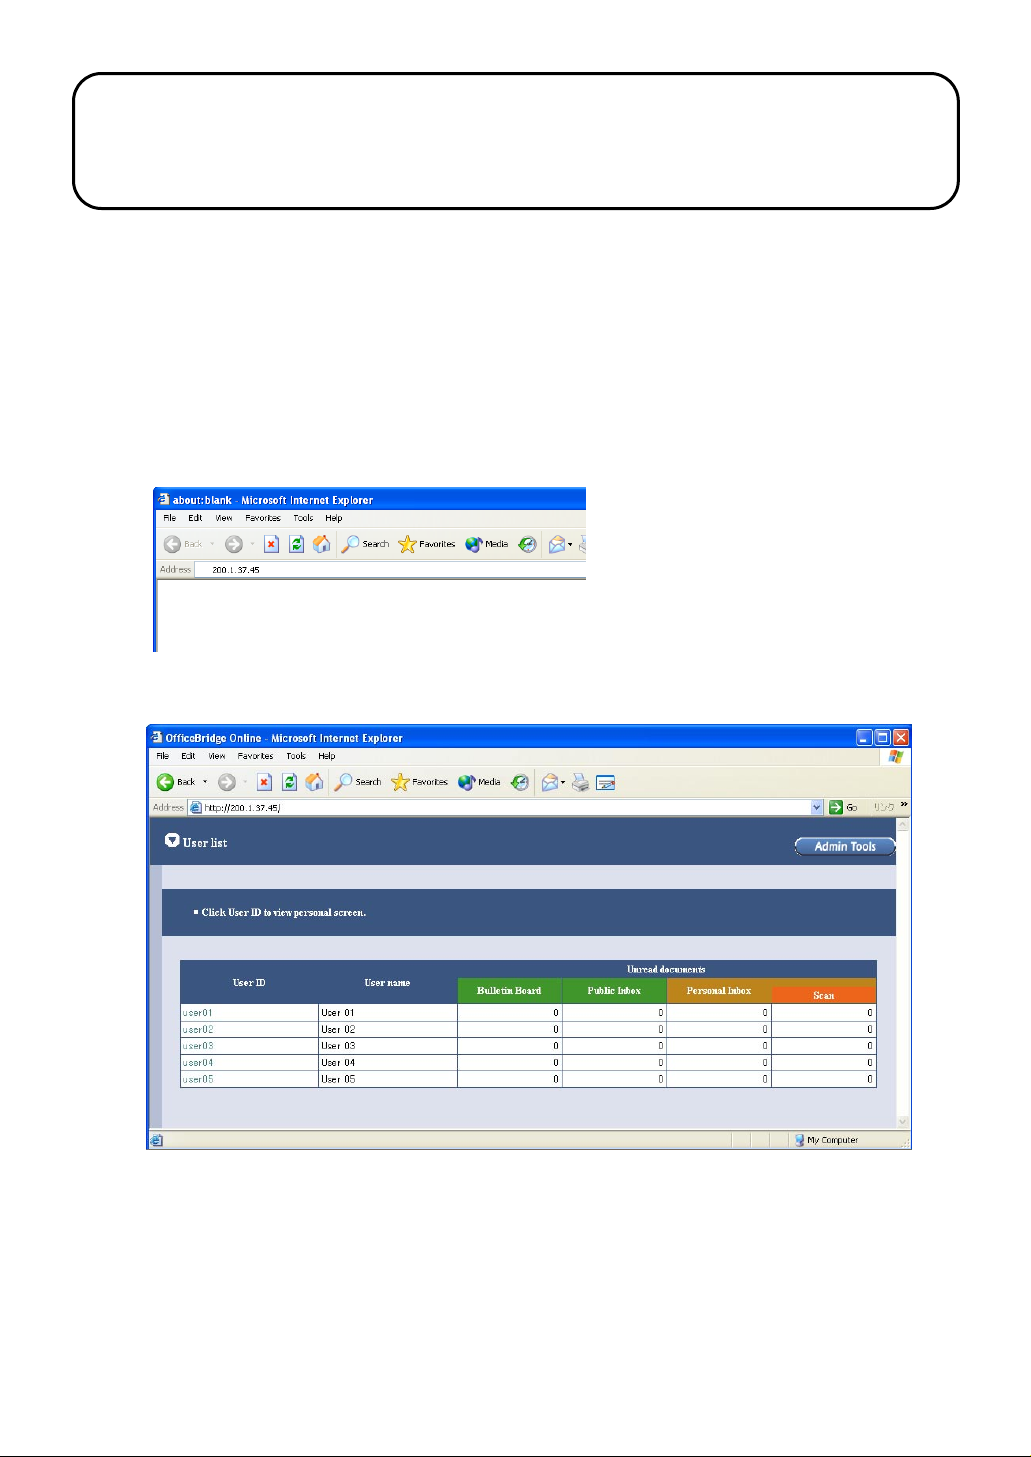
Startup the OfficeBridge Online
Startup “Microsoft Internet Explorer” (4.0 or later) or “Netscape Communicator” (4.5 or Later).
1
Note: Use the latest browser version possible. Some old versions may not produce the correct display.
Enter the IP address in the address box, and press Enter on your computer’s keyboard.
2
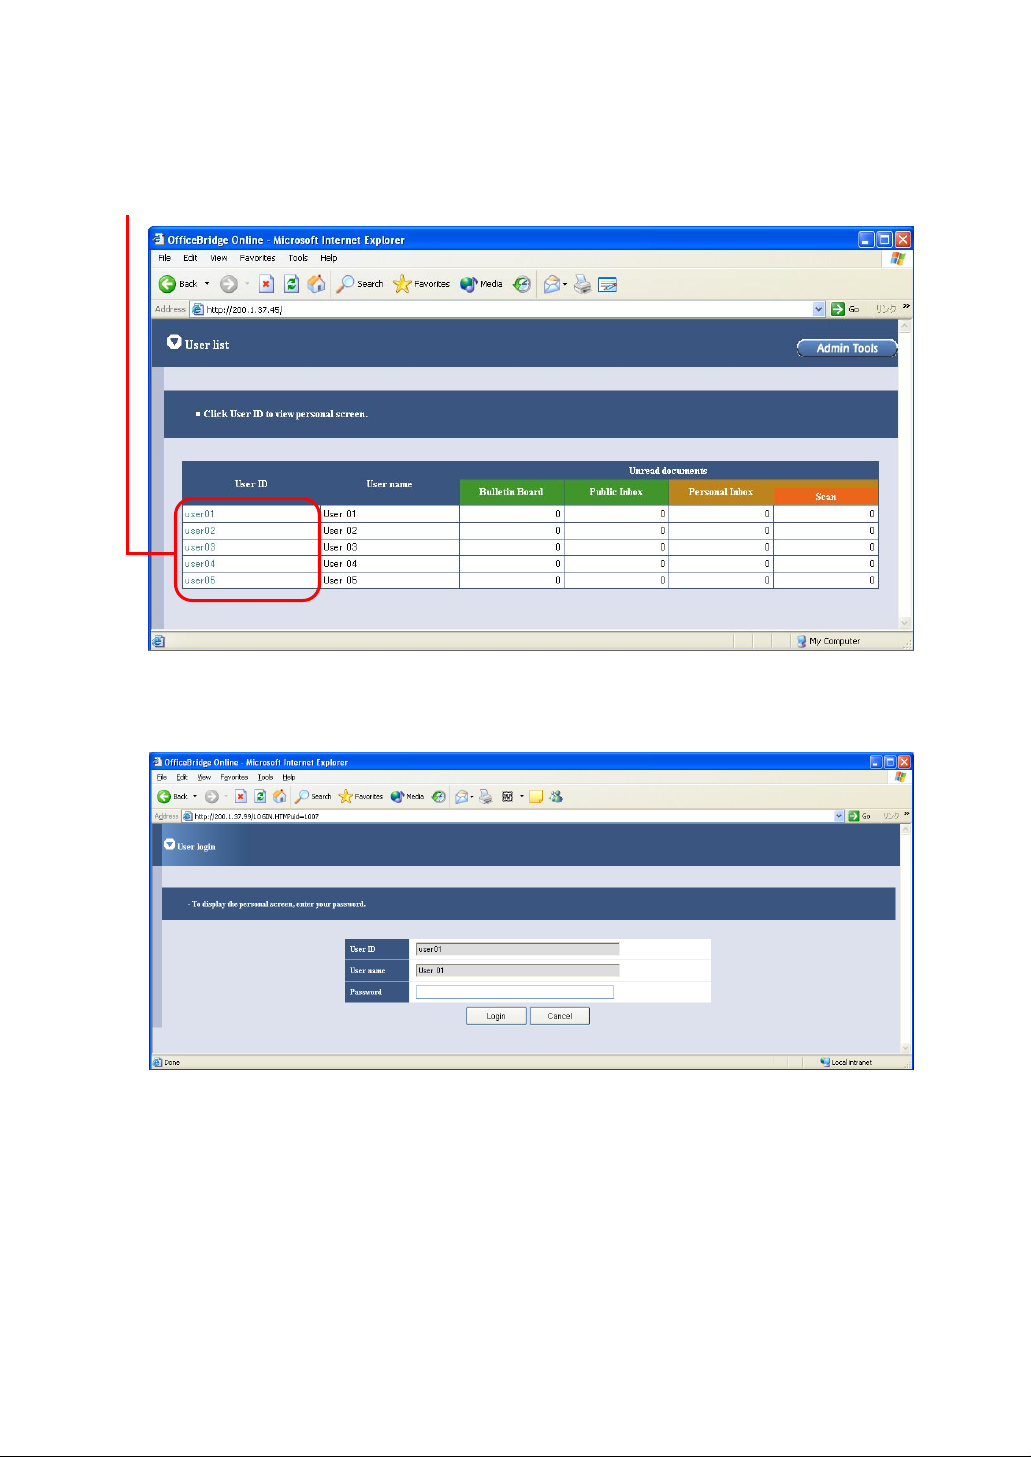
The User list screen will appear.
3
Note: If the “User List” screen does not appear, confirm the IP address in “Setting IP Address, Subnet
mask and Gateway address” (page 17), and carry out power Off/On of the fax main unit to restart.
Adding this page to the Favorites list of your browser is convenient way if you do not remember the IP address for
the OfficeBridge Online.
21
Page 24
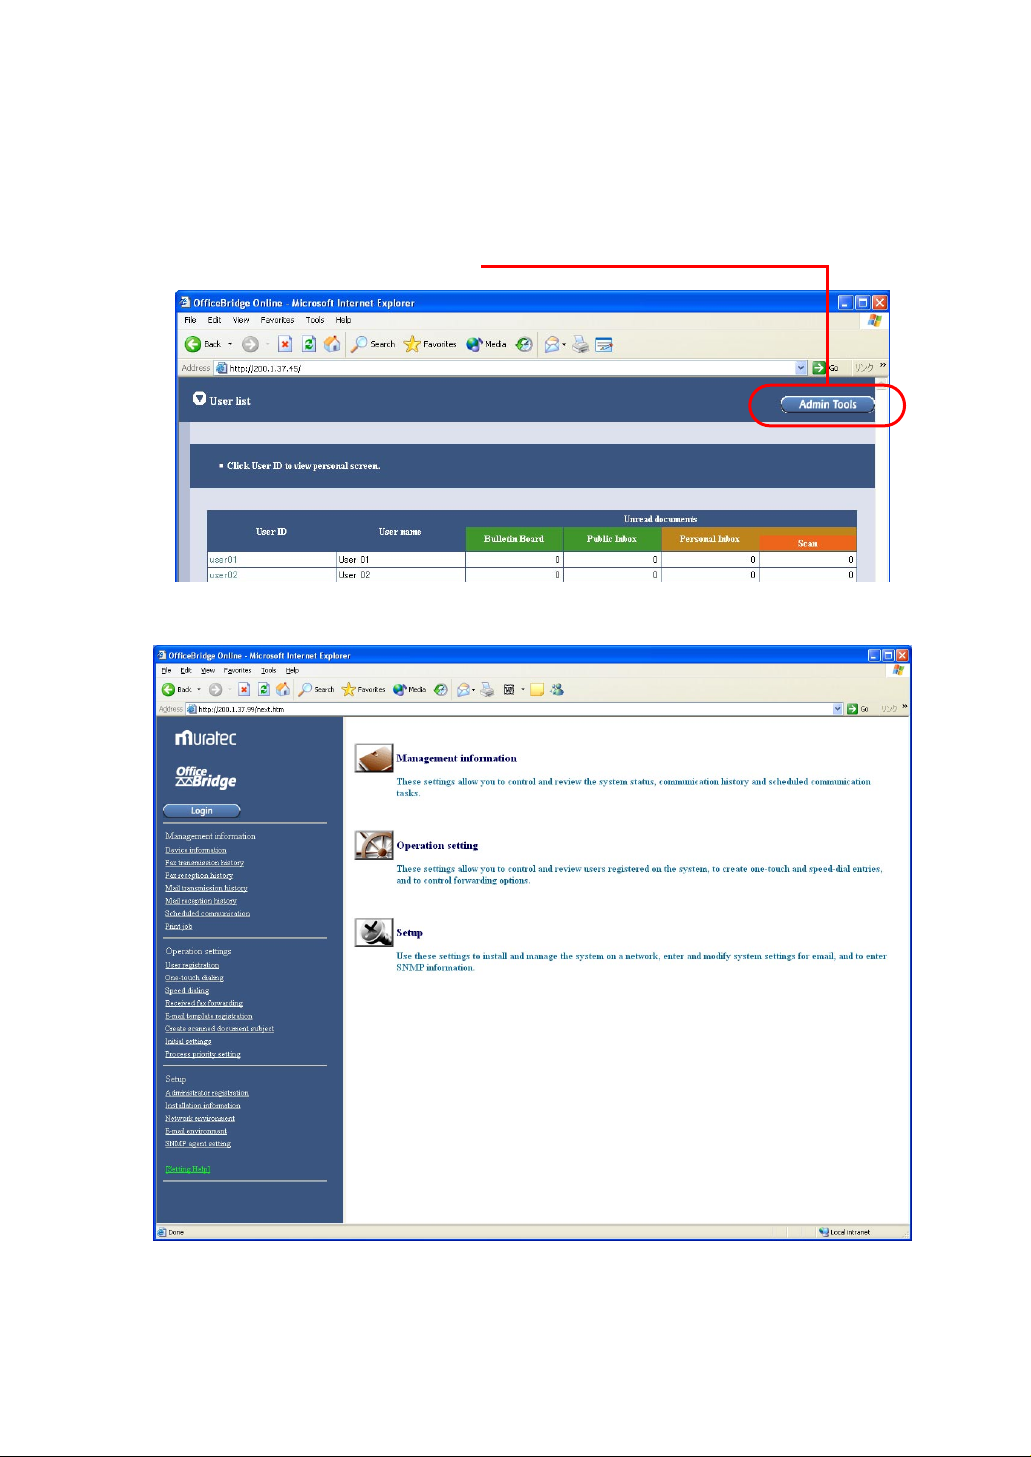
Access to an Administration tools
Administration tool is the program that enables adjustment of settings and registration of your unit with a Web
browser. In addition to adjusting settings and registration, Administration tool enables the management and
browsing of the unit information.
Click Admin Tools on the User List screen.
1
The Administration tool screen will appear.
2
For information of using the Administration tools, refer to “Explanation of
Administration tools screen” on Preface section of Setting edition of the
Reference Manual on the CD.
22
Page 25
Login the Personal screen
Click User ID you want to login on the User list screen.
1
Enter the login password.
2
Note: If the password is not set, this screen will not appear.
23
Page 26
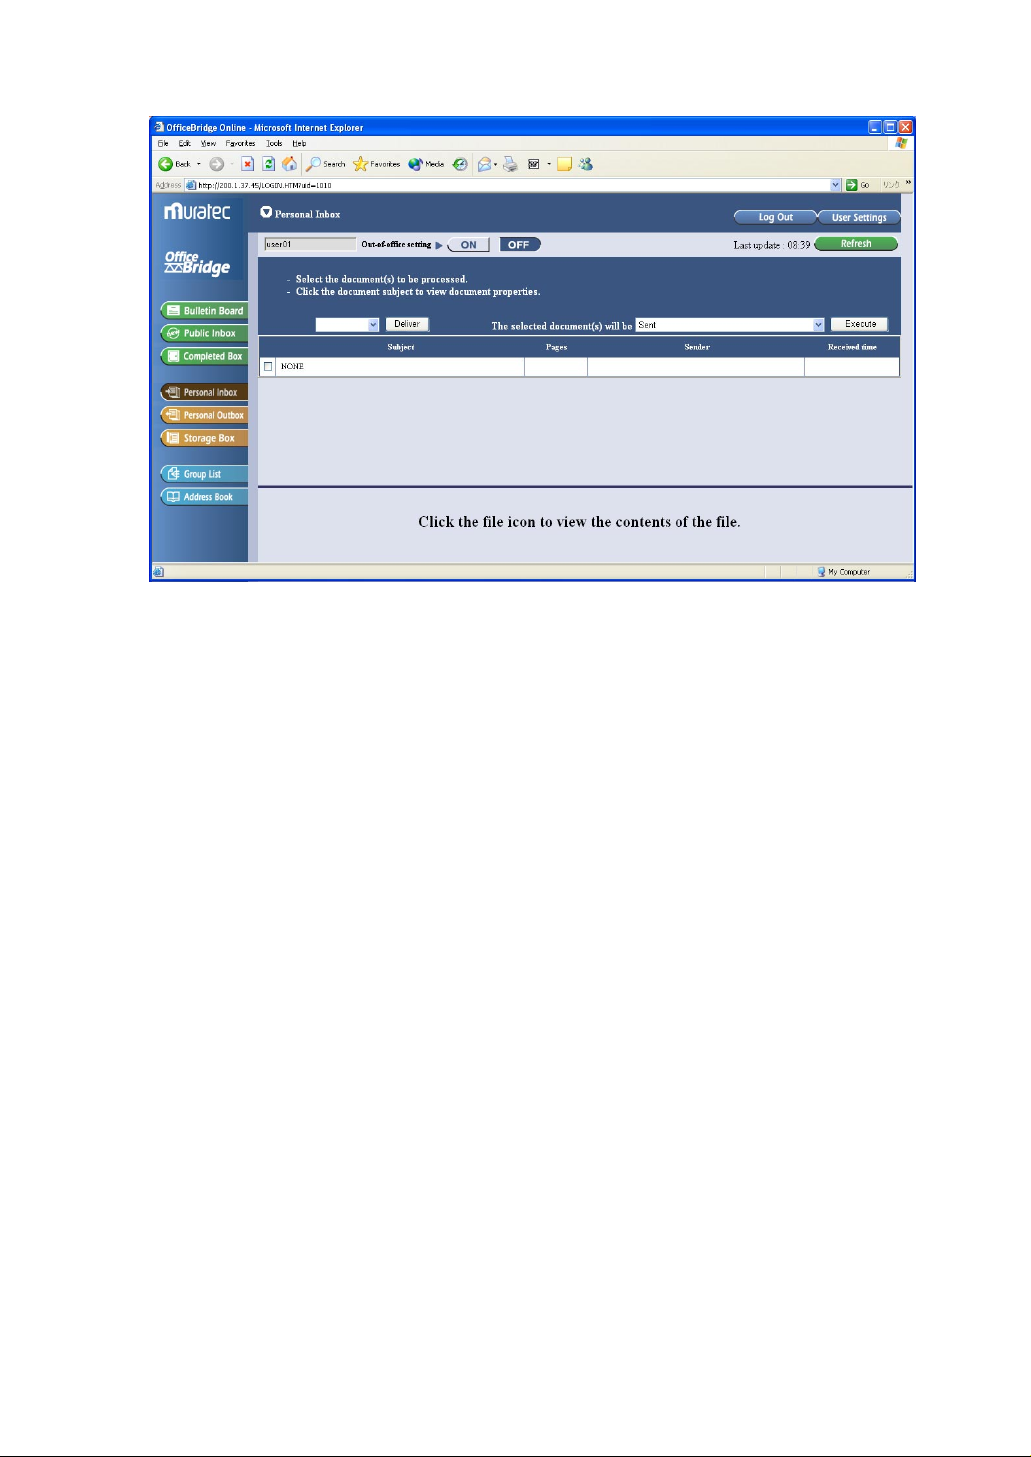
The Personal screen will appear.
3
For information of using the Personal screen, refer to “Explanation of
OfficeBridge Online screen” on Chapter 1 of the Operation edition of the
Reference Manual on the CD.
24
Page 27
User Registration
To use any of OfficeBridge Online features, the person must be registered as an OfficeBridge Online user.
You can register up to 50 users.
Access to the Administration Tools. (See page 22.)
1
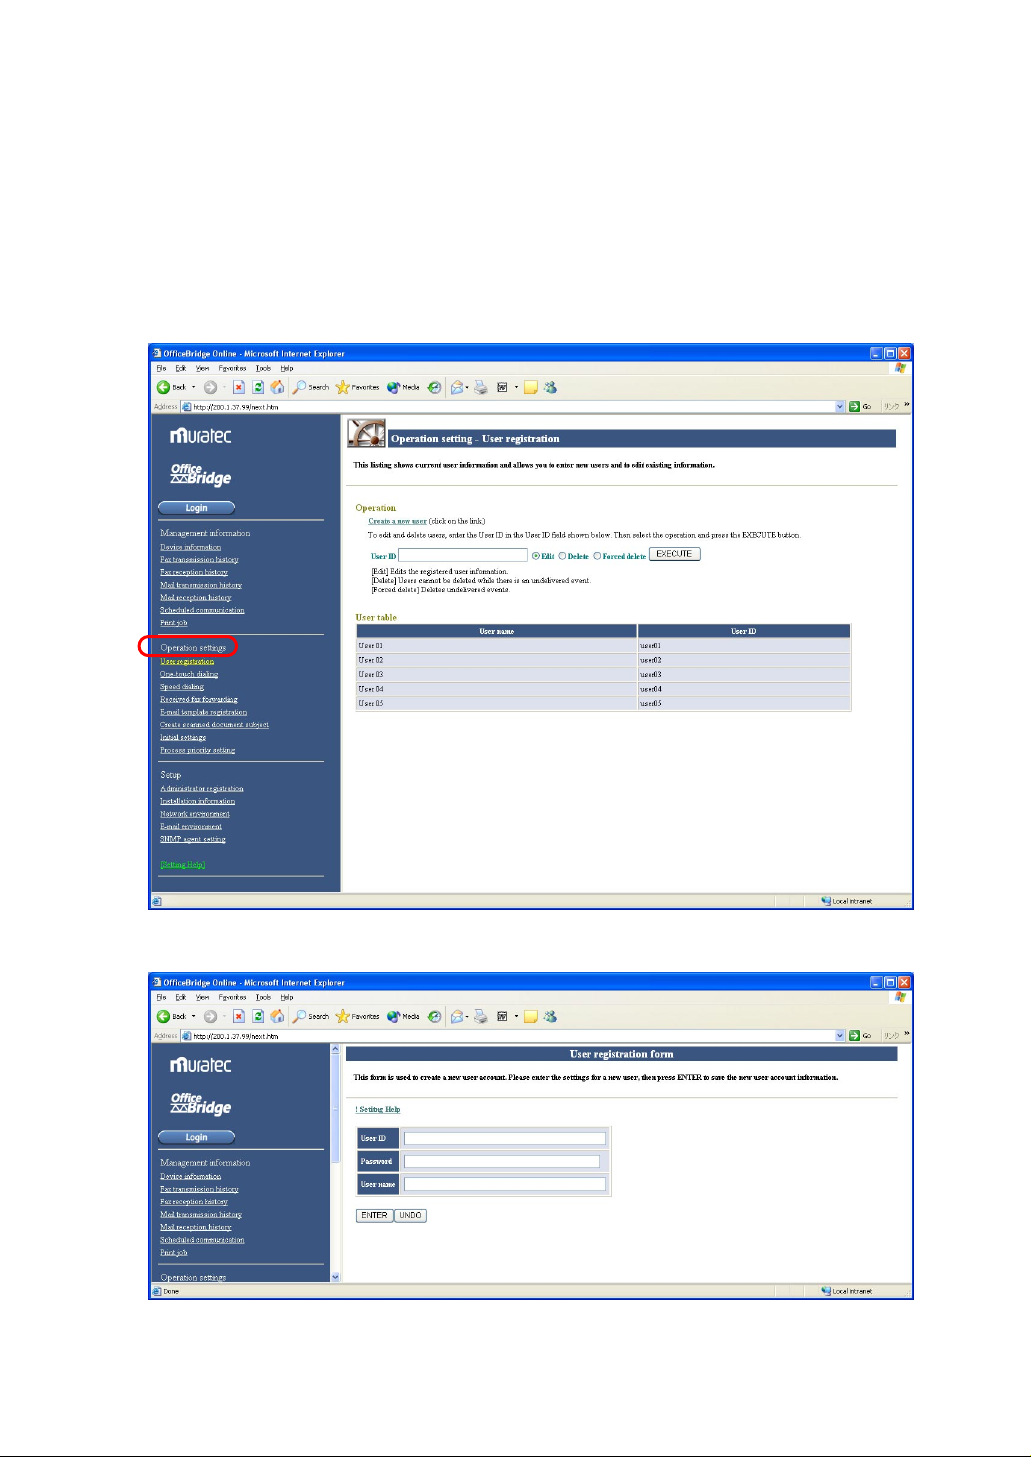
Click “User Registration” under [Operation Settings].
2
In initial setting, the user 01 to user 05 are registered without password setting.
To register a new User ID, click “Create a new user.”
3
Enter the User ID, User name and Password (if necessary) then click “ENTER”.
4
25
Page 28

PC-FAX Transmission
& Reception
PC-FAX Transmission . . . . . . . . . . . . . . . . . . . . . . . . . . . . . . . . . . . . . . . . . . . . . . . . . . . . . . . 27
PC-FAX Reception . . . . . . . . . . . . . . . . . . . . . . . . . . . . . . . . . . . . . . . . . . . . . . . . . . . . . . . . . . 33
26
Page 29
PC-FAX Transmission
r
Send the document from the software application
The OfficeBridge Online allows you to send the documents created on your PC using various software applications
to other fax machine.
Note: To be able to use this feature, install the Muratec OfficeBridge Online Fax driver first. (See page 90.)
Send the document to a Fax
via telephone line.
Fax
Send the document through the Fax drive
LAN
Note: According to the software application you are using, the names of features and functions listed in Print
menus and dialog boxes may vary. The steps described in this section are using the Windows XP.
Create a document or open a file to send.
1
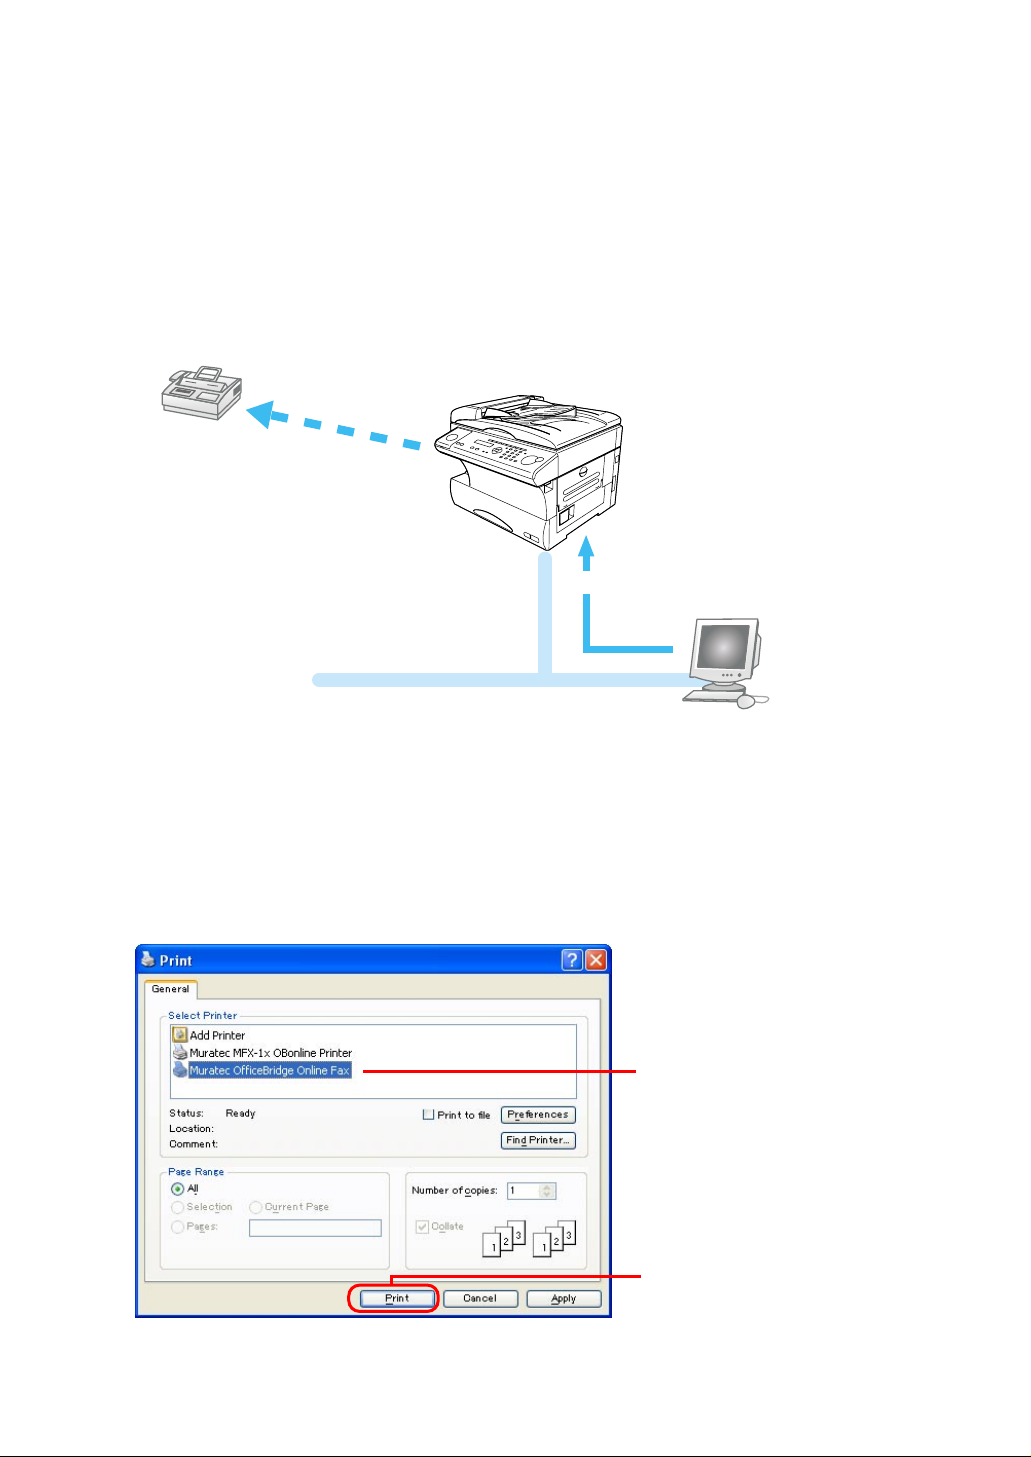
Select Print from the application software’s File menu.
2
Send the document data to the OfficeBridge Online Fax driver.
3
(1) Select the Muratec
OfficeBridge Online Fax.
(2) Click Print or OK.
27
Page 30

The OfficeBridge Online User login screen will appear.
4
(1) Enter the User ID and password.
Note: If the password is not set, do not need to enter it.
(2) Click Send.
Note: If you want to store the document to send it later, click Temporary Storage.
The document is stored in the Personal Outbox. It will be named “Send document” followed by saving day and time (DDHHMMSS format). DD:day, HH:hour, MM:minutes, SS:seconds
The “Document Send” screen will appear. Enter the fax number.
5
(1) Enter the fax number .
(2) Click Add.
If you want to send to more than one locations,
repeat steps (1) to (2).
(3) Confirm the destination(s).
(4) Click Send.
28
Page 31

The screen will change to the “Personal Outbox” screen.
6
You can confirm the sending command status on this screen.
If you want to cancel the fax sending:
Perform the following steps on the Personal Outbox screen.
(1) Select the document you want to cancel.
(2) Select “Canceled” from action menu.
(3) Click Execute.
(1)
(2) (3)
29
Page 32

Send the document from specified box
You can send the document stored in the specified box of the main unit to other fax machine.
Shared Boxes
Fax
Send the document to a Fax
via telephone line.
Bulletin
Board
Personal Boxes
Personal
Inbox
Order to send the document from Box.
Public
Inbox
Personal
Outbox
Completed
Box
Strage
Box
LAN
Login the Personal screen. (See page 23.)
1
Select the Box which has document you want to send.
2
You can select the “Public Inbox,” “Personal Inbox,” “Personal Outbox” and “Storage Box.”
30
Page 33

Select the document you want to send.
3
(1) Check the document you want to send.
(2) Select “Sent” from action menu.
(3) Click Execute.
(1)
(2) (3)
The “Document Send” screen will appear. Enter the fax number.
4
(1) Enter the fax number .
(2) Click Add.
If you want to send to more than two locations,
repeat steps (1) to (2).
(3) Confirm the destination(s).
31
Page 34

Click Send.
5
The screen will change to the “Personal Outbox” screen.
6
You can confirm the sending command status on this screen.
If you want to cancel the fax sending:
Perform the following steps on the Personal Outbox.
(1) Check the document you want to cancel.
(2) Select “Canceled” from action menu.
(3) Click Execute.
32
Page 35

PC-FAX Reception
According to the “Received fax forwarding” setting, the received fax document will be stored in the specified box
without printing on paper.
You can view the stored document on your PC and download it, if necessary.
Received fax is stored in specified box, according to
the "Received fax forwarding" setting.
Fax reception
Fax
Access to the OfficeBridge Online to
view the received document and
if necessary download it.
Shared Boxes
Bulletin
Board
Personal Boxes
Personal
Personal
Inbox
Outbox
Public
Inbox
Completed
Box
Storage
Box
LAN
If "InfoMonitor" is running, when a new document
is stored in specified box, the arrival notice is shown
on your PC.
View the received fax
Startup the OfficeBridge Online. (See page 21.)
1
Check the Unread documents area on the table of your User ID. The number shows how many unread
2
messages are in the box.
33
Page 36

Note: If the “InforMonitor” (see page 15 and 95) is installed and setup its configurations, when you have got a
new message in your box, the new message arrival notification will appear on your PC.
To view the received fax, login your personal screen and click the Document subject or File icon.
3
Note: According to the version of Windows and browser you are using, the appeared dialog box may vary.
34
Page 37

“Received Fax forwarding” setting
You can create up to 100 rules for the received fax messages (Delivery setting), and also create a rule for the
received fax messages not fitting the rules you created (Exceptions handling).
Access to the Administration Tools. (See page 22.)
1
Click “Received fax forwarding” under [Operation settings].
2
Create the rule for the received fax messages. For more information to create a rule, refer to the Help.
3
Override the print setting from the fax machine
You can instruct the machine to print the received fax message by simply pressing a Soft key, even it is set to no
print the received fax message by the rule.
Settings:
Press Program, G, 5.
1
Network
5 Received Fax Print
Press ENTER.
2
Allow Forwarding:On
/
/Enter
Select On or Off.
3
On: The received fax message will be handled according to the rules you created on “Received fax for-
warding” screen.
Off: Disable the rules for received fax messages. The machine will print all received fax messages.
When you select “Off”, skip to step 5.
35
Page 38

Press ENTER. If you select “On” in step 3, the machine asks you to print setting.
4
Print :All
/
/Enter
You can select All or Not-Routed.
All: The machine prints all received fax messages regardless of the rules.
Not-Routed: The machine prints only the received fax message not fitting the rules.
Press ENTER to save the setting.
5
Received Fax Print
** Complete **
Assign the “Received Fax Print” function to the Soft key
To turn on or off this setting, press the Soft key which assigned “Received Fax Print.”
Here’s how to assign the “Received Fax Print” to the Soft key.
Press Program key, B, 1, 0, 3, ENTER.
1
Select Soft Key No.
1:Energy Saving
The function which assigned to this key is shown.
Press or until the Soft Key (1-3) you want to change appears. In this example, we’ve chosen 2.
2
Select Soft Key No.
2:Sort Copy
Press ENTER.
3
2:Sort Copy
/
/Enter
Press or until the “Received Fax Print” appears.
4
2:Received Fax Print
/
/Enter
Press ENTER to save the setting.
5
Press STOP to exit.
6
Attach the Soft key function label you just set.
7
What the Soft key?
Soft key is a shortcut key. You can program the Soft key to turn on or off any function with just the touch of a button. Your machine has three Soft keys on its control panel. If the light above any one of these keys glows, that
means the setting programmed into that key is active.
When the OfficeBridge Online has been attached to your machine, the “Address/ID Entry” and “Received Fax
Print” are added in the Soft key menu.
“Address/ID Entry” — You may use this key when you directly enter the User ID or E-mail address to use the
Network scanner or Internet Fax feature. “Address/ID Entry” is automatically assigned to the Soft key 3 (the
right-most of the Soft key) when the OfficeBridge Online board has been attached to your machine.
“Received Fax Print” — The “Received Fax Print” setting is turned on or off by pressing this key.
36
Page 39

Enable the “Received Fax print” setting:
To enable this setting, press the Soft key which assigned “Received Fax Print.” (see above).
When the light next to the soft key glows, it means the setting is active.
To turn off the setting, simply press the Soft key again.
37
Page 40

Network Scanner
Network Scanner . . . . . . . . . . . . . . . . . . . . . . . . . . . . . . . . . . . . . . . . . . . . . . . . . . . . . . . . . . . 39
Setting Scan parameter . . . . . . . . . . . . . . . . . . . . . . . . . . . . . . . . . . . . . . . . . . . . . . . . . . . . . . 40
Setting Scan mode . . . . . . . . . . . . . . . . . . . . . . . . . . . . . . . . . . . . . . . . . . . . . . . . . . . . . . . . . . 41
Scanning the document . . . . . . . . . . . . . . . . . . . . . . . . . . . . . . . . . . . . . . . . . . . . . . . . . . . . . . 44
Download the scanned image from the Personal screen . . . . . . . . . . . . . . . . . . . . . . . . . . . . 47
Download the scanned image from application software . . . . . . . . . . . . . . . . . . . . . . . . . . . 49
38
Page 41

Network Scanner
The scanned image is stored in the Personal Inbox of registered user. You can retrieve the scanned image from
your PC in the PDF or TIFF format.
OfficeBridge Online
Personal
Inbox
Individual Box
LAN
The scanned image can be downloaded
from the Personal Inbox in the PDF or
TIFF format.
The basic operation for the Network scanner function
The operation for the Network scanner is summarized as follows:
1
Scan the document with your machine. The scanned data will be stored in the specific Personal Inbox. (See
page 44.)
2 Download
If you want to change the default settings of the scanner parameter, see the “Scan parameter setting” (page 40)
and “Scan mode setting” (page 41).
the scanned data from the Personal Inbox. (See page 47.)
39
Page 42

Setting Scan parameter
The following settings instruct your machine how to scan documents when using the Scan mode. The default settings are right for most applications, so try them before changing any of these settings:
• Document type — Set the document type according to the document you want to scan. You can select from:
Photo — Select this mode when scanning photographs or drawings.
Photo/Text — Select this mode when scanning documents containing photographs or drawings and text.
Text — Select this mode when scanning text.
(The default settings is Text.)
• Contrast — Sets how light or dark you want the documents to be.
(The default settings is Normal.)
• Resolution — Sets the resolution for your documents.
If your machine is the MFX-1700, you can choose to scan at 200 dpi, 300 dpi, 400 dpi or 600 dpi.
(The default settings is 400 dpi.)
If your machine is the MFX-1300, the resolution is fixed at 300 dpi.
Scanning at 600 dpi provides greater detail in scanned images, but creates large files and uses more memory
in your PC and your Muratec machine.
To set scan parameters:
Press Program, G, 1, 0, 1.
1
Network Settings
01 Scan Parameters
Press ENTER. The machine asks you to select a document type:
2
Doc. Type :Text
/
/Enter
Press or until the mode you want appears. Then, press ENTER.
3
The machine asks you to select a contrast setting:
4
Contrast :Normal
/
/Enter
Press or until the mode you want appears.
5
Note: If your machine is MFX-1300, skip to step 7.
Press ENTER. The machine asks you to select a resolution:
6
Resolution :400dpi
/
/Enter
Press to ENTER to save the setting.
7
Network Settings
** Complete **
40
Page 43

Setting Scan mode
The following settings instruct your machine how to scan documents when using the Scan mode.
• Save Method — You can select the following:
Batch On — Select this mode if you want to store every page of the document in one file.
Batch Off — Select this mode if you want to separately store each page of the document.
(The default settings is Batch On.)
• Subject Select — This mode allows you to select the file name of the scanned document.
On the default setting, “Scanned document (assigned number starting at 001)” is used as file name.
You can create up to 10 different Subject and select one of them for scanned document.
• Scan Mode Prompt — This mode allows you to set the Scan mode setting every time you perform the
Network scanner feature. (The default settings is Off.)
To set the Save Method:
Press Program, G, 3.
1
Network
3 Scan Mode Setting
Press ENTER. The machine will show:
2
Scan Mode Setting
01 Save Method
Press ENTER.
3
Batch :On
/
/Enter
Press or to select On or Off. Then press ENTER.
4
Press STOP to return to the standby mode.
5
To select subject for scanned document
The subject set here is used for a file name when performing the network scanner feature.
Note: To select the subject in this setting, subject should be registered in advance on the “Create scanned docu-
ment subject” screen, see next page.
Press Program, G, 3.
1
Network
3 Scan Mode Setting
Press ENTER. The machine will show:
2
Scan Mode Setting
01 Save Method
41
Page 44

Press to select “02 Subject Select”.
3
Scan Mode Setting
02 Subject Select
Press ENTER.
4
Subject Select:00
Scanned document
Press or to select the subject for scan data file.
5
Subject Select:01
Not Stored
Press STOP to return to the standby mode.
6
Create scanned document subject
Access to the Administration Tools. (See page 22.)
1
Click “Create scanned document subject” under [Operation Settings].
2
Enter the subject for scanned data. For more information to enter subject, refer to the Help.
3
42
Page 45

To set the Scan mode prompt:
If this setting is set to On, the machine will ask you to set the Scan mode settings — Save Method, Subject Select
and Scan Mode Prompt — every time you perform the Network scanner feature.
(The default settings is Off.)
Press Program, G, 3.
1
Network
3 Scan Mode Setting
Press ENTER. The machine will show:
2
Scan Mode Setting
01 Save Method
Press twice to select “03 Scan Mode Prompt.”
3
Scan Mode Setting
03 Scan Mode Prompt
Press ENTER.
4
Scan Mode Prompt:Off
/
/Enter
Press or to select the subject for scan data file.
5
Scan Mode Prompt:On
/
/Enter
Press STOP to return to the standby mode.
6
43
Page 46

Scanning the document
C
o
p
y
w
F
a
x
w
S
c
a
n
Copy/Fax/Scan key
The scanned document will be stored in the Personal Inbox of the specific UserID you entered.
To scan the document:
Press COPY / FAX / SCAN repeatedly until the following dis-
1
play is shown:
Set UserID 100%
_
In Scanner mode, the COPY light and FAX light will be
turned off.
Set the document in the ADF (Automatic Document Feeder)
2
or on the FBS (FlatBed Scanner) glass.
To improve the scanning quality, you can temporarily change the following settings.
3
• Document type — Press DOCUMENT / RESOLUTION to select the document type from Text,
Photo/Text or Photo you want.
• Contrast — Press CONTRAST to select the contrast you want.
• Reduction/Enlargement — You can select the preset ratio by pressing or , or press SPEED DIAL/
TEL INDEX twice (ZOOM right will glow) and adjust the ratio by 1 percent increments using or ,
or directly enter any percentage between 50 % and 200 % by following procedure.
1. Press #.
2. Using the numeric key to enter your desired ratio (50 to 200).
3. Press # again.
Note: The enlargement is available only for scanning using the FBS. It is not available for scanning
through the ADF.
Note: The Scanning resolution does not change in this time. If you are using the MFX-1700 and you want
to change the scanning resolution, see “Setting scan parameter” on page 40.
Enter the User ID by using by any combination of the following methods:
4
• Using One-touch key
• Using Speed dial number
• Directly entering
Note: To use One-touch key and Speed dial number, the User ID should be registered with them in
advance. You can register them on the “Administration Tools” screen, page 22.
Note: To enter many User IDs of recipient, press BROADCAST first.
Using One-touch key:
1. Press One-touch key where the User ID you want to send is
registered.
Set UserID 100%
[01]_
2. Go to step 10.
Note: If the “Scan Mode Prompt setting” has been set to On (see page 43),
go to step 5.
44
Page 47

Using Speed dial number:
ADDRESS/ID
1. Press the SPEED DIAL/TEL INDEX.
ENTRY
Enter Speed-Dial No.
S_
2. Use the numeric keypad to enter three-digit identifier of the User
ID you want to send.
Enter Speed-Dial No.
S001_
Directly entering:
ADDRESS/ID
1. Press the ADDRESS/ID ENTRY.
ENTRY
Set UserID ;Upper
_
2. Use the one-touch keys and numeric keypad to enter the User ID.
After you have enter all of User IDs, press START.
4
If the “Scan Mode Prompt setting” has been set to On (see page 43), the LCD shows the following display.
5
Otherwise, skip to step 10.
Subj.:ScanDoc
Batch:On Enter/Start
If you want to change the Subject and/or the Batch setting, p
6
If the displayed setting is OK, press START and skip to step 10.
ress ENTER.
Scan Mode Setting
01 Save Method
Press repeatedly until the setting you want to change is appeared. Then press ENTER.
7
Change the setting as you want, then press ENTER.
8
To change other settings, repeat steps 6 to 8.
After you have changed all settings as you want, press START.
9
Your machine will start scanning.
10
If you set the document in the ADF, proceed to step 11.
If you placed the document on the FBS glass, enter your document size by pressing DOCUMENT SIZE,
then press START then skip to step 12.
If you have more documents to scan, press NEXT DOC during scan-
11
ning. Then proceed to step 12.
Otherwise, the machine will return to the standby mode after it has
finished scanning.
ADDRESS/ID
ENTRY
45
Page 48

When the scanning is done, the LCD will show:
12
Next Page →→NextDoc
Completed →→Start
If you want to scan more pages, proceed to step 13.
Otherwise, press START to finish scanning, and the machine will return to the standby mode.
Place the next page.
13
To scan more pages, repeat steps 12–13.
Otherwise, press START to finish scanning, and the machine will return to the standby mode.
Press NEXT DOC to start scanning.
46
Page 49

Download the scanned image from the Personal screen
Follow this procedure to download the scanned image from the Personal screen.
Login the Personal screen. (See page 23.)
1
Click the “Subject” you want to download on the Personal Inbox.
2
The Document details screen will appear. Click the “Archive.”
3
47
Page 50

Select file format, PDF or TIFF. Then click “Download.”
4
The file will be opened with application software installed in your Windows.
5
Note: According to the version of Windows and Browser you are using, File down load dialog box will
appear. In this case, if you want to save the file with PDF format, click “Open this file from its
current location,” then save the file on the application software. Otherwise, the file will be saved
with CGI document format.
Save the file using the save command of the application software.
6
48
Page 51

Download the scanned image from application software
Note: To be able to use this feature, install the Muratec OfficeBridge Online TWAIN Connector first (see page
95). And the application software you are using should supports TWAIN scanning.
Access to the OfficeBridge Online TWAIN connector
Using the TWAIN driver, the documents stored in any of the boxes for “OfficeBridge Online” can be read into
TWAIN-compliant application software.
Follow the steps below to access the OfficeBridge Online TWAIN connector from your application software:
Start the application software that supports TWAIN scanning.
1
Select “OfficeBridge Online TWAIN connector” in your application software. If you need help, refer to your
2
software’s help file.
The following steps describes the “Imaging for Windows®” as an example. (OS: Windows®Me)
Choose “Select Scanner” from the File menu. Choose “Muratec OfficreBridge Online TWAIN Connector”
3
then click OK.
Note: If “Muratec OfficeBridge Online TWAIN Connector” is already selected as the read-in device, this
step is not required.
Select “Scan New” from the File menu. The “User Logon” screen will show:
4
49
Page 52

Select the User ID and enter the Password. Then click OK. The following dialog box will appear.
5
The “Muratec OfficeBridge Online TWAIN Connector” screen (list of the scan (image) documents in the
“Personal Inbox” of the selected user) is displayed.
Note: If no password was set during user registration, password input is not required
A. List
The currently opened level is displayed.
B File list
Displays a list of the opened box documents.
When reading in a document, click it to select it.
C Preview display
Displays a preview of the selected document.
When a check is placed by [Preview], previews of the document can be displayed.
When you click a button or input a number into the text box, the display moves to that page.
D Resolution
Set the linear resolution for the document.
When not changing the linear resolution, put a check by [No change]; when changing the linear
resolution, put a check by [200dpi], [300dpi], or [400dpi].
E Page range
Set the number of pages of the document to read in.
F Pixel type
Select the display type for the document read in as either [B/W] or [Grayscale].
G Erase document(s)
When you place a check by a document, after it is scanned, it is automatically deleted from the box into
which “OfficeBridge Online” scanned it.
H [Download] button
When you click here, the scanning of the scan document starts.
50
Page 53

I [Select server] button
When you want to access to other server (OfficeBridge Online), click this button and enter the IP Address,
then click OK. Then select User ID and enter Password registered on other OfficeBridge Online.
J [Select user] button
Displays the user of the document scan destination.
When changing the user, select the UserID and enter the password.
If no password was set during user registration, password is not required.
K [Refresh] button
When you click, the [File list] display is refreshed.
L [Information] button
Displays [Muratec OfficeBridge Online TWAIN Connector] information.
M [Save] button
When you click, the current settings are saved. You cannot click this button unless the settings have been
changed.
N [Default] button
When you click, the settings are initialized to their factory settings.
O [Exit] button
When you click, the [Muratec OfficeBridge Online TWAIN Connector] ends.
After setting each item, select the scan document (image) from the [File list], then click the “Download”
6
button. The document is read into “Imaging for Windows”.
********************************************************************************************************
dpi (dots per inch)
dpi is a numeric unit expressing the dot fineness for screen display and print out in terms of the number of dots
per one inch straight line. This unit is generally used to express the resolution of scanners, displays, and printers.
The larger the dpi value, the smaller each dot, so the more finely pictures and characters are expressed and the
greater the resolution.
B/W and grayscale
When images are handled by a computer, they are expressed as collections of dots. The simplest mode of expres-
sion using just two types of dots, black and white, is called binary. When handling photographs, images with
intermediate colors, etc., one mode of expression for giving each point darkness information (giving each point
tone information) is called grayscale.
********************************************************************************************************
51
Page 54

Bulletin board
Distribution
Processing request
Bulletin board . . . . . . . . . . . . . . . . . . . . . . . . . . . . . . . . . . . . . . . . . . . . . . . . . . . . . . . . . . . . . 53
Distribution . . . . . . . . . . . . . . . . . . . . . . . . . . . . . . . . . . . . . . . . . . . . . . . . . . . . . . . . . . . . . . . 56
Processing request . . . . . . . . . . . . . . . . . . . . . . . . . . . . . . . . . . . . . . . . . . . . . . . . . . . . . . . . . . 58
52
Page 55

Bulletin board
Bulletin Board is a function that makes it possible to share brief information among registered users.
Scanning
OfficeBridge Online
Personal Boxes
Personal
Inbox
Bulletin
Board
Personal
Outbox
Shared Boxes
Storage
Box
Completed
Box
LAN
The basic operation for the Bulletin board function
The operation for the Bulletin board is summarized as follows:
1 Scan the document with the machine. The scanned data will be stored in the specific Personal Inbox.
2 Post to the Bulletin board.
3 Registered users can use the browser to view a posted document.
Note: If “InfoMonitor” is left running, it will automatically notify registered users when a new bulletin
board document is posted.
53
Page 56

Post the document to the Bulletin board
Scan the document you wan to post to the Bulletin board.
1
Regarding scanning document, refer to “Scanning the document,” page 44.
Login the Personal screen. (See page 23.)
2
Post the document to the Bulletin board.
3
(1) Select the document.
(2) Select “Distributed and/or posted to the bulletin board” from action menu.
(3) Click Execute.
(2) (3)
(1)
(4) Enter the subject and comment, if necessary.
(5) Check the box next to Post to the bulletin board.
(6) Click Send.
(4)
(5)
(6)
54
Page 57

View the posted document
Note: If “InfoMonitor” (see pages 15 and 95) is left running, it will automatically notify registered users when a
new bulletin board document is posted.
Login the Personal screen. (See page 23.)
1
Click Bulletin Board to show the Bulletin board screen.
2
Click the icon to view the posted document.
3
55
Page 58

Distribution
This function allows you to send a document to multiple registered users at a time.
Fax reception
LAN
Scanning
OfficeBridge Online
Personal Boxes
Personal
Personal
Outbox
Personal
Outbox
Storage
Box
Storage
Box
Inbox
Personal
Inbox
Personal Boxes
Personal
Inbox
Personal Boxes
Personal
Outbox
Storage
Box
The basic operation for the Distribution function
The operation for the Bulletin board is summarized as follows:
1 The scanned or received document will be stored in Personal Inbox.
2 Select the document and specify the users you want to send it.
3 The document is distributed to each Personal Inbox of the registered users.
The registered user can use the browser to view the document.
Note: If “InfoMonitor” is left running, it will automatically notify registered users when a new document
is stored in Personal Inbox.
56
Page 59

Distribute the document to registered users
Login the Personal screen. (See page 23.)
1
Distribute the document.
2
(1) Select the document you want to send.
(2) Select “Distributed and/or posted to the bulletin board” from action menu.
(3) Click Execute.
(2)
(1)
(4) Enter the subject and comment, if necessary.
(5) Select the users you wan to send the document.
To select consecutive users, click the first user, press and hold down SHIFT, and then click the last user.
To select non-consecutive users, press and hold down CTRL, and then click each user.
(6) Click Send.
(6)
(4)
(3)
(5)
The document will be distributed to the Personal Inbox of the registered users you specified.
3
57
Page 60

Processing request
Processing Request is a function that attaches deadlines and comments to information read using the unit and
then requests processing of them by other users. The requester can check the processing status of the person in
charge of the processing.
Example: Requesting Processing of Received Documents
The person in charge of fax reception attaches deadlines and comments to the faxes and requests processing of
the people in charge of operations. The people in charge of operations process the forwarded faxes.
OfficeBridge Online
External
Processing Requester
Fax reception
Processing requester box
Person of charge
of Processing
Shared Box
Personal
Inbox
Person in charge of
processing box
Personal
Inbox
Completed
Box
This processing is optimum for documents that have an operations flow, such as forwarding from the person in
charge of operations to the person in charge of sales/shipment, or from the sales assistant to the person in charge
of processing.
Note: For information on the operations related to this page, refer to the “8. Requesting Document Processing”
and “9. Completing Processing of Requested Documents” in Chapter 2 Convenient Usage of Operation
Volume of the Reference manual on the CD.
58
Page 61

A fax is received from an external location.
1
The processing requester checks the fax document in the Personal Inbox and sets a processing deadline for
2
the received fax document.
He (or she) then adds comments explaining the required processing and then forwards the fax document
for which processing is being requested to the person in charge of processing.
(1) Select the document.
(2) Select “Requested for processing” from action menu.
(3) Click Execute.
(1)
(4) Select the person in charge of processing.
(5) Enter the comments explaining the required processing
(6) Select Processing deadline.
(7) Click Request.
(4)
(7)
(2)
(3)
(5)
(6)
59
Page 62

Note: The time of deadline can be changed on “Administration Tools” screen, below.
Click “Process priority setting” under [Operation settings].
Note: A copy of the process requested document is keeping in the Storage Box until the person in charge
of processing complete the requested job.
A new document arrival notification is sent to the computer of the person in charge of processing.
3
Note: The new document arrival notice is only given when the “InfoMonitor” (see pages 15 and 95) is run-
ning.
60
Page 63

When the person in charge of processing completed the requested processing, he or she specifies when the
4
processing is completed.
(1) Select the document.
(2) Select “Completing processing” from action menu.
(3) Click Execute.
(2)
(1)
The processing requester checks the Completed Box to see if the processing has been completed.
5
(3)
61
Page 64

Network Printer
Network Printer . . . . . . . . . . . . . . . . . . . . . . . . . . . . . . . . . . . . . . . . . . . . . . . . . . . . . . . . . . . . 63
62
Page 65

Network Printer
The OfficeBridge Online allows you to print documents created on your PC using various software applications.
Note: To be able to use this feature, install the Muratec MFX-1x OBonline Printer Driver first. (See page 90.)
PC
LAN
Printing the document
Note: According to the software application you are using, the names of features and functions listed in Print
menus and dialog boxes may vary. The steps described in this section are for printing in Windows XP.
Create a document or open a file to print.
1
Open Printer Properties dialog box.
2
(1) Select Print from the application software’s File menu.
(2) Select the Muratec MFX-1x
OBonline Printer.
(3) Click Preferences (or
Properties).
63
Page 66

Specify the required settings.
3
Note: For detail about printer driver functions, refer to the Help.
Print the document.
4
(1) Specify the required settings.
(2) Click OK.
(1) Click Print or OK.
Note: You can cancel a print job in progress by pressing the STOP button on the main unit.
See “Canceling the printing job,” next page.)
64
Page 67

Canceling a printing job
Canceling a print job in progress
You can cancel a print job in progress by pressing STOP on the main unit.
During printing, the main unit will display the following:
1
PC
** Printing **
If you want to cancel the current printing, press STOP on the main unit’s control panel.
2
Print Resume JEnter
Cancel Print JStop
If you wish to do cancel the current print job, press STOP.
3
If you wish to do not cancel the current print job, press ENTER.
Canceling a print job in the queue
On your PC, access to the Administration tools. (See page 22.)
1
Cancel a Print Job in the queue.
2
(1) Click “Print job” under [Management information].
(2) Select a document you want
to stop printing.
(3) Click DELETE to cancel a
document printing.
65
Page 68

Acceptable paper size
The
Muratec MFX-1x OBonline Printer driver
cates the paper source where each paper can be loaded.
Inch version:
Paper Size C1 C2 Bypass Tray
Legal (S) 8.5″ × 14″ Yes Yes Yes
Letter (S) 8.5″ × 11″ Yes Yes Yes
Half Letter (L) 8.5″ × 5.5″ Yes Ye s Yes
Executive (S) 7.25″ × 10.5″ No No Yes
A4 (S) 210 × 297 mm No No Yes
A5 (S) 148 × 210 mm No No Yes
A5 (L) 210 × 148 mm No No Ye s
A6 (S) 105 × 148 mm No No Yes
F4 (S) 210 × 330 mm No No Yes
COM 10 (S) 4.125″ × 9.5″ No No Yes
Monarch (S) 3.875″ × 7.5″ No No Yes
DL (S) 110 × 220 mm No No Yes
Postcard (S) 100 × 148 mm No No Yes
Custom Paper Scanning
Direction
Feed
Direction
(1 inch = 25.4 mm)
supports printing on the following paper size. This also indi-
No No 3.82″ to 8.5″
No No 5.5″ to 14.0″
(S) : Short edge feeding
(L) : Long edge feeding
C1 : 1st paper cassette
C2 : 2nd paper cassette
Metric version:
Paper Size C1 C2 Bypass Tray
Legal (S) 8.5″ × 14″ No No Yes
Letter (S) 8.5″ × 11″ No No Yes
Half Letter (L) 8.5″ × 5.5″ No No Yes
Executive (S) 7.25″ × 10.5″ No No Yes
A4 (S) 210 × 297 mm Ye s Ye s Yes
A5 (S) 148 × 210 mm No No Yes
A5 (L) 210 × 148 mm Yes Ye s Yes
A6 (S) 105 × 148 mm No No Yes
F4 (S) 210 × 330 mm Ye s Ye s Yes
COM 10 (S) 4.125″ × 9.5″ No No Yes
Monarch (S) 3.875″ × 7.5″ No No Yes
DL (S) 110 × 220 mm No No Yes
Postcard (S) 100 × 148 mm No No Yes
Custom Paper Scanning
Direction
Feed
Direction
No No 97 mm to 216 mm
No No 140 mm to 356 mm
(1 inch = 25.4 mm)
(S) : Short edge feeding
(L) : Long edge feeding
C1 : 1st paper cassette
C2 : 2nd paper cassette
66
Page 69

Paper Mismatch error
If the size of paper in the paper cassette does not match the paper size you specified on the printer properties, your unit will show the following message:
Paper Mismatch
Start/Stop
To start the printing:
Press START.
1
Please Select Paper
Legl JC1:Ltr
Size of paper in the selected paper source
“C1” means the 1st paper cassette.
“C2” means the 2nd paper cassette.
“Bypass” means the Bypass tray.
Size of paper you specified on the printer properties
Change the paper in the paper cassette you selected (if necessary, see your fax machine’s operating instruc-
2
tions). Then press Program and select the same size of paper you loaded using the cursor key. After you
change the paper, press ENTER. Your machine will start the printing automatically.
–or–
If another paper source (e.g. 2nd cassette) has the correct size paper for this print job, press PAPER SIZE
to select it. Then press START to start printing.
Note: If you want to print on the paper that is not available on the paper cassette, use the Bypass tray.
To know what size paper is available for your unit, see “Acceptable Paper size” on page 66.
Note:
If you want to abort the printing job, press STOP.
67
Page 70

Internet FAX
Transmission & Reception
Setting the Internet Parameters . . . . . . . . . . . . . . . . . . . . . . . . . . . . . . . . . . . . . . . . . . . . . . 69
Internet Fax sending . . . . . . . . . . . . . . . . . . . . . . . . . . . . . . . . . . . . . . . . . . . . . . . . . . . . . . . . 72
Internet Fax Reception . . . . . . . . . . . . . . . . . . . . . . . . . . . . . . . . . . . . . . . . . . . . . . . . . . . . . . 86
68
Page 71

Setting the Internet Parameters
Pre Installation information
For the Internet Fax feature to work properly, certain information must be set in advance. Please contact your network administrator for the required information and connection to the LAN.
Please set the following information before installation.
Internet Parameters
1* IP Address
2* Subnet Mask
3* Default Gateway IP Address
4* DNS Server IP Address
5* Name of your machine
6* E-mail Address
7* SMTP Server Name or IP Address
8* SMTP User ID
9* SMTP Password
10* SMTP Receiving Domain Name
Note1
Note1
Note2
11* POP Server Name or IP Address
12* E-mail Account (POP User Name)
13* E-mail Password (POP Password)
14 Acceptable Domain Name or E-mail Address
for Relay Transmission
15 MAC Address
* Contact your Network Administrator for this information.
Note1: This item should be set only when SMTP authentication is required from your Internet service provider.
Note2: Enter the domain name when receiving e-mail from the SMTP mail server.
Note: Dynamic Host Configuration Protocol (DHCP) is not supported.
Explanation of contents
1 IP Address : The Internet Protocol (IP) Address assigned to your machine.
2 Subnet Mask : Subnet mask assigned by the Network Administrator.
3 Default Gateway IP Address : The IP Address of your default gateway.
4 DNS Server IP Address : The IP Address of the DNS server.
5 Name of your machine : The name assigned to your machine.
6 E-mail Address : The e-mail address assigned to your machine for sending and
receiving.
69
Page 72

7 SMTP Server Name or IP Address : The SMTP mail server name or the SMTP server IP Address.
8 SMTP User ID : SMTP server user name.
9 SMTP Password : SMTP password.
10 SMTP Receiving Domain Name : The Domain name of SMTP mail server for e-mail receiving.
11 POP Server Name or IP Address : The POP mail server name or the POP server IP Address.
12 E-mail Account (POP User Name) : User name assigned to your machine.
13 E-mail Password (POP Password) : Password assigned to your machine.
14 Acceptable Domain Name or E-mail : Domain name or e-mail address that are authorized to access your
address for Relay Transmission machine for Relay transmission request.
15 MAC Address : Hardware address hard-coded into your machine. If require, can be
displayed by pressing Program, G, 1, 0, 3, ENTER (see page 19).
Setting the IP Address, Subnet mask and Gateway Address
To set the IP Address, Subnet mask and Gateway IP Address, press Program, G, 1, 0, 2, ENTER.
For more information, refer to page 17.
Setting the network environment
If the DNS server is available, enter the IP Address of DNS server on the “Network environment” screen as below.
You can also enter or change the IP Address, Subnet mask and Gateway address in here.
Access to the Administration Tools. (See page 22.)
1
Click “Network environment” under [Setup].
2
Fill in each of the following fields, and then click the “SET”.
3
Note: When you changed the IP Address or Subnet mask, turn the power OFF and then ON according to the fol-
lowing order to reflect the settings.
(1) Turn the fax unit off. (2) Unplug the AC adapter from the OfficeBridge board. (3) Plug the AC adapter
to the OfficeBridge board. (4) Turn the fax unit on.
70
Page 73

Setting the e-mail environment
Access to the Administration Tools. (See page 22.)
1
Click “E-mail environment” under [Setup].
2
Fill in each of the following fields, and then click the “SET”.
3
71
Page 74

Internet Fax sending
C
o
p
y
w
F
a
x
w
S
c
a
n
Copy/Fax/Scan key
Sending the document from your machine
Basic operation
You can send the document via LAN to single or multiple e-mail addresses. The following method can be selected:
• Using One-touch key
• Using Speed dial number
• Tel index search
• Directly entering
Note: To use One-touch key, Speed dial number and Tel index, the e-mail address should be registered into One-
touch key or speed dial number in advance. You can register them on the “Administration Tools”
screen, page 22.
To send document via LAN from your machine:
Press COPY / FAX / SCAN repeatedly until the following dis-
1
play is shown:
Fax Ready
Mar 26 2003 10:10
In Fax mode, the FAX light will glow.
Set the document in the ADF (Automatic Document Feeder)
2
or on the FBS (FlatBed Scanner) glass.
To improve the scanning quality, you can temporarily change the following settings.
3
• Resolution — Press DOCUMENT / RESOLUTION to select the resolution from Normal, Fine, Super
fine or Halftone you want.
• Contrast — Press CONTRAST to select the contrast you want.
Enter e-mail address:
4
Using One-touch key:
1. Press One-touch key where the e-mail address you want to send is
registered.
To:Dallas Office
[01]_
2. Go to step 10.
72
Page 75

Using Speed dial number:
ADDRESS/ID
1. Press the SPEED DIAL/TEL INDEX.
ENTRY
Enter Speed-Dial No.
S_
2. Use the numeric keypad to enter three-digit identifier of the e-mail
address you want to send.
To:Kyoto Office
S001_
Tel index search:
ADDRESS/ID
1. Press the SPEED DIAL/TEL INDEX twice.
ENTRY
Telephone Index [D]
Dallas Office :[01]
The EasyDial directory sorts entries alphabetically in the following
order:
(1) by alphabet, (2) by number and (3) by symbol.
2. Scroll through the listings to find the one you want. You do this by pressing the following cursor key:
• or to select the character set — alphabet, number or symbol — for the first character of the
Location id.
• or to check different listings within that character set.
Note: The scrolling is “open-ended.” For example, when you run out of listings beginning with alpha-
bet “A”, pressing or automatically moves you into listings beginning with other
characters.
3. When the LCD displays the name you want to send, press START.
Directly entering:
1. Press the ADDRESS/ID ENTRY.
Mail Address;Lower
To:_
2. Use the one-touch keys and numeric keypad to enter the e-mail
address.
After you have entered e-mail address, press START.
4
If you set the document in the ADF, proceed to step 6.
5
If you placed the document on the FBS glass, enter your document size by pressing DOCUMENT SIZE,
then press START then skip to step 7.
ADDRESS/ID
ENTRY
73
Page 76

If you have more documents to scan, press NEXT DOC during scan-
6
ning. Then proceed to step 7. Otherwise, skip to step 8.
When the scanning is done, the LCD will show:
7
Next Page →→NextDoc
Completed →→Start
ADDRESS/ID
ENTRY
If you want to scan more pages, place the next page then p
To scan more pages, repeat steps 5 to 7.
Otherwise, press START to finish scanning, and skip to step 8.
The scanned document is sent by e-mail as an image data attachment.
8
ress NEXT DOC to start scanning.
Broadcasting
The fastest way to fax one document to many recipients is by broadcasting.
Using the BROADCAST key
Press COPY / FAX / SCAN to change to Fax mode.
1
In Fax mode, the FAX light will glow and the following standby display is shown:
Fax Ready
Mar 26 2003 10:10
Set the document in the ADF (Automatic Document Feeder) or on the FBS (FlatBed Scanner) glass.
2
To improve the scanning quality, you can temporarily change the following settings.
3
• Resolution — Press DOCUMENT / RESOLUTION to select the resolution from Normal, Fine,
Super fine or Halftone you want.
• Contrast — Press CONTRAST to select the contrast you want.
Press BROADCAST.
4
Enter e-mail address.
5
Following are the three methods you can use to enter the e-mail addresses for broadcasting:
Use the One-touch keys to send up to 55 destinations.
To:Dallas Office
[01]_
Use the Speed dial numbers to send up to 145 destinations.
To:Kyoto Office
S001_
Up to 10 destinations can be entered directly.
Mail Address;Lower
To:Web@muratec.com_
Select “To”, “Cc” or “Bcc” by pressing or of the cursor key.
6
To:Dallas Office
[01]_
74
Page 77

To add more e-mail addresses, repeat steps 4 to 6.
7
You can send up to 210 numbers for a broadcast.
To:Kyoto Office
[01],S001_
Note: If you enter characters by mistake, press
To confirm “To,” “Cc” or “Bcc,” move the cursor to the destination number you want to confirm.
“To”, “Cc” or “Bcc” will be shown on the first line of the LCD followed by destination’s name or e-mail
address.
CANCEL
to erase them.
To:Kyoto Office
[01],S001
Note: If you want to change “To”, “Cc” or “Bcc,” press or of the cursor key.
After you have entered all e-mail addresses, press START.
8
If you set the document in the ADF, proceed to step 10.
9
If you placed the document on the FBS glass, enter your document size by pressing DOCUMENT SIZE,
then press START then skip to step 11.
If you have more documents to scan, press NEXT DOC during scan-
10
ning. Then proceed to step 11. Otherwise, skip to step 12.
When the scanning is done, the LCD will show:
11
Next Page →→NextDoc
Completed →→Start
If you want to scan more pages, place the next page then p
To scan more pages, repeat steps 9 to 11.
Otherwise, press START to finish scanning, and skip to step 12.
ress NEXT DOC to start scanning.
ADDRESS/ID
ENTRY
The scanned document is sent by e-mail as an image data attachment.
12
Using Group number
To use this feature, the Group number should be registered into One-touch keys or Speed dial numbers at first.
You can register the group number on the “One-touch dialing” or “Speed dialing” screen of “Administration Tools.”
Press COPY / FAX / SCAN to change to Fax mode.
1
In Fax mode, the FAX light will glow and the following standby display is shown:
Fax Ready
Mar 26 2003 10:10
Set the document in the ADF (Automatic Document Feeder) or on the FBS (FlatBed Scanner) glass.
2
To improve the scanning quality, you can temporarily change the following settings.
3
• Resolution — Press DOCUMENT / RESOLUTION to select the resolution from Normal, Fine,
Super fine or Halftone you want.
• Contrast — Press CONTRAST to select the contrast you want.
Press GROUP.
4
Enter Group No.
G_
75
Page 78

Enter Group number (0 - 32).
5
Press Start
G33_
Note: If you want to send a e-mail to several groups at a time, press BROADCAST then repeat steps 4–5.
After you have entered all group numbers, press START.
6
If you set the document in the ADF, proceed to step 8.
7
If you placed the document on the FBS glass, enter your document size by pressing DOCUMENT SIZE,
then press START then skip to step 9.
ADDRESS/ID
If you have more documents to scan, press NEXT DOC during scan-
8
ning. Then proceed to step 9. Otherwise, skip to step 10.
When the scanning is done, the LCD will show:
9
Next Page →→NextDoc
Completed →→Start
ENTRY
If you want to scan more pages, place the next page then p
To scan more pages, repeat steps 7 to 9.
Otherwise, press START to finish scanning, and skip to step 10.
The scanned document is sent by e-mail as an image data attachment.
10
Mixed Broadcasting
You can simultaneously send e-mail and fax.
The fastest way to fax one document to many recipients is by broadcasting.
Press COPY / FAX / SCAN to change to Fax mode.
1
In Fax mode, the FAX light will glow and the following standby display is shown:
Fax Ready
Mar 26 2003 10:10
Set the document in the ADF (Automatic Document Feeder) or on the FBS (FlatBed Scanner) glass.
2
To improve the scanning quality, you can temporarily change the following settings.
3
• Resolution — Press DOCUMENT / RESOLUTION to select the resolution from Normal, Fine,
Super fine or Halftone you want.
• Contrast — Press CONTRAST to select the contrast you want.
Press BROADCAST.
4
ress NEXT DOC to start scanning.
Enter the e-mail address or fax numbers.
5
Following are the three methods you can use to enter destinations for broadcasting:
Use the One-touch keys to send up to 55 destinations.
To:Dallas Office
[01]_
Dallas Office
[01]_
76
Page 79

Use the Speed dial numbers to send up to 145 destinations.
To:Kyoto Office
S001_
Up to 10 e-mail addresses and up to 30 fax numbers can be entered directly.
Mail Address;Lower
To:Web@muratec.com_
If you enter the e-mail address, you can select “To”, “Cc” or “Bcc” by pressing or of the cursor key.
6
Kyoto Office
S001_
Press Start
12345678_
To:Dallas Office
1234565,[01]_
To add more e-mail addresses, repeat steps 4 to 6.
7
You can send up to 240 numbers for a broadcast.
To:Kyoto Office
[01],S001_
Note: If you enter characters by mistake, press
After you have entered all destinations, press START.
8
If you set the document in the ADF, proceed to step 10.
9
If you placed the document on the FBS glass, enter your document size by pressing DOCUMENT SIZE,
then press START then skip to step 11.
If you have more documents to scan, press NEXT DOC during scan-
10
ning. Then proceed to step 11. Otherwise, skip to step 12.
CANCEL
to erase them.
ADDRESS/ID
ENTRY
When the scanning is done, the LCD will show:
11
Next Page →→NextDoc
Completed →→Start
If you want to scan more pages, place the next page then p
To scan more pages, repeat steps 9 to 11.
Otherwise, press START to finish scanning, and skip to step 12.
The scanned document is sent by e-mail as an image data attachment.
12
ress NEXT DOC to start scanning.
77
Page 80

E-mail Subject and text message
The OfficeBridge Online will automatically add the default Subject and text message to all outgoing e-mails.
The default Subject and text message are as follows:
Subject :Internet Facsimile Message
Text Message :This is an internet facsimile message. Please see the file attached.
You can create up to 10 different Subject and text messages on the “E-mail template registration” screen in
“Operation settings” of “Administration Tools” though the web browser.
To create or edit the e-mail subject and text message:
Access to the Administration Tools. (See page 22.)
1
Click “E-mail template registration”.
2
Crate or edit the subject and message you want.
3
Note: The default Subject and message cannot edit.
78
Page 81

Select the e-mail Subject and text message
Note: The Subject and text message selected in this setting effects for all e-mail transmissions from your
machine. And it will be keep after finishing that e-mail transmission.
Press Program, G, 2.
1
Network
2 Email Template
Press ENTER. The registered label of the e-mail subject and text message will appear.
2
Email Template:00
Default Message
Press or to select the label.
3
Subject Select:01
Greeting
Press ENTER. The registered e-mail subject and text message will appear.
4
Press or to toggle the Subject and Text message. You can view the message by pressing or .
Subj.:Season’s Greet
///
Text :Merry X’mas
///
/Enter
/Enter
Note: If you want to edit the message, you can edit it on the “E-mail template registration” of the
“Administration Tools”. (See “To create or edit the e-mail subject and text message,” page 78.)
If it is OK, press ENTER.
5
79
Page 82

Send the document from specified box
You can send the document stored in the specified box to another Internet Fax or a PC.
Shared Boxes
Send the document over the Internet
to another Internet Fax or a PC.
Bulletin
Board
Public
Inbox
Completed
Box
Internet Fax
Order to send the document from Box.
Personal Boxes
Personal
Personal
Inbox
Outbox
Strage
Box
LAN
Login the Personal screen. (See page 23.)
1
Select the Box which has document you want to send.
2
You can select the “Public Inbox,” “Personal Inbox,” “Personal Outbox” and “Storage Box.”
80
Page 83

Select the document you want to send.
3
(1) Check the document you want to send.
(2) Select “Sent” from action menu.
(3) Click Execute.
(1)
(2) (3)
The “Document Send” screen will appear. Enter the e-mail address.
4
(1) Enter the e-mail address.
(2) Click Add.
If you want to send to more than two locations,
repeat steps (1) to (2).
(3) Confirm the destination(s).
81
Page 84

In Internet fax sending, the following default subject and text message are added automatically to outgoing
5
e-mail.
Subject :Internet Facsimile Message
Text Message :This is an internet facsimile message. Please see the file attached.
If you want to add a different subject and text message:
(1) Click “Cover page” tab.
(2) Click “Attached”.
(3) Enter Subject and Message. You can up to enter 80 characters for Subject and up to 864 characters for
text message..
(4) Click “Set” to after you entered.
Note: The Subject and message entered on the Cover page tab are only effective for this e-mail transmis-
sion. It will be discarded after finishing this e-mail transmission.
(1)
(4)
(2)
(3)
Click Send.
6
The screen will change to the “Personal Outbox” screen.
7
You can confirm the sending command status on this screen.
82
Page 85

Send the e-mail from application software
r
Note: To be able to use this feature, install the Muratec OfficeBridge Online Fax driver first. (See page 90.)
Send the document over the Internet
to another Internet Fax or a PC.
Internet Fax
Send the document through the Fax drive
LAN
Create a document or open a file to send.
1
Select Print from the application software’s File menu.
2
Send the document data to the OfficeBridge Online Fax driver.
3
(1) Select the Muratec
OfficeBridge Online Fax.
(2) Click Print or OK.
83
Page 86

The OfficeBridge Online User login screen will appear.
4
(1) Enter the User ID and password.
Note: If the password is not set, do not need to enter it.
(2) Click Send.
Note: If you want to store the document to send it later, click Temporary Storage.
The document is stored in the Personal Outbox. It will be named “Send document” followed by saving day and time (DDHHMMSS format). DD:day, HH:hour, MM:minutes, SS:seconds
The “Document Send” screen will appear. Enter e-mail address.
5
(1) Enter e-mail address.
(2) Click Add.
If you want to send to more than one locations,
repeat steps (1) to (2).
(3) Confirm the destination(s).
(4) Click Send.
84
Page 87

The screen will change to the “Personal Outbox” screen.
6
You can confirm the sending command status on this screen.
85
Page 88

Internet Fax Reception
According to the “Received fax forwarding” setting, the incoming e-mail will be stored in the specified box without
printing on paper. You can view the stored document on your PC and download it, if necessary.
Received e-mail is stored in specified box, according to
the "Received fax forwarding" setting.
Internet Fax
E-mail reception
Access to the OfficeBridge Online to
view the received document and
if necessary download it.
LAN
If "InfoMonitor" is running, when a new document
is stored in specified box, the arrival notice is shown
on your PC.
Shared Boxes
Bulletin
Board
Personal Boxes
Personal
Inbox
Public
Inbox
Personal
Outbox
Completed
Box
Storage
Box
View the received fax
Startup the OfficeBridge Online. (See page 21.)
1
Check the Unread documents area on the table of your User ID. The number shows how many unread
2
messages are in the box.
86
Page 89

Note: If the “InforMonitor” (see pages 15 and 95) is installed and setup its configurations, when you have got
a new message in your box, the new message arrival notification will appear on your PC.
To view the incoming e-mail, login your personal screen and click the Document subject or File icon.
3
Note: According to the version of Windows and browser you are using, the appeared dialog box may vary.
“Received Fax forwarding” setting
You can create up to 100 rules for the received fax or e-mail messages (Delivery setting), and also create a rule for
the received fax or e-mail messages not fitting the rules you created (Exceptions handling).
Access to the Administration Tools. (See page 22.)
1
Click “Received fax forwarding.”
2
Create the rule for the received messages. For more information to create a rule, refer to the Help.
3
87
Page 90

Forwarding received e-mail to fax
There are two way of forwarding the received e-mail to other fax machine.
One way is set by “Received fax forwarding seeting”. You can create up to 100 forwarding rules (see above).
The other way of forwarding is forward only the e-mail that contains the designated fax number in a text.
All you have to do is to send mail with forwarding fax numbers in a text. When the OfficeBridge Online received
that e-mail, it analyzes and forwards e-mail messages to the fax number(s) in the e-mail.
Designate Fax Forwarding numbers in the text of the mail as follows:
FAXNO:=<XXXX
xxxx: forwarding fax number
1. Always begin from the start of the line.
2. As long as above condition is fulfilled, the number can be written anywhere in the text.
3. “FAXNO” can be written in either upper case or lower case.
4. The Fax number can have a maximum of 40 digits per number, and a total of 30 fax numbers.
5. When you designate multiple numbers as a broadcast, separate them with comma (,).
Example: FAXNO:=<123-4567,987-6543>
6. Available numbers for broadcasting is dependent on the specifications of the fax used as a gateway.
7. However, if there is a wrong fax number in the mail when designating broadcasting, the mail will not be
forwarded, but an error report will be returned.
Example:
>
88
Page 91

Accepting / Rejecting Fax Forwarding request
With “Administration Tools”, you can set conditions on whether you reject or accept Fax Forwarding requests.
You can also limit mail that accepts forwarding requests by entering the mail address or domain name, as you
desire.
Setting of Fax Forwarding request conditions
Access to the Administration Tools. (See page 22.)
1
Click “E-mail environment” under [Setup].
2
Select one desired condition from [When mail that requests forwarding to fax machine is received].
3
* When you enter multiple mail address or domain names to limit, separate them with a semicolon (;).
Note: When Fax forwarding is rejected, the mail will be returned to the sender.
89
Page 92

Installing
the OfficeBridge Online
Printer & Fax driver
Installing Printer & Fax driver . . . . . . . . . . . . . . . . . . . . . . . . . . . . . . . . . . . . . . . . . . . . . . . . 91
Uninstalling Printer & Fax driver . . . . . . . . . . . . . . . . . . . . . . . . . . . . . . . . . . . . . . . . . . . . . 93
90
Page 93

Installing Printer & Fax driver
Muratec OfficeBridge Online Printer driver (MFX1x OBonline Printer) — This is the printer driver that
allows you to use the Muratec fax machine as a printer.
Muratec OfficeBridge Online Fax driver — This is the driver that makes you to possible to send a document
as a fax document, directly from the application software you are using.
Muratec OfficeBridge Online Port — It creates a connection port on your computer where you can connect
OfficeBridge Online driver that pass data into and out of a computer.
To install the OfficeBridge Online Printer & Fax drivers:
Note: For Windows®XP or Windows®2000 or Windows NT®, log on to Windows as a member of the
Administrators group.
Note: According to the Windows version you are using, the name of items listed in dialog boxes may vary.
The following example utilizes Windows XP.
Start Windows.
1
Insert the OfficeBridge Online Installation CD into your CD-ROM drive.
2
Click Start, and then click Run.
3
In Open, type <Drive>:\Driver\Setup\Setup.exe.
<Drive> is the drive letter for your CD-ROM drive.
You can also browse through the folders to find the Setup.exe by
clicking Browse.
Click OK.
The Setup wizard will appear.
4
Click Next.
The “License Agreement screen” will appear.
5
Read the agreement carefully and, if you agree, click Yes.
Note: To cancel the setup, click No.
91
Page 94

The “Select Components” dialog box will appear.
6
Select driver you want to install and click Next.
Note: The OfficeBridge Online Port must be installed.
It creates a connection port on your computer where you
can connect OfficeBridge Online driver that pass data
into and out of a computer.
Enter the IP Address assigned to your fax machine.
7
In this example, we’ve entered 200.1.37.99.
Note: If necessary, you can see the IP Address by following pro-
cedure:
Open the “Network environment” screen of the Admin Tools on your computer
or press Program, G, 1, 0, 2, ENTER on your fax machine.
Select the port “OB_(IP Address)” for OfficeBridge Online Printer
8
driver. In this example, we’ve selected “OB_200.1.37.99.”
Select the port “OB_(IP Address)” for OfficeBridge Online Fax
9
driver. In this example, we’ve selected “OB_200.1.37.99.”
The “Setup Complete screen” will appear.
10
Select “Yes, I want to restart my computer now” and
click Finish, the computer will restart.
Note: If you are running other application programs, save
your data and close the applications. Then, click
Finish.
Note: If you select “No, I will restart my computer later”
and click Finish, the installation will be not fully com-
pleted. You will need to restart your computer to
complete installation.
92
Page 95

Uninstalling Printer & Fax driver
Note: For Windows®XP or Windows®2000 or Windows NT®, log on to Windows as a member of the
Administrators group.
Note: According to the Windows version you are using, the name of items listed in dialog boxes may vary.
The following example utilizes Windows XP.
To remove the OfficeBridge Online Printer & Fax drivers:
Open Add or Remove Programs in Control Panel.
1
Note: To open Add or Remove Programs, click Start, click
Control Panel, and then double-click Add or Remove
Programs.
Click Change or Remove Programs, and then click the
2
OfficeBridge Online Printer / Fax.
Then click Change/Remove to remove.
The InstallShield wizard will appear.
3
Click Next.
To finish the uninstalling, click Finish.
4
93
Page 96

Installing
the OfficeBridge Online
Utilities
Installing the OfficeBridge Online Utilities . . . . . . . . . . . . . . . . . . . . . . . . . . . . . . . . . . . . . 95
Uninstalling the OfficeBridge Online Utilities . . . . . . . . . . . . . . . . . . . . . . . . . . . . . . . . . . . 99
94
Page 97

Installing the OfficeBridge Online Utilities
Muratec OfficeBridge Online InfoMonitor — Activating this software let the users of OfficeBridge Online
know when a new document arrives into the specified box of the OfficeBridge Online.
Muratec OfficeBridge Online TWAIN Connector — With this driver software, you can download the scanned
image into software application that supports TWAIN scanning.
To install the OfficeBridge utilities:
Note: For Windows®XP or Windows®2000 or Windows NT®, log on to Windows as a member of the
Administrators group.
Note: According to the Windows version you are using, the name of items listed in dialog boxes may vary.
The following example utilizes Windows XP.
Insert the OfficeBridge Online Installation CD into your CD-ROM drive.
1
Click Start, then select Run.
2
In Open, type <Drive>:\Utility\Setup\Setup.exe.
<Drive> is the drive letter for your CD-ROM drive.
You can also browse through the folders to find the Setup.exe by
clicking Browse.
Click OK.
The Setup wizard will appear.
3
Click Next.
The “License Agreement screen” will appear.
4
Read the agreement carefully and, if you agree, click Yes.
Note: To cancel the setup, click No.
95
Page 98

The “Choose Destination Location” dialog box will appear.
5
Specify the location where you wan to install the utilities and
click Next.
The “Select Components” dialog box will appear.
6
Select driver you want to install and click Next.
The “Select Program Folder” dialog box will appear.
7
Click Next.
The “Server address setting” dialog box will appear.
8
Enter the IP Address assigned to your fax machine.
In this example, we’ve entered 200.1.37.99.
Note: If necessary, you can see the IP Address by following pro-
cedure:
Open the “Network environment” screen of the Admin
Tools on your computer
or press Program, G, 1, 0, 2, ENTER on your fax machine.
The “Create shortcut” dialog box will appear.
9
If you want to create the shortcut of OfficeBridge Online, select
items appears on the screen.
Click Next.
96
Page 99

Confirm the installation components, click Next.
10
To finish the installing, click Finish.
11
97
Page 100

To add or remove the OfficeBridge utilities:
Note: For Windows®XP or Windows®2000 or Windows NT®, log on to Windows as a member of the
Administrators group.
Note: According to the Windows version you are using, the name of items listed in dialog boxes may vary.
The following example utilizes Windows XP.
Insert the OfficeBridge Online Installation CD into your CD-ROM drive.
1
Open Add or Remove Programs in Control Panel.
2
Note: To open Add or Remove Programs, click Start, click
Control Panel, and then double-click Add or Remove
Programs.
Click Change or Remove Programs, and then click the
3
OfficeBridge Online Utility.
Then click Change/Remove to remove.
Select Modify and then click Next. Skip to step 6.
4
If you want to remove all installed components (includes the
InfoMonitor and TWAIN connector), select Remove and click
Next. Go to next step.
Click OK. Go to step 7.
5
The “Select Components” dialog box will appear.
6
Select or clear the component you want to install or uninstall and
then click Next.
To finish the installing, click Finish.
7
98
 Loading...