


Quick Reference


CONTENTS
Basic Copy ............................................................................1
Duplex Copying ....................................................................2
Staple Finishing / Sorting ....................................................3
Card copy ..............................................................................4
Soft Key Programming ........................................................6
Registering an Address Book location ................................8
Sending a fax ......................................................................11
Sending to an e-mail address ............................................12
Customizing an e-mail transmission (templates) ............13
Scanning to a network folder ............................................14
Scanning to an FTP server ................................................16
Color scan to print (MFX-2850 only) .................................18
Voice Guidance Controls ....................................................19
Clearing a document jam in ADF ......................................21

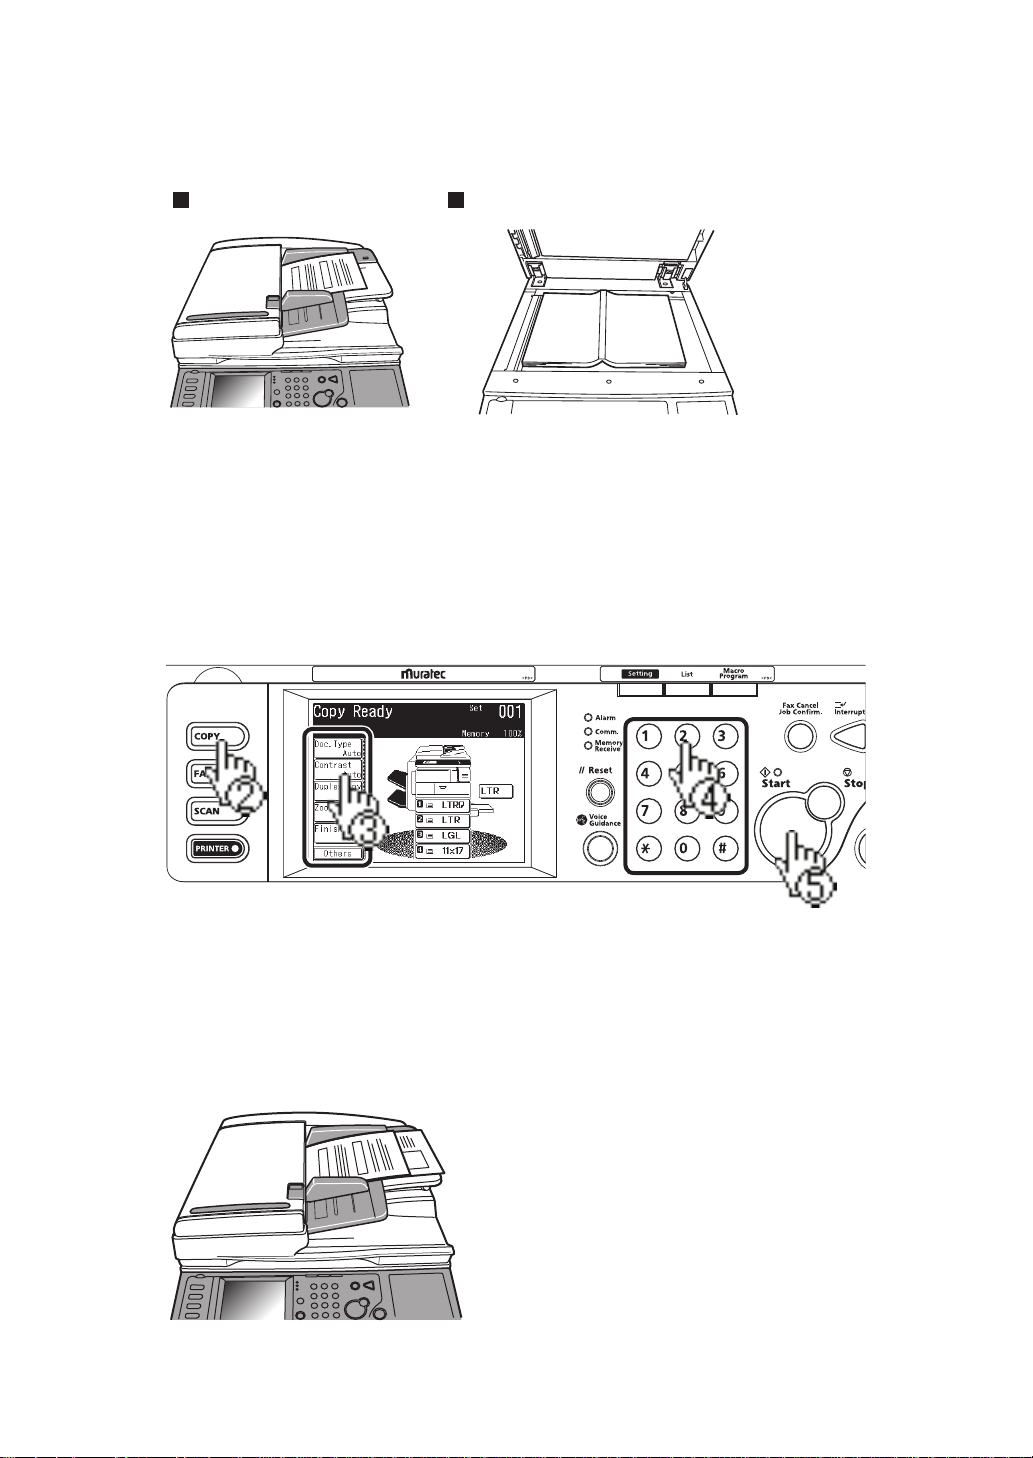
Basic Copy
ADF � Face UP Document glass � Face DOWN
Load the document.
1
Select the copy mode.
2
Adjust any additional settings (ex. Resolution, Contrast).
3
Select the number of copies you wish to make using the numeric
4
keypad.
Press <Start>.
5
Mixed Original Copying
Letter and legal-sized paper can be inserted into the ADF and
the scanner will automatically detect the paper size. The output
will match the original paper size if the appropriate paper has
been loaded into the cassettes.
1
2
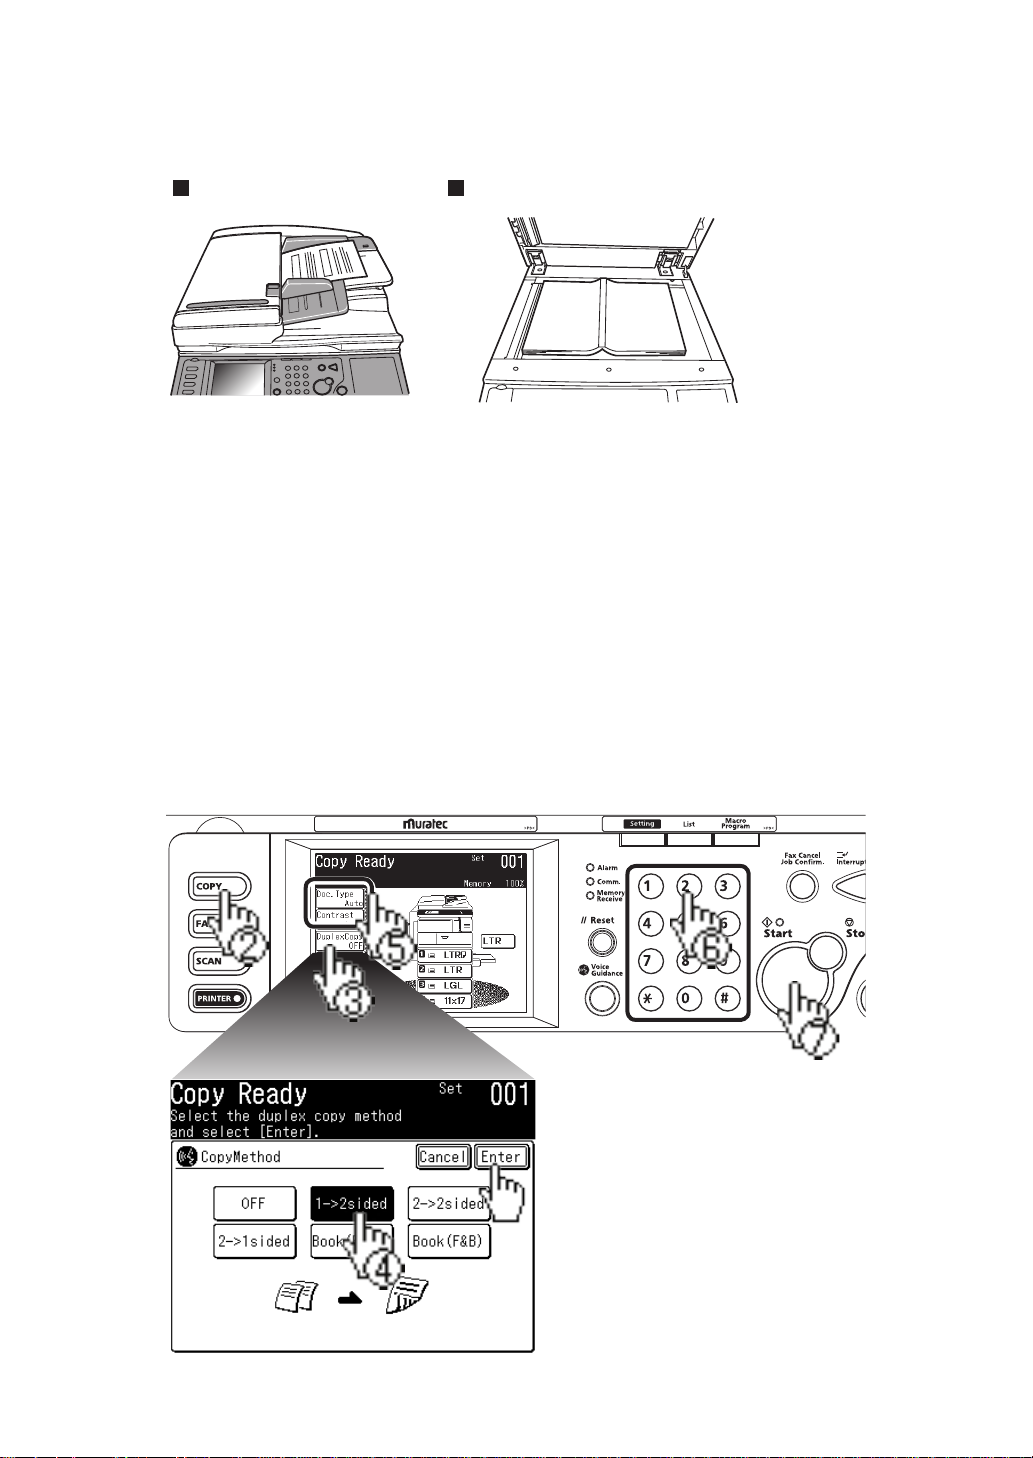
Duplex Copying
ADF � Face UP Document glass � Face DOWN
Load the document.
1
Select the copy mode.
2
Press [Duplex Copy].
3
If the duplex unit has not been installed:
4
If the duplex unit has been installed: Select the duplex copy
Adjust any additional settings (ex. Resolution, Contrast).
5
Select [2-1 sided] and [Enter].
method and press [Enter].
Select the number of copies you wish to make using the numeric
6
keypad.
Press <Start>.
7
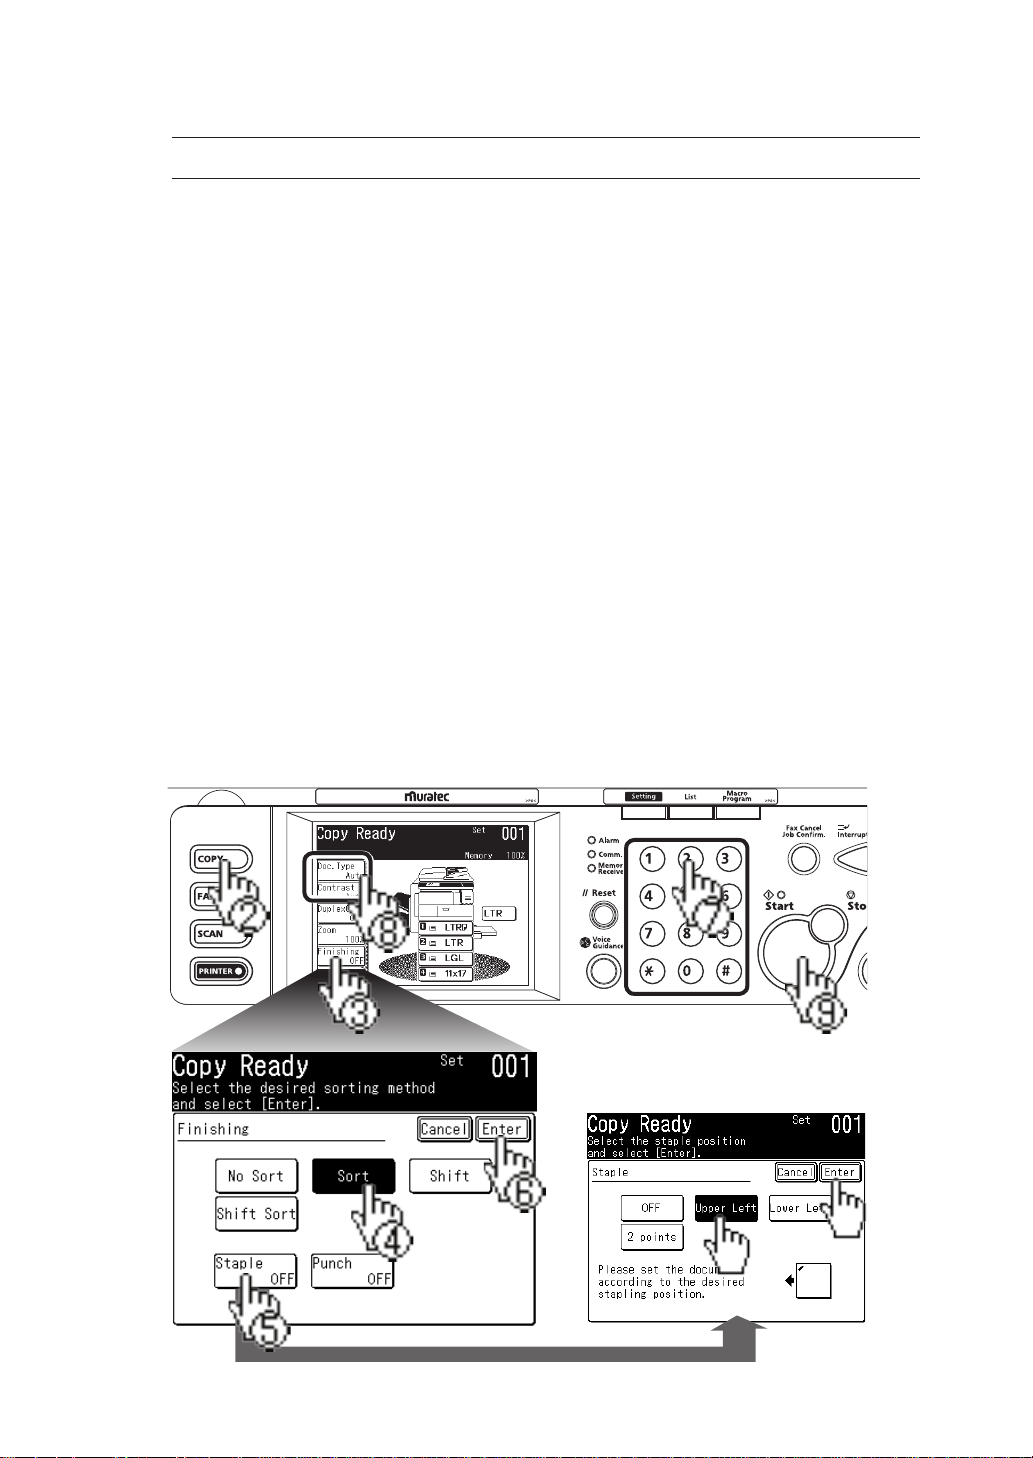
Staple Finishing / Sorting
NOTE:
Load the document into the ADF or on the document glass.Load the document into the ADF or on the document glass.
1
Select the copy mode.
2
Press [Finishing].
3
If the finisher has been installed:
4
If the finisher has not been installed: Select [Sort].
If the finisher has been installed: Select [Staple], choose the
5
staple position and press [Enter].
If the finisher has not been installed proceed to step 6.
Press [Enter].
6
Select the number of copies you wish to make using the numeric
7
keypad.
Adjust any additional settings (ex. Resolution, Contrast).
8
To staple documents, the optional finisher must be installed.
Select [Sort], [Shift] or [Shift Sort].
Press <Start>.
9
3
4
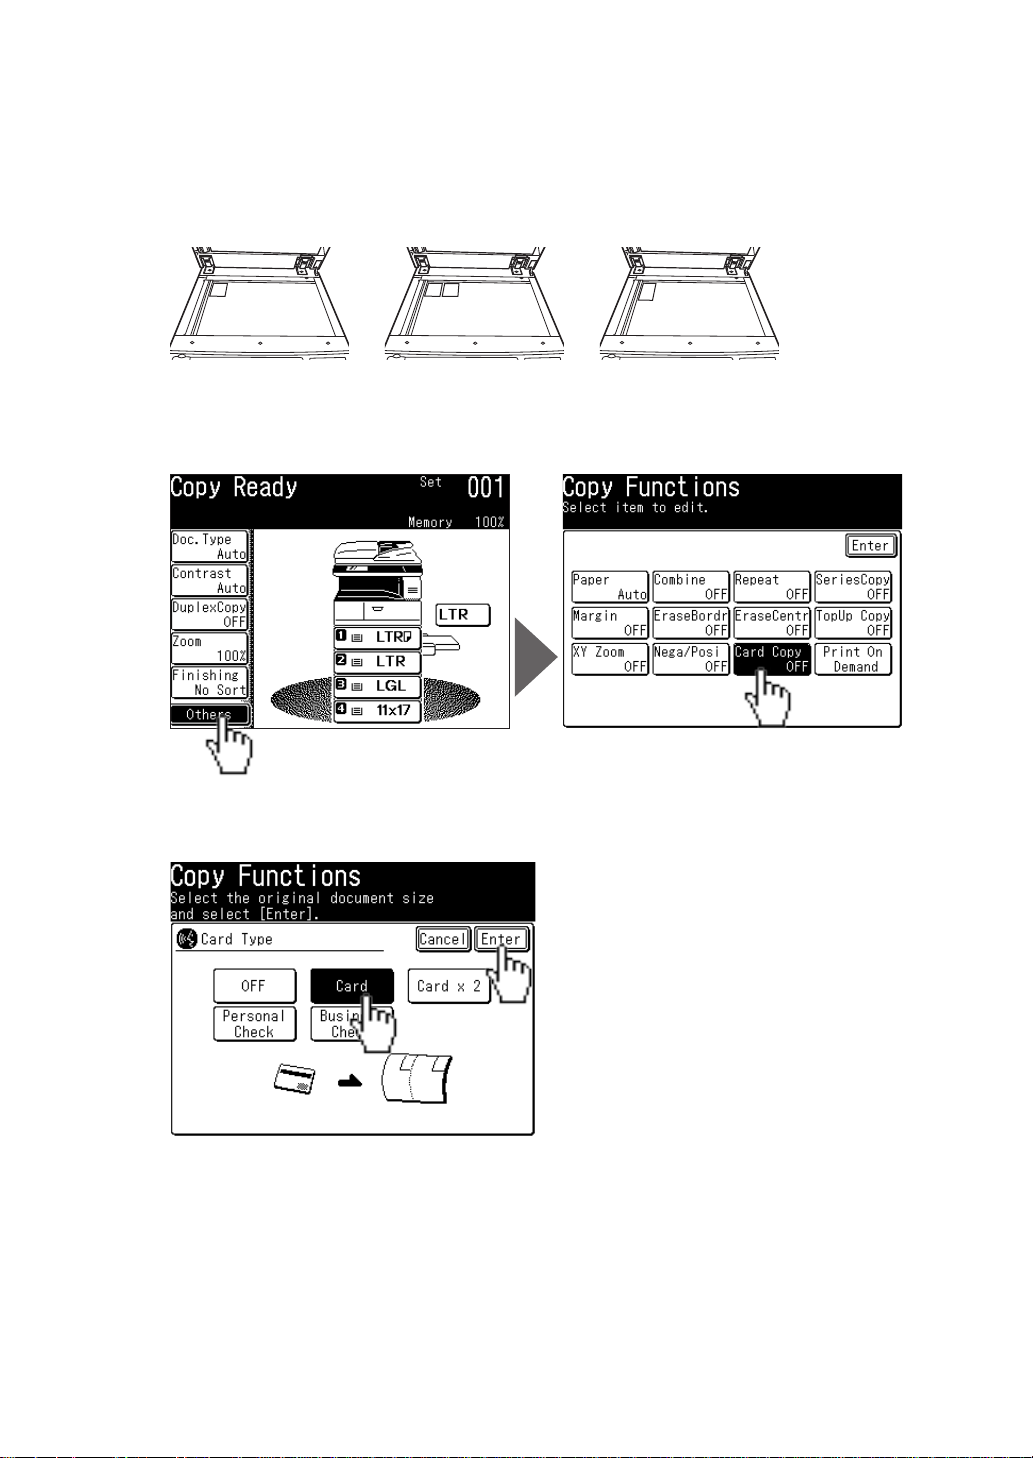
Card copy
Select the copy mode.
1
Place the card(s) or check face-down onto the document glass.
2
(One card) (Two cards) (
Select [Others] and [Card Copy].
3
Select the type and press [Enter].
4
One business or personal check
)
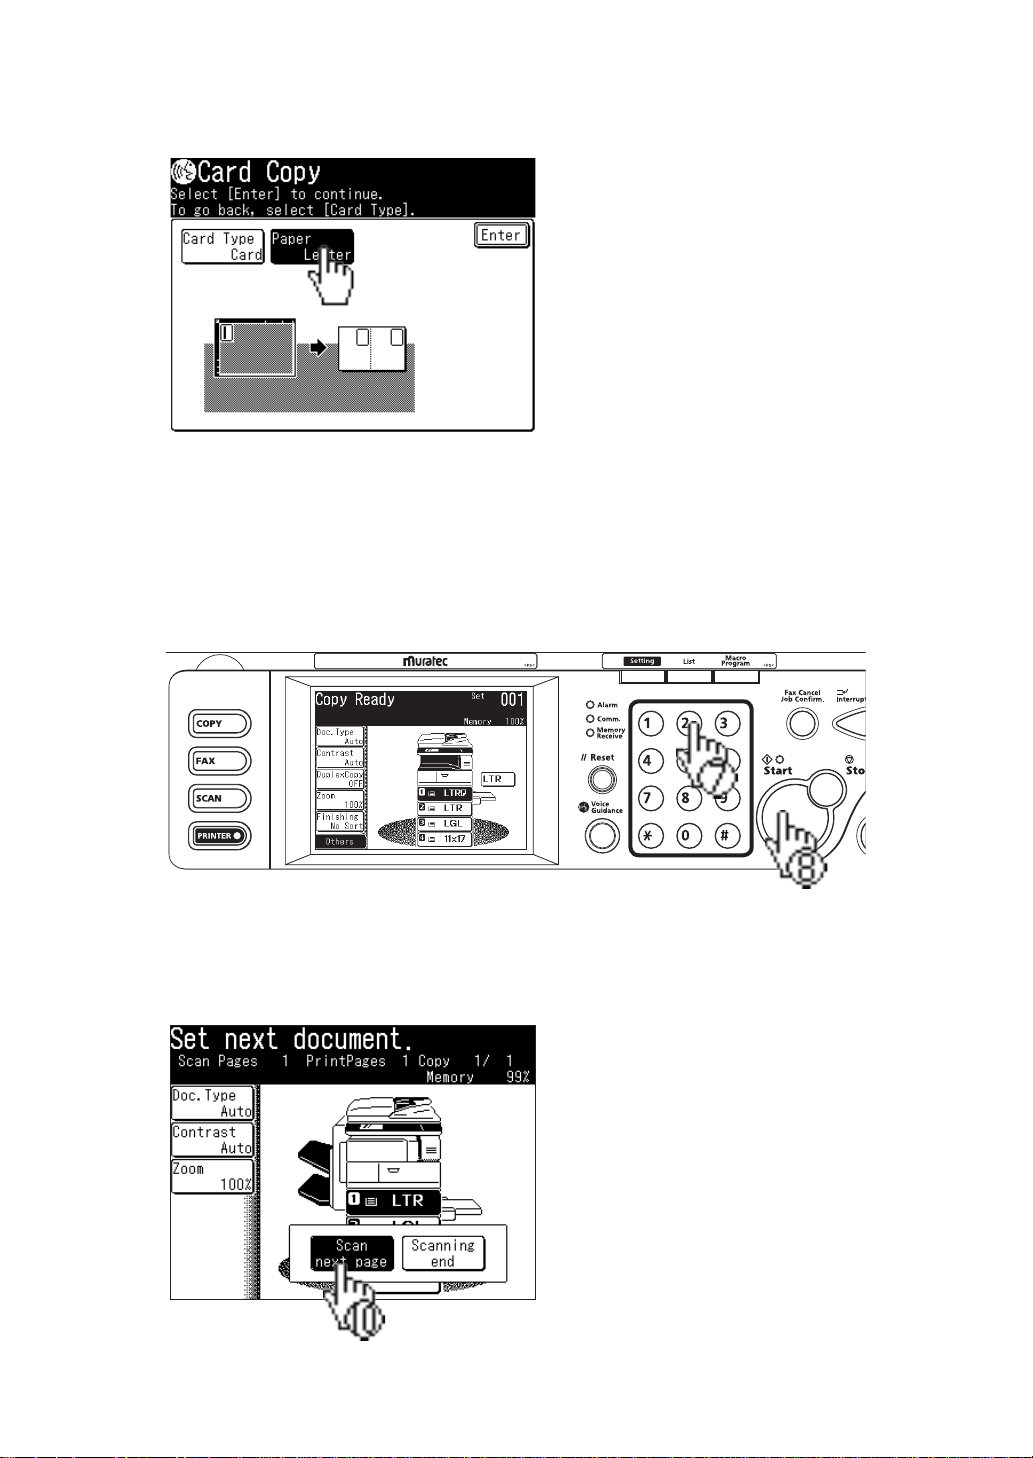
To adjust the output paper size, select [Paper], choose the
5
desired paper source and press [Enter].
Press [Enter] until you return to the standby screen.
6
Select the number of copies you wish to make using the numeric
7
keypad.
Leave the platen cover open and press <Start>.
8
When prompted, turn your card(s) or check over.
9
Select [Scan next page] or <Start>.
10
5

6
Soft Key Programming
You may replace the function keys on each standby screen with
functions you utilize most often.
For this example we will replace the [Zoom] key with [Card Copy] on the
copy mode standby screen.
Select <Settings> from the contol panel.
1
Select [Management] and then [Soft key].
2
Select the mode which contains the screen you want to change.
3
Here we select [Copy].

Select the key you want to replace.
4
Here we select [Zoom].
Select the key you want displayed and press [Enter].
5
Here we select [Card Copy].
Select <Reset> on the control panel to return to the standby
6
screen. The new key will now be displayed.
7

8
Registering an Address Book location
The MFX-2350 / MFX-2850 have two address books: MFP
address book and OfficeBridge Address Book.
Register the following fields to have a quick access to frequently
using destinations:
• Three-digit address book number
• Name (Mandatory field)
• Fax number and/or e-mail address (Mandatory field)
• Dialing Group
Registering an MFP Address Book location
Select <Settings> from the control panel.
1
Press [Speed Dial], then [Enter / Edit].
2
Select a blank number.
3
Enter the fax number and press [Enter].
4

To register the name: Select [Name], enter the name using the
5
QWERTY keypad and press [Enter].
To add the contact to a pre-existing group: Select [Group No],
6
choose the group(s) you want to add the contact to and press
[Enter].
Select <Reset> on the control panel to return to the standby
7
screen. The new contact will be displayed.
Registering an OfficeBridge Address Book Location
Open the OfficeBridge icon on your PC or enter the IP address
1
of your Muratec MFP into URL of your browser.
Select your user name and log in.
2
9

10
On the "Admin Tools" tab, click [Address Book].
3
The [Address Book Entry] screen will be displayed.
4
Click [New].
5
Enter the contact information. The destination must include
6
either an e-mail address or fax location.
Click [Save].
7

Sending a fax
ADF � Face UP Document glass � Face DOWN
Load the document.
1
Select the fax mode.
2
Adjust any additional settings (ex. Resolution, Contrast).
3
Manually enter the destination using the numeric keypad or
4
select a contact from the address book.
Press <Start>. (You do not need to press <Start>, if sending to
5
a single address book location.)
11

12
Sending to an e-mail address
ADF � Face UP Document glass � Face DOWN
Set the document.
1
Select the scan mode.
2
Press [E-mail].
3
Adjust any additional settings (ex. Resolution, Contrast).
4
To enter the e-mail address manually select [Mail Address],
5
enter the address using the QWERTY keypad and press [Enter].
You can also use the registered locations on the display.
Press <Start>. (You do not need to press <Start>, if sending to
6
an address book location.)

Customizing an e-mail transmission
(templates)
Load the document into the ADF or on the document glass.
1
Select the scan mode.
2
Press [E-mail].
3
Adjust any additional settings (ex. Resolution, Contrast).
4
Select [Others] and then [E-mail Subject].
5
Select [Subject] to change the subject line or [Mail Text] to
6
change the body of the e-mail message. Using the QWERTY keypad enter the subject line or text message and press [Enter].
Press [Enter] until you return to the standby mode.
7
To manually enter the e-mail address select [Mail Address],
8
enter the address using the QWERTY keypad and select [Enter].
Press <Start>. (You do not need to press <Start>, if sending to
9
an address book location.)
13

14
Scanning to a network folder
ADF � Face UP Document glass � Face DOWN
Set the document.
1
Select the scan mode.
2
Press [Folder].
3
Adjust any additional settings (ex. Resolution, Contrast).
4
Press [Browse].
5
You may also select a pre-registered shortcut location.

Select the network directory that contains your desired folder.
6
• To scroll, use [ ] and [ ].
Select the folder you wish to scan to.
7
NOTE:
The folder that is highlighted is the folder the machine
will scan to.
• To go up one step, press [Back].
• To return to the first screen, press [Root].
Press <Start>.
8
Operating Tip
A user name and password may be required to login folders.
• Select [User Name], enter the user name using the QWERTY keypad
and press [Enter].
• If your machine is on a windows domain controlled network, add the
domain name after the user name by attaching an “@”, like “sam@dom.
muratec.com”.
• Select [Password] and enter the password using the QWERTY keypadusing the QWERTY keypad
and press [Enter].
15

16
Scanning to an FTP server
ADF � Face UP Document glass � Face DOWN
Set the document.
1
Select the scan mode.
2
Press [FTP].
3
Adjust any additional settings (ex. Resolution, Contrast).
4
Press [Host].
5

Press [Link].
6
Enter the link to the FTP server.
7
• Begin your entry with “//”.
• The “/(slash)” is found in the [Symbol] menu. To switch back
to alpha characters, press [Alpha].
Press [Enter].
8
Select [User Name], enter the user name using the QWERTY
9
keypad and press [Enter].
Select [Password], enter the password using the QWERTY
10
keypad and press [Enter].
Press [Enter].
11
PressPress <Start>.
12
Operating Tip
After entering the FTP destination, select [Register] to add
this location into a shortcut key.
17

18
Color scan to print (MFX-2850 only)
NOTE : In order to use this function, the following item must be
installed:
•The “Scan to print monitor” is installed on your PC
•A color printer has been registered
•
A shared folder has been created to store the image date
Load the document into the ADF or on the document glass.
1
Select the scan mode.
2
Press [Printer].
3
Adjust any additional settings (ex. Resolution, Contrast).
4
Select the printer that you wish to use.
5

Voice Guidance Controls
When the <Voice Guidance> key is illuminated and an “ ” icon
is displayed on the touch screen, you can hear the operation
guidance by pressing the <Voice Guidance> key.
The guidance items are as follows:
Operational User receives instruction on how to perform
operational procedures such as advance program
settings or registering an address book location.
Error User is guided through the correct paper jamUser is guided through the correct paper jam
removal procedure.
Notification User is alerted to the machines status.
Completions User is alerted when a job has been completed.
When the operation guidance is set to “Auto” you will automatically receive guidance without having to press<Voice Guid-<Voice Guidance>.
Press the <Settings> key on the contol panel.
1
Press [Management] and then [Guidance].
2
19

20
Press [OP. Guidance Mode], and select [Auto] and [Enter].
3
Operating Tip
You can adjust the guidance volume for operation, error or notification on the above screen.
To adjust the complete beep, press <Setting>, [Management],
[Sound Settings], [Complete beep] and then select each
function or press <Setting>, [Management], [Sound Set-
tings] and [Job Complete Volume] to adjust the volume.

Clearing a document jam in ADF
Document jamDocument jam
Open & check the
blinking cover.
If a document jam occurs, an alarm will sound and a message
will be displayed. Carefully remove the jammed paper by follow
the displayed steps.
Lift the ADF cover release lever (A1) and open the ADF cover.
1
Remove the jammed document. If the document cannot be
2
removed, proceed to step 3.
Open the inside cover (A2).
3
Gently pull out the jammed document.
4
If the document cannot be removed, proceed to step 5.
21

22
Turning the dial, discharge the jammed document.
5
Lift up the document tray.
6
Gently pull out the jammed document.
7
Lower the document tray. Close the ADF cover.
8
An error message will be printed and indicate the page number
9
at which the jam occurred. Reset the document and resend it.

This page is intentionally blank.
23

3301 East Plano Parkway, Suite 100
Plano, Texas 75074
Muratec America, Inc.
http://www.muratec.com
Murata Machinery, Ltd. 2006
Printed in Japan 2006-09
Part Number: DA1-90290-61
MAI order number: OMMFX2850QRG
0 3 1 9 8 1 9 2 6 6 4 5
 Loading...