

Page 1
Operation Manual
COPY
Chapter1
Getting Started
Basic Copy Features
1-1
2-1
FAX
OPY
C
FAX
Chapter2
Chapter3
Chapter1
Chapter2
Chapter3
Chapter4
Common settings
Advanced Copy Features
Advanced Copy Settings
Basic Fax Features
Advanced Fax Features
Communication Management
Fax Settings
Function Settings
2-29
2-93
3-1
3-57
3-149
3-161
4-1
In This Case...
Maintenance and Troubleshooting
Appendix
As an ENERGY STAR partner, Muratec
America, Inc., has determined that this
product meets the ENERGY STAR**
guidelines for energy efficiency.
R
R
5-1
a1
Page 2
Trademarks
Muratec, the Muratec logo and all Muratec product names contained herein are trademarks of
Muratec America, Inc.
ENERGY STAR is a registered mark of the United States Environmental Protection Agency.
Super G3 is an extension of Group 3 fax technology standards, allowing the use of
high-speed ITU-T V.34 mode ms for 33.6 Kbps transmission and high-speed
protocols for rapid handshaking.
JBIG -Joint Bi-level Image experts Group, the new ITU-T standard image data
compression method. As JBIG compresses the data more efficiently than MMR, it
is especially effective when transmitting halftone (grayscale) image document.
This manual and any updates to it can be found online at www.muratec.com
Go to the Products,, section of this site, then click on
,, ,,
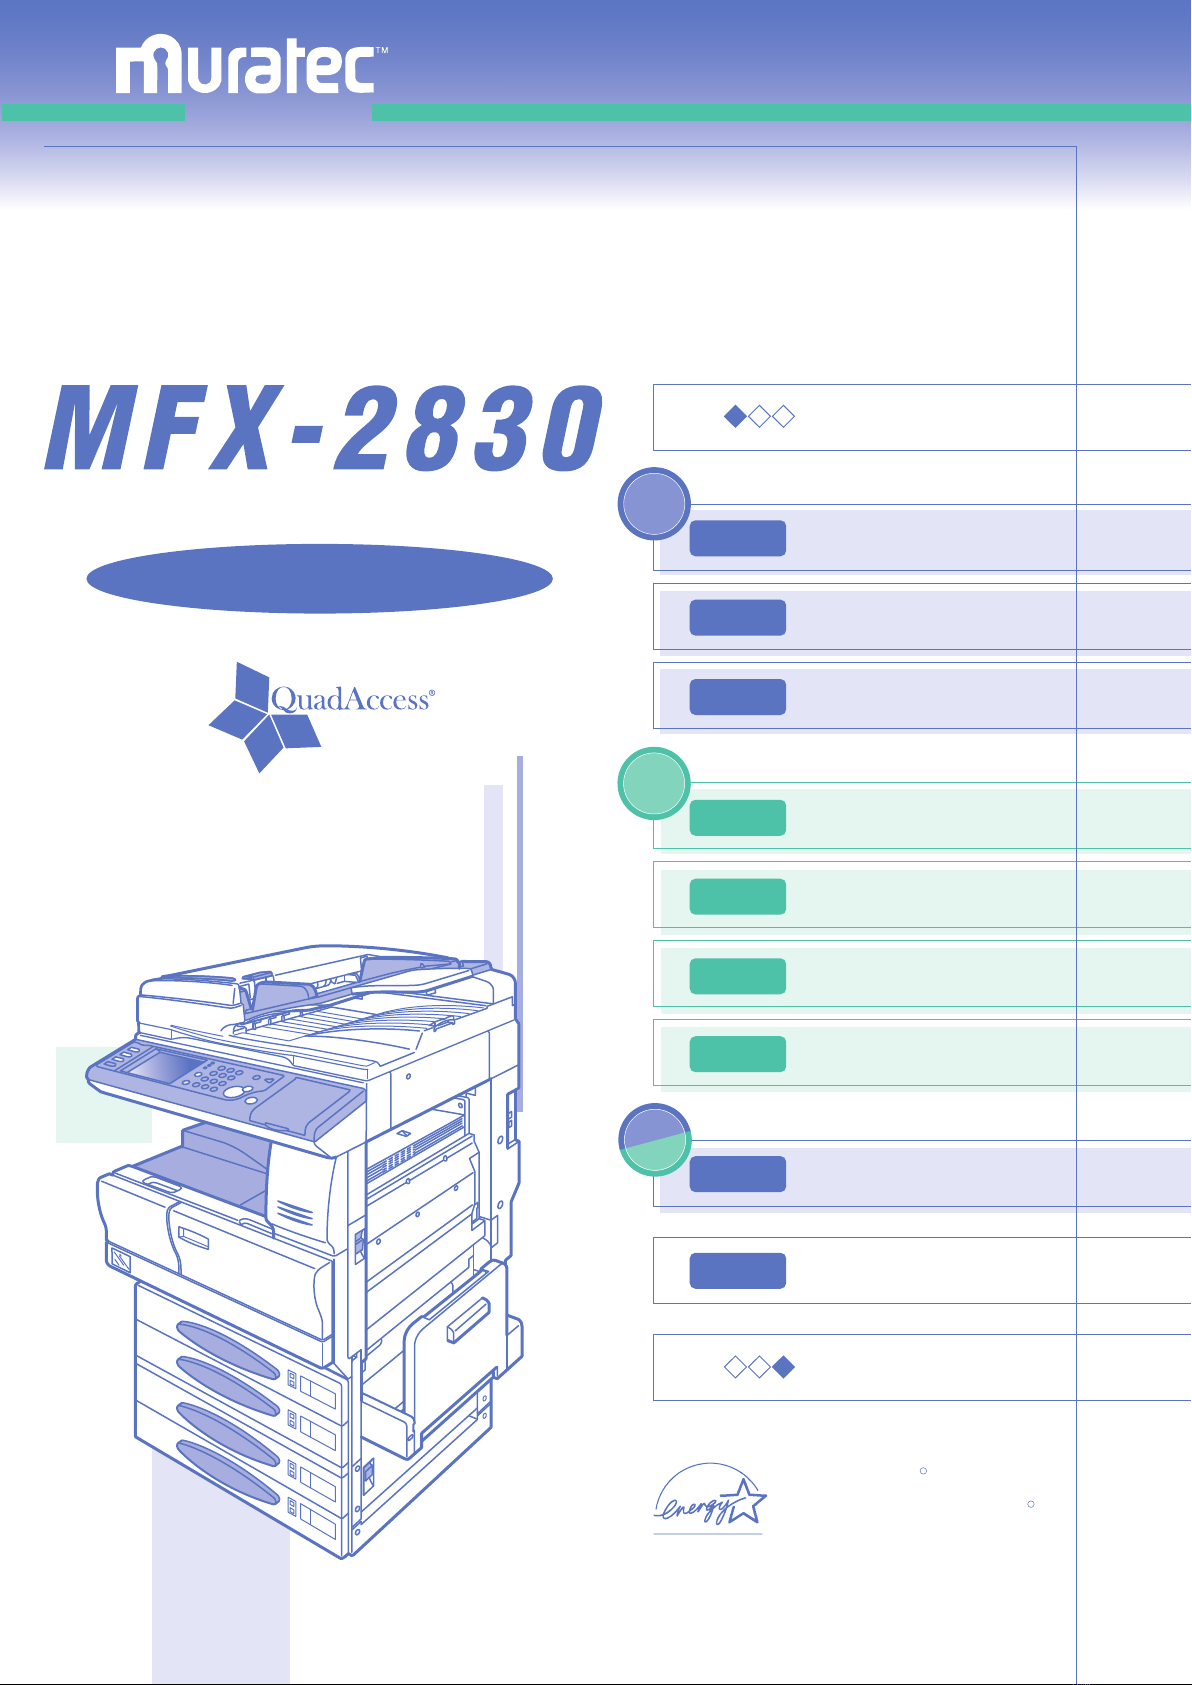
MFX-2830
,,
Customer Support Center : 1-800-347-3296 (from the United States only)
If you are not able to solve an issue by using the operators manual, please contact your authorized
Muratec dealer or consult the Muratec Customer Support Center.
About the serial number
To assist the customer support specialist, please have the model number and serial number
written down prior to your call.
Model Number
Serial Number
The serial number is located on the bar code label
MFX-2830
DA1
Bar code label
DA131010000021 *4BJ
Sample of a Bar code label
Page 3
Main Features
COPY
F A
X
To Remove
PA
PER JAM....
COPY
F A
X
Z
Z
Z Z
COPY
F A
X
1:Sort Copy Reduce 81%
2:Department List
3:Not registered
4:Not registered
5:Not registered
6:Not registered
Run
Select the program number.
Select Enter to return to the previous menu.
Enter
COPY
F A
X
Copy: 0.00 $/Page
Fax : 0.00 $/Page
Cost Management
Select item to edit.
Enter
Enter/Edit
Enter the department code
and select [Enter].
Enter
001:
Enter
Cancel
Department Code
Input range:000000000-999999999
000000000
COPY
COPY
■ ■
● ●
■ ■
● ●
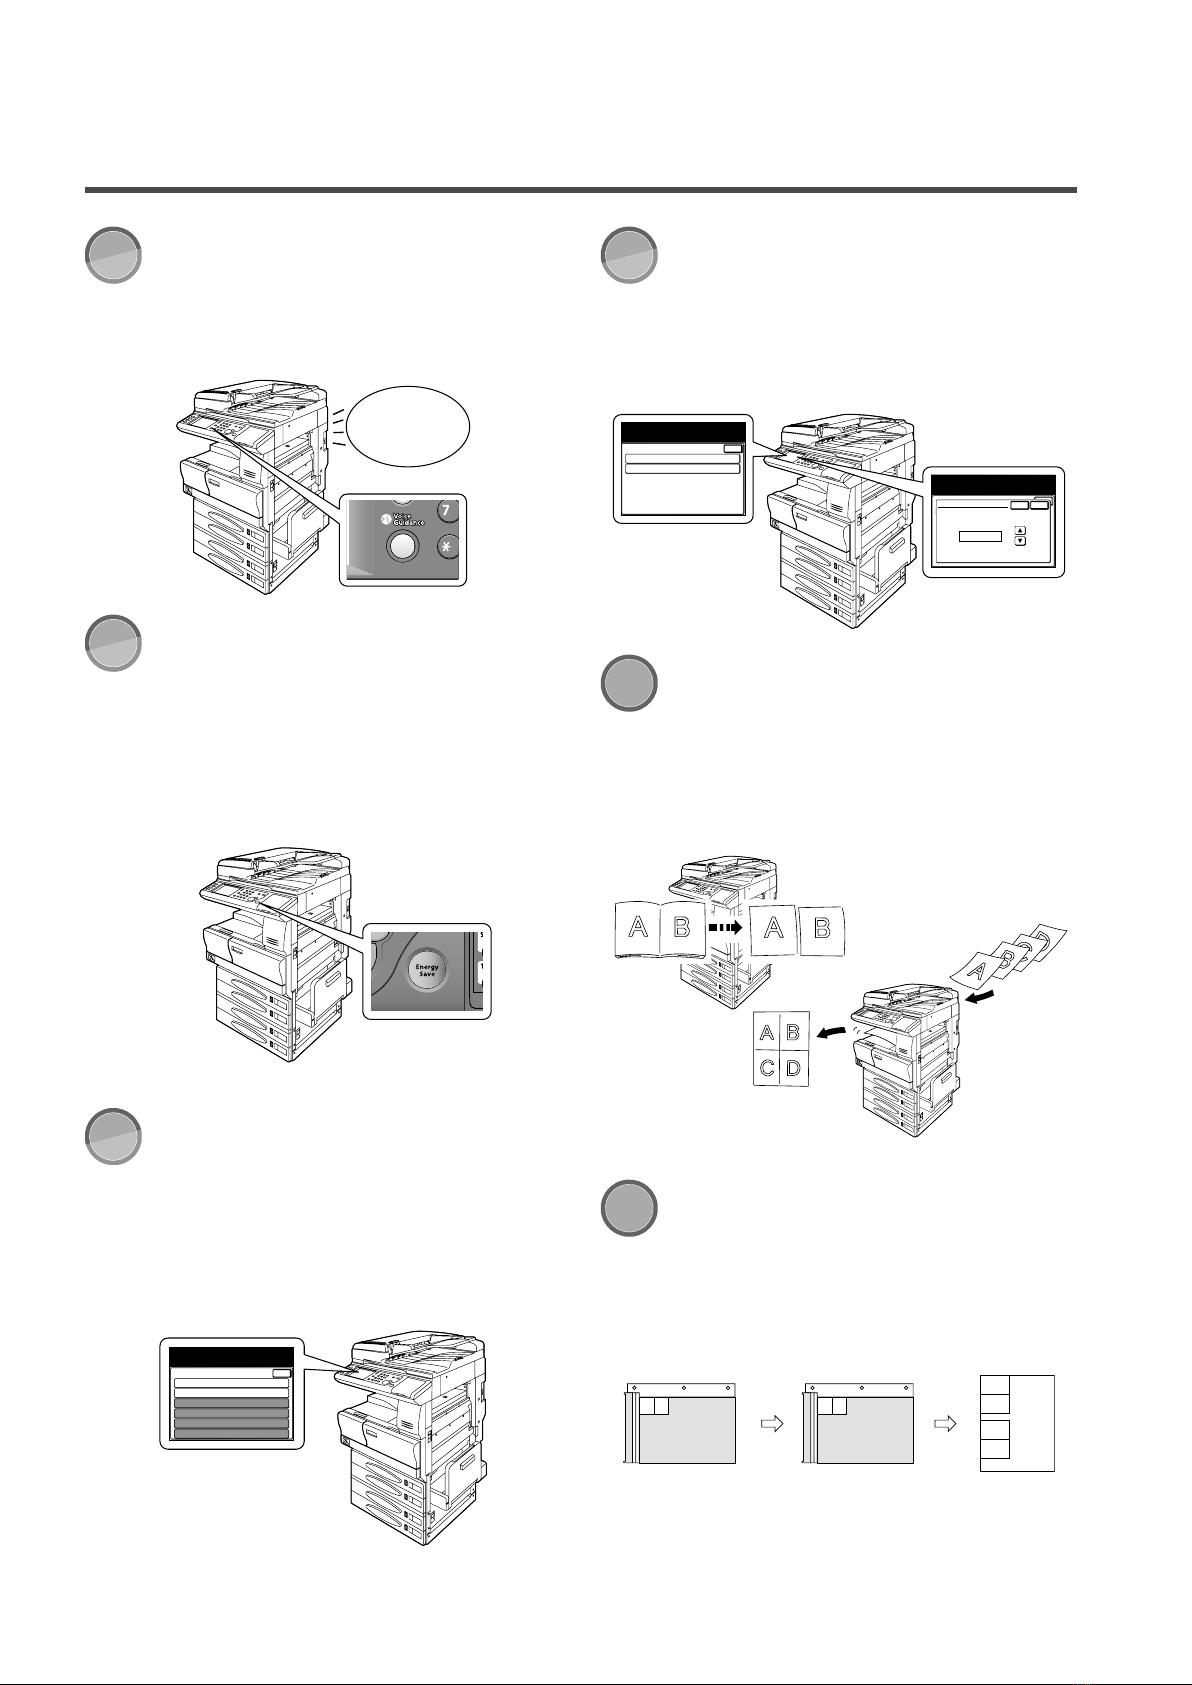
Voice Guidance
When the voice guidance feature is turned on
the machine will guide you through correct
operational procedures and troubleshooting
methods. (see page 1-58 for instruction)
Sleep Mode
Sleep mode assists in reducing energy consumption and lowering overall operating
costs. If the machine is left idle for a predetermined amount of time the machine will
automatically enter sleep mode, reducing operating power to a minimum. (see page 1-25
for instruction)
Department Code
With the MFX-2830 you can easily track usage information by user or department. Track
print, copy, and fax jobs at the departmental
level or at the individual user level. (see page
4-12 for instruction)
Series/N-in-1(Combine)
Reduce paper consumption by combining
multiple documents into a single sheet by using the N-in-1 feature. With series copy, copied book pages can be converted into separate
pages. (see page 2-30, 2-44 for instruction)
Macro Program
Progr amm ing copy jobs can be t edi ous,
especially when you want to customize a job
requiring several steps. If you regularly have
to perform a job that requires multiple steps,
you can program this process into a macro
key, simplifying the process into one step. (see
page 4-2 for instruction)
Card Copy
Need to copy both sid es of a n ID card ,
driver’s license or check? Select the “Card
Copy” mode and quickly copy both sides of a
card or check-sized document onto a single
page. (see page 2-86 for instruction)
Page 4
F A
X
1
2
COPY
F A
X
LTR
LTR
LGL
11x17
DuplexCopy
OFF
Contrast
Auto
Doc.Type
Auto
Zoom
100%
Finishing
No Sort
Others
Memory 100%
Copy Ready
001
Set
F A
X
F A
X
TCR Report
Send
documents
F A
X
F
r
o
m
:
T
o
:
Tx
F A
X
Rx
Main Features
Duplex Scanner
Scan two-sided documents quickly via the
single-pass duplex scanner. As opposed to
competing scanners, the MFX-2830 can scan
and process two-sided documents in one pass,
reducing both time requirements and wear
on moving parts. (see pages 2-67, 3-130 for
instruction)
Soft Keys
Soft K ey s allow you one-touch ac cess to
important features. The soft keys on the
MFX-2830 touch screen are programmable,
meaning you can customize them to your
preferences. (see page 4-10 for instruction)
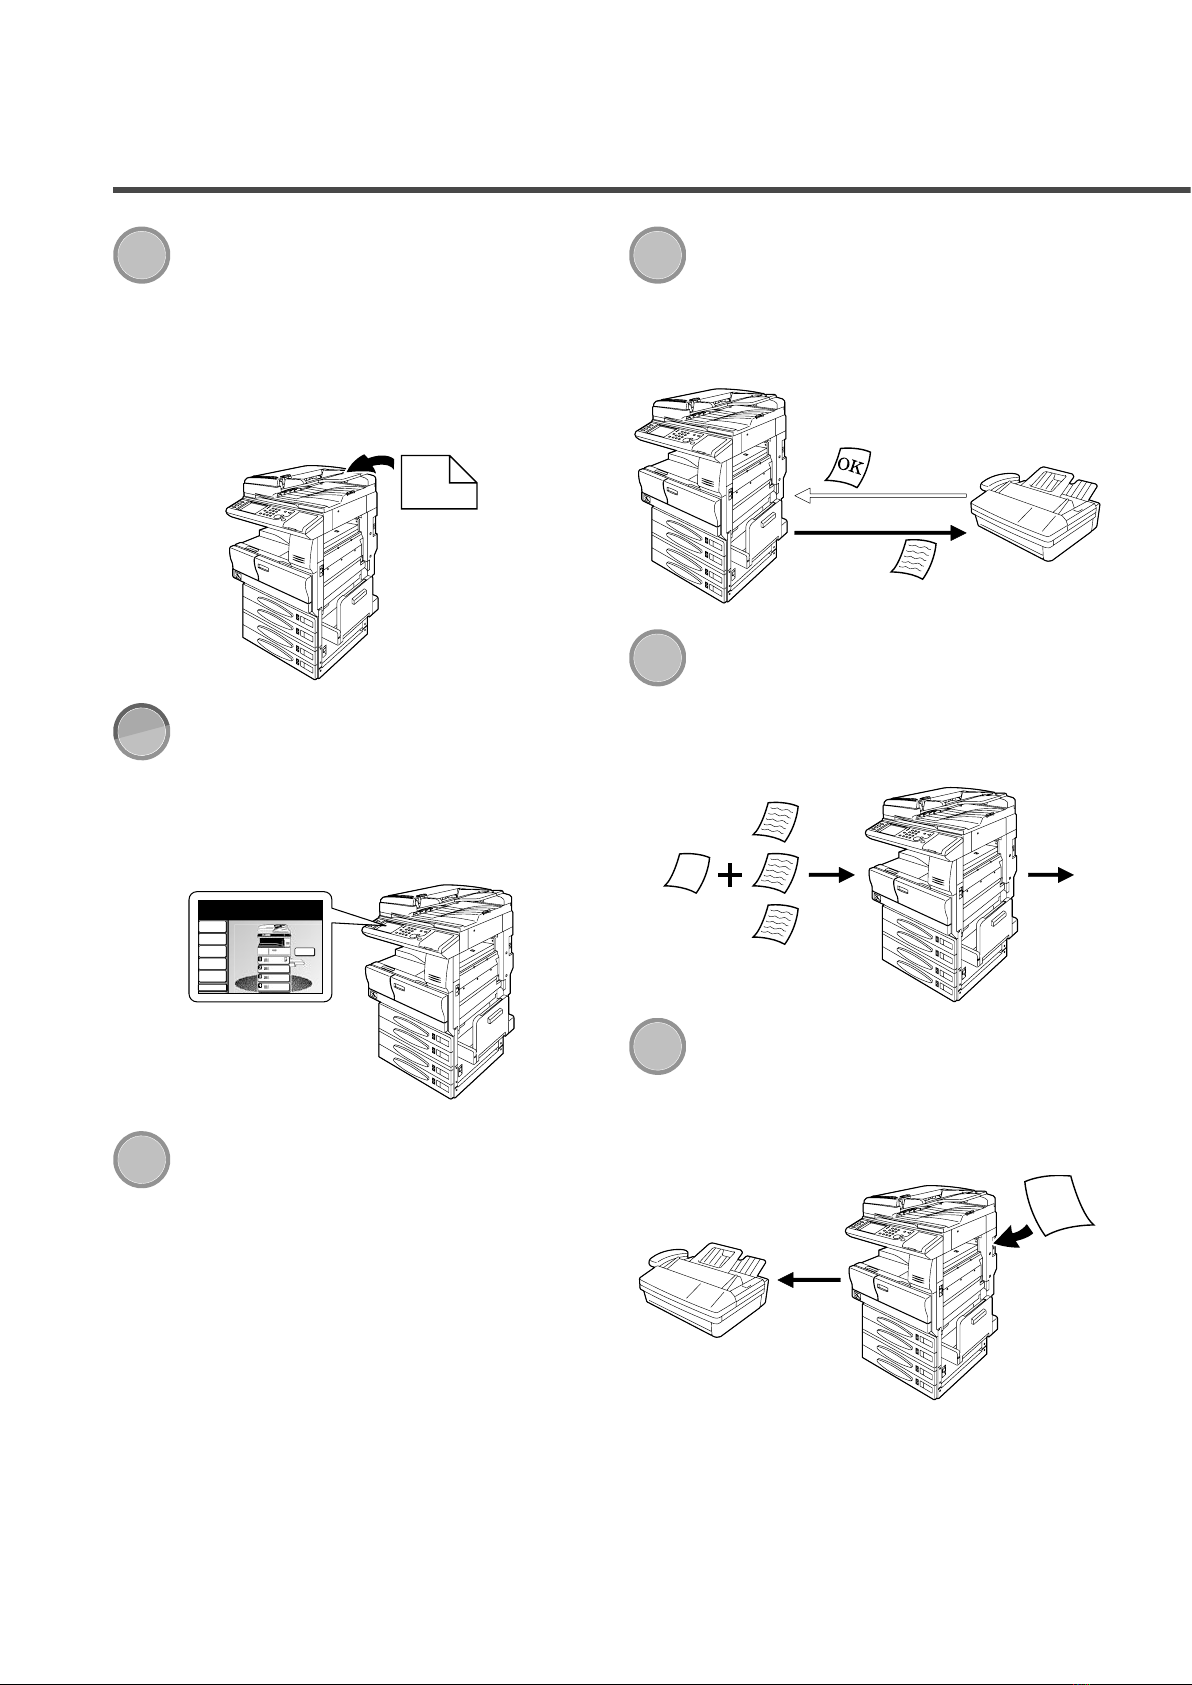
Confirm TCR
Automatically generate a transmission confirmation report to insure that your important fax job successfully reached the remote
machine. (see page 3-150 for instruction)
Cover Page
Quickly add a customized cover page to your
transmission, including text message and
sender’s information. (see page 3-76 for instruction)
Fax Forwarding
Out of the office? Forward incoming fa x
transmissions to any fax location easily by
enabling the MFX-2830’s fax forwarding fea-
Speed Dialing
Users can program up to 500 frequently dialed fax numbers into the speed-dial directory, allowing for easy one-touch transmission
to important contacts. (see page 3-162 for
instruction)
ture. (see page 3-80 for instruction)
Page 5

Main Features
F A
X
1:ABC
2:DEF
3:GHI
4:JKL
5:MNO
Batch Tx
Select the box that will store the
document(s) and select [Enter].
Enter
F A
X
Scan
Print
Menu
Fax Tx
F A
X
Rx
Line Up :OFF
Protect Passcode :****
Copy Protect :OFF
Cost Management
Management
Select item to edit.
Enter
2/3
Depart. Management
SecurityRx :OFF
Batch Transmission
Scan documents into batch transmission
storage boxes and schedule the transmission
time for after hours when the phone rates
are lower. (see page 3-64 for instruction)
QuadAccess
The MFX-2830 boasts a powerful feature
called QuadAccess, found only on Muratec
equipment. This feature allows your machine
to perform a host of functions at once, such as
a fax transmission, printing, scanning documents for transmission and menu programming.
Security Reception
With security reception enabled users can receive fax documents into password protected
storage. This ensures that received jobs are
viewed by authorized users only. (see page
3-88 for instruction)
Useful options
■
OfficeBridge Pro
With the OfficeBridge Pro option activated
your MFX-2830 becomes a cost-effective network printer, high-res scanner, PC fax, Internet fax terminal and scan-to email station.
Staple Finisher
■
Forget the days of manual collation and
stapling. With the staple finisher your documents will be collated, stapled and stacked,
giving your important documents a professional finish.
Page 6
Fax
Copy
1
2
1
2
1
2
1
2
Tx
Rx
PCL6
PS2
601
Useful options
Main Features
Punch Finisher
■
Maximize your document output options
by upgrading to the punch finisher. Quickly
generate professional looking documents for
insertion in binders, folders and other media.
2-Bin Tray
■
No need to sift through a stack of documents
to separate fax and copy jobs. With the 2-Bin
tray installed on the MFX-2830 you can select the output tray that will house your various jobs. (see page 4-32 for instruction)
Paper Cassettes
■
The MFX-2830 can be customized to meet
your output needs. Whether you print thousands of documents per week on letter, or
you need to prin t on va ri ou s media, the
MFX-2830 is flexible enough to match your
printing requirements.
Dual Line Option
■
High-volume faxing is not a problem with
the MFX-2830. By adding a second 33.6 Kbps
modem you can effectively reduce time spent
faxing by sending and receiving faxes simultaneously.
Duplex Printer
■
Reduce paper consumption by converting
one-sided originals into two-sided printouts.
Also, receive your incoming faxes as two-sided printouts for additional savings. (see page
2-67 for instruction)
Printing Possibilities
■
The MFX-2830 comes standard with Windows GDI printing via the USB hub. But if
you require more advanced printing power,
easily upgrade to available PCL5e/6.
Page 7

CONTENTS
Getting Started
This chapter provides an overview of the safety and installation procedures of the MFX-2830,
as well as operating tips for machine set-up.
Getting Started ....................... 1-1
Getting Started ............................................1-2
Regulatory information ............................ 1-2
Limited warranty .....................................1-4
Safety information ....................................1-5
Before using your Muratec machine .......1-7
Symbol and terms (Operating tips) ....... 1-10
Part Names and Functions ........................ 1-12
Equipment configuration .......................1-12
Main unit part names and functions .....1-14
Control panel part names and functions
Touch Screen Display .................................1-20
To change the screen ..............................1-20
Part names and functions ...................... 1-21
Key displays and functions .................... 1-23
Power Switch and ENERGY SAVE ...............1-24
Power switch ........................................... 1-24
ENERGY SAVE and energy save mode ...1-25
Loading Paper ............................................1-26
Acceptable paper sizes ...........................1-26
Unacceptable paper ................................ 1-27
Printing area ........................................... 1-28
Automatic paper supply function ..........1-28
How to load paper ...................................1-29
Loading paper in paper cassette ............1-30
Loading paper into large capacity cassette
Loading paper into bypass tray ............. 1-32
How to load paper into bypass tray by pa-
per type ...................................................1-34
...1-19
.. 1-31
Bypass paper registration ...................... 1-37
How to Load Document .............................1-40
Loadable document sizes .......................1-40
Document scan range .............................1-41
Document precautions ............................ 1-41
How to load document ............................ 1-42
How to Enter Characters ........................... 1-44
Character entry screen ........................... 1-44
Entering alphabet characters ................ 1-45
Entering symbols and special characters
Entering numbers/spaces .......................1-47
Deleting/Inserting characters ................1-48
...1-46
Basic Settings (Setting Mode) ...................1-50
User install .............................................1-51
Setting the language ..............................1-52
Setting the current time ......................... 1-52
Setting the daylight saving time ...........1-53
Setting the communication line .............1-53
Setting the reception mode .................... 1-54
How to select the reception mode .......... 1-55
Setting dial tone detection ..................... 1-56
Setting the sender name ........................ 1-56
Setting the standard TTI ....................... 1-57
Setting the TTI number ......................... 1-57
Voice Guidance ...........................................1-58
VOICE GUIDANCE ............................... 1-58
Voice guidance items ..............................1-59
Operation guidance mode ......................1-59
Voice guidance settings ..........................1-60
Situations when voice guidance is given
... 1-62
Page 8

CONTENTS
Copy
Chapter 1
Basic Copy Features
Chapter 2
Advanced Copy Features
Chapter 3
Advanced Copy Settings
Chapter 1 Basic Copy Features
Before Copying .............................................2-2
Document size automatic detection .........2-2
Document type/contrast setting ............... 2-4
Setting reset .............................................. 2-6
Rotate copy ................................................ 2-6
Memory overflow during copying ............. 2-7
This chapter explains the basic copy features.
This chapter explains the advanced copy features,
such as combined copy and series copy, for convenient
operations.
This chapter explains the copy function settings, such
as changing the initial values of copy scan contrast, or
setting the auto reset time.
... 2-1
2-1 - 2-28
2-29 - 2-92
2-93 - 2-98
Chapter 2 Advanced Copy Features
Combined Copy ..........................................2-30
Repeat Copy ...............................................2-38
Series Copy .................................................2-44
Erasing Document Shadows (Erase Border/
Erase Center) .............................................2-48
Erase border ...........................................2-48
... 2-29
How to Perform Basic Copy .........................2-8
Next document setting ............................. 2-9
Copying using both document glass and ADF
Copy reservation .....................................2-13
Selecting the Paper and Copy ...................2-14
Bypass copy .............................................2-15
Zoom Copy ..................................................2-16
Zoom to match paper size (Automatic mag-
nification) ................................................ 2-16
Zoom by specifying magnification (Set mag-
nification) ................................................ 2-18
Performing zoom copy ............................ 2-20
Finishing .....................................................2-22
Interrupt Copy ...........................................2-24
Checking Copy Print Queue ......................2-26
... 2-12
Erase center ............................................ 2-52
TopUp Copy ................................................2-54
Adding Margin (Margin) ............................2-56
Copying with Different Magnification Ratios
Horizontally and Vertically (XY Zoom) .....2-58
Specifying vertical and horizontal magnifica-
tions separately (XY(%) magnification)
Setting to copy to specified size (XY inch)
Copying with Black and White Areas Re-
versed (Negative/Positive) .........................2-62
Recopying Previous Copy Job (Last Job)
How to perform last job copy .................2-65
Deleting last job document ....................2-66
Duplex Copying ..........................................2-67
Types of duplex copying .........................2-67
How to bind copied documents ..............2-68
One-sided copying of duplex document
...2-58
..2-60
... 2-64
... 2-68
Duplex copying of duplex document ......2-70
Duplex copying of one-sided document
...2-72
Page 9

CONTENTS
Copy
Duplex copying of right and left pages of
facing documents ....................................2-74
Duplex copying of front and back pages of
facing documents ....................................2-76
Making Booklet (Booklet Copy) .................2-78
Binding position and document loading
method ....................................................2-78
For left binding/right binding ................ 2-79
For top binding .......................................2-81
Changing paper ......................................2-83
Changing magnification .........................2-84
When setting image layout .................... 2-85
Card Copy ...................................................2-86
Function Combination List ........................2-88
Display for advanced copy function that
cannot be combined ................................ 2-90
Canceling one of combined advanced copy
Chapter 3 Advanced Copy Settings
Copy Functions Settings ............................2-94
Sample copy function settings ............... 2-94
Default settings list ................................ 2-96
Other settings list ...................................2-97
Printing copy settings list ...................... 2-97
... 2-93
functions .................................................. 2-90
Page 10

CONTENTS
Fax
Chapter 1
Basic Fax Features
Chapter 2
Advanced Fax Features
Chapter 3
Communication Management
Chapter 4
Fax Settings
Chapter 1 Basic Fax Features
This chapter explains basic fax features, including
sending and receiving faxes, and how to use the phone.
This chapter explains advanced fax features, such as
broadcast transmission or delayed transmission, for
convenient operations.
T h i s c h a p ter e x p l a i n s the m a n a gem e n t o f
communication conditions or communication by users.
This chapter explains how to enter speed-dials and
other operational functions.
... 3-1
Before Transmitting .....................................3-2
Automatic document size detection ......... 3-2
When automatic document size detection
cannot be done .......................................... 3-2
Setting the TTI ......................................... 3-3
Transmission resolution/contrast setting
Transmission method settings (Memory
transmission/Real-time transmission) ....3-5
Quick memory transmission .................... 3-6
Dialing symbols ........................................3-6
Overseas setting ....................................... 3-7
... 3-4
Transmitting Faxes ......................................3-8
How to perform basic transmission ......... 3-8
Transmitting using one-touch key ......... 3-10
Transmitting using speed-dial ...............3-10
Transmitting using address book ..........3-12
Redialing .................................................3-18
Memory overflow ....................................3-20
Transmitting manually .......................... 3-21
Changing Document Scan in Mid Scan (Mixed
Transmission) ............................................. 3-24
ADF → Document glass .........................3-24
Document glass → ADF .........................3-26
Canceling/Checking the Communication Document
FAX CANCEL/JOB CONFIRM. .................. 3-28
Canceling/Reviewing Communication docu-
ment ........................................................3-28
Canceling/Checking broadcast transmission
...3-28
3-1 - 3-56
3-57 - 3-148
3-149 - 3-160
3-161 - 3-200
by location ...............................................3-30
Displaying the communication history and
printing the communication results ......3-33
Printing the command list ..................... 3-36
Printing command documents ...............3-38
Receiving Faxes ..........................................3-40
Auto receiving mainly for fax (Fax ready mode)
Receiving a phone call with priority given
to fax (Fax/Tel ready mode) .................... 3-41
Auto receiving with priority given to the
phone (Tel/Fax ready mode) ................... 3-42
Using both the answering machine and fax
(Ans/Fax ready mode) ............................. 3-44
Primarily using the phone (Tel ready mode)
Operations during Reception .....................3-48
Display during reception ........................3-48
Out-of-paper reception ...........................3-48
Recording ....................................................3-50
Effective record area ..............................3-50
Reduction margin ................................... 3-50
Page division ........................................... 3-51
Half-page reception ................................3-51
Rotated reception ...................................3-51
Recording list .......................................... 3-52
Paper size priority .................................. 3-53
Making Phone Call ....................................3-54
How to make a phone call ...................... 3-54
How to receive a phone call .................... 3-56
Adjusting volume ....................................3-56
... 3-40
...3-46
Page 11

CONTENTS
Fax
Chapter 2 Advanced Fax Features
Transmitting Fax to Multiple Recipients (Broadcast)
Performing broadcast transmissions .....3-58
Reviewing and deleting selected locations
Using groups (Group transmission) ......3-61
... 3-57
...3-58
... 3-60
Specif ying Transmi ssion Time (Del aye d
Transmission) ............................................. 3-62
Bundling Faxes & Sending to the Same Loca-
tion (Batch Transmission) .........................3-64
Registering batch transmission boxes ...3-64
Printing the batch transmission box list
Deleting batch transmission boxes ........3-68
Sending batch transmissions ................. 3-70
Printing and deleting documents stored in the
memory of batch transmission boxes
Printing out the batch transmission docu-
ment list .................................................. 3-74
...3-67
.......3-71
Sending Cover Page with Documents .......3-76
Entering messages .................................3-76
Printing the cover page .......................... 3-77
Cover page settings ................................3-79
Forwarding Received Documents ..............3-80
Entering forwarding conditions ............. 3-80
Deleting forwarding conditions .............. 3-84
Printing a list of forwarding conditions
Fax forwarding settings .........................3-87
...3-85
Preventing Received Documents from Being
Read by Others (Security Reception) ........ 3-88
Security reception settings ....................3-88
Printing out security reception documents
...3-90
Polling Communications ............................ 3-92
Polling document storage ....................... 3-92
Deleting polling documents storage
Printing out scheduled polling documents
Polling .....................................................3-96
....... 3-94
...3-95
Performing F-Code Communications ........ 3-98
What are F-code transmissions? ............3-98
Sub-addresses and passwords ...............3-98
Functions used with F-code communications
Registering F-code boxes ......................3-100
Registering F-code security boxes .......3-102
Registering F-code bulletin boxes ........3-105
Registering F-code relay boxes ............3-109
Deleting F-code boxes ...........................3-113
Printing F-code box list ........................ 3-114
Transmissions using sub-addresses (F-code
transmission) ........................................ 3-116
Reception using sub-addresses (F-code poll-
ing) ........................................................3-118
Storing documents in bulletin boxes ... 3-120
Printing stored documents ...................3-122
Deleting stored documents ................... 3-124
Printing a stored document list ........... 3-126
...3-99
Page 12

CONTENTS
Fax
Faxing and Copying the Same Document at
Once (Fax&Copy) .....................................3-128
Scanning and Sending Duplex Documents
Loading the document and printing out at
the destination ...................................... 3-130
Sending duplex documents ..................3-130
Enlarging and Sending Documents (Enlarge
Transmission) ........................................... 3-132
Sending One Section of Document (Scan Size)
OneLine + Distinctive Ring Detection (DRD)
Ring pattern ..........................................3-136
DRD settings ......................................... 3-137
Using Alternative Phone Network Service
Providers ...................................................3-139
Registering dial prefixes ......................3-139
Using dial prefixes to send faxes ......... 3-140
Using dial prefix to make a phone call
...3-130
... 3-134
...3-136
... 3-141
Chapter 3 Communication Management
Managing Communications .....................3-150
Printing journal report .........................3-150
Printing journal report automatically . 3-152
How to read journal report ..................3-153
Transmission confirmation report setting
Issuing a one-off transmission confirmation
report .....................................................3-155
Blocking Junk Faxes ................................3-156
Set block junk faxes ..............................3-156
Deleting registered number .................3-159
Printing block junk list ........................3-160
... 3-149
...3-154
Masking the PIN ......................................3-142
What is PIN masking? .........................3-142
Setting PIN mask ................................. 3-143
Entering speed-dials (Mode 1) ............. 3-144
Entering program one-touch keys (Mode 1)
Dialing while using the PIN mask ......3-146
Performing batch transmission while using
the PIN mask ........................................ 3-148
... 3-145
Page 13

CONTENTS
Fax
Chapter 4 Fax Settings ....... 3-161
Entering/Editing Speed-Dial ................... 3-162
Entering/Editing ...................................3-162
Entering method 1: Entering directly into
unregistered speed-dials ...................... 3-166
Entering method 2: Enter the number us-
ing the numeric keypad ........................ 3-167
Deleting speed-dial ............................... 3-168
Inserting a new contact in the speed-dial
number list ............................................3-169
Deleting speed-dials and moving up the
numbers ................................................3-171
Printing speed-dial list .........................3-172
Registering Program One-Touch .............3-174
Entering/Editing ...................................3-174
Entering delayed transmission ............3-176
Entering Group Names ............................3-188
Printing group list ................................ 3-190
Transmission Default Settings ................3-192
Setting example .................................... 3-192
Transmission default settings list .......3-193
Other Settings ..........................................3-194
Setting example .................................... 3-194
Other settings list .................................3-196
Printing Fax Settings List .......................3-198
Entering polling reception ...................3-177
Entering F-code transmission .............. 3-178
Entering F-code polling ........................ 3-180
Deleting program one-touch ................3-182
Printing program one-touch list ..........3-184
How to use program one-touch ............ 3-186
Page 14

CONTENTS
Common Settings
for Copy and Fax
This chapter explains the common features for copy and fax, such as macro functions and
department management.
Function Settings .................... 4-1
Macros ..........................................................4-2
Setting up macros .....................................4-2
Changing titles of macro keys .................. 4-5
Deleting macros ........................................ 4-6
Printing macro key list ............................. 4-7
Executing macros .....................................4-8
Setting running speed for macro keys .....4-9
Changing Soft Keys ...................................4-10
Managing Operating Conditions by Department
Register copy charge (Cost management)
Register department numbers and names
Deleting department numbers and names
Department management settings ........ 4-17
Faxing and copying using department man-
agement function .................................... 4-18
...4-12
... 4-12
...4-14
... 4-16
Checking Number of Printed Pages ..........4-26
Checking number of printed pages using
the touch screen ......................................4-26
Paper Settings ............................................4-28
Sample settings ......................................4-28
List of paper settings ..............................4-31
Device Management Settings ....................4-33
Sample settings ......................................4-33
Device management setting list ............4-35
Printing device management list ........... 4-38
Printing function list .............................. 4-40
Printing department list ........................ 4-20
Deleting accumulated data .................... 4-22
Protecting department management settings
Printing List of Documents Stored in Memory
...4-23
... 4-24
Page 15

CONTENTS
In This Case...
This chapter explains the troubleshooting methods for paper jams, error messages and
mechanical problems for your machine.
Maintenance and Troubleshooting
Paper Jams ...................................................5-2
If paper jam occurs in the fusing area ..... 5-3
If paper jam occurs in the duplex unit ....5-7
If paper jam occurs in the bypass tray .... 5-8
If paper jam occurs in the paper cassettes
(cassette 1 and cassette 2) ........................5-9
If paper jam occurs in the paper cassettes
(cassette 3 and cassette 4) ......................5-10
If paper jam occurs in the large capacity
cassette ....................................................5-11
Document Jams .......................................... 5-12
Replacing Drum Cartridge/Toner Bottle
Drum cartridge/Toner bottle ..................5-14
Replacing toner bottle ............................ 5-15
Replacing drum cartridge ......................5-17
... 5-1
...5-14
Error Message ............................................5-24
If the alarm sounds ................................5-24
Error code ...............................................5-25
Displayed messages ................................5-27
When Power Failure Occurs ...................... 5-34
Main unit operation ...............................5-34
Memory backups ..................................... 5-34
Documents erased notification ............... 5-35
Troubleshooting .........................................5-36
Unit does not operate ............................. 5-36
The machine does not transmit ............. 5-37
The machine does not receive ................ 5-38
Image quality problems .........................5-39
Maintenance ...............................................5-19
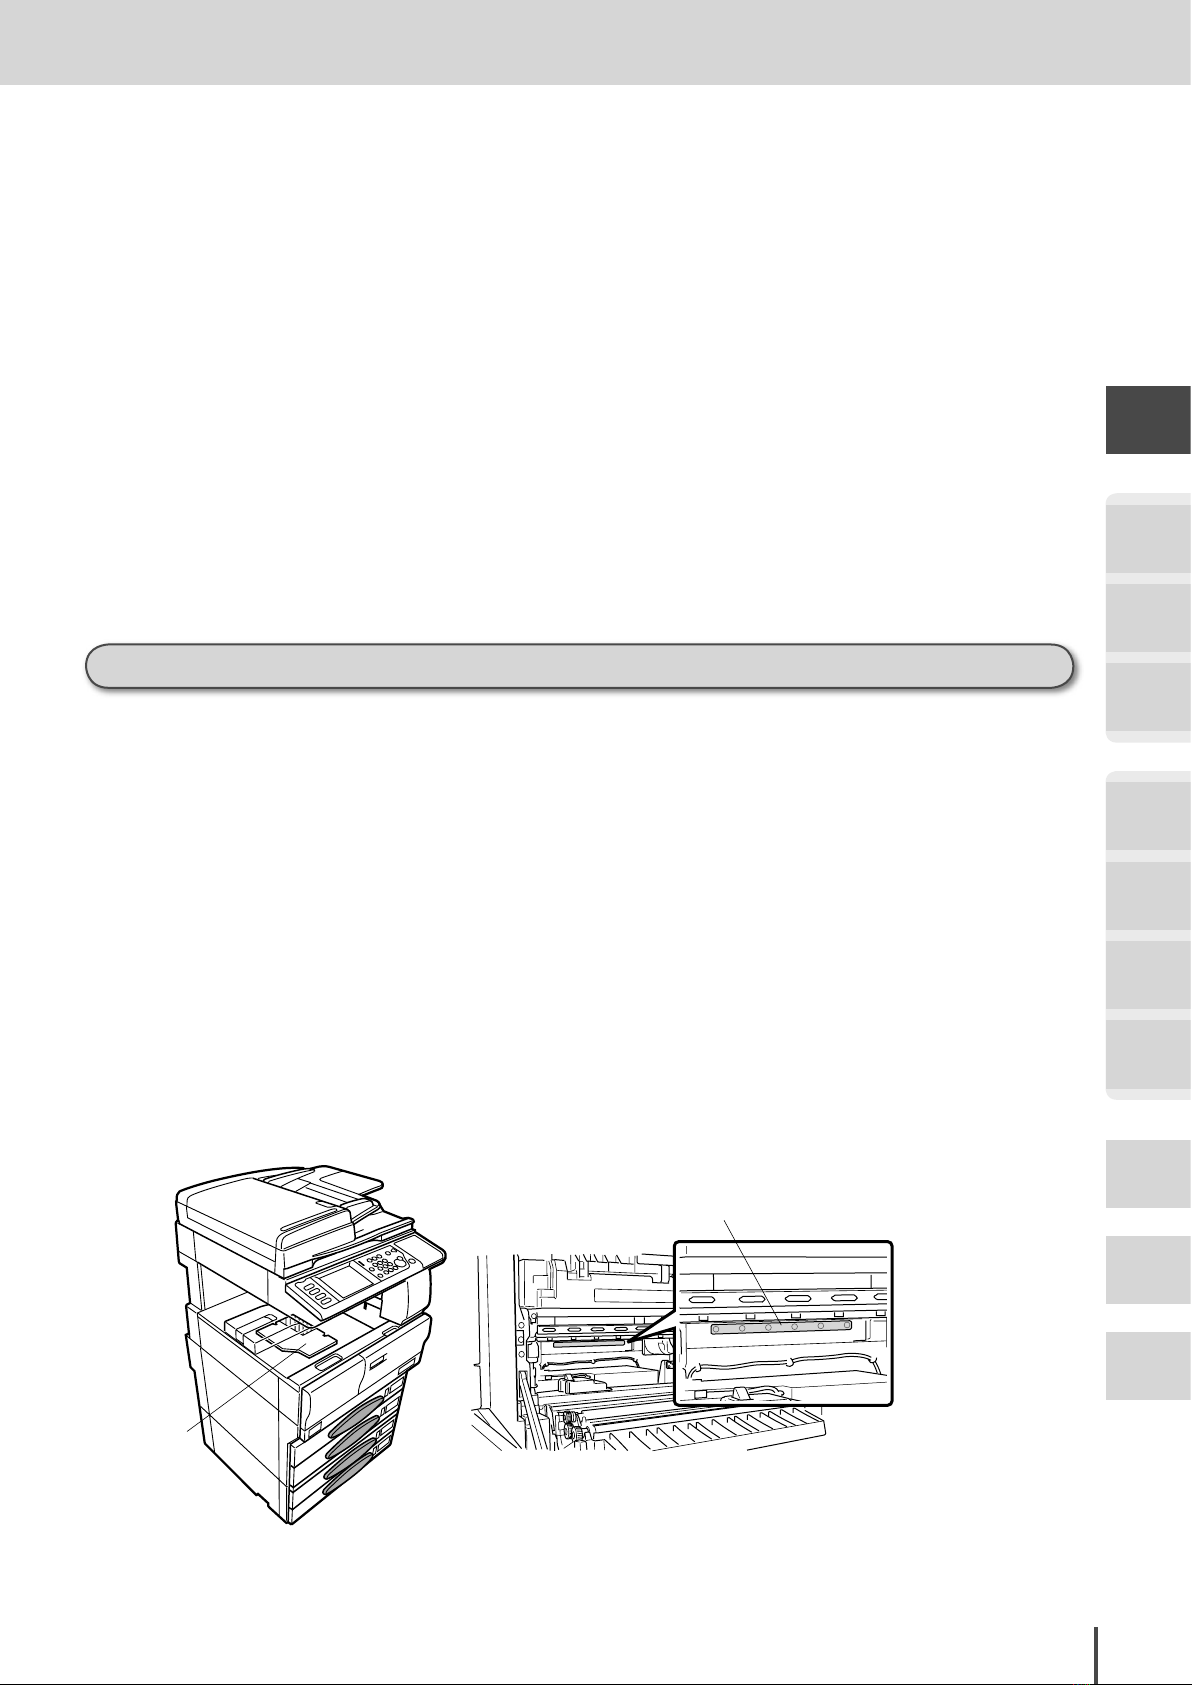
Clean outside of the unit ........................ 5-19
Cleaning ADF glass/Document glass .....5-20
Cleaning platen cover .............................5-22
Cleaning document feeder roller ...........5-23
Page 16

CONTENTS
Appendix
This chapter describes the specifications of the machine and the index.
Appendix ....................................a1
Main Specifications ....................................... a2
Main unit ...................................................a2
Option-related ............................................ a3
Index .............................................................. a6
Page 17

How to read this manual
FAX
Chapter2
Preventing Received Documents from
Being Read by Others
(Security Reception)
Security reception settings
Default: OFF
This enables all documents received after the security reception start time to be stored in
memory without being printed out. This function is useful to store all documents received in
memory at night, for example, when there is no one in the offi ce. You can then print out received faxes later.
�Set the protect passcode in advance. (see page 4-36)
�When the protect passcode is deactivated, security reception is also deactivated.
�When security reception is set to ON, it will start at the specifi ed time every day.
� If any documents are received during security reception, “Security Rx document exists” is displayed and
the Memory Receive lamp illuminates. Once a document is printe d out,
the machine automatically re-
turns to normal reception.
Operating tips
1
Press SETTING.
Enter
Speed Dial
Copy
Functions
User
Install
Group Name
Store Doc
Settings
Management
Scanner
Settings
Settings
Paper
Settings
Fax
Functions
Counter
Select item to edit.
2
Press [Management].
FAX
Chapter1
FAX Chapter1 � Basic Fax Features
3-40
Receiving Faxes
Auto receiving mainly for fax (Fax ready mode)
� Use t he Reception Mode at the User Install setting to set the machine to Fax Ready Mode. (see page
1-54)
�The handset is an optional component. (see page 1-13)
�The machine can be set to ring even if a handset is not installed. (see page 4-35)
Operating tips
1
Your machine rings.
2
Fax reception will begin.
You can pick up the handse t w hil e the ma chin e
is ringing to ta lk on th
e
phone.
Note
· To ma ke the ma chin e
ring, you ne ed to make
th e s ett in gs f or the
handset o r the fax ringer on the machine. ( see
page 4-35)
· The number of rings can
be changed from 1 to 10.
(see page 3-196)
Reference
To change the number of rings...
The number of rings can be set from 1 to 10. You can make it easier to answer the phone by increasing the number of
rings to extend the time until the fax answers the phone.
For the details of setting method, refer to page 3-196.
In this case
Title
Operating tips
Explains the items you
s h o u ld kno w b e f o r e
operation.
Section
Operating steps
F o l l o w t h e s t e p s in
numerical order.
Keys on control panel
Touch screen display
Note
Describes the additional
operating notes for each
step.
Reference
D e s c r ib e s t he p a g e
number referred to for
each function.
In this case
Des cri bes the us efu l
inf orm ati on fo r eac h
function.
Page 18

Page 19

Getting Started ...............................................1-2
Regulatory information ................................1-2
Limited warranty .........................................1-4
Safety information ........................................1-5
Before using your Muratec machine ...........1-7
Symbol and terms (Operating tips) ...........1-10
Part Names and Functions ........................... 1-12
Equipment configuration ...........................1-12
Main unit part names and functions .........1-14
Control panel part names and functions ...1-19
Touch Screen Display .................................... 1-20
To change the screen ..................................1-20
Part names and functions ..........................1-21
Key displays and functions ........................1-23
Power Switch and ENERGY SAVE .................. 1-24
Power switch ...............................................1-24
ENERGY SAVE and energy save mode .......1-25
Loading Paper ............................................... 1-26
Acceptable paper sizes ...............................1-26
Unacceptable paper ....................................1-27
Printing area ...............................................1-28
Automatic paper supply function ..............1-28
How to load paper .......................................1-29
Loading paper in paper cassette ................1-30
Loading paper into large capacity cassette
Loading paper into bypass tray .................1-32
How to load paper into bypass tray by paper type
Bypass paper registration ..........................1-37
..1-31
...1-34
How to Load Document ................................ 1-40
Loadable document sizes ...........................1-40
Document scan range .................................1-41
Document precautions ................................1-41
How to load document ................................1-42
How to Enter Characters .............................. 1-44
Character entry screen ...............................1-44
Entering alphabet characters ....................1-45
Entering symbols and special characters
Entering numbers/spaces ...........................1-47
Deleting/Inserting characters ....................1-48
...1-46
Basic Settings (Setting Mode) ...................... 1-50
User install .................................................1-51
Setting the language ..................................1-52
Setting the current time .............................1-52
Setting the daylight saving time ...............1-53
Setting the communication line .................1-53
Setting the reception mode ........................1-54
How to select the reception mode ..............1-55
Setting dial tone detection .........................1-56
Setting the sender name ............................1-56
Setting the standard TTI ...........................1-57
Setting the TTI number .............................1-57
Voice Guidance .............................................. 1-58
VOICE GUIDANCE ...................................1-58
Voice guidance items ..................................1-59
Operation guidance mode ..........................1-59
Voice guidance settings ..............................1-60
Situations when voice guidance is given ...1-62
Getting
Started
Getting
Started
COPY
Chapter1
COPY
Chapter2
COPY
Chapter3
FAX
Chapter1
FAX
Chapter2
FAX
Chapter3
FAX
Chapter4
Common
Settings
In This
Case...
Appendix
Page 20

Getting
Started
Getting Started
Regulatory information
Customer information
United States of America
This equipment complies with Part 68 of FCC rules and the requirements adopted by the ACTA. On the rear
panel of this equipment is a label that contains, among other information, a product identifier in the format US:
DKUFA02B001J. If required, this number must be provided to the phone company.
The REN is used to determine the number of devices that may be connected to a phone line. Excessive RENs on
a phone line may result in the devices not ringing in response to an incoming call. In most but not all areas, the
sum of RENs should not exceed five (5.0). To be certain of the number of devices that may be connected to a line,
as determined by the total RENs, contact the local phone company. The REN for this product is part of the product identifier that has the format US:DKUFA02B001J. The digits represented by 02 are the REN without a decimal point.
Your fax is designed for use on standard-device phone lines. The fax connects to the phone line with a standard
line called the USOC RJ-11C.
A plug and jack used to connect this equipment to the premises wiring and phone network must comply with the
applicable FCC Part 68 rules and requirements adopted by the ACTA. A compliant phone cord and modular plug
is provided with this product. It is designed to be connected to a compatible modular jack that is also compliant.
See installation instructions for details.
If this equipment MFX-2830 causes harm to the phone network, the phone company will notify you in advance
that temporary discontinuance of service may be required. But if advance notice isn’t practical, the phone company will notify the customer as soon as possible. Also, you will be advised of your right to file a complaint with
the FCC if you believe it is necessary.
The phone company may make changes in its facilities, equipment, operations or procedures that could affect the
operation of the equipment. If this happens the phone company will provide advance notice in order for you to
make necessary modifications to maintain uninterrupted service.
1-2
If trouble is experienced with this equipment MFX-2830, see operating instructions for details. For further repair
or warranty information, please contact Muratec Customer Support Center at 800-347-3296 (from the U.S. only).
If the equipment is causing harm to the phone network, the phone company may request that you disconnect the
equipment until the problem is resolved.
Connection to party line service is subject to state tariffs. Contact the state public utility commission, public service commission or corporation commission for information.
If your home has specially wired alarm equipment connected to the phone line, ensure the installation of this
MFX-2830 does not disable your alarm equipment. If you have questions about what will disable alarm equipment, consult your phone company or a qualified installer.
Getting Started
Page 21

This equipment is hearing aid compatible.
Getting Started
When programming emergency numbers and/or making test calls to emergency numbers:
1) Remain on the line and briefly explain to the dispatcher the reason for the call.
2) Perform such activities in the off-peak hours, such as early morning or late evenings.
To protect your product against power surges, we recommend the use of a power protection device. (Surge arrestor)
The Phone Consumer Protection Act of 1991 makes it unlawful for any person to use a computer or other electronic device, including FAX machines, to send any message unless such message clearly contains in a margin at
the top or bottom of each transmitted page or on the first page of the transmission, the date and time it is sent
and an identification of the business or other entity, or other individual sending the message and the phone number of the sending machine or such business, other entity, or individual. (The phone number provided may not be
a 900 number or any other number for which charges exceed local or long-distance transmission charges.)
In order to program this information into your FAX machine, you should complete the following steps: For in-
structions on programing this information (the “TTI”) into your fax machine, see page 1-56.
FCC Part 15
This equipment has been tested and found to comply with the limits for a Class A digital devices, pursuant to
Part 15 of the FCC Rules. These limits are designed to provide reasonable protection against harmful interference when the equipment is operated in a commercial environment. This equipment generates, uses, and can radiate radio frequency energy and, if not installed and used in accordance with the instruction manual, may cause
harmful interference to radio communications. Operation of this equipment in a residential area is likely to
cause harmful interference in which case the user will be required to correct the interference at his own expense.
Getting
Started
COPY
Chapter1
COPY
Chapter2
COPY
Chapter3
FAX
Chapter1
FAX
Chapter2
FAX
Chapter3
FAX
Chapter4
Canada
NOTICE: This equipment meets the applicable Industry Canada Terminal Equipment Technical Specifications.
NOTICE: The Ringer Equivalence Number (REN) for this terminal equipment is 02. The REN assigned to each
terminal equipment provides an indication of the maximum number of terminals allowed to be connected to a
phone interface. The termination on an interface may consist of any combination of devices subject only to the
requirement that the sum of the Ringer Equivalence Numbers of all the devices does not exceed five.
Canadian ICES-003
This Class A digital apparatus complies with Canadian ICES-003.
Cet appareil numérique de la classe A est conformeá la norme NMB-003 du Canada.
Getting Started
Common
Settings
In This
Case...
Appendix
1-3
Page 22

Getting
Started
Limited warranty
This warranty is made by Muratec America, Inc. (hereafter referred to as “Muratec”). This warranty is valid only
on Muratec products purchased and used in the United States of America. This warranty applies to the product
only while owned and used by the original purchaser (“Customer”). If ownership of the product is transferred,
this warranty terminates. This warranty does not apply to any product in use for rental purposes.
This Muratec product is warranted against defects in material and workmanship for ninety (90) days commencing the date of original Customer purchase. If the product is defective in material and/or workmanship (normal
wear and tear excepted) during the warranty period, Muratec or its authorized representative will, during Muratec’s established service availability hours, make necessary adjustments and repairs, including, at Muratec’
s option, installation of replacement parts. Muratec’s service availability hours are 8:30 AM to 5:00 PM (Central
time) Monday through Friday, excluding Muratec-recognized holidays. Muratec will complete the necessary adjustments and repairs within a reasonable time period, as dictated by the nature of the problem and by Muratec’
s service schedule. Replacement parts may have been used and/or reconditioned. Parts that have been replaced
will remain the property of Muratec. This warranty is subject to the OBLIGATIONS and EXCLUSIONS set
forth.
Obligations
1. This warranty will be honored only on presentation of the original dated authorized Muratec bill of sale or
Muratec dealer bill of sale or sales slip to an authorized Muratec service representative or service center. For
the name of your authorized service center, contact Muratec (from the United States, call 1-469-429-3350; from
Canada, check your in-box materials for the number to call).
2. During the warranty period, the Customer must notify Muratec by phone of any defective product material
and/or workmanship.
3. Transportation (including prepayment of freight and insurance charges) of the product to and from an authorized service center, designated by Muratec, is the responsibility of the Customer.
4. If Muratec provides maintenance or responds to a call which is outside the scope of this warranty, such maintenance shall be billed to the Customer at Muratec’s then-current rates for maintenance and parts and shall
be due and payable in full upon receipt of invoice.
Exclusions
1. This warranty shall not cover a product with missing or altered original identification marks.
2. This warranty applies only to products that the purchaser has properly installed, adjusted and operated in accordance with the instructions set forth in or provided with product literature. This warranty does not apply to
any product which has been subjected to tampering, alteration, misuse, abuse, neglect, improper installation
or transportation damage. Nor does it apply to costs for any service requested for demonstration or to confirm
proper operation of this product.
3. The warranty shall not apply to adjustments, repairs or replacements necessitated by any cause beyond the
control of Muratec (whether foreseeable or not) including, but not limited to, any malfunction, defects or failure caused by or resulting from any of the following: improper unpacking or installation, unauthorized service
or parts, or improper maintenance or cleaning, modification or repair by the Customer, accident (including,
without limitation, unavoidable accidents), fire, flood or other Acts of God, improper phone or electrical power
or surges thereof, interconnection with or use of non-compatible equipment or supplies (including paper), or
placement of the product in an area which does not conform to Muratec space, electrical and/or environmental
requirements.
4. Muratec will not be required to make adjustments, repairs or replacements if the product is installed or used
at a location deemed by Muratec to be hazardous to health or safety, or if Muratec is not provided with free
and reasonable access to the product and a phone during service availability hours, or if the product location is
not accessible by an authorized Muratec service vehicle.
1-4
Getting Started
Page 23
Getting Started
EXCEPT AS EXPRESSLY SET FORTH ABOVE, AND EXCEPT TO THE EXTENT PROHIBITED BY APPLICABLE LAW, MURATEC MAKES NO OTHER WARRANTIES, EXPRESS OR IMPLIED (INCLUDING, BUT
NOT LIMITED TO, ANY IMPLIED WARRANTIES OF MERCHANTABILITY OR FITNESS FOR A PARTICULAR PURPOSE, AND ANY WARRANTY ARISING FROM COURSE OF DEALING OR USAGE OF TRADE),
AND MURATEC EXPRESSLY DISCLAIMS ALL WARRANTIES NOT STATED HEREIN. IN THE EVENT THE
PRODUCT IS NOT FREE FROM DEFECTS AS WARRANTED ABOVE, THE CUSTOMER ’S SOLE REMEDY
SHALL BE REPAIR OR REPLACEMENT AS PROVIDED ABOVE. UNDER NO CIRCUMSTANCES SHALL
MURATEC BE LIABLE TO THE CUSTOMER, OR TO ANY USER, FOR ANY DAMAGES, INCLUDING ANY
INCIDENTAL OR CONSEQUENTIAL DAMAGES, EXPENSES, LOST PROFITS, LOST SAVINGS OR ANY
OTHER DAMAGES ARISING OUT OF THE USE OR INABILITY TO USE THE MURATEC PRODUCT, EVEN
IF MURATEC OR ITS REPRESENTATIVES HAVE BEEN ADVISED OF THE POSSIBILITY OF SUCH DAMAGES.
Some States do not allow the exclusion or limitation of incidental or consequential damages, and some States do
not allow limitations on how long an implied warranty lasts, so the above limitations or exclusions may not apply
to you. This warranty gives you specific legal rights, and you may also have other rights which vary from State to
State.
Getting
Started
COPY
Chapter1
COPY
Chapter2
Safety information
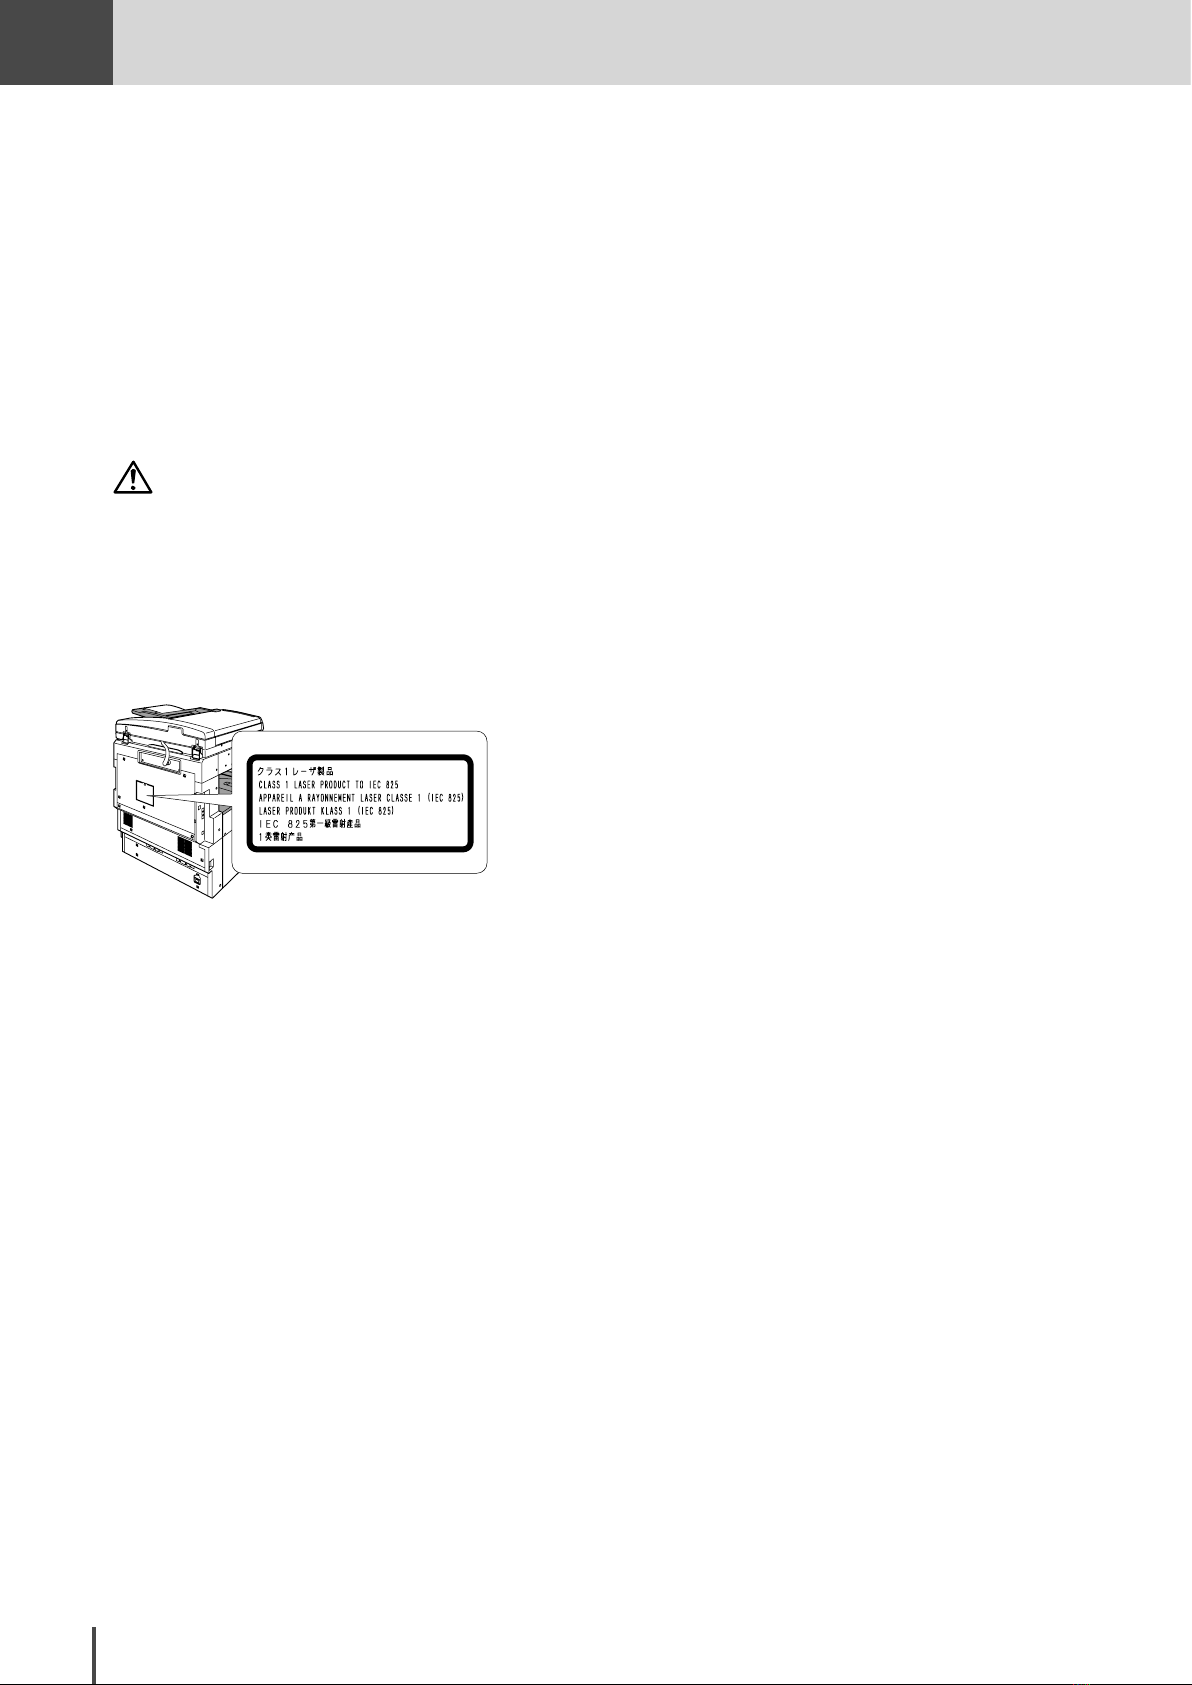
Laser Safety
This is a digital machine which operates by means of a laser. There is no possibility of danger from the laser, provided the machine is operated according to the instructions in this manual.
Since radiation emitted by the laser is completely confined within protective housing, the laser beam cannot escape from the machine during any phase of user operation.
This machine is certified as a Class 1 laser product. This means the machine does not produce hazardous laser
radiation.
Internal Laser Radiation
Maximum Average Radiant Power: 25.3 (µW) at the laser aperture of the print head unit.
Wavelength: 770-795 nm
This product employs a Class IIIb Laser Diode that emits an invisible laser beam. The Laser Diode and Scanning
Polygon Mirror are incorporated in the print head unit.
The print head unit is NOT A FIELD SERVICE ITEM.
Therefore, the print head unit should not be opened under any circumstances.
Laser aperture of the print
head unit
COPY
Chapter3
FAX
Chapter1
FAX
Chapter2
FAX
Chapter3
FAX
Chapter4
Common
Settings
Print head
This figure shows the view inside the right
door with the imaging unit removed.
Getting Started
In This
Case...
Appendix
1-5
Page 24
Getting
Laser safety label
Started
For the United States
CDRH regulation
This machine is certified as a Class 1 Laser product under the Radiation Performance Standard according to the
Food, Drug and Cosmetic Act of 1990.
Compliance is mandatory for Laser products marketed in the United States and is reported to the Center for
Devices and Radiological Health (CDRH) of the U.S. Food and Drug Administration of the U. S. Department of
Health and Human Services (DHHS). This means that the device does not produce hazardous laser radiation.
The label shown below indicates compliance with the CDRH regulations and must be attached to laser products
marketed in the United States.
CAUTION
Use of controls, adjustments or performance of procedures other than those specified in this manual may result in hazardous
radiation exposure.
This is a semiconductor laser. The maximum power of the laser diode is 5mW and the wavelength is 770-795nm.
Laser Safety Label
A laser safety label is attached to the outside of the machine as shown below.
1-6
Getting Started
Page 25
Before using your Muratec machine
50-95 F
Line jack
3.9 inches
(10 cm)
3.9 inches
(10 cm)
19.5 inches
(50 cm)
13.8 inches
(35 cm)
15.7 inches
(40 cm)
Where to set up your machine
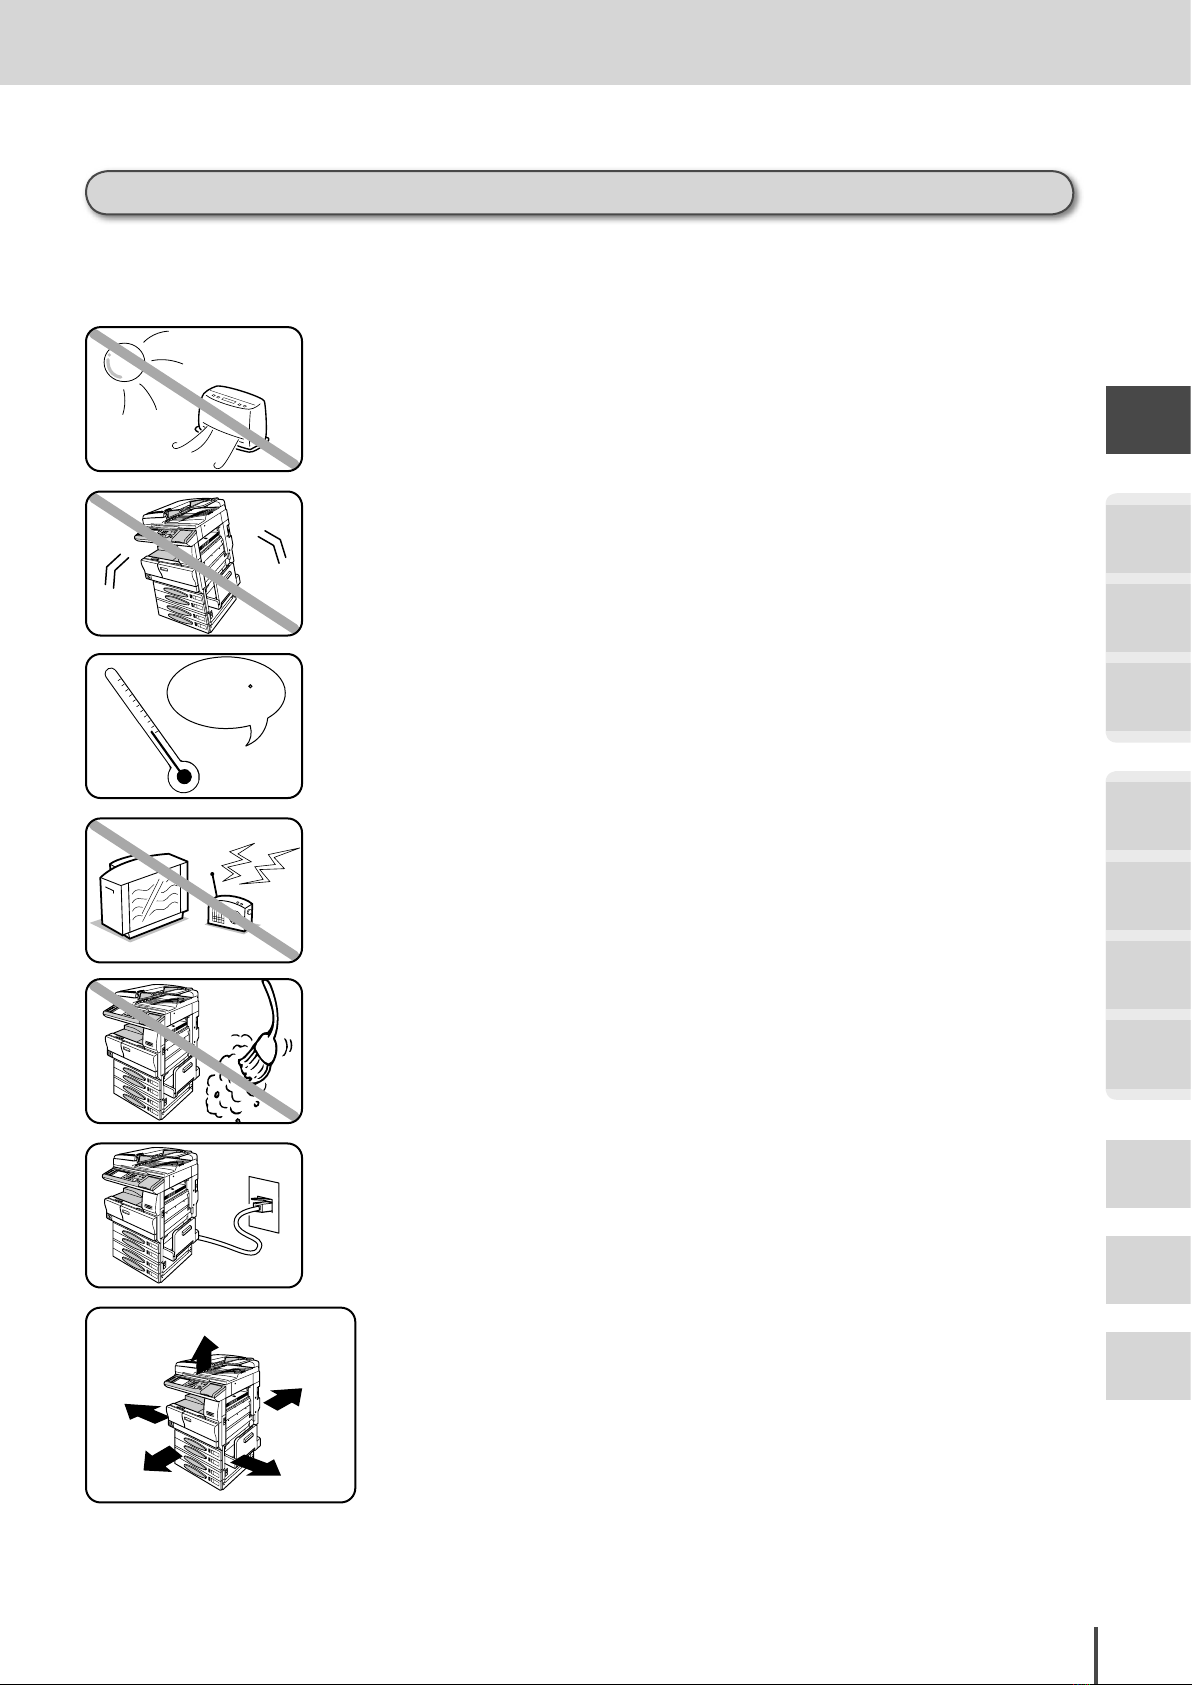
Follow these guidelines when setting up your machine:
Away from direct sunlight
To avoid overheating, set up your machine away from direct sunlight
or a heater.
Level, and vibration-free
To avoid an injury or damage to the machine, set the machine up in a
level, vibration-free location.
Avoid extreme high/low temperature
Use your machine within the temperature range of 50ºF to 95ºF (10ºC
to 35ºC).
Getting Started
Getting
Started
COPY
Chapter1
COPY
Chapter2
COPY
Chapter3
Away from a television or radio
Many appliances and office equipment, including televisions, radios,
copy machines, air conditioners and computers, can generate electronic
noise that can interfere with the operation of your machine.
Clean
Dust buildup can damage your machine.
Periodically clean your machine as described in the operating instruc
tions. Do not use a dust cover, which can cause severe overheating.
Near a phone jack
Your machine uses a standard (modular) phone jack, also known as an
RJ-11.
Space around the machine
To ensure proper ventilation and easy operation, set up the
machine in an area that meets the minimum requirements for
clearance as illustrated below.
FAX
Chapter1
FAX
Chapter2
FAX
Chapter3
-
FAX
Chapter4
Common
Settings
In This
Case...
Appendix
Getting Started
1-7
Page 26

Getting
AC120V
Started
Power requirements
Plug in the power cord
Plug the power cord carefully and completely into a wall outlet.
Do not leave any portion of the electrical cord’s metal plugs ex
posed. Doing so could cause a fire and increases the risk of elec
trical shock.
Do not share an extension cord connector with other
plugs
It can cause electrical shock.
Do not share an outlet with a large appliance
High-consumption appliances such as a refrigerator or air con
ditioner can cause “draw-downs” which could damage your ma
chine.
-
-
-
-
General Precautions
120 VAC outlet
Use a standard three-pronged 120 V electrical outlet to power
your machine. Using any other electrical outlet will damage to
your machine.
For domestic use only
Never use your machine outside the country in which you pur
chased it. Doing so may violate telecommunication and safety
regulations of that country, and variations in electrical and
phone standards can cause poor performance and damage your
machine.
Never disassemble your machine!
Disassembling your machine can cause serious injury to you and
damage to your machine. If service is required, call your autho
rized Muratec dealer.
-
-
1-8
Getting Started
Keep away from liquids
Keep liquids and metal pins or other objects away from your ma
chine. If something falls into the machine, remove the plug from
the outlet and call your authorized Muratec dealer.
-
Page 27

Getting Started
Never handle your machine or power cord with wet hands
Never touch your machine or power cord if your hands are wet.
During electrical storms, disconnect the plug from the outlet
Electrical storms can cause electrical shock or damage the machine.
Do not put furniture or equipment on the power cord
Do not put anything on or over the electrical power cord, and do not
route the power cord under rugs or carpets. Doing so can damage the
power cord or fax, and can cause fire or electrical shock.
Getting
Started
COPY
Chapter1
COPY
Chapter2
Avoid temperature fluctuations
Sudden changes in temperature can cause damaging condensation to
form inside your machine.
Allow clearance around the outlet
Don’t stack boxes or furniture around the outlet.
Use supplies manufactured specifically for Muratec machines
Using toner bottles and other supplies that are not manufactured spe
cifically for Muratec machines may affect the operation of your unit.
-
Storing and handling the toner bottle
To avoid damage to your machine and to assure the best performance possible, follow these guidelines when storing and handling toner bottles:
Store the toner bottle
Store toner bottles at a constant temperature within a range of 50ºF to 95ºF (10ºC to 35ºC). Do not store bottles
in locations subject to extreme fluctuation of temperature and humidity.
COPY
Chapter3
FAX
Chapter1
FAX
Chapter2
FAX
Chapter3
FAX
Chapter4
Common
Settings
In This
Case...
Do not stand the bottle on its end and do not store it upsidedown.
Do not open the protective bag of the bottle until you are ready to install the bottle.
Do not store bottles in areas of:
· Direct sunlight
· Dusty conditions
· Near floppy disks or other computer media, computer screens, or any other materials sensitive to magnetic fields.
Getting Started
Appendix
1-9
Page 28
Getting
Important
NoteNote
Reference
Operating tips
Started
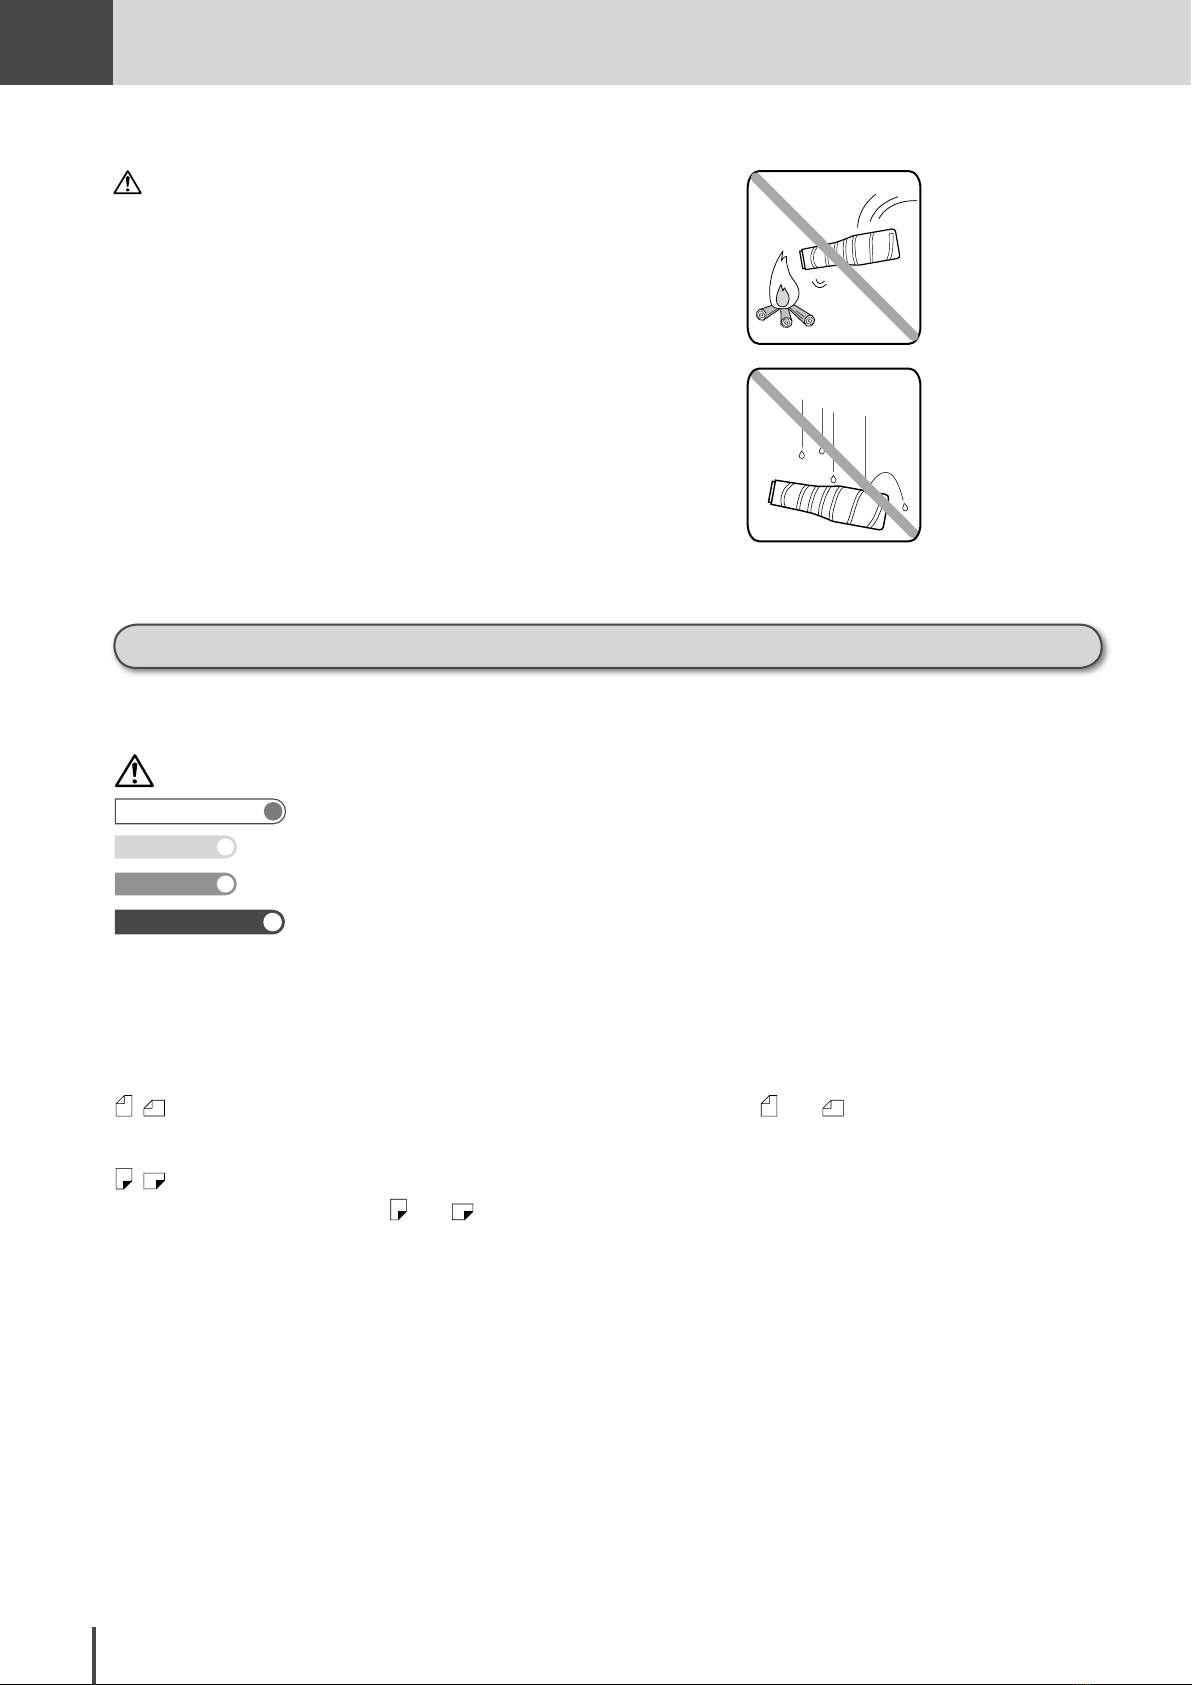
Do not burn toner bottles!
The toner powder is extremely flammable. Exposure to flame can
cause the toner bottles to burn or explode, causing serious injury.
Be careful not to get the toner powder in your eyes.
If the toner powder gets in your eyes, immediately flush your eyes
with water and seek medical assistance.
Keep bottles away from water and oil.
Do not expose bottles to direct sunlight.
Do not expose toner bottles to static or other electrical shock.
Symbol and terms (Operating tips)
In this manual, the following symbols and terms are used, please familiarize yourself with these.
CAUTION This symbol indicates how to avoid personal injury.
This describes conditions or incorrect operations that could cause damage to your machine.
Describes the additional operating notes for each step.
Describes the page number referred to for each function.
Explains the items you should know before operation.
In this case Describes the useful information for each function.
[ ] Keys that appear at the lower area of the touch screen.
BOLD WORDS Keys built into the machine’s operation panel.
Document A document is the original sheet(s) of paper you are copying, faxing or scanning.
, This shows the direction of the document. See “About and symbol” next page.
Paper Paper to be printed on.
,
This shows the direction of the paper.
See “About
and symbol” next page.
1-10
Getting Started
Page 29

About and symbol
Width
Length
Width
Length
Width
Length
Width
Length
Length
Width
Length
Width
and symbols indicate the direction of the document.
When the document has a length longer than its width, we use symbol .
When using the ADF When using the document glass
When the document has a length shorter than its width, we use symbol .
When using the ADF When using the document glass
Getting Started
Getting
Started
COPY
Chapter1
COPY
Chapter2
About and symbol
and symbols indicate the direction of the paper.
When the paper has a length longer than its width, we use symbol or no symbol.
(Paper loaded in the cassette)
When the paper has length shorter than its width, we use symbol .
COPY
Chapter3
FAX
Chapter1
FAX
Chapter2
FAX
Chapter3
FAX
Chapter4
Common
Settings
In This
Case...
(Paper loaded in the cassette)
Getting Started
Appendix
1-11
Page 30
Getting
Started
Part Names and Functions
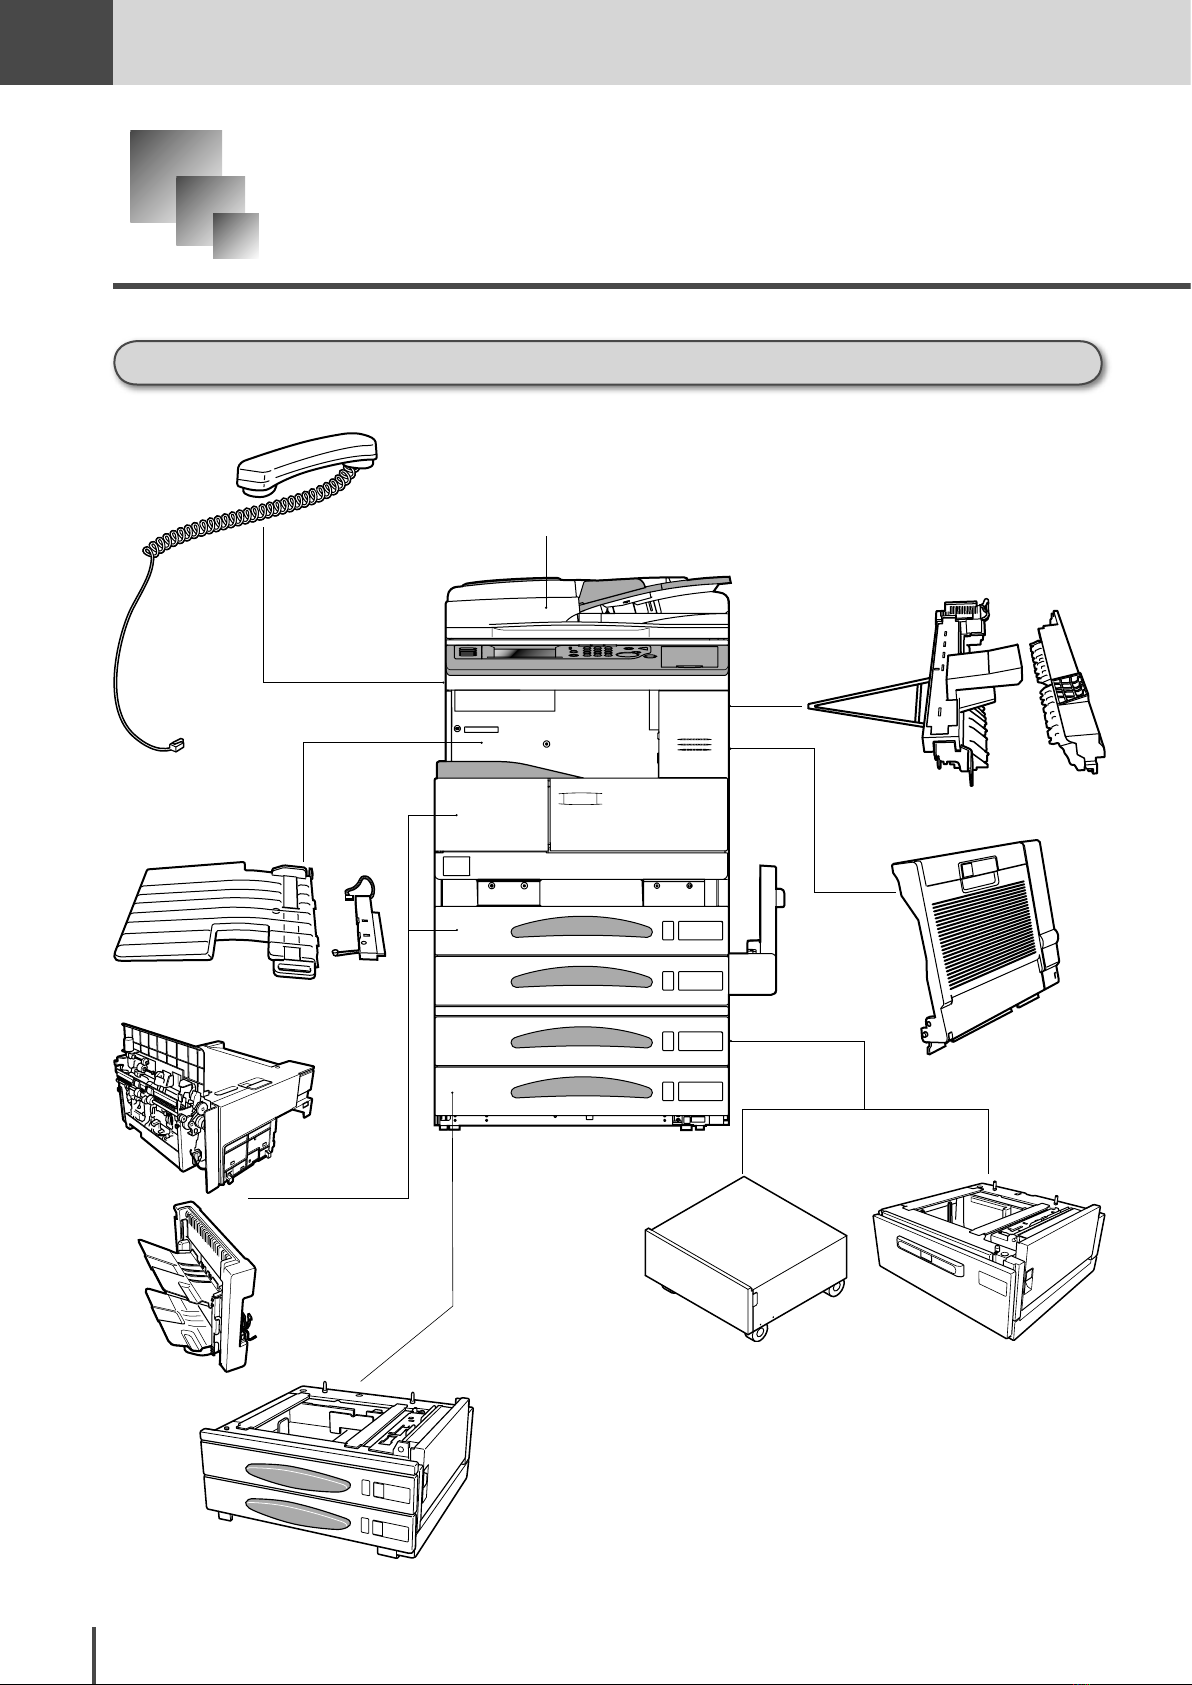
Equipment configuration
9
1
15
7
8
6
5 4
1-12
2,3
Getting Started
Page 31

Part Names and Functions
No. Name Function
1 Automatic Doc um ent Feeder
(ADF)
2 2-Cassette Cabinet This is a two-level paper cassette. Each paper cassette holds up to 500
3 1-Cassette Cabinet This is a one-level paper cassette. It holds up to 500 sheets of paper. The
4 Large Capacity Cassette This is a large capacity paper supply cassette that can hold a maximum of
5 Cabinet This cabinet was developed to make the machine easier to use. There is
6 Duplex Unit Equipping the machine with this unit makes double-sided printing possible.
7 Switchback Unit This is used to reverse or sort the paper. It is required when the machine is
8 2-Bin Tray This sorts the output paper into different trays when copying, faxing, etc.
9 Handset Used for voice communication.
10 32MB Memory Expansion Kit This increases the memory capacity of the machine.
11 Second phone line module This is used to increase the number of communication lines to perform
12 Printer Kit (OP-500) This allows the machine to be used as a fine image printer by application
13 Network Printer Kit (NP-500) This connects the machine to a network to allow it to be used as a network
This scans multi-page documents one page at a time. For a duplex document, the document’s front and back are each scanned once. Hereinafter
this is stated as “ADF” in this manual.
sheets of paper.
second shelf is a drawer that allows paper to be added while the machine is
operating.
2,500 sheets.
space for storing paper and consumables.
equipped with the duplex unit or the 2-Bin tray..
Super G3 transmission to two places simultaneously.
software that supports Windows.
printer.
Getting
Started
COPY
Chapter1
COPY
Chapter2
COPY
Chapter3
FAX
Chapter1
FAX
Chapter2
FAX
Chapter3
FAX
Chapter4
14 OfficeBridge Pro (OB-500) This is an all-in-one package that combines a variety of functions, such as
PC-FAX, internet fax, network printing and network scanning.
15 Finisher This is used to sort multiple copies into their respective stacks where they
can be stapled together, etc.
16 Punch Kit Equipping the Finisher with this makes it possible to punch holes in the
copies.
*1 to 5 are component parts, provided as a set at the time of purchase. 6 to 18 are optional parts.
Getting Started
Common
Settings
In This
Case...
Appendix
1-13
Page 32

Getting
Started
Main unit part names and functions
■ Main unit
12
14
15
13
16
17
18
19
1
2
3
11
4
5
10
7
8
9
No. Name Function
1 Right Cover This is opened to remove jammed paper or to change the drum cartridge.
2 Right Cover Release Lever (C1) Pull up on this to open the right cover.
3 Right Lower Cover This is opened to remove jammed paper.
4 Bypass Tray This is used to copy or print special or custom paper, such as postcards and
envelopes. (see page 1-26)
5 Extension Tray This is extended when loading large-size paper.
6 Paper Loading Guide This is adjusted to match the width of the paper to prevent skewing.
7 Slide Plate This is pulled when the paper in the bypass tray jams.
8 Slide Plate Knob (C3) This controls the movement of the slide plate.
9
Right Lower Cover Release
Lever
(C2)
10 Paper Level Indication Window The red shown in this area increases as the level of the paper in the paper
11 Front Cover (B) This is opened to replace the toner bottle. (see page 5-15)
12 Control Panel This is where the keys and touch screen required for operation are grouped.
13 ADF Cover This is opened when a document jams or to when cleaning the scan area.
14 ADF Cover Release Lever (A1) Pull up on this to open the document cover.
15 Document Guide This supports the document so that it feeds straight.
16 Document Tray This holds the document in the ADF.
17 Document Output Tray This catches originals after they have been scanned.
18
Document Output Extension Tray
19 USB Port The machine can be used as a printer by connecting it to a computer via a
Pull up on this to open the right lower cover.
tray decreases.
This is extended when catching long document.
USB cable.
6
1-14
Getting Started
Page 33

27
26
25
Part Names and Functions
20
21
Getting
Started
COPY
Chapter1
COPY
Chapter2
COPY
Chapter3
22
24
No. Name Function
20 Platen Cover This holds down the document.
21 Document Glass Align the document to be copied or transmitted to the loading guide on the
back of the left side.
22 Counter This counts the total number of sheets printed.
23 Toner Hopper This is pulled out to change the toner bottle.
24 Power Switch This switch is used to turn the machine on and off. Normally, leave the
power on.
25 Paper Output Tray This catches the copied or printed paper with the printed side down.
26 Stopper This keeps the printed paper from falling. It is used when the optional
2-Bin tray is installed.
27 Handset Mounting Position This is the area where the optional handset can be mounted.
23
FAX
Chapter1
FAX
Chapter2
FAX
Chapter3
FAX
Chapter4
Common
Settings
In This
Case...
Getting Started
Appendix
1-15
Page 34

Phone1
Phone2
Line
Network
Line2
>PS<
Getting
Started
29
30
31
32
33
28
No. Name Function
28 Power Jack This is where the power cord is connected.
29 Network Connector This is where the LAN cable is connected when network-related options are
installed.
30 Phone 1 Jack This is used to connect the optional handset.
31 Phone 2 Jack Th is i s used to c on nect a n ex te rn al p ho ne, s uch as an ans wering
machine.
32 Phone Jack This is used to connect the phone line.
33 Second Phone Line Jack This is used to connect the second phone line when the optional second
phone line module kit is installed.
1-16
Getting Started
Page 35

■ Components and options
Part Names and Functions
4
6
5
1
2
3
■ 1-cassette cabinet/2-cassette cabinet
No. Name Function
1 3rd Paper Cassette This holds approximately 500 sheets of paper. The paper size can
2 4ht Paper Cas sette (for the 2 -cassette
cabinet)
be changed easily.
Getting
Started
COPY
Chapter1
COPY
Chapter2
COPY
Chapter3
FAX
Chapter1
FAX
Chapter2
FAX
Chapter3
Cabinet (for the 1-cassette cabinet) This can be used to store extra paper.
3 Right Lower Door Release Lever (C4) This lever allows access to jammed paper.
■ Duplex unit
No. Name Function
4 Duplex Unit Cover (C5) Open this cover to remove jammed paper in the duplex unit.
■ Finisher
No. Name Function
5 Finisher This is used to sort multiple copies into seperate respective stacks
where they can be stapled together.
■ Punch Kit
No. Name Function
6 Punch Kit Equipping the Finisher with this makes it possible to punch holes
in the copies.
FAX
Chapter4
Common
Settings
In This
Case...
Appendix
Getting Started
1-17
Page 36

Getting
Started
1
2
3
4
5
■ Large capacity cassette
No. Name Function
1 3rd Paper Cassette This holds approximately 2,500 sheets of letter sized paper.
2 Drawer Release Button Press this when adding paper.
3 Right Lower Door Open this when there is a paper jam.
■ 2-Bin tray
No. Name Function
4 2-Bin Tray Bins This can seperate copy, fax or print jobs.
5 Paper Removal Lever Pull this to remove paper from the 2-Bin tray bins.
1-18
Getting Started
Page 37

Control panel part names and functions
Part Names and Functions
1 2 3
1. Touch Screen Contrast Volume
This adjusts the brightness of the touch screen
display.
2. Mode Key
Press this to change the displayed screen to the
copy, fax, scanner, or printer mode. The selected
key illuminates.
3. Touch Screen Display
Directly touch the screen to operate.
4. SETTING
Press this to call up the functions.
5. LIST
Press this to print the various lists.
6. MACRO
Press this to run, edit or delete macros. (see page
4-2)
7. ALARM Lamp
This illuminates when an error occurs. (see page
5-24)
8. COMMUNICATING Lamp
This illuminates when communicating.
9. MEMORY RECEIVE Lamp
This illuminates when the paper has run out and
the received data is being placed into memory.
10. RESET
Press this to stop the operation or to delete and
initialize the settings.
11. VOICE GUIDANCE
Press this to hear how to remove a paper jam or
an explanation of a function. This key illuminates
when voice guidance is being given and when it is
possible to hear guidance. (see page 1-58)
9
1011 12
4 5 68 7
13 14
18
15 16 17
12. Numeric Keypad
Press these keys to enter numbers when dialing
a phone number, specifying how many copies to
make, etc.
13. FAX CANCEL/JOB CONFIRM
This is used to stop or check the transmission.
14. INTERRUPT
Press this when copying or printing a received
fax to give priority to another copy job. This key
illuminates when pressed.
15. START
Press this to start the job procedure.
16. STOP
Press this to stop the machine’s operation.
17. ENERGY SAVE
Press this to put the machine into Energy Save
Mode in order to reduce power consumption. (see
page 1-25)
18. One-Touch Key
Press to send a document instantly. The one-
touch key corresponds to the numbers registered
in speed-dial numbers 001 to 048.
Getting
Started
COPY
Chapter1
COPY
Chapter2
COPY
Chapter3
FAX
Chapter1
FAX
Chapter2
FAX
Chapter3
FAX
Chapter4
Common
Settings
In This
Case...
Appendix
Getting Started
1-19
Page 38

Getting
LTR
LTR
LGL
11x17
DuplexCopy
OFF
Contrast
Auto
Doc.Type
Auto
Zoom
100%
Finishing
No Sort
Others
Memory 100%
Copy Ready
001
Set
Fax Ready Mode
1/2
Numeric
List
Index
All
AB
Atlanta
Office
New York
Office
Los Angels
Office
Chicago
Office
Houston
Office
Seattle
Office
London
Office
Paris
Office
Hong Kong
Office
Tokyo
Office
Domestic
Sales Dep
Overseas
Sales Dep
Contrast
Normal
Resolution
Normal
Monitor
Tx Report
OFF
Others
Fax Ready
Sep 24 2004 01:30pm Memory 100%
Broadcast
OFF
1/2
Sep 24 2004 01:30pm Memory 100%
Scan Ready
Resolution
200dpi
Contrast
Auto
Doc.Type
Auto
Zoom
100%
Scan Size
Auto
Others
01:01 02:02 03:03
04:04 05:05 06:06
07:07 08:08 09:09
10:10 11:11 12:12
13:13 14:14 15:15
LTR
LTR
LGL
11x17
Off Line
Print Ready
On Line Mode
Sep 24 2004 01:30pm Memory 100%
Started
Touch Screen Display
The touch screen display allows the function keys displayed on the screen to be operated by
directly touching them.
Functions and number values can be changed by touching the keys or tabs displayed on the
screen.
To change the screen
You can switch to the copy standby screen or fax standby screen by pressing the mode key.
Mode key
Copy standby screen Fax standby screen Scanner standby screen
Printer standby screen
1-20
For information regarding the scanner and printer screens, refer to the Printer User manual and TWAIN User
manual on the CD furnished with this manual together.
Getting Started
Page 39

LTR
LTR
LGL
11x17
DuplexCopy
OFF
Contrast
Auto
Doc.Type
Auto
Zoom
100%
Finishing
No Sort
Others
Memory 100%
Copy Ready
001
Set
Part names and functions
Note
Touch Screen Display
Copy standby screen
Message Area
Set Number
Soft Key
Main Unit Icon
Name Function
Message Area This displays the current status, operation instructions, error messages, and other informa-
tion.
Set Number This displays the number of copies.
Main Unit Icon This displays the status of the main unit. This can also be used to select the cassette to be used
for copying.
The screen display will change depending on the cassette that is installed.
Getting
Started
COPY
Chapter1
COPY
Chapter2
COPY
Chapter3
FAX
Chapter1
FAX
Chapter2
FAX
Chapter3
FAX
Chapter4
Soft Key This is used to set a variety of functions. It also displays the status of the selected function.
This can be changed to the often-used functions. (see page 4-10)
Getting Started
Common
Settings
In This
Case...
Appendix
1-21
Page 40

Fax Ready Mode
1/2
Numeric
List
Index
All
AB
Atlanta
Office
New York
Office
Los Angels
Office
Chicago
Office
Houston
Office
Seattle
Office
London
Office
Paris
Office
Hong Kong
Office
Tokyo
Office
Domestic
Sales Dep
Overseas
Sales Dep
Contrast
Normal
Resolution
Normal
Monitor
Tx Report
OFF
Others
Fax Ready
Sep 24 2004 01:30pm Memory 100%
Broadcast
OFF
Getting
Started
Fax standby screen
Message Area
Standby Status
Time Display and Memory
Soft Key
Destination Keys
Name Function
Message Area This displays the current status, operation instructions, error messages, and other informa-
tion.
Standby Status This displays the standby status.
Time Display and
Memory
Destination Keys This shows the registered speed-dials and group locations.
Soft Key This is used to set a variety of functions. It also displays the status of the selected function.
This displays the current date, time and amount of fax memory remaining.
This can be changed to the often-used functions. (see page 4-10)
1-22
Getting Started
Page 41

Touch Screen Display
Reference
Doc.Type
Auto
Combine
OFF
Photo
Photo
1/2
0.1"
EnterCancel
Key displays and functions
■ Setting key
To set a function, press this key to open the setting screen. Some keys will display the setting value after the
function has been set. When another setting is required to be set first or when the function cannot be combined
with another function, it will be displayed in grey and cannot be selected. Also, when a function setting key is selected, the key colors will be displayed in reverse.
The contents of the setting key (Soft Key) displayed in the standby screen can be changed. (see page 4-10)
Setting
<When key cannot be selected>
Getting
Started
COPY
Chapter1
COPY
Chapter2
<Before selection> <After selection>
■ Cursor keys
These keys are used when entering numbers or selecting functions. They are also used when changing screens.
<Number Entry> <Screen Change>
■ [Cancel], [Enter]
[Cancel] cancels the function or number specified on the screen and closes that screen.
[Enter] sets the function or number specified on the screen and closes that screen.
COPY
Chapter3
FAX
Chapter1
FAX
Chapter2
FAX
Chapter3
FAX
Chapter4
Common
Settings
Getting Started
In This
Case...
Appendix
1-23
Page 42

Getting
Started
Power Switch and ENERGY
SAVE
The machine has two power-related switches; the power switch and ENERGY SAVE.
Power switch
This is turned on (|) the first time you use the machine. Normally, this switch is left on. Turn off (
the machine if you need to physically move it or it will be idle for an extended period of time.
*Faxes cannot be received when the power switch is turned off.
)
1-24
Getting Started
Page 43

ENERGY SAVE and energy save mode
Note
Power Switch and ENERGY SAVE
When the machine has been idle for a predetermined amount of time, the Energy Save mode will
activate to conserve power. The Energy Save mode consists of the “Low Power Mode” and the “Sleep
Mode”. ENERGY SAVE is used to activate the Energy Save mode.
Low Power Mode
· When ENERGY SAVE is pressed, the touch screen and the various lamps are turned off and the printer enters
the rest state (Low Power Mode) to conserve power.
· If the machine is not used for 15 min, it will automatically enter the Low Power Mode. This value can be
changed in Low Power Mode setting displayed after pressing [Energy Save Mode] in [Management]. (see
page 4-36)
· ENERGY SAVE illuminates in green when the machine is in the Low Power Mode.
· When any key or the touch screen is pressed while in the Low Power Mode, the machine will “wake-up” and return to the normal standby state.
Getting
Started
COPY
Chapter1
COPY
Chapter2
COPY
Chapter3
FAX
Chapter1
FAX
Chapter2
FAX
Chapter3
Sleep Mode
· To put the machine in Sleep mode, hold down ENERGY SAVE for 3 seconds.
· When the machine remains in the Low Power Mode for 1 hour, it will automatically enter the Sleep Mode. This
value can be changed in the [Sleep Mode Setting] displayed after pressing [Energy Save Mode] in [Man-
agement]. (see page 4-36)
· When in Sleep Mode, all power is off, but the documents scanned into memory can be transmitted and received
documents can be printed.
The number of reception ring becomes more than the set number in Sleep Mode.
· ENERGY SAVE illuminates in red when the machine is in the Sleep Mode.
· When ENERGY SAVE is pressed in the Sleep Mode, the machine returns to the normal standby state.
· The time to cancel or start the Energy Save Mode can be set. (For Energy Save Mode Time Setting, see page
4-36.)
The Energy Save Mode will not activate if there is a print error, such as an out-of-paper status or paper jam.
FAX
Chapter4
Common
Settings
In This
Case...
Appendix
Getting Started
1-25
Page 44

Getting
Started
Loading Paper
Acceptable paper sizes
● Using the following paper is recommended to effectively utilize the performance of this product.
● Specified paper is paper recommended by Muratec.
● When printing on commonly available paper, refer to the following table and use paper that
meets the specifications.
■ Paper cassette
Paper size Paper weight Paper capacity
From Cassette 1 to Cassette 4
* Cassettes 1 and 2 are main unit
cassettes, Cassette 3 is 1-level paper unit or the upper level of the
2-level paper unit, and Cassette
4 is the lower level of the 2-level
paper unit.
Large capacity cassette Letter Plain paper, Recycled paper
Letter, Letter , Legal, 11
×17", Half-letter, A3, B4, A4,
A4 , B5, B5 , F4, Executive, Executive
Plain paper, Recycled paper
"
: 56 to 90 g/m
: 56 to 90 g/m
■ Bypass tray
Paper size-Paper type Paper weight Paper capacity
Regular size paper
The following paper size can be automatically detected:
Letter, Letter , Half-letter, Half-letter ,
Legal, 11"×17", F4, Executive, Executive ,
A4 , A3, B4
The following paper size can be set, but cannot be automatically detected:
A4, B5, B5 , A5, A5 , A6, CM10, DL
Plain paper: 56 to 90 g/m
Paste board: 91 to 209 g/m
Recycled paper: 60 to 90 g/m
2
Plain paper, Recycled paper
2
2
Paste board: Approx. 50 sheets
OHP film: Approx. 50 sheets
Postcards: Approx. 50 sheets
Labels: Approx. 50 sheets
Envelops: Approx. 10 sheets
Approx. 500 sheets
2
Approx. 2,500 sheets
2
: Approx. 150 sheets
1-26
Special paper
OHP film, Postcards, Labels, Envelopes
Custom paper
Paper vertical (length): 3.9 inches to 11.7
inches
Paper horizontal (width): 5.5 inches to 17.0
inches
Getting Started
Page 45

■ Duplex printing
Loading Paper
Paper size-Paper type
Regular size paper (plain paper only)
11"×17", Legal, Letter, Letter
■ How to store paper
Acceptable paper, if improperly stored, could cause frequent paper jams, reduced print quality and cause equipment malfunction. Store the paper in a location that meets the following conditions.
· Store in a place with low humidity.
· After opening the wrapping, wrap the unused paper in the same wrapper and store it in the cabinet or a location with low humidity.
· Store the paper in a flat location - do not stand it on end.
· Avoid wrinkles, folding, curling, etc.
· Store in a place out of direct sunlight.
Unacceptable paper
Do not use the following papers. Using them could cause poor printing quality, paper jams, or equipment malfunction.
·OHP film that has already been printed on once
*Even OHP film that was output without printing on it cannot be reused.
· Paper printed on by a thermal printer or an inkjet printer
· Paper that is too thick or too thin
· Paper that is creased, folded, wrinkled, or torn
· Paper for which the wrapping has been open for an extended period of time
· Paper that has absorbed moisture
· Paper with holes for binders or paper with perforated lines
· Paper with surfaces that are too smooth, too rough, or not uniform
· Paper with processed surfaces, such as carbon paper, thermal paper, or pressure sensitive paper
· Paper subject to processing such as gilding or embossing
· Paper of different sizes mixed together
· Irregularly shaped paper (paper that is not rectangular)
· Paper that is fastened by glue, staples, paper clips, etc.
· Paper with labels stuck to it
· Paper with ribbons, hooks, buttons, etc. attached to it
· Paper that is curled or waved
· Art paper, coated paper, coated paper for inkjet printers
Getting
Started
COPY
Chapter1
COPY
Chapter2
COPY
Chapter3
FAX
Chapter1
FAX
Chapter2
FAX
Chapter3
FAX
Chapter4
Common
Settings
In This
Case...
Appendix
Getting Started
1-27
Page 46

Getting
Reference
Note
Reference
Started
Printing area
The area image shown below cannot be printed on.
Area A that is 0.04 inches ± 0.16 inches (when enlarged) from the front edge of the paper.
Area B that is 0.04 inches ± 0.16 inches (when enlarged) from the back edge of the paper.
Area C that is 0.04 inches ± 0.16 inches (when enlarged) from the edge of the paper.
Paper discharge direction
A, B, C: 0.04 inches ± 0.16 inches (When evenly magnified)
The blank border around the paper can be changed. (see page 4-37)
Automatic paper supply function
If the paper from the currently selected paper supply tray runs out during printing, the machine
automatically switches to the appropriate cassette and continues printing.
If the large capacity cassette is installed, continuous printing or copying can be performed for a
maximum of 3,500 sheets. (For Letter paper)
■ Paper supply changing order
If the Automatic paper supply function is operating, the paper cassettes and trays are selected with the following priority.
1st Paper Cassette ⇒ 2nd Paper Cassette ⇒ 3rd Paper Cassette ⇒ 4th Paper Cassette ⇒ Bypass Tray
1-28
If the bypass tray is used by Automatic paper supply, the machine must be set to “Select Print Cassette”. (see page 4-31)
If special paper, such as OHP film or label sheets, is loaded in the bypass tray, Automatic paper supply could be triggered causing the wrong paper to be supplied. In this case, it is recommended that the paper type should be set to other than plain paper
in the bypass paper setting. (see page 1-37)
Getting Started
Page 47

How to load paper
Note
Strictly observe the following precautions when loading the paper.
● If the paper is curled, flatten
it out before placing it in the
cassette.
● Load the paper so that it does
not go higher than the ▼ mark
or exceed the specified number of
sheets.
Loading Paper
Getting
Started
COPY
Chapter1
COPY
Chapter2
It is recommended that
al l of th e paper in the
cassette or tray be used
up before new paper is
added.
● Ali gn t he guide pla te f irml y
against the edge of the paper.
● When loading the paper, remove
any paper remaining in the paper
cassette or tray, combine it with
the new paper, tap the paper flush,
and then load it.
COPY
Chapter3
FAX
Chapter1
FAX
Chapter2
FAX
Chapter3
FAX
Chapter4
Common
Settings
In This
Case...
Getting Started
Appendix
1-29
Page 48

Getting
NoteNote
Note
Note
Started
Loading paper in paper cassette
Use the following procedure to load the paper into the main unit cassette or 1-cassette cabinet or
2-cassette cabinet.
Pull out the paper cassette to be
1
S e t th e g u id e p l a te
squarely in the groove.
loaded.
Slide the guide plate to align it
to the proper paper size.
Do not touch the Mylar
with your hands.
Load the paper with the side
2
to be printed on (side facing up
when the wrapping was opened)
facing up.
Mylar
Do n ot touch wi th
your hands.
1-30
Getting Started
Again slide the guide plate to
3
align it to the paper size.
Close the paper cassette.
4
Page 49

Loading paper into large capacity cassette
NoteNote
NoteNote
Use the following procedure to load paper into the large capacity cassette.
Press the Drawer release button.
1
If th e pow er is off, the
cabinet cannot be opened.
Load the paper with the side
2
Do not touch the Mylar
with your hands.
to be printed on (si de fac ing
up w h e n the wrappi n g wa s
opened) facing up, and load it
into the right side of the paper
supply cabinet.
Loading Paper
Mylar
Do not touch with
your hands.
Getting
Started
COPY
Chapter1
COPY
Chapter2
COPY
Chapter3
FAX
Chapter1
Load the paper with the side
3
to be printed on (si de fac ing
up w h e n the wrappi n g wa s
opened) facing up, and load it
into the left side of the paper
supply cabinet.
Close the paper cassette.
4
FAX
Chapter2
FAX
Chapter3
FAX
Chapter4
Common
Settings
In This
Case...
Appendix
Getting Started
1-31
Page 50

Getting
Reference
NoteNote
Started
Loading paper into bypass tray
Use the bypass tray to print on plain paper, postcards, envelopes, OHP film and label sheets. The
loaded paper will be printed on the downward side.
·When loading anything other than plain paper, the paper type must be set. (see page 1-38)
·When loading custom size paper, the paper size must be registered. (see page 1-37)
Open the bypass tray.
1
Bypass
tray
· Load the paper so that it
does not go higher than
the ▼ mark.
· Align th e guide plate
firmly against the edge
of the paper.
● When loading paper that is larger
than the bypass tray, open the extension tray.
Align the guide plate to the pa-
2
per size, face the printing surface
downward, and load the paper by
inserting its edge all the way to
the back.
Ext ens ion
tray
Ext ens ion
tray
1-32
Guide plate
Getting Started
Page 51

LTR
LTR
LGL
11x17
Memory 100%
Copy Ready
001
Set
DuplexCopy
OFF
Contrast
Auto
Doc.Type
Auto
Zoom
100%
Finishing
No Sort
Others
Paper loaded in the bypass
LTR
LTR
LGL
11x17
Memory 100%
001
Set
DuplexCopy
OFF
Contrast
Auto
Doc.Type
Auto
Zoom
100%
Finishing
No Sort
Others
Yes
No
Paper is set to bypass tray.
Auto-detected size:Letter
Paper Type:Plain
Do you want to set it?
LTR
LTR
LGL
11x17
Contrast
Auto
Doc.Type
Auto
Zoom
100%
Finishing
No Sort
Others
Memory 100%
Copy Ready
001
Set
LTR
DuplexCopy
OFF
If you pres s [N o], th e
Note
NoteNote
LTR
LTR
LGL
11x17
001
Set
DuplexCopy
OFF
Contrast
Auto
Doc.Type
Auto
Zoom
100%
Finishing
No Sort
Others
Unkown paper size
Set paper size.
Auto
Letter
Letter
H.LTR
H.LTR
Legal
11
x17
A3
A4
A4
B4
B5
Enter
Cancel
Paper Size
Note
paper will be recognized
as the size registered in
bypass paper size.
The bypass tray is automatically
3
selected when paper is loaded in
it.
■ When the paper size is registered (see page 1-37)
(1) When a paper size that differs
from the registered paper size
(see page 1-37) is loaded, the
message at right is displayed.
(2) To change the paper size to
th e automatically detected
size, press [Yes].
Loading Paper
Getting
Started
COPY
Chapter1
COPY
Chapter2
COPY
Chapter3
Custom sized paper is not
automatically detected.
The auto-detected paper size is
4
displayed.
When the size of the paper loaded in the bypass tray is not automatically detected, the
message at right is displayed.
Select the paper size and press [Enter].
FAX
Chapter1
FAX
Chapter2
FAX
Chapter3
FAX
Chapter4
Common
Settings
In This
Case...
Appendix
Getting Started
1-33
Page 52

Getting
NoteNote
Reference
Started
How to load paper into bypass tray by paper type
When loading anything other than plain paper, the paper type must be set. (see page 1-38)
■ For plain paper
Open the bypass tray.
1
Bypass
tray
· Load the paper so that it
does not go higher than
the ▼ mark. (Up to Approx. 150 sheets)
· Al ign t he guid e pla te
firmly against the edge
of the paper.
● When loading paper that is larger
than the bypass tray, open the extension tray.
Align the guide plate to the pa-
2
per size and load the paper by
inserting its edge all the way to
the back.
Extension tray
Ext ens ion
tray
1-34
Guide plate
Getting Started
Page 53

· When loading envelopes,
NoteNote
NoteNote
Reference
push out the air in the
envel ope s an d fi rml y
press down the flaps.
· If air re ma ins i n th e
envel opes or the flaps
stick up, the envelopes
could become wrinkled
or jammed.
· Do not load more than
10 envelopes at a time.
After loading the paper,
set the paper type of the
bypass paper setting to
[Env/ Po st]. (see p ag e
1-38)
Loading Paper
■ For envelopes
When loading envelopes, load
them with the flaps facing up as
shown in the illustration.
Getting
Started
COPY
Chapter1
COPY
Chapter2
COPY
Chapter3
· Do not loa d the en ve-
lopes in the direction.
· Do not load the envelops
with th e fl aps fac ing
down.
FAX
Chapter1
FAX
Chapter2
FAX
Chapter3
FAX
Chapter4
Common
Settings
In This
Case...
Getting Started
Appendix
1-35
Page 54

Getting
NoteNote
NoteNote
Reference
Reference
Started
Do not load more than 50
sheets at a time.
Af te r loading the fi lm ,
set the paper type of the
bypass paper setting to
[OHP]. (see page 1-38)
■ For OHP film
When loading OHP film, load
1
it to match the orientation of
the document.
Place the printing surface down-
2
ward and load the film.
Do not load more than 50
sheets at a time.
After loading the sheets,
set the paper type of the
bypass paper setting to
[Paste Board]. (see page
1-38)
■ For label sheets
When loading label sheets, load
1
it to match the orientation of the
document.
P la c e the prin t i n g s u rf a c e
2
downward and load the sheets.
1-36
Getting Started
Page 55

Loading Paper
Enter
Speed Dial
Copy
Functions
User
Install
Group Name
Store Doc
Settings
Management
Scanner
Settings
Settings
Counter
Select item to edit.
Paper
Settings
Fax
Functions
Enter
Bypass
Paper
List Paper
Select
Print Cass
Separate
Rx Page
Paper Settings
Select item to edit.
Paper Size
Paper Type :Plain
Custom 1 Size : 8.5x11.0"
Custom 2 Size : 8.5x11.0"
Custom 3 Size : 8.5x11.0"
Bypass Paper
Select item to edit.
Enter
Bypass paper registration
This operation can be simplified by registering paper often used in the bypass tray. Up to 3 custom sized papers can be registered.
Press SETTING.
1
Press [Paper Settings].
2
Getting
Started
COPY
Chapter1
COPY
Chapter2
Press [Bypass Paper].
3
■ Registering often-used sizes
This operation can be simplified by registering the paper size often-used in the bypass tray.
Press [Paper Size].
4
COPY
Chapter3
FAX
Chapter1
FAX
Chapter2
FAX
Chapter3
FAX
Chapter4
Common
Settings
In This
Case...
Getting Started
Appendix
1-37
Page 56

Getting
Paper Size
Paper Type :Plain
Custom 1 Size :08.5x11.0"
Custom 2 Size :08.5x11.0"
Custom 3 Size :08.5x11.0"
Bypass Paper
Select the paper size and select [Enter].
Enter
Enter
Cancel
Paper Size
Auto
Letter
Letter
H.LTR
H.LTR
Legal
11x17
A3
A4
A4
B4
B5
Paper Size :Letter
Paper Type :Plain
Custom 1 Size : 8.5x11.0"
Custom 2 Size : 8.5x11.0"
Custom 3 Size : 8.5x11.0"
Bypass Paper
Select item to edit.
Enter
Paper Size :Letter
Paper Type :Plain
Custom 1 Size : 8.5x11.0"
Custom 2 Size : 8.5x11.0"
Custom 3 Size : 8.5x11.0"
Bypass Paper
Select the paper type and select [Enter].
Enter
Enter
Cancel
Paper Type
Plain
Env/Post
PasteBoard
OHP
Paper Size :Letter
Paper Type :OHP
Custom 1 Size : 8.5x11.0"
Custom 2 Size : 8.5x11.0"
Custom 3 Size : 8.5x11.0"
Bypass Paper
Select item to edit.
Enter
Note
Started
To use automatic selection each time paper is
loaded, select [Auto].
(1) Select the paper size.
5
(2) Press [Enter].
■ Paper types
Register the paper type used in the bypass tray.
Press [Paper Type].
6
(1) Select the paper type.
7
(2) Press [Enter].
■ Registering custom sizes
When using a custom size, set the width and length of the paper. Up to 3 types of
custom paper can be registered.
Press [Custom 1 Size].
8
1-38
Getting Started
Page 57

Enter
Width
11.0"
Length
8.5"
Ppr.
If you use the paper for PC Print,
set the length longer than width.
Custom 1 Size
Adjust the length/width and select [Enter].
(1) Press [Length].
Enter
Width
11.0"
Length
08.5"
Ppr.
If you use the paper for PC Print,
set the length longer than width.
Custom 1 Size
Use the arrows or numeric keypad to input
the width and select [Enter].
Enter
Cancel
Length
Input range: 3.9-11.7
08.5"
Note
9
(2) Use [▲] [▼] or the numeric
keypad to enter the length.
(3) Press [Enter] after entering
the size.
������Loading Paper
Getting
Started
COPY
Chapter1
COPY
Chapter2
(4) Enter [Width] in the same
way.
Press [Enter] after entering the length and width. Enter other cus-
10
tom sizes in the same way.
Press RESET to return to the standby screen.
COPY
Chapter3
FAX
Chapter1
FAX
Chapter2
FAX
Chapter3
FAX
Chapter4
Common
Settings
In This
Case...
Getting Started
Appendix
1-39
Page 58

Getting
Maximum
size
Tx : 35.4 inches (900 mm) (25.6 inches in 600 dpi × 600 dpi)
Copy: 17.7 inches (450 mm)
Minimum
size
3.9 inches (100 mm)
Document feed direction
*
11.7 inches
(297 mm)
4.7 inches
(120 mm)
Maximum size
11.0 inches
(279 mm)
17.0 inces
(432 mm)
Loading standard position
Started
How to Load Document
There are two ways to scan a document, one is using the “ADF” to automatically feed the
document, and the other is the “document glass” that is used to scan books and other threedimensional objects.
Loadable document sizes
●Document size for the ADF ●Document size for the document glass
◆For the ADF
When scanning just one sheet For automatic continuous scanning
Vertical 11.7 inches × horizontal 35.4 inches
Maximum
Minimum Vertical 4.7 inches × horizontal 3.9 inches
Number of sheets that
can be loaded at once
Document paper
thickness
Document paper quality
Up to 17.0 inches (432 mm) is copied. (The remaining 0.7 inch (18 mm) is not copied.)
(11.7 inches × 25.6 inches in 600 dpi × 600 dpi)
When copying: Horizontal 17.7 inches
--
35~128 g//m
(0.05~0.15 mm)
2
High-quality paper or comparable
Vertical 11.7 inches × horizontal 17.0 inches (JIS A3)
(11.7 inches × 25.6 inches in 600 dpi × 600 dpi)
When copying: Horizontal 17.7 inches
Vertical 5.8 inches × horizontal 4.1 inches (JIS A6 )
◆For the document glass
Maximum Vertical 17.0 inches × horizontal 11.0 inches
Minimum Unlimited
11"×17": 30 sheets
Letter (80 g//m2): 100 sheets
52.3~104.7 g//m
(0.07~0.12 mm)
2
1-40
Getting Started
Page 59

Document scan range
fax : 0.08 inches (2 mm)
copy: 0 inch (0 mm)
fax : 0.08 inches (2 mm)
copy: 0 inch (0 mm)
fax : 0.08 inches (2 mm)
copy: 0 inch (0 mm)
fax : 0.08 inches (2 mm)
copy: 0 inches (0 mm)
fax : 8.4 inches (214 mm)
copy: 8.5 inches (216 mm)
fax : 10.9 inches (277 mm)
copy: 11.0 inches (279 mm)
Letter
11" × 17"
How to Load Document
Be aware that the inclined areas will not be scanned even if there are characters on them.
Document precautions
The following documents cannot be loaded in the ADF.
Please use the document glass.
· Torn documents or those with holes in them
· Extremely wrinkled or curled documents
· Moistened documents
· Documents with static electricity
· Documents with carbon on the back
· Cloth or metal sheets, OHP sheets
· Documents with staples, paper clips, or adhesive tape on them
· Documents joined or glued together
· Glossy documents or documents with a special coating
Getting
Started
COPY
Chapter1
COPY
Chapter2
COPY
Chapter3
FAX
Chapter1
FAX
Chapter2
FAX
Chapter3
FAX
Chapter4
Common
Settings
In This
Case...
Placing the following types of documents on the document glass could scratch or crack the glass.
· Strongly pressing down on a document when copying a thick document
· When a hard object is being used as a document, place it carefully on the document glass.
· Sharp protrusions could scratch the document glass.
Getting Started
Appendix
1-41
Page 60

Getting
Started
How to load document
Make sure to dry correction fluid, ink and stamped areas completely before loading the document.
◆When loading the document in the ADF
(1) Place the surface to be copied or transmitted upward and load it all the way to the back on the left side of
the machine. (The loaded document will be copied or transmitted from the top of the stack.)
(2) Align the document guide with the document width.
(3) Carefully adjust it until it touches the edge of the document.
Face the surface of the document to be
copied or transmitted upward.
1-42
Getting Started
Page 61

How to Load Document
◆When placing the document on the document glass
(1) Open the platen cover, place the surface to be copied or transmitted downward, and align the document to
the loading guide on the back of the left side.
(2) Carefully close the platen cover to closely fit the document to the glass.
Align t he document to the
back of the left side.
Getting
Started
Chapter1
COPY
COPY
Chapter2
COPY
Chapter3
FAX
Chapter1
FAX
Chapter2
FAX
Chapter3
FAX
Chapter4
Getting Started
Common
Settings
In This
Case...
Appendix
1-43
Page 62

Getting
3/ 24
ABC_
Clear
Cancel
Enter
Name
Lower
Symbol
Space
1
2
3
4
5
6
7
8
9
0
Q
W
E
R
T
Y
U
I
O
P
_
Z
X
C
V
B
N
M
.
@
A
S
D
F
G
H
J
K
L
Started
How to Enter Characters
Refer to this section when entering characters for names. The characters that can be entered are alphanumeric characters and symbols.
Character entry screen
■ Character entry screen
Edit window
This disp lay s the entered characters.
Mode selection keys
They change the type of characters that are entered.
Cursor keys
They move the char acter
entry position.
Clear
Press t his to dele te the
characters.
Number of entered characters /Number of characters that can be entered
This displays the number
of characters that can be
entered and the number of
characters entered so far.
1-44
Getting Started
Page 63

Entering alphabet characters
3/ 24
ABC_
Clear
Cancel
Enter
Name
Lower
Symbol
Space
1
2
3
4
5
6
7
8
9
0
Q
W
E
R
T
Y
U
I
O
P
_
Z
X
C
V
B
N
M
.
@
A
S
D
F
G
H
J
K
L
3/ 24
ABC_
Clear
Cancel
Enter
Name
Lower
Symbol
Space
1
2
3
4
5
6
7
8
9
0
Q
W
E
R
T
Y
U
I
O
P
_
Z
X
C
V
B
N
M
.
@
A
S
D
F
G
H
J
K
L
9/ 24
ABCoffice_
Clear
Cancel
Enter
Name
Upper
Symbol
Space
1
2
3
4
5
6
7
8
9
0
q
w
e
r
t
y
u
i
o
p
_
z
x
c
v
b
n
m
.
@
a
s
d
f
g
h
j
k
l
Note
Select the characters to be en-
1
tered from the character panel.
How to Enter Characters
Getting
Started
COPY
Chapter1
COPY
Chapter2
Press [Upper] to enter
the upp er c ase let te rs
again.
■ Entering lower case letters
(1) Select [Lower].
2
(2) This enters lower case letters.
COPY
Chapter3
FAX
Chapter1
FAX
Chapter2
FAX
Chapter3
FAX
Chapter4
Common
Settings
In This
Case...
Appendix
Getting Started
1-45
Page 64

Getting
3/ 24
ABC_
Clear
Cancel
Enter
Name
Lower
Symbol
Space
1
2
3
4
5
6
7
8
9
0
Q
W
E
R
T
Y
U
I
O
P
_
Z
X
C
V
B
N
M
.
@
A
S
D
F
G
H
J
K
L
4/ 24
1
4
ABC,_
Clear
Cancel
Enter
Name
Alpha
Space
-
,
/
:
&
'
!
?
"
#
$
%
(
)
*
+
;
<
}
˜
¡
¢
£
¤
¥
¦
§
=
>
[
\
]
^
`
{
|
NoteNote
Started
Entering symbols and special characters
Select [Symbol].
1
Select the symbol or special char-
Enter “_ (underbars)”, “.
(dot)” and “@ (at mark)”
in alphabet entry screen.
2
acter to be entered.
1-46
The symbols that can be entered are as follows.
Getting Started
Page 65

Entering numbers/spaces
6/ 24
ABC123_
Clear
Cancel
Enter
Name
Lower
Symbol
Space
1
2
3
4
5
6
7
8
9
0
Q
W
E
R
T
Y
U
I
O
P
_
Z
X
C
V
B
N
M
.
@
A
S
D
F
G
H
J
K
L
3/ 24
ABC_
Clear
Cancel
Enter
Name
Lower
Symbol
Space
1
2
3
4
5
6
7
8
9
0
Q
W
E
R
T
Y
U
I
O
P
_
Z
X
C
V
B
N
M
.
@
A
S
D
F
G
H
J
K
L
■ Entering numbers using the numeric keypad
E nter numb ers pres sing the
1
numeric keypad.
How to Enter Characters
Getting
Started
COPY
Chapter1
■ Entering numbers from the character panel
Select the numbers to be entered
1
from the character panel.
■ Entering spaces
Press [Space] while entering.
2
COPY
Chapter2
COPY
Chapter3
FAX
Chapter1
FAX
Chapter2
FAX
Chapter3
FAX
Chapter4
Common
Settings
In This
Case...
Appendix
Getting Started
1-47
Page 66

Getting
Note
5/ 24
ABC_DE
Clear
Cancel
Enter
Name
Lower
Symbol
Space
1
2
3
4
5
6
7
8
9
0
Q
W
E
R
T
Y
U
I
O
P
_
Z
X
C
V
B
N
M
.
@
A
S
D
F
G
H
J
K
L
4/ 24
AB_DE
Clear
Cancel
Enter
Name
Lower
Symbol
Space
1
2
3
4
5
6
7
8
9
0
Q
W
E
R
T
Y
U
I
O
P
_
Z
X
C
V
B
N
M
.
@
A
S
D
F
G
H
J
K
L
Started
Deleting/Inserting characters
To delete a character, use [ ] [ ] to move the cursor to the character you want to delete, and then
press [Clear].
And to insert a character, use [ ] [ ] to move the cursor to the insert position and enter the character.
■ Deleting characters
Use [ ] [ ] to move the cursor to
1
the character you want to delete.
The last entered character can be deleted by just
pressing [Clear].
Press [Clear].
2
1-48
Getting Started
Page 67

■ Inserting characters
4/ 24
ABD_E
Clear
Cancel
Enter
Name
Lower
Symbol
Space
1
2
3
4
5
6
7
8
9
0
Q
W
E
R
T
Y
U
I
O
P
_
Z
X
C
V
B
N
M
.
@
A
S
D
F
G
H
J
K
L
5/ 24
ABCD_E
Clear
Cancel
Enter
Name
Lower
Symbol
Space
1
2
3
4
5
6
7
8
9
0
Q
W
E
R
T
Y
U
I
O
P
_
Z
X
C
V
B
N
M
.
@
A
S
D
F
G
H
J
K
L
Use [ ] [ ] to move the cursor
1
to the position you want to insert the character.
Enter the character. The char-
2
acter will be inserted before the
cursor.
How to Enter Characters
Getting
Started
COPY
Chapter1
COPY
Chapter2
COPY
Chapter3
FAX
Chapter1
FAX
Chapter2
FAX
Chapter3
FAX
Chapter4
Common
Settings
In This
Case...
Appendix
Getting Started
1-49
Page 68

Getting
Operating tips
Note
Reference
Started
Basic Settings (Setting Mode)
Configure the settings required by the machine.
Registration items in User Install are as follows:
●
· Language setting
You can select the language displayed in the Touch screen among English, French and Spanish. The default setting is English.
The selected language will be applied to the output list as well as the screen display; however, the voice guidance is
available only in English.
· Time setting
This is used to correctly set the display time. This is basic to all fax operations, such as the Delayed transmission and Journal. Enter the year, month, day, hour, and minutes. Use the 24-hour clock to enter the
time.
· Daylight saving time setting (DST)
When this setting is ON, your machine automatically recognizes DST at 2 A.M. on the appropriate switchover Sunday each year. When the setting is OFF, no automatic change will occur.
· Communication line
Set this to match the type of line to which the machine is connected. If the wrong setting is made, telephoning and faxing cannot be performed.
· Reception mode
Select the desired reception mode from Fax Ready Mode, Tel Ready Mode, Tel/Fax Ready Mode, Fax/Tel
Ready Mode, or Ans/Fax Ready Mode.
Refer to page 1-55 for information regarding how to select the reception mode.
· Dial tone detection
This is used to detect the dial tone. Select OFF normally. Change to ON if the detection is required, however, which will prevent the fax transmission through the line that does not send the dial tone.
· Senders name
This makes it easy to show the senders name to the receiving party, to print the name on the document
received by the receiving party, and for the receiving party to tell where the document came from. Three
types of sender’s name can be set, and up to 22 characters can be entered for each type.
· Standard TTI
Of the set three types of sender’s name, the sender’s name that is used most often can be set as the standard sender name.
· TTI number
The fax number of this machine can be shown to the receiving party or printed on the document received
by the receiving party. Up to 20 digits can be set.
1-50
Getting Started
Page 69

User install
Enter
Speed Dial
Copy
Functions
Group Name
Store Doc
Settings
Management
Scanner
Settings
Settings
Paper
Settings
Counter
Select item to edit.
Fax
Functions
User
Install
Language :English
Time Setting :2004 09/24 13:30
Set Daylight Saving:OFF
Comm. Line :Tone
Reception Mode :Fax Ready Mode
Dial Tone Detection:OFF
User Install
Select item to edit.
Enter
1/2
Note
Keys to be used here
1
SETTING
2
Numeric Keypad
3
Touch Screen
Press SETTING.
1
Basic Settings (Setting Mode)
1
3
2
Getting
Started
Press [ ] [ ] to change
the screen.
Press [User Install].
2
T he User Ins tal l L ist is dis-
3
played.
Set each item. (see page 1-52 to
4
page 1-57)
After setting all the items, press
5
RESET to return to the standby
screen.
Print out the fax setting from the
setting list and make sure the
set information is correct. (see
page 3-198)
COPY
Chapter1
COPY
Chapter2
COPY
Chapter3
FAX
Chapter1
FAX
Chapter2
FAX
Chapter3
FAX
Chapter4
Common
Settings
In This
Case...
Appendix
Getting Started
1-51
Page 70

Getting
Time Setting :2004 09/24 13:30
Set Daylight Saving:OFF
Comm. Line :Tone
Reception Mode :Fax Ready Mode
TTI Enter/Edit
User Install
Select use language and select [Enter].
Enter
1/2
Language :English
Enter
Cancel
Language
SpanishFrenchEnglish
Note
Language :English
Time Setting :2004 09/24 13:30
Set Daylight Saving:OFF
Comm. Line :Tone
Reception Mode :Fax Ready Mode
TTI Enter/Edit
User Install
Enter current time
Enter
1/2
Enter
Cancel
Time Setting
2004 09/24 13:30
Started
Setting the language
Select the language displayed in the Touch screen among English, French and Spanish. The selected language will be applied to the output list as well.
Press [Language].
1
(1) Select the language.
2
The v oic e g uid anc e i s
available only in English.
(2) Press [Enter] after selecting
the language.
Setting the current time
Set the current time in the order of year (4 digits), month (2 digits), day (2 digits), hour (24-hour
clock, 2 digits), and minutes (2 digits).
Press [Time Setting].
1
(1) Use [▼] [▲] [ ] [ ] or the
2
(2) Press [Enter] after entering
numeric keypad to enter the
current time.
the time.
1-52
Getting Started
Page 71

Setting the daylight saving time
Time Setting :2004 09/24 13:30
Comm. Line :Tone
Reception Mode :Fax Ready Mode
TTI Enter/Edit
User Install
Select ON/OFF and select [Enter].
Enter
1/2
Language :English
Set Daylight Saving:OFF
Enter
Cancel
Set Daylight Saving
OFF ON
Language :English
Time Setting :2004 09/24 13:30
Set Daylight Saving:OFF
Comm. Line :Tone
Reception Mode :Fax Ready Mode
TTI Enter/Edit
User Install
Select Comm Line
Enter
1/2
Enter
Cancel
Comm. Line
Tone
Pulse
Select the validity for the daylight saving time.
Press [Set Daylight Saving].
1
Basic Settings (Setting Mode)
(1) Select [ON] to make the day-
2
light saving time valid, and
[OFF] to make it invalid.
(2) Press [Enter] after selecting.
Setting the communication line
Set this to match the type of line to which the machine is connected.
Press [Comm. Line].
1
Getting
Started
COPY
Chapter1
COPY
Chapter2
COPY
Chapter3
FAX
Chapter1
FAX
Chapter2
FAX
Chapter3
(1) Select the dial type.
2
(2) Press [Enter] after selecting.
Getting Started
FAX
Chapter4
Common
Settings
In This
Case...
Appendix
1-53
Page 72

Getting
Reference
Language :English
Time Setting :2004 09/24 13:30
Set Daylight Saving:OFF
Comm. Line :Tone
Reception Mode :Fax Ready Mode
TTI Enter/Edit
User Install
Select reception mode
Enter
1/2
Enter
Cancel
Reception Mode
Ans/Fax
Ready Mode
Fax/Tel
Ready Mode
Tel/Fax
Ready Mode
Tel
Ready Mode
Fax
Ready Mode
Started
Setting the reception mode
Select the reception mode to match the usage.
For the details of selecting the reception mode, refer to page 1-55.
Press [Reception Mode].
1
(1) Select the reception mode.
2
(2) Press [Enter] after selecting.
1-54
Getting Started
Page 73

Basic Settings (Setting Mode)
How to select the reception mode
Select the reception mode to match the usage. You can determine which is the best reception
mode to select by answering the following questions.
What is this machine
being used for?
A For a fax only.
B
For a fax, phone, and answering machine.
B
How are faxes received?
A Answering the phone, receive the fax
manually.
B Not answering the phone, receive the
fax automatically.
B
What are the phone and
fax usage frequencies?
A The fax is used most often.
B The phone is used most often.
C An answering machine is used.
A
A
A
Auto receiving for fax only
(see page 3-40)
(Fax ready mode)
Faxes are automatically received, but the phone can
●
be answered when it rings.
Primarily using the phone
(see page 3-46)
(Tel ready mode)
Sets the priority to recieving calls, not faxes.
●
Faxes cannot be received when no one is in.
▲
Receiving a phone call with priority
given to fax
(Fax/Tel ready mode-Fax priority)
The machine w ill quietly r eceive a fax with out
●
ringing.
Remains in the fax reception mode for a while after
▲
a call comes in. Therefore when it is a phone call,
the other party is made to wait, and the calling
party will accrue phone charges.
(see page 3-41)
Getting
Started
COPY
Chapter1
COPY
Chapter2
COPY
Chapter3
FAX
Chapter1
FAX
Chapter2
FAX
Chapter3
B
C
Auto receiving with priority given
to the phone
(Tel/Fax ready mode-Phone priority)
The reception mode is entered when the phone rings
●
to keep down the phone charges of the calling party
when it is a phone call while also receiving faxes
automatically.
When there is a phone call and the phone rings
▲
more than the preset number of times, the calling
party will be subject to phone charges even if no one
is in.
(see page 3-42)
Using both the answering machine
and fax
(Ans/Fax ready mode)
Wh en it is a phone ca ll , the an sw ering ma chine
message is played, and when it is a fax, the fax is
automatically received.
(see page 3-44)
FAX
Chapter4
Common
Settings
In This
Case...
Appendix
Getting Started
1-55
Page 74

Getting
6/ 22
Dallas_
Clear
Cancel
Enter
TTI 1
Lower
Symbol
Space
1
2
3
4
5
6
7
8
9
0
Q
W
E
R
T
Y
U
I
O
P
_
Z
X
C
V
B
N
M
.
@
A
S
D
F
G
H
J
K
L
Reference
Time Setting :2004 09/24 13:30
Comm. Line :Tone
Reception Mode :Fax Ready Mode
TTI Enter/Edit
User Install
Select ON/OFF and select [Enter].
Enter
1/2
Language :English
Set Daylight Saving:OFF
Enter
Cancel
Dial Tone Detection
OFF ON
Note
Started
Setting dial tone detection
Select if you set the dial tone detection.
Select [OFF] normally.
Press [Dial Tone Detection].
1
(1) Select [ON] to detect the dial
If you se lect [ON], you
cannot transmit the faxes
through line that does not
send the dial tone.
2
(2) Press [Enter] after selecting.
tone, and [OFF] if the detection is not required.
Setting the sender name
Three types of sender’s names can be set.
For details of character
en tr y, re fe r to “How to
Ent e r C h ara c ter s ” on
page 1-44.
1-56
Getting Started
Press [TTI Enter/Edit].
1
Enter TTI 1.
2
(1) Press [TTI 1].
(2) Enter the TTI.
(3) Press [Enter] after the entry.
Enter TTI2 and TTI3 in the same
3
steps above.
Page 75

Language :English
Time Setting :2004 09/24 13:30
Set Daylight Saving:OFF
Comm. Line :Tone
Reception Mode :Fax Ready Mode
TTI Enter/Edit
User Install
Select the Default TTI
and select [Enter].
Enter
1/2
1:Dallas Office
2:General dep.
3:Account dep.
Enter
Cancel
Standard TTI
Setting the standard TTI
Language :English
Time Setting :2004 09/24 13:30
Set Daylight Saving:OFF
Comm. Line :Tone
Reception Mode :Fax Ready Mode
User Install
Enter your fax number
Enter
2/2
Enter
Cancel
TTI Number
1234567890
_
Clear
-
+
Note
Select the TTI normally used.
Press [Standard TTI].
1
(1)Select the TTI.
2
(2) Press [Enter] after selecting.
Basic Settings (Setting Mode)
Getting
Started
COPY
Chapter1
COPY
Chapter2
Setting the TTI number
Press [TTI Number].
· Up to 20 digits can be
set for the TTI number.
· T h e “ +” d enot e s the
country code number.
· If the number is incorre ct , press [Clear] to
enter the correct number.
1
Use the numeric keypad to enter
2
the TTI number.
COPY
Chapter3
FAX
Chapter1
FAX
Chapter2
FAX
Chapter3
FAX
Chapter4
Common
Settings
In This
Case...
Getting Started
Appendix
1-57
Page 76

Getting
Enter
Voice Guidance Key
Assists with operational and troubleshooting
procedures
When blinking, press the voice guidance
key to receive instruction
Play -> Stop -> Repeat
Speed Dial
Enter
Guidance
Paper Jam
Sample
Example of operations
that utilize voice guidance
Open the cover marked by the arrow.
and remove the paper.
Paper jam!Paper jam!
This is a demo of the paper
jam removal procedure.
Started
Voice Guidance
Voice guidance uses “audible messages” to explain functions or the operation method.
VOICE GUIDANCE
VOICE GUIDANCE flashes when voice guidance can be given and during an audio message. Voice
guidance can be stopped by pressing VOICE GUIDANCE again during the message.
<Flashing>
■ Voice guidance sample display
When VOICE GUIDANCE is pressed when it is not flashing, a voice guidance example is displayed.
· Press [Speed Dial Enter] to display the speed-dial setting enter/edit screen. (see step 3, on
page 1-60)
· Press [Paper Jam Sample] to display a sample demonstration of a paper jam troubleshotting
method.
· Press [Guidance] to change the mode or volume for the voice guidance. (see step 4 on page 1-61)
1-58
Getting Started
Page 77

Voice guidance items
Note
Note
Note
Reference
Voice Guidance
■ Operational guidance
This explains functions, the registration/setting method and paper jam clearing method.
Voice guidance is only given for some functions and paper jams.
■ Error reset guidance
When there is a problem with the machine, like a paper jam, guidance is given on how to clear
and reset the problem.
■ Notice guidance
Guidance of the machine’s status, such as “A document has been left on the glass” when a document has been left on the glass.
For “Error Reset Guidance” and “Notice Guidance”, guidance automatically starts depending on the machine status regardless
of VOICE GUIDANCE status.
■ Complete beep
This guidance is given when copying has been completed, a fax transmission/reception is completed and when the received document printing is completed.
Getting
Started
COPY
Chapter1
COPY
Chapter2
COPY
Chapter3
FAX
Chapter1
FAX
Chapter2
FAX
Chapter3
Set “Voice” for each completion sound at Complete Beep in Sound Settings. (see page 1-62)
Operation guidance mode
There are 2 types of modes in operation guidance. The default setting is “Manual”.
OP. guidance mode Operation
Automatic Audio messages are given whenever available.
Manual User must press VOICE GUIDANCE in order to receive audio instruction.
FAX
Chapter4
Common
Settings
In This
Case...
Appendix
Getting Started
1-59
Page 78

Getting
Enter
Speed Dial
Copy
Functions
User
Install
Group Name
Store Doc
Settings
Scanner
Settings
Settings
Paper
Settings
Counter
Select item to edit.
Fax
Functions
Management
*Delete and Move Up. The next number
will move up into the vacant space.
Enter
Enter/Edit
Delete
Delete And
Move Up
Insert
Speed Dial
Select item to edit.
Enter/Edit
Select a number to enter/edit.
Enter
1/84
Note
Started
Example: Speed-Dial Enter/Edit
Press SETTING and then press
1
[Speed Dial].
Press [Enter/Edit].
2
VOICE GUIDANCE flashes.
3
Press the speed-dial number you
want to set.
Mode “Automatic”:
Automatic operational guidance begins when this screen is displayed.
Mode “Manual”:
When in manual mode,
voice guidance is completed wh en th e ent er/edit
op eration fi nishes and
the display returns to the
step 3 screen.
Operation guidan ce be gins when
VOICE GUIDANCE is pressed.
Voice guidance:
“Select the speed-dial you want to
edit........”
Voice guidance settings
The messaging volume and operational guidance mode can be set.
1-60
Getting Started
Press SETTING.
1
Press [Management].
2
Page 79

Soft Key
Auto Reset Time
Sound Settings
Guidance
Energy Save Mode
Auto Print Journal :OFF
Management
Select item to edit.
Enter
1/3
OP. Guidance Mode :Manual
OP. Guidance Volume :Middle
Error Guidance Volume :OFF
Notification Volume :OFF
Guidance
Select item to edit.
Enter
Note
For the voice g uidance
Reference
items, see next page.
Press [Guidance].
3
Press the function you want to
4
set.
Voice Guidance
Getting
Started
COPY
Chapter1
COPY
Chapter2
Function Description Setting
OP. Guidance Mode Set the operation guidance mode. Auto
Manual
OP. Guidance Volume Set the operation guidance messaging volume. Low
Middle
High
Full
Error Guidance
Volume
Notification Volume Set the notice guidance messaging volume. When this is set to OFF, no-
Set the error reset guidance messaging volume. When this is set to OFF,
error reset guidance will not be given.
tice guidance will not be given.
OFF
Low
Middle
High
Full
OFF
Low
Middle
High
Full
COPY
Chapter3
FAX
Chapter1
FAX
Chapter2
FAX
Chapter3
FAX
Chapter4
Common
Settings
In This
Case...
Underlined items are the factory default.
Getting Started
Appendix
1-61
Page 80

Getting
Started
Situations when voice guidance is given
The situations when voice guidance is given and the messaging volume settings/sound output settings are as follows.
Voice guidance item Situations Sound volume settings-output settings
Setting speed-dial
Operation
guidance
Error reset
guidance
Notice guidance
Complete beep
(see page 4-35)
Clearing paper jam
Memory overflow
Copy function management/selection
When a paper jam occurs
Pressing STOP to terminate fax
When toner is low
No paper
When a document is left on the glass after
copying
Loading paper in the bypass tray
When copying completes
When fax transmission completes
When fax reception completes
SETTING→[Management]→[Guidance]→[OP. Guidance Volume] (see page 1-61)
SE TTING→[M anagement]→[G uidance]→[E rror
Guidance Volume] (see page 1-61)
SETTING→[Management]→[Guidance]→[Notification Volume] (see page 1-61)
Output Setting: SETTING→[Management]→[Sound
Settings]→[Complete Beep]→[Copy Complete]
Sound Volume Adjustment: SETTING→[Management]→[Sound Settings]→[Volume]
Output Setting: SETTING→[Management]→[Sound
Settings]→[Complete Beep]→[Transmission Complete]
Sound Volume Adjustment: SETTING→[Management]→[Sound Settings]→[Volume]
Output Setting: SETTING→[Management]→[Sound
Settings]→[Complete Beep]→[Rx Complete]
Sound Volume Adjustment: SETTING→[Management]→[Sound Settings]→[Volume]
1-62
Getting Started
When fax reception print completes
Output Setting: SETTING→[Management]→[Sound
Settings]→[Complete Beep]→[Rx Print Complete]
Sound Volume Adjustment: SETTING→[Management]→[Sound Settings]→[Volume]
Page 81

COPY Chapter1
Basic Copy
Features
Getting
Started
COPY
Chapter1
COPY
Chapter2
COPY
Chapter3
Before Copying ................................................ 2-2
Document size automatic detection .............2-2
Document type/contrast setting ...................2-4
Setting reset ..................................................2-6
Rotate copy ....................................................2-6
Memory overflow during copying .................2-7
How to Perform Basic Copy ............................ 2-8
Next document setting .................................2-9
Copying using both document glass and ADF
Copy reservation .........................................2-13
Selecting the Paper and Copy ......................2-14
Bypass copy .................................................2-15
Zoom Copy ..................................................... 2-16
Zoom to match paper size (Automatic magnifi-
cation) ..........................................................2-16
...2-12
FAX
Chapter1
FAX
Chapter2
FAX
Chapter3
FAX
Chapter4
Common
Settings
In This
Case...
Appendix
Zoom by specifying magnification (Set magni-
fication) .......................................................2-18
Performing zoom copy ................................2-20
Finishing ........................................................ 2-22
Interrupt Copy ..............................................2-24
Checking Copy Print Queue ......................... 2-26
COPY
Page 82

COPY
LTR
LTR
LGL
11x17
DuplexCopy
OFF
Contrast
Auto
Doc.Type
Auto
Zoom
100%
Finishing
No Sort
Others
001
Set
Copy Ready
Memory 99%
Auto doc. size detection failed!
Copy continue? (Legal/100%)
Yes
No
Note
Note
Chapter1
Before Copying
Document size automatic detection
■ Both the ADF and the document glass can automatically detect 11"×17", Legal (14"×8.5"), Let-
ter (11"×8.5"), Letter (8.5"×11"), Half-letter (8.5"×5.5"), and Half-letter (5.5"×8.5") sized documents.
■ When the document size cannot be automatically detected
The following message will be displayed when the document size detection sensor is not working properly because the scanner is operating or the platen cover is open.
· Press [Yes] or START to copy onto the selected paper.
Depending on the paper, the image could run off the paper or there could be extra blank areas on the paper.
· Press [No] or RESET to cancel the operation and return to the standby screen.
Restart the operation by selecting the paper to be used for copying or specifying the scan size.
2-2
COPY Chapter1 ● Basic Copy Features
Page 83

Before Copying
LTR
LTR
LGL
11x17
DuplexCopy
OFF
Contrast
Auto
Doc.Type
Auto
Zoom
100%
Finishing
No Sort
Others
001
Set
Copy Ready
Memory 99%
Paper size is unsuitable.
Copying with autoselected paper.
Copy continue? (Letter /100%)
Yes
No
Note
Note
Reference
■ When the size is automatically detected, but matching paper is not loaded into the cassettes
The following message will be displayed when the machine cannot locate appropriate paper.
Getting
Started
COPY
Chapter1
COPY
Chapter2
· Press [Yes] or START to copy onto the selected paper.
Depending on the paper, the image could run off the paper or there could be extra blank areas on the paper.
· Press [No] or RESET to cancel the operation and return to the standby screen.
Change the copy magnification, and restart the operation.
For details of other errors, refer to page 5-24.
COPY
Chapter3
FAX
Chapter1
FAX
Chapter2
FAX
Chapter3
FAX
Chapter4
Common
Settings
In This
Case...
COPY Chapter1 ● Basic Copy Features
Appendix
2-3
Page 84

COPY
LTR
LTR
LGL
11x17
DuplexCopy
OFF
Contrast
Auto
Doc.Type
Auto
Zoom
100%
Finishing
No Sort
Others
Copy Ready
001
Set
Memory 100%
LTR
LTR
LGL
11x17
DuplexCopy
OFF
Contrast
Auto
Doc.Type
Auto
Zoom
100%
Finishing
No Sort
Others
Copy Ready
Select the document type and select [Enter].
001
Set
Doc.Type
Auto
Text&Photo
Photo
Background
Cancel Enter
LTR
LTR
LGL
11x17
DuplexCopy
OFF
Contrast
Auto
Doc.Type
Photo
Zoom
100%
Finishing
No Sort
Others
Copy Ready
001
Set
Memory 100%
Reference
Note
Chapter1
Document type/contrast setting
Select the document type/contrast to match the document and text.
■ Document type
Press [Doc.Type].
1
T h e d o c u me n t t y p e
d e fault v a l u e ca n be
changed. For detail s of
cha n gin g t he def a ult ,
refer to “Copy Functions
Settings” on page 2-94.
(1) Select the desired document
2
type from the touch screen.
●Auto
Priority is given to text to automatically scan the document at a
suitable setting. (Default)
●Text&Photo
The document is scanned at a
setting suitable for documents
containing a mixture of images
and text.
●Photo
The document is scanned at a
setting that is suitable for images.
●Background
Thi s mod e will s upp res s the
printout of a documents background.
(2) Press [Enter].
Changed to the selected resolu-
3
Press RESET to cancel the
settings.
2-4
COPY Chapter1 ● Basic Copy Features
tion.
Page 85

LTR
LTR
LGL
11x17
DuplexCopy
OFF
Contrast
Auto
Doc.Type
Auto
Zoom
100%
Finishing
No Sort
Others
Copy Ready
001
Set
Memory 100%
LTR
LTR
LGL
11x17
DuplexCopy
OFF
Contrast
Auto
Doc.Type
Auto
Zoom
100%
Finishing
No Sort
Others
Copy Ready
Adjust the contrast and select [Enter].
001
Set
Enter
Cancel
Auto
Contrast
LTR
LTR
LGL
11x17
DuplexCopy
OFF
Contrast
Lighter
Doc.Type
Auto
Zoom
100%
Finishing
No Sort
Others
Copy Ready
001
Set
Memory 100%
T he c o n t r a s t de f a u l t
Reference
Note
value can be changed. For
details of chang ing the
de fault, refer to “C opy
Fu nc tions S et tings” on
page 2-96.
■ Contrast
Press [Contrast].
1
(1) Select the desired contrast
2
The contrast can be automati-
(2) Press [Enter].
from the touch screen.
cally selected or manually selected from 5 levels to match
the document.
●Auto
The document is automatically
scanned at a suitable contrast.
(Default)
●Lightest
To scan at a lighter contrast
●Lighter
To scan at a lighter contrast
●Normal
For normal documents
●Darker
To scan at a darker contrast
●Darkest
To scan at the darkest contrast
Before Copying
Getting
Started
COPY
Chapter1
COPY
Chapter2
COPY
Chapter3
FAX
Chapter1
FAX
Chapter2
FAX
Chapter3
FAX
Chapter4
Changed to the selected contrast.
3
Press RESET to cancel the
settings.
COPY Chapter1 ● Basic Copy Features
Common
Settings
In This
Case...
Appendix
2-5
Page 86

COPY
Chapter1
Setting reset
●Automatic reset
When the machine has not operated for a set period of time, any adjusted settings made during
the previous copy job will return to the default setting status.
The machine is programmed to reset after three minutes, however this can be changed by the
user. (see page 4-35)
●Using RESET to reset the settings
Press RESET to return to the default values. When you finish copying, press RESET to reset the
settings for the next person.
Rotate copy
● Even if the paper is not loaded in the same orientation as the document, the machine will automatically rotate the image to make copying possible.
● The direction of rotation is counterclockwise.
● During zoom in/out copying, the image will be rotated so that the document should fit on the pa-
per. However, the rotation will not be performed when the zoomed image is larger than the 11"×
17"width.
*Example: Automatic zooming of Letter
● Rotation is not performed when the paper size and zoom are specified.
● Rotation is not performed for custom size documents or when the document size cannot be auto-
matically detected.
● Rotation is not performed during Combine copy, Repeat, or XY zoom.
●Rotation copying is not performed to paper sizes other than Letter, Letter , Half-letter, and
Half-letter .
→
11"×17
"
or a 129% copy.
2-6
COPY Chapter1 ● Basic Copy Features
Page 87

Memory overflow during copying
LTR
LTR
LGL
11x17
DuplexCopy
OFF
Contrast
Auto
Doc.Type
Auto
Zoom
100%
Finishing
No Sort
Others
Memory overflow.
001
Set
Memory 1%
LTR
LTR
LGL
11x17
Scanning
Scan Pages 1 PrintPages 1 Copie 1/ 2
DuplexCopy
OFF
Contrast
Auto
Doc.Type
Auto
Memory 3%
Yes
No
Memory overflow.
Number of stored pages:18
Store these pages?
LTR
LTR
LGL
11x17
DuplexCopy
OFF
Contrast
Auto
Doc.Type
Auto
Zoom
100%
Finishing
No Sort
Others
Press [Stop] to exit the documents.
Scan Pages 2 PrintPages 2 Copie 1/ 2
001
Set
Note
When the memory overflows during a copy job, take the following steps.
■ When the memory overflows during the first page of the document scan
Before Copying
Press STO P t o return to the
standby screen.
→
Change the resolution or wait until
the memory is available before trying to copy again.
■ When the memory overflows during the second page or later of
the document scan
· Press [Yes] to copy the stored
pages.
· Press [No] to cancel the copy.
→
Change the resolution or wait until the memory is available before
trying to copy again.
Getting
Started
COPY
Chapter1
COPY
Chapter2
COPY
Chapter3
FAX
Chapter1
FAX
Chapter2
FAX
Chapter3
When using the ADF, the display on the right
is shown when the documents still remain.
Press STOP to discharge the remaining documents.
COPY Chapter1 ● Basic Copy Features
FAX
Chapter4
Common
Settings
In This
Case...
Appendix
2-7
Page 88

COPY
Operating tips
Note
Reference
Reference
Chapter1
How to Perform Basic Copy
●Press COPY to change to the Copy screen.
● For the default settings, copying is performed at Zoom 100%, Paper: Automatic, Document type: Auto-
matic, and Contrast: Automatic.
● For “Paper: Automatic,” the paper that matches the document will be selected. The selectable paper sizes
are 11"×17", Legal, Letter, Letter , Half-letter, and Half-letter . Other paper sizes will not be automati-
cally selected. In this case, press the touch screen to select the cassette containing the paper you want to
copy on.
● Copying cannot be performed when a real time transmission has been scheduled. (see page 3-62)
Ho w to load docume nt
(see page 1-42)
Document type/contrast
setting (see page 2-4)
· This can be set from 1 to
999.
· If you make an incorrect
entry, overwrite it with
the correct entry.
· Whe n t he num ber of
copies is not set, 1 copy
will be made.
Load the document.
1
Set the docment type and con
2
trast as necessary.
Perform the settings for each
3
copy function.
Use the numeric keypad to enter
4
the number of copies.
-
2-8
COPY Chapter1 ● Basic Copy Features
Press START
5
Copy will begin.
.
Page 89

Next document setting
Operating tips
Yes
No
Scanning
Scan Pages 1 PrintPages 1 Copie 1/ 1
Next doc
Memory 94%
Reference
Note
How to Perform Basic Copy
The next document can be set when performing Sort Copy (see page 2-22), Combined Copy (see
page 2-30), Duplex Copy (see page 2-67), Booklet Copy (see page 2-78) or Card Copy (see page
2-86) to scan a different document.
The Next document default setting is “No” when using the ADF, and “Yes” when using the document glass.
■ When using the ADF
Load the document.
Ho w to load docume nt
(see page 1-42)
Ca rd Copy is availab le
only from the document
glass.
1
Set Sort Copy/Combine Copy/Du-
2
plex Copy/Booklet Copy.
Press START.
3
Getting
Started
COPY
Chapter1
COPY
Chapter2
COPY
Chapter3
FAX
Chapter1
FAX
Chapter2
FAX
Chapter3
FAX
Chapter4
COPY Chapter1 ● Basic Copy Features
Common
Settings
In This
Case...
Appendix
2-9
Page 90

COPY
Yes
No
Scanning
Scan Pages 4 PrintPages 1 Copie 1/ 1
Next doc
Memory 94%
LTR
LTR
LGL
11x17
Complete
Next Doc
Zoom
Auto
Contrast
Auto
Doc.Type
Auto
Set next document.
Set next doc.
Memory 94%
Note
Chapter1
· The Ne xt Doc se tting
can be deleted by pressing [Complete].
· To scan another document, press [Yes] during
the document scan.
Press [Yes] while the document
4
is being scanned.
When scanning has been com-
5
pleted, load the next document.
Press [Next Doc]. Scanning of
6
the next document will begin.
2-10
COPY Chapter1 ● Basic Copy Features
Copying will start when scan-
7
ning has been completed.
■ When using the document glass
Load the document.
1
Set Sort Copy/Combined Copy/
2
Duplex Copy/Card Copy.
Page 91

Note
Yes
No
Scanning
Scan Pages 1 PrintPages 1 Copie 1/ 1
Next doc
Memory 98%
LTR
LTR
LGL
11x17
Complete
Next Doc
Zoom
Auto
Contrast
Auto
Doc.Type
Auto
Set next document.
Set next doc.
Memory 94%
LTR
LTR
LGL
11x17
Complete
Next Doc
Zoom
Auto
Contrast
Auto
Doc.Type
Auto
Set next document.
Set next doc.
Memory 94%
Copying of the first copy
Note
will start when scanning
has been completed.
How to Perform Basic Copy
Press START.
3
Getting
Started
COPY
Chapter1
COPY
Chapter2
Pre s sin g [N o] dur ing
document scanning will
start the copy ing of all
documents when the scan
has been completed.
When scanning has been com-
4
pleted, load the next document
(if a book, set the next page in
place).
Press [Next Doc]. The scanning
5
of the next document will begin.
Press [Complete] when all the
6
documents have been scanned.
COPY
Chapter3
FAX
Chapter1
FAX
Chapter2
FAX
Chapter3
FAX
Chapter4
Common
Settings
In This
Case...
Copying will start from the second
7
copy.
COPY Chapter1 ● Basic Copy Features
Appendix
2-11
Page 92

COPY
LTR
LTR
LGL
11x17
LTR
Yes
No
Scanning
Scan Pages 1 PrintPages 1 Copie 1/ 1
Next doc
Memory 98%
LTR
LTR
LGL
11x17
Complete
Next Doc
Zoom
Auto
Contrast
Auto
Doc.Type
Auto
Set next document.
Set next doc.
Memory 94%
Note
Note
Note
Chapter1
Copying using both document glass and ADF
Activating the next document setting will allow you to make a copy using both the document
glass and ADF.
Load the document in the ADF
1
or on the document glass.
Set Sort Copy/Combined Copy/
2
Card Copy cannot be used
for Combined copy.
Duplex Copy.
When a document is load
ed in the ADF, remove the
document from the docu
ment glass.
Press
START
.
3
When the document has been
4
loaded into the ADF, press
during scanning.
When scanning has been com
5
-
-
pleted, load the next document.
[Yes]
-
[Complete]
Press
gin copying.
2-12
COPY Chapter1 ● Basic Copy Features
to be-
Press [Next Doc]
6
ument will be scanned.
. The next doc
-
Page 93

How to Perform Basic Copy
LTR
LTR
LGL
11x17
Copy Reserve Ready
DuplexCopy
OFF
Contrast
Auto
Doc.Type
Auto
Zoom
100%
Finishing
No Sort
Others
001
Set
Scan Pages 12 PrintPages 12 Copie 1/ 1
Memory 23%
LTR
LTR
LGL
11x17
DuplexCopy
OFF
Contrast
Auto
Doc.Type
Auto
Zoom
100%
Finishing
No Sort
Others
Copy Reserve Ready
Complete
Scan Pages 3 PrintPages 3 Copie 1/ 1
001
Set
This will reserve the job, proceed?
Yes
No
Note
LTR
LTR
LGL
11x17
Complete
Next Doc
Zoom
Auto
Contrast
Auto
Doc.Type
Auto
Set next document.
Set next doc.
Memory 94%
Reference
Reference
In this case
When the document is scanned
Wh en t he docum en t is
scanned using the ADF,
copying will begin automatically.
●To have the next document scanned, press “Next Doc” while the document is being scanned.
● The ADF’s default setting is set to “Complete”. To scan the next document, select “Next Doc” while the current docu-
ment is being scanned. For the document glass, the default setting is “Next Doc”.
●Setting to “Complete” during scanning will begin copying of the scanned documents.
7
using the document glass, press
[Complete] to begin copying.
Copy reservation
Getting
Started
COPY
Chapter1
COPY
Chapter2
A different document can be loaded and reserved for copying even while another copy is being printed.
When the printing copy is completed, the copying of the next job will begin, meaning no wasted downtime!
Document type/contrast
setting (see page 2-4)
Th e copy queue can be
checked. (see page 2-26)
“Copy Reserve Ready ” is dis-
1
played while the copy is printing.
Load the document you want to
2
reserve.
Set the document type and con-
3
trast as well as the functions as
necessary.
Press START.
4
Press [Yes] to perform Copy res-
5
ervation.
Scanning of the document will
begin, and copying will start as
soon as the current copy job is
completed.
COPY Chapter1 ● Basic Copy Features
COPY
Chapter3
FAX
Chapter1
FAX
Chapter2
FAX
Chapter3
FAX
Chapter4
Common
Settings
In This
Case...
Appendix
2-13
Page 94

COPY
LTR
LTR
LGL
11x17
LTR
DuplexCopy
OFF
Contrast
Auto
Doc.Type
Auto
Zoom
100%
Finishing
No Sort
Others
Copy Ready
001
Set
Memory 100%
Reference
Reference
Copy Functions
Select the paper source and select [Enter].
Enter
Copy
Function
User
Install
Paper
LTR
LTR
LGL
11x17
Auto
Cancel
Enter
In this case
Note
Chapter1
Selecting the Paper and Copy
The default setting automatically selects the paper to match the document, but you can
specify the paper for copying beforehand.
Load the document.
· How to load document
(see page 1-42)
· Set the document type
and con trast as neces
sary. (see page 2-4)
1
-
to cancel the
RESET
Press
settings.
For using bypass tray for
copying, refer to “Bypass
copy” on page 2-15.
From the touch screen, select the
2
cassette containing the paper
you want to use for copying.
Press
START
to begin copying.
3
2-14
COPY Chapter1 ● Basic Copy Features
To automatically select the paper:
1. Select [Other]
2. Press
3. (1) Press
(2) Press
[Paper]
.
.
[Auto]
[Enter]
.
.
Page 95

Bypass copy
Reference
LTR
LTR
LGL
11x17
Copy Ready
001
Set
DuplexCopy
OFF
Contrast
Auto
Doc.Type
Auto
Zoom
100%
Finishing
No Sort
Others
Memory 100%
Paper loaded in the bypass
Note
Note
Note
Selecting the Paper and Copy
Bypass copy is available with the bypass tray.
For loading paper in the bypass tray, refer to page 1-32.
Load the document.
1
Open the bypass tray.
2
When loading paper that
is larger than the bypass
tray, open the extension
tray.
Align the guide plate to the pa-
Be sure to place the printing surface downward.
3
per size. Place the printing surface downward, and load the paper by inserting its edge all the
way to the back.
Bypass tray
Extension tray
Getting
Started
COPY
Chapter1
COPY
Chapter2
COPY
Chapter3
FAX
Chapter1
FAX
Chapter2
FAX
Chapter3
FAX
Chapter4
Press RESET to cancel the
settings.
The bypass tray is automatically
4
selected when paper has been
loaded into it.
Press START to begin copying.
5
Guide plate
COPY Chapter1 ● Basic Copy Features
Common
Settings
In This
Case...
Appendix
2-15
Page 96

COPY
Legal
121%
77%
11"×17"
Letter
This allows zoom copying to be performed by
setting the magnification at 1% increments.
LTR
LTR
LGL
11x17
DuplexCopy
OFF
Contrast
Auto
Doc.Type
Auto
Zoom
100%
Finishing
No Sort
Others
Copy Ready
001
Set
Memory 100%
Reference
Chapter1
Zoom Copy
Zoom copy consists of the method of automatically zooming to match the paper size (automatic magnification) and the method of zooming by setting the magnification (set magnification). The two magnification setting methods are to specify a previously set magnification
or to freely set the magnification (zoom).
Set magnification Paper specification (automatic magnification) zoom
Zoom to match paper size (Automatic magnification)
Zoom copying is performed by automatically selecting the magnification to match the specified
paper size.
Load the document.
· How to load document
(see page 1-42)
· Set the document type
and con trast as neces
sary. (see page 2-4)
1
-
(1) Press
[Zoom]
.
2
2-16
COPY Chapter1 ● Basic Copy Features
Page 97

LTR
LTR
LGL
11x17
DuplexCopy
OFF
Contrast
Auto
Doc.Type
Auto
Finishing
No Sort
Others
Copy Ready
001
Set
Use the arrows or numeric keypad to
select the zoom ratio and select [Enter].
Zoom
100%
Zoom
Enlarge
77%
Legal->
Letter
121%
Legal->
11x17
100%
+
-
25~400
Cancel
100%
Enter
129%
Letter->
11x17
154%
H.LTR
->
Legal
Reduce
64%
11x17->
Letter
50%
11x17->
H.LTR
Auto
LTR
LTR
LGL
11x17
LTR
DuplexCopy
OFF
Contrast
Auto
Doc.Type
Auto
Zoom
Auto
Finishing
No Sort
Copy Ready
001
Set
Others
Memory 100%
Note
Note
When [Auto] is selected
Note
for the magnification, the
paper in the first cassette
is selected.
Zoom Copy
(2) Press [Auto].
(3) Press [Enter].
Getting
Started
COPY
Chapter1
Whe n usi ng th e a uto matic paper setting, the
ma gn if ic at io n is set to
100%. In this case, repeat
from step 2.
· This can be set from 1 to
999.
· If you make an incorrect
entry, overwrite it with
the correct entry.
· Whe n t he num ber of
copies is not set, 1 copy
will be made.
· Pr ess RES ET to cancel
the settings.
Select the desired paper from the
3
touch screen.
Use the numeric keypad to enter
4
the number of copies.
Press START.
5
COPY
Chapter2
COPY
Chapter3
FAX
Chapter1
FAX
Chapter2
FAX
Chapter3
FAX
Chapter4
Common
Settings
COPY Chapter1 ● Basic Copy Features
In This
Case...
Appendix
2-17
Page 98

COPY
Operating tips
Enter
Margin
OFF
Last job
Combine
OFF
Repeat
OFF
SeriesCopy
OFF
TopUp Copy
OFF
EraseBordr
OFF
EraseCentr
OFF
Card Copy
OFF
XY Zoom
OFF
Nega/Posi
OFF
Copy Functions
Select item to edit.
Paper
Auto
Select the paper source and select [Enter].
Enter
Copy
Function
User
Install
Copy Functions
Paper
LTR
LTR
LGL
11x17
Auto
Cancel Enter
Note
Reference
Chapter1
Zoom by specifying magnification (Set magnification)
Select from the previously set magnifications and perform zoom copying.
● Depending on the selected magnification, the image could run off the paper or there could be extra blank
areas of paper.
● The paper is automatically selected depending on the set magnification. To select the paper, press the
touch screen to select the paper.
● Cassettes containing paper other than 11"×17", Legal, Letter, Letter , or Half-letter, Half-letter can-
not
be selected even if the paper setting has been set to “Auto”. From the touch screen, select the cas-
sette containing the paper you want to use for coping.
Load the document.
Ho w to load docume nt
(see page 1-42)
1
At the default se tt ing,
the paper setting is set to
.
[Auto]
When the paper setting is not set
2
[Auto], use the following pro
to
cedure to set it to [Auto]
(1) Select [Others]
(2) Select
(3) Press
(4) Press
[Paper].
[Auto].
[Enter]
.
twice.
-
.
2-18
COPY Chapter1 ● Basic Copy Features
Page 99

LTR
LTR
LGL
11x17
DuplexCopy
OFF
Contrast
Auto
Doc.Type
Auto
Zoom
100%
Finishing
No Sort
Others
Copy Ready
001
Set
Memory 100%
LTR
LTR
LGL
11x17
DuplexCopy
OFF
Contrast
Auto
Doc.Type
Auto
Finishing
No Sort
Others
Copy Ready
001
Set
Use the arrows or numeric keypad to
select the zoom ratio and select [Enter].
Zoom
100%
Zoom
Enlarge
77%
Legal->
Letter
121%
Legal->
11x17
100%
+
-
25~400
Cancel
77%
Enter
129%
Letter->
11x17
154%
H.LTR
->
Legal
Reduce
64%
11x17->
Letter
50%
11x17->
H.LTR
Auto
When [Auto] is selected
Note
Note
for the magnification, the
paper in the first level is
selected. In this case, repeat from step 2.
Press [Zoom].
3
(1) Select the magnification.
4
(2) Press [Enter].
Zoom Copy
Getting
Started
COPY
Chapter1
COPY
Chapter2
· This can be set from 1 to
999.
· If you make an incorrect
entry, overwrite it with
the correct entry.
· Whe n t he num ber of
copies is not set, 1 copy
will be made.
· Pr ess RES ET to cancel
the settings.
Use the numeric keypad to enter
5
the number of copies.
Press START.
6
COPY
Chapter3
FAX
Chapter1
FAX
Chapter2
FAX
Chapter3
FAX
Chapter4
Common
Settings
In This
Case...
COPY Chapter1 ● Basic Copy Features
Appendix
2-19
Page 100

COPY
LTR
LTR
LGL
11x17
DuplexCopy
OFF
Contrast
Auto
Doc.Type
Auto
Zoom
100%
Finishing
No Sort
Others
Copy Ready
003
Set
Memory 100%
Reference
Note
Chapter1
Performing zoom copy
● The magnification can be set within the range of 25% to 400% at 1% increments to allow fine
zoom copy.
● Use [Zoom] to select a magnification close to the one you want to specify, and then use zoom to
adjust the magnification.
Load the document.
· How to load document
(see page 1-42)
· Set the document type
and con trast as neces
sary. (see page 2-4)
1
-
· This can be set from 1 to
999.
· If you make an incorrect
entry, overwrite it with
the correct entry.
· Whe n t he num ber of
copies is not set, 1 copy
will be made.
Use the numeric keypad to enter
2
the number of copies.
Press [Zoom].
3
2-20
COPY Chapter1 ● Basic Copy Features
 Loading...