

Page 1

OfficeBridge Guide
Plain-paper digital Fax/Copier/Printer/Scanner
Please read this guide before operating this machine.
After you finish reading this guide, keep it handy for easy reference.
Page 2

Chapter 1 Overview of OfficeBridge
1
Chapter 2
Chapter 3
Chapter 4 Operating Utilities
Operating the Various Functions
OfficeBridge Administrator Settings
2
3
4
Page 3
ii How to Read This Manual
How to Read This Manual
Warning
Caution
IMPORTANT
Note
Operational and Safety Information
In this manual, the following symbols are used with the items where important
operational and safety information must be observed.
Symbol Meaning
Describes warnings to protect yourself and others from serious or potentially
fatal injury if you handle the machine incorrectly. For safe operation, please
follow instructions carefully.
Notes a caution to protect yourself and others from personal injury or damage
to properties if you handle the machine incorrectly. For safe operation, please
follow instructions carefully.
Describes important conditions or restrictions you should carefully observe to
avoid problems caused by incorrect operations.
Describes reference information and additional notes for operation.
About the screens
This manual uses the screens of the MFX-2550 standard model, unless otherwise stated.
The screens you see may differ, depending on the options installed.
Page 4

1
Contents iii
Contents
How to Read This Manual .......................................................................................... ii
Operational and Safety Information .........................................................................ii
About the screens .......................................................................................................ii
Chapter 1 Overview of OfficeBridge
Introduction to OfficeBridge ...................................................................................1-2
Managing Faxes as “Digital Documents” ...............................................................1-2
Using Faxes on Computers .....................................................................................1-3
Sharing Information ...............................................................................................1-3
Checking/Changing Machine Functions ................................................................1-4
OfficeBridge Usage Environment ...........................................................................1-5
Screens Used in OfficeBridge ..................................................................................1-6
Login Screen ............................................................................................................ 1-6
Machine Status Screen ...........................................................................................1-7
Document List Screen .............................................................................................1-8
Chapter 2 Operating the Various Functions
Logging In / Logging Out ..........................................................................................2-2
Logging In ................................................................................................................2-2
Logging Out ............................................................................................................. 2-8
Transmitting Documents ..........................................................................................2-9
Transmitting Documents in a Document List .......................................................2-9
Retransmitting Documents ..................................................................................2-14
Canceling Transmission ........................................................................................2-15
Specifying Destinations ........................................................................................2-16
Forwarding Documents ..........................................................................................2-21
Forwarding Documents in a Document List ........................................................2-21
Forwarding Documents Created in Application Software ..................................2-23
Printing Documents.................................................................................................2-26
Printing Documents in a Document List .............................................................2-26
Searching for Documents .......................................................................................2-27
Simple Searching ..................................................................................................2-27
Advanced Searching ..............................................................................................2-28
Checking and Changing Document Information ..............................................2-30
Viewing the Documents in a Document List .......................................................2-30
Checking and Changing Document Information ................................................. 2-31
Registering Sender Distribution Conditions .......................................................2-32
Downloading Documents........................................................................................2-34
Downloading Documents in a Document List .....................................................2-34
Deleting Documents.................................................................................................2-37
Deleting Documents in a Document List .............................................................2-37
Deleting Documents in the Deleted Documents Box ..........................................2-38
Checking the Jobs or History ................................................................................2-40
Checking / Canceling a Communication Job in Progress ....................................2-40
Page 5

iv Contents
Checking / Canceling Print Jobs in Progress .......................................................2-42
Checking the Communication History .................................................................2-44
Checking the Print Job History ............................................................................2-47
Forwarding Documents ..........................................................................................2-48
Forwarding Received Documents .........................................................................2-48
Specifying Forwarding Destinations ....................................................................2-49
Setting the Attachment File Format and Forwarding Period .............................2-54
Chapter 3 OfficeBridge Administrator Settings
Administrator settings list .......................................................................................3-3
Registering Users .......................................................................................................3-5
“User Registration” Screen .....................................................................................3-5
Registering a User...................................................................................................3-6
Copying Existing User Information to Register a New User .............................3-10
Deleting User Information....................................................................................3-11
Importing User Information From an External File ...........................................3-12
Exporting User Information to an External File .................................................3-14
Creating Address Books ..........................................................................................3-15
“Address Book” List Screen ...................................................................................3-15
Registering New Destinations ..............................................................................3-17
Registering the Sender of a Received Document to the Address Book ..............3-19
Copying Existing Destination to Register a New Destination ...........................3-20
Registering Destination Using an LDAP Server .................................................3-21
Deleting Destinations ...........................................................................................3-24
Importing Destination From an External File ....................................................3-25
Exporting Destination to an External File ..........................................................3-30
Grouping Multiple Destinations...........................................................................3-31
Registering Shortcuts .............................................................................................3-38
Setting Folder Shortcuts .......................................................................................3-38
Setting FTP Shortcuts ..........................................................................................3-44
Setting Templates .....................................................................................................3-49
Setting Document Names .....................................................................................3-49
Setting Document Categories ...............................................................................3-53
Setting E-mail Templates .....................................................................................3-56
Setting the Connection Environment .................................................................3-60
Setting the Network Environment .......................................................................3-60
Setting the E-mail Transmission / Reception Environment ...............................3-63
Setting the E-mail Operating Environment ........................................................3-67
Setting the Directory Database Environment .....................................................3-70
Setting Communication Device Monitoring / Control ......................................... 3-75
Setting an Internet Time ......................................................................................3-77
Specifying Device Settings .....................................................................................3-79
Specifying Other Network Settings .....................................................................3-79
Specifying User Install Mode Settings .................................................................3-81
Specifying Default Machine Settings ..................................................................3-82
Settings ..................................................................................................................3-82
Regarding Settings ................................................................................................3-82
Automatically Distributing Received Documents ............................................3-83
Page 6

1
Contents v
Auto Distribution Function ..................................................................................3-83
Setting Auto Distribution (General Settings) ......................................................3-84
Setting Auto Distribution (Individual Settings) ..................................................3-87
Specifying Distribution Destinations ...................................................................3-90
Performing an Auto Distribution Test..................................................................3-94
Copying Existing Auto Distribution Settings to Create New Settings ..............3-96
Deleting Auto Distribution Settings ....................................................................3-97
Usage Management ..................................................................................................3-98
Checking the Usage Status ..................................................................................3-98
Setting the Management History .......................................................................3-101
Resetting the Counters .......................................................................................3-102
Displaying and Copying Machine Settings ......................................................3-103
Setting the Machine Status ................................................................................3-103
Exporting Machine Settings ...............................................................................3-105
Importing Machine Settings ...............................................................................3-106
Specifying Document Box Settings ....................................................................3-107
Saving Transmitted Data (Archive Settings) ...................................................3-111
Specifying Archive Settings ................................................................................3-111
Specifying the Archive Destination ....................................................................3-113
Backing Up Documents .........................................................................................3-117
Specifying Backup Settings ................................................................................3-117
Specifying the Backup Document Display .........................................................3-119
Checking the Backup Log ...................................................................................3-121
Setting Security ......................................................................................................3-123
Setting User Policies ...........................................................................................3-123
Setting the Machine Policy .................................................................................3-130
Setting Access Restrictions .................................................................................3-134
Specifying SSL Certificate Settings ...................................................................3-137
Setting ScanTag ......................................................................................................3-141
“ScanTag Settings” Screen ..................................................................................3-141
ScanTag Settings .................................................................................................3-142
Chapter 4 Operating Utilities
Managing Events (InfoMonitor) .............................................................................4-2
About InfoMonitor ...................................................................................................4-2
Setting InfoMonitor .................................................................................................4-3
Using InfoMonitor .................................................................................................4-17
Creating Cover Pages (CoverPage Editor) .........................................................4-23
Starting CoverPage Editor ...................................................................................4-24
CoverPage Editor Editing Screen .........................................................................4-25
Cover Page Creation Procedure ............................................................................4-30
Specifying Object Settings ....................................................................................4-39
Editing an Object ..................................................................................................4-42
Printing a Cover Page ...........................................................................................4-45
Uploading Cover Pages to OfficeBridge ...............................................................4-47
Page 7

vi Contents
Page 8

Chapter 1
Overview of OfficeBridge
Introduction to OfficeBridge ...................................................................................1-2
Managing Faxes as “Digital Documents” ...............................................................1-2
Using Faxes on Computers .....................................................................................1-3
Sharing Information ...............................................................................................1-3
Checking/Changing Machine Functions ................................................................1-4
OfficeBridge Usage Environment ...........................................................................1-5
Screens Used in OfficeBridge ..................................................................................1-6
Login Screen ............................................................................................................ 1-6
Machine Status Screen ...........................................................................................1-7
Document List Screen .............................................................................................1-8
Page 9

1-2 Introduction to OfficeBridge
Introduction to OfficeBridge
Order form
Order form
Order form
Network
Fax
Destination
Order form
Media
Hard disk
Save as digital document
OfficeBridge is a management system that enables highly functional document
management by connecting with computers on the network.
Managing Faxes as “Digital Documents”
OfficeBridge can manage received faxes as “digital documents”, in a similar manner to
e-mail.
Normally, the content of faxes is checked by printing them out to paper, but OfficeBridge
enables the content of faxes to be checked as images on a computer.
The content of faxes can also be saved as a PDF file.
This enables you to save storage space because the images can be saved to a hard disk or
CD-R, etc. without using a binder as with traditional paper documents.
Page 10
1
Overview of OfficeBridge
Introduction to OfficeBridge 1-3
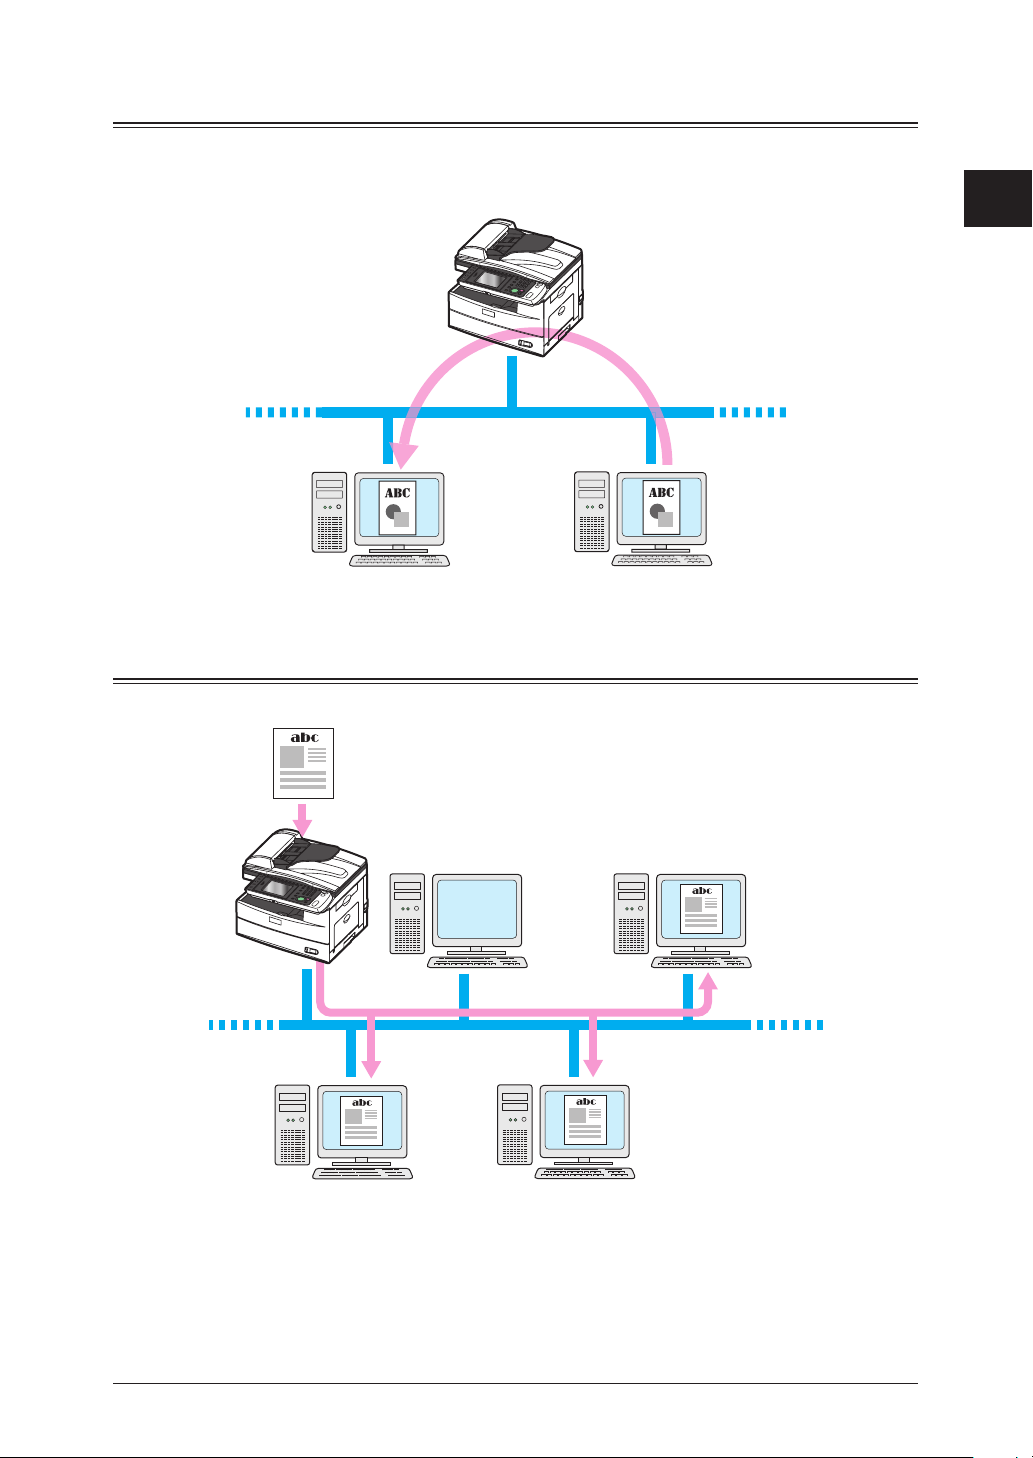
Using Faxes on Computers
Forward received document
Network
Distribute as shared document
Network
Received faxes can be re-used on a computer.
For example, received order forms and invoices can be forwarded to other employees in
the same company without printing them to paper (paperless reception).
Sharing Information
Information can be shared by distributing scanned documents to specific members.
Page 11

1-4 Introduction to OfficeBridge
Checking/Changing Machine Functions
The functions of the machine can be registered and edited directly from a computer.
Page 12

1
Overview of OfficeBridge
OfficeBridge Usage Environment 1-5
OfficeBridge Usage Environment
Network
General public network
Internet
Browser
software
Browser
software
Browser
software
Browser
software
An environment such as the one indicated below is required to use OfficeBridge.
1) Connect the machine to a general public network
2) Connect to the internet to use e-mail, etc.
3) Connect the machine and the computer for each user to the network
4) Install browser software to the computer for each user
Page 13

1-6 Screens Used in OfficeBridge
Screens Used in OfficeBridge
1
6
4 5
2
3
This section describes the basic operation screens used for OfficeBridge.
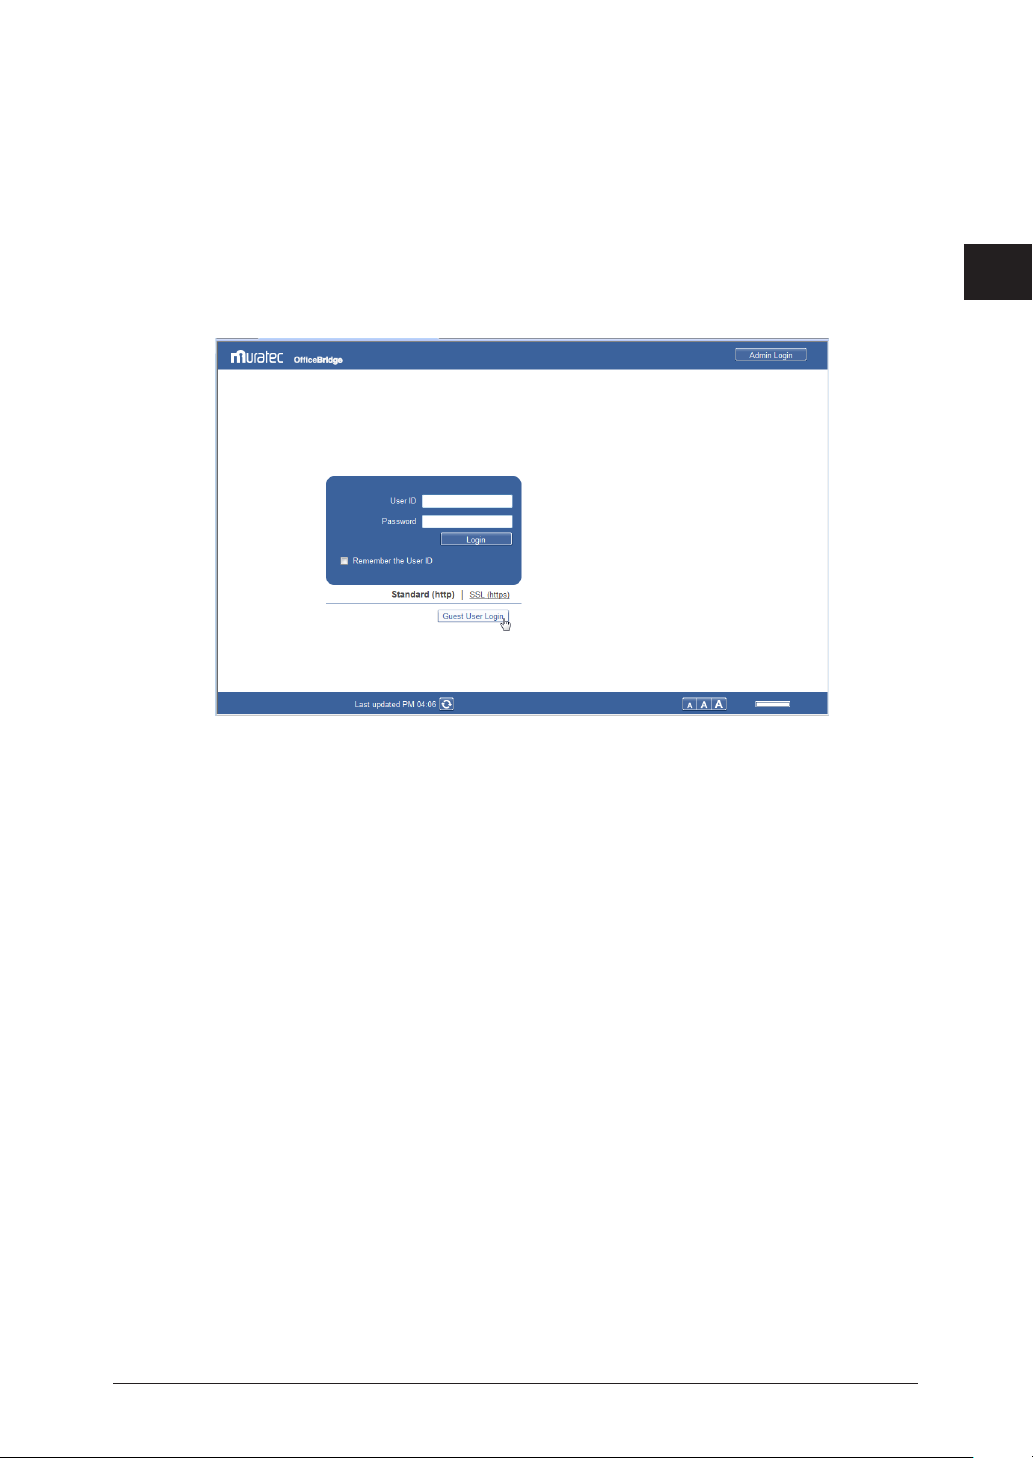
Login Screen
This screen is used for logging in to OfficeBridge. For details, refer to “Logging In /
Logging Out”. (See page 2-2.)
User ID Entry Box
Manually enter the user ID and password.
Item Description
1 User ID Enter the ID for the user to log in as. If the user ID selection is displayed,
you can automatically enter the user ID by selecting a name.
2 Password Enter the password corresponding to the user ID.
3 Remember the
User ID
Select this to remember the latest user ID that was entered.
Page 14

1
Overview of OfficeBridge
Screens Used in OfficeBridge 1-7
User ID Selection
Note
Select the user to log in as from the displayed list of users. If you select a user, the user
ID is automatically entered in the User ID entry box.
Item Description
4 Number Displays the numbers provided when users were registered.
5 Name Displays the registered user names.
If a user name has not been set, the user ID is displayed.
6 Group Displays the name of the group that the user belongs to.
You can filter users by group name.
You can specify to not display the user ID selection in the machine policy settings. •
For details on machine policy settings, refer to “Setting the Machine Policy”. (See
page 3-130.)
If the authentication mode is set to the network mode, the user ID selection is not •
displayed. (See page 3-130.)
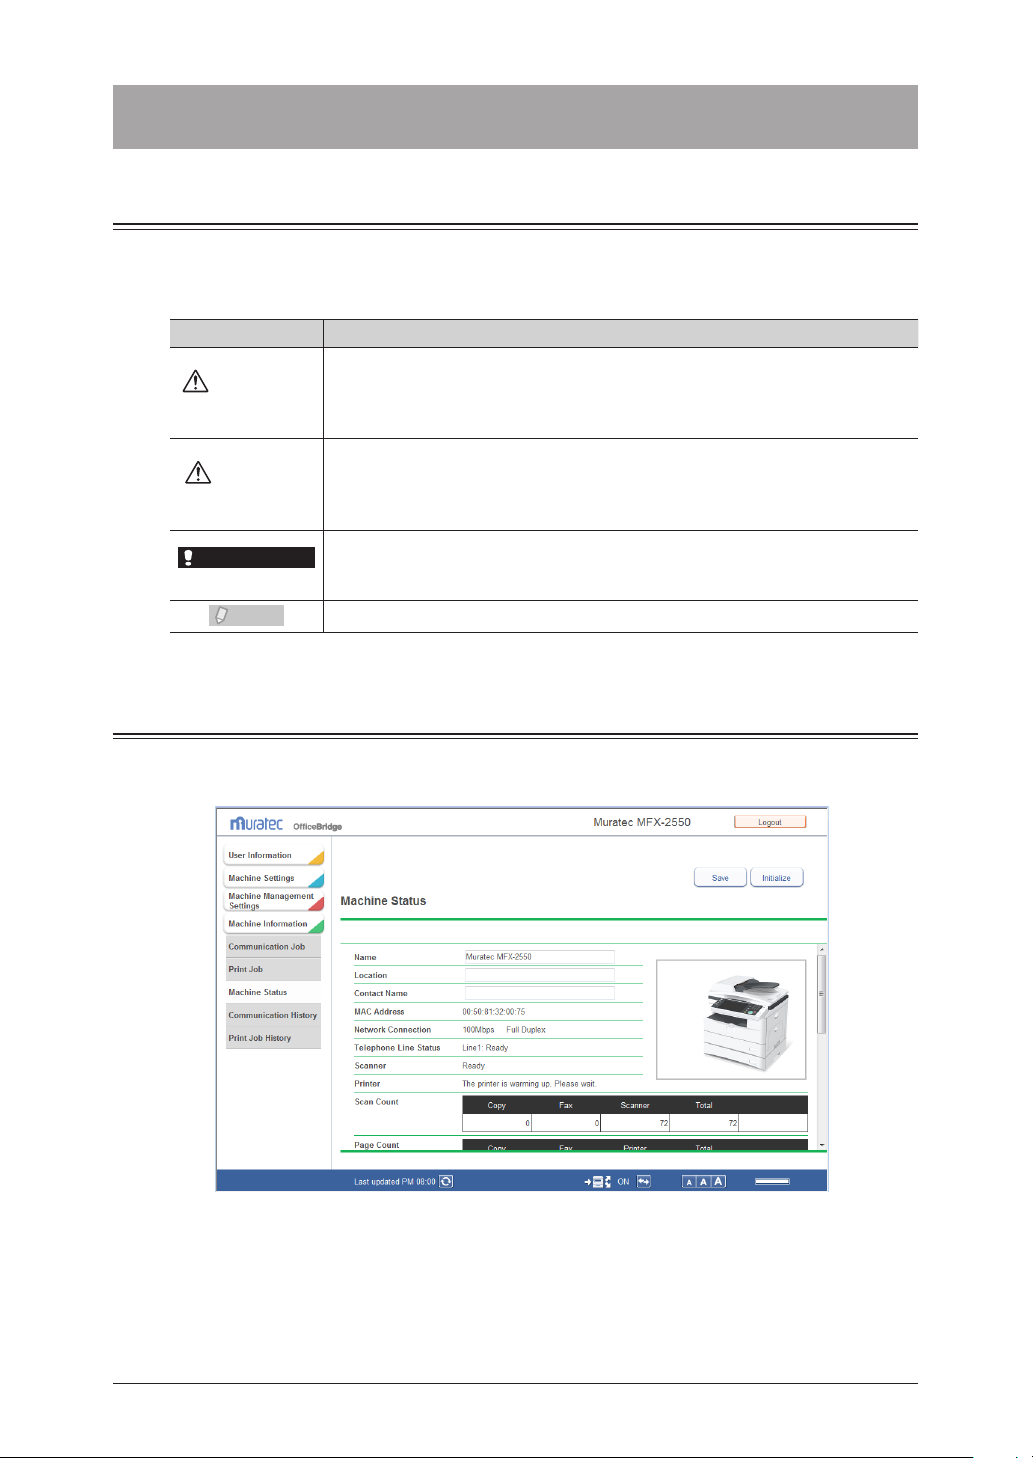
Machine Status Screen
When you enter OfficeBridge, you see the machine status. On this screen, you can set up
various functions. See “Administrator settings list” to see the list. (See page 3-3.)
When you logged in as a user or guest, click [Document Boxes] to switch to the document
list screen.
Page 15

1-8 Screens Used in OfficeBridge
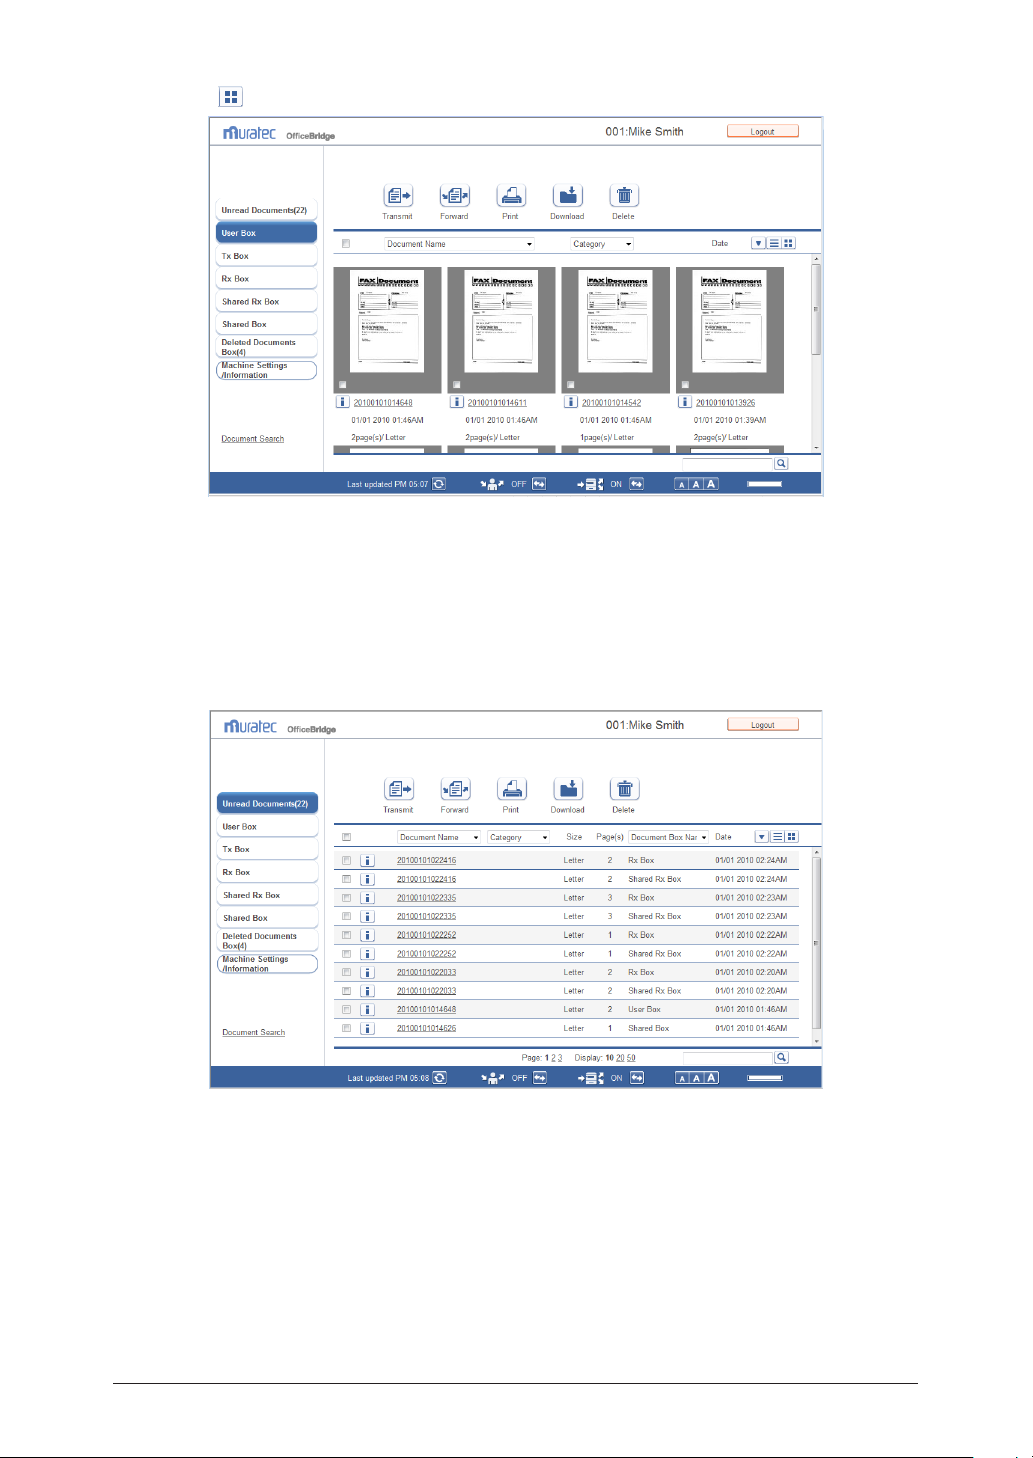
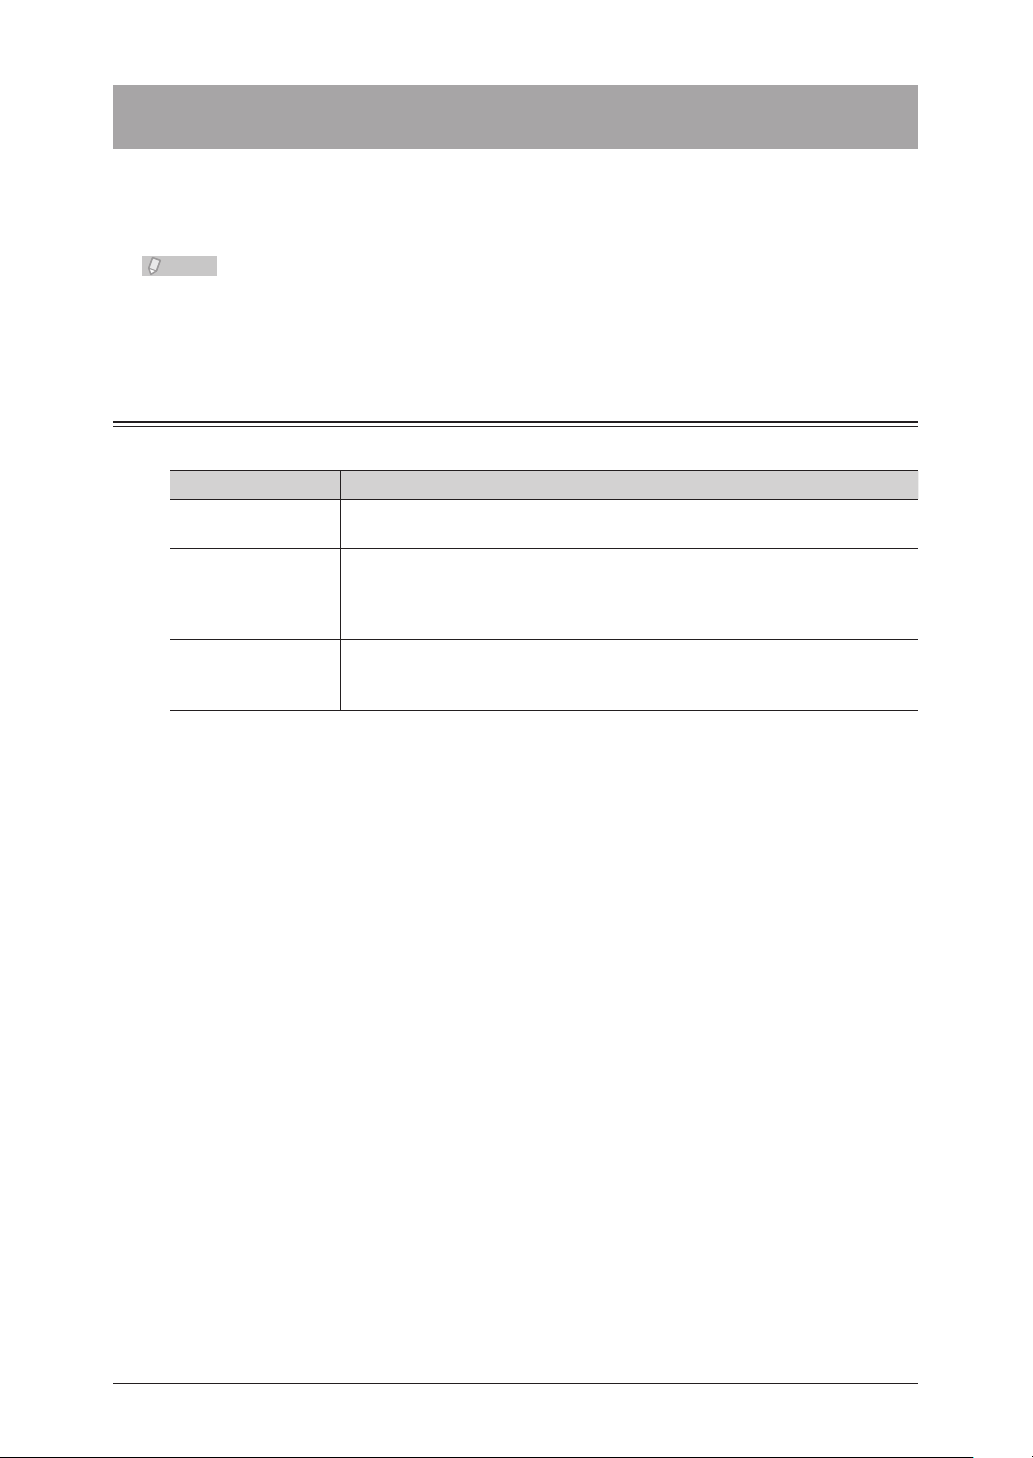
Document List Screen
Header
Function buttons
Footer
1 2 3
Login to OfficeBridge, and press [Document Boxes] to display this screen. This screen
displays a list of documents by their type such as “Received (Rx)” and “Transmitted (Tx)”.
Operations such as transmitting, forwarding, and printing documents are also performed
on this screen.
Header Names and Functions
Item Description
1 Login name
display
2 SSL display This icon is displayed when performing SSL communication
The information displayed here differs according to the screen.
Before login: Nothing is displayed.
After performing a user login: The number and name of the user who is
logged in are displayed.
After performing an administrator login
After performing a guest login
nothing is displayed.
:
The name of the device being used is displayed.
: “Guest” is displayed.
*1
. Otherwise,
Page 16

1
Overview of OfficeBridge
Screens Used in OfficeBridge 1-9
Item Description
Note
4
7 8 9 10 11
5 6
Note
3 [Admin Login] or
[Logout] button
SSL (Secure Socket Layer) is a communication method that encrypts the information that is *1
transmitted and received.
The button displayed here differs according to the screen.
If you click [Admin Login], the administrator screen is displayed. (The login
screen for the administrator screen may be displayed, depending on the
security settings.)
If you click [Logout], the logout process is performed, and the display
returns to the login screen.
Before login: [Admin Login] is displayed.
After login: [Logout] is displayed.
If you perform a logout on the administrator screen when there are no
users, a guest login is performed automatically and the screen after a guest
user login is performed is displayed.
Footer Names and Functions
Item Description
4 Displayed page
and page switch
5 Display Sets the number of items that can be displayed on a single page.
6 Search Enter the text you want to search for from the document name, document
7 Screen refresh
time and
(manual refresh)
button
8 Forwarding
settings status
Displays the currently displayed page in bold.
Click a page number to display the corresponding page.
• Click [<] to move ve pages backward, and click [>] to move ve pages
forward.
• The number before [<] indicates the rst page. Click it to display the rst
page.
• The number before [>] indicates the last page. Click it to display the last
page.
category, or comments of the document box that is currently displayed.
Displays the last time when the screen was updated (hour : minute).
If you click the
Displays the current forwarding settings status.
If the forwarding settings are enabled, “ON” is displayed; if they are
disabled, “OFF” is displayed.
You can click the
forwarding settings.
If the “User Box Forwarding Settings” is disabled in the user policy settings
when the Stand-Alone or Single Sign On mode is set or when the network
mode is set, the forwarding settings status is not displayed. (See page
3-123.)
(manual refresh) button, the screen is refreshed.
(forwarding switch) button to enable/disable the
Page 17

1-10 Screens Used in OfficeBridge
Item Description
Note
Note
9 Auto distribution
settings switch
10 Change font size There are three font sizes; large, medium, and small. (The default font size
11 Remaining disk
space
Function Buttons
Displays the current auto distribution settings status.
If the auto distribution settings are enabled, “ON” is displayed; if they are
disabled, “OFF” is displayed.
You can click the
auto distribution settings.
If the “Auto Distribution” is disabled in the user policy settings, the auto
distribution settings status is not displayed. (See page 3-123.)
is medium.)
The font size setting is retained until it is changed, even after a logout is
performed.
Displays a graph of the remaining space on the data disk of the machine.
The graph is displayed in four levels.
If you move the mouse cursor over the graph, you can display the current
disk space as a number.
If
is displayed, increase the remaining space by downloading documents
to a computer or deleting documents.
(auto distribution switch) button to enable/disable the
Displays the functions you can use on the displayed document list screen.
The displayed function buttons depend on the type of document list screen.
The types and functions of the buttons are indicated below.
Type Description
Transmit
Retransmit
Cancel
Forward
Print
Download
Transmits the document selected in the document list.
If you click this, the “Transmission” screen is displayed. (See page 2-9.)
Retransmits the document selected in the “Tx Box” document list screen.
(Only displayed on the “Tx Box” document list screen.)
If you click this, the “Transmission” screen is displayed. (See page 2-14.)
Cancels the currently transmitting document selected in the “Tx Box”
document list screen.
(Only displayed on the “Tx Box” document list screen.)
If you click this, transmission of the document is canceled. (See page 2-15.)
Forwards the document selected in the document list to another user or
group.
If you click this, the “Forwarding” screen is displayed. (See page 2-21.)
Prints the document selected in the document list. (See page 2-26.)
Downloads the document selected in the document list to a computer.
If you click this, the “Document Download” screen is displayed. (See page
2-34.)
The “Document Download” screen is displayed if “File Format” in
“Download Setting” in “Document Box Settings” is set to “Select when
downloading.” (See page 3-107.)
Page 18

1
Overview of OfficeBridge
Screens Used in OfficeBridge 1-11
Delete
Note
Type Description
Deletes the document selected in the document list.
If you click this, a confirmation message is displayed. Deleted documents
are moved to the “Deleted Documents Box” document list. (See page 2-38.)
If you click this button after selecting a document in the “Deleted
Documents Box” document list, the document is permanently deleted from
OfficeBridge.
Restore
Search again
Returns a document selected in the “Deleted Documents Box” document
list to its original document list. (See page 2-39.)
Displayed after executing a document search.
Click this to display the search screen again. The search conditions you
entered for the previous search are entered on the displayed search screen.
Text Display and Thumbnail Display
Click
to display a document list in text format.
Page 19
1-12 Screens Used in OfficeBridge
Click to display a document list in thumbnail format.
“Unread” and “Deleted Documents box” Document Lists
Unread Documents
Displays a list of all unread documents, regardless of whether they were sent to a
personal or shared destination.
Documents are removed from this document list as soon as they are read.
Page 20

1
Overview of OfficeBridge
Screens Used in OfficeBridge 1-13
Deleted Documents Box
Note
Note
Note
Note
Displays a list of all deleted documents, regardless of whether they are personal or
shared.
This document list is shared with other registered users. The displayed documents are
the same for all users.
Documents in the “Deleted Documents Box” document list have not been •
permanently deleted. To delete a document permanently, select it and click
.
You can enable/disable the “Deleted Documents Box” document list in “Enable the •
deleted document box” in “Document Box Settings”. If you disable the document list,
it is not displayed.
The items displayed are indicated below.
Item Description
Checkbox To select a document, select the corresponding checkbox.
• To select all the documents on the displayed page, select the top checkbox.
• Click the same checkbox to deselect the item.
icon
Document Name Displays the file name of the document.
Category Displays the set document category.
Size Displays the paper size of the document.
Displays the properties of the document.
If you click this, the “Document Properties” screen is displayed.
• Click the document name to check a preview image of the document.
• By selecting a le name from the pull-down menu, you can lter the
displayed documents by file name.
• For scanned documents, the date and time that scanning was performed
is set as the file name if you do not set a document name when scanning.
(Example: A document scanned at 13:30:30 on January 15th, 2010 is
named “20100115133030”.)
If you select a document category from the pull-down menu, you can filter
the displayed documents by category.
Page 21

1-14 Screens Used in OfficeBridge
Item Description
Note
Note
Page(s) Displays the total number of pages for the document.
Document Box Name Displays the name of the document box in which the document is stored or
was stored before being deleted.
By selecting a document box name from the pull-down menu, you can filter
the displayed documents by document box name.
Date Displays the date and time that the document was stored or deleted.
When the documents are displayed in ascending order, click [] to switch to
descending order. When the documents are displayed in descending order,
click [] to switch to ascending order.
“Tx Box”, “Rx Box”, and “Shared Rx Box” Document List
Tx Box
Displays a list of the sent documents.
This document list is specific to each registered user. The displayed documents vary
according to the user.
Documents sent from the machine are listed here, if they were sent while the user logging
in to the machine.
Page 22

1
Overview of OfficeBridge
Screens Used in OfficeBridge 1-15
Rx Box
Note
Displays a list of the received documents.
This document list is specific to each registered user. The displayed documents vary
according to the user.
Documents received by the machine are displayed in the “Rx Box” document list when
you have specified distribution settings to store those documents into the “Rx Box”
document list for each user. (See page 3-83.)
Page 23

1-16 Screens Used in OfficeBridge
Shared Rx Box
Note
Note
Note
This screen displays a list of shared documents received by users.
This document list is shared with other registered users. The displayed documents are
the same for all users.
Documents received by the machine are only displayed in the “Shared Rx Box” •
document list when “Shared Rx box” is selected for “Send to Box” in “Auto
Distribution” setting. (See page 3-83.)
You can enable/disable the “Shared Rx Box” document list in “Enable the Shared •
Rx Box” in “Document Box Settings”. If you disable the document list, it is not
displayed. (See page 3-107.)
The items displayed are indicated below.
Item Description
Checkbox To select a document, select the corresponding checkbox.
• To select all the documents on the displayed page, select the top checkbox.
• Click the same checkbox to deselect the item.
icon
Document Name For the Tx Box, the destination (name and fax number or e-mail address) of
Displays the properties of the document.
If you click this, the “Document Properties” screen is displayed.
the document is displayed. For the Shared Rx Box and Rx Box, the sender
(name or fax number) is displayed. If the sender has not registered the
name or fax number in their machine, the reception date/time is displayed.
• Click the document name to check a preview image of the document.
• If you click [+], all the destinations specied for broadcast transmission
are displayed.
• By selecting a le name from the pull-down menu, you can lter the
displayed documents by file name.
• If you have broadcast to more than one destination, fax destinations are
displayed rst. If you click [+], all the specied destinations are displayed.
Page 24

1
Overview of OfficeBridge
Screens Used in OfficeBridge 1-17
Status
Note
Note
Item Description
For the Tx Box
The transmission result is displayed.
<For normal transmission>
Reserved: The reserved transmission is accepted, and it is in a
transmission queue.
If it is delayed transmission, the document remains in standby
until the specified time is reached.
Sending: The transmission process is being executed.
Redial: The document is waiting for redialing.
OK: The transmission has been completed successfully.
Error: An error has occurred during transmission.
Canceling: The transmission is being canceled.
Cancel: The transmission has been canceled.
<For reroute transmission>
Reserved rerouted Tx: The reserved reroute transmission is accepted, and
it is in a transmission queue.
Sending rerouted Tx: The reroute transmission is being executed.
Rerouted Tx OK: The reroute transmission has been completed
successfully.
Rerouted Tx Error: An error has occurred during reroute transmission.
Canceling rerouted Tx: The reroute transmission is being canceled.
Cancel rerouted Tx: The reroute transmission has been canceled.
If you select a result from the pull-down menu, you can filter the displayed
documents by result.
For reroute transmission, the address before rerouting is displayed, and the
result of the reroute transmission is displayed as the communication result.
For the Rx Box and Shared Rx Box
The reception result is displayed.
Receiving / Sending: The reception and transmission process is being
executed.
OK: The reception has been completed successfully.
Error: An error has occurred during reception.
Waiting to print: The reception is complete and the document is
waiting to be printed.
Printing received doc.: The reception is complete and the document is being
printed.
If you select a result from the pull-down menu, you can filter the displayed
documents by result.
Category Displays the set document category.
If you select a document category from the pull-down menu, you can filter
the displayed documents by category.
Size Displays the paper size of the document.
Page(s) Displays the total number of pages for the document.
Page 25

1-18 Screens Used in OfficeBridge
Item Description
Note
Date Displays the date and time when the document was sent/received. When the
document is reserved, displays the date and time when the document was
reserved.
When the documents are displayed in ascending order, click [] to switch to
descending order. When the documents are displayed in descending order,
click [] to switch to ascending order.
“User Box” and “Shared Box” Document Lists
User Box
Displays a list of the documents scanned with the machine.
Documents are also stored in the user box when the user box is specified from the fax
driver.
This document list is specific to each registered user. The displayed documents vary
according to the user.
Page 26

1
Overview of OfficeBridge
Screens Used in OfficeBridge 1-19
Shared Box
Note
Note
Note
Note
A list of the documents stored as shared documents is displayed.
This document list is shared with other registered users. The displayed documents are
the same for all users.
You can enable/disable the “Shared Box” document list in “Enable the Shared Box”
in “Document Box Settings”. If you disable the document list, it is not displayed. (See
page 3-107.)
The items displayed are indicated below.
Item Description
Checkbox To select a document, select the corresponding checkbox.
• To select all the documents on the displayed page, select the top checkbox.
• Click the same checkbox to deselect the item.
icon
Document Name Displays the file name of the document.
Category Displays the set document category.
Size Displays the paper size of the document.
Page(s) Displays the total number of pages for the document.
Displays the properties of the document.
If you click this, the “Document Properties” screen is displayed.
• Click the document name to check a preview image of the document.
• By selecting a le name from the pull-down menu, you can lter the
displayed documents by file name.
• If no le name has been specied at scanning, the scan date/time is
specified as the file name.
(Example: A document scanned at 13:30:30 on January 15th, 2010 is
named “20100115133030”.)
If you select a document category from the pull-down menu, you can filter
the displayed documents by category.
Page 27

1-20 Screens Used in OfficeBridge
Item Description
Note
Date Displays the date and time when the document stored.
When the documents are displayed in ascending order, click [] to switch to
descending order. When the documents are displayed in descending order,
click [] to switch to ascending order.
Page 28

Chapter 2
Operating the Various Functions
Logging In / Logging Out ..........................................................................................2-2
Logging In ................................................................................................................ 2-2
Logging Out ............................................................................................................. 2-8
Transmitting Documents ..........................................................................................2-9
Transmitting Documents in a Document List .......................................................2-9
Retransmitting Documents ..................................................................................2-14
Canceling Transmission ........................................................................................2-15
Specifying Destinations ........................................................................................2-16
Forwarding Documents ..........................................................................................2-21
Forwarding Documents in a Document List ........................................................2-21
Forwarding Documents Created in Application Software ..................................2-23
Printing Documents.................................................................................................2-26
Printing Documents in a Document List .............................................................2-26
Searching for Documents .......................................................................................2-27
Simple Searching ..................................................................................................2-27
Advanced Searching ..............................................................................................2-28
Checking and Changing Document Information ..............................................2-30
Viewing the Documents in a Document List .......................................................2-30
Checking and Changing Document Information ................................................. 2-31
Registering Sender Distribution Conditions .......................................................2-32
Downloading Documents........................................................................................2-34
Downloading Documents in a Document List .....................................................2-34
Deleting Documents.................................................................................................2-37
Deleting Documents in a Document List .............................................................2-37
Deleting Documents in the Deleted Documents Box ..........................................2-38
Checking the Jobs or History ................................................................................2-40
Checking / Canceling a Communication Job in Progress ....................................2-40
Checking / Canceling Print Jobs in Progress .......................................................2-42
Checking the Communication History .................................................................2-44
Checking the Print Job History ............................................................................2-47
Forwarding Documents ..........................................................................................2-48
Forwarding Received Documents .........................................................................2-48
Specifying Forwarding Destinations ....................................................................2-49
Setting the Attachment File Format and Forwarding Period .............................2-54
Page 29
2-2 Logging In / Logging Out
Logging In / Logging Out
Note
A Web browser is used to operate OfficeBridge. For details on the supported Web
browsers, refer to Chapter 6, “Specifications” in the User's Guide. In this chapter, the
procedure for using Internet Explorer is used as an example.
Perform user registration before using OfficeBridge. For details on registering new
users, refer to “Registering Users”. (See page 3-5.)
Logging In
OfficeBridge has three types of users that can log in; “administrators”, “users”, and “guest”.
User Description
Administrator Can specify all the machine settings. If you set an administrator password,
only the administrator can specify machine settings.
User Personal settings can be specified for each user by creating user information
such as a user ID and password. Scanned documents and transmitted/
received documents, etc. are treated as personal documents. Can specify
some of the machine settings.
Guest This type of user logs in without entering a password. Scanned documents
and transmitted/received documents, etc. are treated as shared documents.
Can specify some of the machine settings.
Connecting to OfficeBridge
Start the Web browser and access OfficeBridge.
Start the Web browser.
1
If there is a shortcut to OfficeBridge on the desktop, you can double click the shortcut to start
the Web browser and access OfficeBridge.
Enter the IP address of the machine in the “Address” bar of the Web browser,
2
and press the [Enter] key.
If no users are registered, you are logged in as a guest.
Page 30

1
2
Operating the Various Functions
Logging In / Logging Out 2-3
Logging In From the User List
Note
Select the user to log in as from the list of users. If you select a user, the user ID is
entered automatically.
Click the user name in the user list.
1
The user ID of the user name you click is automatically entered in “User ID”.
Enter the “Password”, and click [Login].
2
If you set the machine policy to Single Sign On, new users can be registered from •
the login screen. For details, refer to “Setting the Machine Policy.” (See page 3-130.)
For details on registering new users, refer to “• Registering Users”. (See page 3-5.)
If user registration is enabled in the guest user policy, a link to the user registration •
page (“If you do not have a User ID, click here.”) is displayed on the login screen. (See
page 3-123.) Click this link to display the user registration screen.
Page 31

2-4 Logging In / Logging Out
Logging In By Entering a User ID
Note
If you do not want people to find out the user IDs of other users, set the login screen to
“User ID Input” and make the users manually enter their user ID and password. (See
page 3-130.)
Enter the “User ID” and “Password”, and click [Login].
1
If you do not know your own “User ID” and “Password”, contact the administrator.•
If you select “Remember the User ID”, the account ID you enter is stored on your •
computer. The next time you access OfficeBridge, the stored user ID is automatically
entered.
If the authentication method in the machine policy is set to “Network”, the user list •
is not displayed. (See page 3-130.)
Page 32
1
2
Operating the Various Functions
Logging In / Logging Out 2-5
Performing a Guest User Login
You can log in to OfficeBridge without entering a user ID and password. If you disable
“Guest Account Setting” in the machine policy settings, you cannot log in with the guest
account. For details, refer to “Setting the Machine Policy”. (See page 3-130.)
There are some restrictions on transmitting/receiving e-mail and specifying machine
settings. The guest user restrictions can be changed in the machine policy. (See page
3-130.)
Click [Guest User Login].
1
Page 33

2-6 Logging In / Logging Out
Performing an SSL Login
Note
OfficeBridge supports SSL (Secure Socket Layer) security for data communication.
SSL communication encrypts the data communicated between the computers and
OfficeBridge to prevent the theft and modification of data by outside parties.
If you perform an SSL login, the [SSL] icon is displayed on the header.
If you perform an SSL login, the response time will be slower than a regular login
because encryption and authentication are performed for the data.
Click “SSL (https)”.
1
Perform the login procedure.
2
Page 34

1
2
Operating the Various Functions
Logging In / Logging Out 2-7
Performing an Administrator Screen Login
Note
If “Administrator Password” is set in the machine policy setting, the administrator screen
login screen is displayed. For details, refer to “Setting the Machine Policy.” (See page
3-130.)
All the machine settings can be specified on the administrator screen.
Click [Admin Login].
1
If an administrator password is not set, this concludes the procedure.
Enter the administrator password, and click [Login].
2
If no users are registered, press [Logout] after connecting to OfficeBridge to log in to
the administrator screen.
Page 35

2-8 Logging In / Logging Out
Logging Out
Note
Perform the logout procedure when you want to close OfficeBridge or switch users. This is
particularly important when multiple users are using the same computer, as other users
will be able to see your files if you remain logged in. Make sure to perform the logout
procedure for security purposes.
Click [Logout].
1
The display returns to the login screen.
If you do not access OfficeBridge for 30 minutes, you are automatically logged out.
Page 36

1
2
Operating the Various Functions
Transmitting Documents 2-9
Transmitting Documents
You can specify destinations and transmit documents scanned on the machine via fax.
You can also transmit the document as an e-mail attachment by specifying the e-mail
address of the destination.
Transmitting Documents in a Document List
You can transmit the scanned documents and received documents on a document list
screen to a destination via fax or e-mail. Select the document to transmit on the document
list screen and specify the settings on the transmission settings screen.
Performing Transmission
Log in to OfficeBridge as a user or a guest. 1 (See page 2-2.)
Click [Document Boxes].
2
Select the document to transmit on the document list screen.
3
Click 4 [Transmit].
Page 37

2-10 Transmitting Documents
Specify the destination.
5
For details on specifying the destination, refer to “Specifying Destinations”. (See page 2-16.)
Specify the various settings as necessary.
6
You can add a cover page. • (See page 2-10.)
You can add or delete documents. • (See page 2-12.)
You can specify a transmission time and add body text for an e-mail. • (See page 2-13.)
Check the specified settings, and click [Send].
7
To check the document that will be transmitted, click the [+] to the left of the “Preview” eld. •
The document that will be sent is displayed, including the cover page.
If you click [Cancel], all the specified settings are canceled and the display returns to the •
document list.
The document to transmit is displayed on the “Transmission” document list, with “Tx Box” or •
“Reserved” displayed in the “Status” field.
Transmission is performed immediately if there are no other transmission jobs waiting. The •
document is reserved if there are other transmission jobs, and is then transmitted when the
other documents have been transmitted.
Attaching a Cover Page
Cover pages uploaded to OfficeBridge can be attached to documents for transmission.
Open the transmission screen and specify the destinations.
1
See “Performing Transmission” step 1 to 5 how to operate. (See page 2-9.)
Click the [+] to the left of “Cover Page”.
2
Select “ON” for “Select Cover Page”.
3
Page 38

1
2
Operating the Various Functions
Transmitting Documents 2-11
Select the cover page to attach from the pull-down menu.
Note
4
Enter the “Subject” and “Text”.
5
The “Subject” and “Text” entered here are automatically recorded on the selected cover page.
Click [Update].
6
The cover page settings are updated.
Specify the other required settings, and click [Send].
7
Transmission is performed with the selected cover page attached to the start of the document.
You can create cover pages. • (See page 4-23.)
The cover pages you create must be uploaded to OfficeBridge. • (See page 4-48.)
Page 39

2-12 Transmitting Documents
Adding and Deleting Documents
You can add or delete documents after selecting documents. Documents created in an
application can be transmitted together if you add them after saving them to the shared
box or a user box using the fax driver.
Open the transmission screen and specify the destinations.
1
See “Performing Transmission” step 1 to 5 how to operate. (See page 2-9.)
Click [Select Doc].
2
Select the box from the “Document Box” pull-down menu.
3
You can select the unread documents box, the user box, the reception box, the transmission •
box, the shared reception box, or the shared box. A list of the documents in the selected box
is displayed.
If you select a document category from the [Category] pull-down menu at the top, you can •
filter the displayed document list by category. You can also switch the number of items
displayed and the displayed page.
Select the documents to add from the document list, and click [Add].
4
To select all the displayed documents, select the top checkbox.•
Click the same checkbox to deselect the item.•
The added documents are displayed in the “Select All” list on the right of the document •
selection screen. You can delete documents by selecting the document name displayed in
this list and clicking [Delete]. To select and delete all the displayed documents, select the top
checkbox.
The documents are transmitted in the order they are displayed in the “Select All” list. To •
change the order, select the document name to move, and click [Move upward] or [Move
downward]. The selected document moves up or down one level each time you click the
button.
Click
Click [Save].
5
The display returns to the setting screen.
Specify the other required settings, and click [Send].
6
to display the selected documents in the thumbnail format.
Page 40

1
2
Operating the Various Functions
Transmitting Documents 2-13
Specifying Advanced Communication Settings
You can specify a transmission time and add body text for an e-mail.
Open the transmission screen and specify the destinations.
1
See “Performing Transmission” step 1 to 5 how to operate. (See page 2-9.)
Click the [+] to the left of “Advanced Settings”.
2
Specify the required settings.
3
Setting Description
TTI Transmit Set whether to print the TTI on the document and which of the three
TTIs that can be registered to print.
Delayed
Transmission
Transmission
Report
F-Code
Transmission
Mail Text Setting
Set this to specify the time to transmit the document. Transmissions can
be reserved up to one month in advance.
If you set the transmission report, you can print the transmission results
or send them to an e-mail address you enter.
To perform F-Code communication, set a sub address and passcode.
For details on F-Code communication, refer to Chapter 4, “F-Code
Communications” in the Scanner and Fax Guide.
When transmitting to an e-mail destination, you can enter the text and subject
of the e-mail to send. If you do not enter a text and subject, they are entered
automatically according to the settings in “Insert Subject / Text (I-Fax or
E-mail)” in “Optional E-mail Settings”. (See page 3-67.)
Page 41

2-14 Transmitting Documents
Setting Description
File Format When transmitting via e-mail, select the file format for the attached file.
TIFF-S: The simple mode TIFF format.
Documents are all converted to A4 size, 200 dpi for transmission.
When the destination machine cannot receive TIFF files, use this
file format.
TIFF: The full mode TIFF format.
Documents are transmitted with the document size and
resolution set when scanning.
PDF: The PDF format.
Documents can be sent in this format when the destination is a computer
or a machine of the same model using the Internet Fax function.
Document(s) after
transmission
Set whether to save the document in the transmission box after
transmission.
Retransmitting Documents
You can retransmit documents that have been transmitted before.
Log in to OfficeBridge as a user or a guest. 1 (See page 2-2.)
[Document Boxes].
Click
2
In the “Tx Box” document list, select the checkbox of the document you want to
3
retransmit.
Click 4 [Retransmit].
The transmission settings screen is displayed with the same settings as last time specified.
You can change each setting on the transmission settings screen.
Page 42

1
2
Operating the Various Functions
Transmitting Documents 2-15
Check the specified settings, and click [Send].
Note
Note
5
To check the document that will be transmitted, click the [+] to the left of the “Preview” eld.•
If you click [Cancel], all the specified settings are canceled and the display returns to the •
document list.
The document to transmit is displayed on the “Tx Box” document list, with “Sending” (when •
transmission is being performed) or “Reserved” (when transmission is reserved) displayed
in the “Status” field. If there are no other jobs in queue, the document is sent immediately;
if there are other jobs in queue, the document will be sent when those jobs are complete.
To send a document to a reroute destination when the reroute function is enabled, the
system automatically resends the document by fax if a communication error occurs in e-mail
transmission.
The reroute transmission function is only enabled when you select a destination with •
“Reroute Setting” set to “ON” in the address book advanced settings. For details, refer to
“Registering New Destinations”. (See page 3-17.)
Canceling Transmission
You can cancel a document transmission job currently in progress, or in queue.
Transmission can be canceled only when a document is currently being transmitted
(indicated by “Sending”) or is reserved (indicated by “Reserved”).
Log in to OfficeBridge as a user or a guest. 1 (See page 2-2.)
[Document Boxes].
Click
2
Select the document to cancel in the “Tx Box” document list.
3
Click 4 [Cancel].
Page 43

2-16 Transmitting Documents
Click [OK].
5
The document transmission is canceled. If normal transmission is canceled, “Cancel” is
displayed for “Status” in the “Tx Box” document list. If reroute transmission is canceled, “Cancel
rerouted Tx” is displayed.
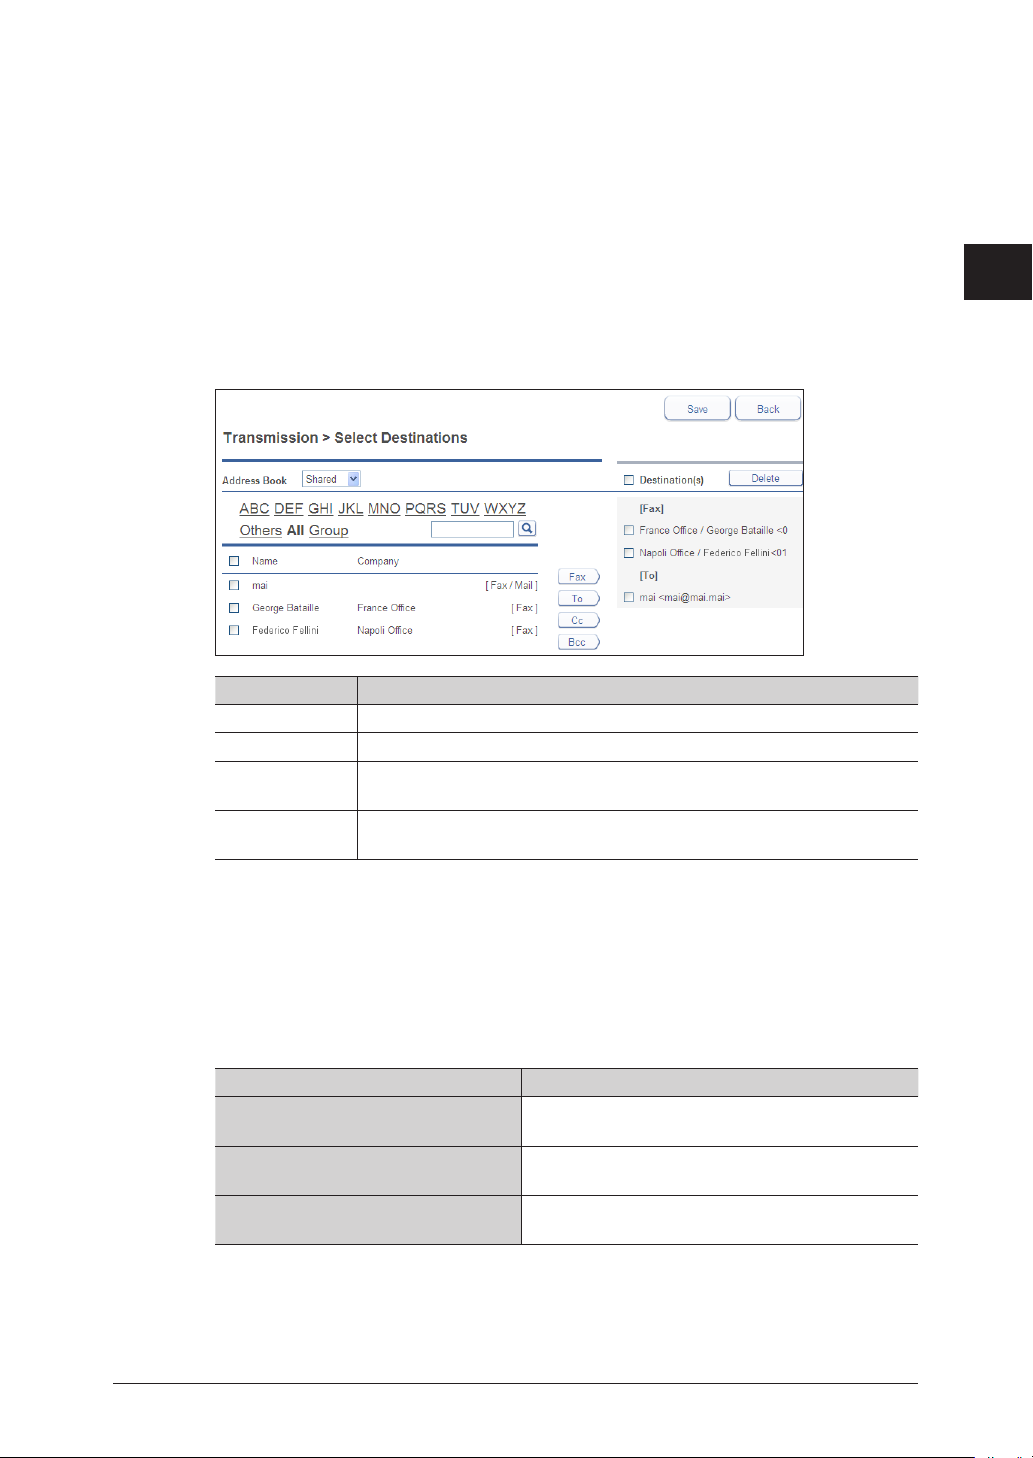
Specifying Destinations
The following four methods are available for specifying destinations. The methods can be
used in conjunction with each other.
Manually entering the destination•
Selecting from the address book•
Searching from an LDAP server•
Selecting a user or group in OfficeBridge•
Manual Entry
Enter the destination fax number or e-mail address in the entry box on the
1
transmission settings screen. (See page 2-10.)
Enter either a fax or e-mail transmission destination. You cannot enter both at the same •
time.
You can enter destinations by selecting the transmission history from the pull-down •
menu
the destination history.
Up to 40 digits can be entered for a fax number. Up to 50 characters can be entered for an •
e-mail address. Up to 30 destinations can be set.
Dialing options can be inserted when entering a fax number. For details on dialing options, •
refer to Chapter 3, “Basic Faxing” in the Scanner and Fax Guide.
When you attach a cover page, enter the name and company name of the
2
. The name and company name will automatically be entered if they are found in
destination.
Up to 30 characters can be entered for the name, and up to 50 characters can be entered for •
the company name.
The name and company name you enter are inserted in the cover page. • (See page 2-10.)
Click [Fax] if you entered a fax number, or [To], [Cc], or [Bcc] if you entered an
3
e-mail address.
The destinations you enter are displayed in the destination list on the right.•
To delete a destination, select the destination to delete from the destination list, and click •
[Delete]. If you select the checkbox to the left of “Destination(s)”, you can select all the
destinations you have entered.
Page 44
1
2
Operating the Various Functions
Transmitting Documents 2-17
Using the Address Book
You can use the address book with destinations registered in advance.
On the transmission settings screen 1 (see page 2-10), select the address book you
want to access from the “Select Destinations” pull-down menu.
Select either [Personal Address Book] or [Shared Address Book]. If you performed a guest user
login, the personal/shared switch is not displayed.
Select a destination from the address book, and click one of the following
2
buttons to add it to the destination list.
Type Meaning
Fax Registers the destination as a fax destination.
To Registers the destination as an e-mail destination.
Cc Registers the destination as a Cc e-mail destination. The original
destination (To) is also notified of the Cc destinations.
Bcc Registers the destination as a Bcc e-mail destination. The original
destinations (To/Cc) are not notified of the Bcc destinations.
The selected items are added to the destination list on the right.•
The registered content is displayed to the right of the address book name. If only a fax •
number is registered, [Fax] is displayed. If only an e-mail address is registered, [Mail] is
displayed. If both are registered, [Fax / Mail] is displayed.
A destination cannot be registered as a fax destination unless it has a fax number registered. A •
destination cannot be registered as an e-mail destination unless it has an e-mail address registered.
The personal address book and shared address book display can also be switched on the •
destination selection screen using the pull-down menu.
You can switch the destination list display using the links above the destination list.•
Type Meaning
[ABC], [DEF], [GHI], [JKL], [MNO],
[PQRS], [TUV], [WXYZ]
[Others]
[Group]
Filters according to the first letter of the destination
name or company name.
Displays the destinations in the order of the
numbers registered in the address book.
Displays only the groups registered in the address
book.
Page 45

2-18 Transmitting Documents
If you enter a string in the search entry field and click • it, items containing the
corresponding string in the address book are searched for and displayed.
To select all the displayed destinations, select the top checkbox. To sort the destinations by •
name, click the [] next to “Name”. To sort the destinations by company name, click the []
next to “Company”.
Click the same checkbox to deselect the item.•
Click [Save].
3
The display returns to the transmission settings screen.
Selecting Users or Groups as Destinations
When transmitting documents to users or groups registered in OfficeBridge, you can
easily specify destinations on the user selection screen.
On the transmission settings screen 1 (see page 2-10), select “Select User” from
the “Select Destinations” pull-down menu.
Select “User” or “Group” from the “User” pull-down menu.
2
Select a user or group from the user selection list, and click [Add] to add it to
3
the destination list.
To delete a destination, select the destination to delete from the destination list, and click •
[Delete].
To select all the displayed users or groups, select the top checkbox.•
Click the same checkbox to deselect the item.•
Click [Save].
4
The display returns to the transmission settings screen.
Page 46

1
2
Operating the Various Functions
Transmitting Documents 2-19
Using LDAP (
You can search for and select destinations from an LDAP (Lightweight Directory Access
Protocol) server.
Lightweight Directory Access Protocol) Server
On the transmission settings screen 1 (see page 2-10), select “LDAP Search” from
the “Select Destinations” pull-down menu.
The “LDAP Search” screen is displayed.
Select the server to search from the “LDAP Server” pull-down menu.
2
Select the search method (“Exact Match” or “Match any conditions”) in the
3
“Search Method” field.
Set the search parameters (“Name”, “Fax Number”, “E-mail Address”, or
4
“Company”) in the “Search Strings” field, and enter the search string in the
entry box.
You cannot search for a company name by itself. When searching for a company name, also
enter the name, fax number, or e-mail address.
The search parameters you can use are indicated below.
Search Parameter Description
Any Searches for items that include the specified string.
Initial Searches for items that start with the specified string.
Final Searches for items that end with the specified string.
Equal Searches for items that exactly match the specified string.
Not used The string entered in the entry box is ignored.
Click [Search].
5
If authentication is required for the LDAP server, the “LDAP Server Authentication” screen •
is displayed.
If authentication is not required, proceed to step 7.•
Page 47

2-20 Transmitting Documents
Enter the account and password, and click [Login].
6
Searching starts.
Select the destinations in the search results, and click one of the following
7
buttons to add them to the destination list.
Up to 30 fax destinations and 30 e-mail destinations can be selected.
Button name Description
Fax Registers the destination as a fax destination.
To Registers the destination as an e-mail destination.
Cc Registers the destination as a Cc e-mail destination. The original
destination (To) is also notified of the Cc destinations.
Bcc Registers the destination as a Bcc e-mail destination. The original
destinations (To/Cc) are not notified of the Bcc destinations.
A destination cannot be registered as a fax destination unless it has a fax number registered •
in the LDAP data. A destination cannot be registered as an e-mail destination unless it has
an e-mail address registered in the LDAP data.
To delete a destination, select the destination you want to delete from the destination list, •
and click [Delete].
Click [Save].
8
The display returns to the transmission settings screen.
Page 48

1
2
Operating the Various Functions
Forwarding Documents 2-21
Forwarding Documents
Note
You can forward received documents to other users or user groups.
If you forward a document to the shared box, all the registered users can view that
document.
Forwarding Documents in a Document List
You can forward the documents in a document list to the shared box, other users or user
groups.
Forwarding Documents in a Document List
Log in to OfficeBridge as a user or a guest. 1 (See page 2-2.)
[Document Boxes].
Click
2
Select the document to forward on the document list screen.
3
Click [Forward].
4
Edit the document name, category, comments, and hold time as necessary. 5 (See
page 2-22.)
Select the forwarding destination.
6
To forward to the shared box, select “Shared Box”.•
To forward to another user or user group, select “User Box”, and click [Select]. • (See page
2-22.)
You can add or delete documents. 7 (See page 2-12.)
Click [Forward].
8
When the selected document is forwarded, the display returns to the document list.•
If you click [Cancel], all the specified settings are canceled and the display returns to the •
document list.
If the “Shared Box” function is disabled in the document box settings, you cannot
forward to the shared box. (See page 3-107.)
Page 49

2-22 Forwarding Documents
Setting the Document Name, Category, Comments, and Hold
Time
Specify each setting as necessary.
Item Description
Document
Name
Category • The document category of the selected document is displayed in the entry box. To
Comment You can add a comment. Up to 1024 characters can be entered. The recipient can
Hold Time The hold time indicates the storage period for the document stored in the reception
• The document name of the selected document is displayed in the entry box.
To change the name, manually change the file name in the entry box. Up to 80
characters can be entered.
• The following characters cannot be used in a document name.
\ / : * ? " < > |
• The document name can be selected from a template (see page 3-49) or the
history in the pull-down menu to the right of the “Document Name” field. The
history of the latest 10 document names and up to 20 document names registered
in the template settings is displayed.
change the name, manually change the document category in the entry box. Up to
20 characters can be entered.
• You can enter a document category by selecting the history in the pull-down
menu to the right of the “Category” field. The latest 10 registered or viewable
document categories are displayed in the history.
check the comments in the document properties. (See page 2-31.)
box of the recipient. Select “No Limit” or “Document Hold Time”. If you selected
“Document Hold Time”, enter the number of days to store the document in the
entry box (between 0 and 99).
User and User Group Settings
Select “User Box” in the “Destination” field, and click [Select].
1
Select “User” or “Group” from the “User” pull-down menu.
2
Select a user or group from the destination list, and click [Add] to add it to the
3
destination list.
To delete a set destination, select the destination to delete, and click [Delete].•
To select all the displayed users or groups, select the top checkbox.•
Click the same checkbox to deselect the item.•
Click [Save].
4
Page 50

1
2
Operating the Various Functions
Forwarding Documents 2-23
Forwarding Documents Created in Application Software
Note
You can import documents created in application software (such as Microsoft Word) and
transmit them to the shared box where they can be viewed by all the registered users.
To perform this operation, you must install the Muratec Fax driver in your computer
in advance. For details on installing the driver, refer to Chapter 2, “Installing to
Windows” in the Printer Guide.
Start the application software and create the document to transmit.
1
Microsoft Word is used here as an example.
Save the document, and select “Print” from the “File” menu.
2
Select [Muratec Fax] from the “Printer Name” pull-down menu in the displayed
3
print dialog.
Click [Properties].
4
The “Fax Printing Preferences” dialog box appears.
Page 51

2-24 Forwarding Documents
Specify the paper settings.
5
Here, “Letter (8.5 × 11in)” is selected for the size, and “Portrait” for the orientation.
Set the resolution.
6
Select 200 × 200 dpi (Normal), 400 × 400 dpi (Fine) or 600 × 600 dpi (S-Fine) for the
resolution.
Click the “Fax Settings” tab.
7
Select “Advanced Mode” in the “Mode” field, and “Save in shared box” in the “Job Type” field.
Page 52

1
2
Operating the Various Functions
Forwarding Documents 2-25
Click [OK].
8
Start printing.
9
When using Microsoft Office Word 2007, click [OK].
The “Document Properties” screen is displayed. If OfficeBridge user settings are specified in
the Muratec Fax driver, OfficeBridge is automatically logged in to, and the forwarding settings
screen is displayed. If user settings are not specified or if the login fails, the login screen is
displayed.
Refer to “Setting the Document Name, Category, Comments, and Hold Time”. (See page 2-22.)
Specify the required settings on the document properties screen, and click
10
[Forward].
Page 53

2-26 Printing Documents
Printing Documents
You can print scanned documents and received documents on the machine.
Printing Documents in a Document List
You can print documents in the document list on the machine.
Log in to OfficeBridge as a user or a guest. 1 (See page 2-2.)
[Document Boxes].
Click
2
Select a document to be printed from the document list screen to print it.
3
In this example, a document inside the user box is selected.
Click [Print].
4
The document is printed.
Page 54

1
2
Operating the Various Functions
Searching for Documents 2-27
Searching for Documents
Note
You can search for documents saved on OfficeBridge. There are two methods for searching;
simple search, which enables you to search by entering a search string only, and advanced
search, which enables you to search by setting detailed conditions.
You can also search for documents included in a document box from the “Search” field
in the footer area. (See page 1-9.)
Simple Searching
You can enter a search string to search for documents that include that string in their
document name, category, or comments.
Log in to OfficeBridge as a user or a guest. 1 (See page 2-2.)
[Document Boxes].
Click
2
Click [Document Search] on the document list screen.
3
Enter the search string in the “Simple Search” field.
4
Page 55

2-28 Searching for Documents
Click [Search].
Note
5
The list of search results is displayed.
You can perform operations such as transmitting documents from the search results.•
Click [Search again] to perform the search again.•
The date and time displayed in the search results is the date and time that the
document was created. For reserved documents, the date and time reserved for
transmission are not displayed.
Advanced Searching
You can search for documents by setting detailed search conditions, such as the document
name, category, and sender.
Log in to OfficeBridge as a user or a guest. 1 (See page 2-2.)
[Document Boxes].
Click
2
Click [Document Search] on the document list screen.
3
The full text search screen displayed.
Click the [+] to the left of the “Advanced Search” eld.
4
Page 56

1
2
Operating the Various Functions
Searching for Documents 2-29
Specify the required settings.
5
Documents that include all the specified conditions are searched for.•
When searching according to the date and time the document was created, enter the date in •
the following order: year (4 digits), month (2 digits), and day (2 digits).
Click [Search].
6
You can perform operations such as transmitting documents from the search results.•
Click [Search again] to perform the search again.•
Page 57

2-30 Checking and Changing Document Information
Checking and Changing Document Information
Note
Note
You can confirm detailed information about documents in a document list. You can also
change set information such as the file name or category.
If you set authorities for users, you can register distribution conditions from •
document information (see page 2-32) and register senders to the address book (see
page 2-17).
You can set the file format for images. • (See page 3-108.)
Viewing the Documents in a Document List
You can view the documents in a document list.
Log in to OfficeBridge as a user or a guest. 1 (See page 2-2.)
[Document Boxes].
Click
2
On the document list screen, click the name of the document you want to view.
3
An image viewer opens to display the contents of the document.
OfficeBridge does not include an image viewer function. The image viewer installed on
your PC will open, allowing you to view the document.
Page 58

1
2
Operating the Various Functions
Checking and Changing Document Information 2-31
Checking and Changing Document Information
On the document properties screen, you can check or change the detailed information
about the scanned documents and received documents in a document list. The following
operation applies to all types of documents.
Log in to OfficeBridge as a user or a guest. 1 (See page 2-2.)
[Document Boxes].
Click
2
On the document list screen, click the
3
information you want to check or change.
for document whose detailed
Edit the detailed information for the document, as necessary.
4
Page 59

2-32 Checking and Changing Document Information
You can edit the following items in the detailed information for a document.
Note
Item Description
“Document Name”, “Category”,
“Comment”
“Hold Time”
“Read Status”
Click [Save].
5
The detailed information for the document is updated.
Enter the information in the entry box for each item.
Select “No Limit” or “Document Hold Time”. If you
selected “Document Hold Time”, enter the number of
days to store the document in the entry box.
You can check whether the document has been displayed
(read) or not (unread). You can also change the read
status of the document to read or unread.
[Confirmation] is displayed for documents in the shared
reception box or shared box. Click [Confirmation] to
display the read status for each user.
Registering Sender Distribution Conditions
You can add document information to the distribution conditions.
Distribution conditions may not be able to be registered, depending on the user
authorities.
Log in to OfficeBridge as a user or a guest. 1 (See page 2-2.)
[Document Boxes].
Click
2
On the document list screen, click
3
for the document whose information you
want to register in the distribution conditions.
Page 60

1
2
Operating the Various Functions
Checking and Changing Document Information 2-33
Click [Add] in “Add to the auto distribution settings”.
4
The auto distribution detailed settings screen is displayed with the following sender
information already entered.
Communication type Condition
Fax Fax number, F-Code number
E-mail E-mail address, subject
Set the distribution conditions on the “Fax Forwarding” screen.
5
For details, refer to “Setting Auto Distribution (Individual Settings)”. (See page 3-87.)
Page 61

2-34 Downloading Documents
Downloading Documents
Note
You can download documents from the document list into the desired location on a
computer. Since the data disk of the machine is limited, it is recommended that you
periodically download documents from the document list, save them to your computer,
and delete the documents from the document list.
Downloading Documents in a Document List
You can download documents on a document list screen to a location you specify.
If you select several documents to download, they are downloaded as a single
compressed file (zip file). In this case, extract the downloaded files using extraction
software.
Log in to OfficeBridge as a user or a guest. 1 (See page 2-2.)
Click
2
3
[Document Boxes].
Select the document to download on the document list screen.
In this example, a document inside the shared box is selected.
You can select multiple documents and download them at the same time.
Click [Download].
4
Page 62

1
2
Operating the Various Functions
Downloading Documents 2-35
If something other than “Select when downloading.” is set in the download settings in “Common
Settings” in “Document Box Settings” (see page 3-108), the document download screen is not
displayed, and the dialog in step 7 is displayed instead.
Select the file format for the file to download.
5
Item Description
File Format
PDF Encryption Setting Specify the PDF encryption settings.
Document
Access
Password
Change
Permissions
Password
Permissions Set the printing, editing, and copying permissions.
Encryption
Level
TIFF: The full mode TIFF format. The document
is downloaded with the document size and
resolution set when it was created.
PDF: The document is downloaded in the PDF
format.
PDF w/Password
Enter the password required to open the encrypted PDF. Up
to 28 characters can be entered.
Enter the password required to change the permission
settings of the encrypted PDF. Up to 28 characters can be
entered.
Set “ON” to enable the operation, or “OFF” to disable it.
Set the security level for viewing the PDF.
The PDF may not be able to be opened, depending on the
version of Acrobat. For example, if you set the encryption
level to “High (128-bit AES) / Acrobat 7.0 or later”, the PDF
will not be able to be opened using Acrobat 6.0 or earlier.
: You can set a password and the various
permissions for the PDF format. If you
select the PDF with password format,
“PDF Encryption Setting” is displayed.
Page 63

2-36 Downloading Documents
Click [Download].
6
Click [Save].
7
Specify the folder to download to, enter a file name, and click [Save].
8
Click [Close] to close the “Download Complete” dialog box.
9
Page 64

1
2
Operating the Various Functions
Deleting Documents 2-37
Deleting Documents
Note
Note
You can delete unnecessary documents from a document list screen. Since the data disk
of the machine is limited, it is recommended that you periodically delete unnecessary
documents.
If the “Deleted Documents Box” function is disabled in the document box settings,
documents you delete are immediately deleted without being moved to the deleted
documents box. (See page 3-110.)
Deleting Documents in a Document List
You can delete documents in a document list. When you delete a document in a box
other than the “Deleted Documents Box”, the deleted document is moved to the “Deleted
Documents Box”.
To delete a document permanently, it is necessary to delete it from the “Deleted
Documents Box”. (See page 2-38.)
The administrator password may be required to delete documents in the “Shared
Rx Box” or “Shared Box”, depending on the document box settings. For details on
document box settings, refer to “Specifying Document Box Settings”. (See page 3-107.)
Log in to OfficeBridge as a user or a guest. 1 (See page 2-2.)
Click
2
3
[Document Boxes].
Select the document to delete on the document list screen.
In this example, a document inside the “Rx Box” is selected.
You can also select multiple documents and delete them at the same time.
Click [Delete].
4
Page 65

2-38 Deleting Documents
Click [OK].
5
The selected documents are deleted from the document list screen, and moved to the “Deleted
Documents Box”.
If you select several documents to delete, it may take some time to delete the documents. In
this case, wait for a while after performing the deletion procedure.
Deleting Documents in the Deleted Documents Box
You can delete documents in the “Deleted Documents Box”. Documents deleted from the
“Deleted Documents Box” are permanently deleted from the machine.
Deleting
Log in to OfficeBridge as a user or a guest. 1 (See page 2-2.)
Click
2
[Document Boxes].
Select the document to delete on the “Deleted Documents Box” screen.
3
You can select multiple documents and delete them at the same time.
Click [Delete].
4
Click [OK].
5
If you select several documents to delete, it may take some time to delete the documents.
Page 66

1
2
Operating the Various Functions
Deleting Documents 2-39
Restoring Documents to their Original Box
You can restore documents in the Deleted Documents Box to their original document box.
Log in to OfficeBridge as a user or a guest. 1 (See page 2-2.)
Click
2
3
4
[Document Boxes].
Select the document to restore on the “Deleted Documents Box” screen.
You can also select multiple documents and restore them at the same time.
Click [Restore].
The selected documents are restored to their original box.
Page 67

2-40 Checking the Jobs or History
Checking the Jobs or History
Note
You can check a communication or print job in progress, and the fax and e-mail history.
Checking / Canceling a Communication Job in Progress
You can check the fax and e-mail transmission reservation status, and the progress of
the communication job being executed. You can also cancel the communication job being
executed.
Up to 100 communication jobs can be displayed.•
Communication jobs can only be canceled when the user has the required privileges.•
Checking Communication Jobs
Log in to OfficeBridge as a user or a guest. 1 (See page 2-2.)
This function is also available on Administrator screen.
Click [Machine Information], and then “Communication Job”.
2
You can click [+] to check the destinations specied for broadcast transmission.
Page 68

1
2
Operating the Various Functions
Checking the Jobs or History 2-41
You can check the following information on the communication job screen.
Destination Displays the destination name of the communication job.
Displays the communication status. For details on the displayed items,
Status
Page(s)
Send Time
Canceling Communication Jobs
You can cancel communication jobs to delete them from the “Communication Job” screen.
Log in to OfficeBridge as a user or a guest. 1 (See page 2-2.)
This function is also available on Administrator screen.
Click [Machine Information], and then “Communication Job”.
2
Select the job to cancel on the communication job screen.
3
refer to “Status” for the “Tx Box”, “Rx Box”, and “Shared Rx Box”
document lists. (See page 1-17.)
Displays the number of pages for the document to transmit. The cover
page is included in the number of pages.
If a transmission starting date/time has been specified, the specified date/
time is displayed in the MM/DD YYYY HH:MM AM/PM format.
You can select multiple jobs and delete them at the same time.•
To select all the displayed communication jobs, select the top checkbox.•
Click the same checkbox to deselect the item.•
When multiple destinations are set for a communication job, [+] is displayed next to the •
destination name.
Click [Delete].
4
Click [OK].
5
The selected jobs are canceled.
Page 69

2-42 Checking the Jobs or History
Canceling Communication Jobs by Destination
Note
Note
When multiple destinations are set for a communication job, you can delete
communication jobs by destination.
You can cancel only fax destinations individually. All e-mail destinations will be
canceled by canceling one e-mail destination.
Click the [+] next to the destination name.
1
The list of destinations is displayed. Click the [-] next to the destination name to return to the
previous display.
Select the destination name for the communication job to cancel.
2
Click [Cancel].
3
The “Is it OK to cancel the selected job(s)?” message is displayed.
Click [OK].
4
The selected jobs are canceled.
Checking / Canceling Print Jobs in Progress
You can check the progress of print jobs being printed or reserved for printing.
You can also cancel the print job being executed.
Print jobs can only be canceled when the user has the required privileges.
Checking a Print Job
Log in to OfficeBridge as a user or a guest. 1 (See page 2-2.)
This function is also available on Administrator screen.
Page 70

1
2
Operating the Various Functions
Checking the Jobs or History 2-43
Click [Machine Information], and then “Print Job”.
2
You can check the following information on the print job screen.
File Name The file name of the document to print is displayed.
Owner
Page(s)
Send Time
Canceling Print Jobs
You can cancel print jobs to delete them from the print job screen.
Select the job to cancel on the print job screen.
1
You can select multiple jobs and delete them at the same time.•
To select all the displayed communication jobs, select the top checkbox.•
Click the same checkbox to deselect the item.•
Displays the name of the user that executed the print job. With the pulldown menu, you can filter the displayed print jobs by user.
Displays the number of pages for the document to print. The number of
pages is not displayed for security print documents.
The date/time that the print job was received is displayed in the MM/DD
YYYY HH:MM AM/PM format.
Click [Delete].
2
Page 71

2-44 Checking the Jobs or History
Click [OK].
3
The selected jobs are canceled.
Checking the Communication History
You can check the history of transmitted and received jobs. Up to 1000 communication
histories can be displayed. You can also print or download the communication history.
Checking the Communication History
Log in to OfficeBridge as a user. 1 (See page 2-2.)
This function is also available on Administrator screen.•
This function • may also be available on Guest login screen, depending on user policy settings.
Click [Machine Information], and then “Communication History”.
2
You can check the following information on the communication history screen.
Displayed Item Description
Number Displays a serial number for all communication jobs (fax
Destination Displays the destination. With the pull-down menu, you can filter the
transmission/reception, e-mail transmission/reception, shared folder
transmission, FTP transmission).
displayed communication history by destination.
Page 72

1
2
Operating the Various Functions
Checking the Jobs or History 2-45
Displayed Item Description
Simple Result Displays either “OK” or “Error” for the communication result. With
the pull-down menu, you can filter the displayed communication
history by communication result.
Tx / Rx Displays whether the communication was a transmission or
reception job. With the pull-down menu, you can filter the displayed
communication history by transmission / reception type.
Comm. Category Displays either “Fax”, “E-mail”, “Folder”, or “FTP” for the
communication type. With the pull-down menu, you can filter the
displayed communication history by communication type.
Date Displays the date and time when the communication started.
To confirm the details for the communication, click the 3 for the job.
The items displayed on the details screen differ according to the communication type.•
For details on error codes, refer to Chapter 4, “Error Messages” in the Administrator's Guide.•
Press [Back] to return to the communication history screen.
4
Page 73

2-46 Checking the Jobs or History
Printing the Communication History
Note
You can print the communication history. You can also filter the various items when
printing the history.
The journal list can also be printed from the device settings on the control panel of the
machine. For details, refer to Chapter 6, “Managing the Communication History” in
the Scanner and Fax Guide.
Click [Print] on the communication history screen.
1
The communication history is printed.
Downloading the Communication History
You can download the communication history in the CSV format.
Click [Download] on the communication history screen.
1
The message “Do you want to open or save this file?” is displayed.
Click [Save].
2
Specify the folder to download to, enter a file name, and click [Save].
3
Click [Close] to close the “Download Complete” dialog box.
4
Page 74

1
2
Operating the Various Functions
Checking the Jobs or History 2-47
Checking the Print Job History
You can check the document print job history. Up to 200 print job hisotries can be
displayed.
Log in to OfficeBridge as a user. 1 (See page 2-2.)
This function is also available on Administrator screen.•
This function • may also be available on Guest login screen, depending on user policy settings.
Click [Machine Information], and then “Print Job History”.
2
You can check the following information on the print job history screen.
Displayed Item Description
Document Name Displays the name of the printed document.
User Displays the name of the user that executed the print job. If this item
cannot be retrieved, “-” is displayed. With the pull-down menu, you
can filter the displayed print history by user.
Job Status Displays either “OK” or “Error” for the print result. “CANCEL” is
displayed if the print job was canceled. With the pull-down menu, you
can filter the displayed print history by result.
Page(s) Displays the number of pages generated by the printer driver.
Port Displays the port used for printing. With the pull-down menu, you can
filter the displayed print history by port.
“LPR”, “RAW”, “IPP”, “USB”, or “Others” is displayed for the port type.
Job Ended Displays the date and time when the print job was completed. You can
switch the print history to ascending order or descending order using
the [] icon.
Page 75

2-48 Forwarding Documents
Forwarding Documents
When you want to check documents when you are away from the office, you can set
“forwarding settings” to automatically forward received documents to a destination of
your choice via fax or e-mail. You can also set to print all the documents received while
you are away from the office.
Forwarding Received Documents
You can forward documents received while you are away from the office to a specified fax
number, e-mail address, folder, or user. You can also print the received documents.
Log in to OfficeBridge as a user. 1 (See page 2-2.)
This function may also be available on Guest login screen, depending on user policy settings.
Click [User Information], and then “User Box Forwarding Settings”.
2
Register the various user box forwarding settings.
3
Setting Description
Forwarding Setting You can set whether to enable or disable the forwarding setting.
Received Document
Handling
File Format You can set the file format to use when forwarding documents. (See
Forwarding Period
Setting
Set “ON” to enable the function, or “OFF” to disable it. The ON/OFF
status of the forwarding setting is linked to the “forwarding switch” in
the footer area.
You can set the method for processing received data.
To print documents received when you are away from the office, select
“Print out”. To perform forwarding, select “Forward to the specified
destination.”, click [Select], and specify the destination to forward to.
(See page 2-49.)
If you set a destination, it is displayed in the list on the right. To
delete a destination, select it and click [Delete].
page 2-54.)
Click the [+] to the left of “File Format” to display the settings.
You can set the period for performing forwarding. (See page 2-54.)
Click the [+] to the left of “Forwarding Period Setting” to display the
settings.
Page 76

1
2
Operating the Various Functions
Forwarding Documents 2-49
Click [Save].
4
The forwarding setting is saved. You can now select [ON] or [OFF] for the forwarding setting
to forward or print received documents. (See page 1-9.)
Specifying Forwarding Destinations
You can specify forwarding destinations using various methods. You can only register a
single forwarding destination.
Opening the Destination Selection
Select “Forward to the specified destination.” for the received document
1
handling. (See page 2-48.)
Click [Select].
2
Refer to pages 2-50 to 2-54 to enter the destination.
3
Page 77

2-50 Forwarding Documents
Specifying From the Address Book
Click [Shared] or [Personal] from “Address Book” in “Fax / E-mail Destinations”.
1
Click [Shared] to open the “Shared Address Book” or [Personal] to open the “Personal Address
Book”.
Select a destination from the address book, and click [Fax] or [To].
2
When you click [Fax], the destination is selected as fax destination. When you click [To], the •
destination is selected as e-mail destination.
The registered content is displayed to the right of the address book name. If only a fax •
number is registered, [Fax] is displayed. If only an e-mail address is registered, [Mail] is
displayed. If both are registered, [Fax / Mail] is displayed.
A destination cannot be registered as a fax destination unless it has a fax number registered. •
A destination cannot be registered as an e-mail destination unless it has an e-mail address
registered.
To delete a destination, select the destination you want to delete from the destination list, •
and click [Delete].
Click [Save].
3
The display returns to the forwarding settings screen.
Page 78

1
2
Operating the Various Functions
Forwarding Documents 2-51
Manually Entering a Fax Destination or E-mail Destination
Enter the fax number or e-mail address of the destination in the “Fax / E-mail
1
Destinations” entry box.
Up to 40 digits can be entered for a fax number. Up to 50 characters can be entered for an •
e-mail address.
Dialing options can be inserted when entering a fax number. For details on dialing options, •
refer to Chapter 3, “Basic Faxing” in the Scanner and Fax Guide.
Click [Fax] if you entered a fax number, or [To] if you entered an e-mail address.
2
The forwarding destination is displayed in the address list.•
To delete a destination, select the forwarding destination to delete from the destination list, •
and click [Delete].
Click [Save].
3
The display returns to the forwarding settings screen.
Specifying Using a Folder Shortcut
Click [Shared] or [Personal] from “Folder Shortcut” in “Folder Destination”.
1
Click [Shared] to open “Shared Folder Shortcut” or [Personal] to open “Personal Folder
Shortcut”.
Select the folder shortcut, and click [Add].
2
The forwarding destination is displayed in the address list.•
To delete a destination, select the forwarding destination to delete from the destination list, •
and click [Delete].
Click [Save].
3
The display returns to the forwarding settings screen.
Page 79

2-52 Forwarding Documents
Manually Entering a Folder Destination
Enter the folder path name of the forwarding destination in the “Folder
1
Destination” entry box in “Folder Destination”.
Up to 128 characters can be entered. The following characters cannot be used in a path •
name; * ? “ < > |.
Enter the path name in the “\\(computer name)\(folder name)\” format.•
If a user name and password are required to access the folder, enter them.
2
Click [Add].
3
The folder is displayed in the destination list.•
To delete a destination, select the forwarding destination from the destination list, and click •
[Delete].
Click [Save].
4
The display returns to the forwarding settings screen.
Browsing for a Folder Destination
Click [Browse] in “Folder Destination” under “Folder Destination”.
1
A list of the network environment you are connected to is displayed.•
If you enter the computer name in the folder path in advance, you can display a list of the •
shared folders in that computer.
Click a displayed computer name or folder name, and select the folder name to
2
set as the forwarding destination.
Click [Back] to return to the previous folder level.•
Click [Root] to return to the first (root) level.•
Page 80

1
2
Operating the Various Functions
Forwarding Documents 2-53
Click [Save].
3
The folder path name is entered as the folder destination.
Specifying From the User List
Click [Select] in the “Users” field.
1
Select a user from the list of users, and click [Add] or [To].
2
When you click [Add], the user box is selected as destination. When you click [To], the •
destination is selected as e-mail destination.
If groups are registered, you can filter the displayed users by group using the [Group] pull-•
down menu.
The registered content is displayed to the right of the user name.•
[Mail] is displayed when an e-mail address is registered. Destinations with nothing •
displayed are only specified as destinations to the user box.
To delete a destination, select the forwarding destination from the destination list, and click •
[Delete].
Click [Save].
3
The display returns to the forwarding settings screen.
Page 81

2-54 Forwarding Documents
Setting the Attachment File Format and Forwarding Period
You can specify the file format and forwarding period to use when forwarding documents.
Click the [+] to the left of “File Format” or “Period” to display the settings.
The items displayed are indicated below.
Item Description Settings
E-mail / Folder Set the file format to save the document in when
forwarding via e-mail. You can set the following file
formats.
TIFF: The full mode TIFF format. The
document is transmitted with the
document size and resolution set
when it was created.
TIFF-S: The simple mode TIFF format.
Documents are all converted to
A4 size and 200 dpi resolution for
transmission.
PDF: Documents are transmitted in the
PDF format.
PDF w/Password
: Can only be set for the attachment
file format for a folder. You can
set a password and the various
permissions for the PDF format. If
you select the PDF with password
format, “PDF Encryption Setting” is
displayed.
E-mail:
PDF
TIFF-S
TIFF
Folder:
PDF
PDF w/
Password
TIFF
Page 82

1
2
Operating the Various Functions
Forwarding Documents 2-55
Item Description Settings
PDF Encryption Setting These items are displayed when “PDF w/ Password”
is selected as the attachment file format for the
folder. Specify the PDF encryption settings.
Document
Access
Password
Change
Permissions
Password
Permissions Set the printing, editing, and copying permissions.
Encryption
Level
Enter the password (user password) required to
open the encrypted PDF. Up to 28 characters can be
entered.
Enter the password (owner password) required to
change the permission settings of the encrypted
PDF. Up to 28 characters can be entered.
Set “ON” to enable the operation, or “OFF” to disable
it.
Set the security level for viewing the PDF.
The PDF may not be able to be opened, depending on
the version of Acrobat.
For example, if you set the encryption level to “High
(128-bit AES) / Acrobat 7.0 or later”, the PDF will
not be able to be opened using Acrobat 6.0 or earlier.
28 characters
28 characters
Printing:
ON
OFF
Editing:
ON
OFF
Copying:
ON
OFF
Low (40bit RC4) /
Acrobat 3.0 or
later
High (128bit RC4) /
Acrobat 6.0 or
later
High (128bit AES) /
Acrobat 7.0 or
later
Page 83

2-56 Forwarding Documents
Item Description Settings
Note
Period Specify the period for which forwarding is performed.
Always Always execute forwarding.
Year/Month/
Date
Specify the
forwarding
day and time
Specify a date to start forwarding and a date to end
forwarding to only execute forwarding during that
period.
Execute forwarding on the specified day of the week
during the start time and end time. You can specify
multiple days of the week. You can also specify to
execute forwarding for only the week the forwarding
setting was enabled, or to execute forwarding every
week.
Underlined values are the default settings specified at the time of shipment.
Always
Year/Month/
Date
Specify the
forwarding
day and time
Year:
1992 to 2036
Month:
1 - 12
Day:
1 - 31
Day of week:
Mon to Sun
AM, PM
Hour:
1 - 12
Minute:
0 - 59
Page 84

Chapter 3
OfficeBridge Administrator Settings
Administrator settings list .......................................................................................3-3
Registering Users .......................................................................................................3-5
“User Registration” Screen .....................................................................................3-5
Registering a User...................................................................................................3-6
Copying Existing User Information to Register a New User .............................3-10
Deleting User Information....................................................................................3-11
Importing User Information From an External File ...........................................3-12
Exporting User Information to an External File .................................................3-14
Creating Address Books ..........................................................................................3-15
“Address Book” List Screen ...................................................................................3-15
Registering New Destinations ..............................................................................3-17
Registering the Sender of a Received Document to the Address Book ..............3-19
Copying Existing Destination to Register a New Destination ...........................3-20
Registering Destination Using an LDAP Server .................................................3-21
Deleting Destinations ...........................................................................................3-24
Importing Destination From an External File ....................................................3-25
Exporting Destination to an External File ..........................................................3-30
Grouping Multiple Destinations...........................................................................3-31
Registering Shortcuts .............................................................................................3-38
Setting Folder Shortcuts .......................................................................................3-38
Setting FTP Shortcuts ..........................................................................................3-44
Setting Templates .....................................................................................................3-49
Setting Document Names .....................................................................................3-49
Setting Document Categories ...............................................................................3-53
Setting E-mail Templates .....................................................................................3-56
Setting the Connection Environment .................................................................3-60
Setting the Network Environment .......................................................................3-60
Setting the E-mail Transmission / Reception Environment ...............................3-63
Setting the E-mail Operating Environment ........................................................3-67
Setting the Directory Database Environment .....................................................3-70
Setting Communication Device Monitoring / Control ......................................... 3-75
Setting an Internet Time ......................................................................................3-77
Specifying Device Settings .....................................................................................3-79
Specifying Other Network Settings .....................................................................3-79
Specifying User Install Mode Settings .................................................................3-81
Specifying Default Machine Settings ..................................................................3-82
Settings ..................................................................................................................3-82
Page 85

Regarding Settings ................................................................................................3-82
Automatically Distributing Received Documents ............................................3-83
Auto Distribution Function ..................................................................................3-83
Setting Auto Distribution (General Settings) ......................................................3-84
Setting Auto Distribution (Individual Settings) ..................................................3-87
Specifying Distribution Destinations ...................................................................3-90
Performing an Auto Distribution Test..................................................................3-94
Copying Existing Auto Distribution Settings to Create New Settings ..............3-96
Deleting Auto Distribution Settings ....................................................................3-97
Usage Management ..................................................................................................3-98
Checking the Usage Status ..................................................................................3-98
Setting the Management History .......................................................................3-101
Resetting the Counters .......................................................................................3-102
Displaying and Copying Machine Settings ......................................................3-103
Setting the Machine Status ................................................................................3-103
Exporting Machine Settings ...............................................................................3-105
Importing Machine Settings ...............................................................................3-106
Specifying Document Box Settings ....................................................................3-107
Saving Transmitted Data (Archive Settings) ...................................................3-111
Specifying Archive Settings ................................................................................3-111
Specifying the Archive Destination ....................................................................3-113
Backing Up Documents .........................................................................................3-117
Specifying Backup Settings ................................................................................3-117
Specifying the Backup Document Display .........................................................3-119
Checking the Backup Log ...................................................................................3-121
Setting Security ......................................................................................................3-123
Setting User Policies ...........................................................................................3-123
Setting the Machine Policy .................................................................................3-130
Setting Access Restrictions .................................................................................3-134
Specifying SSL Certificate Settings ...................................................................3-137
Setting ScanTag ......................................................................................................3-141
“ScanTag Settings” Screen ..................................................................................3-141
ScanTag Settings .................................................................................................3-142
Page 86

1
2
3
OfficeBridge Administrator Settings
Administrator settings list 3-3
Administrator settings list
On the Administrator screen, the following settings are available. Some settings may also
available for Users and Guests.
Items Description
User Information
User Registration Register, edit or delete users.
Address Book Register, edit or delete destinations,
destination groups.
Shortcut
User Box Forwarding
Settings
Templates Register, edit or delete file names,
Machine Settings
TCP/IP Settings Setup network environment.
E-mail Settings
LDAP Server
Settings
SNMP Settings
Internet Time
Setting
Machine Setup Setup machine setting such as
Machine Default
Settings
Machine Management Settings
Auto Distribution
Usage Management Setup usage management, and
User Policy Setup user policies.
Secure Settings Setup network filter, SSL certificate,
Archive Settings Setup to sent communicated
Backup Settings Specify settings for backing up the
Document Box
Settings
Register, edit or delete folder
shortcuts and FTP server shortcuts.
Register, edit or delete forwarding
settings.
categories and e-mail templates.
Setup e-mail transmission/reception
environment.
Setup Lightweight Directory Access
Protocol (LDAP) servers.
Setup SNMP settings.
Setup internet time server
synchronization.
e-mail gateway and automatic panel
logout time, or default settings (user
install).
Setup the machine default settings.
Register, edit or delete distribution
settings.
check the usage status.
or machine policies.
documents to a specified destination
via fax, or store them in a specified
folder.
document files stored in the machine
to a shared folder on the network.
Specify settings relating to the
way the document boxes handle
documents.
Default authority
Admin User Guest
—
page
3-5
3-15
3-38
2-48
3-49
3-60
3-63
3-70
3-75
3-77
3-79
3-82
3-83
3-98
3-123
3-130
3-111
3-117
3-107
Page 87

3-4 Administrator settings list
Items Description
ScanTag Settings Register, edit or delete setting to
create image data and metadata
(data indicating the attributes and
rocessing method of the image file)
in a single scan.
Machine Information
Communication Job
Print Job
Machine Status Check the machine status. Only
Communication
History
Print Job History
Blank: has no authority by default
: has authority by default
—: Unable to set
Check the fax and e-mail
transmission reservation status, and
the progress of the communication
job being executed.
Check the progress of print jobs
being printed or reserved for
printing.
administrator can export / import
machine settings.
Check the history of transmitted
and received jobs.
Check the document print job
history.
Default authority
Admin User Guest
page
3-141
2-40
2-42
3-103
2-44
2-47
Page 88

1
2
3
OfficeBridge Administrator Settings
Registering Users 3-5
Registering Users
16
8
2 3 4 5
7
910 11
To utilize the functions of OfficeBridge, it is necessary to first register users.
There are two methods for registering users; registering them from the user information
settings screen, and importing them from an external file in a format such as the vCard
format.
“User Registration” Screen
The “User Registration” screen displays a list of the registered users.
On this screen you can register new user information and change existing user
information.
Button
Button name Description
1 [Add] Registers new user information.
2 [Duplicate] Copies user information that is already registered. The user
3 [Delete] Deletes user information.
4 [Import] Imports user information from an external file.
5 [Export] Exports user information in the vCard file format.
information can be edited and used as information for another user.
Page 89

3-6 Registering Users
List Items
Note
Item Description
6 Number of users that can
be registered
7 Number The number assigned to the user.
8 Name Displays the name registered.
9 Group Displays the name of the group that the user belongs to. You can
10 Page Enables you to switch pages when destination information does not
11 Number of displayed
items switch
Displays the number of users that can be registered.
also filter the displayed users by group name.
fit on one page. (The number of pages differs according to how many
items are displayed on each page.)
Switches the number of users displayed on one screen (between 10
and 20).
Registering a User
You can register new user information in OfficeBridge.
User registration is performed from the user information settings screen.
Up to 200 users can be registered.
Log in to OfficeBridge as a user. 1 (See page 2-2.)
This function is also available on Administrator screen.•
This function may also be available on Guest login screen, depending on user policy settings.•
Click [User Information].
2
Click [Add].
3
Page 90

1
2
3
OfficeBridge Administrator Settings
Registering Users 3-7
Register the user information.
4
You can register the following items.
Basic Settings
Setting Description Settings
Number Enter the user number. You cannot enter an
existing number.
Name Enter the user name. 64 characters
User ID Enter the ID used for identifying the user.
You cannot enter an existing user ID. This item
is required.
Password Enter the password used for logging in. 28 characters
E-mail Address Enter the e-mail address of the user. 50 characters
User Group Enter the name of the group that the user
belongs to.
If the group name is already registered, you can
also select it from the pull-down menu on the
right.
Advanced Settings
These settings are displayed when you click [+].
Setting Description Settings
Company Enter the company name. 50 characters
Department Enter the name of the department that the
user belongs to.
Fax Number Enter the user's fax number. 40 characters (0 -
Tel Number Enter the user's telephone number. 40 characters (0 -
001 - 200
64 characters
30 characters
100 characters
9, *, #, -)
9, *, #, -)
Page 91

3-8 Registering Users
Setting Description Settings
Note
LDAP Server
Authentication
(If required)
Feed
Account ID Enter the account for logging in to the LDAP
server.
Password Enter the password for logging in to the
LDAP server.
File Format
The file format of the RSS feed is displayed. –
49 characters
29 characters
Number of
Item
Category Select the summary information to include
Policy Select a user policy. (See page 3-123.) –
Theme Setting Select the color theme for the screen.
Language Setting Select the display language on the
Enter the maximum number of items of
summary information to include in the RSS
feed.
in the RSS feed.
OfficeBridge for this user.
10 - 50: 15
Select from the
following items.
(Multiple items
can be selected.)
• User Box
• Tx Box
• Rx Box
• Shared Rx Box
• Shared Box
• Free Disk
Space
• Scan to Folder/
FTP
• PC Print
• Print Received
Document
• Boot
Default Theme
High Contrast
Low Contrast
English
French
Spanish
Transmission Report
Setting
Click [Save].
5
The display returns to the “User Registration” list screen.
Underlined values are the default settings specified at the time of shipment.
Set the transmission report to print after
transmission is complete.
Issuing
Location
OFF Do not print a transmission
report.
Print Print the transmission report.
E-mail
Transmit the transmission report
via e-mail. If you select this
option, enter an e-mail address.
Description
OFF
Print
E-mail
Page 92
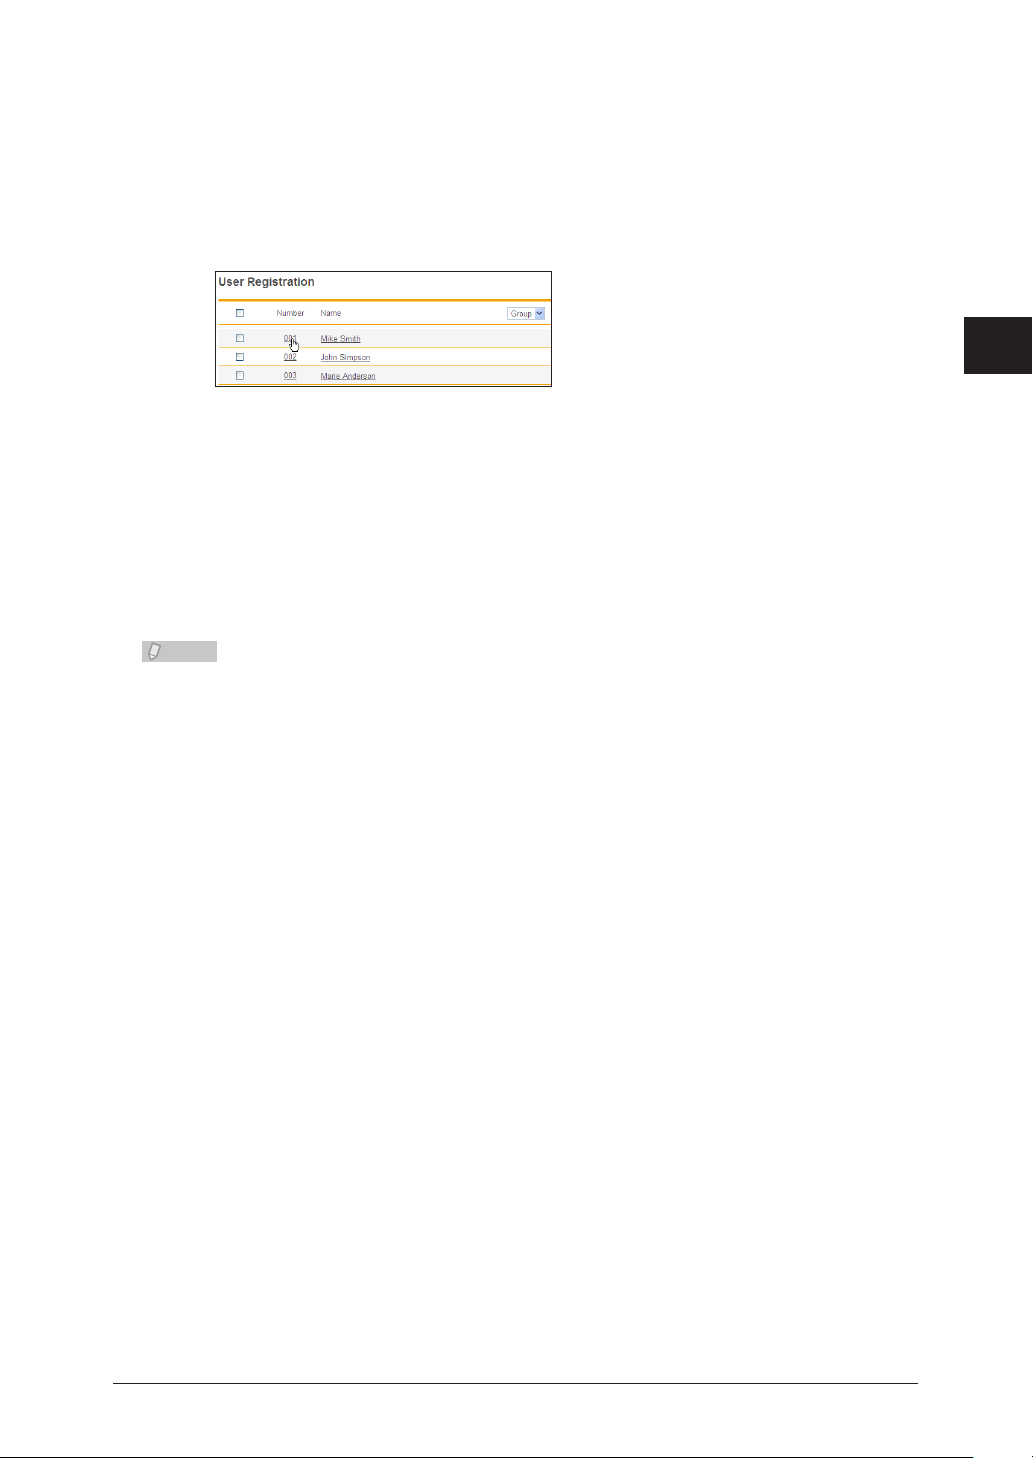
1
2
3
OfficeBridge Administrator Settings
Registering Users 3-9
Changing User Information
Note
You can change user information that has been registered.
On the “User Registration” list screen, click the number or name of the user you
1
want to change.
The “Registration” screen is displayed.
Change the user information.
2
Click [Save].
3
The settings are changed, and the display returns to the “User Registration” list screen.•
Press [Back] to cancel changing the user information and return to the “User Registration” •
list screen.
If you try to change the e-mail address of a user that is currently being used for a
communication job, the error “The e-mail address cannot be changed while a job is
active.” is displayed. Change the e-mail address after the communication job finishes.
Page 93

3-10 Registering Users
Copying Existing User Information to Register a New User
Note
You can copy user information that is already registered to register a new user.
The user information items that can be copied are indicated below.
User Group•
Company•
Department•
Tel Number•
Fax Number•
You cannot copy multiple users at the same time.
Log in to OfficeBridge as a user. 1 (See page 2-2.)
This function is also available on Administrator screen.•
This function may also be available on Guest login screen, depending on user policy settings.•
Click [User Information].
2
The “User Registration” list screen is displayed.
Select the checkbox of the user you want to copy.
3
Click [Duplicate].
4
The “Registration” screen is displayed.
Change the settings to those for the new user to register.
5
Click [Save].
6
The display returns to the “User Registration” list screen.•
Press [Back] to cancel registering the user information and return to the “User Registration” •
list screen.
Page 94

1
2
3
OfficeBridge Administrator Settings
Registering Users 3-11
Deleting User Information
Note
You can delete unnecessary user information from the “User Information” list screen.
You can select multiple users to delete.
The user that is currently logged in can also be deleted.
Log in to OfficeBridge as a user. 1 (See page 2-2.)
This function is also available on Administrator screen.•
This function may also be available on Guest login screen, depending on user policy settings.•
Click [User Information].
2
The “User Registration” list screen is displayed.
Select the checkbox of the users you want to delete.
3
To select all the displayed user information, select the top checkbox.•
Click the same checkbox to deselect the item.•
Click [Delete].
4
The “Is it OK to delete the selected user?” message is displayed.
Click [OK].
5
The selected user information is printed.
Page 95

3-12 Registering Users
Importing User Information From an External File
Note
You can import data from an external file in the vCard format and register it as user
information.
The user information items that can be imported and their corresponding vCard item
names are indicated below. The words enclosed in parentheses are the vCard item names.
User ID (N, FN)•
Company (ORG)•
Department (ORG)•
Telephone Number (TEL;WORK;VOICE)•
Fax Number (TEL;WORK;FAX)•
E-Mail Address (EMAIL)•
Only vCard format files can be imported.•
If the “User ID” is already registered, it will be overwritten with the imported •
information.
Log in to OfficeBridge as a user. 1 (See page 2-2.)
This function is also available on Administrator screen.•
This function may also be available on Guest login screen, depending on user policy settings.•
Click [User Information].
2
The “User Registration” list screen is displayed.
Click [Import].
3
The “Import” screen is displayed.
Click [Browse], and specify the location and name of the file to import.
4
Page 96

1
2
3
OfficeBridge Administrator Settings
Registering Users 3-13
Click [Import].
Note
5
A confirmation message is displayed.
Click [OK].
6
The import process starts.•
When the import process is complete, the display returns to the “User Registration” list •
screen.
When the display returns to the list screen, the number of successful records is
displayed. If the import process failed, one of the following causes is displayed.
Could not analyze the imported file.•
Failed to import. An invalid fax number(s) has been included.•
Failed to import. An invalid phone number(s) has been included.•
Failed to import. An invalid e-mail address(es) has been included.•
Page 97

3-14 Registering Users
Exporting User Information to an External File
Note
You can export the selected user information to an external file in the vCard format.
You can select multiple users.
The user information items that can be exported and their corresponding vCard item
names are indicated below. The words enclosed in parentheses are the vCard item names.
Display Name (N)•
User ID (FN)•
Company (ORG)•
Department (ORG)•
Telephone Number (TEL;WORK;VOICE)•
Fax Number (TEL;WORK;FAX)•
E-Mail Address (EMAIL)•
Only one file is created, even when you select multiple users to export.
Log in to OfficeBridge as a user. 1 (See page 2-2.)
This function is also available on Administrator screen.•
This function may also be available on Guest login screen, depending on user policy settings.•
Click [User Information].
2
The “User Information” list screen is displayed.
Select the checkbox of the users you want to export.
3
To select all the displayed user information, select the top checkbox.•
Click the same checkbox to deselect the item.•
If you click [Export] without selecting users, all the users are exported.•
Click [Export].
4
The “Do you want to open or save this file?” message is displayed.
Click [Save].
5
The “Save As” dialog box is displayed.
Specify the name and location to save the file, and click [Save].
6
The export process starts.
Page 98

1
2
3
OfficeBridge Administrator Settings
Creating Address Books 3-15
Creating Address Books
176
9
2 3 4 5
8
11
12
13 14 1517 18 1610
You can use OfficeBridge to register frequently used destination information (fax
numbers and e-mail addresses, etc.) in the address book.
By registering destination in the address book, you can easily specify the fax or e-mail
address destination settings when performing transmission.
There are two kinds of address books; the shared address book, which all users can use,
and the personal address book, which can be created for each user. Multiple destinations
can be grouped together.
“Address Book” List Screen
The “Address Book” list screen displays a list of the registered destinations.
On this screen you can register new destinations and change existing destinations.
Button
Button name Description
1 [Add] Registers new destinations.
2 [Duplicate] Copies destinations that is already registered. The destination can
3 [Delete] Deletes destinations.
4 [Import] Imports destinations from an external file.
5 [Export] Exports destinations in the specified file format.
be edited and used as another destination.
Page 99

3-16 Creating Address Books
List Items
Item Description
6 Number of destinations
that can be registered
7 Personal / Shared switch Switches the displayed Address Book between personal and shared
8 Filter Enables you to filter the displayed destination list according to a
9 All Enables you to display the destinations according to the assigned
10 Group Displays a list of the registered groups. You can also register groups.
11 Destination Search Enables you to search for destination.
12 Number The number assigned to the destination.
13 Name Displays the destination names.
14 Company Displays the company names of the registered destination.
15 Fax Number Displays the fax numbers of the registered destination.
Displays the number of destinations that can be registered.
destinations. (Only displayed when the user is logged in as a user.)
letter or symbol (Others). You can sort the destinations according to
name or according to company name.
address book destination numbers.
(See page 3-31.)
You can search for the following items.
• Company
• Name
• Fax Number
• E-Mail Address
Searching is performed separately for personal and shared
destinations.
You can also search groups when groups are displayed. In this case,
searching is performed for the group name.
If you click [], the destinations are sorted by name.
If you click [], the destinations are sorted by company name.
16 E-mail Address Displays the e-mail addresses of the registered destination.
17 Page Switch Enables you to switch pages when destination does not fit on one
page. (The number of pages differs according to how many items are
displayed on each page.)
18 Number of displayed
items switch
Switches the number of destinations displayed on one screen
(between 10, 20, and 50).
Page 100

1
2
3
OfficeBridge Administrator Settings
Creating Address Books 3-17
Registering New Destinations
Note
You can register new destinations in OfficeBridge.
Up to 2000 destinations can be registered, including both personal and shared
destinations.
Log in to OfficeBridge as a user. 1 (See page 2-2.)
This function is also available on Administrator screen.•
This function may also be available on Guest login screen, depending on user policy settings.•
Click [User Information], and then [Address Book].
2
The “Address Book” list screen is displayed.
You can select whether to register the destination as personal or shared
3
information.
Click [Add].
4
The “Registration” screen is displayed.
Set the destination.
5
 Loading...