

Page 1

Administrator’s Guide
Plain-paper digital Fax/Copier/Printer/Scanner
Please read this guide before operating this machine.
After you finish reading this guide, keep it handy for easy reference.
Page 2

Chapter 1 Using Common Functions
1
Chapter 2 Management
Chapter 3 Maintenance
Chapter 4 Troubleshooting
2
3
4
Page 3

ii Contents
Contents
How to Read This Manual ...........................................................................................v
Symbols ....................................................................................................................... v
Key Descriptions .......................................................................................................vi
Screens ....................................................................................................................... vi
Chapter 1 Using Common Functions
Entering Characters ..................................................................................................1-2
Overview of the Character Entry Screen ...............................................................1-2
Entering Characters ...............................................................................................1-2
Entering Symbols / Special Characters .................................................................1-3
Deleting / Inserting Characters ..............................................................................1-6
Editing the Soft Keys .................................................................................................1-8
Editing the My MFP Shortcuts .............................................................................1-11
Using My Jobs ...........................................................................................................1-14
Registering /Editing My jobs ................................................................................1-14
Deleting My jobs ....................................................................................................1-18
Printing My Jobs List ...........................................................................................1-19
Executing My jobs .................................................................................................1-20
Checking the Machine Information .....................................................................1-21
List of Entries ............................................................................................................1-22
Paper Settings ...........................................................................................................1-25
Setting the Bypass Paper......................................................................................1-25
List of Paper Settings ............................................................................................1-26
Specifying Default Settings ...................................................................................1-28
Setting Example ....................................................................................................1-28
List of Default Settings .........................................................................................1-29
Outputting Lists .......................................................................................................1-33
Printing the Device Settings List .........................................................................1-33
Printing the User Usage Management List ........................................................1-34
Printing the Root Certificate List .........................................................................1-35
List of Lists ............................................................................................................1-36
Using Personal Settings ..........................................................................................1-37
Specifying Personal Settings ................................................................................1-37
Using Personal Settings ........................................................................................1-40
Logging In / Logging Out ........................................................................................1-41
Logging In ..............................................................................................................1-41
Logging Out ...........................................................................................................1-42
Chapter 2 Management
List of Machine Management Settings ..................................................................2-2
Setting Security Codes ..............................................................................................2-4
Setting the Administrator Password ......................................................................2-4
Page 4

Contents iii
1
Setting the Protect Passcode ..................................................................................2-7
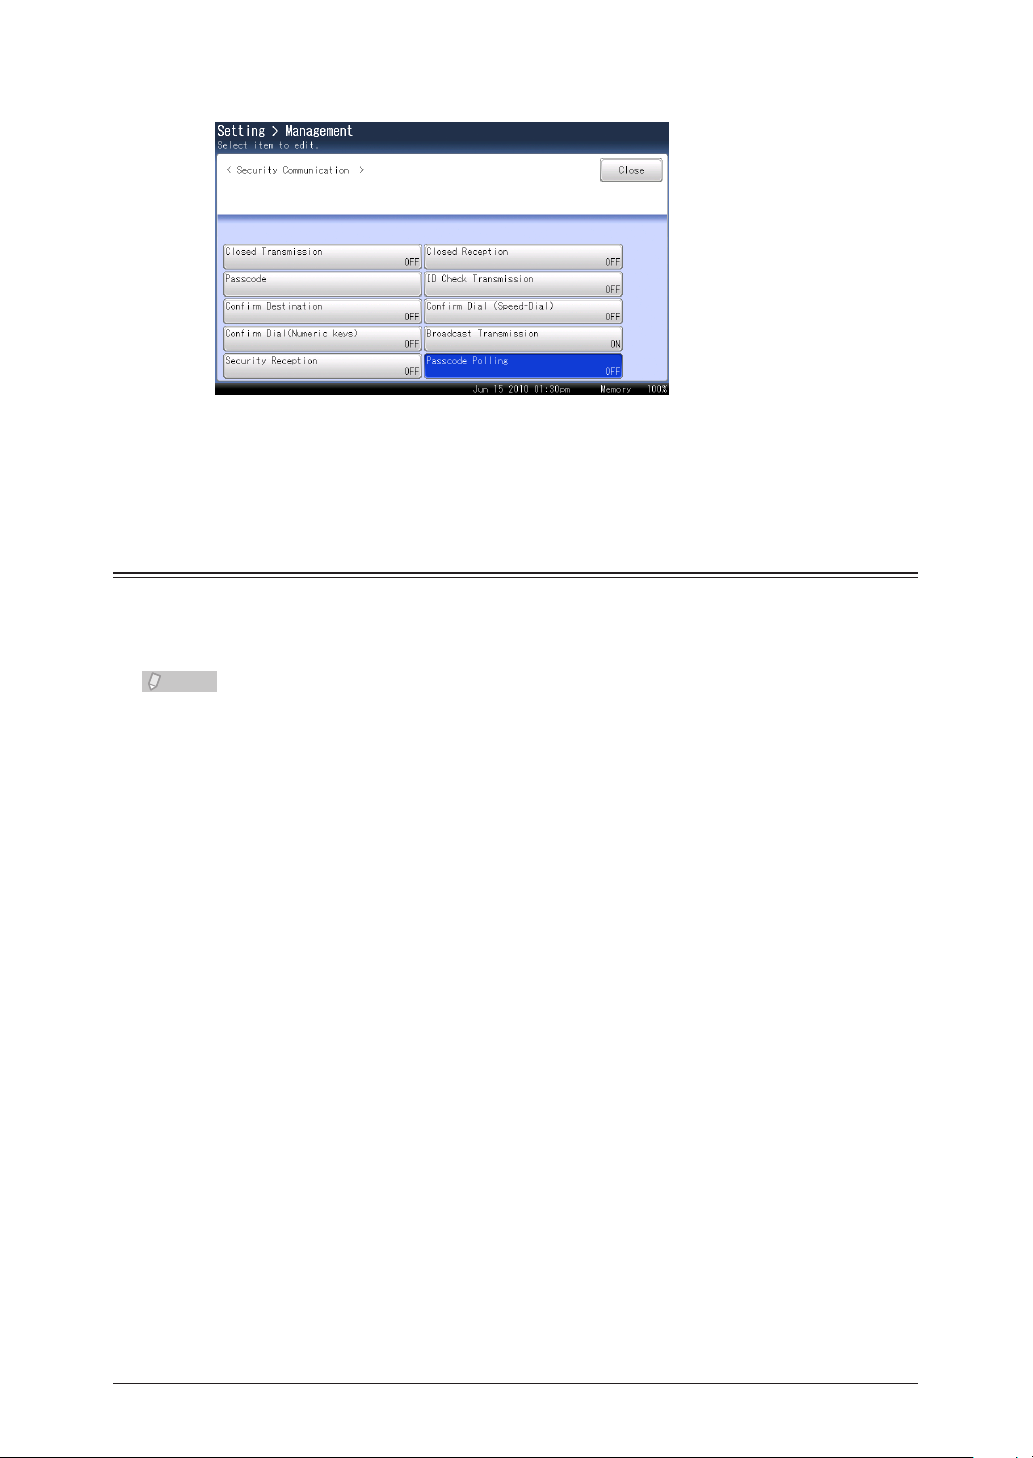
Closed Communication .............................................................................................2-9
Setting Closed Transmission ..................................................................................2-9
Setting Closed Reception ......................................................................................2-10
Setting Passcode Polling .......................................................................................2-11
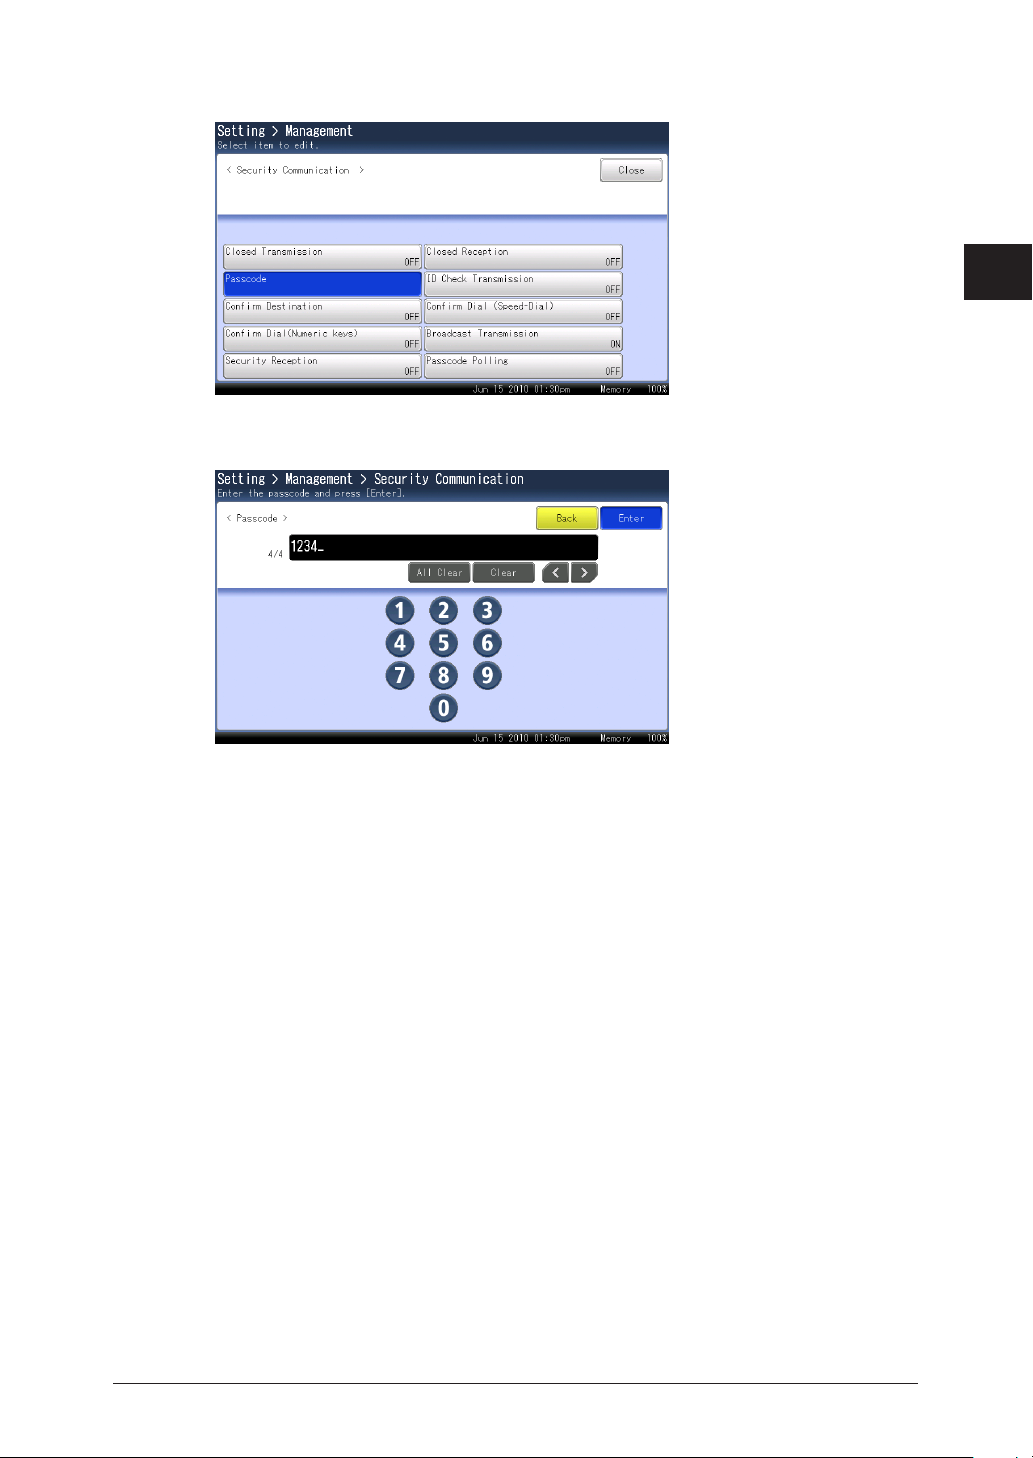
Setting the Passcode .............................................................................................2-12
Communication and Range of Passcodes .............................................................2-14
Setting ID Check Transmission ............................................................................2-16
Confirming the Destination Before Transmission ............................................2-17
Setting the Destination Confirmation Function .................................................. 2-17
Setting the Confirmation Dial Functions ............................................................2-18
Prohibiting Transmission to Multiple Destinations ........................................2-20
Security Reception ...................................................................................................2-21
Activating the PIN mask .........................................................................................2-23
Function Protect Settings ......................................................................................2-25
Setting Function Protection..................................................................................2-26
Using Function Protection ....................................................................................2-28
Setting Mode Protection .........................................................................................2-30
Setting User Authentication ..................................................................................2-32
Setting the Authentication Method ......................................................................2-32
Managing User Access/Cost Accounting .............................................................2-35
Setting the Currency Unit ....................................................................................2-35
Specifying the Charge Settings ............................................................................2-37
Erasing the Accounting Data ...............................................................................2-39
Specifying the Network Settings ..........................................................................2-40
Specifying the TCP/IP Settings ............................................................................2-43
Registering LDAP Servers ....................................................................................2-54
Specifying the Archive Settings ............................................................................2-65
Setting an E-mail Gateway ..................................................................................2-69
Setting the Automatic Logout Time .....................................................................2-71
Mirroring the Machine Settings ...........................................................................2-73
Mirroring Methods ................................................................................................2-73
Importing / Exporting Using USB Memory .........................................................2-74
Directly Copying Via the Network .......................................................................2-80
Chapter 3 Maintenance
Cleaning the Outside of the Machine ....................................................................3-2
Cleaning the Control Panel ......................................................................................3-3
Cleaning the Scanning Area ....................................................................................3-4
Cleaning the Automatic Document Feeder (ADF) .................................................3-4
Cleaning the Scanning Area ...................................................................................3-6
Page 5

iv Contents
Chapter 4 Troubleshooting
Error Messages ...........................................................................................................4-2
Communication Errors ...........................................................................................4-2
Error Messages Displayed on the Screen ..............................................................4-8
Troubleshooting ........................................................................................................4-11
The machine does not operate ..............................................................................4-11
Image Quality Problems .......................................................................................4-12
Cannot Transmit Faxes ........................................................................................4-15
Cannot Receive Faxes ...........................................................................................4-16
Cannot Scan ..........................................................................................................4-16
Cannot Print ..........................................................................................................4-18
Cannot Connect to the Network ...........................................................................4-19
Cannot Install........................................................................................................4-20
OfficeBridge Troubleshooting ............................................................................... 4-21
Browser Settings ...................................................................................................4-23
When a Power Failure Occurs ...............................................................................4-26
Main Unit Operation.............................................................................................4-26
Memory Backups ...................................................................................................4-26
Erased Document Notification .............................................................................4-27
Page 6

How to Read This Manual v
1
How to Read This Manual
Warning
Caution
IMPORTANT
Note
Symbols
In this manual, the following symbols are used with the items where important
operational and safety information must be observed.
Symbol Meaning
Describes warnings to protect yourself and others from serious or potentially
fatal injury if you handle the machine incorrectly. For safe operation, please
follow instructions carefully.
Notes a caution to protect yourself and others from personal injury or damage
to properties if you handle the machine incorrectly. For safe operation, please
follow instructions carefully.
Describes important conditions or restrictions you should carefully observe to
avoid problems caused by incorrect operations.
Describes reference information and additional notes for operation.
Page 7
vi How to Read This Manual
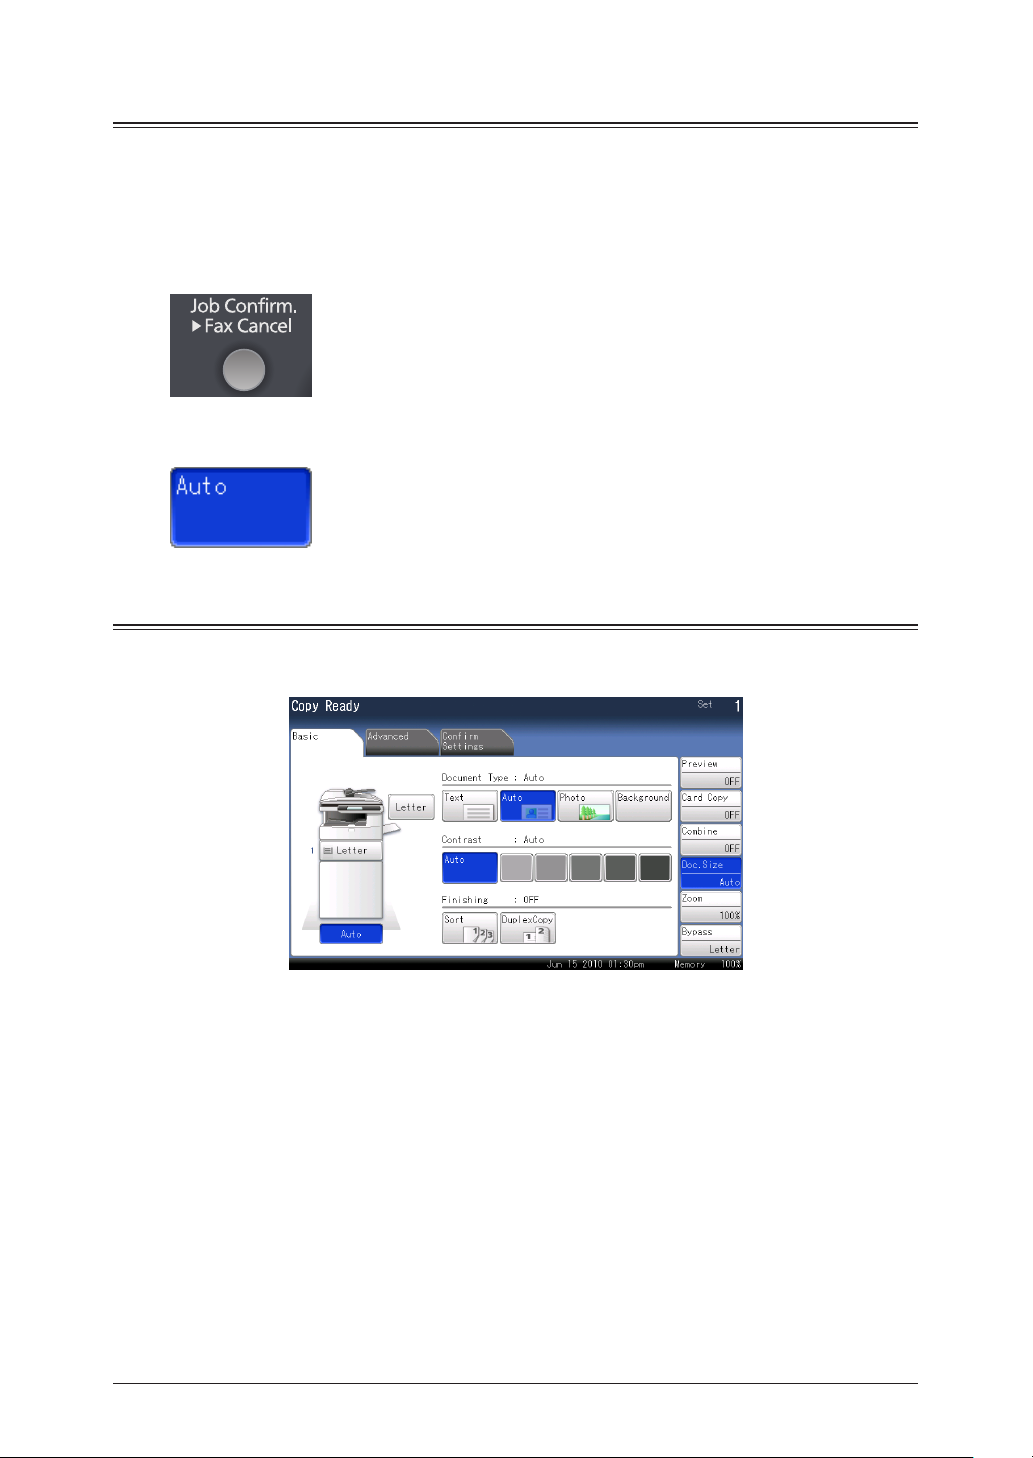
Key Descriptions
In this manual, the operating keys are described as follows:
The key names on the control panel are shown in < >, and the key names on the touch
panel are in [ ].
Keys on the control panel
Enclosed in < >, for example, <Job Confirm. Fax Cancel>.
Touch panel keys
Enclosed in [ ], for example, [Auto].
Screens
This manual uses the screens of the standard model, unless otherwise stated. The screens
you see may differ, depending on the options installed.
Page 8

Chapter 1
Using Common Functions
Entering Characters ..................................................................................................1-2
Overview of the Character Entry Screen ...............................................................1-2
Entering Characters ...............................................................................................1-2
Entering Symbols / Special Characters .................................................................1-3
Deleting / Inserting Characters ..............................................................................1-6
Editing the Soft Keys .................................................................................................1-8
Editing the My MFP Shortcuts .............................................................................1-11
Using My Jobs ...........................................................................................................1-14
Registering /Editing My jobs ................................................................................1-14
Deleting My jobs ....................................................................................................1-18
Printing My Jobs List ...........................................................................................1-19
Executing My jobs .................................................................................................1-20
Checking the Machine Information .....................................................................1-21
List of Entries ............................................................................................................1-22
Paper Settings ...........................................................................................................1-25
Setting the Bypass Paper......................................................................................1-25
List of Paper Settings ............................................................................................1-26
Specifying Default Settings ...................................................................................1-28
Setting Example ....................................................................................................1-28
List of Default Settings .........................................................................................1-29
Outputting Lists .......................................................................................................1-33
Printing the Device Settings List .........................................................................1-33
Printing the User Usage Management List ........................................................1-34
Printing the Root Certificate List ......................................................................... 1-35
List of Lists ............................................................................................................1-36
Using Personal Settings ..........................................................................................1-37
Specifying Personal Settings ................................................................................1-37
Using Personal Settings ........................................................................................1-40
Logging In / Logging Out ........................................................................................1-41
Logging In ..............................................................................................................1-41
Logging Out ...........................................................................................................1-42
Page 9

1-2 Entering Characters
Entering Characters
Refer to this section when entering characters for sender names or names for address
book destinations, etc.
Overview of the Character Entry Screen
Number of entered characters/Number of characters that can be entered
This displays the number of characters that can be entered and the number of characters
entered so far.
Edit window
This displays the
entered characters.
Mode selection
keys
They change the
type of characters
that are being
entered.
[All Clear] button
Press this to delete all characters.
[Clear] button
Press this to delete characters.
Entering Characters
Select the character to enter from the character panel.
1
Cursor keys
They move the character entry position.
Return key
Press this to insert
a line break while
entering text in
cover page or e-mail
text.
[.com] button
You can register up
to 10 domain name
extensions for your
convenience. (See
page 1-4.)
To enter upper case characters, press [Upper].•
To enter lower case characters, press [Lower].•
Page 10
Entering Characters 1-3
1
Using Common Functions
Entering Symbols / Special Characters
Entering Symbols / Special Characters
Press [Symbol].
1
Select the symbol, and press [Enter].
2
Depending on the item to set, such as when entering a workgroup or DNS server
address, some characters cannot be entered.
Entering Numbers
Numbers can be entered using the numeric keys or from the character entry screen.
Page 11

1-4 Entering Characters
Entering Spaces
Note
Press [Space] while entering characters.
Entering “.com”
You can press the [.com] button when entering e-mail addresses, etc. to easily enter
domain names. You can also register the parts other than the domain name in advance to
easily enter frequently used strings.
For details on registering domain names, refer to Chapter 7, “Registering Other
Settings” in the Scanner and Fax Guide.
Enter the e-mail address.
1
Press [.com].
2
Page 12
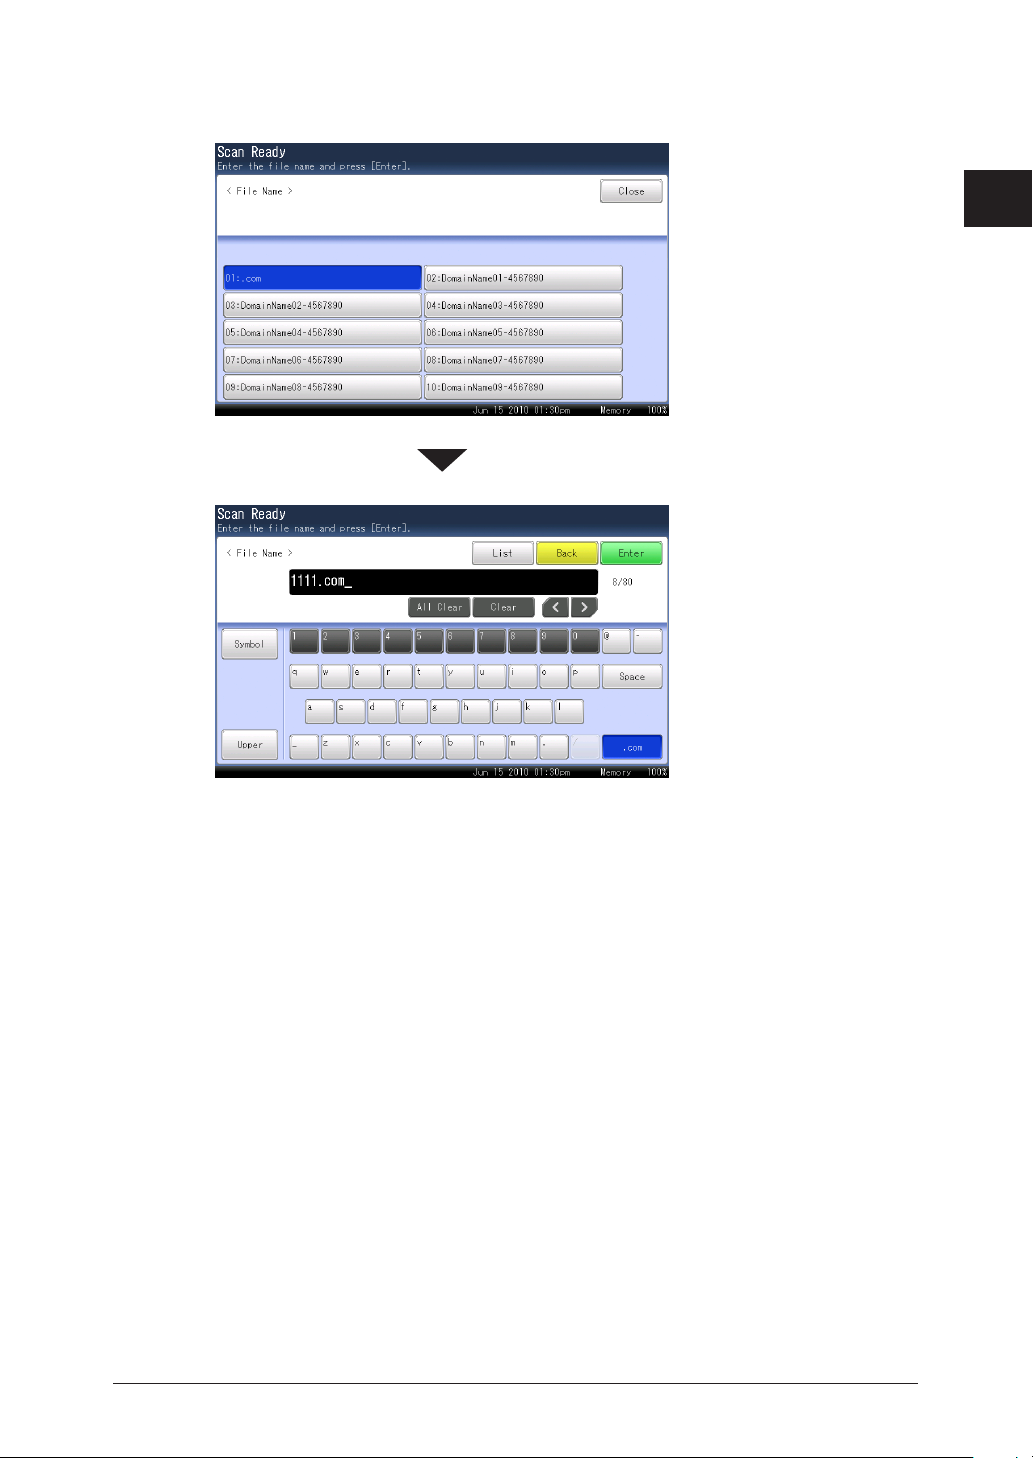
Entering Characters 1-5
1
Using Common Functions
Select the domain name you want to enter.
3
The selected domain name is entered.
The domain name selection screen is not displayed if no domain names are registered.
Page 13

1-6 Entering Characters
Deleting / Inserting Characters
To delete a character, use the cursor buttons to move the cursor to the character you want
to delete, and then press [Clear].
And to insert a character, use the cursor buttons to move the cursor to the insert position
and enter the character.
Deleting Characters
Use the cursor buttons to move the cursor to the position of the character you
1
want to delete.
Press [2 Clear].
The last entered character can be deleted by just pressing [• Clear].
To delete all of the characters, press [All Clear].•
Page 14

Entering Characters 1-7
1
Using Common Functions
Inserting Characters
Use the cursor buttons to move the cursor to the right of the position you want
1
to insert the characters.
Enter the characters.
2
The characters will be inserted before the cursor.
Page 15

1-8 Editing the Soft Keys
Editing the Soft Keys
Note
Up to six advanced functions of each mode can be displayed on the ready screen. By
assigning frequently used functions, you can use them from the ready screen.
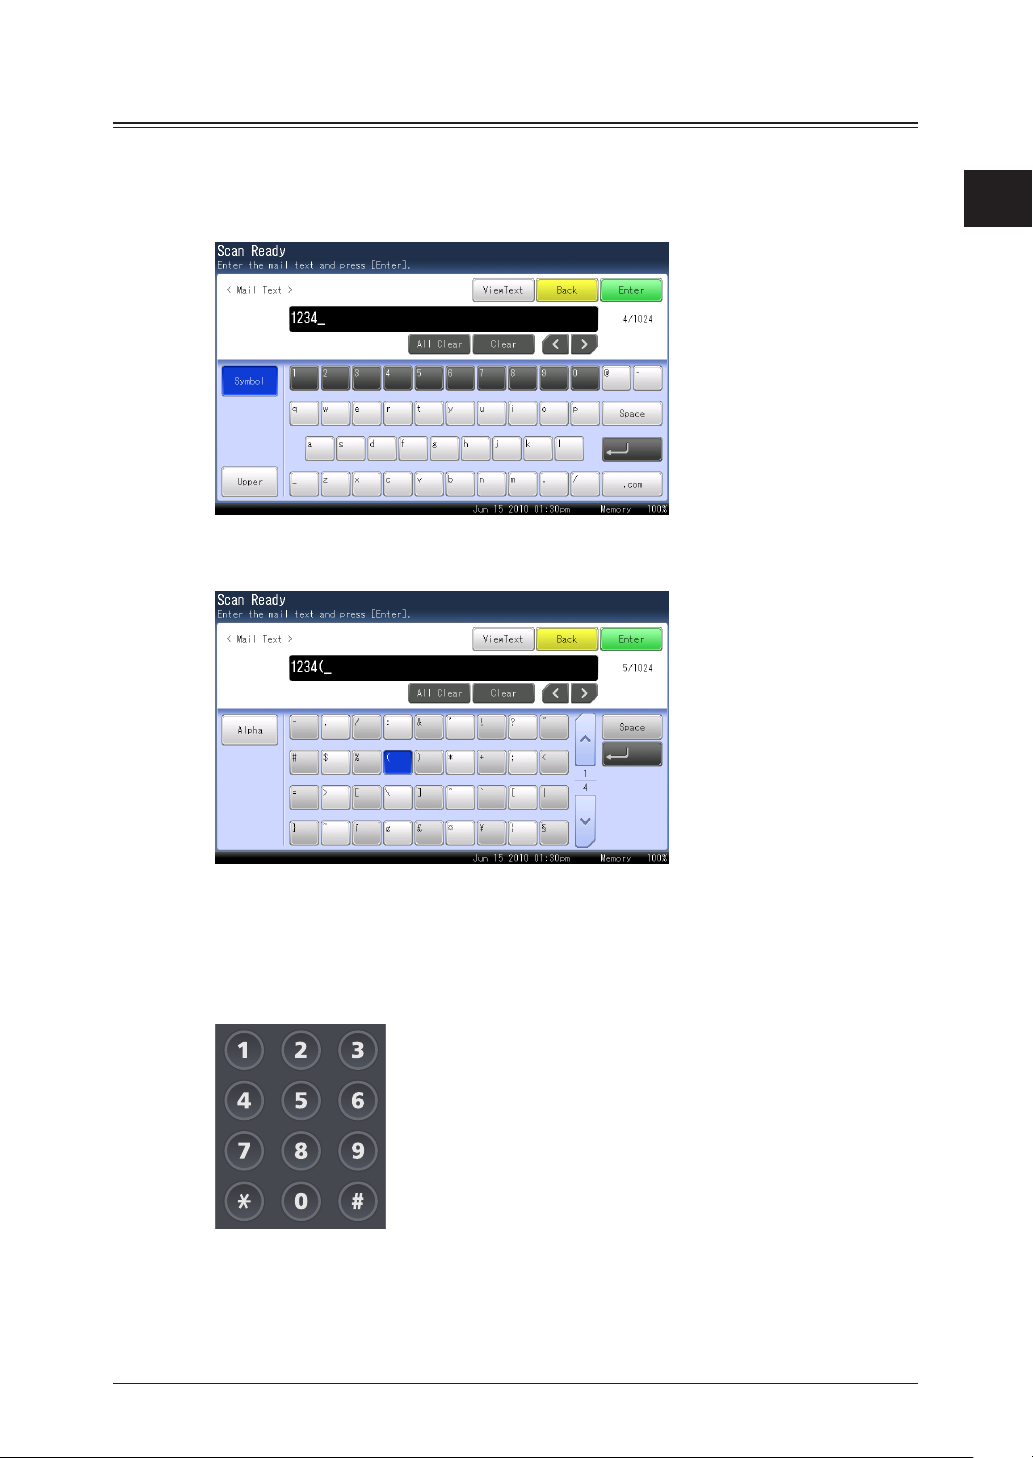
Example of the copy ready screen
Soft Key
Ready Screen Functions that Can Be Assigned
Copy screen
Scanner screen
Fax screen Preview, Resolution, Contrast, Duplex Scan, Redial, Monitor,
Preview, Zoom, Card Copy, Document Size, Bypass, Combine, Next
Document Setting, Run ScanTag Program
Preview, Document Type, Contrast, Resolution, Zoom, Scan Size, Next
Document Setting, Color, Duplex Scan, Broadcast, Batch Scan,
File Format, Speed-Dial, File Name, Mail Address, e-mail Subject, Mail
History, Color Adjustment, Attachment, Category Name, Comments,
TWAIN Box, Scan to Path Notification, Hold Time, Stamp
Speed-Dial, Auto Distribute, Auto Rx, Security Reception, TTI,
Cover Page, Tx Report, File Format, Scan Size, Next Document Setting,
Polling, F-Code Polling, Polling Doc., F-Code Tx, F-Code Doc., Closed
Transmission, ID Check Transmission, Memory Tx, Broadcast, Mail
Address, Mail History, e-mail Subject, Batch Transmission, Check Mail,
Delayed Transmission, e-mail Gateway, Stamp
*1
*1
Only when the “Scan Confirmation Stamp option” is attached.*1
Underlined values are the default settings specified at the time of shipment.
Page 16

Editing the Soft Keys 1-9
1
Using Common Functions
Press <Setting>.
1
Press [Soft Key].
2
Select the ready screen you want to set.
3
Select the soft key you want to edit.
4
Page 17

1-10 Editing the Soft Keys
Select the function you want to display as a soft key, and press [Enter].
5
To continue to specify other soft keys, repeat the procedure from step 4.
Page 18

Editing the My MFP Shortcuts 1-11
1
Using Common Functions
Editing the My MFP Shortcuts
Note
You can change the shortcut keys on the screen displayed when <My MFP> is pressed.
My MFP
shortcuts
The following functions can be assigned:
• Copy
• Scan
• Fax
• Print
• Scan to e-mail
• Scan to PC Folder
• Scan to Box
• Scan to USB Memory
• Scan to FTP Server
• Scan to Print
• Share Rx Box
• Rx Box
• Tx Box
• ScanTag
• Security Print
• Shared Box
• User Box
• PC Folder to Print
• USB Memory to Print
• Register
• Paper Settings
• Default Settings
• Management
• List
• Personal Settings
• Sound Settings
• Language
• LCD Brightness Adjustment
Underlined values are the default settings specified at the time of shipment.
Page 19
1-12 Editing the My MFP Shortcuts
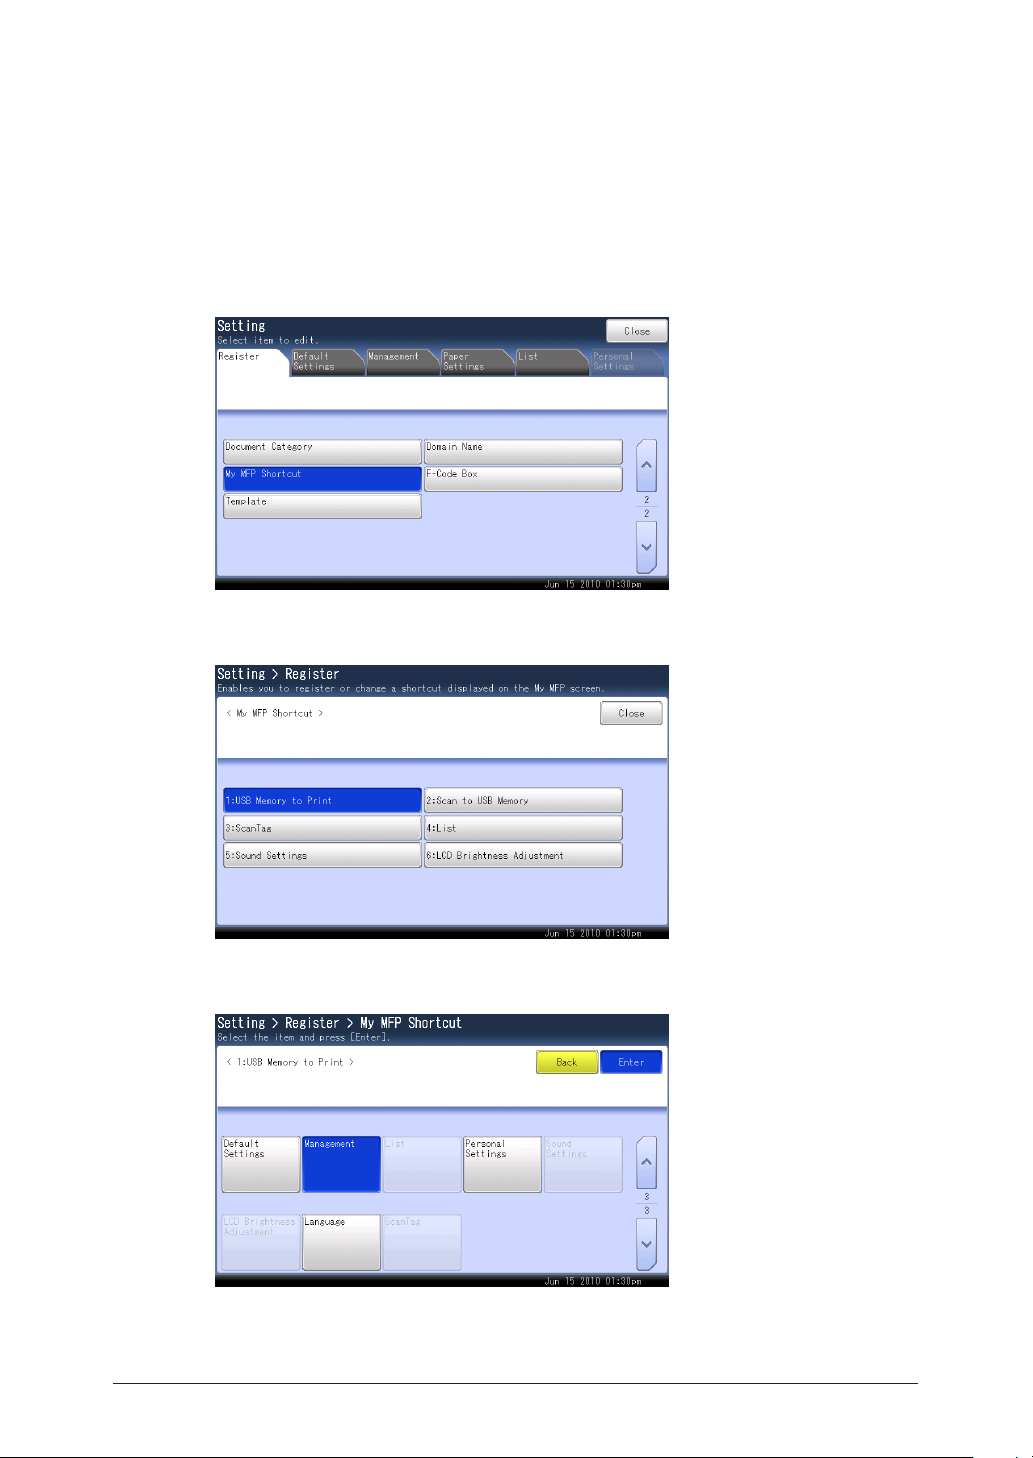
Editing from the Settings Screen
Press <Setting>.
1
Press 2 the [Register] tab.
Press [My MFP Shortcut].
3
Select the shortcut button you want to change.
4
Select the screen you want to register in the shortcut button, and press [Enter].
5
To continue to specify other shortcut buttons, repeat the procedure from step 4.
Page 20

Editing the My MFP Shortcuts 1-13
1
Using Common Functions
Editing From the My MFP Screen
Press <My MFP>.
1
Press [Add/Edit].
2
The remaining procedure is the same as steps 3 4 to 5 in “Editing from the
Settings Screen”. (See page 1-12.)
Page 21

1-14 Using My Jobs
Using My Jobs
Note
Register a series of operations in My Jobs to allow all the registered operations to be
performed with one press of the button. This is useful for registering frequently used
operations.
Up to six • jobs can be registered.
The destinations in the personal address book cannot be registered.•
Print jobs cannot be registered.•
The machine emits a beeping sound when registering My Jobs. The mode key •
corresponding to the mode being registered also flashes, to inform you that the My
Jobs is being registered.
Registering /Editing My jobs
Registering / Editing From the My jobs Screen
This section describes the procedure for registering My Jobs. When editing, select the job
you want to edit in step 5, and press [Edit]. After the screen in step 7 is displayed, select
the item to change.
Press <Setting>.
1
Press 2 the [Register] tab.
Press [My Jobs].
3
Page 22
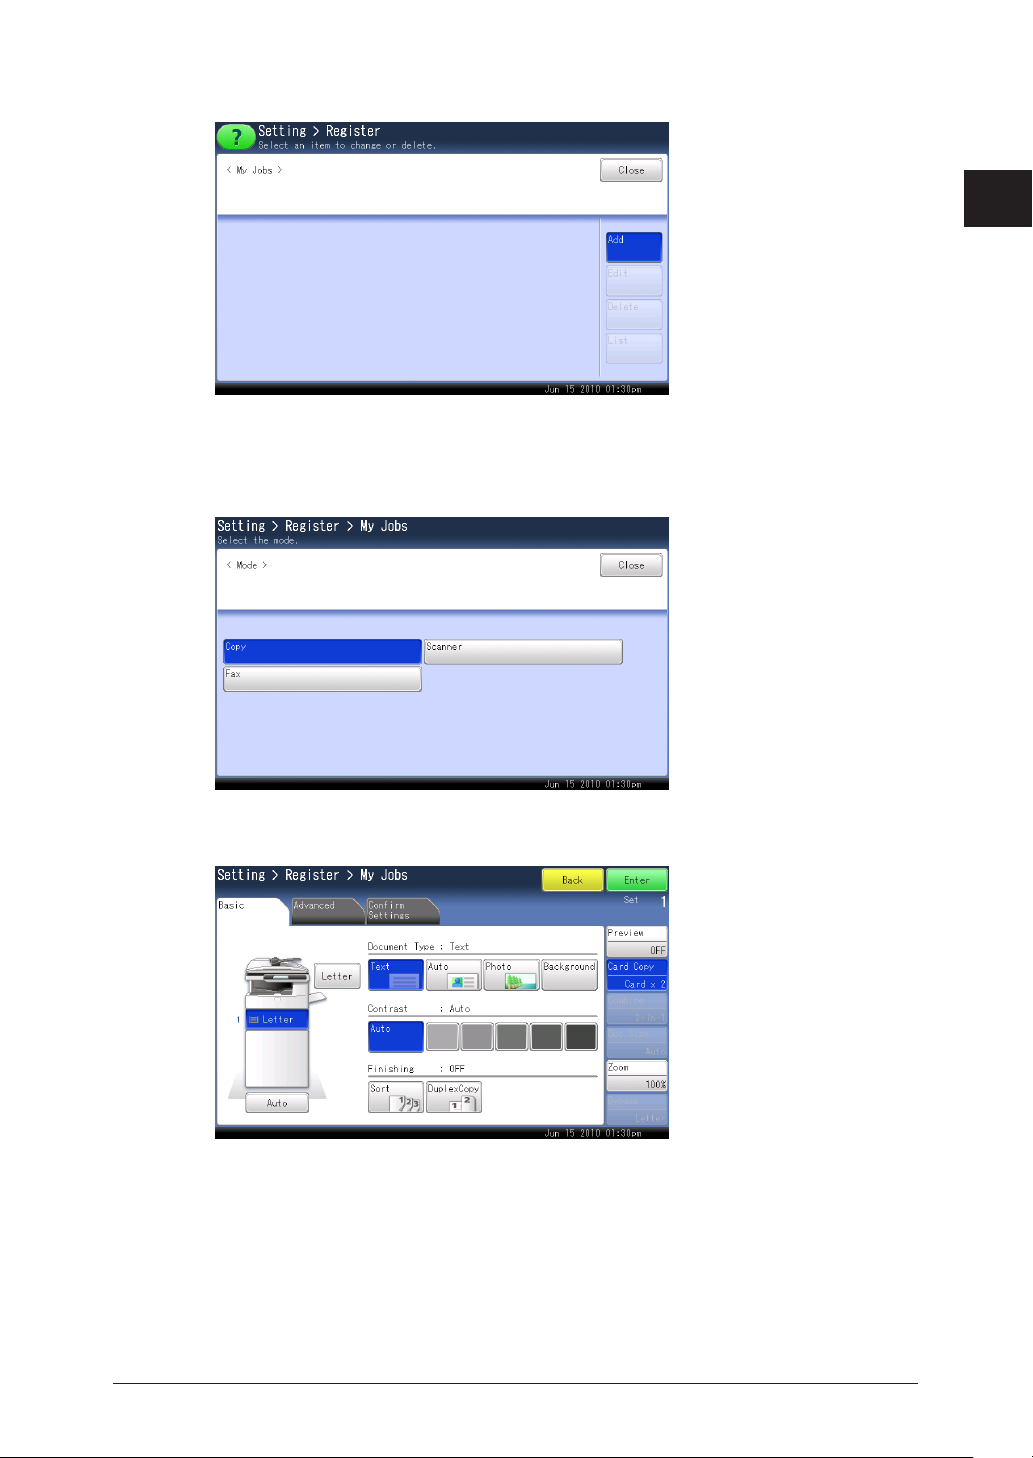
Using My Jobs 1-15
1
Using Common Functions
Press [4 Add].
When editing, select the job you want to edit, and press [Edit]. Proceed to step 7.
Select the type of job you want to register.
5
Perform the operation you want to register, and press 6 [Enter] or <Start>.
Page 23

1-16 Using My Jobs
To register the job name, press [Title].
7
Enter the job name, and press [Enter].
8
Up to 40 characters can be entered.
Press [Start].
9
Select [Yes] to include the start key operation in the
10
the start key operation, and press [Enter].
l
No: Displays the screen indicating the content registered in the job.
l
Yes: Displays the screen indicating the content registered in the job, and then automatically
starts the job.
Press [Close].
11
job or [No] to not include
Page 24
Using My Jobs 1-17
1
Using Common Functions
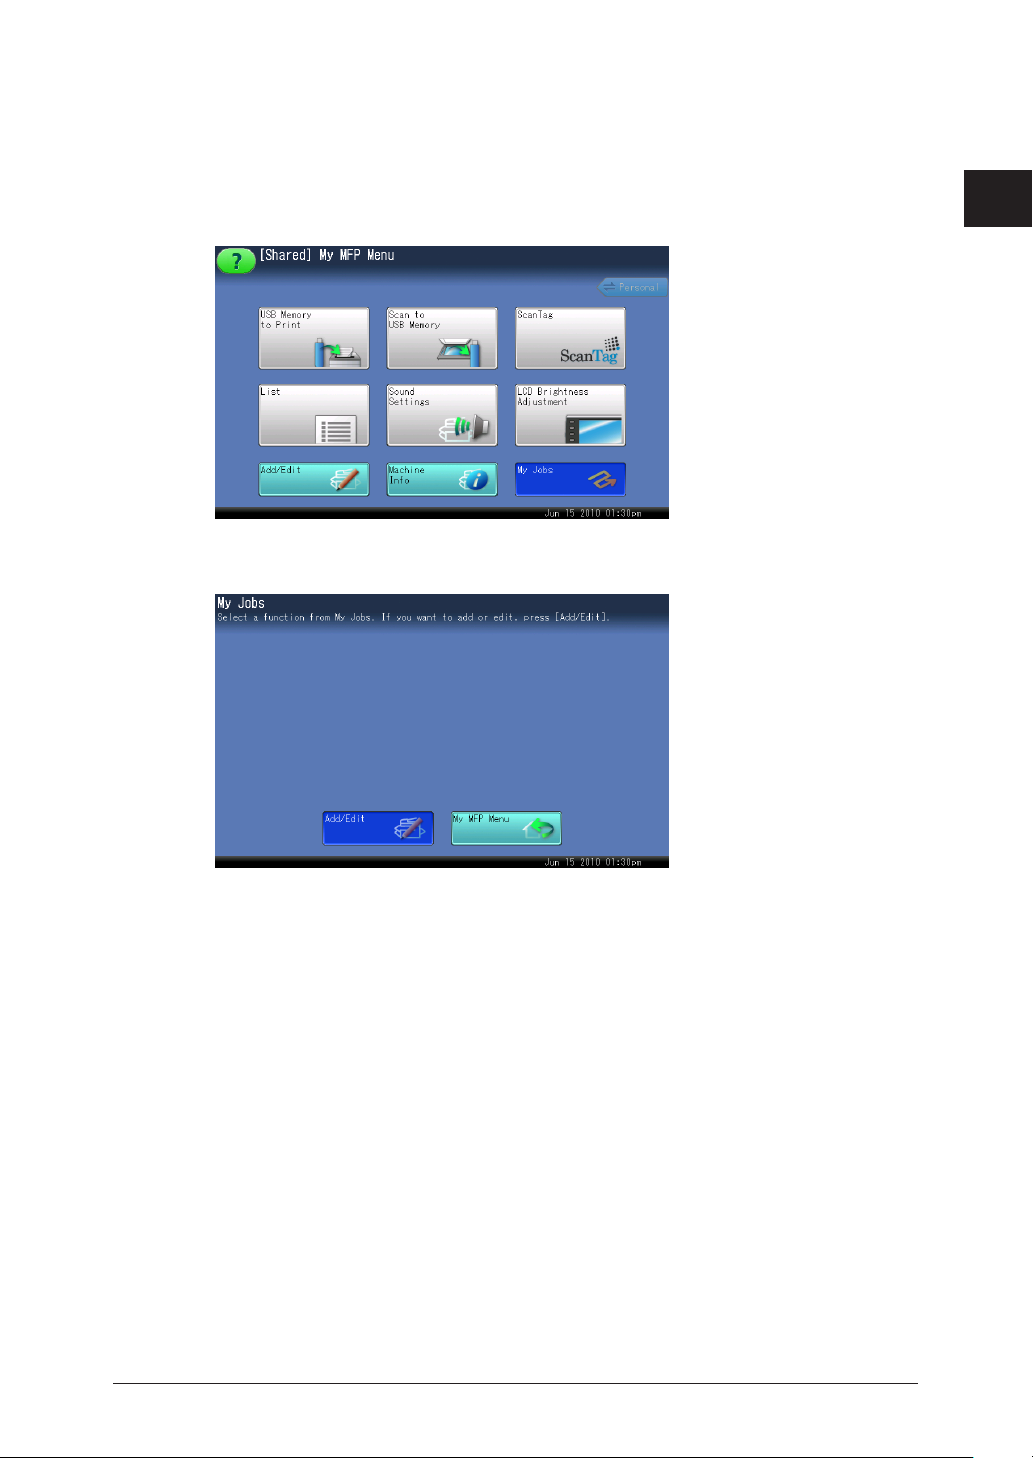
Registering / Editing From the
Press <My MFP>.
1
My jobs Execution Screen
Press [My Jobs].
2
Press [Add/Edit].
3
The remaining procedure is the same as steps 4 4 to 11 in “Registering / Editing
From the My jobs Screen”. (See page 1-14.)
Page 25

1-18 Using My Jobs
Deleting My jobs
Deleting From My jobs Screen
Press <Setting>.
1
Press 2 the [Register] tab.
Press [My Jobs].
3
Select the 4 job you want to delete, and press [Delete].
Press [Yes] to proceed with the deletion.
5
Press [No] to return to the screen in step 4.
Deleting From
Press <My MFP>.
1
Press [My Jobs].
2
My Jobs Execution Screen
Press [Add/Edit].
3
Page 26

Using My Jobs 1-19
1
Using Common Functions
The remaining procedure is the same as steps 4 4 to 5 in “Deleting From My jobs
Screen”. (See page 1-18.)
Printing My Jobs List
Printing From My Jobs Screen
Press <Setting>.
1
Press 2 the [Register] tab.
Press [My Jobs].
3
Press the [List] tab4 .
Select [ON] to enable duplex printing, or [OFF] to disable it.
5
Select [ON] to enable combined printing, or [OFF] to disable it.
6
Press [Yes].
7
Page 27
1-20 Using My Jobs
Printing From
Note
Note
Press <My MFP>.
1
Press [My Jobs].
2
Press [Add/Edit].
3
The remaining procedure is the same as steps 4 4 to 7 in “Printing From My Jobs
Screen”. (See page 1-19.)
My Jobs list can also be printed from [My Jobs List] in [List] after pressing <Setting>.
My Jobs Execution Screen
Executing My jobs
If the registered function is protected, a message indicating so is displayed when My
Jobs is executed. For details, refer to “Setting Mode Protection”. (See page 2-30.)
Press <My MFP>.
1
Press [My Jobs].
2
Press the you want to execute.
3
Page 28

Checking the Machine Information 1-21
1
Using Common Functions
Checking the Machine Information
In the machine information on the My MFP screen, you can check the IP address and
network settings of the machine, the status of optional equipment and consumables, and
the number of pages that have been printed with each mode.
Press <My MFP>.
1
Press [Machine Info].
2
Check the machine information, and press [Print] if you want to print it.
3
If you do not want to print the information, press [My MFP Menu].
Select [ON] to enable duplex printing, or [OFF] to disable it.
4
Select [ON] to enable combined printing, or [OFF] to disable it.
5
Press [Yes].
6
Page 29

1-22 List of Entries
List of Entries
You can register useful functions to use with each mode, such as address book
destinations, My Jobs, and various shortcuts.
Function Description Settings Reference page
Address Book
Entry
Group You can register, edit, and
Soft Key You can set frequently used
My Jobs You can register, edit, and
Favorite Address You can register, edit, and
Folder Shortcut You can register, edit, and
FTP Shortcut You can register, edit, and
TWAIN Scan Box You can register or edit the
You can register, edit,
and delete address book
destinations.
delete groups.
functions as soft keys.
delete My Jobs, or print a list
of My Jobs.
delete destinations to display
in the [Faves] tab on the
scanner screen.
delete shortcuts to shared
folder paths.
delete shortcuts to FTP
servers.
name and I.D. code for a
TWAIN box.
l
Copy Functions
Preview, Card Copy,
Combine, Document
Size, Zoom, Bypass
l
Scanner Functions
Preview, Document
Type, Contrast,
Resolution, File
Name, Color
l
Fax Functions
Preview, Resolution,
Contrast, Redial,
Monitor, Broadcast
Chapter 7, “Registering
Destinations” in the
Scanner and Fax Guide.
Chapter 7, “Registering
Destinations” in the
Scanner and Fax Guide.
1-8
1-14
Chapter 7, “Registering
Destinations” in the
Scanner and Fax Guide.
Chapter 7, “Registering
Destinations” in the
Scanner and Fax Guide.
Chapter 7, “Registering
Destinations” in the
Scanner and Fax Guide.
Chapter 2, “Scanning
Documents Using a
TWAIN Box” in the
Scanner and Fax Guide.
Page 30

List of Entries 1-23
1
Using Common Functions
Function Description Settings Reference page
l
Auto Distribute You can register conditions
to determine whether to
distribute a received fax.
You can also edit, delete, and
print a list of the conditions.
File Name You can register the file name
for the scanned image data in
advance.
Document
Category
Domain Name You can register the domain
My MFP Shortcut You can change the My MFP
You can register, edit, and
delete document categories
to use when saving scanned
documents in a box.
names to display on the
character entry screen.
shortcut keys.
Setting
OFF
ON
l
Priority
Low
Middle
High
l
Conditions
Matching Method
Any
Initial
Final
Equal
l
Auto Print
OFF
ON
l
Schedule
Weekday
Mon, Tue, Wed, Thu,
Fri, Sat, Sun
Start Time/End Time
12:00 am to 11:59 pm
USB Memory to
Print, Scan to USB
Memory, Scan Tag,
List, Sound Settings,
LCD Brightness
Adjustment
Chapter 4, “Useful
Reception Functions”
in the Scanner and Fax
Guide.
Chapter 7, “Registering
Other Settings” in the
Scanner and Fax Guide.
Chapter 7, “Registering
Other Settings” in the
Scanner and Fax Guide.
Chapter 7, “Registering
Other Settings” in the
Scanner and Fax Guide.
1-11
Page 31

1-24 List of Entries
Function Description Settings Reference page
Note
F-Code Box You can register, edit, and
delete F-Code Boxes, or print
a list of the F-Code boxes.
l
Secure Box
Hold Time
0 - 31 Day: 0 Days
Chapter 4, “F-Code
Communications” in the
Scanner and Fax Guide.
I.D.Code
0000
l
Bulletin Box
Rx Protect, Auto
Print, Overwrite,
Erase Tx Doc
OFF
ON
I.D.Code
0000
Template You can register a subject
and mail text for internet
faxes and Scan to E-Mail in
Chapter 7, “Registering
Other Settings” in the
Scanner and Fax Guide.
advance.
Underlined values are the default settings specified at the time of shipment.
Page 32

Paper Settings 1-25
1
Using Common Functions
Paper Settings
Note
You can make paper settings for receiving faxes and making copies. You can also insert
the paper for sorting.
Setting the Bypass Paper
Set the paper size when you load paper in the bypass tray.
Press <Setting>.
1
Press 2 the [Paper Settings] tab.
Press [Bypass].
3
Select the paper size, and press [Enter].
4
Custom-sized paper can be used for PC printing only.
Page 33

1-26 Paper Settings
List of Paper Settings
The settings for the various functions in the paper settings are printed out in the device
settings list. (See page 1-33.)
Function Description Settings
Cassette1 You can set the type and size of paper used in Cassette 1.
Cassette2*1You can set the type and size of paper used in Cassette 2. Letter
Bypass You can set the type and size of paper used in the bypass tray.
For details, refer to “Setting the Bypass Paper”. (See page
1-25.)
Letter
Legal
H.LTR
Legal
H.LTR
Letter
Legal
H.LTR
Executive
DL
COM10
Monarch
Postcard
OHP (LTR)
A4
A5
A5
A6
F4
Custom
*2
Page 34

Paper Settings 1-27
1
Using Common Functions
Function Description Settings
Note
Note
Note
Select Print
Cassette
Copy
You can specify the cassettes to use when [Auto] is set for the
paper selection.
Cassette1
OFF
ON
OFF: This cassette is not used.
ON: This cassette is used.
Cassette2*
OFF
ON
BypassTray
OFF
ON
1
Separate Rx
Page
Fax
You can specify the cassette to be used when receiving faxes
or internet faxes.
OFF: This cassette is not used.
ON: This cassette is used.
You cannot set a paper cassette to [OFF] when using
“Separate Rx Page”.
List
You can select the paper cassette to use for printing lists.
OFF: This cassette is not used.
ON: This cassette is used.
Select the cassette that will be used to print the first page of
a received fax. This enables you to separate received faxes
by printing the first page with a different size or color paper,
while the rest of the fax prints on another paper type.
l
You cannot specify a paper cassette that is disabled for the
fax function.
l
For details, refer to Chapter 4, “Useful Reception Functions”
in the Scanner and Fax Guide.
Cassette1
OFF
ON
Cassette2*
1
OFF
ON
BypassTray
OFF
ON
Cassette1
OFF
ON
Cassette2*
1
OFF
ON
Setting
OFF
ON
Separator Cassette
Cassette 1
Cassette 2*
1
Bypass tray
Print Document
OFF
ON
Cassette 2 is only displayed when installed in the machine.*1
When printing on OHP film, the quality may differ according to the type of OHP film and the *2
usage environment. (Confirmed OHP film: PP2500 from 3M)
Underlined values are the default settings specified at the time of shipment.
Page 35

1-28 Specifying Default Settings
Specifying Default Settings
The default values are those used when you press <Reset> to return to the ready
screen. The machine returns to the default settings if is left without any operation for
a designated period of time. Changing the default values of often-used functions can
shorten the time required to adjust settings.
Setting Example
Here the procedure for changing the default ready screen.
Press <Setting>.
1
Press 2 the [Default Settings] tab.
Press [Default Mode].
3
Select the screen to set, and press [Enter].
4
You can continue to set other default values.
Page 36

Specifying Default Settings 1-29
1
Using Common Functions
List of Default Settings
Function Description Settings
Default Mode You can set the ready screen to display when the
power switch is turned ON and when the specified
auto reset time has elapsed.
Auto Reset
Time
You can set the time until each screen returns to
the ready screen.
l
Copy Screen, Scanner Screen
Automatic Reset Time:
When the machine does not operate for a set period
of time an operation is completed, the selected
settings are reset. (The defaults are restored)
Reset After Scan:
When this is enabled, the resolution, zoom, and
other settings are reset after the document is
scanned.
Copy
Scan
Fax
Print
My MFP
Automatic Reset Time
01-10 Minutes: 03 Minutes
Reset After Scan
OFF
ON
l
Fax Screen, Printer Screen, My MFP Screen
When the machine does not operate for a set period
of time an operation is completed, the selected
settings are reset. (The defaults are restored)
Copy Settings You can set the default values for the copy mode,
such as the document type and contrast for the
documents to be copied.
For details, refer to Chapter 3, “Specifying Default
Copy Settings” in the Copier Guide.
Scanner
Settings
e-mail Settings You can set the default settings for batch
Fax Settings You can set the default values for the fax mode,
Printer
Settings
You can set the default values for the scanner
mode, such as the document type and contrast for
the documents to be scanned.
For details, refer to Chapter 7, “Specifying Default
Settings” in the Scanner and Fax Guide.
transmissions, templates, and the file format for
the Scan to E-Mail function and internet faxes.
For details, refer to Chapter 7, “Specifying Default
Settings” in the Scanner and Fax Guide.
such as the resolution and contrast for the
documents to be faxed.
For details, refer to Chapter 7, “Specifying Default
Settings” in the Scanner and Fax Guide.
You can set the default values for the printer mode,
such as the printer controller settings and the auto
deletion time setting for security printing.
For details, refer to Chapter 9, “Setting the Print
Controller” and “Setting the Auto Deletion Time for
Security Printing” in the Printer Guide.
Automatic Reset Time
01 - 10 Minutes: 03 Minutes
Page 37

1-30 Specifying Default Settings
Function Description Settings
Sound Settings You can set the various sound settings.
l
Volume
You can adjust the volume of the confirmation tone,
completion tone, alarm, operation help, and beep.
Low
Middle
High
These volumes cannot be set individually.
l
Confirmation Tone
You can change the tone that is heard when
pressing the buttons.
l
Completion Tone
The machine can inform you that a copy or internet
fax operation is completed with a beep.
To set all of the following completion tones, select
either [OFF], or [Type 1] to [Type 3].
To set the sounds individually, select [Custom], and
specify the settings individually.
Copy Complete: When copying is complete
Transmission Complete:
When fax or internet fax transmission is
completed
Reception Complete:
When fax or internet fax reception is completed
Rx Print Complete:
When printing of a received document is
complete
PC Printing Complete:
When the printing of a document from a
computer is complete
List Printing Complete:
When printing of a list is complete
Glass Scan Complete:
When the scanning of a document on the
document glass is complete
OFF
Low
Mid
High
OFF
Type 1
Type 2
Type 3
Custom
Page 38

Specifying Default Settings 1-31
1
Using Common Functions
Function Description Settings
l
Sound Settings
Alarm
You can set the machine to inform you of errors
such as when paper has jammed or when the
machine has run out of memory using a beep.
To set all of the following alarm sounds, select
either [ON] or [OFF]. To set the sounds individually,
select [Custom], and specify the settings
individually.
Paper jam: When a paper jam occurs
Out of paper:
When the paper in a paper cassette or the
bypass tray has run out
Toner replacement:
When replacing the toner cartridge
PC print error:
When an error occurs while printing from a
computer
Fax Communication error:
When an error occurs while transmitting a fax
or internet fax
Fax cancel information:
When <Stop> is pressed and there is a reserved
fax or internet fax
Memory Overflow:
When the memory becomes full while scanning
Cover Open: When a cover is open
Document jam:
When there is a document jammed in the ADF
Drum cartridge replacement:
When replacing the drum cartridge
Checkout error:
When the machine wants you to call for service
Charge Wire:
When the drum charge wire requires cleaning
Fax Reception Print Warning:
When the paper for printing a received fax has
run out
OFF
ON
Custom
l
Beep
You can set the ringer for fax reception.
OFF
ON
Page 39

1-32 Specifying Default Settings
Function Description Settings
Note
Note
Energy Save
Mode
You can specify the settings for the low power mode
or sleep mode including the time it takes to switch
to those modes, or the time it takes to start or reset
the energy save mode.
Regardless of this setting, if you press <Energy
Save> on ready screen, the low power mode will
start immediately.
l
Low Power Mode
If the machine is not used for the time set here, it
Low Power Mode
1 - 60 Minutes: 1 Minute
will automatically enter the low power mode.
l
Sleep Mode Setting
If the machine is not used for the amount of
Sleep Mode
1 - 120 Minutes: 1 Minute
time set here when in the Low Power Mode, it
automatically switches to sleep mode.
l
Energy Save Period
You can set the time it takes for the machine to
switch from the low power mode or sleep mode to
the normal state, or vice-versa.
LCD
Start Time:
When this is set to ON, you can set the time to start
the low power mode.
Reset Time:
When this is set to ON, you can set the time to
reset the low power mode.
You can set the brightness for the LCD.
Start Time
OFF
ON
Reset Time
OFF
ON
-3 - +3: 0
Brightness
Adjustment
Underlined values are the default settings specified at the time of shipment.
Page 40

Outputting Lists 1-33
1
Using Common Functions
Outputting Lists
You can print various lists from the [List] tab that is displayed after pressing <Setting>.
Printing the Device Settings List
The following settings can be checked on the device settings list.
Settings in the [Paper Settings] • screen, displayed after pressing <Setting>
Settings in the [Default Settings] • screen, displayed after pressing <Setting>
Settings in the [Management] • screen, displayed after pressing <Setting>
Press <Setting>.
1
Press 2 the [List] tab.
Press [Settings List].
3
Select [ON] to enable duplex printing, or [OFF] to disable it.
4
Select [ON] to enable combined printing, or [OFF] to disable it.
5
Press [Yes].
6
Page 41

1-34 Outputting Lists
Printing the User Usage Management List
Note
Prints a list of the number of pages each user has used for each mode, and total results
for the charges and communication times.
The following information is included on the user usage management list.
The charge per page for copies, faxes, scans, and prints.•
The total charge and total communication time for all users•
The total communication time for • guests and regular users
The total number of pages and total charge of faxing for • guests and regular users
The number of pages and communication times for internet faxes are added to the •
fax items.
Only the items set to ON in User Usage Management are printed in the list.• (See
page 2-35.)
A maximum of 999,999 pages and a maximum time of • 999:59:59 (999 hours, 59
minutes, 59 seconds) can be counted.
For information on resetting the counters, refer to “• Erasing the Accounting Data”.
(See page 2-39.)
If you want to print the device usage status for a specific user only, print the list •
from OfficeBridge. For details, refer to Chapter 3, “Usage Management” in the
OfficeBridge Guide.
Press <Setting>.
1
Press the [List] tab2 .
Press [User / Cost].
3
Select [ON] to enable duplex printing, or [OFF] to disable it.
4
Select [ON] to enable combined printing, or [OFF] to disable it.
5
Press [Yes].
6
Page 42

Outputting Lists 1-35
1
Using Common Functions
Printing the Root Certificate List
Note
You can print the fingerprints for the root certificates of private certificate authorities.
You can also print the fingerprints for the root certificates from OfficeBridge. For
details, refer to Chapter 3, “Setting Security” in the OfficeBridge Guide.
Press <Setting>.
1
Press the [List] tab2 .
Press [Root Cert.].
3
Select [ON] to enable duplex printing, or [OFF] to disable it.
4
Select [ON] to enable combined printing, or [OFF] to disable it.
5
Press [Yes].
6
Page 43

1-36 Outputting Lists
List of Lists
Note
Note
List name Content printed Reference page
Address Book List Prints a list of the destinations registered in the
Group List Prints a list of the destinations registered in the
Journal List Prints a list of the communication results of
Settings List Prints a list of the bypass paper settings, the
Stored Doc. List Prints a list of the stored documents, such as the
User Usage
Management List
My Jobs List Prints a list of the registered My Jobs. 1-19
Auto Distribution
Setting List
F-Code Box List Prints a list of the registered F-Code boxes. Chapter 4, “F-Code
LDAP Server List Prints a list of the registered LDAP servers. 2-64
Root Certificate List You can print the fingerprints for the root
Chapter 7,
address book. The list can be printed in order of
the numbers or in alphabetical order.
address book as groups. The list can be printed in
order of the numbers or in alphabetical order.
transmitted/received faxes, transmitted/received
e-mails, and the Scan to Folder and Scan to FTP
functions.
You can also print the journal report from
OfficeBridge. For details, refer to Chapter 2,
“Checking the Jobs or History” in the OfficeBridge
Guide.
default settings for each function, and the device
management settings, etc.
polling documents, F-Code documents, reserved
documents, received documents, and PC fax
transmission documents.
Prints a list of the number of pages each user
has used for each mode, and total results for the
charges and fax communication times.
Prints a list of the distributing conditions set. Chapter 4, “Useful
certificates of private certificate authorities.
“Registering
Destinations” in the
Scanner and Fax
Guide.
Chapter 7,
“Registering
Destinations” in the
Scanner and Fax
Guide.
Chapter 6, “Managing
the Communication
History” in the
Scanner and Fax
Guide.
1-33
Refer to Chapter 4 of
the Scanner and Fax
Guide.
1-34
Reception Functions”
in the Scanner and
Fax Guide.
Communications” in
the Scanner and Fax
Guide.
1-35
Underlined values are the default settings specified at the time of shipment.
Page 44

Using Personal Settings 1-37
1
Using Common Functions
Using Personal Settings
Note
In the personal settings, you can customize the various settings for each user.
Personal settings are displayed when a user login is performed. (See page 1-41.)
Personal settings cannot be used when the authentication method is set to [Network].
(See page 2-32.)
Specifying Personal Settings
Setting Example
Here the procedure for setting the soft keys is described as an example.
Perform the user login operation.1 (See page 1-41.)
Press <Setting>.
2
Press the [Personal Settings] tab3 .
If you Press the [Personal Settings] tab without performing a user login, the message “Please
login.” is displayed. Return to the ready screen and log in.
Press [Soft Key].
4
For details, refer to “List of Personal Settings”. (See page 1-39.)
Page 45

1-38 Using Personal Settings
Press [Soft Key Customization].
5
Select [ON] and press [Enter].
6
The remaining procedure is the same as steps • 3 to 5 in “Editing the Soft Keys”. (See page
1-8.)
Select [OFF] to disable the personal soft key settings.•
Page 46

Using Personal Settings 1-39
1
Using Common Functions
List of Personal Settings
Note
Function Description Settings Reference page
Address Book
Entry
Group You can register, edit, and
Soft Key You can set the soft keys to
My MFP Shortcut You can set the shortcut
Favorite Address You can register, edit,
Folder Shortcut You can register, edit, and
Transmission
Report
Default Display You can select to display
List You can print a list of the
You can register, edit,
and delete address book
destinations for each user.
delete groups for each user.
display on the copy, fax, and
scanner screens when a user
logs in.
buttons to display when the
My MFP screen is switched
to the personal screen.
and delete destinations to
display in the [Faves] tab on
the scanner screen for each
user.
delete shortcuts to shared
folder paths for each user.
You can set a fax
transmission report for each
user.
either the shared screen or
personal screen when the
user logs in.
destinations in the personal
address book and personal
groups.
Soft Key
Customization
OFF
ON
The settings are
the same as the My
MFP shortcuts on
[Register]. (See page
1-11.)
Personal Settings
OFF
ON
Tx Report Settings
OFF
Print
e-mail
Shared
Personal
Chapter 7, “Registering
Destinations” in the
Scanner and Fax Guide.
Chapter 7, “Registering
Destinations” in the
Scanner and Fax Guide.
1-8
1-11
Chapter 7, “Registering
Destinations” in the
Scanner and Fax Guide.
Chapter 7, “Registering
Destinations” in the
Scanner and Fax Guide.
Chapter 6, “Checking the
Transmission Result”
in the Scanner and Fax
Guide.
1-40
Chapter 7, “Registering
Destinations” in the
Scanner and Fax Guide.
Underlined values are the default settings specified at the time of shipment.
Page 47
1-40 Using Personal Settings
Using Personal Settings
Personal settings can only be used when the user is logged in.
Press 1 [Personal] after performing a user login.
If the shared screen is displayed, press [Personal] to switch to the personal screen.
If the personal screen is displayed, the screen will switch to the shared screen.
Page 48

Logging In / Logging Out 1-41
1
Using Common Functions
Logging In / Logging Out
Note
To use the machine after receiving user authentication, perform a login. If you perform a
login, you can use the following functions.
*1
Personal settings•
Printing and transmitting documents in the user box•
TTI (using user registered information)•
Scan path notification•
Security print•
User access/cost accounting•
Journal report (with the user name printing in the sender field)•
*1 These functions cannot be used when the user authentication method is set to
[Network].
For details on setting user authentication, refer to “• Setting User Authentication”. (See
page 2-32.)
When the “Guest Account Setting” is effective at Machine Policy Setting on the •
OfficeBridge, press <Reset> to use the machine as a guest.
Logging In
(See page 1-37.)
*1
*1
Press <Login> on the 1 ready screen.
If the ready screen is not displayed, press <Reset> to display the ready screen, and then press
<Login>.
Select the user ID, and press [Enter].
2
If the user ID entry screen is displayed, press [User ID] to select the user or enter the user •
ID, and press [Enter].
To set user authentication or the machine policy, press [Input User] to enter the user ID.•
Page 49
1-42 Logging In / Logging Out
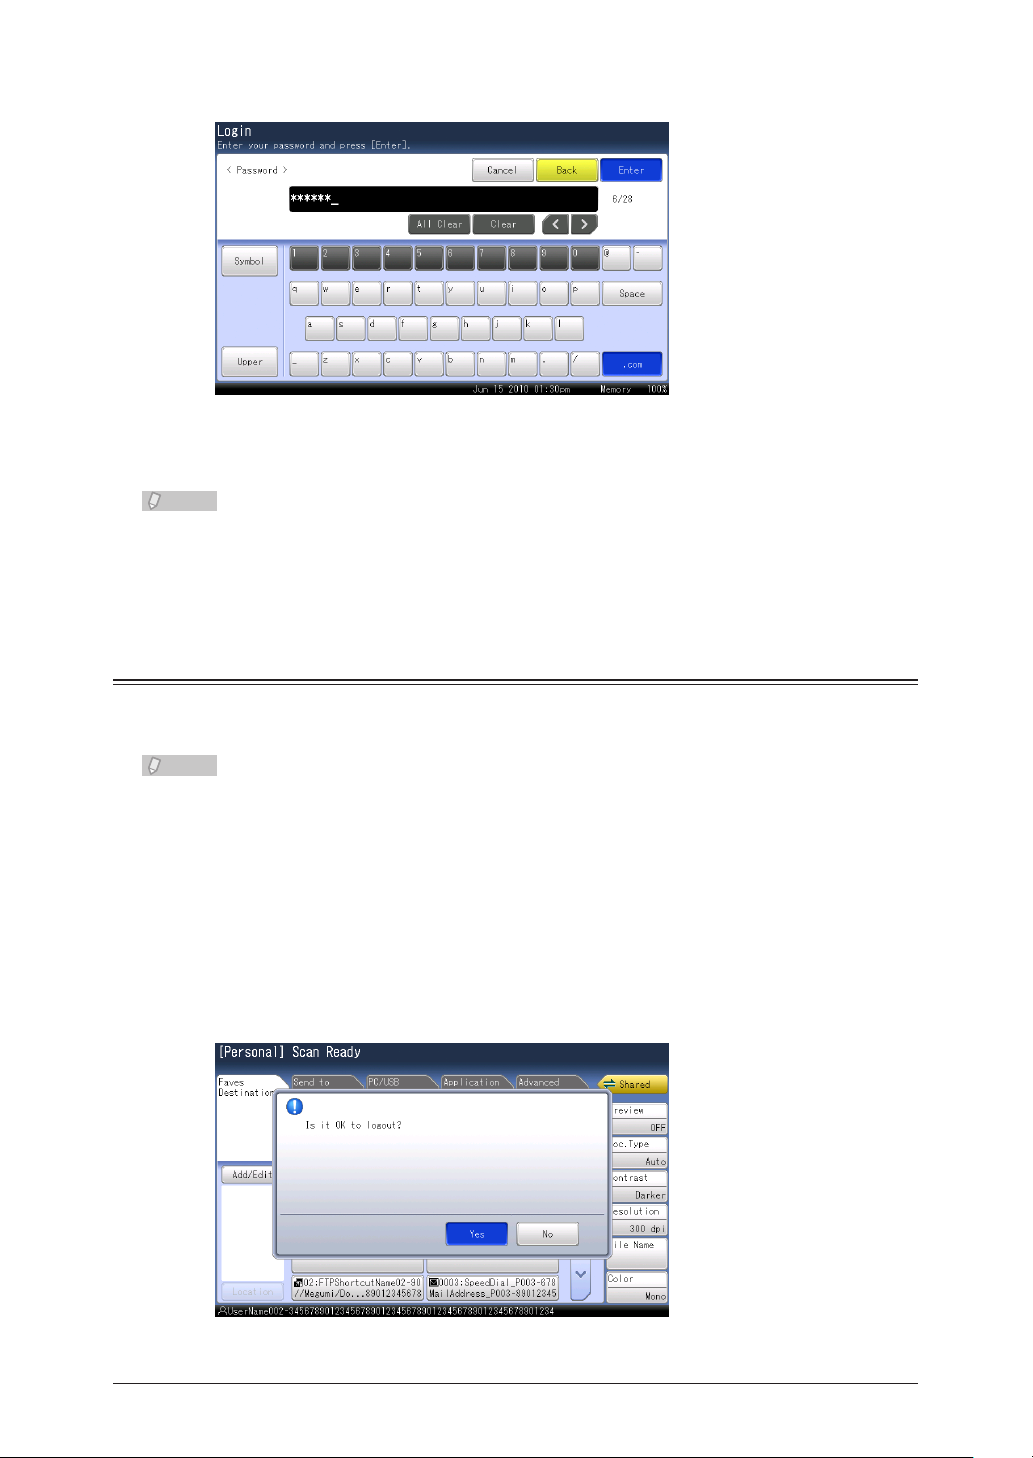
Enter the password, and press [Enter].
Note
Note
3
If a password is not set, press [Enter] without entering a password.•
The message “Failed to login.” is displayed if the login fails.•
Depending on the user authentication settings, you can register a new user ID in step 2.•
For details on machine policy settings, refer to Chapter 3, “• Setting Security” in the
OfficeBridge Guide.
Logging Out
There are two methods for logging out after performing a user login; manual forced
logging out and logging out automatically after the logout time elapses.
For details on setting the automatic logout time, see “Setting the Automatic Logout Time”.
(See page 2-71.)
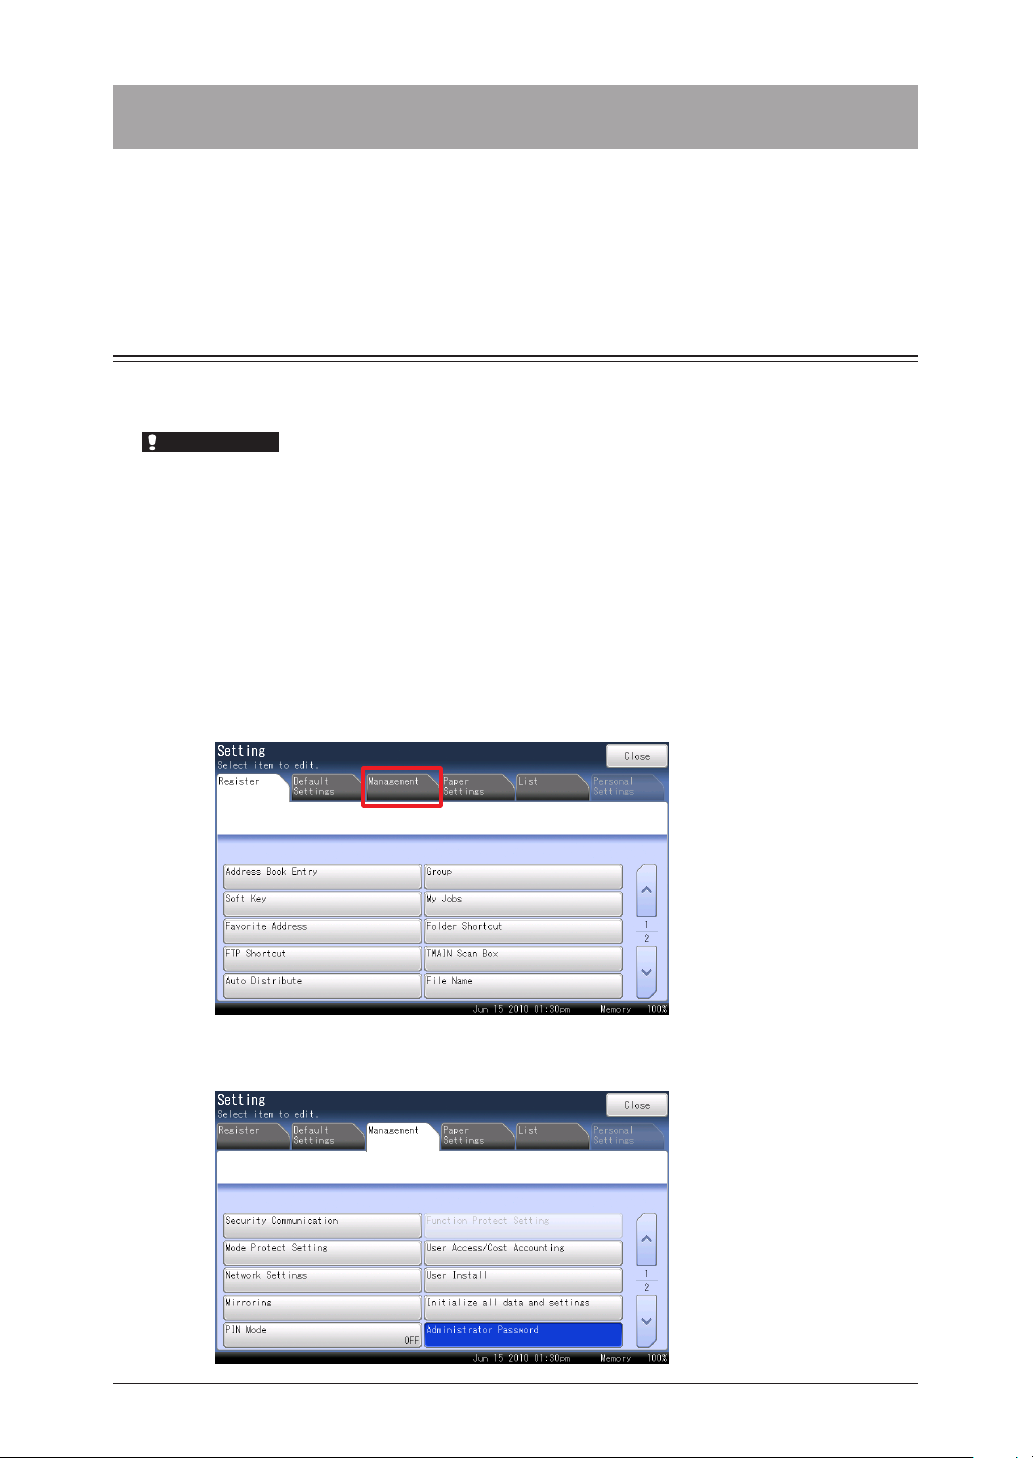
Logging Out Manually
Press <Login> after performing a user login.
1
Press [Yes].
2
If you press [No], you will not be logged out.
Page 50

Chapter 2
Management
List of Machine Management Settings ..................................................................2-2
Setting Security Codes ..............................................................................................2-4
Setting the Administrator Password ......................................................................2-4
Setting the Protect Passcode ..................................................................................2-7
Closed Communication .............................................................................................2-9
Setting Closed Transmission ..................................................................................2-9
Setting Closed Reception ......................................................................................2-10
Setting Passcode Polling .......................................................................................2-11
Setting the Passcode .............................................................................................2-12
Communication and Range of Passcodes .............................................................2-14
Setting ID Check Transmission ............................................................................2-16
Confirming the Destination Before Transmission ............................................2-17
Setting the Destination Confirmation Function .................................................. 2-17
Setting the Confirmation Dial Functions ............................................................2-18
Prohibiting Transmission to Multiple Destinations ........................................2-20
Security Reception ...................................................................................................2-21
Activating the PIN mask .........................................................................................2-23
Function Protect Settings ......................................................................................2-25
Setting Function Protection..................................................................................2-26
Using Function Protection ....................................................................................2-28
Setting Mode Protection .........................................................................................2-30
Setting User Authentication ..................................................................................2-32
Setting the Authentication Method ......................................................................2-32
Managing User Access/Cost Accounting .............................................................2-35
Setting the Currency Unit ....................................................................................2-35
Specifying the Charge Settings ............................................................................2-37
Erasing the Accounting Data ...............................................................................2-39
Specifying the Network Settings ..........................................................................2-40
Specifying the TCP/IP Settings ............................................................................2-43
Registering LDAP Servers ....................................................................................2-54
Specifying the Archive Settings ............................................................................2-65
Setting an E-mail Gateway ..................................................................................2-69
Setting the Automatic Logout Time .....................................................................2-71
Mirroring the Machine Settings ...........................................................................2-73
Mirroring Methods ................................................................................................2-73
Importing / Exporting Using USB Memory .........................................................2-74
Directly Copying Via the Network .......................................................................2-80
Page 51

2-2 List of Machine Management Settings
List of Machine Management Settings
You can specify the important settings related to the machine, such as the user install
mode and security communication settings, and network settings, etc.
If you set an administrator password, a screen for entering the administrator password is
displayed whenever the [Management] tab is pressed, which enables you to prevent users
other than the administrator from changing the settings.
Function Description Settings Reference page
Security
Communication
You can specify the various
security communication settings,
such as closed transmission, ID
check verification, destination
confirmation, and security reception
settings.
Closed Transmission,
Closed Reception, ID
Check Transmission,
Confirm Destination,
Confirm Dial (SpeedDial), Confirm Dial
(Numeric Keys),
Passcode Polling
OFF
ON
Broadcast Transmission
OFF
ON
Secure Reception
OFF
ON (current time)
2-9
Function
Protect Setting
Mode Protect
Setting
User
Access/Cost
Accounting
Network
Settings
User Install You can specify the settings required
You can manage the various settings
using an administrator password
and protect passcode.
You can set the machine to prohibit
the copy, scan, fax, or print modes
from being used.
You can check the total number of
pages and communication time used
by each user for copies and faxes,
set a charge per page, and calculate
the total cost each user has incurred
for copies and faxes.
You can set the network settings for
using the machine on a network.
for using the machine.
Passcode
0000 to 9999: 0000
Prohibited
Protect ON
Protect OFF
OFF
ON
Currency Setting
Dollar
Euro
Pound
Ye n
No Unit
Charge Setting
Copy, Scan, Fax, Print:
OFF
ON (0.00 / page)
2-25
2-30
2-35
2-40
Chapter 3,
“Initial Setup
(User Install)” in
the Scanner and
Fax Guide.
Page 52

List of Machine Management Settings 2-3
1
2
Management
Function Description Settings Reference page
Caution
Note
Mirroring You can copy the settings
information to another machine
(must be the same model).
Initialize
all data and
settings
PIN Mode The entered PIN (personal
Administrator
Password
Protect
Passcode
You can erase the data set in the
<Setting> mode, such as the address
book and copy/fax function settings,
and the data saved in the machine,
such as the stored documents. When
this operation is done, the machine
reboots from itself.
Data that has been cleared cannot
be restored.
identification number) will not
appear in the journal, error message
printout, delayed command list or
transmission report.
You can set the administrator
password.
You can set an administrator
password to prevent users other
than the administrator from editing
the settings in the [Management]
screen.
You can set the protect passcode.
A protect passcode is required when
using function protect settings.
Direct Copy Allowed
Allowed
NotAllowed
OFF
Mode1
Mode2
No administrator
password is set at
shipment.
No protect passcode is
set at shipment.
2-73
2-23
2-4
2-7
Underlined values are the default settings specified at the time of shipment.
Page 53
2-4 Setting Security Codes
Setting Security Codes
IMPORTANT
You can set an administrator password to prevent users other than the administrator
from editing the settings in the [Management] screen, and enable the administrator to
centrally manage machines. A protect passcode is a four digit number required when
setting function protect settings and printing security reception documents.
Setting the Administrator Password
Up to 28 characters can be entered for an administrator password. Make sure to make a
note of and store the password after setting it.
If you forget the administrator password, it is necessary to initialize the machine and
set the password again.
In such a case, contact your authorized Muratec dealer.
Setting the Administrator Password
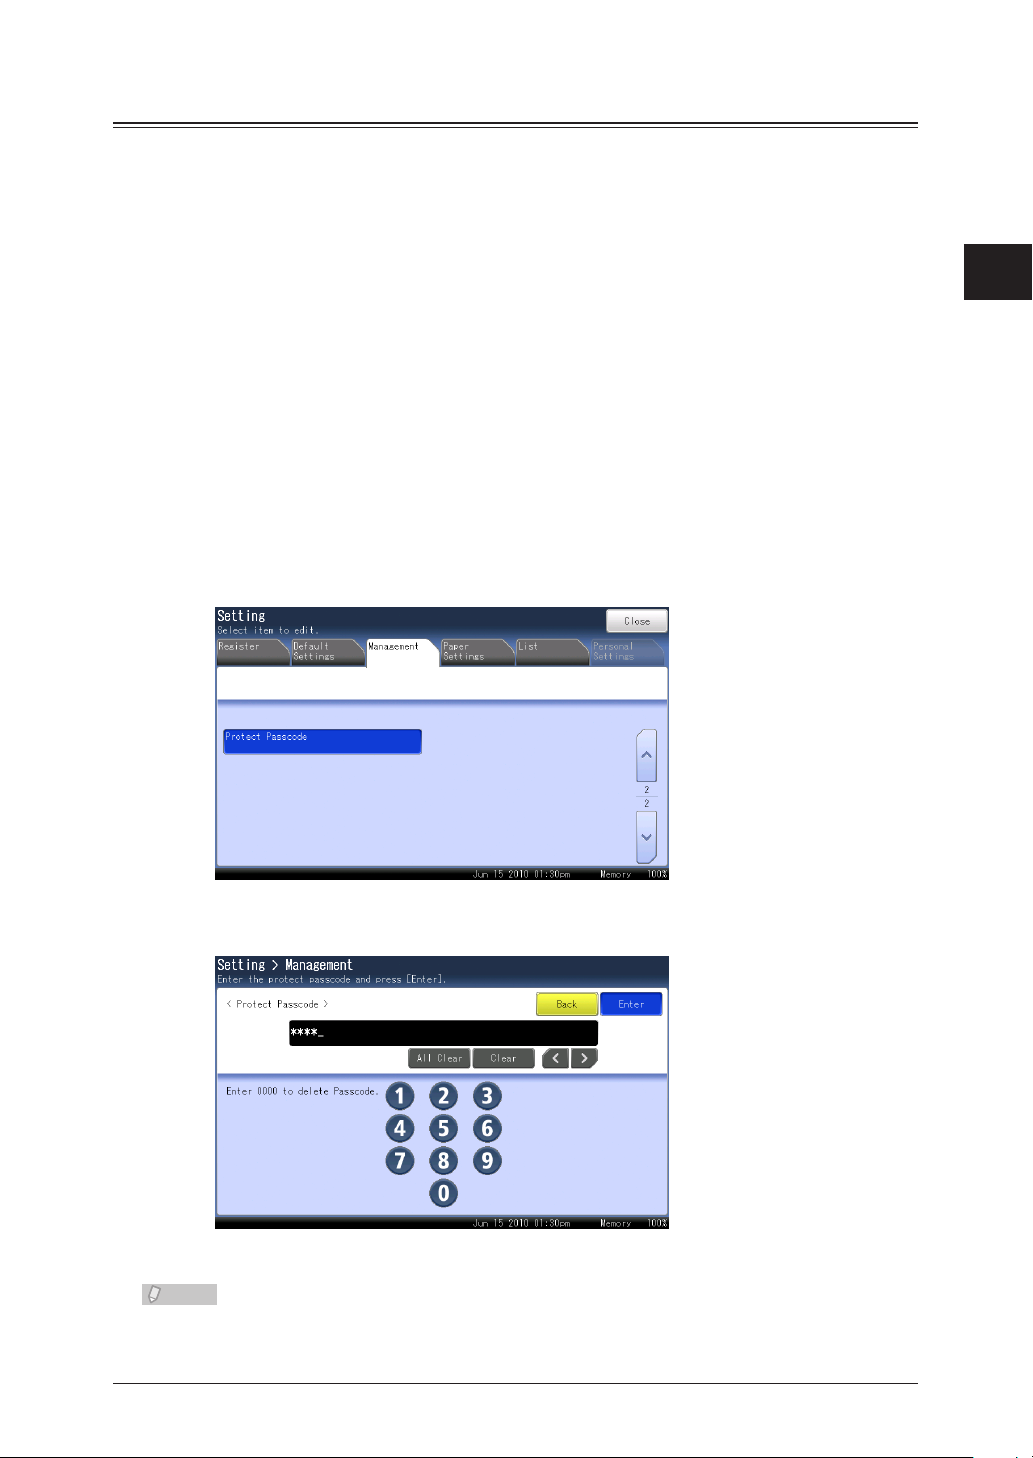
Press <Setting>.
1
Press 2 the [Management] tab.
Press [3 Administrator Password].
Page 54

Setting Security Codes 2-5
1
2
Management
Enter the password you want to set, and press [Enter].
4
Up to 28 characters can be entered.
Enter the password again, and press [Enter].
5
Editing / Deleting the Administrator Password
Press <Setting>.
1
Press 2 the [Management] tab.
Press [Admin Password].
3
Page 55

2-6 Setting Security Codes
Enter the administrator password, and press [Enter].
4
Press [5 Administrator Password].
Enter the new password, and press [Enter].
6
Up to 28 characters can be entered.•
To delete the password, press [Enter] without entering a new password.•
Enter the new password again, and press [Enter].
7
Page 56
Setting Security Codes 2-7
1
2
Management
Setting the Protect Passcode
Note
You can set a four digit number of your choice for the protect passcode. Make sure to
make a note of and store the number after setting it.
Setting the Protect Passcode
Press <Setting>.
1
Press 2 the [Management] tab.
If an administrator password is set,
3
If an administrator password is not set, proceed to step 5.
Enter the administrator password, and press [Enter].
4
Press [Protect Passcode].
5
Enter the protect passcode using the numeric keys, and press [Enter].
6
press [Admin Password].
Enter a four digit number.
Make sure to make a note of and store the protect passcode you set so that you do not
forget it. It is also necessary to enter the protect passcode when disabling it.
Page 57

2-8 Setting Security Codes
Editing / Deleting the Protect Passcode
Press <Setting>.
1
Press 2 the [Management] tab.
If an administrator password is set,
3
If an administrator password is not set, proceed to step 5.
Enter the administrator password, and press [Enter].
4
Press [Protect Passcode].
5
Enter the current protect passcode using the numeric keys, and press [Enter].
6
Enter the new passcode using the numeric keys, and press [Enter].
7
press [Admin Password].
To delete the protect passcode, enter “0000” using the numeric keys, and press [Enter].
Page 58

Closed Communication 2-9
1
2
Management
Closed Communication
Note
When closed communication is set, fax messages are transmitted and received between
Muratec machines only (excluding some models). If a passcode is set, faxes can only
be transmitted and received with Muratec machines the same passcode set. Closed
communication can be set separately for transmission and reception. If you set passcode
polling, you can only perform polling with Muratec machines that also have the same
passcode set.
Setting Closed Transmission
If you set closed transmission, since the destination that faxes can be transmitted to is
limited, you can avoid transmitting faxes to a wrong destination due to an entry error.
When using manual transmission (transmission using the [Monitor] function• , an
optional handset or external phone handset), the closed transmission function is
disabled, even if you set it to ON.
To set the passcode, refer to “• Setting the Passcode”. (See page 2-12.)
For details on the communication range using closed communication and passcodes, •
refer to “Communication and Range of Passcodes”. (See page 2-14.)
For details on setting closed transmission for a single communication, refer to •
Chapter 4, “Security Functions” in the Scanner and Fax Guide.
Press <Setting>.
1
Press 2 the [Management] tab.
If an administrator password is set,
3
If an administrator password is not set, proceed to step 5.
Enter the administrator password, and press [Enter].
4
press [Admin Password].
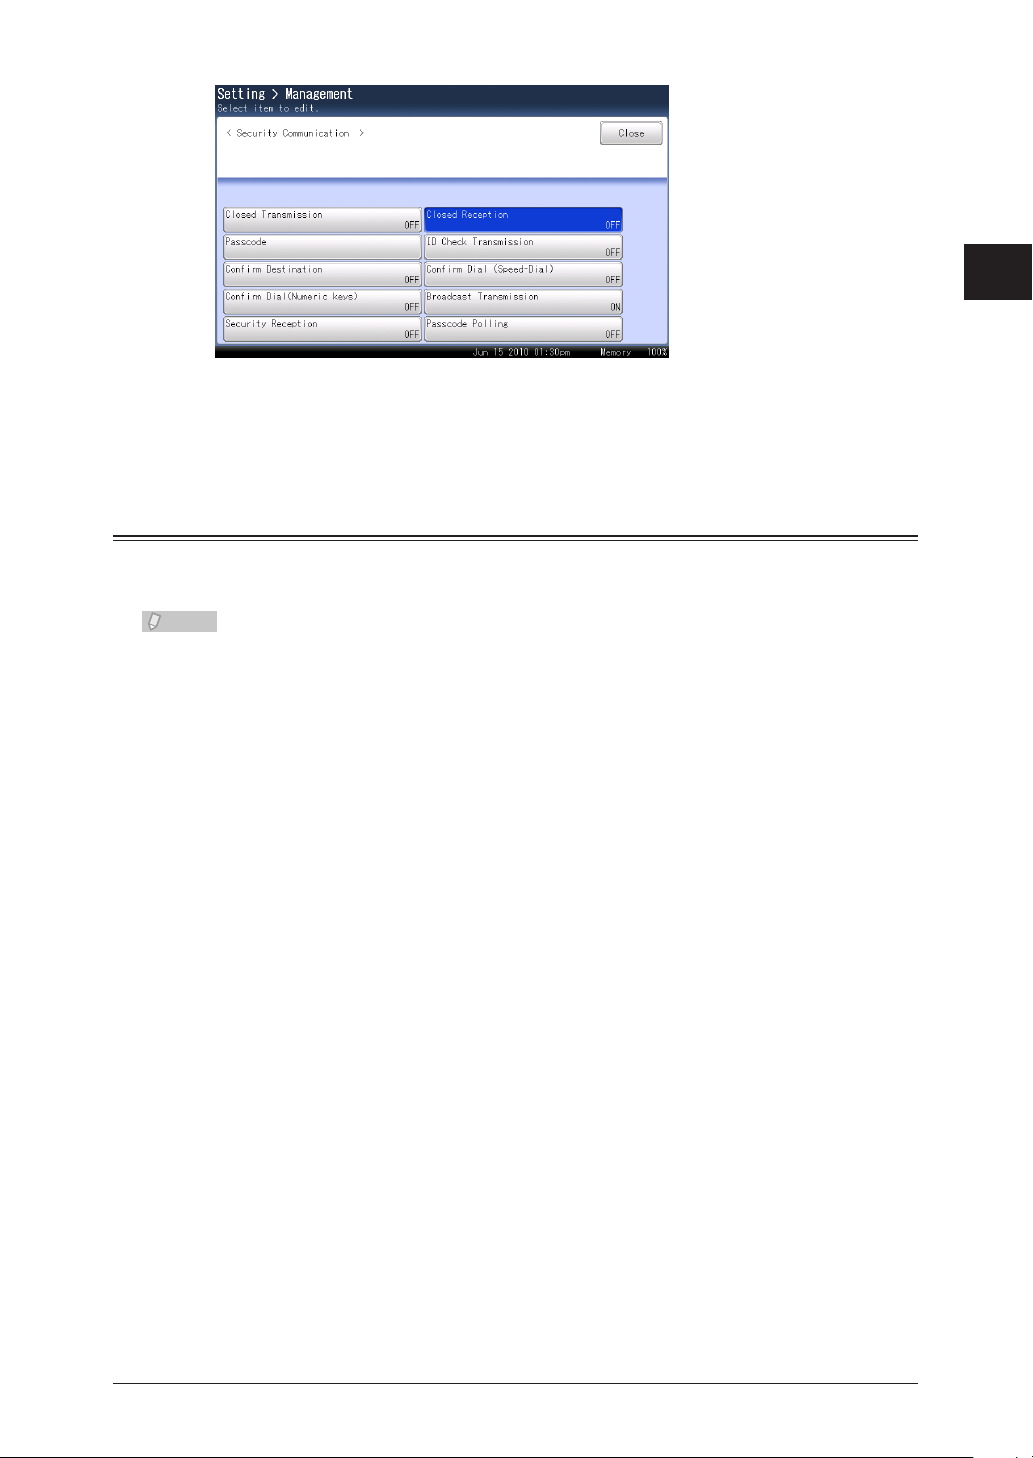
Press [Security Communication].
5
Page 59

2-10 Closed Communication
Press [Closed T6 ransmission].
Note
Select [ON] and press [Enter].
7
Press [OFF] to disable closed transmission.
Setting Closed Reception
If you set closed reception, since the sender that faxes can be received from is limited, you
can avoid receiving faxes from the wrong machine due to an entry error.
To set the passcode, refer to “• Setting the Passcode”. (See page 2-12.)
For details on the communication range using closed communication and passcodes, •
refer to “Communication and Range of Passcodes”. (See page 2-14.)
Press <Setting>.
1
Press 2 the [Management] tab.
If an administrator password is set,
3
If an administrator password is not set, proceed to step 5.
Enter the administrator password, and press [Enter].
4
Press [Security Communication].
5
Press [Closed R6 eception].
press [Admin Password].
Page 60
Closed Communication 2-11
1
2
Management
Select [ON] and press [Enter].
Note
7
Press [OFF] to disable closed reception.
Setting Passcode Polling
If you set passcode polling, you can only perform polling with Muratec machines that also
have the same passcode set. If the passcode does not match, polling cannot be performed.
To set the passcode, refer to “Setting the Passcode”. (See page 2-12.)
Press <Setting>.
1
Press 2 the [Management] tab.
If an administrator password is set,
3
If an administrator password is not set, proceed to step 5.
Enter the administrator password, and press [Enter].
4
Press [Security Communication].
5
press [Admin Password].
Page 61
2-12 Closed Communication
Press [Passcode Polling].
Note
6
Select [ON] and press [Enter].
7
Press [OFF] to disable passcode polling.
Setting the Passcode
Set the passcode required for closed transmission, closed reception, and passcode polling.
You can use closed transmission and reception without setting a passcode; however,
setting a passcode is recommended to strengthen the security function.
When setting the passcode, enter a number other than “0000”. If you enter “0000”, •
the passcode setting is disabled.
Make sure that you do not forget the passcode.•
For details on the communication range using closed communication and passcodes, •
refer to “Communication and Range of Passcodes”. (See page 2-14.)
Press <Setting>.
1
Press 2 the [Management] tab.
If an administrator password is set,
3
If an administrator password is not set, proceed to step 5.
Enter the administrator password, and press [Enter].
4
Press [Security Communication].
5
press [Admin Password].
Page 62
Closed Communication 2-13
1
2
Management
Press [Passcode].
6
Enter the four digit passcode using the numeric keys, and press [Enter].
7
To disable the passcode, enter “0000”.
Page 63

2-14 Closed Communication
Communication and Range of Passcodes
Note
Communication Range of Closed Transmission
When closed transmission is set, fax messages cannot be transmitted to machines other •
than Muratec machines.
If the passcode set on your machine does not match the passcode set on the other •
machine, faxes cannot be transmitted. Refer to the following table (example of when the
passcode is set to “1234”).
The closed transmission function of this machine is not compatible with the closed •
transmission function of our earlier machines. If the destination machine has an earlier
version of the closed transmission function set, transmission cannot be performed even
if the passcodes match.
Passcode set in the
machine
Not set
(0000)
Set
(1234)
Destination machine
(receiver machine)
Other brand machine – Communication errors
Our machine
(Without security function)
Our machine
(With security function)
Other brand machine – Communication error
Our machine
(Without security function)
Our machine
(With security function)
Passcode set in other
machine
– Communication OK
0000 Communication OK
1234 Communication OK
5678 Communication OK
– Communication error
0000 Communication error
1234 Communication OK
5678 Communication error
Result
When a communication error occurs, an error message is printed. The error is denoted
as error code “T.2.2”.
Page 64

Closed Communication 2-15
1
2
Management
Communication Range of Closed Reception
When closed reception is set, fax messages cannot be received from machines other •
than Muratec machines.
If the passcode set on your machine does not match the passcode set on the other •
machine, faxes cannot be received. Refer to the following table (example of when the
passcode is set to “1234”).
In the case of our earlier machines with the closed communication function, if the •
other machine has an earlier version of the closed communication function set, closed
reception can be performed in the same manner as “with security function”.
Passcode set in the
machine
Not set
(0000)
Set
(1234)
Communication Range of Passcode Polling
If the passcode set on your machine does not match the passcode set on the other •
machine, polling cannot be performed. Refer to the “Communication Range of Closed
Transmission” table (example of when the passcode is set to “1234”).
In the case of our earlier machines with the security communication function, passcode •
polling can be performed.
Other machine
(sender machine)
Other brand machine – Communication errors
Our machine
(Without security function)
Our machine
(With security function)
Other brand machine – Communication error
Our machine
(Without security function)
Our machine
(With security function)
Passcode set in other
machine
– Communication OK
0000 Communication OK
1234 Communication OK
5678 Communication OK
– Communication error
0000 Communication error
1234 Communication OK
5678 Communication error
Result
Page 65

2-16 Setting ID Check Transmission
Setting ID Check Transmission
Note
ID check transmission limits fax transmission to when the lower four digits of the fax
number you dialed and those registered in the destination machine match. Transmission
is allowed only when both digits are matched. This function reduces problems caused by
transmitting fax messages to the wrong destination due to line trouble, etc.
For details on setting ID check transmission• for a single communication, refer to
Chapter 4, “Security Functions” in the Scanner and Fax Guide.
When the lower four digits of the fax number registered in the other machine do not •
match the lower four digits of the number you entered, or when a fax number is not
registered in the other machine, a communication error occurs and transmission
fails.
When using manual transmission (transmission using the [Monitor] function• , an
optional handset or external phone handset), the ID check transmission function is
disabled, even if you set it to ON.
Press <Setting>.
1
Press 2 the [Management] tab.
If an administrator password is set,
3
If an administrator password is not set, proceed to step 5.
Enter the administrator password, and press [Enter].
4
Press [Security Communication].
5
Press [ID Check 6 Transmission].
Select [ON] and press [Enter].
7
Select [OFF] to disable ID check transmission.
press [Admin Password].
Page 66

Confirming the Destination Before Transmission 2-17
1
2
Management
Confirming the Destination Before Transmission
Note
You can prevent the transmission of faxes to the wrong destination by setting the machine
to require the entered destination to be confirmed or entered twice before transmission.
For details on confirming the destination before transmission, refer to Chapter 4,
“Security Functions” in the Scanner and Fax Guide.
Setting the Destination Confirmation Function
The screen for confirming the entered destination will be displayed before starting
transmission.
Press <Setting>.
1
Press 2 the [Management] tab.
If an administrator password is set,
3
If an administrator password is not set, proceed to step 5.
Enter the administrator password, and press [Enter].
4
Press [Security Communication].
5
press [Admin Password].
Press [Confirm Destination].
6
Select [ON] and press [Enter].
7
Press [OFF] to disable the destination confirmation function.
Page 67

2-18 Confirming the Destination Before Transmission
Setting the Confirmation Dial Functions
Note
When using an address book destination or entering a destination using the numeric
keys, a screen prompting you to re-enter the entered fax number is displayed. Re-entering
the number enables you to check whether an incorrect number has been entered, which
prevents the transmission of faxes to the wrong destination.
There are two confirmation dial functions you can set; confirm speed-dial and confirm
numeric keys.
When using manual transmission (transmission using the [Monitor] function, an
optional handset or external phone handset), the confirm dial function is disabled,
even if you set it to ON.
Setting the Confirm Speed-Dial Function
Press <Setting>.
1
Press 2 the [Management] tab.
If an administrator password is set,
3
If an administrator password is not set, proceed to step 5.
Enter the administrator password, and press [Enter].
4
Press [Security Communication].
5
Press [6 Confirm Dial (Speed-Dial)].
press [Admin Password].
Select [ON] and press [Enter].
7
Select [OFF] to disable the confirm speed-dial function.
Page 68
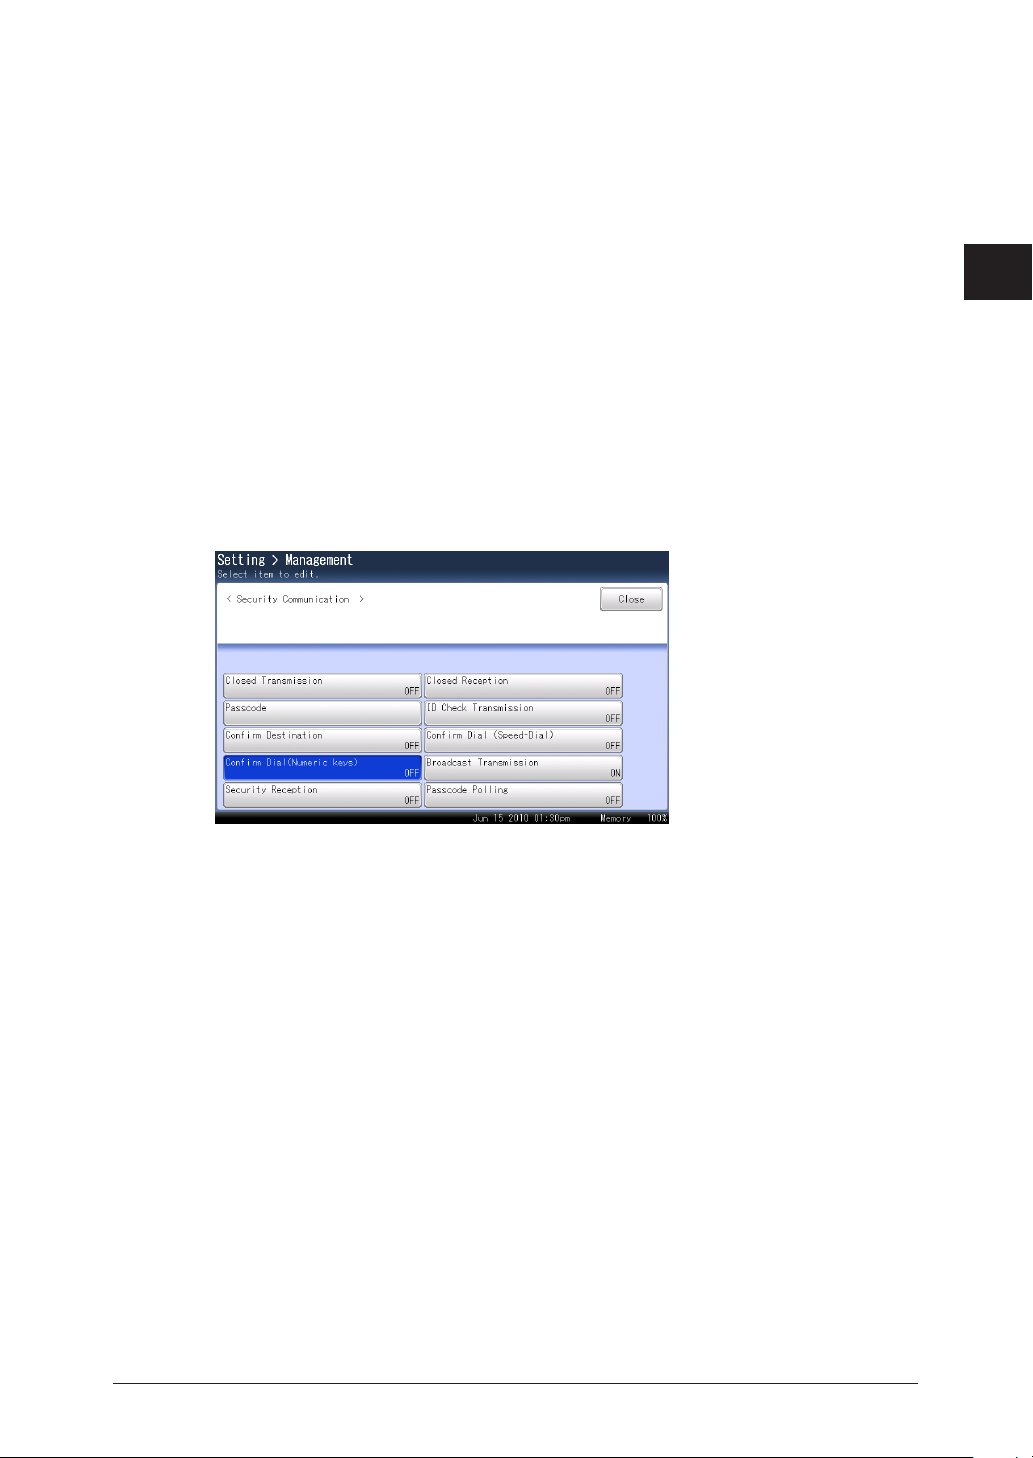
Confirming the Destination Before Transmission 2-19
1
2
Management
Setting the Confirm Numeric Keys Function
Press <Setting>.
1
Press 2 the [Management] tab.
If an administrator password is set,
3
If an administrator password is not set, proceed to step 5.
Enter the administrator password, and press [Enter].
4
Press [Security Communication].
5
Press [6 Confirm Dial (Numeric Keys)].
press [Admin Password].
Select [ON] and press [Enter].
7
Select [OFF] to disable the confirm numeric keys function.
Page 69

2-20 Prohibiting Transmission to Multiple Destinations
Prohibiting Transmission to Multiple Destinations
Note
You can prohibit the entering of multiple destinations to prevent transmitting to
unintentional destinations.
Here, a “destination” refers to a destination entered using the numeric keys or a
speed-dial, address book, or group.
Press <Setting>.
1
Press 2 the [Management] tab.
If an administrator password is set,
3
If an administrator password is not set, proceed to step 5.
Enter the administrator password, and press [Enter].
4
Press [Security Communication].
5
Press [Broadcast 6 Transmission].
Select [OFF] and press [Enter].
7
Press [ON] to disable broadcast prohibition.
press [Admin Password].
Page 70

Security Reception 2-21
1
2
Management
Security Reception
Note
This allows documents received after the security reception start time to be stored in
memory without being printed. This function makes it possible to store documents
received at night in the memory, for example, when no one is in the office. The received
documents in memory can be printed later.
To set security reception, it is necessary to set a protect passcode in advance. • (See
page 2-7.)
When security reception is enabled, it will start at the preset start time every day.•
When documents have been received during security reception, the message •
“Security Reception document exists” is displayed and the information lamp
illuminates green.
For details on printing the received documents that are stored, refer to Chapter 4, •
“Security Functions” in the Scanner and Fax Guide.
Press <Setting>.
1
Press 2 the [Management] tab.
If an administrator password is set,
3
If an administrator password is not set, proceed to step 5.
Enter the administrator password, and press [Enter].
4
Press [Security Communication].
5
Press [6 Security Reception].
press [Admin Password].
Page 71

2-22 Security Reception
Enter the protect passcode, and press [Enter].
7
Press [ON].
8
Select [AM] or [PM] and set9 the security reception starting time, and press
[Enter].
You can • use the numeric keys.
Press [OFF] to disable security reception.•
Page 72

Activating the PIN mask 2-23
1
2
Management
Activating the PIN mask
Note
To prevent unauthorized long-distance calls, some PBX (private branch exchanger)
systems require a PIN (personal identification number) entry when dialing a number.
Your machine's PIN masking feature helps you keep that PIN private.
With PIN masking activated, you can dial a number plus a PIN, but the PIN will not
appear in the journal, error message printout, delayed command list or transmission
report. The PIN may contain up to eight characters including the * or # symbols. You can
enter them from the numeric keys.
There are three possible PIN masking settings:
Deactivates PIN masking. Any PIN you enter will appear on the display and/or printouts
:
Off
Mode 1: Each remote fax machine has a PIN access code per department.
Mode 2: Each fax user has a PIN access code per department.
which show the number you dial.
For details on transmitting using the PIN mask function, refer to Chapter 4, “Security •
Functions” in the Scanner and Fax Guide.
If Mode 1 is set, a PIN is registered in advance when registering a destination.• For
details, refer to Chapter 7, “Registering Destinations” in the Scanner and Fax Guide.
Press <Setting>.
1
Press 2 the [Management] tab.
If an administrator password is set,
3
If an administrator password is not set, proceed to step 5.
Enter the administrator password, and press [Enter].
4
Press [PIN Mode].
5
press [Admin Password].
Page 73

2-24 Activating the PIN mask
Select [Mode1] or [Mode2], and press [Enter].
6
Select [OFF] to deactivate the setting.
Page 74

Function Protect Settings 2-25
1
2
Management
Function Protect Settings
Note
You can use the administrator password to manage various functions.
You can manage the following functions using the administrator password and protect
codes.
Fax functions
Internet fax
functions
Common
functions
Device settings
Outputting
lists
Function What can be managed
Transmission using address book destinations
Transmission using the numeric keys (direct
dialing)
Group transmission
Manual transmission (transmission using the
[Monitor] function, an optional handset or external
phone handset)
Redialing
Closed transmission
ID check transmission
F-Code transmission
Transmission using the e-mail history
Executing My Jobs
Registering address book location
Registering groups
Auto distribution
Storing polling documents
Storing F-Code documents
Registering F-Code boxes
Registering My Jobs
Address book list
Group list
Journal list
Auto distribution setting list
My Jobs list
*1
Prohibit
Require protect passcode
when using
Prohibit
Require protect passcode
when using
Only administrator can
register (administrator
password requested
when using)
Require protect passcode
when using
Only administrator can
output list (administrator
password requested
when outputting)
Require protect passcode
when outputting
When the communication management function is protected, displaying of the communication *1
history is also protected.
When using manual transmission (transmission using [Monitor] function, an optional
handset or external phone handset), the following functions cannot be restricted.
Transmission using address book destinations•
Transmission using the numeric keys (direct dialing)•
Redialing•
Page 75

2-26 Function Protect Settings
Setting Function Protection
Note
To set function protection, it is necessary to set an administrator password (see page
2-4) and protect passcode (see page 2-7) in advance.
Press <Setting>.
1
Press 2 the [Management] tab.
If an administrator password is set, press [Admin Password].
3
If an administrator password is not set, proceed to step 5.
Enter the administrator password, and press [Enter].
4
Press [Function Protect Setting].
5
Enter the protect passcode, and press [Enter].
6
Page 76

Function Protect Settings 2-27
1
2
Management
Select the function to set or edit.
7
Select either option, and press [Enter].
8
l
Prohibited: Use of the fax function is prohibited.
Setting the machine and the outputting of lists is prohibited for all
except the administrator.
(The administrator password is requested when using the function)
l
Protect ON: Require the protect passcode to be entered when using the function.
l
Protect OFF: The function can be used.
To continue to specify other functions, repeat the procedure in steps 9 7 to 8.
Page 77

2-28 Function Protect Settings
Using Function Protection
When a fax function is set to “Prohibited”
When a fax function is set to “Prohibited” in the function protection settings, it cannot be
used. If you select the function, the message “This has been set to disable the function.
Please contact an administrator.” is displayed. Press [Close] to close the message.
When a machine setting or list is set to “Prohibited”
When a machine setting or list is set to “Prohibited” in the function protection settings,
the administrator password is required when using the function.
For example, when the registering of address book location is set to “Prohibited”, a screen
requesting the administrator password to be entered is displayed when <Setting>,
[Register], and then [Address Book Entry] is pressed.
Enter the administrator password, and press [Enter].
1
Register the address book 2 location.
Page 78
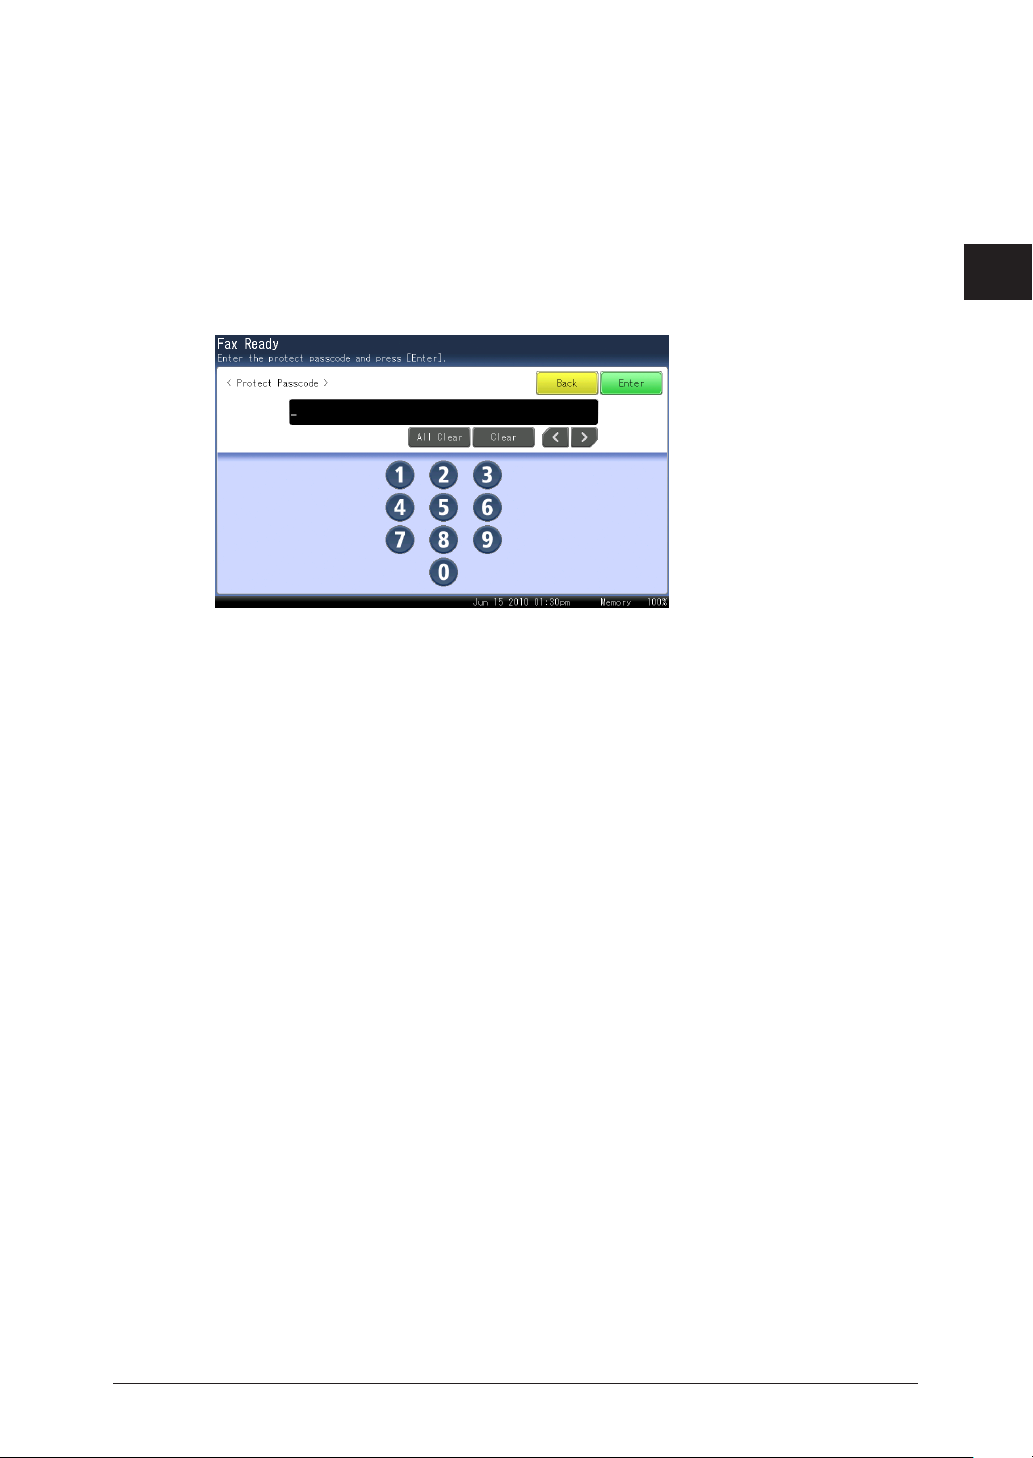
Function Protect Settings 2-29
1
2
Management
When “Protect ON” is Set
If a function is set to “Protect ON” in the function protection settings, the protect passcode
must be entered when using that function.
For example, when the registering of address book destinations is set to “Protect ON”,
a screen requesting the protect passcode to be entered is displayed when <Setting>,
[Register] tab, and then [Address Book Entry] is pressed.
Enter the protect passcode, and press [Enter].
1
Register the address book destination.
2
Page 79
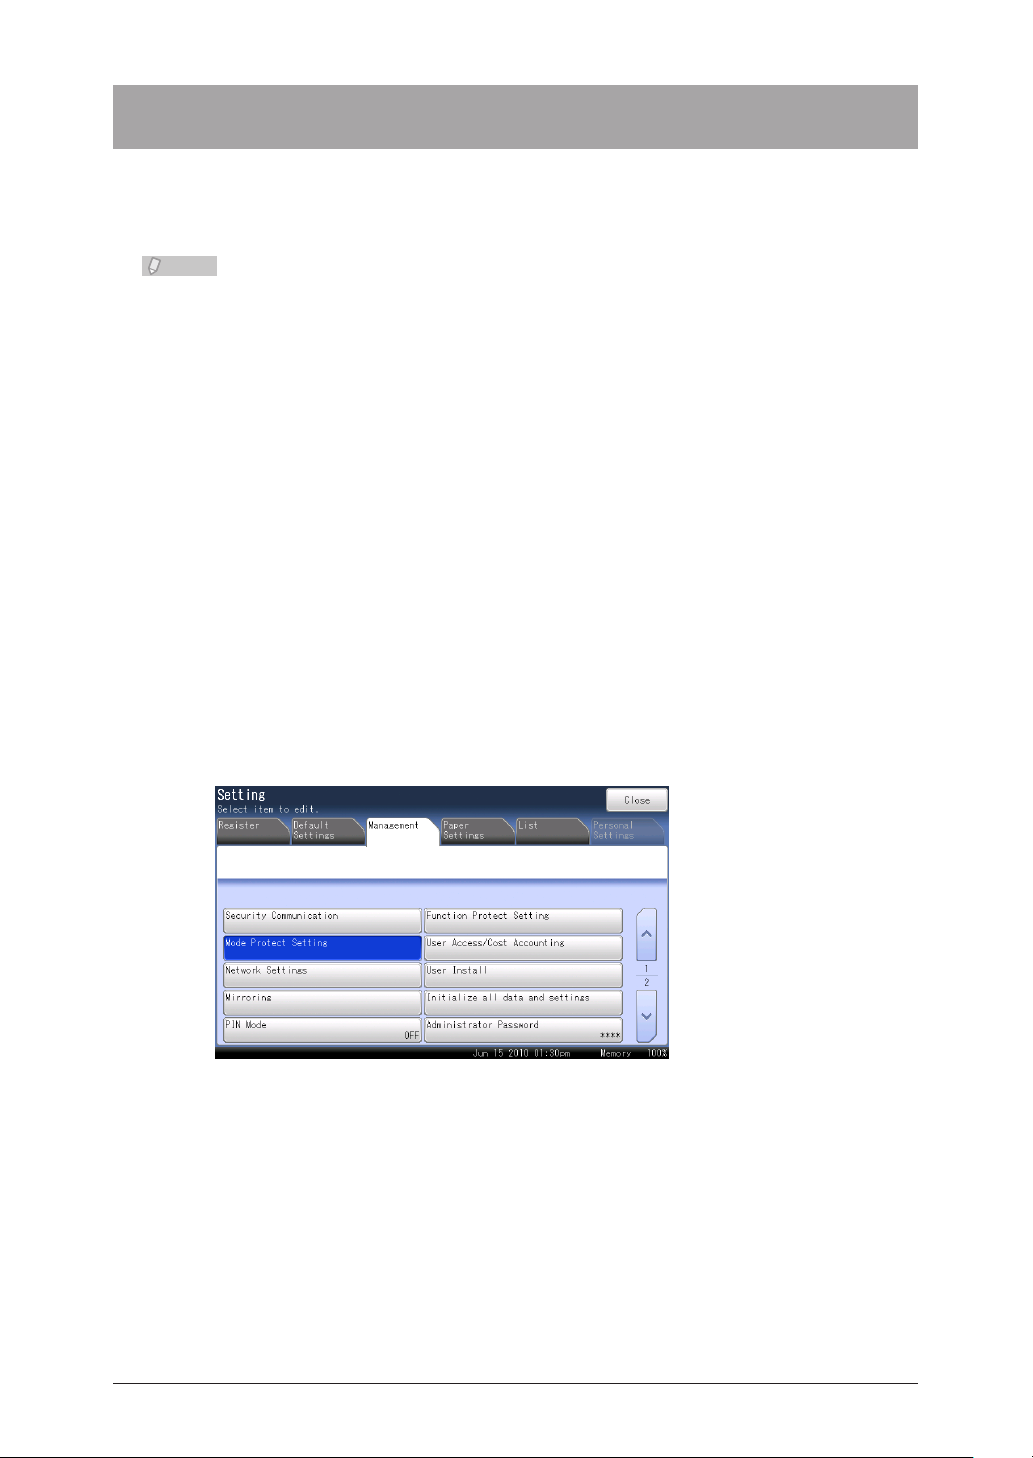
2-30 Setting Mode Protection
Setting Mode Protection
Note
You can prohibit the copy, scanner, fax, or printer modes from being used.
For example, if you enable Copy Protect, the machine will not switch to the copy screen,
even if <Copy> is pressed.
If you prohibit the use of the mode set as the • ready screen, the ready screen will
automatically be changed to the My MFP screen.
You can also prohibit the use of modes by user policy using the user policy settings •
of OfficeBridge. For details, refer to Chapter 3, “Setting Security” in the OfficeBridge
Guide.
Press <Setting>.
1
Press 2 the [Management] tab.
If an administrator password is set,
3
If an administrator password is not set, proceed to step 5.
Enter the administrator password, and press [Enter].
4
Press [Mode Protect Setting].
5
press [Admin Password].
Page 80

Setting Mode Protection 2-31
1
2
Management
Select the function to set.
6
In this example, [Copy Protect] is set.
Select [ON] and press [Enter].
7
If you select [OFF], the function protection is disabled.
Page 81

2-32 Setting User Authentication
Setting User Authentication
Note
Note
You can set authentication for the users to restrict use of the device.
There are three types of authentication methods.
Authentication method Description
Stand-Alone Performs user authentication using the user information in the machine.
User information must be registered in OfficeBridge in advance.
Single Sign On Performs user authentication using the user information in the machine
after performing Active Directory authentication.
If the corresponding user information is not registered in OfficeBridge,
it will automatically be newly registered. If the corresponding user
information is already registered, it will be overwritten with the
information registered in Active Directory.
Network Performs user authentication using the information in Active Directory.
When the number of registered users exceeds the limit (200 users), user registration •
will not be performed and users will log in as guest, even when [Single Sign On] is
set.
For details on the user information that is automatically registered or overwritten •
when [Single Sign On] is set, refer to Chapter 3, “Setting Security” in the
OfficeBridge Guide.
When [Single Sign On] or [Network] is set for the authentication method, it is •
necessary to register a domain name in advance. Register the domain name from
the OfficeBridge screen. For details, refer to Chapter 3, “Setting Security” in the
OfficeBridge Guide.
Setting the Authentication Method
Set the authentication method for users that log in.
You can also set the authentication method using • OfficeBridge. For details, refer to
Chapter 3, “Setting Security” in the OfficeBridge Guide.
Do not set the machine policy from the control panel. Specifying of the machine•
policy settings may fail if you do so.
Press <Setting>.
1
Press 2 the [Management] tab.
If an administrator password is set,
3
If an administrator password is not set, proceed to step 5.
Enter the administrator password, and press [Enter].
4
press [Admin Password].
Page 82

Setting User Authentication 2-33
1
2
Management
Press [Network Settings].
5
Press [Authentication6 Method].
The default setting is [Stand-Alone].
Select the item to set, and press [Enter].
7
Page 83

2-34 Setting User Authentication
Press [Yes].
8
The power of the machine is turned OFF, and then ON again.
Page 84

Managing User Access/Cost Accounting 2-35
1
2
Management
Managing User Access/Cost Accounting
Note
If you use this function, you can check the total number of pages used for the copy, scan,
fax, and print modes and the fax communication time for each user. You can also set a
charge per page and calculate the total cost each user has incurred for copies and faxes,
etc. (The number of pages and communication times for internet faxes are added to the
fax items.)
Costs are calculated for each user when a user login is performed or for the guests when a
guest login is performed.
Operation Flow
Set the currency unit. 1 (See page 2-35.)
Set the settings for copy, scan, fax, and print ON in the charge settings, and set the 2
charge per page. (See page 2-37.)
Use the copy, scan, fax, and print modes.3
Print the user usage management list to check the usage status. 4 (See page 1-34.)
When Print is enabled in Charge Setting, set the same user as the login user in the •
user information for the printer driver.
For details on the printer driver settings, refer to Chapter 6, “Driver Print Settings”
in the Printer Guide.
You can also set the user usage management using • OfficeBridge. For details, refer to
Chapter 3, “Usage Management” in the OfficeBridge Guide.
User usage cannot be managed when the authentication method is set to [Network].•
Setting the Currency Unit
Set the currency unit in the charge settings.
Press <Setting>.
1
Press 2 the [Management] tab.
If an administrator password is set,
3
If an administrator password is not set, proceed to step 5.
Enter the administrator password, and press [Enter].
4
press [Admin Password].
Page 85
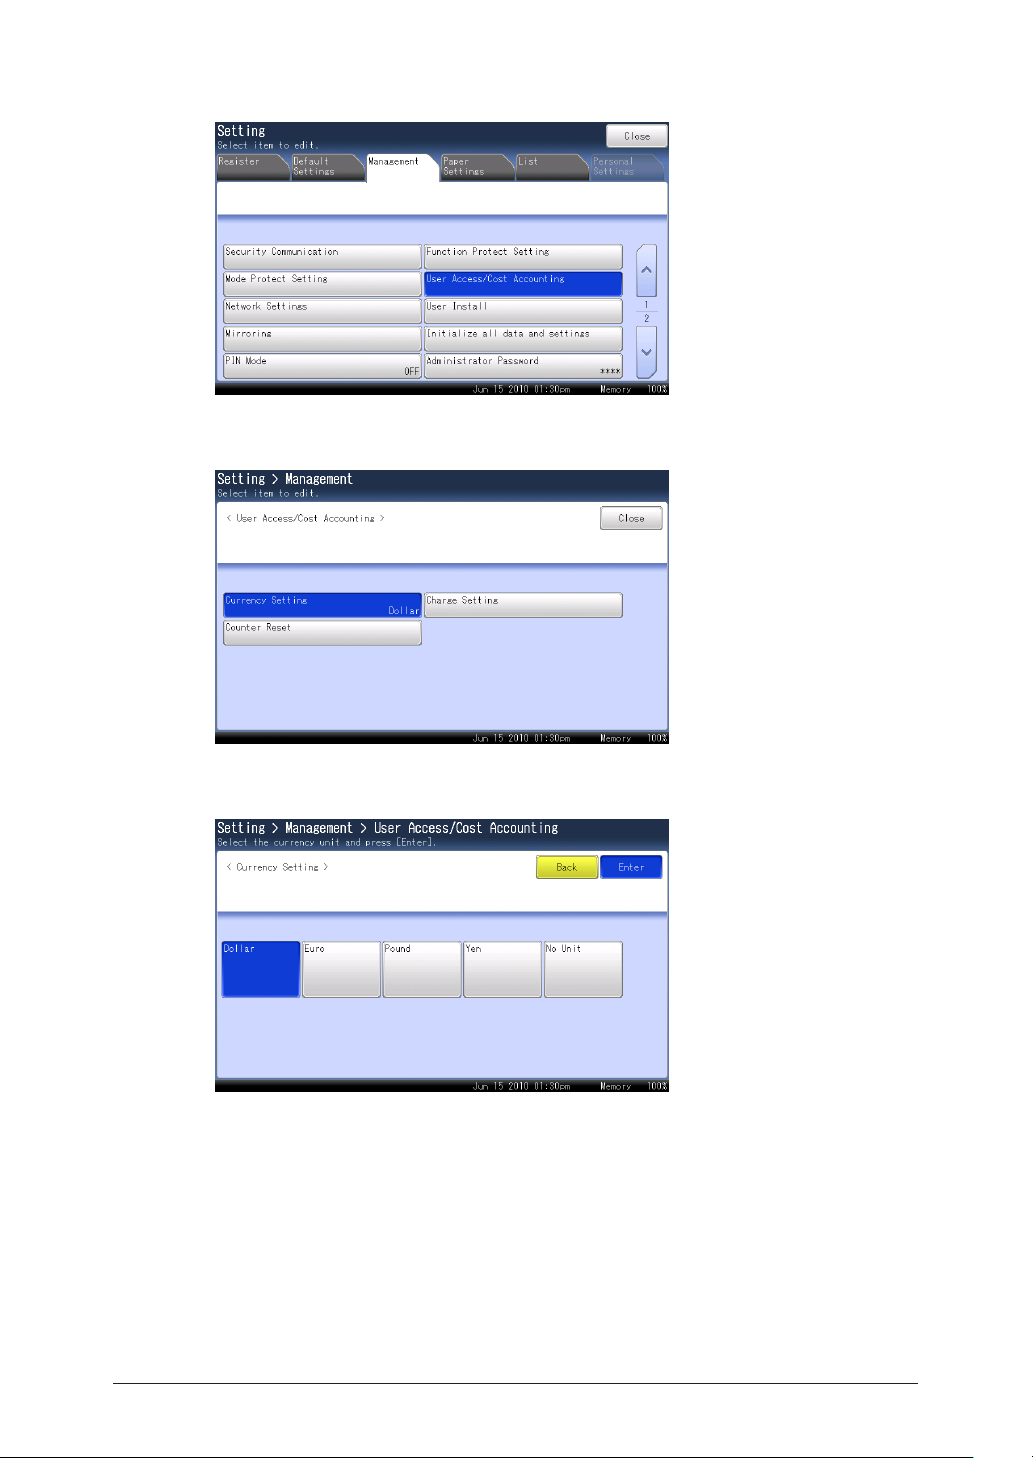
2-36 Managing User Access/Cost Accounting
Press [User Access/Cost Accounting].
5
Press [Currency Setting].
6
Select the currency unit, and press [Enter].
7
Page 86

Managing User Access/Cost Accounting 2-37
1
2
Management
Specifying the Charge Settings
Set the required functions to ON, and set the charge per page.
Press <Setting>.
1
Press 2 the [Management] tab.
If an administrator password is set,
3
If an administrator password is not set, proceed to step 5.
Enter the administrator password, and press [Enter].
4
Press [User Access/Cost Accounting].
5
Press [Charge Setting].
6
press [Admin Password].
Select the function to set.
7
Press [ON].
8
Press [OFF] to disable the charge setting.
Page 87

2-38 Managing User Access/Cost Accounting
Enter the charge per page and press [Enter].
9
You can use [+], [-], and the numeric keys.
To continue to specify other functions, repeat the procedure in steps
10
7 to 9.
Page 88
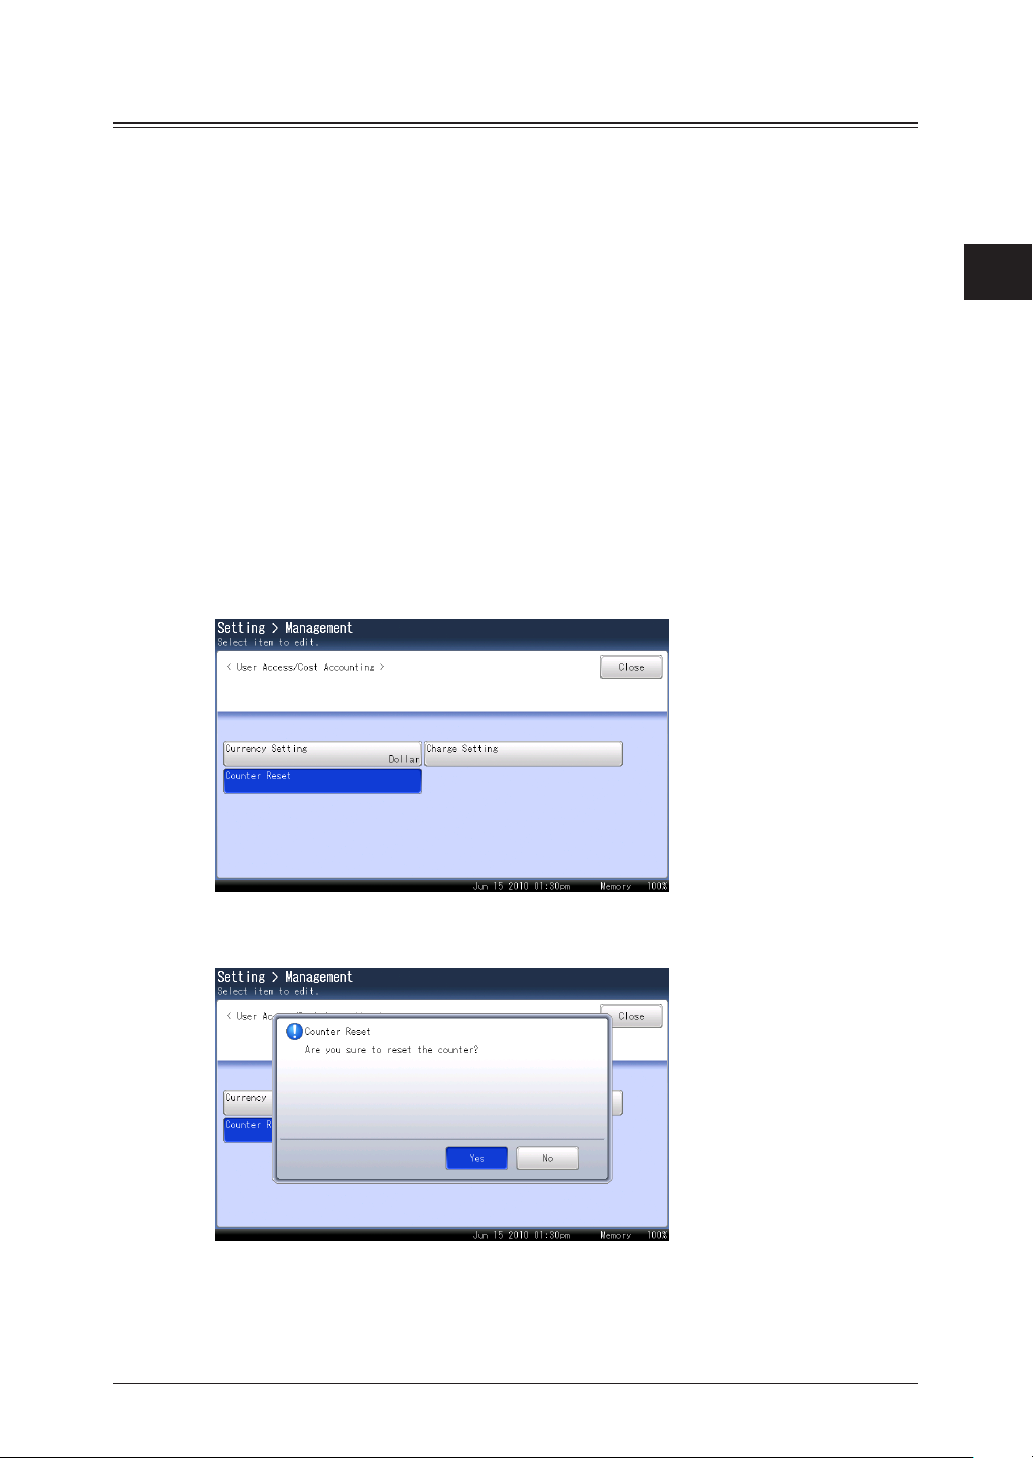
Managing User Access/Cost Accounting 2-39
1
2
Management
Erasing the Accounting Data
You can delete all the accounting data.
Press <Setting>.
1
Press 2 the [Management] tab.
If an administrator password is set,
3
If an administrator password is not set, proceed to step 5.
Enter the administrator password, and press [Enter].
4
Press [User Access/Cost Accounting].
5
Press [Counter Reset].
6
press [Admin Password].
Press [Yes] to delete the accounting data.
7
Press [No] to return to step 6.
Page 89

2-40 Specifying the Network Settings
Specifying the Network Settings
Note
You can set the various functions related to networking.
Contact your network administrator if you are unsure about these settings.
Setting Example
Here the procedure for switching the LAN speed is described as an example.
Press <Setting>.
1
Press 2 the [Management] tab.
If an administrator password is set,
3
If an administrator password is not set, proceed to step 5.
Enter the administrator password, and press [Enter].
4
Press [Network Settings].
5
Select the function to set.
6
In this example, [Network Connection] is selected.•
For details on the settings, refer to “• List of Network Settings”. (See page 2-41.)
press [Admin Password].
Page 90
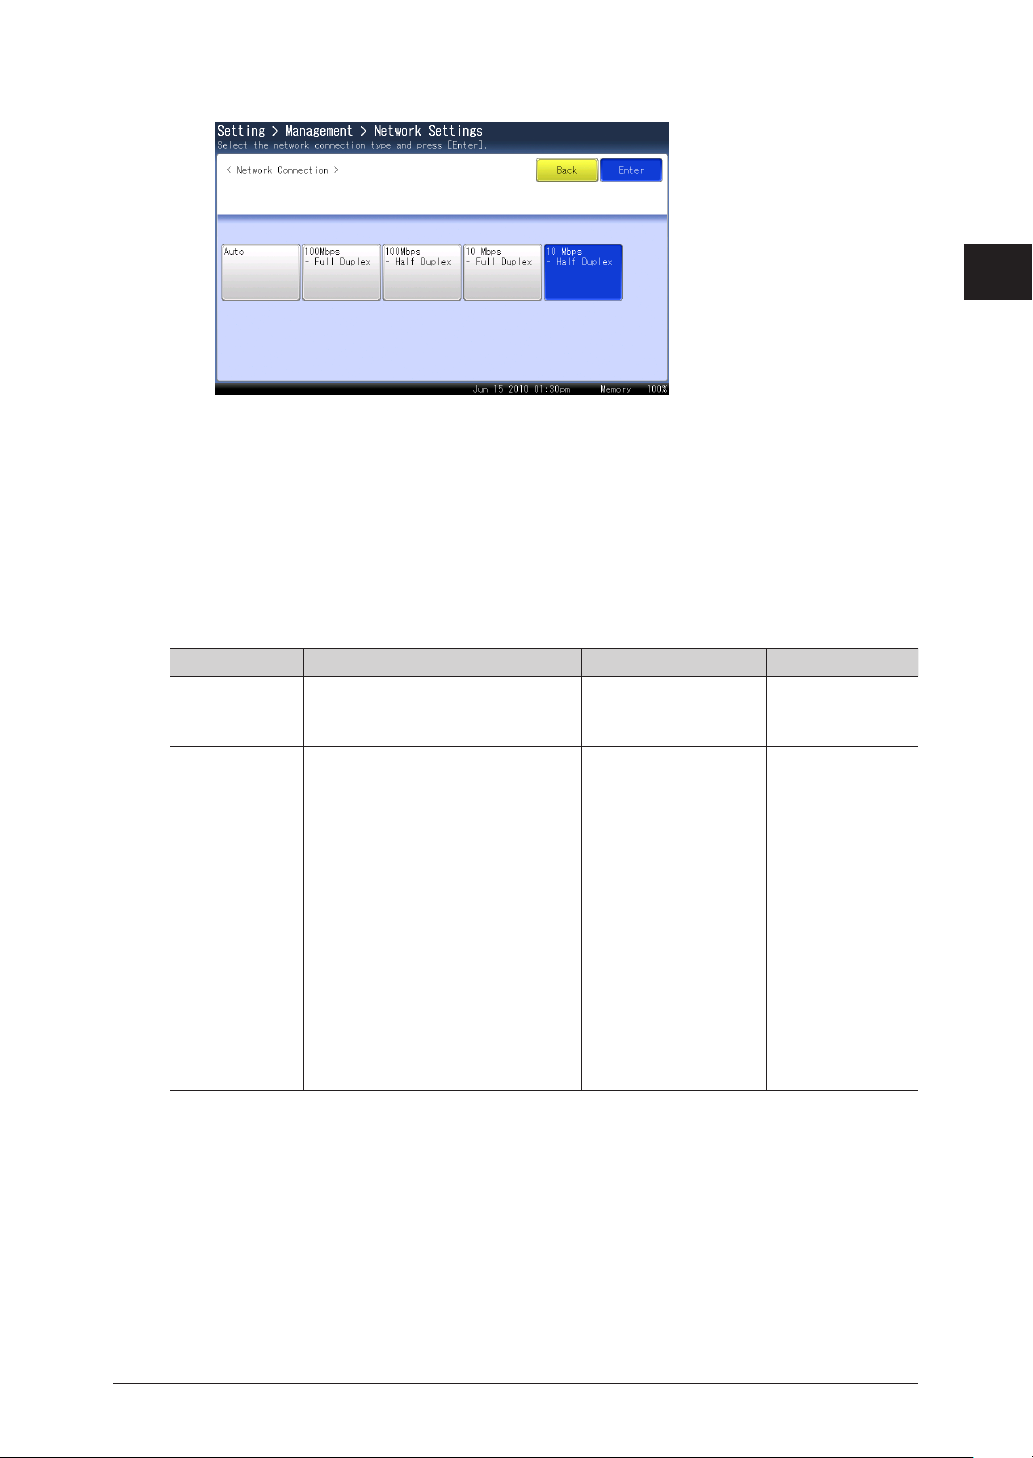
Specifying the Network Settings 2-41
1
2
Management
Select the desired setting.
7
In this example, the LAN speed is changed to [10Mbps - Half Duplex].
Press [8 Enter].
To continue to change other default settings, repeat the procedure in steps 6 to 8.
List of Network Settings
You can set the various functions related to networking.
Function Description Settings Reference page
Ping You can enter a specific IP address
and execute a ping to check the
connection status.
LDAP Server
Setting
You can register, edit, delete,
and print a list of LDAP (Light
Directory Access Protocol) servers.
Name
LDAP Server Address
Port Number
LDAP Server Login
OB User Login
Account ID
Password
Search Base
Max.number of search result
Time Limit
Optional Setting
Attribute Setting
Not registered 2-54
Page 91

2-42 Specifying the Network Settings
Function Description Settings Reference page
TCP/IP Settings You can set the settings for using
2-43
the machine on a network.
l
Host Name
The MAC address is
entered
l
Workgroup
l
DNS Server Addresses
l
DNS Suffix
l
Obtain IP address (DHCP)
WORKGROUP
Not registered
Not registered
ON
OFF
l
IP Address
l
Subnet Mask
l
Default Gateway
l
WINS Server Address
l
IPv6 Setting
192.168.1.10
255.255.255.0
Not registered
Not registered
Refer to Chapter
3, “Setting the
Connection
Environment” in
the OfficeBridge
Guide.
Archive
Settings
When the machine transmits
and receives documents via
Not registered 2-65
fax or e-mail, you can transmit
those documents to a specified
destination via fax, or store them in
a specified shared folder.
e-mail Gateway You can transmit documents to an
2-69
e-mail gateway (fax server).
Authentication
Method
Automatic
LogoutTime
Delete
Restriction
Settings
l
Setting
You can specify the default setting.
l
Prefix
Enter the prefix for the local part of
the e-mail address.
Up to 32 characters can be entered.
l
Suffix
Enter the suffix for the local part of
the e-mail address.
Up to 48 characters can be entered.
Set the authentication method for
users that log in.
You can set the time it takes before
the machine automatically logs out
a logged in user if no operations
have been performed on the
machine.
You can initialize the access
restrictions set in OfficeBridge from
the machine.
Use this function when you cannot
access OfficeBridge.
ON
OFF
Not registered
Not registered
Stand-Alone
Single Sign On
Network
1 - 10min
3min
2-32
2-71
Page 92

Specifying the Network Settings 2-43
1
2
Management
Function Description Settings Reference page
Note
Note
Note
Scan to Print
Clear
Initiliaze
Service Setting
Network
Connection
You can delete the printers
registered in the Scan to Print
Monitor from the machine.
Use this function when the
computer using the Scan to Print
Monitor cannot access the machine.
You can initialize the service
settings specified in the machine
policy settings of OfficeBridge
from the machine. Use this
function when you cannot access
OfficeBridge.
You can set the communication
speed for the LAN that is
connected.
Auto
100Mbps - Full Duplex
100Mbps - Half Duplex
10Mbps - Full Duplex
10Mbps - Half Duplex
Underlined values are the default settings specified at the time of shipment.
Specifying the TCP/IP Settings
You can set the settings for using the machine on a network. The following items can be
set.
Item Description
Host Name Enter the host name of the machine.
The default setting is the MAC address, and up to 15 characters
can be entered.
Workgroup Enter the workgroup name of the network the machine is
connected to.
The default setting is “WORKGROUP”, and up to 15 characters
can be entered.
DNS Server Addresses When using a DNS server, enter the primary DNS server
address and the secondary DNS server address.
DNS Suffix To perform name resolution using only a host name, register the
DNS suffix.
Obtain IP address (DHCP) Enables the setting for automatically obtaining IP addresses
using a DHCP (Dynamic Host Configuration Protocol) server. To
automatically obtain IP addresses, select [ON]. Otherwise, select
[OFF].
IP Address Enter the IP address.
If DHCP is enabled, you cannot display or edit the IP address.
Subnet Mask Enter the subnet mask.
If DHCP is enabled, you cannot edit the subnet mask.
Default Gateway If you are using a gateway, enter the gateway address.
WINS Server Address If you are using a WINS server, enter the WINS server address.
Page 93
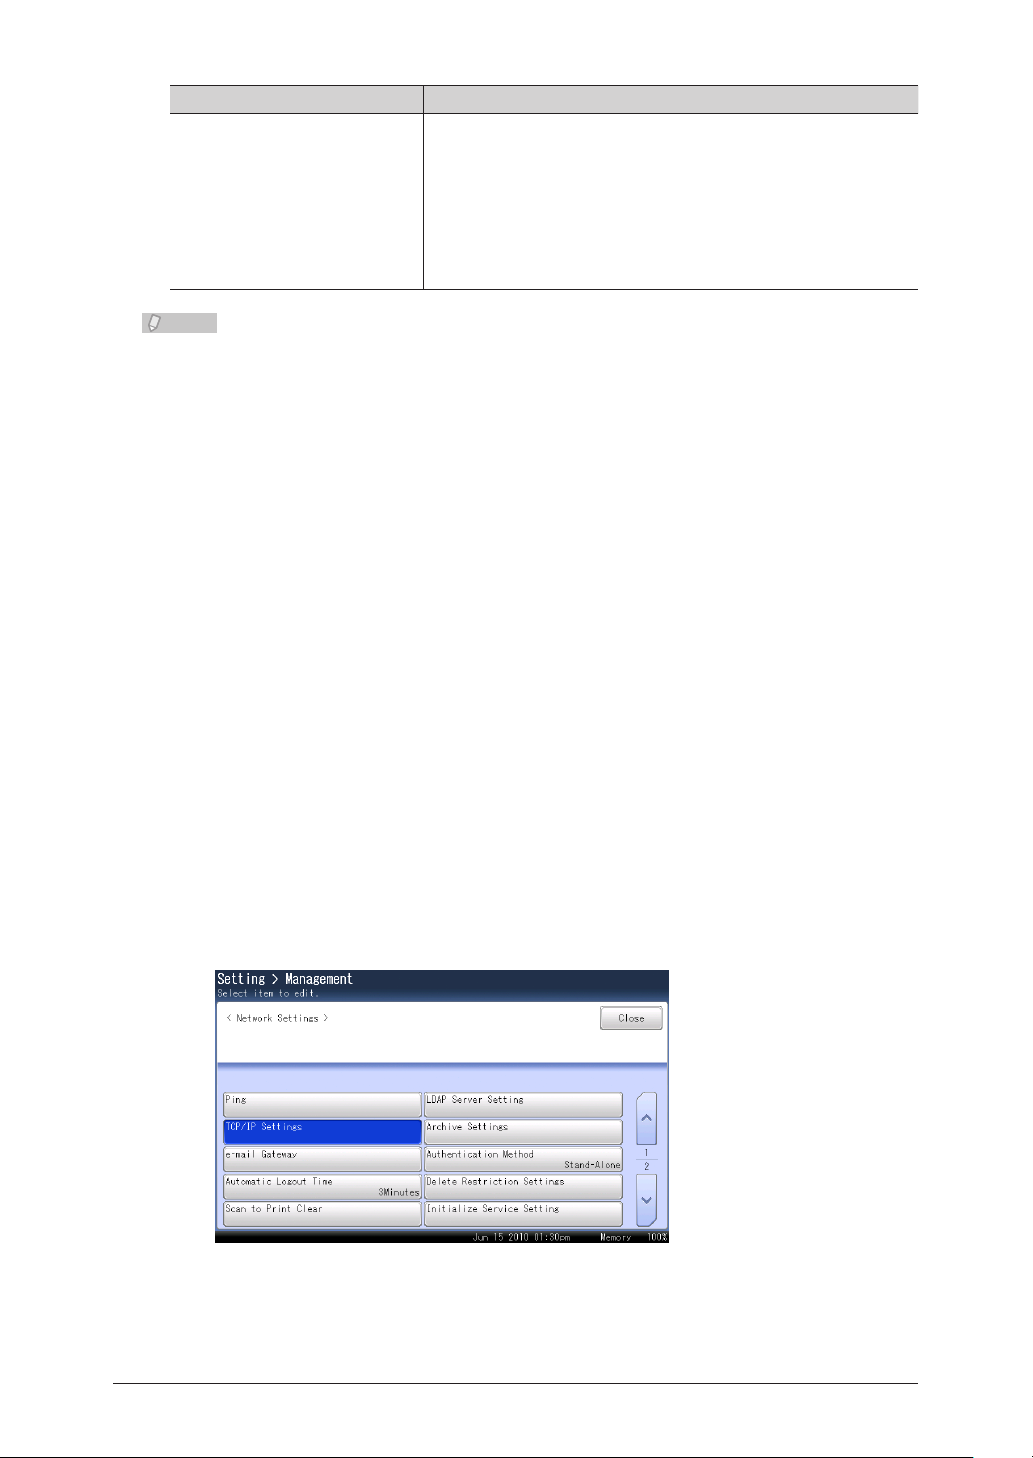
2-44 Specifying the Network Settings
Item Description
Note
IPv6 Setting You can set the following settings:
You can also specify TCP/IP settings using • OfficeBridge. For details, refer to Chapter
3, “Setting the Connection Environment” in the OfficeBridge Guide.
Make sure to obtain permission from the network administrator before changing •
the IP address. Improperly changing the IP address may cause the network to stop
functioning normally.
l
Obtain IPv6 address
l
Link Local Address
l
Global IP Address
l
Subnet Prefix Length
l
Default Gateway
For details on the IPv6 settings, refer to Chapter 3, “Setting the
Connection Environment” in the OfficeBridge Guide.
Opening the TCP/IP Settings Screen
Press <Setting>.
1
Press 2 the [Management] tab.
If an administrator password is set,
3
If an administrator password is not set, proceed to step 5.
Enter the administrator password, and press [Enter].
4
Press [Network Settings].
5
Press [TCP/IP Settings].
6
press [Admin Password].
Specify each setting.
7
Page 94

Specifying the Network Settings 2-45
1
2
Management
Setting the Host Name
Open the TCP/IP settings screen. 1 (See page 2-44.)
Press [Host Name].
2
Enter the host name, and press [Enter].
3
You cannot enter “*” at the start of a name.
Page 95

2-46 Specifying the Network Settings
Setting the Workgroup Name
Note
The domain name cannot be used as the workgroup name.•
If there is no workgroup on the network, create a new workgroup.•
Contact your administrator to create a new workgroup.•
Open the TCP/IP settings screen. 1 (See page 2-44.)
Press [Workgroup].
2
Enter the workgroup name, and press [Enter].
3
You cannot enter “*” at the start of a name.
Page 96

Specifying the Network Settings 2-47
1
2
Management
Setting the DNS Server Address
Open the TCP/IP settings screen. 1 (See page 2-44.)
Press [DNS Server Addresses].
2
Press [Preferred DNS server].
3
Enter the address of the primary DNS server, and press [Enter].
4
Press [Alternate DNS server].
5
Page 97
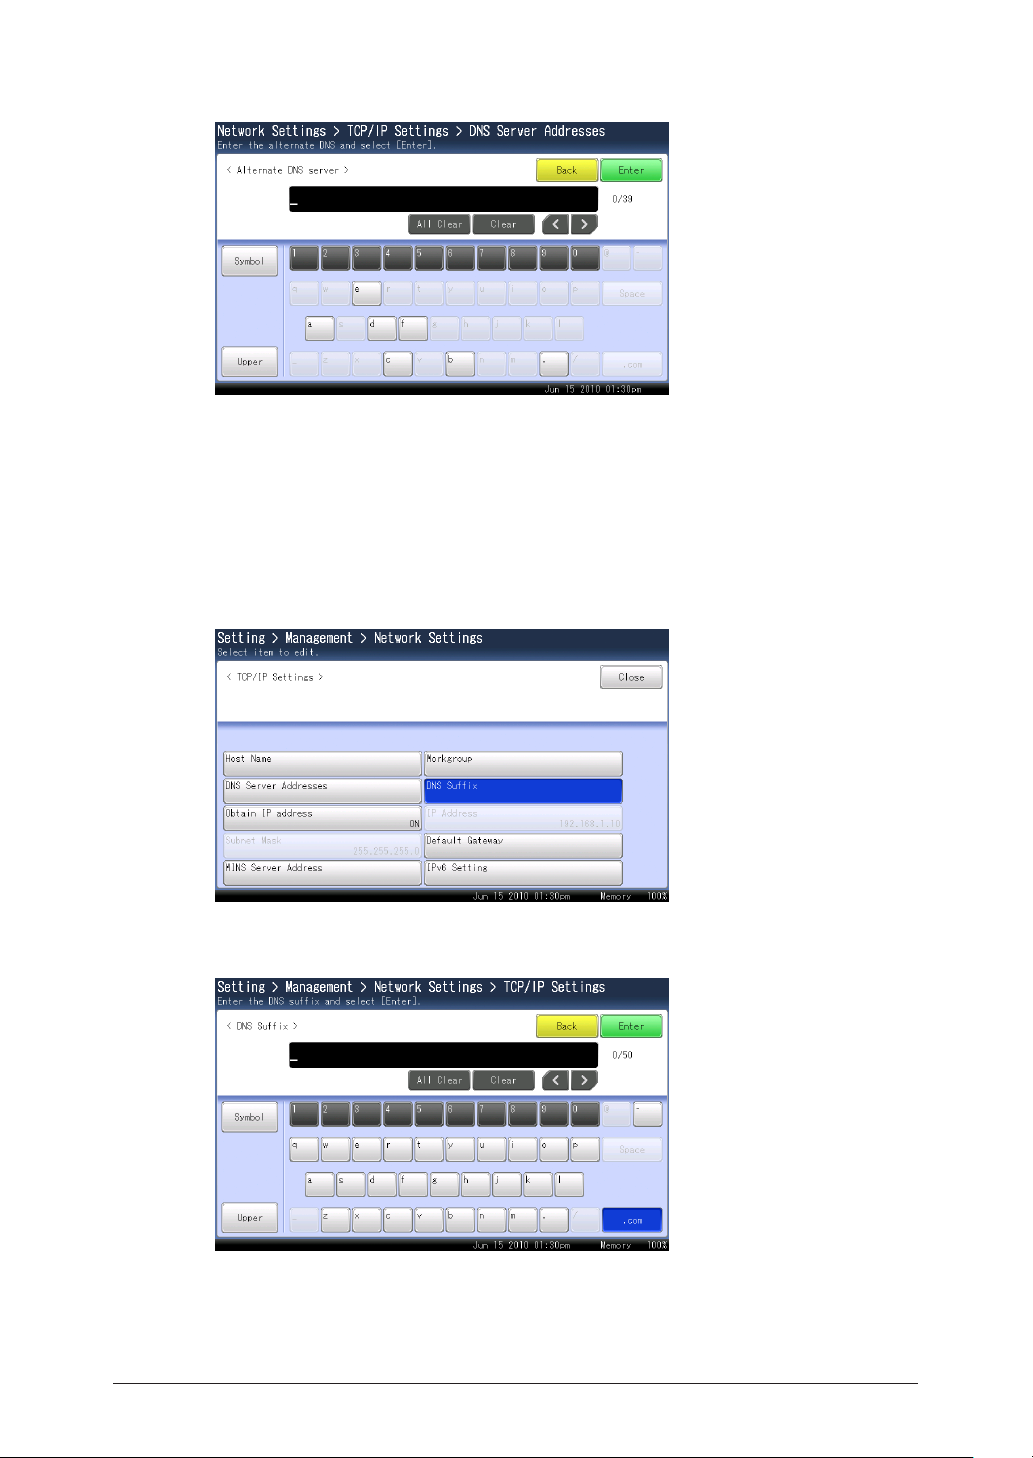
2-48 Specifying the Network Settings
Enter the address of the secondary DNS server, and press [Enter].
6
Setting the DNS Suffix
Open the TCP/IP settings screen.1 (See page 2-44.)
Press [DNS Suffix].
2
Enter the suffix to use when performing a DNS search, and press [Enter].
3
Page 98
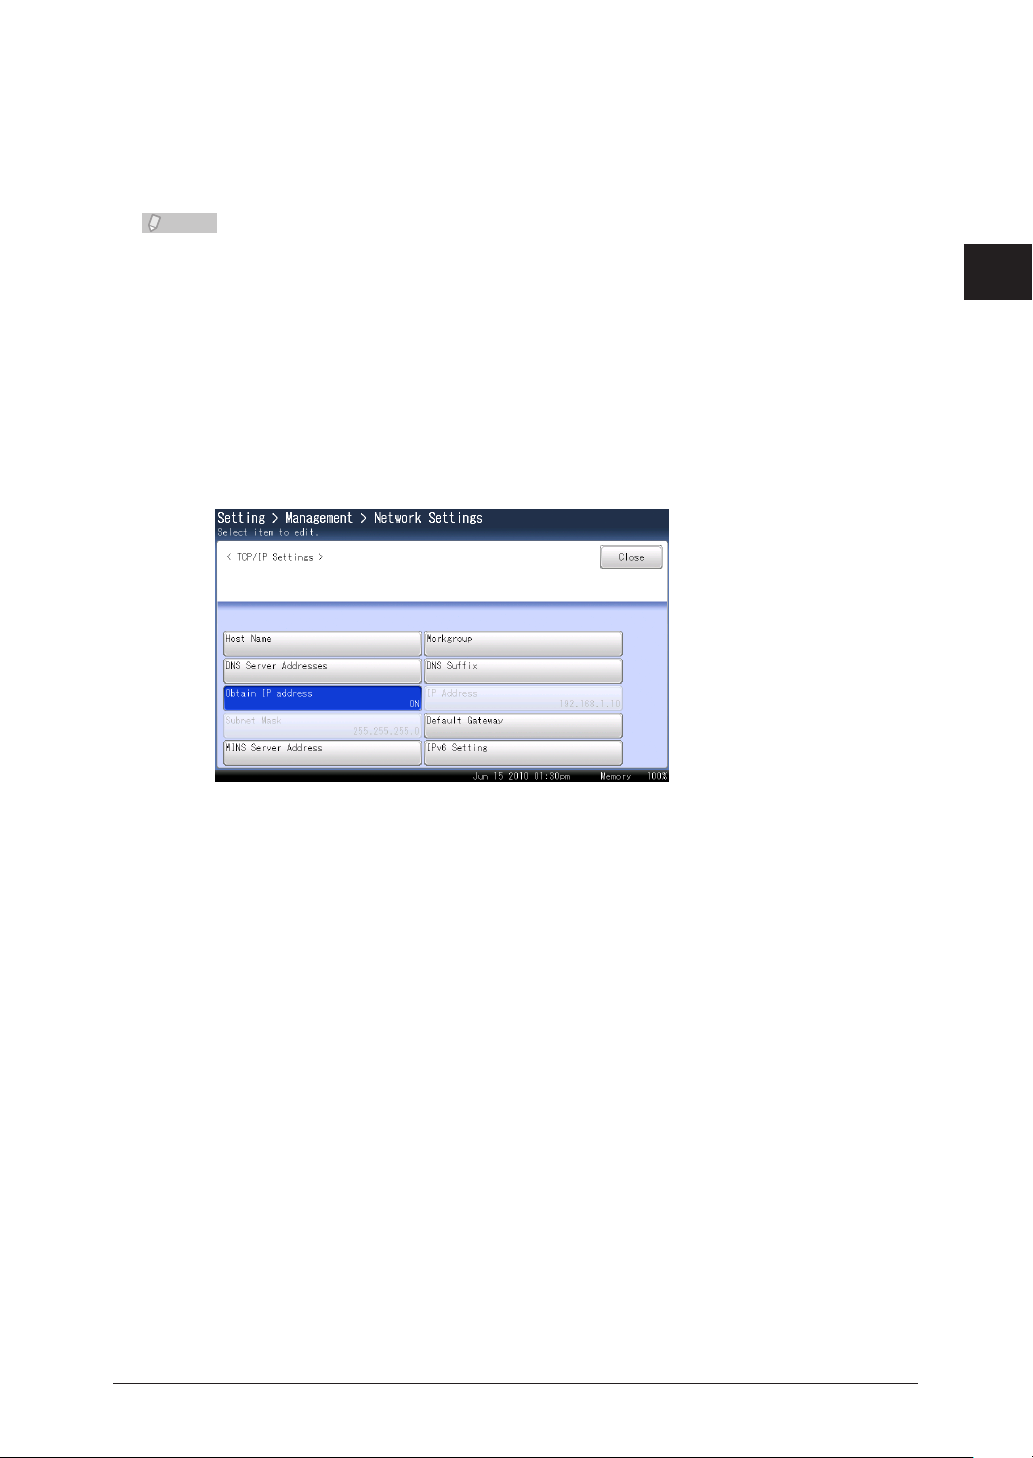
Specifying the Network Settings 2-49
1
2
Management
Setting DHCP
Note
You can use a DHCP (Dynamic Host Configuration Protocol) server to automatically
obtain the IP address and subnet mask, etc.
A gateway address and DNS server address will also be assigned if they are set on the
DHCP server.
If the power is left OFF for an extended period, the IP address may be disabled.•
The IP address and subnet mask assigned by the DHCP server cannot be changed.•
If you do not want to use a DHCP server, disable the DHCP settings, and manually •
assigned the IP address and subnet mask. For details, refer to “Setting the IP
Address” (see page 2-50) and “Setting the Subnet Mask” (see page 2-51).
Open the TCP/IP settings screen. 1 (See page 2-44.)
Obtain IP address].
Press [
2
Select [ON] to obtain the IP address automatically or [OFF] to not, and press
3
[Enter].
Page 99

2-50 Specifying the Network Settings
Setting the IP Address
If DHCP is disabled, manually set the IP address.
Open the TCP/IP settings screen. 1 (See page 2-44.)
Press [IP Address].
2
Enter the IP address, and press [Enter].
3
Page 100

Specifying the Network Settings 2-51
1
2
Management
Setting the Subnet Mask
If DHCP is disabled, manually set the subnet mask.
Open the TCP/IP settings screen.1 (See page 2-44.)
Press [Subnet Mask].
2
Enter the IP address of the subnet mask, and press [Enter].
3
 Loading...