

Page 1
Printer Guide
Plain-paper digital Fax/Copier/Printer/Scanner
Please read this guide before operating this machine.
After you finish reading this guide, keep it handy for easy reference.
Page 2

Chapter 1 Overview
1
Chapter 2 Installing to Windows
Chapter 3 Installing to Mac OS X
Chapter 4 Setting a Shared Printer
Chapter 5 Updating / Deleting Drivers
Chapter 6 Printing From Windows
Chapter 7 Printing From Macintosh
2
3
4
5
6
7
Page 3

ii Contents
Contents
How to Read This Manual ...........................................................................................v
Symbols ....................................................................................................................... v
Key Descriptions .......................................................................................................vi
Screens ....................................................................................................................... vi
Chapter 1 Overview
Overview of Drivers ...................................................................................................1-2
Overview of Utilities ..................................................................................................1-4
System Requirements ................................................................................................1-5
Online and Offline Status .........................................................................................1-7
Chapter 2 Installing to Windows
Installing Via a Network Connection ....................................................................2-2
Installing Drivers and Utilities .............................................................................. 2-2
Installing Via a Local Connection ..........................................................................2-9
Installing Using the Installer .................................................................................2-9
Installing Without Using the Installer ................................................................2-14
Installing From the Add Printer Wizard .............................................................2-16
Using the Printer Driver With a Standard TCP/IP Port .....................................2-16
Using the Printer Driver With IPP ...................................................................... 2-18
Using the Fax Driver With a Stand ard TCP/IP Port ..........................................2-21
Chapter 3 Installing to Mac OS X
Installin
Installing Via a Local Connection ........................................................................3-12
g Via a Network Connection ...................................................................................3-2
Installing to Mac OS X 10.5 or 10.4 .......................................................................3-2
Installing to Mac OS X 10.3 ....................................................................................3-6
Installing to Mac OS X 10.2 ....................................................................................3-9
Chapter 4 Setting a Shared Printer
Overview of Shared Printers ...................................................................................4-2
Setting Example in Windows ...................................................................................4-3
Specifying the Server Side Settings .......................................................................4-3
Specifying the Client Side Settings ........................................................................4-7
Setting Example for a Macintosh ...........................................................................4-9
Specifying the Server Side Settings .......................................................................4-9
Specifying the Client Side Settings ......................................................................4-12
Sharing a Printer Between Different Operating System Versions.....................4-16
Page 4

1
Contents iii
Chapter 5 Updating / Deleting Drivers
Updating / Deleting Drivers in Windows ..............................................................5-2
Updating Using the Installer .................................................................................5-2
Manually Updating / Deleting ................................................................................5-4
Updating / Deleting Drivers on a Macintosh .....................................................5-12
Updating / Deleting in Mac OS X 10.5 or 10.4 ....................................................5-12
Updating / Deleting in Mac OS X 10.3 .................................................................5-13
Updating / Deleting in Mac OS X 10.2 .................................................................5-14
Chapter 6 Printing From Windows
Basic Printing Operation .........................................................................................6-2
Various Printing Methods ........................................................................................6-3
Selecting the Paper .................................................................................................6-3
Printing on a Custom Paper Size ...........................................................................6-5
Printing on Special Paper .......................................................................................6-9
Printing on Both Sides of the Paper .....................................................................6-11
Printing Multiple Pages on One Sheet of Paper .................................................. 6-12
Printing With a Custom Zoom Ratio ....................................................................6-14
Fitting the Zoom Ratio to a Paper Size ................................................................6-15
Sorting the Output ................................................................................................ 6-17
Printing With a Margin (Binding Position) .........................................................6-18
Printing a Booklet .................................................................................................6-20
Printing Documents Securely ...............................................................................6-22
Saving Toner ..........................................................................................................6-24
Changing the Resolution ......................................................................................6-25
Changing the Print Density .................................................................................6-26
Replacing the Font for Printing ............................................................................6-28
Printing With a Computer Font ...........................................................................6-31
Printing a Watermark ...........................................................................................6-33
Canceling Printing ...................................................................................................6-37
Canceling Printing in Windows ............................................................................6-37
Canceling Printing on the Machine .....................................................................6-38
Driver Print Settings ...............................................................................................6-39
Displaying the Print Settings Screen ...................................................................6-39
Common Settings ..................................................................................................6-42
“Paper” Tab ............................................................................................................6-44
“Page Layout” Tab .................................................................................................6-47
“Print Quality” Tab ................................................................................................6-50
“Destination” Tab ..................................................................................................6-52
“Extended Functions” Tab.....................................................................................6-53
PDF / XPS Direct Printing ......................................................................................6-54
Printing ..................................................................................................................6-54
Print Setting ..........................................................................................................6-55
Page 5

iv Contents
Chapter 7 Printing From Macintosh
Basic Printing Operation .........................................................................................7-2
Various Printing Methods ........................................................................................7-4
Sorting the Output .................................................................................................. 7-4
Selecting the Paper .................................................................................................7-5
Printing on a Custom Paper Size ...........................................................................7-7
Printing on Special Paper .......................................................................................7-9
Printing on Both Sides of the Paper .....................................................................7-11
Printing Multiple Pages on One Sheet of Paper .................................................. 7-12
Printing With a Custom Zoom Ratio ....................................................................7-14
Fitting the Zoom Ratio to a Paper Size ................................................................7-15
Printing With a Margin (Binding Position) .........................................................7-17
Printing a Watermark ...........................................................................................7-19
Canceling Printing ...................................................................................................7-21
Canceling Printing on the Macintosh ..................................................................7-21
Canceling Printing on the Machine .....................................................................7-22
Driver Print Settings ...............................................................................................7-23
Displaying the Print Settings Screen ...................................................................7-23
Feature Set: JCL 1 ................................................................................................7-24
Feature Set: JCL 2 ................................................................................................7-25
Feature Set: Watermark 1.....................................................................................7-26
Feature Set: Watermark 2.....................................................................................7-27
Chapter 8 Printing Using the Print Function
Printing OfficeBridge Box Documents ..................................................................8-2
Printing Documents ................................................................................................8-2
Deleting Documents ................................................................................................8-6
Printing Documents Saved in a Shared Folder...................................................8-7
Printing Documents Saved in USB Memory ......................................................8-11
Printing Security Print Documents .....................................................................8-14
Chapter 9 Function Settings
Setting the Auto Deletion Time for Security Printing ......................................9-2
Setting the Print Controller ....................................................................................9-4
Setting Example ......................................................................................................9-4
List of Print Controller Settings.............................................................................9-6
Printing the Device Settings List ...........................................................................9-8
Opening the OfficeBridge Administrator Settings ...........................................9-10
Page 6

1
How to Read This Manual v
How to Read This Manual
Warning
Caution
IMPORTANT
Note
Symbols
In this manual, the following symbols are used with the items where important
operational and safety information must be observed.
Symbol Meaning
Describes warnings to protect yourself and others from serious or potentially
fatal injury if you handle the machine incorrectly. For safe operation, please
follow instructions carefully.
Notes a caution to protect yourself and others from personal injury or damage
to properties if you handle the machine incorrectly. For safe operation, please
follow instructions carefully.
Describes important conditions or restrictions you should carefully observe to
avoid problems caused by incorrect operations.
Describes reference information and additional notes for operation.
Page 7

vi How to Read This Manual
Key Descriptions
In this manual, the operating keys are described as follows:
The key names on the control panel are shown in < >, and the key names on the touch
panel are in [ ].
Keys on the control panel
Enclosed in < >, for example, <Job Confirm. Fax Cancel>.
Touch panel keys
Enclosed in [ ], for example, [Contrast].
Screens
This manual uses the screens of the MFX-2550 standard model, unless otherwise stated.
The screens you see may differ, depending on the options installed.
Page 8

Chapter 1
Overview
Overview of Drivers ...................................................................................................1-2
Overview of Utilities ..................................................................................................1-4
System Requirements ................................................................................................1-5
Online and Offline Status .........................................................................................1-7
Page 9

1-2 Overview of Drivers
Overview of Drivers
Application
Network
Execute printing
Paper: Letter
Pages: 20 pages
Duplex printing
Computer
Network
Drivers are software for executing settings or operations performed on a computer on the
machine.
By installing drivers in a computer, you can print documents, scan photos, etc., and
directly send documents created in applications via fax.
You can install the following types of drivers and utilities.
Standard drivers and utilities:
Name Description Location
GDI Printer Driver This is the standard Windows printer
driver.
FAX Driver This driver is for sending created
documents to a fax destination or e-mail
address directly from a computer.
Scanner Driver This driver is for importing scanned
documents in applications that support
TWAIN.
TIFF Maker This utility enables you to convert
documents created in other applications
to TIFF format image files. These files can
be attached when sending a document via
e-mail using the Internet Fax function.
InfoMonitor This utility is for notifying users with a
message when a new document is received
in a box or when sending of a document
is complete. You can also print and save
documents using InfoMonitor.
CoverPage Editor This utility enables you to create cover
pages to attach to the front of the
document when sending a fax or Internet
Fax.
Scan to Print Monitor This utility enables you to print color
documents scanned on the machine from a
color printer on the network.
\Drivers\ENU\M2550\GDI\
INSTDATA\Printer
\Drivers\ENU\COMMON\
FAX\INSTDATA\Printer
\Drivers\ENU\COMMON\
SCANNER\INSTDATA\
Scanner
\Drivers\ENU\COMMON\
TIFFMAKER\INSTDATA
\Drivers\ENU\COMMON\
INFOMONITOR\INSTDATA
\Drivers\ENU\COMMON\
COVERPAGEEDITOR\
INSTDATA
\Drivers\ENU\COMMON\
SCANTOPRINTMONITOR\
INSTDATA
Page 10
1
Overview
Overview of Drivers 1-3
Optional drivers and utilities:
Note
Name Description Location
PCL 5e Printer Driver This printer driver is for ensuring
compatibility with legacy PCL printers.
To use this driver, the optional “PCL 5e/6
print option” is required.
PCL 6 Printer Driver This printer driver uses the page
discretion language PCL 6.
To use this driver, the optional “PCL 5e/6
print option” is required.
PS3 Printer Driver This printer driver is for printing
documents that include PostScript fonts
and EPS data. To use this driver, the
optional “PCL 5e/6 print option” and
“PostScript Enabler” are required.
XPS Printer Driver This printer driver is for printing XPS.
Applications software using XPS are
available on Windows Vista or later. To use
this driver, the optional “PCL 5e/6 print
option” is required.
PDF Direct Print This utility enables you to print PDF
files without using an application. To use
this application, the optional “PCL 5e/6
print option” and “PostScript Enabler” are
required.
XPS Direct Print This utility enables you to print XPS files
without using an application. To use this
application, the optional “PCL 5e/6 print
option” is required.
\Drivers\ENU\M2550\PCL\
INSTDATA\Printer\5e
\Drivers\ENU\M2550\PCL\
INSTDATA\Printer\6
\Drivers\ENU\M2550\PS3\
INSTDATA\Printer
\Drivers\ENU\M2550\XPS\
INSTDATA\Printer
\Drivers\ENU\M2550\
PDFDIRECTPRINT\
INSTDATA
\Drivers\ENU\M2550\
XPSDIRECTPRINT\
INSTDATA
“ENU” for “\Drivers\ENU\M2550\” differs according to the supported language.
Page 11

1-4 Overview of Utilities
Overview of Utilities
You can use the installer to install the following utilities.
InfoMonitor•
CoverPage Editor•
Scan to Print Monitor•
InfoMonitor
“InfoMonitor” is a utility application for managing the history of events (scanning and
transmission/reception of documents, printing from computers, etc.) that occur in the
machine. Users can be notified of events even if there are not logged in to OfficeBridge.
For details, refer to Chapter 4, “Managing Events (InfoMonitor)” in the OfficeBridge Guide.
CoverPage Editor
With “CoverPage Editor”, you can create cover pages to attach at the top of fax documents
you transmit.
On the cover page, you can insert information registered in the address book (sender/
recipient name, company name and department name, etc.), and also insert strings and
pictures.
For details, refer to Chapter 4, “Creating Cover Pages (CoverPage Editor)” in the
OfficeBridge Guide.
Scan to Print Monitor
“Scan to Print Monitor” is a utility application for printing color documents scanned on
the machine in color from a color printer on the network.
For details, refer to Chapter 1, “Basic Scanning” in the Scanner and Fax Guide.
Page 12

1
Overview
System Requirements 1-5
System Requirements
Note
The installer is used to install the drivers and utilities.
Installation can be performed in a network environment, or a local environment with a
USB connection.
Windows Environment
The system requirements for the installer are as follows.
Windows
Windows
Windows
Windows
Windows Vista
Windows Vista
Windows Vista
Windows Vista
Windows Vista
Windows Server
Operating System (OS)
Windows Server
Windows Server
Windows Server
Windows Server
Windows Server
Windows Server
Windows Server
Windows Server
Windows
Windows
Windows
Windows
CPU Same as the requirement for the OS
Memory
Memory capacity recommended for the OS (If you want to install
the Scan to Print Monitor, at least 512 MB is recommended.)
Interface (Network) Ethernet (10BASE-T, 100BASE-TX)
Interface (Local) USB cable
Drive CD-ROM drive
Microsoft Internet Explorer Ver. 6 or later recommended (with
Web Browser
(When using OfficeBridge)
JavaScript and cookies enabled)
Mozilla Firefox Ver. 2.0 or later (with JavaScript and cookies
enabled)
®
2000 Professional
®
XP Home Edition
®
XP Professional
®
XP Professional ×64 Edition
®
Home Basic (×86/×64)
®
Home Premium (×86/×64)
®
Ultimate (×86/×64)
®
Business (×86/×64)
®
Enterprise (×86/×64)
®
2003 Standard Edition
®
2003 Standard ×64 Edition
®
2003 Enterprise Edition
®
2003 Enterprise ×64 Edition
®
2003 Datacenter Edition
®
2003 Datacenter ×64 Edition
®
2008 Standard (×86/×64)
®
2008 Enterprise (×86/×64)
®
®
®
®
®
2008 Datacenter (×86/×64)
7 Home Premium (x86/x64)
7 Ultimate (x86/x64)
7 Professional (x86/x64)
7 Enterprise (x86/x64)
Administrator privileges are required when installing.•
Do not connect a USB cable until the installer displays a message prompting you to •
connect it.
If you are using Windows Server 2008, you cannot use the TWAIN driver with a •
local connection.
Page 13

1-6 System Requirements
Macintosh Environment
Note
The system requirements for the installer are as follows.
Mac OS X 10.2
Operating System (OS)
CPU Same as the requirement for the OS
Memory Memory capacity recommended for the OS
Interface (Network) Ethernet (10BASE-T, 100BASE-TX)
Interface (Local) USB cable
Drive CD-ROM drive
Mac OS X 10.3
Mac OS X 10.4
Mac OS X 10.5
The optional “PCL 5e/6 print option” and • “PostScript Enabler” are required for
Macintosh Environment.
Only • “PS3 Printer Driver” is available on Macintosh environment.
Trademarks
Monotype•
®
is a trademark of Monotype Imaging Inc. registered in the United States
Patent and Trademark Office and may be registered in certain jurisdictions.
Mozilla and Firefox are trademarks of the Mozilla Foundation.•
Microsoft•
Microsoft Corporation in the United States and other countries.
Apple•
Adobe•
®
, Windows®, and Windows NT® are registered trademarks or trademarks of
®
, Mac®, and Mac OS® are registered trademarks of Apple, Inc.
®
, the Adobe logo, Acrobat®, Adobe® Flash®, and PostScript® are trademarks of
Adobe Systems Incorporated.
All other company names and product names referenced are trademarks or registered •
trademarks of their respective companies.
This product includes RSA BSAFE•
®
Cryptographic software from RSA Security Inc.
RSA and BSAFE are either registered trademarks or trademarks of RSA Security Inc.
in the United States and/or other countries. RSA Security Inc. All rights reserved.
Page 14

1
Overview
Online and Offline Status 1-7
Online and Offline Status
The “online” status of the machine refers to when it can receive and print data from
computers. The machine must be “online” in order to receive print data from computers.
Confirm that the machine is “online” when performing printing.
The “offline” status of the machine refers to when it cannot receive data from computers.
You can cancel printing by making the machine “offline” while it is receiving print data
from a computer.
Perform the procedure below to switch from the “offline” to the “online” status.
Press <Print>.
1
Press [On Line].
2
Page 15

1-8 Online and Offline Status
Page 16

Chapter 2
Installing to Windows
Installing Via a Network Connection ....................................................................2-2
Installing Drivers and Utilities .............................................................................. 2-2
Installing Via a Local Connection ..........................................................................2-9
Installing Using the Installer .................................................................................2-9
Installing Without Using the Installer ................................................................2-14
Installing From the Add Printer Wizard .............................................................2-16
Using the Printer Driver With a Standard TCP/IP Port .....................................2-16
Using the Printer Driver With IPP ...................................................................... 2-18
Using the Fax Driver With a Standard TCP/IP Port ...........................................2-21
Page 17
2-2 Installing Via a Network Connection
Installing Via a Network Connection
Note
There are two types of installation via a network connection; “typical installation” and
“custom installation”.
With a “typical installation”, the standard drivers and utilities are automatically installed
in the computer.
With a “custom installation”, the required drivers and utilities are manually installed in
the computer.
We recommend that you perform a “typical installation” first.
For details on connecting the machine to a network, see Chapter 1, “Connecting the •
LAN Cable” in the User’s Guide.
For details on setting the IP address, subnet mask, and gateway address of the •
machine, see Chapter 2, “Specifying the TCP/IP Settings” in the Administrator’s
Guide.
Installing Drivers and Utilities
Insert the disc into the CD-ROM drive of the computer.
1
The installer starts automatically. The installation top screen is displayed.•
If the installation top screen is not displayed, double-click the “InstMenu.exe” file on the disc.•
If you are using Windows 7, Windows Vista or Windows Server 2008, • enter an administrator
password or provide confirmation when the “User Account Control” screen is displayed.
Select “MFX-2550” from the “Select Model” pull-down menu, and then click
2
[Install Drivers].
You can click the “Select Language” pull-down menu to select the language to display the •
installer in.
You can click the “Select Model” pull-down menu to select the device model to install drivers for.•
Page 18

1
2
Installing to Windows
Installing Via a Network Connection 2-3
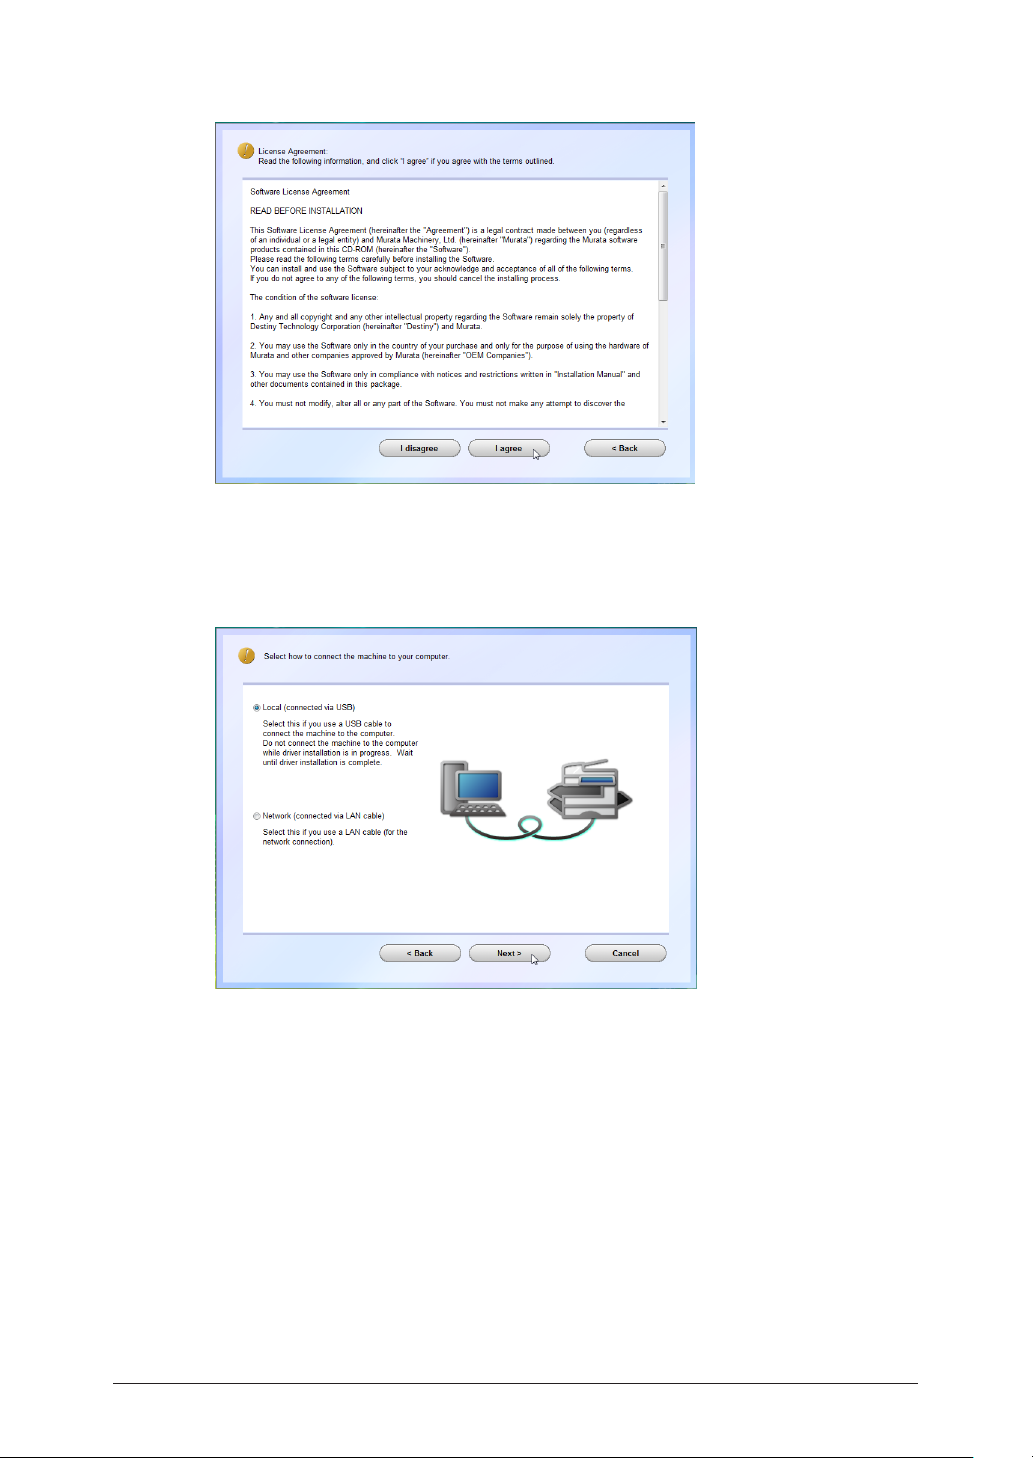
Click [I agree].
3
Click [I disagree] to cancel the installation.•
Click [< Back] to return to the installation top screen.•
Select “Network (connected via LAN cable)”, and click [Next >].
4
Click [< Back] to return to the “License Agreement” screen.•
Click [Cancel] to cancel the installation.•
Page 19

2-4 Installing Via a Network Connection
Select the installation type, and click [Next >].
5
If you selected “Typical Installation (Recommended)”, proceed to step 11.
Select the drivers or utilities to install, and click [Next >].
6
This screen is displayed when installing a standard driver. The screen is different when
installing an optional driver.
Page 20
1
2
Installing to Windows
Installing Via a Network Connection 2-5
Specify the location to install the utilities, and click [Next >].
7
This screen may be displayed, depending on the selected drivers and utilities.•
You can click [Browse] to display the folder browsing dialog and specify the installation •
location.
Click [< Back] to return to the previous screen.•
Click [Cancel] to cancel the installation.•
Click [Next >].
8
This screen may be displayed, depending on the selected drivers and utilities.•
When registering utilities in the Start menu, specify the program category you want them to •
belong to. By default, the utilities are registered in a folder named “Muratec”.
Page 21

2-6 Installing Via a Network Connection
Select the utilities to start automatically, and click [Next >].
9
The shortcut creation screen is displayed.
This screen may be displayed, depending on the selected drivers and utilities.•
The utilities registered here are automatically started when the computer starts.•
Select the utilities to create a shortcut for, and click [Next >].
10
This screen may be displayed, depending on the selected drivers and utilities.
Page 22
1
2
Installing to Windows
Installing Via a Network Connection 2-7
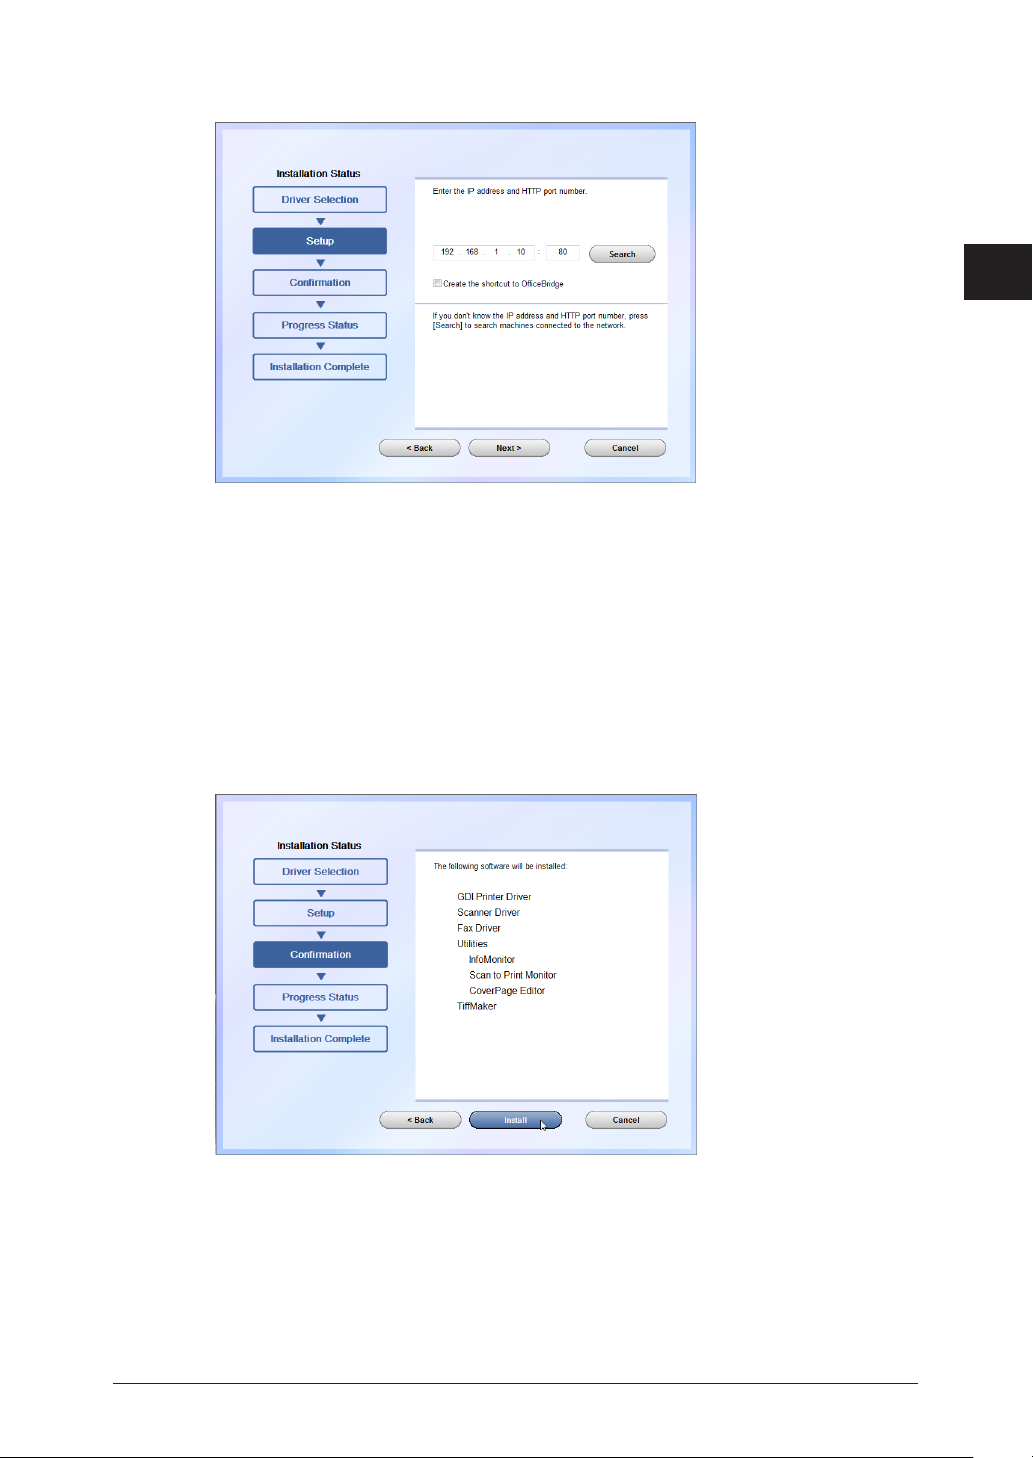
Enter the IP address of the machine to connect to, and click [Next >].
11
Enter the IP address in the “XXX.XXX.XXX.XXX” format (where XXX is a number between 0 •
and 255).
You cannot enter “0.0.0.0”.•
If you do not know the IP address, you can detect the IP address of connected devices on the •
“Device Search” screen. First, click [Search] to display the Device Search screen. Next, click
[Refresh]. If the “Windows Security Alert” screen is displayed, click [Unblock], and then click
[Refresh] again. Select the device name from the list, and click [OK]. (The “Windows Security
Alert” screen is not displayed from the second time you perform this operation.)
If you want to create a shortcut to OfficeBridge on the desktop, select “Create the shortcut to •
OfficeBridge”.
Click [Install].
12
Click [Cancel] to cancel the installation.•
If a message regarding the certificate is displayed, click [Install this driver software anyway], •
[Continue Anyway] or [Yes]. (The displayed message and button names may differ according
to the version of the operating system you are using.)
When the installation is complete, a screen indicating that the installation is complete is
displayed.
Page 23

2-8 Installing Via a Network Connection
When you click [Finish], a screen describing the settings required after installation (Security •
Note
Print test print and InfoMonitor Settings) may be displayed, depending on the settings.
To execute a test security print, it is necessary to complete user authentication. In the screen •
displayed after the installation is complete, click “Security Print test print”, and perform the
operation on the machine. For details, refer to “Printing Security Print Documents”. (See
page 8-14.)
Remove the disc from the CD-ROM drive.
13
For details on setting InfoMonitor after it is installed, refer to Chapter 4, “Managing •
Events (InfoMonitor)” in the OfficeBridge Guide.
For details on setting the Scan to Print Monitor after it is installed, refer to Chapter •
7, “Registering Destinations” in the Scanner and Fax Guide.
Page 24

1
2
Installing to Windows
Installing Via a Local Connection 2-9
Installing Via a Local Connection
Note
There are two types of installation via a local connection; “typical installation” and “custom
installation”.
With a “typical installation”, the standard drivers and utilities are automatically installed
in the computer.
With a “custom installation”, the required drivers and utilities are manually installed in
the computer.
We recommend that you perform a “typical installation” first.
Installing Using the Installer
Installing Using the Installer
When you are a Windows 7 user, please change the Windows setting in advance to
installation. For details, see “Preparation for Windows 7 users”. (See page 2-13.)
Insert the disc into the CD-ROM drive of the computer.
1
The installer starts automatically. The installation top screen is displayed.•
If the installation top screen is not displayed, double-click the “InstMenu.exe” file on the disc.•
If you are using Windows 7, Windows Vista or Windows Server 2008, • enter an administrator
password or provide confirmation when the “User Account Control” screen is displayed.
Click [Install Drivers].
2
Page 25
2-10 Installing Via a Local Connection
Click [I agree].
3
Click [I disagree] to cancel the installation.•
Click [< Back] to return to the previous screen.•
Select “Local (connected via USB)”, and click [Next >].
4
Page 26

1
2
Installing to Windows
Installing Via a Local Connection 2-11
Select the installation type, and click [Next >].
5
If you selected “Typical Installation (Recommended)”, proceed to step 7.
Select the drivers to install, and click [Next >].
6
This screen is displayed when installing a standard driver. The screen is different when
installing an optional driver.
Page 27

2-12 Installing Via a Local Connection
Click [Install].
7
If a message regarding the certificate is displayed, click [Install this driver software anyway],
[Continue Anyway] or [Yes]. (The displayed message and button names may differ according
to the version of the operating system you are using.)
When the installation is complete, a cable connection notification screen is displayed.
Connect the computer and the machine with a USB cable.
8
If the “User Account Control” screen is displayed, click [Continue].•
If you are using Windows XP or Windows Server 2003, the driver selection screen may be •
displayed. Follow the instructions on the screen to perform the procedure.
Page 28
1
2
Installing to Windows
Installing Via a Local Connection 2-13
Click [Finish].
Note
9
Remove the disc from the CD-ROM drive.
10
Preparation for Windows 7 users
Before you start the installation, please change the setting of Windows not to
download the driver from the web site. If you do not change this setting, installation
may take longer time.
After you have finished the installation, you may better return the setting that you
changed.
Click [Start], right-click [Computer] and click “Properties” from the list.
1
Click “Advanced system settings”.
2
When the “User Account Control” dialog box appears, enter an administrator password or
provide confirmation.
Click “Hardware” tab, and click [Device Installation Settings].
3
Page 29

2-14 Installing Via a Local Connection
Select “No, let me choose what to do” and choose “Never install driver software
4
from Windows Update”.
Click [Save Changes], and close the “System Properties” screen.
5
Installing Without Using the Installer
Insert the disc into the CD-ROM drive of the computer.
1
Connect the computer and the machine with a USB cable.
2
Turn the power of the machine ON.
3
A screen similar to the following is displayed.
If the “User Account Control” screen is displayed, click [Continue].
Click “Locate and install driver software (recommended)”.
4
Select “Include subfolders” under “Search for driver software in this location”.
5
Page 30

1
2
Installing to Windows
Installing Via a Local Connection 2-15
Click [Browse], select the driver to install, and click [OK].
Note
6
For details on the types and locations of the printer drivers to install, refer to “Overview of
Drivers”. (See page 1-2.)
Click [Next], and follow the instructions on the screen.
7
If a message regarding the certificate is displayed, click [Continue].
Click [Finish].
8
After the installation is finished, confirm that “Printers” is displayed for the
9
name of the installed printer driver.
Remove the disc from the CD-ROM drive.
10
If you are using Windows XP / Server 2003, the “Found New Hardware Wizard”
screen is displayed in step 2. Select “No, not this time”, and click [Next]. In the screen
displayed next, select “Install from a list or specific location(Advanced)”, and click
[Next]. Follow the instructions on the screen to complete the procedure.
Page 31

2-16 Installing From the Add Printer Wizard
Installing From the Add Printer Wizard
When installing the printer driver or the fax driver, you can use the Add Printer Wizard
in addition to the installer.
This is effective for installing the required printer drivers or fax driver.
This section describes the installation procedure using Windows Vista. For details on the
installation procedure for other operating systems, refer to the manuals for the other
operating systems.
Using the Printer Driver With a Standard TCP/IP Port
Insert the disc into the CD-ROM drive of the computer.
1
Click [Start] 2 [Control Panel] [Hardware and Sound] [Printers].
The “Printers” screen is displayed.
Click “Add a printer” on the toolbar.
3
Click [Add a local printer].
4
Page 32

1
2
Installing to Windows
Installing From the Add Printer Wizard 2-17
Select “Create a new port”, and select “Standard TCP/IP Port” from the pull-down
5
menu.
Click [Next].
6
Enter the IP address or DNS name in “Hostname or IP address”, enter a unique
7
port name in “Port name”, and click [Next].
If a device is not found with the specified IP address, the “Additional Port Information
Required” screen is displayed. Confirm that “Standard” and “Generic Network Card” are
selected in Device Type, and click [Next].
Click [Have Disk].
8
The “Install From Disk” dialog is displayed.
Page 33

2-18 Installing From the Add Printer Wizard
Click [Browse], select the printer driver to install, and click [OK].
Note
Note
9
For details on the types and locations of the printer drivers to install, refer to “Overview of
Drivers”. (See page 1-2.)
Click [Next], and follow the instructions on the screen.
10
If the “User Account Control” screen is displayed, click [Continue].•
If the Windows Security screen is displayed, click [Install this driver software anyway].•
Click [Finish].
11
After the installation is finished, confirm that “Printer” is displayed for the
12
name of the installed printer driver.
Remove the disc from the CD-ROM drive.
13
If you are using Windows 2000 and you cannot print, SNMP may be enabled.
Follow the procedure below to disable the SNMP settings.
Open the “Printers” folder, right-click the printer name without selecting it, and 1
select [Server Properties].
Select the specified port from the “Ports” tab, and click [Configure Port].2
Deselect “SNMP Status Enabled”.3
Using the Printer Driver With IPP
To use the printer driver via IPP, confirm in advance that your network environment •
can use the HTTP protocol.
If the HTTP port number has been changed from the default value of “80”, enter the •
following URL when performing the installation.
Example) http://xxx.xxx.xxx.xxx:631/ipp (when the HTTP port number has been
changed to “631”)
To specify the printer name, confirm in advance that your network environment can •
use DNS.
When using the printer driver (Muratec MFX-2550) via IPP, you cannot use the •
enlarge/reduce function.
Insert the disc into the CD-ROM drive of the computer.
1
Click [Start] 2 [Control Panel] [Hardware and Sound] [Printers].
The “Printers” screen is displayed.
Page 34

1
2
Installing to Windows
Installing From the Add Printer Wizard 2-19
Click “Add a printer” on the toolbar.
3
Click “Add a network, wireless or Bluetooth printer”.
4
Click [Stop], and then click “The printer that I want isn’t listed”.
5
Page 35

2-20 Installing From the Add Printer Wizard
Select “Select a shared printer by name”, enter the printer name or IP address,
6
and click [Next].
Enter the printer name or IP address as indicated below.
To enter the printer name: http://printer name/ipp
To enter the IP address: http://xxx.xxx.xxx.xxx/ipp
Click [Have Disk].
7
The “Install From Disk” dialog is displayed.
Click [Browse], select the printer driver to install, and click [OK].
8
For details on the types and locations of the printer drivers to install, refer to “Overview of
Drivers”. (See page 1-2.)
Click [Next], and follow the instructions on the screen.
9
If the “User Account Control” screen is displayed, click [Continue].•
If the Windows Security screen is displayed, click [Install this driver software anyway].•
Click [Finish].
10
After the installation is finished, confirm that “Printers” is displayed for the
11
name of the installed printer driver.
Remove the disc from the CD-ROM drive.
12
Page 36

1
2
Installing to Windows
Installing From the Add Printer Wizard 2-21
Using the Fax Driver With a Standard TCP/IP Port
Note
If you want to enable the SNMP function for the printer driver, it is necessary to
create a separate port for the fax driver.
Insert the disc into the CD-ROM drive of the computer.
1
Click [Start] 2 [Control Panel] [Hardware and Sound] [Printers].
The “Printers” screen is displayed.
Click “Add a printer” on the toolbar.
3
Click [Add a local printer].
4
Page 37

2-22 Installing From the Add Printer Wizard
Select “Create a new port”, and select “Standard TCP/IP Port” from the pull-down
5
menu.
Click [Next].
6
Enter the IP address or DNS name in “Hostname or IP address”, enter a unique
7
port name in “Port name”, and click [Next].
If a device is not found with the specified IP address, the “Additional Port Information
Required” screen is displayed. Confirm that “Standard” and “Generic Network Card” are
selected in Device Type, and click [Next].
Click [Have Disk].
8
The “Install From Disk” dialog is displayed.
Page 38

1
2
Installing to Windows
Installing From the Add Printer Wizard 2-23
Click [Browse], select the fax driver to install, and click [OK].
Note
9
For details on the location of the fax driver to install, refer to “Overview of Drivers”. (See page
1-2.)
Click [Next], and follow the instructions on the screen.
10
If the “User Account Control” screen is displayed, click [Continue].•
If the Windows Security screen is displayed, click [Install this driver software anyway].•
Click [Finish].
11
After the installation is finished, confirm that “Printer” is displayed for the
12
name of the installed fax driver.
Remove the disc from the CD-ROM drive.
13
If SNMP is enabled, the fax driver may not operate normally.
Follow the procedure below to disable the SNMP settings.
Open the “Printers” folder, right-click the printer name without selecting it, and 1
select [Server Properties].
Select the specified port from the “Ports” tab, and click [Configure Port].2
Deselect “SNMP Status Enabled”.3
Page 39

2-24 Installing From the Add Printer Wizard
Page 40

Chapter 3
Installing to Mac OS X
Installin
Installing Via a Local Connection ........................................................................3-12
g Via a Network Connection ...................................................................................3-2
Installing to Mac OS X 10.5 or 10.4 .......................................................................3-2
Installing to Mac OS X 10.3 ....................................................................................3-6
Installing to Mac OS X 10.2 ....................................................................................3-9
Page 41

3-2 Installing Via a Network Connection
Installin
Note
With a Macintosh, perform the installation by using the installer to install a PPD file
(printer description file).
The installation procedure may slightly vary according to the version of the operating
system.
This section describes the installation procedure for each version.
g Via a Network Connection
Installing to Mac OS X 10.5 or 10.4
The procedure is described using the screens for OS X 10.5, but the procedure is the
same for OS X 10.4.
Insert the disc into the CD-ROM drive of the computer.
1
Start the installer.
2
The installation screen is displayed.
Follow the instructions in the installer to perform the procedure.
3
After the installation is finished, restart the computer.
4
Remove the disc from the CD-ROM drive after restarting the computer.
5
Select “System Preferences” from the 6 menu.
Page 42

1
2
3
Installing to Mac OS X
Installing Via a Network Connection 3-3
Click “Print & Fax” in “Hardware”.
7
Click [+].
8
If the screen is locked, click the key and enter the user name and password to unlock the
screen.
Page 43

3-4 Installing Via a Network Connection
Click “IP” (or “IP Printer” for OS X 10.4).
9
The display switches to the IP settings screen.
In the “Protocol” field, select “Line Printer Daemon - LPD” from the pull-down
10
menu.
Enter the IP address or DNS name for the printer to connect in the “Address”
11
field.
Enter the name of the printer to connect in the “Name” field.
12
Make sure to enter a name.
If necessary, enter the name to display in the print job list in the “Queue” field,
13
and enter the location that the printer is installed in the “Location” field.
Select “Select a driver to use” (“Muratec” for OS X 10.4) from the pull-down
14
menu in the “Driver” (“Driver to Use” for OS X 10.4) field.
Page 44

1
2
3
Installing to Mac OS X
Installing Via a Network Connection 3-5
For OS X 10.5, select the name of the driver to install from “Model”
15
Click [Add].
16
The optional unit selection screen for the printer is displayed.
If an optional paper supply unit is installed in the machine, select the unit
17
name from the pull-down menu.
Page 45

3-6 Installing Via a Network Connection
Click [Continue].
18
The printer name is added to the list of registered printers on the left of the “Print & Fax” •
screen.
If you click [Cancel], the settings are canceled and the display returns to the optional unit •
selection screen.
Click [×] to close the “Print & Fax” screen.
19
Installing to Mac OS X 10.3
Insert the disc into the CD-ROM drive of the computer.
1
Start the installer.
2
The installation screen is displayed.
Follow the instructions in the installer to perform the procedure.
3
After the installation is finished, restart the computer.
4
Remove the disc from the CD-ROM drive after restarting the computer.
5
Select “Utilities” from the “Go” menu.
6
Page 46

1
2
3
Installing to Mac OS X
Installing Via a Network Connection 3-7
Click “Printer Setup Utility”.
7
Click [Add].
8
Select “IP Printing” from the pull-down menu on the top of the screen.
9
Page 47

3-8 Installing Via a Network Connection
Select “LPD/LPR” from the “Printer Type” pull-down menu.
10
Enter the IP address or DNS name for the printer to connect in the “Printer
11
Address” field.
If necessary, enter the name to display in the print job list in the “Queue Name”
12
field.
Select “Muratec” from the “Printer Model” pull-down menu.
13
Select the name of the driver to install from “Model Name”.
14
Click [Add].
15
The IP print settings screen is closed, and the selected printer name is displayed on the •
“Printer List” screen.
If you click [Cancel], the settings are canceled and the display returns to the IP print •
settings screen.
Click [×] to close the “Printer List” screen.
16
Page 48

1
2
3
Installing to Mac OS X
Installing Via a Network Connection 3-9
Installing to Mac OS X 10.2
Insert the disc into the CD-ROM drive of the computer.
1
Start the installer.
2
The installation screen is displayed.
Follow the instructions in the installer to perform the procedure.
3
After the installation is finished, restart the computer.
4
Remove the disc from the CD-ROM drive after restarting the Macintosh.
5
Select “Applications” from the “Go” menu.
6
Click “Utilities”.
7
Page 49

3-10 Installing Via a Network Connection
Click “Print Center”.
8
Click “Add”.
9
Select “IP Printing” from the pull-down menu on the top of the screen.
10
Enter the IP address or DNS name for the printer to connect in the “Printer’s
11
Address” field.
Page 50

1
2
3
Installing to Mac OS X
Installing Via a Network Connection 3-11
If necessary, select “Use default queue on server”, enter the name to display in
12
the print job list.
Select “Muratec” from the “Printer Model” pull-down menu, and select the name
13
of the driver to install from “Model Name”.
Click [Add].
14
The IP print settings screen is closed, and the selected printer IP address and type are •
displayed on the “Printer List” screen.
If you click [Cancel], the settings are canceled and the display returns to the IP print •
settings screen.
Click [×] to close the “Printer List” screen.
15
Page 51

3-12 Installing Via a Local Connection
Installing Via a Local Connection
You can also install the printer driver by connecting the machine via a USB connection.
Insert the disc into the CD-ROM drive of the computer.
1
Start the installer.
2
The installation screen is displayed.
Follow the instructions in the installer to perform the procedure.
3
After the installation is finished, restart the computer.
4
Remove the disc from the CD-ROM drive after restarting the computer.
5
Connect the computer and the machine with a USB cable.
6
Select the printer to use on the “Printer List” screen.
7
For details on the procedure for displaying the “Printer List” screen, refer to the manual for
the operating system.
Page 52

Chapter 4
Setting a Shared Printer
Overview of Shared Printers ...................................................................................4-2
Setting Example in Windows ...................................................................................4-3
Specifying the Server Side Settings .......................................................................4-3
Specifying the Client Side Settings ........................................................................4-7
Setting Example for a Macintosh ...........................................................................4-9
Specifying the Server Side Settings .......................................................................4-9
Specifying the Client Side Settings ......................................................................4-12
Sharing a Printer Between Different Operating System Versions.....................4-16
Page 53

4-2 Overview of Shared Printers
Overview of Shared Printers
Server
Client
• Share the printer driver set on the server
Printer
driver
Printer
driver
Printer
driver
Client
Execute printing
Note
By setting the machine as a shared printer, you can print created documents from the
printer via a server.
If the server is an operating system in which the printer driver can be installed, a driver
CD is not required for installation on the client side.
To execute printing from clients, the server must always be running.
Page 54

1
2
3
4
Setting a Shared Printer
Setting Example in Windows 4-3
Setting Example in Windows
Note
The shared printer settings must be specified on both the server and the clients.
This section describes the procedure for setting a shared printer on a Windows Server
2008 (32-bit) server and a Windows Vista (32-bit) client.
Specifying the Server Side Settings
The following procedure is for a Windows Server 2008 (32-bit) server.
Click [Start] 1 [Control Panel] [Printers].
The “Printers” screen is displayed.
Select the printer to share, and select “Properties” from the menu displayed
2
when you right-click the mouse.
Page 55

4-4 Setting Example in Windows
Click the “Sharing” tab.
3
Select “Share this printer”, and enter the name for the printer to share in the
4
“Share name” entry box.
Since the printer may not be displayed correctly if the shared name is too long (depending on
the client side operating system), it is recommended that you set the name using 8 characters
or less.
Page 56

1
2
3
4
Setting a Shared Printer
Setting Example in Windows 4-5
Click [Additional Drivers].
5
Click the other versions of Windows to share the printer with.
6
Select the operating systems that can download the driver.•
To share with clients that are running a version of Windows that is not displayed here, it is •
necessary to insert the disc on the client side to perform the installation.
Click [OK].
7
Page 57

4-6 Setting Example in Windows
Specify the location of the disk to install, and click [OK].
8
When the installation finishes, the “Additional Drivers” dialog box is closed.
Click [OK].
9
The properties dialog box is closed.
Click [×] to close the “Printers” screen.
10
Page 58

1
2
3
4
Setting a Shared Printer
Setting Example in Windows 4-7
Specifying the Client Side Settings
Note
The following procedure is for a Windows Vista (32-bit) client.
Click [Start] 1 [Control Panel] [Internet & Network] [Display Network
Computers and Devices].
The list of the computers on the network is displayed.
Double-click the computer name set on the server.
2
Double-click the printer name to use.
3
After the installation is finished, the screen for the selected printer is displayed.
Page 59

4-8 Setting Example in Windows
Select “Properties” from the “Printer” menu.
4
Click [Print Test Page].
5
If the print is not performed, install the driver again, or contact your administrator.
Click [OK], and close the “Properties” screen.
6
Page 60

1
2
3
4
Setting a Shared Printer
Setting Example for a Macintosh 4-9
Setting Example for a Macintosh
The shared printer settings must be specified on both the server and the clients.
This section describes the procedure for each operating system version.
Specifying the Server Side Settings
For Mac OS X 10.5
Select “System Preferences” from the 1 menu of the computer in which the
printer driver is installed.
The “System Preferences” screen is displayed.
Click “Print & Fax”.
2
Page 61

4-10 Setting Example for a Macintosh
Select the printer to share in the printer list on the left, and select [Share this
Note
3
printer] on the right.
If the screen is locked, click the key and enter the user name and password to unlock the
screen.
Click [×] to close the “Sharing” screen.
4
For Mac OS X 10.2 to 10.4
The procedure here is described using the screens for OS X 10.4.
Select “System Preferences” from the 1 menu of the computer in which the
printer driver is installed.
Page 62

1
2
3
4
Setting a Shared Printer
Setting Example for a Macintosh 4-11
Click “Sharing”.
2
Confirm that “Services” is selected, and select “Printer Sharing” in the list
3
displayed on the left.
If the screen is locked, click the key and enter the user name and password to unlock the
screen.
Click [×] to close the “Sharing” screen.
4
Page 63

4-12 Setting Example for a Macintosh
Specifying the Client Side Settings
For Mac OS X 10.5
Select “System Preferences” from the 1 menu.
Click “Print & Fax”.
2
Page 64

1
2
3
4
Setting a Shared Printer
Setting Example for a Macintosh 4-13
Click the [+] below the list on the left.
3
A screen indicating the names of the printers that can be shared is displayed (for OS X 10.4,
the “Printer Browser” screen is displayed).
If the screen is locked, click the key and enter the user name and password to unlock the
screen.
Click [Default], select a printer with “Shared Printer” displayed, and click [Add].
4
Click [×] to close the “Print & Fax” screen.
5
Page 65

4-14 Setting Example for a Macintosh
For Mac OS X 10.4
Select “Applications” from the “Go” menu.
1
The “Applications” screen is displayed.
Click “Utilities”.
2
The “Utilities” screen is displayed.
Double-click the “Printer Setup Utility”.
3
The “Printer List” screen is displayed.
Click [Add].
4
Click [Default Browser], select a printer with “Shared Printer” displayed, and
5
click [Add].
Click [×] to close the “Printer List” screen.
6
Page 66

1
2
3
4
Setting a Shared Printer
Setting Example for a Macintosh 4-15
For Mac OS X 10.2 to 10.3
Note
The procedure here is described using the screens for OS X 10.3.
Select “Applications” from the “Go” menu.
1
The “Applications” screen is displayed.
Click “Utilities”.
2
The “Utilities” screen is displayed.
Double-click the “Printer Setup Utility” (“Print Center” for OS X 10.2).
3
The “Printer List” screen is displayed.
Select a printer to share in the printer list.
4
Click [×] to close the “Printer List” screen.
5
Page 67

4-16 Setting Example for a Macintosh
Sharing a Printer Between Different Operating System Versions
When an OS X 10.5 Server is Set
When sharing a printer with a server that is running OS X 10.5, clients running OS X
10.2 to 10.4 can access the printer as is.
“Bonjour Shared” is displayed in “Kind” in the printer list on the client.
When an OS X 10.2 to 10.4 Server is Set
When sharing a printer with a server that is running OS X 10.2 to 10.4, clients running
OS X 10.5 cannot access the printer.
By specifying the following settings on the OS X 10.5 client side, the printer can be
accessed. For details, refer to the Apple site (http://support.apple.com/kb/HT2275).
Select “Applications” from the 1 menu.
The “Applications” screen is displayed.
Click “Utilities”.
2
The “Utilities” screen is displayed.
Double-click “Terminal”.
3
The command entry screen is displayed.
Enter the following command, and press the [return] key.
4
cupsctl BrowseProtocols=’”cups dnssd”’
Add the printer to share.
5
For details, refer to “For Mac OS X 10.5”. (See page 4-12.)
Page 68

Chapter 5
Updating / Deleting Drivers
Updating / Deleting Drivers in Windows ..............................................................5-2
Updating Using the Installer .................................................................................5-2
Manually Updating / Deleting ................................................................................5-4
Updating / Deleting Drivers on a Macintosh .....................................................5-12
Updating / Deleting in Mac OS X 10.5 or 10.4 ....................................................5-12
Updating / Deleting in Mac OS X 10.3 .................................................................5-13
Updating / Deleting in Mac OS X 10.2 .................................................................5-14
Page 69

5-2 Updating / Deleting Drivers in Windows
Updating / Deleting Drivers in Windows
Note
You can update a printer driver using the installer, or by deleting the old printer driver
and then installing the new one manually.
Administrator privileges are required to update a printer driver installed.
Updating Using the Installer
Insert the disc for the new version into the CD-ROM drive of the computer.
1
The installer starts automatically. The installation top screen is displayed.
Click [Install Drivers].
2
Click [I agree].
3
Select the connection method for the machine, and click [Next >].
4
Page 70

1
2
3
4
5
Updating / Deleting Drivers
Updating / Deleting Drivers in Windows 5-3
Select [Update], and click [Next >].
5
Confirm the software to update, and click [Next >].
6
Click [Finish].
7
Page 71

5-4 Updating / Deleting Drivers in Windows
Manually Updating / Deleting
Update Method for Windows 7
Click [Start] 1 [Control Panel] [Hardware and Sound] [Devices and
Printers].
Right-click the printer, and select
2
the printer to delete.
When only one print driver is installed or to delete all printers, right-click the printer and
select “Remove device”.
“Delete print queue” then select the name of
Click [Yes].
3
The selected printer name is deleted from the list of printers.
Click [Close].
4
Page 72

1
2
3
4
5
Updating / Deleting Drivers
Updating / Deleting Drivers in Windows 5-5
Select the printer and click [Print 5 server properties].
Click the “Drivers” tab.
6
Select the name of the printer driver selected in step 2, and click [Remove].
7
Page 73

5-6 Updating / Deleting Drivers in Windows
Select “Remove driver and driver package”, and click [OK].
8
A confirmation message is displayed.
Click [Yes].
9
The “Remove Driver Package” dialog box is displayed.
Click [Delete].
10
When the deletion is complete, click [OK].
11
Click [Close].
12
Restart Windows.
13
Install the new printer driver.
14
For the installation procedure, refer to “Installing to Windows”. (See page 2-1.)
Page 74

1
2
3
4
5
Updating / Deleting Drivers
Updating / Deleting Drivers in Windows 5-7
Update Method for Windows Vista / Server 2008
Click [Start] 1 [Control Panel] [Hardware and Sound] [Printers].
Right-click the name of the printer to delete in the list of printers, and then
2
select “Delete”.
Click [Yes].
3
The selected printer name is deleted from the list of printers.
Page 75

5-8 Updating / Deleting Drivers in Windows
Right-click the printer name without selecting it, and select [Run as
4
administrator] - [Server Properties].
Click [Continue].
5
The “Print Server Properties” dialog box is displayed.
Click the “Drivers” tab.
6
Select the name of the printer driver selected in step 2, and click [Remove].
7
Page 76

1
2
3
4
5
Updating / Deleting Drivers
Updating / Deleting Drivers in Windows 5-9
Select “Remove driver and driver package”, and click [OK].
8
A confirmation message is displayed.
Click [Yes].
9
The “Remove Driver Package” dialog box is displayed.
Click [Delete].
10
When the deletion is complete, click [OK].
11
Click [Close].
12
Restart Windows.
13
Install the new printer driver.
14
For the installation procedure, refer to “Installing to Windows”. (See page 2-1.)
Page 77

5-10 Updating / Deleting Drivers in Windows
Update Method for Windows 2000 / XP / Server 2003
Note
The screens for Windows XP are used, but the procedure is the same for each
operating system.
Perform the following operation according to the version of the operating
1
system.
For Windows 2000, click [Start] [Settings] [Control Panel] [Printers].
For Windows XP, click [Start] [Control Panel] [Printers and Other Hardware] [Printers
and Faxes].
For Windows Server 2003, click [Start] [Printers and Faxes].
Right-click the name of the printer to delete in the list of printers, and then
2
select “Delete”.
Click [Yes].
3
The selected printer name is deleted from the list of printers.
Page 78

1
2
3
4
5
Updating / Deleting Drivers
Updating / Deleting Drivers in Windows 5-11
Select “Server Properties” from the “File” menu of the “Printers and Faxes”
4
screen (“Printers” screen for Windows 2000).
Click the “Drivers” tab.
5
Select the name of the printer driver selected in step 2, and click [Remove].
6
Click [Yes].
7
The printer driver is deleted.
Click [Close].
8
Restart Windows.
9
Install the new printer driver.
10
For the installation procedure, refer to “Installing to Windows”. (See page 2-1.)
Page 79

5-12 Updating / Deleting Drivers on a Macintosh
Updating / Deleting Drivers on a Macintosh
Note
You can update a printer driver by deleting the old printer driver and then installing the
new one.
The update procedure may slightly vary according to the version of the operating system.
This section describes the update procedure for each version.
Updating / Deleting in Mac OS X 10.5 or 10.4
The screens for OS X 10.5 are used, but the procedure is the same for each operating
system.
Select “System Preferences” from the 1 menu.
Click “Print & Fax” in “Hardware”.
2
Select the name of the printer to delete from the list of registered printers on
3
the left of the screen.
Page 80

1
2
3
4
5
Updating / Deleting Drivers
Updating / Deleting Drivers on a Macintosh 5-13
Click [-].
4
If the screen is locked, click the key and enter the user name and password to unlock the
screen.
Install the new printer driver.
5
For the installation procedure, refer to “Installing to Mac OS X”. (See page 3-1.)
Updating / Deleting in Mac OS X 10.3
Select “Utilities” from the “Go” menu.
1
Page 81

5-14 Updating / Deleting Drivers on a Macintosh
Click “Printer Setup Utility”.
2
Select the name of the printer to delete from “Printer List”.
3
Click [Delete].
4
Install the new printer driver.
5
For the installation procedure, refer to “Installing to Mac OS X”. (See page 3-1.)
Updating / Deleting in Mac OS X 10.2
Select “Applications” from the “Go” menu.
1
Click “Utilities”.
2
Click “Print Center”.
3
Page 82

1
2
3
4
5
Updating / Deleting Drivers
Updating / Deleting Drivers on a Macintosh 5-15
Select the name of the printer to delete from “Printer List”.
4
Click [Delete].
5
Install the new printer driver.
6
For the installation procedure, refer to “Installing to Mac OS X”. (See page 3-1.)
Page 83

5-16 Updating / Deleting Drivers on a Macintosh
Page 84

Chapter 6
Printing From Windows
Basic Printing Operation .........................................................................................6-2
Various Printing Methods ........................................................................................6-3
Selecting the Paper .................................................................................................6-3
Printing on a Custom Paper Size ...........................................................................6-5
Printing on Special Paper .......................................................................................6-9
Printing on Both Sides of the Paper .....................................................................6-11
Printing Multiple Pages on One Sheet of Paper .................................................. 6-12
Printing With a Custom Zoom Ratio ....................................................................6-14
Fitting the Zoom Ratio to a Paper Size ................................................................6-15
Sorting the Output ................................................................................................ 6-17
Printing With a Margin (Binding Position) .........................................................6-18
Printing a Booklet .................................................................................................6-20
Printing Documents Securely ...............................................................................6-22
Saving Toner ..........................................................................................................6-24
Changing the Resolution ......................................................................................6-25
Changing the Print Density .................................................................................6-26
Replacing the Font for Printing ............................................................................6-28
Printing With a Computer Font ...........................................................................6-31
Printing a Watermark ...........................................................................................6-33
Canceling Printing ...................................................................................................6-37
Canceling Printing in Windows ............................................................................6-37
Canceling Printing on the Machine .....................................................................6-38
Driver Print Settings ...............................................................................................6-39
Displaying the Print Settings Screen ...................................................................6-39
Common Settings ..................................................................................................6-42
“Paper” Tab ............................................................................................................6-44
“Page Layout” Tab .................................................................................................6-47
“Print Quality” Tab ................................................................................................6-50
“Destination” Tab ..................................................................................................6-52
“Extended Functions” Tab.....................................................................................6-53
PDF / XPS Direct Printing ......................................................................................6-54
Printing ..................................................................................................................6-54
Print Setting ..........................................................................................................6-55
Page 85

6-2 Basic Printing Operation
Basic Printing Operation
Note
From most application software, you can execute printing by selecting “Print” from the
“File” menu.
The “Print” screen differs according to the application software you are using.
Open the data in the application software, and select “Print” from the “File”
1
menu.
The “Print” dialog box is displayed.
Confirm that the name of the printer you want to output from is selected in
2
“Select Printer”.
Set the number of copies to print, etc.
3
If necessary, click [Preferences] to specify the printer driver settings.
4
Click [Print].
5
Printing starts.
Page 86

1
2
3
4
5
6
Printing From Windows
Various Printing Methods 6-3
Various Printing Methods
Note
Selecting the Paper
You can select the paper size to print on.
The paper sizes you can load in the paper cassettes are Letter, Half Letter, and Legal.•
The paper sizes must also be set on the machine. For details, refer to the User’s •
Guide. You cannot print on paper sizes that are not loaded in the machine.
Select “Print” from the “File” menu of the application software.
1
The “Print” dialog box is displayed.
Select the driver to use in “Select Printer”.
2
Click [Preferences].
3
The print settings dialog box is displayed.
Confirm that the “Paper” tab is selected.
4
Select the document size from the pull-down menu in “Document Size”.
5
Page 87

6-4 Various Printing Methods
Select the paper size you want to use from the pull-down menu in “Paper Size”.
6
Specify the zoom setting, as necessary.
Click [OK] in the print settings dialog box.
7
The print settings dialog box is closed.
Click [Print].
8
Printing starts.
Page 88

1
2
3
4
5
6
Printing From Windows
Various Printing Methods 6-5
Printing on a Custom Paper Size
Note
To print on a custom paper size, it is necessary to register the custom paper size in the
printer driver. When you register a custom paper size, you will become able to select it in
“Paper Size” on the “Paper” tab.
Up to 50 types of custom paper sizes can be registered.
This section describes the procedure using Windows Vista.
If you specify a custom paper size when the “Combine” function is set on the “Page •
Layout” tab or something other than “Bypass Tray” or “Auto” is set for “Paper
Source”, the previous setting is disabled. (“Combine” is set to “Off”, and “Paper
Source” is set to “Auto”.)
Use the bypass tray for printing.•
The paper sizes must also be set on the machine. For details, refer to the User’s •
Guide. You cannot print on paper sizes that are not loaded in the machine.
Click [Start] 1 [Control Panel] [Hardware and Sound] [Printers].
Select the printer you want to set, and select “Select printing preferences” from
2
the menu bar.
The print settings dialog box is displayed.
Click [Custom Paper Settings] on the “Paper” tab.
3
The “Custom Paper Settings” dialog box is displayed.
Click [Add].
4
Specify “Name” to add a name.
5
Up to 20 characters can be entered for “Name”.
Enter a length for “Width” and “Length”.
6
You can enter between 3.82 and 8.5 in. for the width, and between 5.51 and 14.01 in. for the •
length.
When performing duplex printing, enter between 5.51 and 8.5 in. for the width, and between •
5.51 and 14.01 in. for the length.
The width value cannot be set to a value larger than that of the length, even if it is within •
the setting range. Also, the height value cannot be set to a value smaller than that of the
width, even if it is within the setting range.
To specify another size, repeat steps 4 to 6.
7
Click [OK].
8
The “Custom Paper Settings” dialog box is closed.
Click [OK] in the print settings dialog box.
9
The print settings dialog box is closed.
Page 89

6-6 Various Printing Methods
Load the custom size paper in the bypass tray.
10
Select “Print” from the “File” menu of the application software.
11
The “Print” dialog box is displayed.
Select the driver to use in “Select Printer”.
12
Click [Preferences].
13
The print settings dialog box is displayed.
Page 90

1
2
3
4
5
6
Printing From Windows
Various Printing Methods 6-7
Confirm that the “Paper” tab is selected.
14
Select the custom size to use in “Document Size”.
15
Select the paper type in “Paper Type”.
16
Click [OK] in the print settings dialog box.
17
The print settings dialog box is closed.
Click [Print].
18
Changing a Registered Custom Paper Size
Click [Custom Paper Settings] on the “Paper” tab in the print settings dialog
1
box.
Select the custom paper size to change.
2
Click [Edit].
3
Page 91

6-8 Various Printing Methods
Change the settings for “Width” and “Length”.
4
Click [OK].
5
Deleting a Registered Custom Paper Settings
Click [Custom Paper Settings] on the “Paper” tab in the print settings dialog
1
box.
Select the custom paper size to delete.
2
Click [Delete].
3
Click [OK].
4
Page 92

1
2
3
4
5
6
Printing From Windows
Various Printing Methods 6-9
Printing on Special Paper
Note
You can print on special types of paper.
The following types of paper can be used.
Plain•
Paste Board•
OHP•
Envelope / Postcard•
When printing on OHP film, the quality may differ according to the type of OHP film
and the usage environment. (Confirmed OHP film: PP2500 from 3M)
Load the paper into the bypass tray.
1
Select “Print” from the “File” menu of the application software.
2
The “Print” dialog box is displayed.
Select the driver to use in “Select Printer”.
3
Click [Preferences].
4
The print settings dialog box is displayed.
Page 93

6-10 Various Printing Methods
Confirm that the “Paper” tab is selected.
5
Select the paper type in “Paper Type”.
6
Click [OK] in the print settings dialog box.
7
The print settings dialog box is closed.
Click [Print].
8
Page 94

1
2
3
4
5
6
Printing From Windows
Various Printing Methods 6-11
Printing on Both Sides of the Paper
Note
You can print on both sides of the paper.
There are restrictions on the paper you can use. For details, refer to the User’s Guide.
Select “Print” from the “File” menu of the application software.
1
The “Print” dialog box is displayed.
Select the driver to use in “Select Printer”.
2
Click [Preferences].
3
The print settings dialog box is displayed.
Click the “Page Layout” tab.
4
Select “Duplex” in “Duplex / Booklet”.
5
Select the binding position in “Binding Position”.
6
Click [OK] in the print settings dialog box.
7
The print settings dialog box is closed.
Click [Print].
8
Page 95

6-12 Various Printing Methods
Printing Multiple Pages on One Sheet of Paper
4
3
2
1
Half
Letter
Letter
1 2
3 4
50%
reduction
50%
reduction
50%
reduction
50%
reduction
Print a four page
document to a single
sheet of Letter paper
Note
A specific number of consecutive pages (two, four, or eight) can be combined and printed
on one sheet of paper.
This section describes the procedure for printing a four page document on a single sheet
of paper as an example.
The zoom ratio is always fixed to auto zoom with the “Combine” function. A userdefined zoom ratio cannot be set.
Select “Print” from the “File” menu of the application software.
1
The “Print” dialog box is displayed.
Select the driver to use in “Select Printer”.
2
Click [Preferences].
3
The print settings dialog box is displayed.
Click the “Page Layout” tab.
4
Select “4-up” from the “Combine” pull-down menu.
5
Click [Advanced] in “Combine”.
6
The “Layout Settings” dialog box is displayed.
Page 96

1
2
3
4
5
6
Printing From Windows
Various Printing Methods 6-13
Select the page layout order.
Note
7
The image for the page layout order varies according to the number of pages to combine and
the orientation of the paper.
Click [OK] in the “Layout Settings” dialog box.
8
The “Layout Settings” dialog box is closed.
Click [OK] in the print settings dialog box.
9
The print settings dialog box is closed.
Click [Print].
10
When performing combined printing with a mixture of vertically oriented documents
and horizontally oriented documents using the optional XPS driver, combined printing
is performed separately for the vertically oriented documents and the horizontally
oriented documents. Therefore, use a driver other than the optional XPS driver when
performing combined printing with a mixture of vertically oriented documents and
horizontally oriented documents.
Page 97

6-14 Various Printing Methods
Printing With a Custom Zoom Ratio
ABCDEFGHIJ
ABCDEFGHIJ
ABCDEFGHIJ
ABCDEFGHIJ
ABCDEFGHIJ
ABCDEFGHIJ
ABCDEFGHIJ
ABCDEFGHIJ
ABCDEFGHIJ
ABCDEFGHIJ
ABCDEFGHIJ
ABCDEFGHIJ
ABCDEFGHIJ
ABCDEFGHIJ
ABCDEFGHIJ
ABCDEFGHIJ
ABCDEFGHIJ
ABCDEFGHIJ
ABCDEFGHIJ
ABCDEFGHIJ
ABCDEFGHIJ
ABCDEFGHIJ
ABCDEFGHIJ
ABCDEFGHIJ
ABCDEFGHIJ
ABCDEFGHIJ
ABCDEFGHIJ
ABCDEFGHIJ
ABCDEFGHIJ
ABCDEFGHIJ
ABCDEFGHIJ
ABCDEFGHIJ
130%
enlargement
50%
reduction
Original document
You can specify the document zoom ratio when printing.
Select “Print” from the “File” menu of the application software.
1
The “Print” dialog box is displayed.
Select the driver to use in “Select Printer”.
2
Click [Preferences].
3
The print settings dialog box is displayed.
Confirm that the “Paper” tab is selected.
4
Select “Zoom” in “Enlarge / Reduce”, and specify the custom zoom ratio in the
5
entry box.
Click [OK] in the print settings dialog box.
6
The print settings dialog box is closed.
Click [Print].
7
Page 98

1
2
3
4
5
6
Printing From Windows
Various Printing Methods 6-15
Fitting the Zoom Ratio to a Paper Size
ABCDEFG
ABCDEFG
ABCDEFG
ABCDEFG
ABCDEFG
ABCDEFG
ABCDEFG
ABCDEFG
ABCDEFG
ABCDEFG
ABCDEFG
ABCDEFG
ABCDEFG
ABCDEFG
ABCDEFG
ABCDEFG
ABCDEFG
ABCDEFG
Half Letter size
(original)
Letter size
You can automatically set the printing zoom ratio according to a specified paper size.
This section describes the procedure for printing an Half Letter size document on Letter
size paper as an example.
Select “Print” from the “File” menu of the application software.
1
The “Print” dialog box is displayed.
Select the driver to use in “Select Printer”.
2
Click [Preferences].
3
The print settings dialog box is displayed.
Confirm that the “Paper” tab is selected.
4
Page 99

6-16 Various Printing Methods
Select “Half Letter (5.5 × 8.5 in.)” from the “Document Size” pull-down menu.
5
Select “Legal (8.5 × 14.0 in.)” from the “Paper Size” pull-down menu.
6
Select “Fit to Paper” in “Enlarge / Reduce”.
7
Click [OK] in the print settings dialog box.
8
The print settings dialog box is closed.
Click [Print].
9
Page 100

1
2
3
4
5
6
Printing From Windows
Various Printing Methods 6-17
Sorting the Output
3
2
1
3
2
1
3
2
1
3
2
1
Sorting enabled
You can sort the sets when outputting multiple print sets.
Select “Print” from the “File” menu of the application software.
1
The “Print” dialog box is displayed.
Select the driver to use in “Select Printer”.
2
Click [Preferences].
3
The print settings dialog box is displayed.
Click the “Destination” tab.
4
 Loading...