

Page 1
Plain-paper digital Fax/Copier/Printer/Scanner
Network Guide
Page 2

Connecting to a LAN
1
Network settings
LDAP server settings
E-mail / I-Fax settings
Using the web browser to change settings
Troubleshooting
Appendix and Index
8
9
2
3
4
5
6
7
8
9
10
11
12
13
14
A
10
11
12
13
14
A
Page 3

Contents
Chapter .........................................................................................................................................1-1
Connecting to a LAN ..................................................................................................................1-1
Connecting the cables ..........................................................................................................1-2
Chapter .........................................................................................................................................2-1
Network settings.........................................................................................................................2-1
TCP/IP settings ....................................................................................................................2-2
Opening the TCP/IP setting menu display .....................................................................2-2
DHCP setting ................................................................................................................... 2-4
IP Address ........................................................................................................................ 2-5
Subnet Mask ....................................................................................................................2-6
Gateway address ..............................................................................................................2-7
DNS Settings ...................................................................................................................2-8
SMB settings ......................................................................................................................2-10
Opening the SMB setting menu display.......................................................................2-10
NetBIOS name ............................................................................................................... 2-12
WorkGroup .....................................................................................................................2-13
WINS server address ..................................................................................................... 2-14
Verifying the IP settings ....................................................................................................2-15
Viewing the MAC address ..................................................................................................2-17
Network settings code ........................................................................................................2-19
Network authentication settings ....................................................................................... 2-22
Setting up the Authentication Mode ............................................................................2-22
Using the authentication mode .....................................................................................2-26
Chapter ......................................................................................................................................... 3-1
LDAP server settings ................................................................................................................. 3-1
Registering an LDAP server ................................................................................................3-2
Setting the default LDAP server .......................................................................................3-14
Modifying the LDAP server settings .................................................................................3-15
Deleting an LDAP server ...................................................................................................3-16
LDAP parameter settings .................................................................................................. 3-17
Configuring LDAP parameter settings.........................................................................3-17
Printing the LDAP parameter setting ..........................................................................3-18
Chapter ......................................................................................................................................... 4-1
E-mail / I-Fax settings ................................................................................................................4-1
E-mail settings .....................................................................................................................4-2
SMTP/POP Settings ........................................................................................................4-2
E-mail settings ................................................................................................................. 4-4
Chapter ......................................................................................................................................... 5-1
Using the web browser to change settings ...........................................................................5-1
Using the Web browser ........................................................................................................ 5-2
System requirements.......................................................................................................5-2
Accessing the start-up web page .....................................................................................5-3
Accessible settings ................................................................................................................ 5-4
Registering or editing the Address Book ........................................................................ 5-4
Page 4

Job management ..............................................................................................................5-6
Confirming the device information, Fax history, Mail history ......................................5-9
Setting-up the file name for scanning, forwarding box ................................................5-15
Configuring the network settings ................................................................................. 5-20
Chapter ......................................................................................................................................... 6-1
Troubleshooting ..........................................................................................................................6-1
Error Messages ................................................................................................................6-2
Network issues .................................................................................................................6-3
E-mail issues .................................................................................................................... 6-4
Chapter ......................................................................................................................................... 7-1
Appendix & Index .......................................................................................................................7-1
Network setting items list ...................................................................................................7-2
Printing a network settings list ...........................................................................................7-7
Printing a network settings list ......................................................................................7-7
Printing a folder shortcut list .........................................................................................7-7
Printing an FTP shortcut list ..........................................................................................7-7
Index .....................................................................................................................................7-8
Page 5

Trademarks
• Muratec, the Muratec logo and all Muratec product names contained herein are trademarks of
Murata machinery, Ltd and Muratec America, Inc.
• QuadAccess is registered trademark of Muratec America Inc.
• Microsoft®, Windows®, Windows® 98, Windows® Me, Windows® 2000, Windows® XP, Windows®
Server 2003 and Internet Explorer are registered trademarks of the Microsoft Corporation.
Screen shots reprinted by permission from the Microsoft Corporation.
• RSA and BSAFE are registered trademarks of RSA Security Inc.
This product includes RSA BSAFE® Cryptographic software from RSA Security Inc.
All other products referenced are trademarks or registered trademarks of their respective companies.
Page 6

Chapter
Connecting to a LAN
Cable connection ....................................................................................1-2
1
Page 7
Connecting the cables
LINE
P
H
O
N
E
1
P
H
O
N
E
2
LINK lamp:
Illuminates when connected to the LAN.
LAN Connector
LAN cable:
10Base-T/100Base-TX cable
RJ-45 connector
ACTIVITY lamp:
Blinks when there is data trafic
on the LAN.
Connect to the Ethernet hub.
In order to use the network features you must connect your machine to your LAN
and adjust the appropriate settings.
To connect the machine to the LAN, a 10BASE-T or 100BASE-TX LAN cable (Category 5) is required.
NOTE: The LAN cable is not included with this product.
1 Turn your machine off and unplug the power cord.
2 Plug one end of the LAN cable into the LAN connector on the left side of the
machine.
3 Plug the other end of the LAN cable into the 10Base-T/100Base-TX Ethernet
hub.
4 Plug the power cord into the wall outlet and turn your machine on.
1-2 Connecting to a LAN
Page 8

Chapter
2
Network settings
TCP/IP settings ......................................................................................2-2
Opening the TCP/IP setting menu display ....................................2-2
DHCP setting ..................................................................................2-4
IP Address .......................................................................................2-5
Subnet Mask ...................................................................................2-6
Gateway address .............................................................................2-7
DNS Settings ...................................................................................2-8
SMB settings ........................................................................................2-10
Opening the SMB setting menu display ......................................2-10
NetBIOS name ..............................................................................2-12
WorkGroup ....................................................................................2-13
WINS server address ....................................................................2-14
Verifying the IP settings ......................................................................2-15
Viewing the MAC address ...................................................................2-17
Network settings code ..........................................................................2-19
Network authentication settings ........................................................2-22
Setting up the Authentication Mode ............................................2-22
Using the authentication mode ....................................................2-26
Page 9

2-2 Network settings
TCP/IP settings
This machine uses TCP/IP protocol to communicate over the LAN, meaning the
TCP/IP settings described in this guide must be registered prior to using the
machine on the LAN.
NOTE: Contact your network administrator if you are unsure about these settings.
IMPORTANT: In order to activate new settings, the machine must be rebooted after the new
settings have been entered. Turn the machine “Off” and after three or more
seconds, turn the machine back “On”.
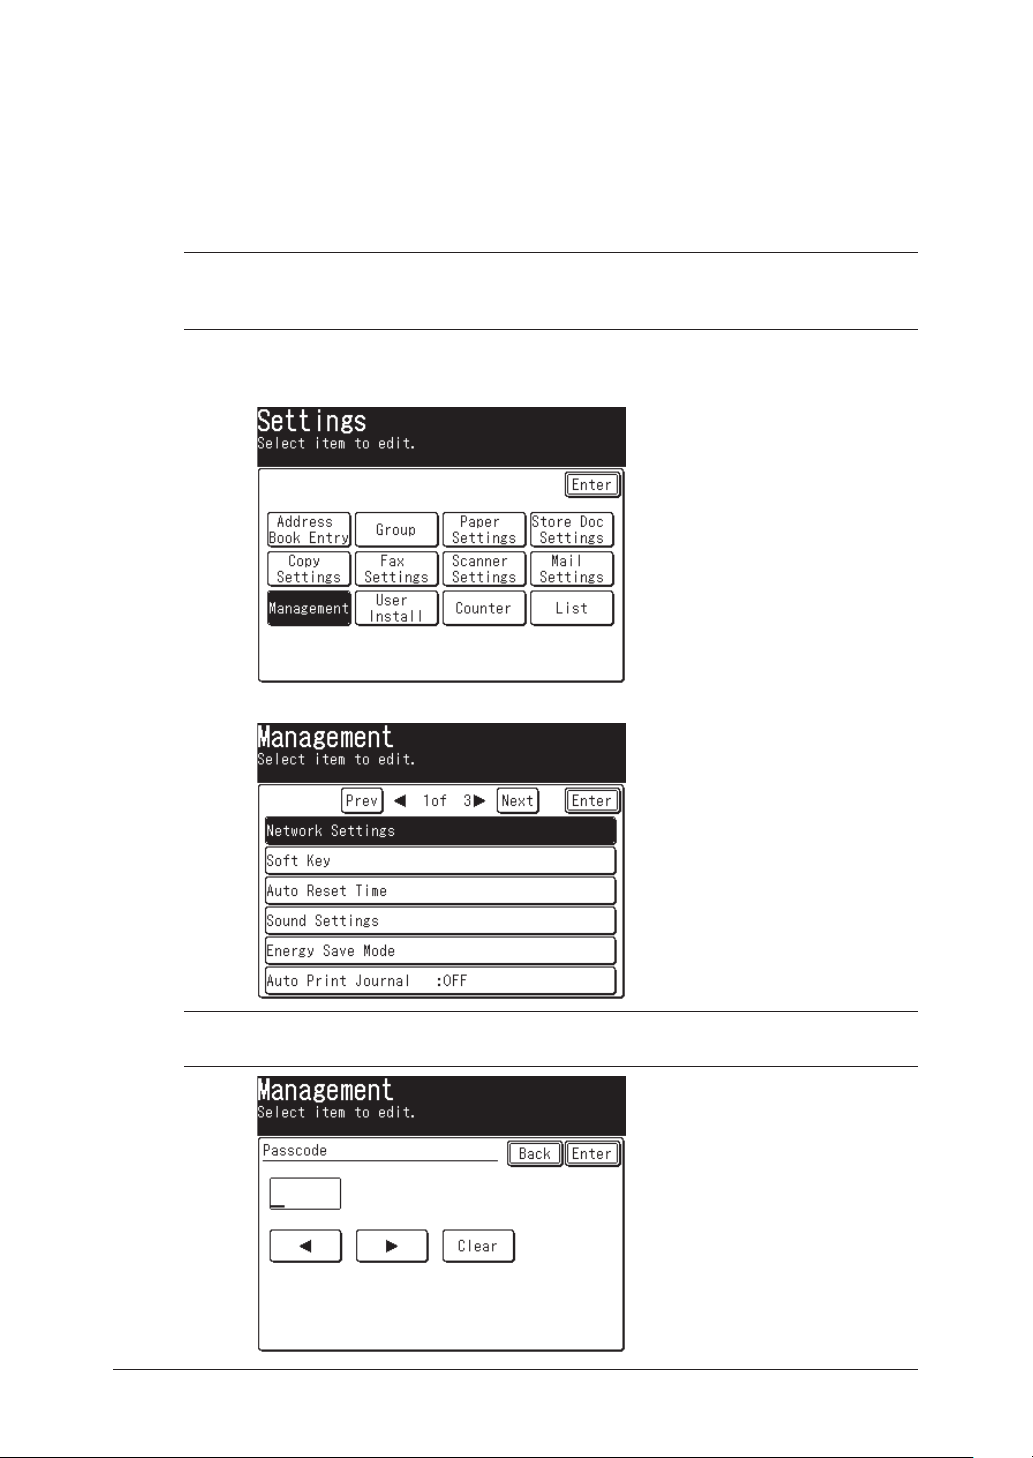
Opening the TCP/IP setting menu display
1 Press [Setting] on the control panel.
2 Press [Management].
3 Press [Network Settings].
Page 10

NOTE: If the network settings code (see page 2-19) has been set, you must enter the
proper four-digit passcode using the numeric keys and press [Enter].
1
2
4 Press [TCP/IP Settings].
5 The TCP/IP setting menu appears.
3
4
Network settings
5
6
7
8
9
10
6 Register these settings.
7 After you have finished configuring the network settings, reboot the machine
to activate the new settings. To reboot the machine, turn the machine “Off” and
after three or more seconds, turn the machine back “On”
11
12
13
14
A
2-3Network settings
Page 11

2-4 Network settings
DHCP setting
If a DHCP (Dynamic Host Configuration Protocol) server is installed on your network, the machine will be assigned the IP address and Subnetmask automatically
when the machine is turned on at first time. According to the DHCP server setting,
a Gateway address and DNS server address may be assigned as well.
IMPORTANT: Once the DHCP server has assigned the IP address to your machine, that IP
address MUST be reserved within the specific DHCP scope. Failure to do so
could result in failed operation when the IP address lease expires.
NOTE:
NOTE: If the DHCP server is not installed on your network, turn this setting to OFF
• You can view the assigned addresses on the TCP/IP setting menu display.
• The IP address and Subnet Mask assigned from the DHCP server cannot be
modified.
• A “Gateway Address” and “DNS server address” will be not assigned when
the primary and secondary address of them are already registered.
and you should enter the IP address and Subnetmask manually.
Page 12

IP Address
Assign an IP address to your machine to enable network communication and to
allow setting adjustments via the web browser.
NOTE: If your server is DHCP compliant, the IP address will be assigned automati-
To assign an IP address manually:
1 Open the TCP/IP setting menu display. (Refer to page 2-2.)
2 Press [DHCP Setting], then press [OFF] and [Enter].
3 Press [IP Address].
cally and it cannot be edited. If the DHCP server is not installed on your
network, you can assign an IP address manually as described below.
1
2
3
4
Network settings
5
6
4 Enter the appropriate IP address using the numeric keys.
Press the arrow keys to navigate the IP address fields. To delete a number,
press the [Clear] button.
5 Press [Enter]. The display returns to the TCP/IP setting menu.
You may configure additional settings.
To return to the Standby mode, press [Reset].
6 After you have completed registering the network settings, the machine
should be rebooted to enable the new settings. To reboot the machine, turn the
machine “Off” and after three or more seconds, turn the machine back “On”
7
8
9
10
11
12
13
14
A
2-5Network settings
Page 13

2-6 Network settings
Subnet Mask
Subnet mask is the mask value that specifies the IP address range of the subnet.
NOTE: If your server is DHCP compliant, the subnet mask will be assigned auto-
matically and it cannot be edited. If the DHCP server is not installed on your
network, you can assign a Subnet mask manually as described below.
To assign a Subnet mask manually:
1 Open the TCP/IP setting menu display. (Refer to page 2-2.)
2 Press [DHCP Setting], then press [OFF] and [Enter].
3 Press [Subnet Mask].
4 Enter the appropriate IP address of the subnet mask using the numeric keys.
Press the arrow keys to navigate the IP address fields. Press the [Clear] to
delete a number.
5 Press [Enter]. The display returns to the TCP/IP setting menu.
You may configure additional settings.
To return to the Standby mode, press [Reset].
6 After you have completed registering the network settings, the machine
should be rebooted to enable the new settings. To reboot the machine, turn the
machine “Off” and after three or more seconds, turn the machine back “On”
Page 14
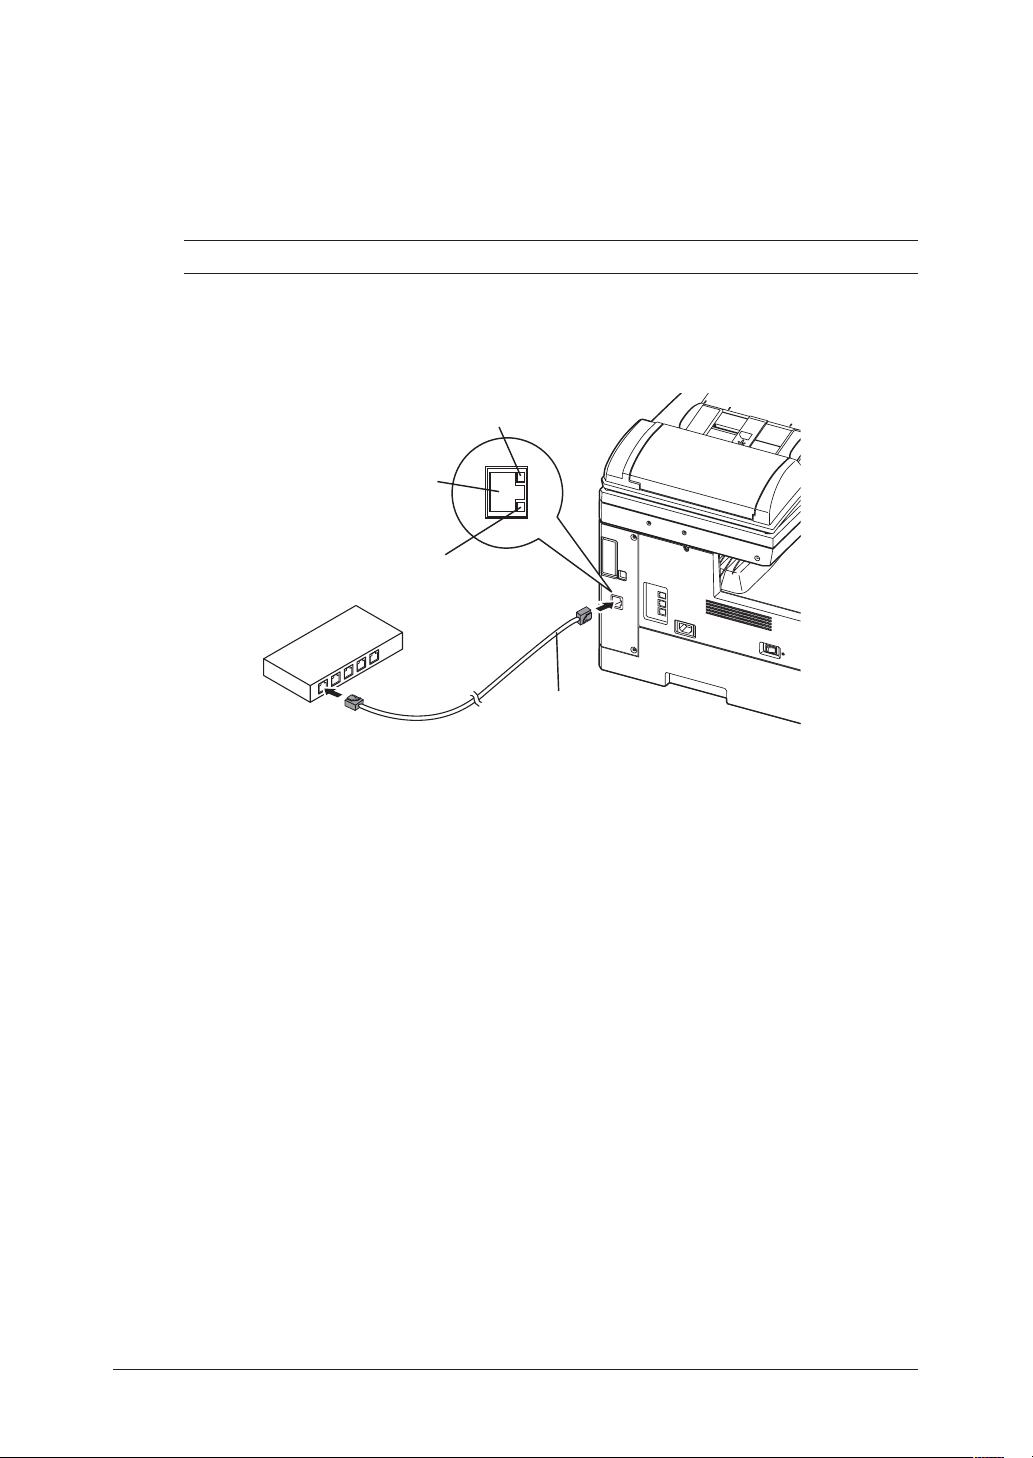
Gateway address
Register the gateway address. The gateway acts as a router that connects one subnet to other subnets to allow communication between them.
1 Open the TCP/IP setting menu display. (Refer to page 2-2.)
2 Press [Gateway1].
3 Enter the appropriate IP address using the numeric keys and press [Enter].
Press the arrow keys to navigate the IP address fields. To delete a number,
press [Clear].
1
2
3
4
Network settings
5
6
4 In the same way, enter an IP address of [Gateway2] (secondary gateway).
NOTE: If you do not wish to set a secondary Gateway, enter “0.0.0.0” or press [Clear] to
delete the IP address.
5 Press [Enter]. The display returns to the TCP/IP setting menu.
You may configure additional settings.
To return to the Standby mode, press [Reset].
6 After you have completed registering the network settings, the machine
should be rebooted to enable the new settings. To reboot the machine, turn the
machine “Off” and after three or more seconds, turn the machine back “On”
7
8
9
10
11
12
13
14
A
2-7Network settings
Page 15

2-8 Network settings
DNS Settings
NOTE: “Dynamic DNS” is not supported with your machine.
DNS server address
1 Open the TCP/IP setting menu display. (Refer to page 2-2.)
2 Press [DNS Setting].
3 Press [DNS1].
4 Enter the appropriate IP address of the primary DNS (Domain Name System)
server using the numeric keys
Press the arrow keys to navigate the IP address fields. To delete a number,
press [Clear].
Page 16

5 Press [Enter]. The display returns to the DNS setting menu.
6 If necessary, enter the IP address of [DNS2] (secondary DNS server).
NOTE: If you do not wish to set a secondary DNS server, enter “0.0.0.0” or press [Clear]
to delete the IP address.
DNS Suffix
7 When you are finished, press [Reset] to return to the standby mode.
1 Open the TCP/IP setting menu display. (Refer to page 2-2.)
2 Press [DNS Setting] g [DNS Suffix].
3 Enter the appropriate DNS suffix.
1
2
3
4
Network settings
5
6
7
8
NOTE: You can specify only one DNS suffix.
4 Press [Enter]. The display returns to the DNS setting menu.
5 Press [Reset] to return to the standby mode.
6 After you have completed registering the network settings, the machine
should be rebooted to enable the new settings. To reboot the machine, turn the
machine “Off” and after three or more seconds, turn the machine back “On”
9
10
11
12
13
14
A
2-9Network settings
Page 17

2-10 Network settings
SMB settings
These settings are required if your LAN uses “NetBIOS over TCP/IP” protocol.
NOTE: Contact your network administrator if you are unsure about this setting.
IMPORTANT: In order to activate new settings, the machine must be rebooted after the new
settings have been entered. Turn the machine “Off” and after three or more
seconds, turn the machine back “On”.
Opening the SMB setting menu display
1 Press [Setting] on the control panel.
2 Press [Management].
3 Press [Network Settings].
Page 18

NOTE: If the network settings code (see page 2-19) has been set, you must enter the
proper four-digit passcode using the numeric keys and press [Enter].
1
2
4 Press [SMB Settings].
5 The SMB setting menu appears.
3
4
Network settings
5
6
7
8
9
10
6 Configure the settings.
7 After the settings have been configured, reboot your machine to enable the new
settings.
2-11Network settings
11
12
13
14
A
Page 19

2-12 Network settings
NetBIOS name
Register a NetBIOS name to identify your machine to other users on the network.
NOTE:
• You can give your machine a unique name containing up to 15 characters. The
name cannot include symbols and/or blank spaces.
The name can include alphanumeric characters and the “–” symbol.
• The workgroup cannot contain duplicate NetBIOS names..
1 Open the SMB setting menu display. (Refer to page 2-10.)
2 Press [NetBIOS].
3 Enter a NetBIOS name. (Enter a name for your machine.)
4 Press [Enter]. The display returns to the SMB setting menu.
You may configure additional settings.
To return to the Standby mode, press [Reset].
5 After you have completed registering the network settings, the machine
should be rebooted to enable the new settings. To reboot the machine, turn the
machine “Off” and after three or more seconds, turn the machine back “On”
Page 20

WorkGroup
Enter an existing workgroup name to identify the group of computers that your
machine is associated with.
1 Open the SMB setting menu display. (Refer to page 2-10.)
2 Press [WorkGroup].
3 Enter an existing workgroup name.
1
2
3
4
Network settings
5
6
NOTE:
• If there is not workgroup in your network, enter a domain name or NetBIOS
domain name of your network. For example, if your domain is muratec.local,
enter “muratec” in the Workgroup setting. Consult your network administrator about the domain name.
4 Press [Enter]. The display returns to the SMB setting menu.
You may configure additional settings.
To return to the Standby mode, press [Reset].
5 After you have completed registering the network settings, the machine
should be rebooted to enable the new settings. To reboot the machine, turn the
machine “Off” and after three or more seconds, turn the machine back “On”
7
8
9
10
11
12
13
14
A
2-13Network settings
Page 21

2-14 Network settings
WINS server address
Specifies that you want to use Windows Internet Naming Service (WINS) resolution. To enable WINS resolution, enter the WINS server address.
1 Open the SMB setting menu display. (Refer to page 2-10.)
2 Press [WINS1].
3 Enter the appropriate IP address of the WINS server using the numeric keys.
Press the arrow keys to navigate the IP address fields. To delete a number,
press the [Clear].
4 Press [Enter]. The display returns to the SMB setting menu.
5 If necessary, repeat the above steps to enter the [WINS2] address (secondary
WINS server).
NOTE: If you do not wish to set a secondary WINS server enter “0.0.0.0” or press
[Clear] to delete the IP address.
6 When you have finished, press [Reset] to return to the Standby mode.
7 After you have completed registering the network settings, the machine
should be rebooted to enable the new settings. To reboot the machine, turn the
machine “Off” and after three or more seconds, turn the machine back “On”
Page 22

Verifying the IP settings
You can ping the IP address and verify that it responds.
1 Press [Setting] on the control panel.
2 Press [Management].
3 Press [Network Settings].
1
2
3
4
Network settings
5
6
7
8
NOTE: If a network settings code (see page 2-19) has been set, you must enter the
proper passcode using the numeric keys and press [Enter].
2-15Network settings
9
10
11
12
13
14
A
Page 23

2-16 Network settings
4 Press [Ping].
5 Enter the IP address you want to verify and then press [Execute].
If the IP address is active on the network, you will receive a reply.
If you do not receive a reply, refer to the “TCP/IP setting” to check the IP
address settings.
6 Press [Reset] to return to the Standby mode.
Page 24

Viewing the MAC address
The MAC (Media Access Control) address is a certain physical address on the
network card.
You can view the MAC address of your machine by:
1 Press [Setting] on the control panel.
2 Press [Management].
3 Press [Network Settings].
1
2
3
4
Network settings
5
6
NOTE: If a network settings code (see page 2-19) has been set, you must enter the
proper passcode using the numeric keys and press [Enter].
7
8
9
10
11
12
13
14
A
2-17Network settings
Page 25

2-18 Network settings
4 Press [Show MAC Address].
5 The MAC address will be displayed.
6 Press [Reset] to return to the Standby mode.
Page 26

Network settings code
This mode will require the entry of a passcode prior to viewing/editing the network
settings.
1 Press [Setting] on the control panel.
2 Press [Management].
3 Press [Network Settings].
1
2
3
4
Network settings
5
6
7
8
NOTE:
• If the network settings code is active, you must enter the proper four-digit
passcode using the numeric keys and press [Enter].
• To edit the setting, enter the “Read/Write” protection passcode.
9
10
11
12
13
14
A
2-19Network settings
Page 27

2-20 Network settings
4 Press [Network Settings Code].
5 Press [Read/Write Code].
6 Enter a new four-digit passcode using the numeric keys.
If you want to disable passcode protection enter “0000”.
NOTE: The entered passcode will be displayed as “
7 Press [Enter].
****
”.
Page 28

8 Press [Read Only Code].
9 Enter a new four-digit passcode using the numeric keys.
If you want to disable passcode protection enter “0000”.
1
2
3
4
Network settings
5
6
NOTE: The “Read Only Code” cannot be set unless the “Read/Write Code” has been
entered.
10 Press [Enter].
11 Press [Reset] to return to the Standby mode.
After you set the network settings code, the machine will prompt you to enter the
passcode whenever you try to access the network settings menu.
7
8
9
10
11
12
13
14
A
2-21Network settings
Page 29

2-22 Network settings
Network authentication settings
This setting allows you to limit machine access to authorized users.
This feature is compatible with Active Directory or Windows NT Server 4.0.
The Network Authentication feature also supports Kerberos, the highest security
level within Active Directory. This product includes RSA BSAFE® Cryptographic
software from RSA Security Inc.
When the setting is activated, users must enter their domain user name and password to authenticate themselves and access the machine.
identify themselves to use the machine. The administrator can check who has
logged on the network using the machine.
In Active Directory, the user’s information will be acquired through the LDAP v3
(using encrypted authentication) when the user is authorized. All outgoing e-mails
including Internet Faxes of the authorized user will be tagged with their e-mail
address when it is registered on the Active Directory, as opposed to the machine’s
e-mail address.
NOTE:
• When the optional OfficeBridge Expansion kit is installed, the network
authentication feature is not available.
Setting up the Authentication Mode
The following four items must be registered prior to using the authentication mode:
• Server Type ..................... Select either Active Directory or Windows NT.
• Domain Name ................. Enter the domain name.
• Logout Time .................... Set the timer for automatic log out.
• Mode Authentication ...... Select which mode(s) will require authentication
copy, fax and/or scan.
Locating the authentication setting
1 Press [Setting] on the control panel.
2 Press [Management].
3 Press [Network Settings].
4 Press [Prev] or [Next] and then press [Authentication Settings].
Page 30

Server Type
Select the server type from Active Directory and Windows NT Server 4.0.
NOTE:
1 Open the authentication settings menu. (Refer to page 2-22)
2 Press [Server Type].
• The DNS server should be set up when using the authentication mode
with Active Directory (Windows 2000 server/ Windows Server 2003).
• If you are using Active Directory, the “Windows Time Service” must be
activated on the Active Directory.
• The WINS settings should be set up when using the authentication mode
with Windows NT Server 4.0.
• If you are using Windows NT Server 4.0, the version must be Service
Pack 4 or later.
1
2
3
4
Network settings
5
6
3 Select the server type and press [Enter].
NOTE: If you select “None”, the authentication settings will be turned off.
7
8
9
10
11
12
13
14
A
2-23Network settings
Page 31
2-24 Network settings
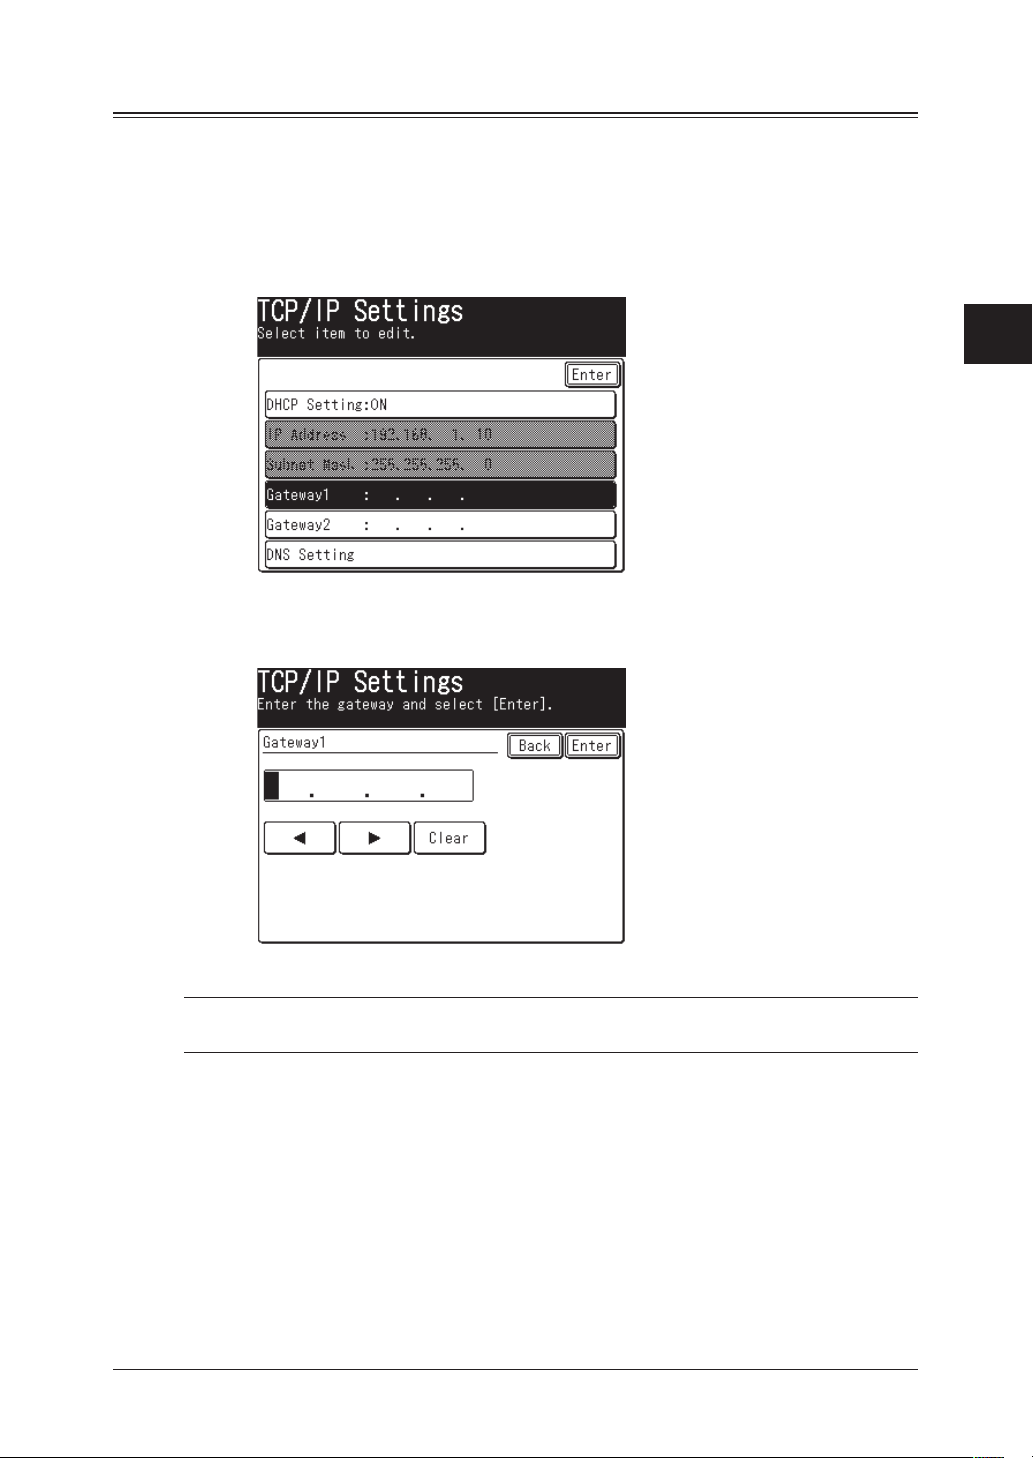
Domain Name
Enter the domain name.
1 Open the authentication settings menu. (Refer to page 2-22)
2 Press [Domain Name].
3 Use the QWERTY keypad and numeric keys to enter the domain name.
NOTE:
4 Press [Enter].
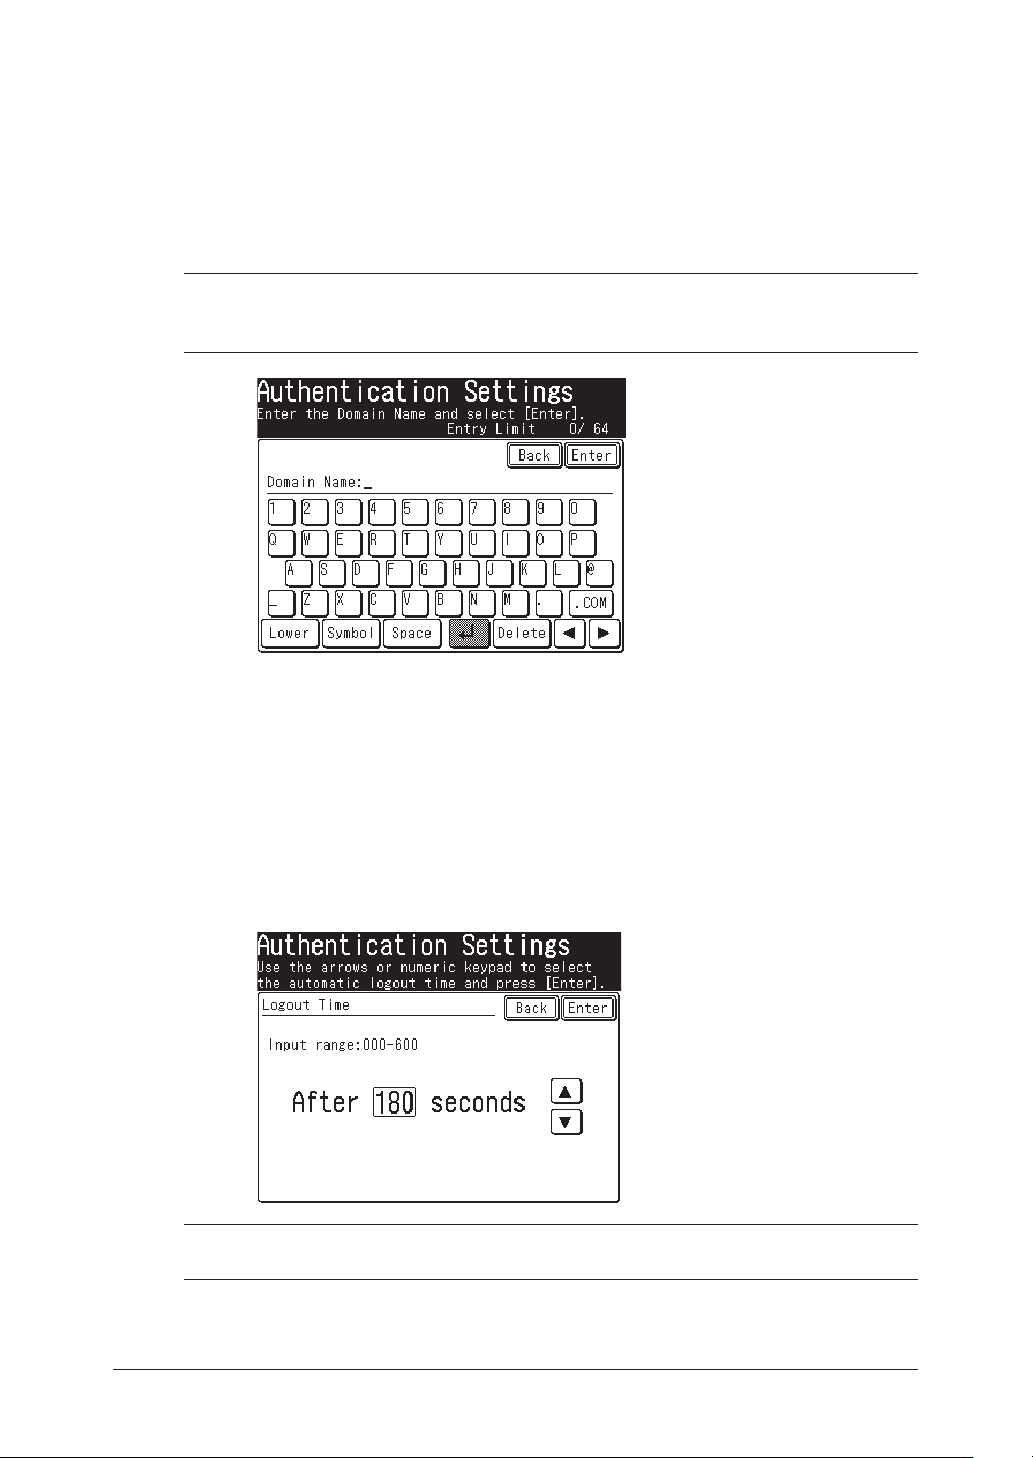
Logout Time
If the machine has been inactive for a set period of time it will automatically log the
user out. This is called the logout time.
1 Open the authentication settings menu. (Refer to page 2-22)
2
• In Active Directory, the domain name may contain up to 64 characters.
• In Windows NT Server 4.0, the domain name may contain up to 15 charac
ters.
Press [Logout Time].
-
3 Use the arrow keys or the numeric keys to enter the time.
NOTE: If the time is set to 0 seconds, the users will not be logged out until the manual
log out operation is executed.
4 Press [Enter].
Page 32
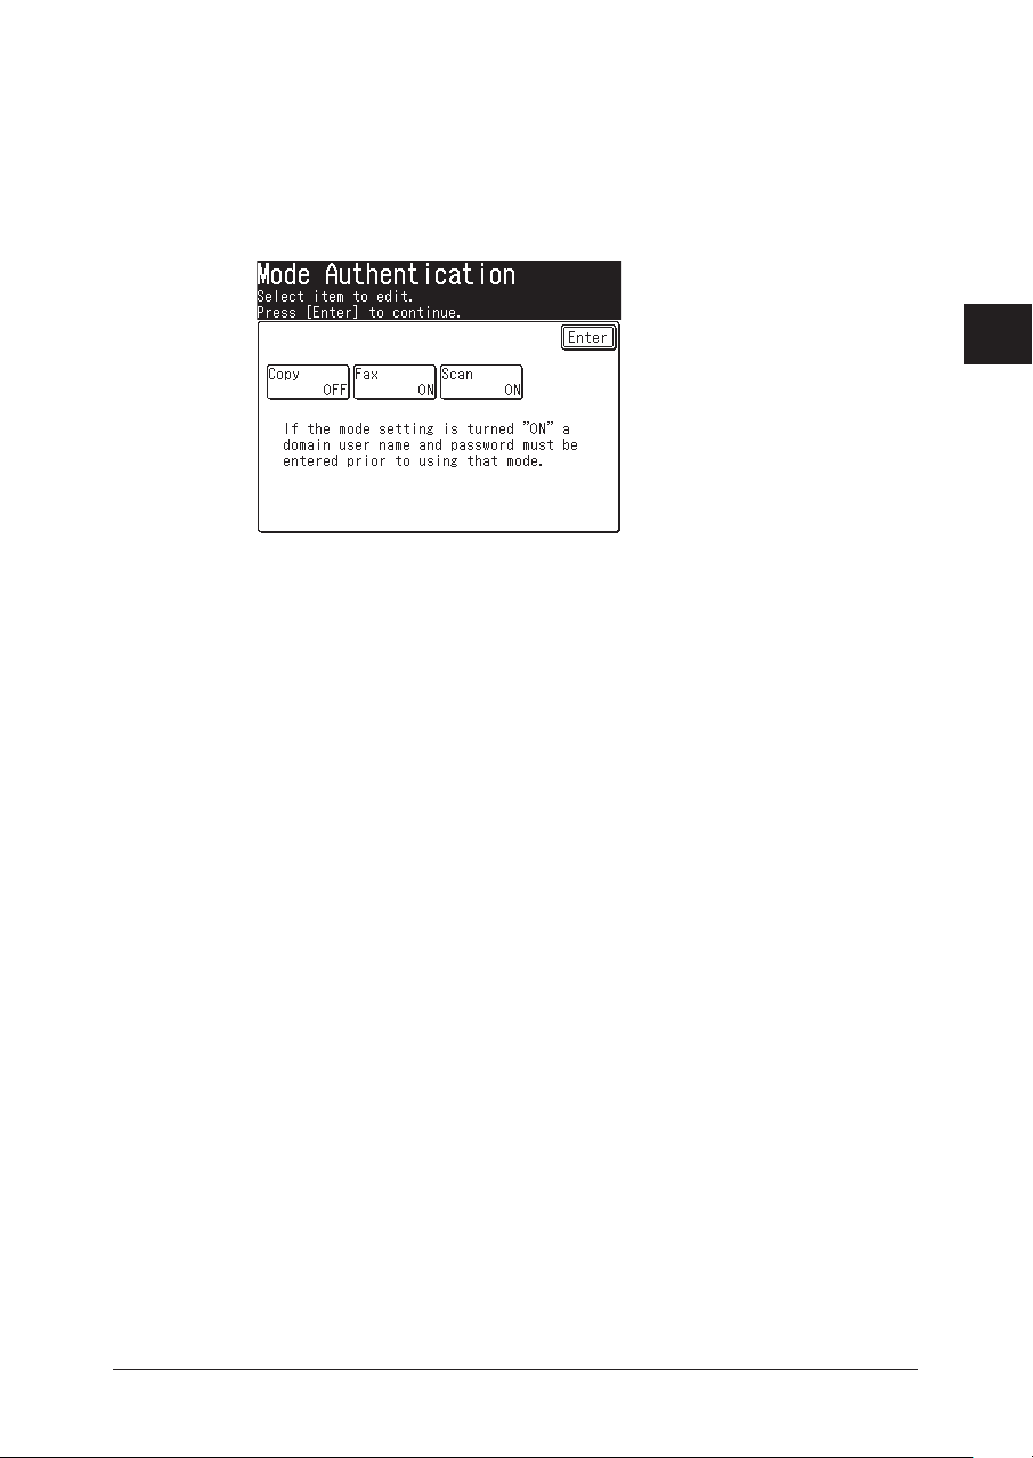
Mode Authentication
Select which mode(s) will require authentication – copy, fax and/or scan.
1 Open the authentication settings menu. (Refer to page 2-22)
2 Press [Mode Authentication].
3 Toggle the button and select “ON” or “OFF” for each mode.
1
2
3
4
Network settings
5
6
7
8
9
10
11
12
13
14
A
2-25Network settings
Page 33
2-26 Network settings
Using the authentication mode
When the Network Authentication feature is activated users will be required to
authenticate themselves, using their domain user name and password, prior to
accessing selected machine functions.
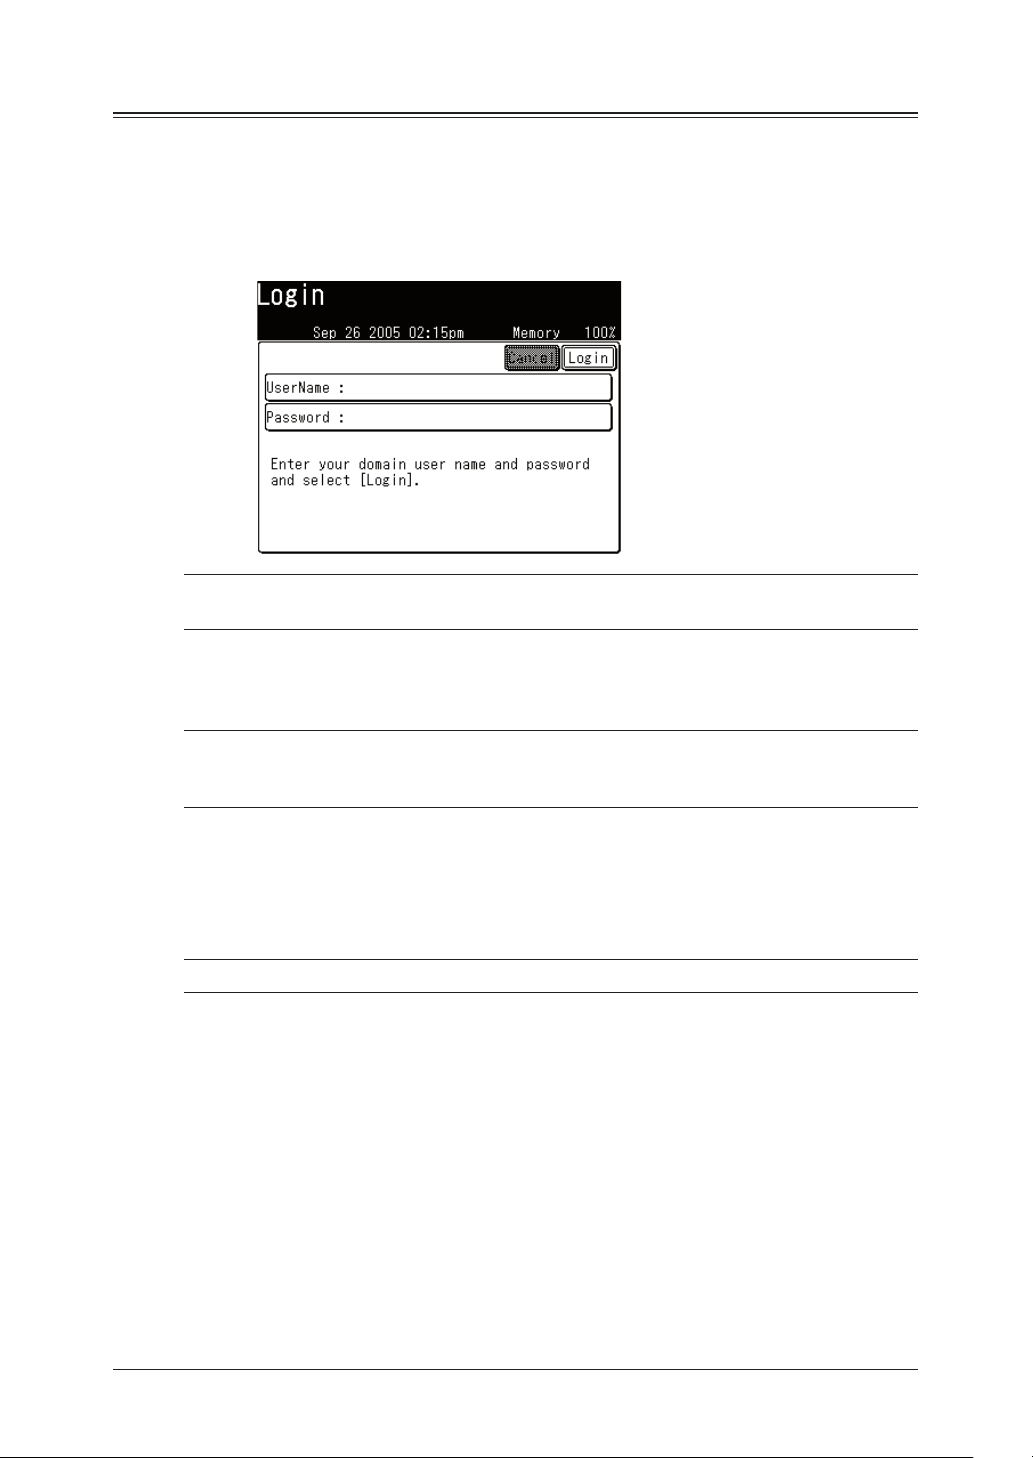
Logging on
1 When you press [COPY], [FAX] or [SCAN] the following screen will appear:
NOTE: Authentication will be required for each mode which has been set to “ON” in
“Mode Authentication”. (See page 2-25.)
2 Press [User Name].
3 Use the QWERTY keypad to enter the domain user name.
NOTE: When you are a user of another domain in trust relational-ship with the
machine registered domain, add your domain name after the user name with
an “@”, like “Sam@dom_company”.
4 Press [Enter].
5 Press [Password].
6 Use the QWERTY keypad and numeric keys to enter the password.
NOTE: The entered password will be displayed using asterisks (*) for security reasons.
7 Press [Enter].
8 Press [Login].
9 Please wait while the machine authorizes you.
Page 34

Logging out
1 Press [Reset] on the control panel.
1
2
2 Press [Logout].
NOTE:
• While you are logged-in, you will be asked whether you want to log out
whenever you press [Reset]. If you want to remain logged-in, however wish to
change modes, press [Enter] or any key.
• If you press [Reset] again on this screen, you will return to the standby mode.
3
4
Network settings
5
6
7
8
9
10
11
12
13
14
A
2-27Network settings
Page 35

2-28 Network settings
Page 36

Chapter
3
LDAP server settings
Registering an LDAP server ..................................................................3-2
Setting the default LDAP server .........................................................3-14
Modifying the LDAP server settings ...................................................3-15
Deleting an LDAP server .....................................................................3-16
LDAP parameter settings ....................................................................3-17
Configuring LDAP parameter settings ........................................3-17
Printing the LDAP parameter setting .........................................3-18
Page 37
3-2 LDAP server settings
Registering an LDAP server
When an LDAP (Light Directory Access Protocol) server is registered, directory
information (ex. e-mail address) residing on the LDAP server can be searched.
Addresses from the LDAP server can then be registered in the machine-side
“Address Book”.
NOTE: Up to 5 LDAP servers can be registered on your machine.
Not all 5 servers may be searched at the same time, only one server may be
searched at a time.
1 Press [Setting] on the control panel.
2 Press [Management].
3 Press [Network Settings].
NOTE: If a network settings code (see page 2-19) has been set, you must enter the
proper passcode using the numeric keys and press [Enter].
Page 38
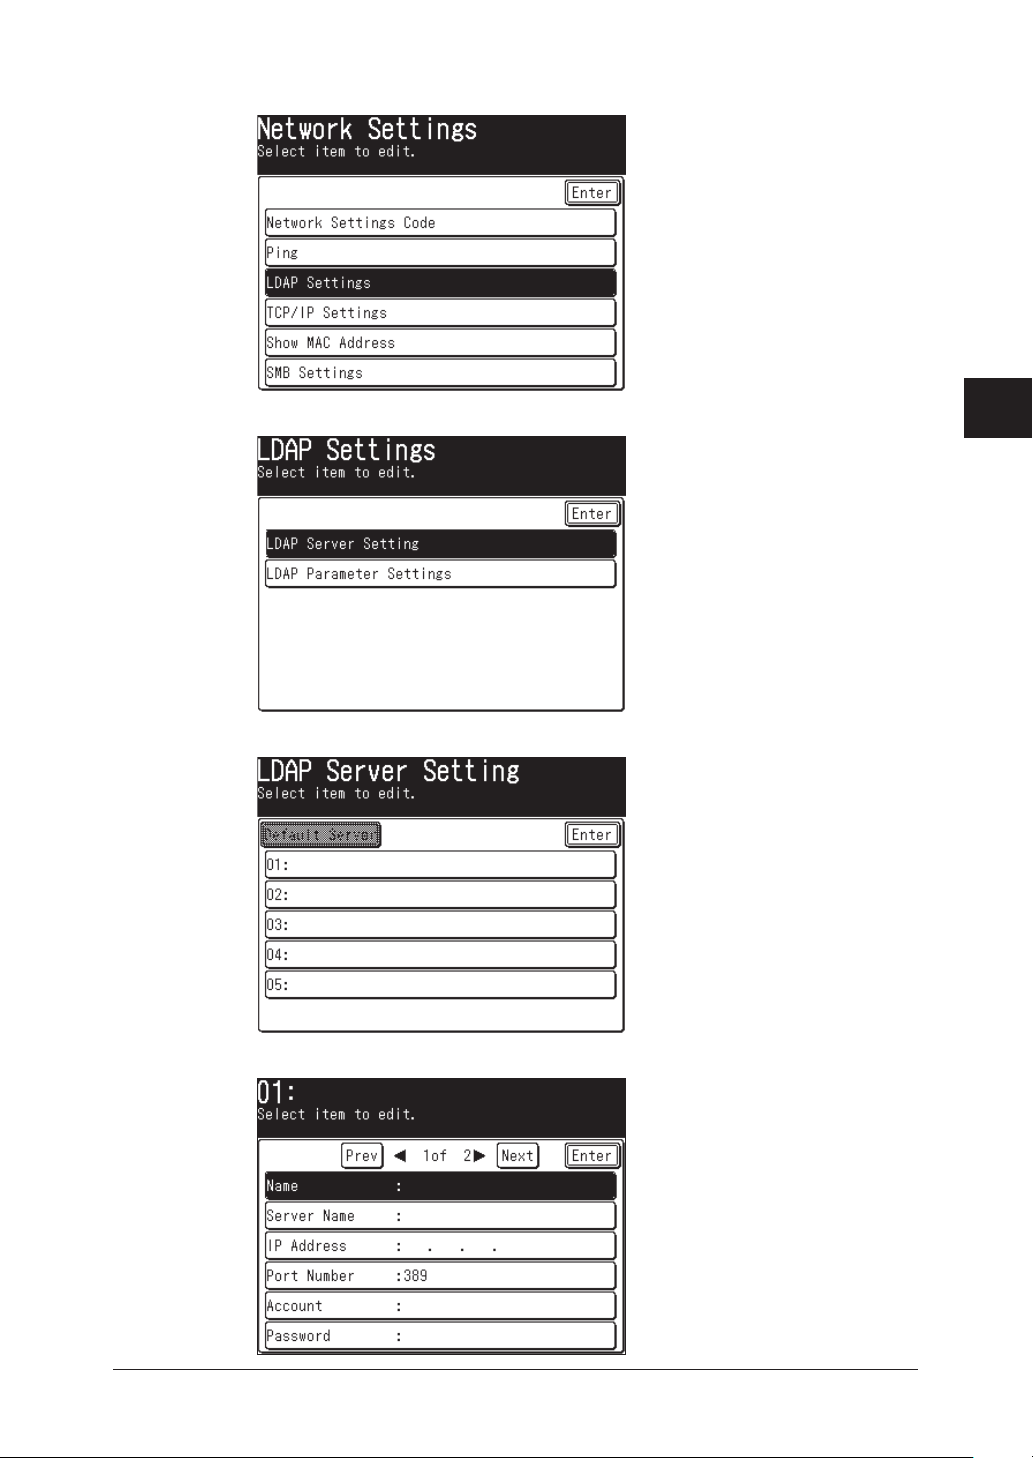
4 Press [LDAP Settings].
5 Press [LDAP Server Setting].
1
2
3
4
5
6
LDAP server settings
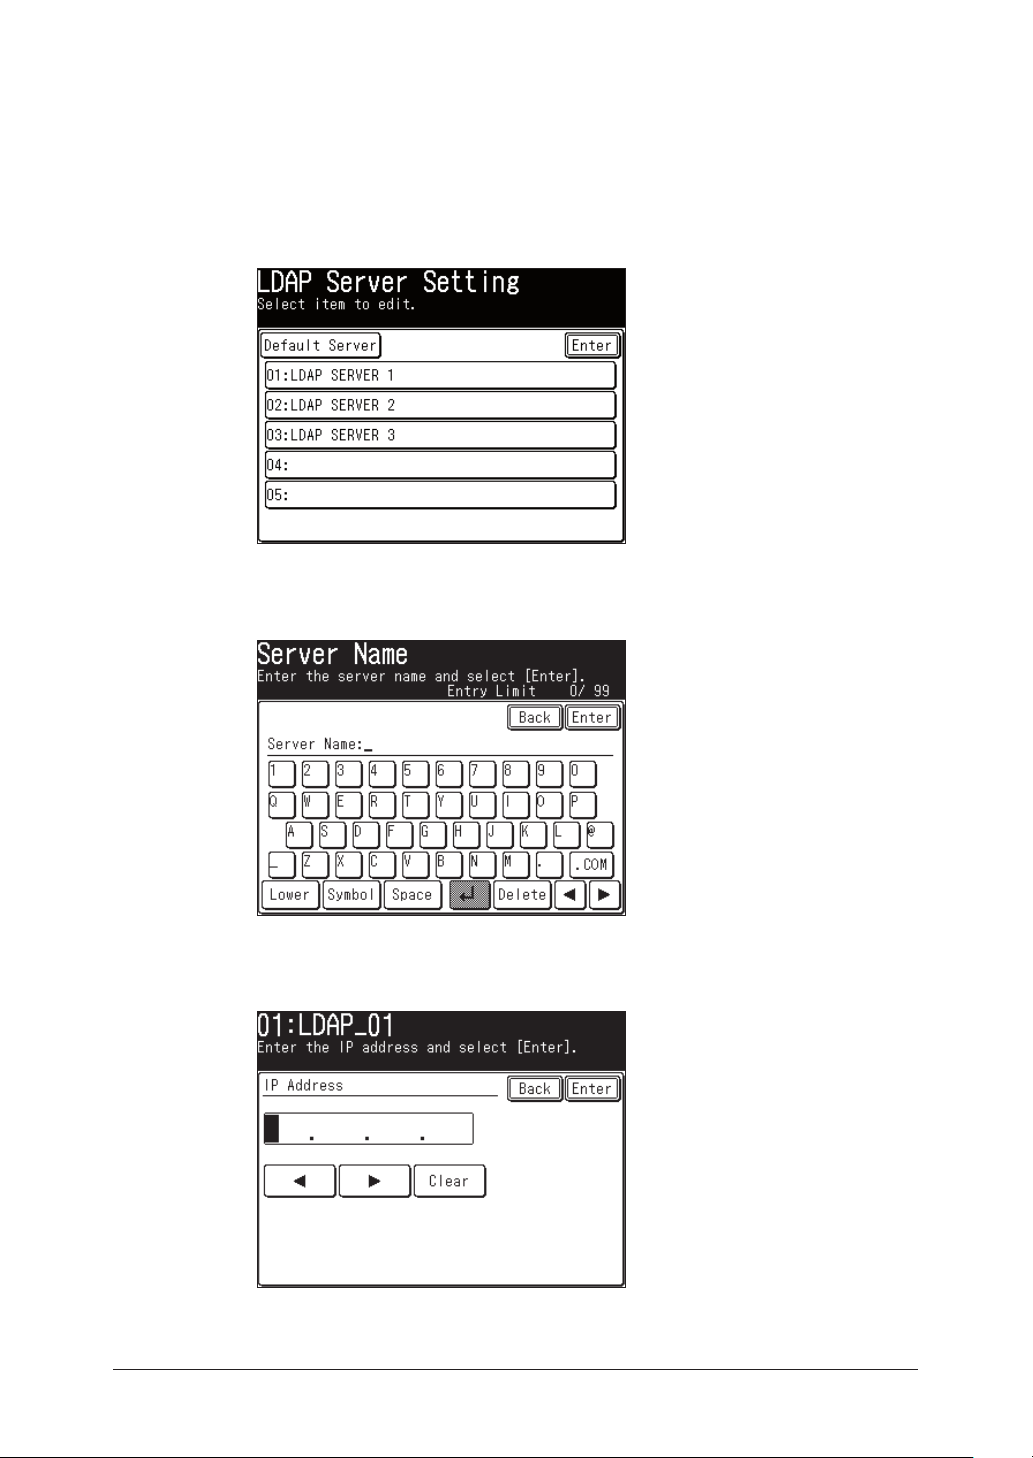
6 Press the LDAP number you want to register (01-05).
7 Press [Name].
7
8
9
10
11
12
13
14
A
3-3LDAP server settings
Page 39
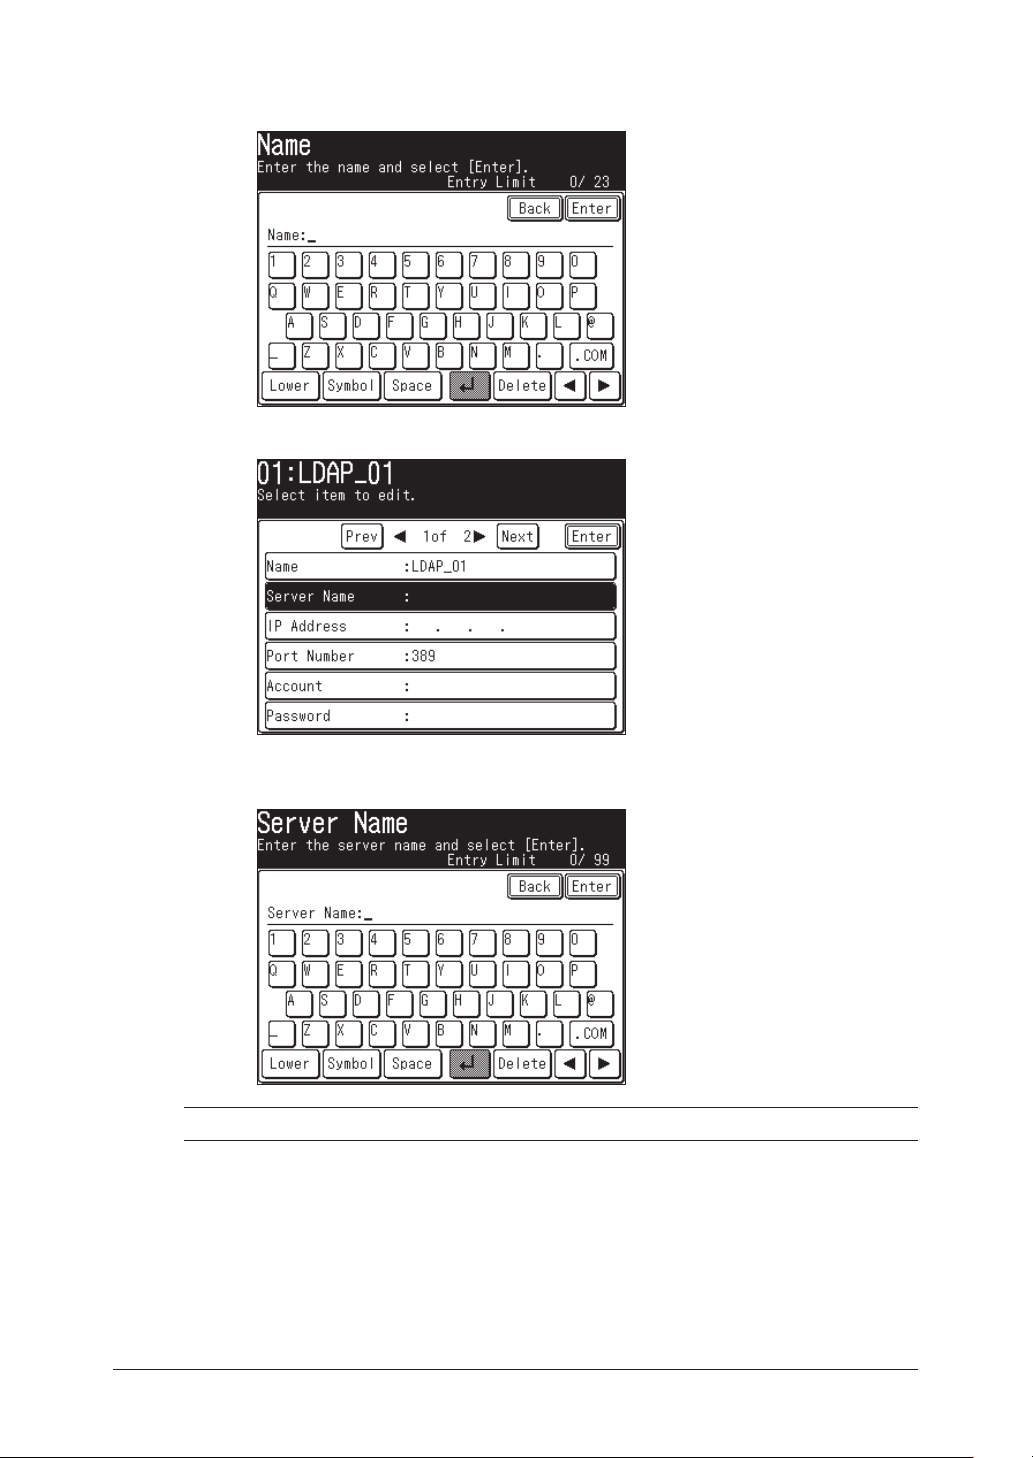
3-4 LDAP server settings
8 You can enter a unique name for the LDAP server setting.
Enter the name using up to 23 characters and press [Enter].
9 Press [Server Name].
10 Enter the LDAP server name and press [Enter].
You can enter up to 99 characters.
NOTE: If you do not know the LDAP server name consult your network administrator.
Page 40
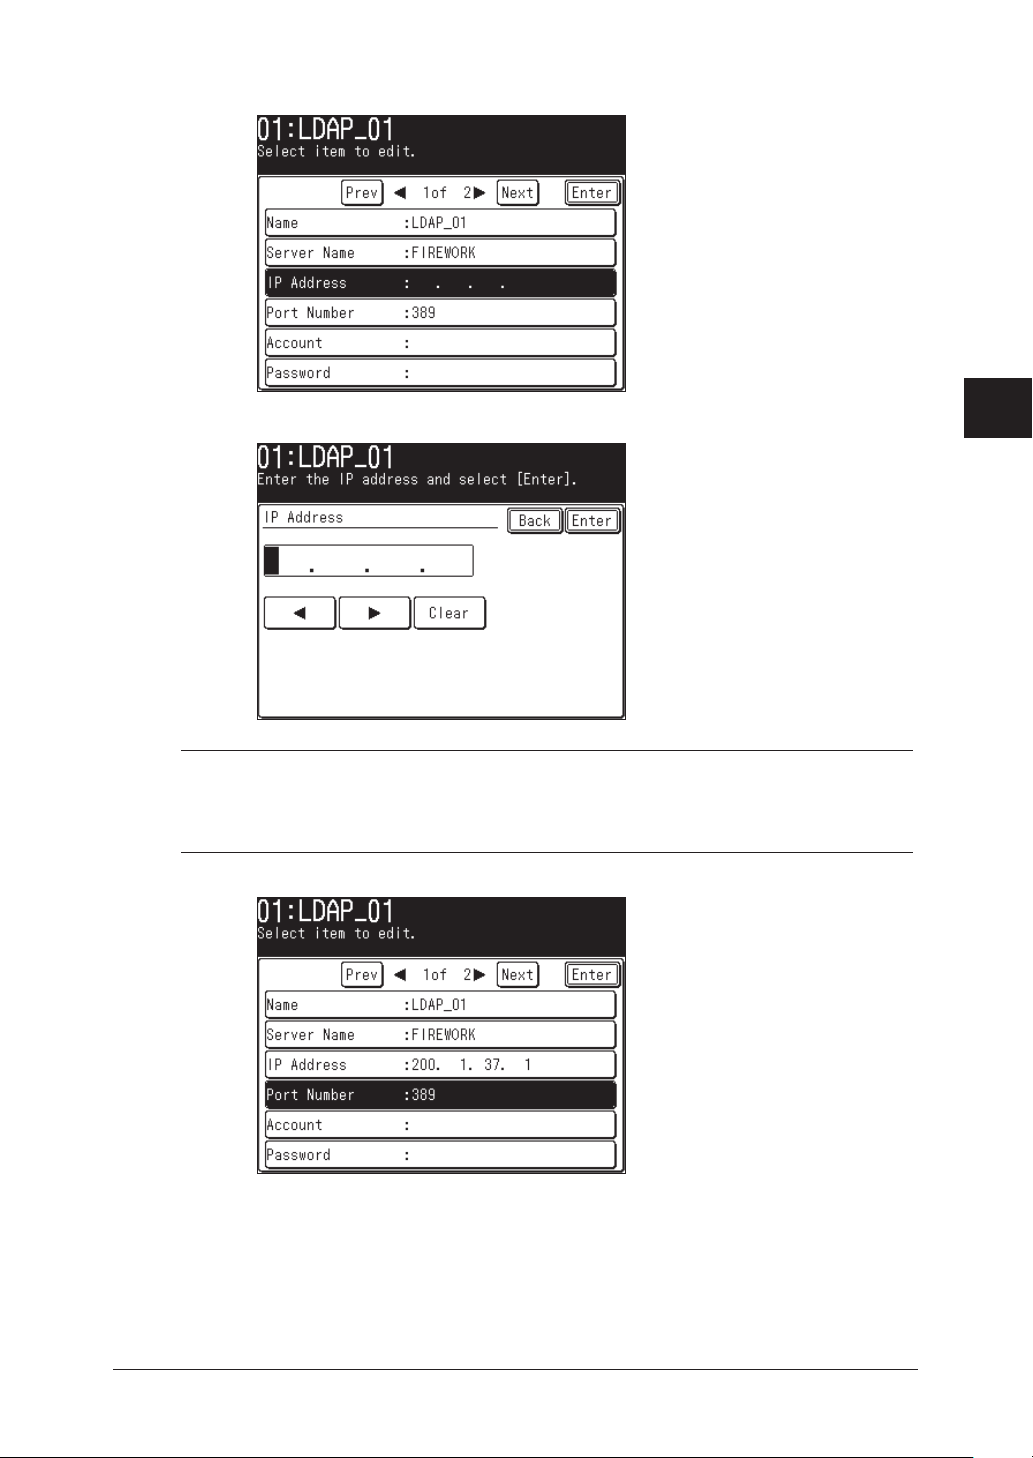
11 Press [IP Address].
12 Enter the LDAP server’s IP address using the numeric keys and press [Enter].
1
2
3
4
5
6
LDAP server settings
NOTE:
• The IP address is given priority when both the LDAP server name and IP
address are registered.
• If you do not know the LDAP server address consult your network administrator.
13 Press [Port Number].
7
8
9
10
11
12
13
14
A
3-5LDAP server settings
Page 41
3-6 LDAP server settings
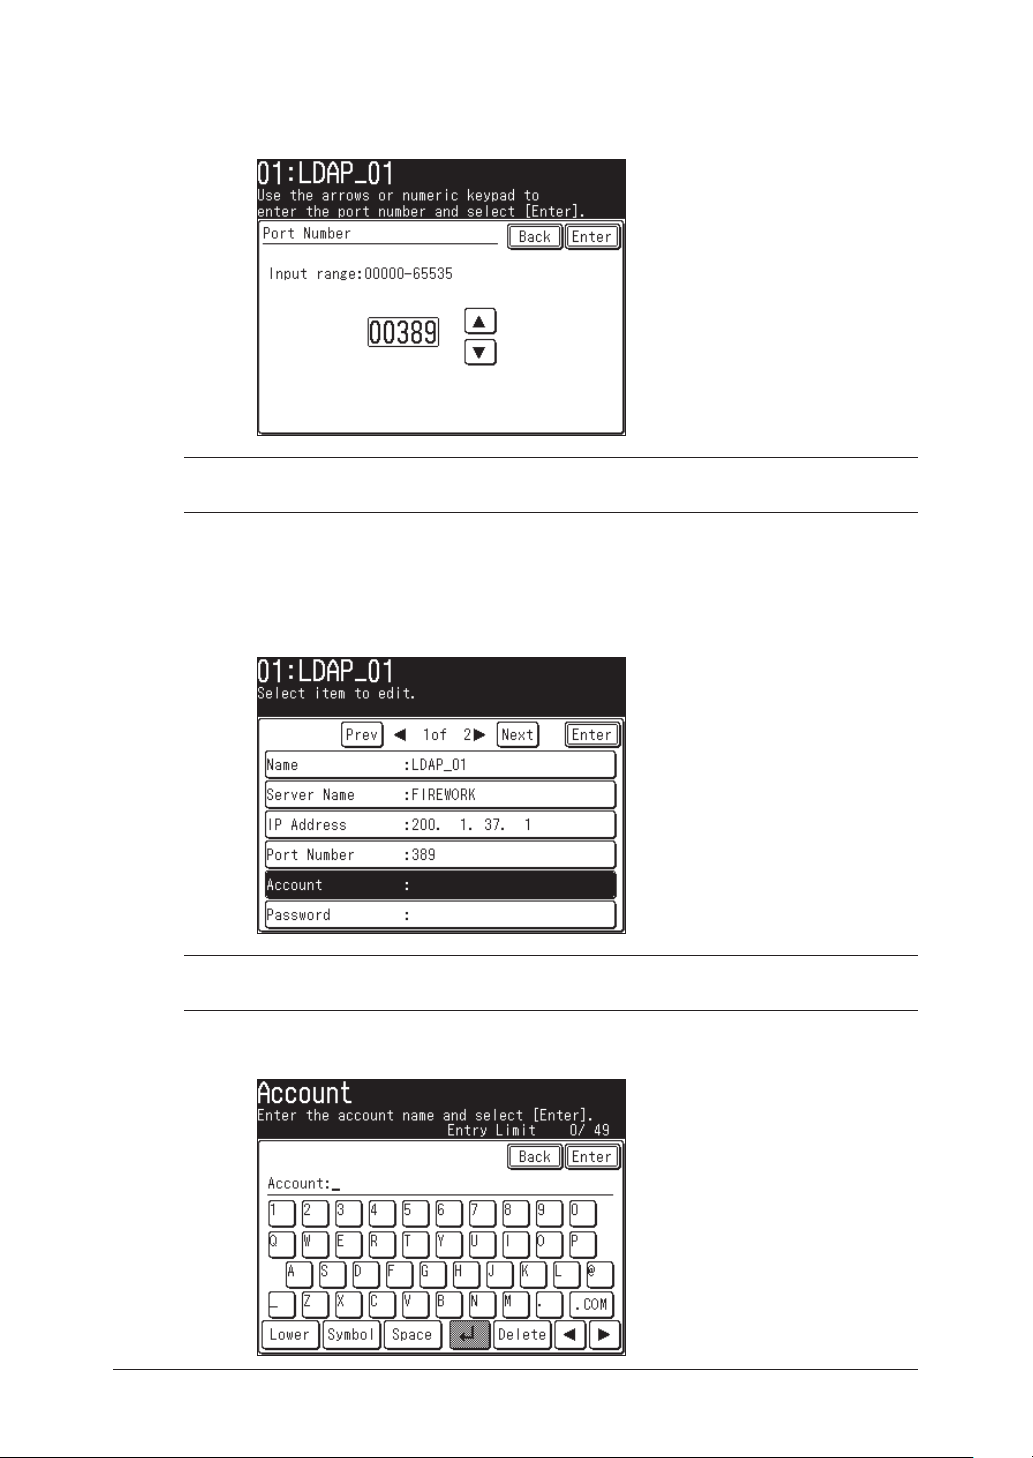
14 Enter the port number using the numeric keys.
The port number can range from 0001–65535.
The default port number is 389.
NOTE: If you entered a wrong number by mistake, please overwrite it with the correct
number.
15 If the LDAP server requires authentication in order to access it, please register
an account name (user name) and passcode.
If your server requires authentication proceed to the next step. Otherwise go to
the step 22.
Press [Account].
16
NOTE: When the “User Login” setting (see step 22) is set to “Yes”, the “Account” and
“Passcode” cannot be entered.
17 Enter the account name (user name) and press [Enter].
You can enter up to 49 characters.
Page 42

18 Press [Password].
19 Enter the passcode using the numeric keys and press [Enter].
You can enter up to 29 characters.
1
2
3
4
5
6
LDAP server settings
NOTE: The passcode will be displayed using asterisks.
20 Press [Next] or [Prev], then press [Login Required].
7
8
9
10
11
12
13
14
A
3-7LDAP server settings
Page 43

3-8 LDAP server settings
21 If the LDAP server requires login information (an account and passcode), press
[Yes]. Otherwise, press [No]. Then press [Enter].
22 When the optional “OfficeBridge Expansion Kit” has been installed on your
machine, press [User Login]. Otherwise, go to step 24.
NOTE: If the optional “OfficeBridge Expansion Kit” has not been installed, this setting
should be set to “NO”.
23 Press [YES] and press [Enter].
NOTE: When the “User Login” setting is set “Yes”, the “Account” and “Passcode” cannot
be entered.
Page 44
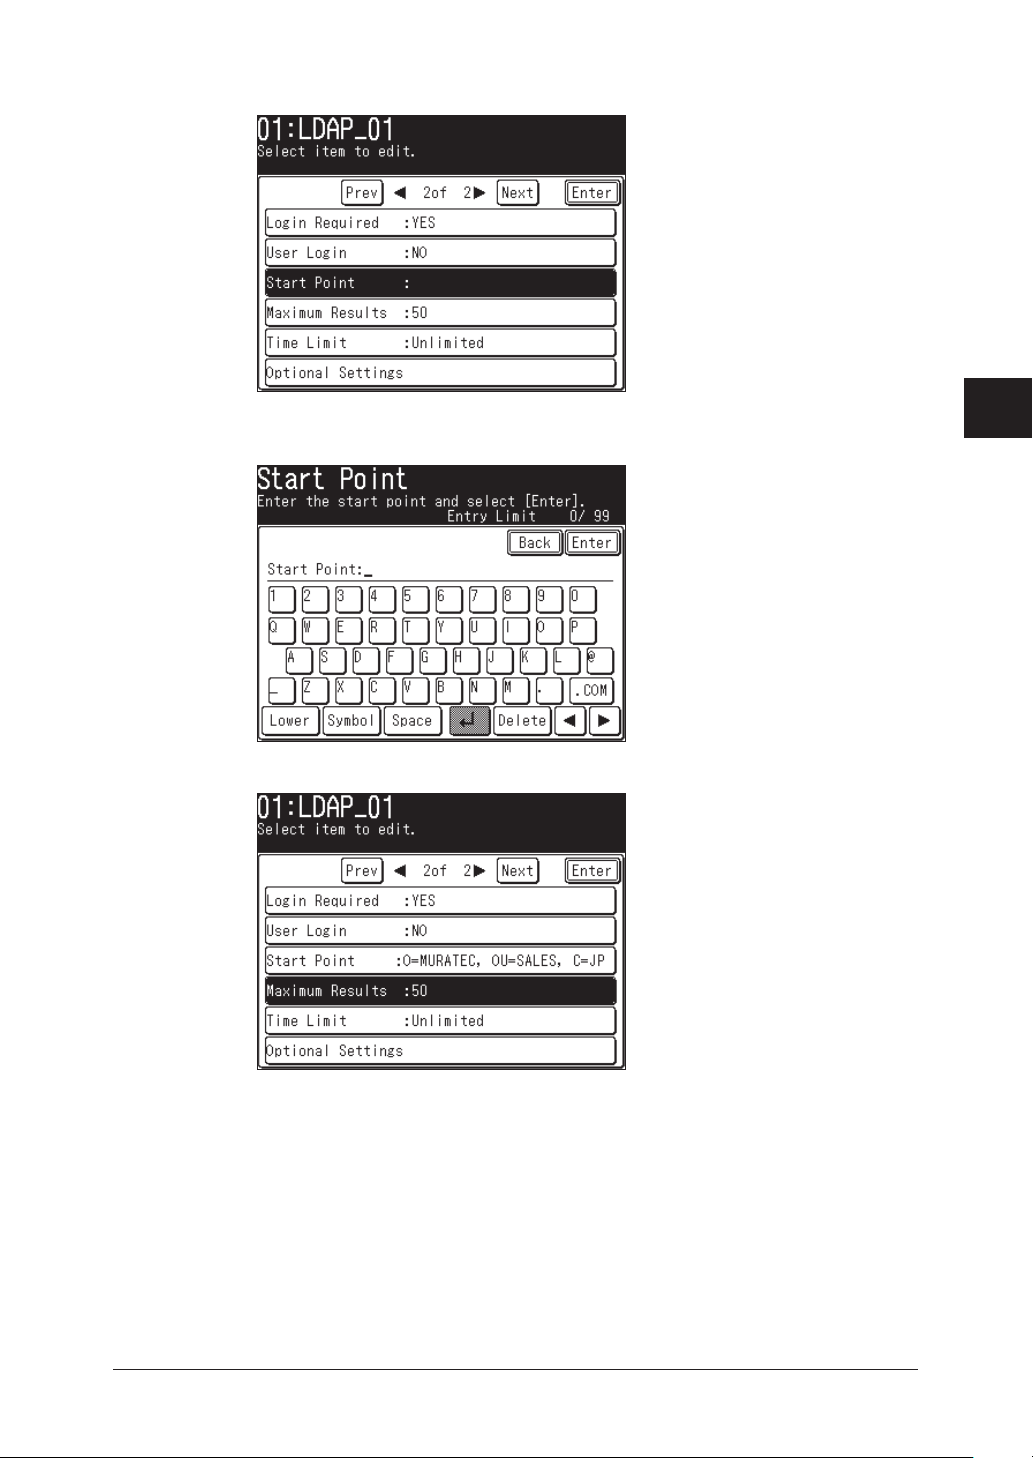
24 Press [Start Point].
25 Enter the search start point and press [Enter].
You can enter up to 99 characters.
1
2
3
4
5
6
LDAP server settings
26 Press [Maximum Results].
7
8
9
10
11
12
13
14
A
3-9LDAP server settings
Page 45
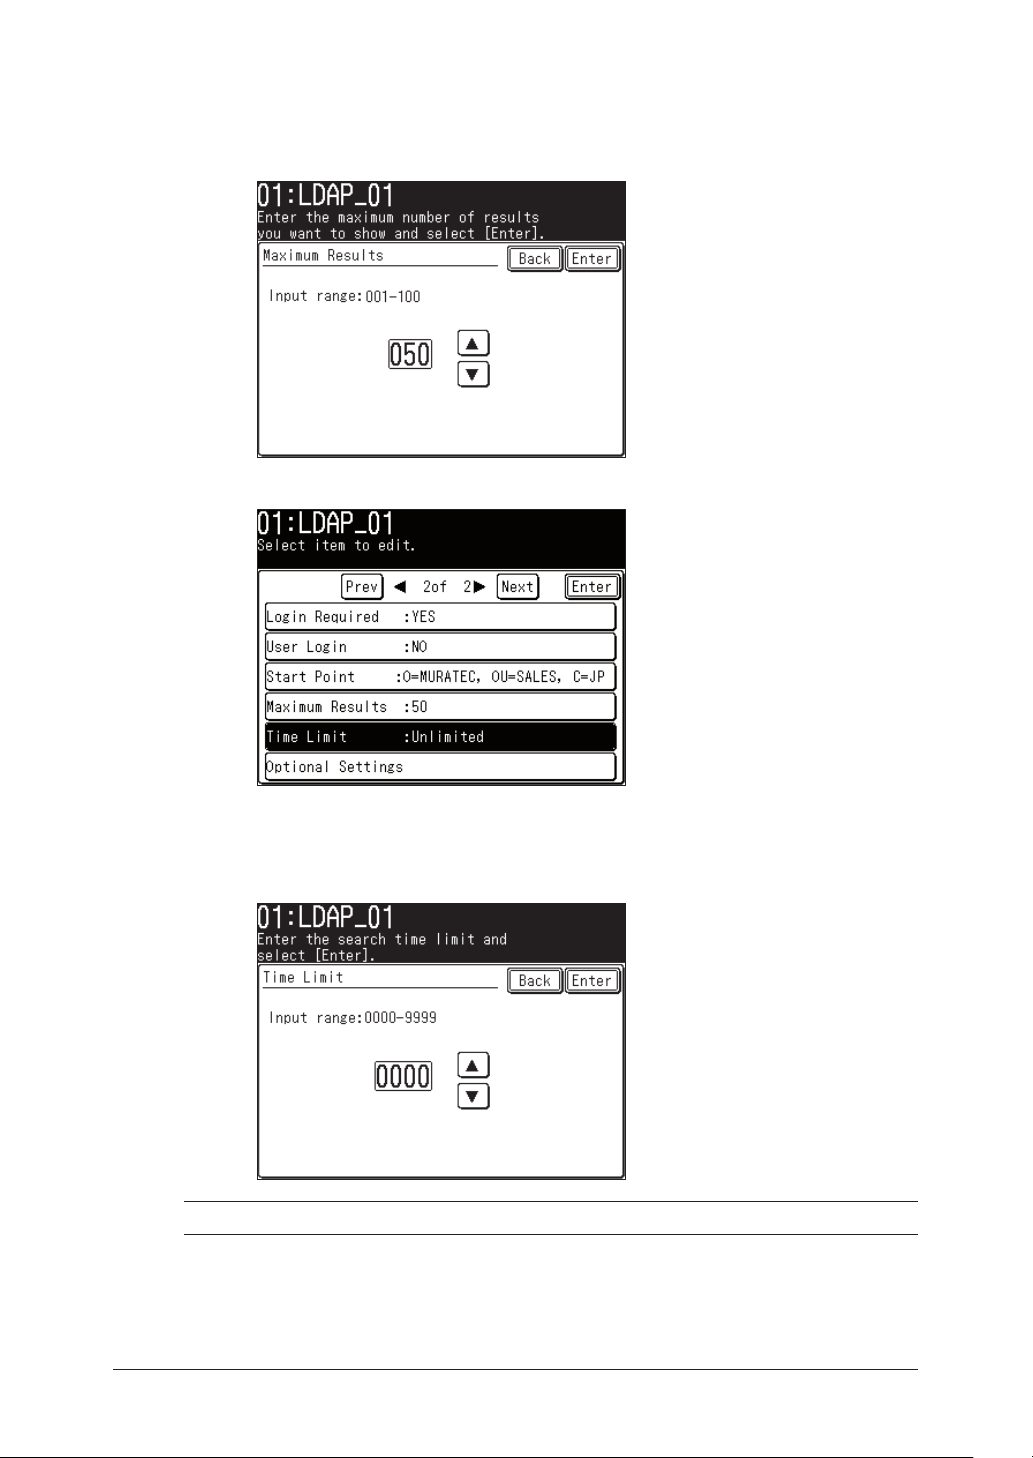
3-10 LDAP server settings
27 Using the numeric keypad enter the maximum number of search results you
want to display and press [Enter].
The number can be entered within the range of 001-100.
The default number is 50.
28 Press [Time Limit].
29 Using the numeric keypad enter the maximum amount of time you want the
machine to search the LDAP server for and press [Enter].
The time can be entered within the range of 0000–9999 seconds.
The default setting is “0000” (unlimited setting).
NOTE: If you do not want to make a time limitation, enter “0000”.
Page 46
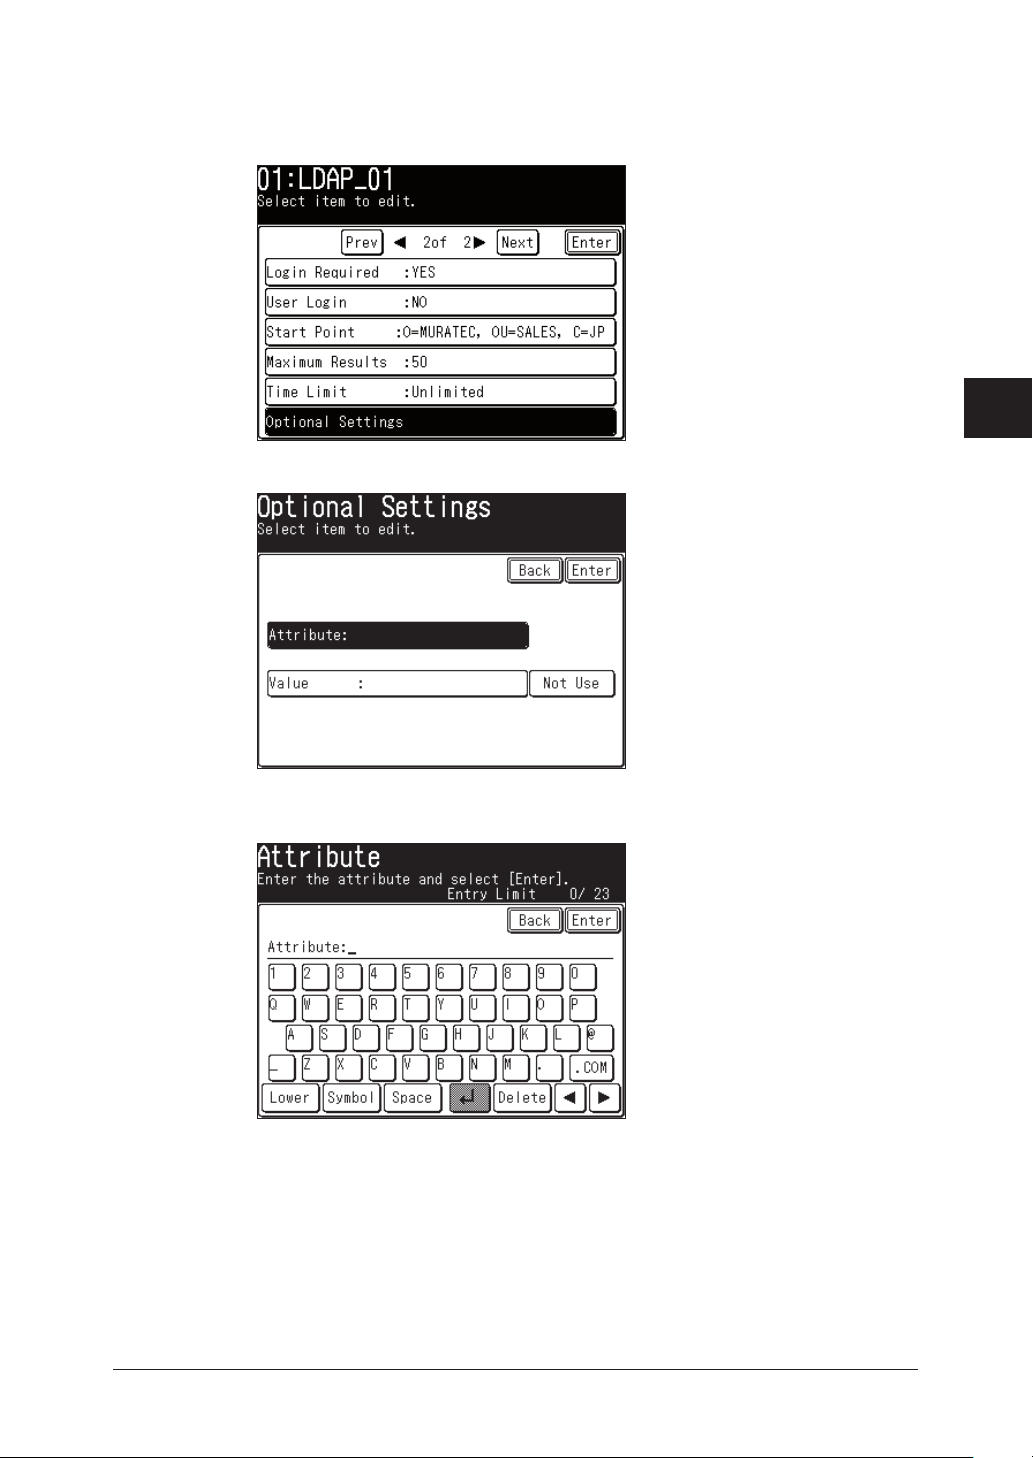
You can configure the search attributes using the “LDAP Parameter Settings” (see
page 3-17). In addition, you can set additional search attributes by:
30 Press [Optional Setting].
1
2
3
31 Select [Attribute].
32 Enter the search attribute and press [Enter].
You can enter up to 23 characters.
4
5
6
LDAP server settings
7
8
9
10
11
12
13
14
A
3-11LDAP server settings
Page 47
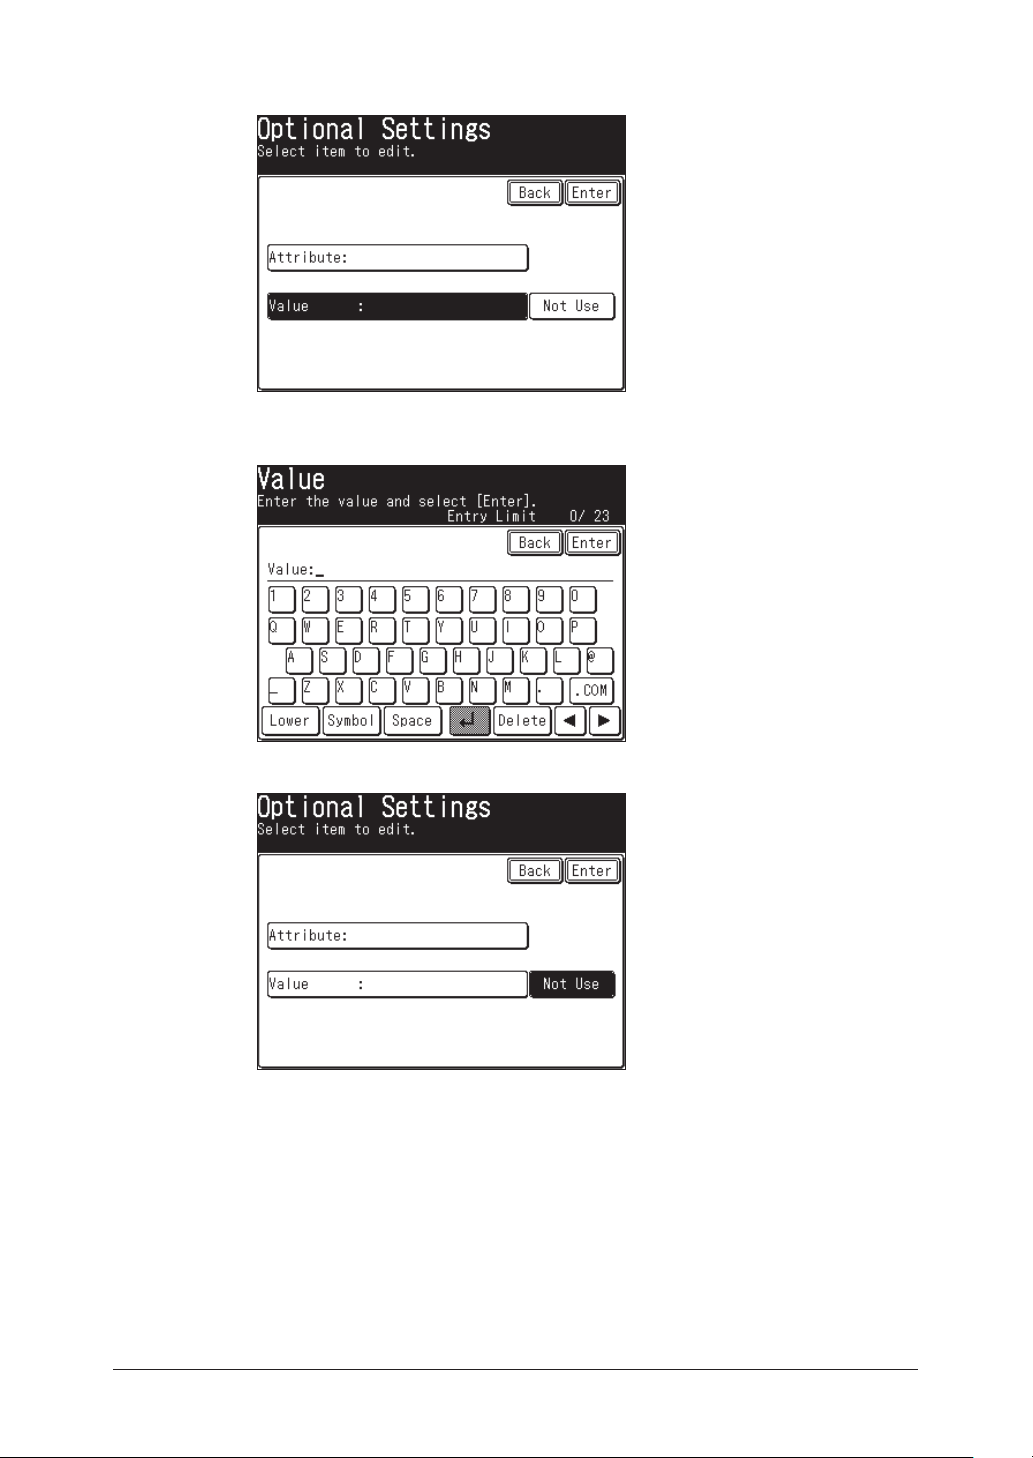
3-12 LDAP server settings
33 Press [Value].
34 Enter the LDAP search value and press [Enter].
You can enter up to 23 characters.
35 To set the search method, press the key next to [Value].
Page 48
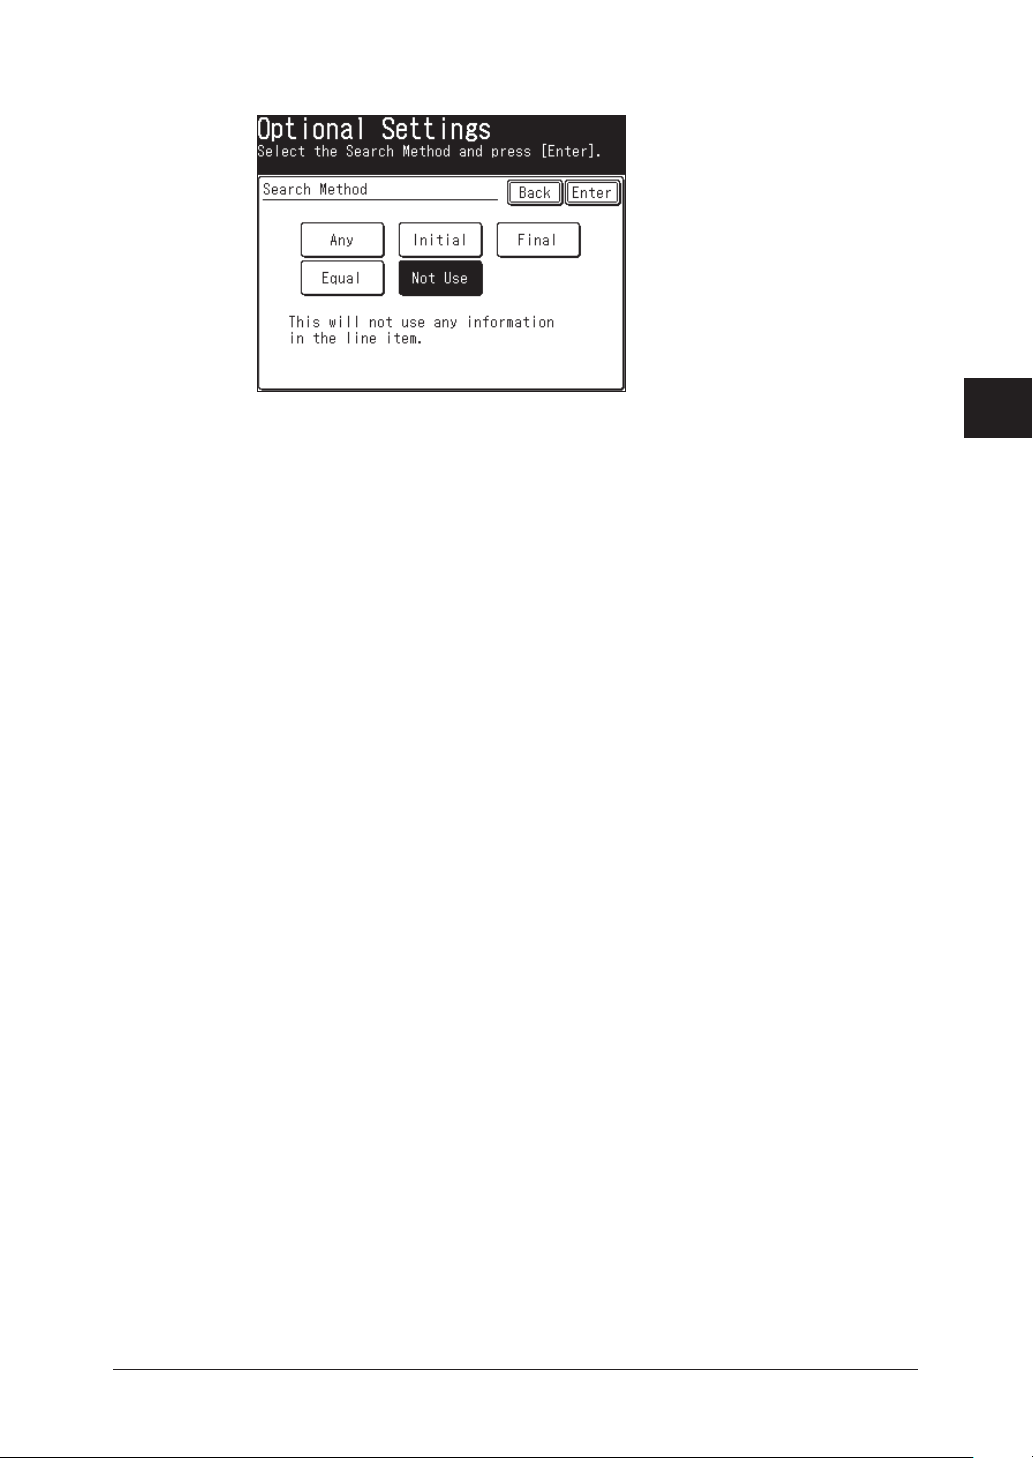
36 Select the search method and press [Enter].
Any Displays the search results that contain the value you entered.
Initial Displays the search results that begin with the value you entered.
Final Displays the search results that end with the value you entered.
Equal Displays the search results that exactly match with the value you
entered.
Not Use Information entered in this field will not be searched.
37 When you have finished press [Reset] on the control panel to return to the
Standby mode.
1
2
3
4
5
6
LDAP server settings
7
8
9
10
11
12
13
14
A
3-13LDAP server settings
Page 49
3-14 LDAP server settings
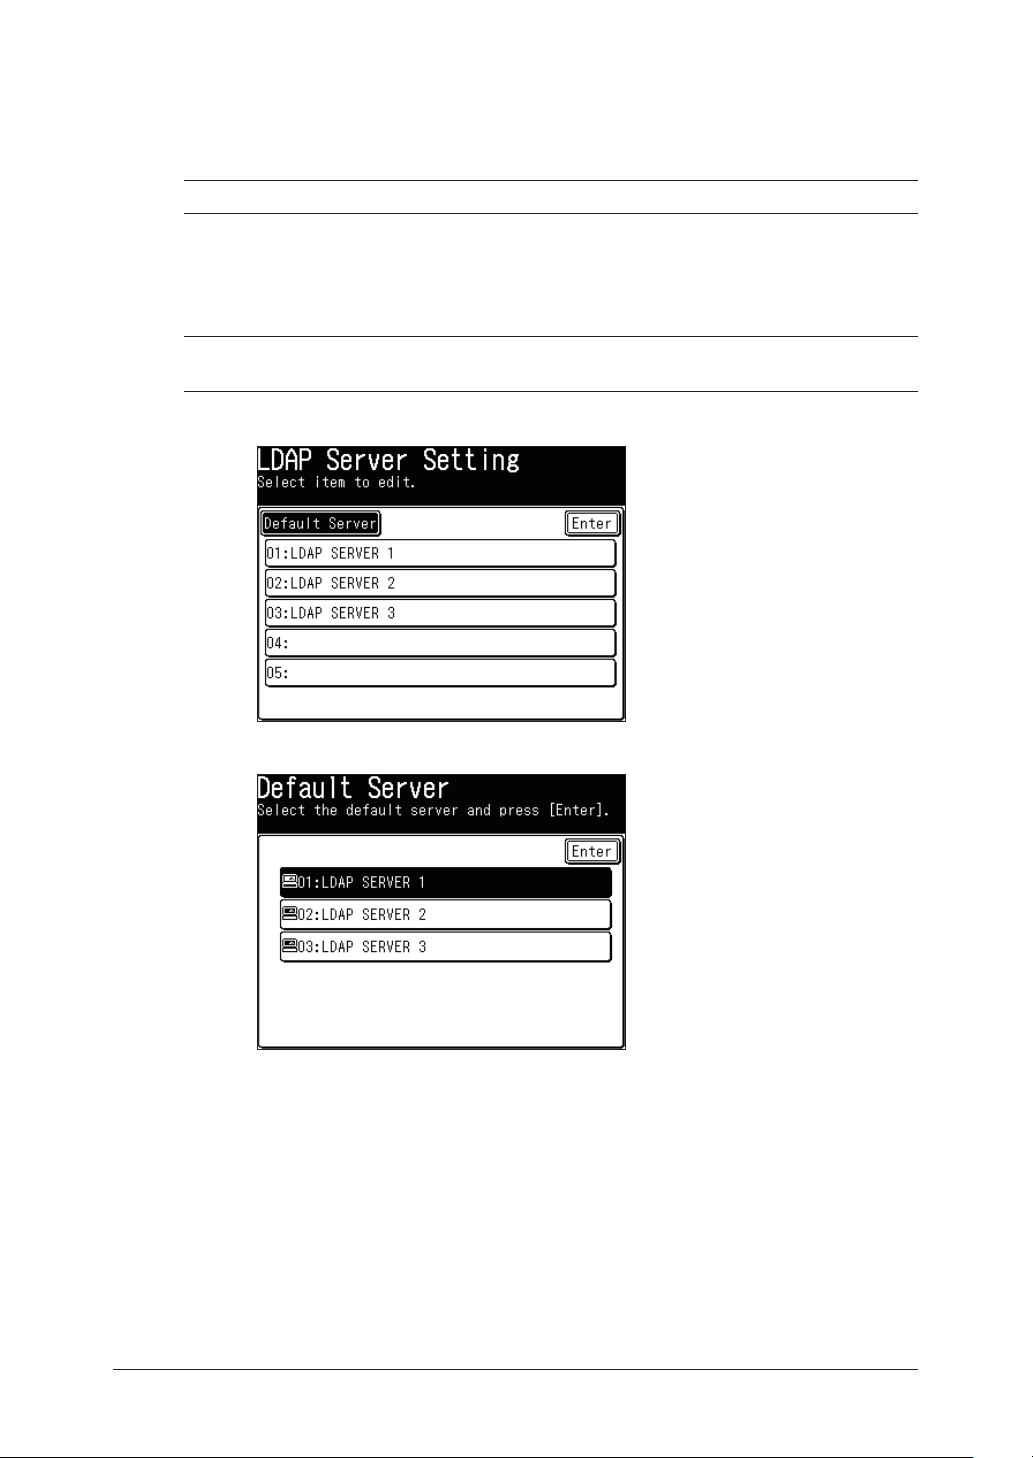
Setting the default LDAP server
You can set the default LDAP server using the following procedure.
NOTE: At least one LDAP server should be registered.
1 Press [Setting] on the control panel.
2 Press [Management], [Network Settings], [LDAP Settings], and [LDAP Server
Setting] in this order.
NOTE: Once you have reached this display, refer to the steps 2 to 5 on pages 3-2 and
3-3.
3 Press [Default Server].
4 Select an LDAP server you want to set as the default server.
5 Press [Enter].
6 When you have finished press [Reset] on the control panel to return to the
Standby mode.
Page 50

Modifying the LDAP server settings
If necessary, you can modify the existing LDAP server setting.
1 Press [Setting] on the control panel.
2 Press [Management], [Network Settings], [LDAP Settings], and [LDAP Server
Setting] in this order.
NOTE: Once you have reached this display, refer to the steps 2 to 5 in the page 3-2 and
3-3.
3 Press the LDAP server you want to modify.
4 Modify the items and press [Enter].
5 When you have finished press [Reset] on the control panel to return to the
Standby mode.
1
2
3
4
5
6
LDAP server settings
7
8
9
10
11
12
13
14
A
3-15LDAP server settings
Page 51
3-16 LDAP server settings
Deleting an LDAP server
1 Press [Setting] on the control panel.
2 Press [Management], [Network Settings], [LDAP Settings], and [LDAP Server
Setting] in this order.
3 Select the LDAP server you want to delete.
4 Press [Server Name].
5 Press [Delete] to clear the server name and press [Enter].
6 Press [IP Address].
7 Press [Clear] to clear the IP Address and press [Enter].
8 When you have finished press [Reset] on the control panel to return to the
Standby mode.
Page 52
LDAP parameter settings
NOTE: If you are unsure about these settings, consult your system administrator.
Configuring LDAP parameter settings
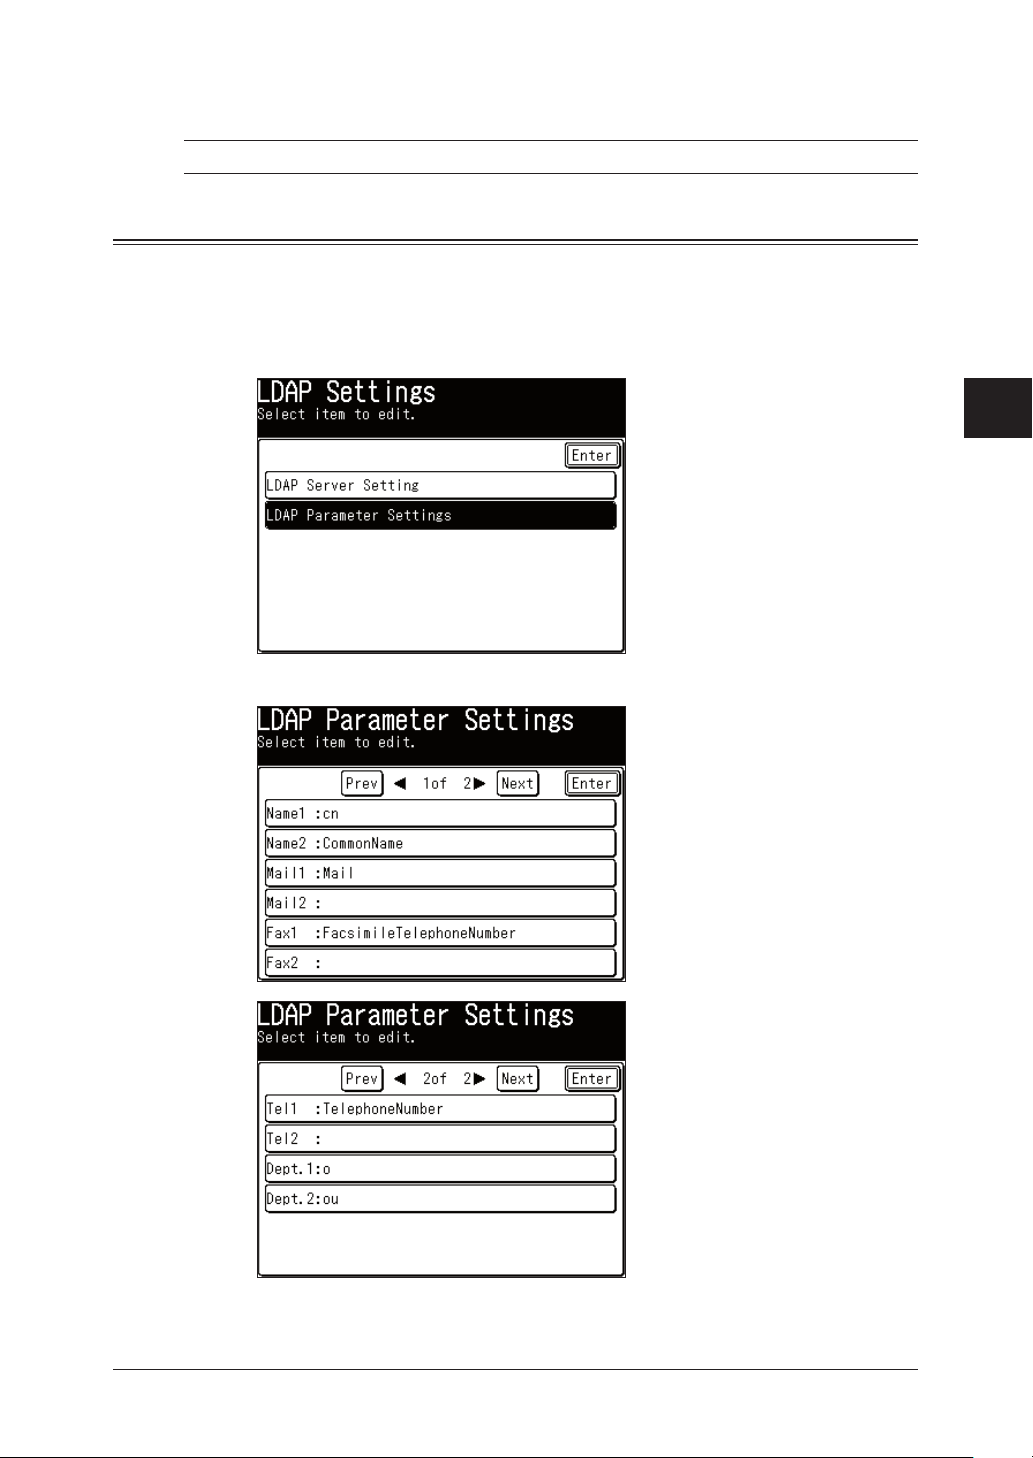
1 Press [Setting] on the control panel.
2 Press [Management], [Network Settings], and [LDAP Settings] in this order.
3 Press [LDAP Parameter Settings].
4 Select an attribute you want to configure.
1
2
3
4
5
6
LDAP server settings
7
8
5 Enter the attribute and press [Enter].
9
10
11
12
13
14
A
3-17LDAP server settings
Page 53

6 When you have finished press [Reset] on the control panel to return to the
Standby mode.
NOTE:
You can register up to two attributes for each search object.
When two attributes have been registered, the attribute 1 (ex. “cn”) is used
for search filter. And then, the machine will retrieve the records that include
the registered attributes you set.
For example, when the LDAP parameters are set as follows, and you entered
a name for object search, the machine first requests the LDAP server to
search the record that includes “cn=(text you’ve entered)”. Then, the machine
retrieves the parameters based on all the registered attributes (cn, commonname, mail, facsimiletelephonenumber, telephonenumber, o, ou) from the
searched records.
Name1 : cn
Name2 : commonname
Mail1 : mail
Mail2 :
Fax1 : facsimiletelephonenumber
Fax2 :
Tel1 : telephonenumber
Tel2 :
Dept.1 : o
Dept.2 : ou
Printing the LDAP parameter setting
Print the “Network Settings” list (refer to page 7-2) and view the “LDAP Parameter
Settings” that are underneath the heading “LDAP Settings”.
3-18 LDAP server settings
Page 54

Chapter
4
E-mail / I-Fax settings
E-mail settings .......................................................................................4-2
SMTP/POP Settings .......................................................................4-2
E-mail settings ................................................................................4-4
Page 55
4-2 E-mail / I-Fax settings
E-mail settings
NOTE: In order to use the e-mail and Internet fax function on your machine, the
“SMTP/POP” settings and “E-mail Settings” must be setup. These settings can
be configured using the Web Browser.
Using the web browser, you can check and configure all the network settings for
your machine. For more information on using the web browser, refer to “Chapter 5: Using the web browser to change settings” on page 5-1.
NOTE: If you want to change settings through the web browser, you must first register
an IP address on the machine. (Refer to page 2-5.)
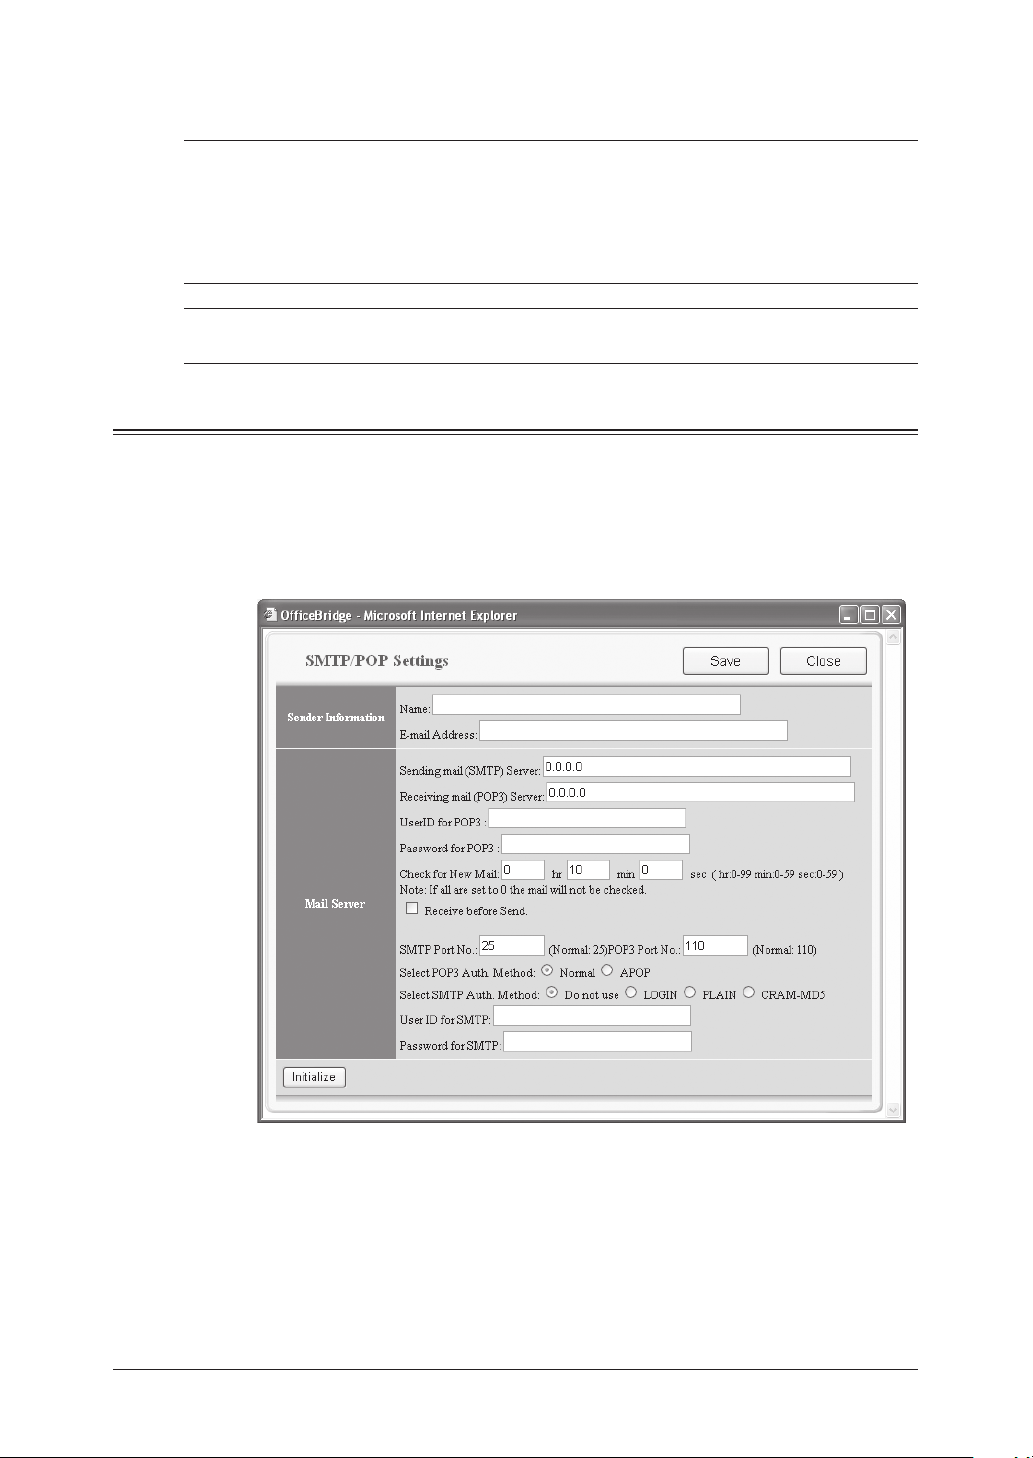
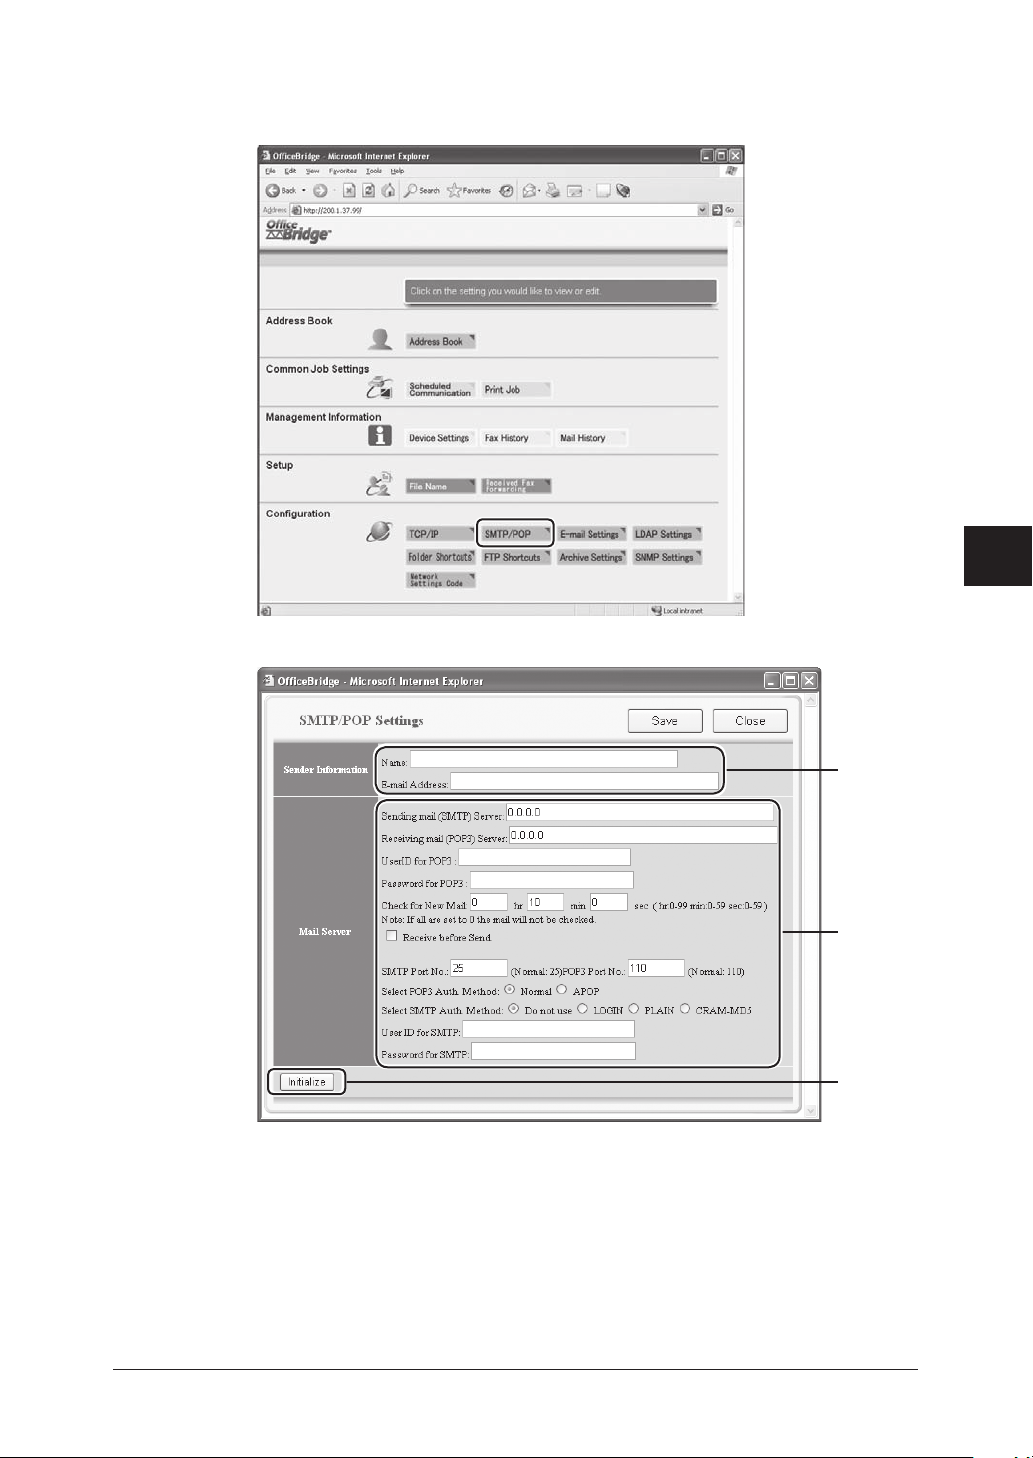
SMTP/POP Settings
1 Type your machine’s IP address into the URL address field on your web
browser (ex. http://200.1.37.99/).
2 Click [SMTP/POP] under the “Configuration” column.
3 Enter the e-mail server settings.
See the following page for a description of each item.
Page 56
Sender
Information
Mail Server
Setting Description
Name Enter a name that is displayed in the sender field of
the e-mail sent from your machine.
Up to 40 characters can be registered.
E-mail address Enter an e-mail address assigned to your machine.
Up to 50 characters can be registered.
Sending mail (SMTP)
server
Receiving mail (POP3)
server
User ID for POP3 Enter the user ID used when logging on to the POP3
Password for POP3 Enter the password used when logging on to the POP3
Check for New Mail This setting establishes the interval at which the mail
Receive before Send. For some providers, POP authentication is required
SMTP Port No. Enter the SMTP port number. (1–65535)
POP3 Port No. Enter the POP3 port number. (1–65535)
Select POP3 Auth.
Method
Select SMTP Auth.
Method
User ID for SMTP Enter the user ID used when logging on to the SMTP
Password for SMTP Enter the password used when logging on to the
Enter a domain name or an IP address of the SMTP
server for sending e-mail.
When entering a domain name, you can enter up to 50
characters.
Enter a domain name or an IP address of the POP3
server for receiving e-mail.
When entering a domain name, you can enter up to 50
characters.
server.
Up to 50 characters.
server.
Up to 50 characters.
server is checked for new mail. The minimum value is
5 seconds and the maximum is 99 hr 59 min 59 sec.
The initial value is 10 min.
To keep this system from checking for e-mail automatically, set all of these values to 0.
before sending (send request to SMTP server). In this
case, check this item.
Default: 25
Default: 110
APOP (Authenticated POP) is a POP security protocol
that encrypts the POP password when connecting
with the POP server. If APOP is available on the POP
server you are using, select “APOP”. Otherwise, select
“Normal”.
Select the SMTP authentication method if the SMTP
server you are using requires authentication.
server, if necessary.
Up to 50 characters can be registered.
SMTP server, if necessary.
Up to 50 characters can be registered.
1
2
3
4
5
6
7
E-mail / I-Fax settings
8
9
10
11
12
13
14
A
4-3E-mail / I-Fax settings
Page 57
4-4 E-mail / I-Fax settings
E-mail settings
1 Type your machine’s IP address in the URL address field on your web browser
(ex. http://200.1.37.99).
2 Click [E-mail Settings] under the “Configuration” column.
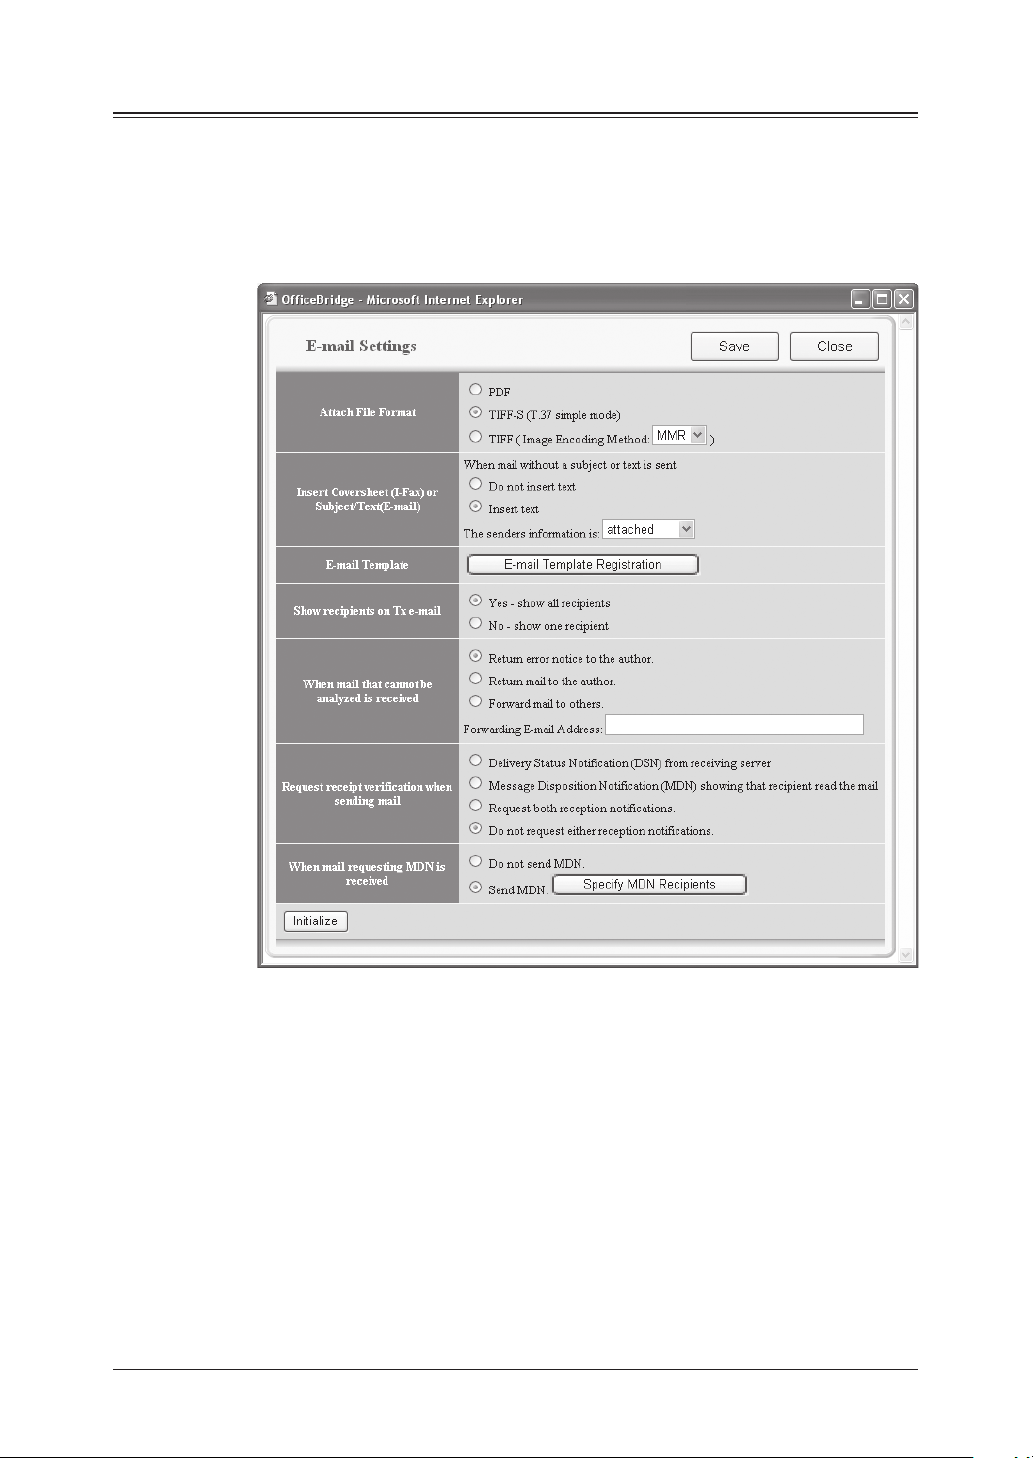
3 Configure the e-mail settings.
See the following page for a description of each item.
Page 58
Setting Description
Attached File
Format
Insert Cover
sheet (I-Fax) or
Subject/Text (Email)
Specifies whether the document will be converted into “PDF”, “TIFF-S” or
“TIFF” format when sending an e-mail.
• [PDF]
The document is converted to PDF format. However, a PDF file is only
available if sending the documents to a PC.
• TIFF-S (ITU-T T.37 simple mode)
The document is converted to TIFF format based on T.37 simple mode.
T.37 is an international standard for Internet faxing. When a document
is sent in simple mode format, it can be received normally by other Internet fax devices. However, all attached documents are converted to A4 size
and 200 dpi resolution.
• [TIFF] (ITU-T T.37 full mode)
The document is converted to TIFF format and is sent at the original
document size and resolution selected during the scanning process.
The “TIFF Image Encoding Method” sets the image encoding method for
sending documents with “TIFF”. Select “MH”, “MR”, “MMR”, or “JBIG”.
NOTE: This setting is effective only for an e-mail sending from the
PC. For the attached file format of an e-mail sending from the
machine, you can set it using the machine’s control panel.
However, the “TIFF Image Encoding Method” setting is effective
for both e-mail sending from PC and e-mail sending from machine.
Specifies whether or not to automatically attach a preset subject line and
text message into an e-mail if it is sent without these items filled in by the
user.
• The sender information
Specifies whether to attach the sender information (name and e-mail
address registered in the “SMTP/POP setting” dialog box, see page 4-2)
to the text.
1
2
3
4
5
6
7
E-mail / I-Fax settings
8
9
Preset subject
Preset text
Sender information
NOTE: This setting is effective only for an e-mail sending from the PC.
However, “The sender information” setting is effective for both email sending from PC and e-mail sending from machine.
10
11
12
13
14
A
4-5E-mail / I-Fax settings
Page 59

Setting Description
E-mail Template You can register up to 10 e-mail templates (subject line and message).
Registered e-mail templates can be used on your machine when entering
the e-mail subject and text message..
Show recipients
on Tx e-mail
When mail that
cannot be analyzed is received
Request receipt
verification when
sending mail
Specifies whether or not to show the e-mail destination in the e-mail
header.
In some cases, received e-mail cannot be correctly printed due to the
format of a received file. This mode allows you to either return an error
message to the sender or have the message forwarded to another inbox.
Check any of the options below:
• Return error notice to author:
Returns an error notice to the author
• Return mail to author:
Returns the original e-mail to the author.
• Forward mail to others:
Forwards the e-mail to another e-mail address without returning it to
the author. You can set just one e-mail address in which to forward mail
that can not be analyzed. The forwarding e-mail address can contain up
to 50 characters.
Specifies whether to request a delivery confirmation or read receipt when
sending e-mail.
• Delivery Status Notification (DSN) from receiving server:
Requests a delivery confirmation.
• Message Disposition Notification (MDN) showing that recipient
read the mail:
Requests a read receipt.
• Request both reception notifications:
Requests both a delivery confirmation and a read receipt.
• Do not request either notifications:
The delivery notification and read receipt will not be requested.
NOTE: Some mail servers and e-mail reception software will not respond
to these requests..
When mail
requesting MDN
is received
Specifies whether or not to return an MDN (Message Disposition Notification) to the sender.
If you do not want to send an MDN select “Do not send MDN”.
If you want to send an MDN select “Send MDN”. You can customize your
machine to only send MDN’s to specified e-mail addresses or domain
names. Click the [Setting security for MDN] and register an e-mail
address or domain name. Up to five can be registered.
4-6 E-mail / I-Fax settings
Page 60

Chapter
5
Using the web browser to change settings
Using the Web browser ..........................................................................5-2
System requirements ......................................................................5-2
Accessing the start-up web page ....................................................5-3
Accessible settings .................................................................................5-4
Registering or editing the Address Book .......................................5-4
Job management .............................................................................5-6
Confirming the device information, Fax history, Mail history ......5-9
Setting-up the file name for scanning, forwarding box ...............5-15
Configuring the network settings ................................................5-20
Page 61

5-2 Using the Web Browser
Using the Web browser
The following items may be viewed or edited using the web browser on your PC.
• Adding or editing Address Book entries
• Job management
• Entering the device information, Reviewing Fax history, and Mail history
• Setting-up the scanned document file name, and forwarding box
• Configuring the network settings
System requirements
The following system environment is required.
Operating System
Microsoft Windows server 2003 (English version)
Microsoft Windows XP (English version)
Microsoft Windows 2000 Professional (English version)
Microsoft Windows NT workstation 4.0 (English version)
Microsoft Windows Me (English version)
Microsoft Windows 98 (English version)
Web browser
Microsoft Internet Explorer 6.0
Page 62
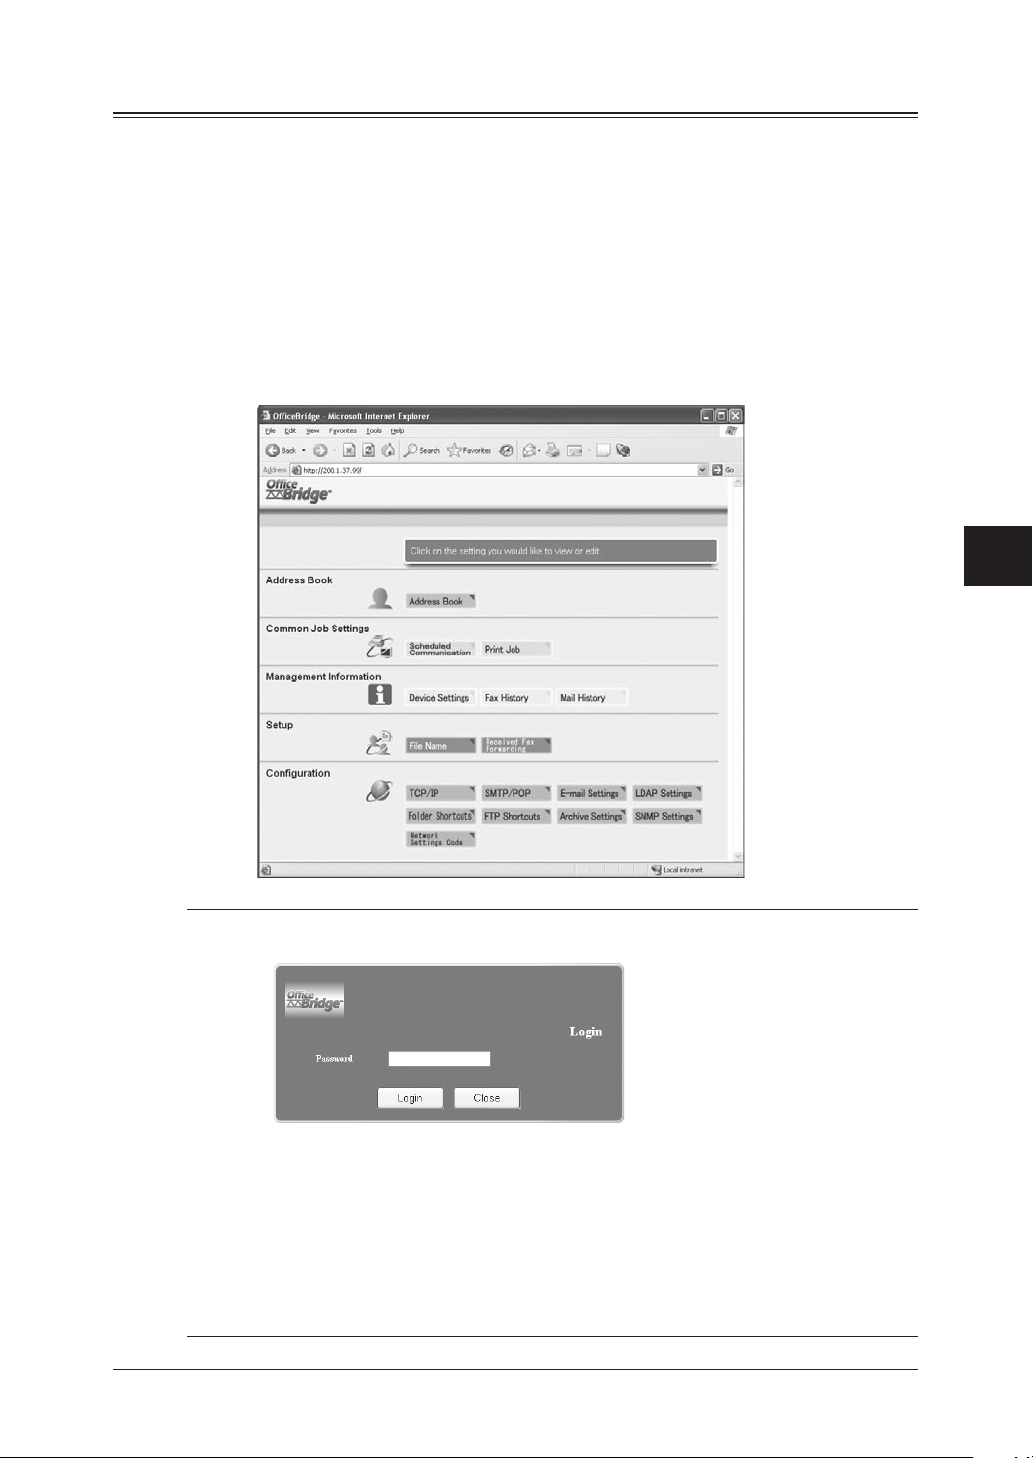
Accessing the start-up web page
To access the start-up Web page:
1 Type your machine’s IP address in the URL address field on your web browser
(ex. http://200.1.37.99).
If you do not know the IP address of your machine, you can find it by:
• Press [Setting], [Management], [Network Settings], and [TCP/IP] in this
order. You can view the IP address on the TCP/IP setting display.
– or –
• Print the “Network Settings” list (see page 7-6) and view the “IP Address”
located underneath the “TCP/IP” heading.
2 The start-up web page will appear.
1
2
3
4
5
6
NOTE:
If the protection passcode has been set, the passcode entry box will appear
and prompt you to enter your passcode.
Users may log-in to the system without entering a passcode.
However, in order to view/edit the following settings the user must log-in as
an authorized user.
• TCP/IP settings
• SMTP/POP settings
• e-mail settings
• LDAP settings
• Network Settings Code setting
7
8
Using the Web Browser
9
10
11
12
13
14
A
5-3Using the Web Browser
Page 63
5-4 Using the Web Browser
Accessible settings
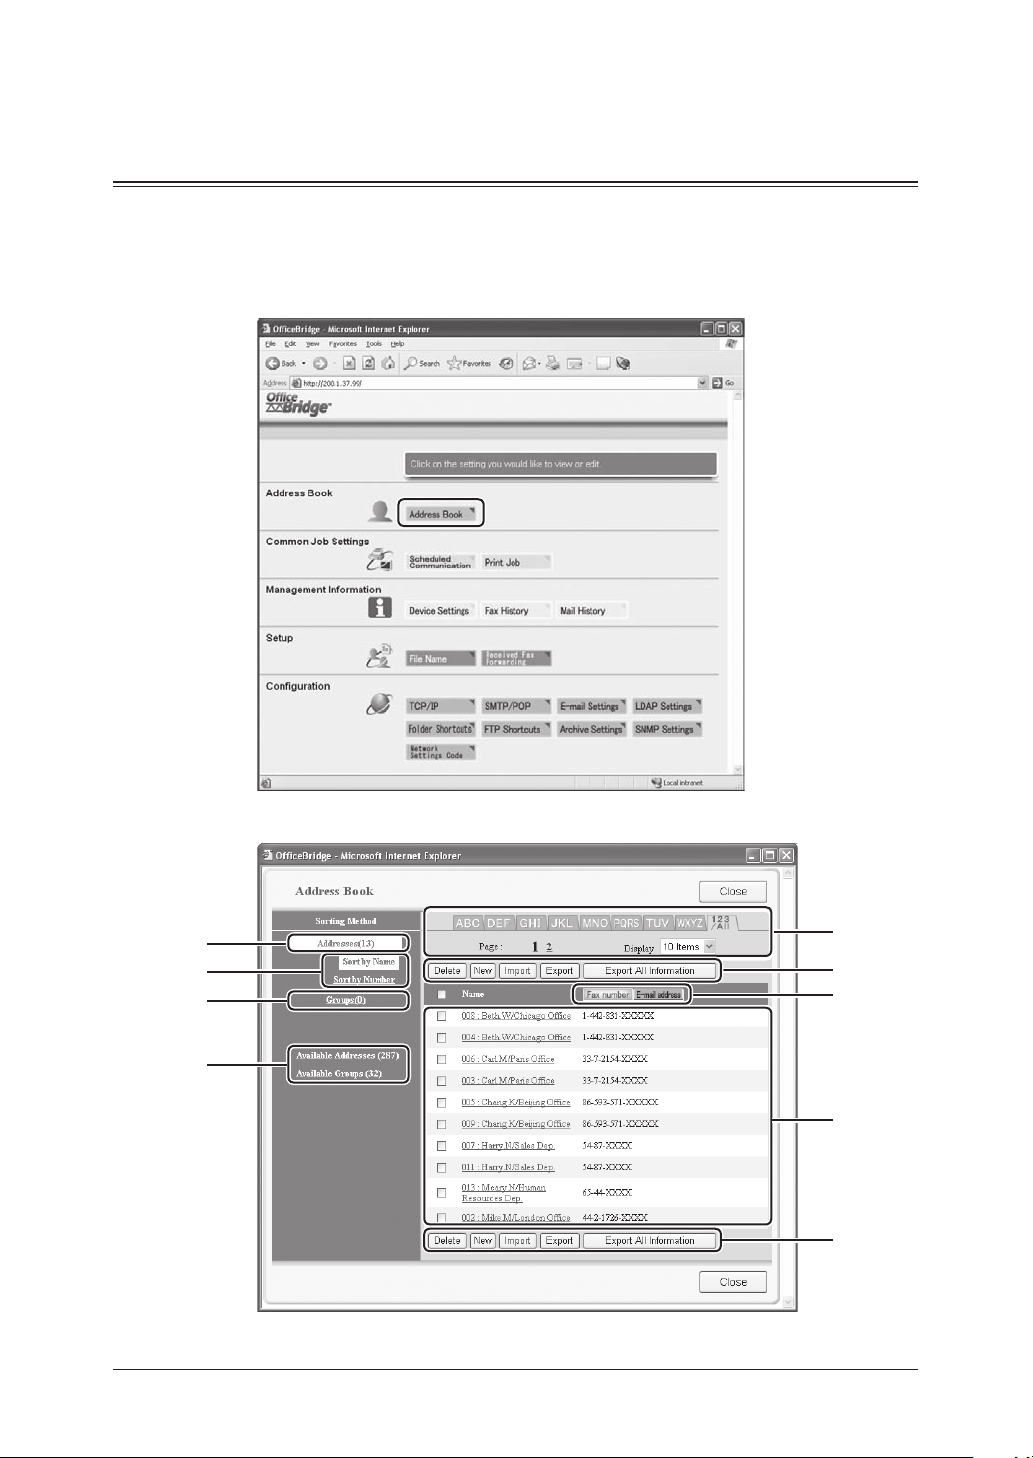
Registering or editing the Address Book
You can quickly register, edit or erase contact information in the address book.
Address Book
1 Click [Address Book] in the “Address Book” column.
2 The “Address Book” display appears.
A
B
C
D
E
F
G
H
F
Page 64

Item
A Click “Address (13)” to display the registered addresses. The number indi-
cates how many addresses have been registered.
B
• Sort by Name
The registered addresses are displayed in alphabetical order.
• Sort by Number
The registered addresses are displayed in the address book number order.
C Click “Groups (0)” to display the registered groups. The number in parenthe-
sis indicates how many groups have been registered.
D Displays the empty address book and group numbers.
E • Index tab
Appears only when the registered addresses are displayed in alphabetical
order.
The registered addresses are sorted in alphabetical, number and symbol
order.
When the [123/All] tab is clicked, all the addresses will be displayed.
• Page
Proceeds to the next page of the address book.
The underlined numbers indicate pages that can be displayed; the number
that is not underlined indicates the page currently being displayed.
• Display
Sets the number of addresses to be displayed (10, 20, or all).
F • [Delete]
To delete an address, click [Delete] after selecting the address you want to
delete.
• [New]
To add a new address, click [New]. When the Address Book Entry display
appears, register the new address information.
NOTE: [New] is not displayed when “Sort by Number” is selected. In this
case, click an address book number directly to register the new
address.
• [Import]
Data written in CSV or vCard format can be imported.
• [Export]
The selected address information can be exported to a CSV or vCard file.
• [Export All Information]
All the registered address information can be exported to a CSV format or
vCard format file.
G Click [Fax number] or [E-mail address] to confirm the entry.
H The registered addresses will be listed in this area.
1
2
3
4
5
6
7
8
Using the Web Browser
9
10
11
12
13
14
A
5-5Using the Web Browser
Page 65
5-6 Using the Web Browser
Job management
You can manage the following jobs:
• [Scheduled Communication]
This confirms scheduled fax and e-mail communications and canceling communication.
• [Print Job]
This confirms the print job status and allows you to quickly cancel a job in queue.
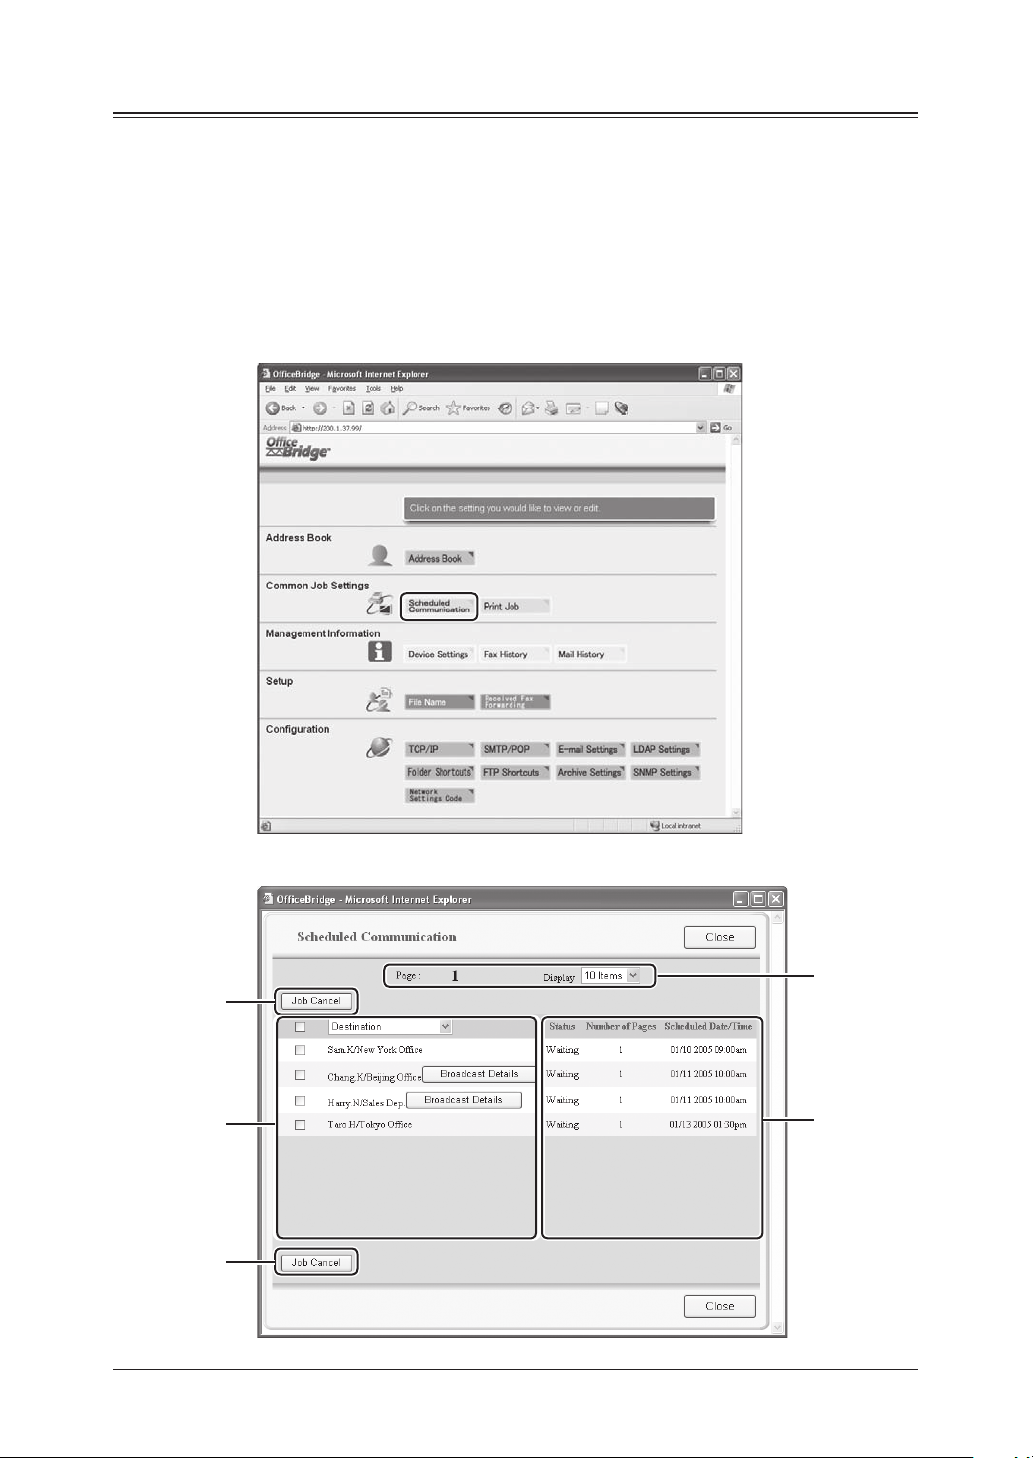
Scheduled Communication
1 Click [Scheduled Communication] in the “Common Job Settings” column.
2 The “Scheduled Communication” display appears.
A
B
A
D
C
Page 66
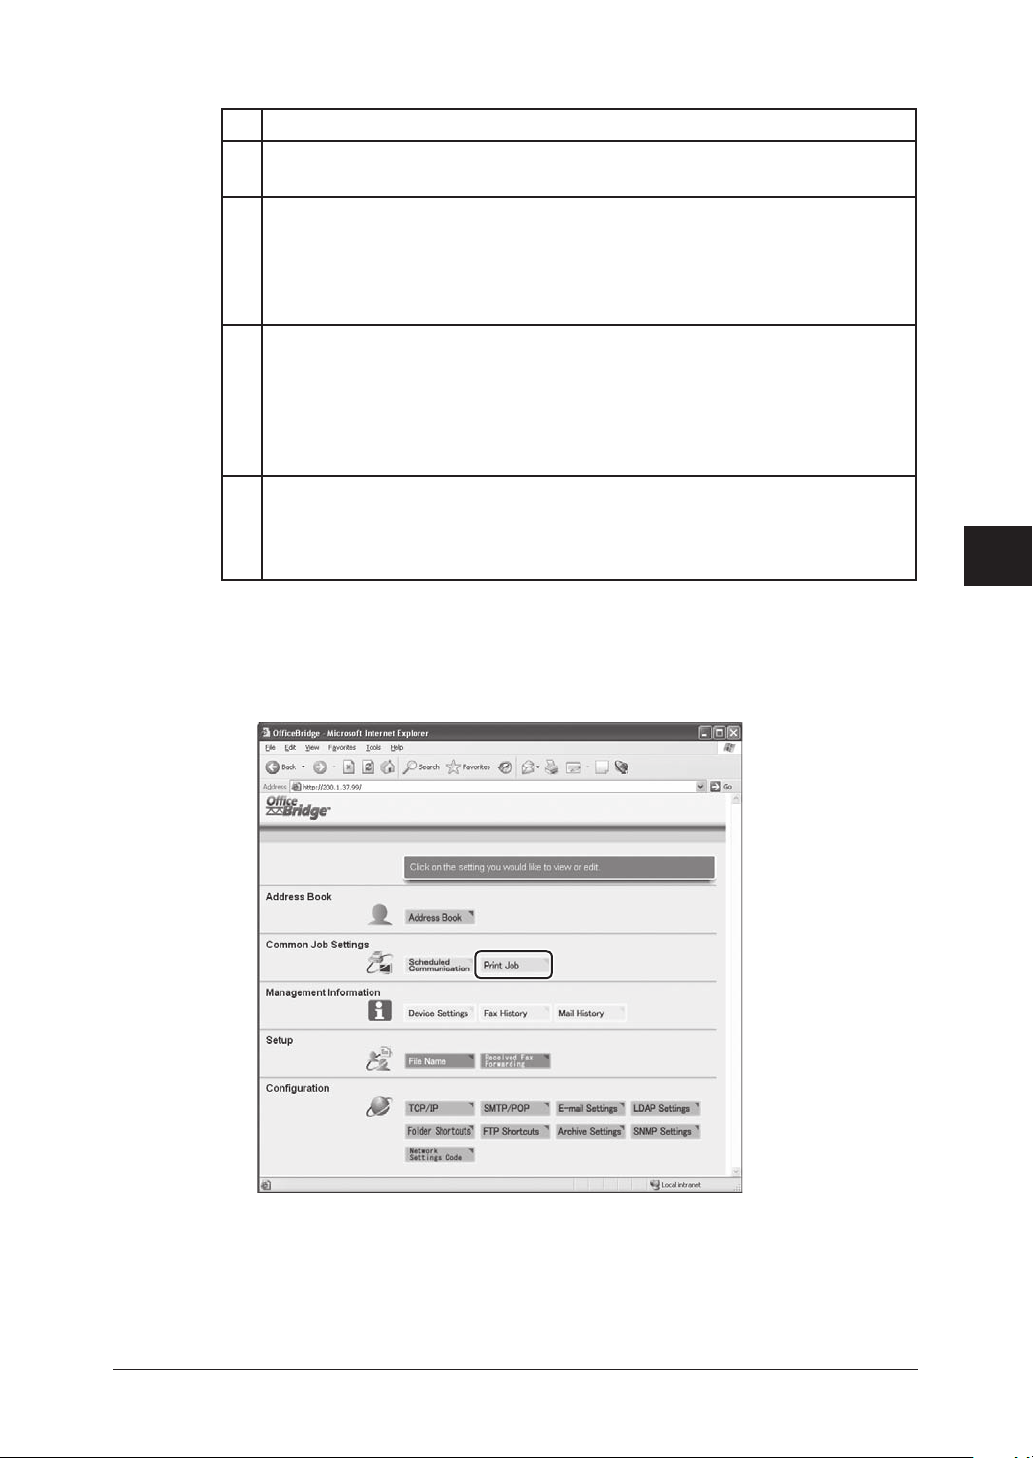
Print Job
Item
A Click [Job Cancel] after selecting the job you want to cancel.
Click [OK] to cancel the selected job.
B The destination will be displayed.
If the job is part of a broadcast, the [Broadcast Details] will appear. You can
confirm the destinations by clicking this.
When you select a destination from the drop down list, the scheduled job is
narrowed down by the selected destination.
C • Status
The current status of the scheduled communication will be displayed.
• Number of Pages”
The number of pages to be transmitted will be displayed.
• Scheduled Date/Time
The date and time scheduled for the start of communications are displayed.
D • Page
Proceeds to the next page of scheduled communications.
• Display
Sets the number of communications to be displayed (10, 20, or all).
1 Click [Print Job] in the “Common Job Settings” column.
1
2
3
4
5
6
7
8
Using the Web Browser
9
10
11
12
13
14
A
5-7Using the Web Browser
Page 67
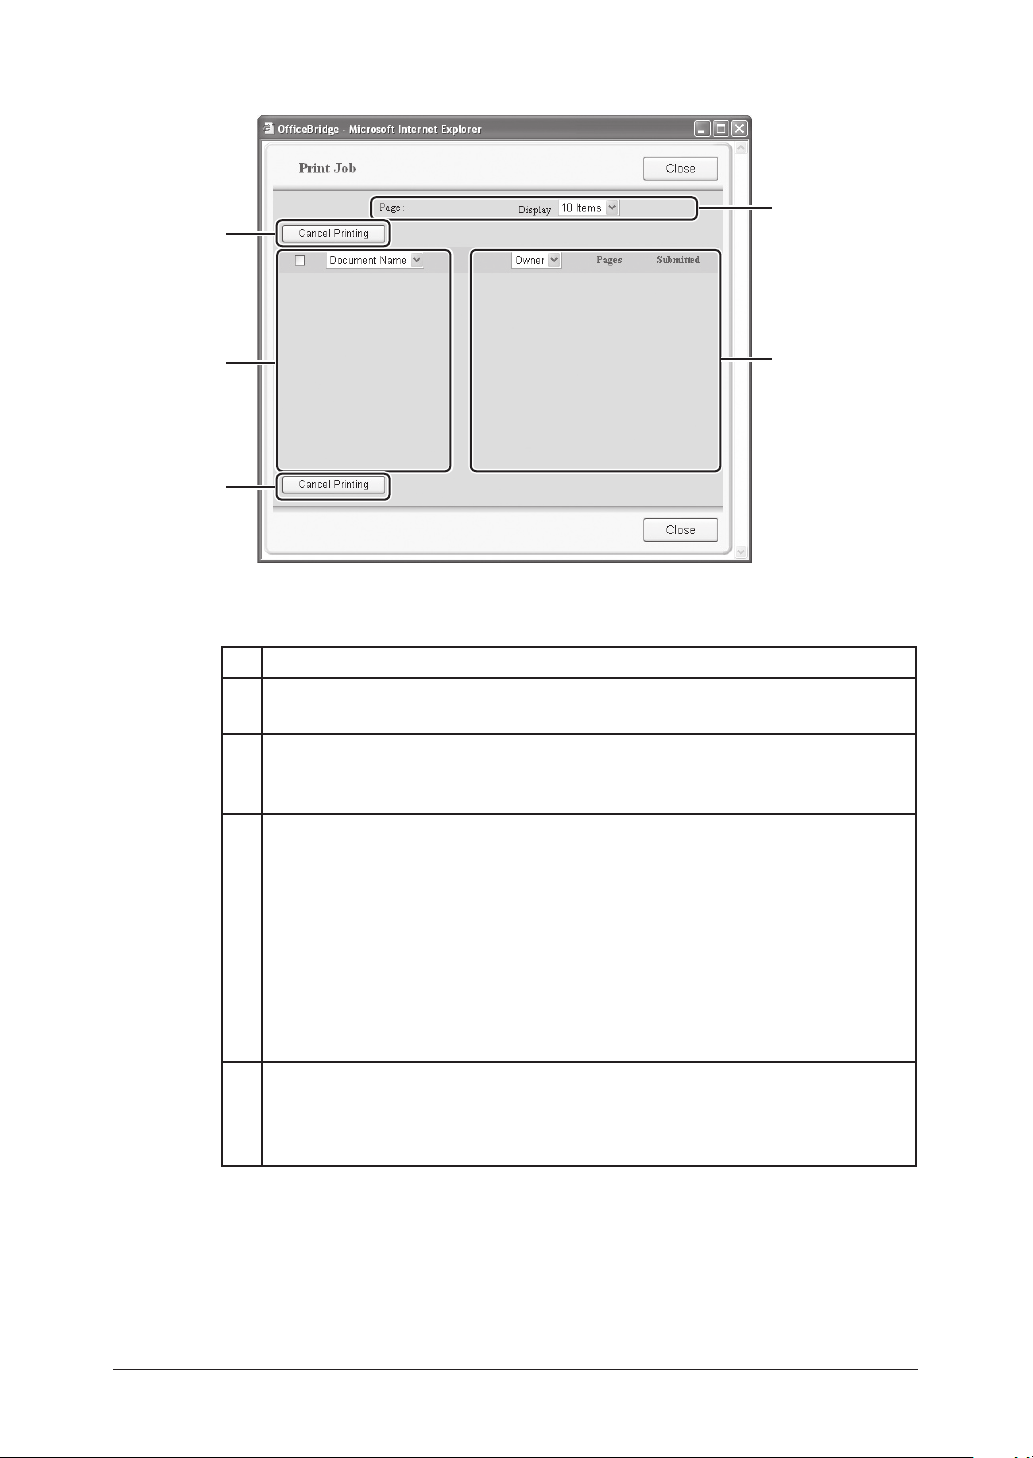
5-8 Using the Web Browser
2 The “Print Job” display appears.
A
D
B
A
C
Item
A Click [Cancel Printing] after selecting the job you want to cancel. Click [OK]
to cancel the selected job.
B The file name of the document will be displayed.
When you select a file name from the drop down list, the print job is narrowed down by the selected file name.
C • Owner
The name of the computer that sent the document to the printer will be
displayed.
If you select a computer name from the drop down list, the list will only
show documents sent from that computer.
• Pages
The number of pages that have been printed and the total number of pages
in the document.
• Submitted
The date and time that the document was sent to the printer will be shown.
D • Page
Proceeds to the next page.
• Display
Sets the number of jobs to be displayed (10, 20, or all).
Page 68
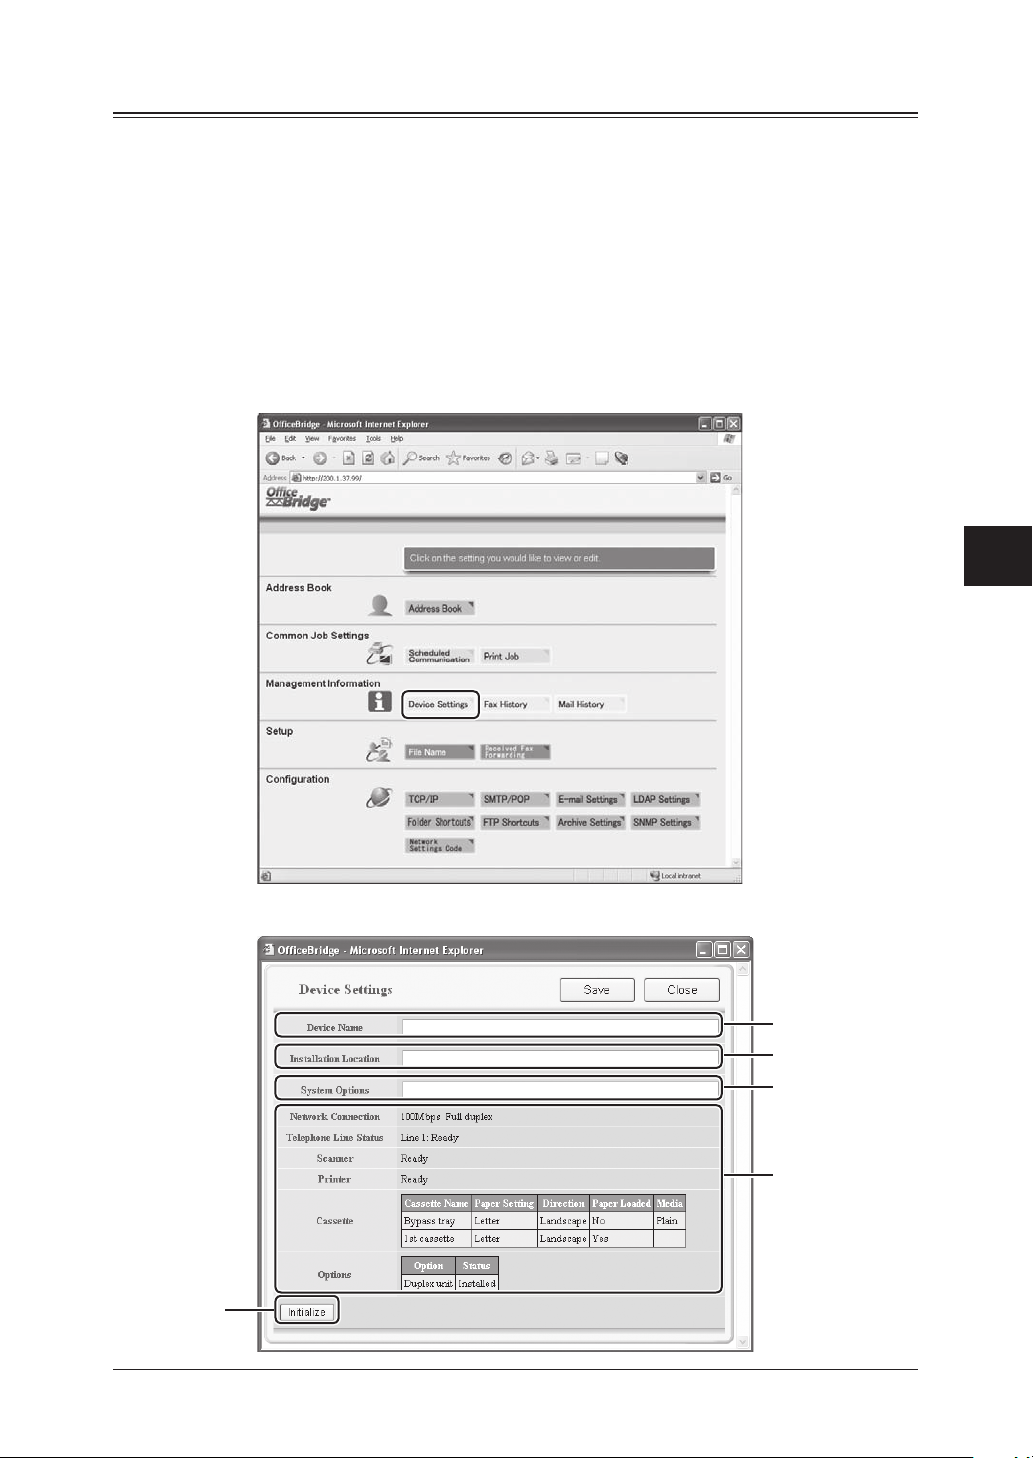
Confirming the device information, Fax history, Mail history
You can confirm the following items:
• Device Settings
Confirm the device information on your machine.
• Fax History
View the fax sending/receiving history.
• Mail History
View the e-mail sending/receiving history.
(Result of I-Fax transactions are included in the Mail history.)
Device Settings
1 Click [Device Settings] in the “Management Information” column.
1
2
3
4
5
6
2 The “Device Settings” display appears.
7
8
Using the Web Browser
9
10
11
A
B
C
12
13
D
14
E
5-9Using the Web Browser
A
Page 69

5-10 Using the Web Browser
Item
A Device Name Enter the name of the machine.
The name can contain up to 40 characters.
B Installation Location Enter the machine’s location.
The location can contain up to 100 characters.
C System Options Select ant options that have been installed on your
machine.
You can enter up to 200 characters.
D Network Connection The current network communications speed and
method are displayed.
Telephone Line Status The current telephone line status is displayed.
Scanner The current scanner status is displayed.
Printer The current printer status is displayed.
Cassette The current cassette status is displayed.
Options The optional duplex print unit status is displayed.
E Initialize Clears the “Device Name”, “Installation Location”
and “System Option” entries.
Save Saves the settings you entered.
Close Closes “Device Settings”.
Page 70
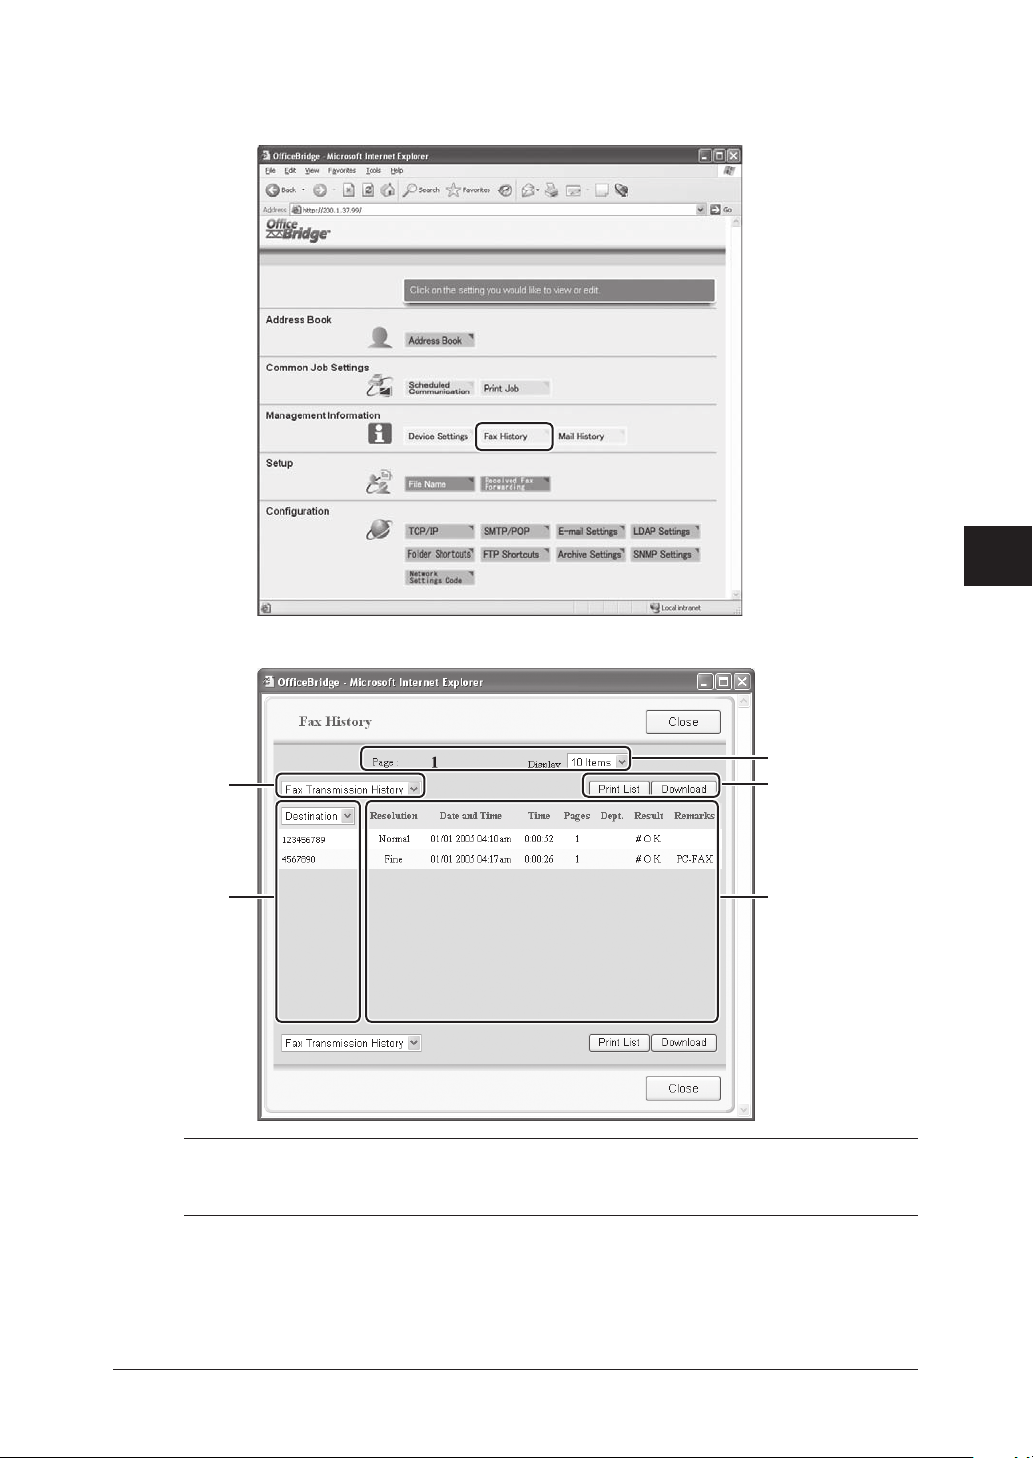
Fax History
1 Click [Fax History] in the “Management Information” column.
2 The “Fax History” dialog appears.
1
2
3
4
5
6
E
A
B
NOTE: The fax history will display a maximum of 100 transmissions – sending and
receiving. Once the limit has been reached the machine will delete the oldest
entry in order to make room for the newest entry.
D
C
7
8
Using the Web Browser
9
10
11
12
13
14
A
5-11Using the Web Browser
Page 71

5-12 Using the Web Browser
Item
A Select either “Fax Transmission History” or “Fax Reception History”.
B The destination will be displayed.
If you select a destination from the drop down list, the history will only show
the communications for that destination.
C • Resolution
Fax resolution.
• Date and Time
The date and time at which the fax was sent.
• Time
The total time of transmission.
• Pages
The number of pages in the fax.
• Dept.
The department code.
• Result
The result of call.
If preceded by an asterisk (*), this signifies an ECM communication.
If preceded by a pound (#), this signifies a super G3 communication.
• Remarks
Additional remarks may be displayed.
For example, a faxing from a network computer will appear as “PC-Fax”.
D • [Print List]
Click [Print List] and select [OK]. The fax history will be printed on the
machine.
• [Download]
Click [Download] and select [OK]. When the Windows file download box
appears follow the instructions.
The fax history will be downloaded to a specified location on the computer
as a CSV file.
E • Page
Proceeds to the next page of the fax history.
• Display
Sets the number of communications to be displayed (10, 20, or all).
Page 72
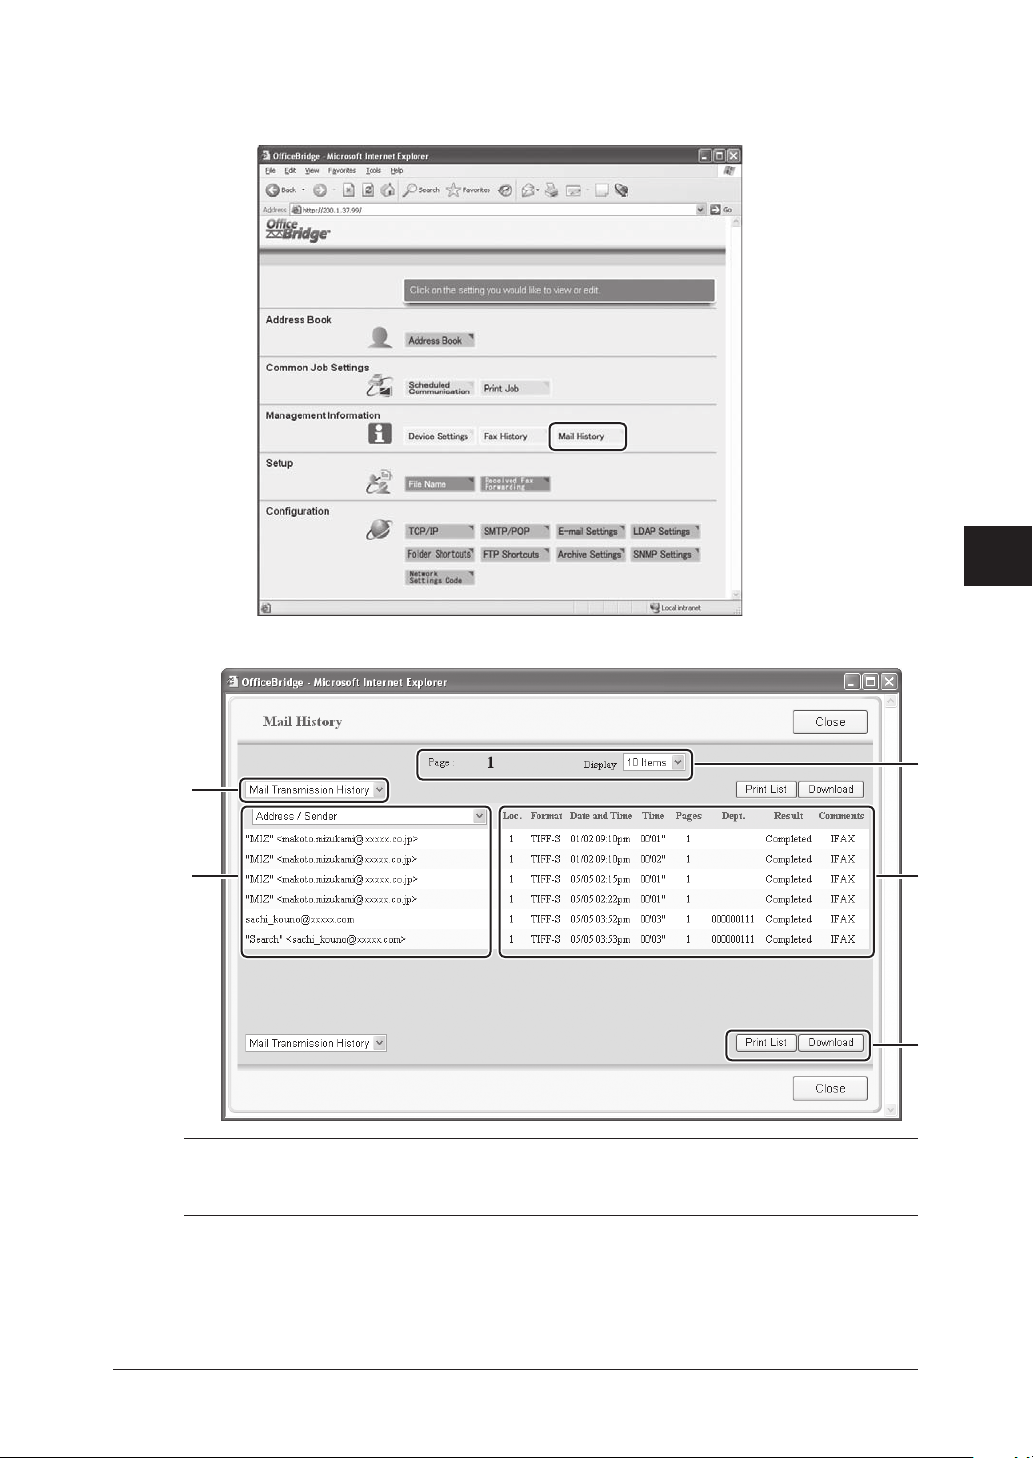
Mail History
1 Click [Mail History] in the “Management Information” column.
2 The “Mail History” dialog appears.
1
2
3
4
5
6
A
B C
NOTE: The e-mail history displays a maximum total of 100 transmissions – sending
and receiving. Once the limit has been reached the machine will delete the oldest entry in order to make room for the newest entry.
7
D
8
Using the Web Browser
9
10
11
E
12
13
14
A
5-13Using the Web Browser
Page 73

5-14 Using the Web Browser
Item
A Select either “Mail Transmission History” or “Mail Reception History” as the
fax history to be displayed.
B In the “Mail Transmission History” mode, the destination of the e-mail
transmission is displayed. When you select a destination from the drop down
list, the displayed history will only include that destination history.
In “Mail Reception History” mode, the e-mail sender is displayed. When
you select a sender from the drop down list, the displayed history will only
include that sender’s history.
C • Loc.
Number of locations the e-mail was sent.
• Format
The file format of the e-mail attached.
• Date
The date and time at which the e-mail was sent.
• Time
The e-mail transmission time.
• Pages
The number of pages in the e-mail.
• Dept.
The department code.
• Result
The result of e-mail.
• Comments
Any additional remarks will be displayed.
D • Page
Proceeds to the next page of the mail history.
• Display
Sets the number of communications to be displayed (10, 20, or all).
E • [Print List]
Click [Print List] and select [OK]. The mail history will be printed on the
machine.
• [Download]
Click [Download] and select [OK]. The download prompt will be displayed.
Follow the instructions.
The fax history will be downloaded as a CSV file.
Page 74
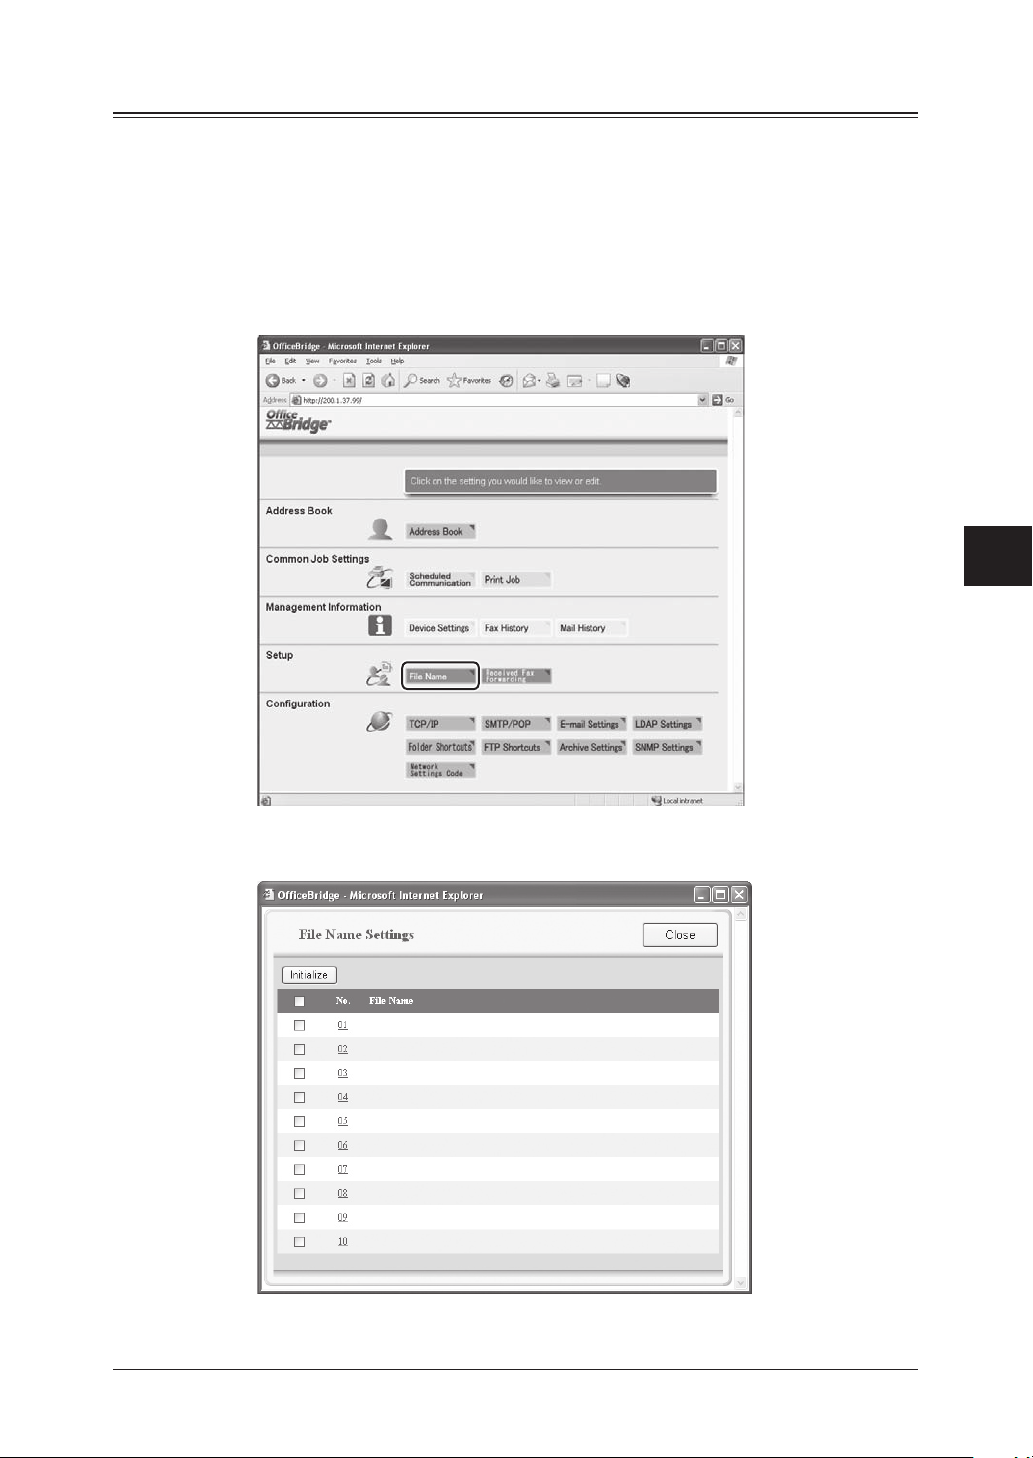
Setting-up the file name for scanning, forwarding box
You can setup the following items:
• File Name
This allows you to have up to 10 commonly used file name stored in memory.
• Received Fax Forwarding
This sets the fax forwarding rule. You can configure up to 5 rules.
Adding or editing a File Name
1 Click [File Name] in the “Setup” column.
1
2
3
4
5
6
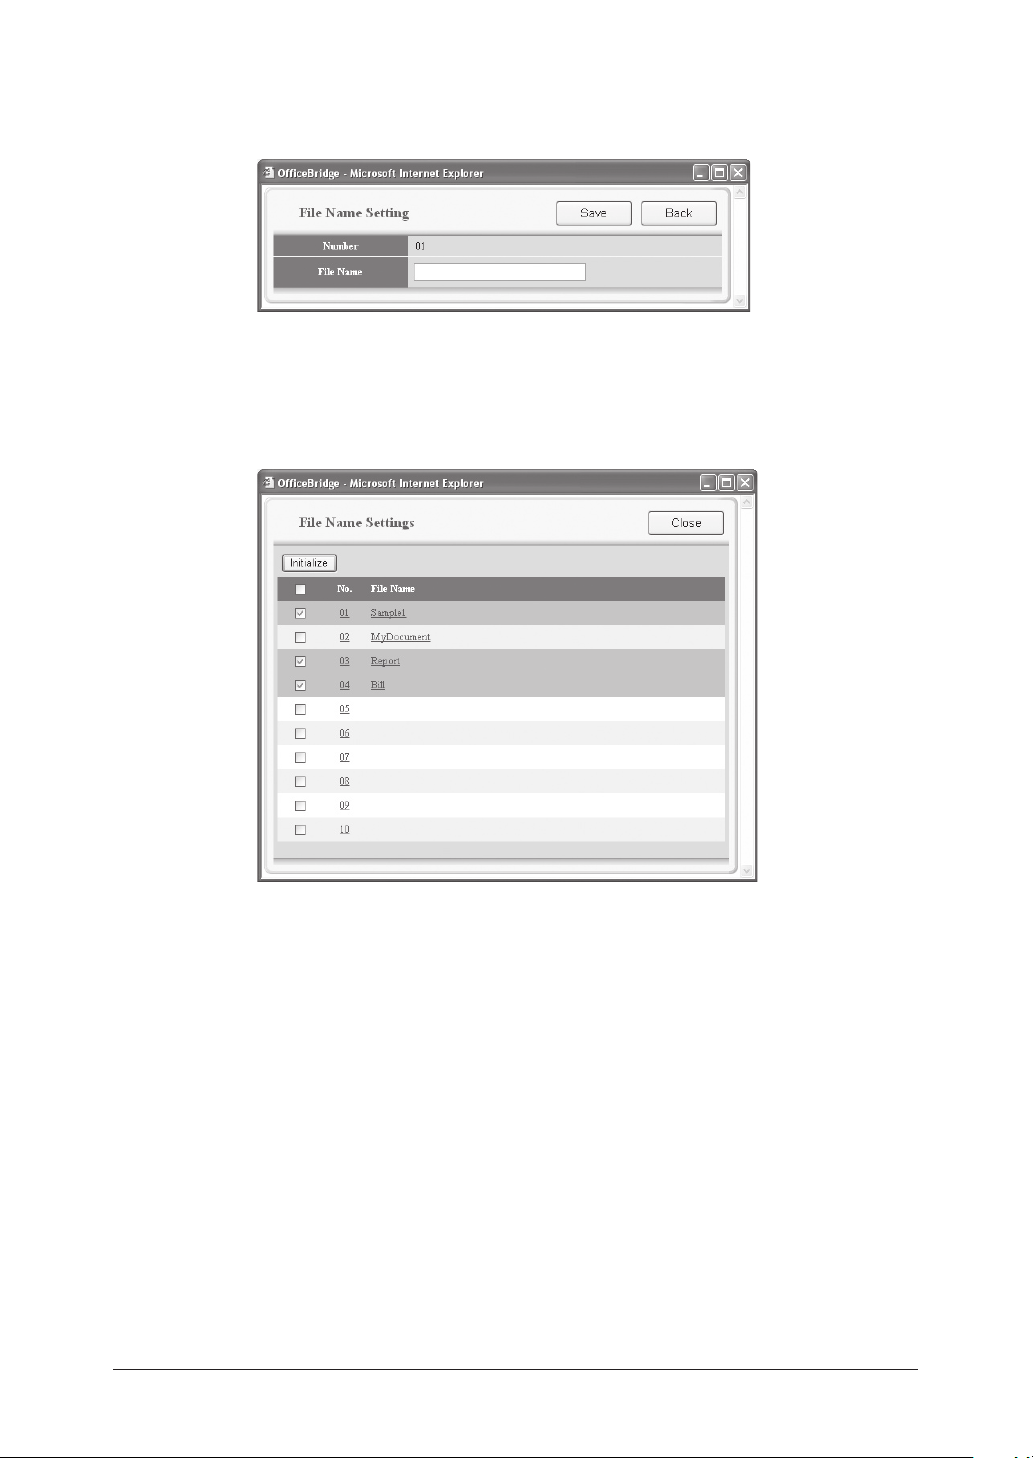
2 The “File Name Settings” dialog box appears.
Click the number you want to set.
7
8
Using the Web Browser
9
10
11
12
13
14
A
5-15Using the Web Browser
Page 75
5-16 Using the Web Browser
3 The “File Name Setting” dialog box appears.
Enter the file name in the “File Name” field.
The name can contain up to 20 characters.
4 Click [Save] to save the file name.
Erasing the File Name
1 Click the No. of the file name you want to erase in “File Name Settings”.
2 Click [Initialize].
The confirmation dialog box appears.
3 On the confirmation dialog box, click [OK] to erase the file name you have
selected. Otherwise, click [Cancel to abort the operation.
Page 76
Received Fax Forwarding
You can set the forwarding condition of received fax and e-mail.
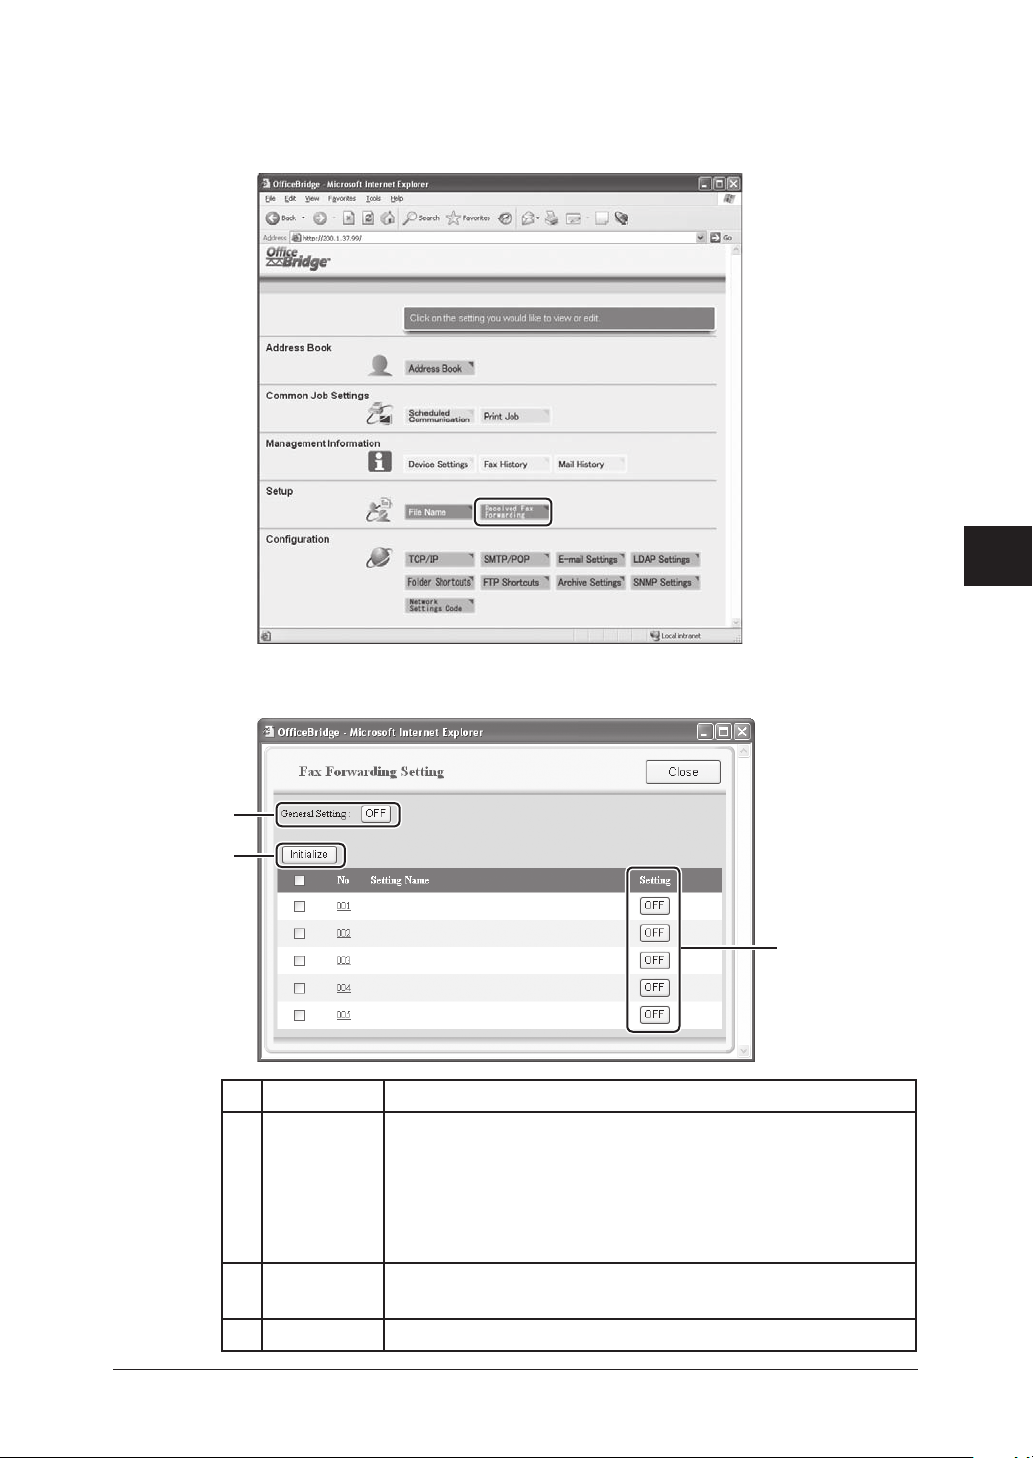
1 Click [Received Fax Forwarding] in the “Setup” column.
1
2
3
4
5
2 The “Fax Forwarding Setting” dialog box appears.
Click a setting number you want to configure.
A
C
Item Description
A General
Setting
B Setting Specifies whether to enable the forwarding setting.
C Initialize Clears the selected forwarding setting.
Specifies whether to enable the Forwarding feature.
You can toggle “ON” or “OFF” by clicking the button.
When this setting is “OFF”, the forwarding feature does not
function even though each forwarding setting is “ON”.
To turn this button to on, at least one forwarding setting
must be registered.
You can change “ON” or “OFF” by clicking the button.
6
7
8
Using the Web Browser
9
10
B
11
12
13
14
A
5-17Using the Web Browser
Page 77
5-18 Using the Web Browser
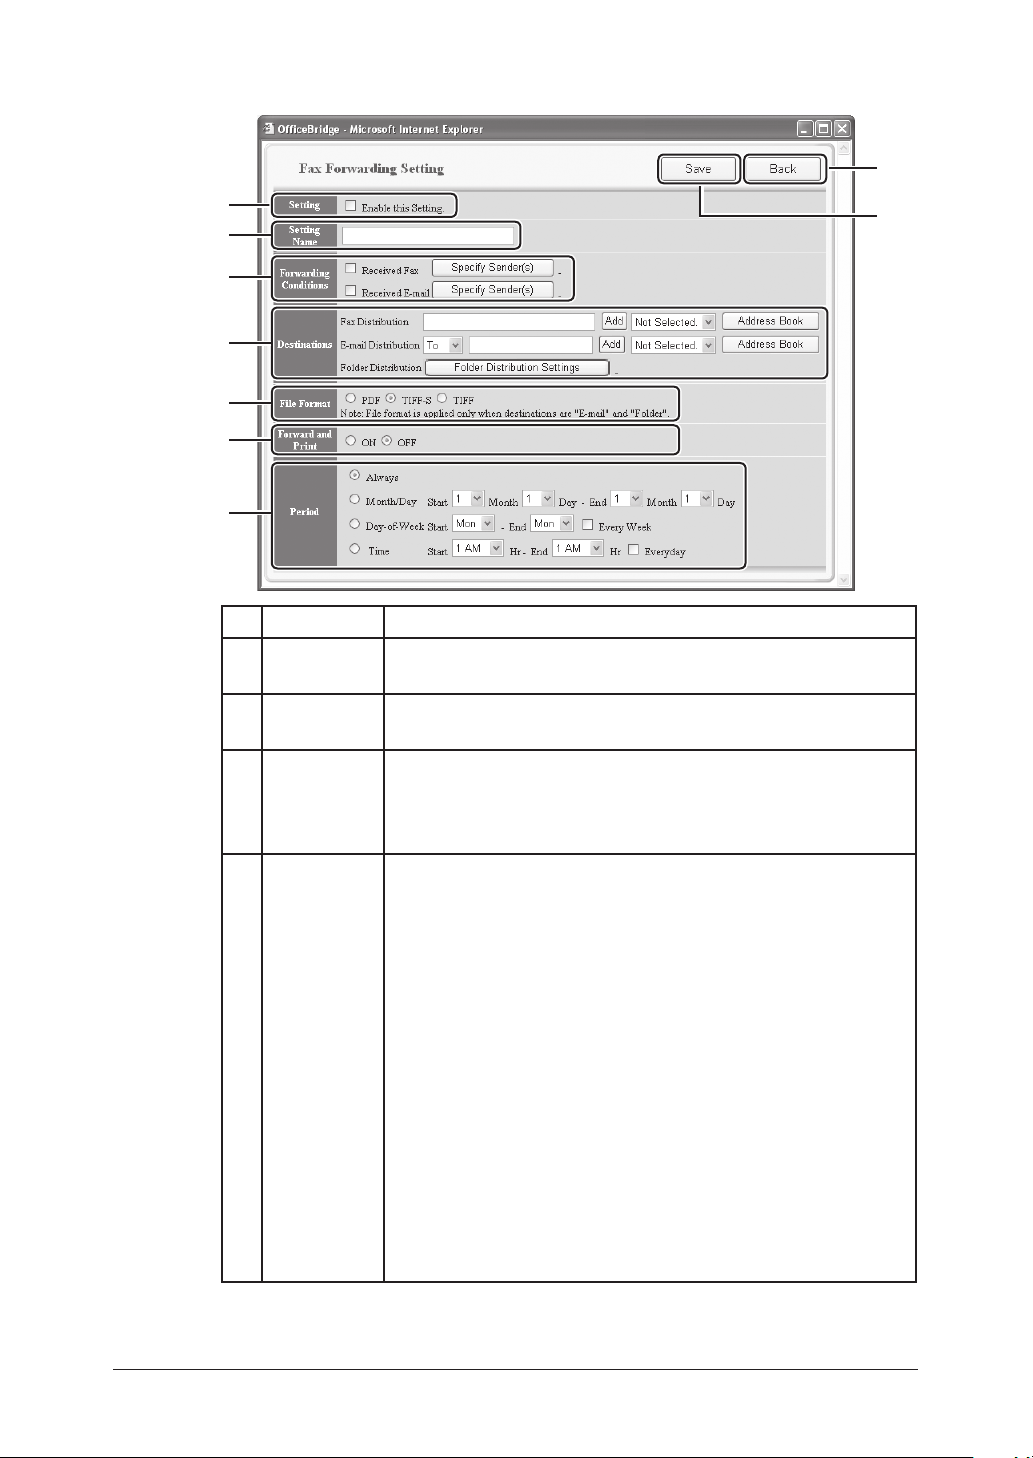
3 Configure the settings.
H
A
B
C
D
E
F
G
Item Description
A Setting Specifies whether to enable the setting you have configured.
Check this box to enable the setting.
B Setting
Name
C Forwarding
Conditions
D Destinations Specifies the forwarding destination.
Enter the name of this setting.
Select the forwarding checkbox.
If you want to allow forwarding to a specified sender only; (1)
click [Specify Sender(s)], (2) enter the detail conditions, (3)
click [Save].
The received fax or e-mail will be forwarded to all destination
specified here.
• To specify the fax number
(1) Enter the fax number.
(2) Click [Add].
– or –
(1) Click [Address Book].
(2) Select the destination.
(3) Click [Add].
(4) Click [Save].
I
• To delete the fax number from the forwarding destination
list
(1) Click [Address Book].
(2) Select destination.
(3) Click [Delete].
(4) Click [Save].
Page 78

• To specify the e-mail address
(1) Enter the e-mail address.
(2) Click [Add].
– or –
(1) Click [Address Book].
(2) Select the destination.
(3) Select “To”, “Cc”, or “Bcc”, if necessary.
(4) Click [Add].
(5) Click [Save].
1
• To delete the e-mail address from the forwarding destination list
(1) Click [Address Book].
(2) Select the destination.
(3) Click [Delete].
(4) Click [Save].
• To specify a shared Windows folder
(1) Click [Folder Distribution Settings].
(2) Enter the folder path, user name and password.
– or –
(1) Click [Folder Distribution Settings].
(2) Click [Shortcut List].
(3) Select the folder shortcut and click [Add].
(4) Click [Save].
• To delete the folder shortcut from the forwarding destination list
(1) Click [Folder Distribution Settings].
(2) Delete the settings in “Manual Entry” column.
– or –
(1) Click [Folder Distribution Settings].
(2) Click [Shortcut List].
(3) Select the folder shortcut and click [Delete].
(4) Click [Save].
E File Format Selecting the forwarded documents file format.
F Forward
and Print
G Period This sets the forwarding period for the received document. To
H Save Saves the settings you entered.
I Close Closes the “Fax Forwarding Settings” dialog box.
Selecting whether or not to print the document prior to for-
warding it.
specify the forwarding period, click one of the following and
set the period.
• “Always”
• “Month/Day”
• “Day-of-week”
• “Time”
2
3
4
5
6
7
8
Using the Web Browser
9
10
11
12
13
14
A
5-19Using the Web Browser
Page 79

5-20 Using the Web Browser
Configuring the network settings
You can configure the following items:
• TCP/IP
This sets the TCP/IP network environment (IP address, subnet mask, etc.)
• SMTP/POP
This sets the e-mail server settings (e-mail address, servers, etc.)
• E-mail Settings
This sets the e-mail settings, such as attachment format, e-mail template registrations, etc.
• LDAP Settings
This sets the LDAP server settings.
• Folder Shortcuts
This sets the folder shortcuts.
• FTP Shortcuts
This sets the FTP server shortcuts.
• Archive Settings
This creates the archiving rules for “fax”, “Internet fax”, and “scan to e-mail” communications.
• SNMP Settings
This sets the SNMP settings.
• Network Settings Code
This sets the protection passcode for the network settings.
Page 80
TCP/IP settings
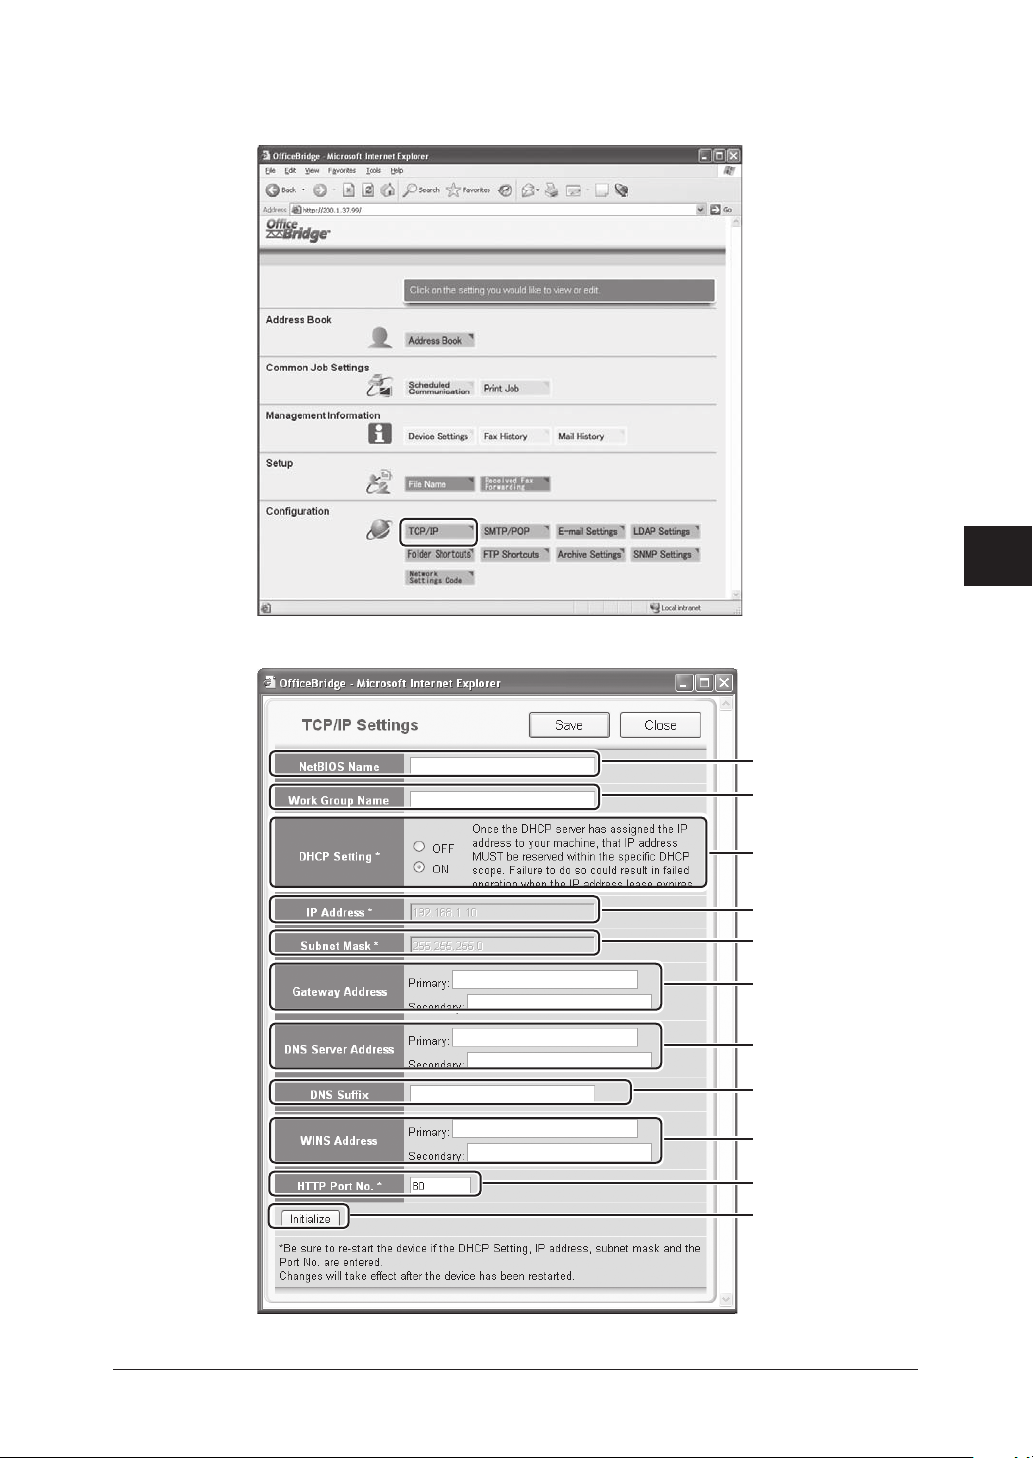
1 Click [TCP/IP] in the “Configuration” column.
2 The “TCP/IP Settings” dialog box appears.
1
2
3
4
5
6
7
A
B
C
D
E
F
8
Using the Web Browser
9
10
11
G
H
I
J
K
12
13
14
A
5-21Using the Web Browser
Page 81

5-22 Using the Web Browser
Item Description
A NetBIOS
Name
B Work Group
Name
C DHCP
Setting
Enter the NetBIOS name.
• A NetBIOS name can be up to 15 alphanumeric characters
and the “–” symbol with no blank spaces.
• The NetBIOS name must be unique on the network.
Enter the name of the workgroup to which your machine
belongs.
If there is not a workgroup on your network, create a workgroup on Windows. A domain name cannot be used as a
workgroup name.
• If there is no workgroup in your network, create a new
workgroup by typing a new name that contains up to 15
characters. The name cannot include symbols and blank
spaces. The name can include alphanumeric and the following symbols: ! @ # $ % ^ & ( ) – _ ` { } . ~
Consult with your network administrator before creating a
new workgroup.
• Cannot enter a domain name as a work group.
• The NetBIOS name must be unique on the network.
If a DHCP server is installed on your network, select “ON”.
After rebooting the machine, an IP address and Subnet Mask
will be automatically assigned by the DHCP server. According
to the DHCP server setting, a primary gateway address and
primary DNS server address may be assigned.
If your network is not using DHCP, select “OFF”.
IMPORTANT: Once the DHCP server has assigned the IP
address to your machine, that IP address MUST be reserved
within the specific DHCP scope. Failure to do so could result
in failed operation when the IP address lease expires.
D IP Address Enter the IP address of your machine.
E Subnet
Mask
F Gateway
Address
G DNS Server
Address
H DNS Suffix Enter the DNS suffix.
I WINS
Address
J HTTP Port
No.
K Initialize Initialize the TCP/IP settings. The settings will return to the
3 When you have finished the entering, click [Save] to save the settings.
4 Reboot the machine to activate the new settings. Turn the machine off and
after three or more seconds, turn it back on.
Enter the IP address for the subnet mask.
Enter the IP address of the gateway.
Enter the IP address of the DNS server.
Enter the IP address of the WINS server.
This sets the HTTP port number for connecting the optional
“OfficeBridge Expansion Kit” from your web browser.
Normally, set to “80”.
factory default setting.
Page 82
SMTP/POP server settings
1 Click [SMTP/POP] in the “Configuration” column.
2 The “TCP/IP Settings” dialog box appears.
1
2
3
4
5
6
7
A
8
Using the Web Browser
9
B
10
11
C
12
13
14
A
5-23Using the Web Browser
Page 83

5-24 Using the Web Browser
Item Description
A Name This name will be displayed in the “From” field when you
send e-mail.
Up to 40 characters can be registered.
E-mail Address Enter the e-mail address that is assigned to your machine.
Sender Information
Up to 50 characters can be registered.
B Sending mail
(SMTP) Server
Receiving mail
(POP3) Server
User ID for
POP3
Password for
POP3
Check for New
Mail
Mail Server
Receive before
Send
SMTP Port No. Enter the SMTP port number. (0–65535)
POP3 Port No. Enter the POP port number. (0–65535)
Select POP3
Auth. Method
Enter the domain name or IP address of the SMTP server
used for sending e-mail.
When entering a domain name, it can be entered up to 50
characters.
Enter the domain name or IP address of the POP3 server
used for receiving e-mail.
When entering a domain name, it can be entered up to 50
characters.
Enter the user ID for the POP3 server.
Up to 50 characters can be registered.
Enter the password for the POP3 server.
Up to 50 characters can be registered.
Set the interval at which the mail server is checked for
new mail. The minimum value is 5 seconds and the maximum is 99 hr 59 min 59 sec.
The default value is 10 min.
If you want to check for mail manually, set all of these
values to “0”. In this case, you can receive an arrived e-mail
by the following procedures.
<Receiving e-mail manually>
1. Press [FAX] on the control panel of your machine.
2. Press [Others] on the display.
3. Press [Next] to show the next screen.
4. Press [Check Mail].
For some providers, POP authentication is required before
sending (send request to SMTP server). In this case, check
this item.
Normally, set to “25”.
Normally, set to “110”.
APOP (Authenticated POP) is a POP security protocol that
encrypts the POP password when connecting with the POP
server.
If APOP is available on the POP server you are using,
select “APOP”. Otherwise, select “Standard”.
Page 84

Item Description
B Select SMTP
Auth. Method
User ID for
SMTP
Password for
Mail Server
SMTP
C Initialize Initialize the SMTP/POP settings. The settings will return
3 When you are finished, click [Save] to save the settings.
Select the SMTP authentication method if the SMTP
server you are using requires authentication.
Enter the user ID for the SMTP server, if necessary.
It can be entered up to 50 characters.
Enter the password for the SMTP server, if necessary.
It can be entered up to 50 characters.
to the factory default setting.
1
2
3
4
5
6
7
8
Using the Web Browser
9
10
11
12
13
14
A
5-25Using the Web Browser
Page 85

5-26 Using the Web Browser
E-mail Settings
1 Click [E-mail Settings] in the “Configuration” column.
2 The “E-mail Settings” dialog box appears.
A
B
C
D
E
F
G
H
Page 86

Item Description
A Attach File
Format
B Insert Cover-
sheet (I-Fax)
or Subject/Text
(E-mail)
Specifies whether the document is converted into a “PDF”,
“TIFF-S” or “TIFF” format when sending an e-mail.
• [PDF]
The document is converted into PDF format. However, a
PDF file can only be transmitted to an e-mail inbox.
• TIFF-S (ITU-T T.37 simple mode)
The document is converted into a TIFF format based on
T.37 simple mode. T.37 is an international standard for
Internet faxing. When a document is sent in simple mode
format, it can be received normally by other Internet fax
devices. However, all attached documents are converted to
A4 size and 200 dpi resolution.
• [TIFF] (ITU-T T.37 full mode)
The document is converted into a TIFF format and is sent
at the original document size and resolution selected during scanning.
“TIFF Image Encoding Method” sets the image encoding
method for sending documents with “TIFF”. Select “MH”,
“MR”, “MMR”, or “JBIG”.
NOTE: This setting is effective only for an e-mail send-
Select whether to automatically attach the following preset
subject line and text message, into an e-mail if it is sent
without these items filled in by the user.
Subject: E-mail Message
Text: This is an e-mail message.
When “Insert text” is selected, you can also select whether
to add the sender information to the text.
The sender information can be stored in “SMTP/POP Settings” dialog. (Refer to page 5-23.)
ing from the PC. For the attached file format of an
e-mail sending from the machine, you can set it
using the machine’s control panel.
However, the “TIFF Image Encoding Method” setting is effective for both e-mail sending from PC
and e-mail sending from machine.
Please see the file attached.
1
2
3
4
5
6
7
8
Using the Web Browser
9
10
11
C E-mail
Template
NOTE: This setting is effective only for an e-mail sending
from the PC.
However, “The sender information” setting is effective for both e-mail sending from PC and e-mail
sending from machine.
Up to 10 e-mail templates can be registered for sending.
Registered e-mail templates can be accessed from the
machine when sending an e-mail.
To register an e-mail template, click the [E-mail Template
Registration] and subject the settings in “E-Mail Template
Registration”.
5-27Using the Web Browser
12
13
14
A
Page 87

5-28 Using the Web Browser
Item Description
D Show
recipients on
Tx e-mail
E When mail
that cannot
be analyzed is
received
F Request receipt
verification
when sending
mail
Select whether to list every recipients on the transmitted
e-mail (privacy issue).
In some cases, received e-mail cannot be correctly printed
due to the format of a received file. This mode allows you
to either return an error message to the sender or have the
message forwarded to another inbox.
• Return error notice to author
Returns an error notice to the author
• Return mail to author
Returns the original e-mail to the author.
• Forward mail to others
Forwards the e-mail to another e-mail address without
returning it to the author. You can set just one e-mail
address in which to forward mail that can not be analyzed. The forwarding e-mail address can contain up to
50 characters
This sets whether to request the receiver for delivery check
(DSN) or reading check (MDN) when sending e-mail.
• Delivery Status Notification (DSN) from receive
server
Requests a delivery confirmation.
• Message Disposition Notification (MDN) showing
that recipient read the mail
Requests a read receipt.
• Request both reception notifications
Requests both a delivery confirmation and a read receipt.
• Do not request either reception notifications
The delivery notification and read receipt will not be
requested.
G When mail
requesting
MDN is
received
H Initialize Initialize the e-mail settings. The settings will return to
NOTE: Some mail servers and e-mail reception software
will not respond to these requests.
Select whether to return a MDN (Message Disposition
Notification) when e-mail is received for which the sending
side requests an MDN.
• Do not send MDN
Not reply a MDN.
• Send MDN
Reply a MDN.
[Specify MDN Recipients]
This is set for replying to MDN only for e-mail received
from specific e-mail addresses or domain names.
Click the [Specify MDN Recipients], then register an
e-mail address or domain name. Up to five can be registered.
the factory default setting.
Page 88
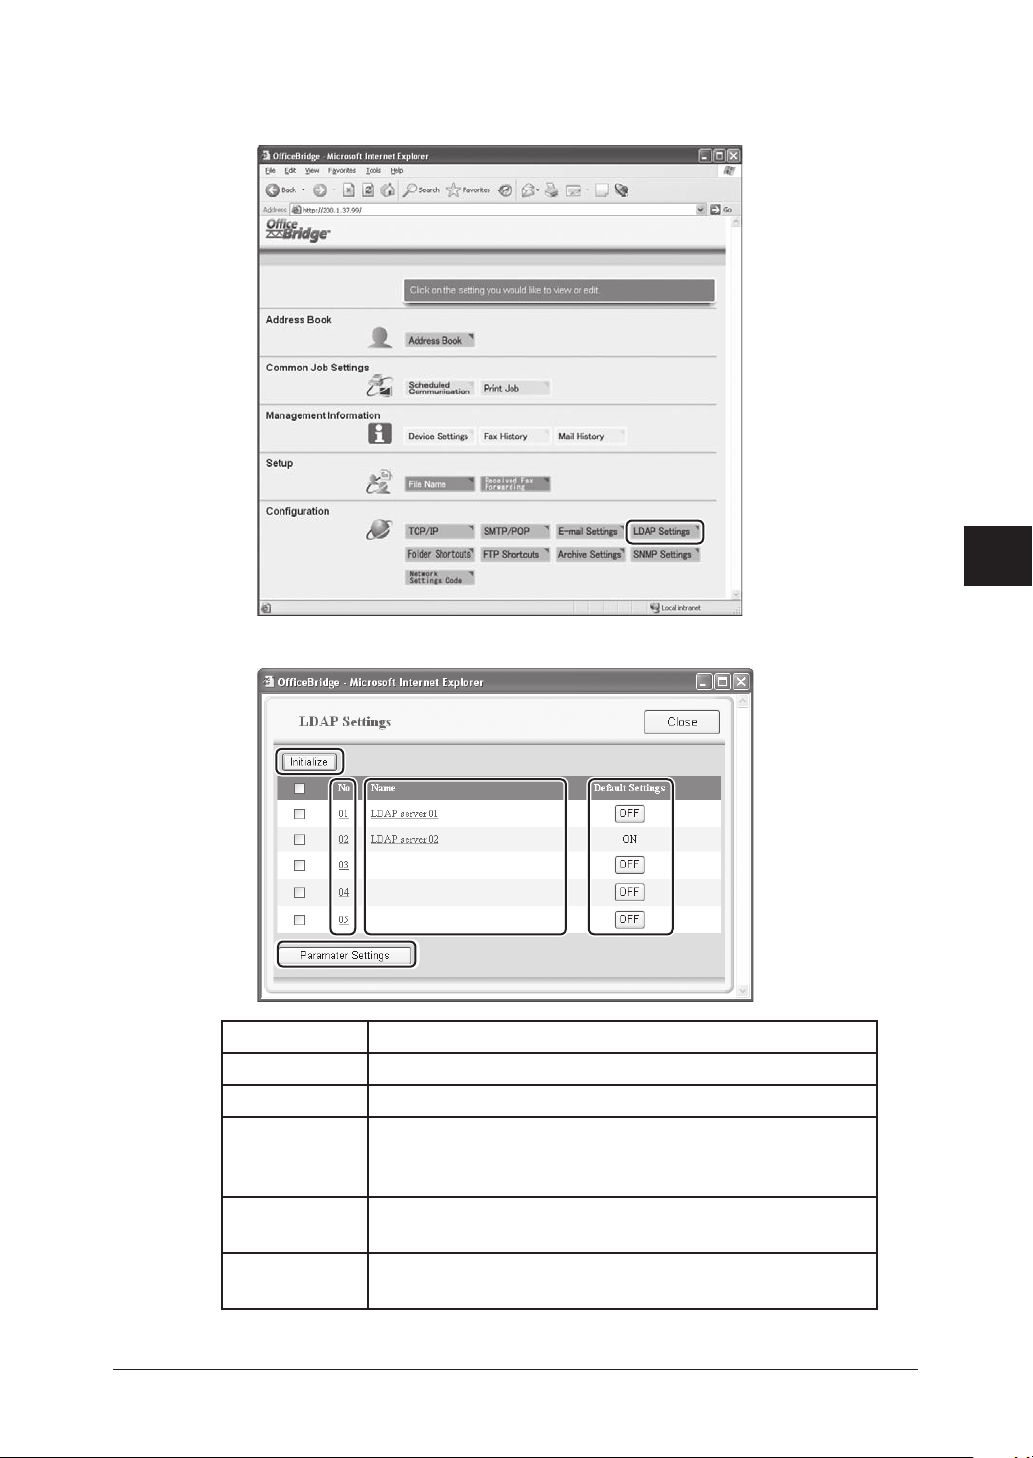
LDAP Settings
1 Click [LDAP Settings] in the “Configuration” column.
2 A list of registered LDAP server will be displayed.
1
2
3
4
5
6
Item Description
No The LDAP server number.
Name The registered LDAP server name.
Default Set-
tings
Initialize To clear the LDAP server settings, select the LDAP server
Parameter Settings
The default LDAP server.
To change the default server, select the [OFF] button of the
LDAP server you want to use as the default server.
you want to delete and select [Initialize].
Select this button to configure the LDAP parameters.
(Refer to page 5-33.)
7
8
Using the Web Browser
9
10
11
12
13
14
A
5-29Using the Web Browser
Page 89

5-30 Using the Web Browser
q Registering a new LDAP server
(1) Select a number (01 to 05) that has not been registered.
The “LDAP Server Settings” dialog appears.
(2) Configure the settings and click [Save].
Item Description
Name Enter the name for identification purposes.
Server Name Enter the LDAP server name.
IP Address Enter the IP address of the LDAP server.
• IP address is given to priority if both the LDAP server
name and IP address are registered.
Port Number Enter the port number that the LDAP server is using.
The default port number is 389.
Account Enter the account name used to log-on to the LDAP server.
Password Enter the password used to log-on to the LDAP server.
Login Required If the LDAP server requires authentication, select “Yes”.
User Login If the optional “OfficeBridge Expansion Kit” has been
installed, select “Yes”. Otherwise, select “No”.
Start Point Set the search start position when searching the LDAP
server.
Page 90

Item Description
Maximum
Results
Time Limit Enter the maximum search time.
Optional Settings
Default Server
Setting
Enter the maximum number of search results to be dis-
played.
• The number can be entered within the range of 1–100.
• The default number is 50.
• The time can be entered within the range of 0–9999
seconds.
• The default setting is “0” (unlimited setting).
Attribute
Enter an attribute for LDAP searching.
Value
Enter a value you want to search.
Searching method
Any: Displays the search results that contain the value you
entered.
Initial: Displays the search results that begin from the
value you entered.
Final: Displays the search results that end with the value
you entered.
Equal: Displays the search results that match up with the
value you entered.
Not Use: Ignores the value you entered.
Select whether to make this server the default server.
1
2
3
4
5
6
7
8
Using the Web Browser
9
10
11
12
13
14
A
5-31Using the Web Browser
Page 91
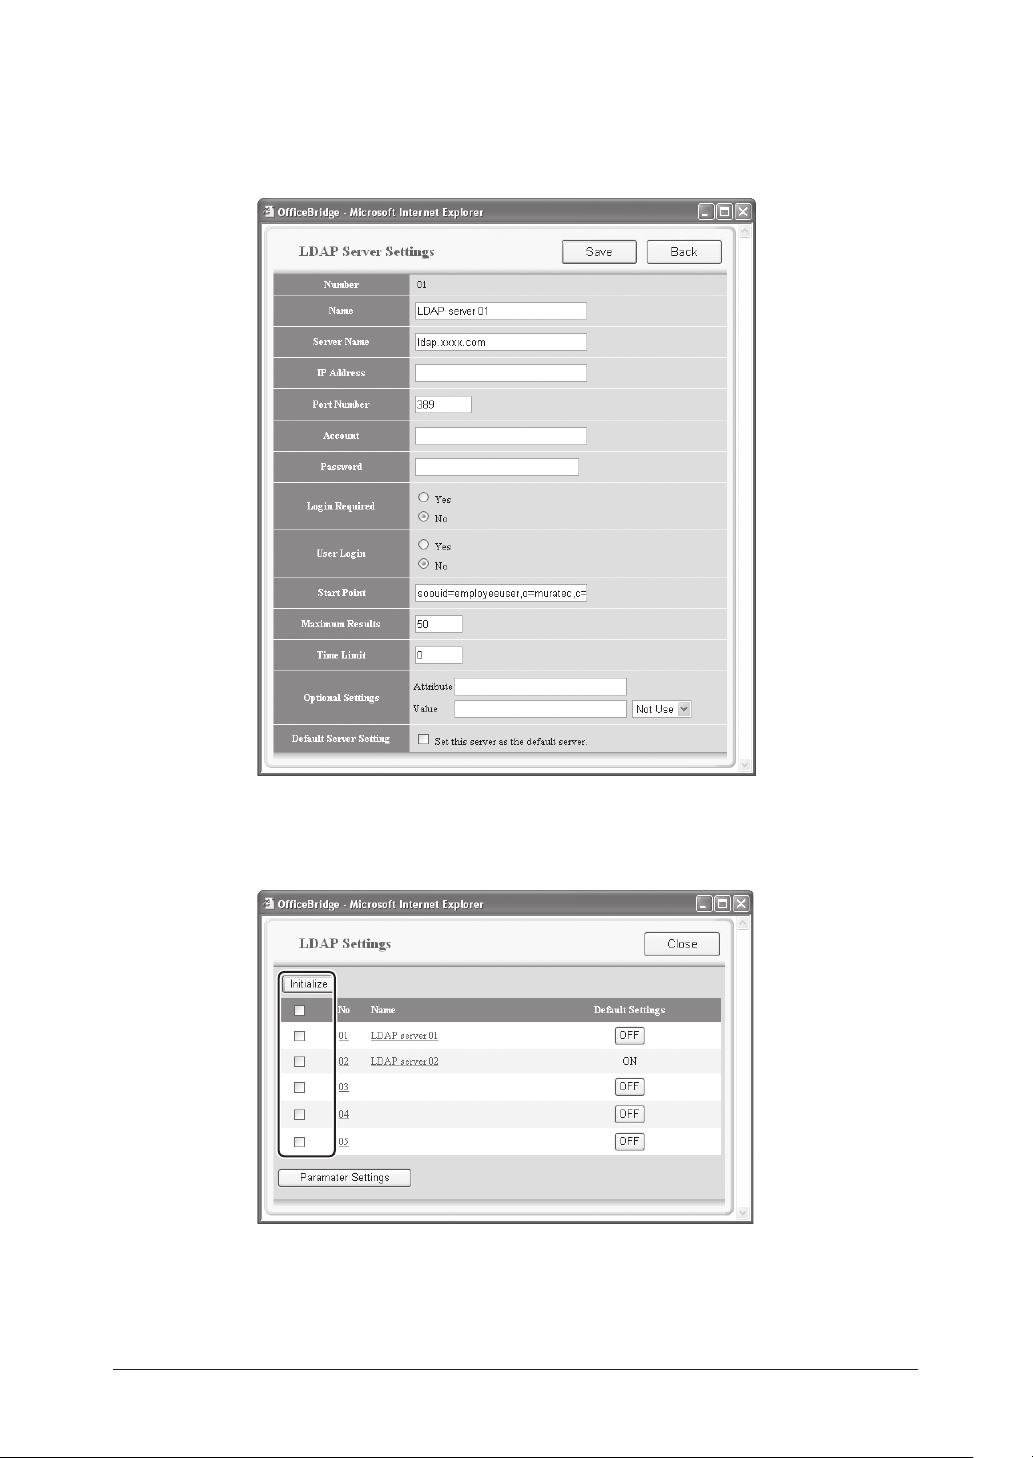
5-32 Using the Web Browser
q Editing the LDAP server settings
(1) Click the LDAP server name.
The “LDAP Server Settings” dialog appears.
(2) Configure the settings and click [Save].
q Deleting an LDAP server
(1) Select the LDAP server you want to delete.
(2) Click [Initialize].
(3) When prompted, click [OK].
Page 92
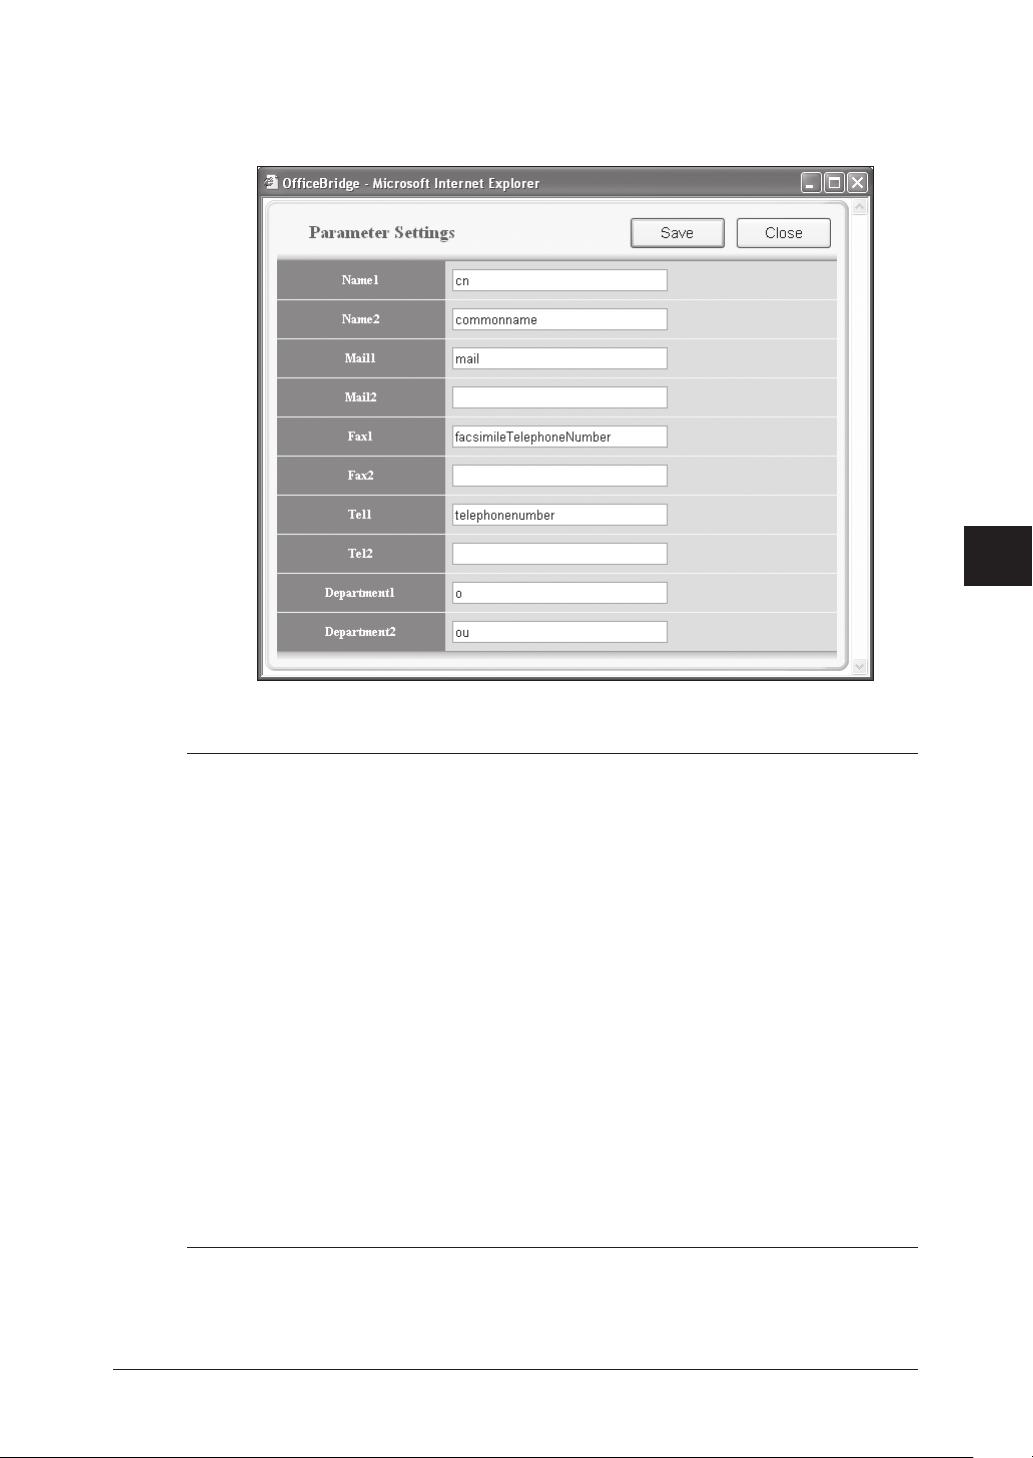
q Parameter Settings
(1) Click [Parameter Settings].
The “Parameter Settings” dialog appears.
1
2
3
4
5
6
(2) Enter an attribute and click [Save].
NOTE:
You can register up to two attributes for each search object.
When two attributes have been registered, the attribute 1 (ex. “cn”) is used
for search filter. And then, the machine will retrieve the records that include
the registered attributes you set.
For example, when the LDAP parameters are set as follows, and you entered
a name for object search, the machine first requests the LDAP server to
search the record that includes “cn=(text you’ve entered)”. Then, the machine
retrieves the parameters based on all the registered attributes (cn, commonname, mail, facsimiletelephonenumber, telephonenumber, o, ou) from the
searched records.
Name1 : cn
Name2 : commonname
Mail1 : mail
Mail2 :
Fax1 : facsimiletelephonenumber
Fax2 :
Tel1 : telephonenumber
Tel2 :
Dept.1 : o
Dept.2 : ou
7
8
Using the Web Browser
9
10
11
12
13
14
A
5-33Using the Web Browser
Page 93
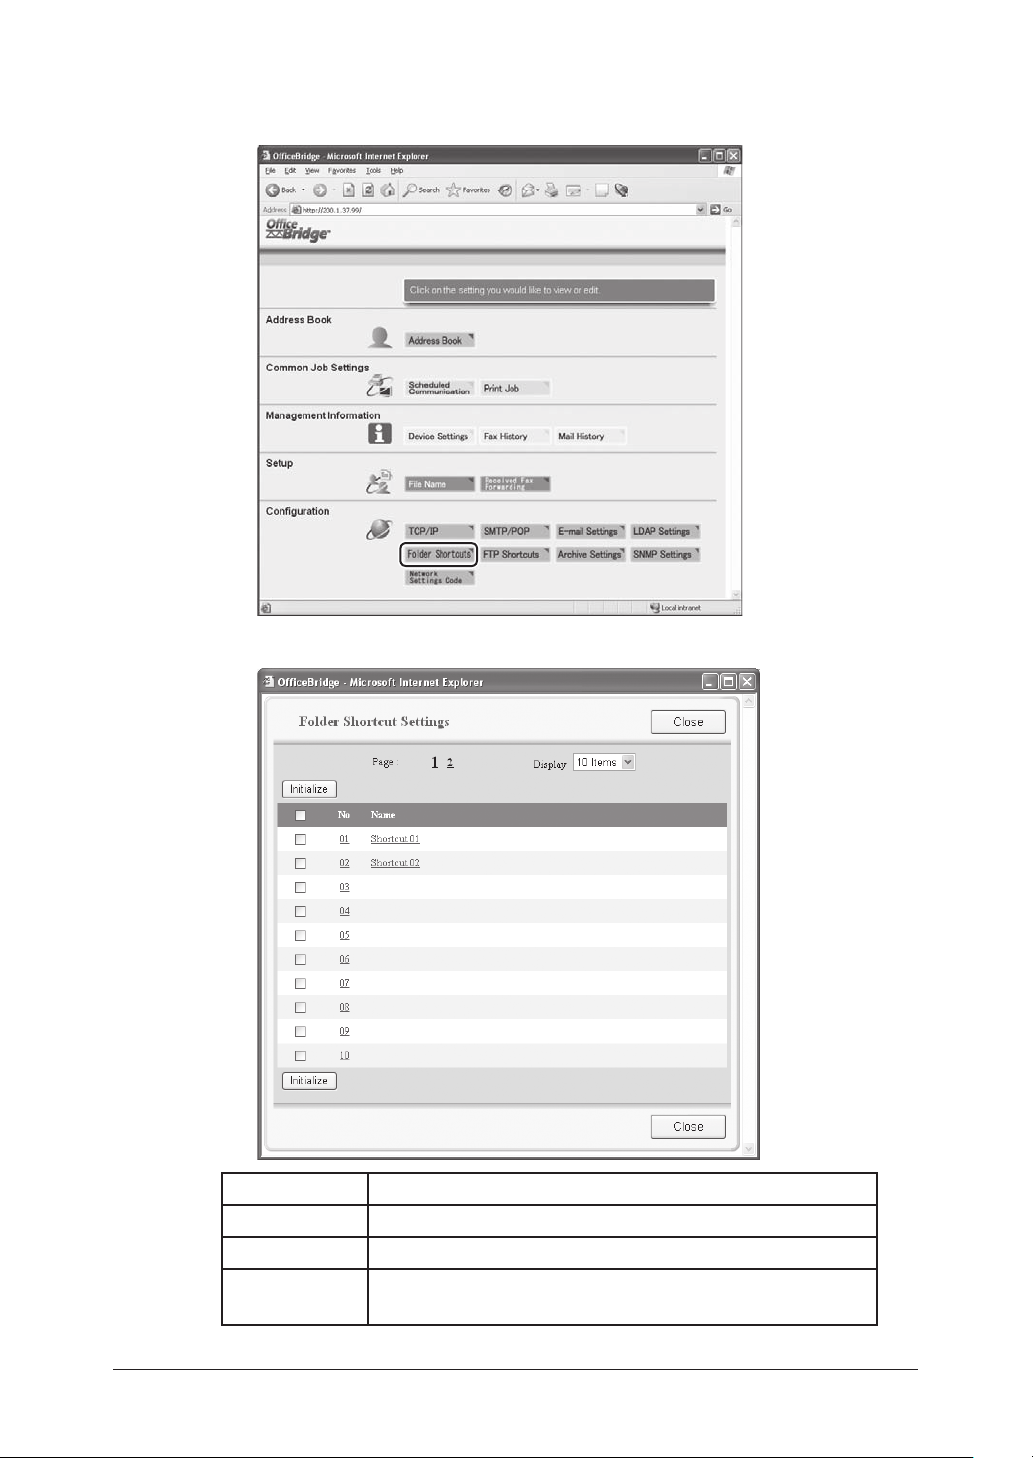
5-34 Using the Web Browser
Folder Shortcuts
1 Click [Folder Shortcuts] in the “Configuration” column.
2 A list of registered folder shortcuts will be displayed.
Item Description
No The shortcut number.
Name The registered shortcut name.
Initialize To delete a folder shortcut, select the box next to the folder
number and click [Initialize].
Page 94
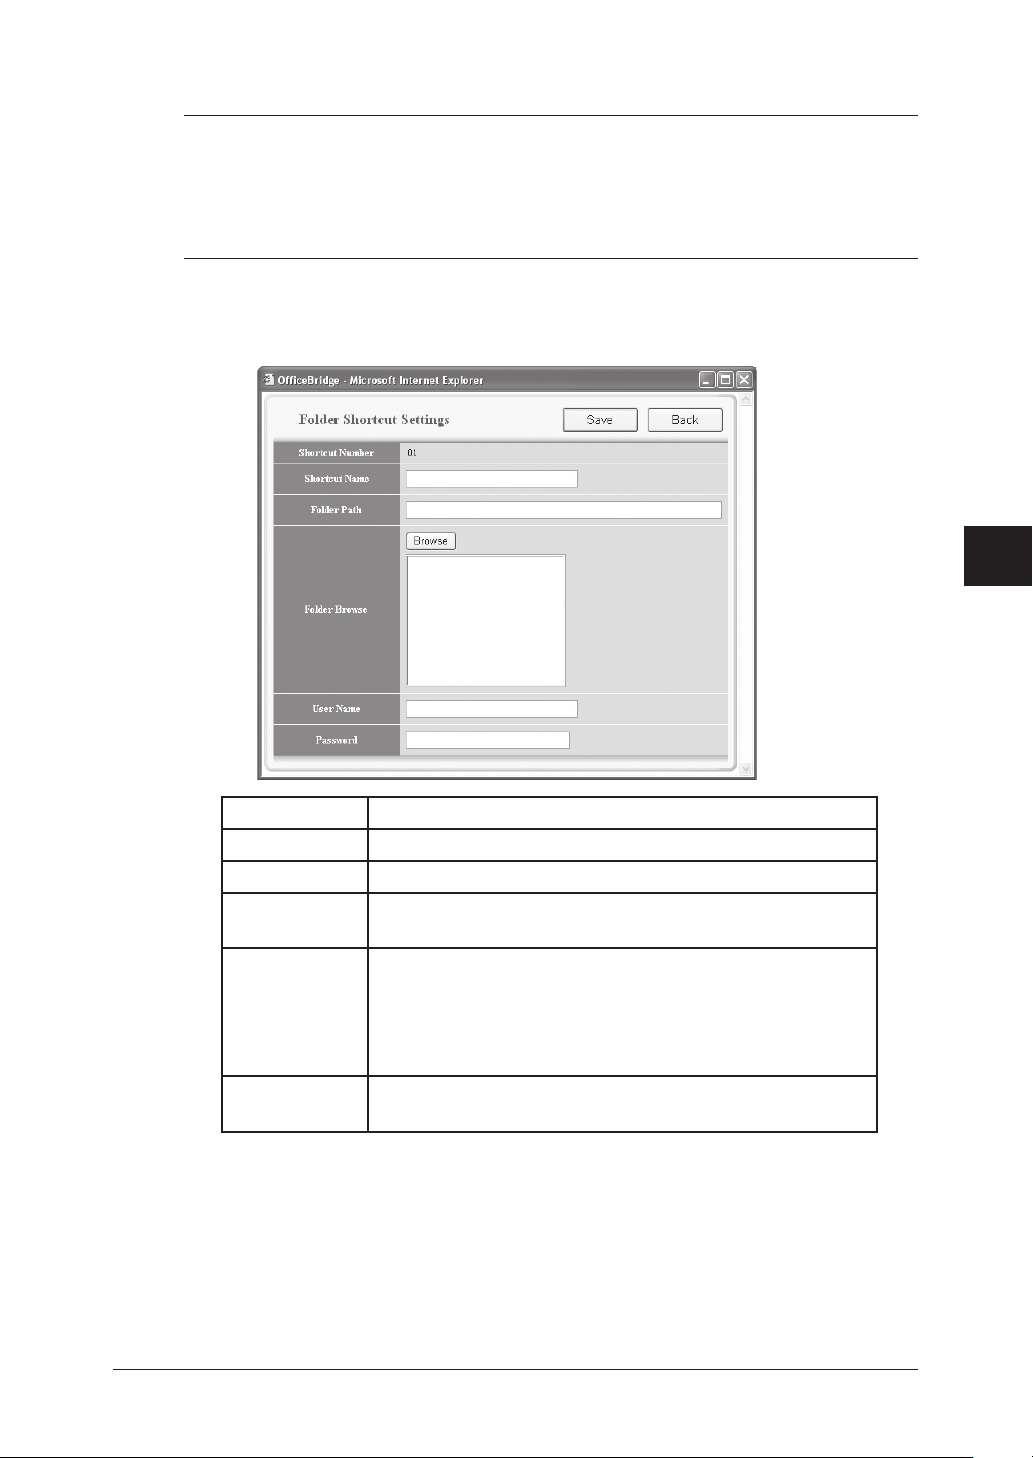
q Registering a new folder shortcut
NOTE: To register the folder as a shortcut, it should meet the following conditions:
• The folder name should not contain other ASCII code.
• The folder should be a shared folder or a folder under the shared folder.
• The shared folder’s name should be within 12 characters.
• The full path should be within 100 characters.
• The folder should be in the same segment with your machine.
(1) Select a number (01 to 20) that is not currently registered.
The “Folder Shortcut Settings” dialog appears.
(2) Configure the settings, then click [Save].
1
2
3
4
5
6
Item Description
Shortcut Name Enter the folder shortcut name.
Folder Path Enter the exact folder path.
Folder Browse If you do not know the exact folder path, select [Browse] to
browse the network.
User Name If the folder requires authentication, please enter the user
name.
If your machine is on a windows domain controlled network, add the domain name after the user name with an
“@”, like “sam@dom_muratec.com”.
Password If the folder requires authentication, please enter the user
password.
7
8
Using the Web Browser
9
10
11
12
13
14
A
5-35Using the Web Browser
Page 95
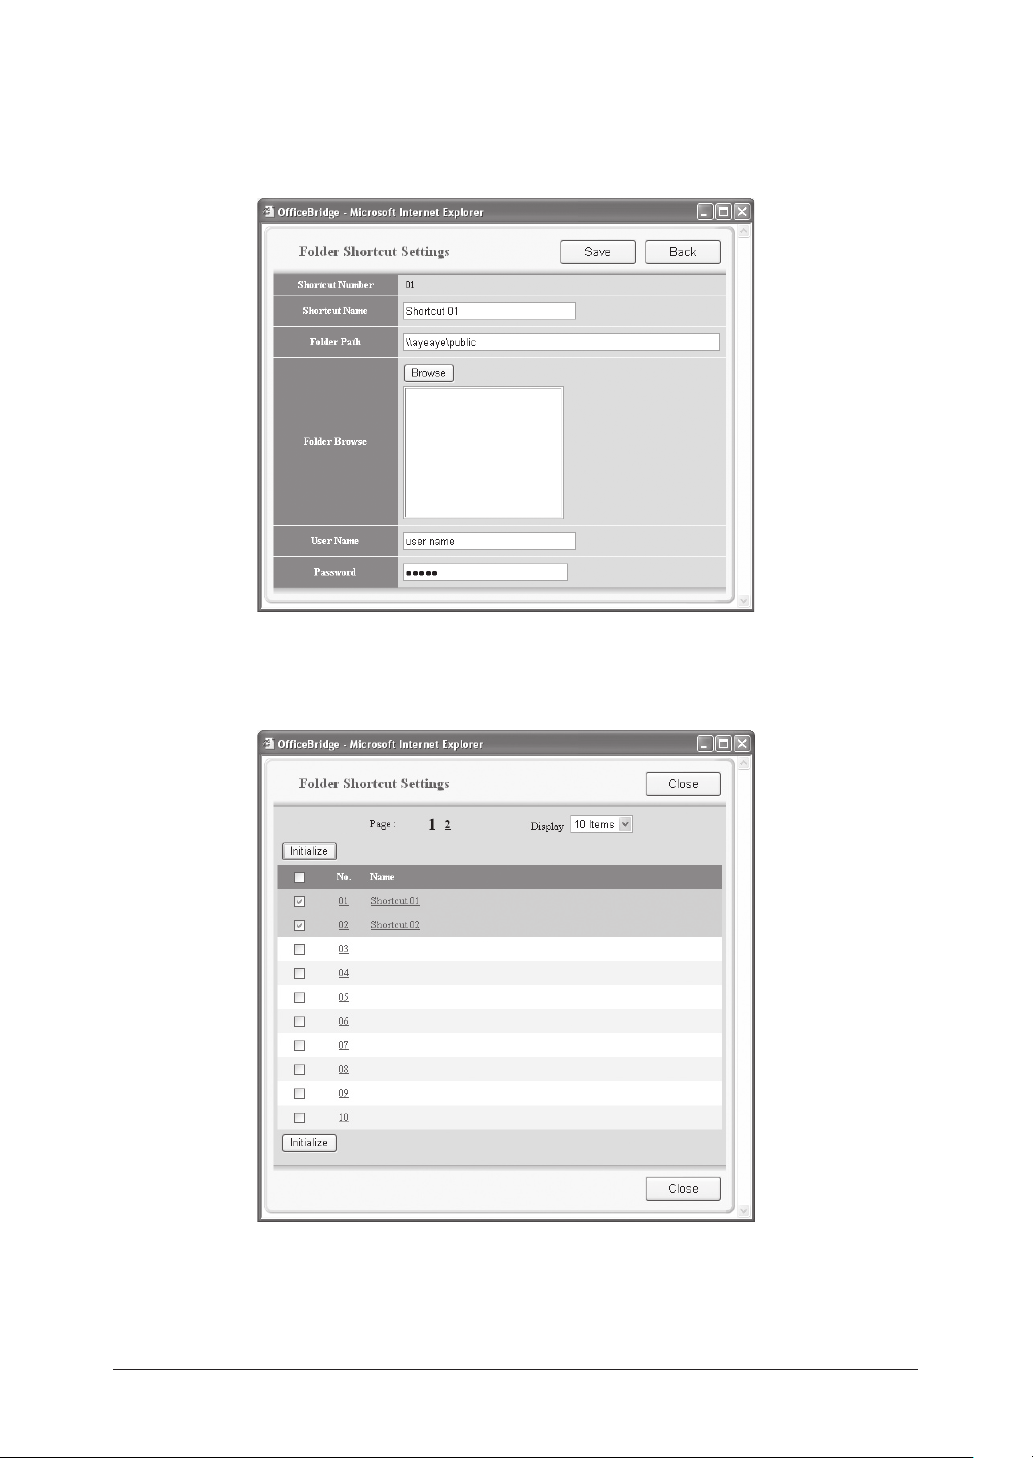
5-36 Using the Web Browser
q Editing an existing folder shortcut
(1) Click the folder shortcut name.
The “Folder Shortcut Settings” dialog appears.
(2) Configure the settings and click [Save].
q Deleting a folder shortcut
(1) Select the folder shortcut you want to delete.
(2) Click [Initialize].
(3) When prompted click [OK].
Page 96
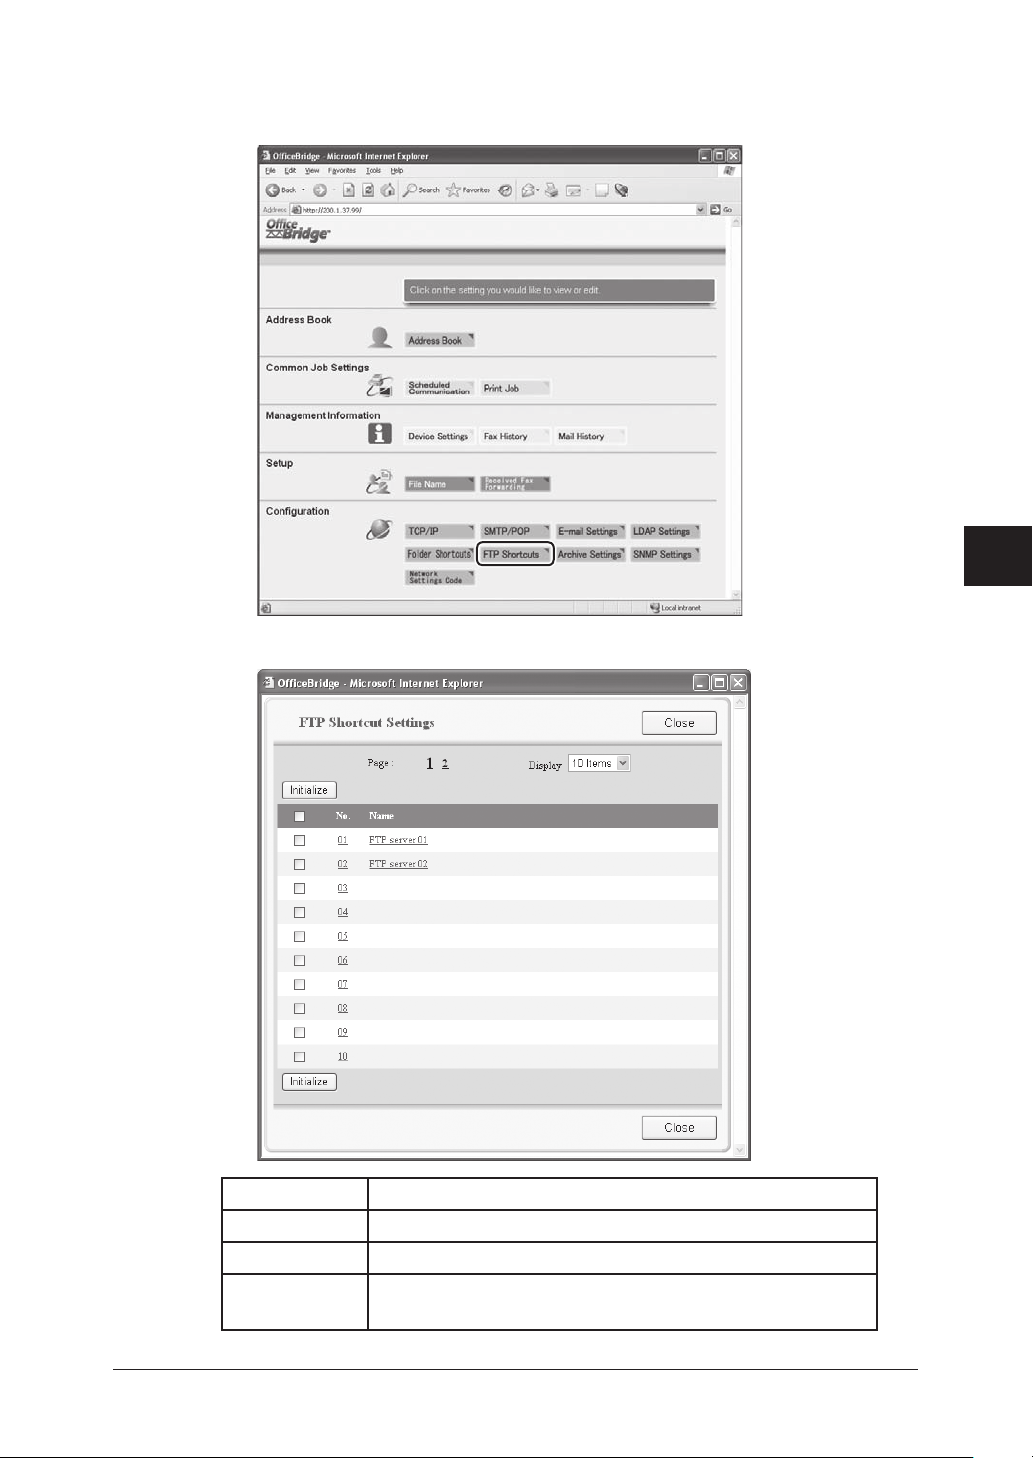
FTP Shortcut setting
1 Click [FTP Shortcuts] in the “Configuration” column.
2 A list of registered FTP shortcuts will be displayed.
1
2
3
4
5
6
Item Description
No The FTP shortcut number.
Name The registered FTP shortcut name.
Initialize To delete an FTP shortcut, select the shortcut and click
[Initialize].
7
8
Using the Web Browser
9
10
11
12
13
14
A
5-37Using the Web Browser
Page 97
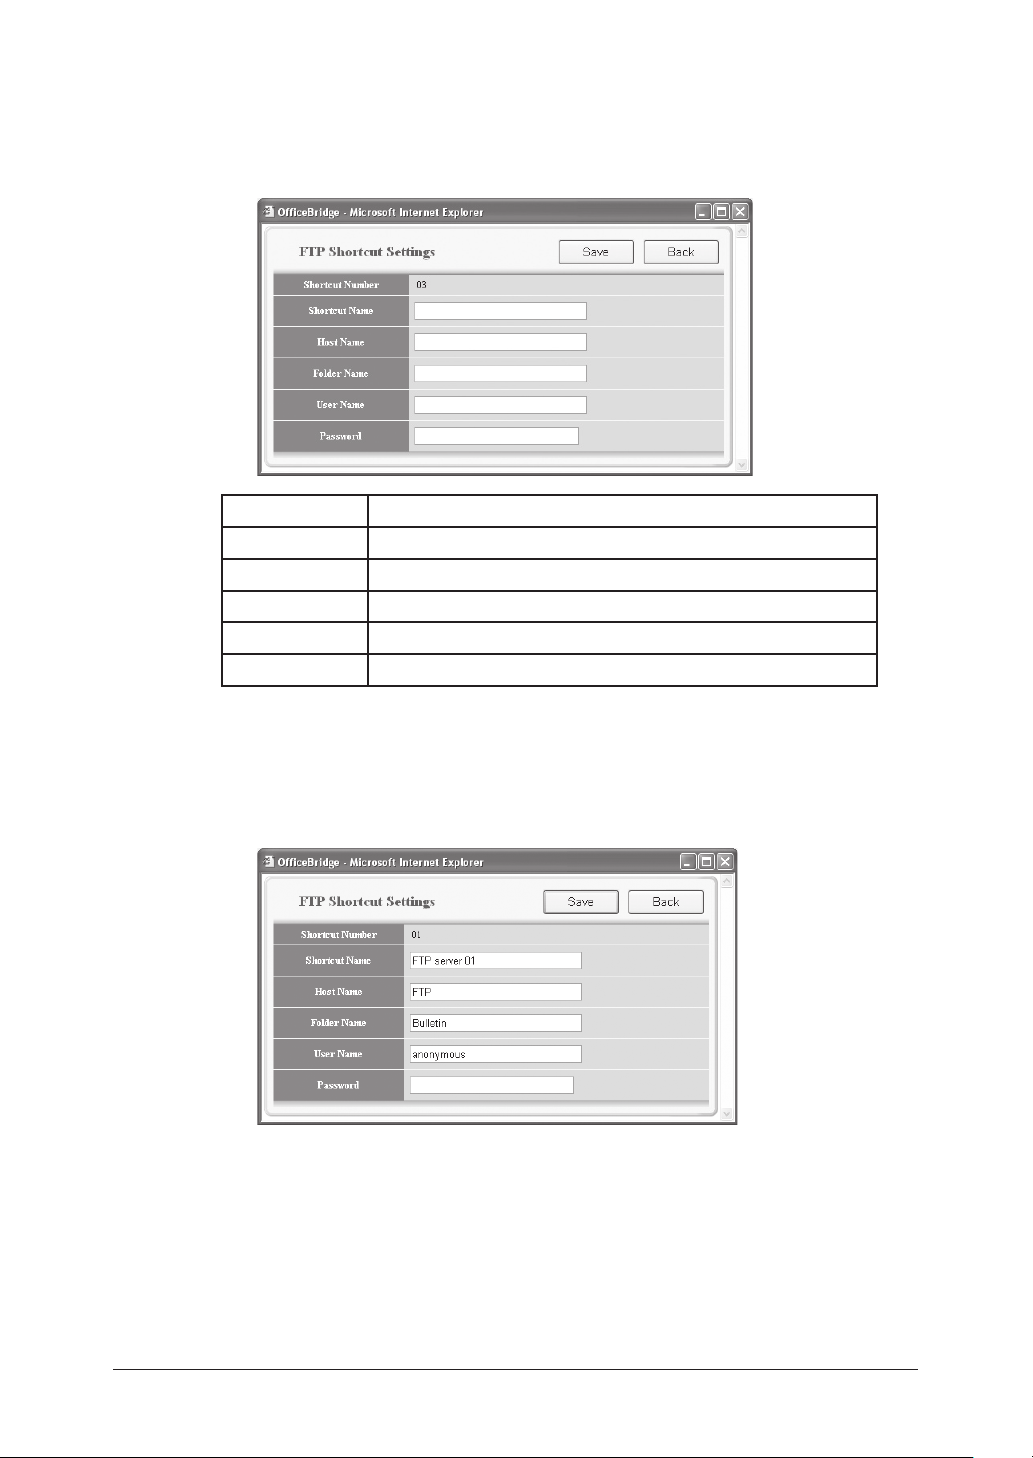
5-38 Using the Web Browser
q Registering a new FTP shortcut
(1) Select a number (01 to 20) that is not currently registered.
The “FTP Shortcut Settings” dialog appears.
(2) Configure the settings, then click [Save].
Item Description
Shortcut Name Enter the shortcut name for identification purposes.
Host Name Enter the FTP server name.
Folder Name Enter the folder name on the FTP server.
User Name Enter the user name for the FTP server.
Password Enter the password for the FTP server.
q Editing an FTP shortcut
(1) Click the FTP shortcut name.
The “FTP Shortcut Settings” dialog appears.
(2) Configure the settings and click [Save].
Page 98

q Deleting an FTP shortcut
(1) Select the FTP shortcut you want to delete.
1
2
3
4
5
(2) Click [Initialize].
(3) When prompted click [OK].
6
7
8
Using the Web Browser
9
10
11
12
13
14
A
5-39Using the Web Browser
Page 99
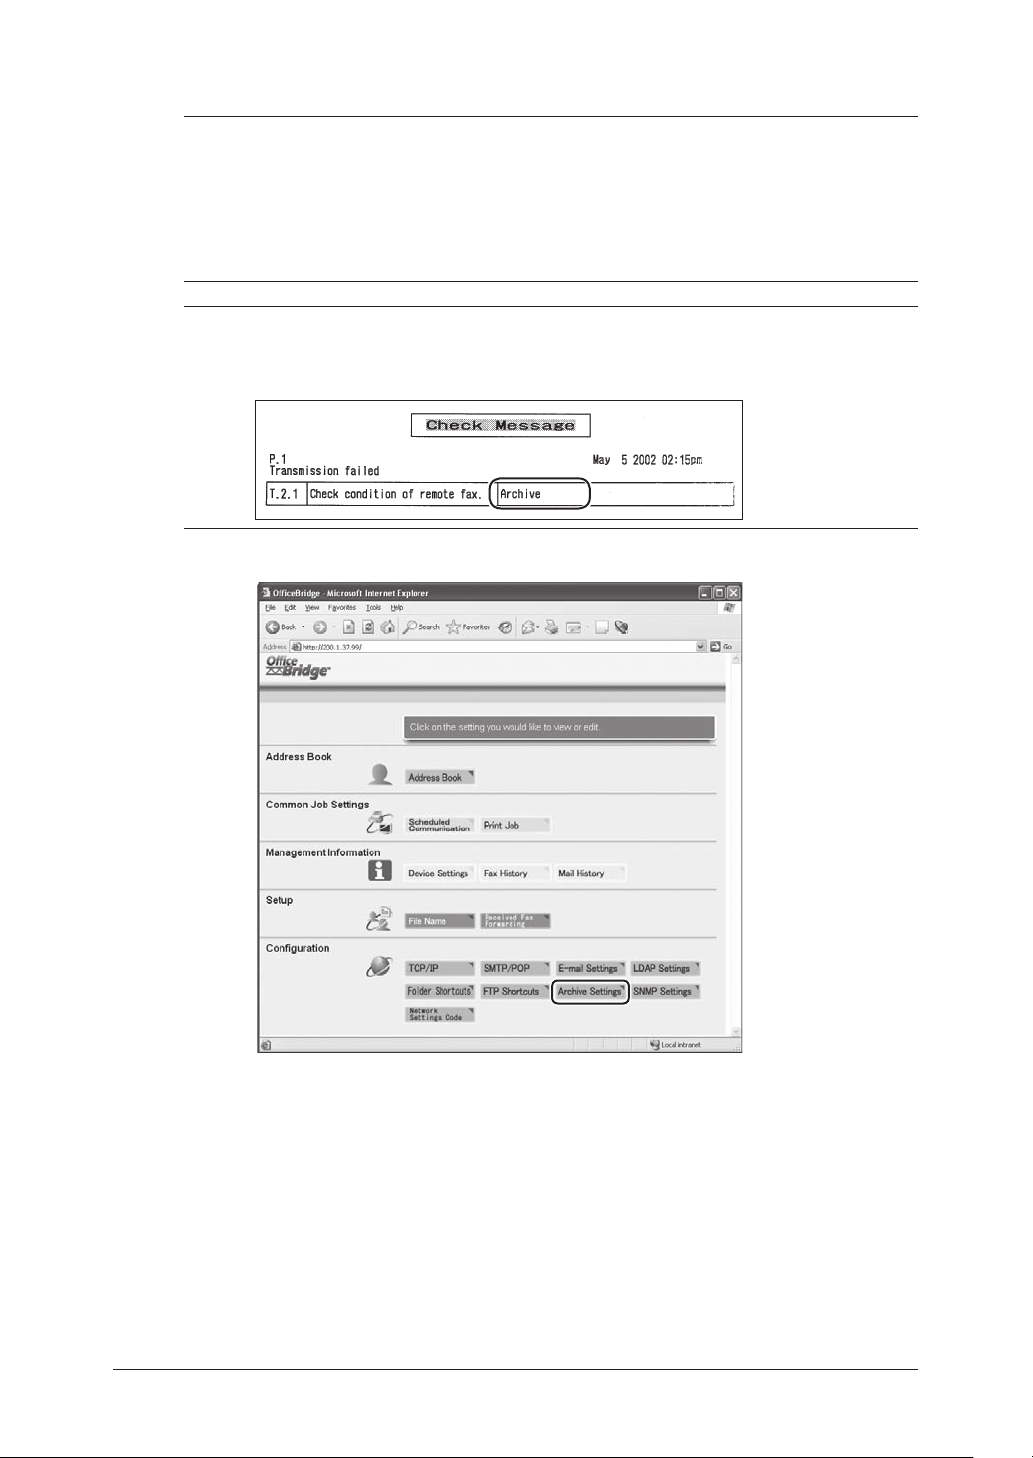
5-40 Using the Web Browser
Archive Settings
NOTE: When you set “Archive Settings” to “ON”, the following transmission will be
disabled.
• Non-memory transmissions
• Transmissions using the [Monitor] or an optional handset
• F-code security receptions
• F-code bulletin box receptions
Polling communications will not be archived.
NOTE: When the machine fails to archive, a check message will be printed out and
indicates that transmission to the “Archive” has failed. You may better inform
the users in advance that this message does not mean the transmission to the
desired destination has failed, when you set this function to [ON].
1 Click [Archive Settings] in the “Configuration” column.
Page 100

2 The “Archive Settings” dialog will be displayed.
Item Description
Transmitted
Fax
Transmitted
I-Fax
Transmitted
e-mail
Received Fax Archive inbound fax documents.
Received I-Fax Archive inbound Internet fax documents.
Archive outbound fax documents.
Archive outbound Internet fax documents.
Archive outbound e-mail documents.
1
2
3
4
5
6
q Configure the archive setting
(1) Click the archive item you want to set.
(2) Configure the settings and click [Save].
Item Description
Archive
Setting
Specifies whether to enable this archive setting.
7
8
Using the Web Browser
9
10
11
12
13
14
A
5-41Using the Web Browser
 Loading...