

Page 1
User’s Guide
Plain-paper digital Fax/Copier/Printer/Scanner
Please read this guide before operating this machine.
After you finish reading this guide, keep it handy for easy reference.
MFX-1350/MFX-1330
F-305/F-300
Page 2

Preface
Thank you for purchasing the Muratec MFX-1350 / MFX-1330 / F-305 / F-300.
This manual describes the standard operating procedures of your machine. Before using this machine,
be sure to read the User’s Guide thoroughly in order to ensure that you use the machine efficiently.
After you have gone through the manual, keep it handy for easy reference.
Note that some of the illustrations of the machine used in this manual may be different from what you
actually see on your machine.
The manuals for your machine
The manuals for this machine are as follows:
Safety Information
Please read this book carefully before using the machine. It contains important information related to
user safety and preventing equipment problems. Make sure you observe all of the precautions listed
in this manual.
User’s Guide (This book)
This manual describes machine operation and maintenance.
Printer and Scanner Driver Manual [PDF]
Explains the installing and operations of printer and scanner drivers. This PDF manual is included
on the GDI Printer/Scanner Driver CD supplied with your machine.
This manual and any updates to it can be found online at www.muratec.com
Go to the “Support” section of this site, then click on “Manuals”.
Page 3

Layout & InstaLLatIon
1
GettInG started
auto dIaLer
sendInG faxes
receIvInG faxes
usInG the f-code box feature
copyInG
specIaL features
restrIctInG MachIne access
user settInGs
report & LIsts
2
3
4
5
6
7
8
9
10
11
MaIntenance & troubLeshootInG
appendIx and Index
12
AI
Page 4

Contents
How to read this manual ...................................................................................................................i
Regulatory information ....................................................................................................................ii
United States of America ............................................................................................................ii
Canada ........................................................................................................................................iii
Limited warranty ..............................................................................................................................v
Precautions .....................................................................................................................................vii
Installing the machine ..............................................................................................................vii
Caution labels and indicators ..................................................................................................viii
Transporting the machine ..........................................................................................................ix
Consumables ...............................................................................................................................ix
Routine Maintenance ..................................................................................................................x
Ventilation .................................................................................................................................... x
Product Recycling and Disposal .................................................................................................xi
Chapter 1
Layout & Installation ..........................................................................................................................1-1
Packing contents .......................................................................................................................1-2
Machine layout .........................................................................................................................1-3
Control panel overview .............................................................................................................1-4
Setting up the machine .................................................................................................................1-7
Unlocking the mirror carriage .................................................................................................1-7
Attaching the document tray ...................................................................................................1-7
Making connections ..................................................................................................................1-8
Installing the drum and toner cartridges ................................................................................1-9
Plug in and power up ..............................................................................................................1-11
Turning off the transport mode .............................................................................................1-11
Loading paper and adjusting the paper size setting ............................................................1-12
Adjusting the speaker volume ...............................................................................................1-12
Initial setup ..................................................................................................................................1-13
Clearing stored settings .........................................................................................................1-13
Getting started ........................................................................................................................1-13
Specifying initial settings .......................................................................................................1-14
Using the Energy Save mode .................................................................................................1-17
Installing drivers [CD] ................................................................................................................1-18
Chapter 2
Getting started ......................................................................................................................................2-1
Operating tips ................................................................................................................................2-2
Switching the machine mode ...................................................................................................2-2
Entering characters ..................................................................................................................2-2
Backup memory ........................................................................................................................2-3
Selecting a function ..................................................................................................................2-4
Function table ...........................................................................................................................2-5
Document and paper handling ....................................................................................................2-10
Document handling ................................................................................................................2-10
Paper handling ........................................................................................................................2-12
Chapter 3
Autodialler .............................................................................................................................................3-1
Autodialer basics ...........................................................................................................................3-2
Autodialers ................................................................................................................................3-2
Call groups ................................................................................................................................3-2
Destination names and phone directory dialing .....................................................................3-2
Special dialing characters ........................................................................................................3-3
One-touch keys ...............................................................................................................................3-4
Page 5

Adding or editing a one-touch number ....................................................................................3-4
Quick one-touch registration....................................................................................................3-5
Erasing a one-touch number ....................................................................................................3-5
How to dial using a one-touch key ...........................................................................................3-6
Speed-dial numbers .......................................................................................................................3-7
Adding or editing a speed-dial number ...................................................................................3-7
Erasing a speed-dial number ...................................................................................................3-7
How to dial using a speed-dial number ...................................................................................3-8
Call group dialing ..........................................................................................................................3-9
Entering or changing a call group ...........................................................................................3-9
Erasing a call group ................................................................................................................3-10
How to dial using a call group ...............................................................................................3-10
Phone directory dialing ...............................................................................................................3-11
How to dial using the phone directory...................................................................................3-11
If the call fails .........................................................................................................................3-12
Chapter 4
Sending faxes ........................................................................................................................................4-1
Before sending ...............................................................................................................................4-2
Document handling ..................................................................................................................4-2
Scanning resolution ..................................................................................................................4-2
Scanning contrast .....................................................................................................................4-2
Mixing the document resolution and contrast in multiple pages ..........................................4-2
Sending method ........................................................................................................................4-3
Memory overflow message .......................................................................................................4-3
Sending a fax ..................................................................................................................................4-4
Memory transmission ...............................................................................................................4-4
Real-time transmission (non memory transmission) .............................................................4-6
Redialing ........................................................................................................................................4-7
A
utomatic fax redialing ............................................................................................................4-7
Manual redial ............................................................................................................................4-7
Reviewing or canceling commands ...............................................................................................4-8
To review or cancel command ..................................................................................................4-8
Reviewing or canceling parts of a broadcast ...........................................................................4-9
Printing a delayed command list .............................................................................................4-9
Printing a stored document ......................................................................................................4-9
View or print the results of fax transactions ........................................................................4-10
Advanced fax functions ...............................................................................................................4-11
Broadcasting ...........................................................................................................................4-12
Delayed transmission .............................................................................................................4-13
Batch transmission .................................................................................................................4-14
Selecting the TTI ....................................................................................................................4-17
Polling transmission ...............................................................................................................4-18
Fax & Copy ..............................................................................................................................4-19
Cover page ...............................................................................................................................4-20
Using alternative telephone network service providers (Dial prefix) ..................................4-21
Sending documents to an e-mail gateway (fax server) ........................................................4-22
Chapter 5
Receiving faxes .....................................................................................................................................5-1
Receiving a fax ...............................................................................................................................5-2
Selecting the reception mode ..
Manual reception mode ............................................................................................................5-2
Automatic reception mode ........................................................................................................5-2
Answering calls manually ........................................................................................................5-4
Switch between the automatic or manual reception mode ....................................................5-4
If the paper runs out during fax reception ..............................................................................5-5
Settings for fax reception ..............................................................................................................5-6
.................................................................................................5-2
Page 6

Setting the number of rings .....................................................................................................5-6
Print settings ............................................................................................................................5-6
Advanced receiving functions .......................................................................................................5-8
Block junk fax ...........................................................................................................................5-9
Receive polling ........................................................................................................................5-11
Fax forwarding ........................................................................................................................5-12
Separator page ........................................................................................................................5-14
Chapter 6
Using F-code box features ..................................................................................................................6-1
F-code: an introduction .............................................................................................................6-2
Creating or modifying an F-code box .......................................................................................6-2
Printing a list of F-code boxes ..................................................................................................6-7
Printing a list of documents stored in your F-code boxes .......................................................6-7
Erasing an empty F-code box ...................................................................................................6-7
Storing a document in a bulletin box for polling.....................................................................6-8
Printing a document stored in a bulletin box..........................................................................6-9
Erasing a document stored in a bulletin box ..........................................................................6-9
Printing a document received in the security box ................................................................6-10
Sending a document using a subaddress and password.......................................................6-11
Polling a document using a subaddress and password.........................................................6-12
Chapter 7
Copying ...................................................................................................................................................7-1
Before copying ................................................................................................................................7-2
Document and paper handling.................................................................................................7-2
Changing your machine to the copy mode ..
Display in the copy standby mode ...........................................................................................7-2
Memory overflow message .......................................................................................................7-2
Making copies ................................................................................................................................7-3
Making copies using the ADF ..................................................................................................7-3
Making copies using the document glass ................................................................................7-3
Basic copy settings ..
Selecting the document type ....................................................................................................7-4
Scanning the contrast ...............................................................................................................7-4
Zoom ratio .................................................................................................................................7-4
Number of copies ......................................................................................................................7-5
Sorting copies ............................................................................................................................7-5
Selecting paper size ..................................................................................................................7-5
Selecting the document size ..
Advanced copy functions ...............................................................................................................7-7
Combine.....................................................................................................................................7-8
Duplex copy ...............................................................................................................................7-9
Copy resolution .......................................................................................................................7-11
.......................................................................................................................7-4
...................................................................................................7-6
............................................................................7-2
Chapter 8
Special features ....................................................................................................................................8-1
Soft keys .........................................................................................................................................8-2
Functions you can assign to a soft key ....................................................................................8-2
Programming a soft key ...........................................................................................................8-3
Macro keys .....................................................................................................................................8-4
Steps you can program into a macro key ................................................................................8-4
Creating or modifying a macro ................................................................................................8-5
Erasing a macro key .................................................................................................................8-6
Macro key speed ........................................................................................................................8-6
Fax dialing using a macro key .................................................................................................8-7
Copying using macro key .........................................................................................................8-7
Printing lists using the macro key ...........................................................................................8-7
Page 7

Storing fax documents using macro key ..................................................................................8-7
Viewing counters ...........................................................................................................................8-8
Chapter 9
Security features ..................................................................................................................................9-1
Security features ............................................................................................................................9-2
Passcode protection ...................................................................................................................9-2
Security reception .....................................................................................................................9-3
Masking the PIN .......................................................................................................................9-5
Using department codes ................................................................................................................9-8
Turning department code protection ON and OFF ................................................................9-8
Entering a department code .....................................................................................................9-8
Erasing a department code ......................................................................................................9-9
Turning the department code setting on and off ....................................................................9-9
Fax charge setting ..................................................................................................................9-10
Copy charge setting ................................................................................................................9-10
Sending a fax using a department code.................................................................................9-11
Making a copy using a department code ...............................................................................9-11
Printing the department code list ..........................................................................................9-12
Resetting the department code counter ................................................................................9-12
Copy protection ............................................................................................................................9-13
Chapter 10
User settings ........................................................................................................................................10-1
Machine settings ..........................................................................................................................10-2
Accessing the machine setting ...............................................................................................10-2
Fax settings ..
Accessing the fax settings ......................................................................................................10-5
Copy settings ................................................................................................................................10-7
Accessing the copy setting ......................................................................................................10-7
Scanner settings ..........................................................................................................................10-8
Accessing the scanner setting ................................................................................................10-8
................................................................................................................................10-5
Chapter 11
Report & Lists ..
Table of the lists and journal ......................................................................................................11-2
Activity journal ............................................................................................................................11-4
Setting the activity journal ....................................................................................................11-4
Printing an activity journal manually ...................................................................................11-4
Setting the printing order of the activity journal ..
Transmission Confirmation Report ............................................................................................11-5
Setting the transmission confirmation report .......................................................................11-5
Stored document list ....................................................................................................................11-6
Erased document notification .....................................................................................................11-6
Chapter 12
Maintenance & Problem solving .....................................................................................................12-1
Maintenance .................................................................................................................................12-2
Cleaning tips ...........................................................................................................................12-2
Cleaning the scanning area ...................................................................................................12-2
Cleaning the ADF rollers .......................................................................................................12-3
Cleaning the drum charge wire and the print head .............................................................12-3
Replace the toner cartridge ....................................................................................................12-4
Replacing the drum cartridge ................................................................................................12-6
Troubleshooting ...........................................................................................................................12-8
Document jams .......................................................................................................................12-8
Paper jams .............................................................................................................................12-11
...................................................................................................................................11-1
...............................................................11-5
Page 8

LCD error messages .............................................................................................................12-14
“Check Message” printouts...................................................................................................12-17
Error code ..............................................................................................................................12-18
Machine errors ......................................................................................................................12-20
Faxing errors .........................................................................................................................12-20
Copying errors.......................................................................................................................12-21
PC printing errors [CD] ........................................................................................................12-21
Scanner errors [CD] ..............................................................................................................12-21
Print quality problems .........................................................................................................12-22
If you cannot solve the problem ...........................................................................................12-24
Appendix & Index .............................................................................................................................. AI-1
Specifications ...............................................................................................................................AI-2
General ....................................................................................................................................AI-2
Fax ...........................................................................................................................................AI-3
Copy .........................................................................................................................................AI-3
Printer .....................................................................................................................................AI-3
Scanner ....................................................................................................................................AI-4
Consumable items ..................................................................................................................AI-4
Page 9

How to read this manual
Symbols
1
In this manual, the following symbols are used with the items where important operational and safety
information must be observed. For safe operation, please carefully read the “Safety Information” supplied with this product.
Describes warnings to protect yourself and others from serious or potentially
fatal injury if you handle the machine incorrectly. For safe operation, please follow instructions carefully.
Describes cautions to protect yourself and others from personal injury or dam-
age to properties if you handle the machine incorrectly. For safe operation,
please follow instructions carefully.
IM
PORTANT Describes important conditions or restrictions you should carefully observe to
avoid problems caused by incorrect operations.
NOTE: Describes reference information and additional notes for operations.
< > The names of the keys on the control panel.
“ ” Items that appear on the LCD.
LCD The Liquid Crystal Display shows
messages and options during operation.
2
3
4
5
6
7
8
Document Original(s) that you are copying, faxing or scanning.
Paper Paper to be printed on.
Tx Denotes sending.
Rx Denotes receiving.
, Shows the direction of the document and paper.
Direction mark Document placed on the ADF
or document glass*
or
Nothing
Ex.) Letter
Ex.) Half-letter
* The document glass is available only for the MFX-1350/MFX-1330.
Paper loaded in the
paper cassette
9
10
11
12
A
i
Page 10

ii
Regulatory information
Customer information
United States of America
The MFX-1350/MFX-1330/F-305/F-300 hereafter referred to as “product”, complies with
Part 68 of the FCC rules and the requirements adopted by the ACTA. On the rear panel
of the product is a label that contains, among other information, a product identifier in
the format US:DKUFA02B004C (for MFX-1350/F-305), US:DKUFA02B003C (for MFX-
1330), or US:DKUFA02B002C (for F-300). If required, this number must be provided to
the telephone company.
The REN is used to determine the number of devices that may be connected to a telephone line. Excessive RENs on a telephone line may result in the devices not ringing
in response to an incoming call. In most, but not all areas, the sum of RENs should not
exceed five (5.0). To be certain of the number of devices that may be connected to a line,
as determined by the total RENs, contact the local telephone company. The REN for this
product is part of the product identifier that has the format US:DKUFA02B004C (for
MFX-1350/F-305), US:DKUFA02B003C (for MFX-1330), or US:DKUFA02B002C (for F-
300). The digits represented by “02B” are the REN without a decimal point.
The product is designed for use on standard-device telephone lines. The product connects to the telephone line with a standard line called the USOC RJ-11C.
Any plug and jack used to connect the product to the wiring and telephone network of
the premises must comply with the applicable Part 68 of the FCC rules and the requirements adopted by the ACTA. A compliant telephone cord and modular plug is provided
with this product. It is designed to be connected to a compatible modular jack that is
also compliant. See installation instructions for details.
If the product causes harm to the telephone network, the telephone company will notify
you in advance that temporary discontinuance of service may be required. If advance
notice isn’t practical, the telephone company will notify you as soon as possible and may
advise you of your right to file a complaint with the FCC if you believe it is necessary.
The telephone company may make changes in its facilities, equipment, operations or
procedures that could affect the operation of the product. If this happens, the telephone
company will provide advance notice in order for you to make necessary modifications to
maintain uninterrupted service.
If trouble is experienced with the product, see operating instructions for details. For
further repair or warranty information, please contact the Muratec Customer Support
Center at 800-347-3296 (from the U.S. A. only). If the product is causing harm to the
telephone network, the telephone company may request that you disconnect the product
until the problem is resolved.
Connection to party line service is subject to state tariffs. Contact the state public utility
commission, public service commission, or corporation commission for information.
If your home has specially wired alarm equipment connected to the telephone line,
ensure the installation of the product does not disable your alarm equipment. If you
have questions about what will disable alarm equipment, consult your telephone company or a qualified installer.
The product is hearing aid compatible.
When programming emergency numbers and/or making test calls to emergency numbers:
Page 11

1) Remain on the line and briefly explain to the dispatcher the reason for the call.
2) Perform such activities in the off-peak hours, such as early morning or late evenings.
To protect the product against power surges, we recommend the use of a power protec-
tion device (Surge arrestor).
1
The Telephone Consumer Protection Act of 1991 makes it unlawful for any person to
use a computer or other electronic device, including FAX machines, to send any message
unless such message clearly contains in a margin at the top or bottom of each transmitted page or on the first page of the transmission, the date and time it is sent and
an identification of the receiving business or other entity, or other individual sending
the message and the telephone number of the sending machine or such business, other
entity, or individual. (The telephone number provided may not be a 900 number or any
other number for which charges exceed local or long-distance transmission charges.)
For instructions on programming this information into the product, see “Initial Setup” on
pages 1-13 to 1-17 of this manual.
FCC Part 15
This product equipment has been tested and found to comply with the limits for a Class
A digital devices, pursuant to Part 15 of the FCC Rules. These limits are designed to
provide reasonable protection against harmful interference when the equipment is
operated in a commercial environment. The product equipment generates, uses, and
can radiate radio frequency energy and, if not installed and used in accordance with the
instruction manual, may cause harmful interference to radio communications. Operation of this equipment in a residential area is likely to cause harmful radio interference,
in which case the user will be required to correct the interference at their own expense.
Canada
NOTICE:
This product equipment meets the applicable Industry Canada Terminal Equipment
Technical Specifications.
NOTICE:
The Ringer Equivalence Number (REN) for this terminal equipment is 0.2 (for MFX1330/F-300), or 0.9 (for MFX-1350/F-305). The REN assigned to each terminal equipment provides an indication of the maximum number of terminals allowed to be connected to a telephone interface. The termination on an interface may consist of any
combination of devices subject only to the requirement that the sum of the Ringer
Equivalence Numbers of all the devices does not exceed five.
2
3
4
5
6
7
8
9
10
Canadian ICES-003
This Class A digital apparatus complies with Canadian ICES-003.
Cet appareil numérique de la classe A est conforme à la norme NMB-003 du Canada.
11
12
A
iii
Page 12

iv
ENERGY STAR
What is an ENERGY STAR® program?
®
As an ENERGY STAR® partner, Muratec has determined that this product
meets the ENERGY STAR® guidelines for energy efficiency.
The international ENERGY STAR® program is the international program
to promote energy efficient consumer products. This program aims the
reduction of power consumption of office equipment, of which power are
often turned ON for a long time, from the energy saving view that “efficiently use the energy when needed”. It adopts the voluntary system a
manufacturer can join by its independent decision.
QuadAccess
®
QuadAccess is a more powerful version of what already is a pretty power-
ful feature, called dual access. While a fax with normal dual access allows
you to do two things at once, QuadAccess allows you to do four operations
at once.
For example, even if the machine is (1) printing a copy, (2) transmitting
from memory and (3) scanning documents for a different memory transmission, you can still (4) program the machine.
Super G3
Super G3 is an extension of Group 3 fax technology standards, allowing
the use of high-speed ITU-T V.34 modems for 33.6 Kbps transmission and
high-speed protocols for rapid handshaking.
JBIG — Joint Bi-level Image experts Group, the new ITU-T standard
image data compression method. As JBIG compresses the data more
efficiently than MMR, it is especially effective when transmitting halftone
(grayscale) image document.
Trademarks
Muratec, the Muratec logo and all Muratec product names contained here in are trademarks of
Murata Machinery, Ltd. and Muratec America, Inc.
QuadAccess® is trademarks of Muratec America, Inc.
All other company names and product names referenced are trademarks or registered trademarks of
their respective companies.
Page 13

Limited warranty
This warranty is made by Muratec America, Inc. (hereafter referred to as “Muratec”).
This warranty is valid only on Muratec products purchased and used in the United
States of America. This warranty applies to the product only while owned and used by
the original purchaser (“Customer”). If ownership of the product is transferred, this
warranty terminates. This warranty does not apply to any product in use for rental
purposes.
This Muratec product is warranted against defects in material and workmanship for
ninety (90) days commencing the date of original Customer purchase. If the product is
defective in material and/or workmanship (normal wear and tear excepted) during the
warranty period, Muratec or its authorized representative will, during Muratec’s established service availability hours, make necessary adjustments and repairs, including, at
Muratec’s option, installation of replacement parts. Muratec’s service availability hours
are 8:30 am to 5:00 pm (Central time) Monday through Friday, excluding Muratec-recognized holidays. Muratec will complete the necessary adjustments and repairs within
a reasonable time period, as dictated by the nature of the problem and by Muratec’s
service schedule. Replacement parts may have been used and/or reconditioned. Parts
that have been replaced will remain the property of Muratec. This warranty is subject to
the obligations and exclusions set forth.
Obligations
1. This warranty will be honored only on presentation of the original dated authorized Muratec bill of sale or Muratec dealer bill of sale or sales slip to an authorized
Muratec service representative or service center. For the name of your authorized
service center, contact Muratec (from the United States, call 1-469-429-3350; from
Canada, check your in-box materials for the number to call).
2. During the warranty period, the Customer must notify Muratec by telephone of any
defective product material and/or workmanship.
3. Transportation (including prepayment of freight and insurance charges) of the product
to and from an authorized service center, designated by Muratec, is the responsibility
of the Customer.
4. If Muratec provides maintenance or responds to a call which is outside the scope of
this warranty, such maintenance shall be billed to the Customer at Muratec’s thencurrent rates for maintenance and parts and shall be due and payable in full upon
receipt of invoice.
1
2
3
4
5
6
7
8
9
Exclusions
1. This warranty shall not cover a product with missing or altered original identification
marks.
2. This warranty applies only to products that the purchaser has properly installed,
adjusted and operated in accordance with the instructions set forth in or provided
with product literature. This warranty does not apply to any product which has been
subjected to tampering, alteration, misuse, abuse, neglect, improper installation or
transportation damage. Nor does it apply to costs for any service requested for demonstration or to confirm proper operation of this product.
3. The warranty shall not apply to adjustments, repairs or replacements necessitated by
any cause beyond the control of Muratec (whether foreseeable or not) including, but
not limited to, any malfunction, defects or failure caused by or resulting from any of
the following: improper unpacking or installation, unauthorized service or parts, or
improper maintenance or cleaning, modification or repair by the Customer, accident
(including, without limitation, unavoidable accidents), fire, flood or other Acts of God,
improper telephone or electrical power or surges thereof, interconnection with or use of
non-compatible equipment or supplies (including paper), or placement of the product
in an area which does not conform to Muratec space, electrical and/or environmental
requirements.
10
11
12
A
v
Page 14

vi
4. Muratec will not be required to make adjustments, repairs or replacements if the product is installed or used at a location deemed by Muratec to be hazardous to health or
safety, or if Muratec is not provided with free and reasonable access to the product and
a telephone during service availability hours, or if the product location is not accessible by an authorized Muratec service vehicle.
except as expressLy set forth above, and except to the extent prohIbIted by appLIcabLe
Law, Muratec Makes no other warrantIes, express or IMpLIed (IncLudInG, but not LIMIted
to, any IMpLIed warrantIes of MerchantabILIty or fItness for a partIcuLar purpose, and
any warranty arIsInG froM course of deaLInG or usaGe of trade), and Muratec expressLy
dIscLaIMs aLL warrantIes not stated hereIn. In the event the product Is not free froM
defects as warranted above, the custoMer’s soLe reMedy shaLL be repaIr or repLaceMent
as provIded above. under no cIrcuMstances shaLL Muratec be LIabLe to the custoMer, or to
any user, for any daMaGes, IncLudInG any IncIdentaL or consequentIaL daMaGes, expenses,
Lost profIts, Lost savInGs or any other daMaGes arIsInG out of the use or InabILIty to use
the Muratec product, even If Muratec or Its representatIves have been advIsed of the pos-
sIbILIty of such daMaGes.
Some States do not allow the exclusion or limitation of incidental or consequential damages, and some States do not allow limitations on how long an implied warranty lasts,
so the above limitations or exclusions may not apply to you. This warranty gives you
specific legal rights, and you may also have other rights which vary from State to State.
Page 15
Precautions
713 mm
(28.1 inches)
813 mm
(32 inches)
853 mm (33.6 inches)
753 mm (29.6 inches)
50 mm
(2 inches)
50 mm
(2 inches)
772 mm
(30.4 inches)
872 mm
(34.3 inches)
100 mm
(4 inches)
100 mm
(4 inches)
Besides the “Safety Information” supplied with this product, please observe the following
instructions.
1
Installing the machine
• Do not let any object obstruct or plug the ventilation holes of this product. Accumulated heat inside the product could result in a malfunction.
IMPORTANT
• I
nstall the machine to keep the ventilating slot of the machine at least 4 inches (10
cm) away from walls or other devices.
o ensure proper ventilation and easy operation, secure an adequate installation space
• T
around the machine.
2
3
4
5
6
7
8
• Do not install in places exposed to extreme temperature fluctuation. Use your
machine within the temperature range of 50°F(10°C) to 89.6°F(32°C), the humidity
range of 20% to 80%RH.
• Avoid outdoor installation.
NOTE: In order to enable easy machine maintenance and replacement of consumables,
maintain an adequate amount of space around the machine. When lifting the
machine, be sure to grab the handles on the left and right sides of the cassette tray.
9
10
11
12
A
vii
Page 16
viii
Caution labels and indicators
The caution labels and indicators are attached to the machine as shown below, to avoid
any serious injury.
The f u s e r unit and the area around it inside the mach ine a r e extremely hot.
To avoid getting burned, DO NOT TOUCH.
• Do not burn toner cartridges. Exposure to an open flame can cause the toner cartridge
to burn or explode, causing serious injury.
• Never expose a cartridge to direct sunlight.
• Never attempt to disassemble a toner cartridge or attempt to refill it.
Page 17
Transporting the machine
• Two or more people should carry the machine. Before transporting the machine, be
sure to check that you disconnect the plug from the outlet and remove the line cable.
Otherwise, the damaged cable can cause fire, electrical shock or malfunction.
• Before transporting the machine, remove the toner cartridge (or toner bottle).
• When lifting the machine, be sure to grab the handles on the left and right sides of the
cassette tray.
• If you install the machine on a cabinet, secure the machine with stoppers to prevent
it from moving. Otherwise, the machine may move in an unexpected direction, potentially causing injury.
• If you need to transport the machine over a long distance, consult your Muratec dealer.
Consumables
• Do not burn toner cartridges. Exposure to an open flame can cause the toner cartridge
to burn or explode, causing serious injury.
• Please dispose of used toner and drum cartridges in accordance with local regulations.
• Keep toner and other consumables out of the reach of small children. If a child should
ingest toner, consult a physician immediately.
1
2
3
4
5
6
7
IMPORTANT
• D
o not store the toner cartridge (or toner bottle), drum cartridge (or drum unit) or
paper in any of the following places:
Places exposed to fire
–
– Places exposed to direct sunlight
– Places subject to high temperature and/or high humidity
– Places subject to rapid temperature changes
– Dusty areas
– Inside a car, left for a long time
• Do not directly touch the photoreceptor surface of the drum cartridge (or drum unit),
or expose it to direct sunlight. This could cause a reduction in print quality.
• To prevent caking in the toner, never stand the cartridge on its end and do not store it
up side down.
• Never attempt to disassemble a toner cartridge or attempt to refill it.
• Do not remove the cartridge from its protective bag until you are ready to install it.
• Handle cartridges with care. Do not subject it to shock or vibrations.
8
9
10
11
12
A
ix
Page 18

x
Routine Maintenance
• Do not burn toner cartridges. Exposure to an open flame can cause the toner cartridge
to burn or explode, causing serious injury.
• The fuser unit and the area around it inside the machine are extremely hot when operating. When you clear a paper jam or inspect inside, be careful not to touch around the
fuser unit. It may cause burns.
• When you clear a paper jam or replace the toner cartridge (or toner bottle), be careful
• Be careful not to stain your hands or clothes with the toner. If your hands or clothes
• Do not attempt machine operations that are not described in this manual.
Ventilation
• Always operate the product in well ventilated areas.
• Do not let any object obstruct or plug the ventilation holes of this product. Accumu-
not to get the toner powder into your eyes or mouth. If the toner gets in your eyes or
mouth, immediately flush with cold water an d consult a physician.
get stained, wash them immediately with cold water. The stains may become permanent if washed using warm water.
Operating the product in poorly ventilated areas for an extended time period could
pose health risks. Be sure to frequently ventilate the operating area.
lated heat inside the product could result in a malfunction.
Page 19

Product Recycling and Disposal
This product contains mercury in the fluorescent lamp in the scanner (< 5mg).
Disposal of mercury may be regulated due to environmental considerations. For disposal
or recycling information, please contact your local authorities.
For California, USA only
This Perchlorate warning applies only to primary CR (Manganese Dioxide) Lithium coin
cells. Perchlorate Material-special handling may apply. See www.dtsc.ca.gov/hazardouswaste/perchlorate.
1
2
3
Ni-MH (Nickel Metal Hydride) batteries are installed inside machine as back up
memory batteries.
Please dispose of used batteries in an environmentally friendly manner according to the
manufacturer’s instructions. For replacement of the batteries, please contact your qualified service technician.
4
5
6
7
8
9
10
xi
11
12
A
Page 20

Chapter
Layout & Installation
Packing contents .................................................................................... 1-2
Machine layout ..
Control panel overview ..
Setting up the machine ..
Unlocking the mirror carriage ..
Attaching the document tray ..
Making connections ..
Installing the drum and toner cartridges ..
Plug in and power up ..
Turning off the transport mode ..
Loading paper and adjusting the paper size setting ..
Adjusting the speaker volume ..
Initial setup ..
Clearing stored settings ..
Getting started ..
Specifying initial settings ..
Using the Energy Save mode ..
Installing drivers [CD] ..
............................................................................................... 1-13
.................................................................................... 1-3
....................................................................... 1-4
............................................................................... 1-7
............................................................1-7
.............................................................. 1-7
............................................................................. 1-8
.......................................... 1-9
........................................................................ 1-11
........................................................1-11
....................... 1-12
..........................................................1-12
.................................................................... 1-13
.................................................................................. 1-13
................................................................. 1-14
............................................................1-17
.............................................................................. 1-18
1
Page 21

1-2 Layout & InstaLLatIon
Packing contents
Main unit with 500-sheet paper cassette
AC power cord
Printer & scanner
driver CD
Document tray
Telephone line cable
Ferrite core
Drum cartridge Toner cartridge
Documentation & labels
(1) User’s guide (this book)
(2) Safety Information
(3) Paper size label
(4) One-touch key label
(5) Soft key label
(6) Mirror carriage caution sheet
(MFX-1350 and MFX-1330 only)
(3) (4)
(1)
(5)
(6)
(2)
NOTE: • The appearance of the AC power cord and telephone line cable vary according to
countries.
• The toner cartridge supplied with your machine is starter toner cartridge, which
yields approximately 3,000 printouts. You can purchase regular, full-yield toner
cartridge from your Muratec dealer.
Page 22

Machine layout
LINE
PHONE1
PHONE2
LINE
PHONE1
PHONE2
Bypass tray
Automatic
document feeder
(ADF)
Control panel
Paper cassette
2nd paper cassette
(Option)
1st side cover
2nd side cover
Front cover
Paper level
Indicator
Document
guides
Document
tray
Document
exit tray
Document glass
Power switch
AC power jack
Telephone
Connectors
Platen cover
Paper exit tray
Second phone line
(Option)
Network connector
(Option)
USB connector
The document glass
is available only for
the MFX-1350/MFX-1330.
The following illustration uses the MFX-1350/MFX-1330. All illustrations used in this manual are of
the MFX-1350/MFX-1330 unless otherwise noted.
1
2
3
4
5
Layout & InstaLLatIon
6
7
8
9
10
11
12
13
14
A
1-3Layout & InstaLLatIon
Page 23

1-4 Layout & InstaLLatIon
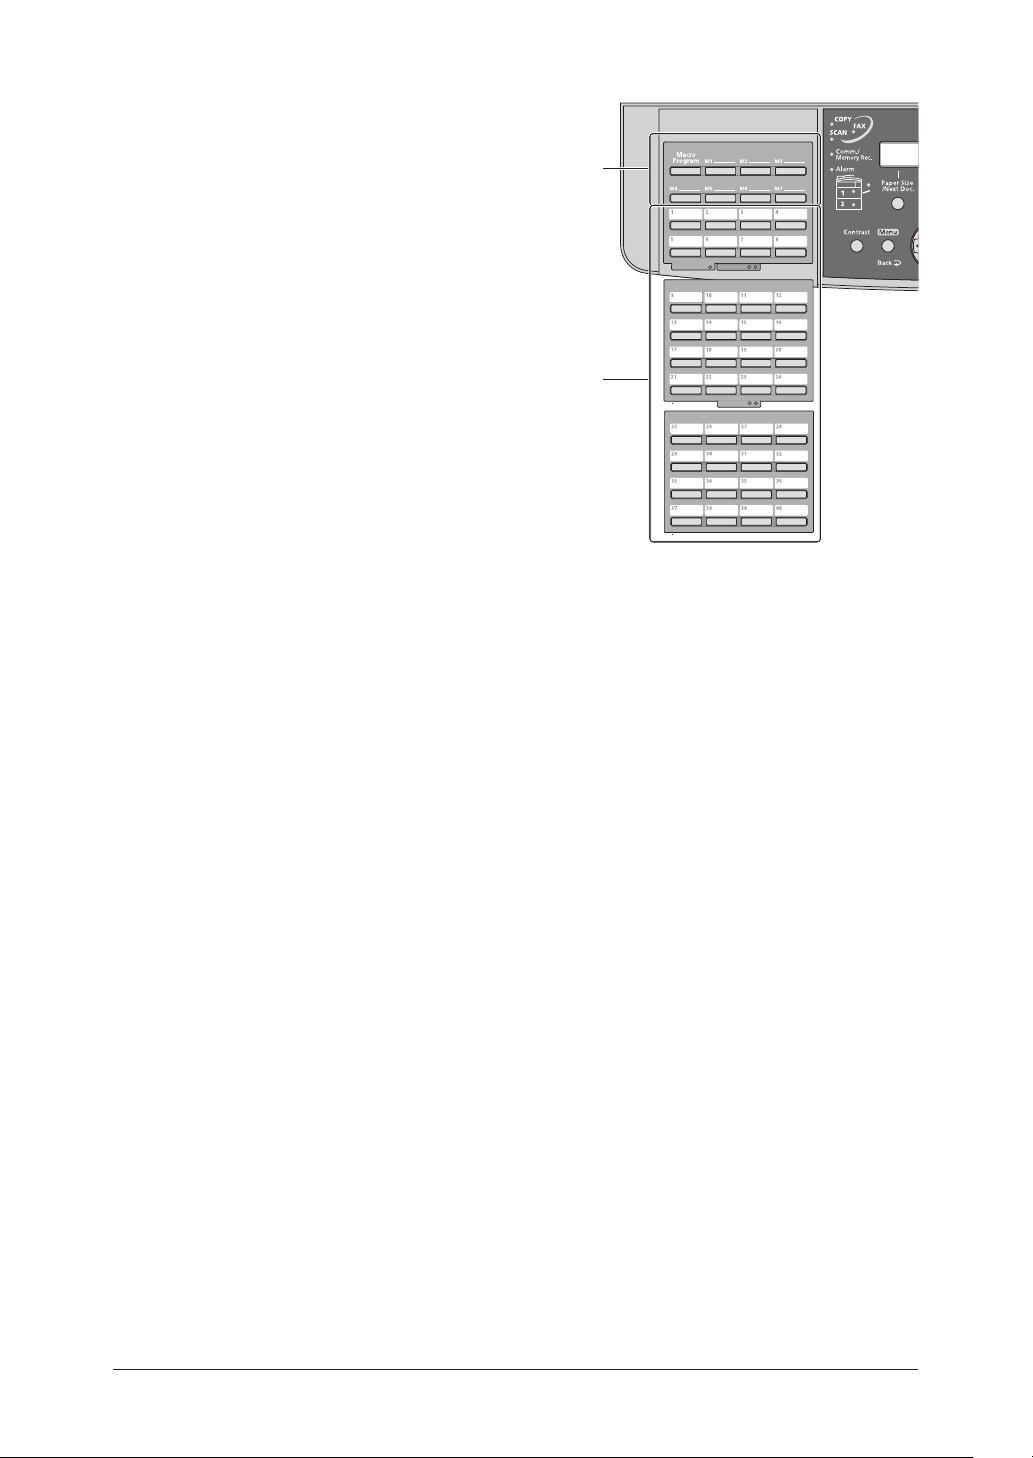
Control panel overview
1 2 34 5 6 7 8 9
10 11 12 13 14
15 16 17 18
19 20 21 22
1 2 34 5 6 7 8 9
10 11 12 13 14
15 16 17 18
19 20 21 22
MFX-1350 / MFX-1330 model
F-305 / F-300 model
Mode switch button
1
Press this button to switch the machine’s mode.
Paper source light
2
Indicates the selected paper source.
Alarm light
3
Glows when a
Comm. /Memory Rec. light
4
Blinks when the machine is communicating with another machine.
Glows when the machine has received documents into memory.
Machine mode light
5
Indicates what mode the machine is in.
Paper Size /Next Doc. (MFX-1350 / MFX-1330 model)
6
Selects the paper you want to use for copying.
Also, if you press this key while the machine is scanning, the machine will allow for the scanning of
additional documents. once the current set has been completed.
Paper Size (F-305 / F-300 model)
Selects the paper you want to use for copying.
LCD (Liquid crystal display)
7
Shows messages and selections prompted during operation.
errors
occurs.
Page 24

Doc. Size
8
When using the ADF: Instructs the machine to scan Auto*, Letter, Half-letter or Legal size docu-
ments.
* When you select Auto, custom size documents (up to 35.43 in. (900 mm) in
length) can be automatically scanned.
When using the document glass*: Instructs the machine to scan Letter, Half-letter or Legal size
documents.
* The document glass is available only for the MFX-1350/MFX-
1330.
Doc. Resolution
9
Selects the fax and copy resolution.
Contrast
10
Adjusts the scanning contrast level.
Menu /Back
11
Accesses machine settings. Also, it allows you to go back to the previous menu level.
Cursor keys
12
<p>(Redial): Scrolls through recently dialed numbers. (Page 4-7.)
<q>(Tel Index): Displays one-touch and speed-dial entries which are sorted alphanumerically,
similar to a phone directory. (Page 3-11.)
In copy and scan mode —
<p> <q>: Adjusts the zoom ratio.
Enter
13
Selects or confirms settings.
Cancel
14
Deletes characters on the LCD and cancel commands you have entered into the machine.
Soft keys
15
Frequently used functions can be assigned into the following keys.
The following are the default settings:
MFX-1350/MFX-1330 F-305/F-300
Soft key 1 Sort Report
Soft key 2 Bypass Monitor
Soft key 3 Combine Pause /Dial Opt.
(See “Soft keys” on page 8-2 for more information.)
Advanced Functions
16
You can choose any function that is not assigned as a soft key. The displayed functions may vary
according to the mode the machine is in.
Speed Dial /Group
17
Press this key once and enter the three-digit code to dial a pre-registered fax or phone number.
Also, press this key twice and enter a group number to perform group dialing.
Job Confirm. /Fax Cancel
18
Cancel or review fax jobs, or review the results of a fax transmission.
Numeric keys
19
Enter numerical values as well as fax/phone numbers and characters.
Reset
20
Returns the menu to the standby screen and resets all settings back to their defaults.
Start
21
Executes operation.
Stop
22
Stops the machine’s operation. However, to stop a fax transmission, press <Job Confirm. /Fax Cancel>.
1
2
3
4
5
Layout & InstaLLatIon
6
7
8
9
10
11
12
13
14
A
1-5Layout & InstaLLatIon
Page 25
1-6 Layout & InstaLLatIon
23
24
Macro keys
23
Programming the macro keys can reduce a multi-step
operation into a one-touch executable.
(See “Macro keys” on page 8-4 for more information.)
One-Touch keys
24
Instantly dials a pre-registered fax or phone number.
Page 26
Setting up the machine
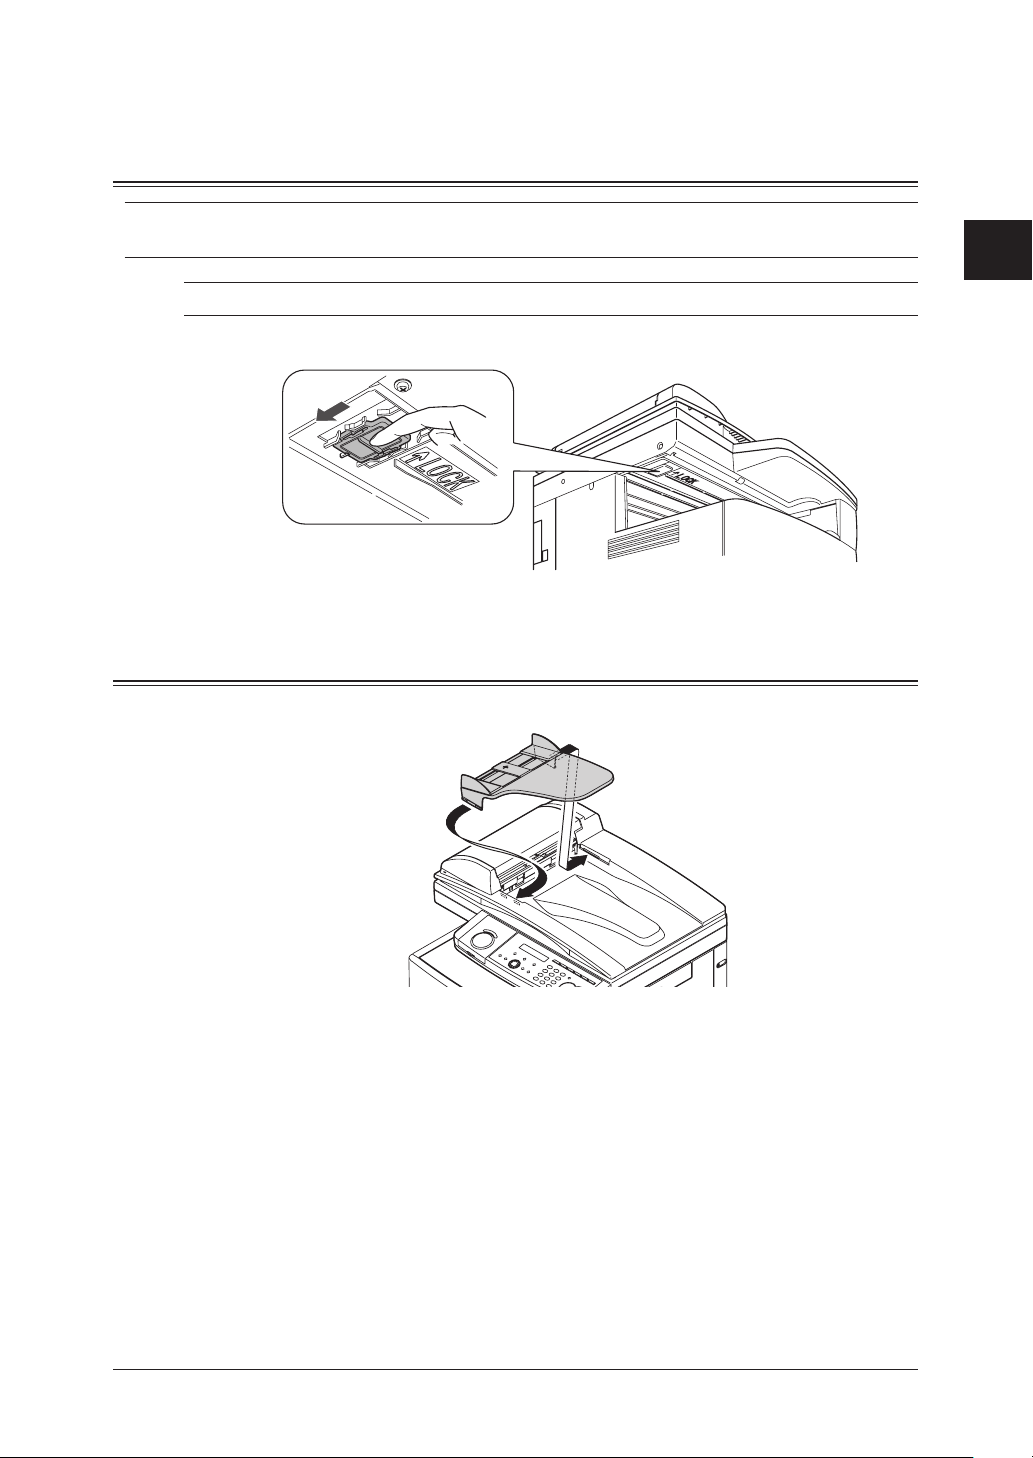
Unlocking the mirror carriage
IMPORTANT: Do not turn the power on until after you have unlocked the scanner unit. Doing so
could damage the machine.
1
NOTE: This procedure is required only for MFX-1350/MFX-1330.
Slide the scanner unit lock switch to the unlock position as shown below.
1
After you have unlocked the scanner unit, turn the transport mode off. (See page 1-11.)
2
Attaching the document tray
Attach the document tray by inserting it into the appropriate holes, as shown below.
2
3
4
5
Layout & InstaLLatIon
6
7
8
9
10
11
12
13
14
A
1-7Layout & InstaLLatIon
Page 27

1-8 Layout & InstaLLatIon
Making connections
Telephone wall jack
LINE
PHONE1
PHONE2
spacer
handset
cradle
2*10'
2*10'
.+0'
External phone
(even an answering machine)
Modular cap
LINE
PHONE1
PHONE2
Telephone line connection
Attach the supplied ferrite core to the telephone line cable as illustrated below.
Plug the telephone line cable into the LINE jack and the other end to the wall jack.
If you want to use your machine for receiving both faxes and voice calls, connect the
optional handset or an external telephone to your machine.
Connecting the optional handset
Attach the handset cradle and the spacer using the screws supplied with the cradle.
Then plug the handset cord into the PHONE 1 jack of your machine.
Connecting an external phone
Plug the external phone’s line into the PHONE 2 jack of your machine.
Page 28
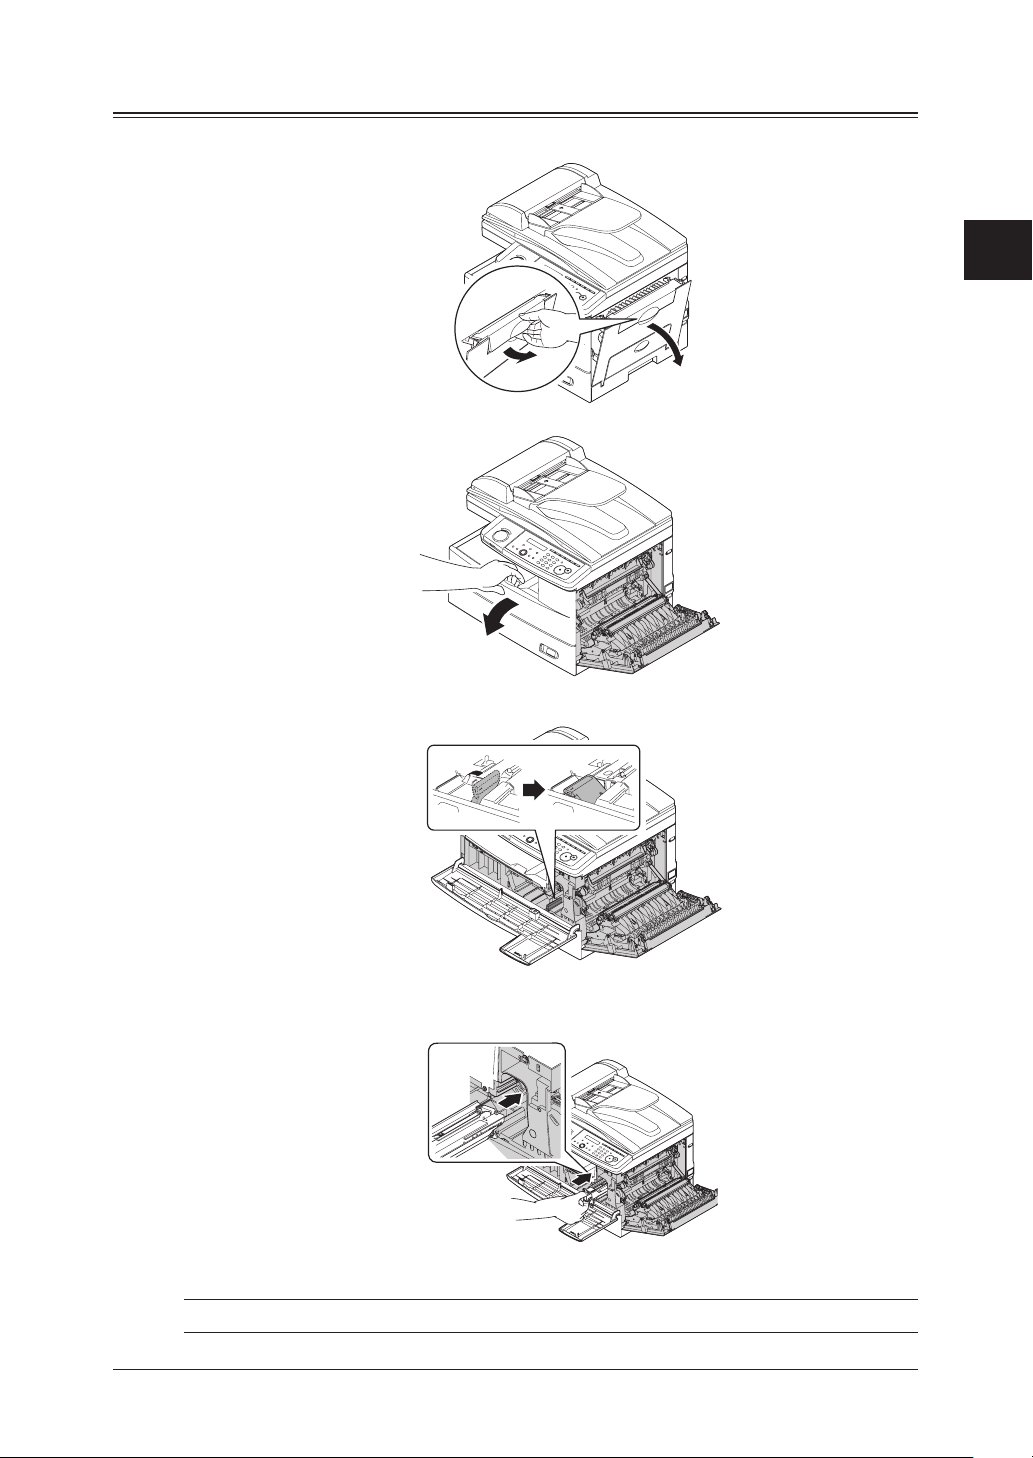
Installing the drum and toner cartridges
Pull the release lever to open the side cover.
1
Open the front cover.
2
Turn the toner cartridge locking lever to the left (unlock position).
3
1
2
3
4
5
Layout & InstaLLatIon
6
7
8
9
Unpack the drum cartridge from its carton and slide it into the machine firmly until it
4
locks into place.
NOTE: Shield the drum cartridge from light.
10
11
12
13
14
A
1-9Layout & InstaLLatIon
Page 29
1-10 Layout & InstaLLatIon
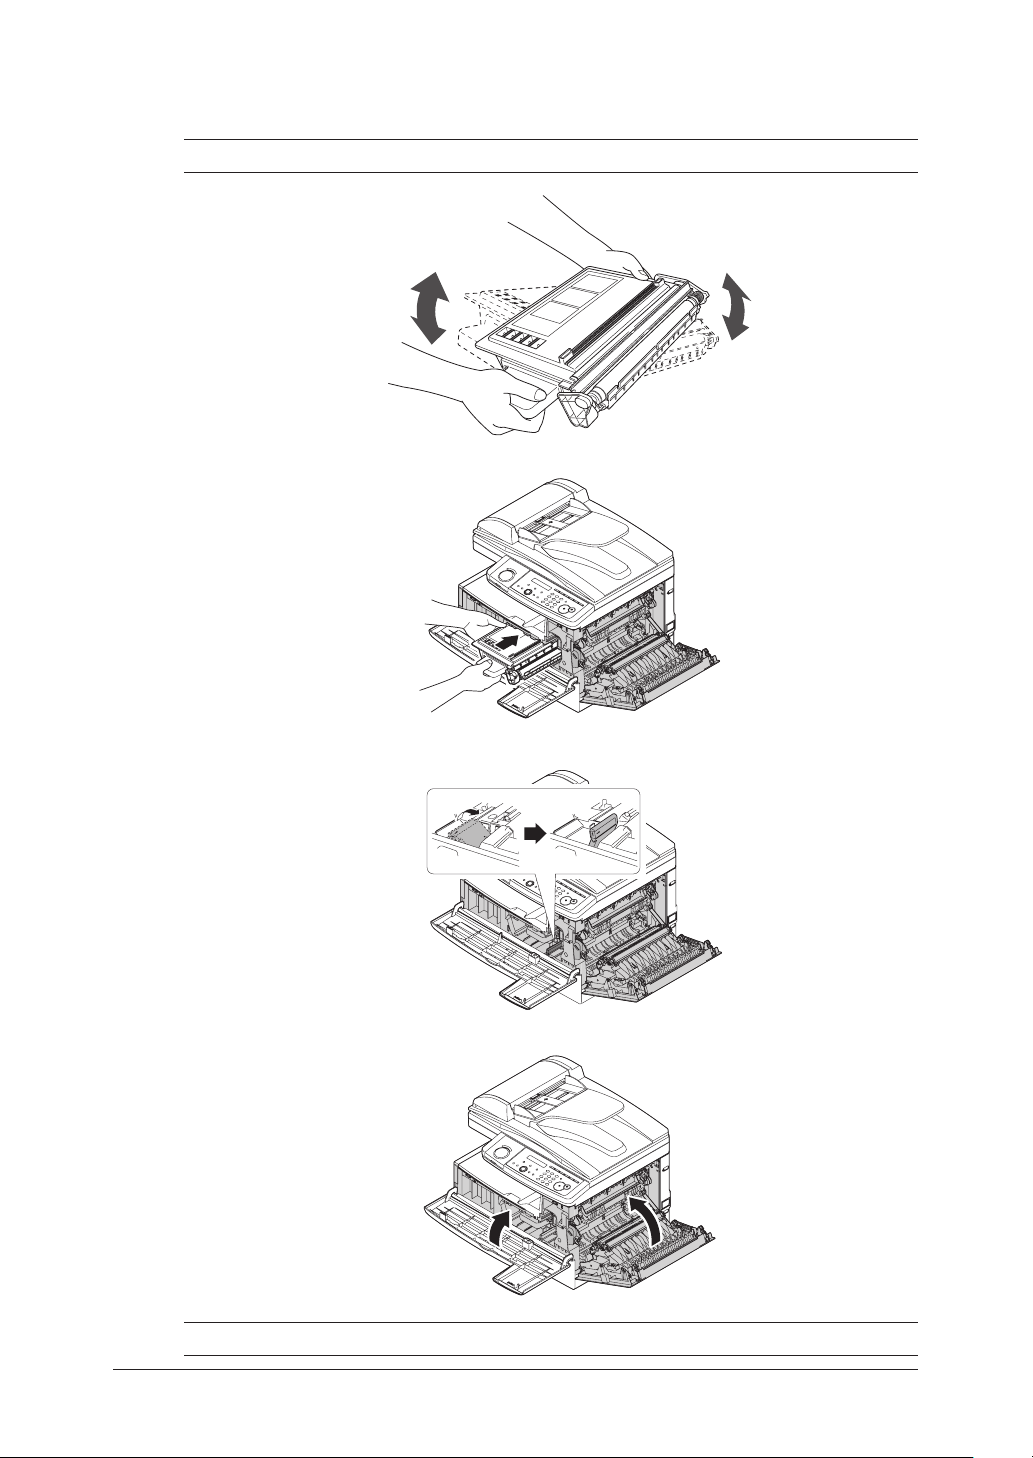
Unpack the starter toner cartridge from its carton. Then, holding the toner cartridge
5
with both hands, gently shake it to distribute the toner evenly inside the cartridge.
NOTE: Do not touch the roller of the toner cartridge.
Slide the toner cartridge into the machine firmly until it locks into place.
6
Turn the cartridge locking lever to the right until it locks into place.
7
Close the front and side covers.
8
NOTE: The machine will not operate if the covers are not closed properly.
Page 30

Plug in and power up
Plug the non-pronged end of the supplied AC power cord into the AC socket on the
1
machine and the pronged end into a properly grounded AC outlet.
IMPORTANT: Be sure not to turn the power on until after you have unlocked the scanner unit.
(See page 1-7.)
Turn on the power switch. The markings are international standards:
2
I means on, O means off.
It will take a few seconds for the machine to warm up.
The machine will show:
Mirror Locked
(The above display will not appear on the F-305/F-300.)
To use the machine, turn off the transport mode.
1
2
3
4
5
Layout & InstaLLatIon
6
7
8
9
NOTE: While the power is on, the scanner lamp will always lights, but this does not mean
machine failure. See also “Scanner Sleep” on page 10-4.
Turning off the transport mode
When the machine is in the transport mode, the machine will show:
Mirror Locked
To turn off the transport mode:
Press <Menu>, <*>, <1>, <4>.
1
Mirror Locked :On
//Enter
Press <q> or <p> to select “Off” and press <Enter>.
2
The scanner unit will move to home position and the machine will be ready to use.
IMPORTANT: • The transport mode will not appear on the F-305/F-300.
• If you must move the machine, turn this mode to on, then power off and lock the
scanner unit by sliding the lock switch.
10
11
12
13
14
A
1-11Layout & InstaLLatIon
Page 31

1-12 Layout & InstaLLatIon
Loading paper and adjusting the paper size setting
Please see “Paper handling” on pages 2-12 to 2-16.
Adjusting the speaker volume
Press
<
1
2
3
4
5
copy4fax4scan
Fax Ready
Dec 15 2007 1:30pm
Press <Advanced Functions> repeatedly until “Monitor” is displayed.
For F-305/F-300, simply press <Monitor>.
Monitor
//Enter
Press <Enter>. You will hear a dial tone.
Press <t> or <u> to adjust the volume.
** Tel Mode **
Volume :
Press <Advanced Functions> repeatedly to select “Monitor” and press <Enter> to hang
up. For F-305/F-300, press <Monitor> to hang up.
nnnnnn
> to switch the machine to the fax mode.
Page 32

Initial setup
Clearing stored settings
Before using your machine, clear the built-in user data. This ensures that the memory
will hold only your settings.
IMPORTANT: After specifying the initial settings, do not clear the memory again without an
authorized technician’s advice.
To clear the memory:
Press <Menu>, <*>, <0>, then <2>.
1
Clear User Settings
Yes Enter
If you want to clear the memory, press <Enter>.
2
If you do not want to clear the memory, just press <Cancel>.
Getting started
Clear User Settings
No Cancel
1
2
3
4
5
Layout & InstaLLatIon
6
In some countries you are required by law to indicate your name and fax number on
every fax you send.
YOU MUST THEREFORE STORE YOUR NAME (OR COMPANY NAME) AND
FAX NUMBER IN YOUR MACHINE BEFORE USING IT.
Every fax page you send arrives at the receiving machine with a single line of text at
the very top of the page. This text lists a name, called the Transmit Terminal Identifier
(TTI), and a fax number.
Under “Specifying initial settings” below, you can stored the following items including
your name and fax number.
• Language
• Current date and time
• Automatic daylight saving time detection
• Fax reception mode
• Dial tone detection
• Phone dialing type
• Your fax number
• TTI 1 / TTI 2 / TTI 3
• Usual TTI
• Idle time before switching to the Energy Save mode
The settings you adjust here can always be changed later.
7
8
9
10
11
12
13
14
A
1-13Layout & InstaLLatIon
Page 33

1-14 Layout & InstaLLatIon
Specifying initial settings
TimeYearMonth
Enter Time
12/15 '07 13:30
Day
If you press <Reset> during initial setup, your machine returns to Standby mode. But it
will keep the settings you saved by pressing <Enter> as described below.
1
Language
2
3
Date & Time
4
5
To change a digit, press <t> to move the cursor left or <u> to move it right. Then,
6
Switch to the Fax mode by pressing
Press <Menu>, <9>, <Enter>.
The machine will show the current language setting.
Language :English
//Enter
Press <q> or <p> until your desired language appears.
Then press <Enter> to save the setting and continue.
The machine will show the current calendar/clock setting.
Use the numeric keys to enter the correct date in the MMDDYY format and time in
the 24-hour format.
For instance, to set 1:30 PM on December 15, 2007, press 1215071330:
enter the correct digit.
Press <Enter> to save the clock setting and continue.
<
copy4fax4scan
>
.
Daylight savings
7 Set the daylight saving. When you set it to “On”, the machine automatically adjusts
8 Press <q> or <p> to select “On” or “Off”, then press <Enter> to save the setting.
Fax reception mode
9
10
11
the clock in the summer time period.
Daylight Saving :Off
//Enter
The machine now shows the machine’s current reception mode.
Fax Ready
//Enter
For now, select “Fax Ready”. (For details on the reception modes, see “Selecting the
reception mode” on page 5-2.)
Press <Enter> to save the setting and continue.
Page 34

Dial tone detection
The machine asks you to set whether the machine should detect a dial tone before
12
dialing.
DialTone Detect :Off
//Enter
Normally select “Off”. If you need to detect a dial tone when dialling, select “On”,
13
however you cannot send a fax if there is no dial tone.
Press <Enter> to save the setting and continue.
14
Phone dial type
The machine will ask you to set the dialing type needed for the fax machine, either
15
tone or pulse.
Phone Type :Tone
//Enter
1
2
3
4
Press <q> or <p> to select the dialing type on your phone line, then press <Enter> to
16
save the setting.
Your fax number
The machine will not ask you to enter your fax number to display on the recipients
17
display or printed fax documents.
Your Fax Number
+1-972-364-3350_
Use the numeric keys to enter your fax number. This number can contain up to 20
18
characters.
• To enter a “+” symbol before your country code:
For MFX-1350/MFX-1330 — Press <Advanced Functions> repeatedly until “Pause
/Dial Opt.” is displayed on the LCD then press <Enter>.
For F-305/F-300 — Simply press <Pause /Dial Options>.
• To enter the hyphen “–” to make long numbers easier to read:
For MFX-1350/MFX-1330 — Press <Advanced Functions> repeatedly until “Pause
/Dial Opt.” is displayed, then press <Enter>. Repeat this procedure again to enter
a “–” character on the LCD.
For F-305/F-300 — Simply press <Pause /Dial Options> twice.
• If you make a mistake, press <Cancel> to erase the digit on the left.
• To change just one number, press <t> or <u> to move the cursor, press <Cancel>
to erase the number. Then re-enter the fax number correctly.
Press <Enter> to save the number.
19
TTI (your name)
The machine will now ask you to enter the name (or company name) to be shown at
20
the top of faxes you send. You can enter three different names. Each name can store
up to 22 characters.
TTI 1 ;Upper
_
5
Layout & InstaLLatIon
6
7
8
9
10
11
12
13
14
A
Use the numeric keys to enter characters. (Refer to “Entering characters,” on page
2-2.)
1-15Layout & InstaLLatIon
Page 35

1-16 Layout & InstaLLatIon
If you make a mistake, press <Cancel> to erase to the left.
To change just one character, press <t> or <u> to move the cursor, press <Cancel> to
erase it. Then re-enter the correct character.
Press <Enter>.
21
TTI 2 ;Upper
_
If you do not want to enter TTI 2, skip to step 23.
Use the numeric keys to enter the name for TTI 2.
22
Press <Enter>.
23
TTI 3 ;Upper
_
If you do not want to enter TTI 3, skip to step 25.
Use the numeric keys to enter the name for TTI 3.
24
Press <Enter> to save the setting and continue.
25
Default TTI selection
The machine now asks you to set the default TTI to be shown at the top of faxes you
26
send.
Usual TTI :TTI 1
//Enter
Press <q> or <p> to select TTI 1, TTI 2 or TTI 3.
27
Press <Enter> to save the setting and continue.
28
Idle time setting for switching to the Energy Save mode
The machine will now ask you to enter the time at which the machine will enter the
29
energy save mode.
Your machine will automatically enter the Energy Save mode after your entered time
has elapsed.
The default value is 5 minutes.
Energy Save Timing
(001-240) 005 min.
Enter the time (in minutes) using the numeric keys.
30
Press <Enter> to save the setting.
31
Press <Reset> to return to the standby mode.
32
Page 36

Using the Energy Save mode
In order to conserve energy, your machine is initially set to enter the Energy Save mode
automatically when the machine is left idle for a certain period.
The machine will automatically enter the Energy Save mode after approx. 5 minutes of
idle time.
In the Energy Save mode, the machine will stop pre-heating for printing and display
“Energy Save Mode” on the LCD. However, the indicators on the control panel and scanner lamp will not shut off even when the machine is in the Energy Save mode.
To recover from Energy Save mode, press any key on the control panel.
When your machine receives a fax message during energy save mode, the machine will
wake up.
To change the Energy Save mode setting:
Press <Menu>, <2>, <1>, <0>, <5>, then <Enter>.
1
Energy Save Mode:On
//Enter
Press <q> or <p> to select “On” or “Off”.
2
Press <Enter> to save the setting.
3
1
2
3
4
5
Layout & InstaLLatIon
6
Press <Reset> to exit and return to the standby mode.
4
NOTE: The idle time setting can be changed. Refer to “Idle time setting for switching to the
Energy Save mode” of “Specifying initial settings” on page 1-14.
NOTE: If you assign “Energy Save” to a soft key, you can switch your machine to Energy Save
mode immediately by pressing the soft key, regardless of the on/off setting and time setting. For details of the soft key, see page 8-2.
7
8
9
10
11
12
13
14
A
1-17Layout & InstaLLatIon
Page 37

Installing drivers [CD]
To use your machine as a printer or a scanner, install the drivers on the supplied CD to
your computer.
For further information of installing, printer driver and scanner driver, see the manuals
on the CD.
1-18 Layout & InstaLLatIon
Page 38

Chapter
2
Getting started
Operating tips ............................................................................................... 2-2
Switching the machine mode ..
Entering characters ..
Backup memory ..
Selecting a function ..
Function table ..
Document and paper handling ..
Document handling ..
Paper handling ..
............................................................................. 2-2
................................................................................... 2-3
............................................................................. 2-4
...................................................................................... 2-5
........................................................................... 2-10
.................................................................................. 2-12
.............................................................. 2-2
................................................................. 2-10
Page 39

2-2 GettInG started
Operating tips
Switching the machine mode
To switch the machine mode, press <
The mode light indicates what mode the machine is in.
NOTE: You cannot switch the mode in any of the following cases:
• When scanning a document.
• During real time transmission.
• When programming any function settings.
Entering characters
Certain settings allow you to enter characters; for your TTI (your name), remote fax’s
name or others. To enter letters or other characters, use the following guidelines:
By pressing the numeric key repeatedly, you can access the following characters as
shown in the table below.
copy4fax4scan
>.
When you want to enter a character that shares the same numeric key with other characters, press <u> to move the cursor to the right.
Page 40

Upper and lower case characters
////
Enter
Press <#> to toggle between upper and lower case.
TTI1 ;Upper
_
“Upper” means the machine will enter only upper-case letters, similar to the "Caps
Lock" button on your PC.
“Lower” means the machine will enter only lower-case letters.
Entering symbols
You can also enter special characters or symbols.
When the machine prompts you to enter a name, press <*>.
1
The LCD will change to:
Select the character you want to enter using the <t>, <u>, <p> or <q> keys.
2
To enter a character, press <Enter>.
3
If you want to enter another character, repeat steps 1 to 3.
4
Otherwise, go to next step.
Press <Enter> to save it.
5
Editing characters
If you entered an incorrect letter or digit, press <Cancel> to erase the character on the
left.
To edit just one character or digit, press <t> or <u> to move the cursor to that character or digit. Then press <Cancel> to erase it. Re-enter the correct character or digit.
TTI1 ;Lower
_
1
2
3
4
5
GettInG started
6
7
8
9
10
11
Backup memory
User data and auto-dialing settings are automatically backed up in memory.
However, documents stored in memory will be lost after 72 hours if there is a power
failure or if you disconnect the power cord. (See “Specifications,” page AI-2.)
12
13
14
A
2-3GettInG started
Page 41

2-4 GettInG started
Selecting a function
To start setting a function, you must first press <Menu>.
The two ways of selecting a function are described below.
The procedures described in this manual are using short-cut operations.
Short-cut operation with the numeric keys
Press <Enter>, then press a three- or four-digit numbers to select the function.
For example, “Press <Menu>, <2>, <1>, <0>, <1>, <Enter>”…
… you would press <Menu>
… then <2>
… then <1>
… then <0> (the numeric key zero)
… then <1>
… then <Enter>
Searching for a function using the cursor key
Even if you don’t remember the exact commands needed for an operation, you can search
for and enter the function using the cursor key (q, p, u, t).
To search for a function:
Press <Menu>.
1
Search for the function using <q>, <p>, <t> or <u>.
2
The function table on the next page may be useful for your search.
For example, if you want to set the “Cassette Size,” press <
Press <Enter> when you have found the function that you want to set.
3
Going back to the previous screen by pressing <Back>
Press <Back> to go back to the previous menu level.
q>,
<u>, <u>
.
Page 42

Function table
You can search for any function using the function table below.
Function menu
level one
1. Autodial
Entries
2. User
Settings
*1 The optional NIC is required.
*2 The optional 2nd phone kit is required.
The duplex printing is available only for the MFX-1350 (with standard duplex unit)/MFX-1330 (with optional duplex unit) only.
*3
Function menu
level two
1. One-Touch
Dial
2. Speed Dial 1. Enter
3. Group Dial 1. Enter
1. Mac
hine
Settings
Function menu
level three
. Enter
1
One-Touch
2. Erase
One-Touc
Speed-Dial
2. Erase
Speed-Dial
Group Dial
2. Erase
Group Dial
01
. Cassette
Size
02. Protect
Passcode
03. Soft Key
04. Silent
Mode
05. Energy
Save Mode
06.
Fax & Copy
Description Setting Page
Registers a one-touch number. — 3-4
Erases a registered one-touch number. — 3-5
h
Registers a speed-dial number. — 3-7
Erases a registered speed-dial number. — 3-7
Registers a dial group. — 3-9
Erases a registered dial group. — 3-10
Sets paper size for the paper cassette.
Sets the passcode for using the security
.
features
Assigns a function to a soft key
function can be activated or deactivated
by pressing the soft key.
Default setting
MFX-1350/MFX-1330:
Soft key 1: Sort Copy
Soft key 2: Bypass
Soft key 3: Combine
F-305/F-300:
Soft key 1: Report
Soft key 2: Monitor
Soft key 3: Pause /Dial Options
Mutes your machine.
Conserves power
Make a copy of your document each time
it is transmitted.
(
The underlined settings are factory defaults.)
Ltr
Legl
HLtr
— 9-2
, so the
.
Sort Copy
Combine
Zoom
Broadcast
Address Entry
Report
Monitor
Pause /Dial Opt.
Delayed
Batch Tx
Select TTI
Select Line
Cover Page
Fax Forward
Fax & Copy
Security
Separator Page
Memory Tx
Auto Rx
F-Code Tx
F-Code Polling
Polling
Dial Prefix
Bypass
Duplex Copy
Page Counter
Energy Save
Online
Mode Switch
Off
On
Off
On
Off
On
*1
*2
*3
2-16
8-2
10-2
1-16
10-3
4-19
1
2
3
4
5
GettInG started
6
7
8
9
10
11
12
13
14
A
2-5GettInG started
Page 43

2-6 GettInG started
Level one
function menu
2. User
Settings
Level two
function menu
1. Machine
Settings
2.Fax
Settings
Level three
function menu
. Primary
07
Mode
08. Service
Mode
09. Date & Time
. Paper
10
Source
11. Page
Counter
12. Scanner
Sleep
01. Scan
Parameters
02. Print
P
arameters
03. # Of Rings
04. Redial
05. Dialing
Pause
06. Memory Tx
07. Quick Tx
08. Select TTI
09. ECM Mode
10. Block Junk
F
ax
Description Setting Page
You can set the primary standby mode.
For technical support. Do not turn this
setting on unless an authorized technician asks you to do so.
Sets the current date and time — 10-3
Selects the paper source for faxing or
.
copying
ys the total number of pages you
Displa
have printed and scanned.
You can specify the sleep period of the
scanner lamp to prolong the life of your
machine’s scanner lamp.
ou can set the following settings for fax
Y
sending.
• Primary fax resolution
• Primary scanning contrast
• Super fine resolution
ou can set the following settings for fax
Y
reception.
• Reduction rate
• Reduction margin
• Half-page reception*
*
or the MFX-1350(with standard
F
duplex unit)/MFX-1330(with optional
duplex unit), the following menu is
displayed.
• Paper save function
Sets the number of rings before your
machine answers.
Sets the number of times and dial interval for automatic fax redialing.
Sets the dialing pause length.
Turns memory transmission on/off
Turns quic
Selects the
Turns ECM mode on/off.
Rejects unauthorized incoming faxes.
k memory transmission on/off.
TTI you want to use.
Scan
Copy
Fax
Off
On
Fax
Copy
Fax/Copy
Not Used
— 8-8
Off
On
For MFX-1350/F-305
Start time: 19:00
Reset time: 06:30
For MFX-1330/F-300
Start time: 22:00
Reset time: 06:00
Normal, Fine,
S-Fine, Gray
Lightest, Light,
Normal, Dark,
Darkest
400dpi, 600dpi
Auto, 100%
40 mm (00-85 mm)
Off, On
Off, H. Page Rx, Duplex
Rx
For M FX-13 50/ F-3 05
02 times (00-10 times)
For M FX-13 30/ F-3 00
02 times (01-10 times)
For MFX-1350/F-305
02 times (00-14 times)
1 min. (0-5 min.)
For MFX-1330/F-300
02 times (02-15 times)
1 min. (1-5 min.)
For MFX-1350/F-305
02 sec. (00-10 sec.)
For MFX-1330/F-300
02 sec. (02-10 sec.)
.
Off
On
Off
On
TTI Default
TTI1
TTI2
TTI3
Off
Off
On
Off
Mode1
Mode2
Mode3
10-3
10-3
10-3
10-4
10-5
5-7
10-5
5-6
10-6
10-6
10-6
4-3
10-6
4-3
10-6
4-17
10-6
5-9
Page 44

Level one
function menu
2. User
Settings
3. Other
Settings
* For details of scanner settings, refer to the PDF manual on the GDI Printer / Scanner Driver CD supplied with the machine.
Level two
function menu
2.Fax
Settings
3. Copy
Settings
4. Scanner
Settings
1. Journal &
Reports
2. Cover
Page
3. Department
Code
Level three
function menu
11. Security
Rx
12. Separator
Page
13. Receive
Ti
meStamp
14. PIN Mode
15. F
ax Charge
16. Dial Prefix
19. E-mail
Gatew
ay
1. Scan
Parameters
2. Auto Reset
Time
3. Copy Auto
4. Copy
Protect
5. Sort Copy
6. Combine
7. Resolution
8. Copy
Charge
1. Scan
Parameters
2. Auto Reset
. Journal
1
AutoPrt.
2. Journal
Line Up
3. Report
Auto Print
. Set
1
Cover Page
2. Enter
Cover Page
1. Set Dept.
Protect
Description Setting Page
Keeps all received fax messages in
memory until printed manually.
P
artition each received documents by
inserting a separator page.
Prints the received date and time on the
top of each received document
Prevents unauthorized long-distance
calls.
Sets the print c
Store the appropriate access number to
access the alternative telephone service
provider.
On/Off setting for E-mail gateway. Available only for the MFX-1350/F-MFX-1330
with optional network interface card.
ou can set the following for copying.
Y
• Primary document type
• Primary scanning contrast
Sets the time (minutes) for automatically
resetting the copying parameters.
Selects item for auto selection.
Turns copy protection on/off.
Turns copy sorting on/off.
Turns combine copy on/off.
Sets the copy resolution.
Sets the copy charge per page.
Sets the followings:
•Document type
•Scanning resolution
•Scanning contrast
Sets the time (minutes) for the scan
parameters return to their initial condition.
Prints the activity journal automatically
after 100 transactions.
Changes the printing order of the activity journal.
Prints the Transmit Confirmation
Report(TCR) automatically after every
transmission.
Turns cover page sending on/off.
Enter your cover page message
Protection for the department code
settings
harge for fax receptions.
. — 4-20
.
Off
On
Off
On
Off
On
Off
Mode1
Mode2
$00.00 ($00.00-99.99) 9-10
— 4-21
Off
On
Text, Photo&Text, Photo
Lightest, Light,
Normal, Dark,
Darkest
03 min. (01-10 min.) 10-7
Paper Size
Reduction
Doc. size
Off
On
Off
On
Off
On
600 dpi
300 dpi
$00.00 ($00.00-99.99) 9-10
Text, Photo&Text, Photo
200, 300, 600 dpi
Lightest, Light,
Normal, Dark,
Darkest
03 min. (01-10 min.) *
Off
On
Off
On
Off
On
Off
On
Off
On
9-3
5-14
10-6
9-5
4-22
10-7
10-7
9-13
10-7
7-8
10-7
7-11
10-8
11-4
11-5
11-5
4-20
9-8
1
2
3
4
5
GettInG started
6
7
8
9
10
11
*
12
13
14
A
2-7GettInG started
Page 45

2-8 GettInG started
Level one
function menu
3. Other
Settings
4. Doc.
Management
5. Print 1. List Print 01. Function
* For details of scanner settings, refer to the PDF manual on the GDI Printer / Scanner Driver CD supplied with the machine.
Level two
function menu
3. Department
Code
4. F-Code Box 1. Set
h Tx 1
5. Batc
6. Fax
orward
F
7. Scan Box 1. Set
1. Store
Document
2. Erase
Document
3. Print
Document
Level three
function menu
Enter
2.
Dept. Code
3. Erase
Dept. Code
4. Set Dept.
Setting
5. Reset
Dept.Count
F-Code Box
2. Erase
F-Code Box
. Set
Batch Box
2. Erase
Batch Box
1. Set Fax
Forward
2. Enter Fax
F
3. Erase Fax
F
Scan Box
1. Polling
Document
2. F-Code
Document
1. Polling
Document
. F-Code
2
Document
3. Batch
Document
4. Scan Box
Document
1. Polling
Document
. F-Code
2
Document
3. Batch
Document
Security Rx
4.
Doc.
5. Com.
Stored Doc.
List
02. Machine
Settings
orward
orward
Description Setting Page
Stores a department code. — 9-8
Erases the stored document code
Turns department code on/off.
Clear the department code counter. — 9-12
Sets up an F-code box. — 6-3
Erases an empty F-code box. — 6-7
Sets up a batch box. — 4-14
Erases an empty batc
Turns fax forwarding on/off.
Set the forwarding rules. — 5-12
Erases the forwarding rules. — 5-13
Sets up a scan box. — *
Stores a document to be retrieved by
other fax machine.
Stores a document to be retrieved by
other F-code compatible fax machine.
Erases a document stored for polling
transmission.
Erases a document stored in the F-code
box.
Erases a document stored for a batc
transmission.
Erase a document stored in a scan box. — *
Prints a document stored for polling
transmission.
Prints a document stored in an F-code
box.
Prints a document stored in a batc
Prints a fax received during security
reception.
Prints a document stored for dela
transmission.
Prints the list of functions. — 11-2
Prints the mac
h box. — 4-16
hine setting. — 11-2
. — 9-9
Off
On
Off
On
— 4-18
— 6-8
— 4-18
— 6-9
h box
— 4-16
— 4-18
— 6-9
h box. — 4-15
— 9-4
yed
— 4-9
9-9
5-12
Page 46

Level one
function menu
5. Print 1. List Print 03. Fax
User Install
9.
Level two
function menu
— — You can set up the following settings
Level three
function menu
Settings
04. Copy
Settings
05. Journal
06. Commands
List
07. One-Touch
List
08. Speed-Dial
List
09. Group List
10. Block Junk
Dial List
11. Cover Page
12. Depart-
ment List
13. F-Code Box
List
14. F-Code Doc.
List
15. Batch Box
List
16. Batch Doc.
List
Fax Forward
17.
List
18. Macros List
19. Scanner
Settings
20. Store Doc.
List
22. Network
Settings
Description Setting Page
Prints a list of fax settings
Prints a list of copy settings. — 11-2
Prints the activity journal manually
You can print the Tx report, Rx report,
and Tx/Rx reports individually.
Prints the list of delayed commands. — 11-2
Prints the list of one-touch dial keys. — 11-2
Prints the list of speed-dial numbers. — 11-2
Prints the list of group numbers. — 11-2
Prints the list of bloc
Prints the cover page
Prints a total communication time and
printed pages for each department code.
Prints the list of F-code boxes. — 11-3
Prints the list of documents stored in the
F-code boxes
Prints the list of batc
Prints the list of documents stored in the
batc
Prints the list of forwarding rules. — 11-3
Prints the list of macro keys
Prints the list of scanner settings. — 11-3
Prints the list of documents stored in
memory
Prints the list of network settings
continuously.
•Language
•Current date and time
•Daylight Saving
•Fax reception mode
•Dial Tone Detect
•Phone Type
•Your fax number
•Your TTI 1 (your name)
•Your TTI 2 (your name)
•Your TTI 3 (your name)
•Usual TTI
•
Energy Save Timing (Idle time for entering to the energy save mode.)
.
h boxes.
.
. — 11-2
.
— 11-2
ked phone numbers. — 11-2
. — 11-2
— 11-2
— 11-3
h boxes. — 11-3
— 11-3
. — 11-3
— 11-3
. — 11-3
1-14
English, French, German, Spanish
—
Off, On
Tel Ready, Fax Ready,
Fax/Tel Ready, Tel/Fax
Ready, Ans/Fax Ready
Off, On
Tone, Pulse
—
—
—
—
TTI 1, TTI 2, TTI 3
005 min. (001-240 min.)
1
2
3
4
5
GettInG started
6
7
8
9
10
11
12
13
14
A
2-9GettInG started
Page 47

2-10 GettInG started
Document and paper handling
Document handling
Be sure to read the following guidelines before you begin the sending, copying or scanning.
Acceptable documents
ADF
Single-sheet Multiple-sheet
Size
(W × L)
Quantity 1 sheet Max. 80 sheets of Letter-,
Weight 35.0 to 128.0 g/m
Thickness 0.05 to 0.15 mm 0.07 to 0.12 mm
Document
type
* In the real time transmission with super-fine resolution, 8.5
Max. 8.5 × 35.43 in.*
(216 × 900 mm)*
Min. 4.72 × 3.94 in.
(120 × 100 mm)
2
Plain paper Plain paper
Max. 8.5 × 14 in.
(216 × 356 mm)
Min. 8.5 × 5.49 in.
(216 × 139.5 mm)
Legal-, or Half-letter
- size sheets
(75 g/m2 or 20lb. paper)
52.0 to 105.0 g/m
× 14 in. (
2
216
× 356 mm).
Document glass
The document glass is available only for the MFX-1350/MFX-1330.
Size
(W × L)
Quantity 1 sheet
Weight —
Thickness —
Document
type
Max. 8.5 × 14 in.
(216 × 356 mm)
Plain paper and other
types of documents.
Things not to put in your machine
To prevent jams and damage in the automatic document feeder, do not insert the following:
• Folded, curled, torn, wrinkled or very thin pages
• Documents with staples, glue, tape, paper clips or still-wet correction fluid
• “Sticky notes” (or documents with “sticky notes” attached)
• Cardboard, newspaper or fabric
• Pages with duplicating carbon on either side
• Credit cards or any small, thick items
• OHP transparency film
Page 48

Scanning area
Letter
Legal
Fax : 8.2 in. (208 mm)
Copy : 8.5 in. (216 mm)
Fax : 0.08 in. (2.0 mm)
Copy : 0 in. (0 mm)
Fax : 0.1 in. (2.5 mm)
Copy : 0 in. (0 mm)
Scanned area
The scanned area is shown below.
Loading documents in the ADF
Insert the documents face up, top edge first.
1
Adjust the document guides to the document
2
size.
1
2
3
4
5
GettInG started
6
7
8
Loading the document on the glass
The document glass is available only for the MFX-1350/MFX-1330.
IMPORTANT: When copying a bound document, such as a book, the copied image may contain
1 Make sure there are no documents in
the adf.
2 Lift the platen cover.
3 Place the document face down on the
document glass. The document should
be aligned to the upper left corner.
4 Gently close the platen cover.
some black areas. To reduce this effect, hold down the document to prevent its bound
part from rising. However, do not press too strongly. This may break the document
glass and cause personal injury.
9
10
11
12
13
14
A
2-11GettInG started
Page 49

2-12 GettInG started
Paper handling
Acceptable paper sizes
Paper cassette
Paper type Paper size Quantity
Plain paper
(weight: 20–24 lbs.)
Bypass tray
Paper type Paper size Quantity
Plain paper
(weight: 20–24 lbs.)
Envelopes DL: 4.33 × 8.66 in. (110 × 220 mm)
Postcard 3.94 × 5.83 in. (100 × 148 mm) 20 sheets
Transparency Letter 20 sheets
Letter, Legal, Half-letter
Letter, Legal, Half-letter , Executive
A4, A5, A5 , A6, F4,
Custom sizes
• Width: 3.8 to 8.5 in. (97 to 216 mm)
• Length: 5.5 to 14 in. (140 to 356 mm)
Com#10: 4.125 × 9.5 in. (105 × 241 mm)
Monarch: 3.875 × 7.5 in. (98.4 × 190.5 mm)
500 sheets
(weight: 20 lbs.)
50 sheets
(weight: 20 lbs.)
1 sheet
1 envelope
• Custom-sized paper can be used for PC printing only.
• A5-sized paper cannot use for PC printing, but
• Do not use envelopes with double flaps or pressure seals since these do not feed properly.
• If using a transparency (OHP) film, be sure that the film does not have a paper backing and/or a leading strip. If it does, remove the paper backing and/or strip before
loading. Only the film should go in, not film with any backing or strip.
Duplex printing
For the MFX-1350(with standard duplex unit)/MFX-1330(with optional duplex unit), the
duplex printing is available and only the following paper sizes can be used for duplex
printing.
Paper type Paper size
Plain paper
(weight: 20–24 lbs.)
Paper to avoid:
To prevent jams and damage to your machine, do not use the following:
• Creased paper • Very thick paper
• Wrinkled paper • Paper previously printed on by a printer
• Folded paper • Paper with holes
• Curled paper • Envelopes with pressure seals
• Torn paper • Extremely shiny or highly textured paper
• Carbon paper • Art paper, coated paper, coated paper for inkjet printers
• Moist paper • Paper printed on a thermal printer or an inkjet printer
• Very thin paper
A5 is available.
Letter, Legal, A4, F4
Page 50

Printable area
0.12 in (3 mm)
0.12 in (3 mm)
0.12 in (3 mm)0.12 in (3 mm)
Printable area
The printable area is shown below.
Loading paper into the paper cassettes
1
2
3
4
NOTE: After you load paper into the paper cassettes, you need to set the paper size you
loaded. See “Setting of the paper size” on page 2-16.
Pull the handle to open the paper cassette.
1
Press down the paper lifting plate until it locks in position.
2
5
GettInG started
6
7
8
9
10
11
12
13
14
Adjust the rear paper guide to the desired paper length.
3
A
2-13GettInG started
Page 51

2-14 GettInG started
Load the paper into the cassette.
4
• Before you insert paper in the cassette, stack it so the leading edge and sides of
the paper are even.
• Do not stack the paper over the limit mark inside of the cassette.
NOTE: To prevent paper jams, do not refill this paper cassette without first removing any
remaining paper. In other words, do not just add sheets to an already-loaded stack.
Pinch the side paper guide and adjust to the width of the stack.
5
Close the paper cassette.
6
After loading paper in the paper cassette, you need to set the paper size.
7
(See “Setting of the paper size” on page 2-16.)
Attach the paper size sticker supplied with your machine to the front of the cassette.
8
Page 52

Loading paper into the bypass tray
When you need to use a paper size that is not currently loaded in the paper cassette, or
when you want to print on a envelope, transparency film or custom sized paper, use the
bypass tray.
NOTE: Only use print media specified under “Acceptable paper size” on page 2-12 to avoid
paper jams and print quality problems.
Open the bypass tray on the right side of your machine. Unfold the paper support
1
extension.
1
2
3
4
5
To set the paper, 1) raise the flapper release lever 2) load paper until it comes to a stop.
2
1) Adjust the paper guides to fit the paper, 2) then lower the flapper release lever.
3
GettInG started
6
7
8
9
10
11
12
13
14
A
2-15GettInG started
Page 53

After loading paper into the bypass tray, you need to set the correct paper size by
4
pressing <Bypass>.
(
For F-305/F-300, press <Advanced functions> repeatedly until “Bypass” is displayed
on the LCD and then press <Enter>.
Bypass Tray :Ltr
//Enter
Press <q> or <p> to select the paper size you want to use.
5
Bypass Tray :Ltr
//Enter
Press <Enter>.
6
NOTE: You can set the default paper size for the bypass tray. See step 6 of “Setting of the
paper size” below.
Setting of the paper size
Default setting: 1st cassette: Letter, 2nd cassette (option): Letter, Bypass Tray: Letter
After loading paper into the paper cassette, you need to set the correct paper size by
using the following procedure.
Press <Menu>, <2>, <1>, <0>, <1>, <Enter>.
1
1st Cassette :Ltr
//Enter
)
Press <q> or <p> to select the paper size you will use in the first cassette.
2
Press <Enter>.
3
If you have the optional second cassette, proceed to step 4.
Otherwise, skip to step 6.
Press <q> or <p> to select the paper size you will use in the second cassette.
4
2nd Cassette :Ltr
//Enter
Press <Enter>.
5
Also, you can set the default paper size for the bypass tray. Press <q> or <p> to
6
select the paper size for the bypass tray. After, you load the paper into the bypass
tray, you need to set the correct paper size by pressing <Bypass>.
Bypass Tray :Ltr
//Enter
Press <Enter>.
7
Press <Reset> to exit and return to the standby mode.
8
2-16 GettInG started
Page 54

Chapter
3
Autodialler
Autodialer basics ........................................................................................... 3-2
Autodialers ..
Call groups ..
Destination names and phone directory dialing ..
Special dialing characters ..
One-touch keys ..
Adding or editing a one-touch number ..
Quick one-touch registration ..
Erasing a one-touch number................................................................. 3-5
How to dial using a one-touch key........................................................ 3-6
Speed-dial numbers .
Adding or editing a speed-dial number ..
Erasing a speed-dial number ..
How to dial using a speed-dial number ..
Call group dialing ..
Entering or changing a call group ..
Erasing a call group ..
How to dial using a call group ..
Phone directory dialing ..
How to dial using the phone directory ..
If the call fails ..
.......................................................................................... 3-2
........................................................................................... 3-2
................................ 3-2
................................................................... 3-3
............................................................................................ 3-4
............................................... 3-4
.............................................................. 3-5
.
.................................................................................... 3-7
.............................................. 3-7
.............................................................. 3-7
.............................................. 3-8
....................................................................................... 3-9
......................................................3-9
.......................................................................... 3-10
..........................................................3-10
............................................................................. 3-11
............................................. 3-11
.................................................................................... 3-12
Page 55

3-2 autodIaLLer & dIaLLInG optIons
Autodialer basics
Your machine’s autodialer stores your most frequently called phone and fax numbers for
instant recall.
Autodialers
There are two kinds of autodialer numbers. The difference between the two is how you
dial them.
Type How to dial Numbers stored
One-touch key
Speed-dial number
Call groups
Call groups are sets of fax numbers that make it easy to send the same fax message to
several locations.
Your machine can store up to 200 numbers in each group, with up to 32 groups total.
Also see “Call group dialing” on page 3-9.
Press one of the keys marked 1 to 40 on
the left side of the control panel.
Press <Speed Dial /Group> followed by
a three-digit identifier between 001 and
160.
40
160
Destination names and phone directory dialing
When you store numbers in your autodialer, you can give these numbers descriptive
names, such as “Chicago office” or “Billing department”.
The phone directory sorts these names alphabetically. Using phone directory dialing, you
can look up these numbers by their descriptive names, just as if you were using a phone
book.
Also see “Phone directory dialing” on page 3-11.
Page 56

Special dialing characters
Your machine allows you to enter special dialing characters when registering the autodialer. The chart below briefly describes each of these characters. It also tells you how to
store those characters in your autodialer.
Character Description Keystroke
Press <Advanced Functions>
Each pause lasts two seconds.
If you must wait for another dial tone or signal at
/P
any point in the dialing sequence, enter a pause.
(You can change the pause length. See page 10-6.)
– Makes long numbers easier to be read.
Switches from pulse-dialing to tone-dialing.
/T
No need to use this character when using a tone
line.
Enters a “Dial prefix code” to access the alternative
/N
telephone network.
“/N” must be entered before the first of number.
repeatedly until “Pause /Dial
Opt.” appears, then press
<Enter>.
– or –
Press the soft key assigned to
“Pause /Dial Opt.” once.
Press <Advanced Functions>
repeatedly until “Pause /Dial
Opt.” appears, then press
<Enter>. Repeat this procedure until the “–” character
appears on the LCD.
– or –
Press the <Pause /Dial Optitons> soft key twice.
Press <Advanced Functions>
repeatedly until “Pause /Dial
Opt.” appears, then press
<Enter>. Repeat this procedure until the “/T” character
appears on the LCD.
– or –
Press the <Pause /Dial
Options> soft key until a “/T”
appears.
Press <Advanced Functions>
repeatedly until “Dial Prefix
(/N)” appears and press
<Enter>. Repeat this procedure until the “/N” character
appears on the LCD.
– or –
Press the <Pause /Dial
Options> soft key until “/N”
appears.
1
2
3
4
5
6
7
8
9
autodIaLLer & dIaLLInG optIons
10
11
12
13
14
A
NOTE: For details on how to assign “Pause /Dial Opt.” to a soft key, see page 8-2.
“Pause/Dial Opt.” is defaulted to a soft key in F-305/F-300.
3-3autodIaLLer & dIaLLInG optIons
Page 57

3-4 autodIaLLer & dIaLLInG optIons
One-touch keys
Adding or editing a one-touch number
Your machine can store up to 40 one-touch numbers using the keys marked 1 to 40.
Press <Menu>, <1>, <1>, <1>, then <Enter>. The empty one-touch number will be
1
shown.
Select One-Touch
01:No Number Stored
Press <q> or <p> to select a one-touch number.
2
You can also select a one-touch key by pressing that key.
Press <Enter>.
3
01:Fax Number
_
Use the numeric keys to enter the number exactly as you would enter it if performing
4
a manual dial. The number can hold up to 40 digits.
To change a dial number, press <t> or <u> to move the cursor and press <Cancel> to
erase the number. Then enter the correct digit.
Press <Enter>.
5
01:Name ;Upper
_
Use the numeric keys to name the one-touch key.
6
The name can hold up to 24 characters.
(Regarding how to enter the characters, see “Entering characters” on page 2-2.)
To change the name, press <t> or <u> to move the cursor, and press <Cancel> to
erase the name. Then re-enter the correct name.
Press <Enter> to save the setting.
7
The next empty one-touch number will be shown.
To enter another one-touch number, repeat this procedure from step 2.
8
To exit the operation and return to standby mode, press <Reset>.
Use the one-touch key labels supplied with your machine to label the one-touch keys
9
for easy reference.
NOTE: To print a list of one-touch numbers, press <Menu>, <5>, <1>, <0>, <7>, <Enter>.
Page 58

Quick one-touch registration
Make sure that the machine is in the fax standby mode.
1
Fax Ready
Dec 15 2007 1:30pm
Press an empty one-touch key you want to register. The machine will show:
2
01:Enter One-Touch
Yes Enter
To cancel this operation, press <Cancel>.
To store the one-touch number, press <Enter>.
3
01:Fax Number
_
Use the numeric keys to enter the number as if performing a manual dial.
4
The number can hold up to 40 digits.
To change a number, press <t> or <u> to move the cursor and press <Cancel> to
erase the number. Then enter the correct number.
Press <Enter>.
5
01:Name ;Upper
_
Use the numeric keys to name the one-touch key.
6
The name can hold up to 24 characters.
(Regarding how to enter the character, see “Entering characters” on page 2-2.)
To change a name, press <t> or <u> to move the cursor and press <Cancel> to erase
the name. Then enter the name correctly.
Press <Enter> to save the setting.
7
The machine will return to the standby mode.
Use the one-touch key labels supplied with your machine to label the one-touch keys
8
for easy reference.
Erasing a one-touch number
Press <Menu>, <1>, <1>, <2>, then <Enter>.
1
01:Enter One-Touch
No Cancel
1
2
3
4
5
6
7
8
9
autodIaLLer & dIaLLInG optIons
10
11
12
13
Press <q> or <p> to select a one-touch number.
2
You can also select a one-touch key by pressing that key.
Press <Enter> twice.
3
If you want to exit without erasing, press <Cancel>.
To erase another one-touch number, repeat this procedure from step 2.
4
Otherwise, press <Reset> to return to the standby mode.
14
A
3-5autodIaLLer & dIaLLInG optIons
Page 59

3-6 autodIaLLer & dIaLLInG optIons
How to dial using a one-touch key
One-touch keys
MFX-1350/MFX-1330 control panel
One-touch fax dialing
Switch to the Fax mode by pressing
1
Place the document on the ADF or the document glass.
2
When you use the document glass, select the document size by pressing <Doc. Size>.
3
Adjust the document resolution and contrast.
4
Open the one-touch key panel and press the desired one-touch key.
5
NOTE: The document glass is available only for the Mfx-1350/Mfx-1330.
One-touch phone dialing
NOTE: To connect an external phone to your machine to make a phone call (see page 1-8).
1 Lift the telephone handset.
Press the desired one-touch key .
2
<
copy4fax4scan
>
.
Page 60

Speed-dial numbers
Adding or editing a speed-dial number
Your machine can store up to 160 speed-dial numbers, each designated by a three-digit
identifier codes (001 through 160.)
Press <Menu>, <1>, <2>, <1>, then <Enter>. The empty speed-dial number will be
1
shown.
Enter Speed Dial No.
001:No Number Stored
1
2
Press <q> or <p> to select a speed-dial number.
2
You can also select a speed-dial number by directly entering that three-digit identifier
code (001-160).
Press <Enter>.
3
001:Fax Number
_
Use the numeric keys to enter the number as if performing a manual dial. The num-
4
ber can hold up to 40 characters:
To change the number, press <t> or <u> to move the cursor and press <Cancel> to
erase the number. Then enter the correct number.
Press <Enter>.
5
001:Name ;Upper
_
Use the numeric keys to enter the speed dial name.
6
The name can hold up to 24 characters.
(Regarding how to enter characters, see “Entering characters” on page 2-2.)
To change the name, press <t> or <u> to move the cursor and press <Cancel> to
erase the name. Then enter the name correctly.
Press <Enter> to save the setting.
7
The next empty speed-dial number will be shown.
To enter another speed-dial number, repeat this procedure from step 2.
8
To exit the operation and return to the standby mode, press <Reset>.
3
4
5
6
7
8
9
autodIaLLer & dIaLLInG optIons
10
11
12
13
NOTE: To print a list of speed-dial numbers, press <Menu>, <5>, <1>, <0>, <8>, then <Enter>.
Erasing a speed-dial number
Press <Menu>, <1>, <2>, <2>, then <Enter>.
1
Press <q> or <p> to select the speed-dial number.
2
You can also select the speed-dial number by directly entering that three-digit identi-
fier code.
Press <Enter> twice.
3
If you want to exit without erasing, press <Cancel>.
To erase another speed-dial number, repeat this procedure from step 2.
4
Otherwise, press <Reset> to return to the standby mode.
14
A
3-7autodIaLLer & dIaLLInG optIons
Page 61

3-8 autodIaLLer & dIaLLInG optIons
How to dial using a speed-dial number
Press this key once.
Enter three-digit code.
Press <Start>.
MFX-1350/MFX-1330 control panel
Fax dialing via speed-dial
Switch to the Fax mode by pressing
1
Place the document on the ADF or the document glass.
2
When you use the document glass, select the document size by pressing <Doc. Size>.
3
Adjust the document resolution and contrast.
4
Press <Speed Dial /Group> once.
5
Enter Speed Dial No.
S_
<
copy4fax4scan
>
.
Use the numeric keys to enter the three-digit identifier for the speed-dial number. The
6
machine will show the name (or fax number) you have stored:
Sales division
S001_
Press <Start>.
7
NOTE: The document glass is available only for the MFX-1350/MFX-1330.
Phoning via speed-dial
NOTE: To connect an external phone to your machine to make a phone call (see page 1-8).
Lift the telephone handset.
1
Press <Speed Dial /Group> once.
2
** Tel Mode **
S_
Use the numeric keys to enter the three-digit identifier for the speed-dial number. As
3
the machine dials, it will show the number on the LCD.
Page 62

Call group dialing
If you frequently send the same fax message to several destinations, use call group
dialing. Call groups can store many one-touch keys and speed-dial numbers, so you can
broadcast the fax message by simply performing the group dialing operation.
Entering or changing a call group
Your machine can store up to 32 call groups.
Press <Menu>, <1>, <3>, <1>, then <Enter>. The empty call group number will be
1
shown:
Enter Group No.
01:No Number Stored
Press <q> or <p> to select a call group number.
2
You can also select a call group by directly entering that two-digit identifier code (01-32).
Press <Enter>.
3
01:Enter One-T/Speed
_
Enter the one-touch and speed-dial numbers you want to store into the call group by
4
pressing the one-touch key or <Speed Dial /Group> followed by three-digit code. A
comma will automatically be inserted between each number.
01:Sales division
[01],[03],S001_
If you want to enter all the one-touch and speed-dial numbers currently stored in your
machine, press <*> without any characters.
01:Enter One-T/Speed
*_
1
2
3
4
5
6
7
8
9
autodIaLLer & dIaLLInG optIons
10
Press <Enter>.
5
01:Name ;Upper
_
Use the numeric keys to name the group number.
6
The name can hold up to 24 characters.
(Regarding how to enter characters, refer “Entering characters” on page 2-2.)
To change the name, press <t> or <u> to move the cursor, and press <Cancel> to
erase the name. Then enter the correct name.
Press <Enter> to save the setting.
7
The next empty call group will be shown.
To enter another call group, repeat this procedure from step 2.
8
To exit and return to the standby mode, press <Reset>.
NOTE: To print a call group list, press <Menu>, <5>, <1>, <0>, <9>, <Enter>. Then select group
number and press <Enter>.
3-9autodIaLLer & dIaLLInG optIons
11
12
13
14
A
Page 63

3-10 autodIaLLer & dIaLLInG optIons
Erasing a call group
Press this key twice.
Enter group number.
Press <Start>.
Press <Menu>, <1>, <3>, <2>, then <Enter>.
1
Press <q> or <p> to select the call group you want to erase.
2
You can also select the call group by directly entering the two-digit identifier code
(01-32).
Press <Enter> twice.
3
If you want to exit without erasing, press <Cancel>.
To erase another call group, repeat the procedure from step 2.
4
Otherwise, press <Reset> to exit and return to the standby mode.
How to dial using a call group
MFX-1350/MFX-1330 control panel
To perform call group fax dialing
Switch to the Fax mode by pressing
1
Place the document on the ADF or the document glass.
2
When you use the document glass, select the document size by pressing <Doc. Size>.
3
Adjust the document resolution and contrast.
4
Press <Speed Dial /Group> twice.
5
Enter Group No.
G_
Use the numeric keys to enter the two-digit call group number.
6
Press <Start>.
7
NOTE: The document glass is available only for the MFX-1350/MFX-1330.
<
copy4fax4scan
>
.
Page 64

Phone directory dialing
Press <> then search the name by pressing <>, <>, <>, <>.
Phone directory dialing is similar to an electronic phone book. The phone directory sorts
and displays numbers alphabetically according to their names, so you can access them
with ease.
How to dial using the phone directory
MFX-1350/MFX-1330 control panel
For a fax call:
1
Place the document in the ADF and adjust the document mode and contrast.
For a regular phone call:
Lift the telephone handset.
NOTE: To connect an external phone to your machine to make a phone call. (See page 1-8.)
Press <q> (Tel Index).
2
The machine shows the first listing in your phone directory:
Telephone Index [A]
Asian partner :[01]
The phone directory sorts entries in the following order:
(1) alphabetically, (2) numerically and (3) by symbol.
Scroll through the listings to find the desired contact. Using the cursor keys:
3
• <t> or <u> to select the character set — alphabet, number or symbol — for the
first character of the name you have stored in the autodialer.
• <q> or <p> to check different listings within that character set.
Use the cursor keys to perform a quick search.
When the name you want to dial is displayed, press <Start>.
4
• If you have set the document in the ADF, your machine will start the fax transmission.
• If you're making a regular phone call, the machine will dial the remote party.
1
2
3
4
5
6
7
8
9
autodIaLLer & dIaLLInG optIons
10
11
12
13
14
A
3-11autodIaLLer & dIaLLInG optIons
Page 65

If the call fails
If the call fails, what happens next depends upon the kind of call it was.
If it was a fax call…
…Your machine will automatically redial the number. It keeps trying until one of the
following occurs:
• It successfully reaches the other number
• It has attempted the maximum number of redials and has still not connected.
If it was a regular phone call…
…You will have to redial manually:
Lift the handset.
1
Press <p> (Redial).
2
View Redial History
01:1234567890
Your machine can remember the last 10 dialed numbers.
3
Use <q> or <p> to select the dial number you want to redial.
Press <Start>.
4
3-12 autodIaLLer & dIaLLInG optIons
Page 66

Chapter
4
Sending faxes
Before sending ............................................................................................... 4-2
Document handling ..
Scanning resolution ..
Scanning contrast ..
Mixing the document resolution and contrast in multiple pages ..
Sending method ..
Memory overflow message ..
Sending a fax ..
Memory transmission ..
Real-time transmission (non memory transmission) ..
Redialing........................................................................................................ 4-7
Automatic fax redialing .
Manual redial ..
Reviewing or canceling commands ..
To review or cancel command ..
Reviewing or canceling parts of a broadcast ..
Printing a delayed command list ..
Printing a stored document ..
View or print the results of fax transactions ..
Advanced fax functions ..
Broadcasting ..
Delayed transmission ..
Batch transmission ..
Selecting the TTI ..
Polling transmission ..
Fax & Copy ..
Cover page ..
Using alternative telephone network service providers (Dial prefix)
Sending documents to an e-mail gateway (fax server) ..
............................................................................................... 4-4
........................................................................................ 4-19
......................................................................................... 4-20
............................................................................. 4-2
............................................................................. 4-2
................................................................................ 4-2
..... 4-2
................................................................................... 4-3
.................................................................. 4-3
......................................................................... 4-4
........................ 4-6
.
...................................................................... 4-7
...................................................................................... 4-7
............................................................4-8
.............................................................4-8
...................................... 4-9
........................................................4-9
................................................................ 4-9
................................... 4-10
............................................................................. 4-11
...................................................................................... 4-12
........................................................................ 4-13
........................................................................... 4-14
............................................................................... 4-17
.......................................................................... 4-18
.....4-21
................... 4-22
Page 67

4-2 sendInG faxes
Before sending
Document handling
Before you begin please review the acceptable document sizes and proper loading methods on pages 2-10 to 2-11.
Scanning resolution
• Normal is suitable for most text documents and simple drawings.
• Fine is ideal for maps, moderately complicated drawings, floorplans or handwritten
documents.
• Superfine (“S-Fine” on the LCD) reproduces the detail of extremely complicated drawings or line art.
•
Grayscale (“Gray” on the LCD) captures shades in photos and drawings.
To change the scanning resolution:
Press <Doc. Resolution>.
1
Set Resolution
t Normal
Press <t>, <u> or <Doc. Resolution> repeatedly to select the resolution.
2
u
Scanning contrast
Setting the scanning contrast allows you to compensate for any excessive lightness or darkness, as the case may be, of the document pages you are sending.
To change the scanning contrast:
Press <Contrast>.
1
Set Contrast
Light v
Press <t> to lighten, press <u> to darken, or press <Contrast> repeatedly to select
2
the contrast.
To avoid confusing the Light and Dark settings, just remember — “Light lightens” and
“Dark darkens”.
|
|n|
|
u
Dark
Mixing the document resolution and contrast in multiple pages
You can change the document resolution and contrast for each page of your documents.
Select the document resolution and contrast for the first page.
1
Press <Start>.
2
Prior to scanning the next page, select the document resolution and contrast for the
3
next page.
Page 68

Sending method
The following three sending methods are available on your machine.
Memory transmission:
For a normal memory transmission, your machine: (1) scans the entire document into
memory, (2) dials the other fax machine, and (3) transmits the document.
Quick memory transmission:
For a quick memory transmission, your machine doesn’t wait to scan all pages into
memory before dialing. After it scans the first page of your document, your machine will
dial the other fax machine. When it makes contact, your machine transmits the stored
document from memory while at the same time scanning the remaining pages of your
document into memory.
The quick memory transmission is defaulted to “On”. However, you can turn it “Off” for
the default. (See “Fax settings” on page 10-5.)
1
2
3
4
Real-time transmission:
In the following cases, the machine doesn’t use memory for fax sending
• When memory transmission is turned off.
• When you are sending a fax using on-hook dialing (pressing <Advanced Functions>
repeatedly until “Monitor” appears and pressing <Enter> or the soft key assigned to
the “Monitor”.*1) or using an external telephone handset.
• When the machine’s memory is full
In Real time transmission, the next page will not scan until the current page has been
transmitted.
Notes for real time transmissions:
• On
ly one destination can be dialed
• The document glass*2 cannot be used for real time transmission
*1 “Monitor” has already been assigned to a soft key on the F-305/F-300 as default.
*2 The document glass is available only for the MFX-1350/MFX-1330.
Memory overflow message
In normal memory transmission, if you have stored too much information in your
machine’s memory, a “Memory Overflow” message will appear on the LCD:
Memory Overflow
Start Or Cancel
This appears because (1) too many pages have been stored in the memory, or (2) the
pages that are stored have too much information on them for your machine to remember.
If this message appears, press <Start> to tell your machine to keep as many pages in
memory as possible, or press <Cancel> to erase all pages stored during the current
operation (but not previous operations).
Dividing a large document into smaller batches will help you avoid this error.
Use real time transmissions to avoid these problems. (See “Real-time transmission,” page
4-3 and 4-6.)
5
6
7
sendInG faxes
8
9
10
11
12
13
14
A
NOTE: If the machine is idle for 3 minutes, the machine will automatically erase any docu-
ent stored in memory during the last operation.
m
4-3sendInG faxes
Page 69

4-4 sendInG faxes
Sending a fax
Memory transmission
Sending a fax using the ADF
Switch to the Fax mode by pressing
1
Fax Ready
Dec 15 2007 1:30pm
Place your document on the ADF. (See page 2-11 for details.)
2
Adjust the scanning resolution and contrast.(See page 4-2.)
3
Dial the fax number.
4
• Use the numeric keys to dial the number.
–or–
• Press a one-touch key. (See page 3-6.)
–or–
• Press <Speed Dial /Group> and the three-digit code. (See page 3-8.)
–or–
• Use call group dialing. (See page 3-10.)
–or–
• Use the phone directory dialing. (See page 3-11.)
Press <Start>. (If you pressed a one-touch key, no need to press <Start>.)
5
By pressing <Start>, you have given your machine a command.
This command number appears on the first line of the LCD for a few seconds. You will
need to know this command number if you want to cancel the transmission or print a
stored document (See “
== Command:01 ==
Auto Mem100%
<
copy4fax4scan
Reviewing or canceling commands
>
.
” on page 4-8).
At the end of the operation, your machine beeps and displays:
6
** Complete **
Whenever you transmit a document, what actually appears on the top line of the LCD depends
on the information stored in the remote fax machine. The line may even be blank.
NOTE: If you want to cancel a transmission during document scanning, press <Stop>.
If you want to cancel a transmission that is in progress, use the Review Commands
feature.
See “Reviewing or canceling commands” on page 4-8.
NOTE: If the call fails, see “Redialing” on page 4-7.
Page 70

Sending a fax using the document glass
The document glass is available only for the MFX-1350/MFX-1330.
Switch to the Fax mode by pressing
1
Fax Ready
Dec 15 2007 1:30pm
Place your document on the document glass. (See page 2-11 for details.)
2
<
copy4fax4scan
>
.
1
Press <Doc. Size> to select the document size, Letter,
3
Adjust the scanning resolution and contrast. (See page 4-2.)
4
Dial the fax number.
5
• Use the numeric keys to dial the number.
–or–
• Press a one-touch key. (See page 3-6.)
–or–
• Press <Speed Dial /Group> and the three-digit code. (See page 3-8.)
–or–
• Use call group dialing. (See page 3-10.)
–or–
• Use the phone directory dialing. (See page 3-11.)
Press <Start>. (If you pressed a one-touch key, no need to press <Start>.)
6
By pressing <Start>, you have given your machine a command.
This command number appears on the first line of the LCD for a few seconds. You will
need to know this command number if you later wish to cancel the transmission or
print a stored document (See “Reviewing or canceling commands” pages 4-8 to 4-10).
== Command:01 ==
NextDoc Ltr Mem100%
When scanning is complete, the machine will show:
7
Start Scan NextDoc
Tx Start Start
Half-letter
or Legal.
2
3
4
5
6
7
sendInG faxes
8
9
10
11
12
Insert the next page and press <Paper Size /Next Doc.>.
8
Otherwise, press <Start> to start the transmission.
At the end of the operation, your machine beeps and displays:
9
** Complete **
Whenever you transmit a document, what actually appears on the top line of the LCD depends
on the information stored in the remote fax machine. The line may even be blank.
NOTE: If you want to cancel a transmission while scanning the document, press <Stop>.
If you want to cancel a transmission that is in progress, use the Review Commands
feature. See “Reviewing or canceling commands” on page 4-8.
NOTE: If the call fails, see “Redialing” on page 4-7.
13
14
A
4-5sendInG faxes
Page 71

4-6 sendInG faxes
Real-time transmission (non memory transmission)
Your machine will simply dial the other fax and when it makes contact, your machine
will feed the document through, scanning and transmitting real time
• With real time transmission, you can watch each page as it is scanned and sent.
To perform a real time transmission:
Switch to the fax mode by pressing
1
Place the document on the ADF.
2
NOTE: • The document glass cannot be used for real time transmission.
• The document glass is available only for the MFX-1350/MFX-1330 .
Obtain a dial tone, either by:
3
• Pressing <Advanced Functions> repeatedly until “Monitor” appears, and then
press <Enter>.
– or –
Pressing the “Monitor” soft key
–or–
• Lift the handset if you have connected an external telephone to your machine.
In either case, the machine shows:
** Tel Mode **
_
– or –
Press <Advanced Functions> repeatedly until “Memory Tx” appears and press
<Enter>. Then select “Off” and press <Enter> to turn off the memory transmission.
– or –
If you assigned “Memory Tx” to a soft key (page 8-2), turn off the memory transmission
by simply pressing that key.
<
copy4fax4scan
>
.
NOTE: “Monitor” is a default soft key on the F-305/F-300.
Dial the fax number.
4
• Use the numeric keys to dial the number.
–or–
• Press a one-touch key. (See page 3-6.)
–or–
• Press <Speed Dial /Group> and three-digit code. (See page 3-8.)
–or–
• Use the phone directory dialing. (See page 3-11.)
NOTE: With real time transmission, only one destination can be dialed.
When you hear fax tones from the remote unit, press <Start>.
5
If a person answers the phone, use the handset to tell that person that you are trying
to send a fax. When you hear fax tones, press <Start>.
If the call fails and you used “Monitor” to dial, p
until “Monitor” appears, then press <Enter> or press the “Monitor” soft key
If you are using the handset, hang up after pressing <Start>.
NOTE: To cancel the transmission, use Review commands features. (page 4-8)
ress <Advanced Functions> repeatedly
to hang up.
Page 72

Redialing
Automatic fax redialing
When using memory transmission and the line is busy, your machine will automatically
redial the number up to two times in one minute intervals.
If the last redial attempt fails, your machine prints (and/or displays) an error messages.
While in the Auto Redial mode, “AutoRedial” appears on the first line of the LCD.
** Auto Redial **
Dec 15 2007 1:30pm
You can change the redial time and interval settings. (See “Fax settings” on page 10-5.)
If you want to end the redial procedure, delete the redial command of it from the com-
mand list. (See “Reviewing or canceling a command” on the next page.)
1
2
3
4
Manual redial
Press <p> (Redial)
Press <p> (Redial).
1
View Redial History
01:1234567890
Your machine will remember the last 10 dialed numbers.
2
Press <q> or <p> to select the dial number you want to redial.
Press <Start>.
3
to redial the number entered using the numeric keys.
5
6
7
sendInG faxes
8
9
10
11
12
13
14
A
4-7sendInG faxes
Page 73

4-8 sendInG faxes
Reviewing or canceling commands
Your machine can store many “Jobs” in its memory. It also keeps track of each command
by assigning it a command number, like “C01.”
Delayed commands, redial attempts and current fax transmissions are all stored in your
machine’s memory and given a command number.
Your machine can store up to 99 delayed commands. It identifies each by a two-digit
command number from 01 to 99.
The Review Commands function gives you the power to check on each job (or command)
in your machine’s memory. It also allows you to cancel a fax transmission command.
To review or cancel command
Press <Job Confirm./Fax Cancel>.
1
Delayed Commands
//Enter
If your machine is attempting to perform a command, the machine display the com-
mand.
If you want to cancel the command, go to step 3.
C01:5552009
//Cancel
Press <Enter>.
2
The machine shows the first command, indicated by its command number and the
phone number it will dial.
Here, you see Command No. : 01, and the number it’s set to dial. If the command is to
send a broadcast (see page 4-12), “Broadcast” appears instead of the phone number.
If the command is to send a batch transmission (see page 4-14), the machine shows
the batch box number (such as “B01”) rather than the command number.
If the command is for Call group dialing (see page 3-9), the group number (such as
“G01”) appears instead of the phone number.
If the command is for polling (see page 5-11), the machine shows polling number (such
as “P01”) rather than the command number.
If there are no stored commands in your machine, the machine shows “No Command
Stored”. Press <Reset> to return to standby mode.
Press <q> or <p> to scroll through currently stored commands.
3
If you want to cancel the command shown, press <Cancel>.
4
The following two displays will appear alternately:
C01:5552009
Yes Cancel
To proceed with canceling the command, press <Cancel>.
5
To keep this command and continue reviewing stored commands, press <Back>.
In either case, the LCD will go back to step 2.
To stop reviewing or canceling commands, press <Reset>.
6
C01:5552009
No Back
Page 74

Reviewing or canceling parts of a broadcast
You also can review or cancel certain numbers within a broadcast:
Press <Job Confirm./Fax Cancel>, then <Enter>.
1
Press <q> or <p> to scroll through currently stored broadcast commands.
2
C01:Broadcast
///Cancel
1
When the command you want to cancel is shown, skip to step 6.
3
If you want to review individual numbers within this broadcast, go on to step 4 with-
out pressing <Cancel>.
To review individual numbers within this broadcast, press <u> to see the first num-
4
ber. The machine shows:
9-5550388
///Cancel
Press <q> or <p> until you find the number you want to cancel.
5
Press <Cancel>, <Cancel>.
6
The next number will appear and if you want to cancel this number, press <Cancel>
twice.
If you want to cancel a different number, go back to step 5.
If you want to go back to reviewing or canceling another command, press <t>.
To stop reviewing or canceling commands, press <Reset>.
Printing a delayed command list
Your machine can print a command list which tells you:
• The command’s identification number
• The phone number, or “Remote location”
• The start time (this appears in a DD,HH:MM format)
• A “note” telling you if the command is a polling or F-Code operation.
To print a delayed command list, press <Menu>, <5>, <1>, <0>, <6>, then <Enter>.
2
3
4
5
6
7
sendInG faxes
8
9
10
11
12
13
Printing a stored document
Your machine can print out each document stored for delayed transmission.
To print a stored document, you will need to know the document’s command number,
which you can obtain by either reviewing the commands or printing a delayed command
list (see above).
Press <Menu>, <4>, <3>, <5>, then <Enter>.
1
Select Comm. No.
C01:123-4567
Press <q> or <p> to select the command number.
2
Press <Enter>.
3
14
A
4-9sendInG faxes
Page 75

4-10 sendInG faxes
View or print the results of fax transactions
You can view the results of the last 70 transactions.
Press <Job Confirm./Fax Cancel> and <q> or <p> to select “Show History”.
1
Show History
//Enter
Press <Enter>. The machine will show the last fax transaction.
2
Remote location called (The destination name)
Tx001:ABC
O K 12/15 13:30
Starting date and time (MM/DD HH:MM format)
NOTE: You can print the result of a fax transaction appearing on the LCD by pressing
<Enter>.
Press <q> or <p> to view other transaction results.
3
Assigned number, starting each day at “001”
“Tx” denotes transmission, “Rx” denotes reception.
Result of fax transaction
“OK”: Transaction was successful.
Error code: Transaction failed. (Page 12-18.)
Press <Reset> to exit.
4
Printing the result of a fax transaction:
In step 2, you can print the result of the fax transaction that appears on the LCD by
pressing <Enter>. Furthermore, if you want to print a list of transaction results, press
<Menu>, <5>, <1>, <0>, <5>, then <Enter>. Your machine will print the “Activity Journal.” For details of the Activity journal, see
page 11-4.
Page 76

Advanced fax functions
The <Advanced Functions> key is for easy access to the following fax functions listed in
the table.
NOTE: • To
• If one of the functions is assigned to any of the three soft keys, that function will
To select the fax function using the <Advanced Functions> key:
1
2
3
The table below lists the order of display. Refer to the pages indicated for detailed
* For details of printer settings, refer to the PDF manual on the GDI Printer/Scanner Driver CD supplied
shorten a frequent-use operation, assigning the function to a soft key is recom-
mended. For how to do this, see page 8-2.
not be available through the <Advance Functions> key.
Switch to the fax mode by pressing
Press <Advanced Functions>.
Press <q> or <p>, or <Advanced Functions> repeatedly to select the function. Then
press <Enter>.
information.
Advanced function
Broadcast Used to send a fax to multiple parties. p. 4-12
Address Entry Used to enter a recipient’s address. *
Report Prints the transmit confirmation report for the next transmission. p. 11-5
Monitor Obtains a dial tone for on-hook dialing. —
Pause/Dial Opt. Used to enter a dialing character. p. 3-3
Delayed Used to make a delayed transmission. p. 4-13
Batch Tx Stores a document for batch transmission. p. 4-14
Select TTI Used to select the TTI or to disable the TTI on your transmission. p. 4-17
Cover Page Used for the cover page setting. p. 4-20
Fax Forward Enables or disables fax forwarding. p. 5-12
Fax & Copy Enables or disables Fax&Copy. p. 4-19
Security Enables or disables security reception. p. 9-3
Separator Page Enables or disables separator page. p. 5-14
Memory Tx Enables or disables memory Tx. p. 4-3
Auto Rx Toggles between the manual and auto reception mode. p. 5-2
F-Code Tx Used to make an F-code transmission. p. 6-11
F-Code Polling Used for F-code polling. p. 6-12
Polling Used for polling reception. p. 5-11
Dial Prefix Used to enter the “/N” symbol. p. 4-21
Bypass Used to set the paper size on the bypass tray. p. 2-15
Page Counter Displays the total printed and scanned page count. p. 8-8
Energy Save Switches to the energy save mode immediately. p. 1-17
Online Cancels PC printing. *
Mode Switch Switches the machine’s mode. p. 2-2
E-mail Gateway Enables or disables the e-mail gateway. p.4-22
with the machine.
Descriptions Reference
<
copy4fax4scan
>
.
1
2
3
4
5
6
7
sendInG faxes
8
9
10
11
12
13
14
A
4-11sendInG faxes
Page 77

4-12 sendInG faxes
Broadcasting
The fastest way to fax one document to many recipients is to broadcast it.
In an ordinary broadcast, you can send faxes as you normally would, except you just add
more fax numbers.
You can enter up to 230 numbers:
• One-touch dialing: Up to 40 locations
• Speed dial numbers: Up to 160 locations
• Manually-dialed numbers: Up to 30 locations
You can broadcast using any function that requires a fax number to be
entered.
To send a broadcast fax:
Switch to the fax mode by pressing
1
Load the document and make any necessary adjustments.
2
Press <Advanced Functions> until “Broadcast” appears on the LCD and press
3
<Enter>.
Broadcast
//Enter
– or –
Press the “Broadcast” soft key.
<
copy4fax4scan
>
.
Enter the first fax number, as usual.
4
Use either a one-touch key, a speed-dial number, a call group or a regular number
dialed from the numeric keys.
Press Start
1111
To add more fax numbers, repeat step 4. If you manually enter the fax number, repeat
5
procedures from step 3 to insert a comma (pressing a one-touch key and <Speed Dial
/Group> inserts its own comma).
You can send up to 230 numbers for a broadcast.
Sales division
[01],1111,2222,S001
Press <Start>. Your machine scans the document into memory and then sends it to
6
each number you entered.
NOTE: • For soft key information, see page 8-2.
• If you enter characters by mistake, press <Cancel> to erase them.
• If you frequently broadcast documents to the same destinations, use the call group
dialing for your convenience. (Page 3-9.)
Making changes to a broadcast
If you need to make changes to a broadcast after set-up, see “Reviewing or canceling
parts of a broadcast” on page 4-9.
Page 78

Delayed transmission
Setting up a delayed transmission
Your machine can store up to 99 delayed commands, each of which you can program up
to 31 days in advance.
Your machine only remembers the day of the month that it is supposed to send a delayed
transmission. It does not remember the month itself. So if you want to send a transmission at 2:15 pm on 27 November, do not program the transmission sooner than 2:16 pm
on 26 October.
To set up a delayed transmission:
Switch to the Fax mode by pressing
1
Load the document and make any necessary adjustments.
2
Press <Advanced Functions> until “Delayed” appears on the LCD and press <Enter>.
3
Delayed
//Enter
– or –
Press the “Delayed” soft key.
<
copy4fax4scan
1
2
>
.
3
4
5
6
The machine shows the current day of the month, followed by the current time (in 24-
4
hour format):
Delayed
Enter Time 27,14:15
Use the numeric keys to enter the day of the month and the time when in which you
5
want to send the delayed transmission.
When the date and time are entered, press <Enter> to save the delayed transmission.
6
Enter Fax Number
_
Enter the fax number.
7
You can either press a one-touch key, enter a speed-dial number or use the numeric
keys to manually enter the fax number.
Press <Start>.
8
Your machine will scan the document into memory, then it returns to the standby
mode, while showing this on the LCD:
** Reserved **
Nov 27 2007 2:15pm
This means your machine is “Reserved” for the delayed transmission you just pro-
grammed.
• If you specified the delayed real time transmission (non-memory transmission), do not
remove the document in the ADF. If the document is removed from the ADF before a
delayed command completes, it cancels the delayed real time transmission.
7
sendInG faxes
8
9
10
11
12
13
14
A
4-13sendInG faxes
Page 79

4-14 sendInG faxes
Batch transmission
Batch transmission allows you to store multiple documents in an electronic “basket”
throughout the day and then fax that entire basket to one location.
To do this, just tell the machine when and where the transmission should go. When that
date and time arrives, your machine will transmit each document in the batch box to the
remote fax machine. You can store up to 40 documents (each document can include one
or more pages) into your machine’s five electronic batch boxes.
Adding or editing a batch box
Before sending a batch transmission, you have to add batch boxes in your machine. The
steps below also let you modify the existing batch boxes.
Press <Menu>, <3>, <5>, <1>, then <Enter>.
1
Select Batch Box
1:No Number Stored
Use the numeric keys to enter the batch box number (1–5).
2
Press <Enter>.
3
1:Fax Number
_
Use the numeric keys to enter the fax number as if you were performing a transmis-
4
sion. The number can be up to 40 characters in length.
To change a number, press <t> or <u> to move the cursor, press <Cancel> to erase
the number. Then enter the correct number.
Press <Enter>.
5
1:Transmit Time
Enter Time 27,14:15
Instruct your machine to send from this batch box in one of the following ways:
6
Option 1 — Once at a certain time on a certain day of the month
(For example: “Do this at 5:05 pm on the 30th.”) — Use the numeric keys to enter
the date and time (24-hour format) the machine should send the documents from the
batch box:
1:Transmit Time
Enter Time 30,17:05
Option 2 — At a certain time each day you press the key
(For example: “Do this at 5:05 pm today.”) — Use the numeric keys to enter <0>, <0>,
and then the time when the machine should send the documents from the batch box:
1:Transmit Time
Enter Time 00,17:05
Press <Enter>.
7
1:Box Name ;Upper
_
Enter the name by using the numeric keys.
8
A batch box’s name can hold up to 24 characters.
(Regarding how to enter the character, see “Entering characters” on page 2-2.)
Page 80

To change a name, press <t> or <u> to move the cursor, press <Cancel> to erase the
name. Then enter the name correctly.
Press <Enter> to save the batch box information.
9
To create or modify another batch box, repeat procedures from step 2.
10
To exit, press <Reset>.
NOTE: To print a list of batch boxes, press <Menu>, <5>, <1>, <1>, <5>, <Enter>. (See page
11-3.)
Storing a document for batch transmission
Your machine can store up to 40 documents (each document can include one page or
many pages) in each batch box until the date and time you designate the batch transmission to take place. Once the batch documents are transmitted, they are automatically
erased from the batch box.
To store a document in a batch box for batch transmission:
Load the document in the ADF or document glass, and make any necessary adjust-
1
ments.
Press <Advanced Functions> until “Batch Tx” appears on the LCD then press
2
<Enter>.
Batch Tx
//Enter
– or –
Press the “Batch Tx” soft key
The machine shows the following display.
3
Select Batch Box
1:111-1111
Use the <q> or <p> to select the batch box you want to use.
4
Press <Enter>.
5
Press Start
Box : 5 File : 1
1
2
3
4
5
6
7
sendInG faxes
8
9
10
11
12
Your machine gives each document in a batch box a file number. You will need to
know this file number if you later wish to erase or print the stored document. Each
batch box can hold up to 40 files.
Press <Start>. The machine shows “Reserved” on the top line of the LCD. This means
6
the document is stored in memory.
NOTE: • The document glass is available only for the MFX-1350/MFX-1330
• To print a list of the documents stored in batch boxes, press <Menu>, <5>, <1>,
<1>, <6>, then <Enter>. (See page 11-3.)
Printing a document stored in a batch box:
Press <Menu>, <4>, <3>, <3>, then <Enter>.
1
Use the numeric key to enter the box number, then press <Enter>.
2
Use the numeric key to enter the document’s file number, then press <Enter>.
3
machine prints the document, and returns to the standby mode.
13
14
A
Your
4-15sendInG faxes
Page 81

4-16 sendInG faxes
Erasing a document stored in a batch box:
Press <Menu>, <4>, <2>, <3>, then <Enter>.
1
Use the numeric key to enter the box number, then press <Enter>.
2
Use the numeric key to enter the document’s file number.
3
Press <Enter> to delete the document.
4
If you want to quit the operation without erasing, press <Cancel>.
Erasing an empty batch box
Batch boxes must be empty to be erased. If a box has documents stored in it, you must
delete those before proceeding. (See above “Erasing a document stored in a batch box”.)
To erase an empty batch box:
Press <Menu>, <3>, <5>, <2>, then <Enter>.
1
Select Batch Box
1:9-5551023
Use the numeric key to enter the batch box number.
2
Press <Enter>. The following two displays will appear:
3
1:Erase Batch Box
Yes Enter
Press <Enter> to erase the batch box.
4
To cancel, press <Cancel>.
To erase another batch box, repeat procedures from step 2.
5
To exit, press <Reset>.
1:Erase Batch Box
No Cancel
NOTE: If you select a batch box which is not empty, the machine beeps and briefly shows:
Select Batch Box
Document Stored
Erase any documents stored in the batch box, then repeat this procedure from the
beginning to erase the box.
Page 82

Selecting the TTI
THE SLEREXE COMPANY LIMITED
SAPORS LANE - BOOLE - DORSET - BH25 8ER
TELEPHONE BOOLE (94513) 51617 - TELEX 123456
Your name Fax: +1-123-456-7890 Dec 15 2007 1:30pm P. 001/001
TTI information
Date and time
of transmission Page number
Your fax number
You can select the name
either TTI 1, TTI 2 or TTI 3
Every fax page you send arrives at the receiving machine with a single line of text at the
top of the page. This text lists your name, your fax number, date & time of transmission
and page number as below.
You can select the three types of TTI (your name) stored in the “Specifying initial settings” (pages 1-14 to 1-16) for each transmission. Also, you can tell the machine whether
or not to send the TTI information.
1
2
3
4
5
6
IMPORTANT: In some countries you are required by law to indicate your name and fax number on
every fax you send.
Press <Menu>, <2>, <2>, <0>, <8>.
1
– or –
Press <Advanced Functions> until “Select TTI” appears on the LCD.
Select TTI
//Enter
Press <Enter>.
2
TTI Default
//Enter
Press <q> or <p> to select one of following:
3
• “TTI Default” — The machine will send the “Usual TTI” you have set in “Usual
TTI selection” of “Specifying initial settings” on page 1-14.
• “TTI 1:(your entered name)” — The machine will send TTI 1.
• “TTI 2:(your entered name)” — The machine will send TTI 2.
• “TTI 3:(your entered name)” — The machine will send TTI 3.
• “TTI Off” — The TTI information will not be printed.
Press <Enter> to save the setting.
4
NOTE: If you assigned “Select TTI” to the soft key (page 8-2), you can select TTI by simply
pressing that key.
7
sendInG faxes
8
9
10
11
12
13
14
A
4-17sendInG faxes
Page 83

4-18 sendInG faxes
Polling transmission
Polling transmission allows someone to retrieve a document stored in your machine’s
memory. The stored document will be sent when the other party calls you.
Storing a document for polling transmission
Switch to the Fax mode by pressing
1
If your machine is set for Tel Ready reception, change it to a reception mode other
2
than Tel Ready. (Refer to “Selecting the reception mode” on page 5-2.)
Place the document on the ADF or document glass, and adjust the fax resolution and
3
contrast.
Press <Menu>, <4>, <1>, <1>, then <Enter>.
4
Your machine will scan the document into memory and return to the standby mode.
NOTE: • The document glass is available only for the MFX-1350/MFX-1330.
• Once the remote fax machine polls the document you stored, your machine will
automatically erase the document from memory.
Printing a stored polling document
To print a polling document without erasing it, press <Menu>, <4>, <3>, <1>, then
<Enter>.
<
copy4fax4scan
>
.
Erasing a stored polling document:
To erase a polling document from your machine’s memory:
Press <Menu>, <4>, <2>, <1>, then <Enter>.
1
Press <Enter> to erase the document.
2
If you want to quit the operation without erasing, press <Cancel>.
Page 84

Fax & Copy
With the Fax & Copy feature turned on, your machine asks if you want to make a copy of
a document each time it transmits.
Setting the Fax & Copy function
1
2
Press <Menu>, <2>, <1>, <0>, <6>, then <Enter>.
– or –
Press <Advanced Functions> until “Fax & Copy” appears on the LCD then press
<Enter>.
Fax & Copy :Off
//Enter
Press <q> or <p> to select “On” or “Off ”.
1
2
3
Press <Enter> to save the setting.
3
Press <Reset> to exit and return to the standby mode.
4
NOTE: • The Fax & Copy function cannot be used for real time transmission
• With this feature, the quick memory transmission (see page 4-3) will be canceled.
• This feature does not work for polling (page 4-18) or F-code bulletin box polling
(page 6-8).
NOTE: If you assign “Fax & Copy” to a soft key (page 8-2), you can turn the Fax & Copy on
or off by simply pressing that key.
Using the Fax & Copy feature
Place the document and select the scanning resolution and contrast.
1
Enter the fax number.
2
You may use a one-touch key, speed-dial number, call group or the numeric keys to
enter the fax number manually.
Press <Start>. (If you are using one-touch key, no need to press <Start>.)
3
The LCD will change to the copy mode and asks how many copies you want to make.
4
Fax & Copy 01
Auto Ltr 100%
Use the numeric keys to enter the number of copies you want. Choose from 01 to 99
5
copies.
Press <Start> to begin the transmission and copying process.
6
4
5
6
7
sendInG faxes
8
9
10
11
12
13
14
A
4-19sendInG faxes
Page 85

4-20 sendInG faxes
Cover page
Fax Message From:
Nov 27 2007 10:12am
Name
Fax Number
[
(Enter your message)
]
[
(Enter your message)
]
[
(Enter your message)
]
(Your name)
(Your fax number)
Your machine can store a cover page and send it at the beginning of each outgoing fax.
Turning the cover page on
Press <Menu>, <3>, <2>, <1>, then <Enter>.
1
– or –
Press <Advanced Functions> until “Cover Page” appears on the LCD then press
<Enter>.
Cover Page :Off
//Enter
Press <q> or <p> to select “On” or “Off ”, then press <Enter>.
2
Now the cover page feature is working but your message line is blank. To enter a mes-
sage, see “Entering the cover page message,” below.
The usual TTI and your fax number you have entered in the Initial settings (page 1-14
to 1-16) will be pre-populated in the cover page automatically.
NOTE: If you assigned “Cover Page” to a soft key (page 8-2), you can turn the Cover page on
or off by simply pressing that key.
Entering the cover page message
The message can hold up to 120 characters divided into 3 lines.
Each line can hold up to 40 characters.
Press <Menu>, <3>, <2>, <2>, then <Enter>.
1
Line 1 ;Upper
_
Use the numeric keys to enter a message for the 1st line.
2
(Regarding how to enter the character, see “Entering characters” on page 2-2.)
Press <Enter> to save it.
3
To enter a message into another line, the procedure is same as the step 2 and 3.
4
When you finish entering a message, press <Reset> to exit.
5
Printing the cover page
To confirm that the cover page is set correctly, print a sample cover page from your
machine. Press <Menu>, <5>, <1>, <1>, <1>, then <Enter>.
Page 86

Using alternative telephone network service providers (Dial prefix)
When you make a call, you may want to use alternative telephone network service provider to take advantage of low rates.
The following information describes how to program the access number.
Press <Menu>, <2>, <2>, <1>, <6>, then <Enter>.
1
Dial Prex No
_
1
Enter the telephone network access number using the numeric keys.
2
Access numbers may contain up to 40 digits.
If you must wait for another dial tone at the dialing, enter a pause at the end of the
access number by pressing <Advanced Functions> repeatedly until “Pause /Dial Opt.”
appears and press <Enter> or press the <Pause /Dial Options> soft key.
“Special dialing characters,” page 3-3.)
Press <Enter> to save it.
3
Press <Reset> to exit and return to standby mode.
4
NOTE:
Sending faxes with the Dial prefix feature
“Pause /Dial Opt.”
To dial using the numeric keys
Place the document on the ADF or document glass.
1
Press <Advanced Functions> repeatedly until “Dial Prefix(/N)” appears then press
2
<Enter> to enter an “/N”.
– or –
If you assigned “Dial Prefix” to a soft key (page 8-2), simply press that key.
This symbol indicates access to the alternative telephone network.
Press Start
/N_
has been assigned to soft key on the F-305/F-300 as default.
(Refer to
2
3
4
5
6
7
sendInG faxes
8
9
10
11
12
Enter the fax number using the numeric keys.
3
Press <Start>.
4
NOTE: • You must enter the full National Code telephone number when dialing telephone
numbers via any network.
• You can assign the “Dial prefix” to a soft key (page 8-2) to enter an “/N”, but it cannot be combined with any one-touch key or speed-dial number for dialing. In order
to send faxes using the one-touch key or speed-dial number, you must instruct
your machine to access the alternative telephone network when you store the fax
number into your autodialer.
To enter an access number into your autodialer:
Before entering a fax number, press <Advanced Functions> repeatedly until “Dial
Prefix(/N)” appears then press <Enter> to enter an “/N”. And then, enter the fax
number.
• The document glass is available only for the MFX-1350/MFX-1330.
4-21sendInG faxes
13
14
A
Page 87

4-22 sendInG faxes
Sending documents to an e-mail gateway (fax server)
When this feature is activated, you can send documents to an e-mail gateway (fax
server) by simply entering the fax number. The machine will automatically add a prefix
and suffix to the fax number you have entered and send it to the e-mail gateway.
NOTE: • This function is available only for the MFX-1350/F-305.
• To use this function, the optional NIC(Network Interface Card) is required.
The following functions are not able to combine with sending faxes using the email gateway:
- Real time transmission
-
- F-code transmission or F-code polling
- Manual line selection (This function is only available when the optional
Polling
second phone line module is attached.)
Setting the e-mail gateway feature
Press <Menu>, <2>, <2>, <1>, <9>, <Enter>.
1
E-mail Gateway :Off
//Enter
Use the cursor key to select “On”, then press <Enter>.
2
E-mail Gateway :On
//Enter
If you want the machine to always send fax documents to an e-mail gateway, select
“On”. Otherwise, select “Off ”.
Enter the prefix that should added before the fax number by using the numeric keys
3
(up to 32 characters), and press <Enter>.
(For example, “Fax=”)
Prex ;Upper
_
Enter the suffix that should be added after the fax number (up to 48 characters) and
4
press <Enter> to save the setting.
(For example, “@domain name”)
Sufx ;Upper
_
Press <Reset> to go back to the standby mode.
5
NOTE: Total characters of prefix, fax number and suffix should be within 50 characters. For
specific prefix and suffix information, please refer to the e-mail gateway documentation.
Page 88

Sending faxes using an e-mail gateway
Switch to the fax mode.
1
Load the document.
2
Make sure the e-mail gateway is “On”.
3
NOTE: You can also set it “On” by pressing <Advance Functions> repeatedly.
Specify the destination.
4
Press <Start>.
5
1
2
NOTE: • To cancel the transmission, press <Stop> while the machine is scanning a docu-
ment. Once the machine starts the transmission, you cannot stop it.
• When setting the e-mail gateway to “On”, the memory transmission always works
regardless of its on/off setting.
3
4
5
6
7
sendInG faxes
8
9
10
11
12
13
14
A
4-23sendInG faxes
Page 89

This page intentionally left blank.
4-24 sendInG faxes
Page 90

Chapter
5
Receiving faxes
Receiving a fax .............................................................................................. 5-2
Selecting the reception mode ..
Manual reception mode ..
Automatic reception mode ..
Answering calls manually ..
Switch between the automatic or manual reception mode ..
If the paper runs out during fax reception........................................... 5-5
.
Settings for fax reception .
Setting the number of rings ..
Print settings ..
Advanced receiving functions ..
Block junk fax ..
Receive polling ..
Fax forwarding ..
Separator page..................................................................................... 5-14
............................................................................ 5-6
....................................................................................... 5-6
...................................................................................... 5-9
................................................................................... 5-11
.................................................................................. 5-12
.............................................................. 5-2
....................................................................... 5-2
.................................................................. 5-2
................................................................... 5-4
............... 5-4
................................................................ 5-6
..................................................................... 5-8
Page 91

5-2 receIvInG faxes
Receiving a fax
Selecting the reception mode
Press <Menu>, <9>, and then press <Enter> four times.
1
The machine shows your current fax reception mode:
Fax Ready
//Enter
Press <q> or <p> to select your desired reception mode.
2
Your machine has five different reception modes:
• Tel Ready (see “Manual receive mode,” below)
• Fax Ready (see “Automatic receive mode,” below)
• Fax/Tel Ready (see next page)
• Tel/Fax Ready (see next page)
• Ans/Fax Ready (see next page)
Press <Enter> to save the setting.
3
Press <Reset> to exit.
4
NOTE: If you assigned “Auto Rx” to a soft key (page 8-2), you can toggle between Manual
reception (Tel Ready) and Automatic reception (you have set) by pressing that key.
Manual reception mode
Tel Ready mode
Use it if:
• You want to use the same line for both fax and phone calls
• You mainly receive voice calls.
In this mode:
Your machine never answers calls automatically. You must answer each call as
described in “Answering calls manually” (page 5-4).
You will need to:
• An external phone connection. (See page 1-8.)
Automatic reception mode
Fax Ready mode
Use it if:
Your machine uses its own phone line and doesn’t share it with a phone or an
answering machine.
In this mode:
Your machine answers each call and attempts to receive a fax.
Page 92

Fax/Tel Ready mode
Use it if:
• You want to use the same line for both fax and phone calls
• You are using the machine as both a fax machine and a telephone , but its primary
use will be for faxing.
In this mode:
Your machine receives faxes silently but also alerts you when a regular voice call
comes in. (Your machine also beeps once at the end of each reception.)
When a voice call comes in, your machine sounds a special ring (but the telephone
connected to your machine will not ring). If you hear it, answer using your handset.
You will need to:
• An external phone connection. (See page 1-8.)
1
2
3
Tel/Fax Ready mode
Use it if:
• You want to use the same line for both fax and phone calls
• You are using the machine as both a fax machine and a telephone but its primary
use will be as a telephone.
In this mode:
Your machine rings the number of times you have set (the default setting is twice).
If you don’t answer the call while ringing, your machine answers the call automatically. If a caller sends a fax, your machine begins receiving it. If a voice call comes
in, your machine sounds a special ring, telling you to answer using the handset. (But
the telephone connected to your machine will not ring.)
You will need to:
• An external phone connection. (See page 1-8.)
Ans./Fax Ready mode
Use it if:
You are using an answering machine connected to your machine.
In this mode:
An answering machine connected to your machine answers each call.
If a voice call comes in, the answering machine begins to record the incoming
message.
If your machine hears a fax tone, it begins receiving the fax message.
You will need to:
• An external phone connection. (See page 1-8.)
Using an answering machine with your machine:
Set the machine to Ans./Fax Ready. (See “Selecting the reception mode” on page 5-2.)
1
4
5
6
7
8
receIvInG faxes
9
10
11
12
13
14
A
Set your answering machine to answer calls after no more than two rings.
2
Create a new outgoing message on your answering machine.
3
Your answering machine’s outgoing message should be no longer than 10 seconds.
5-3receIvInG faxes
Page 93

5-4 receIvInG faxes
Answering calls manually
NOTE: • To answer a call manually, you must install an external phone to your machine.
• Make sure the document is not set on the ADF.
Receiving a call manually with an external phone
In “Tel Ready” or “Tel/Fax Ready” mode, when the external phone rings, pick up handset:
• If you hear fax tones (“beep — beep — beep”), put the handset down, but do not
hang up. Walk to your machine and press <Start>. After you press <Start>, hang
up the external phone’s handset. Because remote fax machines will wait several
seconds to hear reception tones from your machine, you have about 30 seconds to
walk to your machine and press <Start>.
Switch between the automatic or manual reception mode
Make sure that the machine is in the fax mode. If not, press
1
switch to the Fax mode.
Press <Advanced Functions> until “Auto Rx” appears on the LCD then press <Enter>.
2
Auto Rx :Off
//Enter
Press <q> or <p> to select “On” or “Off ”.
3
• To switch to manual reception mode, select “Off ”
• To switch to automatic reception mode, select “On”
Press <Enter> to save the setting.
4
NOTE: If you assigned “Auto Rx” to a soft key (page 8-2), you can toggle Manual reception
(Tel Ready) and Automatic reception (you have set) by pressing that key.
<
copy4fax4scan
>
to
Page 94

If the paper runs out during fax reception
When your machine runs completely out of paper, it beeps, the alarm light is lit, and the
LCD shows the following message.
Please Supply Paper
Out-of-paper reception
If your machine runs out of paper, it stores up to 250 fax receptions in its memory. This
is called “out-of-paper reception.” Once you refill the paper supply, the machine prints
the stored messages automatically.
NOTE: The number of pages (not receptions) your fax machine can store for out-of-paper
reception will vary. It depends on:
• Your machine’s memory capacity
• Types of documents sent to your machine
• Fax resolution of documents sent to your machine
1
2
3
4
5
6
7
8
receIvInG faxes
9
10
11
12
13
14
A
5-5receIvInG faxes
Page 95

5-6 receIvInG faxes
Settings for fax reception
Setting the number of rings
Default setting: Twice
You can set how many times your machine will ring before answering a call.
Press <Menu>, <2>, <2>, <0>, <3>, then <Enter>.
1
For MFX-1350/F-305 For MFX-1300/F-300
# Of Rings
(00-10) 02 times
Use the numeric key to enter the number of rings you want.
2
Press <Enter> to save the setting.
3
Press <Reset> to exit.
4
Print settings
You can set three parameters for printing received fax documents:
• Print reduction rate
• Reduction margin
• Paper save function
You set all three in the same procedure, mentioned on next page.
Each description is as follows:
# Of Rings
(01-10) 02 times
Print reduction rate:
Print reduction lets you set the machine to reduce large incoming documents to a size
that fits the paper in your machine. (This setting doesn’t affect copies you may make
with your machine.)
Below are the options for the print reduction rate for fax reception:
Setting Description
Auto Automatically reduces printouts at variable rates down to a mini-
mum of 50%. Tries to reduce printout to fit on one sheet of your
selected paper size. If it cannot, print the image at 100% size on two
or more pages.
100% Does not reduce documents. (Due to the sender’s TTI, this may
print two pages when receiving a one-page fax document.)
Reduction margin:
Your machine’s reduction margin is measured in millimeters (mm). We will define reduction margin by explaining how it is used:
When a fax message enters your machine’s memory, the machine measures the message’s length and compares it to (a) the length of your selected paper (not include the
print margins) plus (b) the reduction margin you set. If the length of the incoming message is shorter than (a) plus (b), your machine prints the message on just one sheet.
If it is longer, your machine prints the message on two or more sheets.
An Auto reduction setting and a reduction margin setting of 40 mm will print most
incoming faxes as single pages. Try this combination first and then, only if you have
problems with it, select different settings.
Page 96

Paper save function:
•Half-page reception
Half-page reception can conserve paper if some of the faxes you receive are half-page,
“Memo-sized” messages. When activated, this feature tells the machine to combine two of
these half-page receptions onto a single sheet.
Half-page reception only combines half-page messages sent back-to-back during the
same transmission. It won’t combine two half-page faxes from separate transmissions.
•Duplex reception
Duplex reception can save paper by duplex printing received faxes.
When activated, this feature tells the machine to combine and print the received two
pages onto both sides of a single sheet. This feature is available only for the MFX-1350
(with standard duplex unit)/MFX-1330 (with optional duplex unit).
1
2
3
To adjust the print settings
Default setting:
Rx reduction rate: “Auto”, Reduction margin: “40 mm”, Half-page reception: “Off ” (Paper
save: “Off ”).
Press <Menu>, <2>, <2>, <0>, <2>, then <Enter>. The machine shows the current
1
reduction rate for fax reception:
Rx Reduc. Rate :Auto
//Enter
Press <q> or <p> to select the reduction rate.
2
Press <Enter> to save the setting.
3
The machine shows the current reduction margin:
Margin
(00-85): 40 mm
Use the numeric keys to enter the reduction margin you want.
4
Press <Enter> to save the setting.
5
The machine shows the current setting for half-page reception:
Half Page Recpt.:Off
//Enter
If your machine is a duplex model, the machine shows the current setting for the
paper save function.
Paper Save:Off
//Enter
Press <q> or <p> to select the paper save function.
6
4
5
6
7
8
receIvInG faxes
9
10
11
12
13
14
A
Press <Enter> to save the setting.
7
Press <Reset> to return to the standby mode.
8
5-7receIvInG faxes
Page 97

5-8 receIvInG faxes
Advanced receiving functions
The <Advanced Functions> key is for easy access to the following fax functions listed in
the table.
NOTE: • To shorten a frequent-use operation, assigning the function to a soft key is recom-
nded. For how to do this, see page 8-2.
me
• If one of the functions is assigned to any of the three soft keys, that function will
not be available through the <Advance Functions> key.
To select the fax function using advanced functions key:
Switch to the Fax mode by pressing
1
Press <Advanced Functions>.
2
Press <q> or <p>, or <Advanced Functions> repeatedly to select the function. Then
3
<
copy4fax4scan
>
.
press <Enter>.
The table below lists the order of display. Refer to the pages indicated for detailed information.
Advanced function Descriptions Reference
Broadcast Used to make a broadcasting. p. 4-12
Address Entry Used to enter a recipient’s address.
Report Prints the transmit confirmation report for only the next trans-
mission.
Monitor Obtains a dial tone to on-hook dialing. —
Pause/Dial Opt. Enters the special dialing character. p. 3-3
Delayed Used to make a delayed transmission. p. 4-13
Batch Tx Stores a document for batch transmission. p. 4-14
Select TTI Used to select the TTI or to disable the TTI on your transmission. p. 4-17
Cover Page Used for the cover page setting. p. 4-20
Fax Forward Enables or cancels the fax forwarding. p. 5-12
Fax & Copy Enables or cancels the Fax&Copy. p. 4-19
Security Enables or cancels the security reception. p. 9-3
Separator Page Enables or cancels the separator page. p. 5-14
Memory Tx Enables or cancels the memory Tx. p. 4-3
Auto Rx Enables or cancels the auto reception. p. 5-2
F-Code Tx Used to make an F-code transmission. p. 6-11
F-Code Polling Used to make an F-code polling. p. 6-12
Polling Used to make a polling reception. p. 5-11
Dial Prefix Enters the “/N” symbol. p. 4-21
Bypass Used to set the paper size on the bypass tray. p. 2-15
Page Counter Displays total printed and scanned page. p. 8-8
Energy Save Enables or cancels the Energy save mode. p. 1-17
Online Cancels PC printing. *
Mode Switch Switches the machine’s mode. p. 2-2
E-mail Gateway Enables or cancels the e-mail gateway. p.4-22
* For details of printer settings, refer to the PDF manual on the GDI Printer/Scanner Driver CD
supplied with the machine.
Printer/Scanner
Driver Manual
p. 11-5
Page 98

Block junk fax
Your machine’s Block Junk Fax feature lets you bar the gates against unauthorized
incoming faxes (“Junk fax”). But before you block junk fax, first understand how this
feature works, to determine if it is right for you.
There are four possible settings for Block Junk Fax:
• Off — The feature is not activated.
• Mode1 — Your machine checks whether the last four digits of any phone number in
your autodialer matches the last four digits of the remote fax’s phone number. If it
does not find a match, your machine disconnects the call.
• Mode2 — This mode rejects any call from a number whose last four digits match any
number in the blocked numbers list. Your machine can hold up to 50 blocked numbers.
• Mode3 — This mode rejects numbers that are not in the autodialer and also rejects
numbers that are in the blocked numbers list. This mode lets you keep a number on
your autodialer for transmission to it, while still blocking its incoming calls by putting
it in the blocked numbers list.
1
2
3
4
But before you activate the Block Junk Fax feature, please consider:
• Not all fax machine owners enter their phone numbers in their machine. — With Block
Junk Fax activated, your machine would reject faxes from these machines.
• Access codes can cause confusion. — If an autodialer entry ends with extra codes, such
as long-distance codes, Block Junk Fax will block out calls from those faxes.
To set the mode for block junk fax:
Press <Menu>, <2>, <2>, <1>, <0>, then <Enter>. The machine shows the current
1
setting:
Block Junk Fax:Off
//Enter
Press <q> or <p> until the mode you want appears.
2
Press <Enter> to save the setting.
3
What you do next depends on what you selected in step 1:
• If you selected “Off” or “Mode1”, press <Reset> to return to standby mode.
• If you selected either “Mode2” or “Mode3”, go on to step 4.
The machine shows:
4
Select BlockJunk No.
01:No Number Stored
5 Press <q> or <p> until you find an empty position in the list, then press <Enter>.
If you want to modify an existing entry in the blocked numbers list, press <q> or <p>
until you see the number you want to modify, then press <Enter>.
To clear a number from the list, see “Erasing a number from the blocked numbers list,”
next page.
Use the numeric keys to enter the last four-digit number of a fax number you want to
6
block. You can enter the last eight-digit number to identify each fax number, but only
the last four-digit number will be used for blocked number.
For example, if you want to block a fax from someone with a number of 123-456-7890,
you should enter 7, 8, 9, 0:
01:Enter Fax Number
7890_
5
6
7
8
receIvInG faxes
9
10
11
12
13
14
A
5-9receIvInG faxes
Page 99

5-10 receIvInG faxes
To change a specific digit, press <t> to move left or <u> to move right until the cursor
is under the digit, then use the numeric key to enter the correct number.
Press <Enter> to save the setting.
7
If you do want to enter other number, repeat procedures from step 5.
8
To exit, press <Reset>.
Erasing a number from the blocked numbers list
To clear a number from the list:
Press <Menu>, <2>, <2>, <1>, <0>, then <Enter>.
1
Block Junk Fax:Mode2
//Enter
Press <Enter>.
2
Select BlockJunk No.
01:5553038_
Press <q> or <p> until you see the number you want to clear.
3
Press <Cancel>.
4
01:Erase Junk Fax
Yes Enter
01:Erase Junk Fax
No Cancel
Press <Enter> to erase the number. If you want to cancel the erasing, press <Cancel>.
5
To clear another number, repeat procedures from step 3.
6
Press <Reset> to return your machine to standby mode.
7
Printing a list of the blocked numbers:
To print a list of the blocked numbers, press <Menu>, <5>, <1>, <1>, <0>, then <Enter>.
Page 100

Receive polling
Polling allows someone to fax a document to you without having to make the call or pay
for it. There are two kinds of polling:
• Regular polling — Your machine retrieves a document from a remote fax machine.
• F-Code polling — Your machine retrieves a document stored in a F-code boxes of
the remote fax machine. To do this, you must be communicating with another Fcode-compatible machine. For more information of the F-code communication, see
“Using F-code box features,” page 6-1.
NOTE: For polling to work, the remote machine must also be set up to be polled.
1
2
Regular polling
To set up your machine for regular polling:
Make sure the document is inserted in the remote fax machine.
1
Press <Advanced Functions> until “Polling” appears on the LCD then press <Enter>.
2
Use <q> or <p> to select “On”.
Polling :On
//Enter
– or –
Press the soft key assigned to “Polling”.
Enter the remote fax machine’s number.
3
Enter Fax Number
_
To perform the regular polling now, skip to step 7.
4
To perform delayed regular polling, go on to step 5.
Press <Advanced Functions> until “Delayed” appears on the LCD then press <Enter>.
5
Delayed
Enter Time 15,17:05
Use the numeric keys to enter the date and time (use the 24-hour format) when your
6
machine should perform the delayed regular polling. Then press <Enter>.
Press <Start>.
7
When your machine polls for documents, it dials the number and, upon making contact
with the other machine, begins receiving the document as if the other machine had
placed the call.
3
4
5
6
7
8
receIvInG faxes
9
10
11
12
13
14
A
5-11receIvInG faxes
 Loading...