

Page 1

MP54G3 (MS-6855A)
Wireless 11g MiniPCI Card
User’s Guide
i
Page 2

FCC STATEMEMT:
This device is intended only for OEM integrators under the following conditions:
1) The antenna must be installed such that 20 cm is maintained between the
antenna and users, and
2) The transmitter module may not be co-located with any other transmitter
or antenna.
As long as 2 conditions above are met, further transmitter test will not be
required. However, the OEM integrator is still responsible for testing their
end-product for any additional compliance requirements required with this
module installed (for example, digital device emissions, PC peripheral
requirements, etc.).
IMPORTANT NOTE: In the event that these conditions can not be met (for
example certain laptop configurations or co-location with another
transmitter), then the FCC authorization is no longer considered valid and
the FCC ID can not be used on the final product. In these circumstances, the
OEM integrator will be responsible for re-evaluating the end product
(including the transmitter) and obtaining a separate FCC authorization.
End Product Labeling
This transmitter module is authorized only for use in device where the
antenna may be installed such that 20 cm may be maintained between the
antenna and users (for example access points, routers, wireless ADSL modems,
and similar equipment). The final end product must be labeled in a visible
area with the following: "Contains TX FCC ID:I4L-MS6855A".
Manual Information for End Users
The end user must not have manual instructions to remove or install the
device. The user manual for end users must include the following information
in a prominent location:
"IMPORTANT NOTE: To comply with FCC RF exposure compliance
requirements, the
antenna used for this transmitter must be installed to provide a separation
distance of at least 20 cm from all persons and must not be co-located or
operating in conjunction with any other antenna or transmitter."
Page 3

FCC Caution
1. The device complies with Part 15 of the FCC rules. Operation is subject to
the following two conditions:
(1) This device may not cause harmful interference, and
(2) This device must accept any interference received, including interference
that may cause undesired operation.
2. FCC RF Radiation Exposure Statement: The equipment complies with FCC
RF radiation exposure limits set forth for an uncontrolled environment.
This equipment should be installed and operated with a minimum
distance of 20 centimeters between the radiator and your body.
3. This Transmitter must not be co-located or operating in conjunction with
any other antenna or transmitter.
4. Changes or modifications to this unit not expressly approved by the
party responsible for compliance could void the user authority to operate
the equipment.
Trademarks
Microsoft Windows and Internet Explorer are registered trademarks or trademarks of
Microsoft Corporation.
All brand names, icons, and trademarks used in this manual are the sole property of their
respective owners.
Revision History
Revision History Date
V 1.0 First Release March 2004
ii
Page 4

Important Safety Precautions
Always read and follow these basic safety precautions carefully when handling any
piece of electronic component.
1. Keep this User’s Guide for future reference.
2. Keep this equipment away from humidity.
3. Lay this equipment on a reliable flat surface before setting it up.
4. The openings on the enclosure are for air convection hence protects the
equipment from overheating.
5. All cautions and warnings on the equipment should be noted.
6. Never pour any liquid into the opening that could damage or cause electrical
shock.
7. If any of the following situations arises, get the equipment checked by a
service personnel:
Liquid has penetrated into the equipment
The equipment has been exposed to moisture
The equipment has not work well or you can not get it work
according to User’s Manual
The equipment has dropped and damaged
If the equipment has obvious sign of breakage
8. DO NOT LEAVE THIS EQUIPMENT IN AN ENVIRONMENT
UNCONDITIONED, STORAGE TEMPERATURE ABOVE 60O C OR
BELOW -20OC, IT MAY DAMAGE THE EQUIPMENT.
iii
Page 5

Introduction
>>> 1.1 MP54G3 (MS-6855A) - Wireless 11g
MiniPCI Card
Compliant with IEEE802.11g, the Wireless 11g MiniPCI Card
MP54G3 (MS-6855A) is a high-efficiency wireless adapter for
wireless networking at home, in office or in public places. The
data rate can be up to 54 Mbps and auto-negotiated to 48, 36, 24,
18, 12, 9, 6Mbps (IEEE 802.11g), or 11, 5.5, 2, 1Mbps (IEEE802.
11b).
With the wireless LAN adapter, you can roam between conference room and office without being disconnected the LAN cables;
in addition, sharing files and printers can be easy tasks.
The wireless LAN adapter is available to Microsoft Windows
operating systems (Windows® XP/2000/ME/98SE) and can be
integrated into networking with either Ad-hoc mode (computerto-computer, without an Access Point) or Infrastructure mode
(computer-to-access point, an Access Point is required).
1
Page 6
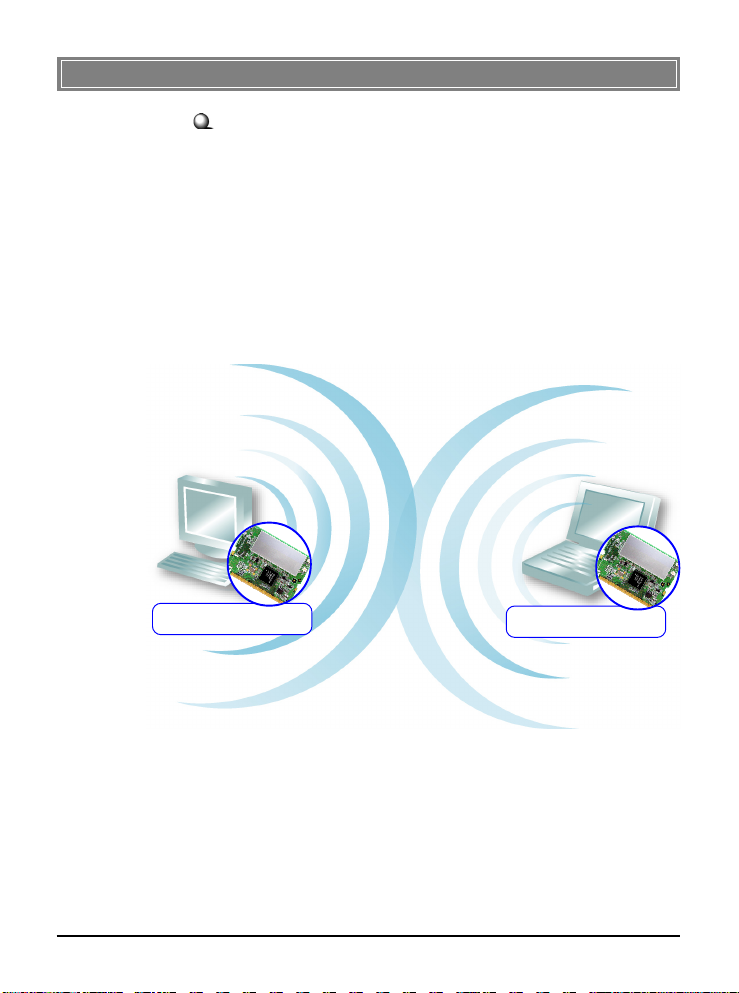
>>> 1.2 How Wireless LAN Adapter Works
Ad-hoc Mode : An Ad-hoc network is a local area network or
other small network, especially one with wireless or temporary
plug-in connections, in which some of the network devices are
part of the network only for the duration of a communications
session. Users in the network can share files, print to a shared
printer, and access the Internet with a shared modem. In this
kind of network, new devices can be quickly added; however,
users can only communicate with other wireless LAN computers that are in this wireless LAN workgroup, and are within
range.
Wireless 11g MiniPCI Card
Wireless 11g MiniPCI Card
2
Page 7
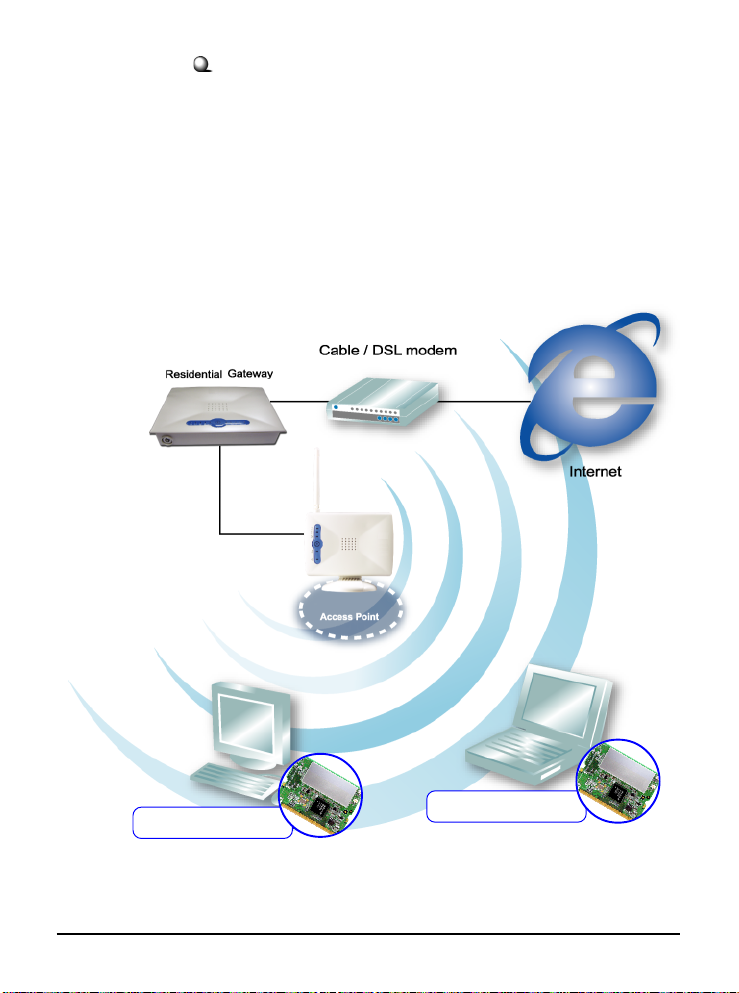
Infrastructure Mode : The difference between Infrastructure
network and Ad-hoc network is that the former one includes an
Access Point. In an Infrastructure network, the Access Point can
manage the bandwidth to maximize bandwidth utilization. Additionally, the Access Point enables users on a wireless LAN to
access an existing wired network, allowing wireless users to take
advantage of the wired networks resources, such as Internet,
email, file transfer, and printer sharing. The scale and range of the
Infrastructure networking are larger and wider than that of the
Ad-hoc networking.
Wireless 11g MiniPCI Card
Wireless 11g MiniPCI Card
3
Page 8

>>> 1.3 Specifications
Form Factor 32-bit Type IIIB
Operation voltage 3.3V
Antenna Connector Two antenna connectors
Standard - IEEE 802.11g/b
Frequency Range 2.412GHz to 2.484GHz
Data Rate and IEEE 802.11b (Auto-Fallback):
Modulation Types - CCK @ 5.5 and 11 Mbps
Operating Channels 13 selectable sub-channels
Media Access Protocol Direct Sequence Spread
- WECA Wi-Fi
- WHQL (Windows XP/2000)
- DQPSK @ 2 Mbps
- DBPSK @ 1 Mbps
IEEE 802.11g (Auto-Fallback):
- OFDM @ 54, 48, 36, 24, 18,
12, 9, 6 Mbps
Spectrum (DSSS) with ACK;
Half-Duplex
Security / Encryption - 64-/128-bit WEP
- AES-CCM Authentication
mode
- WPA support
- 802.1x
- WAPI
- TKIP
4
Page 9

Range Up to 400 m
Transmitter Output Power Up to 15dBm
Operating system Microsoft® Windows® 98SE/
ME/2000/XP
Environmental - Operating Temperature:
0 ~ 55OC
- Operating Humidity:
10 ~ 90%, non-condensing
Dimensions (WxDxH) 59.75 x 44.60 mm
Weight 15 g
5
Page 10
>>> 1.4 System Requirements
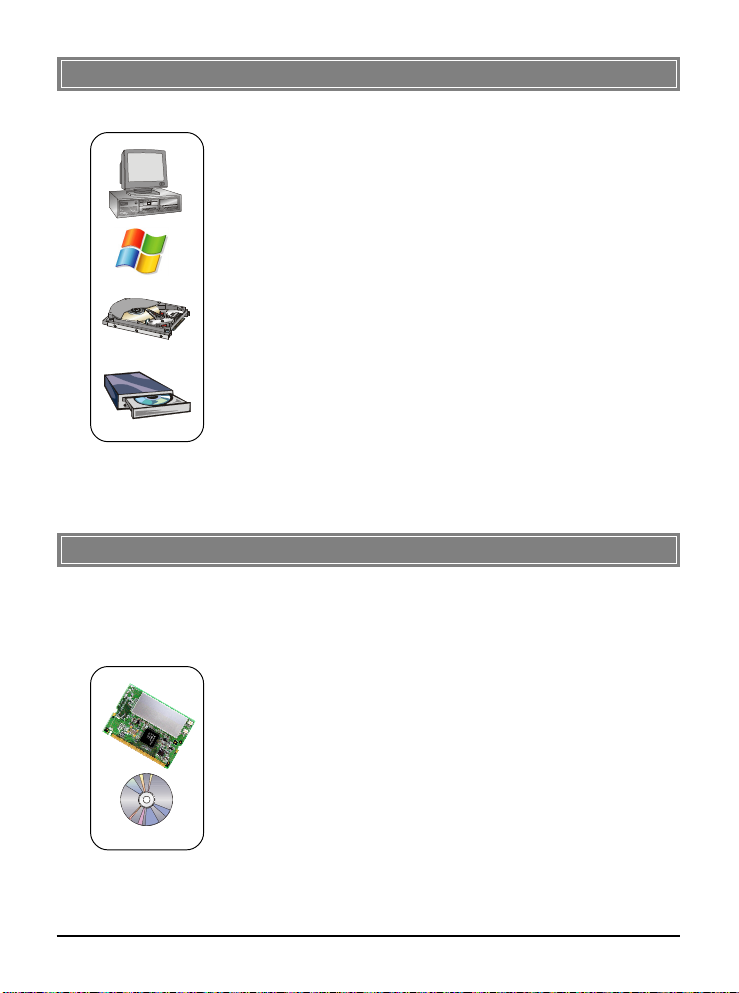
Before installing the wireless LAN adapter, your PC should meet
the following items:
- One desktop/notebook PC with an available MiniPCI slot.
- Windows® 98SE/ME/2000/XP operating system.
- Minimum 5MB free disk space for installing the driver and
utilities.
- One CD-ROM drive, double speed or higher.
>>> 1.5 Package Contents
Unpack the package and check all the items carefully. If any item
contained is damaged or missing, please contact your local dealer
as soon as possible. Also, keep the box and packing materials in
case you need to ship the unit in the future. The package should
contain the following items:
- One Wireless 11g MiniPCI Card.
- One Installation CD-ROM including drivers, utilities, and the
manual files.
6
Page 11
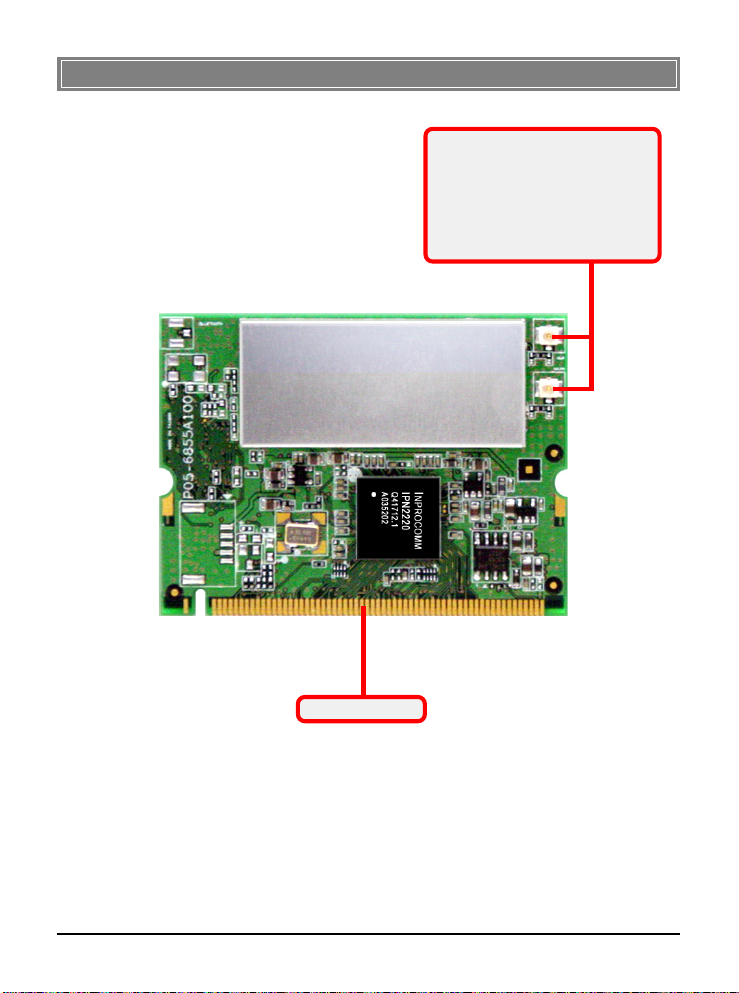
>>> 1.6 Product View
External antenna connectors
Connect to external antennas for
enhanced data transmission and
reception. The external antennas
are well designed on the desktop
or notebook computers.
Golden Finger
7
Page 12
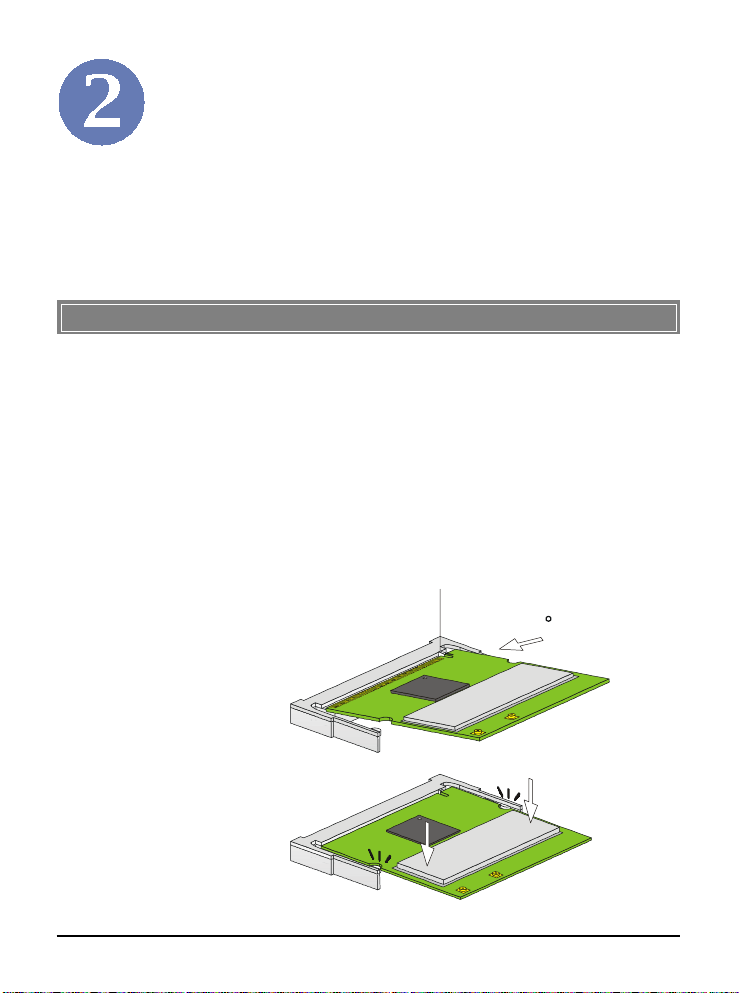
Hardware Installation
The following diagrams provide you a basic installation for your
wireless LAN adapter, including how to install and remove the
MiniPCI card. The instruction below is suitable for most computers with MiniPCI slot. For more information about the
MiniPCI module, please refer to your computer’s manual.
>>> 2.1 Installing the Wireless LAN Adapter
1. Locate the MiniPCI slot on the mainboard.
2. Place the wireless LAN adapter over the MiniPCI slot
(at an angle of 30 degrees). Then, gently insert it into
the slot until the golden finger of the card gets fully
inserted.
3. Press down the card, and the retaining clips (on two
sides of the slot) will lock onto the notches of the card.
Foolproof
notch
30
8
Page 13
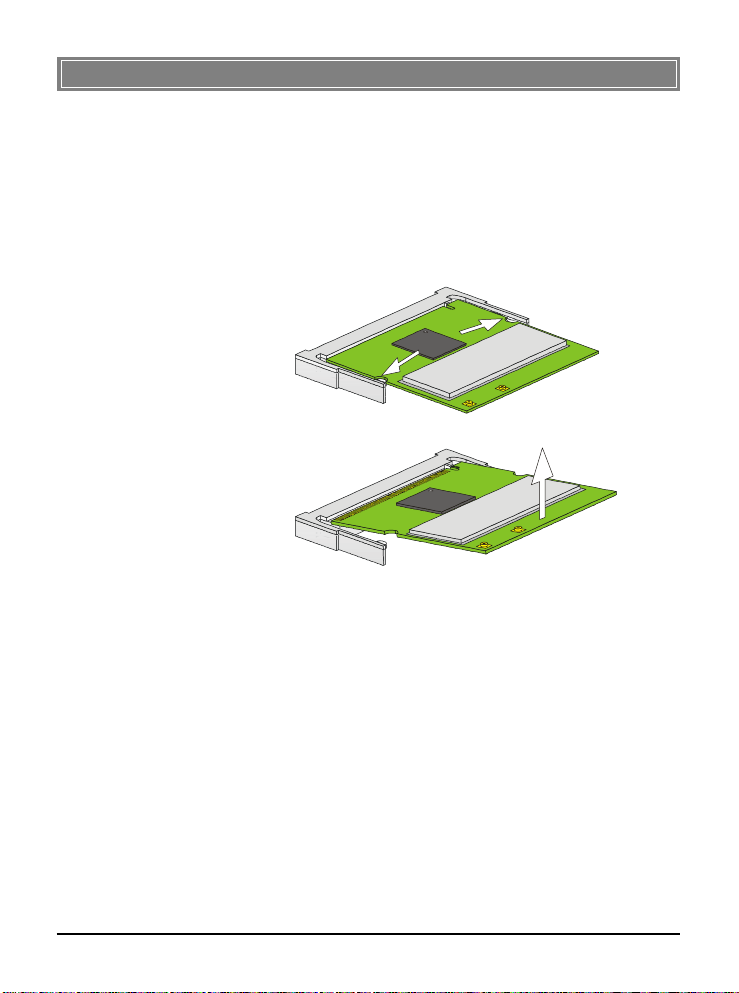
>>> 2.2 Removing the Wireless LAN Adapter
1. Locate the MiniPCI slot with wireless LAN adapter
installed.
2. Press the retaining clips outwards, and the card should
bound upwards slightly after being released from the
slot.
3. Remove the card from the MiniPCI slot carefully.
9
Page 14
Software Installation
This chapter describes the procedures of installing the driver
and utility. Follow the instruction step by step to finish the
installation. If you use Windows® 98SE/ME, please prepare
the Windows® Setup CD at hand before installing the driver;
because the system will ask you to insert the Setup CD to copy
files during the installation.
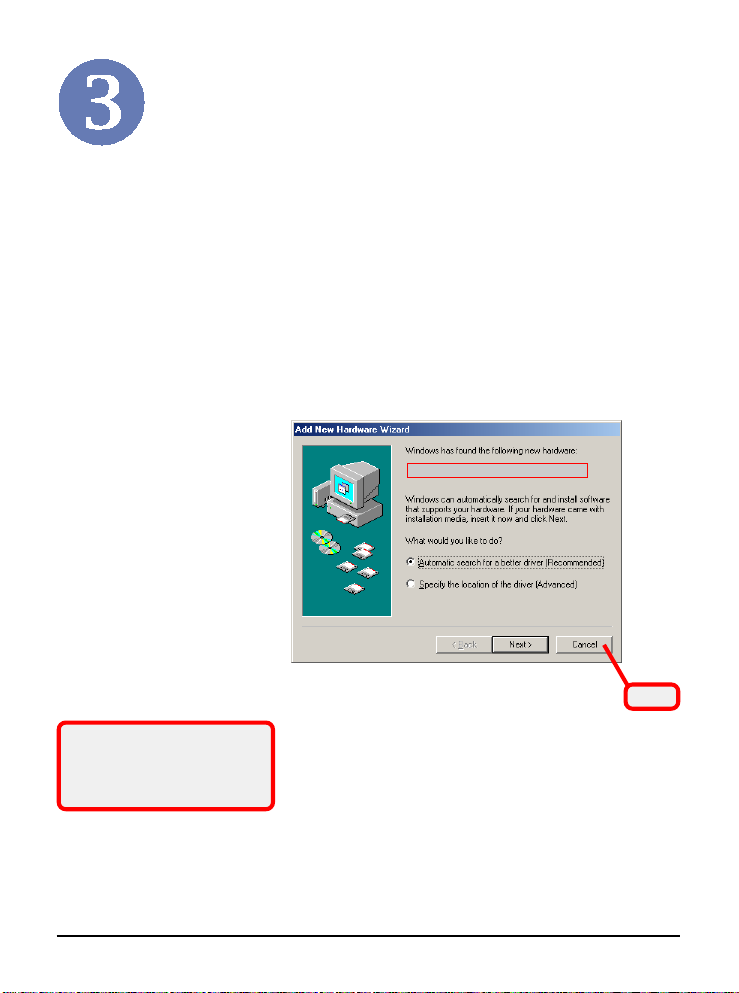
Please NOTE that the MP54G3
computer before installing the driver and utility. Then, the
operating system will detect a new device and start to configure
the new device. Click Cancel here to start installation from the
InstallShield Wizard.
Tip: The wireless LAN adapter
should be installed into your
PC before installing the driver
and utility.
should be installed into your
Your Wireless LAN adapter type
Click
10
Page 15
STEP
11
1
11
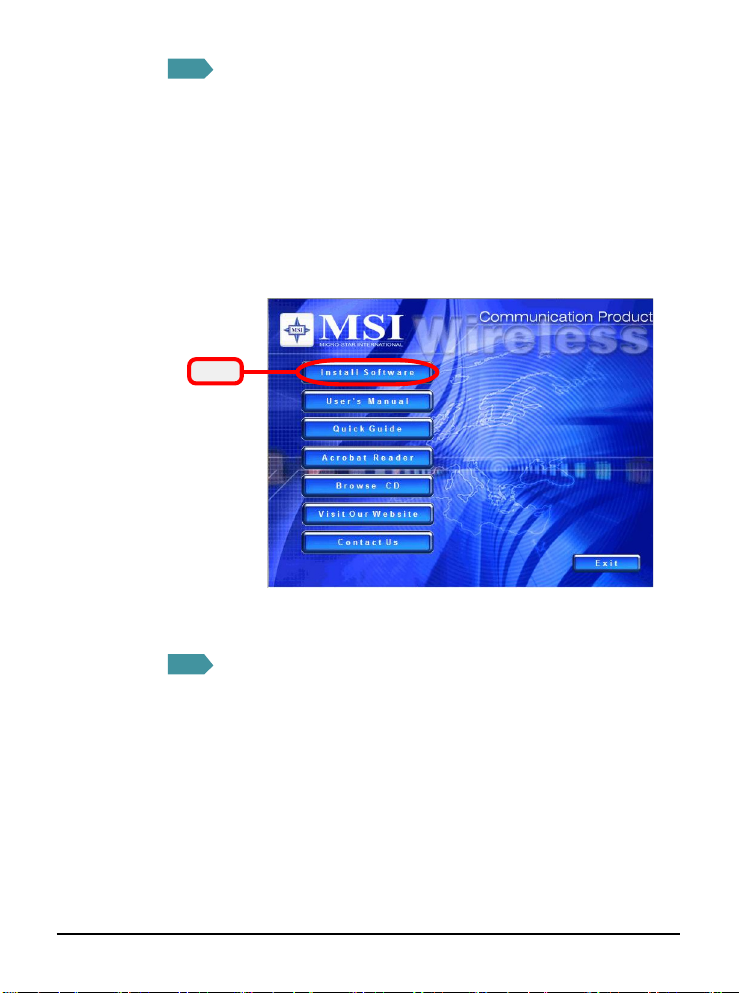
Insert the software CD into your CD-ROM drive, and the Setup
program should launch automatically.
If the Autorun program doesn’t launch automatically, click Start
at the taskbar and select Run.... Type E:\setup.exe (where E is
your CD-drive) in the Open box and click OK to launch the
Setup program manually.
The main screen of Setup program will appear as below. Click
the Install Software button.
Click
STEP
22
2
22
The welcome screen of InstallShield Wizard appears. Click
Next.
Read and accept the License Agreement; then, click Next.
In the following window, enter the user’s information (User
Name, Organization) in the respective fields; then, click Next.
11
Page 16
STEP
33
3
33
Click Install and the program will copy the necessary files to
the system. The progress indicator shows the installing status.
If you use Windows 98SE/ME, you may be asked to insert the
Windows Setup CD during the installation. Please insert the
Setup CD by the on-screen instruction to continue the
installation.
STEP
44
4
44
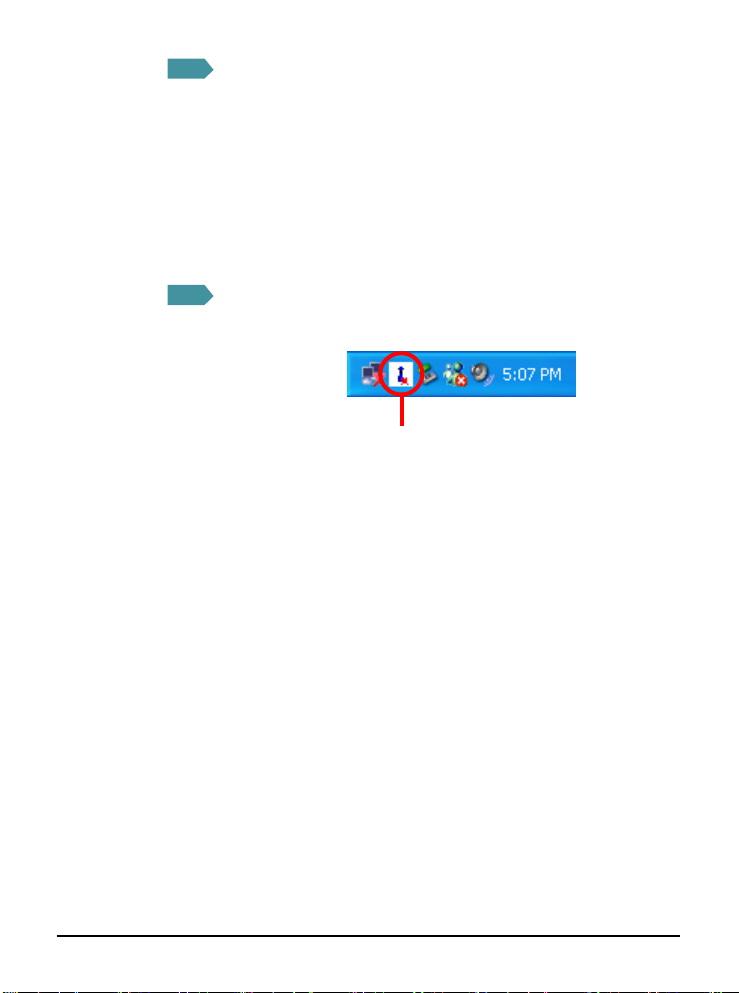
Click Finish when the installation is completed. The MSI Wireless LAN icon will appear in the status area.
MSI Wireless LAN icon
12
 Loading...