

MSI CB54G2, MS-6835, MS-6834 User Manual

1. ENGLISH................................................…3
2. DEUTSCH................................................ 13
3. FRANÇAIS...............................................23
4. ESPAÑOL................................................ 33
5. ITALIANO.................................................43
6. NEDERLANDS........................................ 53
7. ČESKY..................................................... 63
8. PORTUGUÊS.......................................… 73
9. POLSKI.................................................... 83
10. PУCCKИЙ................................................93
11. Polski.....................................................103
12. Pols........................................................ 113
13. TÜRKÇE.................................................123
14.
ไทย
....................................................... 133
15. 简体中文................................................. 143
16. 繁體㆗文................................................. 153
Version 1.0
P/N: G52-C6834X7

For Radio Product (purly) (EMC+LVD+RF)
EC DECLARATION OF CONFORMITY (EUROPE)
MICRO-STAR INTERNATIONAL declares that Wireless 11g PCI Card
(MSI PC54G2) and Wireless 11g CardBus Card (MSI CB54G2) conform to
the specifications listed below, following the provisions of the European
R&TTE directive 1999/5/EC and Low Voltage Directive 73/23/EEC:
EN 301 489-1..., EN301 489-n (n depends on product requirement) General
EMC requirements,
EN 609 50 Safety requirement,
EN 300 328-2 Technical requirement for Radio equipment.
NOTE: This equipment is intended to be used in all EU and EFTA countries.
Outdoor use may be restricted to certain frequencies and/or may require a
license for operation. For more details, please contact MICRO-STAR
INTERNATIONAL.
NOTE: Combinations of power levels and antennas resulting in a radiated
power level of above 100 mW are considered as not compliant with the
above mentioned directive and are not allowed for use within the European
community and countries that have adopted the European R&TTE directive
1999/5/EC and/or the CEPT recommendation Rec 70.03. For more details
on legal combinations of power levels and antennas, please contact
MICRO-STAR INTERNATIONAL.
Technical Support:
1. Visit the MSI website for technical guide, driver and software updates,
and other information: http://www.msi.com.tw/
2. Contact our technical staff at: support@msi.com.tw

ENGLISH
Before You Begin
This Quick Start Guide can be used for any current MSI Wireless
Network Adapter, providing you with easy installation steps to help
you build your network easily and quickly. For further instructions,
please refer to your User’s Guide. For the latest information or other
technical support, please visit MSI website at: http://www.msi.com.tw.
How to Use This Guide
If you want to
install your wireless network adapter page 5 ~ 6
install software page 7 ~ 8
connect the network page 9 ~ 12
... refer to...
4
QuickStart Guide
Hardware Installation
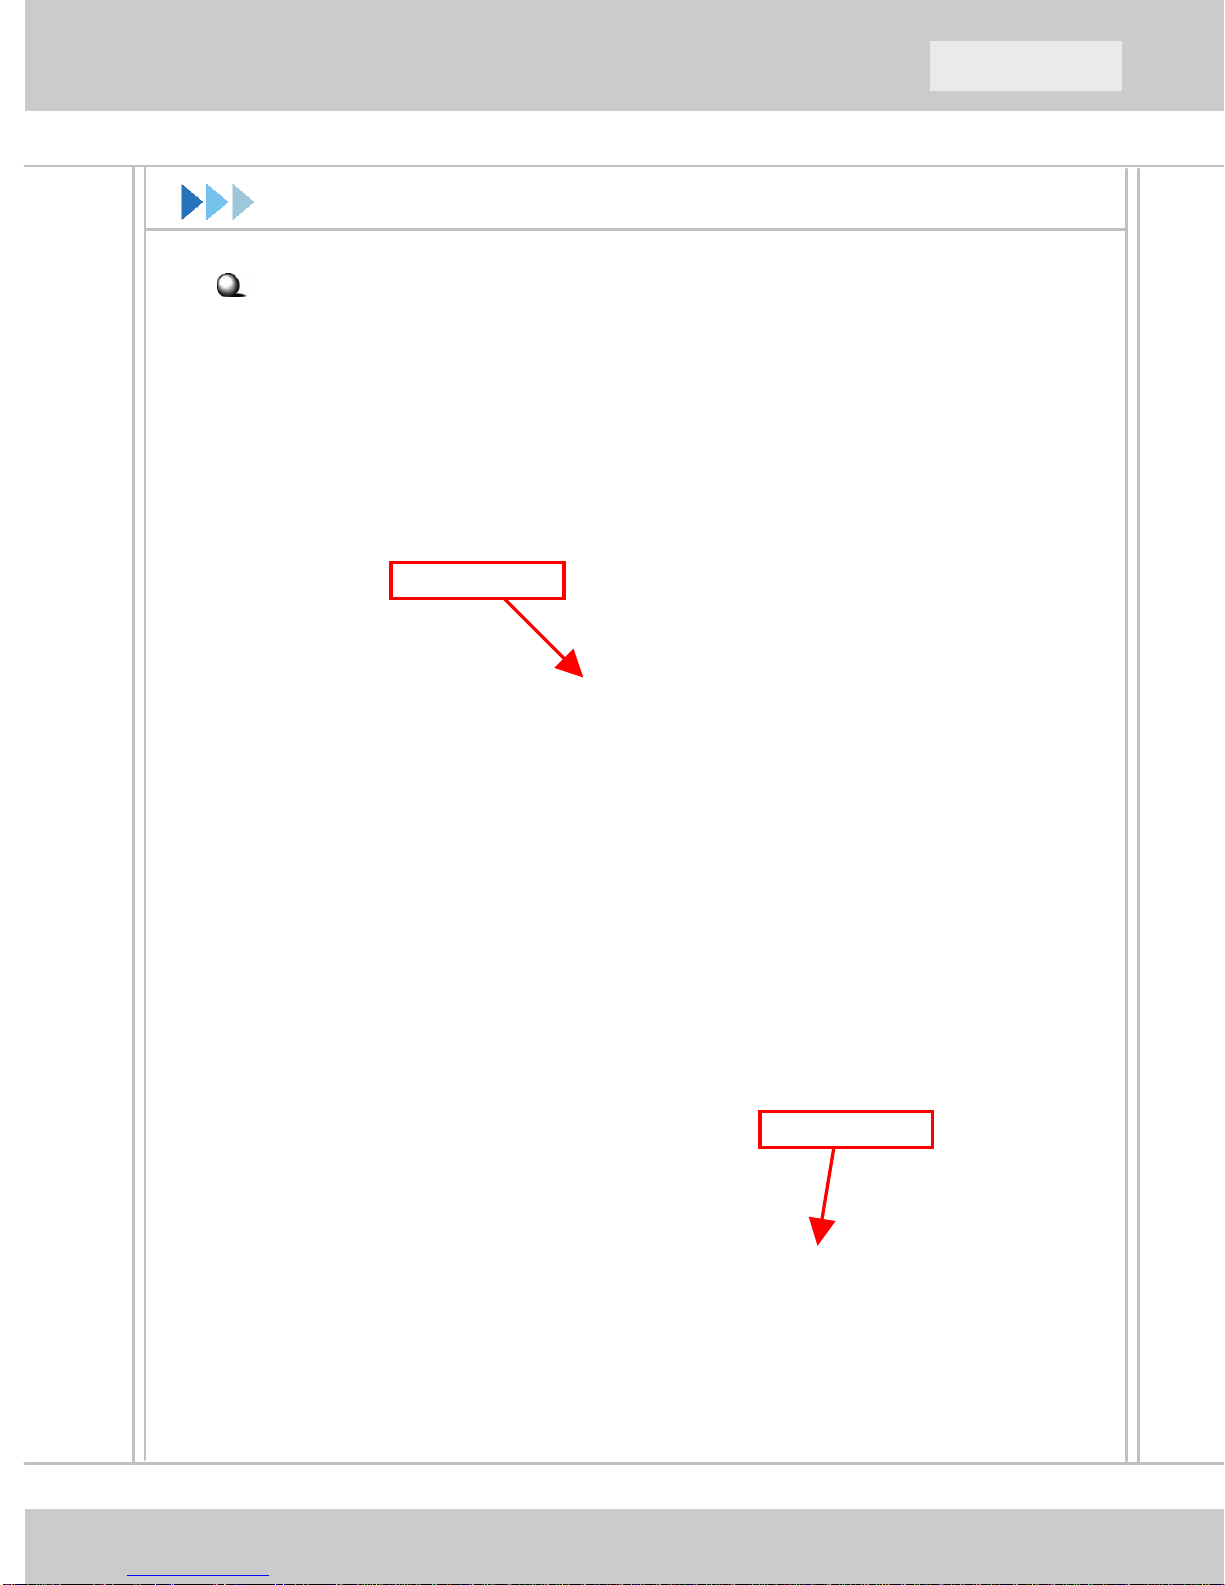
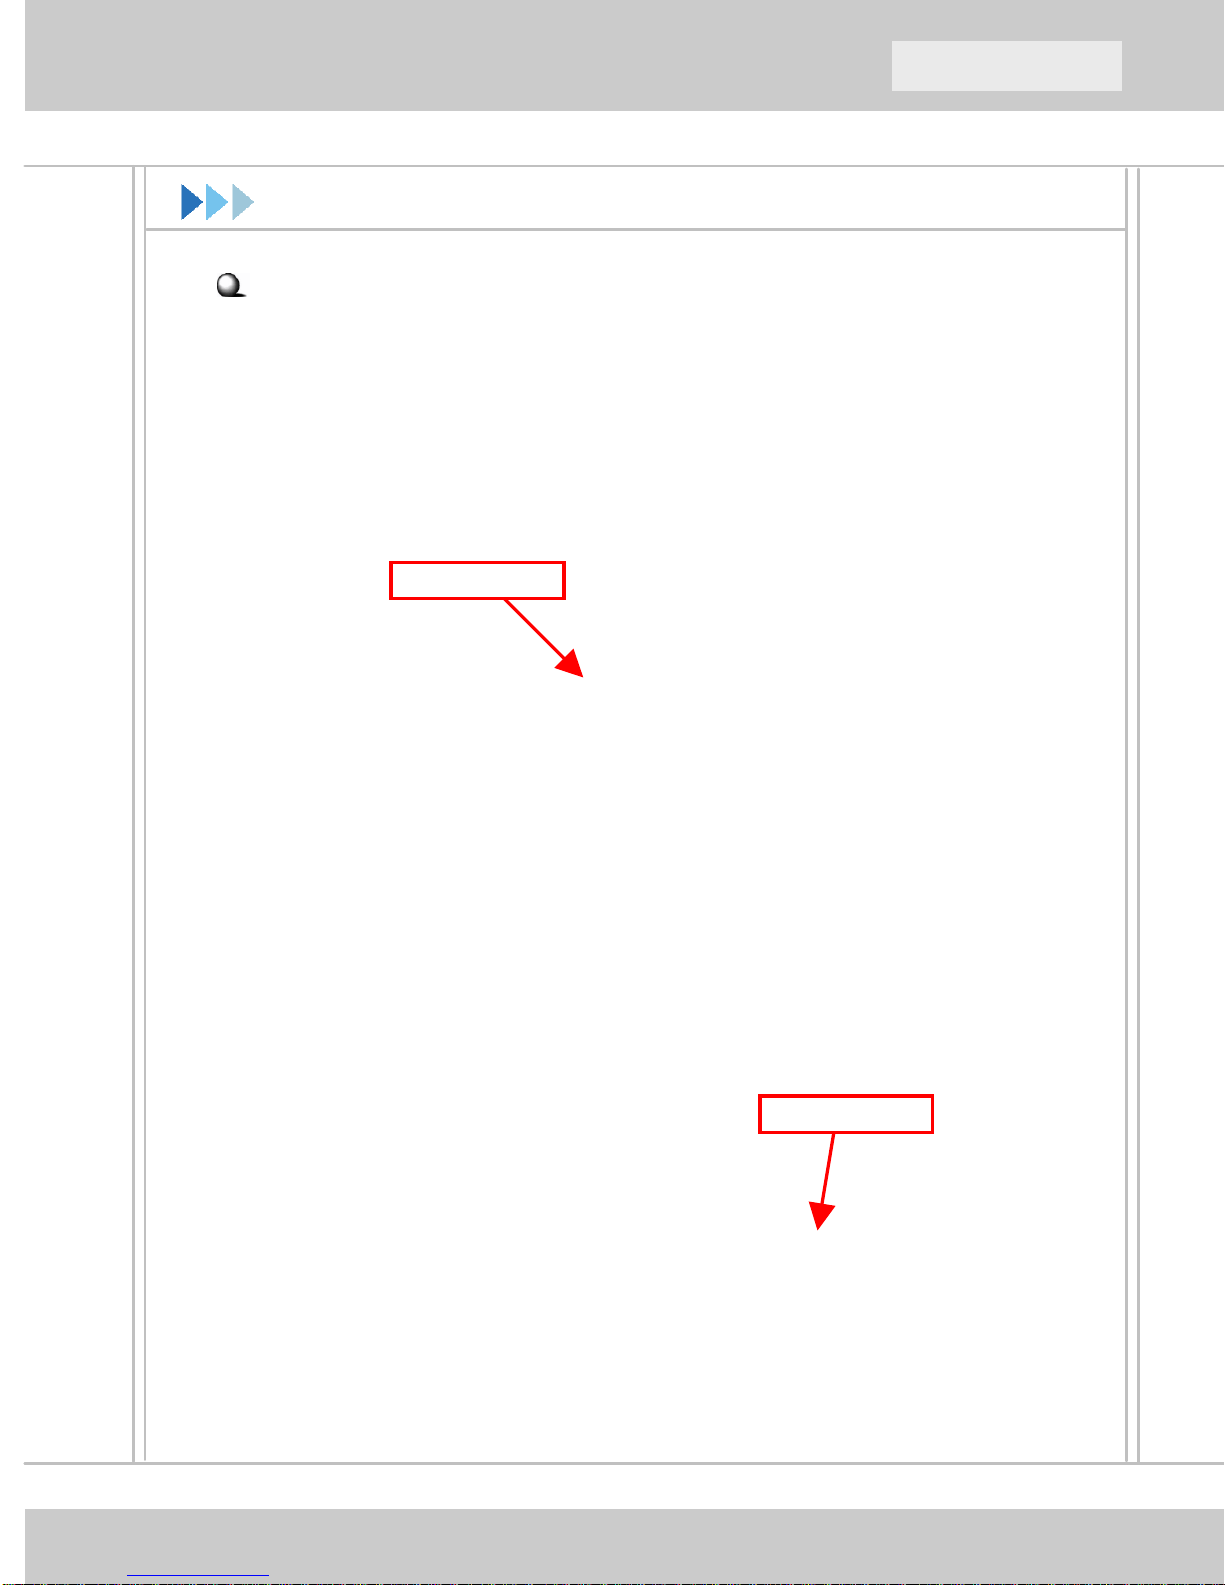
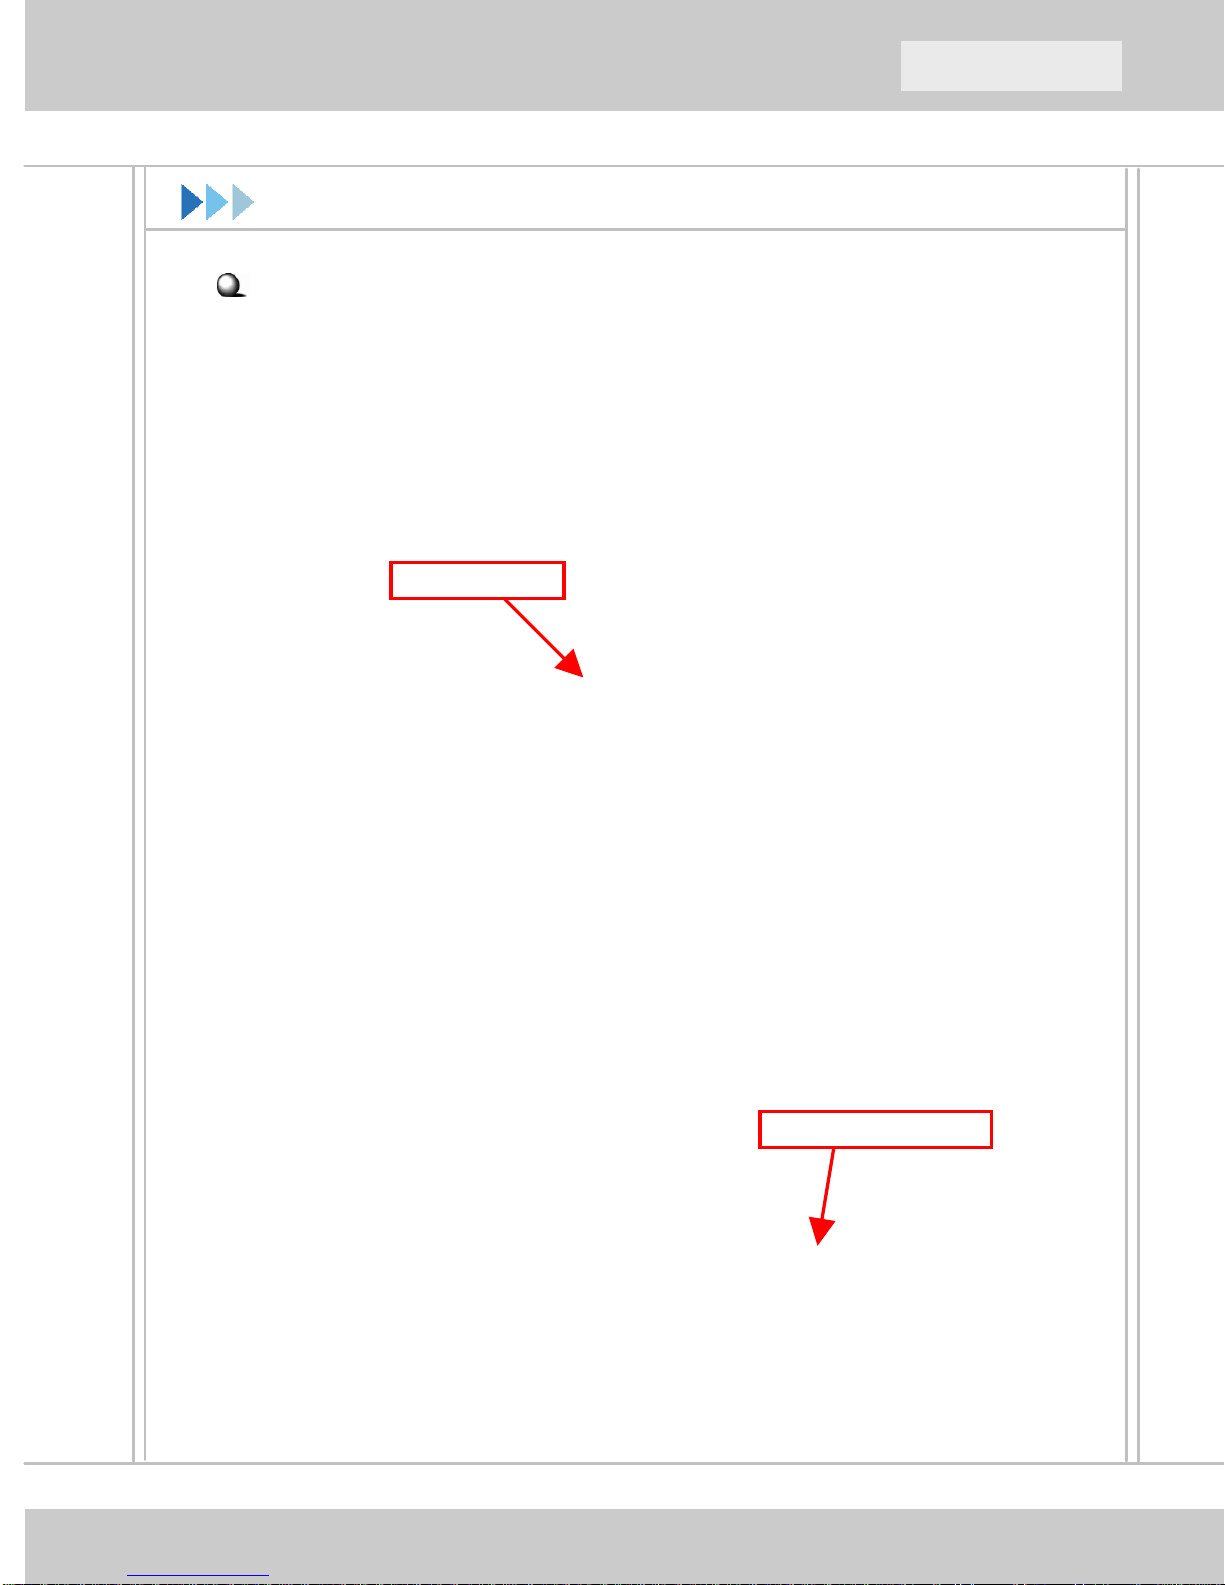
If you have a CardBus adapter (MS-6835)
Locate the available PC card slot on your computer, and then insert the
CardBus adapter into the PC card slot.
Installing CardBus adapter
To remove the CardBus adapter,
press the Eject Button of PC card
slot to make it stretch out. Then,
push the Eject Button and the
CardBus adapter will slide out
slightly. Pull it out of the slot.
PC card slot
Eject Button
Please note that before removing
the CardBus adapter, you should
stop the device in Windows.
5
Hardware Installation (2)
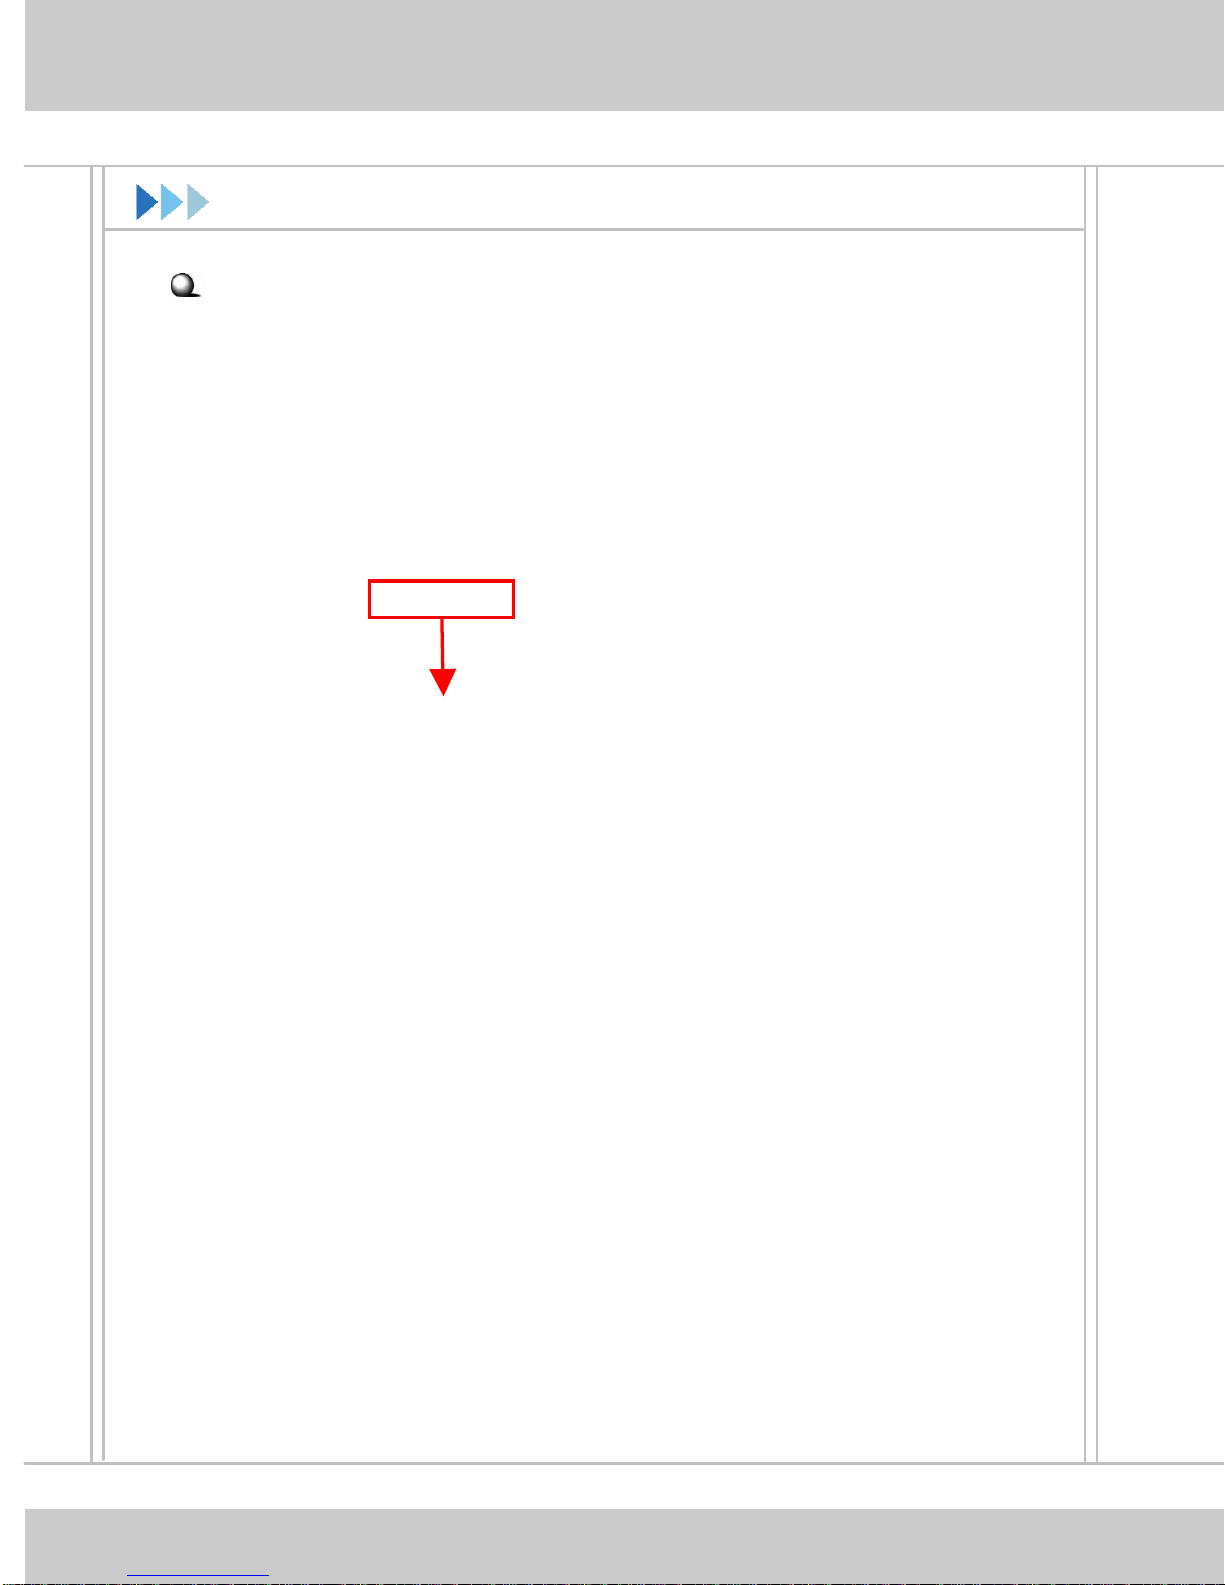
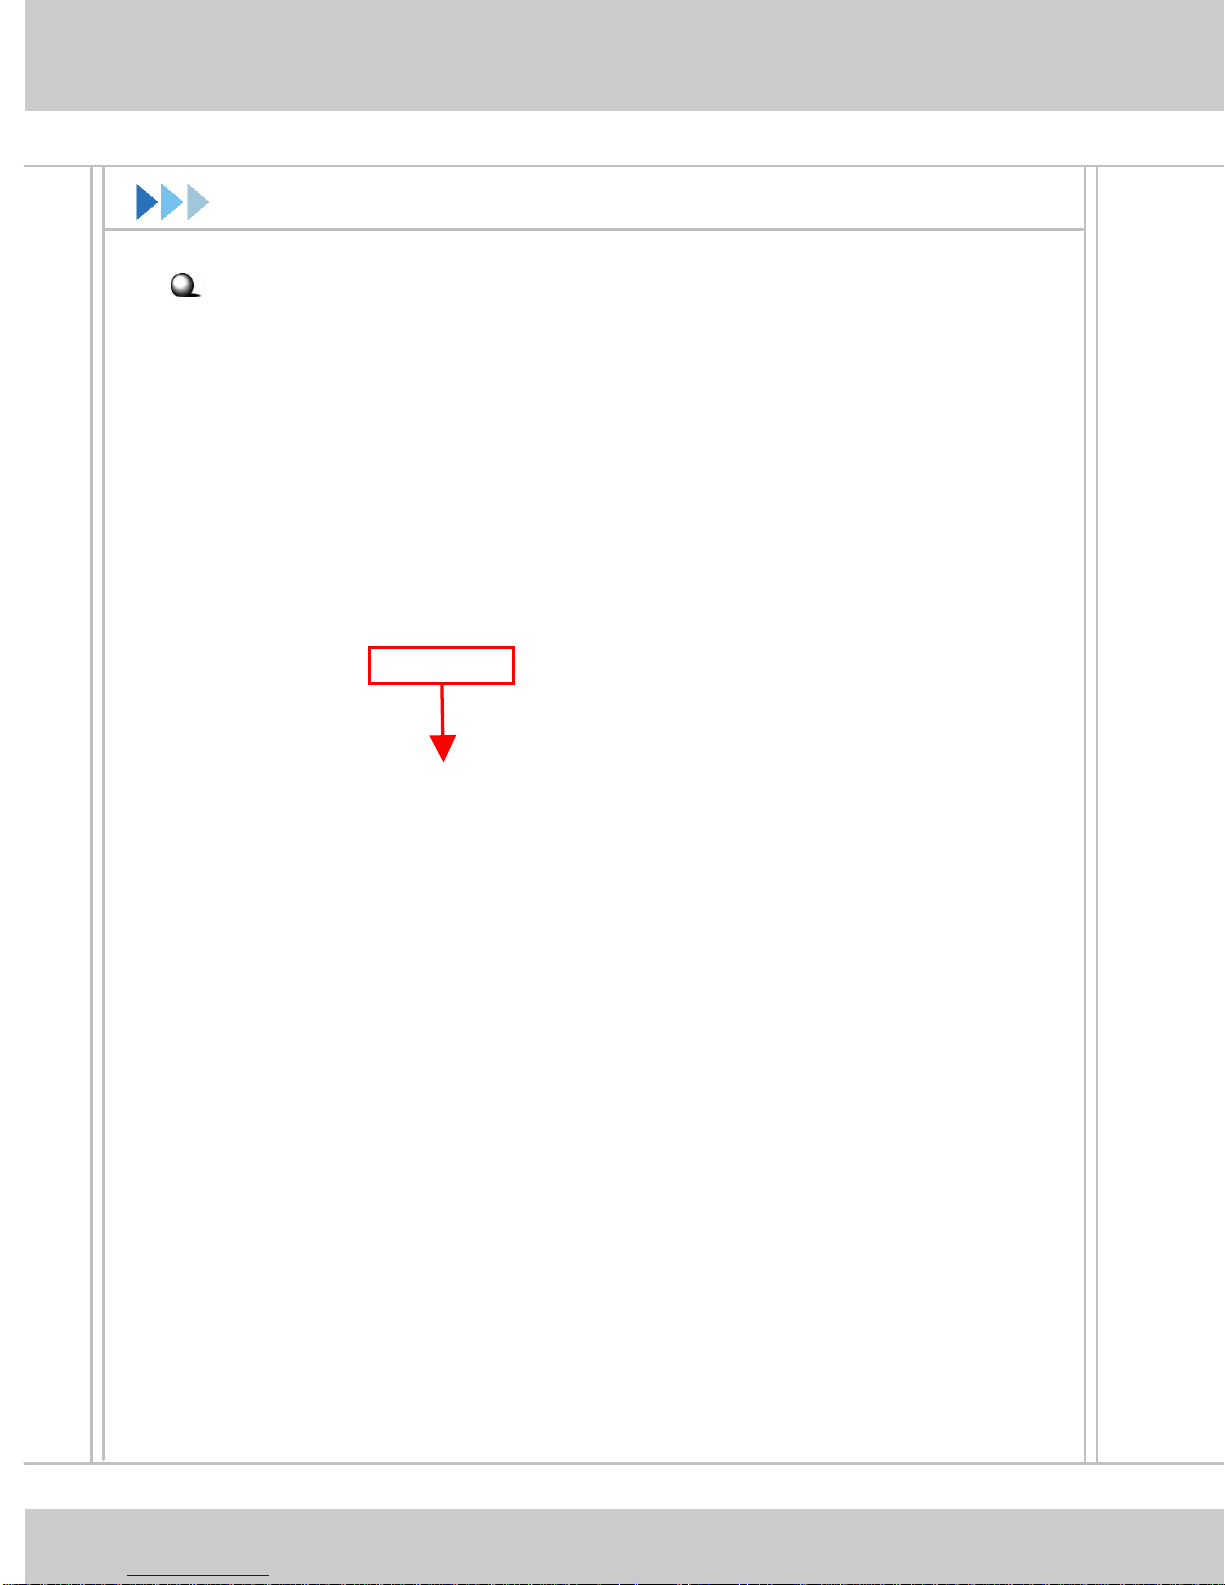
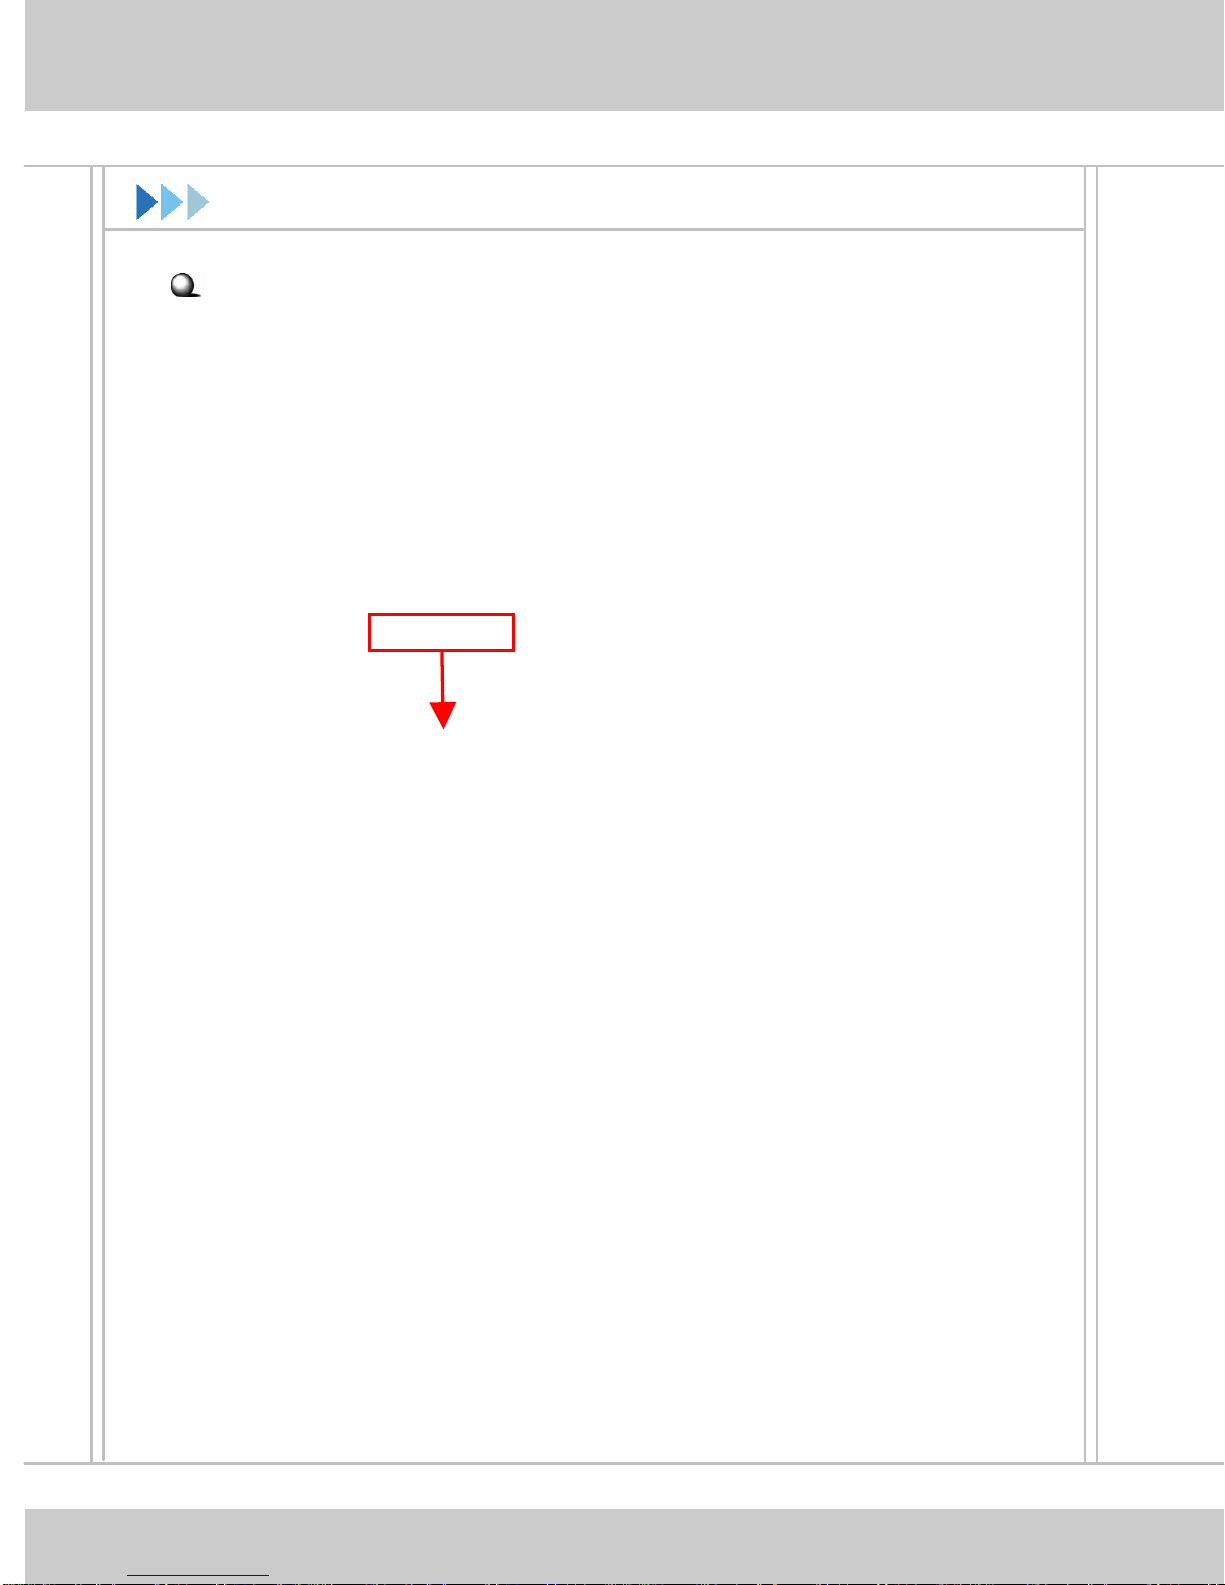
If you have a PCI adapter (MS-6834)
First, confirm that the system is turned off. Remove the computer’s
case to locate the available PCI slot on the motherboard. Insert the
PCI adapter into the slot firmly; then, secure it with the bracket screw.
Replace the cover and connect the external antenna.
If you are not skilled at installing the PCI adapter, please ask the
vendor or an experienced technician for help.
PCI slot
Installing PCI adapter
6
QuickStart Guide
Software Setup
After installing the wireless adapter to your computer and then turning
on the computer, the operating system will detect a new device and
start the configuration automatically. Please CANCEL the system’s
Add New Hardware Wizard here to install the required driver and
utility from InstallShield Wizard of your Software CD.
X
Insert the Software CD into your CD-ROM drive, and the Setup
program should launch automatically.
If the Autorun program does not launch automatically, click Start at
the taskbar and select Run.... Type E:\setup.exe (where E is your
CDROM drive) in the Open box and click OK to launch the Setup
program manually.
The main screen of Setup program will appear as below. Click the
Install Software button.
7

Software Setup (2)
Y
Z
[
The welcome screen of InstallShield Wizard appears. Click Next.
Read and accept the License Agreement; then, click Next.
In the following window, enter the user’s information (User Name and
Organization) in the respective fields; then, click Next.
Click Install and the program will copy the necessary files to the
system. The progress indicator shows the installing status.
Click Finish when the installation is completed. The MSI Wireless
LAN icon will appear in the status area.
MSI Wireless LAN icon
8
QuickStart Guide
Connecting Network
After installing the software, the MSI wireless adapter provides you
with a convenient and powerful utility that allows you to set up,
configure, and know your networking status easily and clearly.
Your MSI wireless adapter can be used by two networking modes:
Infrastructure mode and Ad-hoc mode.
Infrastructure Mode allows your computer to communicate with the
other computers in the network through an Access Point.
To connect the Access Point:
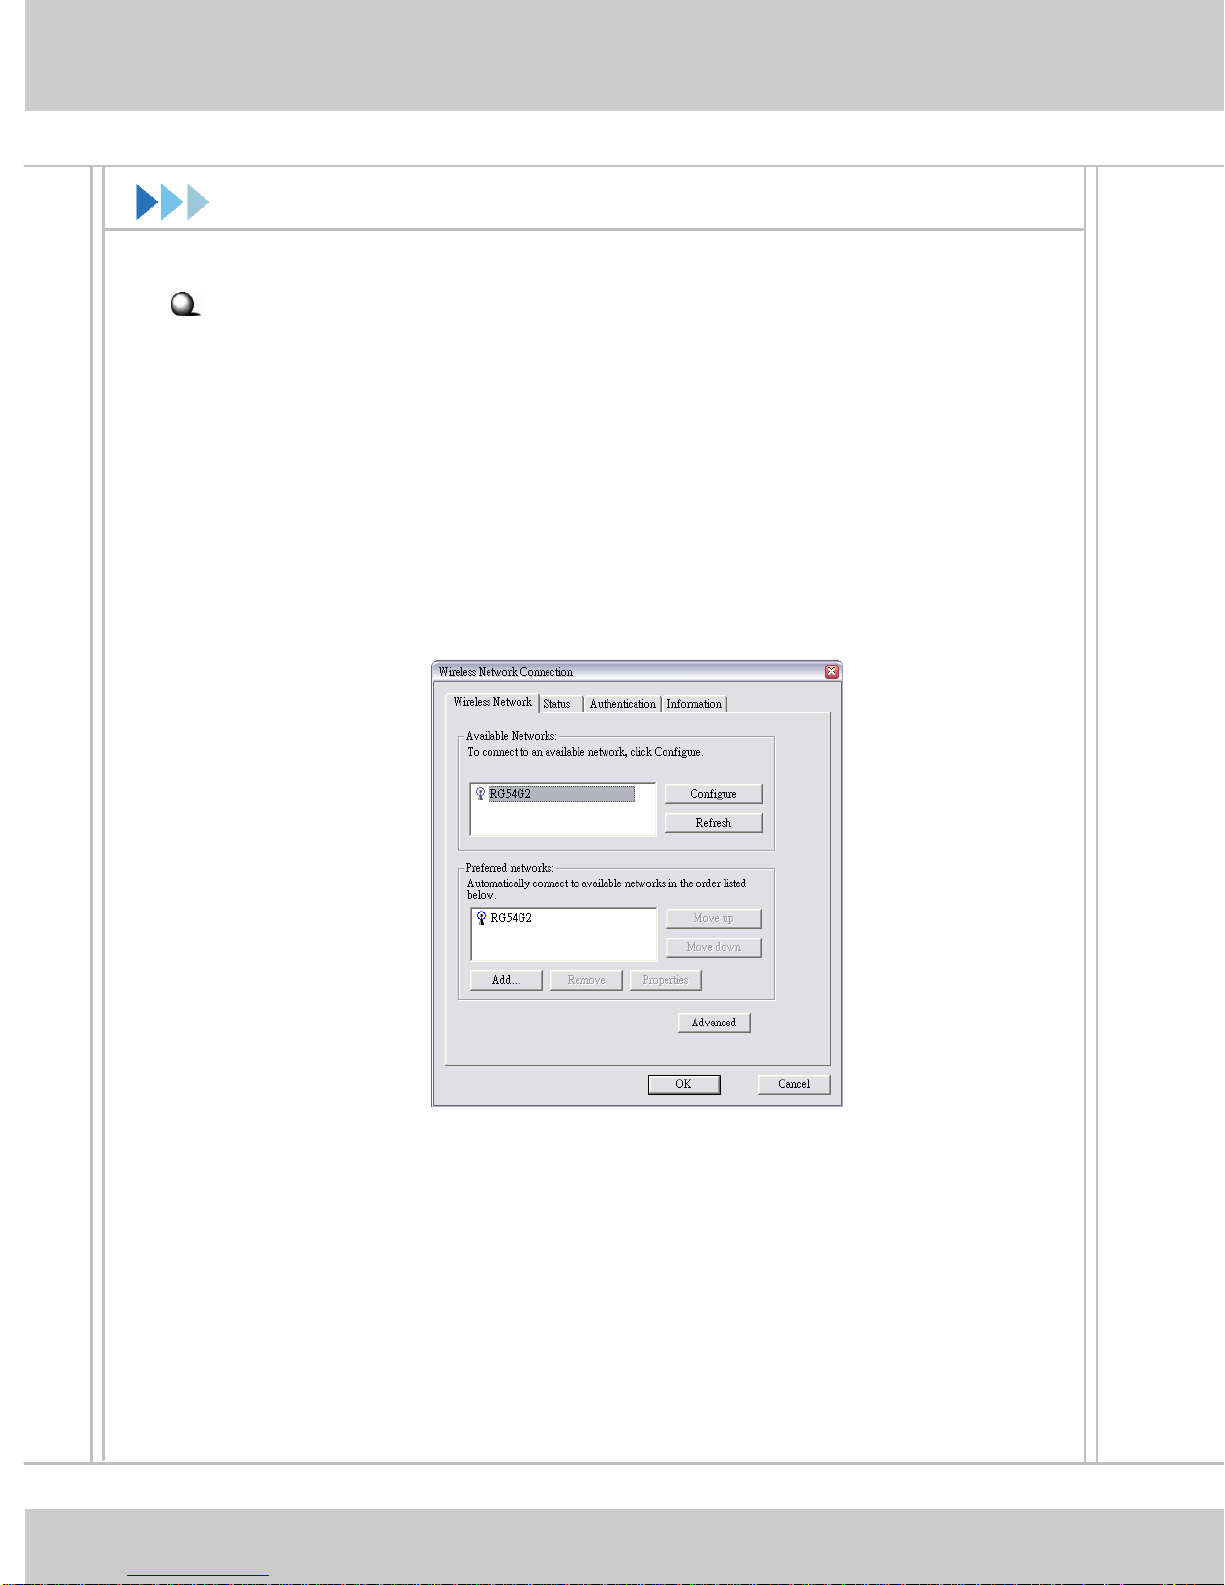
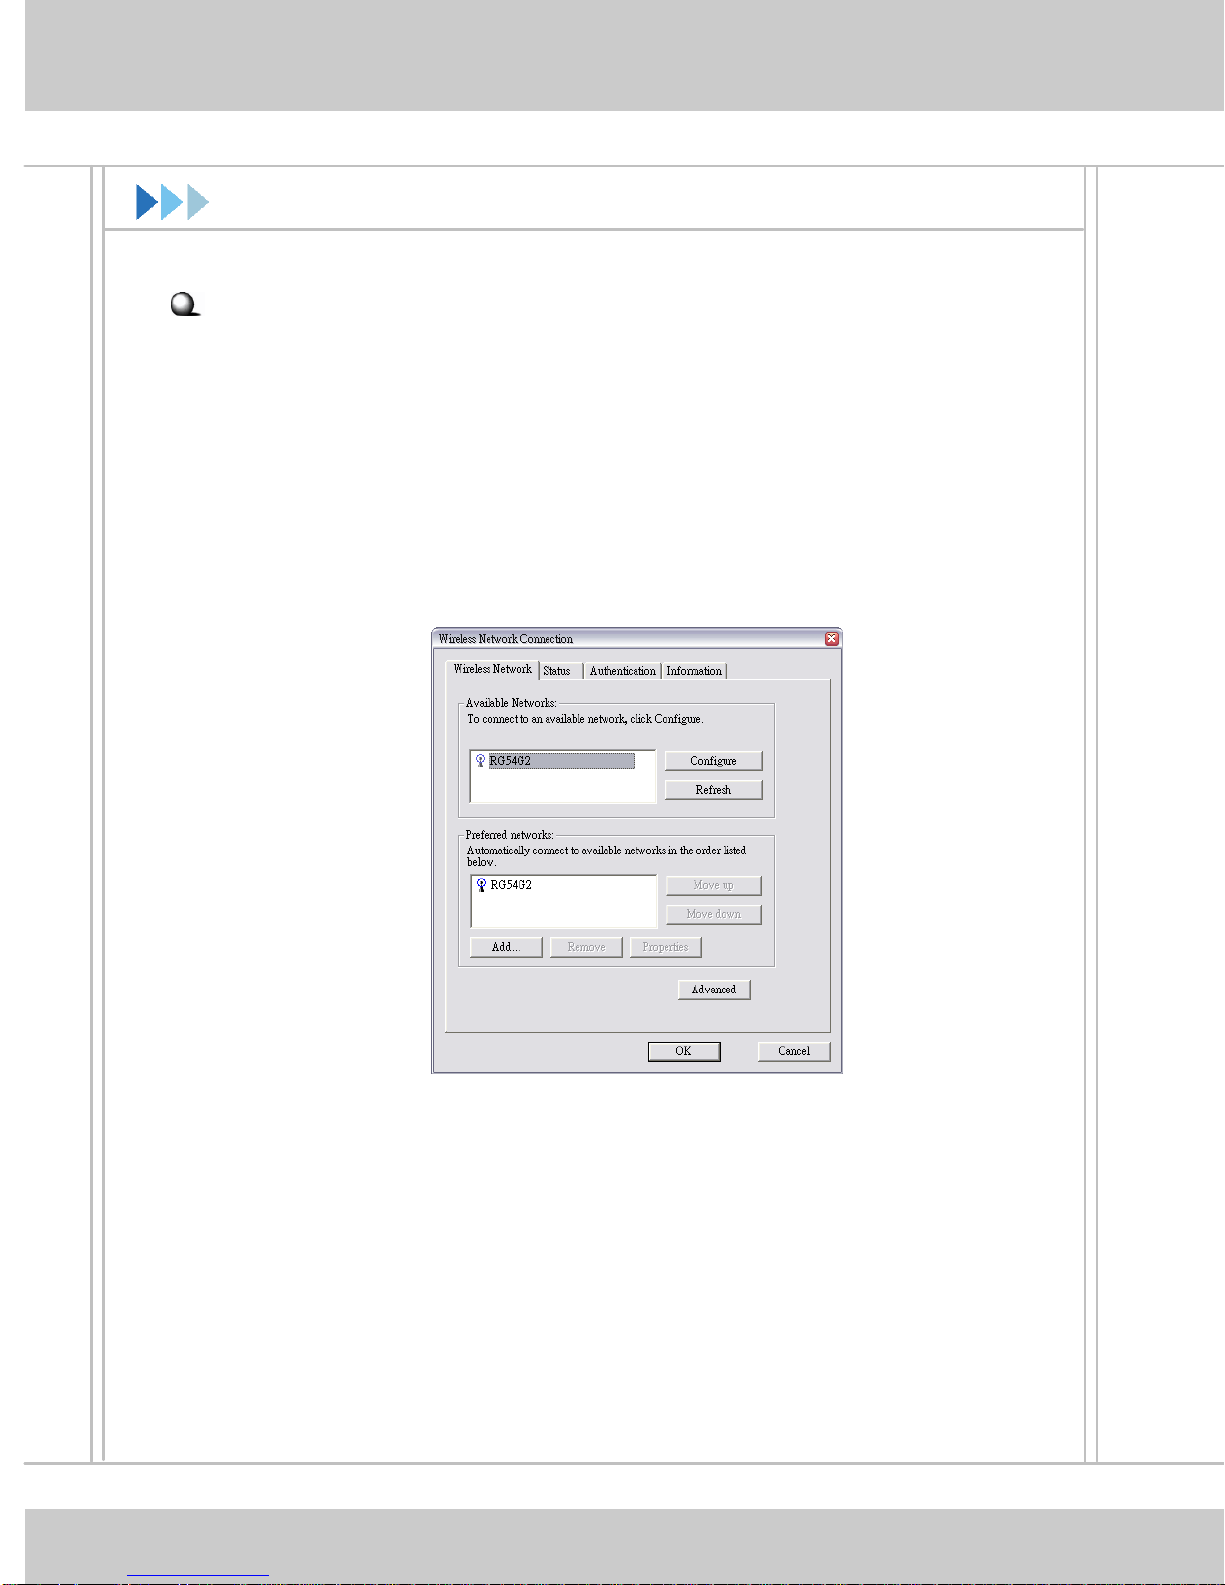
1. Click the MSI Wireless LAN icon to bring up the Wireless
Network Connection window.
2. In the list of Available wireless networks, select (highlight) the
network you want, and then click Connect.
click
select
9
Connecting Network (2)
Advanced Settings for Infrastructure Mode
Follow the instructions below to configure advanced settings in the
Infrastructure mode.
1. Click Advanced in the Wireless Network Connection window.
2. You can click Refresh to search the available Access Points in the
network again. The results will be displayed in the Available
Networks field.
3. Select one network (Access Point) you want, and click Configure
to set up the selected network.
4. For security purpose, you can set up the Network Key and
Authentication.
5. Click OK to complete the configuration. The MSI Wireless LAN
icon indicates the connection status.
10
QuickStart Guide
Connecting Network (3)
Ad-hoc Mode allows your computer to communicate directly with any
computer installed with compatible wireless adapter.
To build the Ad-hoc network:
1. Click the MSI Wireless LAN icon to bring up the Wireless
Network Connection window. Then, click Advanced.
2. Click Add.
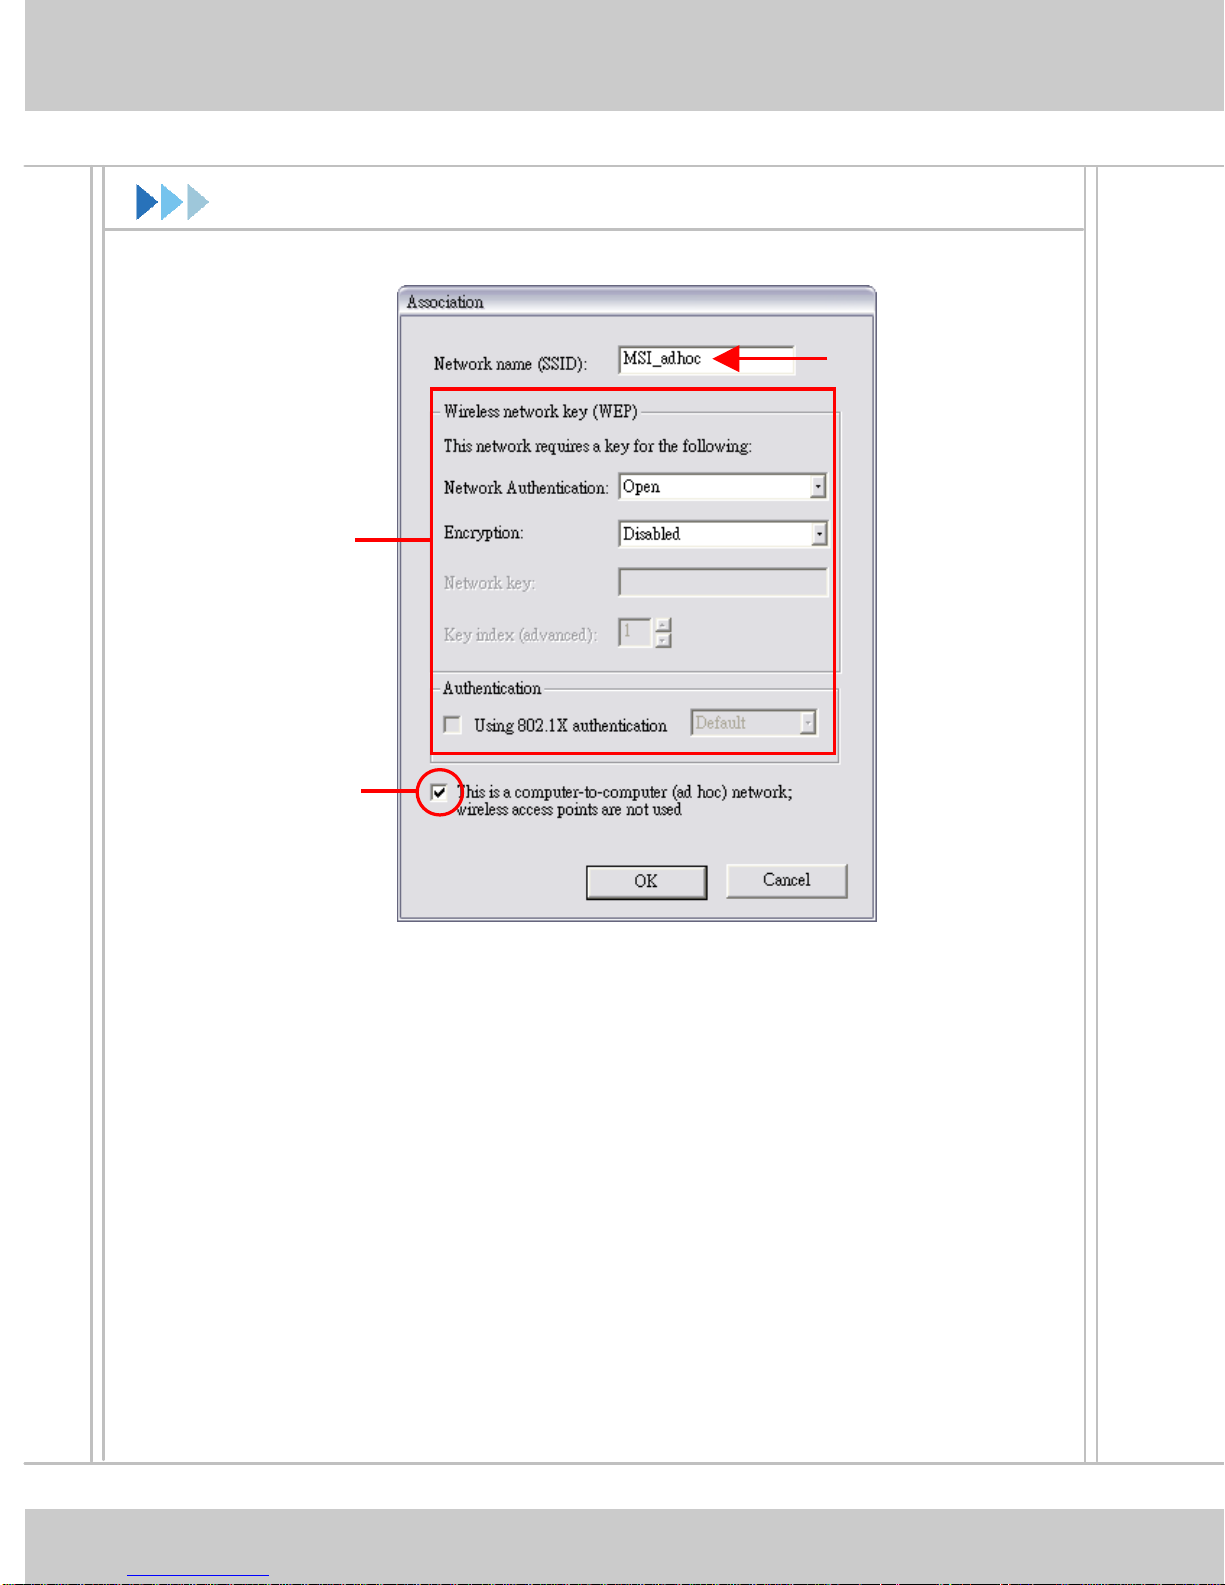
3. Set up the Network Name (SSID) and Network Key (if needed)
for the Ad-hoc network.
Check “This is a computer-to-computer [ad hoc] network;
4.
wireless access points are not used” option and click OK to
enable the Ad-hoc mode, and return to the Wireless Connection
window.
11
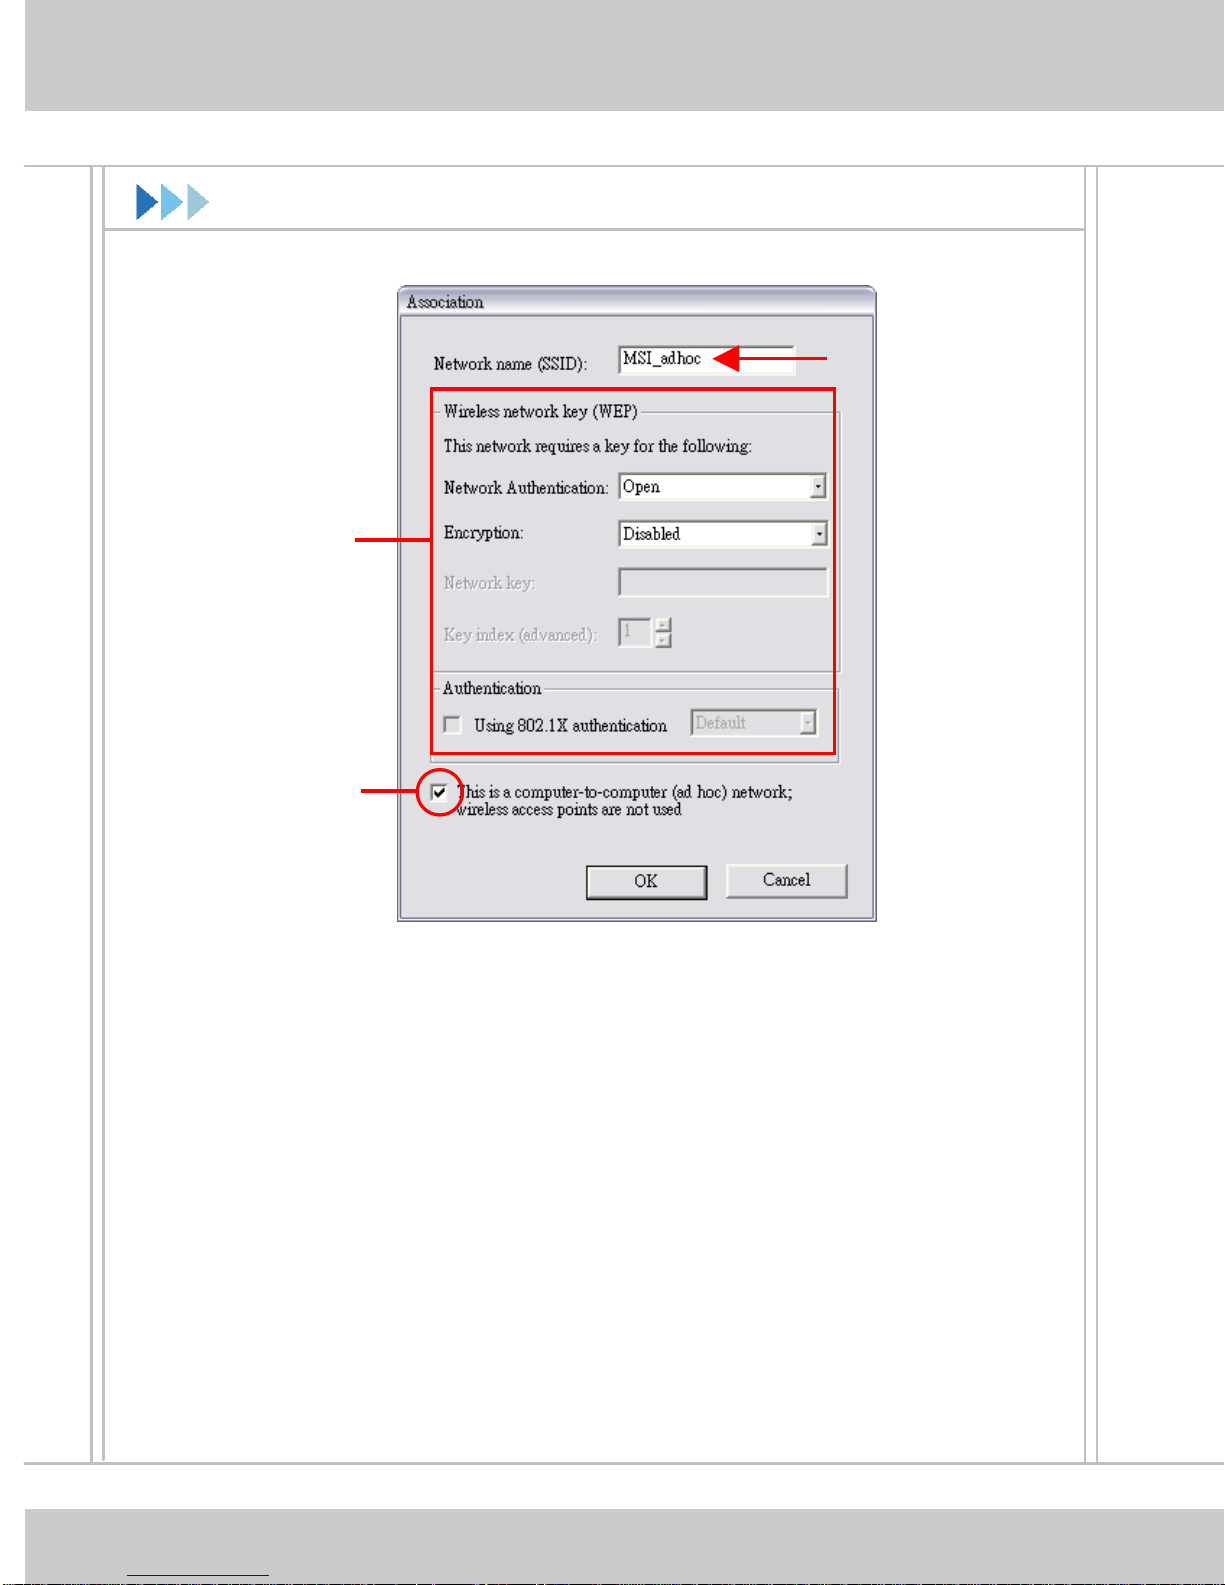
Connecting Network (4)
Enter a Network
Name (SSID)
Setup the WEP and
Authentication for
your need
Check this option
5. Click OK to complete the configuration. The MSI Wireless LAN
icon indicates the connection status.
The computer setting up this Ad-hoc network through the procedure is
the designated administrator of the network. Any computer can
access the network by selecting Connect in the Wireless Network
Connection window.
12

DEUTSCH
Bevor Sie anfangen
Diese Kurzanleitung erlaubt es Ihnen, jede aktuelle MSI Wireless LAN
Karte in einigen leichten Schritten zu installieren und somit Ihr
Netzwerk ebenso leicht und schnell aufzubauen. Weiter gehende
Informationen entnehmen Sie bitte Ihrem Benutzerhandbuch. Um die
neuesten Information oder weitere technische Unterstützung zu
erhalten, suchen Sie bitte die MSI Website auf:
http://www.msi-computer.de.
Wie Sie diese Anleitung verwenden
Wenn Sie beabsichtigen... schlagen Sie nach auf...
Ihre WLAN-Karte zu installieren Seite 15 ~ 16
Software zu installieren Seite 17 ~ 18
Ihre Karte zu konfigurieren Seite 19 ~ 22
14
Schnellstartanleitung
Installation der Hardware
Wenn Sie eine CardBus Karte (MS-6835) verwenden
Machen Sie an Ihrem Computer einen freien PC-Card Slot ausfindig
und schieben Sie dann bitte die CardBus Karte hinein.
Installation CardBus Karte
Um die CardBus Karte wieder zu
entnehmen, drücken Sie bitte die
Auswurftaste des PC-Card Slot,
damit diese hervorschnellt. Als
nächstes drücken Sie bitte die
Auswurftatste, darauf hin gleitet die
CardBus Karte weit genug heraus,
damit Sie sie aus dem Slot ziehen
PC Card Slot
Auswurftaste
können
Bevor Sie die CardBus Karte
entnehmen, sollten Sie das Gerät
unter Windows ausschalten.
.
15
Installation der Hardware (2)
Wenn Sie eine PCI Karte (MS-6834) verwenden
Vergewissern Sie sich zuerst, dass das System ausgeschaltet ist.
Öffnen Sie das Computergehäuse, um einen freien PCI Slot auf dem
Mainboard ausfindig zu machen. Setzen Sie die Karte fest in den
freien Slot ein und sichern Sie danach die Karte mit der Schraube des
Slotblechs am Gehäuse. Schließen Sie das Gehäuse wieder und
verbinden Sie die externe Antenne mit der Karte.
Bitten Sie gegebenenfalls zur Installation der PCI Karte Ihren Händler
oder einen erfahrenen Techniker um Hilfe.
PCI Slot
Einbau PCI Karte
16
Schnellstartanleitung
Installation der Softwa re
Nachdem Sie die WLAN Karte eingebaut haben, wird Ihr
Betriebssystem nach dem Einschalten das neue Gerät erkennen und
automatisch die Konfiguration starten. Bitte klicken Sie auf
ABBRECHEN und beenden Sie so den Hardware Assistenten Ihres
Betriebssytems. Starten Sie stattdessen den InstallShield Wizard
von der beigelegten Software CD, um die benötigten Treiber und das
Konfigurations-Utility zu installieren.
X
Legen Sie die Software CD in Ihr CD-ROM Laufwerk, das
Einrichtungsprogramm sollte automatisch starten.
Startet das Programm nicht automatisch, klicken Sie auf Start in der
Taskleiste und wählen Sie Ausführen…. Geben Sie im Fenster
“Ausführen” E:\setup.exe ein (wobei E Ihr CDROM Laufwerk
bezeichnet) und klicken Sie auf OK, um das Einrichtungsprogramm
von Hand zu starten
Das Hauptfenster des Einrichtungsprogramms erscheint wie unten
dargestellt. Klicken Sie auf die Schaltfläche “Install Software”.
.
17
Installation der Softwa re (2)
Y
Z
[
Der Startbildschirm des InstallShield Wizard erscheint. Klicken Sie auf
Next.
Lesen Sie die Lizenzvereinbarung (License Agreement) und nehmen
Sie diese an (accept), klicken Sie danach auf Next.
Geben Sie im folgenden Fenster Ihre Nutzerdaten (Benutzername
-User Name- und Organisation) in die entsprechenden Felder ein,
klicken Sie auf Next.
Klicken Sie auf Install, damit das Programm die notwendigen Dateien
auf Ihr System kopiert. Die Fortschrittsanzeige gibt den Fortgang der
Installation wieder.
Klicken Sie auf Finish wenn die Installation abgeschlossen ist. Das
MSI Wireless LAN Icon erscheint nun im Statusbereich der Taskleiste
unten rechts.
MSI Wireless LAN Icon
18
Schnellstartanleitung
Verbindung zum Netzwerk
Nach der Installation der Software wartet die MSI WLAN-Karte mit
einem bequemen und leistungsfähigem Utility auf, das es Ihnen
gestattet, Ihre Karte leicht und übersichtlich einzurichten, zu
konfigurieren und den Status Ihrer Verbindung zum Netzwerk zu
überwachen.
Ihre MSI WLAN Karte kann in zwei Netzwerkmodi verwendet werden:
“Infrastructure mode” und “Ad-hoc mode”.
Der “Infrastructure Mode” gestattet es Ihrem Computer, mit anderen
Rechnern im Netzwerk über einen Access Point zu kommunizieren.
Herstellung der Verbindung zu einem Access Point:
1. Klicken Sie auf das MSI Wireless LAN Icon, um das Fenster
“Wireless Network Connection” aufzurufen.
2. Wählen Sie in der Liste der verfügbaren WLANs Ihres durch
anklicken und hervorheben aus und klicken Sie dann auf
“Connect”.
Anklicken
Auswählen
19

Verbindung zum Netzwerk (2)
Erweiterte Einstellungen für den “Infrastructure Mode”
Befolgen Sie die folgenden Anweisungen, um erweiterte Einstellungen
im “Infrastructure Mode” vorzunehmen.
1. Klicken Sie auf “Advanced” im Fenster “Wireless Network
Connection”.
2. Klicken Sie auf “Refresh”, um erneut nach den verfügbaren
Access Points im Netzwerk zu suchen. Das Ergebnis wird im
Feld “Available Networks” präsentiert.
3. Wählen Sie ein Netzwerk (einen Access Point) aus und klicken
Sie auf “Configure”, um den Zugang zum ausgewählten Netzwerk
zu konfigurieren.
4. Aus Gründen der Sicherheit können Sie den Schlüssel des
Netzwerks (Network Key) und die Authentifikation festlegen.
5. Klicken Sie auf “OK”, um die Konfiguration zu vervollständigen.
Das MSI Wireless LAN Icon zeigt den Verbindungsstatus an.
20
Schnellstartanleitung
Verbindung zum Netzwerk (3)
Der “Ad-hoc Mode” ermöglicht es Ihrem Rechner, direkt mit jedem
Computer Verbindung aufzunehmen, der mit einer kompatiblen
WLAN-Karte ausgestattet ist.
Herstellung einer “Ad-hoc” Netzwerkverbindung:
1. Klicken Sie auf das MSI Wireless LAN Icon um das Fenster
“Wireless Network Connection” aufzurufen. Klicken Sie als
nächstes auf “Advanced”.
2. Klicken Sie auf “Add”
3. Stellen Sie den Netzwerknamen (SSID) und Netzwerkschlüssel
(Network Key – sofern notwendig) ein, um eine “Ad-hoc”
Netzwerkverbindung herzustellen.
Markieren Sie die Option “This is a computer-to-computer [ad
4.
hoc] network; wireless access points are not used”
(ausschließlich Verbindung von Rechner zu Rechner, keine
Access Points verwendet). Klicken Sie dann auf “OK”, um den
“Ad-hoc mode” zu aktivieren und kehren Sie zum Fenster
“Wireless Connection” zurück.
21
Verbindung zum Netzwerk (4)
Geben Sie einen
Netzwerknamen
(SSID) ein
Einstellung des
WEP (Verschlüsselung) und der
Authentifizierung
Hier Haken
setzen
5. Klicken Sie auf “OK”, um die Konfiguration abzuschliessen.
Das MSI Wireless LAN Icon zeigt den Verbindungsstatus an.
Der Computer, der dieses “Ad-hoc” Netzwerk begründet, ist der
administrierende Rechner des Netzwerks. Weitere Rechner können
dem Netzwerk durch Auswahl von “Connect” im Fenster “Wireless
Network Connection” beitreten.
22

FRANÇAIS
Avant de commencer
Ce Guide d’Installation Rapide peut être utilisé pour n’importe quel
adaptateur de réseau sans-fil MSI. Ce guide permet une installation
facile étape par étape pour vous aider à monter un réseau rapidement et
facilement. Pour plus d’informations, référez vous au guide de
l’utilisateur. Pour les dernières informations ou un support technique,
visitez le site MSI à http://www.msi-computer.fr.
Comment Utiliser ce Guide
Si vous voulez… rendez vous…
installer votre adaptateur réseau sans-fil page 25 ~ 26
installer le logiciel page 27 ~ 28
connecter le réseau page 29 ~ 32
24
e
Guide Rapide De Debut
Installation Matériel
Si vous avez un adaptateur CardBus (MS-6835)
Repérez le slot CardBus de votre ordinateur, puis insérez l’adaptateur
CardBus dans le slot.
Installation de l’adapteur d
Cardbus
Pour retirer l’adaptateur CardBus,
Appuyez sur le bouton d’éjection
du slot. Puis, poussez le bouton
d’éjection et l’adaptateur CardBus
sortira lentement. Tirez le hors du
slot.
Slot carte PC
Bouton d’éjection
Notez qu'avant de retirer
l’adaptateur CardBus, vous devez
stopper l’appareil sous Windows.
25
Installation Matériel (2)
Si vous avez un adaptateur PCI (MS-6834)
Premièrement, vérifiez que le système est éteint. Ouvrez l’unité
centrale et repérez un port PCI libre sur la carte mère. Insérez
fermement l’adaptateur PCI dans le slot ; puis, sécurisez le en le
vissant au support. Refermez l’unité centrale et connectez l’antenne
externe.
Slot PCI
Si vous n’êtes pas assez compétent pour installer l’adaptateur PCI,
demandez à votre revendeur ou à un technicien de vous aider.
Installation de
l’adaptateur PCI
26
Guide Rapide De Debut
In stall ation Logi ciel
Après avoir installé l’adaptateur sans-fil sur votre ordinateur et avoir
allumé l’ordinateur, le système d’exploitation détectera un nouveau
périphérique et démarrera sa configuration automatiquement.
ANNULEZ l’aide à l’installation de nouveau périphérique pour
installer les bons drivers et l’utilitaire InstallShield Wizard depuis
votre CD.
X
Insérez le CD logiciel dans votre lecteur CD-ROM, le programme de
setup se lancera automatiquement.
Si le programme d’autorun ne se lance pas automatiquement, cliquez
sur le menu Démarrer et sélectionnez Exécuter…. Tapez
E:\setup.exe (où E est votre lecteur CD-ROM) dans la fenêtre
Exécuter et cliquez sur OK pour lancer l’installation automatique.
L’écran principal du programme de Setup apparaîtra comme ci dessous.
Cliquez sur le bouton d’Installation Logiciel.
27
In stall ati on Logiciel (2)
Y
Z
[
L’écran de bienvenu d’InstallShield apparaîtra. Cliquez sur Next.
Lisez et acceptez la licence ; puis cliquez sur Next.
Dans la fenêtre suivante, entrez les informations utilisateurs (Nom
d’utilisateur et Organisation) dans les champs respectifs ; puis cliquez
sur Next.
Cliquez sur Install et le programme copiera les fichiers nécessaires.
L’indicateur de progression vous montre le statut de l’installation.
Cliquez sur Finish quand l’installation est complète. L’icône MSI
Wireless LAN apparaîtra dans la barre des statuts.
Icône MSI de réseau sans fil
28
Guide Rapide De Debut
Connexion Réseau
Après l’instalaltion logiciel, l’adaptateur MSI sans-fil vous permet, à
l’aide d’un utilitaire pratique et puissant, de configurer et de connaître
le statut de votre réseau.
Votre adaptateur MSI sans-fil peut être utilisé selon deux modes
réseau : Infrastructure mode et Ad-hoc mode.
Infrastructure Mode : permet à votre ordinateur de communiquer
avec les autres ordinateurs du réseau à travers un accès point.
Pour connecter l’acces point :
1. Cliquez sur l’icône MSI Wireless LAN pour arriver à la fenêtre
Wireless Network Connection.
2. Dans la liste des réseau sans-fil joignable, sélectionnez (en
surbrillance) le réseau désiré, et cliquez sur Connect.
cliquer
choisir
29
Connexion Réseau (2)
Réglages Avancés pour le Mode Infrastructure
Suivez les instructions ci-dessous pour configurer les réglages avancés
du mode infrastructure.
1. Cliquez sur Advanced dans la fenêtre de connexion réseau sans fil.
2. Vous pouvez cliquez sur Refresh pour chercher l’accès point au
réseau. Le résultat sera affiché dans le champ des réseaux valides.
3. Sélectionnez le réseau (Access Point) que vous désirez et cliquez
sur Configure pour régler le réseau sélectionné.
4. Pour plus de sécurité, vous pouvez configurer la clé et
l'authentification réseau.
5. Cliquez sur OK pour terminer la configuration. L’icône MSI
Wireless LAN indiquera le statut de la connexion.
30
 Loading...