

Page 1

FCC Statement
The changes or modifications not expressly approved by the party responsible for compliance
could void the user’s authority to operate the equipment
User information
This device complies with part 15 of FCC Rule Operations is subject to the following two
conditions:
(1) This device may not cause harmful interference, and
(2) This device must accept any interference received, including interference that may cause
undesired operation.
To comply with FCC RF exposure requirement, this device and its antenna must not be
co-located or operating in the conjunction with any other antenna or transmitter.
Bluetooth ID: B01433
Page 2

APPENDIX
Hiermit erklärt Micro Star International CO., LTD dass sich dieses Produkt in Übereinstimmung mit den grundlegenden
Anforderungen und den anderen relevanten Vorschriften der Richtlinie 1999/5/EG befindet.
Die Konformitätserklärung kann auf folgender website eingesehen werden:
http://www.msi-technology.de/support/dl_man.php?Prod_Typ=9
Hereby, Micro Star International CO., LTD declares that this device is in compliance with the essential requirements and other
relevant provisions of Directive 1999/5/EC.
The respective Declaration of conformity can be found online:
http://www.msi-technology.de/support/dl_man.php?Prod_Typ=9
Europe: Frequencies: 2.400 – 2.4835 GHz, 79 channels
France: Outdoor use limited to 10 mW within the band; Frequencies: 2.454 – 2.4835 GHz, 23 channels
Italy: If used outside of own premises, general authorisation is required
Notified Countries:
Germany, UK, Netherlands, Belgium, Norway, Sweden, Denmark, Finland, France, Italy, Spain, Austria, Iceland, Ireland, Portugal,
Greece, Luxemburg and Switzerland
Bestimmungsgemäße Verwendung:
Diese Produkt wird an den USB-Anschluß des PC (oder Hub) angeschlossen. Der USB Dongle verbindet PCs über eine
Funkverbindung . Es kann auch eine Funkverbindung zu anderen geeigneten Bluetooth-Geräten hergestellt werden.
Prescribed use:
This is prepared to be connected to any USB-Port of PCs (or Hubs). The USB Dongle sets up a radio link between to PCs.
Additional it is possible to link to any other Bluetooth device which stick to the Bluetooth requirement.
Hinweise zur Reichweite:
Der Abstand zwischen Sender und Empfänger (von einem Bluetooth-Gerät zu einem Bluetooth-Gerät) hängt stark von der
Einsatzumgebung ab. Wände, Betonboden (Eisen), beschichtete Fensterscheiben, Fahrzeug-Karosserie, etc..
Weitere Beeinflussungen:
- Hochfrequenzaussendungen jeder Art
- Gebäude, Bäume, etc.
- Heizkörper, Stahlbeton, etc.
- offen betriebene Computer, etc.
- Mikrowellenherde, etc,
Die Kommunikation zwischen unterschiedlichen Bluetooth-Geräten ist von der jeweiligen Software und dem entsprechenden
Versionsstand abhängig
Operating range:
devices varies depending the specific environment. Walls, concrete floor (iron), laminated windows, vehicle-body, etc..
The transmission range between different Bluetooth
More electromagnetic interferences:
- high frequency emission of any kind,
- Buildings, trees, etc.
- Heaters, ferroconcrete, etc.
- open computer systems, etc.
- Microwave oven, etc,
Communication (exchange data) is dependent on the software concerned the Bluetooth devices.
Page 3
Content
1. English 1
2. Deutsch 11
3. Français 23
4. Español 35
5. Italiano 45
6. NEDERLANDS 55
7. česky 65
8. PORTUEGUÊS 75
9. 85
10. 95
11. 107
12. 117
13. 127
14. 137
15. 简体中文 147
16. 繁體中文 155
Page 4

ENGLISH
1
Page 5

Introduction
This Wireless headset is based on Bluetooth technology, connects to
a compatible phone without wires. It converts easily your mobile
phone communication to the headset. This headset integrated with
CSR BC02 and LTCC technology, provides fast and reliable voice
transmission.
Note: This bluetooth headset just supports “call receiving”
function, if the bluetooth phone only has headset profile,
without handsfree profile.
It doesn’t support a bluetooth phone without headset
and handsfree profile, such as Nokia 7650.
The following page of this user manual focus on how to use this
product
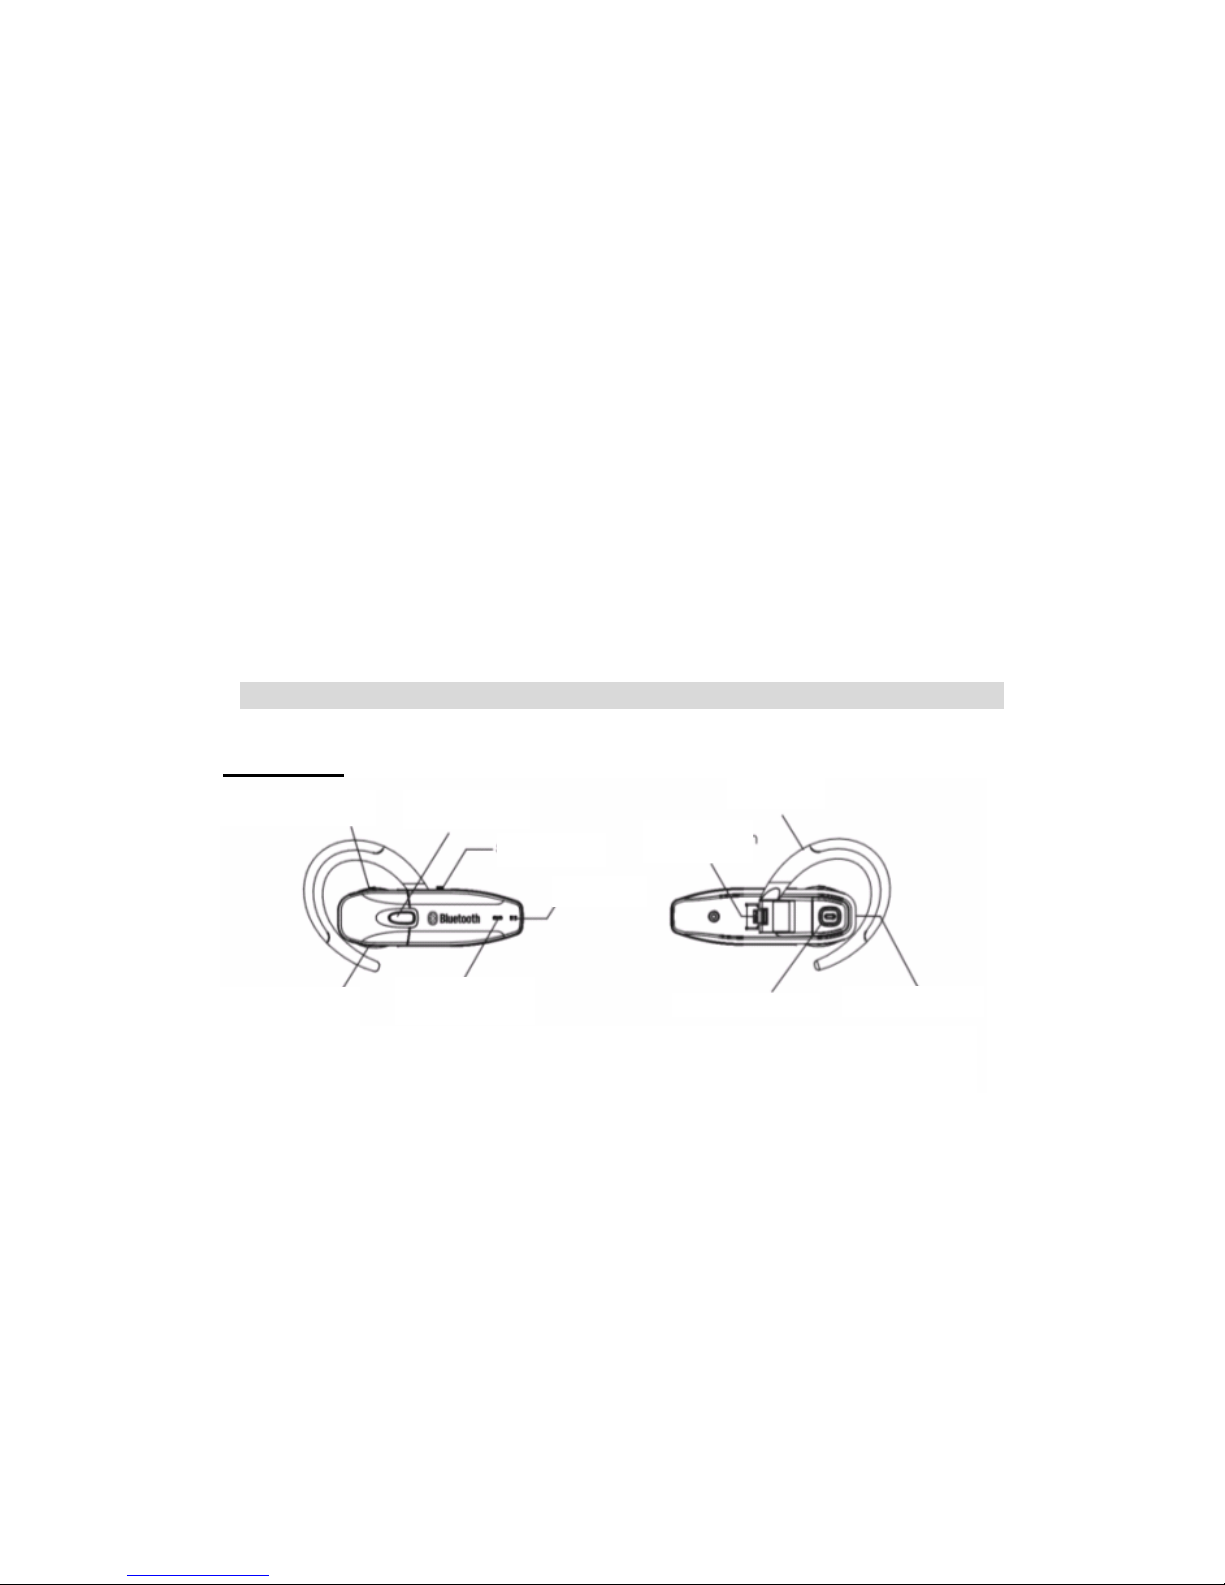
Overview
2
Page 6
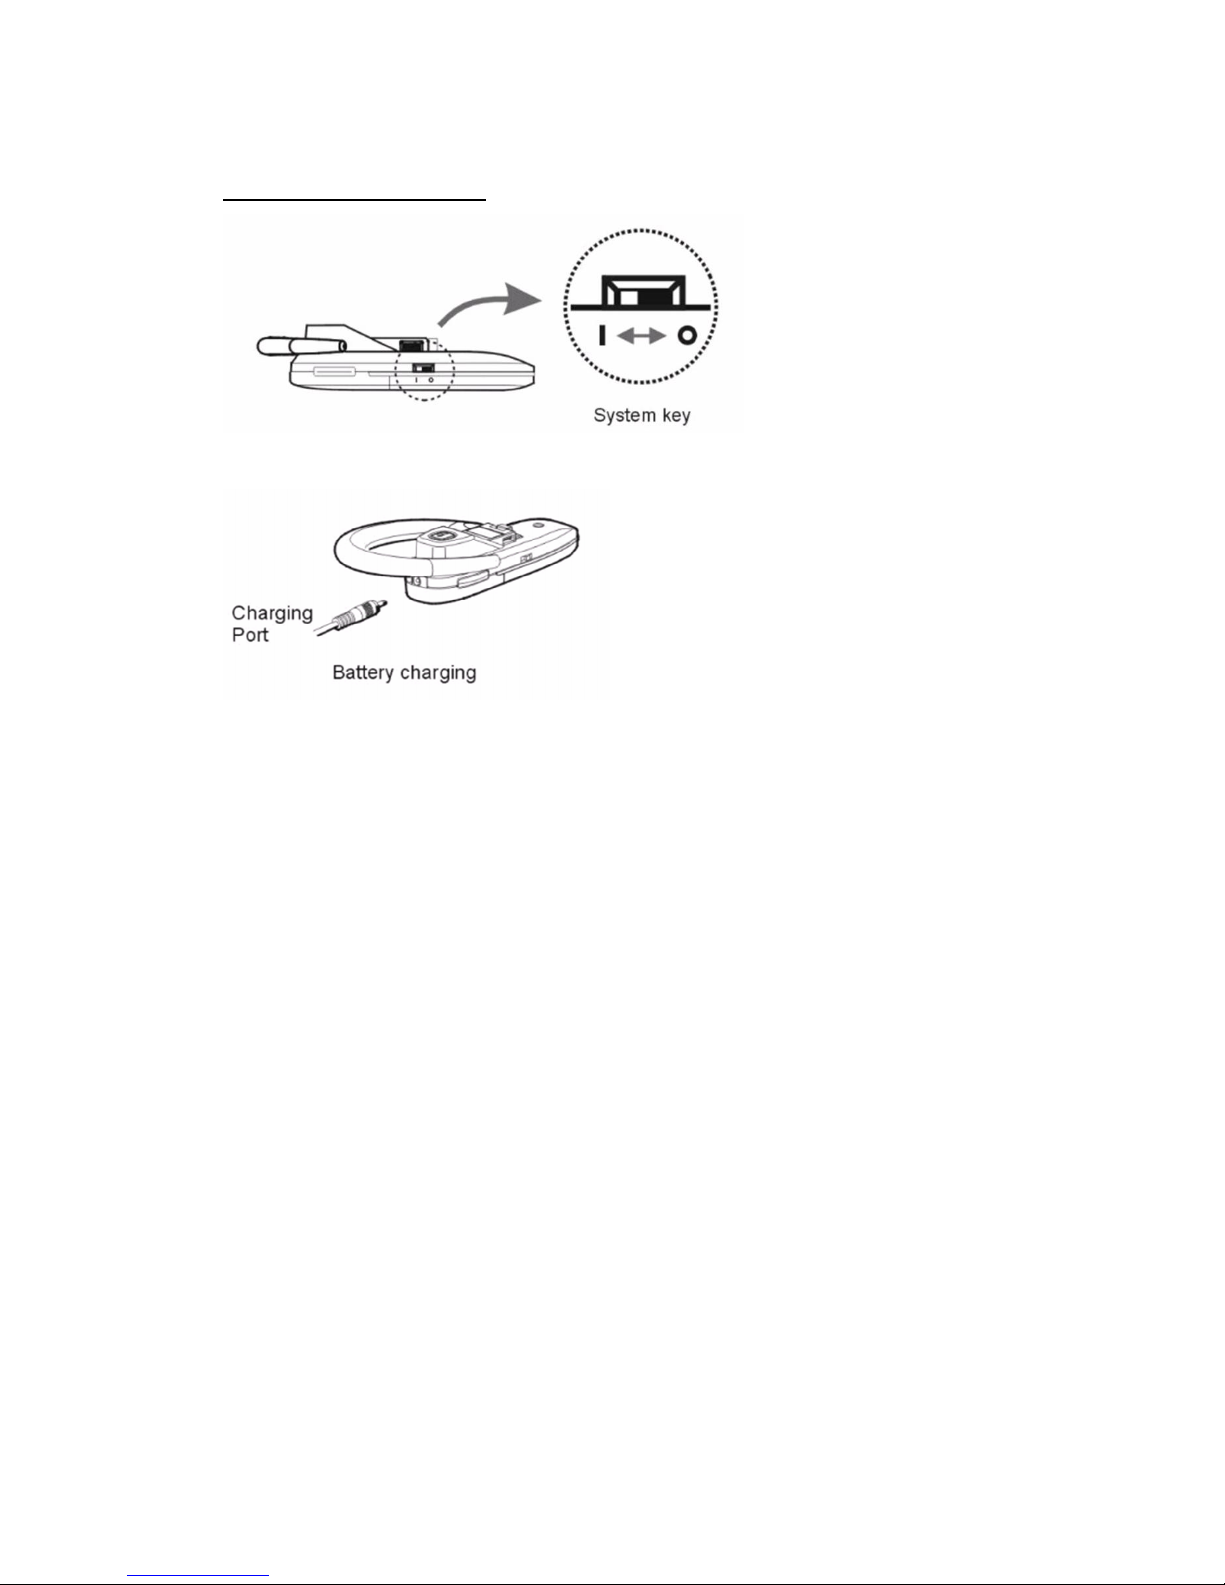
Getting started
Charging the battery
This headset is equipped with a lightweight and durable Lithium
Polymer rechargeable battery and must be charged prior use.
1. Please switch the "System key" to " I " position to turn on the
system.
2. Please plug the charger into the charging port of the headset and
the headset will automatically turn off.
3. The RL indicator will light on while charging and will light off until
fully charged.
Note:
- Charging with USB on the PC or notebook
a. Connect the USB cable to the charger connector on the
headset.
b. Connect the other end of USB cable to the USB port on
the PC or notebook
- Please switch the System Key off, if you wouldn't use this
headset for a period time (said 2 months) to keep headset
in good protection.
- Please do not use the headset during charging.
- Please use the provided charger only.
- When the LED indicator flashes RL means the battery level
is low and should be recharged.
3
Page 7

- With battery fully charged the talk time will be 5 to 6 hours
and the stand-by time will be about 200 hours.
Switch ON/OFF
1. Switch ON: press the on/off key for 2-3 seconds, you will see that
BL flashes fast for 1.5 seconds, then, keeps flashing slowly.
2. Standyby Mode: Headset switches to standby mode from link mode
automatically, to save the power. The BL flashes once in each 3
seconds
3. Switch OFF: press the on/off key for 2-3 seconds, you will see that
RL flashes fast for 1.5 seconds, then, both RL and BL are off.
Note:
- Do not press on/off key more than 7~8 seconds when
turning on the headset; otherwise, it may go into pairing
mode. If that happens, please short press the on/off key
and it will go into conversation status and then short press
on/off key again it will go into stand-by mode.
Pairing
Before using this headset, you have to pair it with a Bluetooth enabled
device. You pair the headset with the phone by adding it to the pairing
list in the phone. Then two devices will recognize each other when
they connect.
1. Ensure that your headset is powered off before initiating the pairing.
2. Press the on/off key for 7~8 seconds, you will see that the BL
flashes fast for 5 times, then off for 2 seconds, then BL on RL off
followed by BL off RL on continuously, indicating that the headset is
in its pairing mode.
3. Make sure the Bluetooth capability of mobile phones are turned on
to search and pair with this headset.(For the details, please refer to
the manual of your mobile phones.)
4. Your phone will find the headset and list "MSI FREE TALK FT200"
under "Found Device".
5. Select "MSI FREE TALK FT200" to begin the pairing.
6. Enter the PIN number "1234" and press confirm or yes key in your
mobile phone when asked to do so by your mobile phone.
4
Page 8
7. The RL is off and BL flashes slowly after pairing. Then, the headset
is in its stand-by mode.
8. You can use your headset now.
Note:
- You only need to pair the headset with your mobile phone at
the first time. You do not need to redo the pairing process
until you want to use it with another mobile phone.
- If no pairing is possible for a period of time, the headset will
automatically turn to "Power On" mode however you can't
use it and you have to repeat the steps 1~3 to pair again.
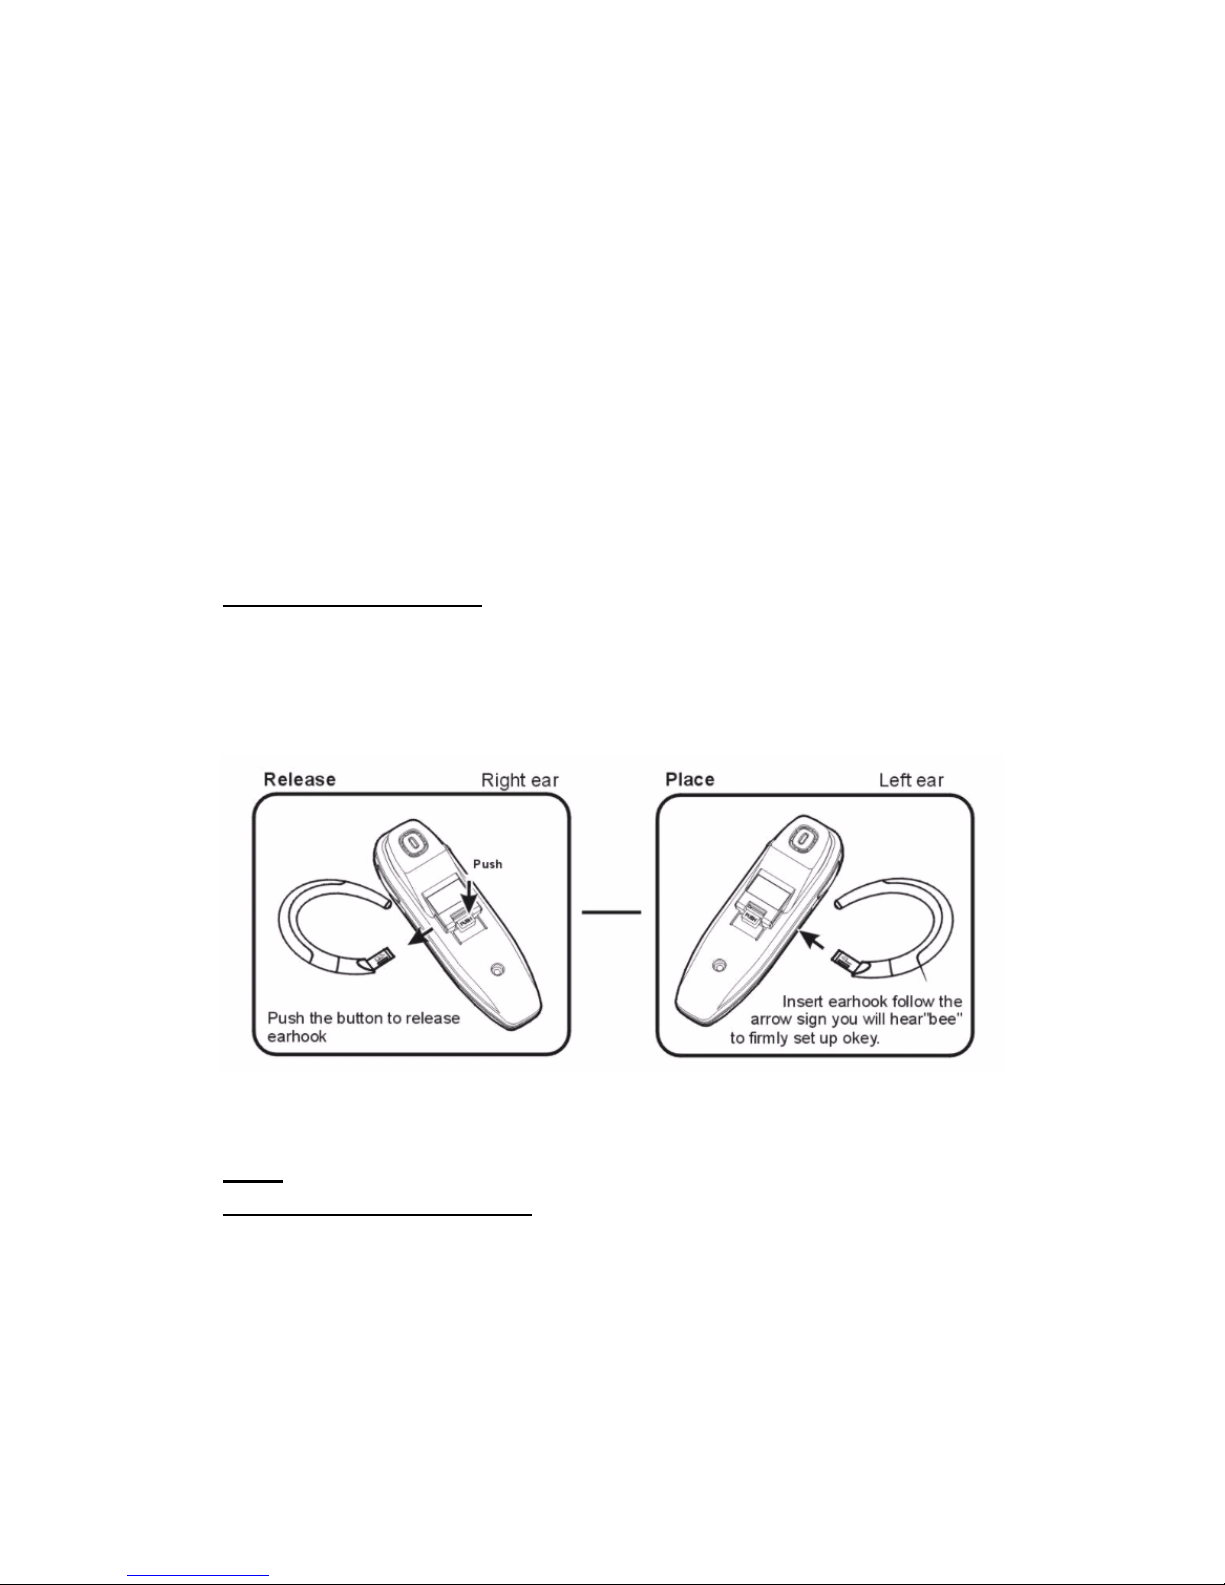
To wear the headset
1. Please put the ear hook behind your ear and the microphone
toward your mouth.
2. You may change the ear hook for right ear or left ear following the
next two graphs.
Calls
Answering a coming call
1. When headset is in its stand-by mode and your mobile phone rings,
headset will start to ring after the 2nd or 3rd ring of your mobile
phone. Then, press the on/off key to answer the call. If headset
does not ring after the 4th ring of your mobile phone, you may
answer the call through headset by pressing the on/off key.
2. During your conversation, the BL will flashes twice every second.
5
Page 9

3. If you answer the coming call through your phone, the voice will
remains on the phone. Press the on/off key briefly to transfer the
voice to the headset.
4. The maximum working distance between this headset and mobile
phone is 5 meters indoor and 5~10 meters outdoor.
Ending a call
To end a call, press the on/off key again or the phone's End Key once.
Making a call
When the headset is connected to your phone, make a call by using
your phone in the normal way.
Making a voice dialing
(If your mobile phone supports this function)
1. In stand-by mode, short press the on/off key to initiate voice dial.
2. During voice dial set up, short press the on/off key again to cancel
voice dial.
Redailing the last dialing number
(If your mobile phone supports this function)
1. In standby mode, press the Volume up key or Volume down key for
2 seconds, the mobile phone will redial its last calling number.
2. Short press the on/off key will end the call.
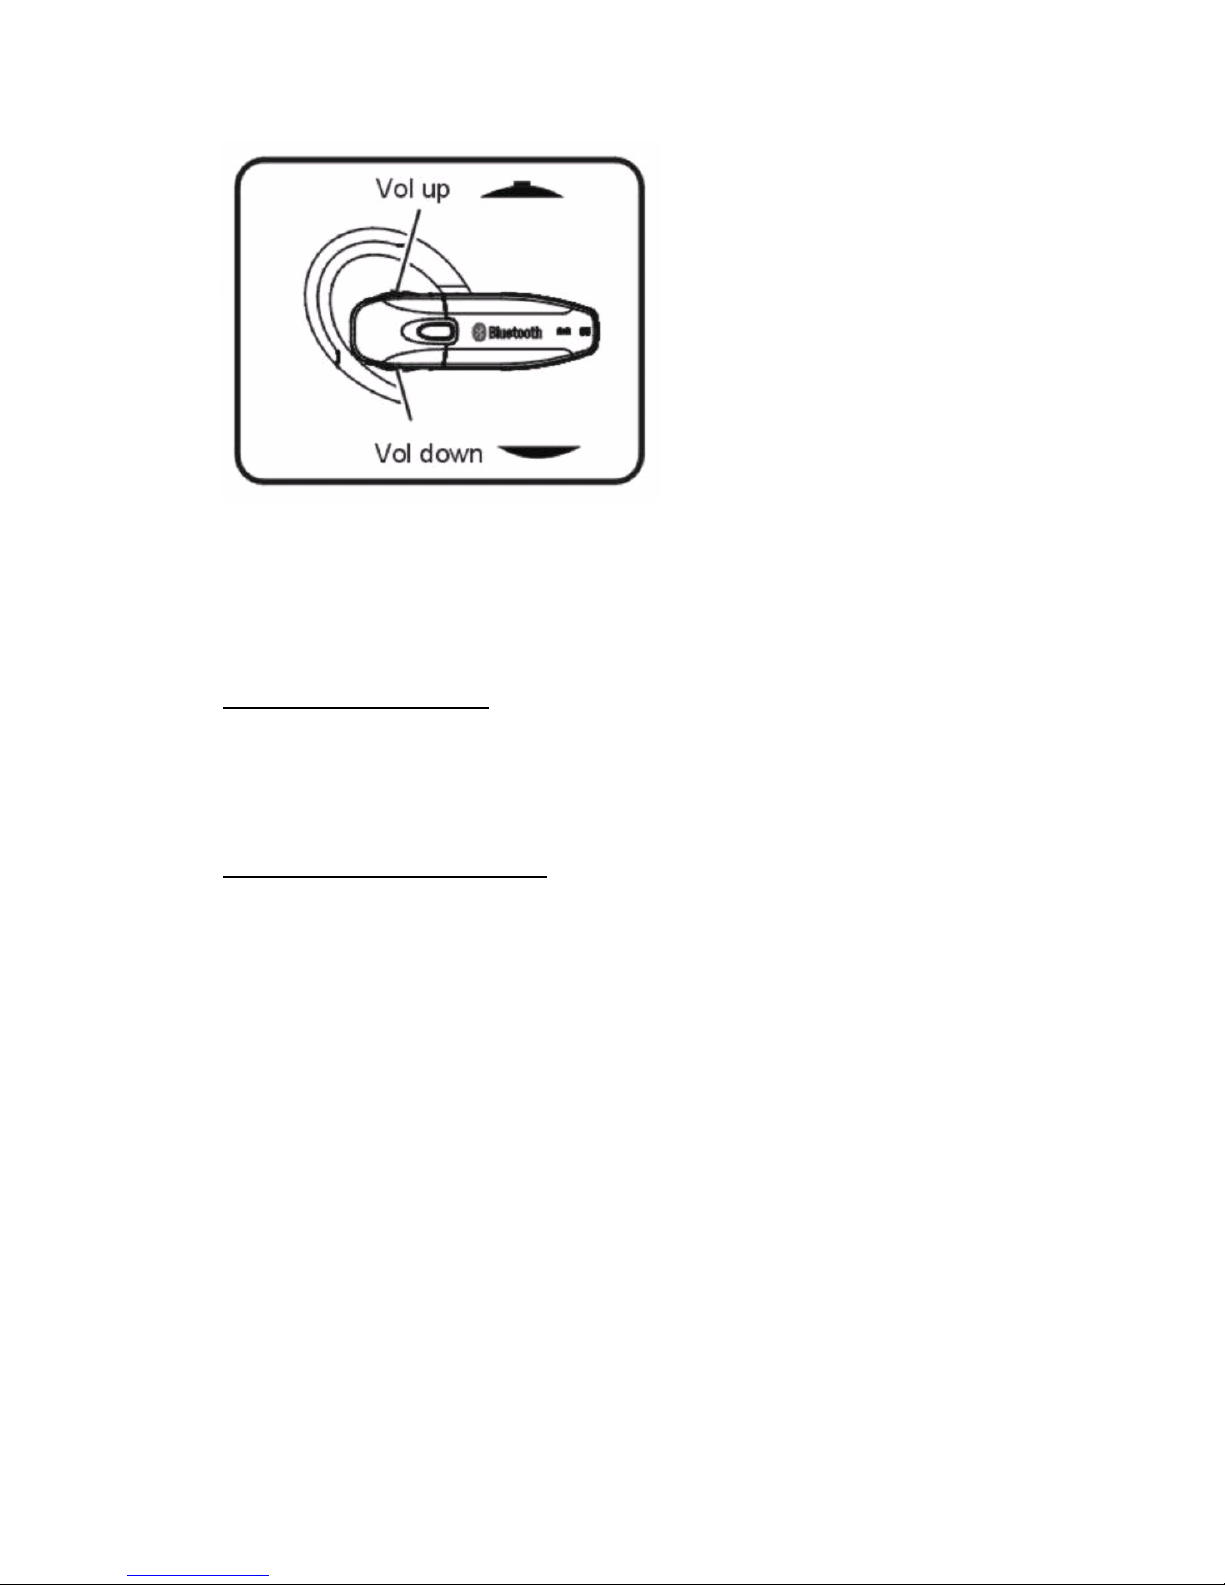
Volume control
During conversation,
1. Press the Volume up key to increase the speaker volume.
2. Press the Volume down key to decrease the speaker volume.
3. Press the Volume up key or Volume down key for 2 seconds until
you hear beeps to mute the microphone.
4. Short press the Volume up key or Volume down key again to
un-mute the microphone.
6
Page 10
Remark!! to reduce echo
If you hear echo of your voice, you may need to adjust volume level of
the headset to reduce echo.
Reject a coming call
1. When you receive a call, the headset rings, and the blue LED
flashes fastly 3 times at each 3 seconds.
2. Long press the on/off key to reject the call.
Connect with a PC or PDA
You are allowed to connect the Headset with a Bluetooth enabled PC
or PDA that is supported by Audio Gateway Profiles. Please refer to the
user manual of your Bluetooth enabled PC or PDA for more
information.
Note
Microsoft® Windows® XP_SP2 built-in Bluetooth driver
currently does not support AV profile & Headset profile
Important Information
Troubleshooting
1. No indication of charging is shown.
If Headset battery is empty or has not been used for a long
time it may take a couple of minutes for the Headset
7
Page 11

indicator to show the charging status with a steady red
light.
2. If you cannot connect the headset to your phone:
-Make sure that the headset is switched on and paired with
your phone.
-Make sure that the Bluetooth feature is activated on your
phone.
-Check if the headset is within a maximum of 10 meters of
your phone and that there are no obstructions, such as
walls, or other electronic devices between the headset and
the phone.
-The pairing information list of the headset may be full. The
headset can store the information of up to 8 phones at a
time. If the list becomes full, reset the headset to the
original settings.
-If the headset does not respond to your actions, remove
the battery for a short while.
Product care and maintenance
-Keep the headset dry. Precipitation, humidity and all types
of liquids or moisture can contain minerals that could
corrode electronic circuits.
-Do not use or store the headset in dusty, dirty areas. Its
moving parts can be damaged.
-Do not store the headset in hot areas. High temperatures
can shorten the life of electronic devices, damage batteries,
and warp or melt certain plastics.
-Do not store the headset in cold areas. When it warms up,
moisture can form inside, which may damage electronic
circuit boards.
-Do not attempt to open the headset. Non-expert handling
may damage it.
8
Page 12

-Do not drop, knock or shake the headset. Rough handling
can break internal circuit boards.
-Do not use harsh chemicals, cleaning solvents, or strong
detergents to clean the headset.
-Do not paint the headset. Paint can clog the moving parts
and prevent proper operation.
Children
Keep all accessories out of the reach of small children.
Battery Information
● New batteries
For first time use plug the adapter into the Headset and
charge it at least 4 hours until the red indicator turns off.
● Battery care
-The rechargeable battery has a long service life if treated
with good care.
-Temperature extremes can affect the ability of your battery
to charge.
-Use the battery only for its intended purpose.
-Never use any charger or battery when it is damaged.
-Leaving the headset in hot or cold places, such as in a
closed car in summer or winter conditions will reduce the
capacity and lifetime of the battery. Always try to keep the
battery between –10℃ and 45℃. A headset with a hot or
cold battery may not work temporarily, even when the
battery is full charged.
-Do not dispose a battery in a fire. Dispose the batteries
according to local regulations. Do not dispose as
household waste.
About Pairing
● What is Pairing?
Pairing is a process of associating Bluetooth devices with
9
Page 13

each other. It will establish a permanent security link
between the devices and enable quick access to the
services provided without the need to enter passkeys.
● Bluetooth Passkey
Each headset has a default passkey 1234 for pairing,
which is stored in its internal memory. You are usually
required to enter the passkey 1234 in a pairing process
with a Bluetooth mobile phone or other devices, however it
depends on the kind of Bluetooth device that the headset
is to connect to. Please refer to the user’s manual of the
devices for the specific operation.
● Paired devices remain paired even when:
- One of the devices is not powered on.
- A service connection is interrupted or the service has
stopped
- One or both devices are rebooted.
10
Page 14

DEUTSCH
11
Page 15
Einführung
Entriegelung
Sprechmuschel
Dieses Wireless Headset funktioniert auf der Grundlage der
Bluetooth-Technologie und kann drahtlos mit einem kompatiblen
Handy verbunden werden. Problemlos werden die Gespräche vom
Handy auf das Headset übertragen. Eine schnelle und zuverlässige
Tonübertragung wird durch die integrierten Technologien CSR BC02
und LTCC ermöglicht.
Hinweis: Wenn das Bluetooth-Handy nur auf die
Headsetfunktion (ohne Freisprechfunktion) eingestellt
ist, unterstützt das Bluetooth-Headset den Empfang
von Anrufen.
Es unterstützt keine Bluetooth-Handys ohne Headsetund Freisprechfunktion (z.B. Nokia 7650).
Auf der folgenden Seite wird die Bedienung des Geräts beschrieben.
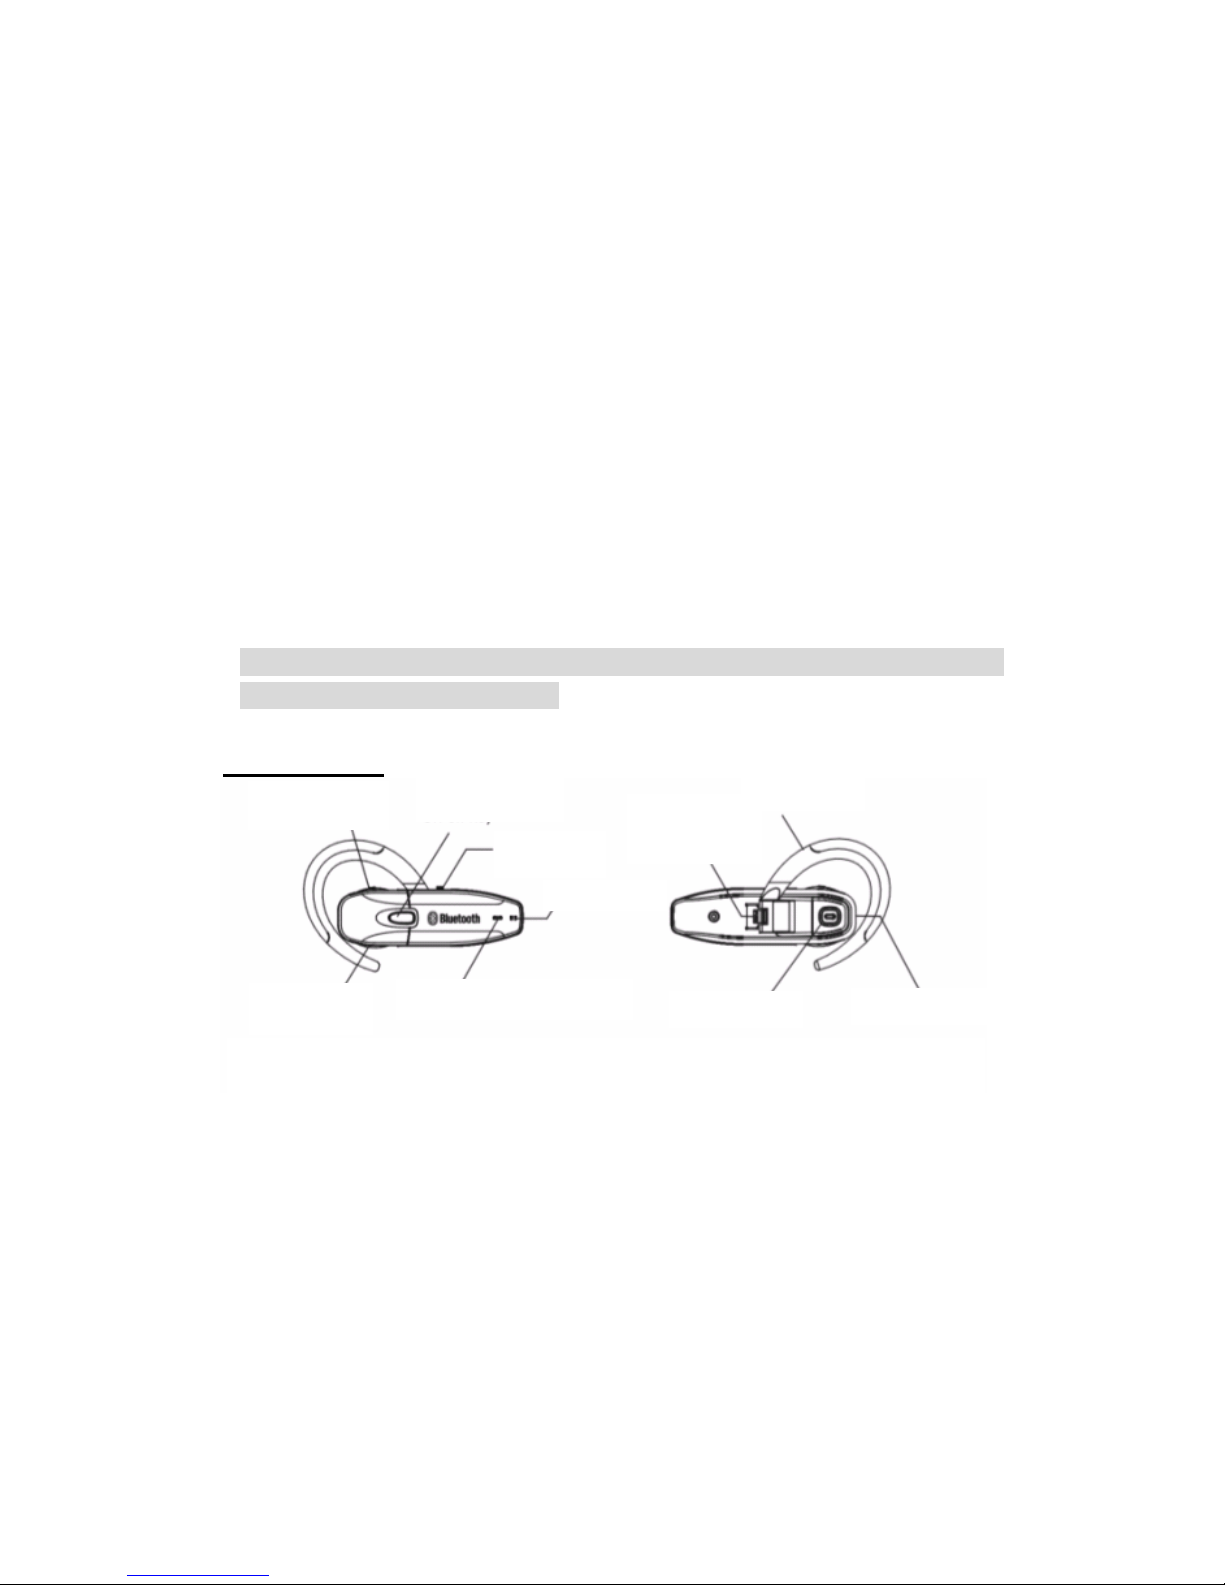
Übersicht
Lautstärke erhöhen
Ein/Aus-Taste
Ohrbügel
Systemtaste
Mikrofon
Lautstärke verringern
Hinweis: Im folgenden wird "RL" für die rote Statusanzeige und "BL" für die blaue Statusanzeige
verwendet.
LED-Anzeige
(Ohrbügel)
Ladeanschluss
12
Page 16

Erste Schritte
Aufladen des Akkus
Systemschalter
Ladeanschluss
Laden des Akkus
Dieses Headset ist mit einem extrem leichten und langlebigen
Lithiumpolymerakku ausgestattet, der vor der ersten Benutzung
aufgeladen werden muss.
1. Schieben Sie den "Systemschalter" auf die Position "I", um das
System einzuschalten.
2. Schließen Sie das Ladegerät an den Ladeanschluss des Headsets an.
Das Headset schaltet sich dann automatisch ab.
3. Während des Ladevorgangs leuchtet die RL-Anzeige. Sie erlischt,
wenn der Ladevorgang abgeschlossen ist.
Hinweis:
- Laden über den USB-Anschluss des PC oder Notebooks
a、 Schließen Sie das USB-Kabel an den Ladeanschluss des
Kopfhörers an.
b、 Schließen Sie das andere Ende des USB-Kabels an den
USB-Anschluss des PC oder Notebooks an.
- Schalten Sie das Gerät mit dem Systemschalter aus, wenn
Sie wissen, dass Sie es über einen längeren Zeitraum (z.B.
2 Monate) nicht verwenden werden.
- Verwenden Sie das Headset nicht während des
Ladevorgangs.
- Verwenden Sie nur das mitgelieferte Ladegerät.
13
Page 17

- Wenn die RL-Anzeige rot blinkt, ist der Akku fast leer und
sollte geladen werden.
- Bei einem voll geladenen Akku beträgt die Sprechdauer 5
bis 6 Stunden, die Standbydauer etwa 200 Stunden.
Ein-/Ausschalten
1. Einschalten: Drücken Sie 2-3 Sekunden lang auf die Ein/Aus-Taste,
um das Headset einzuschalten. Die BL-Anzeige blinkt dann 1,5
Sekunden lang schnell hintereinander, danach blinkt sie langsam.
2. Standbymodus: Das Headset wechselt automatisch vom
Verbindungsmodus in den Standbymodus, um Strom zu sparen.
Die BL-Anzeige blinkt dann alle 3 Sekunden einmal.
3. Ausschalten: Drücken Sie 2-3 Sekunden lang auf die Ein/Aus-Taste.
Die ersten 1,5 Sekunden blinkt die RL-Anzeige, dann erlöschen
beide Anzeigen (RL und BL).
Hinweis
- Drücken Sie beim Einschalten des Headsets nicht zu
lange auf die Ein/Aus-Taste (länger als 7 – 8 Sekunden),
da es sonst in den Pairingmodus wechselt. Wenn das
versehentlich passieren sollte, drücken Sie einmal kurz
auf die Ein/Aus-Taste, um das Gerät in den Sprechstatus
zu versetzen. Wenn Sie dann noch einmal kurz auf die
Ein/Aus-Taste drücken, wechselt es in den
Standbymodus.
Pairing
Bevor Sie dieses Headset das erste Mal benutzen, muss es mit einem
bluetoothfähigen Gerät "gepaart" werden. Das geschieht, indem Sie
das Headset in die Pairingliste des Handys aufnehmen. Dann
erkennen sich die Geräte gegenseitig, wenn sie verbunden werden.
1. Vor dem Pairing muss das Headset ausgeschaltet werden.
2. Drücken Sie 7 – 8 Sekunden lang auf die Ein/Aus-Taste. Die
BL-Anzeige blinkt dann fünfmal schnell hintereinander, leuchtet
dann 2 Sekunden lang gar nicht, und dann blinkt sie fünfmal im
Wechsel schnell mit der RL-Anzeige, um den Pairingmodus
anzuzeigen.
14
Page 18
3. Vergessen Sie nicht, vorher die Bluetoothfunktion des Handys
Rechtes Ohr
einzuschalten. (Lesen Sie dazu im Benutzerhandbuch des Handys
nach.)
4. Das Handy erkennt das Headset und führt es dann unter "Found
Device" (Erkannte Geräte) als "MSI FREE TALK FT200" auf.
5. Wählen Sie "MSI FREE TALK FT200", um den Pairingvorgang zu
starten.
6. Geben Sie die Pin-Nummer "1234" ein und drücken Sie auf die
Ja-Taste des Handys.
7. Nach dem Pairing ist die RL-Anzeige aus, und die BL-Anzeige blinkt
langsam. Das Headset befindet sich im Standbymodus.
8. Das Headset ist einsatzbereit.
Hinweis:
- Sie müssen nur einmal das Pairing für das Headset mit dem
Handy durchführen. Ein Pairing muss nur dann wieder
durchgeführt werden, wenn Sie das Headset mit einem
anderen Handy verwenden möchten.
- Wenn ein Pairing über einen bestimmten Zeitraum nicht
möglich ist, schaltet es sich automatisch ein, lässt sich aber
nicht verwenden. Führen Sie für das Pairing noch einmal die
Schritte 1 – 3 aus.
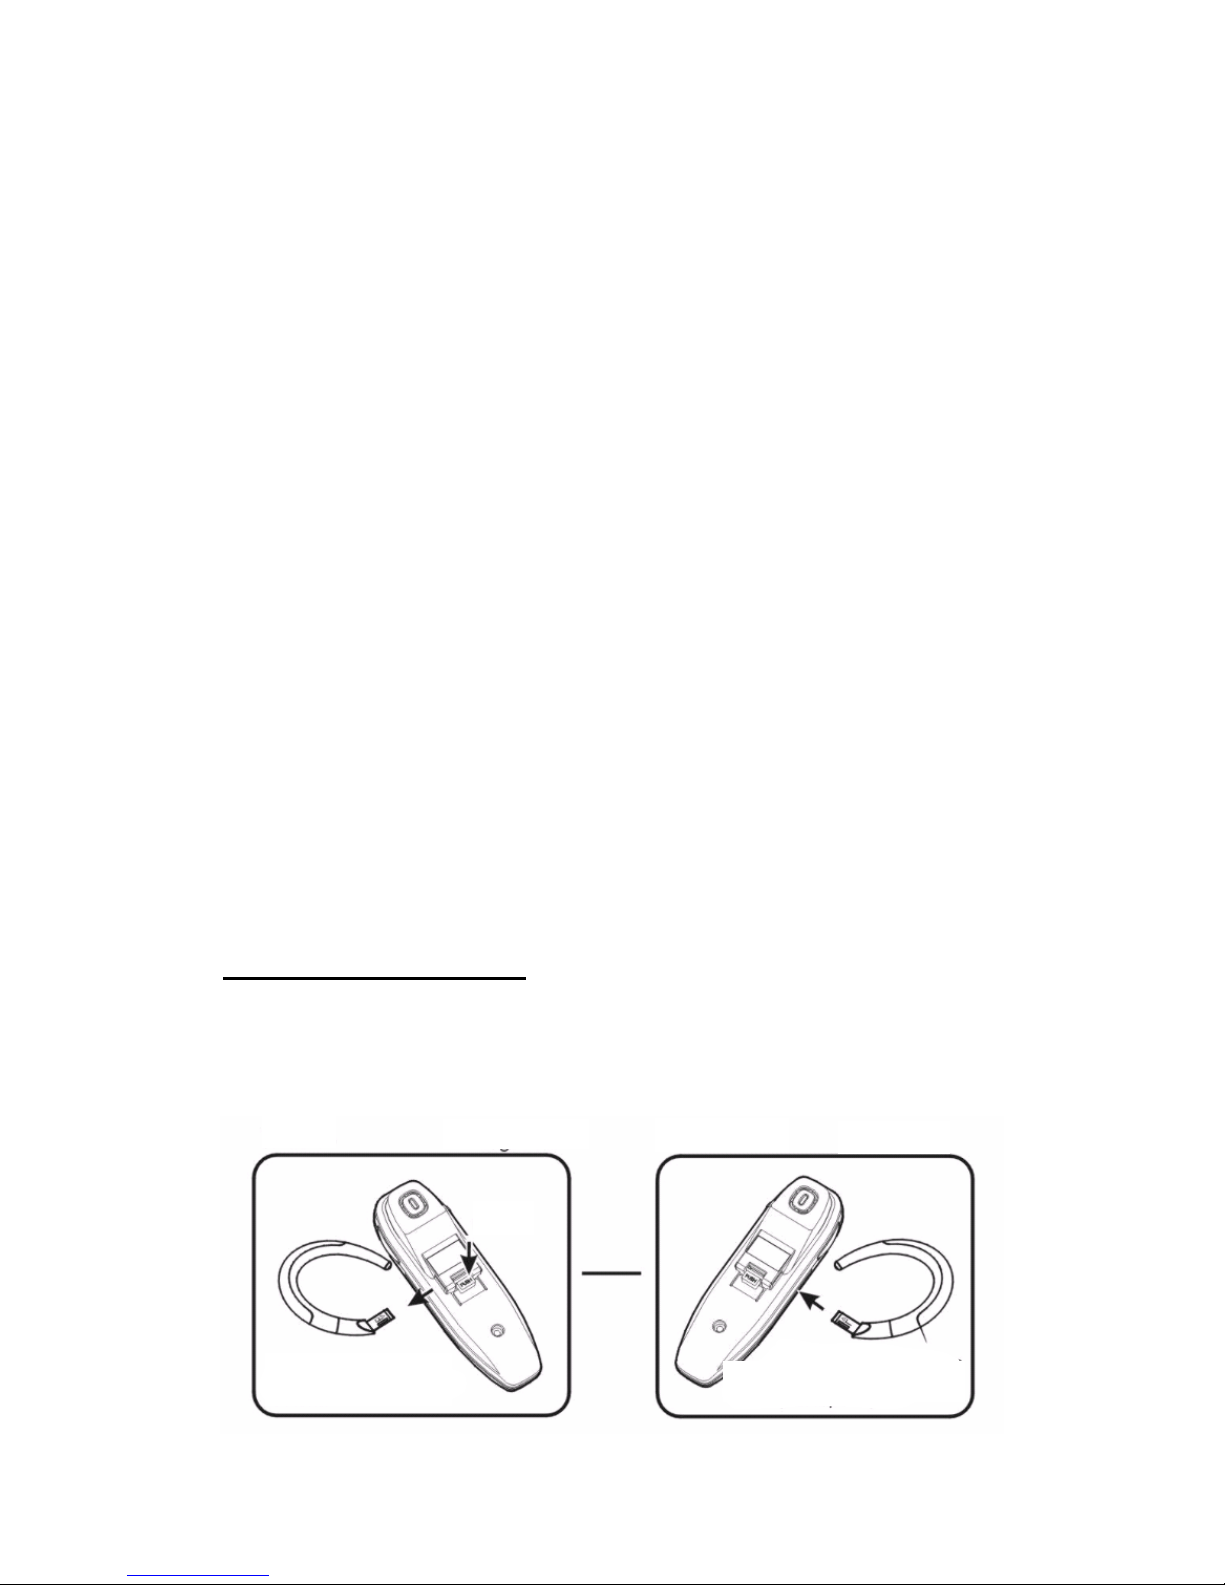
Aufsetzen des Headsets
1. Hängen Sie den Ohrbügel über Ihr Ohr, wobei das Mikrofon zu
Ihrem Mund gerichtet sein muss.
2. Sie können den Ohrbügel entsprechend der beiden Abbildungen so
anbringen, dass Sie es an beiden Seiten tragen können.
Lösen
Stoß
Zum Lösen des Bügels auf die
Taste drücken
Einstecken
Bügel in Pfeilrichtung einsetzen. Bei
korrektem Einsetzen ertönt ein Piepton.
Linkes Ohr
15
Page 19

Anrufe
Annehmen eingehender Anrufe
1. Wenn sich das Headset im Standbymodus befindet und das Handy
klingelt, beginnt das Headset nach dem 2. oder 3. Klingeln des
Handys ebenfalls zu klingeln. Drücken Sie dann auf die
Ein/Aus-Taste, um den Anruf anzunehmen. Wenn das Headset
nach dem 4. Klingeln des Handys nicht klingelt, können Sie den
Anruf durch Drücken der Ein/Aus-Taste annehmen.
2. Während des Gesprächs blinkt die BL-Anzeige zweimal pro
Sekunde.
3. Wenn Sie den Anruf am Handy annehmen, bleibt der Ton auf dem
Handy. Drücken Sie kurz auf die Ein/Aus-Taste, um den Ton auf das
Headset umzuleiten.
4. Die maximale Reichweite zwischen diesem Headset und dem Handy
beträgt in Räumen 5 m und im Freien 5 – 10 m.
Beenden eines Anrufs
Um einen Anruf zu beenden, drücken Sie noch einmal uaf die
Ein/Aus-Taste des Headsets oder auf die Auflegen-Taste des Handys.
Telefonieren
Wenn das Headset mit dem Handy verbunden ist, können Sie mit dem
Handy ganz normal telefonieren.
Sprachgesteuertes Wählen (Voice Dialing)
(Wenn diese Funktion von Ihrem Handy unterstützt wird.)
1. Drücken Sie im Bereitschaftsmodus (Standby) kurz auf die
Ein/Aus-Taste, um die Voice-Dialing-Funktion zu starten.
2. Drücken Sie während der Einstellung der Voice-Dialing-Funktion
kurz auf die Ein/Aus-Taste, um diese Funktion zu beenden.
Wahlwiederholung
(Wenn diese Funktion von Ihrem Handy unterstützt wird.)
1. Drücken Sie im Standbymodus 2 Sekunden lang auf die Taste
Lautstärke erhöhen/verringern. Dann wählt das Handy die zuletzt
verwendete Nummer.
16
Page 20
2. Wenn Sie kurz auf die Ein/Aus-Taste drücken, wird das Gespräch
beendet.
Einstellen der Lautstärke
Während des Gesprächs:
1. Drücken Sie auf die Taste "Lautstärke erhöhen", um die Lautstärke
zu erhöhen.
2. Drücken Sie auf die Taste "Lautstärke verringern", um die
Lautstärke zu verringern.
3. Drücken Sie 2 Sekunden lang auf die Taste "Lautstärke erhöhen"
oder "Lautstärke verringern", um das Mikrofon stummzuschalten.
4. Drücken Sie kurz auf die Taste "Lautstärke erhöhen" oder
"Lautstärke verringern", um den Ton wiederherzustellen.
Lautstärke erhöhen
Lautstärke verringern
Hinweis zum Echo!!
Wenn Sie ein Echo Ihrer Stimme hören, kann es möglicherweise
hilfreich sein, die Lautstärke des Headsets zu verringern.
Abweisen eines Anrufs
1. Bei einem eingehenden Anruf klingelt das Headset, und die
blaue LED-Anzeige blinkt alle 3 Sekunden dreimal schnell
hintereinander.
2. Drücken Sie etwas länger auf die Ein/Aus-Taste, um den Anruf
abzuweisen.
Anschließen an PCs und PDAs
Sie kö nnen das Headset an bluetoothfähige PCs und PDAs anschließen,
17
Page 21

die über die Audio-Gateway-Funktion verfügen. Lesen Sie dazu im
Benutzerhandbuch des bluetoothfähigen PCs oder PDAs nach.
Hinweis
Der bei Microsoft® Windows® XP_SP2 integrierte
Bluetoothtreiber unterstützt gegenwärtig nicht die AV- und
Headsetfunktion.
Wichtige Informationen
FEHLERBEHEBUNG
1. Der Ladevorgang wird nicht angezeigt.
Wenn der Headsetakku leer ist oder das Gerät über einen
längeren Zeitraum nicht benutzt wurde, kann es einige
Minuten dauern, bis die Ladeanzeige des Headsets mit
einem roten Dauerlicht den Ladestatus anzeigt.
2. Es kann keine Verbindung zwischen Headset und
Handy hergestellt werden:
- Stellen Sie sicher, dass das Headset eingeschaltet ist,
und führen Sie mit dem Handy ein Pairing durch.
- Stellen Sie sicher, dass bei Ihrem Handy die
Bluetoothfunktion aktiviert ist.
- Prüfen Sie, ob sich das Headset innerhalb der Reichweite
von maximal 10 m zum Handy befindet. Auch Hindernisse
wie Wände oder andere elektronische Geräte zwischen
Headset und Handy können die Verbindung stören.
- Möglicherweise ist die Pairing-Informationsliste des
Headsets voll. Das Headset kann Informationen von
maximal 8 Handys speichern. Wenn die Liste voll ist, muss
das Headset auf die ursprünglichen Einstellungen
zurückgesetzt werden.
- Wenn das Headset weiterhin nicht reagiert, entnehmen
für einen Moment den Akku.
18
Page 22

Pflege und Wartung
- Achten Sie darauf, dass das Headset nicht feucht oder
nass wird. Niederschläge, Feuchtigkeit und alle Arten von
Flüssigkeiten enthalten Mineralien, die zur Korrosion in
den elektronischen Schaltkreisen führen können.
- Bewahren Sie das Headset nicht in staubigen und
schmutzigen Umgebungen auf, da dadurch die
beweglichen Teile beschädigt werden können.
- Bewahren Sie das Headset nicht in zu warmen
Umgebungen auf. Durch hohe Temperaturen kann sich die
Lebensdauer von elektronischen Geräten verkürzen,
Batterien können beschädigt werden und Kunststoffteile
können sich verziehen oder schmelzen.
- Bewahren Sie das Headset nicht in zu kalten
Umgebungen auf. Wenn das Gerät wieder in die Wärme
kommt, kann die Feuchtigkeit im Innern kondensieren,
wodurch die elektronischen Schaltkreise beschädigt
werden können.
- Versuchen Die nicht das Headset zu öffnen. Bei
unsachgemäßer Behandlung kann es beschädigt werden.
- Das Headset darf nicht herunterfallen, anstoßen oder
erschüttert werden. Bei Gewalteinwirkung und
Erschütterungen können die internen Schaltkreise
beschädigt werden.
- Verwenden Sie zum Reinigen des Headsets keine
scharfen Chemikalien, Lösungsmittel oder starken
Reinigungsmittel.
- Tragen Sie keine Farbe auf das Headset auf. Durch die
Farbe können die beweglichen Teile blockiert und der
Betrieb beeinträchtigt werden.
Kinder
19
Page 23

Halten Sie alle Teile außerhalb der Reichweite von kleinen
Kindern.
Informationen zum Akku
● Neue Akkus
Wenn Sie das Headset das erste Mal benutzen,
schließen Sie es an das Stromnetz an und lassen Sie
den Akku mindestens 4 Stunden lang aufladen, bis die
rote Anzeigelampe erlischt.
● Pflege des Akkus
- Starke Temperaturschwankungen können die
Ladekapazität des Akkus verringern.
- Verwenden Sie den Akku nur für den ihm vorgesehenen
Zweck.
- Verwenden Sie Akku und Ladegerät nicht, wenn sie
beschädigt sind.
- Wenn Sie das Headset an sehr kalten oder sehr warmen
Orten liegen lassen, z.B. im Winter oder im Sommer in
einem verschlossenen Auto, verringert sich die
Ladekapazität und Lebensdauer des Akkus. Die
Umgebungstemperatur sollte immer zwischen –10℃ und
45℃ liegen. Wenn der Akku kalt ist, kann es auch bei voll
geladenem Akku zu vorübergehenden Funktionsausfällen
des Headsets kommen.
- Werfen Sie den Akku nicht in Feuer. Entsorgen Sie den
Akku entsprechend der regionalen Vorschriften. Geben Sie
ihn nicht in den normalen Hausmüll.
Über das Pairing
● Was ist Pairing?
Pairing ist der Vorgang, bei dem zwei Bluetoothgeräte
miteinander verbunden werden. Zwischen den Geräten
wird eine permanente, sichere Verbindung hergestellt, bei
20
Page 24

der ohne die Eingabe von Passwörtern ein schneller
Zugriff auf die Dienste möglich ist.
● Bluetooth-Passwort
Jedes Headset hat für das Pairing das Standardpasswort
1234, der in seinem internen Speicher gespeichert ist.
Normalerweise müssen Sie beim Pairingvorgang mit
einem Bluetooth-Handy oder anderen Geräten das
Passwort 1234 eingeben. Das hängt jedoch von der Art
des Bluetooth-Geräts ab, mit dem das Headset verbunden
werden soll. Eine genaue Beschreibung der erforderlichen
Schritte können Sie dem Benutzerhandbuch des
entsprechenden Geräts entnehmen.
● Durch Pairing verbundene Geräte bleiben auch
dann verbunden, wenn:
- eines der Geräte ausgeschaltet ist;
- eine Dienstverbindung unterbrochen oder abgebrochen
wurde;
- eines oder beide Geräte wieder eingeschaltet werden.
21
Page 25

22
Page 26

FRANÇAIS
23
Page 27
Introduction
Ce casque sans fil basé sur la technologie Bluetooth, se connecte à
un téléphone compatible sans fils. Il transmet facilement la
communication avec votre téléphone mobile vers le casque. Ce
casque comprenant l'intégration de la technologie CSR BC02 et LTCC,
offre une transmission vocale rapide et fiable.
Remarque : Ce casque Bluetooth prend simplement en
charge la fonction “réception d'appel”, si le téléphone
Bluetooth possède seulement un profil écouteur, sans
profil mains libres.
Il ne prend pas en charge un téléphone Bluetooth sans
profil écouteur et mains libres, tel que Nokia 7650.
La page suivante de ce manuel de l'utilisateur se concentre sur la
manière d’utiliser ce produit
Présentation
Augmenter le
volume
Touche
allumé-éteint
Touche
système
Microphone
Bouton
d'ouverture
(oreillette)
Oreillette
Diminuer le
volume
Remarque : Dans ce qui suit, RL signifie lumière d'indicateur d'état Rouge et BL signifie lumière
d'indicateur d'état Bleue.
Indicateur lumineux LED
24
Haut-parleur
Port de charge
Page 28

Mise en route
Port de
Charge de la batterie
Touche système
Charger la batterie
charge
Ce casque est équipé d'une batterie rechargeable Lithium Polymère
légère et résistante et doit être rechargé avant l'utilisation.
1. Basculez la "Touche système" sur la position " I " pour allumer le
système.
2. Branchez le chargeur dans le port de charge du casque et le casque
s'éteindra automatiquement.
3. L'indicateur RL s'allumera pendant la charge et s'éteindra quand la
batterie sera entièrement chargée.
Remarque :
- Chargement via le câble USB sur l'ordinateur ou le
bloc-notes
a、 Connectez le câble USB au connecteur du chargeur
situé sur le casque d'écoute
b、 Connectez l’autre extrémité du câble USB au port USB
sur l'ordinateur ou le bloc-notes.
- Basculez la Touche Système sur o (off), si vous ne devez
pas utiliser ce casque pendant une période prolongée (2
mois par exemple) pour protéger le casque.
- N'utilisez pas le casque pendant la charge.
- Utilisez uniquement le chargeur fourni.
25
Page 29

- Quand l'indicateur RL clignote cela signifie que le niveau de
la batterie est faible et qu'elle doit être rechargée.
- Avec une batterie entièrement rechargée la durée de
conversation sera de 5 à 6 heures et la durée de veille sera
d’environ 200 heures.
ALLUMER/ÉTEINDRE
1. Allumer : Appuyez sur la touche allumer/éteindre pendant 2-3
secondes, vous verrez BL clignoter rapidement pendant 1,5
secondes, puis continuer à clignoter lentement.
2. Mode veille : Le casque passe automatiquement du mode liaison au
mode veille, pour économiser l'énergie. BL clignote une fois toutes
les 3 secondes.
3. Eteindre : appuyez sur la touche allumer/éteindre (on/off) pendant
2-3 secondes, vous verrez RL clignoter rapidement pendant 1,5
secondes, puis RL et BL s'éteignent.
Remarque :
- N'appuyez pas sur la touche allumer/éteindre (on/off)
plus de 7~8 secondes quand vous allumez le casque;
autrement il risque d'entrer en mode de jumelage. Si cela
se produit, appuyez un court instant sur la touche
allumer/éteindre (on/off) et il entrera en état de
conversation et appuyez à nouveau un court instant sur la
touche allumer/éteindre et il entrera en mode veille.
Jumelage
Avant d'utiliser ce casque, vous devez le jumeler avec un matériel
adapté Bluetooth. Vous jumelez le casque avec le téléphone en
l’ajoutant à la liste de jumelage du téléphone. Deux matériels se
reconnaîtront alors l’un l’autre lors de la connexion.
1. Vérifiez que votre casque est éteint avant de démarrer le jumelage.
2. Appuyez sur la touche allumer/éteindre (on/off) pendant 7~8
secondes, vous verrez BL clignoter rapidement 5 fois, puis
s'éteindre pendant 2 secondes, puis BL allumé RL éteint suivi de BL
éteint RL allumé en continu, indiquant que le casque est en mode
de jumelage.
3. Vérifiez que les capacités Bluetooth de vos téléphones mobiles sont
activées pour permettre la recherche et le jumelage avec ce
26
Page 30

casque. (Pour les détails, reportez-vous au manuel de vos
Insérez l'oreillette en suivant
vous entendrez un son "bee"
Appuyez sur le
bouton pour libérer
téléphones mobiles.)
4. Votre téléphone trouvera le casque et mettra "MSI FREE TALK
FT200" dans la liste sous "Matériel trouvé".
5. Sélectionnez "MSI FREE TALK FT200" pour démarrer le jumelage.
6. Entrez le code PIN "1234" et appuyez sur la touche confirmer ou oui
de votre téléphone mobile quand vous y êtes invité par votre
téléphone mobile.
7. La RL est éteint et BL clignote lentement après le jumelage. Puis, le
casque entre dans son mode veille.
8. Vous pouvez maintenant utiliser le casque.
Remarque :
- Vous devez jumeler le casque avec votre téléphone mobile
seulement lors de la première utilisation. Vous n’avez pas à
effectuer à nouveau le jumelage tant que vous ne désirez
pas l’utiliser avec un autre téléphone mobile.
- Si aucun jumelage n'est possible pendant une certaine
durée, le casque entrera automatiquement en mode
"Allumé" (Power On) cependant vous ne pourrez pas
l'utiliser et vous devrez répéter les étapes 1~3 pour le
jumeler à nouveau.
Pour porter le casque
1. Mettez l'oreillette derrière votre oreille et le microphone devant
votre bouche.
2. Vous pouvez mettre l'oreillette sur l'oreille droite ou l'oreille gauche
en vous reportant aux deux dessins suivants.
Libérer
l'oreillette
Oreille droite Oreille gauche
Appuyer
Placer
l'indication de la flèche et
pour positionner fermement
la touche okey.
27
Page 31

Appels
Répondre à un appel entrant
1. Quand le casque est en mode veille et que votre téléphone mobile
sonne, le casque commencera à sonner après la 2
ème
ou la 3
ème
sonnerie de votre té lé phone mobile. Ensuite, appuyez sur la touche
allumer/éteindre (on/off) pour répondre à l'appel. Si le casque ne
sonne pas au bout de la 4
ème
sonnerie de votre téléphone mobile,
vous pouvez répondre à l'appel à l'aide de votre casque en
appuyant sur la touche allumer/éteindre (on/off).
2. Pendant votre conversation, BL clignote deux fois par seconde.
3. Si vous répondez à un appel entrant à l'aide de votre téléphone, la
voix restera sur le téléphone. Appuyez brièvement sur la touche
allumer/éteindre (on/off) pour transférer la voix au casque.
4. La distance de travail maximum entre le casque et le téléphone
mobile est de 5 mètres en intérieur et de 5~10 mètres en
extérieur.
Terminer un appel
Pour terminer un appel, appuyez à nouveau sur la touche
allumer/éteindre (on/off) ou sur la touche Terminer (End) du
téléphone.
Effectuer un appel
Quand le casque est connecté à votre téléphone, effectuez un appel à
l’aide de votre téléphone de façon normale.
Effectuer un appel par numérotation vocale
(Si votre téléphone mobile prend en charge cette fonction)
1. En mode veille, appuyez un court instant sur la touche
allumer/éteindre (on/off) pour initialiser la numérotation vocale.
2. Pendant la configuration de la numérotation vocale, appuyez à
nouveau un court instant sur la touche allumer/éteindre (on/off)
pour annuler la numérotation vocale.
Rappeler le dernier numéro appelant
(Si votre téléphone mobile prend en charge cette fonction)
28
Page 32

1. En mode veille, appuyez sur la touche Augmenter le volume ou sur
la touche Diminuer le volume pendant 2 secondes, le téléphone
mobile rappellera son dernier numéro appelant.
2. Appuyez un court instant sur la touche allumer/éteindre (on/off)
pour terminer l'appel.
Contrôle de volume
Pendant la conversation,
1. Appuyez sur la touche Augmenter le volume pour augmenter le
volume du haut-parleur.
2. Appuyez sur la touche Diminuer le volume pour diminuer le volume
du haut-parleur.
3. Appuyez sur la touche Augmenter le volume ou sur la touche
Diminuer le volume pendant 2 secondes jusqu'à entendre des bips
sonores pour rendre silencieux le microphone.
4. Appuyez à nouveau deux courts instants sur la touche Augmenter
le volume ou sur la touche Diminuer le volume pour réactiver le
microphone.
Augmenter le volume
Diminuer le volume
Remarque!! pour diminuer l'écho
Si vous entendez l'écho de votre voix, vous devrez peut-être régler le
niveau du volume du casque pour diminuer l'écho.
Rejeter un appel entrant
1. Quand vous recevez un appel, le casque sonne, et la LED bleue
clignote rapidement 3 fois toutes les 3 secondes.
2. Appuyez sur la touche allumer/éteindre (on/off) pour rejeter
l'appel.
29
Page 33

Connecter avec un PC ou PDA
Vous pouvez connecter le casque avec un PC ou PDA adapté Bluetooth
prenant en charge les Profils de Passerelle Audio. Reportez-vous au
manuel utilisateur de votre PC ou PDA adapté Bluetooth pour plus
d'informations.
Remarque
Le pilote Bluetooth intégré de Microsoft® Windows® XP_SP2
ne prend pas actuellement en charge le profil AV & le profil
Casque
Informations Importantes
1. Aucune indication de charge ne s’affiche.
Si la batterie du Casque est vide ou n’a pas été utilisée
pendant une période prolongée, cela peut prendre
quelques minutes avant que l’indicateur du Casque
n’affiche l’état de charge avec une lumière rouge fixe.
2. Si vous ne pouvez pas connecter le casque à votre
téléphone:
o Vérifiez que le casque est allumé et apparié avec
votre téléphone.
o Vérifiez que la fonction Bluetooth est activée sur votre
téléphone.
o Vérifiez que le casque se trouve à moins de 10
mètres de votre téléphone et qu’il n’y a pas
d’obstacles, tels que des murs, ou autres appareils
électroniques entre le casque et le téléphone.
o La liste des informations d’appariement du casque
est peut-être pleine. Le casque peut stocker les
informations de jusqu’à 8 téléphones à la fois. Si la
liste est pleine, réinitialisez le casque à ses
30
Page 34

paramètres d’origine.
o Si le casque ne répond pas à vos actions, retirez la
batterie pendant un court moment.
Soin et entretien du produit
o Maintenez le casque au sec. Les précipitations,
l’humidité et tous types de liquides ou de
condensation peuvent contenir des minéraux qui
corrodent les circuits électroniques.
o N’utilisez pas ou ne rangez pas le casque dans des
endroits poussiéreux ou sales. Ses pièces en
mouvement pourraient être endommagées.
o Ne rangez pas le casque dans des endroits chauds.
Les températures élevées peuvent raccourcir la
durée de vie des appareils électroniques,
endommager les batteries, et déformer ou faire
fondre certains plastiques.
o Ne rangez pas le casque dans des endroits froids.
Quand il se réchauffe, de la condensation peut se
former à l’intérieur, ce qui pourrait endommager les
cartes des circuits électroniques.
o N’essayez pas d’ouvrir le casque. La manipulation
par des personnes non expertes peut l’endommager.
o Ne pas faire tomber, ne pas cogner ou secouer le
casque. Une manipulation brutale peut endommager
les cartes des circuits internes.
o N’utilisez pas de produits chimiques agressifs, des
solvants de nettoyage, ou des détergents puissants
pour nettoyer le casque.
o Ne peignez pas le casque. La peinture peut
encrasser les pièces en mouvement et empêcher un
31
Page 35

fonctionnement correct.
Enfants
Ranger tous les accessoires hors de portée des petits
enfants.
Informations sur la Batterie
● Nouvelles batteries
Pour la première utilisation, branchez l’adaptateur au
Casque et chargez-le au moins 4 heures jusqu’à ce que
l’indicateur rouge s’éteigne.
● Précautions avec la batterie
o La batterie rechargeable durera longtemps quand elle
est traitée avec soin.
o Les températures extrêmes peuvent affecter la
capacité de chargement de votre batterie.
o Utilisez la batterie seulement pour ce dont elle est
prévue.
o N’utilisez jamais de chargeur ou de batterie
endommagés.
o Le fait de laisser le casque dans des endroits chauds
ou froids, tels que dans une voiture fermée en été ou
en hiver, diminuera la capacité et la durée de vie de la
batterie. Essayez toujours de garder la batterie
entre –10°C et 45°C. Un casque avec une batterie
chaude ou froide peut ne pas fonctionner
temporairement, même quand la batterie est
entièrement rechargée.
o Ne jetez pas une batterie au feu. Eliminez les
batteries conformément aux réglementations locales.
Ne jetez pas les batteries dans la poubelle
32
Page 36

domestique.
A propos de l’Appariement
● Qu’est-ce que l’Appariement?
L’appariement est un processus d’association de
matériels Bluetooth les uns avec les autres. Il établira
une liaison de sécurité permanente entre les matériels
et permettra un accès rapide aux services fournis sans
qu’il soit nécessaire d’entrer une clé d’accès.
● Clé d’Accès de Bluetooth
Chaque casque possède une clé d’accès 1234 par
défaut servant à apparier, qui est stockée dans sa
mémoire interne. Dans un processus d’appariement
vous devez habituellement entrer la clé d’accès 1234
avec un téléphone mobile Bluetooth ou autre matériel,
cependant, cela dépend de la sorte de matériel
Bluetooth auquel le casque est connecté.
Reportez-vous au manuel utilisateur du matériel pour
l’utilisation spécifique.
● Les matériels appariés restent appariés même
quand :
o Un des matériels n’est pas allumé.
o Une connexion de service est interrompue ou si le
service est arrêté.
o Un ou les deux matériels sont redémarrés.
33
Page 37

34
Page 38

ESPAÑOL
35
Page 39

Introducción
Tecla de encendido
Botón soltar
Este auricular inalámbrico está basado en la tecnología Bluetooth,
conectándose a un teléfono compatible sin cables. Convierte
fácilmente la comunicación de su teléfono móvil al auricular. Este
auricular con tecnología CSR BC02 y LTCC integrada, ofrece una
transmisión de voz rápida y fiable.
Nota: Este auricular bluetooth sólo soporta la función de
“recepción de llamada”, si el teléfono bluetooth sólo tiene
el perfil de auricular, sin perfil manos libres.
No soporta un teléfono bluetooth sin perfil para
auriculares y manos libres, como el Nokia 7650.
La siguiente página de este manual del usuario trata sobre como
utilizar este producto
Vista previa
Subir volumen
apagado
Tecla del sistema
(gancho de la oreja)
Enganche para la oreja
Micrófon
Bajar volumen
Nota: En adelante, RL significa luz indicadora de estado roja y BL luz indicadora de estado azul.
Indicador de luz LED
Altavoz
Puerto de carga
Primeros pasos
36
Page 40

Cargar la batería
Tecla del sistema
Puerto de carga
Carga de la batería
Este auricular está equipado con una batería recargable de litio
polímero de poco peso y larga duración y debe cargarse antes de su
uso.
1. Por favor, cambie la "tecla del sistema" a la posición " I " para
encender el sistema.
2. Conecte el cargador al puerto de carga del auricular y éste se
apagará automáticamente.
3. El indicador LR se encenderá durante la carga y se apagará cuando la
carga finalice.
Nota:
- Carga con el USB de un PC o portátil
a. Conecte el cable USB al conector del cargador en los
auriculares.
b. Conecte el otro extremo del cable USB al puerto USB del
PC o portátil
- Apague la tecla del sistema si no va a usar el auricular
durante un tiempo (unos 2 meses) para que el auricular
esté bien protegido.
- No utilice el auricular durante la carga.
- Utilice sólo el cargador incluido.
- Cuando el indicador LED parpadea en LR significa que el
nivel de la batería es bajo y debe recargarse.
37
Page 41

- Con la batería cargada por completo, el tiempo de
conversación será de 5 a 6 horas y el tiempo en espera será
de unas 200 horas.
ENCENDER/APAGAR
1. Encender: pulse la tecla de encendido/apagado (on/off) durante 2-3
segundos, verá que la LA parpadea rápido durante 1,5 segundos;
luego parpadeará más lentamente.
2. Modo suspensión: El auricular cambia al modo suspensión desde el
modo de conexión automáticamente para ahorrar energía. El
indicador LA parpadeará una vez cada 3 segundos.
3. Apagar: pulse la tecla de encendido/apagado (on/off) durante 2-3
segundos, verá que la LR parpadea rápido durante 1,5 segundos;
luego la LR y la LA se apagarán.
Nota:
- No mantenga pulsada la tecla de encendido/apagado (on/off)
durante más de 7 u 8 segundos cuando encienda el
auricular; de lo contrario podría entrar en modo de
emparejamiento. Si esto ocurriese, realice una pulsación
corta en la tecla de encendido/apagado (on/off) y entrará
en estado de conversación y luego realice de nuevo una
pulsación corta en la tecla de encendido/apagado (on/off)
y entrará en modo suspensión.
Emparejamiento
Antes de usar este auricular, deberá emparejarlo con un dispositivo con
Bluetooth. Se empareja auricular con el teléfono añadiéndolo a la lista
de emparejamiento del teléfono. Los dos dispositivos se reconocerán al
conectarse.
1. Compruebe que su auricular esté apagado antes de iniciar el
emparejamiento.
2. Pulse la tecla de encendido/apagado (on/off) durante 7 u 8 segundos,
verá que la LA parpadea rápido 5 veces, luego se apaga durante 2
segundos y luego la LA encendida y la LR apagada seguido de la LA
apagada y la LR encendida fija, indicando que el auricular está en su
modo de emparejamiento.
3. Asegúrese de haber activado la característica Bluetooth de los
38
Page 42

teléfonos móviles para buscarlos y emparejarlos con este auricular.
Pulse el botón para
(Para más detalles, consulte el manual de sus teléfonos móviles).
4. Su teléfono encontrará al auricular y aparecerá "MSI FREE TALK
FT200" en "Dispositivo encontrado" (Found Device).
5. Seleccione "MSI FREE TALK FT200" para iniciar el emparejamiento.
6. Introduzca el número de PIN "1234" y pulse la tecla de confirmación
o de Sí del teléfono móvil cuando éste se lo pida.
7. La LR se apaga y la LB parpadea lentamente tras el emparejamiento.
Luego, el auricular está en su modo suspensión.
8. Ahora ya puede usar su auricular.
Nota:
- Sólo tiene que emparejar el auricular con su teléfono móvil la
primera vez. No tiene que repetir el proceso de
emparejamiento hasta que desee utilizarlo con otro teléfono
móvil.
- Si no es posible emparejar durante un tiempo, el auricular
cambiará al modo "Encendido" (Power On), pero no podrá
usarlo y tendrá que repetir los pasos 1 al 3 para volver a
emparejar.
Para llevar el auricular
1. Coloque el gancho de la oreja detrás de su oreja y el micrófono hacia
la boca.
2. Puede cambiar el gancho de la oreja para la oreja derecha o la
izquierda como en estos dos gráficos.
Soltar
soltar el gancho de la
oreja
Oreja derecha
Pulsar
Colocar
Inserte el gancho de la oreja
siguiendo la flecha y escuchará un
"sonido" cuando esté bien ajustado.
Oreja izquierda
39
Page 43

Llamadas
Contestar a una llamada entrante
1. Cuando el auricular esté en modo suspensión y su teléfono móvil
suene, el auricular comenzará a sonar tras la 2ª ó 3ª llamada de su
teléfono móvil. A continuación, pulse la tecla de encendido/apagado
(on/off) para responder a la llamada. Si el auricular no suena tras la
4ª llamada de su teléfono móvil, puede responder a la llamada a
través del auricular pulsando la tecla de encendido/apagado
(on/off).
2. Durante la conversación, la LA parpadeará dos veces cada segundo.
3. Si responde a la llamada entrante a través de su teléfono, la voz se
quedará en el teléfono. Pulse brevemente la tecla de
encendido/apagado (on/off) para transferir la voz al auricular.
4. La distancia máxima de funcionamiento entre el auricular y el
teléfono móvil es de 5 metros en interiores y de 5 a 10 metros en
exteriores.
Finalizar una llamada
Para finalizar una llamada, pulse el botón de encendido/apagado
(on/off) de nuevo o la tecla Fin del teléfono una vez.
Realizar una llamada
Cuando el auricular esté conectado a su teléfono, realice la llamada
utilizando su teléfono de manera normal.
Realizar una marcación por voz
(Si su teléfono móvil soporta esta función)
1. En el modo Suspensión, realice una pulsación corta en el botón de
encendido/apagado (on/off) para iniciar una marcación por voz.
2. Durante la configuración de la marcación por voz, realice una
pulsación corta en el botón de encendido/apagado (on/off) de nuevo
para cancelar la marcación por voz.
Rellamada al último número marcado
(Si su teléfono móvil soporta esta función)
1. En el modo suspensión, pulse la tecla Subir volumen o Bajar volumen
durante 2 segundos, el teléfono móvil volverá a marcar el último
número marcado.
40
Page 44

2. Realice una pulsación corta en la tecla de encendido/apagado (on/off)
para finalizar la llamada.
Control del volumen
Durante la conversación,
1. Pulse la tecla Subir volumen para aumentar el volumen del altavoz.
2. Pulse la tecla Bajar volumen para disminuir el volumen del altavoz.
3. Pulse la tecla Subir volumen o Bajar volumen durante 2 segundos
hasta escuchar sonidos para silenciar el micrófono.
4. Realice una pulsación corta en la tecla Subir volumen o Bajar
volumen de nuevo para quitar el silencio del micrófono.
Subir vol.
Bajar vol.
¡Observación! para reducir el eco
Si escucha el eco de su voz, puede que necesite ajustar el nivel del
volumen del auricular para reducir el eco.
Rechazar una llamada entrante
1. Cuando reciba una llamada, el auricular sonará y el LED azul
parpadeará rápidamente 3 veces cada 3 segundos.
2. Mantenga pulsada la tecla de encendido/apagado (on/off) para
rechazar la llamada.
Conectar a un PC o PDA
Puede conectar el auricular con un PC o PDA con Bluetooth que soporte
los perfiles de puerta de enlace de audio. Consulte el manual del
usuario de su PC o PDA con Bluetooth para más información.
Nota
41
Page 45

El controlador Bluetooth incluido en Microsoft® Windows®
XP_SP2 no soporta actualmente el perfil AV y el perfil Auricular
Información importante
Solución de problemas
1. El indicador LED rojo parpadea.
Indica que los auriculares tienen la batería baja. Cargue los
auriculares durante 2 horas hasta que el indicador LED se
apague.
2. Los auriculares no pueden activarse tras haberse
cargado 20 minutos.
Para activar los auriculares necesitará haber cargado la
batería al menos 40 minutos.
Sin embargo se recomienda cargar la batería al completo
antes de usarla.
3. No aparece ninguna indicación de carga.
La batería de los auriculares está vacía o no se ha usado
durante mucho tiempo, puede que tarde un par de minutos
hasta que el indicador muestre el estado de la carga con una
luz roja fija.
4. No hay sonido de contacto entre los auriculares y
otros dispositivos.
-Compruebe que los dos dispositivos se han emparejado.
-Compruebe que los auriculares estén encendidos.
-Compruebe que los dos dispositivos se encuentran dentro
del alcance operativo.
-Compruebe que su teléfono móvil tenga la fuerza de señal
apropiada.
-Algunos teléfonos móviles Bluetooth pueden soportar
únicamente unos auriculares Bluetooth.
42
Page 46

Puede que exista una desconexión cuando haya más de un
par de auriculares emparejados al teléfono móvil.
Cuidados del producto
.El uso de accesorios no originales puede dar como
resultado una deterioración del rendimiento, lesiones, daños
en el producto, descarga electrónica y finalización de la
garantía.
.Si intenta desmontar los auriculares, podría dañarlos y la
garantía se anulará.
Niños
No deje que los niños jueguen con los auriculares, pues
contienen partes pequeñas que pueden provocar asfixia.
Cargador de viaje
.El cargador está diseñado para un uso exclusivo en
interiores. No lo utilice a la intemperie.
.El cargador debe conectarse a las fuentes de alimentación
designadas según las marcas.
.Cuando quite el cargador de un enchufe, nunca tire del
cable del cargador, podría dañarlo.
Información de la batería
● Batería nueva
La primera vez, enchufe el adaptador a los auriculares y
cárguelo durante al menos 4 horas hasta que el indicador
rojo se apague.
● Cuidados de la batería
-La batería recargable tiene una larga duración si se trata
con cuidado.
-La batería sólo puede cargarse dentro de los límites de
temperatura de -10C a 45C.
-Utilice la batería a temperatura ambiente para una mayor
capacidad.
43
Page 47

-La capacidad de la batería puede reducirse si se utiliza en
un ambiente frío.
-Los auriculares deben recargarse cada dos meses si no se
utilizan durante mucho tiempo.
Acerca del emparejamiento
● ¿Qué es el emparejamiento?
El emparejamiento es un proceso de asociación mutua de
dispositivos Bluetooth. Establecerá una conexión de
seguridad permanente entre los dispositivos y permitirá un
acceso rápido a los servicios ofrecidos sin la necesidad de
introducir claves de acceso.
● Clave de acceso Bluetooth
Cada juego de auriculares tiene una clave de acceso
predeterminada 1234 para el emparejamiento, guardada en
su memoria interna. Normalmente se le pide que introduzca
la clave de acceso 1234 en el proceso de emparejamiento
con un teléfono móvil u otros dispositivos, sin embargo,
dependerá del tipo de dispositivo Bluetooth al que los
auriculares se conecten. Consulte el manual del usuario de
los dispositivos para las funciones específicas.
● Los dispositivos emparejados permanecerán
emparejados incluso aunque:
-uno de los dispositivos no esté encendido.
-se interrumpa una conexión de servicios o el servicio se
detenga
-uno o ambos dispositivos se reinicien
44
Page 48

ITALIANO
45
Page 49

Introduzione
LED
Indicatore luminoso
Tas
to di
Questo auricolare wireless, basato sulla tecnologia Bluetooth, si
collega a un telefono compatibile senza fili. Converte facilmente la
comunicazione di un telefono cellulare all’auricolare. Questo
auricolare integrato con CSR BC02 e con la tecnologia LTCC, fornisce
una trasmissione vocale veloce e affidabile.
Nota: questo auricolare bluetooth supporta soltanto la
funzione di “call receiving”, se il telefono bluetooth ha
soltanto il profilo auricolare, senza il profilo vivavoce.
Non supporta un telefono bluetooth senza profilo
auricolare e vivavoce, come Nokia 7650.
L’argomento della pagina successiva di questo manuale dell’utente è
come usare il prodotto
Visione
Overview
d’Insieme
Volume up
accensione/spegnimento
Tasto sistema
Tasto rilascio
Aggancio orecchio
Microfono
Volume down
Nota: A partire da ora, RL sta per indicatore luminoso di stato Rosso e BL per Indicatore
luminoso di stato Blu.
Altoparlante
Porta di carica
46
Page 50

Informazioni preliminari
Caricare la batteria
Tasto sistema
orta di carica
Caricamento batteria
L’auricolare è fornito di una batteria ricaricabile polimero di Litio
leggera e di lunga durata da ricaricare prima dell’uso.
1. Spostare il “Tasto Sistema” sulla posizione " I " per accendere il
sistema.
2. Inserire il caricabatteria nella porta di carica dell’auricolare e
l’auricolare si spegnerà automaticamente.
3. L’indicatore RL rimarrà acceso durante la carica e si spegnerà a
carica completata.
Note:
- Ricarica mediante interfaccia USB con il PC o il notebook
a、 Collegare il cavo USB al connettore caricatore
dell'auricolare.
b、 Collegare l'altra estremità del cavo USB alla porta USB
del PC o del notebook.
- Per mantenere l’auricolare in condizioni protette, spegnere
il Tasto Sistema nel caso in cui non si utilizzi l’auricolare
per un certo periodo (per es. 2 mesi).
- Non usare l’auricolare durante la carica.
- Usare soltanto il caricabatteria in dotazione.
- Quando l’indicatore LED lampeggia RL la batteria è quasi
scarica e dovrebbe essere ricaricata.
47
Page 51

- Se la batteria è carica del tutto, il tempo di conversazione
va dalle 5 alle 6 ore il tempo di stand-by è di circa 200 ore.
Accensione/Spegnimento
1. Accensione: premere il tasto on/off per 2-3 secondi, si noterà che il
BL lampeggia velocemente per 1,5 secondi, poi ncomincia a
lampeggiare lentamente..
2. Modalità Standby: l’auricolare passa dalla modalità di connessione
alla modalità standby automaticamente, per risparmiare energia.
Il BL lampeggia una volta ogni 3 secondi
3. Switch OFF: prenere il tasto on/off key per 2-3 secondi, si noterà
che l’RL lampeggia per 1,5 secondi, poi sia RL sia Bl si spengono.
Nota:
- No premere il tasto on/off per più di 7~8 secondi
all’accensione dell’auricolare; altrimenti l’apparecchio
potrebbe passare in modalità di accoppiamento.
In questo caso, premere rapidamente il tasto the on/off e
questo passerà in condizione di conversazione e quindi
premere nuovamente il tasto on/off e questo passerà in
modalità stand-by.
Accoppiamento
Prima di usare l’auricolare, è necessario accoppiarlo con
un’apparecchiatura abilitata Bluetooth. L’auricolare si accoppia con il
telefono aggiungendolo all’elenco accoppiamenti sul telefono. In tal
modo le due apparecchiature si riconosceranno quando si collegano.
1. Assicurarsi che l’auricolare sia spento prima di iniziare
l’accoppiamento.
2. Premere il tasto on/off per for 7~8 secondi, si noterà che il BL
lampeggia per 5 volte, quindi si spegne per 2 secondi, poi si avrà
BL acceso,RL spento seguito da BL spento Rl accesso
ininterrottamente, a indicare lche l’auricolare è in modalità
accoppiamento.
3. Assicurarsi che la potenzialità Bluetooth dei telefoni cellulari siano
accese per cercare l’auricolare ed effettuare l’accoppiamento.( Per
48
Page 52

i dettagli, consultare il manuale del telefono cellulare.)
Premere il pulsante per
orecchio
4. Il telefono troverà l’auricolare e l’elenco "MSI FREE TALK FT200" in
"Found Device".
5. Selezionare "MSI FREE TALK FT200" per incominciare
l’accoppiamento.
6. Inserire il numero PIN "1234" e premere il tasto di conferma o ok
sul telefono cellulare quando il telefono cellulare lo richiederà.
7. L’ RL è spento e il BL lampeggia lentamente dopo l’accoppiamento.
Quindi l’auricolare è in modalità stand-by.
8. Ora è possibile usare l’auricolare.
Nota:
- E’ necessario effettuare l’accoppiamento auricolare-
telefono soltanto la prima volta. Non è necessario ripetere la
procedura fin quando non si desidera usare l’auricolare con
un altro telefono cellulare.
- Se non è possibile effettuare l’accoppiamento per un certo
periodo di tempo, l’auricolare passerà automaticamente in
modalità "Power On", ma non sarà possibile usarlo e si
dovranno ripetere le fasi 1~3 per rieffettuare
l’accoppiamento.
Indossare l’auricolare
1. Sistemare l’aggancio dell’auricolare dietro l’orecchio e il microfono
in direzione della bocca.
2. E’ possibile scegliere se agganciare l’auricolare all’orecchio destro o
sinistro seguendo le figure che seguono.
Sgancio
Orecchio destro Aggancio
Orecchio sinistro
spinta
sganciare l’aggancio
Inserire l’aggancio orecchio seguendo
la freccia; si sentirà un “bee” quando
sarà fissato propriamente.
49
Page 53

Chiamate
Rispondere a una chiamata
1. Quando l’auricolare è in modalità stand-by e il telefono cellulare
squilla, l’auricolare comincerà a squillare dopo il secondo o terzo
suono del telefono cellulare. Premere il tasto on/off per rispondere
alla chiamata. Se l’auricolare non squilla dopo il quarto squillo del
telefono cellulare, è possibile rispondere alla chiamata tramite
l’auricolare premendo il tasto on/off.
2. Durante la conversazione, il BL lampeggerà due volte al secondo.
3. Se si risponde alla chiamata tramite il telefono, l’audio rimarrà sul
telefono. Premere rapidamente il tasto on/off per trasferire la voce
all’auricolare.
4. La distanza massima di funzionamento tra l’auricolare e il telefono
cellulare è di 5 metri al chiuso e 5~10 metri all’aperto.
Terminare una chiamata
Per terminare una chiamata, premere di nuovo il tasto on/off o il tasto
Fine del telefono una volta.
Effettuare una chiamata
Quando l’auricolare è collegato al telefono, effettuare una chiamata
usando il telefono secondo la normale procedura.
Effettuare una selezione vocale
(Se il telefono cellulare supporta questa funzione)
1. In modalità standby, premere rapidamente il tastoon/off per
iniziare una selezione vocale.
2. Durante l’impostazione della selezione vocale, premere
rapidamente il tasto on/off di nuovo per cancellare la selezione
vocale.
Riselezionare l’ultimo numero selezionato
(Se il telefono supporta questa funzione)
1. In modalità standby, premere i tasti Volume up o Volume down
per 2 secondi, il telefono cellulare riselezionerà l’ultimo numero
chiamato.
2. Premere rapidamente il tasto on/off per terminare la chiamata.
50
Page 54

Controllo volume
Durante la conversazione,
1. Premere il tasto Volume up per alzare il volume dell’altoparlante.
2. Premere il tasto Volume down per abbassare il volume
dell’altoparlante.
3. Premere il tasto Volume up o il tasto Volume down per 2 secondi
fino a quando si sentono i suoni brevi e acuti per silenziare il
microfono.
4. Premere rapidamente di nuovo il tasto Volume up o il tasto Volume
down per riattivare il microfono.
Vol up
Vol down
Osservazione Per ridurre l’eco
Se si sente l’eco della propria voce, è probabile che si debba regolare
il livello del volume dell’auricolare per ridurre l’eco..
Non accettare una chiamata
1. Quando si riceve una chiamata, l’auricolare squilla, e il LED Blu
lampeggia rapidamente 3 volte ogni 3 secondi.
2. Premere a lungo il tasto the on/off per non accettare la
chiamata.
Collegamento a un PC o a un PDA
E’ possibile collegare l’Auricolare a un PC o a un PDA abilitati Bluetooth
che siano supportati da Profili Gateway Audio. Per ulteriori
informazioni, consultare il manuale d’istruzioni del PC o del PDA
abilitati Bluetooth.
51
Page 55

Nota
Il driver Bluetooth incorporato inMicrosoft® Windows®
XP_SP2, al momento non supporta il profilo AV e il profilo
Auricolare.
Informazioni importanti
Risoluzione dei problemi
1. L'indicatore LED rosso lampeggia.
Indica che l'auricolare sta funzionando a batteria scarica.
Mettere in carica l'auricolare per 2 ore, finché non si spegne
il LED rosso.
2. L'auricolare non può essere attivato anche dopo
averlo caricato per 20 minuti.
Per attivare l'auricolare, è necessario caricare la sua
batteria per almeno 40 minuti.
Tuttavia, è vivamente consigliato caricare completamente
l'apparecchio prima di utilizzarlo.
3. Non è visibile alcuna indicazione di carica.
Nei casi in cui l'auricolare abbia la batteria completamente
scarica, oppure non è stato utilizzato per molto tempo,
potrebbero essere necessari un paio di minuti per
accendere di colore rosso fisso il LED di indicazione della
carica.
4. Nessun contatto audio tra l'auricolare e altri
dispositivi.
- Accertarsi che i due dispositivi siano abbinati (pairing).
- Accertarsi che l'auricolare sia acceso.
- Accertarsi che i due dispositivi siano entrambi all'interno
del campo di azione.
- Accertarsi che il segnale del cellulare abbia intensità
52
Page 56

sufficiente.
- Alcuni cellulari Bluetooth supportano un solo auricolare
Bluetooth.
È possibile che si verifichi una disconnessione quando con
il cellulare è abbinato più di un auricolare.
Cura del prodotto
- L'utilizzo di accessori non originali può portare a una
riduzione delle prestazioni, infortuni, danni al prodotto,
scosse elettriche e termine della garanzia.
- Se si prova a smontare l'auricolare lo si può danneggiare,
e la garanzia sarà da considerarsi terminata.
Bambini
Non consentire ai bambini di giocare con l'auricolare, dato
che gli oggetti piccoli rappresentano un pericolo di
soffocamento.
Utilizzo del caricatore
- Il caricatore è progettato per essere utilizzato unicamente
in interni. Non utilizzarlo all'esterno.
- Il caricatore deve essere collegato alle fonti di
alimentazione adatte.
- Quando si rimuove il caricatore da una presa, non tirarlo
mai dal cavo poiché ciò potrebbe danneggiarlo.
Informazioni sulla batteria
● Batterie nuove
Per il primo utilizzo, inserire l'adattatore nell'auricolare e
caricarlo per almeno 4 ore, finché il LED rosso non si
spegne.
● Cura della batteria
- La batteria ricaricabile durerà a lungo se trattata con
attenzione.
- La batteria può essere caricata solo nell'intervallo di
53
Page 57

temperatura da -10°C a 45°C.
- Utilizzare la batteria a temperatura ambiente per ottenere
la massima capacità possibile.
- La capacità della batteria può essere ridotta in ambienti
freddi.
- L'auricolare deve essere ricaricato ogni due mesi, nel
caso non lo si utilizzi per un lungo periodo di tempo.
Informazioni sull'abbinamento (Pairing)
● Cos'è l'abbinamento?
L'abbinamento è il processo di associazione delle
periferiche Bluetooth l'una con l'altra. Esso stabilisce un
collegamento di sicurezza permanente tra i dispositivi e
consente un rapido accesso ai servizi forniti, senza la
necessità di inserire passkey.
● Passkey di Bluetooth
Ciascun auricolare ha la passkey predefinita 1234 per
l'abbinamento, che è memorizzata nella memoria interna.
Di solito è necessario inserire la passkey 1234 in un
processo di abbinamento con un cellulare Bluetooth o altro
dispositivo, tuttavia ciò dipende dal tipo di dispositivo
Bluetooth a cui l'auricolare si connette. Fare riferimento al
manuale utente dei dispositivi utilizzati per le istruzioni
specifiche.
● I dispositivi abbinati restano abbinati anche
quando:
- uno dei dispositivi non è acceso
- una connessione a un servizio è interrotta o il servizio
arrestato
- uno dei due dispositivi viene spento e riacceso
54
Page 58

NEDERLANDS
55
Page 59

Inleiding
Deze draadloze hoofdtelefoon is gebaseerd op de draadloze Bluetooth-technologie, waarmee
draadloos op een compatibele telefoon kan worden aangesloten. Hiermee kan uw mobiele
telefooncommunicatie probleemloos naar een hoofdtelefoon worden overgezet. Met deze
CSR BC02 en LTCC technologie geïntegreerde hoofdtelefoon wordt snelle en betrouwbare
spraakoverdracht geleverd.
Opmerking: De “oproepen ontvangen” functie kan alleen door deze
Bluetooth-hoofdtelefoon worden ondersteund als de Bluetooth-telefoon over een
hoofdtelefoon-profiel zonder handsfree-profiel beschikt.
Er wordt geen Bluetooth-telefoon zonder hoofdtelefoon-profiel en
handsfree-profiel, zoals de Nokia 7650, ondersteund.
Op de volgende pagina van deze handleiding wordt beschreven hoe dit product gebruikt dient
te worden.
Overzicht
hoger volume
aan-/uittoets
systeemtoet
vrijgavetoets
(oorhaak)
Oorhaak
microfo
lager volume
Note: Hier betekent RL controlelampje Rode status en BL controlelampje Blauwe status
LED-controlelampje
luidspreker
oplaadpoot
Te beginnen met
56
Page 60

De batterij opladen
oplaadpoort
systeemtoets
batterij opladen
Deze hoofdtelefoon is uitgerust met a lichtgewicht en duurzame oplaadbare batterij van
Lithium Polymer en dient voor het gebruik te worden opgeladen.
1. Schakel de "System key" (systeemtoets) naar de " I " positie om het systeem aan te zetten.
2. Steek de lader in de laadpoort van de hoofdtelefoon, waarna de hoofdtelefoon automatisch
wordt uitgezet.
3. Het RL-controlelampje wordt tijdens het opladen verlicht en wordt weer uitgezet zodra de
batterij volledig is opgeladen.
Opmerking:
-Opladen met de USB-verbinding van de PC of de notebook
a、 Sluit de USB-kabel aan op aan op de opladeraansluiting van de hoofdtelefoon.
b、 Sluit de andere kant van de USB-kabel aan op de USB-poort van de PC of de
notebook
- Als u deze hoofdtelefoon enige tijd (ongeveer 2 maanden) niet denkt te gebruiken,
schakelt u de Systeemtoets uit om de hoofdtelefoon te beschermen.
- Gebruik de hoofdtelefoon niet tijdens het opladen.
- Gebruik alleen de meegeleverde lader.
- Als het RL-controlelampje rood knippert, betekent dit dat het batterijniveau laag is en
opgeladen dient te worden.
- Met een volledig opgeladen batterij zal de spraaktijd 5 tot 6 uur bedragen en de
stand-by tijd ongeveer 200 uur bedragen.
57
Page 61

AAN/UITzetten
1. AANzetten: Druk de aan-/uittoets ongeveer 2 tot 3 seconden lang in en u zult zien dat de BL
1,5 seconde lang snel knippert en vervolgens langzaam blijft knipperen.
2. Standby-modus: Om voeding te besparen, wordt de hoofdtelefoon automatisch van de
linkmodus naar de standby-modus overgeschakeld. De BL knippert eenmaal per 3 seconden
3. UITzetten: Druk de aan-/uittoets ongeveer 2 tot 3 seconden lang in en u zult zien dat de BL
snel 1,5 seconde lang knippert, en zowel de RL als BL uitstaan.
Opmerking:
-Druk de aan- en uittoets niet langer dan 7 tot 8 seconden in wanneer u de hoofdtelefoon aanzet;
anders kan het naar de koppelingsmodus overgaan. Mocht dit gebeuren, druk dan kort
op de aan- en uittoets
en dan gaat het in de gespreksstatus over en druk vervolgens nogmaals kort op de
aan-/uittoets waarna het in de standby-modus wordt gezet.
Koppeling
Voordat u deze hoofdtelefoon gebruikt, dient het aan toestellen met Bluetooth-functionaliteit te
worden gekoppeld. Koppel de hoofdtelefoon aan de telefoon door het aan de koppelingslijst
van de telefoon toe te voegen. Vervolgens herkennen de twee apparaten elkaar wanneer zij
worden aangesloten.
1. Zorg dat uw hoofdtelefoon is uitgezet voordat u het koppelingsproces start
2. Druk 7 of 8 seconden lang op de aan-/uittoets en u zult zien dat de BL snel 5 keer knippert, en
vervolgens 2 seconden lang uitstaat. Vervolgens gaat de BL aan en de RL uit, dan staat de
BL voortdurend uit en de RL voortdurend aan, hetgeen aangeeft dat de hoofdtelefoon zich
in de modus bevindt.
3. Zorg dat de Bluetooth-functionaliteit van mobiele telefoons is aangezet om de koppeling van
deze hoofdtelefoon op te kunnen zoeken. (Voor verdere details kunt u de handleidingen van
uw mobiele telefoons raadplegen.)
4. Uw telefoon zal de hoofdtelefoon vinden en "MSI FREE TALK FT200" wordt weergegeven
onder "Found Device" (toestel gevonden).
5. Selecteer "MSI FREE TALK FT200" om de koppeling te beginnen.
6. Voer de pincode "1234" in en druk op de bevestigings- of ‘ Yes” toets van uw mobiele
telefoon wanneer uw mobiele telefoon daarom vraagt.
7. De RL staat uit en de BL knippert langzaam als de koppeling tot stand is gebracht. Dan
bevindt de hoofdtelefoon zich in de standby-modus.
8. U kunt uw hoofdtelefoon nu gebruiken.
58
Page 62

Opmerking:
- U hoeft alleen de eerste keer uw hoofdtelefoon aan uw mobiele telefoon te koppelen.
U hoeft het koppelingproces niet meer te herhalen totdat u de hoofdtelefoon met een
andere mobiele telefoon wilt gebruiken.
- Als er enige tijd geen koppeling mogelijk is, wordt de hoofdtelefoon automatisch naar
de "Power On" (voeding aan) modus overgezet. Maar als u het niet kunt gebruiken,
dienen stappen 1 tot 3 nogmaals herhaald te worden.
De hoofdtelefoon dragen
1. Plaats de oor-haak achter uw oor en richt de microfoon op uw mond.
2. U kunt de oor-haak volgens de twee hieronder weergeven illustraties naar het linker of
rechter oor veranderen.
vrijgave
rechter oor
Duwen
plaats
linker oor
druk op de toets om de
oorhaak vrij te geven
plaats de oorhaak zoals aangewezen door de pijl
waarop u een geluidstoon
hoortdat de installatie gelukt is.
Oproepen
Een inkomend gesprek beantwoorden
1. Wanneer de hoofdtelefoon zich in de standby-modus bevindt en uw mobiele telefoon een
beltoon afgeeft, wordt er ook een beltoon afgegeven door de hoofdtelefoon na de 2e of 3e
beltoon van uw mobiele telefoon. Druk vervolgens op de aan-/uittoets om de oproep te
beantwoorden. Als de hoofdtelefoon niet rinkelt na de 4e beltoon van uw mobiele telefoon,
kunt u de oproep via de hoofdtelefoon aannemen door op de aan-/uittoets te drukken.
2. Tijdens het gesprek zal de BL tweemaal per seconde knipperen.
3. Als u de oproep via uw telefoon beantwoordt, zal de spraak op de telefoon blijven. Druk kort
op de aan-/uittoets om de spraak naar de hoofdtelefoon over te dragen.
4. De maximale werkafstand tussen deze hoofdtelefoon en de mobiele telefoon bedraagt 5
meter binnenshuis en 5 tot 10 meter buitenshuis.
59
Page 63

Een oproep beëindigen
Om een oproep te beëindigen, druk nogmaals op de aan-/uittoets of eenmaal op de
Beëindigingtoets.
Een oproep plaatsen
Wanneer de hoofdtelefoon op uw telefoon is aangesloten, kunt u een oproep plaatsen door uw
telefoon op de normale manier te gebruiken.
Een oproep met spraakgestuurde nummerkeuze plaatsen
(Als uw mobiele telefoon deze functie ondersteunt)
1. In de standby-modus druk kort op de aan-/uittoets om spraakgestuurde nummerkeuze te laten
beginnen.
2. Tijdens het instellen van de spraakgestuurde nummerkeuze kunt u nogmaals kort op de
aan-/uittoets drukken om de spraakgestuurde nummerkeuze te annuleren.
De laatste door u geplaatste oproep nogmaals oproepen
(Als uw mobiele telefoon deze functie ondersteunt)
1. Als de telefoon zich in de standby-modus bevindt, druk 2 seconden lang op de toetsen voor
Volume hoger of Volume lager, waarop de mobiele telefoon de laatst geplaatste oproep zal
herhalen.
2. Door vervolgens kort op de aan-/uittoets te drukken, wordt de oproep beëindigd.
Volumeregeling
Tijdens het gesprek,
1. Druk op de Volume hoger toets om het volume van de luidspreker te verhogen.
2. Druk op de Volume lager toets om het volume van de luidspreker te verlagen.
3. Druk 2 seconden lang op de toetsen voor Volume hoger of Volume lager, waarop de
microfoon een geluidstoon voortbrengt om de microfoon te dempen.
4. Druk nogmaals kort op de toetsen voor Volume hoger of Volume lager, waarop de microfoon
een geluidstoon voortbrengt om het dempen van de microfoon weer te annuleren.
60
Page 64

hoger volume
lager volume
Opmerking!! Om echo’s te verminderen.
Als u de echo van uw eigen stem hoort, dient u wellicht het volumeniveau van de hoofdtelefoon
aan te passen om de echo te verminderen.
Een inkomend gesprek verwerpen
1. Wanneer u een oproep ontvangt, zal de hoofdtelefoon
gaan rinkelen, en de blauwe LED 3 keer iedere 3
seconden gaan knipperen.
2. Druk vervolgens op de aan-/uittoets om de oproep te beantwoorden.
Op een PC of PDA aansluiten
U kunt de Hoofdtelefoon op een voor Bluetooth geschikte PC of PDA aansluiten, die wordt
ondersteund door de Profielen van Audio Gateway. Voor verder informatie kunt u de
gebruiksaanwijzing van uw voor Bluetooth geschikte PC of PDA raadplegen.
Opmerking
Er worden momenteel geen AV- of Headset-profielen door het met Microsoft®
Windows® XP_SP2 ingebouwde Bluetooth-station ondersteund.
61
Page 65

Belangrijke informatie
Problemen oplossen
1. Het opladen wordt niet weergegeven.
Indien de batterij van de hoofdtelefoon leeg is of indien de
hoofdtelefoon niet gebruikt werd voor een lange tijd, kan het een
aantal minuten duren voordat het indicatorlichtje het opladen
weergeeft aan de hand van een continu rood brandend
indicatorlichtje.
2. U kunt de hoofdtelefoon niet met de telefoon verbinden:
-Zorg ervoor dat de hoofdtelefoon ingeschakeld is en verbonden
met uw telefoon.
-Zorg ervoor dat de Bluetooth-functie van uw telefoon
ingeschakeld is.
-Controleer of de hoofdtelefoon zich binnen een afstand van 10
meter van de telefoon bevindt en of er geen obstructies, zoals
muren en andere elektronische apparaten tussen de
hoofdtelefoon en de telefoon bevinden.
-De lijst met gekoppelde apparaten van de hoofdtelefoon is
misschien vol. De hoofdtelefoon kan slechts 8 gekoppelde
telefonen per keer bevatten. Indien de lijst is, dan zal de
hoofdtelefoon terug ingesteld worden op de oorspronkelijke
instellingen.
-Indien de hoofdtelefoon niet reageert op uw acties, verwijder
dan de batterij heel eventjes.
Zorg dragen voor uw product en onderhoud
-Hou de hoofdtelefoon buiten bereik van natte omgevingen.
Regen, vochtigheid en vloeistoffen kunnen mineralen bevatten
die corrosie van elektronische circuits veroorzaken.
-Gebruik of bewaar de hoofdtelefoon niet in stoffige en vuile
omgevingen. De bewegende delen kunnen beschadigd worden.
-Bewaar de hoofdtelefoon niet in warme omgevingen. Hoge
temperaturen zullen de levensduur van elektronische apparaten
verkorten, batterijen beschadigen en bepaalde plastieksoorten
doen smelten.
- Bewaar de hoofdtelefoon niet in koude omgevingen.
62
Page 66

Tijdens het opwarmen kan er vocht ontstaan, die de
elektronische circuitborden kan beschadigen.
-Tracht niet van de hoofdtelefoon te openen of te demonteren.
Niet-boevoegde handelingen kunnen het beschadigen.
-Laat de hoofdtelefoon niet vallen en vermijdt schudden. Brutale
handelingen kunnen het interne circuit beschadigen.
-Gebruik geen agressieve chemische producten,
reinigingsproducten of sterke detergenten om de hoofdtelefoon
te reinigen.
-Verf de hoofdtelefoon niet. Verf kan de bewegende delen
belemmeren en de normale werking onmogelijk maken.
Kinderen
Hou alle accessoires van dit product buiten bereik van kleine
kinderen.
Informatie over de batterij
● Nieuwe batterijen
Wanneer u de hoofdtelefoon voor de eerste keer gebruikt,
dient u deze op te laden gedurende tenminste 4 uur totdat het
rode indicatorlichtje uitgaat.
● Zorg dragen voor uw batterijen
-Indien u zorg draagt voor uw oplaadbare batterij dan zal deze
een lange levensduur hebben.
-Extreme temperaturen kunnen het opladen van uw batterij
beinvloeden.
-Gebruik de batterij enkel voor het bestemde doel.
-Gebruik nooit een beschadigde batterij of oplader.
-Wanneer u de hoofdtelefoon in warme of koude plaatsen
bewaart, zoals een gesloten auto in de zomer of de winter, zal de
capaciteit en de levensduur van de batterij verminderen. Bewaar
de batterij in een omgeving met een temperatuur tussen –10℃
en 45℃. Een hoofdtelefoon met een warme of koude batterij kant
tijdelijk niet werken, zelf indien de batterij volledig opgeladen is.
63
Page 67

-Gooi de batterijen niet in vuur. Werp de batterijen weg in
overeenstemming met de plaatselijke reglementering. Gooi de
batterijen niet bij het huishoudvuil.
Over koppelen (pairing)
● Wat is koppelen?
Koppelen is een procedure waarin apparaten met elkaar
geassocieerd worden. Het zal een permanente beveiligde
koppeling tussen de apparaten creëren en een snelle toegang tot
geleverde services mogelijk maken, zonder dat we een
wachtwoord moeten opgeven.
● Bluetooth-wachtwoord (passkey)
Elke hoofdtelefoon heeft het standaard wachtwoord 1234 voor
het koppelen. Dit wachtwoord is in het interne geheugen van de
hoofdtelefoon opgeslagen. U moet het wachtwoord 1234
invoeren tijden het koppelen met een mobiele telefoon of met
andere apparaten met Bluetooth-functionaliteit. Het feit of u al
dan niet het wachtwoord moet invoeren kan afhankelijk zijn van
het Bluetooth-apparaat waarmee u gaat koppelen. Raadpleeg de
handleiding van het apparaat voor de juiste werking.
● Gekoppelde apparaten blijven gekoppeld zelf wanneer:
- Één van de apparaten niet ingeschakeld is.
- Een serviceverbinding onderbroken is of een service gestopt is.
- Één van of beide apparaten opnieuw opgestart wordt.
64
Page 68

Česky
65
Page 69

Úvod
Světelný
LED
Uvolnění klipsu
Tento bezdrátový headset pracuje na bázi technologie Bluetooth a
lze jej použít s jakýmkoliv kompatibilním telefonem. Snadno
přemění Váš mobilní telefon na headsetové zařízení. Tento headset
zajišťuje s použitím technologií CSR BC02 a LTCC rychlou a
spolehlivou hlasovou komunikaci.
Upozornění: Tento headset umožňuje pouze přijímání hovorů,
“call receiving”, jestliže Váš telefon má Bluetooth profil
pro headset, ale ne pro hands-free.
Nepodporuje však telefony s technologií Bluetooth, které
nemají profily pro headset a pro handsfree, jako je
například Nokia 7650.
Na následující stránce tohoto návodu k použití najdete pokyny, jak tento
produkt používat.
Stručný přehled
Zvýšení hlasitosti
Snížení hlasitosti
Tlačítko
indikátor
Systémové
Mikrofon
za ucho
Klips za ucho
Slucháto
Konektor nabíjení
66
Page 70

Nabíjecí
konektor
Nabíjení baterie
Začínáme
Nabití akumulátoru
Systémový klíč
Headset je vybaven lehkou a trvanlivou dobíjecí baterií typu Lithium
Polymer, kterou musíte před prvním použitím nabít.
1. Uveďte zařízení do chodu přepnutím sytémového klíče do polohy
"I".
2. Připojte nabíječku do nabíjecí zdířky na headsetu, headset se
automaticky vypne.
3. Červené kontrolní světlo se rozsvítí a zhasne až po úplném nabití
akumulátoru.
Upozornění:
- Nabíjení pomocí USB na PC nebo notebooku
a、 Připojte kabel USB ke konektoru pro nabíjení na
sluchátku.
b、 Druhý konec kabelu USB připojte k portu USB na PC
nebo notebooku.
- Pokud nebudete headset používat po delší dobu (více jak 2
měsíce), vypněte ho Systémovým klíčem.
- Během nabíjení akumulátoru headset nepoužívejte.
- K nabíjení používejte pouze dodanou nabíječku.
67
Page 71

- Jestliže červený LED indikátor bliká, znamená to, že je
třeba baterii dobít.
- Plně nabitá akumulátor umožňuje 5 až 6 hodin provozu
nebo 200 hodin v pohotovostním režimu.
Zapnutí/vypnutí
1. Zapnutí: stiskněte vypínač po dobu 2-3 sekund, modrý světelný
indikátor bude 1,5 sekundy rychle blikat, poté se blikání zpomalí.
2. Pohotovostní režim: Pro úsporu energie se headset automaticky
přepne do pohotovostního režimu. Modrý světelný indikátor bliká
jednou za 3 sekundy.
3. Vypnutí: stiskněte tlačítko vypínače a držte ho 2-3 sekundy,
červený indikátor bude 1,5 sekundy rychle blikat, poté obě
kontrolní světla zhasnou.
Upozornění:
- Při zapínání headsetu nedržte tlačítko vypínače stisknuté
příliš dlouho (ne více jak 7 až 8 sek.), mohlo by dojít k
přechodu na párovací režim. Pokud se tak stane, krátkým
stisknutím tlačítka on/off (vypínače) přejdete do
provozního režimu. Další krátkým stisknutím přepnete
headset na úsporný režim.
Párování
Před použitím tohoto headsetu musíte provést jeho spárování se
zařízením kompatibilním s Bluetooth technologií. Párování Vašeho
headsetu provedete tak, že ho přidáte na seznam párů na Vašem
telefonu. Obě zařízení se vzájemně rozpoznají, kdykoliv je potom
zapnete.
1. Před provedením párování se ujistěte, že headset je vypnutý.
2. Stiskněte tlačítko vypínače na dobu 7 až 8 sekund, modrý indikátor
5x blikne, pak na 2 sekundy zhasne. Modrý indikátor se rozsvítí a
červený indikátor zhasne, poté modrý indikátor zhasne a modrý se
rozsvítí, což znamená, že zařízení je v párovacím režimu.
3. Ujistěte se, že funkce Bluetooth Vašeho telefonu je aktivovaná, aby
mohlo dojít k vyhledání Vašeho headsetu a spárování. (Podrobnosti
najdete v návodu k použití Vašeho mobilního telefonu.)
4. Váš telefon najde headset a zobrazí jej jako "MSI FREE TALK FT200"
68
Page 72

v položce Nalezené zařízení - "Found Device".
Pravé ucho
Levé ucho
Vložte klips ve směru šipky, zvukový
5. Zvolte "MSI FREE TALK FT200", zahájí se párovací proces.
6. Vložte kód "1234" a stiskněte tlačítko “confirm (potvrzeno)” nebo
“yes (ano)” na Vašem mobilním telefonu, poté, co Vás o to telefon
požádá.
7. Po ukončení párování červený indikátor zhasne a modrý indikátor
pomalu bliká. Headset je nyní v pohotovostním režimu.
8. Můžete ho začít používat.
Upozornění:
- Párování headsetu s Vaším telefonem musíte provést pouze
při prvním použití. Párování se nemusí opakovat, dokud
nebudete chtít použít headset s jiným telefonem.
- Pokud není párování po nějaké době úspěšné, headset se
automaticky zapne, ale nelze jej používat. Zopakujte znovu
párovací proces popsaný v bodech 1 až 3.
Nasazení headsetu
1. Nasaďte si sluchátko na levé nebo na pravé ucho a ujistěte se, že
mikrofon míří na Vaše ústa.
2. Nastavení sluchátka pro levé nebo pravé ucho je popsáno v nákresu
níže.
Vyjmutí
Zatlačit
Stisknutím tlačítka uvolníte klips
Sestavení
signál potvrdí správnost uchycení.
69
Page 73

Volání
Přijímání hovoru
1. Když je headset v pohotovostním režimu a Váš mobilní telefon
zazvoní, headset začne zvonit po 2. nebo 3. zazvonění Vašeho
mobilního telefonu. Stisknutím tlačítka on/off přijmete hovor.
Jestliže headset nezačne zvonit po 4. zazvonění Vašeho mobilního
telefonu, můžete přijmout hovor prostřednictvím headsetu
stisknutím tlačítka on/off.
2. Během hovoru modrý indikátor bliká dvakrát za sekundu.
3. Jestliže přijmete hovor na Vašem mobilním telefonu, hovor zůstane
na telefonu. Krátkým stisknutím tlačítka on/off se hovor přepojí na
Váš headset.
4. Maximální funkční vzdálenost mezi headsetem a mobilním
telefonem je 5 metrů v místnosti a 5 až 10 metrů v exteriéru.
Ukončení hovoru
Hovor ukončíte opětovným stisknutím tlačítka on/off nebo jedním
stisknutím tlačítka End na telefonu.
Volání
Když je headset připojen k Vašemu mobilnímu telefonu, telefonujte
jako normálně.
Hlasové vytáčení
(Pokud Váš telefon podporuje tuto funkci)
1. V pohotovostním režimu krátkým stisknutím tlačítka Talk aktivujete
hlasové vytáčení.
2. Zrušení hlasového vytáčení provedete opětovným stisknutím
tlačítka Talk.
Opakovaná volba posledně volaného čísla
(Pokud Váš telefon podporuje tuto funkci)
1. V pohotovostním režimu stiskněte tlačítko Volume up (Zvýšení
hlasitosti) nebo Volume down (Snížení hlasitosti) na 2 sekundy,
mobilní telefon vytočí posledně volané číslo.
2. Krátkým stisknutím tlačítka on/off hovor ukončíte.
70
Page 74

Kontrola hlasitosti
Zvýšení hlasitosti
Snížení hlasitosti
Během hovoru,
1. Stisknutím tlačítka Volume up zvýšíte hlasitost.
2. Stisknutím tlačítka Volume down snížíte hlasitost.
3. Mikrofon ztlumíte stisknutím tlačítka Volume up nebo Volume down
na 2 sekundy, dokud neuslyšíte pípnutí.
4. Mikrofon aktivujete krátkým stisknutím tlačítka Volume up nebo
Volume down.
Připomínka!! Jak odstranit ozvěnu
Jestliže v headsetu slyšíte ozvěnu Vašeho hlasu, seřízením hlasitosti ji
odstraníte.
Odmítnutí příchozího hovoru
1. Příchozí hovor ohlašuje headset zazvoněním a modrý indikátor
LED rychle bliká 3x každé 3 sekundy.
2. Hovor odmítnete dlouhým stisknutím tlačítka on/off.
Připojení k počítači nebo zařízení PDA
Váš headset je možné napojit na osobní počítač nebo zařízení PDA
vybavené technologií Bluetooth s podporou profilů Audio Gateway.
Podrobné informace najdete v návodu pro uživatele Vašeho počítače
nebo zařízení PDA.
Upozornění
Ovladač Bluetooth, který je součástí Microsoft® Windows®
XP_SP2, v současnosti nepodporuje profily AV a Headset.
71
Page 75

Důležité informace
Řešení problémů
1. Nabíjení baterie není nijak signalizováno.
Pokud je baterie sluchátka dlouhou dobu vybitá nebo
nepoužívaná, může trvat i několik minut, než začne
kontrolka sluchátka signalizovat stav nabíjení souvislým
červeným světlem.
2. Pokud nemůžete připojit sluchátko k Vašemu
telefonu:
- Ujistěte se, že je sluchátko zapnuté a spárované s Vaším
telefonem.
- Ujistěte se, že je funkce Bluetooth na Vašem telefonu
aktivována.
- Zkontrolujte, zda se sluchátko nachází ve vzdálenosti
nejvýše 10 metrů od Vašeho telefonu a zda mezi oběma
přístroji nejsou žádné překážky, jako např. zdi nebo jiná
elektronická zařízení.
- Seznam párovaných zařízení sluchátka může být již plný.
Do sluchátka lze najednou uložit údaje o nejvýše 8
telefonech. Pokud se seznam naplní, obnovte výchozí
nastavení sluchátka.
- Pokud sluchátko vůbec nereaguje, vyjměte na krátkou
dobu jeho baterii.
Péče a údržba produktu
- Udržujte sluchátko suché. Déšť, mokro a všechny typy
tekutin nebo vlhkosti mohou obsahovat minerály, které
způsobují korozi elektrických obvodů.
- Nepoužívejte ani neuchovávejte sluchátko na prašných
nebo špinavých místech. Mohly by se poškodit jeho
pohyblivé součásti.
- Neuchovávejte sluchátko v místech s vysokými teplotami.
Vysoké teploty mohou zkracovat životnost elektronických
přístrojů, poškozovat baterie a deformovat nebo tavit
některé plasty.
- Neuchovávejte sluchátko na chladných místech. Při jeho
72
Page 76

zahřátí se může uvnitř vytvářet vlhkost, která může
poškodit elektrické obvodové desky.
- Nepokoušejte se sluchátko rozebírat. Neodborným
zásahem jej můžete poškodit.
- Neupusťte, neklepejte ani netřeste se sluchátkem. Hrubé
zacházení může poškodit vnitřní obvodové desky.
- Při čištění sluchátka nepoužívejte chemikálie, čistící
prostředky ani silná rozpouštědla.
- Sluchátko nijak nebarvěte. Barva může slepit pohyblivé
součásti sluchátka a bránit tak jeho správné funkci.
Děti
Veškeré příslušenství uchovávejte mimo dosah malých
dětí.
Údaje o bateriích
● Nové baterie
Před prvním použitím připojte nabíječku do sluchátek a
nabíjejte baterii po dobu alespoň 4 hodin, dokud
červená kontrolka nezhasne.
● Péče o baterie
- Řádnou péčí o dobíjecí baterii dosáhnete její dlouhé
životnosti.
- Extrémní teploty mohou mít vliv na dobíjení Vaší baterie.
- Tuto baterii používejte pouze k určenému účelu.
- Nikdy k jejímu dobíjení nepoužívejte jiný typ nabíječky,
baterie by se mohla poškodit.
- Ponechávání sluchátka na místech s vysokou nebo
nízkou teplotou, jako např. v uzavřeném autě v létě nebo
v zimě, snižuje kapacitu a životnost baterie. Vždy se
snažte uchovávat baterii při teplotách od –10℃ do 45℃.
Sluchátko, jehož baterie je horká nebo příliš chladná,
nemusí být dočasně funkční, a to ani když je baterie zcela
nabitá.
73
Page 77

- Baterii nevhazujte do ohně. Baterie likvidujte v souladu
s místními nařízeními. Nevyhazujte ji do smíšeného
domácího odpadu.
O párování
● Co je to párování?
Párování je proces vzájemného propojení zařízení, která
podporují Bluetooth. Tak se mezi zařízeními zřídí trvalé
zabezpečené spojení, které umožní rychlý přístup
k poskytovaným službám bez nutnosti zadávání
přístupových klíčů.
● Přístupový klíč Bluetooth
Pro párování je výchozím přístupovým klíčem každého
sluchátka 1234, který je uložen v jeho vnitřní paměti.
V závislosti na typu zařízení Bluetooth, ke kterému se má
sluchátko připojit, budete při procesu párování s mobilním
telefonem Bluetooth nebo jiným přístrojem obvykle
požádání o zadání přístupového klíče 1234. Bližší
informace naleznete v uživatelském návodu příslušného
přístroje.
● Párová zařízení zůstanou spárovaná i když:
- bude jedno ze zařízení vypnuté.
- bude spojení přerušeno nebo služba zastavena.
- bude jedno nebo obě zařízení restartována.
74
Page 78

PORTUGUÊS
75
Page 79

Introdução
Nota: LV significa luz do indicador do estado vermelha e LA significa luz do indicador
Tecla
Indicador de luz do
Este auscultador sem fio é baseado na tecnologia bluetooth e conecta-se a um telefone
compatível sem fio. Converte facilmente sua comunicação de telefone móvel para o
auscultador. Este auscultador integrado com a tecnologia LTCC e CSR BC02 fornece
transmissão de voz rápida e confiável.
Nota: Este auscultador bluetooth suporta somente a função ‘chamada a receber’,
se o telefone bluetooth tiver somente o perfil de auscultador, sem o perfil de
telefone de mãos livre.
Não suporta um telefone bluetooth sem o auscultador e perfil de telefone de
mãos livre, similar ao Nokia 7650.
A seguinte página deste manual do utilizador indica como utilizar este produto.
Visão geral
錯誤!
Volume acima
ligado-desligado
Tecla de sistema
Microfone
Gancho de ouvido
Volume abaixo
do estado azul.
LED
Altifalante
Porta de recarga
76
Page 80

Iniciar
Porta de
Recarregar a bateria
recarga
Recarregar a bateria
Tecla do sistema
Este auscultador é equipado com uma bateria recarregável de lítio-polímero durável e
leve e deve ser recarregada antes de ser utilizada.
1. Mude a "Tecla do sistema" para a posição " I " para ligar o sistema.
2. Conecte o recarregador a porta de recarga do auscultador para desligá-lo
automaticamente.
3. O indicador RL acenderá ao recarregar e apagará após ser recarregado completamente.
Nota:
-Carregamento por USB no PC ou notebook
a. Conectar o cabo USB ao conector do carregador no fone de ouvido.
b. Conectar a outra extremidade do cabo USB à porta USB no PC ou notebook
- Desligue a tecla do sistema se não utilizar este auscultador por um período (2
meses) para mantê-lo com uma boa protecção.
- Não utilize o auscultador durante o período de recarga.
- Utilize somente o recarregador fornecido.
- Quando o indicador LED cintilar RL significa que o nível da bateria está baixo e
deve ser recarregada.
- Com a bateria completamente recarregada o período de conversação será de 5 a
6 horas e o de espera será de aproximadamente 200 horas.
77
Page 81

Ligar/Desligar
1. Ligar: prima a tecla ligado/desligado por 2-3 segundos, verá que BL cintila rápido por
1,5 segundos e depois continua a cintilar lentamente.
2. Modo em espera: O auscultador entra no modo em espera do modo de ligação
automaticamente para guardar energia. O BL cintila uma vez a cada 3 segundos
3. Desligar: prima a tecla ligado/desligado por 2-3 segundos, verá que RL cintila rápido
por 1,5 segundos e depois ambos RL e BL são desligados.
Nota:
- Não prima a tecla ligado/desligado mais do que 7~8 segundos quando
ligar o auscultador; caso contrário, pode ingressar no modo
emparelhamento. Se isso ocorrer, prima rapidamente a tecla ligado/desligado
para ingressará no estado de conversação e depois rapidamente a tecla
ligado/desligado novamente para ingressar no modo em espera.
Emparelhamento
Antes de utilizar o auscultador, deverá emparelhá-lo a um dispositivo com bluetooth
incorporado. Emparelhe o auscultador a um telefone adicionando-o à lista de
emparelhamento no telefone. Depois dois dispositivos efectuam o reconhecimento entre
si ao conectarem-se.
1. Assegure que seu auscultador esteja desligado antes de iniciar o emparelhamento.
2. Prima a tecla ligado/desligado por 7~8 segundos, verá que BL cintila rápido 5 vezes,
depois desligado por 2 segundos, depois o BL ligado e RL desligado seguido por BL
desligado e RL ligado continuamente., indicando que o auricular está no modo de
emparelhamento.
3. Verifique se a característica bluetooth dos telefones móveis está activada para procura e
emparelhar com este auscultador (para obter mais detalhes, consulte o manual de seu
telefone móvel).
4. Seu telefone encontrará o auscultador e a lista "MSI FREE TALK FT200" sob
"Encontrou o dispositivo".
5. Seleccione "MSI FREE TALK FT200" para iniciar o emparelhamento.
6. Introduza o número PIN "1234" e prima a tecla confirmar ou sim no seu telefone móvel
quando for solicitado.
7. O RL está desligado e BL cintila lentamente após o emparelhamento. A seguir, o
auscultador ingressa no modo em espera.
8. É possível utilizar o auscultador agora.
78
Page 82

Prima o botão para
Nota:
- É somente necessário emparelhar o auscultador a um telefone móvel na
primeira vez. Não é necessário refazer o processo de emparelhamento até que
pretenda utilizá-lo num outro telefone móvel.
- Se não for possível efectuar o emparelhamento por um período de tempo, o
auscultador ingressa no modo "Ligado" automaticamente mesmo que não possa
utilizá-lo e deverá repetir os passos de 1~3 para emparelhá-lo novamente.
Para utilizar o auscultador
1. Coloque o gancho atrás da sua orelha e o microfone voltado para a sua boca.
2. É possível mudar o gancho de ouvido para o ouvido direito ou esquerdo seguindo os
dois gráficos a seguir.
錯誤!
Liberar
Ouvido direito
Colocar
Ouvido esquerdo
Premir
liberar o gancho
Introduza o gancho seguindo o
sinal da seta e ouvirá um "beep"
para configurar correctamente
Chamadas
Responder chamadas a receber
1. Quando o auscultador estiver no modo em espera e seu telefone móvel tocar, começará
a tocar após o segundo ou terceiro toque de seu telefone móvel. A seguir, prima a tecla
ligado/desligado para responder a chamada. Se o auscultador não tocar depois do
quarto toque de seu telefone móvel, pode responder a chamada através de seu
auscultador premindo a tecla ligado/desligado.
2. Durante a sua conversação, o BL cintilará duas vezes a cada segundo.
3. Se responder a chamada a receber através de seu telefone, a voz se manterá no aparelho.
Prima a tecla ligado/desligado rapidamente para transferir a voz para o auscultador.
4. A distância máxima de funcionamento entre o auscultador e o telefone móvel é de 5
metros internamente e 5~10 metros externamente.
Terminar uma chamada
Para terminar uma chamada, prima a tecla ligado/desligado novamente ou a tecla
terminar no telefone uma vez.
79
Page 83

Efectuar uma chamada
Quando o auscultador estiver conectado a um telefone, efectue uma chamada da forma
normal.
Efectuar uma chamada de discagem por voz
(Se seu telefone móvel suportar esta função)
1. No modo em espera, prima rapidamente a tecla ligado/desligado para iniciar a
discagem por voz.
2. Durante a configuração da discagem por voz, prima rapidamente a tecla
ligado/desligado novamente para cancelar
a discagem por voz.
Rediscagem do último número
(Se seu telefone móvel suportar esta função)
1. No modo em espera, prima a tecla Volume acima ou Volume abaixo por 2 segundos, o
telefone móvel repete o seu último número de chamada.
2. Prima a tecla ligado/desligado rapidamente para terminar a chamada.
Controlo de volume
Durante a conversação:
1. Prima a tecla Volume acima para aumentar o volume do altifalante.
2. Prima a tecla Volume abaixo para diminuir o volume do altifalante.
3. Prima a tecla Volume acima ou Volume abaixo por 2 segundos até que ouça um beep
para emudecer o microfone.
4. Prima rapidamente a tecla Volume acima ou Volume abaixo novamente para emudecer
o microfone.
錯誤!
Volume acima
Volume abaixo
Observação! Para reduzir o eco
80
Page 84

Se ouvir eco de sua voz, pode ser necessário ajustar o nível de volume do auscultador para
reduzir o eco.
Rejeitar uma chamada de entrada
1. Ao receber uma chamada, o auscultador toca e o LED azul cintila rapidamente 3
vezes a cada 3 segundos.
2. Prima por mais tempo a tecla ligado/desligado para rejeitar a chamada.
Conecte-se a um PC ou PDA
É permitido conectar o auscultador a um PC ou PDA com bluetooth incorporado que é
suportado por perfis de portal de áudio. Consulte o manual de utilizador de seu PC ou
PDA com bluetooth incorporado para obter mais informações.
Nota:
O driver com o bluetooth incorporado Microsoft® Windows® XP_SP2 não suporta
atualmente os perfis AV e do auscultador.
Informação Importante
Resolvendo Problemas
1. Nenhuma indicação de carregamento é mostrada.
Se a bateria do Fone de Ouvido estiver vazia ou não houver
sido usada por muito tempo, poderá levar alguns minutos
para o indicador do Fone de ouvido mostrar o estado de
carregamento com uma luz vermelha regular.
2. Se você não puder conectar o fone de ouvido ao seu
telefone :
-Assegure-se de que o fone de ouvido esteja ligado e
acoplado com seu telefone.
- Assegure-se de que a característica Bluetooth está ativada
no seu telefone.
-Assegure-se de que o fone de ouvido esteja dentro de um
máximo de 10 metros do seu telefone e que não haja
obstruções, tais como paredes, ou outros dispositivos
eletrônicos entre o fone de ouvido e o telefone.
-A lista de informação de acoplamento pode estar cheia. O
fone de ouvido pode armazenar a informação de até 8
81
Page 85

telefones ao mesmo tempo. Se a lista se tornar cheia,
reajuste o fone de ouvido aos ajustes originais.
-Se o fone de ouvido não responder às suas ações, remova
a bateria por um momento.
Cuidado e manutenção do produto
-Mantenha o fone de ouvido seco. Precipitação, umidade e
todos os tipos de líquidos ou umidade podem conter
minerais que irão corroer circuitos eletrônicos.
-Não use ou armazene o fone de ouvido em áreas
empoeiradas e sujas. Suas peças móveis podem ser
danificadas.
-Não armazene o fone de ouvido em áreas quentes. Altas
temperaturas podem encurtar a vida de dispositivos
eletrônicos, danificar baterias, e entortar ou dissolver certos
plásticos.
-Não armazene o fone de ouvido em áreas frias. Ao
aquecer-se, pode se formar umidade internamente, o qual
pode danificar placas de circuitos eletrônicos.
-Não tente abrir o fone de ouvido. Manuseio não especialista
pode danificá-lo.
-Não deixe o fone de ouvido cair, ser batido ou ser sacudido.
Manuseio bruto pode quebrar as placas de circuitos
internos.
-Não use solventes de limpeza químicas fortes ou
detergentes fortes para limpar o fone de ouvido.
-Não pinte o fone de ouvido. Pintura pode obstruir as peças
móveis e prevenir operação apropriada.
Crianças
Mantenha todos os acessórios fora do alcance de crianças
pequenas.
Informação da Bateria
● Baterias novas
Para uso a primeira vez, conecte o adaptador no Fone de
ouvido e carregue-o por ao menos 4 horas até que o
indicador vermelho esteja desligado.
● Cuidado da bateria
-A bateria recarregável tem uma vida de serviço longa se for
bem tratada.
82
Page 86

-Temperaturas extremas podem afetar a habilidade de sua
bateria de carregar.
-Use a bateria somente para o seu propósito intencionado.
-Nunca use nenhum carregador ou bateria que esteja
danificada.
-Deixando o fone de ouvido em lugares quentes ou frios, tais
como em um carro fechado no verão ou inverno, reduzirá a
capacidade e vida útil da bateria. Tente manter sempre a
bateria entre–10℃ e 45℃. Um fone de ouvido com uma
bateria quente ou fria pode não funcionar temporariamente,
mesmo quando a bateria está completamente carregada.
-Não descarte de uma bateria no fogo. Descarte as baterias
de acordo com as regulações locais. Não descarte como
dejetos domésticos.
Sobre Acoplamento
● O que é Acoplamento?
Acoplamento é um processo de associação de dispositivos
Bluetooth com outro. Ele estabelecerá uma conexão de
segurança permanente entre os dispositivos e permitirá um
acesso rápido aos serviços provistos sem a necessidade de
entrar as senhas.
● Senha Bluetooth
Cada fone de ouvido tem uma senha pré-definida 1234 para
acoplamento, que está armazenada em sua memória
interna. Você será solicitado a entrar a senha 1234 em um
processo de acoplamento com um telefone celular Bluetooth
ou outros dispositivos, contudo depende do tipo de
dispositivo Bluetooth conectado ao fone de ouvido.
Consulte o manual do usuário dos dispositivos para saber da
operação específica.
● Dispositivos acoplados permanecem acoplados
mesmo quando:
- Um dos dispositivos não estiver ligado.
- Uma conexão de serviço estiver interrompido ou o
serviço estiver parado.
- Um ou ambos dispositivos forem reinicializados.
83
Page 87

84
Page 88

POLSKA
85
Page 89

Wstęp
Przycisk
Przycisk uwalniajcy
ą
Zestaw słuchawkowy wykorzystuje technologię Bluetooth i łączy
się bezprzewodowo z kompatybilnym telefonem. W łatwy sposób
konwertuje rozmowy z telefonu komórkowego do słuchawki..
Zestaw pracuje w technologiach CSR BC02 i LTCC i zapewnia szybką
i dobrą transmisję głosu.
Uwaga: Jeśli telefon bluetooth ma jedynie profil "zestaw
słuchawkowy" bez profilu "zestaw głośnomówiący" ,
urządzenie to może obsługiwać tylko funkcję "rozmowy
przychodzące".
Nie obsługuje ono telefonów bluetooth bez profilów
“zestaw sł uchawkowy” i “zestaw głośnomówiący” takich,
jak Nokia 7650.
Na kolejnych stronach instrukcji znajdują się opisy, w jaki sposób
korzystać z urządzenia
Krótki opis
wczania/wyczania
Goniej
Ciszej
Uwaga: W dalszej czci tekstu RL oznacza czerwon diod, a BL
łś
łąłą
zaczep suchawki
Wcznik
Dioda
ęśąę
łą
Mikrofon
ł
zaczep suchawki
Suchawka
ł
– niebiesk.
ł
Gniazdko adowaniauwalniajcy
ą
łą
86
Page 90

Początek pracy
Ładowanie baterii
Gniazdko adowania
ł
Zestaw ten wyposażony jest w lekki i trwały akumulator
litowo-polimerowy, który musi być naładowany przed korzystaniem z
zestawu.
1. Przełącz włącznik na pozycję " I ", by włączyć urządzenie.
2. Włóż wtyczkę do gniazda ładowania w zestawie, a zestaw
automatycznie zostanie wyłączony.
3. Podczas ładowania akumulatora będzie się świeciła czerwona dioda.
Zgaśnie ona po naładowaniu.
adowanie baterii
Ł
Wcznik
łą
Uwaga:
- Ładowanie przez port USB w komputerze PC lub notebooku
a. Podłącz kabel ładowarki do złącza USB w zestawie.
b. Podłącz drugi koniec kabla USB do portu USB w
komputerze PC lub notebooku.
- Wyłącz włącznik, jeśli nie używasz zestawu przez dłuższy
czas (np. 2 miesiące). W ten sposób właściwie
zabezpieczysz urządzenie.
- Nie korzystaj z zestawu podczas ładowania akumulatora.
- Używaj tylko oryginalnej ładowarki.
- Gdy dioda mruga na czerwono, oznacza to, że akumulator
jest wyczerpany i należy go podładować.
- Jeśli akumulator jest w pełni naładowany, wystarcza on na
87
Page 91

5 - 6-godzinną rozmowę lub 200 godzin przebywania w
trybie wstrzymania.
Włączanie/wyłączanie
1. Włączanie: wciśnij przycisk włączania/wyłączania i przytrzymaj 2-3
sekundy. Niebieska dioda przez 1,5 sek. będzie mrugać szybko, a
następnie wolno.
2. Tryb wstrzymania: Zestaw przełącza się automatycznie ze stanu
aktywnego w stan wstrzymania, by zmniejszyć zużycie
prądu. Niebieska dioda mruga raz na 3 sek.
3. Wyłączanie: wciśnij przycisk włączania/wyłączania i przytrzymaj
przez 2-3 sek. Czerwona dioda przez 1,5 sek. będzie szybko
mrugać, a następnie obie diody (czerwona i niebieska) zgasną.
Uwaga:
- Podczas włączania nie trzymaj wciśniętego przycisku
włączania/wyłączania dłużej niż 7-8 sekund
gdyż zestaw może przełączyć się w tryb
"parowanie urządzeń". Jeśli tak się stanie, wciśnij przycisk
włączania/wyłączania,
a zestaw przełączy się w tryb rozmowy. Następnie
ponownie wciśnij
przycisk włączania/wyłączania - urządzenie wejdzie w tryb
wstrzymania.
Parowanie
Przed użyciem zestawu, należy go sparować z odpowiednim
urządzeniem Bluetooth. Zrobisz to dodając zestaw słuchawkowy do
listy sparowanych urządzeń w telefonie. Po podłączeniu oba
urządzenia rozpoznają się nawzajem.
1. Przed rozpoczęciem parowania, zestaw słuchawkowy należy
wyłączyć.
2. Wciśnij przycisk włączania/wyłączania i przytrzymaj go przez 7-8
sekund. Niebieska dioda zamruga szybko 5 razy, a następnie
zgaśnie na 2 sekundy. Następnie niebieska dioda zapali się, a
czerwona zgaśnie, po czym niebieska zgaśnie ponownie, a
czerwona zaświeci się światłem stałym. Oznacza to, że zestaw
88
Page 92

przełączył się w tryb parowania.
Wcinij przyc
ś
isk, by
W ó zaczep zgodnie z kierunkiem strzaki.
łżł
3. Upewnij się, czy telefon komórkowy działa w technologii Bluetooth,
a następnie włącz go, by móc wyszukać i sparować zestaw
słuchawkowy.(Więcej szczegółów znajdziesz w instrukcji obsługi
telefonu komórkowego.)
4. Telefon znajdzie zestaw słuchawkowy i na liście w sekcji
"Znalezione urządzenia" pojawi się napis "MSI FREE TALK FT200" .
5. Wybierz "MSI FREE TALK FT200", by rozpocząć parowanie.
6. Wprowadź hasło "1234" i potwierdź wciskając przycisk w zestawie
lub telefonie, gdy zostaniesz o to poproszony przez stosowny
komunikat w telefonie.
7. Po sparowaniu czerwona dioda jest wyłączona, a niebieska wolno
mruga. Następnie zestaw przechodzi w tryb wstrzymania.
8. Możesz już użyć zestawu słuchawkowego.
Uwaga:
- Zestaw słuchawkowy i telefon komórkowy sparowuje się
tylko jeden raz. Nie trzeba powtarzać tej czynności, jeśli nie
korzysta się z innego telefonu komórkowego.
- Jeśli przez dłuższy niemożliwe jest sparowanie zestawu,
przełącza się on automatycznie na tryb "Włączony",
jednakże nie można z niego korzystać i trzeba powtórzyć
punkty 1-3, by ponownie sparować urządzenia.
Wkładanie słuchawki
1. Załóż zaczep słuchawki za uchem, a mikrofon umocuj przy ustach.
2. Zaczep można dostosować do prawego lub lewego ucha, zgodnie z
poniższym rysunkiem.
Wyjmij
Prawe ucho
Umie
ść
Lewe ucho
uwolni zaczep
ć
suchawki
ł
89
Usyszysz sygna, potwierdzajcy, e
łłąż
zosta on umieszczony prawidowo.
łł
Page 93

Rozmowy
Odbieranie rozmowy przychodzącej
1. Gdy dzwoni telefon, a zestaw znajduje się w trybie wstrzymania,
zacznie on dzwonić po 2-3 sygnałach telefonu. Wciśnij przycisk
włączania/wyłączania i odbierz rozmowę. Jeśli zestaw nie dzwoni
po czwartym dzwonku telefonu, możesz odebrać rozmowę w
zestawie wciskają przycisk włączania/wyłączania.
2. Podczas rozmowy niebieska dioda będzie się zapalać dwa razy na
sekundę.
3. Jeśli rozmowę odbierasz przez telefon, głos pozostanie w nim.
Wciśnij na krótko przycisk włączania/wyłączania, by przenieść
głos do zestawu.
4. Maksymalna odległość między zestawem a telefonem
komórkowym wynosi 5 metrów w pomieszczeniu zamkniętym i
5-10 metrów na zewnątrz.
Zakończenie rozmowy
Chcąc zakończyć rozmowę wciśnij ponownie przycisk
włączania/wyłączania lub przycisk rozłączenia w telefonie.
Wykonywanie połączenia
Jeśli zestaw podłączony jest do telefonu, wybierz numer w telefonie w
normalny sposób.
Wybieranie głosowe
(Jeśli twój telefon ma tę funkcję)
1. W trybie wstrzymania, chcąc wybrać numer głosowo, wciśnij na
krótko przycisk włączania/wyłączania.
2. Podczas ustawiania wybierania głosowego, wciśnij na krótko
przycisk włączania/wyłączania, by przerwać
tę czynność.
Powtórne wybieranie ostatniego numeru
(Jeśli twój telefon ma tę funkcję)
1. W trybie wstrzymania przyciśnij przycisk zgłaśniania lub ściszania i
trzymaj przez 2 sekundy. Telefon powtórnie wybierze ostatni
numer.
2. Krótkie wciśnięcie przycisku włączania/wyłączania zakończy
90
Page 94

rozmowę.
Ustawienie głośności
Podczas rozmowy,
1. Wciśnij przycisk zgłaśniania, by zgłośnić dźwięk w słuchawce.
2. Wciśnij przycisk ściszania, by ściszyć dźwięk w słuchawce.
3. Chcąc chwilowo wyłączyć mikrofon, wciśnij przycisk zgłaśniania lub
ściszania i przytrzymaj 2 sekundy, aż usłyszysz sygnał.
4. Krótkie przyciśnięcie przycisku zgłaśniania lub ściszania powtórnie
włączy mikrofon.
Goniej
łś
Ciszej
Uwaga!! redukowanie echa
Jeśli słyszysz echo swojego głosu, musisz ustawić odpowiedni poziom
głośności w zestawie, a zostanie ono zredukowane.
Odrzucenie połączenia
1. Gdy ktoś chce się z tobą połączyć, zestaw zaczyna dzwonić a
niebieska dioda mruga szybko po trzy razy co trzy sekundy.
2. Chcąc odrzucić rozmowę wciśnij i długo przytrzymaj przycisk
włączania/wyłączania.
Połączenie z komputerem i PDA
Możesz połączyć zestaw z komputerem i PDA z włączoną funkję
Bluetooth. Jest to obsługiwane przez Audio Gateway Profiles. Chcąc
uzyskać więcej informacji, należy zapoznać się z instrukcją obsługi
komputera lub PDA z funkcją Bluetooth.
Uwaga
91
Page 95

Sterownik Bluetooth dla Microsoft® Windows® XP_SP2
obecnie nie obsługuje profilu AV i profilu słuchawkowego.
Ważne informacje
Rozwiązywanie problemów
1. Brak sygnałów oznaczających ładowanie.
W przypadku baterii zestawu słuchawkowego, która
została całkowicie rozładowana lub nie była używana przez
długi okres wskaźnik stanu ładowania (czerwona dioda
LED) może zaświecić się dopiero po upływie kilku minut.
2. Jeśli nie można połączyć zestawu słuchawkowego z
telefonem:
- Upewnij się, że zestaw został włączony i połączony w parę
z telefonem.
- Upewnij się, że w telefonie włączona została funkcja
Bluetooth.
- Sprawdź, czy zestaw słuchawkowy znajduje się w
promieniu 10 m od telefonu i że między zestawem i
telefonem nie ma żadnych przeszkód (np. ścian czy innych
urządzeń elektronicznych).
- Lista danych dotyczących łączenia w pary w zestawie
słuchawkowym może być pełna. Jednocześnie w zestawie
mogą być przechowywane dane dotyczące połączeń z
maksymalnie 8 telefonami. Jeśli lista zostanie zapełniona,
zresetuj zestaw w celu przywrócenia pierwotnych ustawień.
- Jeśli zestaw nie odpowiada na czynności użytkownika, na
krótką chwilę wyjmij z niego baterię.
Konserwacja produktu
- Zestaw słuchawkowy musi być suchy. Opady
atmosferyczne, wilgoć i wszelkie ciecze mogą zawierać
minerały powodujące korozję obwodów elektrycznych.
- Zestawu nie należy przechowywać ani używać w
obecności kurzu i pyłu. Uszkodzeniu mogą ulec jego
ruchome części.
92
Page 96

- Zestawu nie należy przechowywać w wysokich
temperaturach. Wysokie temperatury mogą wpływać na
skrócenie okresu eksploatacji urządzeń elektronicznych,
powodować uszkodzenia baterii i powodować wypaczanie
lub topienie niektórych tworzyw sztucznych.
- Zestawu nie należy przechowywać w niskich
temperaturach. Po ogrzaniu wewnątrz urządzenia może
powstać wilgoć i uszkodzić obwody elektroniczne.
- Nie należy próbować otwierać zestawu. Obsługa przez
niewyspecjalizowane osoby może prowadzić do
uszkodzenia urządzenia.
- Zestawu nie należy upuszczać, uderzać ani nie należy
nim potrząsać. Nieostrożna obsługa może prowadzić do
uszkodzenia wewnętrznych płytek z obwodami.
- Zestawu nie należy czyścić przy użyciu żrących substancji
chemicznych, rozpuszczalników czyszczących ani silnych
detergentów.
- Nie należy malować zestawu. Farba może zatkać
ruchome części i uniemożliwić prawidłowe działanie
urządzenia.
Dzieci
Wszystkie akcesoria należy chronić przed dziećmi.
Informacje o bateriach
● Nowe baterie
Przed pierwszym użyciem do zestawu należy podłączyć
zasilacz i ładować zestaw przez co najmniej 4 godziny,
do momentu wyłączenia czerwonej diody LED.
● Konserwacja baterii
- Bateria przeznaczona do wielokrotnego ładowania,
używana zgodnie ze wskazówkami, charakteryzuje się
długim okresem eksploatacji.
- Bardzo wysokie i bardzo niskie temperatury mogą
wpływać na proces ładowania baterii.
- Baterii należy używać tylko zgodnie z przeznaczeniem.
- Nigdy nie należy używać uszkodzonej ładowarki ani
baterii.
93
Page 97

- Pozostawianie zestawu słuchawkowego w miejscach o
wysokich lub niskich temperaturach (np. w zamkniętym
samochodzie podczas letnich lub zimowych warunków
pogodowych) spowoduje zmniejszenie pojemności i
skrócenie okresu eksploatacji baterii. Należy zawsze starać
się przechowywać baterię w temperaturze od –10°C do
45°C. Zestaw słuchawkowy z gorącą lub zimną baterią
może przez jakiś czas nie działać — nawet jeśli bateria jest
w pełni naładowana.
- Baterii nie należy wrzucać do ognia. Baterie należy
utylizować zgodnie z miejscowymi przepisami. Baterii nie
należy wyrzucać razem z odpadami domowymi.
Informacje o łączeniu w pary
● Co to jest łączenie w pary?
Łączenie w pary to proces kojarzenia urządzeń Bluetooth.
W wyniku tego procesu ustanawiane jest trwałe połączenie
między urządzeniami, umożliwiające szybkie uzyskiwanie
dostępu do odpowiednich usług bez konieczności
wprowadzania kodu.
● Kod Bluetooth
W pamięci wewnętrznej każdego zestawu słuchawkowego
przechowywany jest domyślny kod łączenia w pary: „1234”.
Podczas łączenia zestawu słuchawkowego w parę z
telefonem komórkowym lub innym urządzeniem
wprowadzenie kodu „1234” jest zwykle wymagane, ale
zależy to od rodzaju urządzenia Bluetooth, z którym
łączony jest zestaw. Informacje na temat obsługi
poszczególnych urządzeń można znaleźć w instrukcjach
obsługi tych urządzeń.
● Urządzenia pozostają połączone w parę nawet
wtedy, gdy:
- jedno z nich nie jest włączone,
- połączenie usługi zostało przerwane lub usługa została
zatrzymana,
- jedno lub oba urządzenia zostały uruchomione ponownie.
94
Page 98

PУССКИЙ
95
Page 99

Предисловие
Эта беспроводная гарнитура использует технологию Bluetooth для
беспроводного подсоединения к совместимому телефону. Она без труда
обеспечивает связь между мобильным телефоном и гарнитурой. Эта
гарнитура, выполненная на основе технологии CSR BC02 и LTCC,
гарантирует быструю и надежную голосовую связь.
Примечание: Эта Bluetooth-гарнитура поддерживает лишь
функцию «приема вызова», если bluetooth-телефон
поддерживает лишь профиль гарнитуры, без профиля
«свободные руки».
Она не поддерживает bluetooth-телефон без гарнитуры и
профиля «свободные руки», например Nokia 7650.
Следующая страница посвящена тому, как использовать это изделие
Обзор
Громкость выше
Кнопка включения-выключения
Системная кнопка
Кнопка
высвобождения
(заушника)
Заушник
Микрофон
Громкость ниже
Примечание: В последующем изложении RL означает: красный световой индикатор состояния - и
BL: синий световой индикатор состояния.
Световой СИД-индикатор
Динамик Разъем для подзарядки
96
Page 100

Начало работы
Зарядка аккумулятора
Системная кнопка
Разъем для
подзарядки
Зарядка аккумулятора
Эта гарнитура снабжена легким и долговечным литиевым полимерным
подзаряжаемым аккумулятором, который нужно зарядить перед
применением.
1. Переведите "System key" (Системную кнопку) в положение " I " для
включения питания системы.
2. Подсоедините зарядное устройство к разъему для подзарядки
гарнитуры и гарнитура автоматически отключится.
3. В процессе зарядки засветится индикатор RL и погаснет после
завершения зарядки.
Примечание:
- Зарядка по каналу USB от настольного компьютера или ноутбука
a、 Кабель USB подключите к разъему зарядного устройства на
гарнитуре.
b、 Другой конец кабеля USB подключите к разъему USB
настольного компьютера или ноутбука.
- Выключите системную кнопку (System Key), если Вы не
собираетесь длительно использовать эту гарнитуру (порядка 2
месяцев), чтобы обеспечить сохранность гарнитуры.
- Не пользуйтесь головным телефоном в процессе зарядки.
- Пользуйтесь только прилагаемым зарядным устройством.
- Когда СИД-индикатор RL мигает, это означает, что аккумулятор
разряжен и его следует подзарядить.
97
 Loading...