

Page 1

DRAGON CENTER
User Guide
(For MSI’s Motherboards & Desktops)
1
Page 2

Contents
About DRAGON CENTER ........................................................................................ 5
Get Started ............................................................................................................. 6
System Requirements ............................................................................................ 6
Supported Hardware .............................................................................................. 6
Installing DRAGON CENTER .................................................................................. 6
Launching DRAGON CENTER ................................................................................. 8
How to completely remove DRAGON CENTER ...................................................... 8
DRAGON CENTER Basics ....................................................................................... 9
Main Screen ............................................................................................................ 9
Information Bar ...................................................................................................... 9
Main Menu ............................................................................................................ 10
Sub Menu .............................................................................................................. 10
Game Optimization .............................................................................................. 11
Gaming Mode ........................................................................................................ 11
Gaming Mode Option ............................................................................................ 11
How to Add Games into Gaming Mode ................................................................. 12
How to Remove Games from Gaming Mode ........................................................ 13
How to Enable Gaming Mode ............................................................................... 14
User Scenario ...................................................................................................... 15
Selecting User Scenario ....................................................................................... 15
Canceling User Scenario ...................................................................................... 16
Setting User Options............................................................................................. 17
How to Adjust the CPU Frequency ....................................................................... 17
How to Adjust the Motherboard Voltage .............................................................. 18
How to Use Game Boost ....................................................................................... 19
How to Adjust the GPU and GPU Memory Frequency .......................................... 21
How to Adjust the DRAM Timing .......................................................................... 22
How to Adjust the DRAM Voltage ......................................................................... 23
Adjusting the Fan Speed ....................................................................................... 24
How to Enable MSI Fast Boot ............................................................................... 26
Monitor ................................................................................................................. 27
How to Use the Hardware Monitor ....................................................................... 27
FROZR AI Cooling ................................................................................................. 29
How to enable FROZR AI Cooling ......................................................................... 29
Setting Manual Mode for FROZR AI Cooling ........................................................ 30
Game Highlights .................................................................................................. 31
How to Share Game Highlights to Social Media ................................................. 32
2
Contents
Page 3

How to Remove Game Highlights ......................................................................... 33
Installing MSI Companion .................................................................................... 34
Setting MSI Companion ........................................................................................ 36
How to Discover MSI Companion ......................................................................... 39
Setting Game Highlights....................................................................................... 40
True Color ............................................................................................................ 42
True Color Preset Options .................................................................................... 42
How to customize screen color ............................................................................ 43
LAN Manager ....................................................................................................... 44
Network Control Menu ......................................................................................... 44
Setting Network Speed ......................................................................................... 45
Customizing Application Priorities ....................................................................... 46
Mystic Light .......................................................................................................... 47
Voice Command ................................................................................................... 50
DYNAMIC DASHBOARD Control Panel (optional) ................................................ 55
DYNAMIC DASHBOARD II Control Panel (optional) ............................................. 57
Gaming Gear ........................................................................................................ 59
Gaming Knob (optional) ........................................................................................ 60
Noise Cancellation (optional) .............................................................................. 63
Product Registration ........................................................................................... 64
Live Update .......................................................................................................... 65
System Info .......................................................................................................... 66
Microsoft APP ...................................................................................................... 67
Gaming Hotkey (Install by Live Update) .............................................................. 68
Recording a Macro ............................................................................................... 68
Creating and Editing a Macro ............................................................................... 70
Enabling and Disabling the Macro ....................................................................... 71
Making Hotkeys for Windows OS.......................................................................... 72
Making Hotkeys for Login ..................................................................................... 73
Delete the Hotkeys ............................................................................................... 73
Setting Hotkey for Mouse DPI .............................................................................. 74
Smart Tool (Install by Live Update)..................................................................... 75
How to Create a USB Flash Drive Installer for Windows ..................................... 75
Super RAID ........................................................................................................... 76
How to Uninstall Intel® Optane™ Memory .......................................................... 77
Voice Boost (Install by Live Update) .................................................................... 78
Enabling Voice Boost ............................................................................................ 78
Contents
3
Page 4

Super Charger (Install by Live Update) .............................................................. 79
DPC Latency Tuner (Install by Live Update) ....................................................... 80
Notices ................................................................................................................. 81
Copyright ............................................................................................................... 81
Revision History .................................................................................................... 81
4
Contents
Page 5

About DRAGON CENTER
∙ Optimize game settings and enjoy a high quality gaming experience.
∙ System performance tuning, you can choose overclock or silent.
∙ Monitor system information.
∙ Adjust the best display settings for your eyes.
∙ Register your MSI products.
∙ Control the LED light effects and synchronize effects to your devices.
∙ Manage network connection settings.
∙ Use utilities to control special features.
Important
⚠
THE SOFTWARE FEATURES IN THIS USER GUIDE VARY BY
PRODUCT.
THE SCREENSHOTS FOR THE UI IN THIS USER GUIDE ARE FOR
REFERENCE ONLY AND THE ACTUAL UI DESIGN MAY VARY.
About DRAGON CENTER
5
Page 6
Get Started
System Requirements
∙ Operating System:
▪ Windows 10 64-bit
Supported Hardware
∙ Motherboard:
▪ MSI motherboards
∙ Graphics card:
▪ MSI GeForce RTX 20 & GTX 16 Series graphics cards or newer
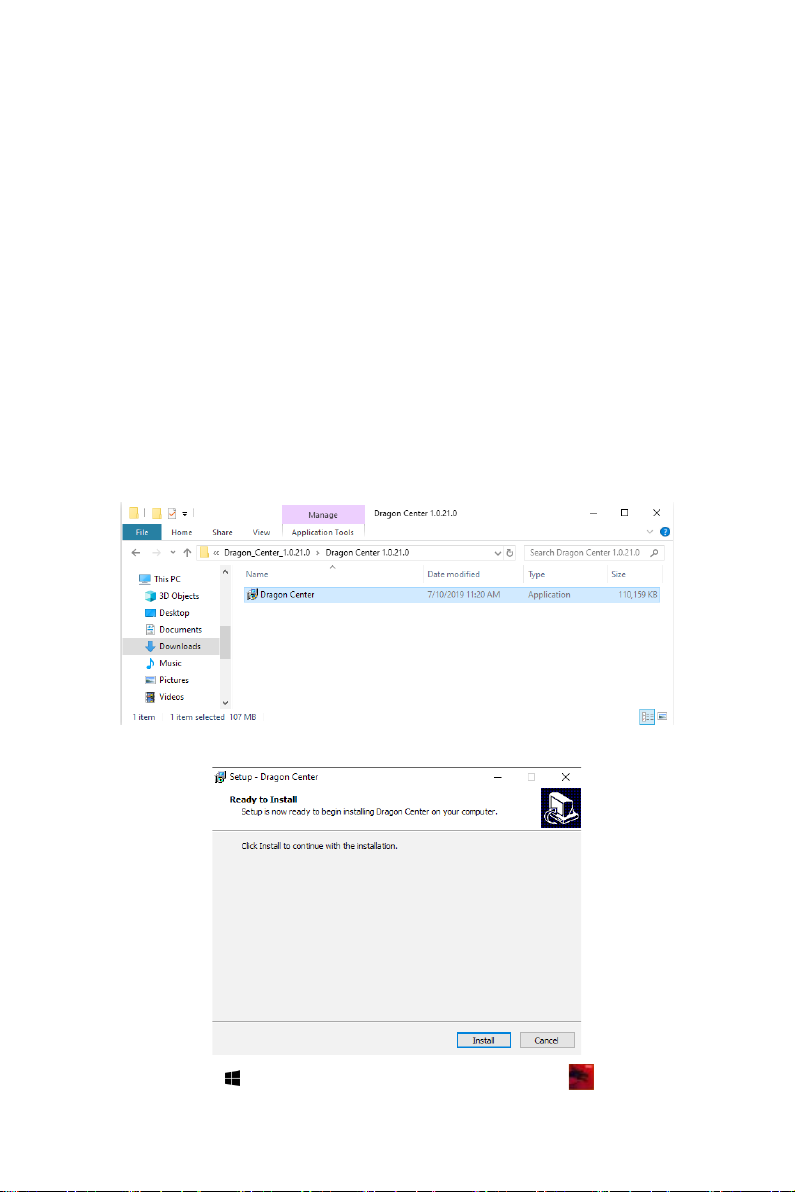
Installing DRAGON CENTER
1. Go to MSI Website download DRAGON CENTER.
2. Extract the downloaded file.
3. Double-click on the extracted Dragon Center setup program.
4. Click Install to continue the process.
5. Open the Start menu, then right-click on Dragon Center icon .
Get Started
6
Page 7
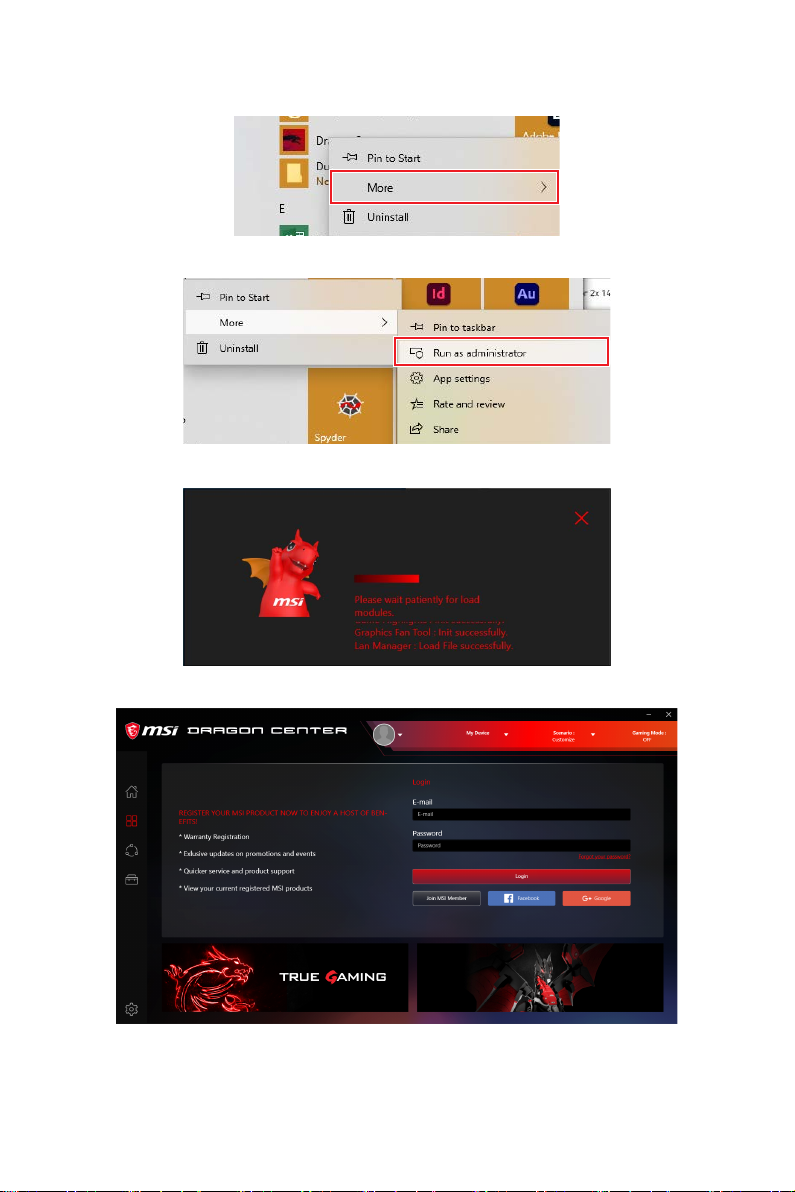
6. Hover over More.
7. Select Run as administrator.
8. Please wait until the installation is complete.
9. You can start to use DRAGON CENTER.
Get Started
7
Page 8
Launching DRAGON CENTER
Open the Start menu, then select Dragon Center .
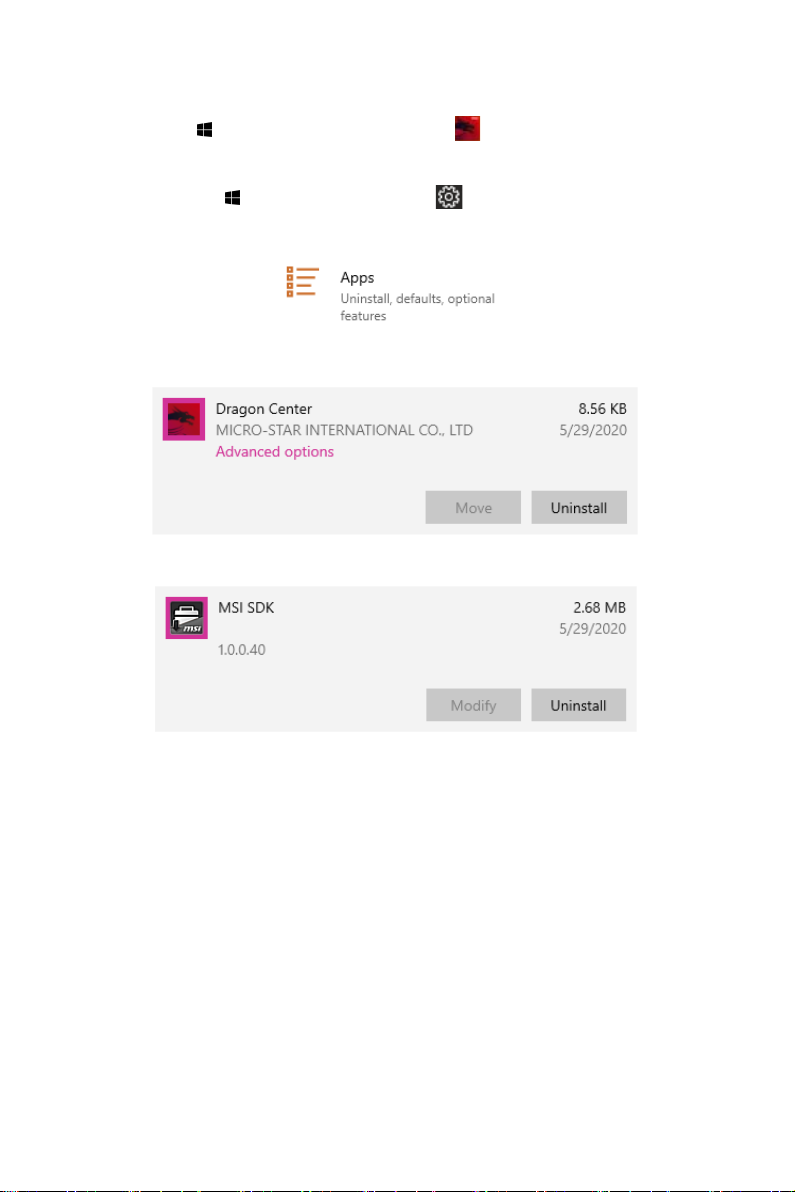
How to completely remove DRAGON CENTER
1. Open the Start menu, then select settings .
2. Select Apps.
3. Uninstall Dragon Center.
4. Uninstall MSI SDK.
Get Started
8
Page 9
DRAGON CENTER Basics
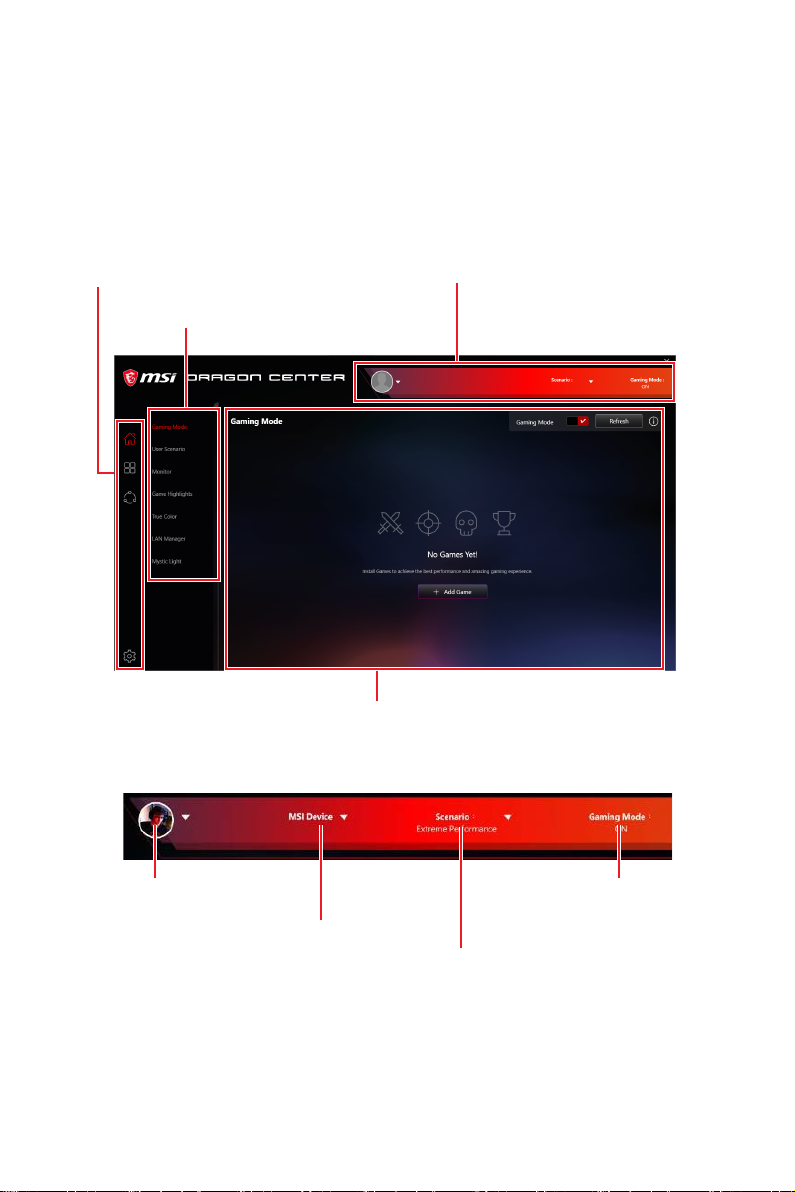
Main Screen
Important
⚠
The screenshots for the UI in this user guide are for reference only and the actual UI
design may vary.
Main Menu
Sub Menu
Information Bar
Information Bar
Operation Panel
Display System
Profile Picture/
Login/ Logout
Display MSI product
currently in use. Click
to enter the control
page.
Display mode
currently applied.
Switch between
different modes by
selecting a mode
from the drop-down
menu.
Display Gaming
Mode Status.
DRAGON CENTER Basics
9
Page 10
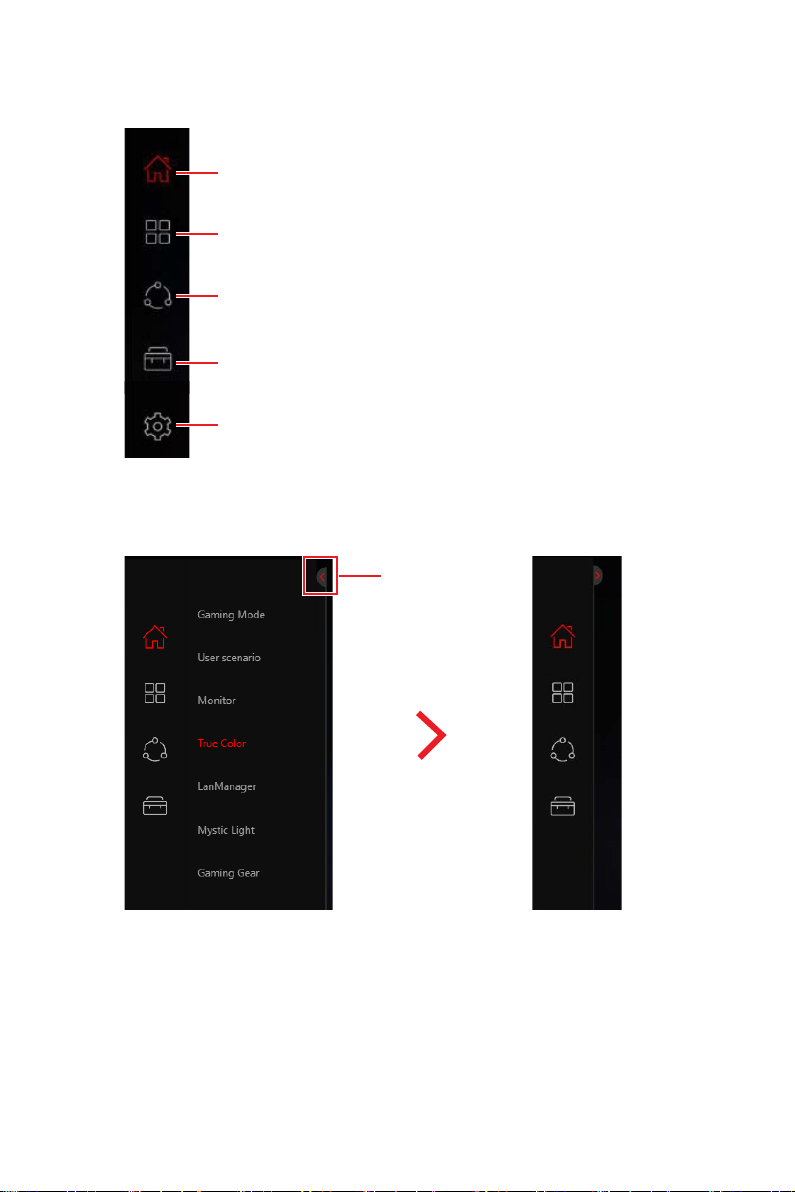
Main Menu
Sub Menu
Home
My Device
Support
Tools
Setting
Collapse Button
DRAGON CENTER Basics
10
Page 11
Game Optimization
The Gaming Mode feature will optimize the computer system, monitor, cooler and
other peripherals to provide the best gaming experience.
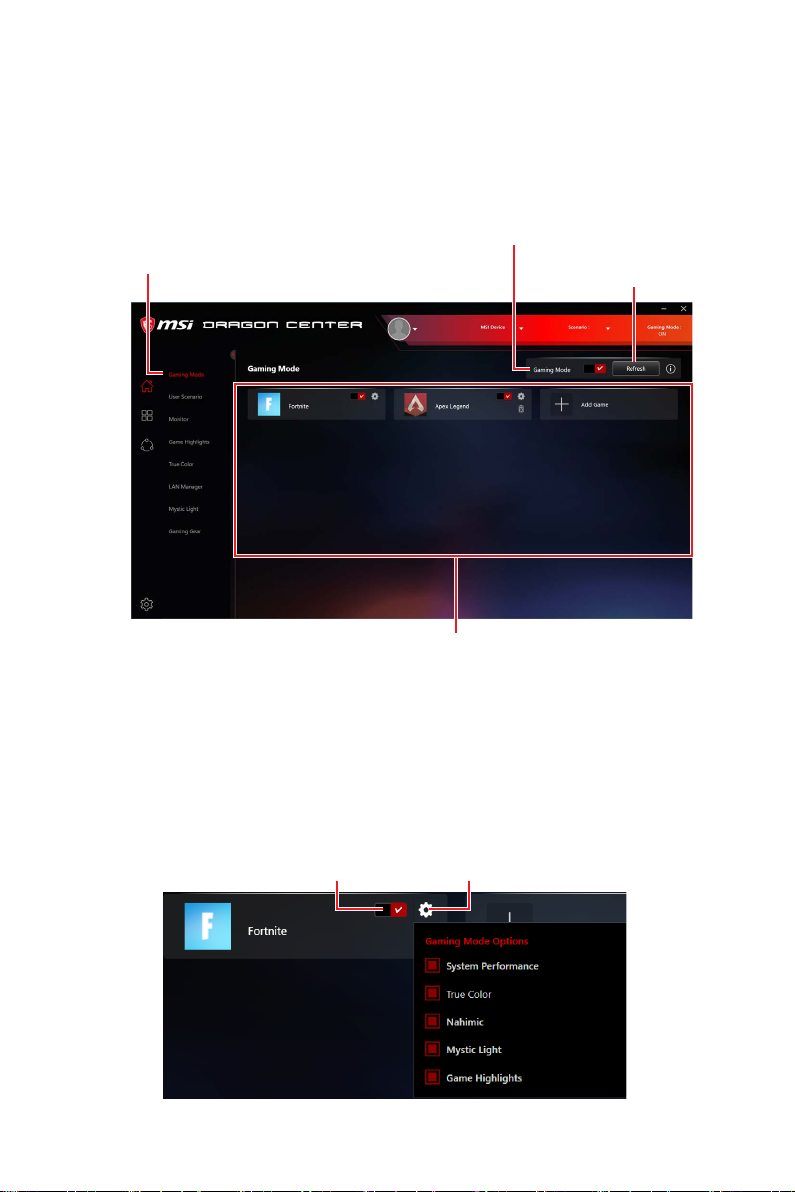
Gaming Mode
Select Gaming Mode in the sub
menu to enter Gaming Mode
control panel
Applications Optimized by Gaming Mode
Important
⚠
Gaming Mode doesn’t support PRO Series Motherboards.
Gaming Mode switch
Refresh software
list button
Gaming Mode Option
Game Mode switch and option settings are available in the upper right corner of each
game icon. You can choose whether the game applies Game Mode, such as System
Performance, True Color, Nahimic and Touchpad Disable while playing the game.
On/Off the switch to
apply Gaming mode
Option Settings
Game Optimization
11
Page 12
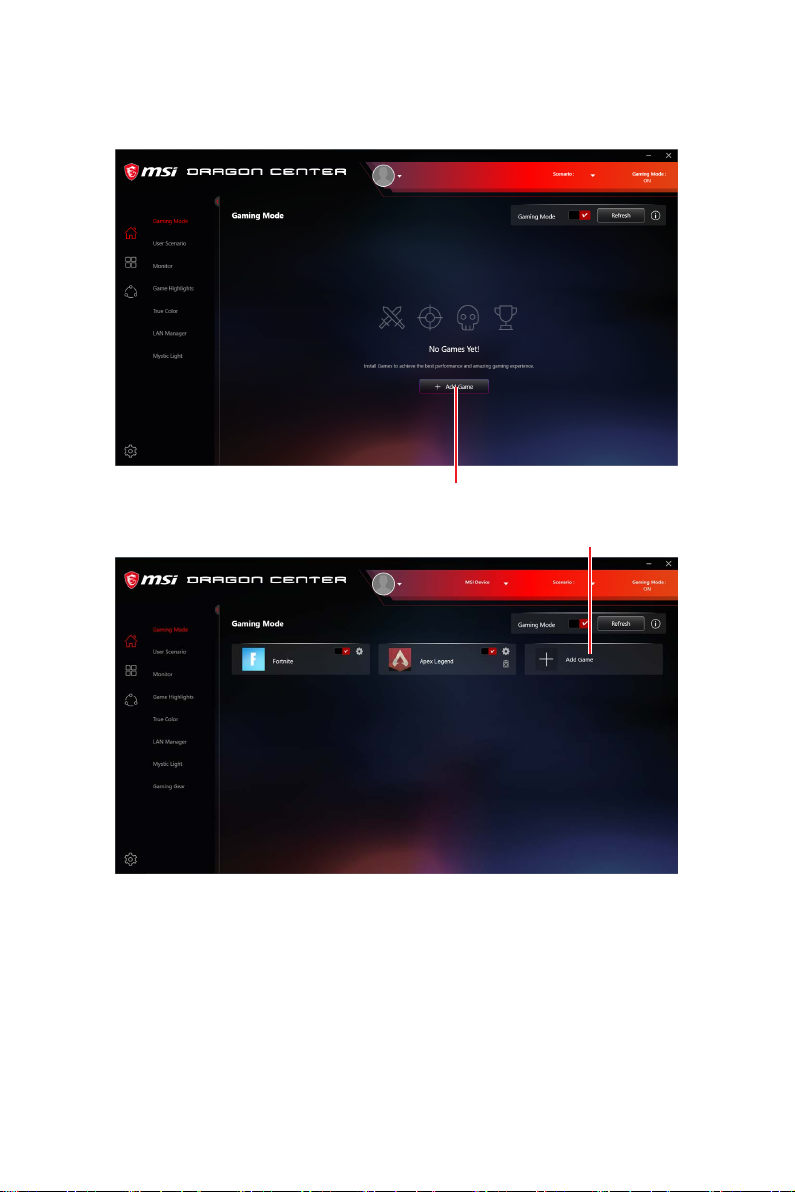
How to Add Games into Gaming Mode
Click Add Game button. Then select the game's .exe file.
Add Game button
Add Game button
Game Optimization
12
Page 13
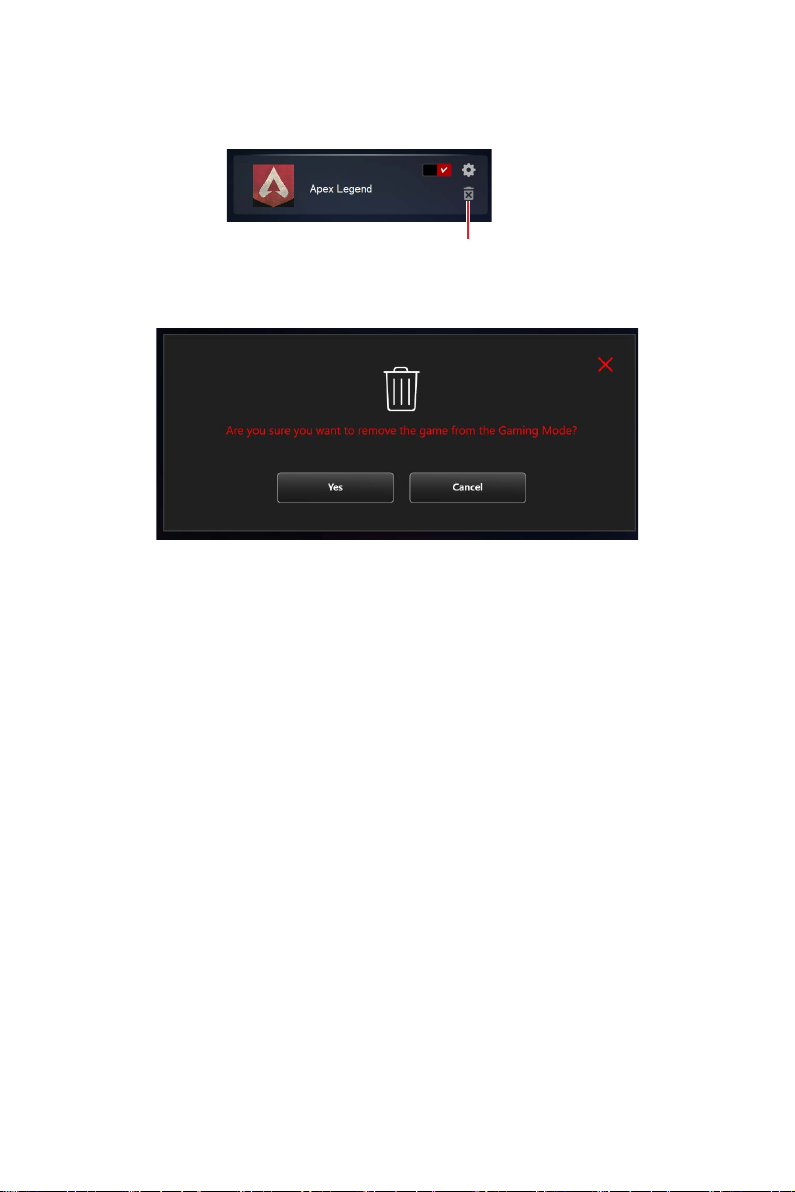
How to Remove Games from Gaming Mode
1. Click Remove Game icon.
Remove Game button
2. When prompted, click Yes button to confirm this deletion, or click Cancel button
to cancel this process.
Game Optimization
13
Page 14
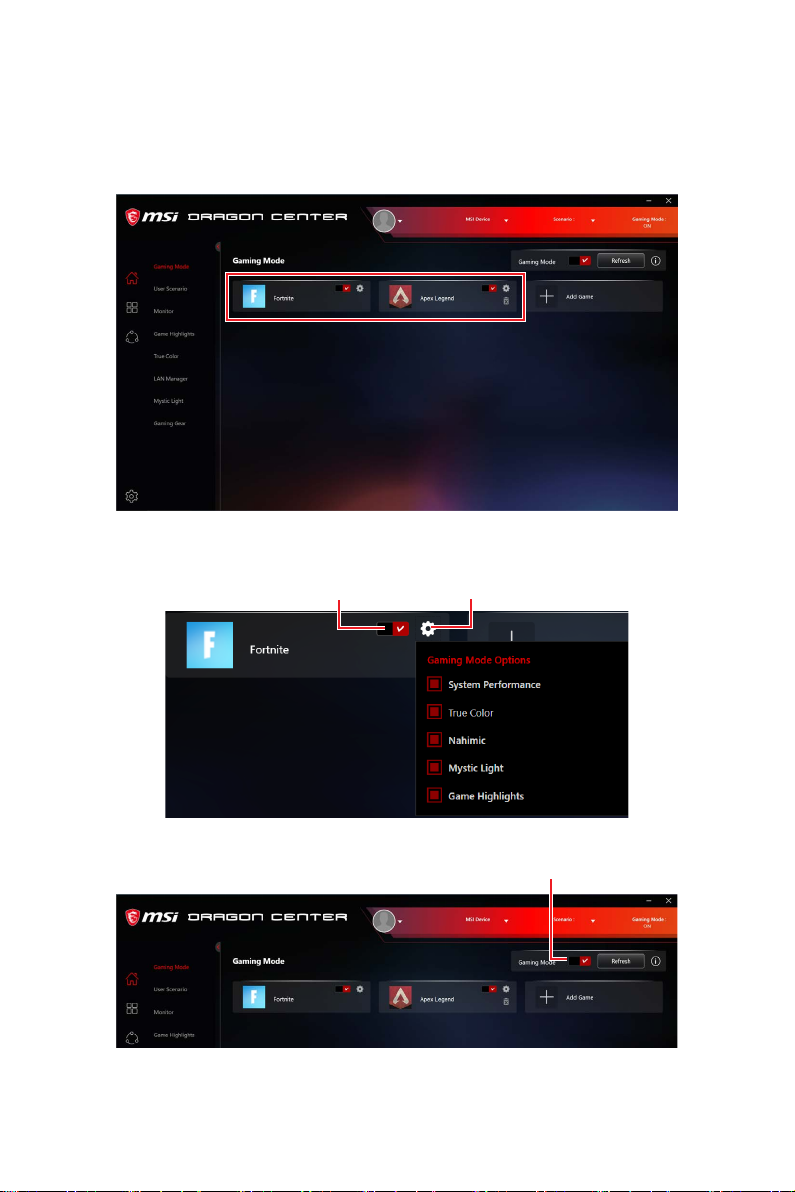
How to Enable Gaming Mode
You can enable the Gaming Mode to adjust settings for System Performance, True
Color, Nahimic, Mystic Light and Game Highlights while playing the game.
1. Select the installed game icon in Home > Gaming Mode.
2. Check Gaming Mode Options.
3. Turn on the switch for the game.
On/Off the switch
Option Settings
4. Turn on Gaming Mode switch.
5. Play the game.
Game Optimization
14
Gaming Mode switch
Page 15

User Scenario
In addition to Gaming mode, users can choose from three scenarios and one
customized option depending on different situations. Each scenario has default
settings for CPU, DRAM, Fan, and Graphics Card. There is one more function called
Software Control Mode, which can switch on/off only CPU and Fan settings in the
selected mode.
Selecting User Scenario
1. Go to Home > User Scenario.
2. Turn on/off Software Control Mode in the upper right corner of the screen.
3. Select one of the options.
4. Restart your computer to apply the settings.
▪ Extreme Performance – A configuration that boosts the highest possible
performance for AAA games, and enables overclocking.
▪ Balance - MSI recommended settings for average users.
▪ Silent - A configuration that allows system to run smoothly with minimum
loading.
▪ Customize - Customize the performance level and fan speed as desired.
User Scenario
15
Page 16
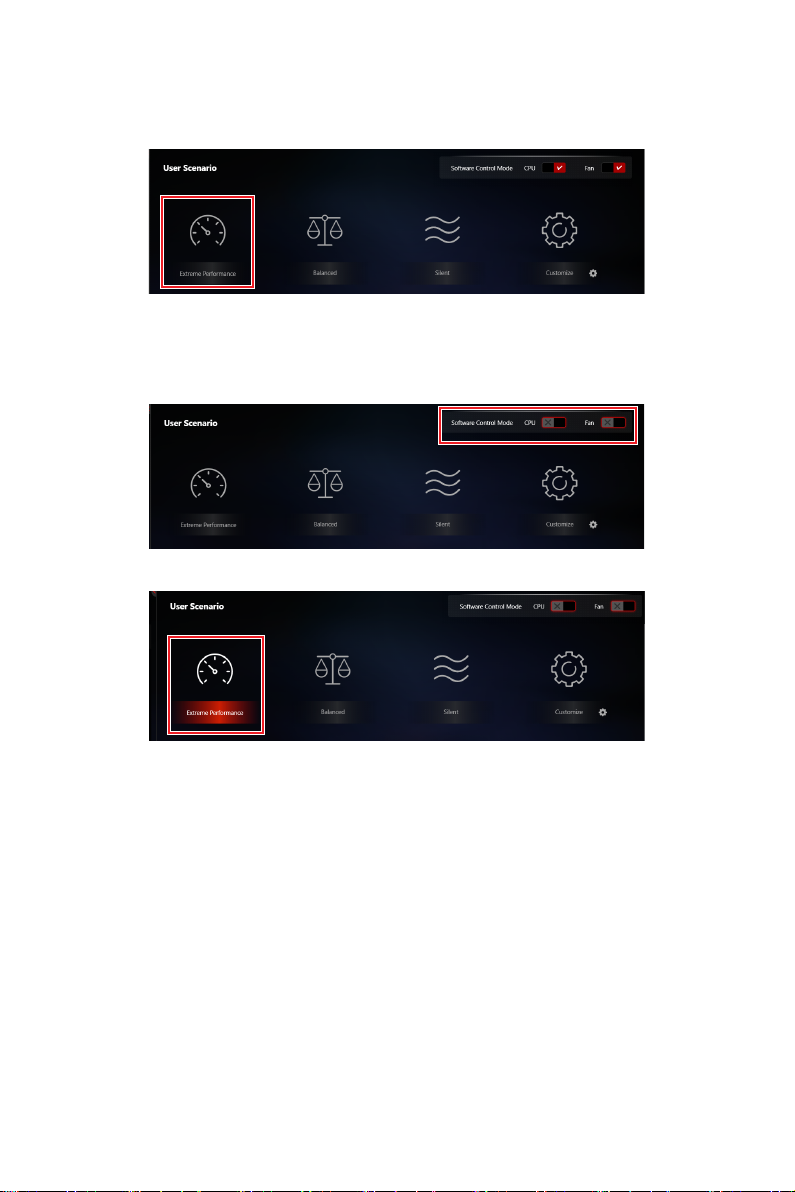
Canceling User Scenario
1. Click on the selected scenario again.
2. Restart your computer to apply the BIOS settings.
How to disable CPU/Fan settings when applying User Scenario
1. Turn off Software Control Mode in the upper right corner of the screen.
2. Select one of the options to apply the mode except for CPU/Fan settings.
3. Restart your computer to apply the settings.
Important
⚠
∙
Software Control Mode only controls the options in User Scenario, not including
Gaming Mode.
∙
After turning on or off Software Control Mode, you need to select one of User
Scenario modes to apply the settings.
∙
If you turn on Gaming Mode switch and also select one of User Scenario modes, the
system will apply Gaming Mode settings first.
User Scenario
16
Page 17
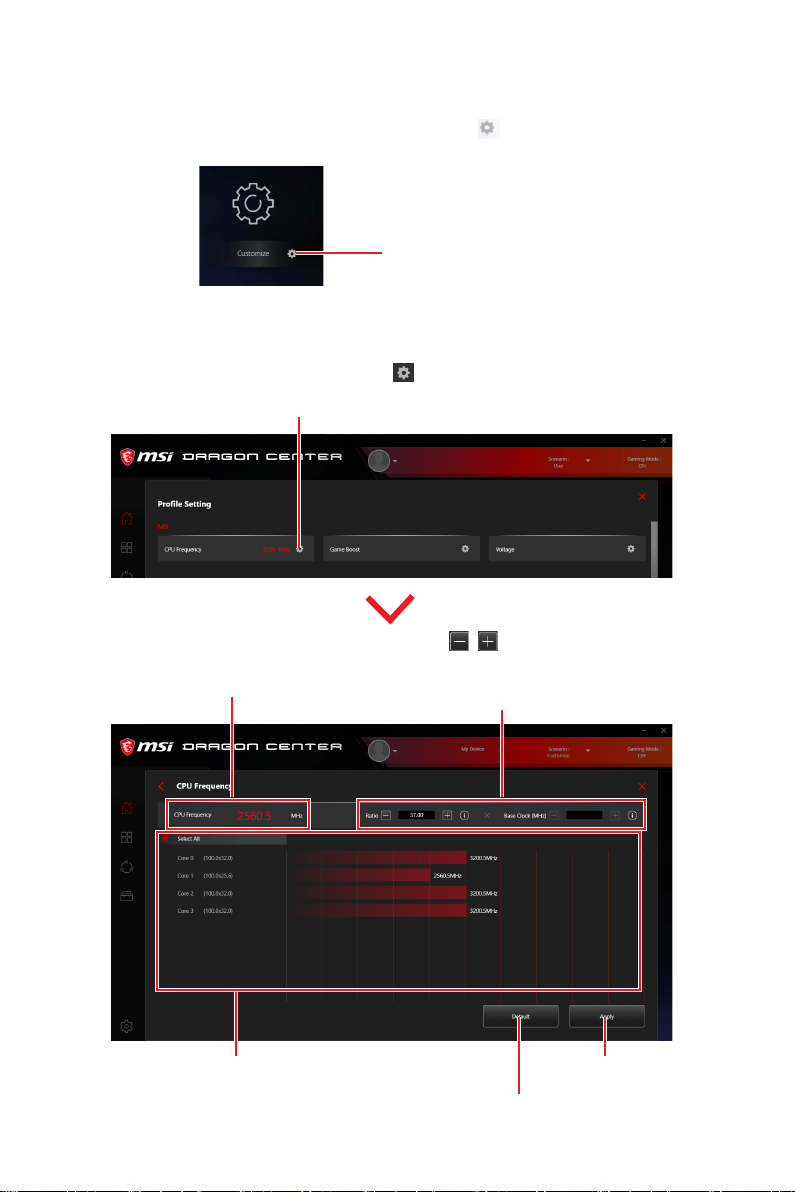
Setting User Options
In the lower right corner of User icon, click the setting icon to customize user
options.
Click to set User Options
How to Adjust the CPU Frequency
1. Go to Home > User Scenario, click Customize.
2. Click the MB > CPU Frequency setting
Click here
CPU frequency = Ratio * BCLK
.
Click / to adjust CPU ratio and
Base Clock frequency (BCLK). You
can also fill out the value in the input
box.
Select all or individual cores
Apply changes
Default values
User Scenario
17
Page 18
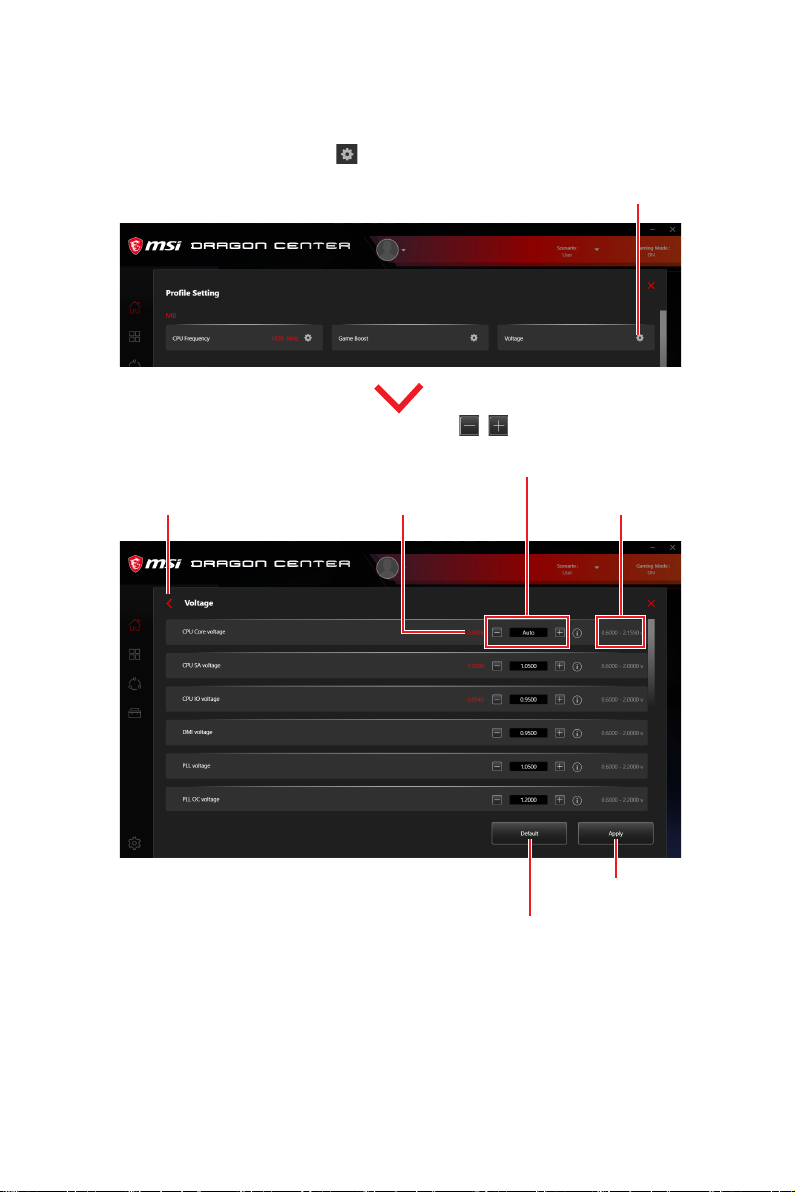
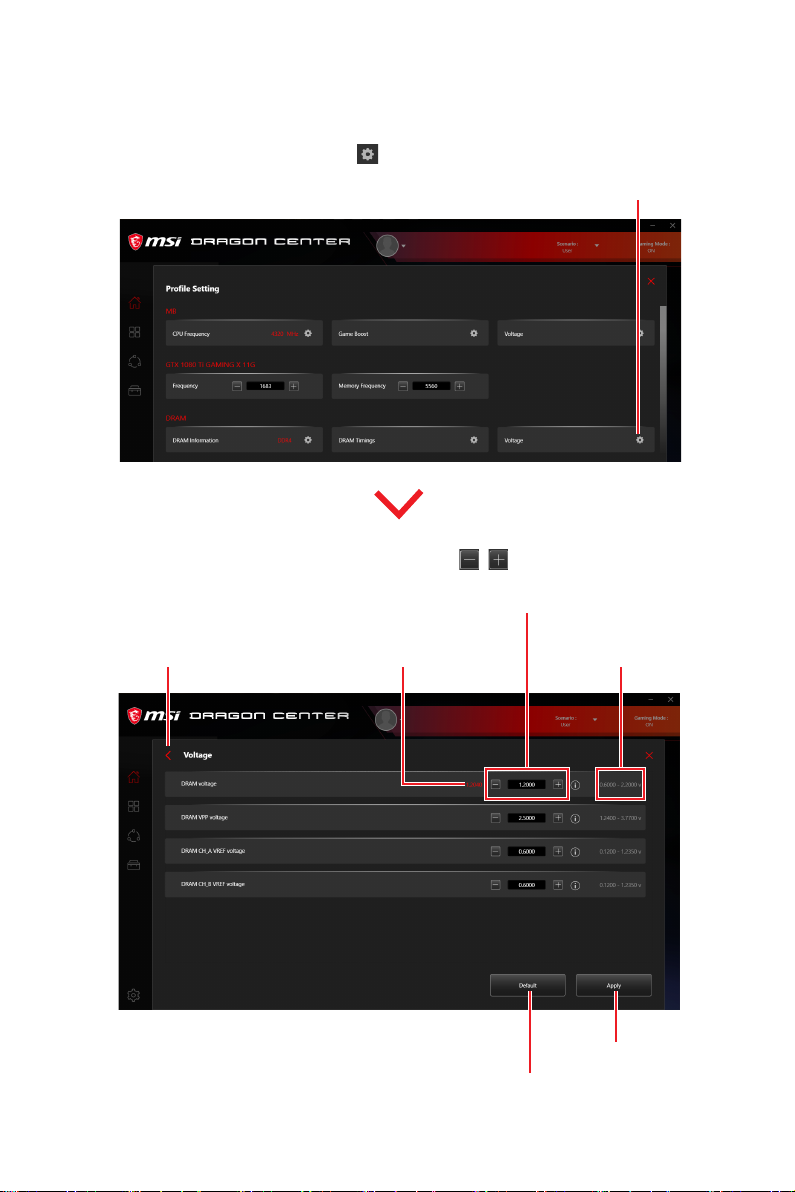
How to Adjust the Motherboard Voltage
1. Go to Home > User Scenario, click Customize.
2. Click the MB > Voltage setting
.
Click / to adjust voltage value.
You can also fill out the value in the
input box.
Click here
Back
Current voltage value
Range
Apply changes
Default values
User Scenario
18
Page 19
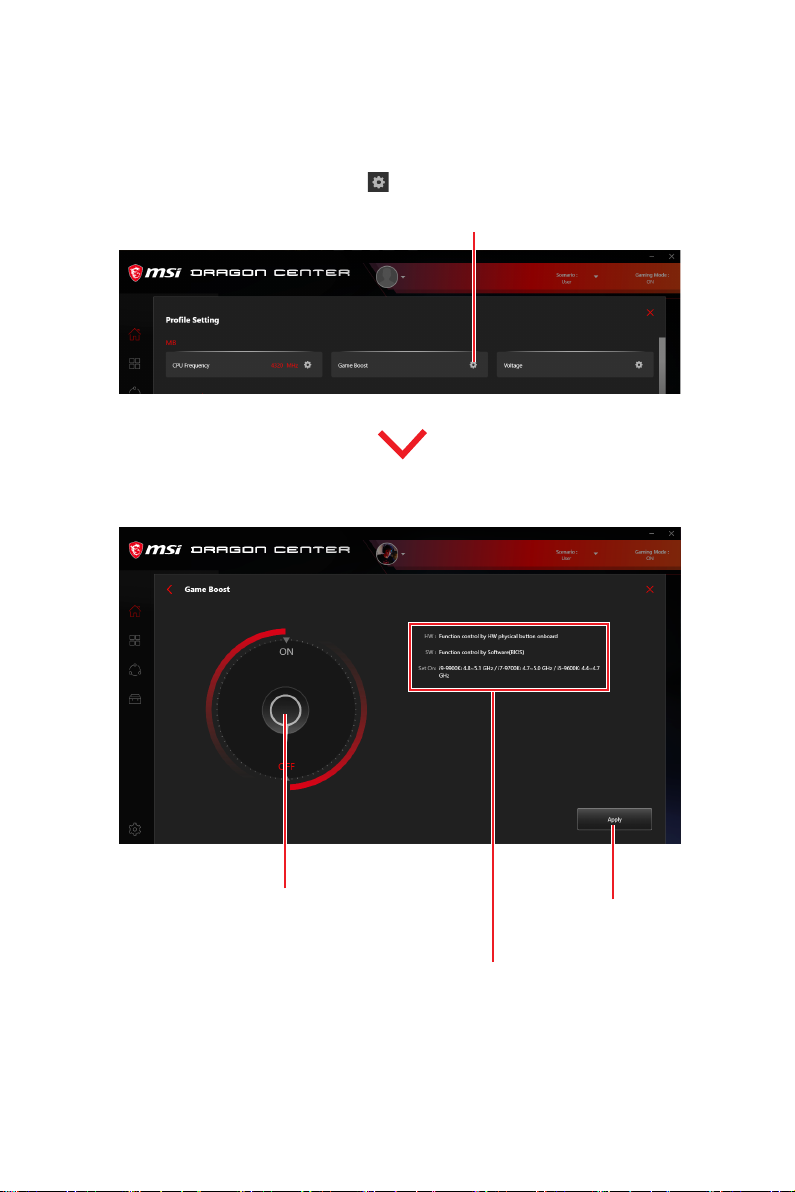
How to Use Game Boost
The GAME BOOST feature allows you to overclock your computer.
1. Go to Home > User Scenario, click Customize.
2. Click the MB > Game Boost setting
For Motherboard with Game Boost
.
Click here
On/Off button to enable/disable
Game Boost feature
Apply changes
Function description
User Scenario
19
Page 20
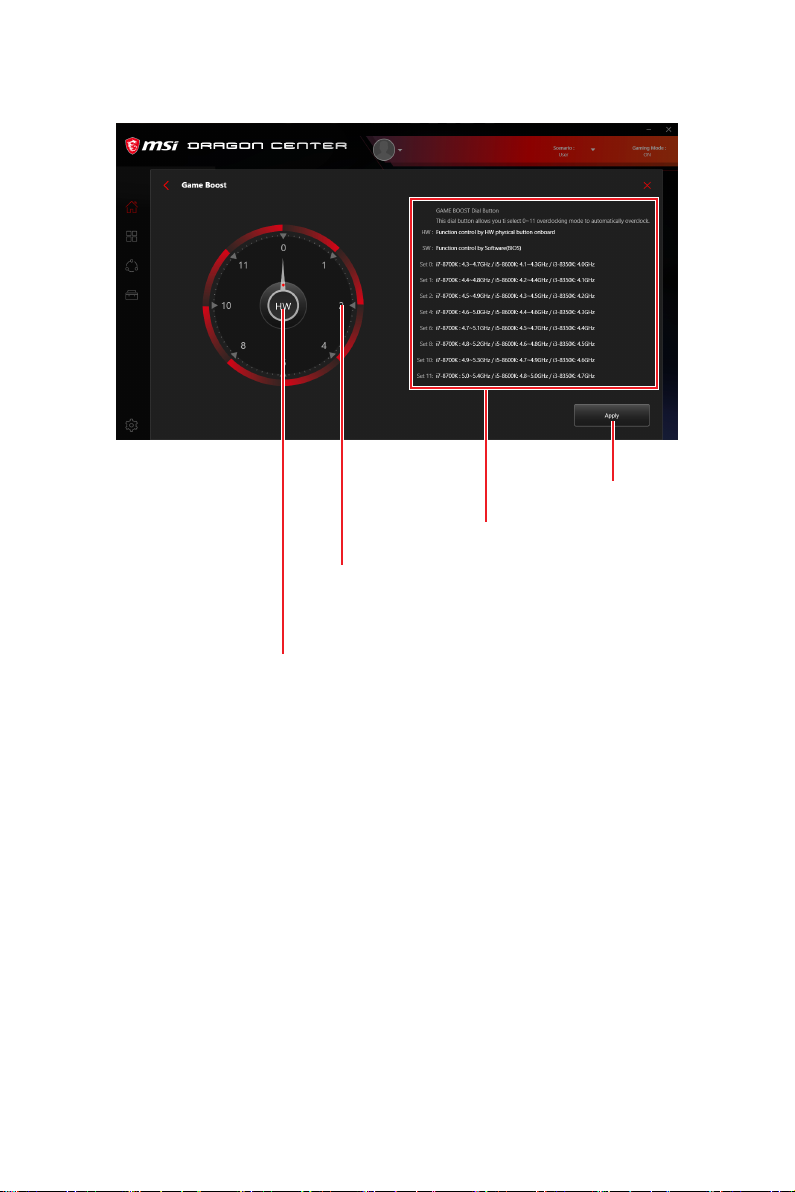
For Motherboard with Game Boost 8 Stages
Click 0~11 number to select a stage
from number 0 (default) to number 11
(extreme) for overclocking the processor.
DRAGON CENTER provides the software interface
instead of GAME BOOST knob on the motherboard.
You can click on the center button to switch
GAME BOOST control between software (SW) and
hardware (HW).
Apply changes
Function description
User Scenario
20
Page 21
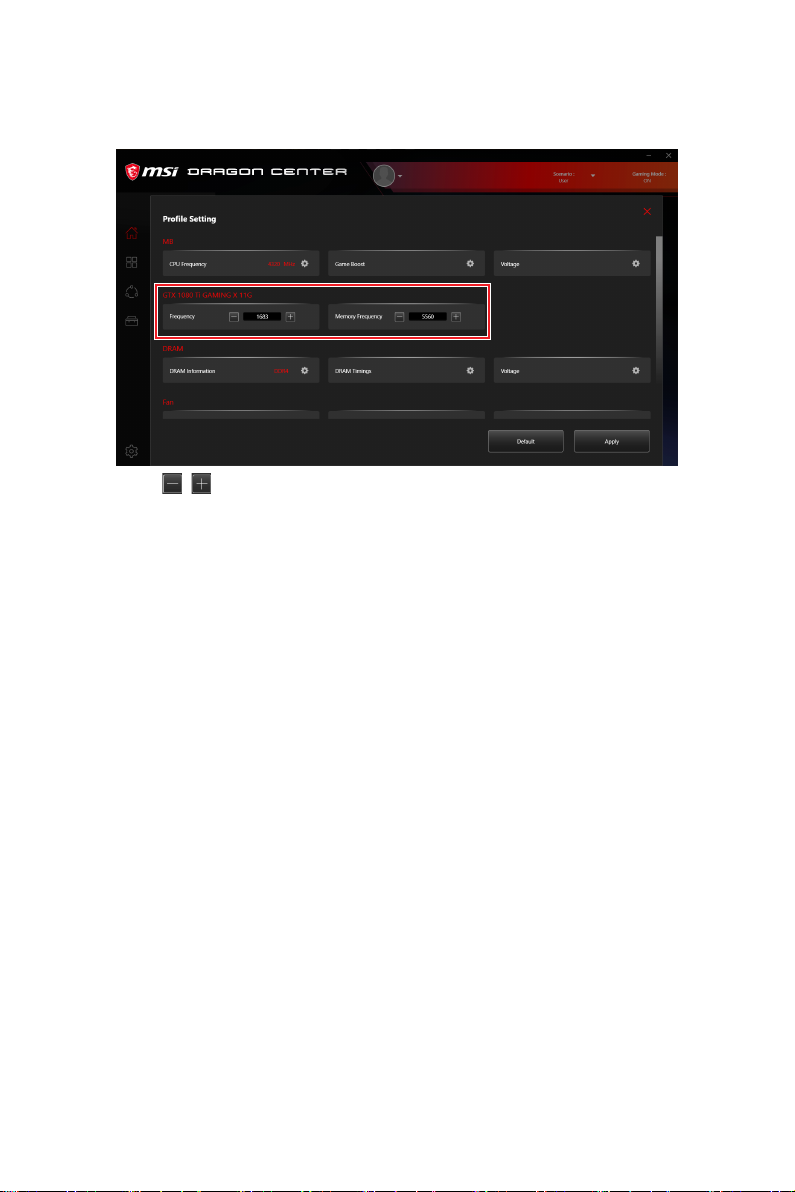
How to Adjust the GPU and GPU Memory Frequency
1. Go to Home > User Scenario, click Customize.
2. Click / to adjust GPU Frequency and GPU Memory Frequency. You can also
fill out the value in the input box.
3. Click the Apply button to apply change.
User Scenario
21
Page 22
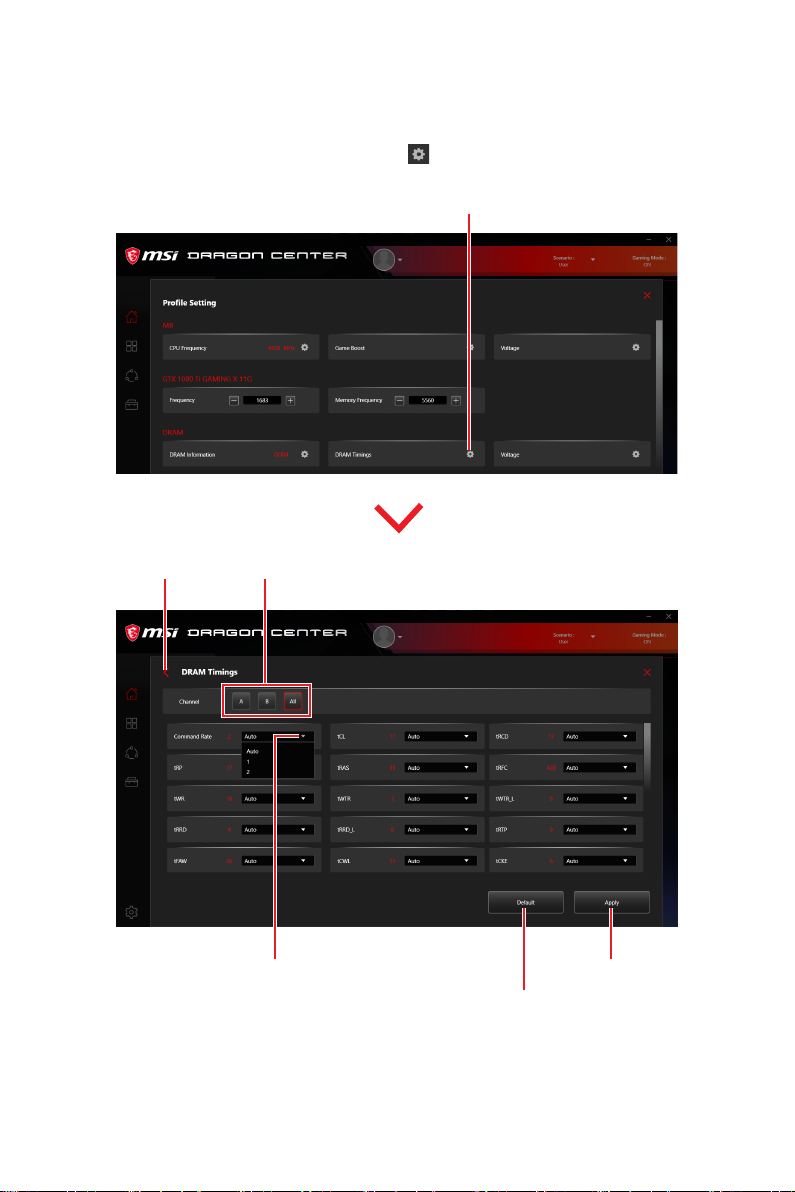
How to Adjust the DRAM Timing
1. Go to Home > User Scenario, click Customize.
2. Click the DRAM > DRAM Timings setting
.
Click here
Back
Click to select an available value
from the drop-down menu
Select the DRAM Channel
Apply changes
Default values
User Scenario
22
Page 23
How to Adjust the DRAM Voltage
1. Go to Home > User Scenario, click Customize.
2. Click the DRAM > Voltage setting
.
Click / to adjust voltage value.
You can also fill out the value in the
input box.
Click here
Back
Current voltage value
Apply changes
Default values
Range
User Scenario
23
Page 24
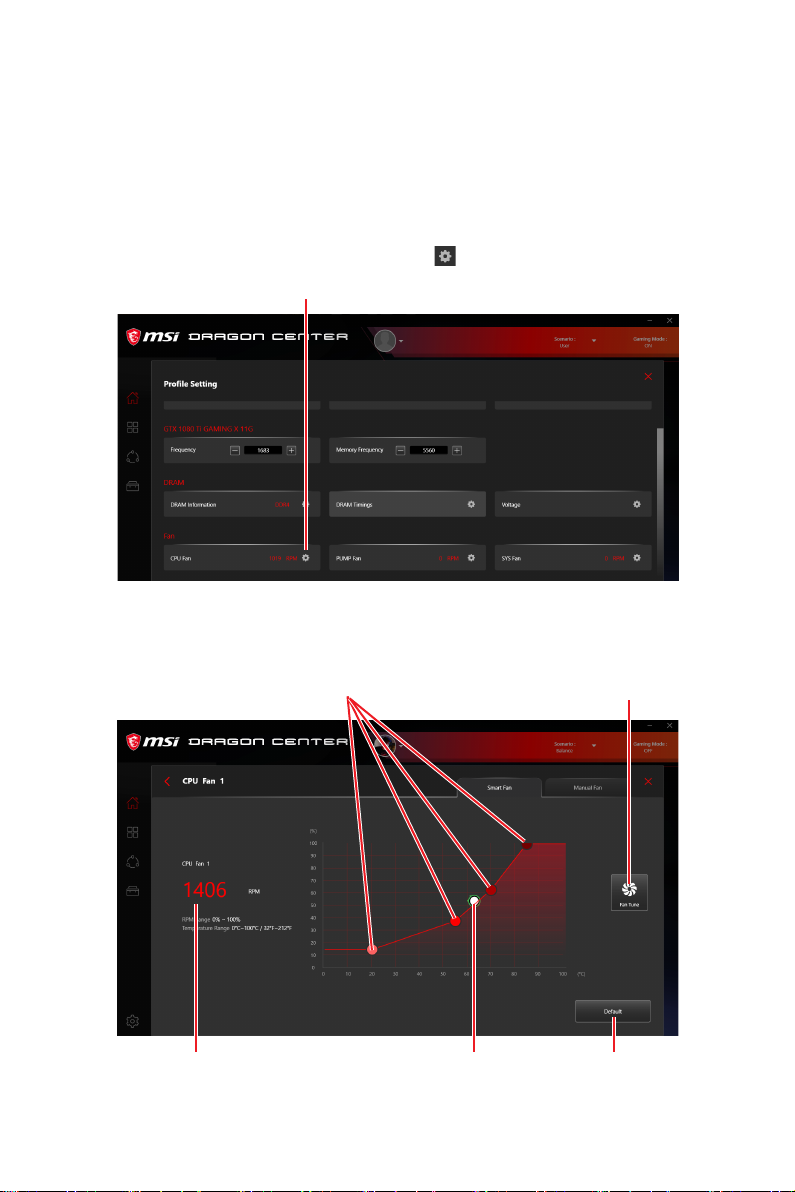
Adjusting the Fan Speed
Fan speed control panel provides Smart Fan and Manual Fan settings. You can switch
the control mode by clicking the Smart Fan or Manual Fan tabs on the Fan control
panel.
How to enter the fan speed control panel
1. Go to Home > User Scenario, click Customize.
2. Click the Fan > CPU/ PUMP/ SYS fan setting
Click here
How to use the Smart Fan control panel
.
User Scenario
24
The Smart Fan control panel contains 4 dots
which allow you to drag and adjust the Smart
Speed slopes. The fan speed will change along
with the Smart Speed curve.
Current fan speed
The white dot will create strip
chart in real time.
Fan Tune - click to
automatically optimize
the smart fan setting.
Default setting
Page 25
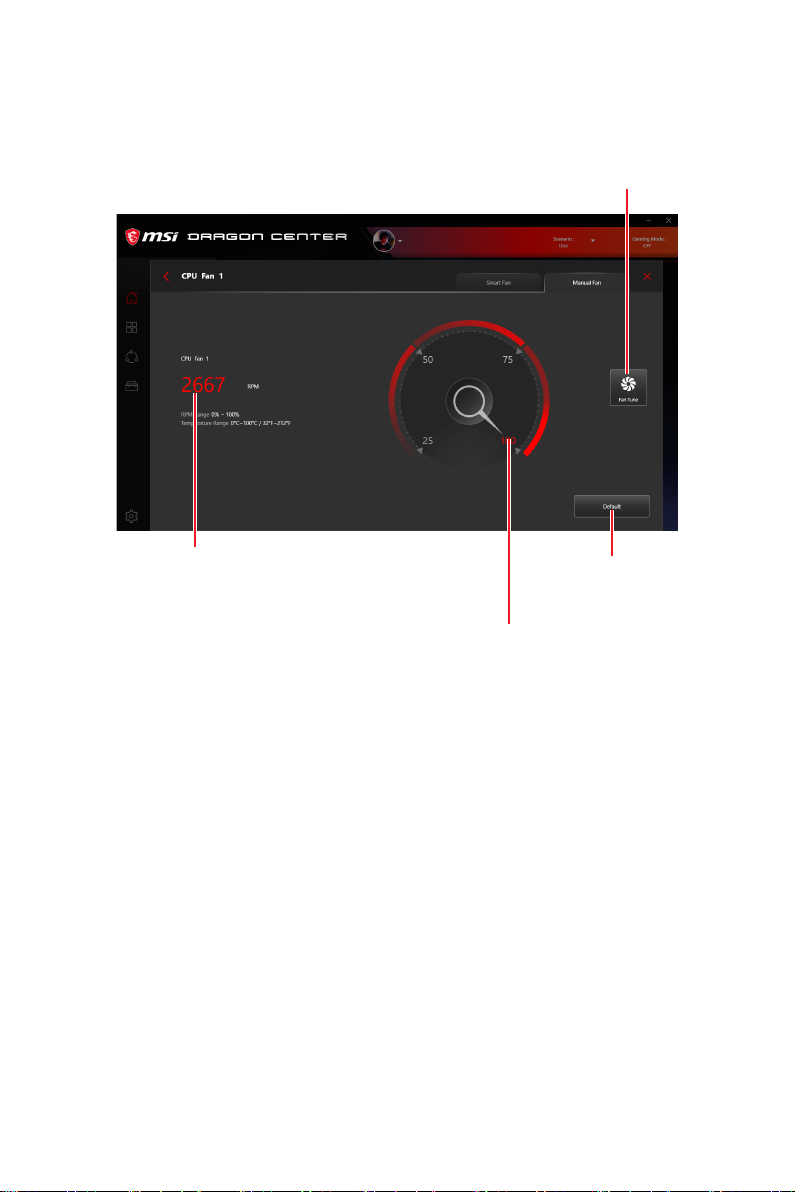
How to use the Manual Fan control panel
Fan Tune - click to
automatically optimize
the smart fan setting.
Current fan speed
Default setting
Click the percentage to
manually control the
fan speed.
User Scenario
25
Page 26
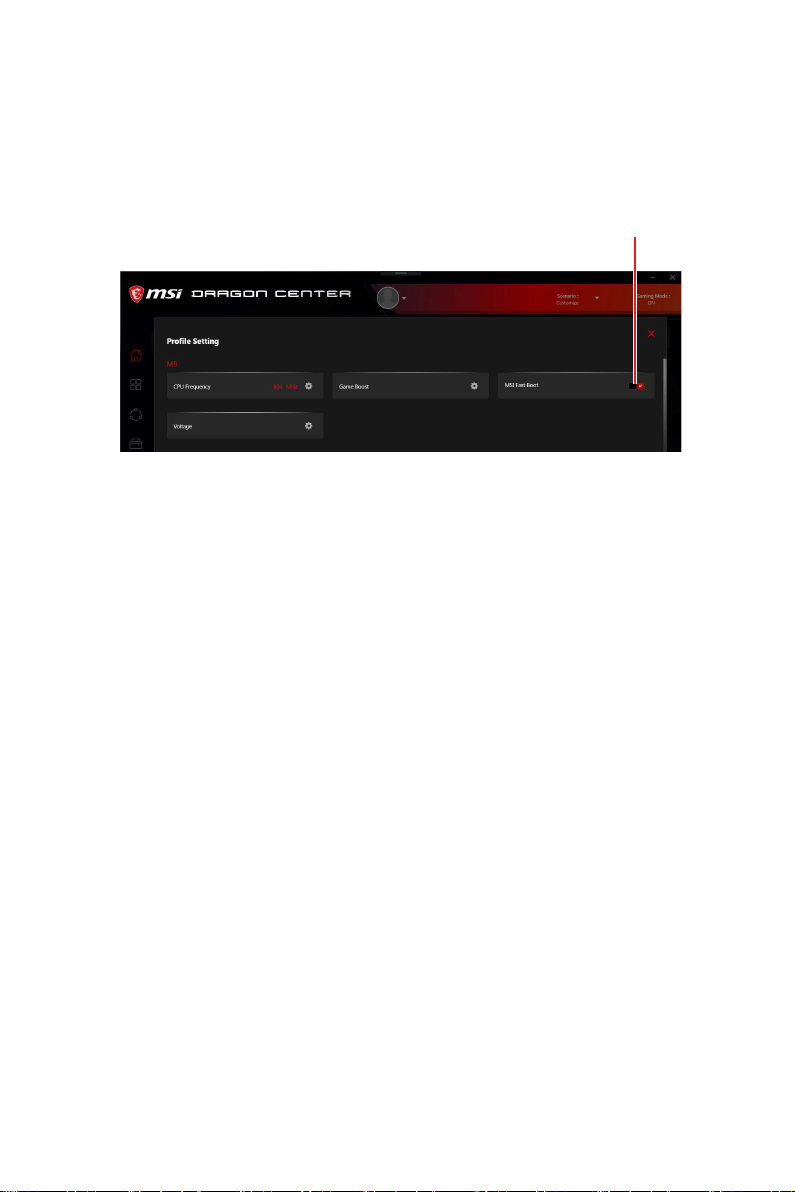
How to Enable MSI Fast Boot
The MSI Fast Boot feature can decrease computer startup time.
1. Go to Home > User Scenario, click Customize.
2. Click the MSI Fast Boot to enable.
3. Click the Apply button to apply changes.
4. Reboot your computer, and MSI Fast Boot will be enabled.
Click here
User Scenario
26
Page 27
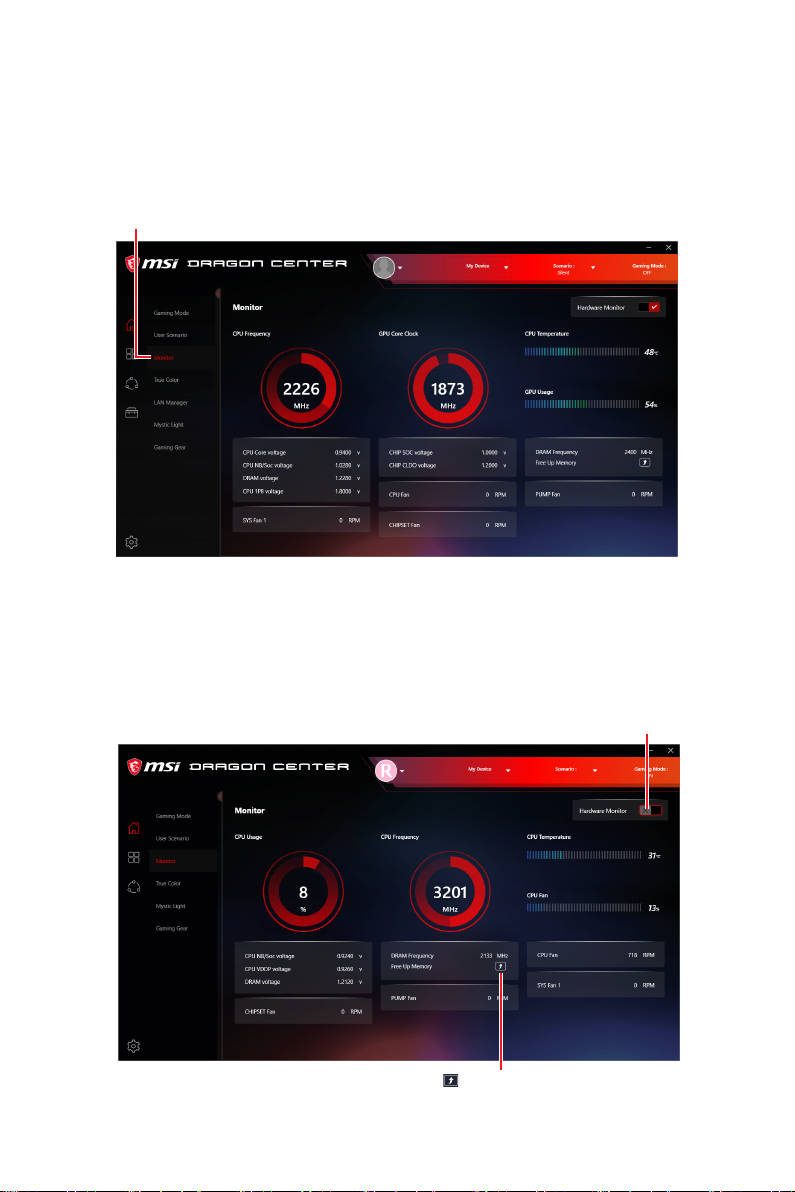
Monitor
Monitor feature provides a custom hardware monitor gadget to display the system
status.
Select Monitor in the sub menu to
enter Monitor page
How to Use the Hardware Monitor
1. Go to Home > Monitor.
2. Enable the Hardware Monitor switch in the upper right corner, and the Hardware
Monitor gadget will appear.
Click
to free up memory
Click to enable the
Hardware Monitor gadget
Monitor
27
Page 28

3. Click the setting icon in the top left corner of the Hardware Monitor gadget to
open the monitoring item menu.
Click to open the monitoring
item menu.
4. Select the item you want to display in the gadget.
Select all items
28
Select the item you want to display in the gadget
Monitor
Page 29

FROZR AI Cooling
FROZR AI Cooling feature will use AI technology to detect CPU & GPU temperatures
and automatically adjust fan duty of system fans to a proper value.
Supported Hardware:
MSI B550/ Z490/ X570/ Z590 series of motherboards
How to enable FROZR AI Cooling
1. Go to Home > FROZR AI Cooling.
2. Select one among Performance/ Silent/ Manual Mode.
▪ Performance - Boost extreme performance with higher fan speed.
▪ Silent - Adjust fan speed for best cooling and silence.
▪ Manual - Customize fan speed as desired.
Choose one mode from
the drop-down menu
Current fan speed
Current fan speed curve
FROZR AI Cooling
29
Page 30

Setting Manual Mode for FROZR AI Cooling
1. Go to Home > FROZR AI Cooling.
2. Select Manual Mode from the drop-down menu.
3. Fill out CPU&GPU temperatures and the corresponding fan duty for different
three stages.
Blue curve - GPU fan duty
Green curve - System fan duty
Red curve - CPU fan duty
FROZR AI Cooling
30
Click to apply
for Default
settings
Click to apply
for Manual
Mode settings
Page 31
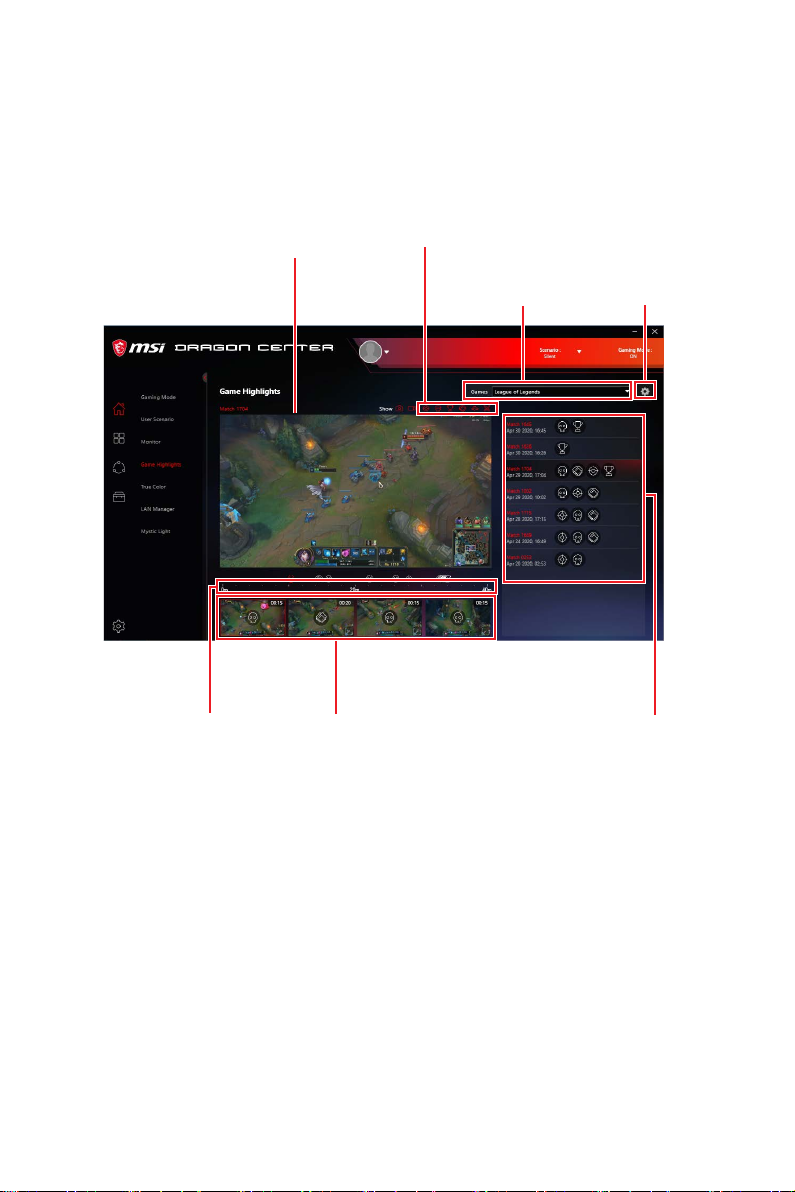
Game Highlights
Game Highlights feature will automatically capture clips of amazing gameplay
moments. It looks for certain events which occurs in games, and saves the captured
videos in your local folder.
Gameplay
display zone
Video timeline
Display certain
event clips
Auto captured
event clips
Supported games
displayed in the
drop-down list
Setting
Game video
record list
Important
⚠
Game Highlights feature only supports certain series of Motherboards. In addition,
this function is currently available in Fortnite, League of Legends, and Apex Legends.
Game Highlights
31
Page 32

How to Share Game Highlights to Social Media
Game Highlights feature supports uploading videos directly to social media, such as
YouTube, Twitter, and Discord.
Options to open files
in the folder and to
directly share clips to
social media
Game Highlights
32
Page 33

How to Remove Game Highlights
You can choose to delete game highlight video which includes several clips or to
remove one single game highlight clip from the whole game video.
Click here to
remove the game
highlight video
Click here to
remove the game
highlight clip
Game Highlights
33
Page 34

Installing MSI Companion
Before you enable Game Highlights function, you should install MSI Companion first.
1. Go to Home > Game Highlights.
2. When a prompt window appears, click Download MSI Companion app.
Click here
3. Execute MSI Companion-Installer.exe, and click Next to continue the process.
4. Select I have read and accepted Overwolf’s terms and Privacy Policy.
Game Highlights
34
Page 35

5. After finishing MSI companion and Overwolf Installation, click Launch to activate
MSI companion.
How to Activate MSI Companion
You can activate MSI companion by one of the following methods:
∙ Open Overwolf in System Tray, and click MSI Companion
∙ Press ctrl + tab in games to open Overwolf, and click MSI Companion
∙ Click MSI Companion
on the desktop.
.
.
Game Highlights
35
Page 36

Setting MSI Companion
After activating MSI Companion app, you will see a pop-up window displaying detailed
settings for Quick Settings, System Monitor, and Audio Monitor.
On Quick Settings tab
Linked to User Scenario
setting in Dragon Center
Adjust system volume Adjust mouse sensitivity
Linked to True Color
setting in Dragon Center
Game Highlights
36
Page 37

On System Monitor tab
Turn on System
Monitor to display
system performance
in games
You can choose one from these
two display ways, it will show
an in-game overlay with the
pattern you select.
∙ Default
Select the system
performance you
want to display on
the screen
Turn on to save log
files for system
monitoring
Adjust transparency for
monitor background
∙ Minimize
Select black/ white
monitor background
Game Highlights
37
Page 38

On Audio Monitor tab
Turn on to display
whether Nahimic
surround function
is enabled or not
Important
⚠
∙
Audio Monitor only works properly when Nahimic is installed.
∙
Audio formats among browsers are NOT supported by Audio Monitor.
Display audio information
of identified applications
with sounds
Game Highlights
38
Page 39

How to Discover MSI Companion
1. Go to Home > Game Highlights.
2. When a prompt window appears, click Discover MSI Companion app.
Click here
Game Highlights
39
Page 40

Setting Game Highlights
∙ Select Game Highlights in the sub menu, click setting .
∙ Adjust settings for Games, Capture, and Storage.
On Games tab
Click here
Game Highlights
40
On/Off Game Highlights
Page 41

On Capture tab
Adjust hotkey settings
for manual capture
On Storage tab
Select Auto Manage/ Manual
Manage for file size and disk
space settings
Game Highlights
41
Page 42

True Color
With True Color function, you can adjust the best screen gamma, saturation,
brightness and contrast settings for your eyes.
The Ture Color feature supports games in windowed mode.
Select True Color in the sub menu
to enter True Color control panel
Select the quick screen color option
True Color Preset Options
When you click the preset option, the screen settings will be immediately applied to
your computer. The detailed options are as follows:
▪ EyeRest - reduces blue light of your computer screen for eye care.
▪ Gaming - enhances the contrast of the screen.
▪ Movie - enhances the dynamic contrast of the screen.
▪ Customize - allows you to adjust gamma, contrast and color balance of your
computer screen. Please refer to the instructions on page 41.
▪ Default - uses the system default setting.
42
True Color
Page 43

How to customize screen color
The True Color control panel has a Customize feature that allows you to customize
your own colors.
1. Click the setting
2. Click and drag the sliders to adjust the Gamma, Level, Brightness and Contrast on
Red, Green and Blue tabs.
icon in the lower right corner of Customize icon.
Click the gear icon
3. Click the Apply button to save the settings.
True Color
43
Page 44

LAN Manager
LAN Manager is applied to Windows 10 network traffic shaping. It keeps your internet
speed stable and faster during heavy uploads/downloads and reduces the ping value
of online games. If your motherboard has a Wi-Fi module, it can also provide virtual
access point functionality for your mobile device for traffic shaping.
To use LAN Manager:
1. Install the LAN driver.
2. Connect your computer to the internet.
3. Go to Home > LAN Manager.
Shows the
Select LAN Manager in the sub
menu to enter LAN Manager
control panel
current network
configuration
LAN Manager
main switch
Shows the
Wireless network
around you
Network control menu
Network Control Menu
Other relevant settings on the LAN Manager Control Panel are as follows:
▪ Priority - customizes application network bandwidth priorities.
▪ Usage - displays the application network usage status.
▪ Network Test - allows you to set up bandwidth control.
▪ Advanced Setting - allows you to expand RWIN to accelerate download speed.
You can also block IP address and set up virtual access point.
LAN Manager
44
Page 45

Setting Network Speed
1. Select the Network Test control panel.
2. Click Test Network Speed.
3. cFos Speed Test web page will be opened.
4. Click to test Upload speed, and click to test Download speed.
5. Fill in the speed test results in the Upload speed and Download speed input
boxes.
6. Check the Enable Bandwidth Control checkbox.
LAN Manager
45
Page 46

Customizing Application Priorities
The Priority control panel displays what application is currently using network
bandwidth.
1. Test and set the network speed as described previously.
2. Select the Priority control panel.
3. Use the category bar to filter the displayed applications categories.
4. Click the drop-down menu next to the application name to select the priority of the
application.
Note: To stop some applications from using bandwidth, you can click to block the
application.
LAN Manager
46
Page 47

Mystic Light
Mystic Light feature allows you to control LED light effects of MSI & partner products.
For some earlier products, you can go to product download page to download the
applicable LED control software.
When you click the Apply
button, the LED effect settings
can be saved to Profile1~3,
and you can switch to different
settings by clicking Profile1~3.
Game Sync
Third party
control setting
Device
synchronization
All Synchronization
LED item dropdown menu
Mystic Light
main switch
Click to access
Ambient Link
Apply button
DYNAMIC
DASHBOARD button
Light effect, LED color,
speed and brightness
lever selectors
Mystic Light
47
Page 48

∙ Device synchronization - In this section, you may synchronize LED light effect to
your devices.
▪ All synchronization - Click the big chain icon on the left side of all the devices.
Click the big chain icon
▪ To synchronize devices - Click the chain icon above device icon. When the chain
icon turns red, it indicates that the device has synchronized LED effect settings
with other devices.
Chain icon - indicates the device
has been synchronized.
▪ Individual - You can also change settings for one single device. To do that, click
the chain icon and the color will turn gray as below.
Device icon - click it to change LED effect setting for this
device. When the icon turns red, it indicates the device
you’re currently setting.
∙ LED item drop-down menu - Click to select the LED item on the device. The LED
effects vary depending on your LED item selection.
Broken-chain icon - indicates the
device is not synchronized.
48
Mystic Light
Page 49

∙ Light effect drop-down menu
Click it to select LED light effects. Please note
that the options about light effects would be more
or less depending on the devices you have. It will
only list the light effects which are available for all
applicable devices.
∙ LED Color selector - In this section, you may select the color for one single light
effect (Stack, Breathing, Flashing etc.).
The outer arc is a custom color picker and the inner arc is the default color picker
that cannot be changed. You can simply change the LED color by clicking on the
color on the outer or inner arc. To store a custom color, click one of the color slots
on the outer arc to store the color of your choice.
Drag the brightness slider up to increase brightness or
drag down to decrease brightness.
Use the Hue Circle to choose the color you want. The color you choose
will be displayed on the center circle.
∙ Effect speed and brightness level
You can specify a color by editing an
RGB (red, green, blue) color value
between 0 and 255.
Drag the sliders to adjust the LED
light effect switching speed and light
brightness.
Please note that these functions will only
be available if your device supports it.
Mystic Light
49
Page 50

Voice Command
Mystic Light allows you to use your voice to change LED effects.
To start Voice Command, you need to install Windows 10 Speech Voices.
1. Go to Windows Settings, select Time & Language.
2. Select Add a preferred language, then add English and the voice packages.
3. Change your default speech options to English by selecting Speech.
50
Mystic Light
Page 51

How to Control Mystic Light via Voice Command
Go to Home > Mystic Light, click setting in the upper right corner. Enable Voice
Command and then you can change the LED style by saying Hey Lucky.
Enable Voice Command
Click here
A list of Hey Lucky commands Click to open the list of
Important
⚠
If the Voice Command option does not appear, try uninstalling the MSI SDK and
Dragon Center . Then reinstall Dragon Center again.
Hey Lucky commands
Mystic Light
51
Page 52

Ambient Link
With the Ambient Link feature, it will provide visual color feedback on Philips Hue and
Nanoleaf depending on what is happening in games. To use Ambient Link, you need to
follow the instructions below to complete the link setup.
Supported Motherboards
∙ MEG Z390 GODLIKE
∙ MEG Z390 ACE
∙ MPG Z390 GAMING PRO CARBON AC
∙ MPG Z390 GAMING EDGE AC
∙ Z390I CORSAIR
∙ MPG Z390M GAMING EDGE AC
∙ MPG X570 GAMING PRO CARBON WIFI
∙ MPG Z390I GAMING EDGE AC
∙ MEG X570 GODLIKE
∙ MEG X570 ACE
∙ MEG X570 UNIFY
∙ PRESTIGE X570 CREATION
∙ MPG X570 GAMING EDGE WIFI
∙ Creator TRX40
∙ MEG Z490 GODLIKE
Network Requirements
∙ The router is broadcasting a 2.4GHz network.
∙ The Wi-Fi network is using WPA/WPA2 security.
∙ The router is configured for any of the Wi-Fi modes a/b/g/n.
∙ MEG Z490 ACE
∙ MEG Z490 UNIFY
∙ MPG Z490 GAMING CARBON WIFI
∙ MPG Z490M GAMING EDGE WIFI
∙ MEG Z490I UNIFY
∙ MPG Z490 GAMING EDGE WIFI
∙ MAG B460M MORTAR WIFI
∙ MAG X570 TOMAHAWK WIFI
∙ MPG B460I GAMING EDGE WIFI
∙ B450M BAZOOKA MAX WIFI
∙ MPG B550 GAMING CARBON WIFI
∙ MPG B550 GAMING EDGE WIFI
∙ MPG B550I GAMING EDGE WIFI
∙ MAG B550M MORTAR WIFI
Philips Hue Setup (optional)
1. Plug in your Hue bridge and it will automatically power up.
2. Connect it to the router LAN port.
3. Wait for the two lights to come on and you are good to go. (Left is power light and
center is local network
Nanoleaf Setup (optional)
∙ The router is compatible with Bonjour (mDNS).
Mystic Light
52
Page 53

Ambient Link Control Panel
Game Mode and Ambient Mode can only be activated one at a time in the Ambient
Link control panel.
∙ Game Mode tab
Click to synchronize/ nonsynchronize the game
Synchronization main switch
Click to access the game control panel
Select Game Event,
Back
color and brightness
Preview the effect Apply changes
Mystic Light
53
Page 54

∙ Ambient Mode tab
Preview the effect
ON/OFF background
light & music
Click to select an effect
as background light
∙ Ambient Link tab
Click to detect
devices
Click to
synchronize
Click to switch to Philips
Hue and Nanoleaf
Re-synchronize Remove
the device
Apply changes
Drag the slider to adjust light
brightness
Status indicator
Adjust orientation or
position
54
Mystic Light
Page 55

DYNAMIC DASHBOARD Control Panel (optional)
Click DYNAMIC DASHBOARD button to open the DYNAMIC DASHBOARD control panel.
Enabled DYNAMIC DASHBOARD
Select all items
Display custom animation
Display game boost status
Display hardware status
Items selection panel
Click to restore MSI default
animation
Upload animation
Preview
Click to apply changes
Disabled DYNAMIC DASHBOARD
Selecting Display Items
1. Select Enabled in the upper left corner of the control panel.
2. Select items you want to show on the DYNAMIC DASHBOARD.
3. Click Apply to apply your changes.
Mystic Light
55
Page 56

Uploading Custom Animation
Click the Upload icon and select a .gif animation file.
.GIF File Restriction
Dimensions: 256 x 64
DPI: 72
Size: max 128KB
64px
256px
Restoring MSI Default Animation
Click the Dragon icon to restore the MSI default animation.
Fan Speed/ Temperature/ Voltage State
Available Items:
Fan Speed : CPU fan / Water pump fan / System fan speed
Temperature : CPU / System / MOS / PCH / PCIe / M.2 / Sensors temperature
Voltage : CPU / Memory voltage
Fan Speed
Temperature Voltage
Hardware Information
Graphics Card
CPU Information Memory Information
Information
GAME BOOST State
When you use the GAME BOOST Knob, DYNAMIC DASHBOARD will
display the CPU frequency information.
Stage 0 Stage 1~11
GAME BOOST Disabled
Important
⚠
Game Boost is only available on K CPUs and speeds may vary based on CPU model.
Mystic Light
56
5.4 ~5.7 GHz
Page 57

DYNAMIC DASHBOARD II Control Panel (optional)
Click DYNAMIC DASHBOARD button to open the DYNAMIC DASHBOARD control panel.
Enable / Disable DYNAMIC DASHBOARD II
Select all item
Items selection panel
Preview
Display text
Display specific
animation
Click to restore MSI default
animation
Display hardware status
Display custom animation
Upload animation
Click to apply changes
Selecting Display Items
1. Click the switch in the upper right corner of the control panel to enable it.
2. Select items you want to show on the DYNAMIC DASHBOARD II.
3. Click Apply to apply your changes.
Mystic Light
57
Page 58

Uploading Custom Animation
Click the Upload icon and select a .gif animation file.
.GIF File Restriction
Dimensions: 176 x 48
DPI: 72~93
Size: max 1024KB
48px
176px
Fan Speed/ Temperature/ Voltage State
Available Items:
Fan Speed : CPU fan / Water pump fan / System fan speed
Temperature : CPU / System / MOS / PCH / PCIe / M.2 / Sensors temperature
Voltage : CPU / Memory voltage
Fan Speed
Temperature Voltage
Hardware Information
Graphics Card
CPU Information Memory Information
Information
58
Mystic Light
Page 59

Gaming Gear
This panel allows you to control MSI’s gaming gear and supported third-party devices.
Select Gaming Gear in the sub
menu to enter Gaming Gear menu
Supported devices will be
displayed here. Click to enter the
control panel of the device.
Gaming Gear
59
Page 60

Gaming Knob (optional)
Certain series of desktops have the gaming knob for controlling system settings and
monitoring the system status.
60
Rotate:
∙ selecting function menus and items
∙ adjusting function values
∙ entering into from function menus
Short Press (OK):
∙ entering submenus
∙ confirming a selection or setting
Long Press (Exit):
∙ return upper menu
∙ exit monitor function
Gaming Gear
Page 61
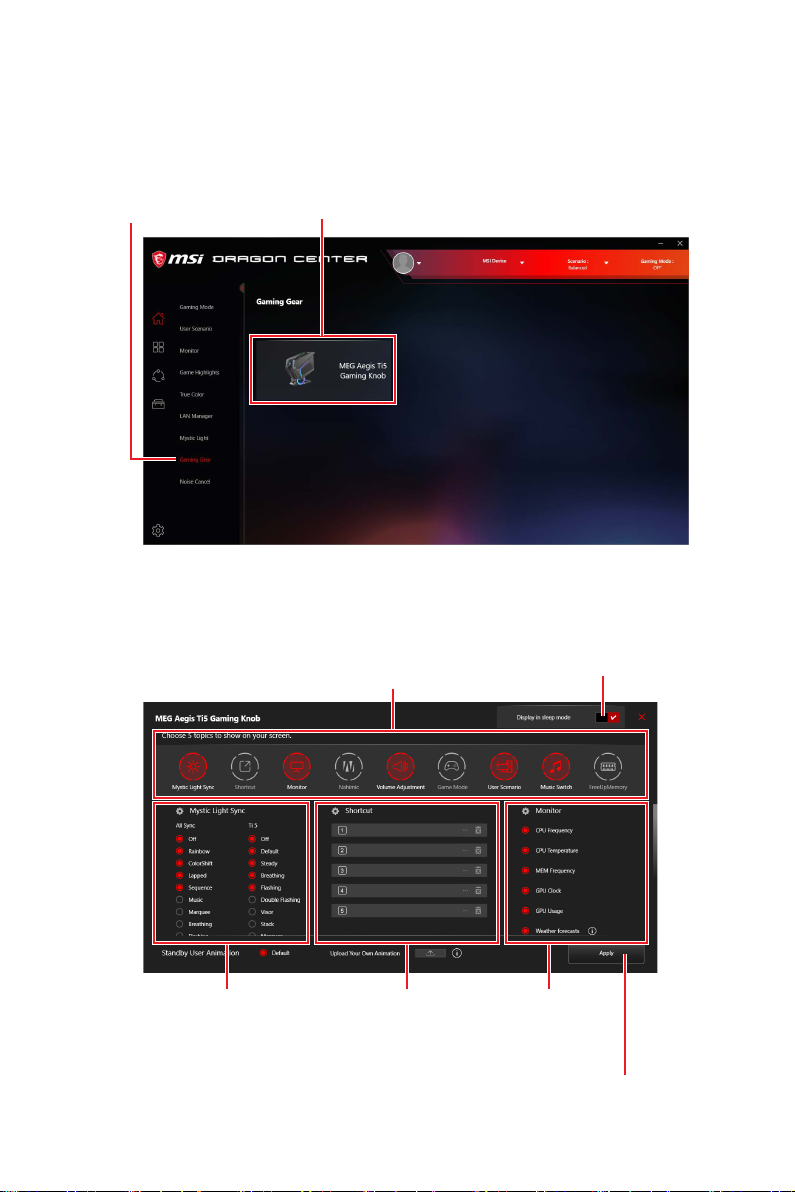
Setting Gaming Knob
Go to Home > Gaming Gear > Select Gaming Knob.
Select Gaming
Gear in the sub
menu
Select Gaming Knob
Gaming Knob Control Panel
Choose 5 topics to show on the
Gaming Knob screen
Allow Standby
animation display in
sleep mode
Mystic Light items
selection panel
Shortcut items
selection panel
Monitor items
selection panel
Click to apply changes
Gaming Gear
61
Page 62

Topics
▪ Mystic Light - Switch Mystic Light effect by Gaming Knob.
▪ Shortcut - Fast execution customize program (.exe file) by Gaming Knob.
▪ Monitor - Show Display Hardware information on Gaming Knob Screen.
▫ Note 1:Weather forecasts function need an internet connection and allow
location service.
▫ Note 2. When execution monitor function, standby animation will not display.
▪ Nahimic - Switch Nahimic’s profiles by Gaming Knob.
▪ Volume Adjustment - Easy to adjust OS volume by Gaming Knob.
▫ Note: Volume adjustment is the default idle function.
▪ Game Mode - Switch Game mode on/off by Gaming Knob.
▪ User Scenario - Switch User Scenario by Gaming Knob.
▪ Music Switch - Adjust Media player function (Play/ Pause/ Next track/ Previous
track) by Gaming Knob.
▪ FreeUpMemory - Execute Free Up Memory function by Gaming Knob.
Uploading Your Own Animation
Click the Upload icon and select .jpg animation files.
62
Gaming Gear
Click to upload .jpg animation files
.JPG File Restriction
Dimensions: 240 x 240
Animation speed: 24 FPS
Size: max 3.0 MB
240px
240px
Page 63

Noise Cancellation (optional)
The AI-powered noise cancellation is trained through a deep neural network (DNN),
the model is generated with more than 500 million data, simulates the way the
human brain works. When a sound is heard, the model automatically recognizes
and separates the vocal sound from background noises. Hence, filtering out all the
unwanted noise. This feature greatly improves the users’ communication experience.
Select Noise Cancellation in the
sub menu to enter MSI Sound
Tune panel
Enable/ Disable Speaker Noise
Cancellation.
Select Microphone (MSI Sound Tune) in the
communication software.
Select Speaker (MSI Sound Tune) in the
communication software.
Enable/ Disable Microphone
Noise Cancellation.
Noise Cancellation (optional)
63
Page 64

Product Registration
Register your MSI product to get exclusive updates, quicker service and product
support.
Select My Device in the sub menu
to register your product
Login to your MSI account on this My Devices tab. If you don’t have an MSI account,
please click the Join MSI Member button or use Facebook, Google Plus to login.
Click the Product Register button and fill in the product registration form.
Product Registration
64
Page 65

Live Update
Live Update feature allows you to scan system and download the latest drivers, BIOS
and utilities. With Live Update, you don’t need to search the drivers on websites, and
don’t need to know the models of motherboard and graphics cards. Live Update will
download the appropriate drivers automatically.
To use Live Update:
1. Connect your computer to the internet.
2. Go to Support > Live Update.
Click to scan the
system
Select which item you
want to update.
Utilities and drivers list
Click to install
Live Update
65
Page 66

System Info
The System Info provides information about your computer drivers, BIOS and utilities
versions.
To open System Info:
1. Go to Support > System Info.
To export system information:
1. Go to Support > System Info.
2. Click Export System Info button in the upper right corner.
3. Browse to the location where you want to save the new text file, and then click
Save.
Click to export
system information
to a text file.
66
Shows drivers, BIOS and
utilities versions.
System Info
Page 67

Microsoft APP
The Microsoft App feature detects installed drivers and displays a relative Microsoft
application download links.
To install Microsoft App:
1. Go to Support > Microsoft App.
2. Click the Get it from Microsoft icon
3. Download and install the application from Microsoft Store.
on the right side of the item.
Click to install
Microsoft APP
67
Page 68

Gaming Hotkey (Install by Live Update)
Gaming Hotkey provides instant control of the system through the hotkeys defined by
users themselves.
Tools > Gaming Hotkey
On/Off Gaming Hotkey
Click to select the Macro Genie,
Windows Keys, Login Keys and DPI
sub-menu.
Important
⚠
Gaming Hotkey doesn’t support PRO Series Motherboards.
Recording a Macro
1. Enter Macro Genie sub-menu.
2. Click Record and then perform the actions to record the macro.
3. To stop recording the macro, click Stop
Gaming Hotkey (Install by Live Update)
68
.
Page 69

Note: You can also use hotkeys to start/ stop recording. Click Setting
to open the Recorder Hotkey Setting panel. Then click the Start Hotkey/ Stop Hotkey
and press the key you want to assign to an action.
4. In the Edit panel, enter a file name for your new macro into the File Name text
box. (Following section will describe how to edit macro)
5. Fill in the Description text box.
6. Click the Start Key/ Stop Key and press the key you want to assign.
7. Click Save
. The Macro will be listed in the Macro Genie submenu.
Gaming Hotkey (Install by Live Update)
69
Page 70

Creating and Editing a Macro
1. Enter Macro Genie sub-menu.
2. Click Create to create a new macro, or click Edit to edit the
selected macro.
3. Select Keys, Combine Keys, Mouse Click or Delay.
Select Keys, Combine
Keys, Mouse Click or
Delay.
Scroll to delete
unwanted scripts
4. Click
import into the macro script.
5. Click
Gaming Hotkey (Install by Live Update)
70
next to the Time box to increase/ decrease the number of times to
import command selection into the macro script.
macro script
Import into the macro
script
Page 71
6. Set the Cycle property.
▪ Counter of Loop - Execute script the number of times specified by a certain
value.
▪ Continuous play until clicked abort key - Execute script until you press Stop
Key.
▪ Loop interval - Execute the script at specified time intervals.
7. In the Edit panel, enter a file name for your new macro into the File Name text
box.
8. Fill in the Description text box.
9. Click Save
. The Macro will be listed in the Macro Genie submenu.
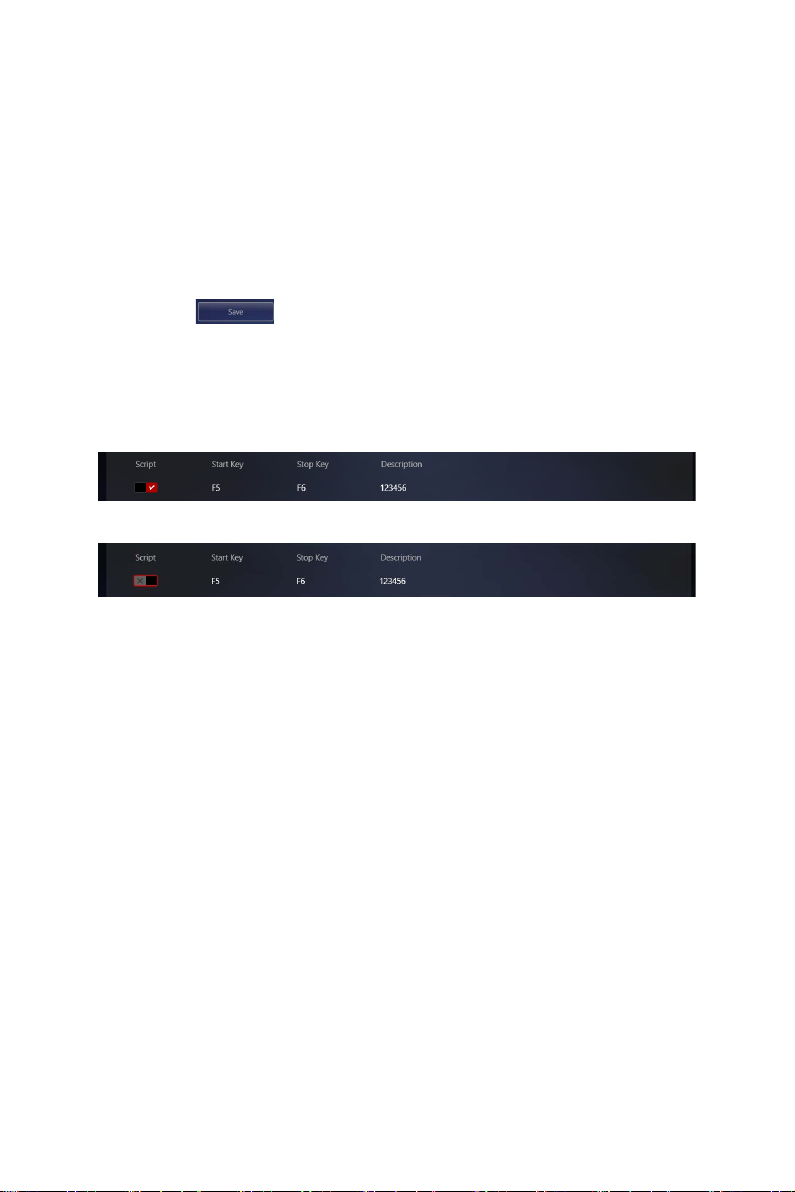
Enabling and Disabling the Macro
Toggle the Script button to blue to enable the macro.
Toggle the Script button to gray to disable the macro.
Gaming Hotkey (Install by Live Update)
71
Page 72

Making Hotkeys for Windows OS
1. Enter Windows Keys sub-menu.
2. Click the input box next to the action.
3. Press the key you want to assign to the action. For example, press F4 for Stop as
shown below. To cancel it, click
4. Click to apply changes.
.
Assign Hotkey to open folder or file
Click to assign the hotkey
Gaming Hotkey (Install by Live Update)
72
Click to select folder / file
Page 73

Making Hotkeys for Login
You can create Hotkeys to automatically fill in the login page.
1. Enter Login Keys sub-menu.
2. Fill in these input boxes.
▪ Login info - the name of the Hotkey.
▪ Hotkey - assign a Hotkey.
▪ ID - the text for fill in the login ID.
▪ Tab - select the number of times to press the Tab key.
▪ Password - the text for fill in the password.
3. Click Apply
to apply changes.
Delete the Hotkeys
Select Hotkeys you want to delete
Click to delete
selected Hotkeys
Gaming Hotkey (Install by Live Update)
73
Page 74
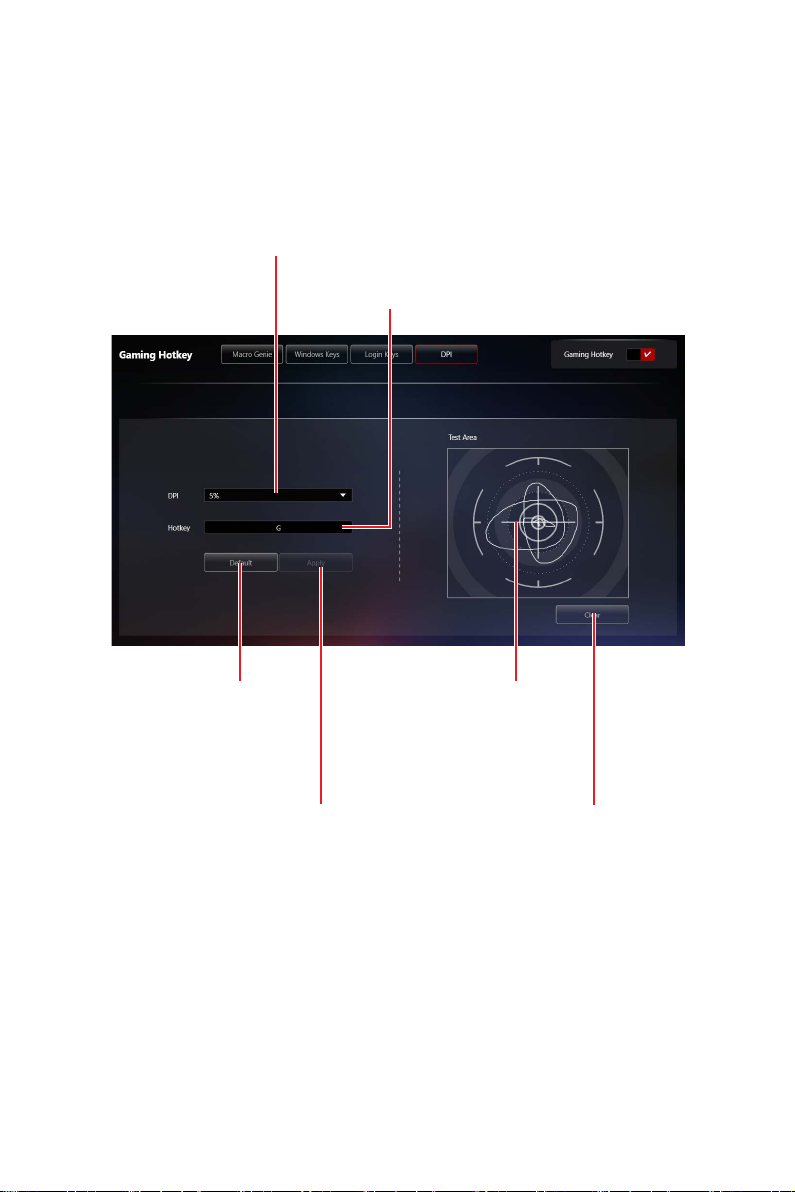
Setting Hotkey for Mouse DPI
You can specify a hotkey to change the mouse’s DPI.
Select the DPI percentage
in the drop-down menu.
The higher your DPI is,
the more sensitive your
mouse is.
Set the hotkey to
change the DPI.
Default Button
- reverts to
the default DPI
setting.
Gaming Hotkey (Install by Live Update)
74
Apply Button applies changes.
Use the mouse to
draw on this test
area to test the
DPI settings.
Clear Button clears drawing on
the test area.
Page 75

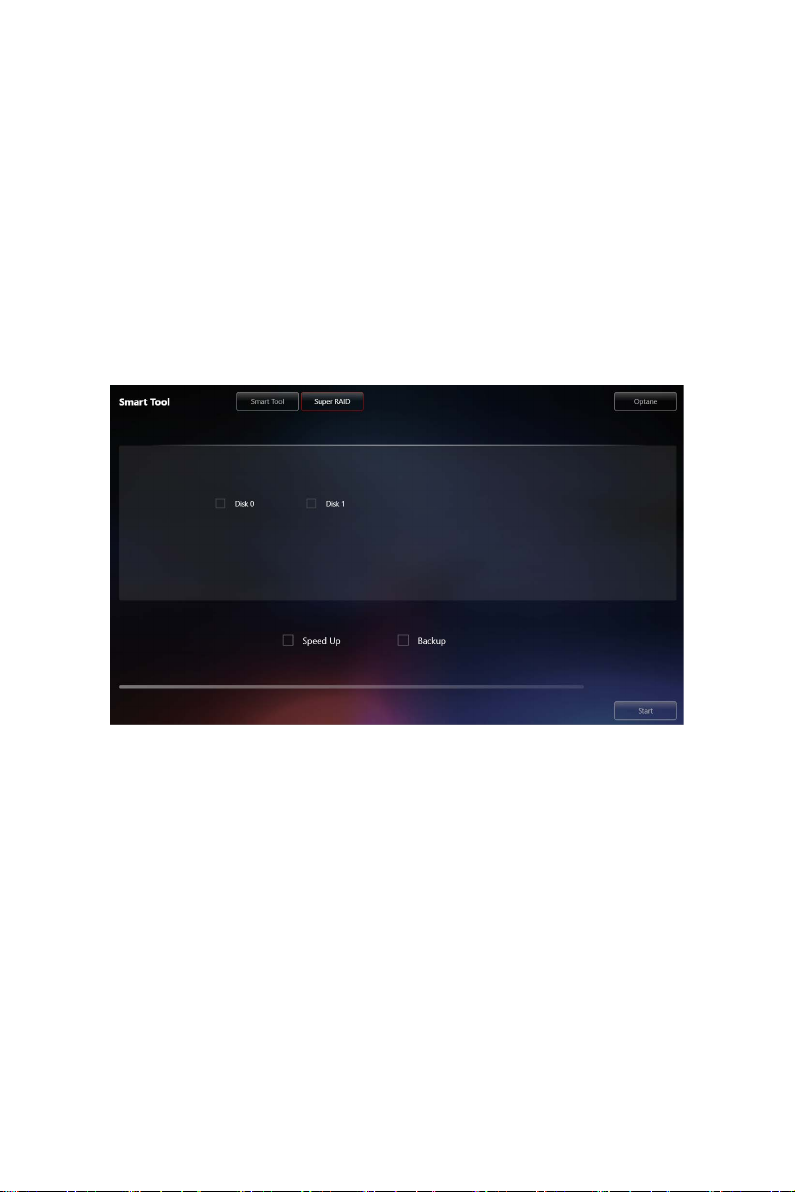
Smart Tool (Install by Live Update)
Tools > Smart Tool
Smart Tool is a tool that can help you to create your Windows installation USB flash
drive, and it can also create a super RAID.
Main menu
The main menu allows you to choose Smart Tool or SUPER RAID.
Important
⚠
The Super RAID button is only available when your system equipped with at least 3
hard-disk drives (1 system disk and 2 data disks).
How to Create a USB Flash Drive Installer for Windows
Before you can create your Windows installation USB flash drive, you’ll need to have
your Windows Installation Disc or ISO file, and also have a minimum of an 8GB USB
flash drive to create your installer. If the USB drive is already being used, be sure to
back up files. This process might erase the important data on the USB drive.
1. Click Smart Tool.
2. Choose Windows Installation source file. Click
directory or click
3. Choose USB storage and select your USB flash drive in the drop-down list. In case
the USB flash drive is not listed, click
4. If you want to install Windows on the RAID drive, select the RAID driver version
from the drop-down menu.
5. If you want to add NVMe driver for your NVMe SSD drive, check the Add NVMe
driver checkbox.
button to select an ISO file .
Refresh Drive button.
Browse button to select the
Smart Tool (Install by Live Update)
75
Page 76
6. Click Start to complete the process. When prompt Finish!, click OK.
Important
⚠
You can also install Windows from an ISO file. Select the ISO destination, and then
burn it onto the DVD. However, this method does not support RAID drive.
Super RAID
This utility allows you to create a super RAID in Windows system.
Important
⚠
The Super RAID button is only available when your system equipped with at least 3
hard-disk drives (1 system disk and 2 data disks).
How to Create a Super RAID
1. Click Super RAID.
2. Use checkboxs to select the disks you want included in your RAID.
3. Choose Speed Up or Backup for RAID type.
∙ Speed Up = RAID0
∙ Backup = RAID1
4. Click Start.
5. When prompt Finish!, click OK.
Important
⚠
SUPER RAID can't include the system disk.
Smart Tool (Install by Live Update)
76
Page 77

How to Uninstall Intel® Optane™ Memory
After Intel Optane Memory is enabled, the system BIOS settings will be switched from
AHCI mode to RAID/ Optane mode. If you directly uninstall Intel Optane Memory and
switch BIOS settings back to AHCI mode, it will prevent Intel Optane Memory from
functioning properly and the sysyem may not boot. MSI has developed a tool that can
help you uninstall Intel Optane Memory and safely switch back to AHCI mode.
Important
⚠
The Optane button is only available when Intel Optane Memory is Enabled or Intel
Rapid Storage Technology is Enabled.
1. Click the Optane button.
2. When prompt Restart your computer to finish uninstalling Optane function? click
OK.
3. Reboot System.
Smart Tool (Install by Live Update)
77
Page 78

Voice Boost (Install by Live Update)
Voice Boost is an audio mixer that manages audio volume on VoIP and apps. What
gamers need to do is set the priority level of his or her voice. After that, Voice Boost
will automatically control audios, and make sure the voice is clearer by dynamically
decreasing volume from other apps. If the voice is not detected, all volume will return
to the original settings.
Tools > Voice Boost
Important
⚠
∙
The Voice Boost function is only available with Nahimic 2.5/ 3 and voice
communication tools (TeamSpeak, Raidcall, Skype, SkypeHost and Discord).
∙
Voice Boost doesn’t support PRO Series Motherboards.
On/Off Voice Boost
Enabling Voice Boost
1. Install Nahimic and a voice communication tool.
2. Turn on the Voice Boost switch in the upper right corner of the screen.
3. Select your VoIP software.
4. Adjust the volume ratio for VoIP software.
Voice Boost (Install by Live Update)
78
Page 79

Super Charger (Install by Live Update)
Tools > Super Charger
Super Charger provides charging function for iPad, iPhone and iPod.
iPad has a different power requirement: 1.6A power supply rather than the 0.5A
current available with conventional USB interfaces. That is why computer cannot
charge your iPad even with power on. The MSI Super Charger is a Windows resident
program capable of changing power supply mode of your USB port. Once iPad
is connected to your USB port, the Super Charger will send a signal to initiate its
charging circuit.
Enabling Super Charger
Super Charger function will be enabled automatically after installing Super Charger.
If your motherboard has a Super Charger Port (please refer to the motherboard user
manual), the following dialog will appear. And Turn On the switch.
When you shutdown, hibernate, or put your computer to sleep, Super Charger Port
will be still able to provide charging function.
When a warning prompt window appears, click Yes to continue.
Important
⚠
When Super Charger is enabled, the Super Charger Port will be changed to Charging
mode, therefore, the data syncing will be disabled.
Super Charger (Install by Live Update)
79
Page 80

DPC Latency Tuner (Install by Live Update)
Tools > DPC Latency Tuner
DPC LATENCY TUNER is a convenient tool that helps you optimize your PC settings
to get a smooth audio/video playback experience and a faster responsive system.
For instance, you can easily change the CPU, iGPU ratio and DRAM frequency when
playing different games. A higher iGPU frequency clock can bring a better quality of
image resolution.
Adjust CPU, memory and iGPU settings.
Apply changes
Selecting CPU Ratio Apply Mode
Different games have their own appropriate core, and you can change it to All Core,
Turbo Ratio and Per Core by adjusting the CPU Ratio Apply Mode to acquire the best
gaming experience.
DPC Latency Tuner (Install by Live Update)
80
Page 81

Notices
Micro-Star Int’l Co.,Ltd.
The MSI logo used is a registered trademark of Micro-Star Int’l Co., Ltd. All other
marks and names mentioned may be trademarks of their respective owners. No
warranty as to accuracy or completeness is expressed or implied. MSI reserves the
right to make changes to this document without prior notice.
Copyright
© Micro-Star Int’l Co.,Ltd. 2020 All rights reserved.
Revision History
Version 2.0, 2018/09, First release
Version 2.1, 2018/09, Add Gaming Hotkey, Voice Boost
Version 2.2, 2019/01, Add Mystic Light, Smart Tool, Super Charger, DPC Latency Tuner
Version 2.3, 2019/02, Change to white background
Version 2.4, 2019/07, UWP version
Version 2.5, 2019/10, Add Gaming Hotkey, Voice Boost, Smart Tool, Super Charger
Version 2.6, 2020/06, Add Voice Command, Game Highlights
Version 2.7, 2020/09, Add Software Control mode switch
Version 2.8, 2020/10, Update Installation method & Add Frozr AI Cooling
Version 2.9, 2020/11, Add Noise Cancellation & Gaming Knob
Notices
81
 Loading...