

Page 1

V ersion 1.0
January 2004
G52-O8408A1
Quick Installation Guide
Multi-Lingual
+
_
R
RW
+
_
Warning: This is a RPC-II DVD-ROM drive,
the maximum number of times that you
are allowed to change the regional code
setting is 4.
Page 2

Copyright Notice
The material in this document is the intellectual property of MICRO-STAR INTERNATIONAL.
We take every care in the preparation of this document, but no guarantee is given as to the
correctness of its contents. Our products are under continual improvement and we reserve
the right to make changes without notice.
Trademarks
All trademarks used in this manual are the property of their respective owners.
Pentium is a registered trademark of Intel Corporation.
Windows is a registered trademark of Microsoft Corporation.
FCC-B Radio Frequency Interference Statement
This equipment has been tested and found to comply with the limits for a class B digital
device, pursuant to part 15 of the FCC rules. These limits are designed to provide
reasonable protection against harmful interference when the equipment is operated in a
commercial environment. This equipment generates, uses and can radiate radio frequency energy and, if not installed and used in accordance with the instruction manual,
may cause harmful interference to radio communications. Operation of this equipment in
a residential area is likely to cause harmful interference, in which case the user will be
required to correct the interference at his own expense.
Notice 1
The changes or modifications not expressly approved by the party responsible for compliance could void the user’s authority to operate the equipment.
Notice 2
Shielded interface cables and A.C. power cord, if any, must be used in order to comply
with the emission limits.
VOIR LA NOTICE D’INST ALLATION AVANT
DE RACCORDER AU RESEAU.
Micro-Star International
TEL.886-2-32345599
FAX.886-2-32345488
http://www.msi.com.tw
Reversion History
Version Note Date
v1.0 First released with 13 languages January 2004
MS-8404A
MS-8408A
Page 3

Table of Contents
Front Panel ..............................................................................1
Rear Panel ...............................................................................1
English ......................................................................................2
French ......................................................................................4
German ....................................................................................6
Spanish ....................................................................................8
Portuguese .............................................................................10
Turkish ....................................................................................12
Russian ...................................................................................14
Japanese................................................................................16
Thai.........................................................................................18
Simplified Chinese ................................................................20
Traditional Chinese ...............................................................22
Persian ...................................................................................24
Arabic .....................................................................................26
Page 4
ΝοτεΝοτε
ΝοτεΝοτε
Νοτε
Page 5
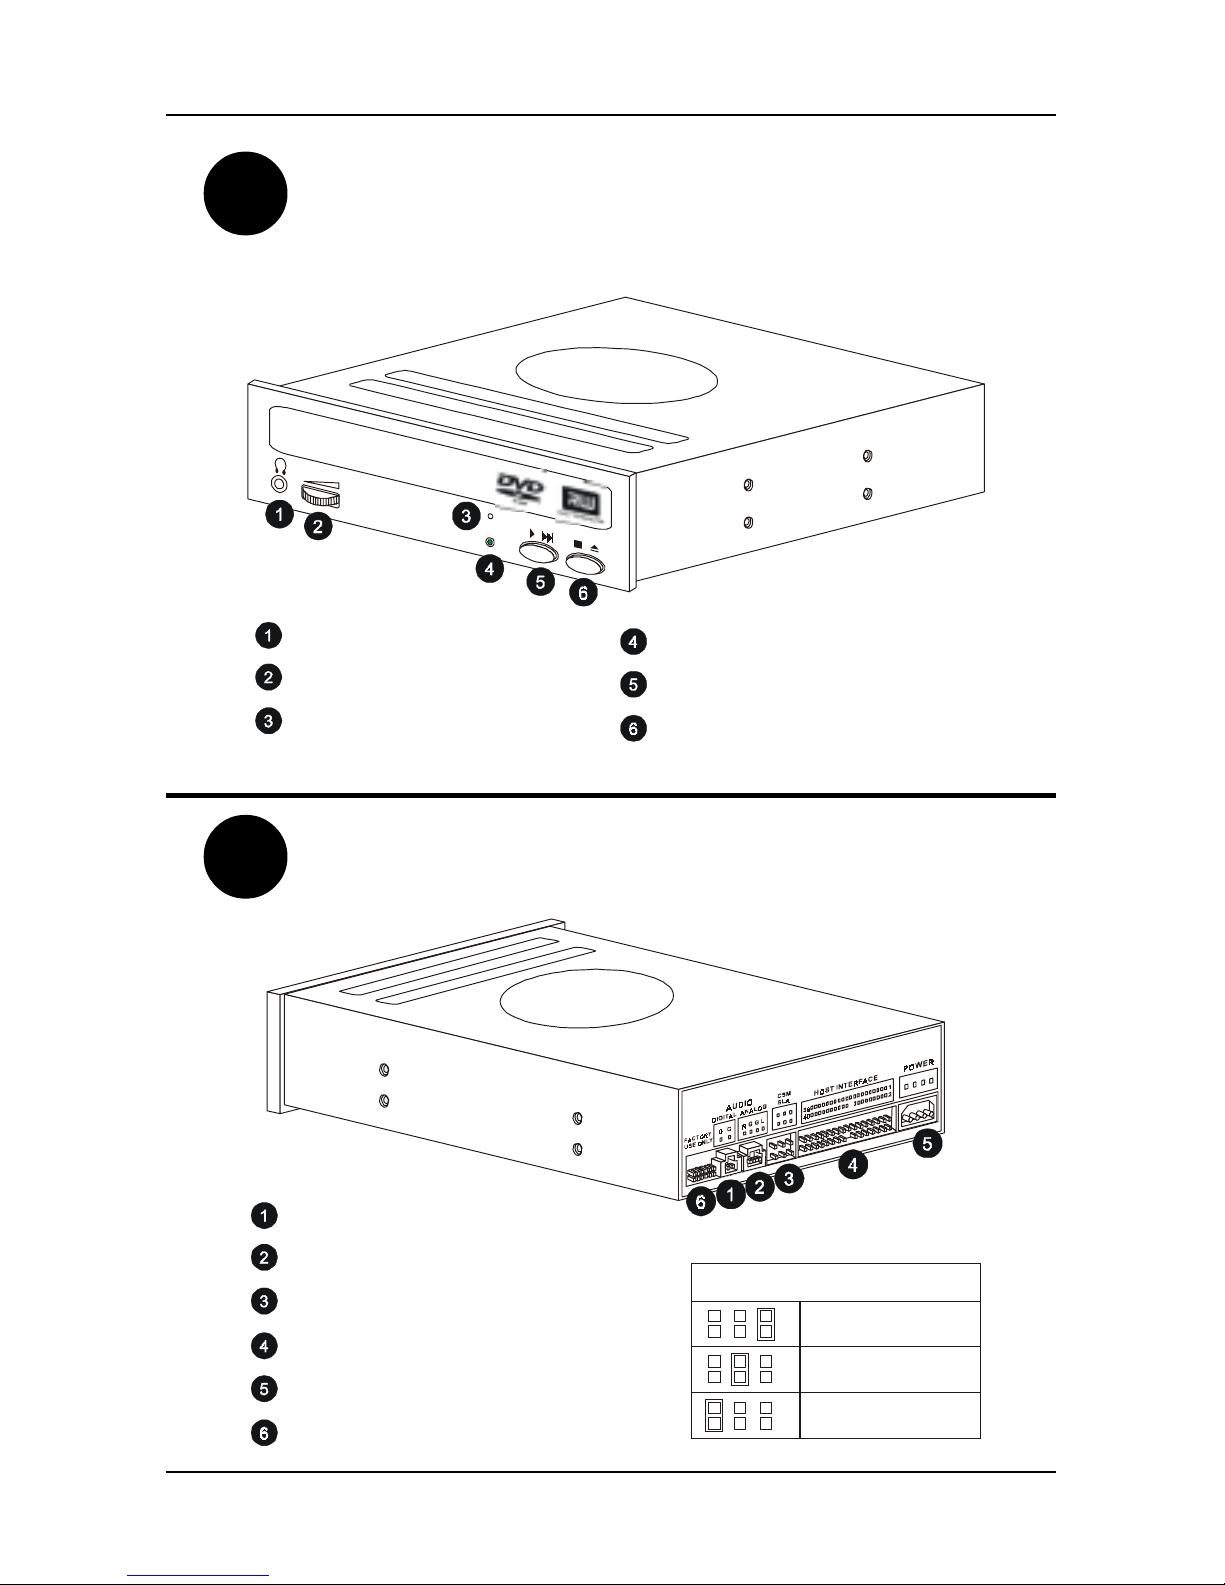
1
F
ront Panel
R
Headph one Jack
Volume Cont rol
Emergency Eject Hole
Read(Green) / Write(Red) LED
Play / Skip Button
Stop / Open / Close Button
Digital Audio Output Connector
Analog Audio Output Connector
Device Configuration Jumper
Host Interface Connector
Power Supply Conne c tor
Tes t Jump er (Do not use)
MASTER
SLAVE
Cable Select
CSM
SLA
ear Panel
Page 6

2
ENGLISH
Hardware Installation
1. Turn off the power of the computer.
2. Remove the cover of the computer.
3. Setup the Master/Slave jumpers on the jack of the DVD-Dual drive.
4. Insert the DVD-Dual drive into one of the vacant 5.25-inch bays and secure it with the
mounting screws included in the DVD-Dual package.
5. Connect Power Cable to the Power Plug.
6. Connect the 40-pin IDE Cable to the IDE connector of the DVD-Dual Drive and make
sure that the red edge of the IDE Cable corresponds to pin 1 of the IDE interface on the
DVD-Dual Drive.
7. If you have a sound card, connect the 4-pin CD Audio cable to the DVD-Dual Drive’s
Analog Audio line out connector, and the audio-in connector of the sound card.
8. Replace the cover of the computer and reconnect the power cords.
Warning: Test Jumper is for Factory test only, please
DO NOT USE!
Software installation
For Windows 95/98/ME:
This DVD-Dual drive will be automatically detected and the correct device driver will be
loaded automatically also. Hence, there is no need to install any DVD-Dual device driver
under Window 95/98/ME system.
If your DVD-Dual cannot be detected automatically, please do as follows:
a. Restart your computer, and then click on the “control panel” icon under “my
computer.”
b. Double-click on the “add new hardware” icon, and then click “next” and “yes”
at the dialog boxes.
c. Allow windows to search for your new DVD-Dual drive automatically, and
loads the driver software to complete the installation.
For Windows NT/2000/XP or OS/2 WARP or other systems
DVD-Dual drive supports the standard ATAPI drive interface. Your system should be able
to load the appropriate driver for your drive.
Emergency Eject Hole: When the tray cannot be open automatically for any reasons, please
insert an eject-bar (a straightened paper clip with diameter of 1.2mm can be used as an ejectbar, press it inside of emergency eject hole, and then eject the tray manually. Make sure to
turn off the power before doing this action.
Page 7

3
ENGLISH
Installing Nero
System Requirements
Your system should come with a pre-installed operating system or you may choose to upgrade
your operating system to the latest. Below you will find a list of those that Nero support.
Please check to make sure that you have one of the following operating systems:
Operating System
• Windows 95 / 98 / 98SE / ME
• Windows NT 4.0 (service pack 6) / Windows 2000 (service pack 2 or higher)
• Windows XP
Hardware
• Your PC must have a 500 MHz system or higher recommended. Please refer to the PC
manuals that came with your system for system configuration information.
• You must have at least 64 MB RAM memory. Generally, more would be better.
• The hard disk access time should be less than 19 milliseconds
• Graphics card with 8 MB or higher (for video).
• We recommend that Nero will be most comfortable to work with in a screen resolution of
1024x768 or greater.
• 700 MB of free hard drive space for drive images recommended. Generally, more would
be better.
Installing Nero
Step 1: Insert the Nero CD-ROM into your CD/DVD drive on your PC. If you have a
feature called “Autorun” activated, this will start your installation process
automatically. If you do not have “Autorun” activated, you can go to My
Computer > Click on the drive letter of the CD/DVD drive > click setup.exe
Step 2: Follow prompts until you are finished installing the software.
Step 3: Restart your PC
Uninstalling Nero
Step 1: Go to Start > Control Panel > Add or Remove Programs. In some operating
systems, you will find - Start > Settings > Control Panel.
Step 2: Select Nero in the Add or Remove Programs window and click “remove”.
Step 3: In some cases, you will find that when removing software, there will be one or
two files that the operating system will ask if you want them removed since they
may be shared by other programs. If you are unsure, always opt to keep these
files.
Page 8

4
FRENCH
Installation matérielle
1. Couper l’alimentation de votre ordinateur
2. Retirer le capôt de votre boîtier
3. Configurer le jumper à l’arrière du graveur en Maître ou Esclave
4. Insérer le graveur DVD dans la baie 5 pouces ¼ vacante, et bloquer le grâce à la visserie
fournie.
5. Connecter le câble d’alimentation
6. Connecter la nappe IDE 40 pins sur le graveur de DVD en vous assurant que la bande rouge
longeant le câble IDE soit alignée avec le pin 1 du connecteur du graveur DVD.
7. Si vous possédez une carte son, connecter la câble CD audio audio 4 pins sur votre sortie
Analogique Audio de votre graveur DVD, et sur l’entrée audio de votre carte son.
8. Replacer le capôt de votre boîtier et connecter l’alimentation.
Attention: Le test jumper est uniquement utilisable pour les tests en usine, veuillez ne
pas utliser cette fonction.
Installation des logiciels
Pour Windows 95/98/Me:
Windows devrait détecter automatiquement votre nouveau graveur de DVD. Les pilotes seront
directement installés et votre lecteur prêt à l’emploi.
Si votre graveur n’est pas détecté automatiquement, veuillez suivre les instructions suivantes:
a. Redémarrez votre ordinateur, et cliquer sur “panneau de configuration”.
b. Double-cliquer sur “ajout de nouveau matériel”, et cliquer sur “suivant” puis “oui” dans
la boîte de dialogue.
c. Laisser windows chercher votre graveur DVD automatiquement, il chargera alors les
pilotes nécessaires.
Pour Windows NT/2000/XP ou OS/2 WARP et autres sytèmes.
Le DVD Dual est à la norme ATAPI. Votre système devraît être capable de charger les pilotes
nécessaires automatiquement.
Ejection en cas d’urgence: Lorsque le tiroir ne peut être ouvert, insérer, dans le petit trou situé
sur la face avant du lecteur, une pointe de 1.2 mm et appuyer assez fortement. Le tiroir doit
alors s’ouvrir. Veillez à couper l’alimentation de votre ordinateur avant de faire cette manipulation.
Page 9

5
FRENCH
Installation de Nero
Système nécessaire
Votre système d’exploitation doit être au préalable installé dans sa version la plus récente. Ci
dessous vous trouverez la liste des OS supportés par Nero. Assurez vous que vous possédez
bien une des ces versions.
Système d’exploitation
• Windows 95 / 98 / 98SE / ME
• Windows NT 4.0 (service pack 6) / Windows 2000 (service pack 2 or higher)
• Windows XP
Matériel
• La vitesse minimale de votre processeur doit être de 500 MHz.
• La quantité de mémoire vive doit être au minimum de 64 Mo. Plus est vivement conseillé.
• Le temps d’accès du disque dur doit être inférieur à 19 millisecondes.
• Votre carte graphique doit intégrer au minimum 8 Mo de mémoire.
• Nous recommandons d’utiliser la résolution de 1027x768 pour une utilisation optimale
de Nero.
• 700 Mo minimum d’espace libre sur votre disque dur sont nécessaires à l’installation de
Neros.
Installation de Nero
Step 1: Première étape: Insérer le CD Nero dans votre lecteur de CD-ROM ou DVD. Si
vous avez activer l’option “insertion automatique”, le logiciel d’installation se
lancera tout seul. Dans le cas contraire, double cliquer sur l’icône de votre lecteur
, puis sur l’icône “Setup.exe.”
Step 2: Seconde étape: Suivez les instructions jusque la fin de l’installation.
Step 3: Troisième étape: Redémarrez votre ordinateur.
Désintaller Nero
Step 1: Première étape: Allez sur le menu “démarrez”, “panneau de configuration”, puis
“ajout/suppression” de programmes.
Step 2: Seconde étape: Sélectionner Nero dans la liste des programmes et cliquer sur
“désinstaller”.
Step 3: Dernière étape: Dans certains cas, vous pouvez trouver après désinstalltion un
ou deux fichiers orphelins. Ceux ci peuvent être utilisés par d’autres programmes.
Si vous n’êtes pas certain de leurs inutilités, veillez à ne pas les effacer.
Page 10

6
GERMAN
Hardware-Installation
1. Schalten Sie den Computer aus.
2. Entfernen Sie die Gehäuseabdeckung.
3. Setzen Sie den Master/Slave-Jumper auf den Stecker für das DVD-Dual-Laufwerk.
4. Schieben Sie das DVD-Dual-Laufwerk in einen der freien 5.25-Zoll-Einschübe und sichern
Sie es mit den mitgelieferten Montageschrauben.
5. Verbinden Sie das Stromkabel mit dem Stromanschluss.
6. Verbinden Sie das 40-Pin IDE-Kabel mit dem IDE-Anschluss des DVD-Dual-Laufwerks.
Vergewissern Sie sich, dass die rote Kante des IDE-Kabels am Pin 1 des IDE-Anschlusses
anliegt.
7. Falls Sie eine Soundkarte besitzen, verbinden Sie das 4-Pin CD Audiokabel mit dem
analogen Audio-Ausgangsstecker des DVD-Dual-Laufwerks und dem Audio-Eingang der
Soundkarte.
8. Schließen Sie das Gehäuse und verbinden Sie die Netzkabel.
Achtung: Der Test-Jumper ist nur für werkseigene Testzwecke. BITTE
NICHT
BENUTZEN!
Software-Installation
Für Windows 95/98/ME:
Das neue DVD-Dual-Laufwerk wird automatisch erkannt und zugewiesen. Die korrekten Gerätetreiber werden automatisch geladen. Eine Installation von DVD-Dual-Gerätetreibern ist unter
Windows 95/98/ME nicht notwendig.
Wir Ihr DVD-Dual-Laufwerk nicht automatisch erkannt, gehen Sie folgendermaßen vor:
a. Starten Sie Ihren Computer neu, Klicken Sie auf “Systemsteuerung” unter “Mein
Computer.”
b. Klicken Sie doppelt auf “Neue Hardware hinzufügen”, klicken Sie auf “weiter” and
“ja” in den Dialogfeldern.
c. Erlauben Sie Windows die automatische Suche nach Ihrem neuen DVD-Dual-Laufwerk
sowie das Laden der Softwaretreiber, um die Installation zu vervollständigen.
Für Windows NT/2000/XP oder OS/2 WARP oder andere Betriebssysteme
Das DVD-Dual-Laufwerk unterstützt die Standard ATAPI-Laufwerk-Schnittstelle. Ihr System sollte die passenden Treiber für Ihr Laufwerk laden können.
Not-Auswurfloch: Wenn sich der Laufwerkschacht nicht automatisch öffnet, stecken Sie bitte
eine Auswurfhilfe (etwa einen festen Papierstreifen mit einem Durchmesser von ca. 1,2mm) in
das Auswurfloch, um den Schacht zu öffnen (bitte keine spitzen Gegenstände wie Nägel oder
Nadeln verwenden). Vergewissern Sie sich, dass das Gerät abgeschaltet ist und nicht unter
Strom steht, bevor Sie diese Maßnahme durchführen.
Page 11

7
GERMAN
Installation von Nero
System-Anforderungen
Ihr System sollte über ein vorinstalliertes bzw. aktualisiertes Betriebssystem verfügen.
Nachstehend finden Sie eine Liste von Betriebssystemen, die Nero unterstützen. Bitte
vergewissern Sie sich, dass auf Ihrem PC eines der aufgeführten Betriebssysteme installiert
ist:
Betriebssystem
• Windows 95 / 98 / 98SE / ME
• Windows NT 4.0 (service pack 6) / Windows 2000 (Service Pack 2 oder höher)
• Windows XP
Hardware
• Prozessor mit mindestens 500 MHz. Angaben über die Konfiguration Ihres PCs finden
Sie im dazugehörigen Handbuch.
• Mindestens 64 MB RAM Arbeitsspeicher. Mehr Speicherkapazität wird empfohlen.
• Die Zugriffszeit auf die Festplatte sollte unter 19 Millisekunden liegen.
• Grafikkarte mit 8 MB oder höher (für Video).
• Nero sollte mit einer Bildschirmauflösung 1024x768 oder größer betrieben werden.
• Auf der Festplatte sollten sich mindestens 700 MB Speicherplatz befinden. Mehr
Speicherplatz wird empfohlen.X
Installation von Nero
Schritt 1: Legen Sie die Nero CD-ROM in das CD/DVD-Laufwerk Ihres PCs ein. Verfügt
Ihr PC über das aktivierte Feature “Autorun”, startet der Installationsvorgang
automatisch. Ist “Autorun” nicht aktiviert, wählen Sie „Mein Computer“.
Klicken Sie auf den Laufwerks-Buchstaben des CD/DVD-Laufwerks, dann auf
setup.exe.
Schritt 2: Folgen Sie den Anweisungen bis die Software vollständig installiert ist.
Schritt 3: Starten Sie Ihren PC neu.
Deinstallation von Nero
Schritt 1: Gehen Sie zu Start > Systemsteuerung > Programme hinzufügen oder entfernen.
Manche Betriebssysteme, verfügen über - Start > Einstellungen >
Systemsteuerung.
Schritt 2: Wählen Sie Nero unter >Programme hinzufügen oder entfernen “entfernen”.
Schritt 3: Während der Softwareentfernung kann es in einigen Fällen vorkommen, dass
das Betriebssystem fragt, ob ein oder zwei Dateien, die von anderen Programmen
genutzt werden, tatsächlich entfernt werden sollen. Wenn Sie sich nicht sicher,
sind behalten Sie diese Dateien.
Page 12

8
Instalación del Hardware
1. Desconecte la corriente de la computadora.
2. Abra el gabinete de la computadora.
3. Configure los puentes Maestro/Esclavo en el conector de la unidad de DVD-Dual según
se necesite.
4. Inserte la unidad de DVD-Dual en una de las bahías de 5 ¼” libres y asegúrela con los
tornillos de montaje incluidos en el paquete de la DVD-Dual.
5. Conecte el cable de electricidad al tomacorriente.
6. Conecte el cable IDE de 40 pines al conector IDE de la unidad de DVD-Dual y
asegúrese de que el borde rojo del cable IDE corresponda con el pin 1 de la interfase IDE
en la unidad de DVD-Dual.
7. Si posee una tarjeta de sonido, conecte el cable de sonido de 4 pines al conector de
sonido análogo de salida de la unidad de DVD-Dual, y al conector de entrada de sonido
de la tarjeta de sonido.
8. Cierre el gabinete de la computadora y conéctela a la corriente.
Advertencia: El puente de prueba es para pruebas de fábrica solamente, por favor
NO
LO UTILICE
Instalación del Software
Para Windows 95/98/ME:
La nueva unidad DVD-Dual será detectada e identificada automáticamente y el driver
correcto será cargado. Por ello, no hay necesidad de instalar ningún driver para el DVD-Dual
bajo sistema operativo Window 95/98/ME.
Si su unidad DVD-Dual no puede ser detectada automáticamente, haga lo siguiente:
a. Reinicie su computadora, haga clic en el ícono “Panel de Control” bajo “Mi
Computadora”.
b. Haga doble-clic en el ícono “Agregar Nuevo Hardware”, y luego haga clic en
“Próximo” y “Sí” en las cajas de diálogo.
c. Permita que Windows busque su nueva unidad DVD-Dual automáticamente, y
cargue el software del driver para completar la instalación.
Para Windows NT/2000/XP o OS/2 WARP u otros sistemas:
La unidad DVD-Dual tiene soporte para la interfase ATAPI estándar. Su sistema debería
poder cargar el driver apropiado para su unidad.
Orificio de Expulsión de Emergencia: Si la bandeja no se abre automáticamente por
cualquier motivo, por favor inserte una barrita de expulsión (se puede usar un sujetapapeles
con diámetro de 1.2mm estirado como barrita de expulsión). Insértela en el orificio de
expulsión de emergencia y abra la bandeja manualmente. Asegúrese de cortarle la corriente a
la computadora antes de proceder.
SPANISH
Page 13

9
Instalación de Nero
Requerimientos del Sistema
A continuación, hallará la lista de todos los sistemas operativos compatibles con el Nero. Por
favor asegúrese que su sistema posea uno de los siguientes sistemas operativos:
Sistemas Operativos
• Windows 95 / 98 / 98SE / ME
• Windows NT 4.0 (service pack 6) / Windows 2000 (service pack 2 o más)
• Windows XP
Hardware
• Se recomienda que su PC tenga un sistema de 500 MHz o más. Por favor refiérase a los
manuales que vinieron con su PC para la información de la configuración del sistema.
• Debe tener por lo menos 64 MB de memoria RAM. Generalmente, más memoria sería
mejor.
• El tiempo de acceso al disco duro debe ser menor a los 19 milisegundos
• La tarjeta gráfica debe tener 8 MB o más (para video).
• Recomendamos una resolución de pantalla de 1024x768 o más.
• 700 MB de espacio libre en el disco duro para las imágenes. Generalmente, más espacio
sería mejor.
Instalación de Nero
Paso 1: Inserte el CD-ROM del Nero en la unidad CD/DVD de su PC. Si tiene el “Auto
arranque” activado, el proceso de instalación se iniciará automáticamente. Si no
tiene el “Auto arranque” activado, puede ir a Mi Computadora > Haga clic en la
letra de la unidad del CD/DVD > haga clic en setup.exe
Paso 2: Siga las indicaciones hasta finalizar la instalación del programa.
Paso 3: Reinicie su computadora.
Desinstalación de Nero
Paso 1: Vaya a Inicio > Panel de Control > Agregar o Remover Programas. En algunos
sistemas operativos, encontrará - Inicio > Configuración > Panel de Control.
Paso 2: Seleccione Nero en la ventana de Agregar o Remover Programas y haga clic en
“remover”.
Paso 3: En algunos casos, encontrará que al remover software, el sistema operativo
preguntará si quiere remover uno o dos archivos que pueden ser compartidos con
otros programas. Si no está seguro, siempre opte por guardar los archivos.
SPANISH
Page 14

10
PORTUGUESE
Insalação de Hardware
1. Desconecte os cabos de seu computador da energia, em seguida, remova a capa do cabimete
de seu computador.
2. Ajuste os jumpers Master e Escravos na saída de eletricidade do aparelho DVD-Dual.
3. Inserte o parelho de DVD-Dual dentro do espaço correspondente a 5.25 polegadas e
asegure-o com os parafusos de montagem que vêm incluídos no pacote do DVD-Dual.
5. Conecte o cabo de eletricidade na tomada.
6. Conecte o cabo IDE de 40 pinos no conector IDE do aparelho DVD-Dual e esteja seguro
de que a extremidade vermelha do cabo IDE corresponda ao pino 1 da interface IDE ao
aparelho DVD-Dual.
7. Deve conectar o cabo de áudio de 4 pinos ao conector de áudio analógico de saída do
aparelho DVD-Dual, e ao conector de entrada da placa de som.
8. Coloque novamente a capa de seu computador, e reconecte os cabos elétricos.
Atenção: O Jumper de teste é somente para uso de fábrica. Por favor,
NÃO O UTILISE!
Instalação do Software
Para Windows 95/98/ME:
O sistema detectará automaticamente, determinará o novo DVD-Dual e carregará driver correto.
Conseqüêntemente, não há necessidade de instalar qualquer driver de DVD-Dual sob o sistema
Window 95/98/ME.
Se o DVD- Dual não puder ser detectado automaticamente, por favor faça o seguinte:
a. Reinicie seu computador, clique no ícone “meu computador” e logo em “painel de
controle”
b. Doble-clique no ícone “adicionar novo hardware”, e logo “seguinte” e depois
“sim” na caixa de diálogos.
c. Siga windows para procurar pelo seu novo driver DVD-Dual automaticamente, e
carregue o driver software to complete a instalação.
Para o sistema windows NT/2000/XP, OS/2 WARP ou outros sistemas o driver DVD-Dual
suporta a interface ATAPI standard e seu sistema poderá ser capaz de carregar o drive apropriado
para seu sistema.
Abertura de ejeção de Emergência: Quando a bandeija não puder se abrir automaticamente
por qualquer razão, por favor inserte à tranca (um clipe de papel com diâmetro de 1.2mm pode
ser usado como tranca de ejeção, pressione-o para dentro da abertura, logo, ejete a bandeja
manualmente. Asegurese-se de desligar a eletricidade antes de fazer todo o processo.
Page 15

11
PORTUGUESE
Instalação do Nero
Requerimentos do sistema
Seu sistema poderia vir com um sistema de operação pre-instalado ou você pode escolher um
upgrade atual para operação do sistema. Veja a lista abaixo onde você encontrará disponíveis
o suporte do Nero. Por favor revise, para asegurar-se de que você tem um dos seguintes
sistemas de operação:
Sistemas de Operativos
• Windows 95 / 98 / 98SE / ME
• Windows NT 4.0 (service pack 6) / Windows 2000 (service pack 2 or higher)
• Windows XP
Hardware
• É recomendado que seu PC tenha um sistema de 500 MHz ou mais. Por favor observe
que no manual do seu PC vem a informação de figuração do seu sistema.
• Você deve ter pelo menos 64 MB RAM de memória. Geralmente quanto mais, melhor.
• O disco duro acessa um tempo mais curto que 19 milissegundo
• A placa gráfica com 8 MB ou mais (para vídeo).
• Recomendamos uma resolução de 1024x768 ou mais para que trabalhe de forma mais
confortável com o Nero.
• Também é recomendado 700 MB de espaço livre para as imágens em seu disco duro.
Geralmente quanto mais espaço, melhor.
Instalando o Nero
1º Passo: Inserte o CD-ROM Nero dentro da unidade CD/DVD de seu PC. Se você tem
ativada uma característica chamada “Autorun”, isto fará com que a instalação se
processará automaticamente. Se você não tem “Autorun” ativado em seu sistema,
você poderá ir a “Meu Computador” > Clique no na letra de unidade do CD/DVD
> clique “setup.exe”
2º Passo: Siga as instruções até que termine a instalação do programa.
3º Passo: Reinicie seu PC
Desinstalando o Nero
1º Passo: vá a Iniciar > Painel de Controle > Adicionar ou Remover Programas. Em alguns
sistemas operativos, você encontrará - Início > Configuração > Painel de Controle.
2º Passo: Selete Nero na janela de Adicionar e Remover Programas e clique “remover”.
3º Passo: Em alguns casos, você verá que ao remover o software, haverá uma ou duas
pastas que podem ser compartidas com outros programs. Se você não estiver
seguro, sempre opte para guardar estes files.
Page 16

12
TURKISH
Donanım Montajı
1. Bilgisayararınızı kapatın.
2. Bilgisayarınızın kasasını açın.
3. DVD-Dual sürücünün üstündeki jackteki Master/Slave jumperlarını ayarlayın.
4. DVD-Dual sürücüyü boş 5.25 inçlik yuvalardan birine yerleştirin ve DVD-Dual paketinden çıkan vidalarl
a
yerini sağlamlaştırın.
5. Power Kablosunu Power fişine takın.
6. 40-pinlik IDE kabloyu DVD-Dual sürücünün IDE konnektörüne takın ve IDE kablonun kırmızı köşesinin
DVD-Dual sürücünün IDE interfazının pin 1’ine denk geldiğinden emin olun.
7. Eğer bir ses kartınız varsa, 4-pinlik CD Audio kablosunu DVD-Dual sürücünü Analog Audio line out
konnektörüne ve ses kartının audio-in konnektörüne bağlayın.
8. Bilgisayarın kasasını kapatın ve güç kablolarını yeniden yerlerine yerleştirin.
Uyarı: Test Jumperı sadece fabrika testi içindir, lütfen KULLANMAYINIZ!
Ya z ılım yükleme
Windows 95/98/ME için:
Yeni DVD-Dual sürücü otomatik olarak sistemde tanınır ve doğru aygıt sürücüsü yüklenir. Bu nedenle, Window
s
95/98/ME sisteminde herhangi bir DVD-Dual aygıt sürücüsü yüklemeye gerek kalmaz.
Eğer DVD-Dual’ınız otomatik olarak sistem tarafından tanınmazsa, lütfen aşağıdaki yolu takip edin:
a. Bilgisayarınızı tekrar başlatın, sonra ‘’bilgisayarım’’ın içindeki ‘’denetim masası’’ ikonu üzerin
e
klikleyin.
b. ‘
’Yeni donanım ekle
’’ ikonu üzerine çift tıklayın ve diyalog kutularına ‘’
evet
’’ deyin.
c. Windows’un yeni DVD-Dual sürücünüzü otomatik olarak aramasına ve sürücünün yazılımın
ı
yükleyerek yüklemeyi tamamlamasına izin verin.
Windows NT/2000/XP veya OS/2 WARP veya diğer sistemler için DVD-Dual sürücü standart ATAPI sürüc
ü
interfazını destekler. Sisteminiz sürücünüz için uygun sürücüyü yükleyecektir.
Acil Durum Eject Yuvası: Herhangi bir nedenden dolayı yuva açılamadığı zaman, lütfen bir eject-barı (1.2mm
çapında düzleştirilmiş bir ataç eject-barı olarak kullanılabilir, acil durum eject yuvasının içine itiniz, ve ejec
t
yuvasını manuel olarak çıkarınız) yerleştiriniz.
Page 17

13
TURKISH
Nero’yu yükleme
Sistem Gereksinimleri
Sisteminizde bir operasyon sistemi önyüklemesi olmalı ya da operasyon sisteminizi en son haline yenilemeyi seçebilirsiniz.
Aşağıda bunlardan Nero’nun desteklediklerinin bir listesini bulacaksınız.Lütfen emin olmak için aşağıdaki sistemlerden birine
sahip olup olmadığınızı kontrol ediniz.
İşletim Sistemi
Windows 95 / 98SE / ME
Windows NT 4.0 (servis paketi 6) (6 lı paketler halinde) / Windows 2000 (servis paketi 2 veya üstü) (2li ya da dah
a
fazla paketler halinde)
Windows XP
Donanım
PC nizin 500 MHz ya da daha yüksek olması tavsiye edilir.Lütfen sistem konfigürasyon bilgileri için PC niz ile
birlikte gelen sistem bilgisi elkitabına gözatınız.
En az 64 MB RAM hafızasına sahip olmanız gereklidir. Genelde daha yüksek olması, iyi olur.
Hard diske aktarım süresi 19 milisaniyeden az olmalıdır.
Grafik kartı 8MB ya da daha yüksek olmalıdır.( video için)
Nero’nun en rahat kullanımı için ekran çözünürlüğünün 1024x768 ya da daha iyisi olması tavsiye edilir.
Tavsiye edilen boş sürücü alanı 700 MB dır. Genel olarak daha fazla alan, daha iyi olur.
Nero’yu Yükleme
1. adım Nero CD’sini CD/DVD sürücünüze yerleştirin. Eğer “Autorun” özelliğiniz aktif durumdaysa yükleme süreci
otomatik olarak başlayacaktır. If you do not have “Autorun” activated, you can go to My Computer > Click on
the drive letter of the CD/DVD drive > click setup.exe
Eğer “Autorun” aktif değilse My Computer > CD/DVD sürücüsü > setup.exe yi tıklayınız.
2. adım
Ya zılımın yüklemesi bitene kadar adımları takip ediniz.
3. adım PC nizi tekrar başlatın.
Nero’nun Kaldırılması
1. adım: Başlat > Denetim masası > Program Ekle Kaldır
Bazı sistemlerde
Başlangıç > Ayarlar > Denetim Masası
şeklinde olabilir.
2. adım Program Ekle veya Kaldır penceresinde Nero seçilir ve “kaldır” tıklanır.
3. adım
Bazı durumlarda , yazılımı silerken, sistem tarafından bir ya da iki dosyanın başka programlar tarafından da
kullanıldığını, yine de silmek istediğinizden emin olup olmadığınız sorulur. Eğer emin değilseniz bu dosyaları
silmemeyi seçin.
Page 18

14
RUSSIAN
Устан овка оборудования
1. Выключите питание вашего компьютера.
2. Снимите крышку системного блока.
3. С помощью переключателя установите режим Master/Slave вашего комбинированного накопителя DVD/CD-RW.
4. Вставьте комбинированный накопитель DVD/CD-RW в один из свободных 5.25 дюймовых контейнеров системного
блока и закрепите винтами из комплекта поставки.
5. Подключите кабель питания.
6. Подключите 40-контактный IDE кабель к IDE разъёму комбинированного накопителя DVD/CD-RW и убедитесь, что
красный проводник кабеля подключён к первому контакту IDE разъёма накопителя.
7. Если в системе есть звуковая карта, соедините 4-х конт актный разъём аналогового аудио (Analog Audio line out) с
линейным входом (audio-in) звуковой карты.
8. Закройте крышку системного блока и подключите шнур питания.
Внимание: Тестовый переключатель предназначен только для технологических целей, пожалуйста, Н
Е
МЕНЯЙТЕ ЕГО ПОЛОЖЕНИЕ!
Устан овка программного обеспечения
Для Windows 95/98/ME:
Система автоматически определит комбинированный накопитель DVD/CD-RW и загрузит соответствующий драйвер.
Таким образом, нет необходимости устанавливать дополнительные драйверы комбинированного накопителя
DVD/CD-RW для Window 95/98/ME.
Если ваш накопитель DVD/CD-RW не определился автоматически, пожалуйста, выполните следующие действия:
a. Перезапустите компьюте р, зайдите в “Панель Управления”( “Control Panel”) из закладки “Мой компьютер”
(“My Computer”).
b. Дважды кликните на иконке
“Добавить новое оборудование”
(
“Add New Hardware”
), затем выберите ответы
“Далее” (“Next”
) и
“Да” (“Yes”)
в появляющихся диалоговых окнах.
c. Позвольте операционной системе автоматически найти комбинированный накопитель DVD/CD-RW, загрузить
драйверы и установить программное обеспечение.
Для Windows NT/2000/XP или OS/2 WARP или других операционных систем
комбинированный накопитель DVD/CD-RW имеет стандартный интерфейс ATAP I устройств, и ваша операционная
система должна поддерживать такие устройства.
Механизм ав3арийного извлечения диска:
Если лоток с диском не выдвигается автоматически, то, после выключения
питания, следует воспользоваться ключом аварийного извлечения диска. Этот ключ вставляется в отверстие аварийного
извлечения диска, нажимается на рычаг внутри накопителя , затем лоток выдвигается вручную. При отсутствии
специального ключа, можно использовать выпрямленную скрепку для бумаг диаметром 1,2 мм.
Page 19

15
RUSSIAN
Уст а новка ПО Nero
Системные требования
На компьютере должна быть установлена одна из нижеприведённых операционных систем, которые поддерживают
программное обеспечение (ПО) Nero. Перед установкой ПО убедитесь, что у вас установлена одна из операционных
систем:
Программное обеспечение
Windows 95 / 98SE / ME
Windows NT 4.0 (service pack 6) / Windows 2000 (service pack 2 или более поздний)
Windows XP
Аппаратное обеспечение
ПК с процессором частотой 500 МГц и выше. (Необходимые данные можно найти в Руководстве
Пользователя ПК).
Не менее 64 МБ оперативной памяти. Вообще говоря, чем больше, тем лучше.
Жёсткий диск со временем доступа не более 19 мс.
Видеокарта с видеопамятью не менее 8 МБ (для воспроизведения видео).
Рекомендованное разрешение экрана для работы с ПО Nero 1024x768 или выше.
Не менее 700 МБ свободного места на жёстком диске для записи образа CD-диска. Вообще говоря, чем
больше, тем лучше.
Установка ПО Nero
Шаг 1: Вставьте CD-ROM с программой Nero в накопитель CD/DVD вашего компьютера. Если в вашей системе
разрешена функция “Автозапуск” (“Autorun”), то процесс инсталляции запустится автоматически. Если в
вашей системе не разрешена функция “Автозапуск”, то вам следует выполнить следующие действия: Мой
Компьютер> затем выберите накопитель CD/DVD и кликните на программе setup.exe
Шаг 2
: Следуйте указаниям на экране, появляющимся в процессе установки.
Шаг 3: Перезапустите компьютер
Деинсталляция ПО Nero
Шаг 1:
Выполните следующую последовательность
Пуск > Панель управления > Устан ов ка/Удаление
программ (Start > Control Panel > Add or Remove Programs). В некоторых операционных системах
следует выполнить
Пуск > Ус т ано в ки > Панель управления (Start > Settings > Control Panel)
.
Шаг 2
: Выберите Nero в окне
Устано вка/Уд але ние программ (Add or Remove Programs
) и нажмите “уд али ть”
(“remove”).
Шаг 3
: В некоторых случаях, при удалении ПО может появиться предупреждение операционной системы о том,
что некоторые из удаля ем ых файлов могут совместно использоваться другими программами. Если вы не
уверены в том, что эти файлы не используются другими программами, всегда выбирайте опцию “сохранить
файлы” (“Keep Files”).
Page 20

16
JAPANESE
ドライブの接続
1. コンピュータ の電源ケーブル を抜きま す。
2.
コンピュータのケースカバー を開けま す。
3.
DVDデュアルドライブの「
Master/Slave
」ジャンパを設定します。
4. 付属のネジを 使用して、空い ている5 インチベイにド ライブを固定 します。
5.
平型4ピンの汎用電源コネク タをドラ イブに接続しま す。
6.
マザーボード側のIDE端子 とドライ ブ側のIDE端 子とドライブ 側端子を接 続
します。
7.
アナログ音声を接続する場合 は、ドラ イブ背面のアナ ログ音声出力 端子と、マ ザ
ーボード(またはサウンドカ ード)の 音声入力端子を 接続してくだ さい。
8. ケースカバー を元に戻し、電 源ケーブ ルを接続します 。
警告: テスト用ジャンパーピンは、工場出荷試験専用のピンです。お客様は操作しな
いでください。
ソフトウェアのインストール
Windows 95/98/ME をご使用の場合:
本機はOS標準ドライバーソ フトで動 作しますので、別 途ドライ バーソフトを イン
ストールする必要はありませ ん。
もし、DV Dドライブとし てしか認識 されない場合は 、以下の方法で再検出を行 っ
てください。
:
a.
システムを再起動し、「コントロールパネル」の中に ある「マイコ ンピュー
タ」を開きます。
b.
「新しいハードウェアの検出 」をダブ ルクリックし、「次へ」と「はい」を
クリックして自動検出作業を 進めます 。
c. DVDドライブが検出され、自動的にドライバーソフトが読み 込まれ ます。
(OSインストールCD−R OMを要 求される場合が あります。)
Windows NT/2000/XP などをお使いの場合
本機はOS標準ドライバーで 動作しま すので、別途 ドライバー ソフトを導入す る必
要はありません。
緊急取り出し穴について
:
何らかの事情によりメディアを 強制排出 する必要がある
場合、次の方法で取り出すこ とができ ます。
・ クリップなどを加工し、直径
1.2
ミリの折れ曲がっていない針 金を用意します 。
・ 取り出しボタン付近にある緊急取り出し穴に差し込み、内部にある排出機構を押
しこみます。
※電源が入っている状態でこ の操作を 行わないでくだ さい。
Page 21

17
JAPANESE
Nero
のインストール
必要なシステム
N
ero
を快適にご使用頂くために、以下の環境でのご使用を推奨します。
:
対応OS
Windows 98SE / ME
Windows NT 4.0 (service pack 6) /Windows 2000 (service pack 2 or higher)
Windows XP
ハードウェア
動作周波数
500MHz
以上の
CPU
64MB
以上の物理メモリ(必須)、
256MB
を推奨
アクセスタイム
19ms
以上の速度を持つ
HDD
8MB
以上のメモリを搭載した
VGA
カード
NERO
エキスプレスを快適にご使用いただく為には、
1024x768
以上の画面表
示解像度を推奨します。
700 MB
以上のハードディスク空き容量
Nero
のインストール
ステップ1
: Nero
のインストールディスクを、ドライブにセットします。
OS側が「自動再生する」に設定されていれば、インストール
プログラムが自動的に起動します。自動再生をキャンセルして
いる場合は、マイコンピューターから
CD-ROM
内容を表示し、
「
setup.exe
」を実行してください。
ステップ2
:
画面の指示に従って、インストール作業を進めてください。
ステップ3
:
システムを再起動してください。
Nero
のアンインストール
ステップ1
:
コントロールパネルの中にある「アプリケーションの追加と削
除」を開きます。
ステップ2
: Nero
を選択し、「プログラムの削除」をクリックします。
※アンインストール作業中に削除しても良いかどうか不確実なファイルがあ
った場合には、できるだけこのファイルを残すようにしてください。削除した
場合、ソフトの動作に思わぬ支障を来す場合があります。
Page 22

18
THAI
Page 23

19
THAI
Page 24

20
TRADITIONAL CHINESE
硬體安裝:硬體安裝:
硬體安裝:硬體安裝:
硬體安裝:
1. 關閉電腦電源。
2. 打開電腦外殼。
3. 在DVD-DUAL 後面調整跳線設定為Master或是Slave。
4. 將DVD-DUAL裝入空的5.25英吋磁碟機空間,並用所附的螺絲固定。
5. 連接電源線至DVD-DUAL後面的電源插座。
6. 連接40-pin IDE Cable到DVD-DUAL後面的IDE插座,同時注意IDE紅緣
線邊緣對準插座上的pin 1。
7. 如果你有音效卡,請分別在DVD-DUAL後面的Analog Audio line out插座
上連4-pin的光碟機音效線到音效卡上的光碟機專用line-in接線插座。
8. 將電腦的外殼裝回,重新啟動電腦。
警告:警告:
警告:警告:
警告:Test Jumper
為工廠生產時測試用為工廠生產時測試用
為工廠生產時測試用為工廠生產時測試用
為工廠生產時測試用
,,
,,
,
請勿使用請勿使用
請勿使用請勿使用
請勿使用
軟體安裝:軟體安裝:
軟體安裝:軟體安裝:
軟體安裝:
Window 95/98/ME系統
啟動電源,Window 95/98/ME會自動偵測新的DVD-DUAL裝置,並為您安
裝驅動程式,所以並不需要另外安裝DVD-DUAL驅動程式。如果您的
DVD-DUAL無法自動辨識,請一下列方式安裝驅動程式:
A 重新啟動您的電腦, 並在我的電腦中點選“控制台”
B 在“控制台”中,選擇“加入新的硬體”, 再按下對話框內的
“下一步”以及“是”
C 依照視窗上的指示操作,讓Windows系統自動搜尋新的DVD-
DUAL光碟機,並安裝最適當的驅動程式
Windows NT/2000/XP 或OS/2 WARP或其他作業系統
在Windows NT/2000/XP, OS/2 WARP或其他作業系統中,並不需要安裝DVDDUAL驅動程式,本光碟機支援ATAPI介面,您的作業系統將會為您載入適當
的驅動程式。
緊急退片孔:如遇托盤無法自動退出時,請先關閉電源,並以直徑約1.2mm拉直
迴紋針插入,以手動方式退出。
Page 25

21
TRADITIONAL CHINESE
安裝安裝
安裝安裝
安裝
NERONERO
NERONERO
NERO
系統需求系統需求
系統需求系統需求
系統需求
您的系統應事先具備已安裝好的作業系統,或是選擇將作業系統升級為最新版
本,以下是Nero支援的作業系統清單,請確認您具備下列任一種作業系統。
作業系統
• WINDOWS 95 / 98SE / ME
• WINDOWS NT4.0(SERVICE PACK6) / WINDOWS 2000(SERVICE PACK2
OR HIGHER)
• WINDOWS XP
硬體
• 您的電腦必須配備500MHZ系統或是更高等級
• 您至少要有64MB RAM記憶體,一般而言,越多越好
• 硬碟存取時間應少於19毫秒
• 8MB或是以上的圖形卡(針對視訊)
• 建議您使用1024x768或更高的螢幕解析度,此設定與NERO搭配的效果
最佳
• 建議保留700MB的硬碟可使用空間以供映像檔使用,一般來說,可使用空
間越多越好
安裝步驟安裝步驟
安裝步驟安裝步驟
安裝步驟
步驟 1: 將 Nero CD-ROM 插入電腦的 CD/DVD 光碟機中。如果您已啟動
「自動執行」的功能,就會自動啟動安裝程序。如果沒有啟動
「自動執行」功能,可以到 [我的電腦 ] > 按一下 CD/DVD 光碟機
的磁碟機代號 > 再按 setup.exe。
步驟 2: 遵循提示,直到完成軟體安裝為止。
步驟 3: 重新啟動電腦。
解除安裝解除安裝
解除安裝解除安裝
解除安裝
Nero Nero
Nero Nero
Nero
步驟 1: 請到 [開始] > [控制台] > [新增或移除程式]。在某些作業系統中,
您可能會看到 - [開始] > [設定] > [控制台]。
步驟 2: 在 [新增或移除程式] 視窗中選擇 [Nero],然後按一下 [移除]。
步驟 3: 在某些情況下,當您移除軟體時,您會發現有一、兩個檔案與其
他程式共用,這時作業系統會詢問您是否要將它們移除。如果您
不確定的話,請永遠選擇保留這些檔案。
Page 26

22
SIMPLIFIED CHINESE
硬件设置硬件设置
硬件设置硬件设置
硬件设置
::
::
:
1 关闭电脑电源。
2 打开电脑机箱。
3 在 DVD-DUAL 设置主/ 从跳线。
4 将DVD-DUAL驱动器置于空的机箱的5.25英寸托架内,用附带螺丝进
行固定。
5 连接电源电缆插头。
6 连接40 针的IDE 线到DVD-DUAL 驱动的IDE 连接器上,并确信IDE 线
的红色边沿对着 DVD-DUAL驱动器IDE接口的1号针
7如果你有声卡,将连接4 针的CD-AUDIO 电缆到DVD-DUAL驱动器的
模拟音频线输出,和声卡的音频输入。
8 重新装上电脑机箱和电脑电源线。
警告:测试跳线是工厂测试使用的,请勿使用。
软件设置软件设置
软件设置软件设置
软件设置
::
::
:
适用WINDOWS 95/98/ME
自动检测并决定新的 DVD-DUAL 驱动,并装载正确的设备驱动,以后无须
在 WIN95/98/ME下面不用安装任何驱动。
如果你的DVD-DUAL不能自动查明请按下列做:
A 重新启动你的电脑,并在“我的电脑”中点击“控制面 板”图
标。
B 双击“添加新硬件”图标,然后在对话框中点击“NEXT”和
“YES”。
C 允许WINDOWS 自动查找新的DVD-DUAL 驱动,并装载驱动软件
完全安装。
适用 WINDOWS NT/2000/XP 或 OS/2 WARP 或其他系统
DVD-DUAL 驱动支持标准的 ATAPI 驱动接口。你的系统将能装载合适驱动。
紧急取出孔:当盘片不能自动弹出。请插入一个取出条(一个直径1.2MM
的回形针作为取出条使用)推入回形针到紧急取出孔并且手动取出盘片。在
Page 27

23
SIMPLIFIED CHINESE
安装安装
安装安装
安装
NERONERO
NERONERO
NERO
::
::
:
系統需求系統需求
系統需求系統需求
系統需求
你的系统应该之前安装一个操作系统或者你之后可以选择升级你的操作系统,
你在下面 NERO 支持的操作系统中选择一个。请检查并确认你有下列操作系
统之一。
操作系统
• WINDOWS 95/98SE/ME/XP
• WINDOWS NT4.0(SERVICE PACK6)/WINDOWS 2000(SERVICE PACK2
OR HIGHER)
硬件
• 你的电脑必须有 500MHZ 或推荐更高,请参照你的 PC 手机的系统配置
信息
• 你至少需要有 64M 内存,通常越多越好
• 硬盘访问时间不少于 19 毫秒
• 显存在 8M 或更高
• 我们推荐 NERO 在1024X768 或更高的屏幕分辨率工作
• 推荐磁盘映象 700M 的硬盘自由空间,通常越多越好
安装安装
安装安装
安装
NERONERO
NERONERO
NERO
::
::
:
第 1 步 :将 Nero CD-ROM 插入 PC 的 CD/DVD 驱动器。 如果您激活了
名为“自动运行”的功能,安装过程会自动开始。 如果您没
有激活“自动运行”,可转到“我的电脑”,单击 CD/DVD
驱动器的驱动器盘符,然后再单击 setup.exe。
第 2 步:根据提示操作,直至完成软件安装。
第 3 步:重新启动 PC。
卸载卸载
卸载卸载
卸载
Nero Nero
Nero Nero
Nero
第 1 步:转到“开始”>“控制面板”>“添加或删除程序”。
在有些操作系统中的操作是:“开始”> “ 设置”> “ 控制面
板”。
第 2 步:在“添加或删除程序”窗口中选择“Nero”,然后单击
“删除”。
第 3 步:有时,在删除软件时您会发现,操作系统会询问您是否要删除
其中的某一两个文件,因为其他程序可能在共享这些文件。如
果您不能确定,请始终选择保留这些文件。
Page 28

24
PERSIAN
Page 29

25
PERSIAN
•
•
•
•
•
•
Page 30

26
ARABIC
Page 31

27
ARABIC
 Loading...