

Page 1

Digi Vox Ultimate HD
User Manual
Page 2

Page 3

Copyright and Trademark Notice
©2007 by MSI. All rights reserved.
Information in this document is subject to change without notice. No part of this
document may be reproduced or transmitted in any form or by any means, electronic
or mechanical without prior written permission of MSI.
MSI makes no representation or warranties with respect to the contents hereof and
specifically disclaims any implied warranties of merchantability or fitness for any
particular purpose. MSI reserves the right to revise this manual and to make changes
in its content without obligation to notify any person or organization of such revision or
change. In no event shall MSI be liable to you or any third party for any consequential,
incidental, direct, indirect, special, punitive, or other damages (including without
limitation, damages for loss of profits, interruptions, loss of information, pecuniary loss,
etc.), even if MSI has been advised of the possibility of such damages arising from any
defect or error in this manual or product.
Windows
®
is a trademark of Microsoft Corporation. All other brand names used in this
document are registered trademarks of their respective companies.
COPYRIGHT NOTICES
The material in this document is the intellectual property of MICRO-STAR
INTERNATIONAL. We take every care in the preparation of this document, but no
guarantee is given as to the correctness of its contents. Our products are under
continual improvement and we reserve the right to make changes without notice.
TRADEMARKS
All trademarks are the properties of their respective owners.
MICRO-STAR INTERNATIONAL Statement
All contents are subject to change without notice.
One year guarantee is for the device only. Warranty for accessories expired within
seven days of purchase date.
Page 4
Digi Vox Ultimate HD
TotalMedia Interface Overview
3.2 Main Menu
3.3 Total Media Setting
3.4 Total Media Interface Instruction
3.5 DVD Management
3.6 Picture Management
3.7 Music Management
3.8 Video Management
3.9 Setting
12
13
16
17
18
19
20
4. Remote Control
Remote Control Overview
24
24
Page 5

Page 6

Getting Started
1. Getting Started
1.1 Introduction
Thank you for choosing the Digi Vox UItimate HD TV tuner and video capture unit.
This product turns your PC into a powerful desktop multimedia system quickly and
easily. Capture video and still images and experience real-time MPEG-2 recording.
The Digi Vox UItimate HD provides you with a high quality TV viewing experience
with true stereo sound!
1.2 Features
Antenna ready DVB-T Silicon Tuner
Watch TV in a resizable window or full-screen
Listen to DVB radio
Teletext and EPG support
TimeShifting functions
Record digital TV perfectly to MPEG-2
Scheduled recording and one-touch recording from EPG
Capture still images
Ultra-portable design you can take anywhere
Windows Vista Premium Certified
1.3 Package Contents
When removing the contents of the package, please inspect all items to ensure no
damage was sustained during shipping. The following items should be included in the
package:
Digi Vox UItimate HD
Software Package CD
Quick Installation Guide
Portable antenna for DVB-T*
Remote control
* The included antenna is only suitable for areas with a strong DVB-T signal. If you have reception
problems, first try to move or reorient the antenna. Otherwise, you may need to use a stronger
antenna for better reception.
1
Page 7

Getting Started
1.4 System Requirements
To successfully use the Digi Vox UItimate HD solution, please ensure that your
system meets the following requirements:
®
Pentium
¢
256 MB RAM (minimum), 512 MB RAM recommended
¢
One available USB 2.0 port
¢
AC97 compatible sound card
¢
1GB free HD space
¢
CD-ROM drive (for driver/software installation)
¢
DirectX 9.0c or higher installed
¢
Graphics card/chipset with full support for DirectX 9.0 or above; Windows XP MCE
¢
2005 certified card/chipset required if using Windows XP MCE 2005
Microsoft XP SP2, XP MCE 2005*, Vista or Windows 7 installed
4 or AMD Athlon 2.0 GHz or faster, 2.4GHz or faster recommended
¢
* When using the Digi Vox UItimate HD with Windows Media Center in Windows XP MCE 2005, you
must install a 3rd party MPEG-2 decoder (such as Power DVD 6 or WinDVD6 or NVIDIA MPEG-2
decoder) in order to use the Digi Vox UItimate HD with
Windows Media Center.
2
Page 8
Installation
2. Installation
The following sections provide step-by-step instructions on installing and configuring
The following sections provide step-by-step instructions on installing and configuring
the card, accessories and software.
t ard, accessories and software
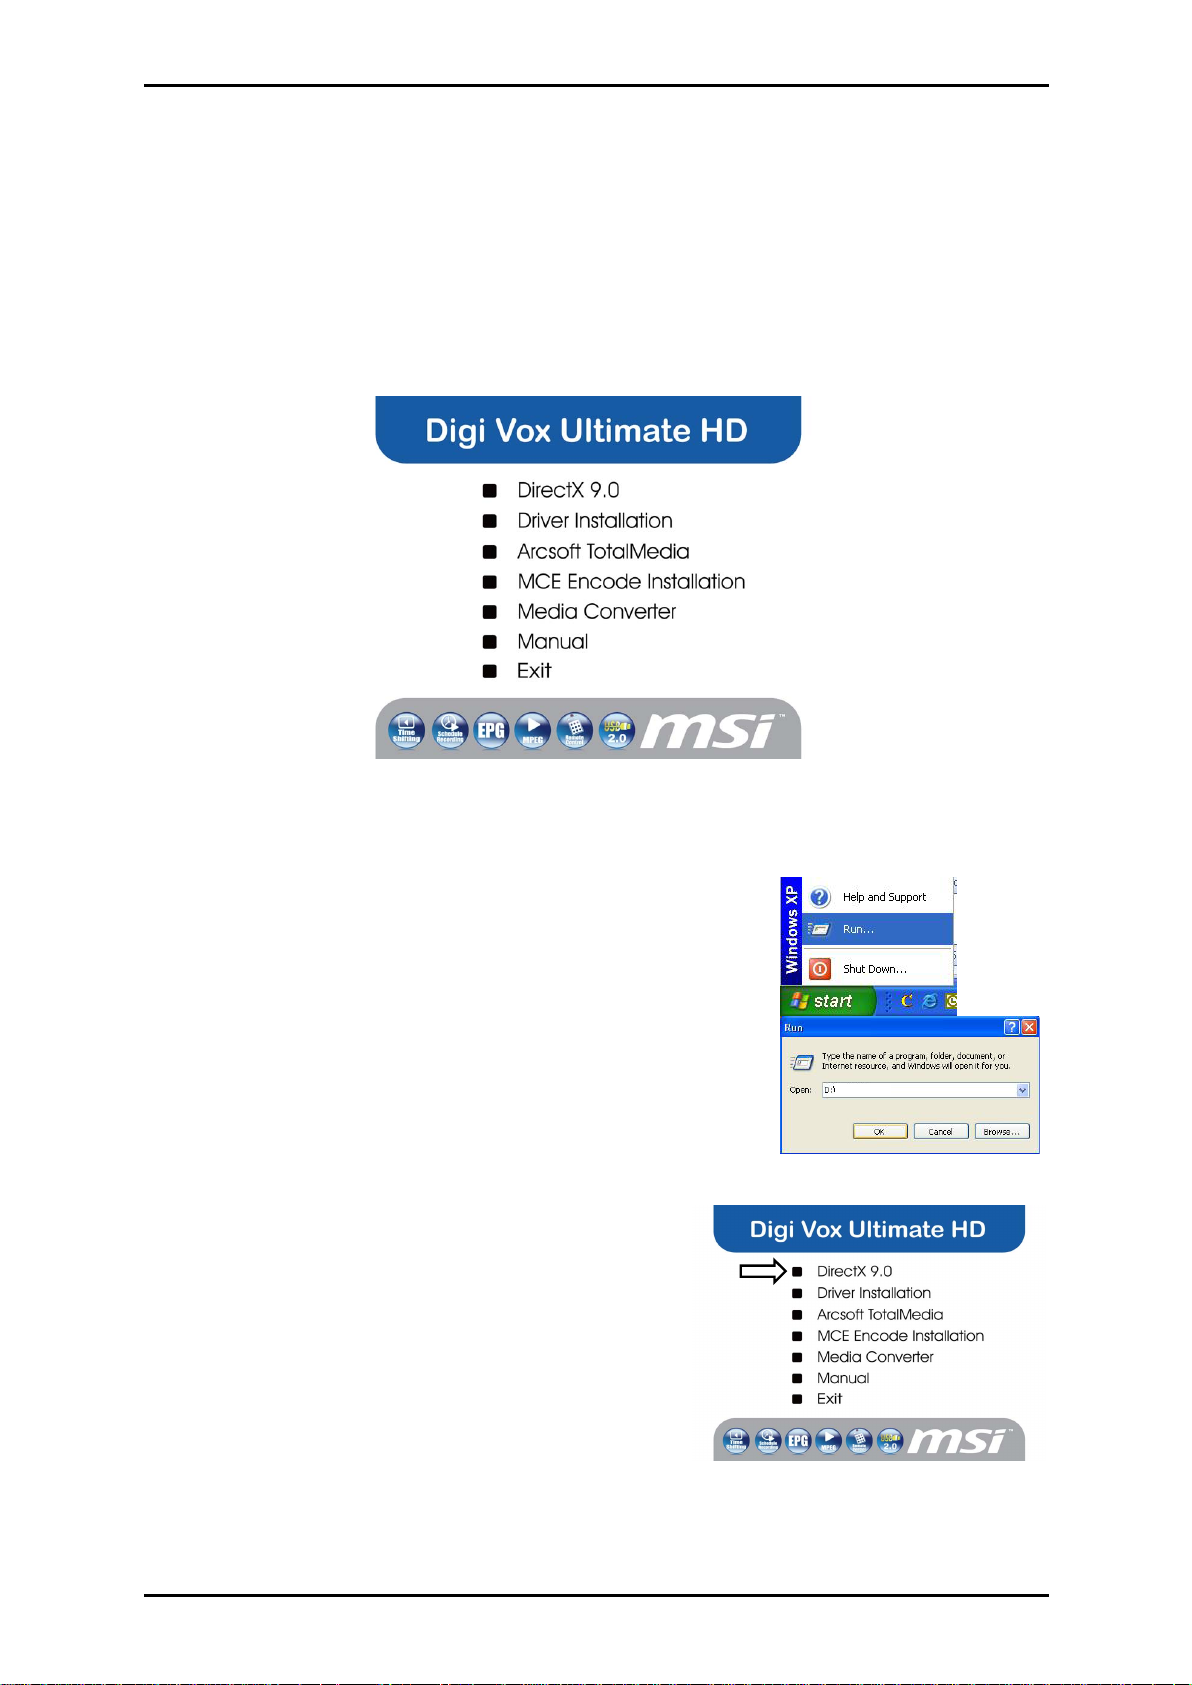
Before installing your DigiVOX mini II V3.0, insert the installation CD and an
Before installing your Digi Vox UItimate HD, please insert the installation CD and
installati n menu should load aut m ti lly.
installation menu should load automatically.
.
If you use Windows XP or MCE 2005, click on Windows XP/MCE 2005.Ifyouuse
If the Autostart program does not appear automatically when you insert your
Windows Vista, click on Window
installation CD, start it manually by running the
If the Autostart program does not appear automatically
Autorun.exe file located on the installation CD, or by
when you insert your Installation CD, start it manually by
clicking the Start button, choosing Run…., and typing in
running the InstallCD.exe file located on the Installation
D:\autorun.exe (if D: is your CD-ROM drive)
CD, or by clicking the Start button, choosing Run…, and
typing in D:\InstallCD.exe.
(if D: is your CD-ROM drive)
2.1 DirectX 9.0
Digi Vox UItimate HD requires to be supported by
Click on DirectX 9.0 and follow the prompts to
DirectX 9.0 or above. If the DriectX on your PC is
install DirectX. After the installation is completed,
lower then 9.0 version, please install DirectX 9.0
shut down the computer.
from autorun page.
Clicks on DirectX 9.0 and follow the prompts to
install DirectX. After the installation is completed,
shut down the computer.
s Vista.
Autorun.exe
3
Page 9

Installation
2.2 Connecting the Digi Vox UItimate HD
Connect the RF dongle to the connection port on the Digi Vox UItimate HD. Connect
your digital antenna to the RF dongle.
Now plug the Digi Vox UItimate HD unit into an open USB 2.0 port on your PC.
4
Page 10

2.3 Driver Installation
Installation
From the installation menu, please click on Driver Installation to install Digi Vox
.
Ultimate HD driver. Follow the prompts to complete installation of the driver.
2.4 Installation of the TV application
Install the TV software by clicking “Arcsoft Total Media”. Just follow the prompts to
install the software
5
Page 11

Installation
2.5 Setup of Media Center (MCE 2005)
Double-click the My TV icon on your desktop to start Media Center.
Click on Settings.
Click on Set Up TV Signal.
Now click on TV.
A warning message will appear. Click
Yes.
Click Next.
6
Select Yes, use this region to
configure TV services if your current
region is displayed. If not, select No, I
want to select a different region.
Click Next.
Page 12

Installation
If you chose to select your region,
select your region from the list and
click Next.
Click on Next.
Click the circle next to Set Up Guide
Settings and click Next.
If you want to use the Media Center
Guide, select Yes and follow the
onscreen prompts. If not, select No.
Click Next.
Click Start Scan to begin a channel
scan.
Windows MCE will now scan for
available channels in your area. This
may take a few minutes.
7
Page 13

Installation
When the scan is finished, click Next To watch TV, click on My TV from the
main menu.
Click on Live TV and you can now start
watching TV! For more details on how
to use Media Center, consult your
Windows MCE user manual or online
help.
! In order to use the Digi Vox UItimate HD with MCE 2005, you must install
an MCE Certified MPEG-2 decoder (also known as a DVD decoder) in order to
watch and record TV in Windows MCE. This DVD decoder is not included on
the installation CD. To install a DVD decoder, you can install software such as
CyberLink PowerDVD, InterVideo XPack, Sonic CinePlayer, nVidia DVD
Decoder or other such product that includes a DVD decoder.
! If you are unable to scan any channels or configure both tuners, make sure you
have updated your copy of Windows MCE through Update Rollup 2 (KB900325)
and through all available updates on Windows Update (including optional
updates).
8
Page 14

2.6 Setup Media Center (Vista Premium Users)
Installation
1. Click on the Media Center icon
from the Start Menu or the QuickStart bar.
3. Click Next and follow the onscreen
instructions to set up Media Center.
2. From the welcome screen, select
Custom setup and click OK.
4. When you reach the Optional
Setup screen, select Configure tuner,
TV signal, and Guide and click Next.
5. If you are in the currently displayed
region, select Yes, use this region to
configure TV services and click Next.
Otherwise, click No, I want to select a
different region, click Next, and choose
your region from the list that appears then
click Next.
6. Here, select your TV signal
source. Select Antenna and click Next.
9
Page 15

Installation
7. Here, choose Digial Terrestrial and
click Next
9. Here, select Yes if you want to use
Media Center’s Guide feature, or No if not.
Click Next.
.
8. Click Start Scan and let the
channel scan finish, then click Next after
it finishes.
10. This completes setup of your TV
card with Media Center. You can
continue to set up the rest of the options,
or you can select I am finished and
Next to finish setup.
.
10
Page 16

__________________________________________________________
Total Media
3.Total Media
3.1 Total Media Interface Overview
1
2
3
4
5
6
7
8
10
11
9
23
12
1. Full Screen
2. EPG
3. Channels
4. Recorded TV
5. Schedule
6. Capture Frame
7. Teletext
8. Settings
9. Playback
10. Stop
11. Backward
13
14
15
16
17
18
19
21
20
22
12. Forward
13. Skip to beginning
14. Skip to end
15. Volume Bar
16. Volume Down
17. Volume Up
18. Channel Down
19. Channel Up
20. My Favorite
21. Aspect Ratio
22. MTS
23.RECORD
__________________________________________________________
11
Page 17

Total Media
__________________________________________________________
3.2 Main Menu
Total Media is a Media Center Like software. You can not only watch Digital TV but a
Picture and Video Management tool. The below software instruction will guide you to
learn the magic of Total Media 3.
3.3 Total Media setting
Before you start to watch Totalmedia, you have to follow instruction to scan down all
available channels in your region.
3.3.1
On the TV Signal Setting, please
select your country and click “Next”
3.3.2
Click “Start” to scan Total Media
channels. All scanned channels
will be shown on channel list.
When scan is completed,
click “Next” to the next step.
__________________________________________________________
12
Page 18

__________________________________________________________
3.3.3
Please click “Finish” to finish the
channel scanning.
3.4 Total Media Interface Instruction
Total Media
3.4.1 Full Screen
Click “ Full Screen” to enlarge TV
on
full monitor
Total Media
3.4.2 EPG Information
On EPG information page, you can
check TV program name list on
Total Media
3.4.3 Channel Information
When click “Channels” , All
Total Media
Channel list
channels for next few days
Channels will be on
__________________________________________________________
13
Page 19

Total Media
__________________________________________________________
3.4.4 Recorded TV
All recorded TV will be saved on your
hard drive, and you can directly watch
all recorded TV from “Recorded TV”
option. You can also run “Video
Setting” from this page. (Please refer
to 3.6 for “Video Setting” Information)
3.4.5 Schedule
When click “Schedule”, the schedule
recording list will be shown. You can
choose “Add” to set new recording
schedule.
3.4.5.1 Add
You can set a new Total Media
channel,
schedule recording.
3.4.5.2Capture Frame
When “Capture Frame” is clicked, the
frame will be captured and on the left
up of screen, a “Frame Captured”
mark will be shown.
frequency and time table for
__________________________________________________________
14
Page 20

__________________________________________________________
3.4.6 Teletext
Teletext service is only supported
on specific region. “Teletext”
option can only be enable when
the region provide teletext service.
3.4.7 Setting
On “setting” option, you can Reset
TV Signal / Edit Channel / TV
settings / Import or Export
Channel list.
Total Media
3.4.8 Recording Bar
On Recording Bar, you can record
TV program / Play recorded
programs / Adjust volume /
Change Channel / Show favorite
list / Adjust aspect ratio / adjust
MTS setting
__________________________________________________________
15
Page 21

3.5 DVD Management
3.5.1
Total Media DVD/VCD play is an
easy operating DVD/VCD playback
system.
You can not only play DVD or VCD
movie but also capture frame from
the playing DVD by only a simple
click.
3.5.2
If you do not insert any DVD or VCD
disc on your DVD-ROM or CD-ROM
drive. Total Media will ask you to
insert a valid disc for DVD or VCD
playback
16
Page 22

Total Media
__________________________________________________________
3.6 Picture Management
3.6.1
Please select your picture folder.
Click “Play” to play slide show. For
slide show setting,
3.6.2
On Slide Show Setting, you can
adjust the “interval” / “Transition”
and add Music Soundtrack
__________________________________________________________
17
Page 23

3.7 Music Management
3.7.1
Please add your favorite music to
“My Playlists”. You can listen to
music by playing songs from “My
Playlists”.
You may also use “Rip Music CD”
and “Burn to Disc” to create your
music CD
18
Page 24

__________________________________________________________
Total Media
3.8 Video Management
3.8.1 Video Information
To preview, rename or edit a video file, begin
by selecting the video. If the file is not in the
current directory, use the navigation control at
the top of the screen to go to the folder
containing the file.
3.8.2 Capture
If capture device is connected, you
can capture video clips from your DV /
Camcorder / VCR
3.8.3 Video Setting
Please refer to 3.7.5 for Video Setting
information
__________________________________________________________
19
Page 25

Total Media
__________________________________________________________
3.9 Setting
3.9.1 General Setting
From General Setting, you can set
up the “Printer” / “Frame Storage”
and “Video Recording Storage”
location / Display setting on
hardware acceleration and 3D
effect.
On “About Total Media”,you can
see the TM version.
For online registration and version
update, you can upgrade the TM
to latest version by one button
clicking.
__________________________________________________________
20
Page 26

__________________________________________________________
3.9.2 TV Setting
3.9.2.1.1 Reset TV signal
Reset your region and click “Next”
to rescan channels
3.9.2.1.2 Scan Channel
Click “Start” to rescan DVB-T
channels. When the scan is
Total Media
completed, click “Next” to finish
the channel rescan.
3.9.2.2 Edit Channel
It is editable or removable on
channel information. You can
directly change the channel name
from “Edit Channel” option.
__________________________________________________________
21
Page 27

Total Media
__________________________________________________________
3.9.2.3 TV Settings
In some regions, Subtitle service
is provided by broadcaster. Right
click “Subtitle” to support
subtitling.
3.9.2.4 Import Channel List
If you would like to import any
Channel list, just choose the
correct route and click “Import” to
import new channel list.
3.9.2.5 Export Channel List
If you would like to save the
channel list, just choose the
correct route and click “Export” to
export new channel list
__________________________________________________________
22
Page 28

__________________________________________________________
3.9.3.1 Video Setting
On regions supporting Subtitle
service, you can enable “Subtitle”
option for recorded TV program.
(Note: For not support subtitle
service region, Subtitle will not be
able to enabled)
3.9.3.2 Capture Setting
If capture device is detected, you
can find the device information
and adjust the setting from
“Capture Setting” option.
Total Media
3.9.4 Picture Setting
On Picture Setting, you can adjust
the slide show parameters to fit in
your request. You can also add
your favorite music to create better
slide show for your pictures.
__________________________________________________________
23
Page 29

Remote Control
__________________________________________________________
4.1 Remote Control
1
5
6
2
3
4
8
9
1. POWER
2. MUTE
3. FAVORITE
4. NUMBER 0 to 9
5. Volume Up
6. Volume Down
7. ENTER
8. Channel Up
9. Channel Down
7
If you would like to save the
channel list, just choose the
correct route and click “Export” to
export new channel list
__________________________________________________________
24
 Loading...