

Page 1

-1-
DIGI VOX mini Installation Manual
Contents
V1.0
Chapter 1 : DIGI VOX mini Dongle Hardware Installation........................................................................3
1.1 Package Contents...............................................................................................................................3
1.2 System Requirements.........................................................................................................................3
1.3 Hardware Installation........................................................................................................................3
Chapter 2 : DIGI VOX mini Drivers Setup...................................................................................................4
Chapter 3 : DVB-T PLUS Software Installation...........................................................................................5
Chapter 4 : DVB-T PLUS Software Functions.............................................................................................7
Chapter 5: DTVR.............................................................................................................................................8
5.1 System Setting and Channel Scan ....................................................................................................8
5.2 Main Panel..........................................................................................................................................9
5.2.1 Information Window ..............................................................................................................9
5.2.2 Basic Tools..............................................................................................................................10
5.2.3 Channel Tuning.....................................................................................................................10
5.2.4 Input Source ..........................................................................................................................10
5.2.5 Volume Adjust.......................................................................................................................10
5.2.6 Record, Playback and TimeShifting....................................................................................11
5.3 Schedule Recording..........................................................................................................................13
5.3.1 Capture ..................................................................................................................................13
5.3.2 Time option............................................................................................................................13
5.4 Setup Utility......................................................................................................................................15
5.4.1 Channel Setup Properties.....................................................................................................15
5.4.2 Capture Setup Properties.....................................................................................................15
5.4.3 Other Setup Properties.........................................................................................................16
5.5 Setup Utility for composite and S-Video........................................................................................17
5.5.1 Capture Setup Function .......................................................................................................17
5.5.2 Video Setup properties..........................................................................................................17
5.5.3 Other Function......................................................................................................................18
5.6 Channel Preview...............................................................................................................................18
5.7 Snapshot............................................................................................................................................19
5.8 Sleeping Timer..................................................................................................................................19
5.9 iEPG ..................................................................................................................................................19
5.10 Pop-Up Menu..................................................................................................................................20
Page 2

-2-
5.11 Teletext.............................................................................................................................................21
Chapter 6 : MPEG Encoder..........................................................................................................................22
6.1 User Interface...................................................................................................................................22
6.2 Practice Streaming Video File Format Conversion.......................................................................22
Chapter 7 : MPEG Editor.............................................................................................................................25
7.1 Play List Editor ................................................................................................................................25
7.2 Display Panel....................................................................................................................................26
7.2.1 Original Clips Display Window...........................................................................................27
7.2.2 Edited Clips Display Window..............................................................................................27
7.3 Original and Staging Clips..............................................................................................................27
7.3.1 Original Clips ........................................................................................................................27
7.3.2 Staging Clips..........................................................................................................................28
7.4 Frame Edit Mode.............................................................................................................................28
7.4.1.Frame Range Selection for Editing .....................................................................................28
7.4.2. Video Frames Editing and Saving......................................................................................29
Chapter 8 : Burn DVD...................................................................................................................................30
8.1 Adding Files......................................................................................................................................30
8.2 Burning .............................................................................................................................................31
Chapter 9 : FAQ .............................................................................................................................................32
FAQ 1 : How do I use the “Schedule Record in Power-Off mode (SRPO)” function?....................32
FAQ 2 : How to capture video clip in MPEG4 format?.....................................................................33
Page 3
-3-
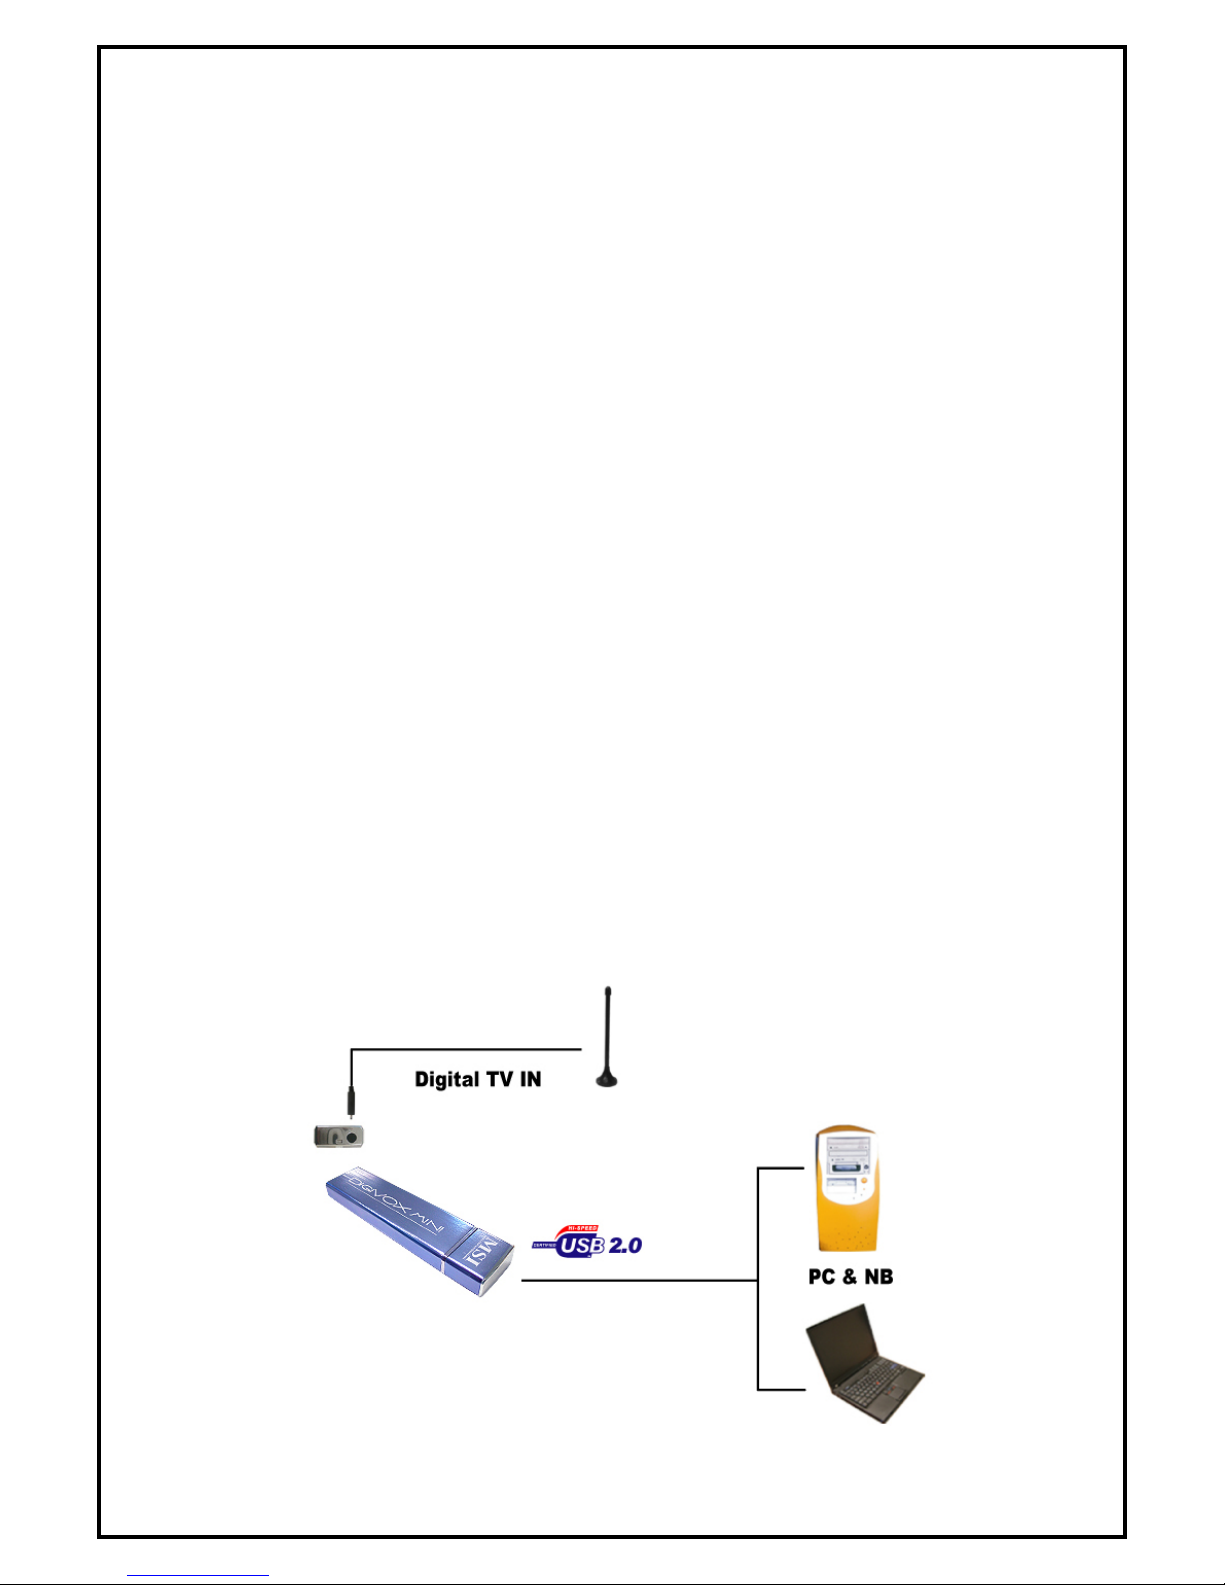
Chapter 1 : DIGI VOX mini Dongle Hardware Installation
1.1 Package Contents
Unpack your DIGI VOX mini package and make sure that all items are included. The following items should
be included in your package:
MSI Digi VOX mini USB2.0
Software Pack CD
Quick guide
USB2.0 extension cable
Portable antenna
Antenna adapter Cable
1.2 System Requirements
PentiumR –IV1.6 GHz or above
256MB RAM of system memory or above.
One free USB2.0 port
Graphics Card (Must support Microsoft DirectR x9.0 or above)
Sound Card (AC97 compatible sound card).
1GB Free HD Space.
CD-ROM Drive (For software installation)
Microsoft DirectR x9.0b .
Windows ® 2000/XP / MCE(when using MCE OS an extra 3rd party DVD decoder must be installed)
1.3 Hardware Installation
Please follow the steps shown below to connect DIGI VOX mini to your computer:
1. Connect the antenna into the TV INPUT connector.
2. Plug DIGI VOX mini Dongle into the USB 2.0 port of your system.
Page 4
-4-
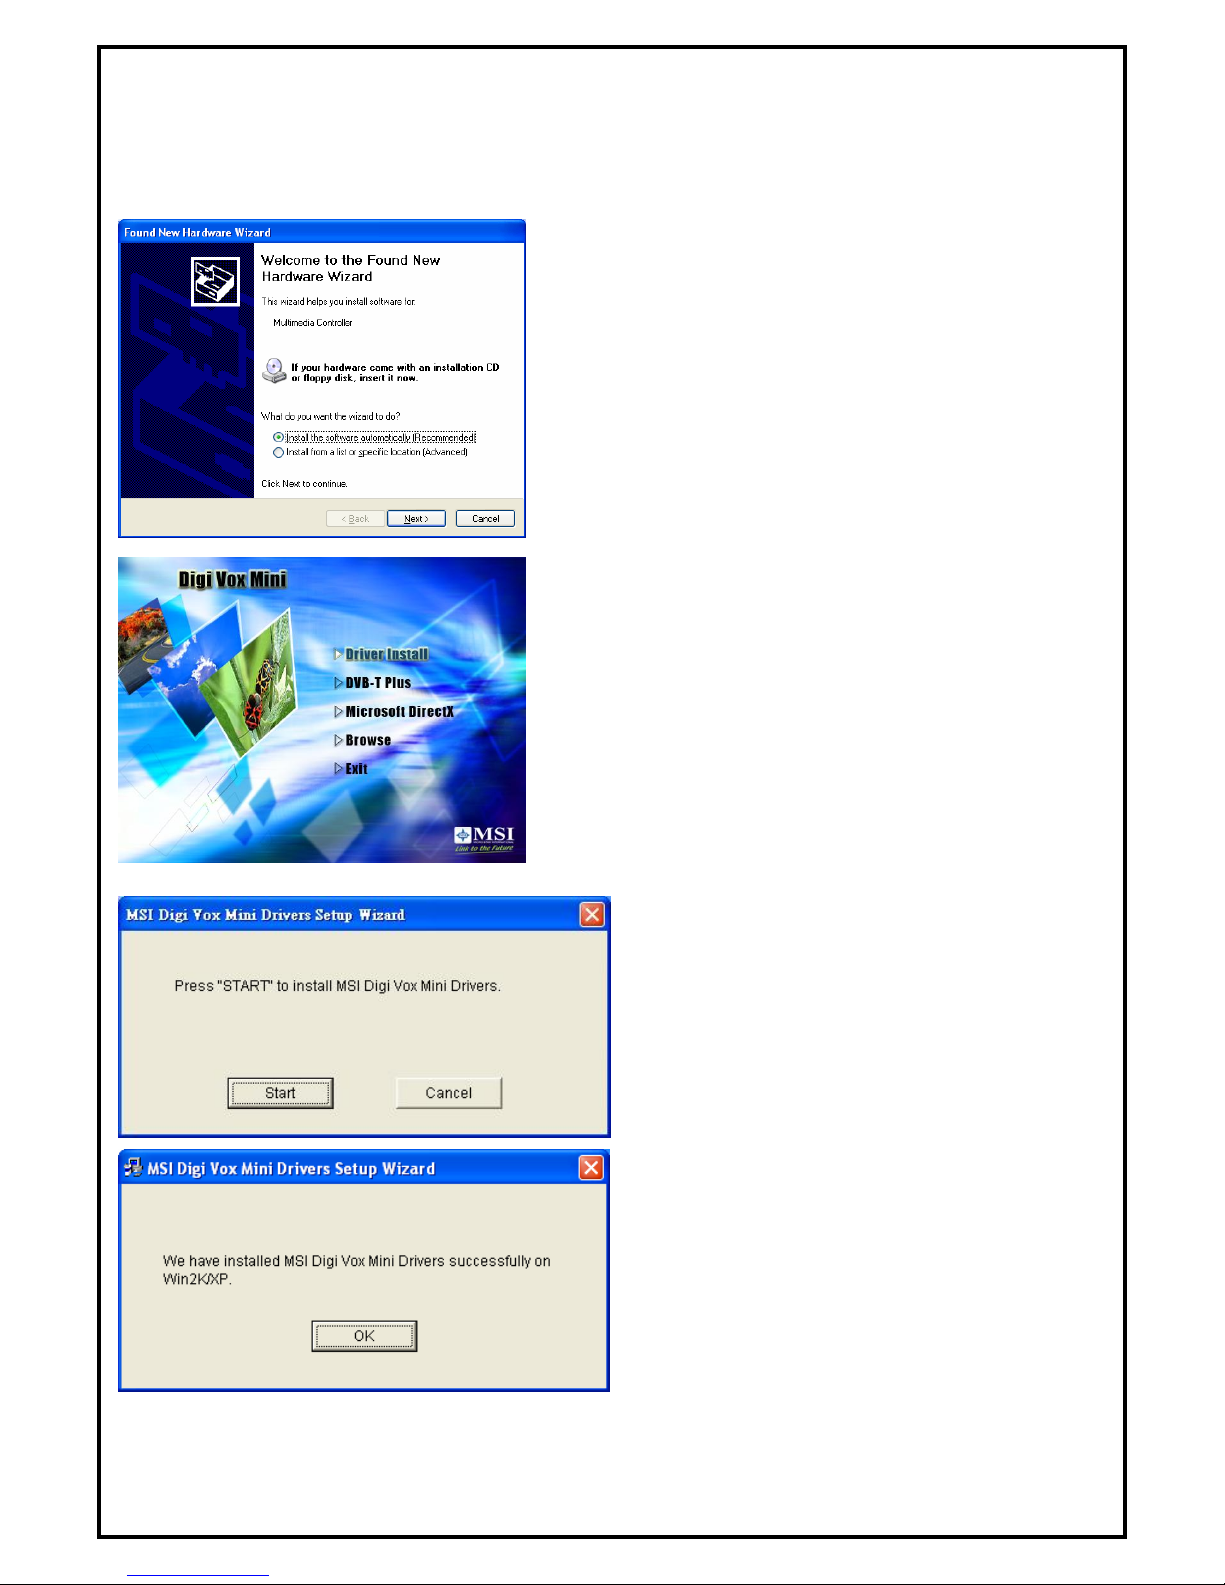
Chapter 2 : DIGI VOX mini Drivers Setup
Before installation, we recommend that you exit all background programs. These include applications such
as anti-virus software and system monitoring applications.
Once you finish the hardware installation, restart your
system. “Windows Found New Hardware Wizard” will pop
up. Please click “Cancel” and run the setup included in the
CD.
1. Select “Driver Install” to install drivers and utilities.
2. The driver utilities will help you to install all the
drivers. Click “Start” to continue installing
drivers. Please wait while installation in process.
3. Click “Start” to start installing DVB-T BDA
drivers. Please wait while installation is in
process.
Note: You can restart your computer after installing
DVB-T PLUS software application.
Page 5
-5-
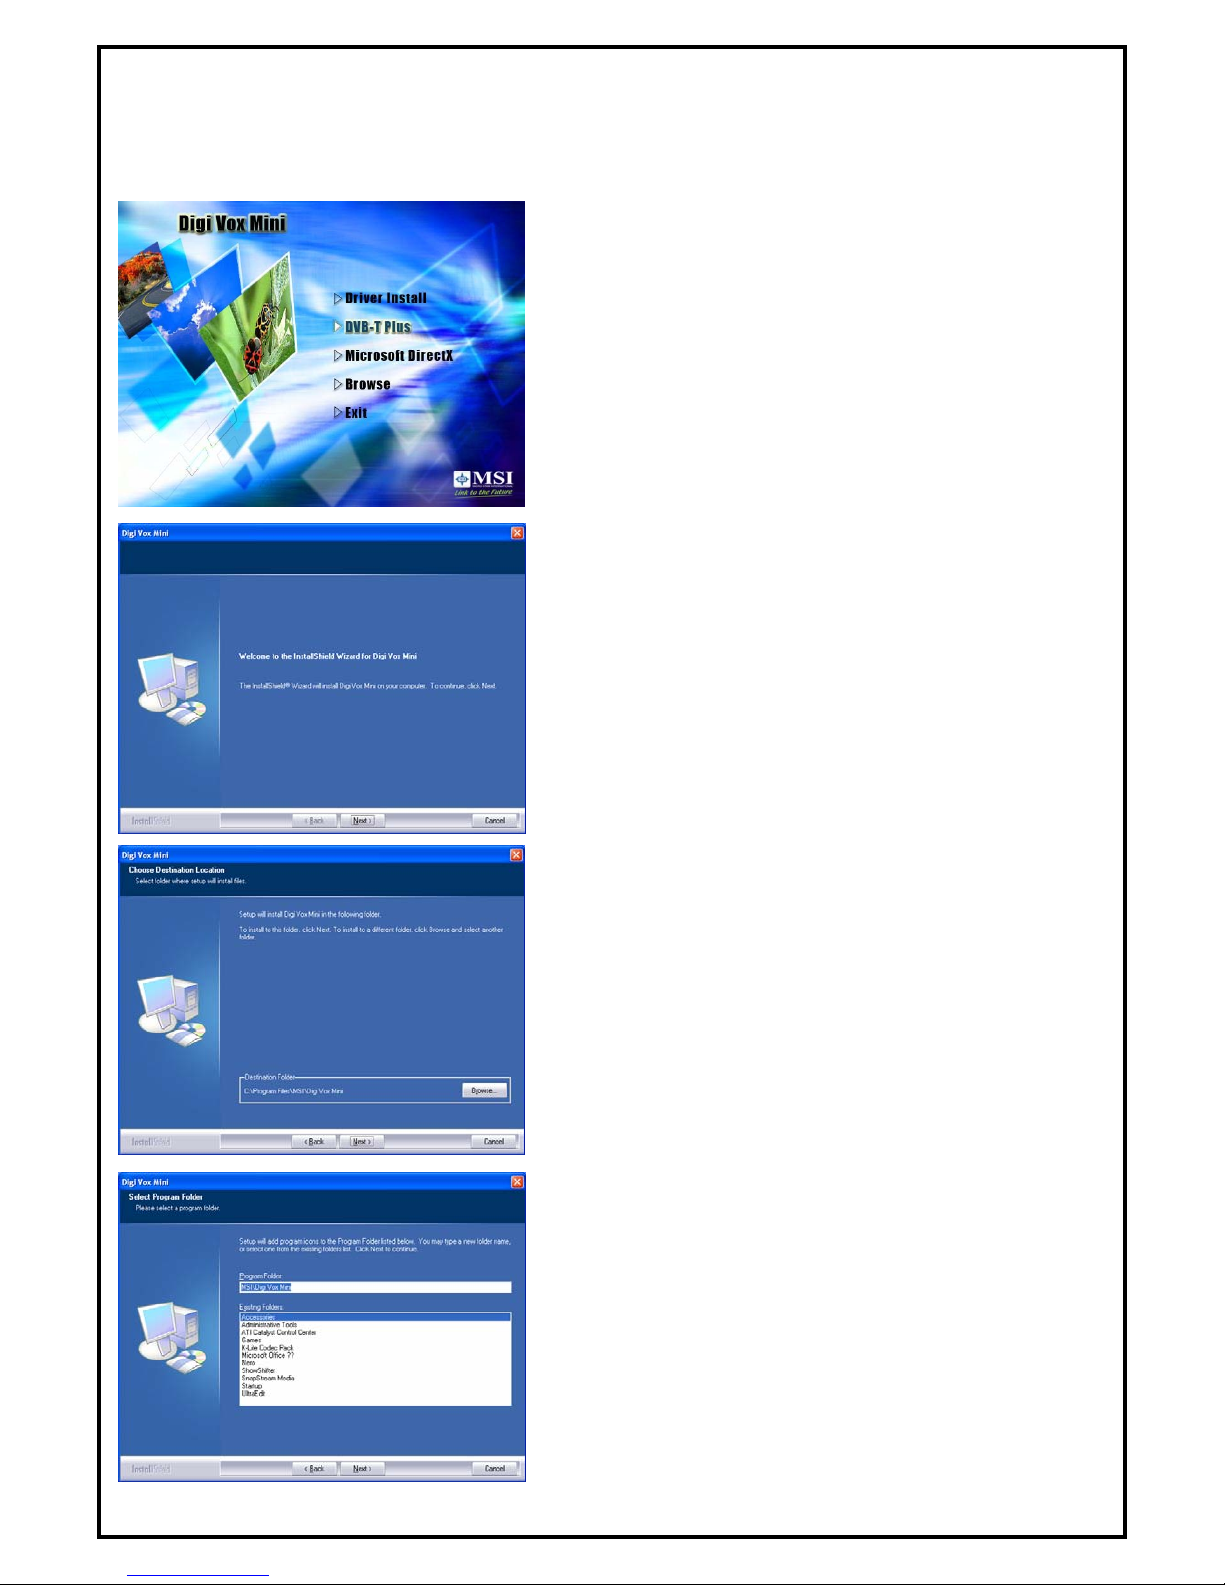
Chapter 3 : DVB-T PLUS Software Installation
After the drivers are installed, the next step you need to do is to install “DVB-T PLUS”. Please follow the
steps below to install it.
1. Select “DVB-T PLUS” to start installing the software.
2. The InstallShield Wizard will guide through installation of
DVB-T PLUS application. Click “Next” to continue.
3. Please choose the destination folder where you want to
install the files. You can click “Browse” to change the
destination folder.
4. Setup will add program icons to the Program Folder’s list.
You may type a new folder name, or select one from the
existing folders list. Click “Next” to start installing. Please
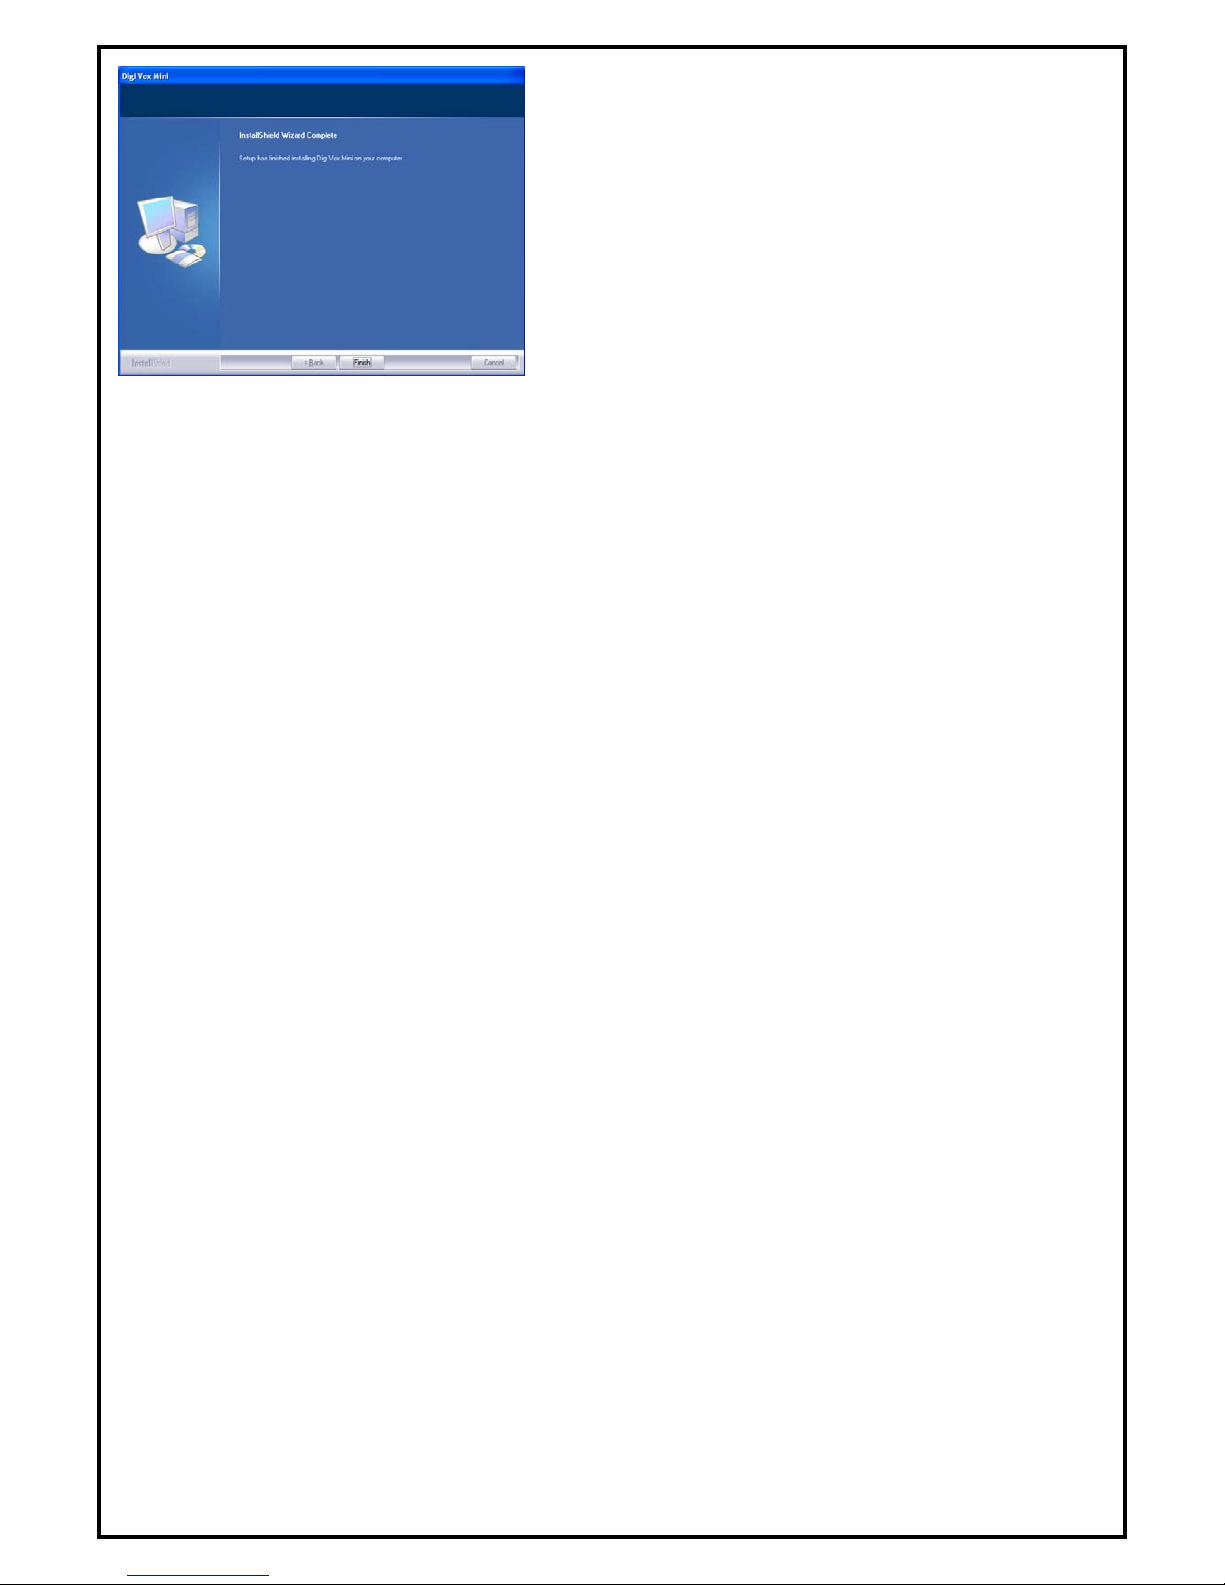
wait while installation in process.
Page 6
-6-
5. When the message as the one on the left pops up, click
“Finish” to end the installation.
Page 7
-7-
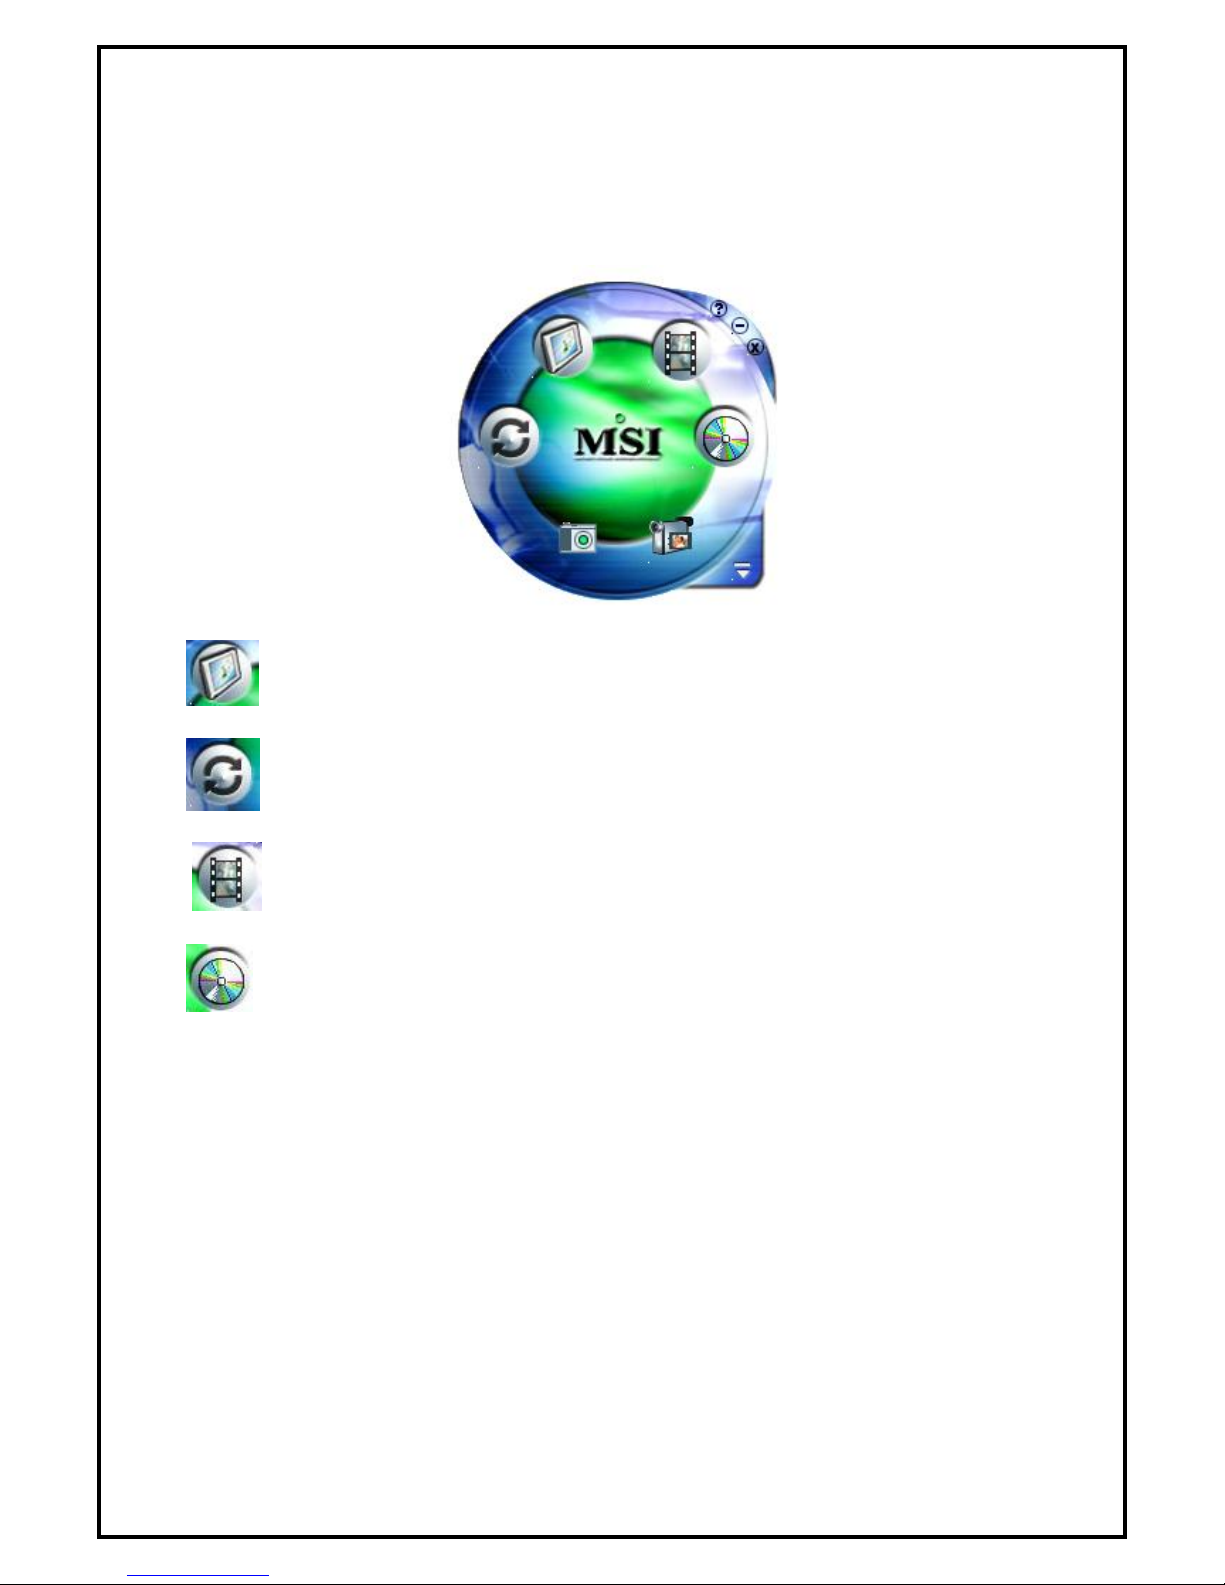
Chapter 4 : DVB-T PLUS Software Functions
When using DVB-T PLUS, There are four different functions to choose from. Picture below is an example
of how the interface looks like and a short description of each function.
• DTVR : DTVR turns your PC into a full-featured video recorder.
• MPEG Encoder : MPEG Encoder converts AVI files into MPEG format.
• Video Editor : Video Editor makes editing MPEG video files easy.
• Burn DVD : Burn DVD creates VCD, SVCD and DVD that can be played on a
PC or DVD player.
Note: For more detailed descriptions, please refer to DVB-T PLUS user manual.
Page 8
-8-
Chapter 5: DTVR
DTVR is a powerful and easy-to-use TV application which includes feature-rich video/audio entertainment
functions. DTVR provides a convenient way to watch and record digital terrestrial TV programs or video on
your PC and also allows you to playback recorded TV or video files. You could also listen to digital radio
broadcasts (NOT DAB) under radio mode if it is included in your model.
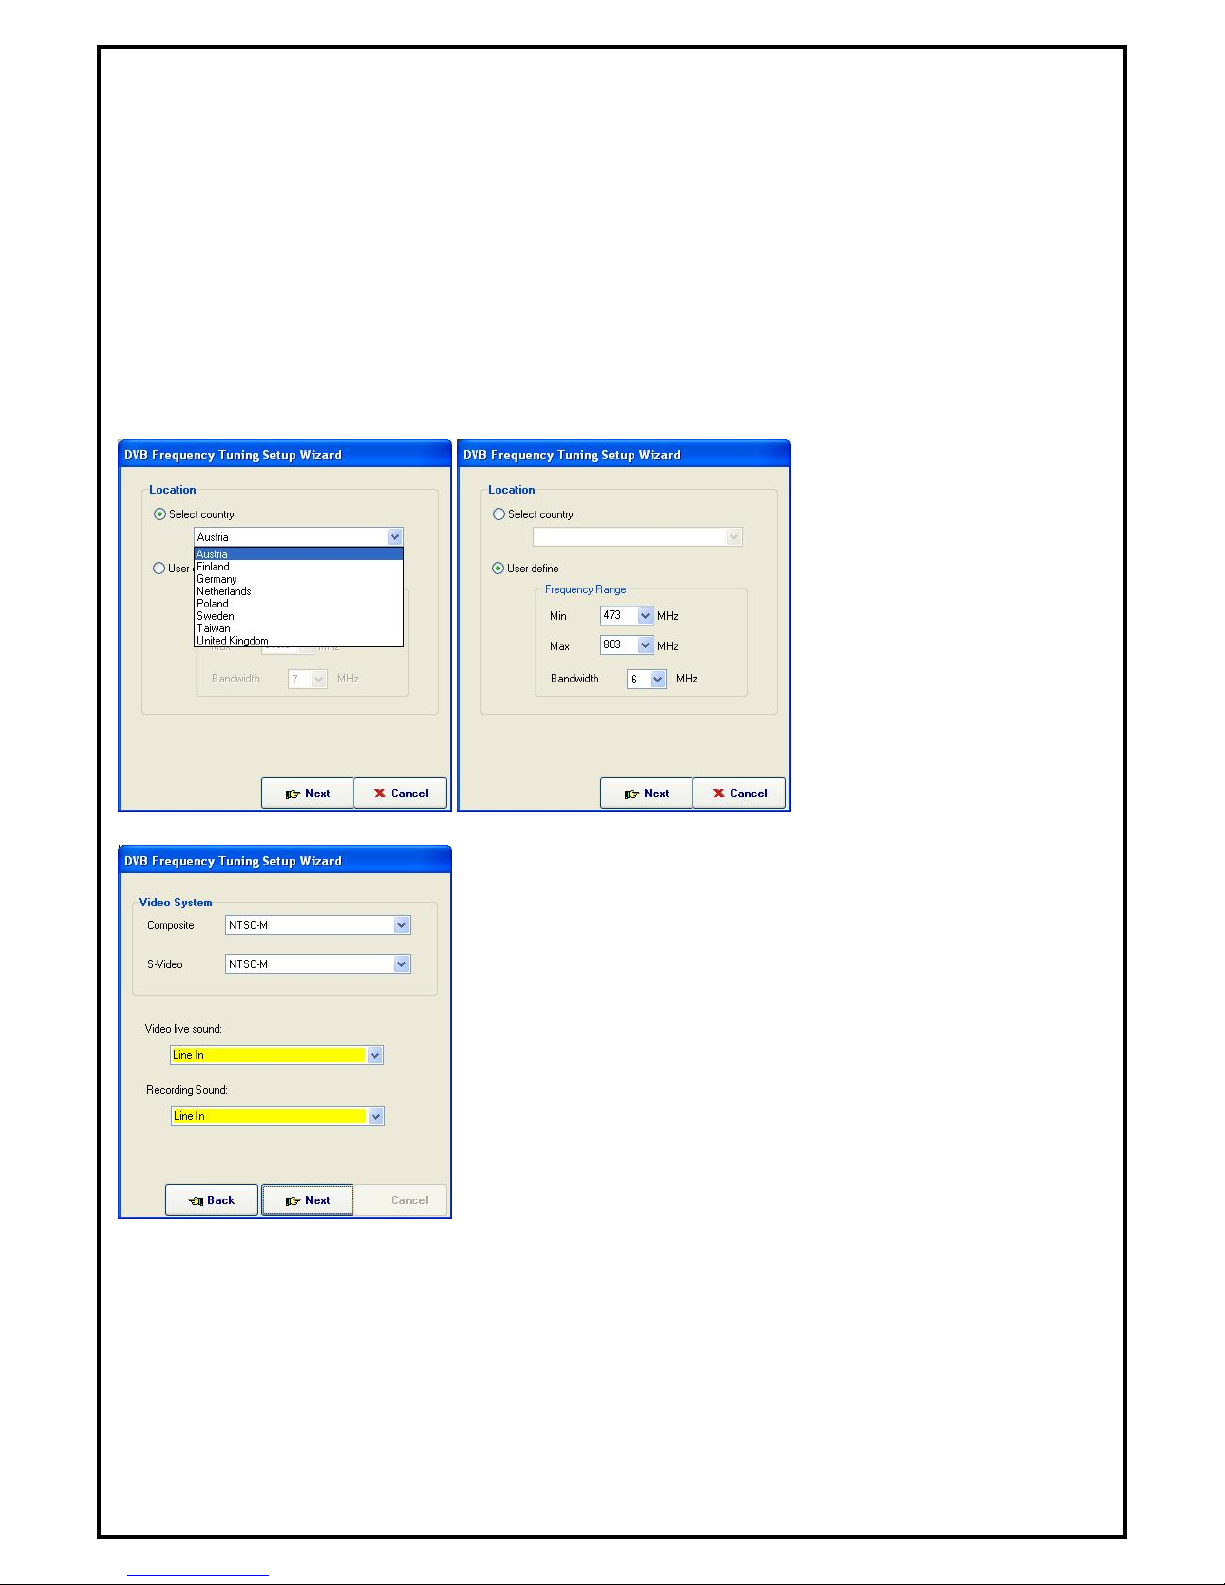
5.1 System Setting and Channel Scan
When executing DTVR at first time, TV Setup Wizard will help you to set your TV configurations step-by-
step.
Set the frequency range by
either choosing your origin’s
default frequency from “Select
country,” or define the range
manually from “User define.”
Set frequency input source from “Video System” and sound source
from “Video live sound.” Video live sound is the audio device
channel that connects to your audio-out of TV tuner card.
Page 9
-9-
Click “Start” to start channel scanning.
After scanning the set frequency range, click “Finish” to
activate DTVR to follow the frequency table set from channel
scanning to do channel mapping.
Note:
Sometimes the signal strength will affect the scanning result. If you cannot scan enough channels,
please check the terrestrial TV signal by moving your antenna around to find a better reception spot.
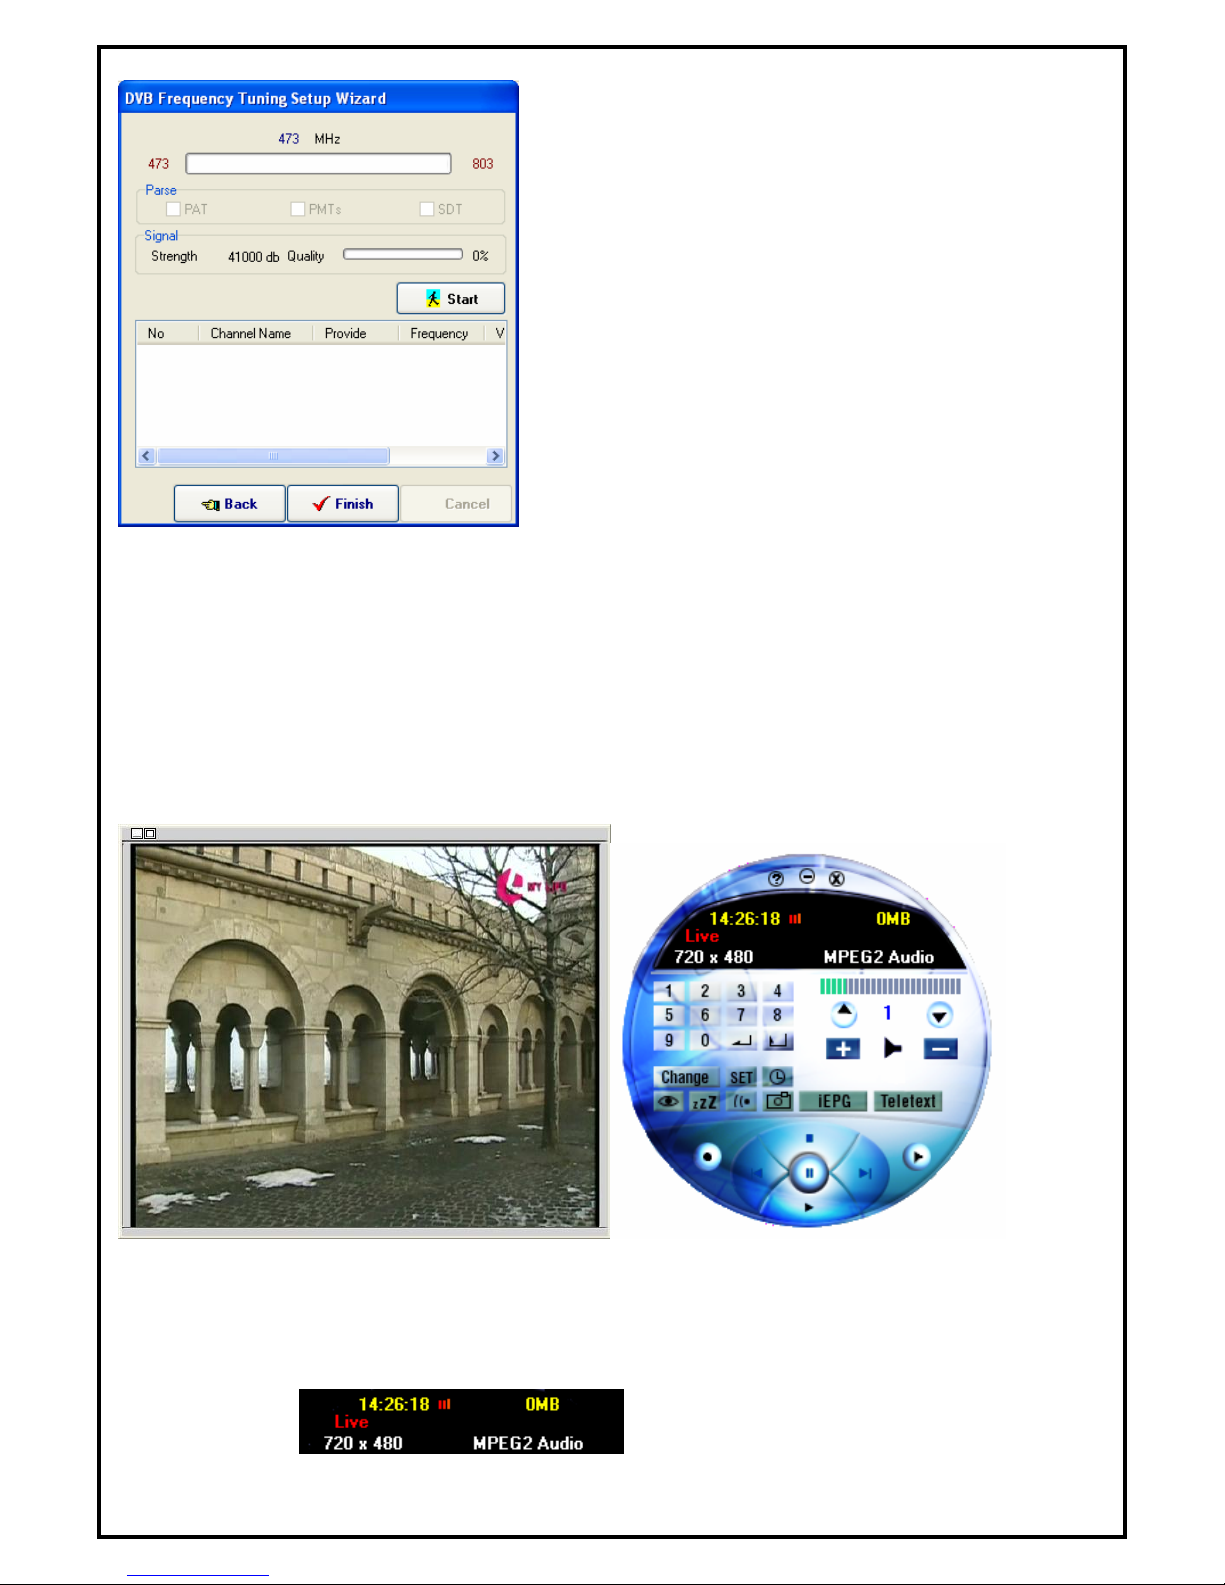
5.2 Main Panel
Preview window size can be adjusted by mouse or double click to switch to full-screen. There are six major
functions of DTVR.
5.2.1 Information Window
Displays current state (Live, REC, Playback, Time-Shifting), TV sound state (Mono, Stereo or SAP),
audio volume, speaker state, recording time, recording file size and current time.
Page 10
-10-
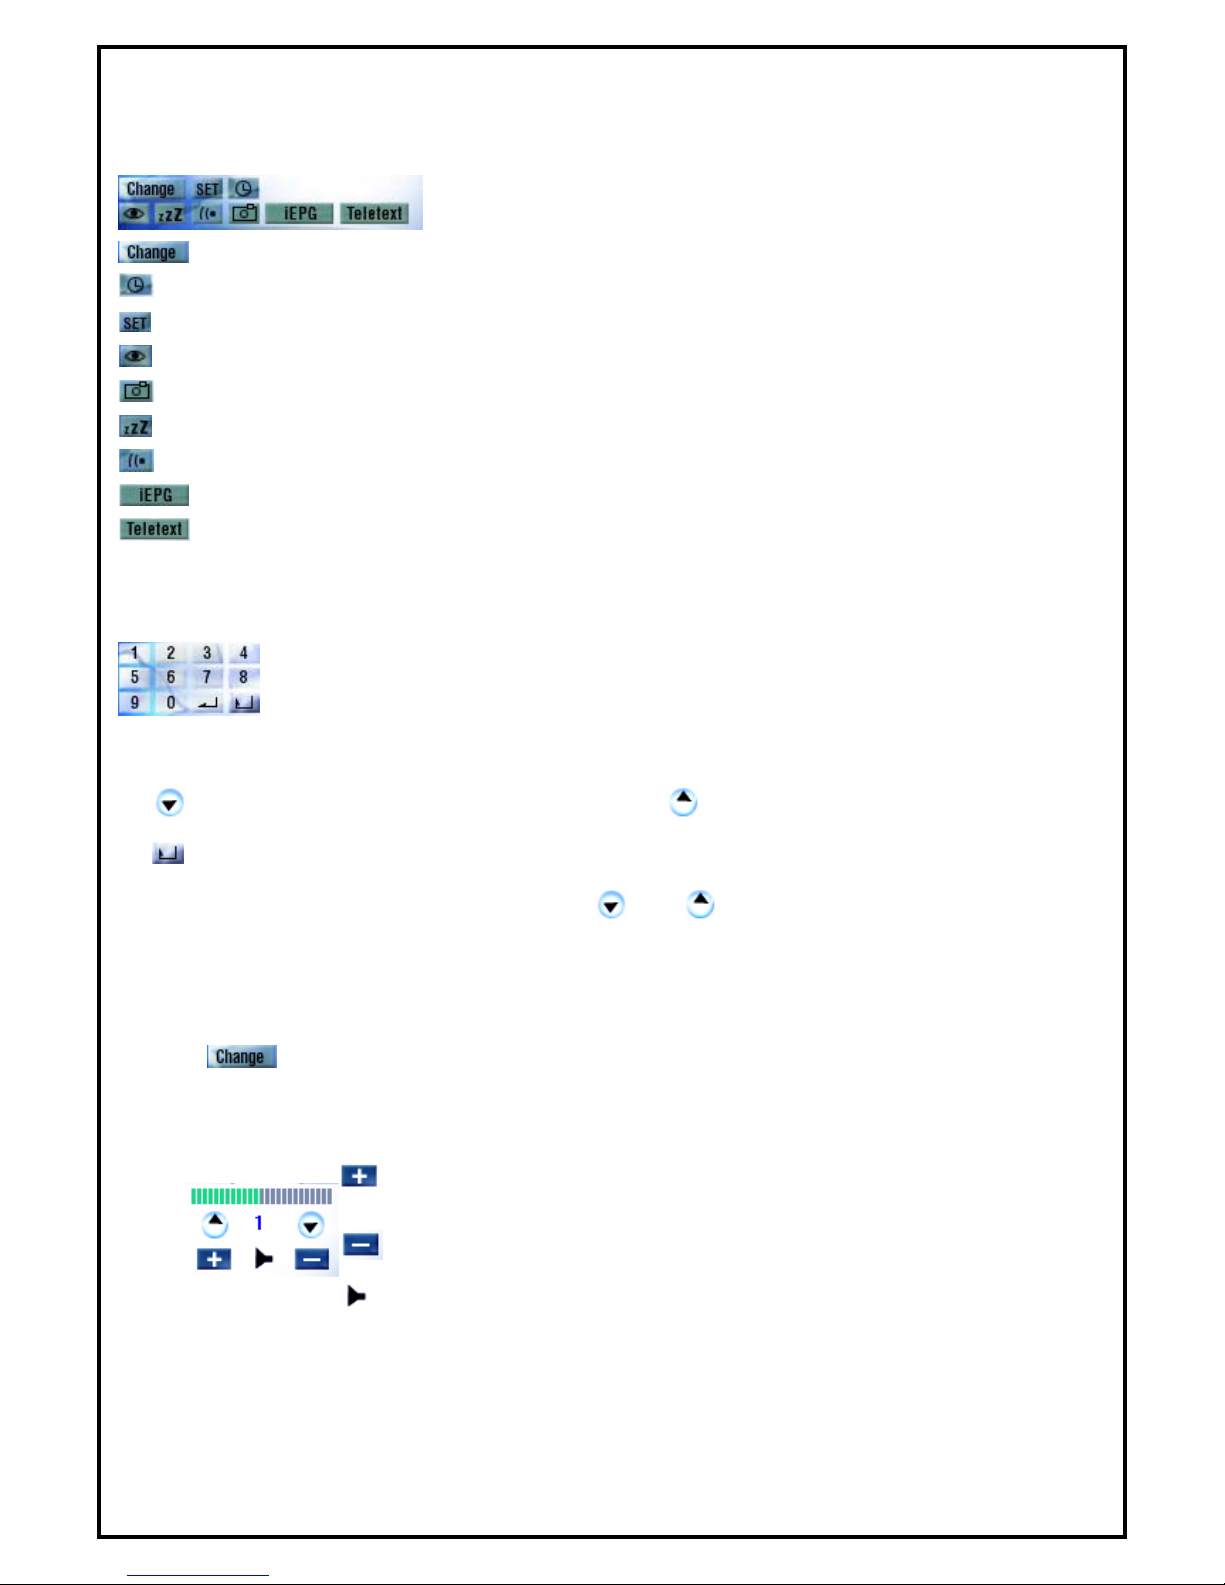
5.2.2 Basic Tools
There are 9 sub functions, see following for icon definition.
: Switch different video source
: Scheduling
: Setup
: Channel preview
: Snapshot
: Sleeping timer setup
: TV audio mode switching (Your channel must support multi sound.)
: Launch IEPG function
: Launch Teletext
5.2.3 Channel Tuning
Selecting channel can be done by entering the channel through numeric keys from the
application’s control panel or keyboard.
: Previous channel.
: Next channel.
: Back to previous channel.
Note: Frequency table must be enabled in order for and buttons to be functional.
5.2.4 Input Source
There are only one video input sources for users to select from (DVB-T). Input source can be changed by
clicking “ ” button on control panel or choose "Switch Video Source" in popup menu.
5.2.5 Volume Adjust
: Volume increase
: Volume decrease
: Mute or restore sound
Page 11

-11-
5.2.6 Record, Playback and TimeShifting
1. Record Function
Any current live video can be recorded by clicking the capture button, on control panel or choose
"Capture" in popup menu. To stop recording, simply click the “Stop” button on control panel or
choose "Stop" in popup menu to stop current recording. Recorded files can be reviewed in the playback list
after recording.
2. Playback Function
By clicking the “Play” button,
on control panel or choose "Play" in popup menu to playback any
recorded files. A playback dialog which shows all recorded video files and all recently played files will pop
up. More than one video/Audio files from either recorded file or files of your own collections can be entered
into a play list.
Button Definition:
• : Play
• : Pause
• : Stop
• : Rewind
• : Fast Forward
Note: The window above is an example of adding or deleting files to and from the play list.
Page 12

12
3. Time-Shifting Function
Time-Shifting can be done during live mode by clicking on control panel or choose "Time-Shifting" in
popup menu. In Time-Shifting mode, simply click on control panel or choose "Play" in popup menu
to get back and watch the channel from where you left. Click on control panel or choose "Stop" in
popup menu to stop Time-Shifting. Then you would see the pop up window as below. If you want to save
video clip, please select the option “Save file on time shifting” and click “OK” to save it.
During Time-Shifting mode, you can switch from current video to Time-Shifting video window and vice
versa by choosing "Real Screen" in popup menu.
Page 13

-13-
5.3 Schedule Recording
To setup a schedule recording, click from the control panel to enter the “Schedule Recording Agent”
properties window.
5.3.1 Capture
Capture Source: Choose the input source where you
want to capture from.
Channel: Select the channel to record from.
Capture format (profile): Choose the desired file format
for saving the recorded file.
Capture size: Choose the frame size of the recording file.
Bit rate (Kbps): Choose the recording bit rate.
Capture quality: Choose the capture quality.
Frame rate: Choose the number of frames per second for
the recording schedule.
Capture audio option: Four options to choose from,
"Capture audio", "Capture audio only, No video" or "No
audio".
File name option: Use the “date/time” as the default file
name for recorded video files or define a different name.
5.3.2 Time option
Current time: Shows the current time.
Starting time: Date and time of the set schedule recording event.
Duration: Time length of the set schedule recording event.
Recording rule: Enter the recording rule for the schedule recording. The default value is "Once only"
When a recording schedule is entered, the entered
recording schedule will be shown in the table like the one
on the left.
Insert: Inserts a new recording schedule record.
Edit: Edit a recording schedule record.
Delete: Delete a recording schedule records.
Delete All: Delete the entire recording schedule from the
list.
Start Power-off Schedule : This function allows users to
turn off the system immediately and it will turn your PC
back on automatically few minutes prior to the schedule
recording.
Page 14

-14-
Note: To enable this function, please first enable
“Hibernate” function in the windows power
management configuration.
The “Today To-do List” frame shows all of the recording
schedules set for today.
If any recording schedule had failed, an error message will
be created automatically into the “Log” frame.
Output folder: A different directory can be chosen to
save the recorded files.
Auto-execute at start up: Enable this option in order to
execute Schedule Agent automatically at start up.
Enable Power-off schedule recording mode: Enabling
this option allows system to shutdown automatically when
a schedule recording is finished.
Page 15

-15-
5.4 Setup Utility
5.4.1 Channel Setup Properties
The “Channel Setup” property page allows users to customize and configure TV channels and edit users’
favorite channels by grouping them. Signals from satellite dish can be scanned for channels automatically
and users can label and identify their favorite channels, as well as include or exclude channels from the
scanned channels list. Channel settings such as Channel Name, Provider and frequency fine tune can be
changed by double clicking on the selected channel.
Update Channel: Please select the channel you want
to see and click “Update Channel”.
Auto Scan: Click the button to start Auto-scan
function.
5.4.2 Capture Setup Properties
Video capture: When you select the DVB-T as the
capture source, you can only use MPEG2 as capture
format.
Capture location: Setting your capture folder.
Capture filename: Setting your capture file name.
You can choose “User date/time” as filename or
define by yourself.
Enable time limit: To limit your record time.
Capture audio device: You can select “Capture
audio”, “Capture audio only, No Video” or “no
audio”.
Page 16

-16-
5.4.3 Other Setup Properties
Always On Top: Set display panel to topmost
Display Aspect Ratio: Set the aspect ratio of the
display window (Free, 4:3 or 16:9)
Enable PIP playback: Enables the PIP
(Picture-In-Picture) function while playback files.
Enable VMR: If your VGA card supports VMR,
please use it as the display mode. If your VGA card
doesn’t support VMR, please disable this function.
Enable DXVA: DXVA (DirectX VA) is the new
Microsoft standard API for accelerating video
rendering under DirectShow. If your VGA card
supports hardware that can accelerate MPEG2 video
playback, please enable this function for better video
playback performance, and reduce the amount of
CPU usage. Your display window will be smoother when you enable this function.
Multi language option: To select the different language interface on line.
OSD
Enable OSD: Enables OSD function.
Set OSD display color: Set the On Screen Display’s font color.
Preview
Preview time interval: Setting the interval time. The minimized value is 8 seconds.
Preview dimension: To select the Preview dimension as 2x2, 3x3, 4x4 or 5x5.
Page 17

-17-
5.5 Setup Utility for composite and S-Video
5.5.1 Capture Setup Function
Capture format (profile) :
Settings for the video format in which you want to record
the files in.
Video Capture for analog input :
Capture Size: Setting video capture size.
Bite Rate (Kbps): Setting capture bite rate.
Capture quality: Setting capture quality.
Frame Rate: Setting capture frame rate.
Capture location: Setting your capture folder.
Capture filename: Setting your capture file name.
You can choose “User date/time” as filename or
define by yourself.
Enable time limit: To limit your record time.
Capture audio device: You can select “Capture audio”, “Capture audio only, No Video” or “no audio”.
If you select “Capture audio only, No Video”, you can capture the file as WAV or MP3 format.
Audio Capture for analog input :
Video live sound: External audio source input port.
Audio Source: To setting where the audio source. (Recommend using Line in.)
Audio format: Setting your audio capture format.
Recording Sound: External audio source input port
Recording level: Setting your audio capture volume level
5.5.2 Video Setup properties
Color: Brightness, contrast, hue and saturation
adjustment.
Video System: Sets the system format for the input
sources from composite video and S-Video
Enable high quality preview: Enables high quality
preview mode
Page 18

-18-
5.5.3 Other Function
Always on Top: The preview window will always be on
top.
Display Aspect Ration: You can change the display
aspect ratio to 4 : 3 , 16 : 9 or free mode.
Enable PIP playback: Enable the Picture-In-Picture
function while playing back files.
Enable VMR: If your VGA card supports VMR, please
use it as the display mode. If your VGA card doesn’t
support VMR, please disable this function.
Enable DXVA: DXVA (DirectX VA) is the new
Microsoft standard API for accelerating video rendering
under DirectShow. If your VGA card supports hardware that can accelerate MPEG2 video playback, please
enable this function for better video playback performance, and reduce the amount of CPU usage. Your
display window will be smoother when you enable this function.
Multi language option: To select the different language interface on line.
OSD
Enable OSD: Enables OSD function.
Set OSD display color: Set the On Screen Display’s font color.
Preview
Preview time interval: Setting the interval time. The minimized value is 8 seconds.
Preview dimension: To select the Preview dimension as 2x2, 3x3, 4x4 or 5x5.
5.6 Channel Preview
Click from the control panel or choose "Channel Preview" on popup menu.
While in channel preview mode, use the arrow
keys on the keyboard and press “Enter” or
double click the left button on the mouse to
exit the preview mode and watch the selected
channel.
Page 19

-19-
5.7 Snapshot
Snapshots (still image capture) can be taken from current viewing window by clicking from the control
panel or choose "Snapshot" in popup menu. The Snapshot window will pop up when a snapshot is taken.
Here, users can view, save or delete images taken.
Note: The captured images can be saved in either bitmap or JPEG file format when saving the file.
5.8 Sleeping Timer
If is selected, you can use “Sleeping Timer” function.
After you select the button, you would see the dialog box as below:
You can use slide bar or left and right key to adjust the timer value, click “OK” to start or “Cancel” to exit.
5.9 iEPG
Click on the iEPG icon and it will pop up as shown in the window below.
You will see the information provided by the TV supplier in the message window.
Page 20

-20-
5.10 Pop-Up Menu
When running DTVR, you can move the cursor onto the display window or control panel and right-click the
mouse for the menu to pop-up. This menu will also appear when you press the [F12] key on your keyboard.
The commands on this right-click menu are the same as those on the DTVR control panel, along with some
extra options added.
Always On Top - Set display window to topmost
Display Aspect Ratio - Sets the aspect ratio of the display window (Free, 4:3
or 16:9)
Full Screen - Switch to full screen or restore to normal window
Previous Channel - Go to previous available channel
Next Channel - Go to next available channel
Recall Channel - Go back to last selected channel
Channel Preview - Browse available channels as sub-window
Show Channel Panel – Show available channels as sub-window
Capture - Start recording video
Play - Start playback of recorded program
Time shifting - Start time shifting
Snapshot - Capture still images of current picture
Mute - Mute or restore sound
Setup - Open DTVR setup window
Sleeping Timer - Set sleeping timer on/off
Schedule Recording - Open scheduling recordings
iEPG - Use the iEPG function to preset record programs from internet
About - Show version and copyright information
Exit - Exit DTVR
Page 21

-21-
5.11 Teletext
Opens a DVB Teletext file Start Decoding
Saves the current Teletext file Next Page
Copies text to the clipboard Previous page
Go to a specified page manually Next sub page
Return to the home page. Previous sub page
Prints the current Teletext file. (Note : You must connect a printer before using this
function.)
Page 22

-22-
Chapter 6 : MPEG Encoder
6.1 User Interface
Fig. 6.1 is an example of how the main panel looks like when executing MPEG Encoder:
Fig. 6.1
The main panel is composed of four segments. Refer to Fig. 6.1
Header Buttons
Add input files; Delete files; Edit options; Start and Stop transcoding.
Batch Process Display Window
Displays file name, encoding status, screen size and play time of files
to be transcoded.
Progress Display Window
Displays formatting information about the file being transcoded.
Preview Display Window
Displays the video of the file being transcoded.
6.2 Practice Streaming Video File Format Conversion
MPEG Encoder 5.0 transcodes multimedia files between
video formats. For multimedia files to be transcoded using
Encoder 5.0, they must be playable under Windows Media
Player. File formats that can be transcoded are: AVI,
DV-AVI, MPEG 1, MPEG 2, ASF, WMV, DivX, and
DAT.
Fig. 6.2
Page 23

-23-
Fig. 6.3
To add a multimedia file to be transcoded, click the "+" or "Add" button. This will open the "Browse"
dialog box. Browse to the directory/file wanted and click on "Open". (Another method of adding files to the
“Batch Process Display Window” is to simply highlight a file, then drag and drop it into the Batch Process
Display Window.) Refer to Fig. 6.3
Once the multimedia file is added to the “Batch Process Display Window,” the Option Selection Dialog Box
appears. This begins the process of selecting the output format for the transcoder to create. Choose among
four categories of formats: MPEG 1, MPEG 2; Category tabs appear at the top of the window. After
selecting a format category, choose a specific video format (and detailed options if necessary). Please refer to
Fig. 6.2
The output file will be created in the same directory as the original file unless a different path is manually
chosen. It will also maintain the original video file name and add a file extension matching the video format
of the output type selected. The file name can also be manually changed. Refer to Fig. 6.4
Fig. 6.4
Once the output video format and options are selected, click "OK", then the file will appear in the Batch
Process Display Window. Refer to Fig. 6.5
Fig. 6.5
The Batch Process Display Window shows three states of process in the Status column.
1. “Waiting” means that the media file displayed is queued for transcoding (compression and/or translation).
The transcoding of video files in the "Waiting" state begins when the Encoding button is clicked.
2. “Exclusion” means that transcoding of that file will not occur.
3. “Done” means that the transcoding (compression and/or translation) is successfully completed.
Page 24

-24-
To change a file's status between Waiting and Exclusion (and vice versa), double click on the file line. The
Waiting state will change to an Exclusion state and be reported as "Skip". Similarly, a file with a "Skip"
status when double-clicked, will change to "Waiting."
Fig. 6.5 shows the status Exclusion that changed status of previously added at above by double clicking with
mouse.
Although you push Encoding button in this status, it will not execute compression and translation process.
Change the status to “Waiting” by double clicking the mouse and click the “Encoding” button to execute the
conversion process.
Fig. 6.6
During Transcoding, the Status column changes to display the percentage of progress accomplished. Also,
once the transcoding process has begun the (right arrow) Encoding button changes to a Stop button. If the
Stop button is clicked-on during transcoding, the process will stop.
Once the transcoding process completes successfully, the status will change to “Done”. To transcode the
same file again. For example, double-click on the file in the Batch Process Display Window and the Status
will change to Waiting. To change the option again, highlight the file with a single mouse click and then
click on the Option or Edit button to execute the “Option Selection” dialog box.
To view the transcoded output video file, highlight the video file and click on the
“Output” Play button.
Page 25

-25-
Chapter 7 : MPEG Editor
Fig. 7.1
Fig. 7.1 Shows how the “MPEG Editor” user interface looks like.
• Menu Section : file open, file/video clip delete, video property, change skin color, minimize,
maximize, close and help.
• Display panel : play original video clips, play edited video clips (preview), display saving progress
information.
• Video Clip Staging Section : Original clips, Staging clips.
• Frame Edit Section : mark frame range, sequence arrangement, merges multiple frames into one
video.
• Title Edit Section : add title, font style, size, color, movement (straight line, curve line)
• Audio Edit Section : add audio and create sound effect
• Special Effect Section : use Color Effect, Filter Effect, Transition Effect, Transition In Effect,
Transition Out Effect, Noise Reduction Filter
7.1 Play List Editor
: Add files to play list
• Support MPEG-1, 2 system file (Video and
Audio), AVI (DV-AVI).
• Select a file and click Ok button.
Page 26

-26-
: Clip/File delete
Delete clips registered in Original/Staging Clips.
Actual file on a hard disk is deleted when "Delete File" is
checked.
: Mpeg Properties Dialog
Displays your input mpeg file properties
7.2 Display Panel
Fig. 7.2
Page 27

-27-
The very top of Fig. 7.2 displays the video files added to the play list. The four editing mode when the
“Effect” is selected in Fig. 7.2 is the mode to choose when adding special effects to the editing clips.
7.2.1 Original Clips Display Window
• Displays videos of Original Clips. (Double Click or Drag and Drop)
• Videos in Staging Clips cannot be displayed in this window.
• In Title editing mode, Title can be edited in this window.
• In Audio editing mode, it displays registered audio files.
• In Special Effect mode, it displays all available filters.
• Displays the progress information when final video is created.
7.2.2 Edited Clips Display Window
• Displays videos in Staging Clips. (Double Click or Drag and Drop)
• Videos in Original Clips can be displayed in this window.
• Preview function displays edited video in this window.
7.3 Original and Staging Clips
Fig. 7.3
The 4 editing mode where the “Audio” is selected in Fig. 7.3 is the mode to choose when editing the audio
of the editing clips.
7.3.1 Original Clips
This is the area where video clips that need to be edited are added and managed.
Video clips can be dragged and dropped into the Original Clips area.
The sequence of video clips added can also be rearranged easily by drag and drop.
i) How to add video clips
Use the
button in the “Menu” to browse and select video clips to add to the Original Clips
Page 28

-28-
area.
Drag and Drop video files to the Original Clips area.
ii) How to view and manage video clips in the Original Clips area:
To view a video clip in the Original Clips are, either double click on the video clip or drag and drop
the video clip from the Original Clips area on to the Original Video Display window.
Clicking on the right mouse button will bring up a Popup Menu. This menu performs the following
functions: copy, delete and show property information.
7.3.2 Staging Clips
• This is the area where video clips are added after frame ranges are specified.
• Video clips can be managed for further editing in this area.
• Editing, deletion and sequence arranging are done here.
• File properties for each video clip can be obtained by right mouse clicking on the clip.
• Video clips are acted upon and added to the Staging area using the four application buttons on the
left side of Video Editor. Those four buttons are "Cut", "Title", "Audio" and "Effect".
7.4 Frame Edit Mode
7.4.1.Frame Range Selection for Editing
Fig. 7.4
The 4 editing mode where the “Title” is selected in Fig. 7.4 is the mode to choose when adding titles to
the editing clips.
• Specify frame range
• To add an entire video clip, drag the clip from the Original Clips area and drop it in the Staging Clips
area.
• To add portions of a video clip, drag the clip from the Original Clips area and drop it in the left
preview window. Then using the Mark-in/Mark-out button, cut the portion of the video clip to be
edited and then click the
button to transfer the clip to the Staging Clips area.
• Users can repeat the above steps to add multiple video frames.
Page 29

-29-
Fig. 7.5
Fig. 7.5 displays the list of the files chosen to be used for editing.
7.4.2. Video Frames Editing and Saving
7.4.2.1 Adding Video Clip
• Click to browse and select video clips to add to the original clips area.
• Drag and drop video files to the original clips area.
• Double click on added video clips in original clips area or drag and drop them to original
video
• Display Window to view and select frames for further editing.
7.4.2.2 Selecting frame ranges for video editing click “Mark-in” to specify the beginning of a clip and
mark-out to set the end of the clip. Next, click on the button to move the clips from the auto edit
window to the Staging Clips area.
7.4.2.3 Editing video frames
• Select video frames in “Staging Clips” List.
• Rearrange the sequence of videos.
• Repeat the same scene by putting the same video frames multiple times.
• Delete sections of video they do not want.
• Confirm the video before final saving using preview function.
• Save the final video when editing is completed.
Page 30

-30-
Chapter 8 : Burn DVD
8.1 Adding Files
Select format :
DVD: For DVD.
VCD: For Video CD.
SVCD: For Super VCD.
DATA: For multimedia data CD.
1 This dialog box shows up when the
is clicked. Video or photo files are displayed as
thumb nails on the screen (As shown below) after
being added.
2 Added files can be deleted. Click on the file to be
deleted and then click on the button.
3 When all necessary files are added, click on
to move to next step.
Page 31

-31-
8.2 Burning
: This button allows users to go back to the previous step and change selected files or selected
format.
1. Select DVD/CD burner to use.
2. : Eject DVD/CD drive.
3. : Erase all content on DVD/CD media.
4. : Open option dialog box.
NTSC, PAL, Both: Select video type.
Support XVCD and XSVCD: Data rate is not checked in order to support XVCD and XSVCD.
Perform Writing Test before recording: Check to insure that the DVD/CD writer is functioning
correctly before actual burning.
Use Windows temporary directory: [Default] Uses Windows temporary directory as DVD
Maker's temporary directory.
Path: Allows DVD Maker to specify the temporary directory.
Page 32

-32-
Chapter 9 : FAQ
FAQ 1 : How do I use the “Schedule Record in Power-Off mode (SRPO)” function?
ANS: Before you use the power-off schedule recording function, please make sure your system can support
hibernate function.
Enter to the “Display Properties” and choose “Screen
Saver”.
Click the “Power” button to and enter to the Hibernate”
function. You would see the option “Enable hibernate
support”. Check the box to activate the settings of
“Schedule Recording in Power-Off” function.
Click on to start setting the Schedule Recording
Properties. After you finish the setting, please click the
“OK” to the next step.
Then you would see your setting in the schedule. If you
want to use power-off schedule recording now, click on
the “Start Power-off Schedule” button. A confirmation
message will pop up to confirm if you want to shutdown
system. If you click “YES”, the system will shutdown
immediately. PC will be turned back on automatically few
minutes prior to the recording schedule.
.
Page 33

-33-
FAQ 2 : How to capture video clip in MPEG4 format?
If you use other capture source such as composite or S-Video, you could record video clips in MPEG 4.
(When you select DVB-T as the capture source, you can’t be able to capture video in MPEG 4 format.)
Please follow the following steps to record files in MPEG 4 format.
Step 1: We provide two kinds of MPEG 4 format, Microsoft and DivX.
Please download the MPEG 4 Codec from Internet.
DivX: http://www.divx.com/
Microsoft: http://www.microsoft.com
Step 2: Install the MPEG 4 codec
Step 3: Click the setup button, ( ) and enter the capture setting. Select MPEG 4 as the recording format.
Step 4: Go to the other setting. Select the MPEG 4 codec you
want to use, Microsoft or DivX.
Step 5: When you finish the setting, please click “OK” to save
your setting. Then you can use the record function to capture TV
programs in MPEG 4 format.
 Loading...