

Page 1

U
SER’S
G
UIDE
Version 1.0
November 2004
i
Page 2

FCC-B Radio Frequency Interference Statement
This equipment has been tested and found to comply with the limits for
a class B digital device, pursuant to part 15 of the FCC rules. These
limits are designed to provide reasonable protection against harmful
interference when the equipment is operated in a commercial
environment. This equipment generates, uses and can radiate radio
frequency energy and, if not installed and used in accordance with the
instruction manual, may cause harmful interference to radio
communications. Operation of this equipment in a residential area is
likely to cause harmful interference, in which case the user will be
required to correct the interference at his own expense.
Notice 1
The changes or modifications not expressly approved by the party responsible for compliance could void the user’s authority to operate the
equipment.
Notice 2
Shielded interface cables and A.C. power cord, if any, must be used in
order to comply with the emission limits.
VOIR LA NOTICE D’ INSTALLATION AVANT DE RACCORDER
AU RESEAU.
8623
ii
Page 3

Copyright Notice
The material in this document is the intellectual property of MICROSTAR INTERNATIONAL. We take every care in the preparation of this
document, but no guarantee is given as to the correctness of its contents.
Our products are under continual improvement and we reserve the
right to make changes without notice.
Trademarks
All trademarks are the properties of their respective owners.
† Intel
®
and Pentium
† PS/2 and OS/2 are registered trademarks of International Busi-
ness Machines Corporation.
† Windows® 95/98/2000/NT/XP are registered trademarks of
Microsoft Corporation.
† Open GL® / DirectX® / DirectDraw® / Direct3D® / DirectVideo® /
DirectActiveX® are registered trademarks of Microsoft Corporation.
† Netware® is a registered trademark of Novell, Inc.
† Award® is a registered trademark of Phoenix Technologies Ltd.
† AMI® is a registered trademark of American Megatrends Inc.
† nVIDIA® / nfiniteFXTM is a registered trademark of nVIDIA
Corporation.
®
are registered trademarks of Intel Corporation.
Macrovision Corporation Product Notice
This product incorporates copyright protection technology that is protected by method claims of certain U.S. patents and other intellectual
property rights owned by Macrovision Corporation and other right owners.
Use of this copyright protection technology must be authorized by
Macrovision Corporation, and is intended for home and other limited
viewing uses only unless otherwise authorized by Macrovision
Corporation. Reverse engineering or disassembly is prohibited.
Revision History
RevisionDate Release Note
V 1.0 November 2004 Digital @nywhere
iii
Page 4

Important Safety Precautions
Always read and follow these basic safety precautions carefully when handling
any piece of electronic component.
1. Keep this User’s Manual for future reference.
2. Keep this equipment away from humidity.
3. Lay this equipment on a stable, flat surface before setting it up.
4. The openings on the enclosure are for air convection, hence they
protect the equipment from overheating.
5. Make sure the voltage of the power source and adjust properly
110/220V before connecting the equipment to the power inlet.
6. Place the power cord in a way that people are unlikely to step on it. Do
not place anything on the power cord.
7. Always Unplug the Power Cord before inserting any add-on card or
module.
8. All cautions and warnings on the equipment should be noted.
9. Never pour any liquid into the opening that could damage the
equipment or cause an electrical shock.
10.If any of the following situations arise, get the equipment checked by
a service personnel:
† The power cord or plug is damaged
† Liquid has penetrated into the equipment
† The equipment has been exposed to moisture
† The equipment has not functioned properly or in accordance
with the User’s Guide
† The equipment was dropped and damaged
† The equipment has obvious signs of breakage
11.DO NOT LEAVE THE EQUIPMENT IN AN UNCONDITIONED
ENVIRONMENT WITH A STORAGE TEMPERATURE OF 600 C (1400F)
OR ABOVE. IT MAY DAMAGE THE EQUIPMENT.
iv
Page 5

CON TENTS
Chapter 1 GETTING STARTED...................................................................1-1
1.1 How to Use this Guide....................................................................1-2
1.2 Conventions of this Guide...............................................................1-3
Chapter 2 INTRODUCTION........................................................................2-1
2.1 System Requirements....................................................................2-2
2.2 Product List.......................................................................................2-3
Chapter 3 HARDWARE INSTALLATION....................................................3-1
3.1 Card Installation...............................................................................3-2
Chapter 4 SOFTWARE INSTALLATION.....................................................4-1
4.1 Digital @nywhere Setup Utilities....................................................4-2
4.2 Digital @nywhere Software Installation..........................................4-4
4.3 Using Digital @nywhere..................................................................4-6
4.4 Using DTVR......................................................................................4-7
4.4.1 Scanning Terrestrial TV signal............................................4-7
4.4.2 Main Panel Function............................................................4-8
4.4.3 Schedule Function.............................................................4-11
4.4.4 Setup Utility for Digital @nywhere.....................................4-14
4.4.5 Setup Utility for composite and S-Video...........................4-16
4.4.6 Channel Preview................................................................4-18
4.4.7 Snapshot............................................................................4-18
4.4.8 Sleeping Timer..................................................................4-18
4.4.9 Pop-up Menu......................................................................4-19
4.4.10Remote function................................................................4-20
4.4.11FM function.........................................................................4-21
4.5 MPEG Encoder...............................................................................4-23
4.5.1 Interface Explanation..........................................................4-23
4.5.2 Practice Streaming Video Translation..............................4-23
4.6 Video Editor....................................................................................4-26
4.6.1 Interface Explanation..........................................................4-26
4.6.2 Menu Area...........................................................................4-26
4.6.3 Display Area.......................................................................4-27
4.6.4 Original and Staging Clips................................................4-28
4.6.5 Frame Edit Mode................................................................4-29
4.7 DVD Maker.......................................................................................4-30
4.7.1 Adding Files.......................................................................4-30
4.7.2 Burning...............................................................................4-31
4.8 FAQ..................................................................................................4-32
v
Page 6

Νοτε
vi
Page 7

1
GETTING STARTED
This user’s guide is designed for a series of TV
Tuner cards. Read this chapter first, and it will give
you a clear instruction on how to use this guide.
1-1
Page 8

Chapter 1
1.1 How to Use this Guide
This user’s guide is designed for a series of TV Tuner cards. Before
you start reading this guide, find out the product name of the TV Tuner
card you have just purchased on the gift box, and look for the specification and function description in next chapter in accordance with the product
name of your TV Tuner card .
Chapter 2, INTRODUCTION, provides the brief specification and function of each TV Tuner card. For detailed description of all functions, you
may refer to the rest of the chapters. Note that the TV Tuner card you
purchased may not cover all functions mentioned herein; therefore, it is
recommended to read the “Reference” information first, which indexes
the correspoding founction description of each different TV Tuner card,
and then find the proper function description for your TV Tuner card in
the other chapters.
Chapter 3, HARDWARE INSTALLATION, tells you how to install your TV
Tuner card into your computer correctly, and the function of each connector on the TV Tuner card. Also note that your TV Tuner card may not
cover all functions mentioned in this chapter. Check on Chapter 2,
INTRODUCTION, for the specification of the TV Tuner card you purchased if you have any problem finding the proper function description
for your card.
Chapter 4, SOFTWARE INSTALLATION, describes how to install MSI TV
Tuner card software for Windows XP or 2000, including the driver and
useful utilities.
1-2
Page 9
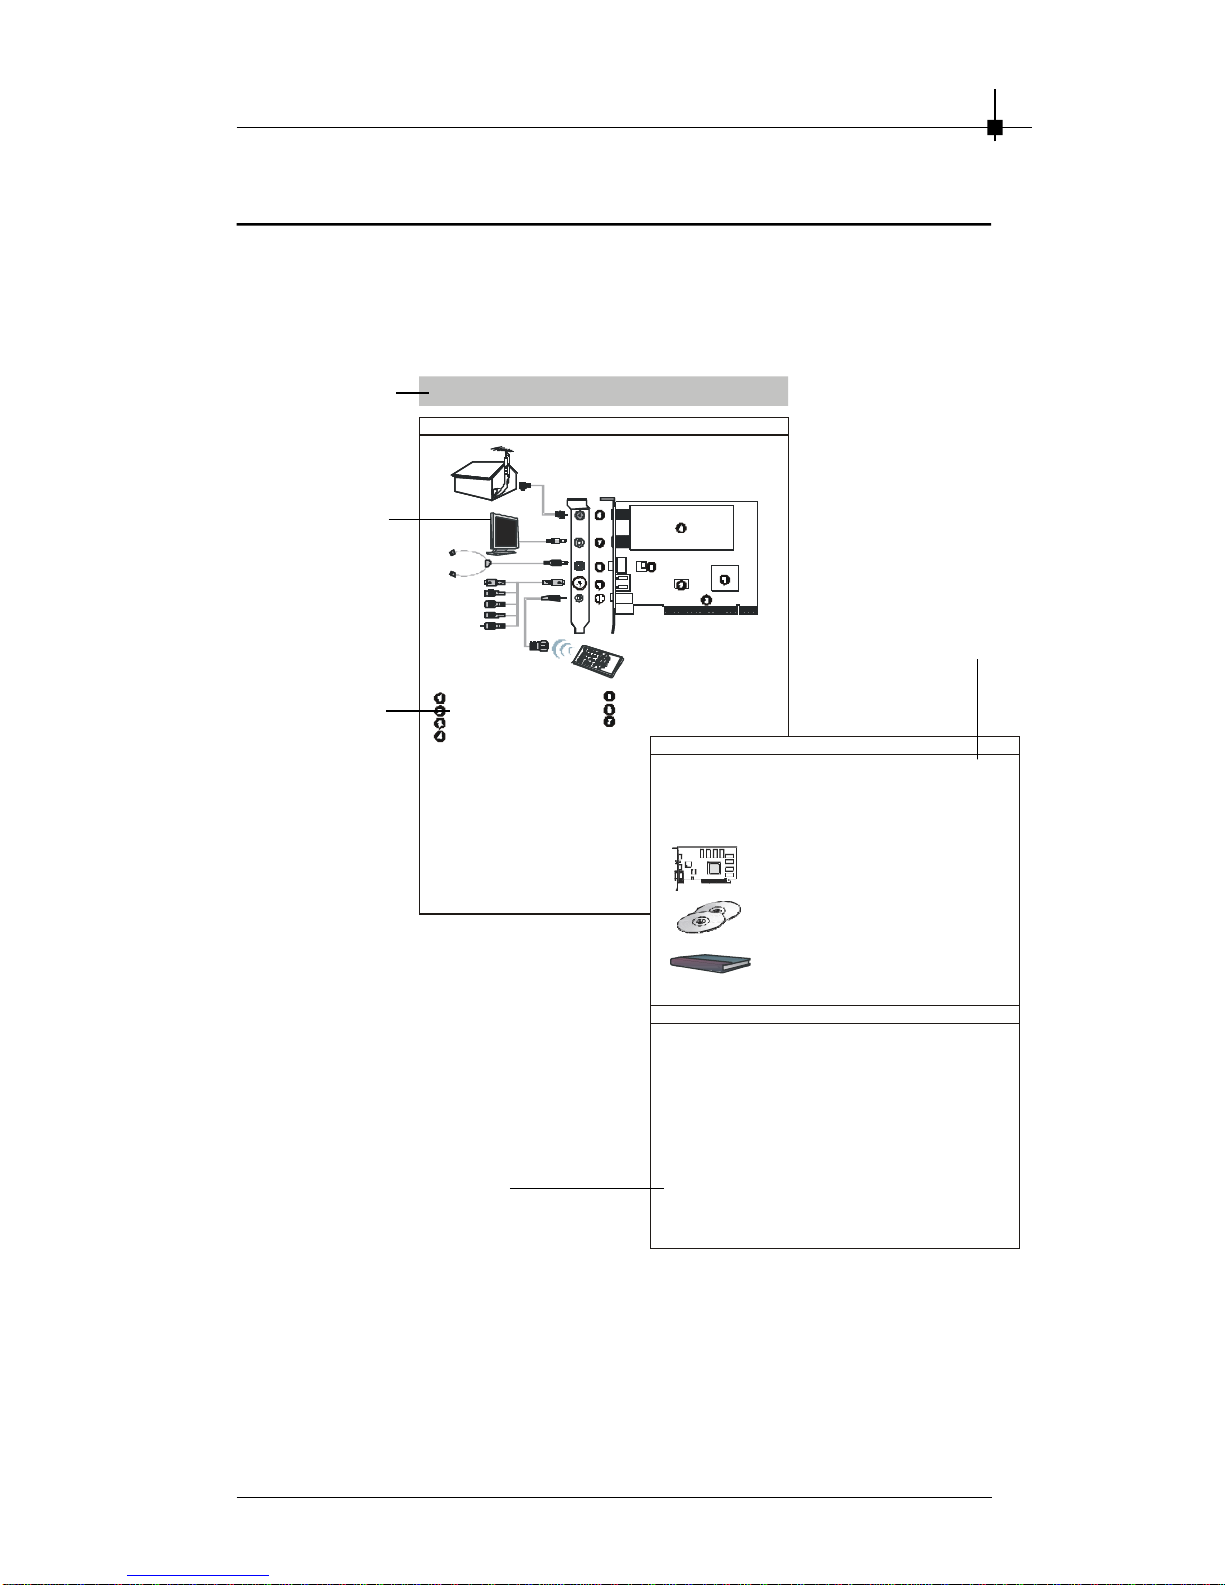
Getting Started
RF_OUT Connector
Package Contents
Unpack the package and inspect all the items carefully. If any item
VGA Card
Software Pack Cds
Reference
1. Getting Started..................................................................1-1
2. Introduction.......................................................................2-1
2.2Product List...................................................................2-4
1.2 Conventions of this Guide
Read the conventions of this guide, and it will give you an idea about
how this guide is designed and how this guide should be used.
The product
name of the TV
Tuner card
The layout of
the TV Tuner
card
The components on the
TV Tuner card
Digital @nywhere
Conaxant 23883
R/M Controller
PCI Interface
Samsung Tuner
Layout
The package
contents of this
TV Tuner card
Philips TEA5767
RF_IN Connector
.
contained is damaged or missing, please contact your local dealer
as soon as possible. Also, keep the box and packing materials in
case you need to ship the unit in the future.
Your VGA card package should contain the following items:
Users' Manual
Corresponding function for
each particular TV Tuner
card
2.1System Requirements ....................................................2-2
4. Software Installation........................................................... 4-1
1-3
3.. Hardware Installation......................................................... 3-1
Page 10

Chapter 1
Νοτε
1-4
Page 11

2
INTRODUCTION
This chapter provides some brief specification and
function of each card. For detailed description of
all functions, you may need to refer to the other
chapters. Note that the card you purchased may
not cover all functions mentioned herein; therefore,
it is recommended that you read the “Reference”
information first, which indexes the correspoding
founction description to each different card, and
then find the proper function description for your
card in other chapters.
2-1
Page 12
Chapter 2
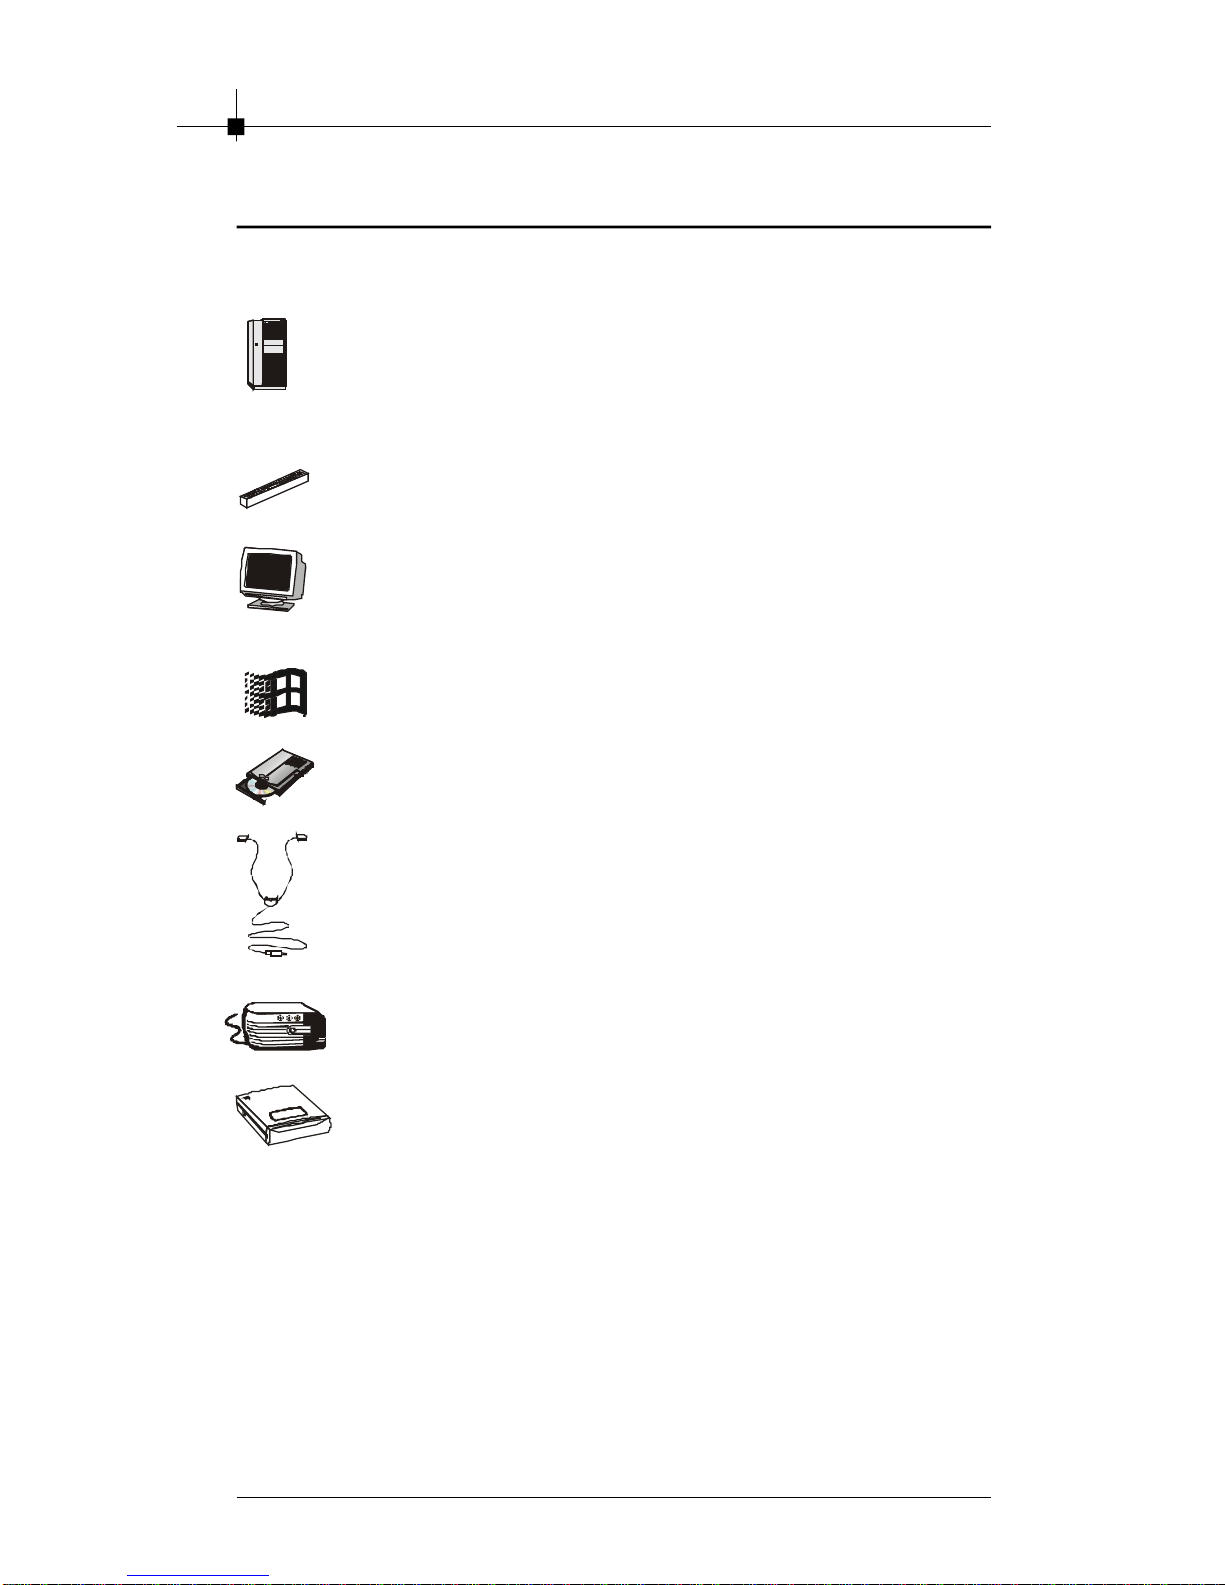
2.1 System Requirements
To install the TV Tuner card, your system needs to meet the following
Computer
Expansion Slot
Monitor
Operating System
CD-ROM Drive
Antenna
PC with Pentium III 800, or above 128M
RAM (256MB is recommended), or
compatible system
PCI 2.2 Compliant Slot
VGA support, minimum 640 x 480
resolution
Windows® XP/2000
Double Speed or Higher
Work UHF/VHF Antenna
Speakers
Hardisk
Others
§ Graphic Card (Support Microsoft DirectX 9.0 or above)
§ Sound Card (SoundBlaster 16 Compatible Sound Card)
§ Available Terrestrial Signal in your region
2-2
1GB Free HD Space
Page 13
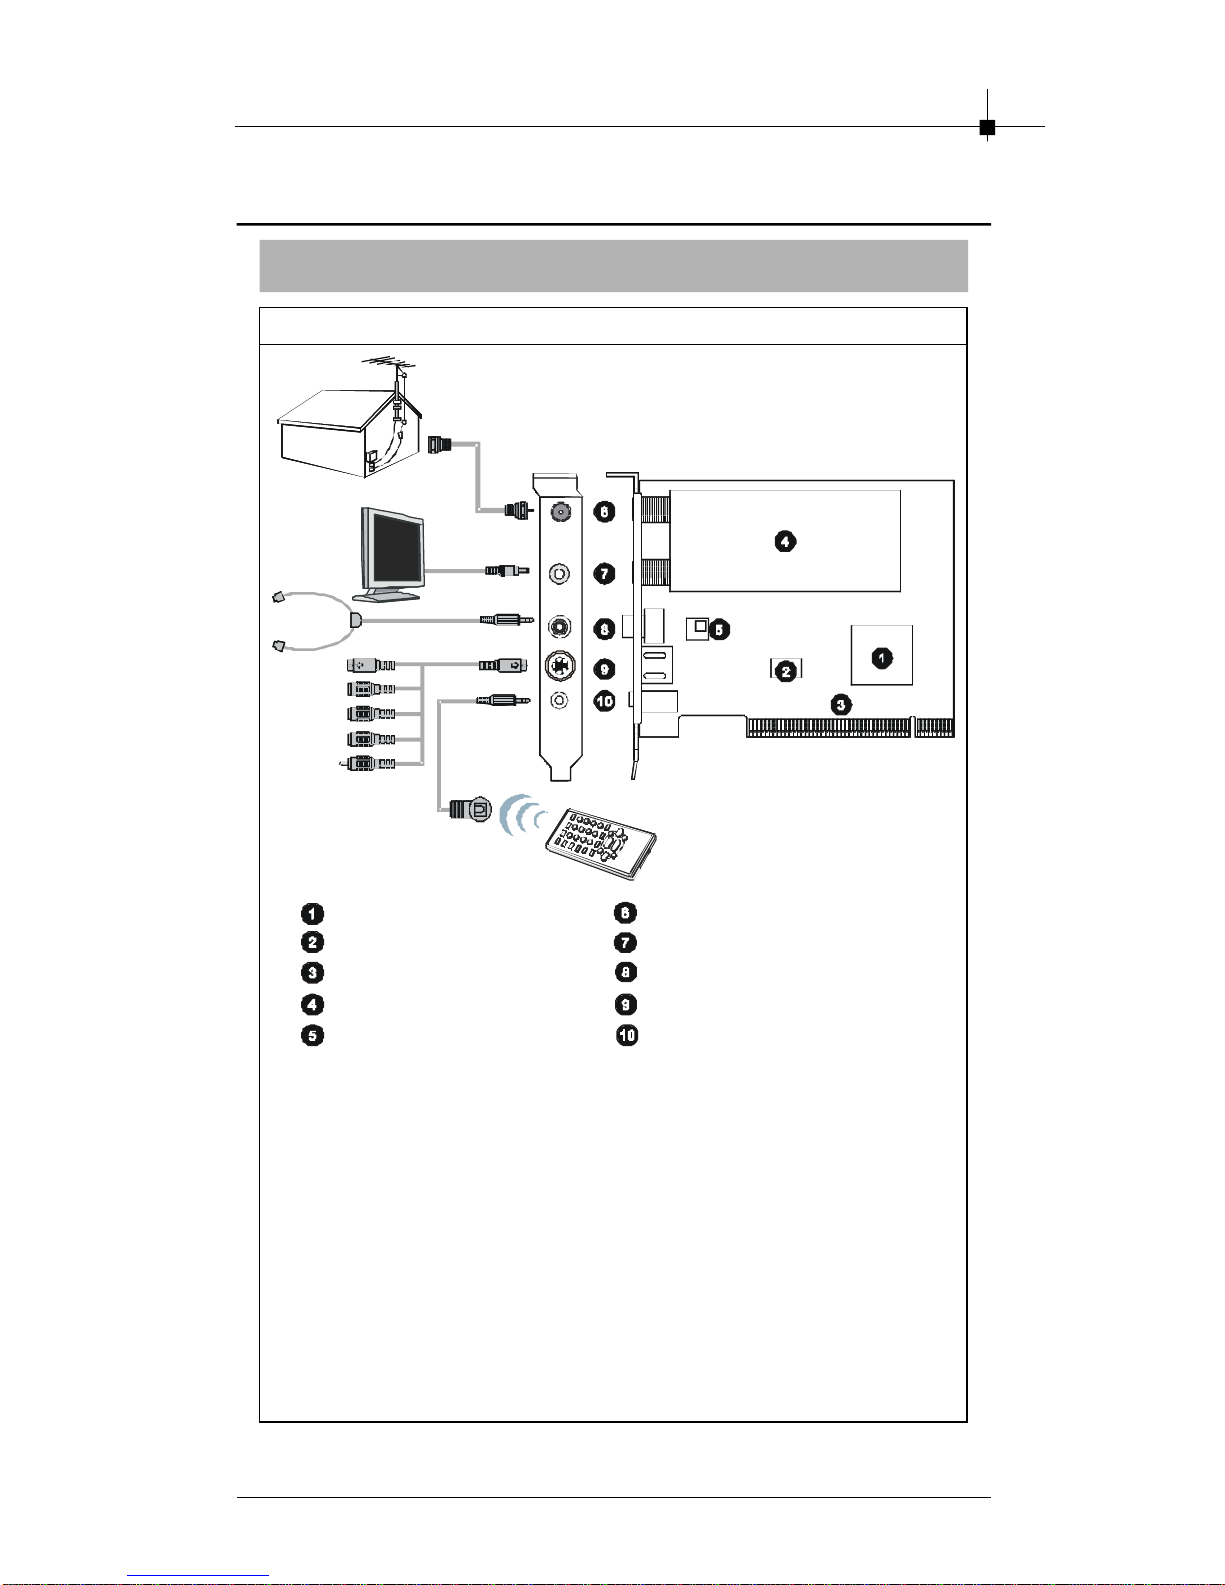
2.2 Product List
TV@nywhere-Plus
Introduction
Layout
Conaxant 23883
R/M controller
PCI Interface
Samsung Tuner
Philips TEA 5767
RF_IN Connector
RF_OUT Connector
FM Radio Antenna Connector
AV_IN/OUT Connector
Remote Receiver Connector
2-3
Page 14
Chapter 2
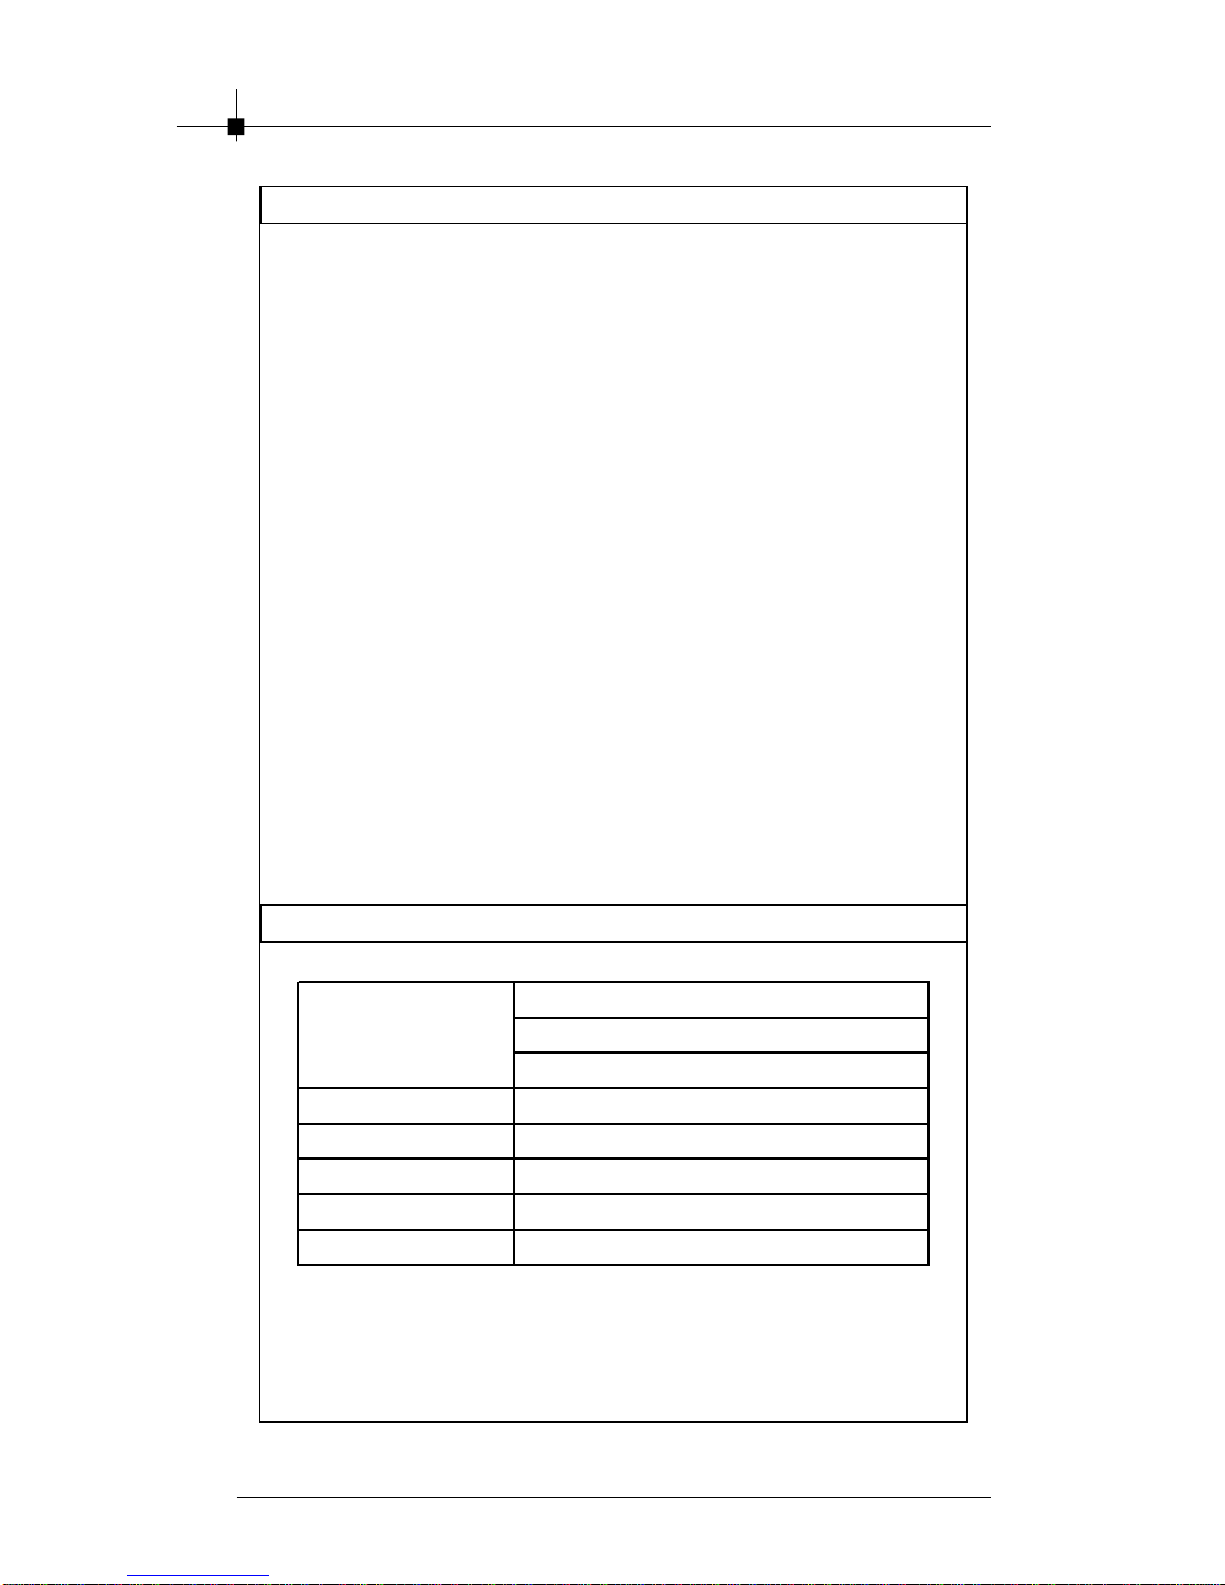
Features
§ Combo Digital@nywhere with FM Stereo Radio.
§ Watch FREE Digital Terrestrial TV and Listen FREE Digital Radio
(not DAB) on PC.
§ User-Friendly and Powerful DTVR application
§ Enhanced 16:9 Wide-Format Display
-Auto Channel Scan and Name Recognition
-Multiple Channel Preview
-TV Video always on the top of the monitor screen
-On-Line Help
§ Support EPG Function (DVB Standard)
§ Support TimeShift – Record & Playback Live TV Program at the
same time
§ Support Real-Time Digital Video Recording in MPEG2 (Program
Stream) format
§ Support Scheduled Recording
§ Support Still Image Capture in JPEG or BMP format
§ Support Picture-In-Picture (PIP) function
§ Support 10bit video converter
§ FM Radio Tuner built-in
§ Additional AV/S Video Input for Connect Other Video Sources.
(such as DVD Player/ VCD/VHS/ Camcorder)
§ SRPO – Schedule-Recording in PC Power-Off Mode
§ Power-Off PC by Remote Controller
§ Build in DirectBurn software and edit function to DVD、VCD、
SVCD...
2-4
Spcifications
TV Input - 75 Ohm (UHF/VHF) TV Antenna
Video Input
FM Input FM(stereo) radio
Video Output TV Output - 75 Ohm (UHF/VHF) TV Antenna
Receiving Frequency 51 - 858 MHz tuning range
Bandwidth 6MHz(NTSC), 7 & 8MHz(PAL)
Code Rate 1/2, 2/3, 3/4, 4/5, 5/6 and 7/8
Composite Video
S-Video
Page 15
Introduction
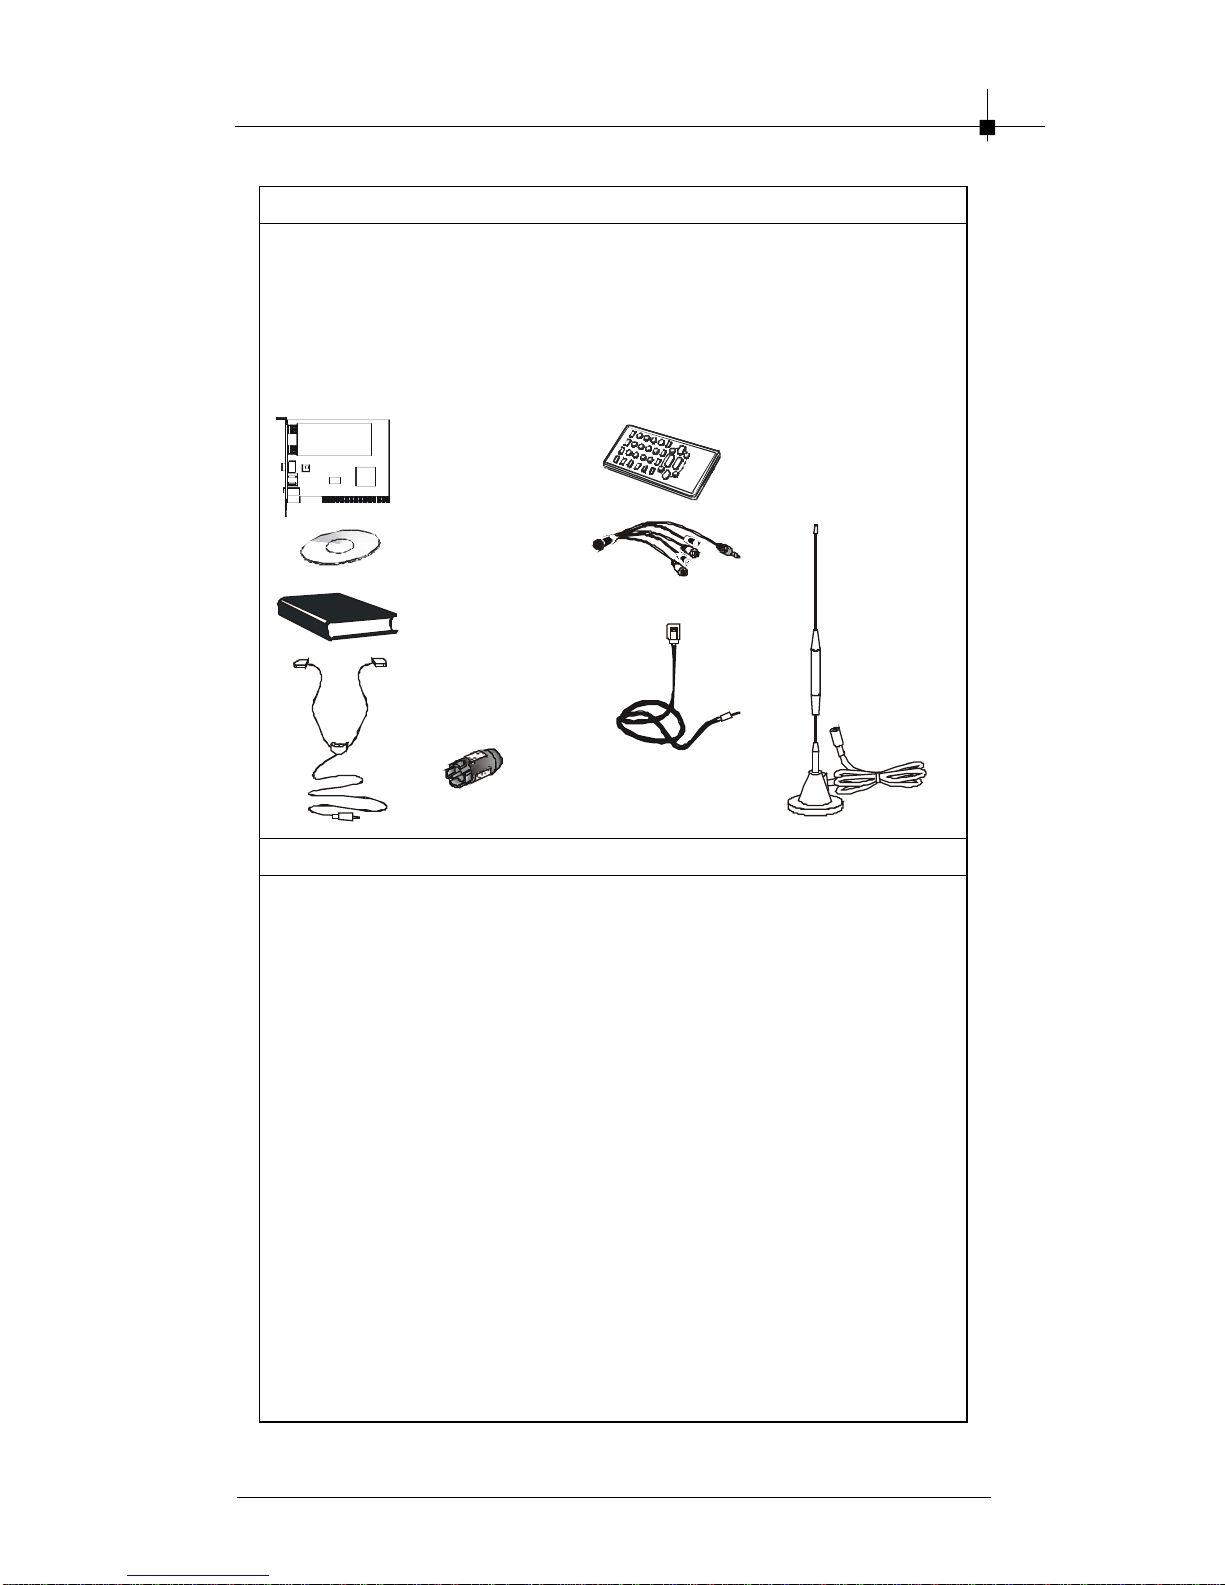
Package Contents
Unpack the package and inspect all the items carefully. If any item
contained is damaged or missing, please contact your local dealer as
soon as possible. Also, keep the box and packing materials in case you
need to ship the unit in the future.
Your card package should contain the following items:
Digitial@nywhere
PCI Card
Software Pack CD
User’s Guide
FM Radio
Antenna
RF converter
4 in 1 AV-Cable
Remote Receiver
Cable
Remote Controller
Mini Digital
Antenna
Reference
Chapter 1 GETTING STARTED.............................................1-1
Chapter 2 INTRODUCTION..................................................2-1
2.1 System Requirements................................................2-2
2.3 Product List..................................................................2-4
Chapter 3 HARDWARE INSTALLATION...............................3-1
3.1 Card Installation..........................................................3-2
Chapter 4 SOFTWARE INSTALLATION................................4-1
2-5
Page 16

Chapter 2
Νοτε
2-6
Page 17

3
HARDWARE
INSTALLATION
This chapter tells you how to install your card into
your computer correctly and how to use the connectors on the card. Note that your card may not
cover all functions mentioned in this chapter.
Check on Chapter 2, INTRODUCTION, for the
specification of the card you purchased if you have
any problem in finding the proper function descrip-
tion for your card.
3-1
Page 18

Chapter 3
3.1 Card Installation
To install the card into your computer, please follow
the steps below:
1. Follow the Windows® shut down procedure
to turn off your computer.
MSI reminds you...
Warning: Always remember to turn off your
computer before installing or removing
hardware to or from your computer. Neither the manufacturer nor the dealer is
responsible for damages if the user ignores this warning!!!
2. Remove the cover from your
computer.
3. Put the card directly over the PCI
and press one end of the card
into the slot first. Gently but firmly
press the other end until it is
fully seated in the slot. Secure
the card with a bracket screw.
3-2
Page 19
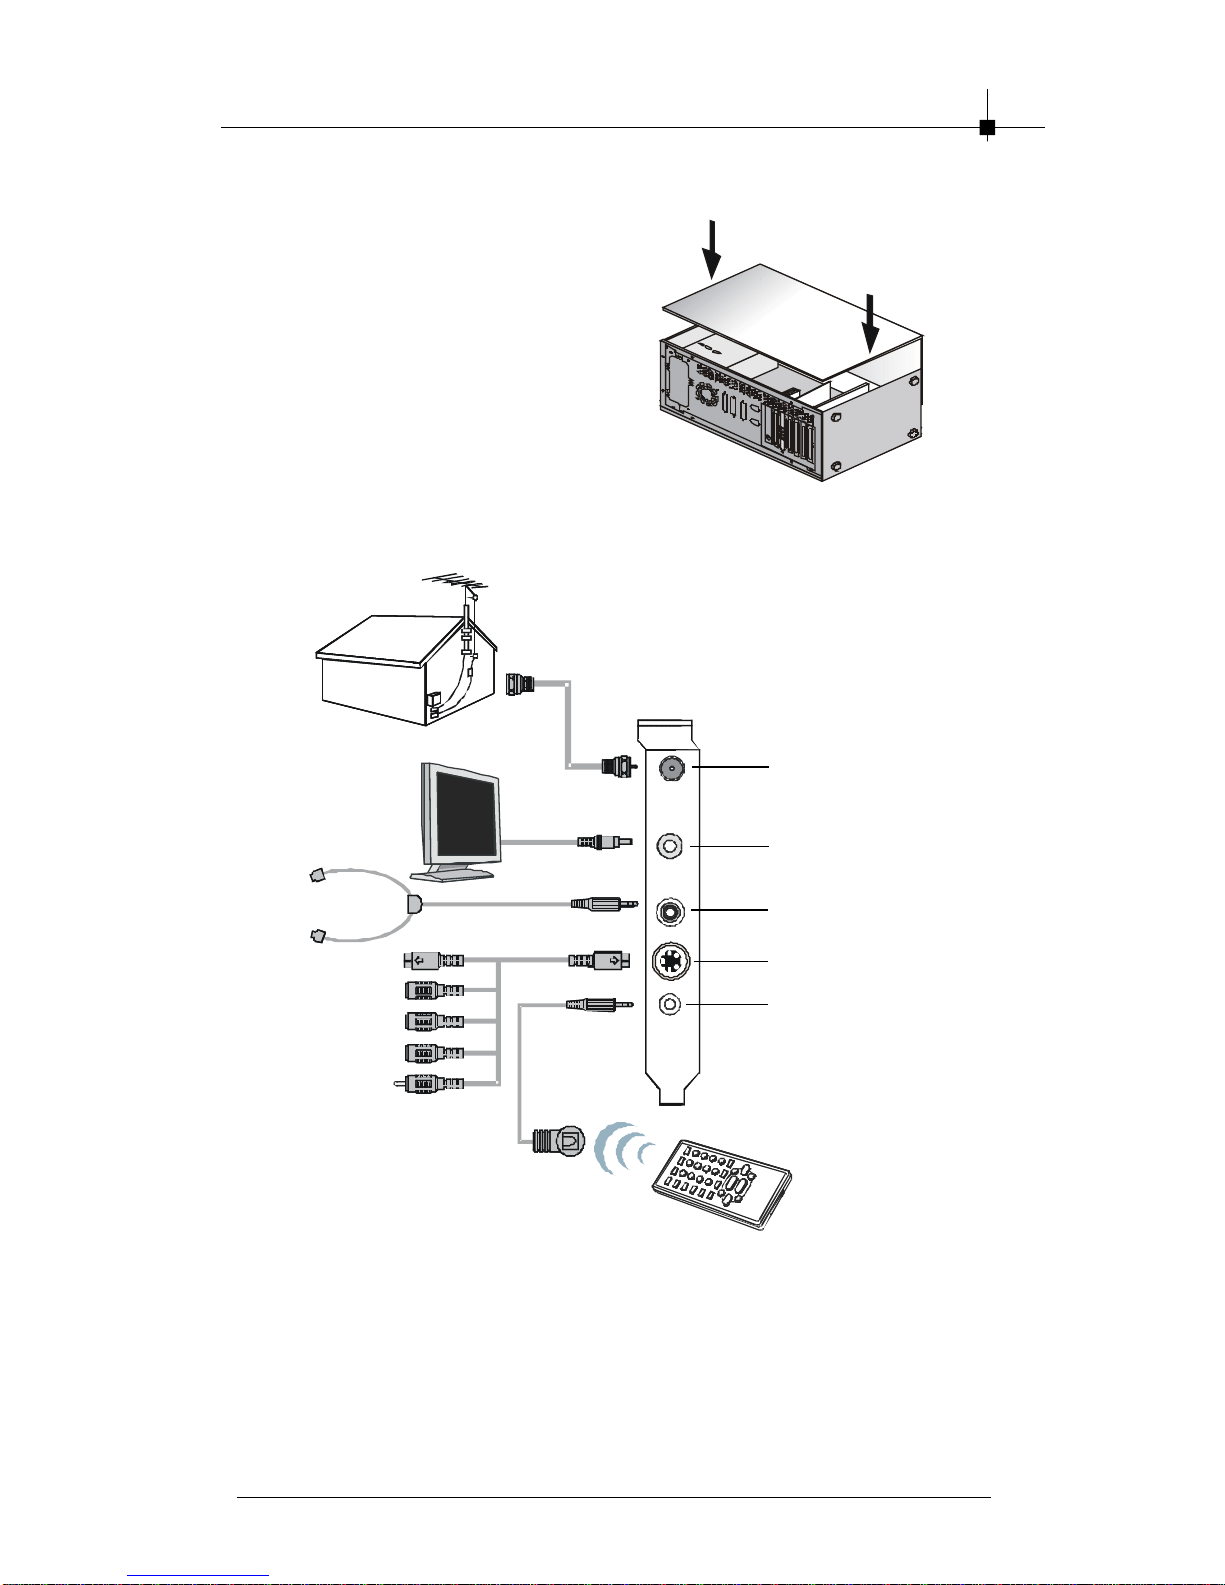
4. Install the computer cover.
5. Connect all necessary cables.
Hardware Installation
Remote Receiver Cable
Connect to another
computer with Digital
@nywhere, if available
FM Radio Antenna
AV_IN/OUT Connector
Remote Receiver Cable
3-3
Page 20

Chapter 3
Νοτε
3-4
Page 21

4
SOFTWARE
INSTALLATION
This chapter describes how to install software
under Windows® XP / 2000, including the drivers
and useful utilities.
3-1
Page 22

Chapter 4
4.1 Digital @nywhere Setup Utilities
The Digital @nywhere package comes with complete Windows software
utilities. These utilities can be found from the CD-ROM in this package. Before
installation, it is highly recommended that all background programs are
disabled. These include applications such as anti-virus software and system
monitoring applications.
1. When you finish the hardware
setup and restart your system. The
“Found New Hardware Wizard”
window will pop up. Please click
“Cancel ” and you can make use
of DVB-T setup utilities to easily
install it.
2. Put the installation CD into the CD-
ROM drive. Firstly, the autorun
setup page will detect whether
your DirectX version is 9.0 or not.
For the performance and stability issue, we suggest you updating DirectX
up to 9.0 version. Please click “ Yes” to start installing DirectX 9.0 to your
system. ( If you have already installed DirectX 9.0 in your system, you will
not see the message. You can refer to step 4 to install drivers in your
system. )
3. After you finish the DirectX 9.0
installation, you need to restart
your system. Please click “ OK” to
restart your system.
4. After you install DirectX 9.0, you
can start to install the Digital
@nywhere drivers in your system.
Please insert the installation CD
again and then the auto-run setup
page will appear as left side
picture. Please click “Install Driver”
to install drivers and utilities of the
Digital @nywhere.
4-2
Page 23

5. The Digital @nywhere setup
utilities will guide you to install all
TV card drivers and utilities on
your PC. Click “ Next” to continue.
6. The utilities will help you install the
TV card drivers automatically.
Please click “ Next” to install the
drivers.
Software Installation
7. Please click “Start ” to start
installing Digital @nywhere DVBT
BDA Drivers.
8. When the left side message
appears, that means all of your
drivers and utilities have been
installed in your system. Please
select “ Yes, I want to restart my
computer now.” and then click
“Finish” to restart your system.
4-3
Page 24

Chapter 4
4.2 Digital @nywhere Software Installation
The Digital @nywhere installation CD comes with complete Windows software utilities. These utilities can be found from the CD-ROM in the package.
Before installation, it is highly recommended that all background programs are
disabled. These include applications such as anti-virus software and system
monitoring applications. Please follow the steps as below to install the Digital
@nywhere application.
1. Insert the installation CD disk into
the CD-ROM drive. The auto-run
setup page will appear as left side
picture.Please select
“Digital@anywhere” to start
installing the application in your
system.
2. Then the installation wizard will
guide you to install the Digital
@nywhere application. Please
click “ Next” to continue.
3. If you want to change the
destination folder, you can first
click “ Browse…” to choose
destination location where you
want to install files. Then please
click “ Next” to continue.
4-4
Page 25

4. The Setup wizard will add
program icons to the Program
Folder listed below. You may type
a new folder name, or select one
from the existing folders list. After
you click “Next” , the installshield
wizard will start copying files to
your destination folder. It may take
a few minutes, and please wait a
moment.
5. After finishing the installation of
Digital @nywhere on your
computer, the left side message
will appear. Please click “Finish” to
end the installation.
Software Installation
4-5
Page 26
Chapter 4
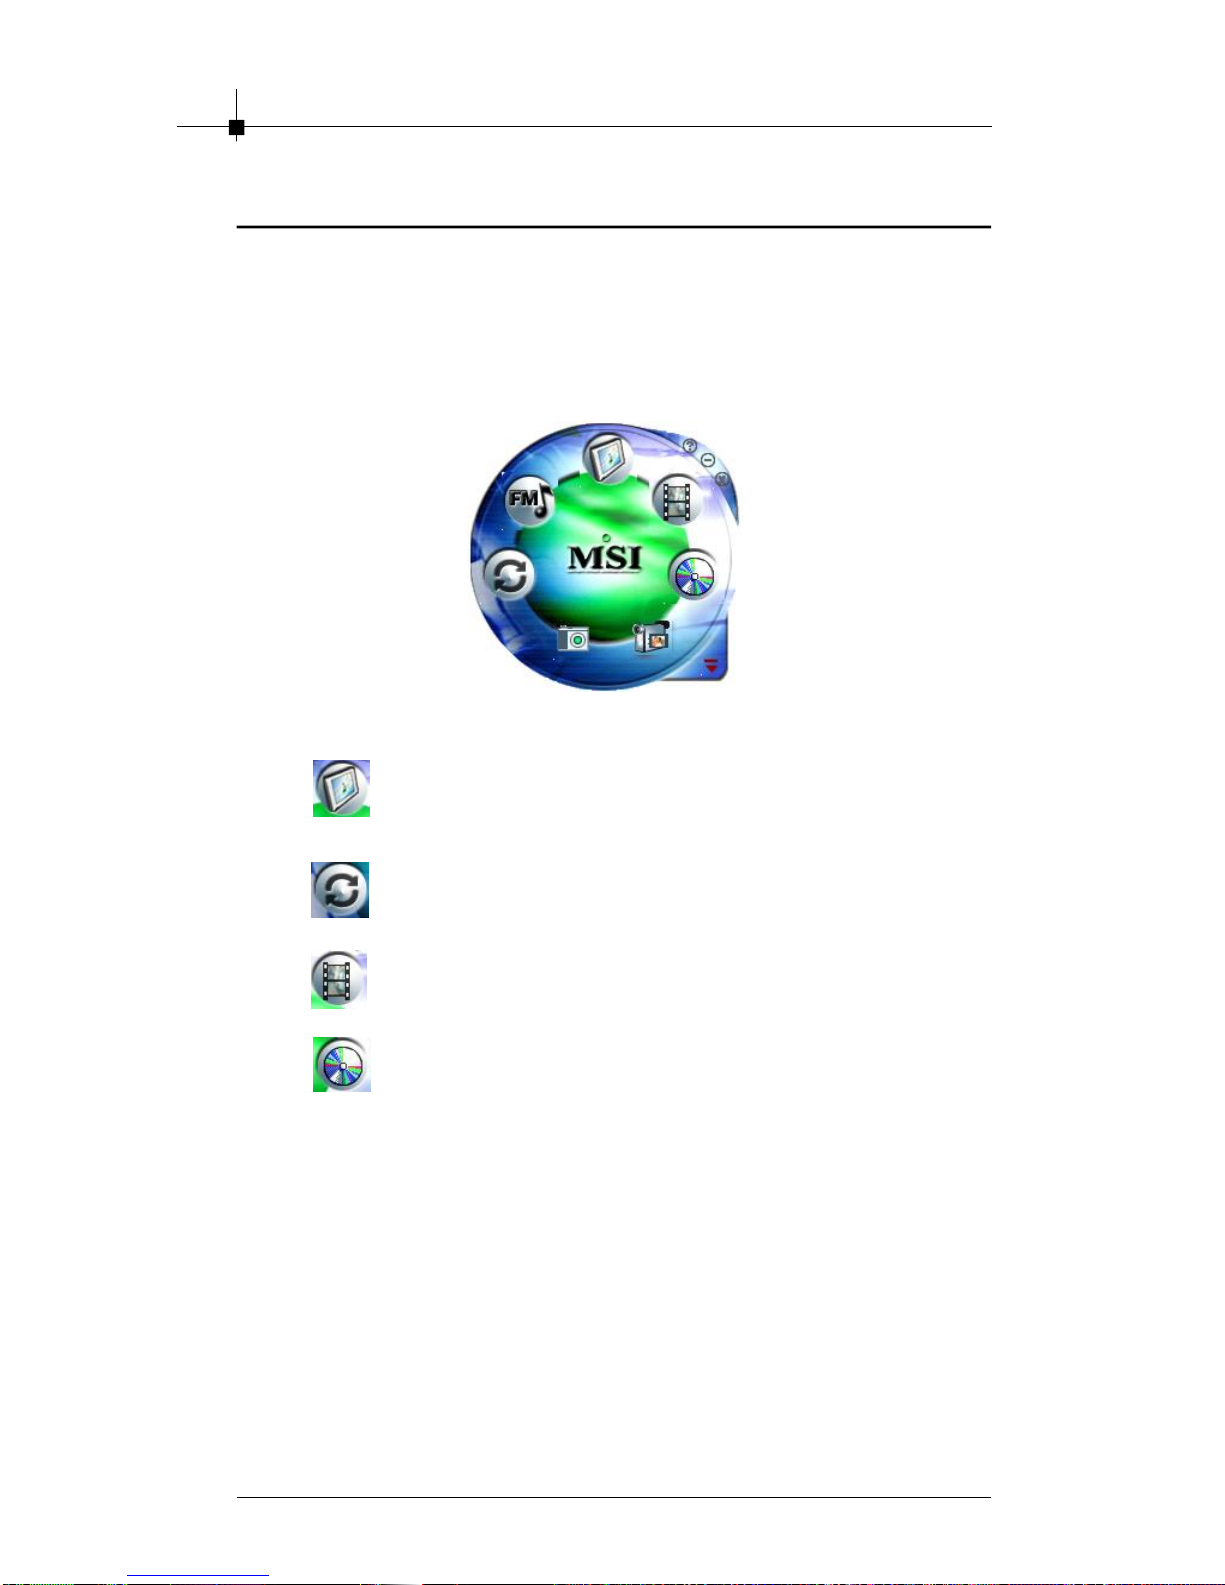
4.3 Using Digital @nywhere
After you finish the installation of Digital @nywhere application, you can start
to use the application to watch free-to-air digital terrestrial TV on your system.
(Note that to have the best capability of your system, please install the
Microsoft DirectX 9.0 before you use Digital @nywhere.)When you start to
use the Digital @nywhere, you can select one of the functions as below.
DTVR allows you to watch free-to-air digital terrestrial
TV on your PC. (For the detailed instruction, please refer
to chapter 4.4 Using DTVR)
MPEG Encoder allows you to convert AVI files into MPEG
format. (For the detailed instruction, please refer to
chapter 4.5)
Video Editor makes editing MPEG videos easy. (For the
detailed instruction, please refer to chapter 4.6)
DVD Maker allows you to create a VCD, SVCD and DVD
that can be played on a PC or DVD player. (For the
detailed instruction, please refer to chapter 4.7)
4-6
Page 27
Software Installation
4.4 Using DTVR
DTVR is a powerful and easy-to-use digital TV application that provides the
most feature-rich video/audio entertainment. With Digital @nywhere, you can
access free-to-air digital terrestrial TV programs and radio (*). DTVR provides
a convenient way to watch and record Digital TV on your PC and allows you
to play the recorded TV program. (*: The digital radio is not DAB.)
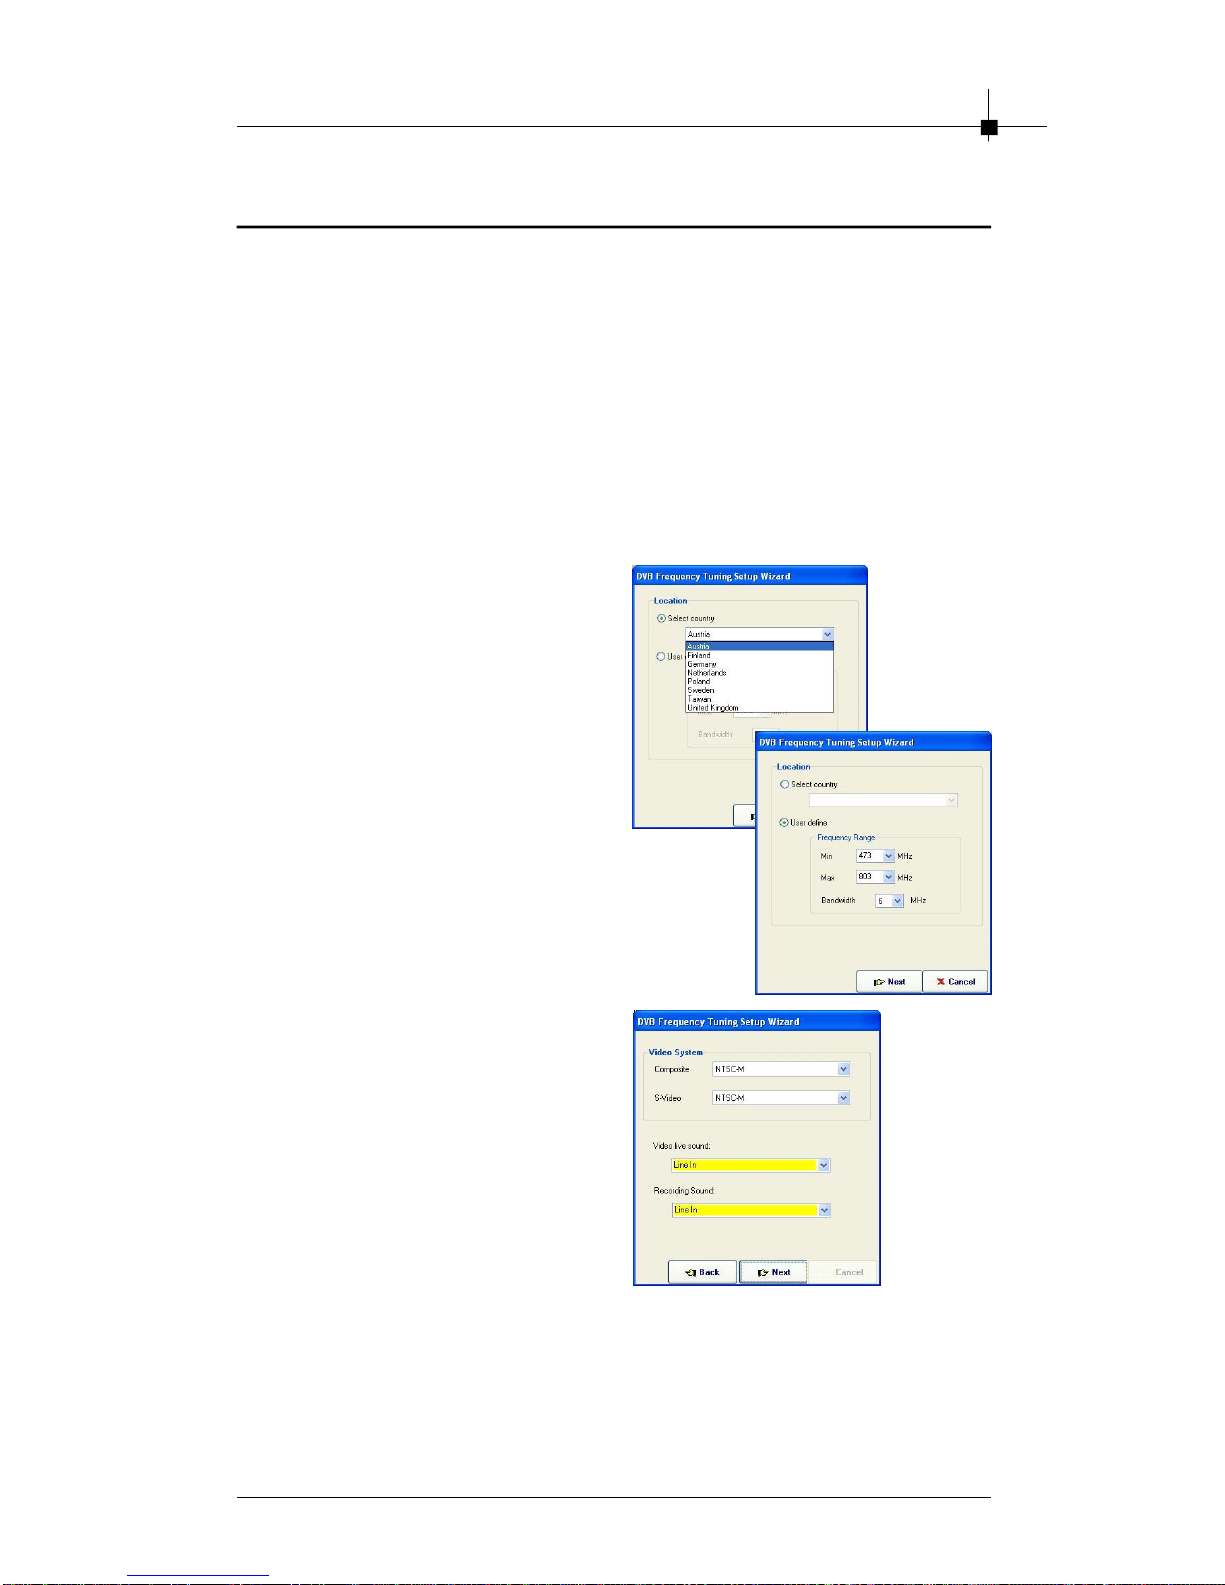
4.4.1 Scanning Terrestrial TV signal
If you run the DTVR at the first time, the “DVB Frequency Tuning Setup Wizard”
will guide you to set the correct frequency and then help you to scan the all
free-to-air digital terrestrial TV channels.
1. Select Location.You are allowed to
choose either Select country or
User Define, and then click “Next”
to continue.
(a) Select country: You can
select one country where you
locate at.
(b) User define: You have to set
the maximum frequency,
minimum frequency and
bandwidth by yourself. If you
are not sure about the
frequency range and
bandwidth, please click “select
country” to use the default
settings.
2. In the Video system, you have to
choose the video format of
composite and S-Video. (Usually,
it’s the same as your local TV
system.)
You also have to choose the
external audio source input port.
We suggest you using the “Line in”
as the external audio source.
4-7
Page 28

Chapter 4
3. In this step, it will show you the
scan range and signal strength.
The frequency range depends on
your country or user defined
setting. The signal strength will
show you the terrestrial signal
receiving status. If you have
checked all of your settings,
please click “Start” to scan
channels.
Note that sometimes the signal
strength will effect the channel
scan result. If you cannot scan
enough channels, please check
the terrestrial TV signal.
4.4.2 Main Panel Function
The Main window is the most important window of DTVR that displays live
video or playback. You can drag it everywhere or adjust its size by mouse or
double click to switch to full-screen. There are six major functions of DTVR.
Infor mation Window
Display the current time, current status
(Live, REC, Playback, TimeShifting), TV
audio state, video source, recording
file size, recording time, minimum
display window, close application and
help file.
4-8
Page 29

Software Installation
Basic Tool Part
There are seven different functions in the basic tool part, please see the
following description.
Switch video source as DVBT ,
Composite, S-Video and FM radio.
Scheduling
Setup
Channel preview
Snapshot
Sleeping timer setup
TV audio mode switching (Your channel
must support multi sound.)
Launch IEPG function
Launch Teletext
Channel Adjust Part
You can do channel selecting by clicking number keys on the
control panel or keyboard when video source is in DVB-T.
Channel up : Go to previous enabled channel.
Channel down : Go to next enabled channel.
Note that it is necessary to do auto-scanning to enable the Channel up and
Channel down function.
Recall channel : Go to last selected channel.
Input Source Part
There are three video input sources DVB-T, Composite, S-Video and FM radio.
You can change video source by clicking video source ( ) on the control
panel or choose ”Switch Video Source” from the pop-up menu (right-click).
4-9
Page 30

Chapter 4
Volume Adjust Part
Increase Volumn Mute Decrease Volumn
Record, Playback ,TimeShifting Par t
1. Record Function
At Live mode, you can start recording current live video by clicking
on control panel or choose “Capture” from the pop-up menu. Once you are
in capturing, click on control panel or choose “Stop” from the pop-up
menu to stop current recording. You can review your recorded files in the
playback list after recording.
2. Playback Function
You can do playback by clicking on control panel or choose “Play”
from the pop-up menu. This will bring a playback dialog that shows all
captured files you have done and all recent played files. You can assign
more than one file from recorded file or importing from file dialog, DTVR will
gather all files you selected to a play list.
Add selected item to
Add:
Play list. Double-click
the selected item to
add it into the Play list.
Delete:
Delete All:
Rename:
Import:
Delete selected item.
Delete all items.
Rename selected item.
Import file(s) to play
list.
Clear:
Clear all items on play
list.
While playing, you can use following functions:
-Play button : If media file is paused, resume playback.
-Pause button : To pause the current playing media file.
-Stop button : Stop current playing media file and go to Live mode.
-Backward button : Go backward.
-Forward button : Go forward.
4-10
Page 31
Software Installation
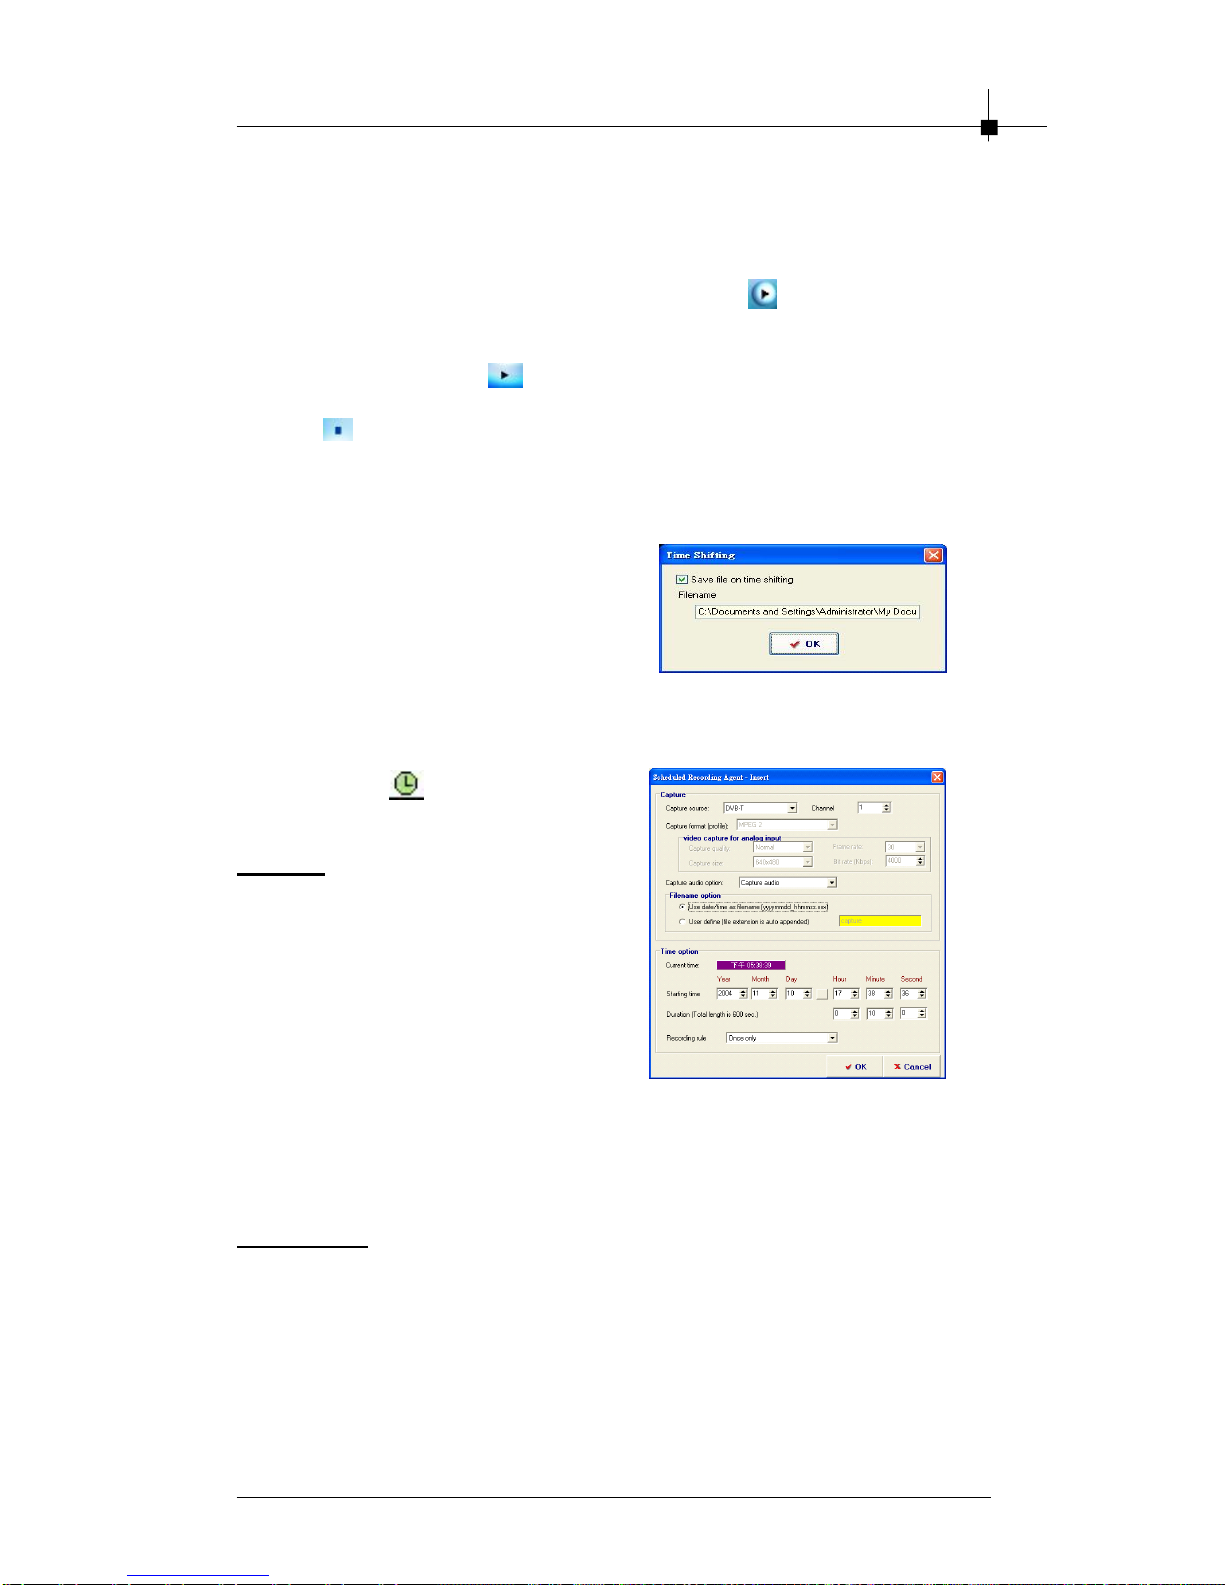
3. TimeShifting Function
In Live mode, you can do time-shifting by clicking on control panel or
choose “Time Shifting” from the pop-up menu. Once you are in time-
shifting mode, you need to record at least 10 seconds before starting
playing. You can click on control panel or choose “Play”” from the popup menu to watch the recorded file. Once you want to stop time-shifting,
click on control panel or choose “Stop” from the pop-up menu to stop it.
Then you would see the pop up window as below. If you want to save
video clip, please select the option “ Save file on time shifting” and click
“OK” to save it.
During time-shifting, you can switch
current video and time-shifting video
window by choosing “ Real Screen”
from the pop-up menu.
4.4.3 Schedule Function
When you click , you can start
setting the schedule properties.
Capture
- Capture Source: Capture source
includes DVB-T, Composite and SVideo.
- Channel: Select the channel
which you want to record.
- Capture format (profile): When
you select DVB-T as the capture
source, you can only use MPEG2
as capture format. (If you use
other capture source such as composite or S-Video, you can use other
capture format such as VCD, DVD or MPEG4.)
- File name option: You can use the date/time as your capture file name
or define by yourself.
Time option
- Current time: Show the current time.
- Starting time: Enter the date and time when you want to start recording
the files.
- Duration: Enter the length you want to record the program.
- Recording rule: Enter the recording rule you want to use. The default
value is “Once only”.
4-11
Page 32

Chapter 4
Schedule Recording Agent Setting
When you input a record schedule, you will find that your record schedule
have been added to the Schedule Recording Agent.
Open
Schedule Recording Agent Setting
When you input a record schedule, you will find that your record schedule
1. Open
-Insert: Insert a new record schedule.
-Edit: Edit the record schedule.
-Delete: Delete a record schedule.
-Delete All: Delete all of the record
schedule.
-Start Power-off Schedule: If you
click this button, the system will turn
off immediately. When the scheduled
recording time comes, your PC will turn
on automatically and start recording TV
programs as scheduled.
Note: To enable this function, please enable the “ Hibernate”
function in the windows power management configuration in
advance.
2. Today To-do List
It will show all of the record schedule
items of the day.
4-12
Page 33
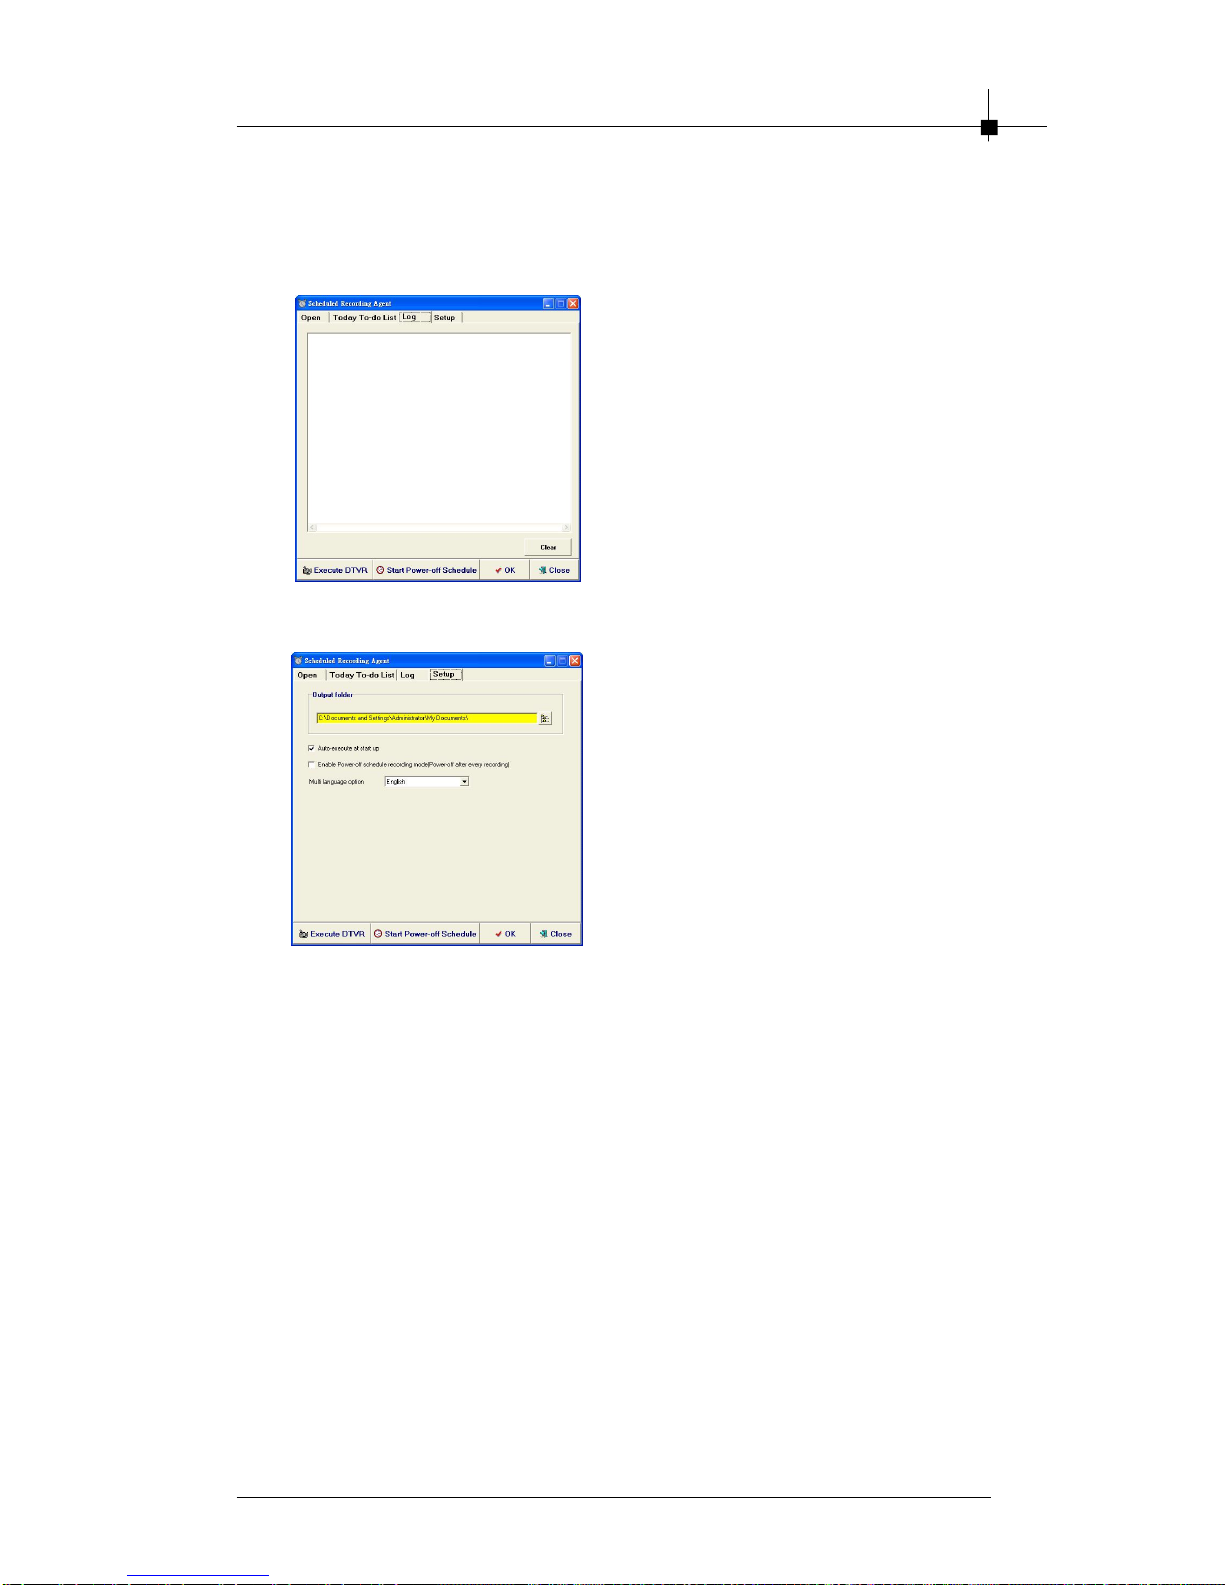
3. Log
Software Installation
If your record schedule fails, the error
message will show in Log description.
You can check error messages here.
-Output folder: You can change the
different capture folder to save your
record files.
-Auto-execute at start up: Enabling
this option makes schedule agent
always execute at start up, otherwise it doesn’ t. Default is enabled.
-Enable Power-off schedule
recording mode: Enabling this
option makes system shutdown
automatically when schedule
recording finishes. Default is
disabled.
4-13
Page 34

Chapter 4
4.4.4 Setup Utility for Digital @nywhere
The setup utility will be different when using different video source. Different
video source will show various interfaces.
Channel Setup Function
-Add: Add a channel to your list.
-Delect: Delete a channel from your
exist list.
-Update Channel: Please select the
channel you want to see and click
“Update Channel”.
-Auto Scan: Click the button to start
Auto-scan function.
Capture Setup Function
-Video capture device: You can
select the record format as MPEG2
PS or MPEG2 TS format. MPEG2 PS
will record current channel. MPEG2
TS format will record all of the TV
programs in the current transpond.
-Capture location: Setting your
capture folder.
-Capture filename: Setting your
capture file name. You can choose
“User date/time” as filename or define
by yourself.
-Enable time limit: To limit your
record time.
-Capture current program only
4-14
Page 35

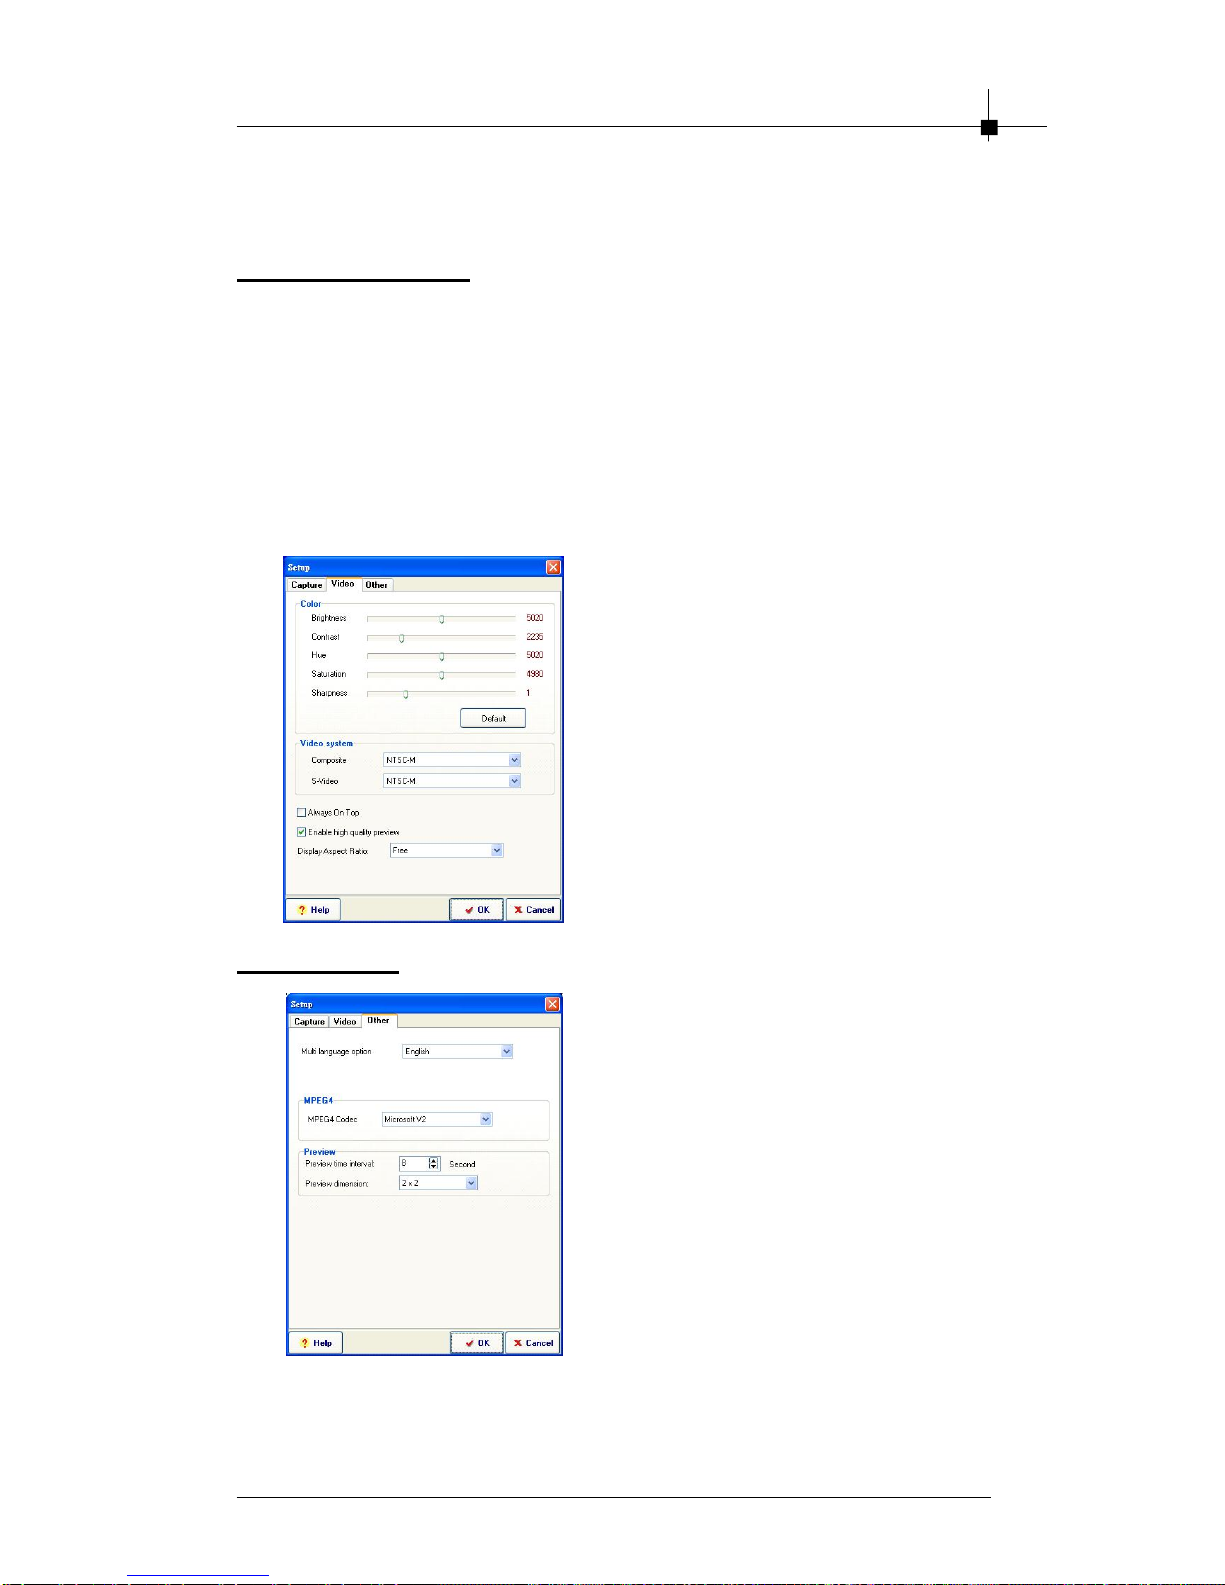
Video Function
Software Installation
-Color: Brightness, contrast, hue and
saturation adjustment. You can
change each scroll bars to see the
effect.
-Default: Click it to set as default
value.
Other Function
- Always On Top: Set main window to
topmost
- Display Aspect Ratio: Set the
aspect ratio of the display window
(Free, 4:3 or 16:9)
- Enable DxVA: DXVA (DirectX VA) is
the new Microsoft standard API for
accelerating video rendering under
DirectShow. If your VGA card
supports hardware that can accelerate MPEG2 video playback, please
enable this function for better video
playback performance, and reduce
the amount of CPU usage. Your
display window will more smooth
when you enable this function.
- Enable VMR: If your VGA card supports VMR, please use it as the
display mode. If your VGA card doesn’t support VMR, please disable this
function.
- Enable PIP playback: Enable the PIP ( Picture-In-Picture ) function while
you are playback files.
- Multi language option: To select the different language interface on
line.
4-15
Page 36

Chapter 4
OSD
-Enable OSD: Enable OSD function.
-Set OSD display color: Setting the font color for the OSD (On Screen
Display)
Preview
-Preview time interval: Setting the interval time. The minimized value is 8
seconds.
-Preview dimension: To select the Preview dimension as 2x2, 3x3, 4x4 or
5x5.
4.4.5 Setup Utility for composite and S-Video
Capture Setup Function
-Video Capture format (profile):
Setting what kind of video format
which you want to record.
-Video input format: Select your
video input formats YUY2, UYVY or
RGB.
-Capture format (profile): Setting
what kind of video format which you
want to record.
-Capture Size: Setting video capture
size.
-Bite Rate (Kbps): Setting capture bite
rate.
-Capture quality: Setting capture
quality.
-Frame Rate: Setting capture frame rate.
-Capture location: Setting your capture folder.
-Capture filename: Setting your capture file name. You can choose
“User date/time” as filename or define by yourself.
-Enable time limit: To limit your record time.
-Capture audio device: You can select “ Capture audio”, “Capture audio
only, No Video” or “no audio”. If you select “Capture audio only, No
Video”, you can capture the file as WAV or MP3 format.
Audio Capture for analog input
-Video live sound: External audio source input port.
-Audio Source: To setting where the audio source. (Recommend using
Line in.)
-Audio format: Setting your audio capture format.
-Recording Sound: External audio source input port
-Recording level: Setting your audio capture volume level
4-16
Page 37
Software Installation
Video Setup Function
Color
Brightness, contrast, hue and saturation adjustment. You can change each
scroll bars to see the effect.
Video System
Although the TV tuner on your TV tuner capture card is fixed and you
have to set up the TV system right after the first time you launch Digital
@nywhere, you still have the chance to use this product to display the
varies standards of video system.
-Always On Top: Set main window to
topmost
-Enable high quality preview:
Enable high quality preview mode
-Display Aspect Ratio: Set the
aspect ratio of the display window
(Free, 4:3 or 16:9)
Other Function
-Multi language option: To select
the different language interface on
line.
Preview
-Preview time interval: Setting the
interval time. The minimized value is 8
seconds.
-Preview dimension: To select the
Preview dimension as 2x2, 3x3, 4x4
or 5x5.
4-17
Page 38

Chapter 4
4.4.6 Channel Preview
You can do channel surfing by clicking
on control panel or choose
“Channel Preview” from the pop-up
menu. While channel surfing, you can
select any sub-window by 4 arrow
keys (left, right, up, down) or click on
the picture directly. If you want to stop
channel surfing, you can double click
on the mouse or press “ Enter” key to
watch sub-window channel.
4.4.7 Snapshot
You can do Snapshot (Still Image Capture) on current preview window by
click on control panel or choose “ Snapshot” from the pop-up menu. When
snapshot is done, the snapshot window will show up and you can do View/
Save/Delete for all images.
Note that the saved image format supports both BMP and JPEG, you can
decide which format you want to save when you execute “Save / Save All”
on file dialog.
4.4.8 Sleeping Timer
If the is selected, you can use
sleeping timer function.
After you select the button, you would
see the dialog box as below:
You can use slide bar or left and right
key to adjust sleeping timer value. Click
“OK” to start, “Cancel” to exit.
4-18
Page 39

Software Installation
4.4.9 Pop-Up Menu
Any time while running DTVR, you can put the cursor on the display window
or control panel and right-click to see a pop-up text menu. This menu will also
appear when you press the [F12] key on your keyboard. The commands on
this right-click menu are the same as those on the DTVR control panel, along
with some extra options added. The right-click menu is explained below.
-Always On Top: Set main window to topmost
-Display Aspect Ratio: Set the aspect ratio of the
display window (Free, 4:3 or 16:9)
-Full Screen: Switch to full screen or restore to
normal window
-Switch Video Source: Switch video source (DVBT, Composite or S-Video)
-Previous Channel: Go to previous available channel
-Next Channel: Go to next available channel
-Recall Channel: Go back to last selected channel
-Channel Preview: Browse available channels as
sub-window
-Capture: Start recording video
-Play: Start playback of recorded program
-Time shifting: Start time shifting
-Snapshot: Capture still images of current picture
-Mute: Mute or restore sound
-Setup: Open DTVR setup window
-Sleeping Timer: Set sleeping timer on/off
-Schedule Recording: Open scheduling recordings
-IEPG: Use the IEPG function to preset record pro-
grams from internet
-About: Show version and copyright information
-Exit: Exit DTVR
4-19
Page 40

Chapter 4
4.4.10 Remote function
1. POWER: Press this button to turn On / OFF
Digital @nywhere.
2. SOURCE: Select DVB-T, Composite and
SVHS.
3. SCAN: Scan all channels.
4. EPG: Turn on electronic program guide.
5. Numeric Keypad: Select the desired
channel directly.
6. MUTE: Press this button to mute the sound.
7. ZOOM: Click this button full screen display
video.
8. PREVIEW: Channel preview
9. SNAP: Click this button to capture image.
10.REC: Start recording current live video
11. STOP: Stop recording current live video
12.PAUSE: To pause the current playing media file
13.PLAY: Click this button to playback recorded file
14.BACKWARD: Go backward while playback a recorded file
15.FORWARE: Go forward while playback a recorded file
16.CH+: Click this button to go to next channel.
17.CH-: Click this button to go to previous channel.
18.VOL+: Click this button to increase the audio volume
19.VOL-: Click this button to decrease the audio volume
20.PIP: Enable the PIP (Picture-In-Picture) function while you are playback
files.
21.Power-Off PC by remote control: Click
the RESET button when you want to poweroff your PC. You will see the message pop
up as below. Press “Power” button of the
remote controller or click “ OK” button on the
message window and the system will shot
down immediately. (You have to turn off the
software DTVR before using this function.)
4-20
Page 41

Software Installation
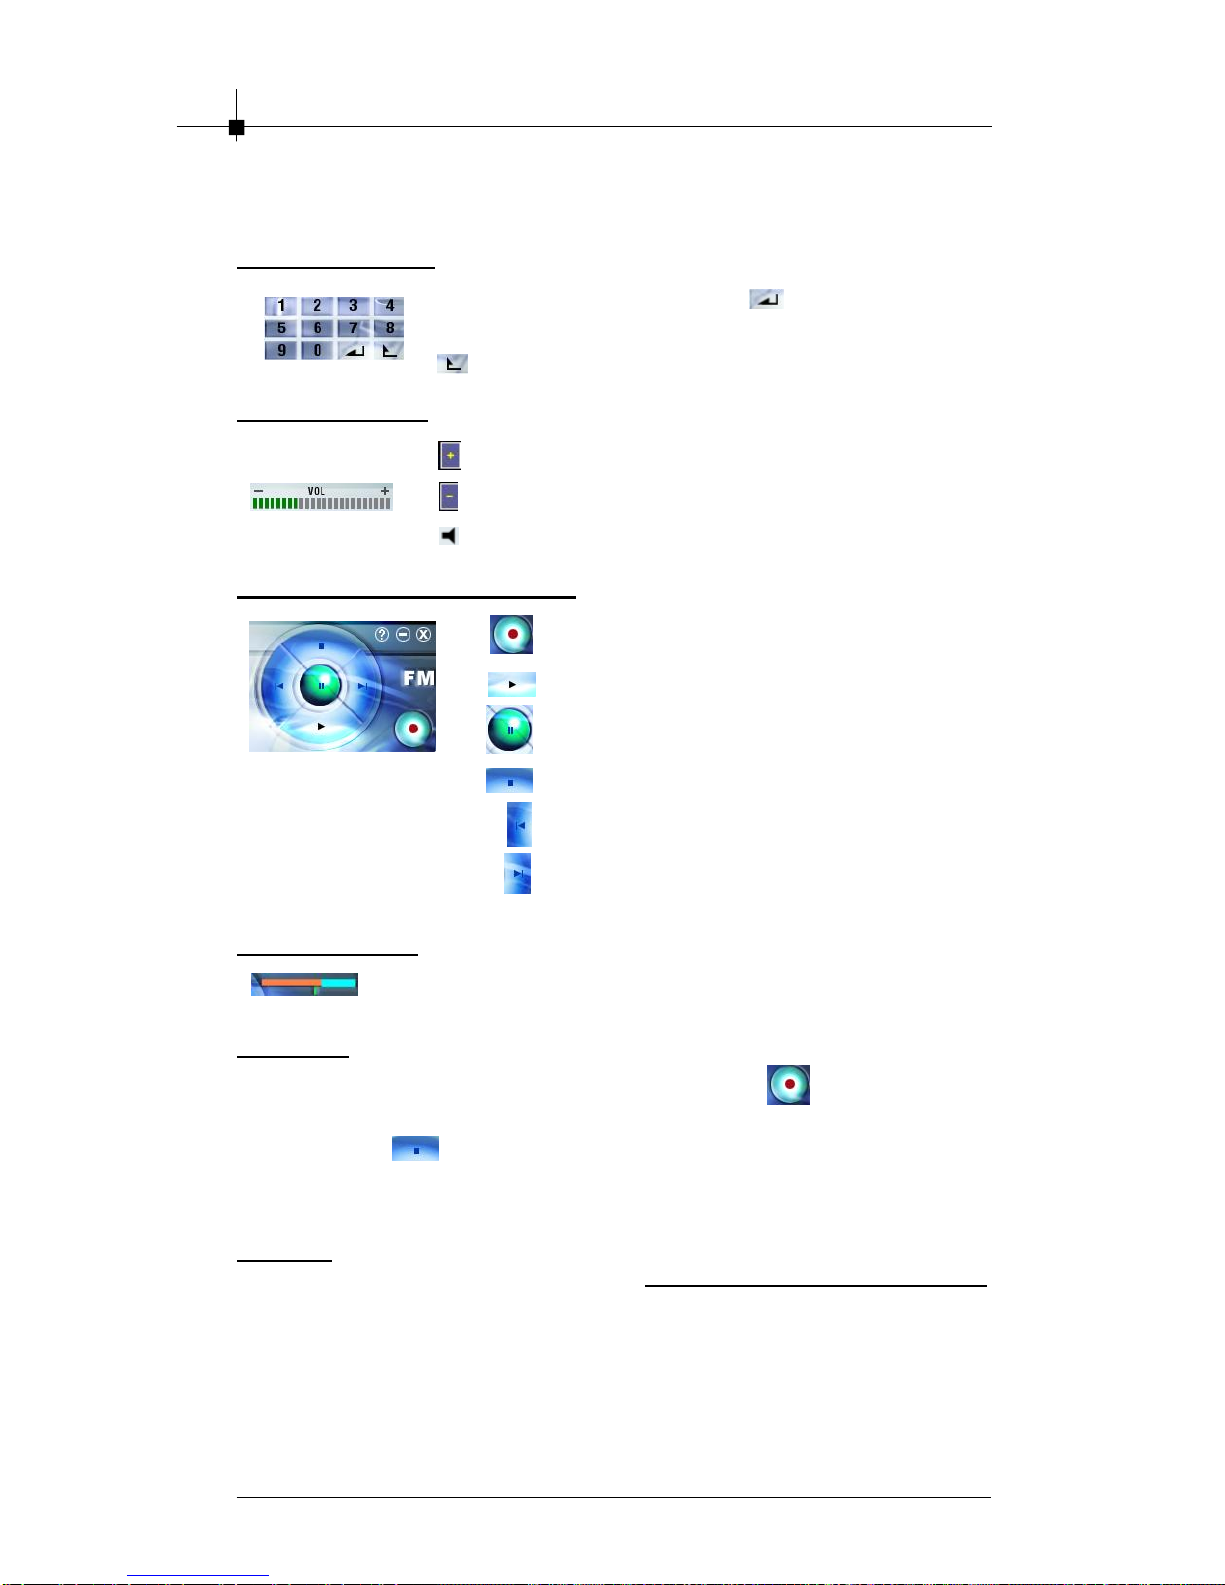
4.4.11 FM Function
FM is a powerful application provides you listen and record FM radio. There
are 50 memory channels can be assigned and you can use schedule recording to specific memory channel.
The FM control panel is designed to look like controls on a electric appliance,
you can click button on control panel to do the function you want. The
following page shows descriptions for the FM control panel functions, and
tips for operating FM features.
Information Window:
Display current state (FM, REC, Playback),
audio volume, speaker state, recording time,
recording file size and current time.
Tuning Frequency Adjusting:
You can click or drag the frequency slide bar
to set new frequency.
Basic tool:
Switch to TV
Scheduling
Setup
Add current frequency to memory
channel list
Increase 0.05MHz to current
frequency value
Decrease 0.05MHz to current
frequency value
Go to next channel
Back to last channel
4-21
Page 42
Chapter 4
Channel adjusting
Enter the number key and Enter( ) or wait 1 seconds
that direct jump to the channel you input.
: Go to last selected channel.
Volume adjusting
: Increase volume
: Decrease volume
: Mute or restore sound
Record/Playback/Time-shifting:
: Start recording
: Start playback
: Pause current playback
: Stop playback and back to Live mode
: Go backward
: Go forward
Time control bar
While playback, it shows general elapsed time or time
remaining, also jump to specific time in program by mouse click.
Recording
You can start recording current audio channel by click capture button
on control panel or choice “Capture” on popup menu. Once you are in
capturing, click stop button on control panel or choice “Stop” on popup
menu to stop current recording. You can review your recorded files in the
playback list after recording.
Playback
Same as playback of TVR. Please refer the Recor d, Playback ,TimeShifting Part
section in 4.4.2 Main Panel Function.
4-22
Page 43
Software Installation
4.5 MPEG Encoder
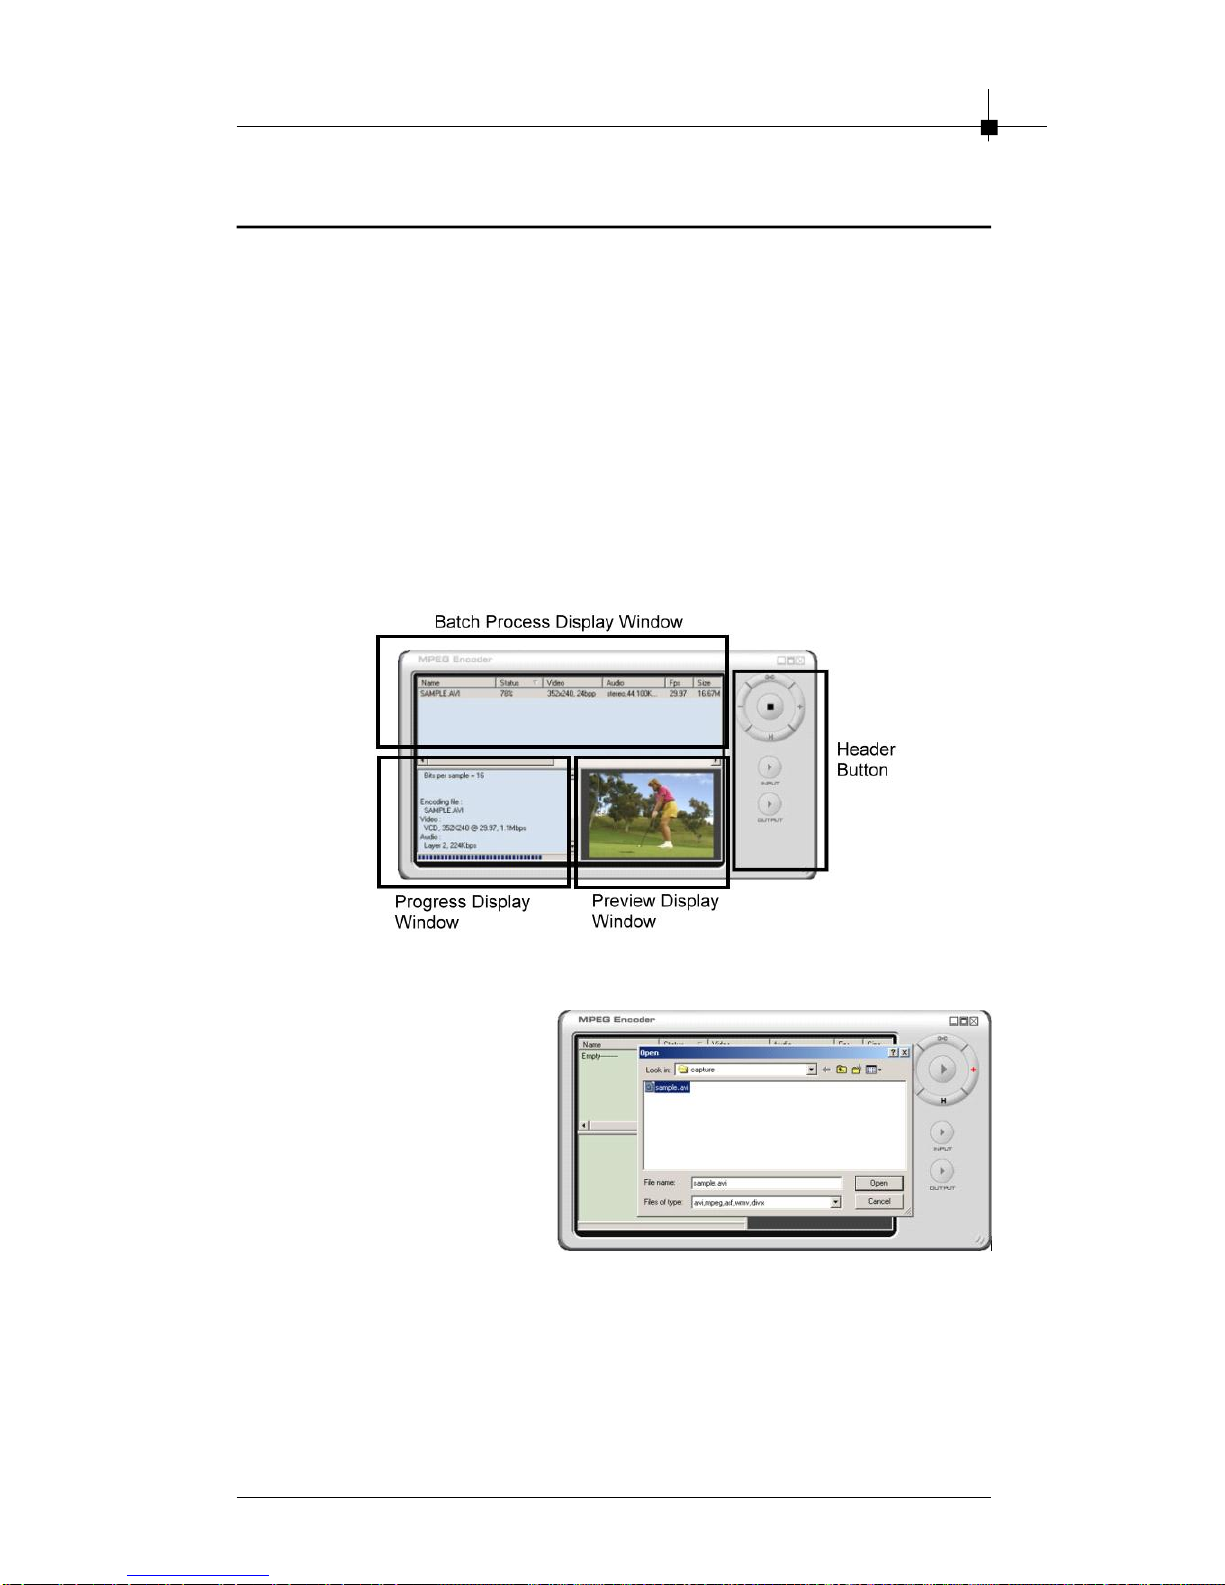
4.5.1 Interface Explanation
The default page is composed of four parts:
Header Buttons
Add input files; Delete files; Edit options; Start and Stop transcoding.
Batch Process Display Window
Displays file name, encoding status, screen size and play time of files to be
transcoded.
Progress Display Window
Displays formatting information about the file being transcoded.
Preview Display Window
Displays the video of the file being transcoded.
4.5.2 Practice Streaming Video Translation
MPEG Encoder transcodes
multimedia files among video
formats. For using MPEG
Encoder, they must be able to
be played with Windows Media
Player. File formats that can be
transcoded are: AVI, DV-AVI,
MPEG-1, MPEG-2, ASF, WMV,
DivX, and DAT.
To add a multimedia file to be transcoded, click on the “+” or “Add”. This will
open the “Browse” dialog box. Browse to the directory/file wanted and click
on “Open” . (Another method of adding files to the Batch Process Display
Window is to simply highlight a file, then drag and drop it into the Batch
Process Display Window.)
4-23
Page 44

Chapter 4
Once the multimedia file is added to the Batch
Process Display Window, the Option Dialog
Box appears. This begins the process of
selecting the output format for the
transcoder. Choose among four categories
of formats: MPEG-1, MPEG-2; Category tabs
appear at the top of the window. After
selecting a format category, choose a
specific video format (and detailed options if
necessary).
The output file will be created in the same
directory as the original file unless a different
path is manually chosen. It will also maintain
the original video file name and add a file
extension matching the video format of the
output type selected. The file name can also
be manually changed.
Once the output video format and options are selected, click “OK” and the file
will appear in the Batch Process Display Window.
The Batch Process Display Window shows three states of process in the
Status column.
1. Waiting: The media file displayed is queued for transcoding (compression
and/or translation). The transcoding of video files in the “Waiting” state
begins when the Encoding is clicked.
2. Exclusion: Transcoding of that file will not occur.
3. Done: The transcoding (compression and/or translation) is successfully
completed.
To change a file’s status between Waiting and Exclusion (and vice versa),
double click on the file line. The Waiting state will change to an Exclusion state
and be reported as “Skip”. Similarly, a file with a “Skip” status when double-
clicked, will change to “Waiting”.
4-24
Page 45

Software Installation
During Transcoding, the Status
column changes to display the
percent of progress
accomplished. Also, once the
transcoding process has
begun, the (right arrow)
Encoding button changes to a
Stop button. If the Stop button
is clicked-on during
transcoding, the process will
stop. Once the transcoding process completes successfully, the status will
change to Done. To transcode the same file again - for example, with an option
change - double click on the file in the Batch Process Display Window and the
Status will change to Waiting. To change the options again, highlight the file
with a single mouse click and then click on the “Option” or “Edit” button to
execute the Option Selection Dialog box.
To view the transcoded output video file, highlight the video file and click-on
the Output Play button.
4-25
Page 46

Chapter 4
4.6 Video Editor
4.6.1 Interface Explanation
Video Editor’s screen has following areas.
-Menu Area: file open, file/video clip delete, video property, change skin
color, minimize, maximize, close and help
-Display Area: play original video clips, play edited video clips (preview),
display saving progress information
-Video Clip Staging Area: Original Clips, Staging Clips
-Frame Edit Area: mark frame range, sequence arrangement, merge
multiple frames into one video
-Title Edit Area: add title, font style, size, color, movement (straight line,
curve line)
-Audio Edit Area: add audio and create sound effect
-Special Effect Edit Area: use Color Effect, Filter Effect, Transition Effect,
Transition In Effect, Transition Out Effect, Noise Reduction Filter
File open
4.6.2 Menu Area
File open
Clip/File delete
Clip/File
delete
MPEG
Properties
Dialog
-Support MPEG-1, 2 system file(Video
and Audio), AVI(DV-AVI).
-Select a file and click “Open” button.
-Delete clips registered in
Original/Staging Clips.
-Actual file on a hard disk is
deleted when “Delete File” is
checked.
4-26
Page 47

MPEG Properties Dialog
4.6.3 Display Area
Software Installation
-Display your input MPEG file properties
Original Video Display Window
-Displays videos in Original Clips.
(Double Click or Drag and Drop)
-Videos in Staging Clips cannot
be displayed in this window.
-In Title editing mode, Title can be
edited in this window.
-In Audio editing mode, it displays
registered audio files.
-In Special Effect mode, it
displays all available filters.
-Displays the progress information when final video is created.
Edited Video Display Window
-Displays videos in Staging Clips.
(Double Click or Drag and Drop)
-Videos in Original Clips can be
displayed in this window.
-Preview function displays
edited video in this window.
4-27
Page 48

Chapter 4
4.6.4 Original and Staging Clips
Original Clips
-This is the area where video clips that need to be edited are added and
managed.
-Video clips can be dragged and dropped into the Original Clips area.
-The sequence of video clips added can also be rearranged easily by drag
and drop.
How to add video clips
a.Use the button in the menu area to browse and select video clips
to add to the Original Clips area.
b.Drag and Drop video files to the Original Clips area.
How to view and manage video clips in the Original Clips area
a.To view a video clip in the Original Clips are, either double click on the
video clip or drag and drop the video clip from the Original Clips area
on to the Original Video Display window.
b.Clicking on the right mouse button will bring up a Pop-up Menu. This
menu performs the following functions: copy, delete and show
property information.
Staging Clips
-This is the area where video clips are added after frame ranges are
specified.
-Video clips can be managed for further editing in this area.
-Editing, deletion and sequence arranging are done here.
-File properties for each video clip can be obtained by right mouse clicking
on the clip.
-Video clips are acted upon and added to the Staging area using the four
application buttons on the left side of Video Editor. Those four buttons are
“Cut”, “Title” , “Audio” and “ Effect”.
4-28
Page 49

4.6.5 Frame Edit Mode
Frame Range Selection for Editing
-Specify frame range
-To add an entire video
clip, drag the clip from the
Original Clips area and
drop it in the Staging Clips
area.
-To add portions of a video
clip, drag the clip from the
Original Clips area and
drop it in the left preview
window. Then using the
Mark-in/Mark-out button,
cut the portion of the
video clip to be edited and
Software Installation
then click the button to transfer the clip to the Staging Clips area.
-Users can repeat the above steps to add multiple video frames.
Video Frames Editing and Saving
1. Adding Video Clip
-Use the button in the menu area to browse and select video clips to
add to the original clips area.
-Drag and drop video files to the original clips area.
-Double click on added video clips in original clips area or drag and drop
them to original video.
-Display Window to view and select frames for further editing.
2.Selecting frame ranges for video editing click mark-in to specify the
beginning of a clip and mark-out to set the end of the clip. Next, click on
the button to move the clips from the auto edit window to the Staging Clips
area.
3.Editing video frames
-Select video frames in staging clips area.
-Users can rearrange the sequence of videos.
-Users can repeat the same scene by putting the same video frames
multiple times.
-Users can delete sections of video they do not want.
-Users can confirm the video before final saving using preview function.
-User can repeat the above steps.
-Save the final video when editing is completed.
4-29
Page 50

Chapter 4
4.7 DVD Maker
4.7.1 Adding Files
1.Select format
DVD: For DVD.
VCD: For Video CD.
SVCD: For Super VCD.
DATA: For multi-media data CD.
2.This dialog box shows up when the
is clicked. Video or photo
files are displayed as thumb nails on
the screen (like below) after being
added.
3.Added files can be deleted. Click on
the file to be deleted and then click
on the button.
4.When all necessary files are added,
click on to
move to next step.
4-30
Page 51
Software Installation
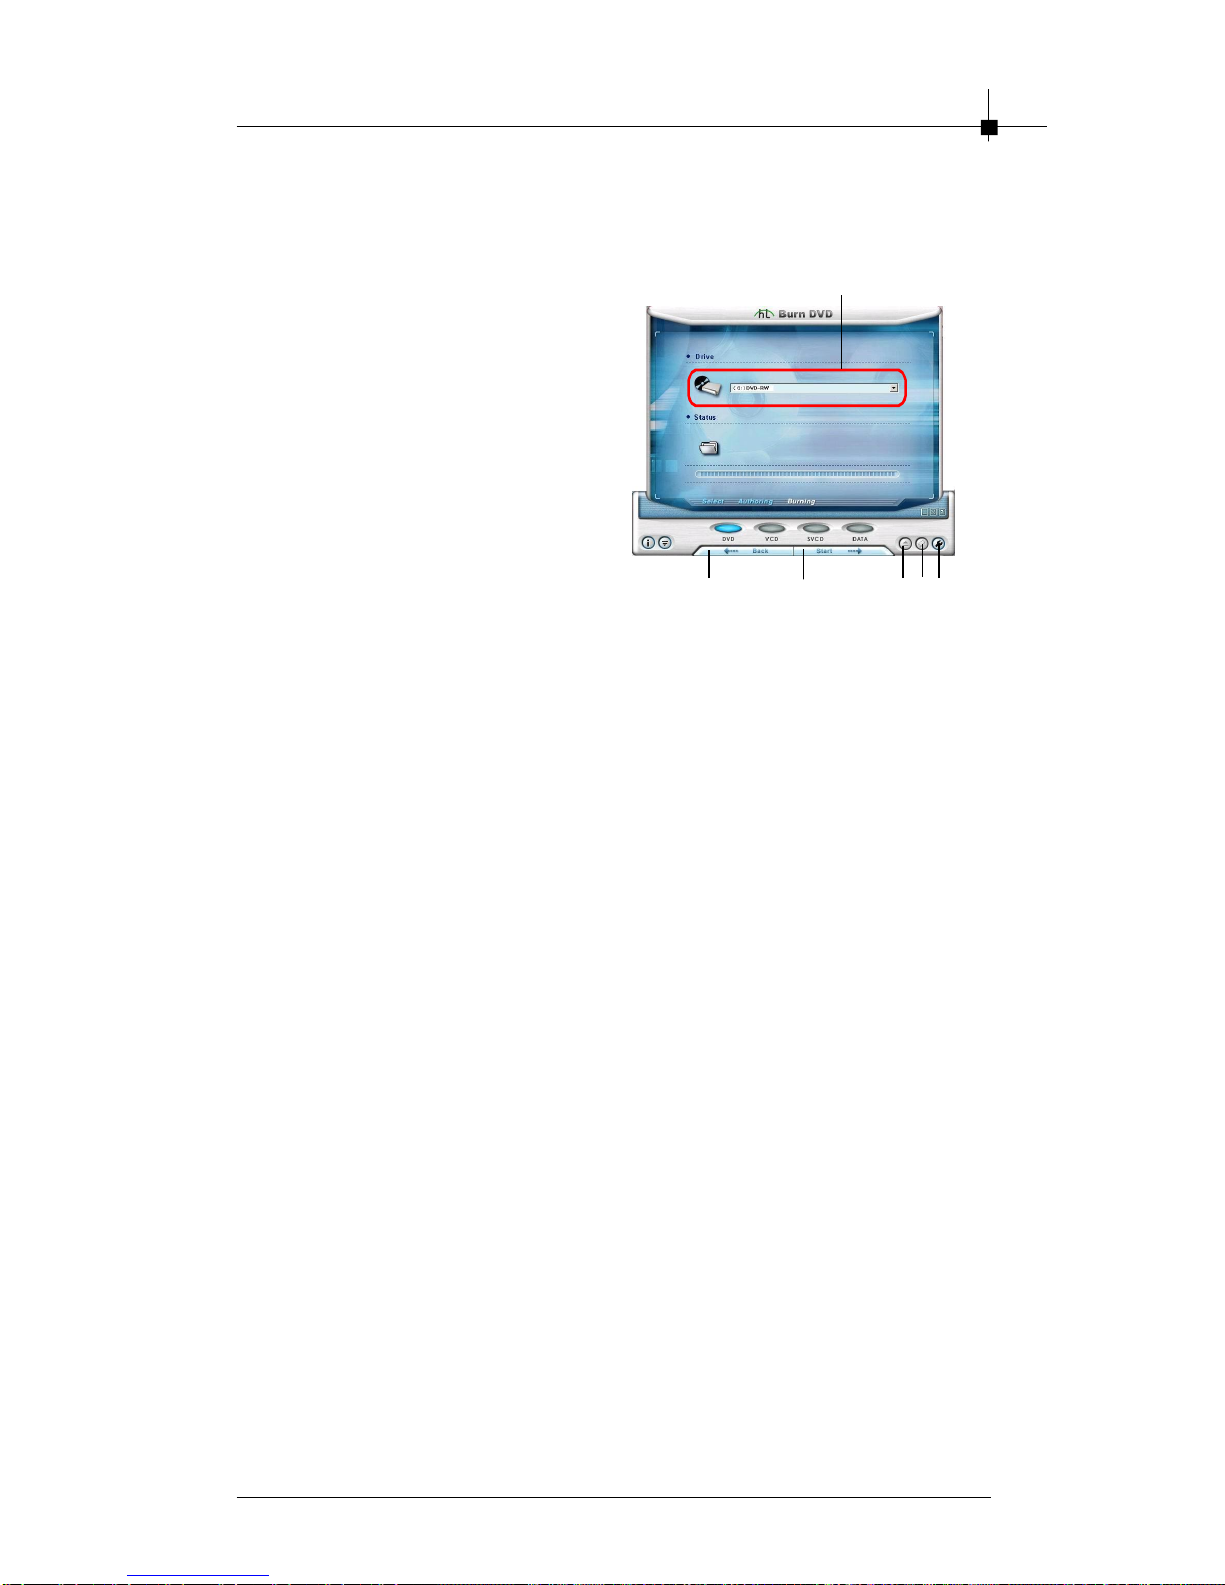
4.7.2 Burning
1.The below window shows up.
2.This “ Back” button allows users to
go back to previous step. Users can
go back to previous step and
change selected files or selected
format.
3.Select DVD/CD burner to use.
4.Eject DVD/CD drive.
5.Erase all content on DVD/CD media.
6.Open option dialog box.
-NTSC, PAL, Both: Select video
type.
-Support XVCD and XSVCD:
Data rate is not checked in order
to support XVCD and XSVCD.
-Perform Writing Test before
recording: Checks to insure that
the DVD/CD writer is functioning
correctly before actual burning.
-Use Windows temporary
directory: [Default] Use Win-
dows temporary directory as DVD
Maker’s temporary directory.
-Path: Users can specify DVD
Maker’s temporary directory.
2 7
3
45
6
7.After selecting DVD/CD burner and
changing settings in Option dialog
box, users click to start burning DVD
or CD.
4-31
Page 52

Chapter 4
4.8 FAQ
Q1.How do I use the power-off schedule recording function?
Before you use the power-off schedule recording function, please make sure
your system can support hibernate function.
Step 1.
Enter to the “display properties” and
choose the “ screen saver” .
Step 2.
Click the “Power” button to and enter to
the “ Hibernate” function. You would
see the option “ Enable hibernate
support”. Please click on the function
so that you can use the power-off
schedule recording function.
Step 3.
Then you can click on the button
to start setting the schedule properties.
After you finish the setting, please click
the “OK” to the next step.
Step 4.
Then you would see your setting in the
schedule. If you want to use poweroff schedule recording now, please
click on the “Start Power-off Schedule
” button. It will pop up a confirm
message to ask you if you want to
shutdown system. If you click “YES”,
the system will shutdown your PC
immediately. It will turn on your PC
automatically and start record TV
programs as the schedule set up.
4-32
Page 53

Software Installation
Q2. How to capture video clip as MPEG4 format?
If you use other capture source such as composite or S-Video, you can
record video clips as MPEG4. (When you select DVB-T as the capture source,
you can’t capture video format as MPEG4.) Please follow the steps below to
record files as MPEG4 format.
Step 1.
We provide two kinds of MPEG4
format, Microsoft and DIVX.
Please download the MPEG4 Codec
from Internet.
DIVX: http://www.divx.com/
Microsoft: http://www.microsoft.com
Or you can e-mail to our technical
support department.
Step 2.
Install the MPEG4 codec
Step 3.
Click the setup button ( ) and enter
to the capture setting. Please select the
MPEG4 record format.
Step 4.
Go to the other setting. Select the
Mpge4 codec you want to use,
Microsoft or DIVX.
Step 5.
When you finish the setting, please
4-33
Page 54

Chapter 4
Νοτε
4-34
 Loading...