

Page 1
INSTRUMENT MANUAL
®
SECTOR Imager
Models 2400 & 6000
www.mesoscale.com
®
Page 2

FOR RESEARCH USE ONLY. NOT FOR USE IN DIAGNOSTIC PROCEDURES.
Disclaimer of Warranty and Liability
Changes in Publication
Unauthorized Use of Manual Material
Unauthorized Use of Trademarks or Service Marks
MESO SCALE DIAGNOSTICS, LLC. (“MSD”) MAKES NO REPRESENTATION OR WARRANTY OF ANY KIND, AND HEREBY
EXPRESSLY EXCLUDES AND DISCLAIMS ANY AND ALL REPRESENTATIONS AND WARRANTIES WITH REGARD TO THIS
INSTRUMENT MANUAL (THIS “MANUAL”), INCLUDING, BUT NOT LIMITED TO, ANY IMPLIED WARRANTY OF MERCHANTABILITY,
SUITABILITY OR FITNESS FOR A PARTICULAR PURPOSE, DATA ACCURACY, SYSTEM INTEGRATION, QUIET TITLE OR
NONINFRINGEMENT. NO STATEMENT IN THIS MANUAL SHALL BE INTERPRETED TO GRANT OR EXTEND ANY WARRANTY ON
THE PRODUCTS DESCRIBED HEREIN. MSD SHALL NOT BE LIABLE FOR ERRORS OR OMISSIONS CONTAINED HEREIN OR FOR
ANY DAMAGES OF ANY KIND, INCLUDING, BUT NOT LIMITED TO DIRECT, INDIRECT, SPECIAL, INCIDENTAL, CONSEQUENTIAL
OR PUNITIVE, WHETHER ARISING IN CONTRACT, TORT, STRICT LIABILITY OR OTHERWISE, THAT MAY BE INCURRED IN
CONNECTION WITH THE FURNISHING, PERFORMANCE OR USE OF THIS MANUAL.
The information contained in this Manual is subject to change without notice.
No part of this Manual may be duplicated, reproduced, stored in a retrieval system, translated, transcribed, or transmitted in any form
or by any means without the express prior written permission of MSD. This Manual shall be returned to MSD within two (2) business
days following any request by MSD.
MESO SCALE DISCOVERY, MESO SCALE DIAGNOSTICS, MSD, DISCOVERY WORKBENCH, MULTI-ARRAY, MULTI-SPOT,
QUICKPLEX, SECTOR, SECTOR PR, SECTOR HTS, SULFO-TAG, V-PLEX, STREPTAVIDIN GOLD, MESO, www.mesoscale.com,
SMALL SPOT (design), 96 WELL 1, 4, 7, & 10-SPOT (designs), 384 WELL 1 & 4-SPOT (designs), MSD (design), and SPOT THE
DIFFERENCE are trademarks and/or service marks of Meso Scale Diagnostics, LLC. Unauthorized use of any MSD trademark or
service mark may be a violation of federal and state trademark laws and is strictly prohibited by Meso Scale Diagnostics, LLC.
All other trademarks or service marks are the property of their respective owners.
© 2013. Meso Scale Diagnostics, LLC. All rights reserved.
Manual Part Number: 3-1200-0B0007-J
November 2013
Printed in USA
Page 3

Table of Contents
Introduction .............................................................................................................................................................. 7
1.1 Intended Audience .......................................................................................................................................... 7
1.2 How to Use This Manual ................................................................................................................................. 7
1.3 Formatting Information ................................................................................................................................... 8
Important Information .............................................................................................................................................. 10
2.1 General Operation ........................................................................................................................................ 10
2.2 Hazards ....................................................................................................................................................... 10
2.2.1 Electrical ....................................................................................................................................... 11
2.2.2 Chemical and Biological ................................................................................................................. 12
2.2.3 Visual ............................................................................................................................................ 12
2.2.4 Mechanical .................................................................................................................................... 13
2.2.5 ESD Sensitivity .............................................................................................................................. 13
2.2.6 Electromagnetic Interference and Susceptibility ............................................................................... 13
2.3 Software Compatibility ................................................................................................................................. 14
2.4 Decontamination Prior to Shipping or Servicing ............................................................................................ 14
System Description ................................................................................................................................................. 16
3.1 Intended Use ................................................................................................................................................ 16
3.2 Specifications Overview ................................................................................................................................ 16
3.3 Plate Compatibility ....................................................................................................................................... 16
3.4 System Components ..................................................................................................................................... 17
3.5 The SECTOR Imager ..................................................................................................................................... 17
3.5.1 CCD Camera and Telecentric Lens .................................................................................................. 18
3.5.2 Motion Control System .................................................................................................................. 19
3.5.3 Plate Barcode Readers .................................................................................................................... 19
3.5.4 MULTI-ARRAY Plate Input/Output Stacker ....................................................................................... 19
3.5.5 Stack Tubes ................................................................................................................................... 19
3.5.6 Single Plate Adaptor ...................................................................................................................... 20
3.5.7 Stacker Cover Plate ........................................................................................................................ 21
3.5.8 Status LEDs ................................................................................................................................... 21
3.5.9 Power Switch and Input/Output (I/O) Panel ...................................................................................... 22
3.5.10 Halt Button .................................................................................................................................... 23
3.6 Microsoft Windows-Compatible Workstations ................................................................................................ 24
3.7 MSD DISCOVERY WORKBENCH Software ..................................................................................................... 25
3.8 Operational Modes ....................................................................................................................................... 25
3.9 Image Readout ............................................................................................................................................. 25
3.10 SECTOR Imager Demonstration Test Plate ..................................................................................................... 26
3.11 Uninterruptible Power Supply ....................................................................................................................... 27
Installation ............................................................................................................................................................. 29
Quick Start ............................................................................................................................................................. 31
5.1 Start-up ....................................................................................................................................................... 31
5.2 Setup ........................................................................................................................................................... 33
5.3 Run ............................................................................................................................................................. 35
5.3.1 Operations ..................................................................................................................................... 35
5.4 Results ........................................................................................................................................................ 37
Using the SECTOR Imager ....................................................................................................................................... 39
1
2
3
4
5
6
Page 4

6.1 Single Plate Run .......................................................................................................................................... 39
6.2 Stack Run—Multiple Plates .......................................................................................................................... 39
6.2.1 Loading the Stack Tube .................................................................................................................. 39
6.2.2 Unloading the Stack Tube ............................................................................................................... 41
6.3 Robotics Integration ..................................................................................................................................... 41
Maintenance ........................................................................................................................................................... 43
7.1 Preventive Maintenance ................................................................................................................................ 43
7.2 Instrument Cleaning ..................................................................................................................................... 43
7.2.1 Adapter and Stack Tube Cleaning .................................................................................................... 43
7.3 Instrument Decontamination ......................................................................................................................... 44
Appendix ................................................................................................................................................................ 46
8.1 Troubleshooting Guide ................................................................................................................................. 46
8.2 Specifications .............................................................................................................................................. 50
8.2.1 SECTOR Imager ............................................................................................................................. 50
8.2.2 Scientific Performance ................................................................................................................... 50
8.2.3 Environmental Specifications .......................................................................................................... 50
8.2.4 Power Requirements ...................................................................................................................... 50
8.2.5 SECTOR Imager Physical Dimensions ............................................................................................. 51
8.2.6 Plate Standard Read Volume (per Well) ........................................................................................... 51
8.2.7 Custom Bar Code Compatibility* .................................................................................................... 51
8.2.8 Plate Specifications ........................................................................................................................ 51
8.3 Regulatory and Safety Certifications .............................................................................................................. 51
8.3.1 WEEE Compliance .......................................................................................................................... 52
8.4 Symbols and Labels ..................................................................................................................................... 53
Technical Support ................................................................................................................................................... 55
9.1 Bug Reports and Suggestions ....................................................................................................................... 55
9.2 Problems Running SECTOR Imagers ............................................................................................................. 55
9.3 How to Contact Us ....................................................................................................................................... 55
Figure 2:1 SECTOR Imager electrical hazards. SECTOR Imager 6000 shown. ..................................................................... 11
Figure 3:1 SECTOR Imager system. SECTOR Imager 6000 shown. .................................................................................... 17
Figure 3:2 SECTOR 6000 Imager components .................................................................................................................. 18
Figure 3:3 Input (right) stacker interface plate .................................................................................................................. 20
Figure 3:4 Fully loaded standard and high capacity stack tubes ........................................................................................ 20
Figure 3:5 SECTOR Imager plate in single plate adaptor ................................................................................................... 21
Figure 3:6 SECTOR Imager status LEDs ........................................................................................................................... 22
Figure 3:7 Power switch and I/O panel. SECTOR Imager 6000 (model 1200) shown. .......................................................... 23
Figure 3:8 SECTOR Imager halt button ............................................................................................................................ 24
Figure 3:9 Cable attachment locations for SECTOR Imager 2400/2400A ............................................................................ 24
Figure 3:10 The SECTOR 6000 reads 96-well plates in six sectors .................................................................................... 25
Figure 3:11 The SECTOR 2400/2400A reads 96-well plates in 24 sectors .......................................................................... 26
Figure 3:12 SECTOR Imager 6000 Demonstration Test Plate ............................................................................................. 26
Figure 3:13 Loading a SECTOR Imager demonstration plate ............................................................................................. 27
Figure 5:1 Instrument Status window............................................................................................................................... 31
Figure 5:2 MSD DISCOVERY WORKBENCH desktop icon ................................................................................................. 32
7
8
9
List of Figures
iv
Page 5

Figure 5:3 SECTOR Imager icon ...................................................................................................................................... 32
Figure 5:4: MSD DISCOVERY WORKBENCH splash screen ............................................................................................... 33
Figure 5:5 SECTOR Imager Window: Setup, Plate Summary, and Operations areas ............................................................ 34
Figure 5:6 Stacker cover over the output port with empty single plate adapter in the input port ........................................... 34
Figure 5:7 SECTOR Imager demonstration plate in the single plate adaptor ....................................................................... 35
Figure 5:8 SECTOR Imager window, Run Options dialog box ............................................................................................ 36
Figure 5:9 Demonstration plate results, Color Map layer .................................................................................................. 37
Figure 6:1 Loading MULTI-ARRAY plates into stack tube ................................................................................................. 40
Table 3:1 Stack tube plate capacities ............................................................................................................................... 19
Table 8:1: Troubleshooting guide .................................................................................................................................... 46
Table 8:2 Scientific performance ..................................................................................................................................... 50
Table 8:3 Symbols and labels ......................................................................................................................................... 53
List of Tables
v
Page 6

1
Introduction
6
Page 7

www.mesoscale.com
Introduction 1
MESO SCALE DISCOVERY® (MSD) develops, manufactures, and markets biological assays that provide cost-effective and valuable
information to scientists in drug discovery, therapeutic screening, and life science research. MSD's product portfolio is based on
MULTI-ARRAY
exceptional sensitivity, speed, dynamic range, and convenience.
MSD
develops, manufactures, and markets detection instrument systems as well as a line of assay kits for use with these instruments,
a proprietary line of reagents, and custom microplate printing and assay development services. MSD MULTI-ARRAY microplates are
available in 96-, 384-, and 1536-well formats with standard or high-binding surfaces. MSD plates may be purchased uncoated or
coated with proteins such as streptavidin or avidin, with anti-species antibodies such as goat anti-mouse or goat anti-rabbit, or with
antibodies against specific analytes. Custom coatings and surface treatments are available.
MSD MULTI-ARRAY plates are available as single spot (single assay) plates and as MULTI-SPOT
each well. MULTI-SPOT plates measure multiple analytes simultaneously in a single well, increasing throughput and enabling novel
assay panels.
®
technology, a proprietary combination of patterned arrays and electrochemiluminescence detection that results in
®
plates with patterned spot arrays in
For more details and information about applications, please visit the MSD website at
.
1.1 Intended Audience
This manual is for all users of the SECTOR Imagers. Users should understand general computer and Microsoft® Windows terminology,
and be familiar with standard laboratory practices. The intended users of the SECTOR Imagers are those conducting research in the life
sciences.
The SECTOR Imager 2400/2400A and SECTOR Imager 6000 share many features. Throughout this manual, the reader should assume
that a feature is common to all instruments unless otherwise noted. This manual describes how to operate SECTOR Imagers and
acquire data. The analysis of this data is treated in a separate manual: DISCOVERY WORKBENCH
®
User Guide.
1.2 How to Use This Manual
This publication is intended as reference and instruction for users of MSD SECTOR Imager 6000 (models 1200 and 1201) and
SECTOR Imager 2400/2400A (models 1250/1251). These instruments are designed to read MSD MULTI-ARRAY and MULTI-SPOT
plates.
This manual is divided into chapters containing main topics and subsections. Use the hyperlinked Table of Contents to find topics of
interest quickly. The List of Figures and List of Tables hyperlink to the images and tables that enhance understanding of written
information in this manual. The Appendix contains supplemental information on troubleshooting, instrument specifications, safety
symbols, regulatory information, and labels.
The term SECTOR Imager will be used to describe the SECTOR Imager 2400/2400A and the SECTOR Imager 6000 when the feature
being described is substantially the same. Differences between SECTOR Imagers will be described explicitly where appropriate.
Introduction 7
Page 8
Tips
Notes
Warnings and Caution Symbols
WARNING
Symbol
Explanation
CAUTION
CAUTION:
Symbol
Tips provide extra information or details that help users perform functions more efficiently.
Notes provide supplemental information on the proper use of the SECTOR Imager and its software.
General warnings advise operators of potential hazards and highlight the procedures or information necessary to avoid personal injury
during use of the SECTOR Imager.
A caution note highlights procedures or information necessary to avoid damage to equipment, corruption of software, loss of data, or
invalid test results.
instructions in this publication may result in damage to the product, injury to operating personnel or poor instrument
performance
Risk exists for a mechanical, chemical, or safety hazard
Risk exists for an electrical hazard
Carefully read and understand all information in this document. Failure to read, understand, and follow the
1.3 Formatting Information
This guide uses the following formatting conventions:
Internal hyperlinks are formatted bold/gray. Click to jump instantly to the referenced section or figure.
Clickstreams are indicated with arrows and always start with a top-level menu item: Select Tools Plate Data
History.
Information to be entered by the user is shown in italics: Enter 5.
Information that the user chooses based on what is displayed is bracketed: Double-click <experiment name>
When referring to a term as it appears in the software, we capitalize it exactly as it is capitalized on-screen: Select
Read from Bar Code from the Plate Type menu.
Introduction 8
Page 9

2
Important Information
9
Page 10
Important Information 2
WARNING:
CAUTION:
CAUTION:
CAUTION:
CAUTION:
CAUTION:
not
CAUTION:
NOTE:
8.2.3 Environmental Specifications
CAUTION:
not
CAUTION:
CAUTION:
2.1 General Operation
The SECTOR Imagers are designed to run 24 hours a day. Once initialized, the SECTOR Imager enters standby mode when plates are
not running. Standby maintains the CCD detector temperature. The SECTOR Imager requires no additional initialization when left in
standby mode.
in this manual, the protection provided by the equipment may be impaired.
Specifically, updating aspects of the operating system or installing any software that changes parameters of the computer
environment could interfere with proper operation of the instrument software.
software on the SECTOR Imager computer system could cause conflicts with the operation of the instrument software.
instrument operation. It is suggested that any virus checking software run on the instrument be configured to minimize the
scanning of newly generated files while the instrument is operating.
system power features that disable USB communication, such as Hibernate, will cause the system to stop responding and
requires a power off/on cycle of the instrument and PC to restore function.
The instrument can only be operated with all covers in place. If the unit is operated in any manner not specified
Installation of additional software on the computer system used to operate the SECTOR Imager is not supported.
Running screen-savers, automated maintenance software, network-security software, and other possible
The instrument generates files when running. Virus scanning on the instrument computer can interfere with
Use of other applications while plates are being read may interfere with system performance. Use of operating
error may also occur if a plate is being read when the time is automatically changed from standard to daylight savings time or
vice versa.
The SECTOR Imager should be operated in a dust-free environment with an ambient temperature between 20–26oC, and
humidity levels between 10–80% (non-condensing). Environments or locations with high levels of vibration should be avoided.
See Section
cooling vents and the CCD camera tower cooling vents on the SECTOR Imager are
the instrumentation or cause injuries. Avoid handling or storing infectious or radioactive materials near the SECTOR Imager.
Additional USB devices may
Changes to the computer clock can cause a system error if the changes are made during a plate read. A system
Keep the SECTOR Imager away from direct sources of heat or cold and direct sunlight. Ensure that the rear
Do not place any objects, materials, or liquid containers on top of the SECTOR Imager.
Falling objects or splashing liquids, including chemically reactive or infectious reagents, can cause damage to
be connected to the SECTOR Imager computer system.
for complete environmental specifications.
blocked.
2.2 Hazards
This section contains notices and warnings that should be read carefully. Before working with the SECTOR Imager, become familiar
with all safety precautions and regulations concerning the handling of materials and the instrument’s electrical and mechanical
components.
Important Information 10
Page 11
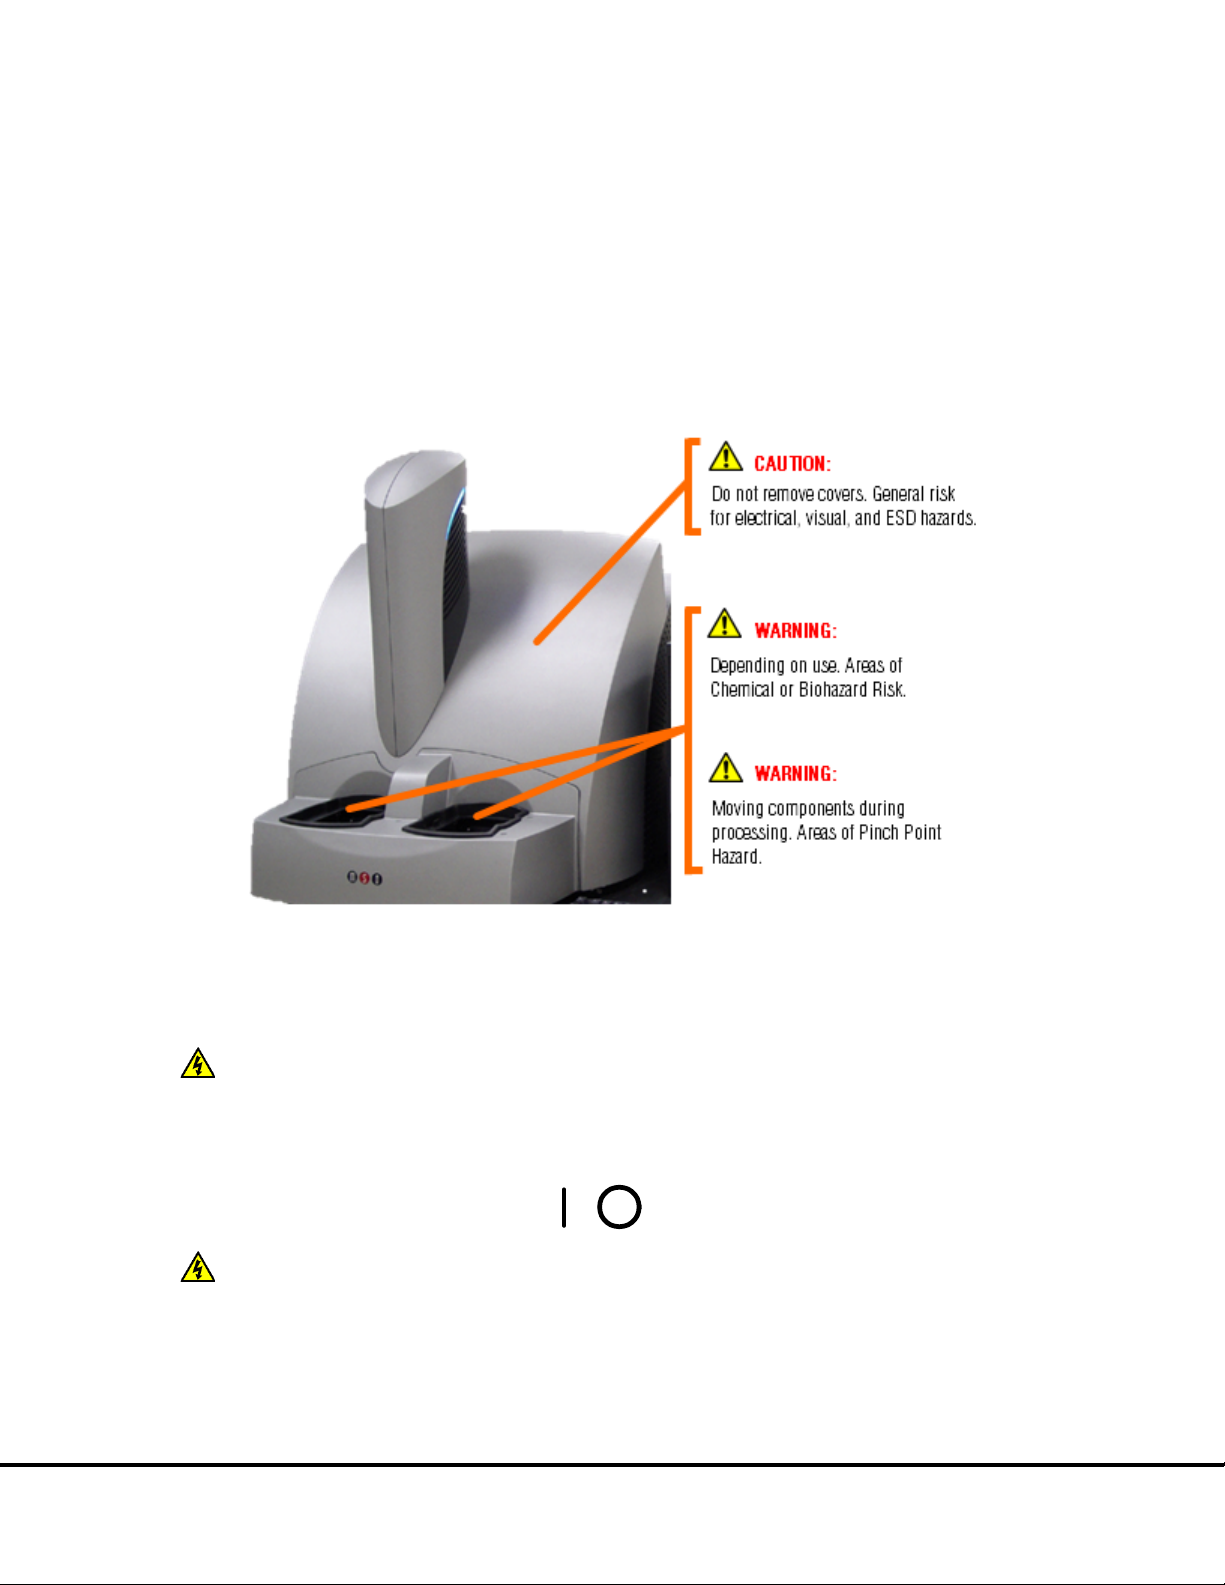
Operating this device in a manner not specified by MESO SCALE DISCOVERY may impair the electrical and thermal protection
Figure 2:1 SECTOR Imager electrical hazards. SECTOR Imager 6000 shown.
WARNING:
Instrument Service
WARNING:
Instrument Service
provided by the equipment.
As with most laboratory instruments, the SECTOR Imager presents certain hazards for users. We have identified five key types of
hazards:
• Electrical
• Chemical and biological
• Visual
• Mechanical
• ESD sensitivity
2.2.1 Electrical
Do not attempt to open the instrument cover and work with any electronic elements. An electrical shock may occur. The SECTOR
Imager was designed and tested in compliance with appropriate electrical safety standards.
IMAGER. Please contact MSD
When the power switch is in the off position, all internal electrical circuits are disconnected from both the live and neutral lines of the
electrical power source.
should power down the instrument and disconnect the SECTOR Imager power cable from the wall socket prior to cleaning near
moving parts. For significant spills or liquid intrusion into the instrument enclosure (e.g. resulting from a fire protection water
sprinkler), contact MSD
The SECTOR Imager should not be operated in hazardous atmospheres, as defined by the National Fire Protection Association, the
National Electric Code, and International Standards.
The SECTOR Imager contains AC voltages. DO NOT ATTEMPT TO SERVICE OR REPAIR THE SECTOR
For best performance, remove any sample or reagent spillage from the instrument. For safety, the operator
for all service and repair, including electrical problems.
On Off
.
Important Information 11
Page 12
Although the SECTOR Imager is shielded and grounded, laboratory personnel should never remove any instrument covers that would
NOTE:
strongly
CAUTION:
CAUTION:
Scientific and Technical Support
WARNING:
WARNING:
WARNING:
expose electrical circuits. Only authorized MSD Service personnel should perform repairs to the interior of the SECTOR Imager.
We
Laboratory Standards Institute (CLSI) document entitled GP17-A2, Clinical Laboratory Safety; Approved Guideline, Section 19,
Instrument Testing.
tests should be documented. New or incoming equipment should also undergo electrical safety checks before use. Power cords
should be inspected annually for integrity.
prong adaptor disconnects utility ground, creating a shock hazard. Always connect the system power cord directly to a threeprong receptacle with a functional ground.
recommend that users of laboratory instruments (such as the SECTOR Imager) follow the Clinical and
Grounding and polarity checks should be conducted on all electrical outlets annually, and the results of these
Do not use a two-prong plug or extension cord to connect primary power to the SECTOR Imager. Use of a two-
2.2.2 Chemical and Biological
Users are responsible for taking all necessary precautions against hazards associated with the use of laboratory chemicals. Running
assays on the SECTOR Imager may involve the use of potent chemicals—such as bases and solvents, cleaning and disinfection
agents, and assay reagents. Such chemicals should be independently evaluated for chemical or biological hazards.
Laboratory regulations and good laboratory practices concerning the use of such chemicals should be followed at all times. Use
personal protective equipment recommended by your facility when handling any of these reagents.
Product labels, package inserts and product information sheets with specific usage recommendations are provided for all plates and
reagents used with the SECTOR Imager. Contact MSD
for MSD plates and reagents.
to obtain material safety data sheets (MSDS)
Samples, user reagents, or controls used in assays may be infectious or biohazardous. By working with these materials, users may be
exposed to biological hazards. Laboratory regulations concerning the handling of potentially infectious material should be followed at
all times.
Users should avoid breathing reagent fumes or aerosols. Gloves and goggles should be worn when disposing of used plates. If skin
comes in contact with reagents, rinse the exposed area with water immediately and follow appropriate safety protocols as determined
by your facility. Dispose of used plates according to federal, state, and local regulations.
hazardous reagents.
personal protective equipment and good laboratory practices are strongly suggested when working in these areas.
Wear gloves. Avoid skin contact and inhalation when handling plates that contain or have been exposed to
The stacker input and output locations are considered susceptible to contamination during normal use. Use of
2.2.3 Visual
Older versions of the SECTOR Imager 6000 with last 3-digits of serial #’s below 198, and the SECTOR Imager 2400 with last 3-digits
of serial #’s below 109 have a scanning bar code reader with a class 2 Laser. Although the laser beam is not visible during normal
operation, personnel may be exposed if operating the SECTOR Imager with the light-tight door open or with the covers removed. Laser
output power is 1.0 mW maximum. Newer SECTOR Imagers use light emitting diodes (LEDs) to read bar codes.
personnel.
DO NOT STARE INTO THE BEAM. The laser is only directly viewable and accessible by qualified service
Important Information 12
Page 13
WARNING:
WARNING:
Instrument Service
WARNING:
CAUTION:
WARNING:
Figure 3:5
Figure 3:4
Figure 3:5
CAUTION:
hazardous radiation exposure.
Use of controls, or adjustment or performance of procedures other than those specified herein, may result in
2.2.4 Mechanical
kg). Be careful to use proper technique when lifting it to minimize the risk of injury. Two or more people should lift from beneath
the instrument. Please contact MSD
instrument while it is in operation. Do not place fingers in stack tubes or the plate carrier when the instrument is in operation.
Labels are affixed to the stack tube platforms indicating a pinch hazard.
The SECTOR Imager 6000 weighs 150 lbs (68 kg) and the SECTOR Imager 2400/2400A weighs 140 lbs (64
The SECTOR Imager presents potential mechanical hazards. To avoid injury, do not touch any part of the
before attempting to move the instrument.
movement.
mechanical force. As with any mechanical instrument, you should take certain precautions when operating the SECTOR Imager:
• Do not wear loose garments or jewelry that could catch in moving mechanisms.
• Operate the instrument with the cover intact.
• Keep hands away from pathways of moving parts during operation.
• Do not attempt mechanical repair.
• Do not bump into or lean on the SECTOR Imager, or place any objects on top of it.
• Never operate the instrument unless both stacker ports contain a single plate adaptor (
When using robotic plate loaders (robots), ensure that there is nothing present that will obstruct robot
Moving parts of the SECTOR Imager can be damaged or become misaligned when exposed to strong
(
), or the stacker cover plate (
).
), a stack tube
2.2.5 ESD Sensitivity
The SECTOR Imager has been tested for electrostatic discharge (ESD) sensitivity and complies with the applicable international
standards. Standard installation precautions should be taken when stationing the instrument for regular use. Like many instruments of
its kind, the SECTOR Imager is sensitive to static discharge in excess of 4.0 kV. In typical laboratory environments, electrostatic
discharge should not be a problem.
2.2.6 Electromagnetic Interference and Susceptibility
This equipment has been tested and found to comply with the limits for a Class A digital device, pursuant to Part 15 of FCC rules.
These limits are designed to provide reasonable protection against harmful interference when the equipment is operated in a
commercial environment. The equipment generates, uses, and can radiate radio frequency energy and, if not installed and used in
accordance with the instruction manual, may cause interference, in which case users will be required to correct the interference at their
own expense.
Changes or modifications not expressly approved by MSD may void the warranty. The operator shall use any special accessories
provided with the equipment such as the power supply or shielded cables that are necessary for compliance with FCC standards.
controlled electromagnetic environment. Transmitters of RF energy such as mobile (cellular) telephones should not be used in
close proximity.
SECTOR Imager 6000 and SECTOR Imager 2400/2400A instruments have been tested for operation in a
Important Information 13
Page 14

CAUTION:
Scientific and Technical Support
Instrument Service
WARNING:
electrical circuit. This may be accomplished using an uninterruptible power supply (UPS), power strip of proper electrical rating,
or by verifying the power wall outlets. If one of these is not possible, a ground strap should be used to connect the instrument
chassis to the computer chassis. Please contact MSD
assistance.
To avoid interference from voltage transients, the computer and instrument should be powered by the same
if you have questions or need
2.3 Software Compatibility
The Microsoft Windows® Update service can affect the operation of the instrument software. When running, the update application can
turn off the database services upon which the instrument relies, causing errors and stopping instrument operation. Updates should not
be run during instrument use. Run manually or schedule Windows updates when you are sure that the instrument will not be in use.
Occasionally, Windows Update does not restart the database server after it runs. This will cause the instrument software to run
incorrectly. Restarting the computer will restart the database service and restore the instrument to full operation.
The SECTOR Imager system has not been tested for compatibility with all programs. Installation of additional applications, such as
anti-virus and security programs may interfere with function.
2.4 Decontamination Prior to Shipping or Servicing
The SECTOR Imager may have been used to analyze infectious materials or in an environment where infectious materials were
handled. For the protection of future users and service personnel, please follow site safety procedures and the directions of the site
safety officer to disinfect the SECTOR Imager before shipping or service. Please contact MSD
for details.
requirements for the SECTOR Imager before shipping or service.
Follow site safety procedures and the directions of the site safety officer to determine decontamination
Important Information 14
Page 15

3
System Description
15
Page 16

System Description 3
3.1 Intended Use
The SECTOR Imager 6000 and SECTOR Imager 2400/2400A are for research use only. The instruments are not for use in diagnostic
procedures.
3.2 Specifications Overview
The SECTOR Imager offers high sensitivity and six logs of dynamic range. The SECTOR Imager 6000 reads plates at a rate of
approximately 70 seconds per plate. The SECTOR Imager 2400/2400A reads plates at a rate of approximately 3 ½ minutes per plate.
Using MSD DISCOVERY WORKBENCH software, all models provide the capability to interact with a third party external robotic
controller.
3.3 Plate Compatibility
The SECTOR Imager 2400A is compatible with:
• 96-well MULTI-ARRAY plates
• 96-well, 4-, 7-, and 10-spot MULTI-SPOT plates
The SECTOR Imager 2400 is compatible with:
• 96- and 384-well MULTI-ARRAY plates
• 96-well, 4-, 7-, and 10-spot MULTI-SPOT plates
The SECTOR Imager 6000 is compatible with:
• 96- and 384-well MULTI-ARRAY plates
• 96-well, 4-, 7-, and 10-spot MULTI-SPOT plates
• 384-well, 4-spot MULTI-SPOT plates
• 1536-well MULTI-ARRAY plates
MULTI-ARRAY and MULTI-SPOT plates are designed to be read only once and may not be reused.
®
SECTOR Imagers cannot read plates designed for the SECTOR PR
instruments.
System Description 16
Page 17
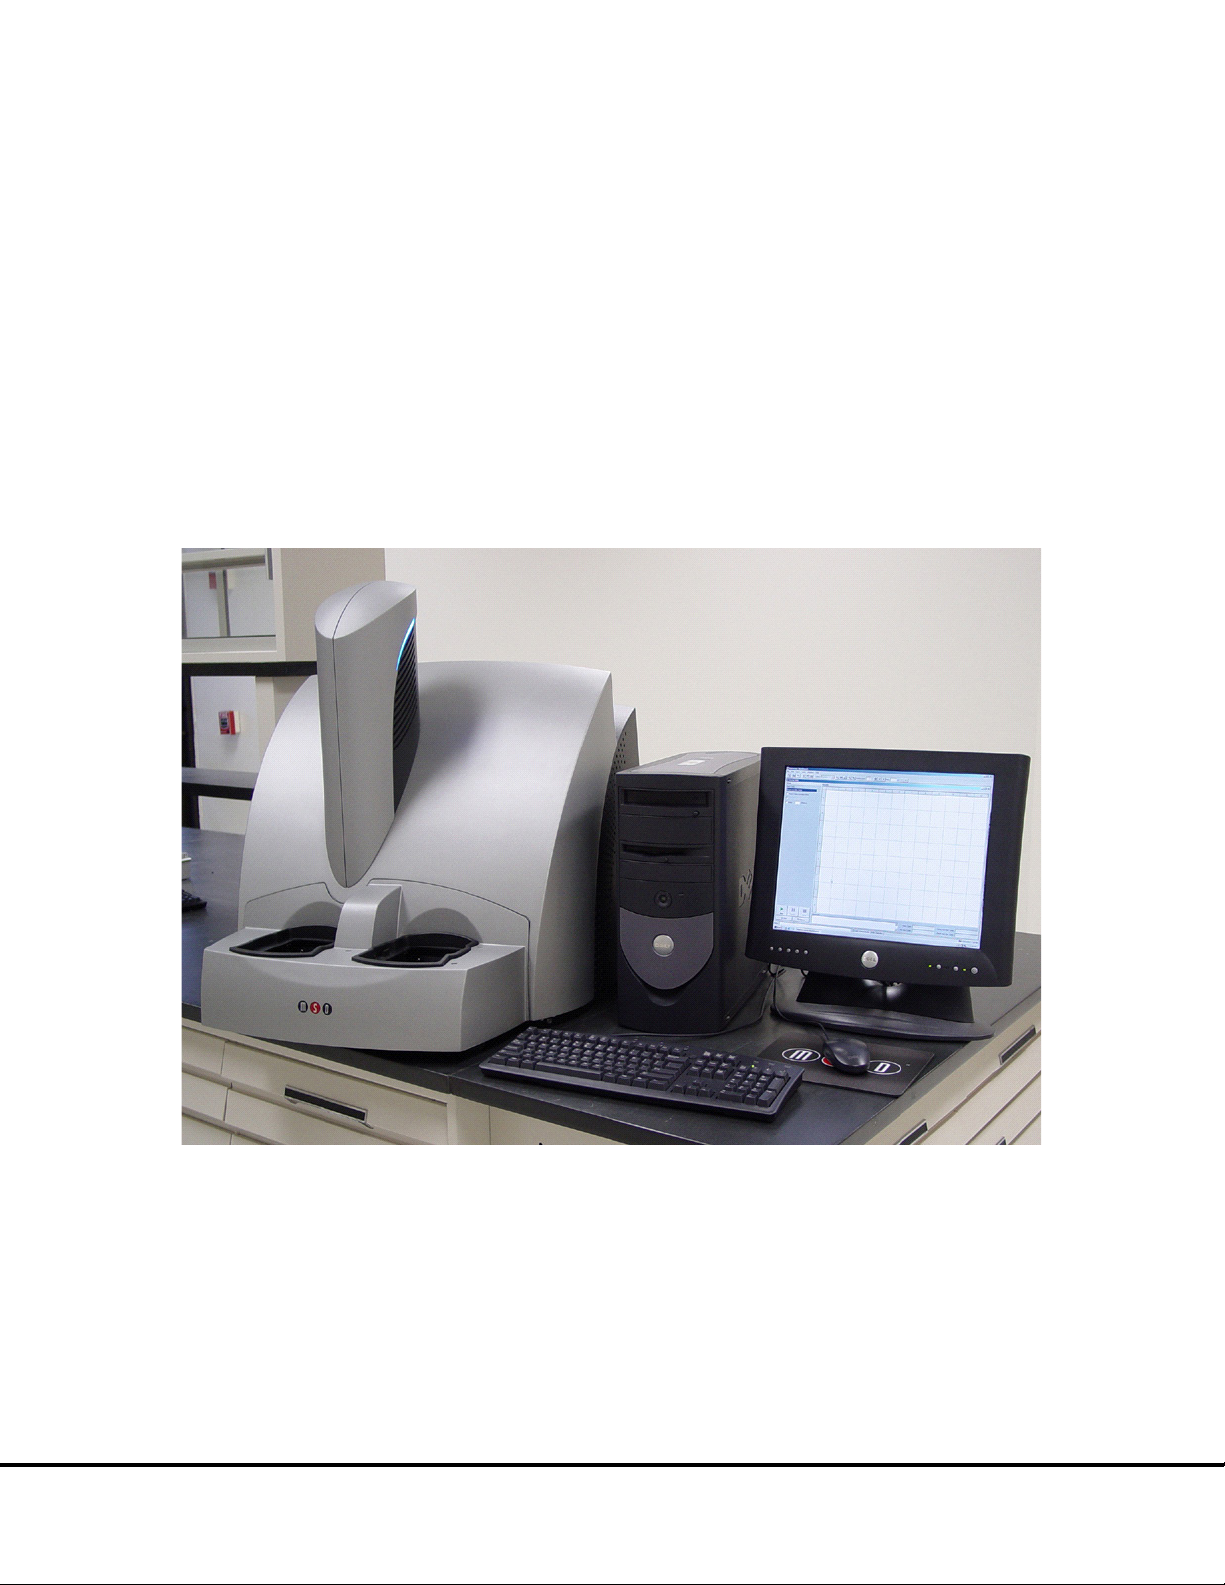
3.4 System Components
Figure 3:1
Figure 3:1 SECTOR Imager system. SECTOR Imager 6000 shown.
Figure 3:2
A standard SECTOR Imager system consists of the following (
• SECTOR Imager instrument
• Microsoft Windows-compatible workstation
• MSD DISCOVERY WORKBENCH software
• SECTOR Imager demonstration plate
• Cables (SECTOR Imager 6000 [model 1200] and SECTOR Imager 2400/2400A [models 1250/1251]): power, RS-232, USB,
and camera serial cable
• Cables (SECTOR Imager 6000 [model 1201]): power and USB
• Uninterruptible power supply (UPS)
• SECTOR Imager 2400 and 6000 Instrument Manual
• DISCOVERY WORKBENCH User Guide
):
3.5 The SECTOR Imager
The main components of the SECTOR Imager include (
• CCD camera and telecentric lens
• Motion control system
• Plate barcode readers (short and long side)
• Integrated MULTI-ARRAY plate input/output stack
):
System Description 17
Page 18
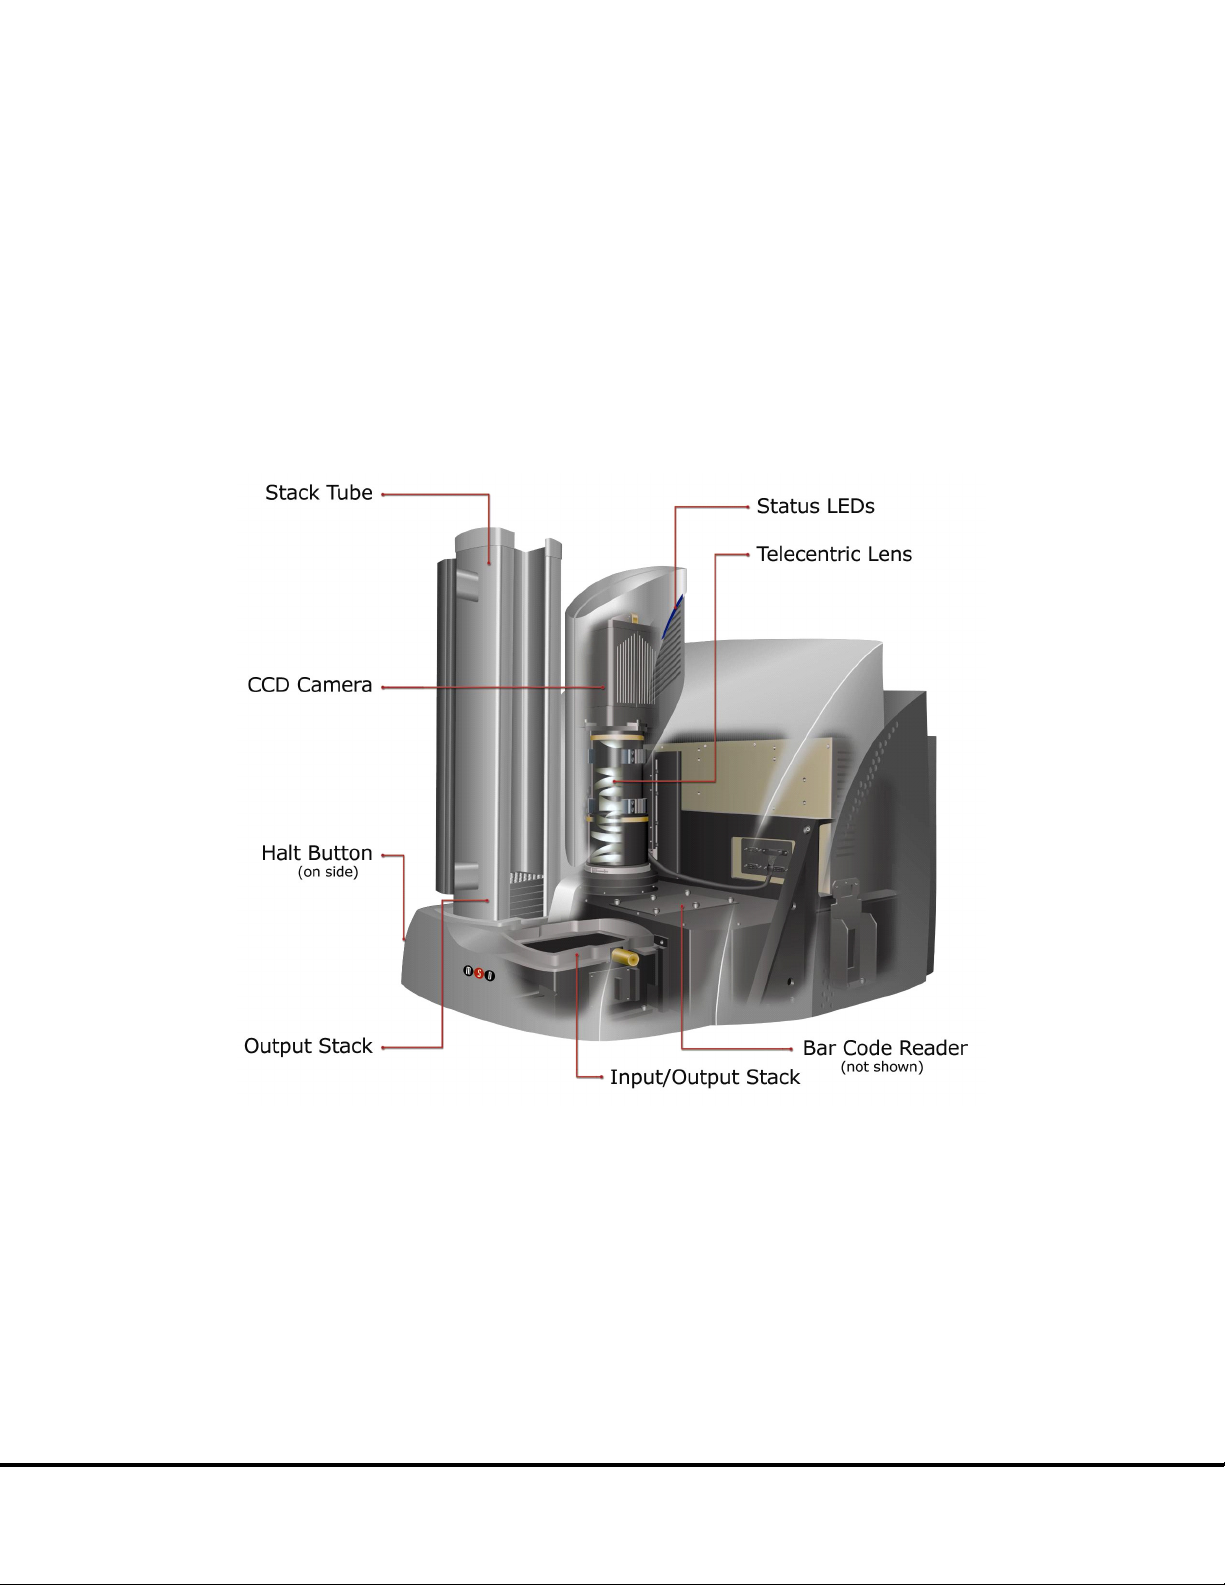
• Stack tubes (2, standard capacity)
NOTE:
not
Figure 3:2 SECTOR 6000 Imager components
NOTE:
• Single plate adaptor (1, not shown)
• One stacker cover plate (1, not shown)
• Instrument status LEDs
• Power switch and I/O panel (not shown)
• Halt button
The stacker cover plate comes preinstalled on the SECTOR Imager 2400A. This model does
include) stack tubes or the output stacker mechanism.
Additional stack tubes, single plate adaptors, and stacker cover plates may be purchased from MSD.
use (and does not
The SECTOR Imager 2400/2400A employs a different CCD camera and a different custom lens optimized to read
MULTI-ARRAY plates in 24 sectors (not shown).
3.5.1 CCD Camera and Telecentric Lens
Each SECTOR Imager uses a sensitive, high-resolution CCD camera and lens system to detect light emitted from MULTI-ARRAY
plates. The SECTOR Imager 2400/2400A reads plates using 24 sectors or segments. The SECTOR Imager 6000 reads plates using 6
sectors or segments, yielding higher throughput.
Once the instrument is turned on and the software is started, it takes approximately 45 to 60 minutes for the CCD chip to reach and
stabilize at its normal operating temperature of –35 ±1°C (SECTOR Imager 6000) or -25 ±1°C (SECTOR Imager 2400/2400A). The
telecentric lens of both SECTOR Imagers provides high efficiency and uniform collection of light from MULTI-ARRAY plates.
System Description 18
Page 19

3.5.2 Motion Control System
6 Using the SECTOR Imager
Code 39
Code 128
Scientific and Technical Support
WARNING:
Note:
Table 3:1
Figure 3:3
Figure 3:4
Table 3:1
Table 3:1 Stack tube plate capacities
Stack Tube
Plate Type
Capacity
Standard
Standard (
Extended
Extended
The SECTOR Imager uses a precision mechanism for transporting MULTI-ARRAY plates from the input stacker, into the CCD
detector’s viewing area, and back to either the input or output stacker, depending on selections in the DISCOVERY WORKBENCH
Software. (See Section
) for more information on reading a plate.)
3.5.3 Plate Barcode Readers
The SECTOR Imager’s two barcode readers read the barcode(s) on the MULTI-ARRAY plates. The MULTI-ARRAY plates come with an
MSD barcode label that uniquely identifies the plate and allows the SECTOR Imager to detect the type of plate being run.
If desired, the user may apply a custom barcode label either on the same side of the plate as the MSD barcode or on one of the short
sides of the plate. The custom barcode label should be applied at the same height as the MSD barcode label. The custom barcode
must be of one of the following formats:
To enable custom bar codes, when the SECTOR Imager reader window is open, go to Tools Instrument Configuration. Select
Enable Long-side Custom Bar Code Reader and/or Enable Short-side Custom Bar Code Reader.
or
.
Please contact MSD
for additional information regarding the use of custom barcodes on MSD
MULTI-ARRAY plates.
3.5.4 MULTI-ARRAY Plate Input/Output Stacker
SECTOR Imagers 6000 and 2400 include an integrated mechanism to manipulate multiple MULTI-ARRAY plates arranged vertically
(referred to as the “stacker”). The stacker will automatically pull plates from the input (right) side and eject them into the output (left)
side. The stacker may be used with two single plate adaptors or two stack tubes or one of each. Stacker cover plates or single plate
adaptors containing an empty plate should be used over the stacker interface plates whenever the machine is not in use.
When running single plates, the input (right) stacker interface plate can act as both input and output ports. For safety, place a stacker
cover plate over the left stacker interface plate when not in use.
The stacker contains components that may move at any time. Users
of the SECTOR Imager should never place their fingers into the stacker for any reason
unless the instrument is powered off.
The SECTOR Imager 2400A is not equipped with an output stacker mechanism and
does not use stack tubes. All plates are returned to the input port after reading.
3.5.5 Stack Tubes
MSD offers standard-capacity (standard) and high capacity (extended) stack tubes (
SECTOR Imager 2400. When using stack tubes, ensure that the stack tube is fully seated on the stacker interface plate (
The standard tubes are provided with the SECTOR Imager 6000 and SECTOR Imager 2400, and both standard and extended tubes are
separately available for purchase (
).
) for both the SECTOR Imager 6000 and
).
Lists the capacity of MSD stack tubes for each plate type.
(Standard Capacity) 96-well MULTI-ARRAY 20 plates
Standard Capacity) 384-well MULTI-ARRAY 30 plates
(High Capacity)
(High Capacity)
384-well MULTI-ARRAY 75 plates
96-well MULTI-ARRAY 50 plates
System Description 19
Page 20

Figure 3:3 Input (right) stacker interface plate
Figure 3:4 Fully loaded standard and high capacity stack tubes
Figure 3:5
3.5.6 Single Plate Adaptor
The SECTOR Imager reads single plates placed manually into the single plate adaptor. When inserting the single plate adaptor into the
stacker, ensure that the single plate adaptor is fully seated on the stacker interface plate.
single plate properly loaded in the single plate adaptor. The single plate adaptor may also be used with laboratory robotics.
(right side of image) shows a
System Description 20
Page 21

3.5.7 Stacker Cover Plate
Figure 3:5
Figure 3:5 SECTOR Imager plate in single plate adaptor
Figure 3:6
Steady blue:
Blinking blue:
Steady red:
The stacker cover plate (
return single plates to the input side. Both stacker interface plates should be covered when the machine is not in use.
The SECTOR Imager 2400A comes preconfigured to return plates to the input side. A stacker cover plate is preinstalled on the output
port.
left side of image) is used to cover the output (left) stacker interface when the machine is set to
A stacker cover plate should always be in place when no stack tube or single plate adaptor is present.
3.5.8 Status LEDs
The status LEDs built into the camera tower indicate the current operational mode of the SECTOR Imager (
•
•
•
Instrument is in standby mode
Instrument is currently reading a plate
Instrument is in fault mode or is waiting for the addition of plates
).
System Description 21
Page 22

Figure 3:6 SECTOR Imager status LEDs
Figure 3:7
NOTE:
3.5.9 Power Switch and Input/Output (I/O) Panel
The I/O panel of the SECTOR Imager, located on the rear right side of the SECTOR Imager, includes the instrument’s power switch,
power entry module, and connectors for USB, RS-232, camera serial communications, and robotic halt activation cables (
The instrument can be powered-on and off via the power switch. Typically, the instrument should be left powered-on to maintain
camera temperature.
Only use the communications cables supplied with the SECTOR Imager. Use of cables other than those supplied may
degrade instrument performance.
A halt connector is present in order to add an external switch that will de-energize the motion control system. The SECTOR Imager
connector receptacle is Hirose Electric Co Ltd HRS, Part #SR30-10R-4S. The mating connector is Hirose Part #SR30-10PE-4P, SR3010PM-4P, or SR30-10PQ-4P.
).
System Description 22
Page 23

Figure 3:7 Power switch and I/O panel. SECTOR Imager 6000 (model 1200) shown.
Figure 3:8
NOTE:
must
Scientific and Technical Support
3.5.10 Halt Button
The halt button (
SECTOR Imager abruptly. This button immediately de-energizes the main motion control components in the instrument. However, the
remaining electronic components of the instrument remain powered and still pose a shock hazard.
pressed again before the motion system and software will function. For SECTOR Imager 6000 model 1200 and SECTOR Imager
2400/2400A, the halt switch is a momentary switch, so this not a concern.
The halt function can also be accessed through the rear I/O panel to enable external safety devices to halt the motion of the SECTOR
Imager. Please contact MSD
For SECTOR Imager 6000 model 1201, this switch is on/off. If it is pressed for any reason, all motion will halt. It
The halt switch should never be obstructed or restricted from access.
) is mounted on the front left side of the SECTOR Imager. It can be pressed to halt movement of the
for more information on this feature.
be
System Description 23
Page 24

Figure 3:8 SECTOR Imager halt button
3.7 MSD DISCOVERY WORKBENCH Software
Figure 3:9
Figure 3:9 Cable attachment locations for SECTOR Imager 2400/2400A
3.6 Microsoft Windows-Compatible Workstations
Computer workstations are configured by MSD for use with the SECTOR Imager and come preloaded with MSD DISCOVERY
WORKBENCH application software (
display, keyboard, and mouse. The instrument computer and its software are an integral part of the system and should only be
modified by a MSD service engineer.
). The workstation includes a personal computer,
I/O connections on the associated computer workstation are shown in
.
System Description 24
Page 25

3.7 MSD DISCOVERY WORKBENCH Software
The two-stack, stand-alone workstation mode
The one-position, single plate handling mode
The two-position, single plate handling mode
The single-plate loading and stack-unloading mode
6.3 Robotics Integration
Figure 3:10
Figure 3:11
Figure 3:10 The SECTOR 6000 reads 96-well plates in six sectors
1
2 3
4
5 6
DISCOVERY WORKBENCH is a Windows application that supports the operation of SECTOR Imagers, stores both current and
historical plate data, and analyzes and presents results. The application has several components: instrument modules, a secure
database (the Plate Data History), kit layouts, data integrity features, and data analysis functions. Please refer to the DISCOVERY
WORKBENCH User Guide for additional information.
3.8 Operational Modes
The SECTOR Imager can be configured as a stand-alone workstation or integrated into robotic systems using the single plate adaptor
provided. The single plate adaptor replaces the input stack tube and can serve as the load/unload location when using a robot for
loading plates or when loading a single plate manually.
SECTOR Imager 6000 and SECTOR Imager 2400 have four operational modes:
•
•
unloading single plates. The plate can be loaded either manually or by robotic plate handling equipment. In this mode, the
stacker cover plate should be placed over the interface for safety.
•
single plate adaptor on the output side for unloading.
•
stack tube on the output side for unloading.
SECTOR Imager 2400A operates exclusively in the one-position, single plate handling mode.
uses input and output stack tubes for loading and unloading.
uses the single plate adaptor in the input side for both loading and
uses a single plate adaptor on the input side for loading, and a second
uses the single plate adaptor on the input side for loading and a
See Section
for general information on robotic operational modes.
3.9 Image Readout
The SECTOR Imager uses a CCD camera to obtain images of the plate during detection. One advantage of imaging detection is that the
time required to read a plate is independent of the format of the plate (i.e., it is independent of the number of wells/plate or spots/well).
SECTOR Imagers read plates in sectors to improve sensitivity and optical detection efficiency. The SECTOR Imager 6000 reads plates
in 6 sectors at a rate of approximately 70 seconds per plate (
at a rate of approximately 3 ½ minutes per plate (
).
). The SECTOR Imager 2400/2400A reads plates in 24 sectors
System Description 25
Page 26
Figure 3:11 The SECTOR 2400/2400A reads 96-well plates in 24 sectors
1
2
3
4
5
6
7
8 9
10
11 12
13
14 15
16
17
18
19 20
21
22 23
24
Figure 3:12
Figure 3:12 SECTOR Imager 6000 Demonstration Test Plate
3.10 SECTOR Imager Demonstration Test Plate
Each SECTOR Imager is shipped with one demonstration plate. This demonstration plate verifies operation of the system and can be
used for operational qualification (OQ). It does not verify performance qualification (PQ) and is not to be used for calibration purposes.
It should be used to verify the function of the SECTOR Imager. The demonstration plate consists of an electronic circuit board housed
in a plastic carrier in the shape of a standard plate. The circuit board for the SECTOR Imager 6000 has six separate sectors, simulating
the structure of MSD MULTI-ARRAY plates (
SECTOR Imager 2400/2400A (not shown) uses a different electrode configuration designed to match the SECTOR Imager 2400/2400A.
) as read by the SECTOR Imager 6000. The demonstration plate for the
For the SECTOR Imager 6000, sectors 3 and 4 of the demonstration plate have LEDs that test the CCD camera in the SECTOR Imager.
The remaining four sectors of the plate contain known electronic components for testing the electrical functioning of the instrument
across its range of operation. The demonstration plate can be used without any chemical reagents, either to check instrument function
at the start of each day or as a tool for demonstrating the instrument and software to new users. The LEDs for the SECTOR Imager
2400/2400A demonstration plate are in sectors 5, 12, 14, and 19.
Store the demonstration plate in its custom case when not in use, and keep the demonstration plate clean and free of dust and debris.
System Description 26
Page 27
To use, place the demonstration plate in the single plate adaptor with the chamfered corners of the plate facing into the instrument
Figure 3:13
5 Quick Start
Figure 3:13 Loading a SECTOR Imager demonstration plate
NOTE:
strongly
(
for more details.
). This orientation ensures that the bar code reader can automatically read the bar code label. See Section
3.11 Uninterruptible Power Supply
The SECTOR Imager should be operated with an uninterruptible power supply (UPS) to ensure the integrity of data in the event of
power line transients.
The UPS required will depend on the standard operating voltage at your laboratory’s location. Please ensure that the proper UPS is
employed for the power conditions in your country and local area.
Although the SECTOR Imager has been tested and complies with applicable electrical standards, operation of the system
with a UPS is
encouraged for uninterrupted operation and protection from power line interference.
System Description 27
Page 28

4
Installation
28
Page 29

CAUTION:
CAUTION:
CAUTION:
Instrument Service
Installation 4
A qualified MSD service engineer must install and configure the SECTOR Imager before use. Installation includes setup, connection of
the instrument to its computer system, and verification that the instrument is functioning properly. Only the computer provided with the
instrument and configured by an MSD service engineer should be used to operate the SECTOR Imager.
Specifically, updating aspects of the operating system or installing any software that changes parameters of the computer
environment could interfere with proper operation of the instrument software.
other software on the SECTOR Imager computer could cause conflicts with the operation of the instrument software.
system power features that disable USB communication, such as Hibernate, will cause the system to stop responding; a power
off/on cycle of the instrument and PC is required to restore function.
Installation of additional software on the computer system used to operate the SECTOR Imager is not supported.
Running virus-checking software, screen-savers, maintenance software, network-security software, and possibly
Use of other applications while plates are being read may interfere with system performance. Use of operating
MSD
should be consulted prior to moving the instrument.
Installation 29
Page 30

5
Quick Start
30
Page 31
not
Figure 5:1
NOTE:
5.2 Setup
Figure 5:1 Instrument Status window
Quick Start 5
This chapter will guide you through running the SECTOR Imager demonstration plate and verifying that the instrument acquires data
and functions properly. Running the SECTOR Imager demonstration plate at the start of each day may be part of standard operation.
The SECTOR Imager has a cooled CCD camera that needs to be brought to operating temperature before plates are read. To initiate the
cooling process, the SECTOR Imager must be turned on, the MSD DISCOVERY WORKBENCH software must be started, and the
SECTOR Imager Tools must be running (see steps 1–4 below). Simply turning on the instrument will
If the instrument has been off, allow at least 45 to 60 minutes for the CCD camera to cool when restarting. Operating temperature,
either -25 ±1°C or -35 ±1°C for the SECTOR Imager 2400/2400A and SECTOR Imager 6000, respectively, must be reached before the
DISCOVERY WORKBENCH software will allow the processing of any plates.
initiate CCD camera cooling.
The Status window displays the temperature of the CCD camera while it is cooling (
operating temperature, the temperature indicator will disappear, indicating that the instrument is ready for use. (The status window is
accessible by selecting Tools from the menu bar in the DISCOVERY WORKBENCH software.)
If the SECTOR Imager has been idle, but has not been shut down (i.e., is in standby mode), then the CCD camera will
already be at the proper temperature, and users may skip to Section
.
). Once the CCD camera has reached its
5.1 Start-up
To start the system:
1. Turn on the SECTOR Imager and the computer connected to it. If a robot is connected, the startup sequence is SECTOR
Imager, then the robot, then the computer.
Quick Start 31
Page 32

2. Log on to the Windows operating system. To do this, enter Administrator as the user login name and MsdAdmin as the
Figure 5:2
Figure 5:2 MSD DISCOVERY WORKBENCH desktop icon
Figure 5:3
Figure 5:3 SECTOR Imager icon
Figure 5:4
password. (This is the default login shipped with the system; you may change this login/password or add additional
Windows user accounts.)
3. If DISCOVERY WORKBENCH does not start automatically, double-click the MSD DISCOVERY WORKBENCH icon on the
Windows desktop (
).
4. Click the
process.
The SECTOR Imager splash screen (
been powered-up, the cooling process will take approximately 45 to 60 minutes.
SECTOR Imager icon (
) on the toolbar to connect to the imager and initiate the CCD camera cooling
) will display while the instrument is initializing. If the instrument has just
Quick Start 32
Page 33

Figure 5:4: MSD DISCOVERY WORKBENCH splash screen
Figure
5:5
NOTE:
5.2 Setup
On the left side of the SECTOR Imager window, users can view and edit the Setup selections for the demonstration plate read (
).
1. Select Read from Bar Code from the Plate Type menu.
2. Select the Return Plates to Input Stack checkbox. If left unchecked, the demonstration plate will be placed in the output stack
on the left side of the SECTOR Imager after reading. Because the demonstration plate will be run as a single plate, it is most
convenient to return it to the input stack after processing.
It is very important to select Return Plates to Input Stack checkbox when the stacker cover plate is on the output
stack so that the SECTOR Imager will not attempt to place the plate into the covered interface at the end of the read. (The
SECTOR Imager 2400A has a cover plate permanently installed on the output stack and automatically returns plates to the
input side.)
3. Leave the Apply Kit Layout box unchecked. This option is covered in DISCOVERY WORKBENCH User Guide.
4. Select the Read __ Plate(s) checkbox and enter 1 in the text field.
Quick Start 33
Page 34

Figure 5:5 SECTOR Imager Window: Setup, Plate Summary, and Operations areas
Figure 5:6
Figure 5:6 Stacker cover over the output port with empty single plate adapter in the input port
Figure 5:7
5. Place the single plate adaptor on the input (right) stacker interface plate (
6. Load the SECTOR Imager demonstration plate into the single plate adaptor (
automatically identify the plate orientation and adjust the data acquisition and analysis accordingly.)
).
). (Sensors in the instrument will
Quick Start 34
Page 35

Figure 5:7 SECTOR Imager demonstration plate in the single plate adaptor
NOTE:
Scientific and Technical Support
Figure 5:8
5.2 Setup
Pause.
Stop.
Eject.
Retract.
If the SECTOR Imager is unable to read the barcode on the demonstration plate (or if no barcode label is present), the
plate will be skipped and ejected from the instrument. Please contact MSD
assistance.
for
5.3 Run
When the camera reaches proper operating temperature, the Instrument Log (click Show Log in the Status window) will indicate that
the temperature is locked. At that point, the instrument is ready.
Click Run in the SECTOR Imager window. The Run Options dialog window will open (
1. Verify Setup Selections. If changes are necessary, click Cancel, make changes in the area (
Imager window, and re-verify Setup Selections.
2. Run name is optional, but one can be entered in the second section.
3. Verify the Export information and make changes if necessary. (Refer to the DISCOVERY WORKBENCH User Guide for
additional details.) The export selections control the format and the location of the exported text data file that will be created
when the demonstration plate is read.
4. Click
OK. The plate read starts. View the status in the lower left region (Status bar) of the DISCOVERY WORKBENCH
software to monitor progress. When the plate read is complete, the demonstration plate is returned to the stacker and
enabled again.
5.3.1 Operations
The Pause, Stop, Eject, and Retract buttons operate the motion control system that moves plates through the instrument.
•
Pauses the plate read. Selecting Pause again resumes the read.
•
Stops the current run and ejects any plate inside the instrument.
•
Transfers a plate from inside the instrument (but not being read) to the stacker output port where it may be retrieved.
This function is disabled during a plate run.
).
) of the SECTOR
Run is
•
Moves a plate from the input port into the instrument. No further action is taken without input from the operator.
This function is disabled during a plate run.
Quick Start 35
Page 36

Figure 5:8 SECTOR Imager window, Run Options dialog box
Quick Start 36
Page 37

5.4 Results
Figure 5:9
Figure 5:9 Demonstration plate results, Color Map layer
Figure 3:10
Figure 5:9
Figure 3:11
The software provides several options for viewing results. Select View Layer Views from the menu or select a layer from the Layer
menu on the toolbar. Refer to the DISCOVERY WORKBENCH User Guide for details on data viewing options. If you observe the data as
it is acquired in Color Map view, bright wells should display numbers above 2000 and dark wells should display numbers below 200.
shows a Color Map view of the data from the demonstration plate.
When using the SECTOR Imager 6000 demonstration plate sectors 3 and 4 (
shown in
demonstration plate provided for the 2400/2400A (
wells.
. Sectors 1, 2, 5, and 6 should have uniform, low signal levels corresponding to instrument background. The
) functions similarly, with sectors 5, 12, 14 and 19 displaying bright
) should display four bright wells each, as
Quick Start 37
Page 38

6
Using the SECTOR Imager
38
Page 39

NOTE:
3.5 SECTOR Imager
Instrument
If the stacker cover plate is present on the output stack, remember to select the Return Plates to Input Stack
Figure 3:4
Figure 6:1
Using the SECTOR Imager 6
This chapter explains how to prepare and load single or multiple MULTI-ARRAY plates for typical use with SECTOR Imagers.
Additional information is provided to integrate the instrument with an external, third-party robotic system. Please refer to the
DISCOVERY WORKBENCH User Guide for detailed instructions on running MULTI-ARRAY plates on the SECTOR Imager system.
This section assumes that a qualified MSD service engineer has installed and configured the instrument, and that the user
has run a demonstration plate as described in the previous section.
6.1 Single Plate Run
To run a single MULTI-ARRAY plate, place the single plate adaptor in the right stacker interface (Section
The right stacker interface can act as both input and output locations. If not using the output (left) interface, place the stacker cover
plate over it. The SECTOR Imager will pull and eject plates from/to the input (right) interface. The SECTOR Imager 2400A has a stacker
cover plate preinstalled on the output side and is configured to automatically pull and eject plates from/to the input (right) interface.
).
If using the output side, install a second single plate adaptor or a stack tube on the output (left) stacker interface plate. The SECTOR
Imager (except the SECTOR Imager 2400A) will automatically pull plates from the right side and eject plates into the left side.
checkbox so that the SECTOR Imager will not attempt to place the plate into the covered stack at the end of the
read. (The SECTOR Imager 2400A is configured to automatically Return Plates to the input stacker port.)
Prepare the MULTI-ARRAY plate using the required reagents per the assay protocol. Place the plate into the single plate adapter.
Sensors within the instrument will automatically identify the plate orientation and compensate the data acquisition and analysis
accordingly. Per the detailed instructions in the DISCOVERY WORKBENCH User Guide, configure the options in DISCOVERY
WORKBENCH and run the plate.
6.2 Stack Run—Multiple Plates
Multiple plates may be loaded into SECTOR Imager 6000 and SECTOR Imager 2400 instruments using the standard or high-capacity
stack tubes (
stack tubes.)
6.2.1 Loading the Stack Tube
Prepare MULTI-ARRAY plates using the required reagents per the assay protocol.
To load prepared plates into the stack tube:
1. Stack plates on a stable surface.
). SECTOR Imagers read plates from the bottom of the stack tube. (The SECTOR Imager 2400A does not use
2. Place the stack of plates on top of an extra, standard 96-well MULTI-ARRAY plate. This extra plate serves as a spacer for
loading (
).
Using the SECTOR Imager 39
Page 40

3. Orient the stack tube so that the chamfers of the plates are toward the back of the instrument and the bar code labels are to
NOTE:
Figure 6:1
Figure 6:1 Loading MULTI-ARRAY plates into stack tube
If the stack of plates to be run is too tall for the above procedure, you can insert the additional plates through
CAUTION:
Table 3:1 Stack Tube
plate capacities
WARNING:
the left.
A label on the inside of the stack tube reminds users of the correct orientation for loading plates. The stack tube itself
will only fit on the interface plate in one orientation.
4. Slide the stack tube carefully over the top of the stack of plates such that the plates slide into the tube. Once the stack tube
base is flush with the stable surface, all but the extra plate will be loaded into the stack tube (
5. Remove the single plate adaptor if it is present on the stacker.
6. Place the full stack tube on the input (right) stacker interface plate.
7. Place an empty stack tube of the same size on the output (left) stacker interface plate.
).
the top of the stack tube (up to the stack tube capacity) during the run. Be careful to not to add more plates than
can be accommodated in the output stack tube.
loading the stack tubes.
When reading multiple plates in a run, ensure that the stack tube is not overloaded. See
.
Loading a tall stack of plates could lead to spilling potentially harmful chemical reagents. Use caution when
Using the SECTOR Imager 40
Page 41

6.2.2 Unloading the Stack Tube
CAUTION:
Scientific and Technical Support
After running a stack of plates, the consumed plates will be located in the output stack tube. These plates should be unloaded and
properly disposed of prior to running additional plate stacks to prevent the possibility of overfilling the output stack tube.
exceeds the capacity of the output stack.
Not removing the completed plates from the output stack may cause spills if the number of completed plates
The plates should be removed manually by sliding them up and out the top of the stack tube. The last few
plates can be accessed by pushing the last plate up from the bottom of the stack tube.
6.3 Robotics Integration
All SECTOR Imagers can be integrated with a robotics system for loading and unloading plates using the Remote Instrument Mode,
which allows the instrument to be used as a component through its remote interface. A Remote Instrument Manual that provides
descriptions of the commands recognized by the MSD software is available upon request. Contact
for more information on robotics integration.
Using the SECTOR Imager 41
Page 42

7
Maintenance
42
Page 43

WARNING:
Scientific
and Technical Support
Customer Service
CAUTION:
WARNING:
Instrument Service
Maintenance 7
This chapter contains basic maintenance instructions for the SECTOR Imager and some components. A qualified MSD service
engineer should perform all other maintenance procedures not described in this section.
The SECTOR Imager requires proper care, including occasional preventive maintenance. Only MSD service engineers should perform
standard preventive maintenance on the instrument. The schedule for these procedures depends on the usage of the instrument.
Please perform periodic system maintenance on the computer in order to maintain high performance. This includes running the
defragmentation program included with the operating system on a regular basis. A performance qualification kit containing plates,
reagents, and a protocol for verifying instrument performance, is available for purchase (MSD catalog #R31QQ-3). MSD
Opening the instrument to perform maintenance incurs risk of mechanical, electrical, and laser harm.
can provide more details on the performance qualification kit.
Inspect the SECTOR Imager before and after each use to ensure that there is no debris (liquid, dirt, plastic
items, etc.) on or near the stacker interface plate. Clean the SECTOR Imager after each use as described below.
7.1 Preventive Maintenance
Scheduled maintenance should include the cleaning and lubrication of all appropriate internal components. Only MSD service
engineers should perform this maintenance, usually once every 6 months.
Contact MSD
to ask about our service contracts.
7.2 Instrument Cleaning
Reasonable care should be taken to prevent unnecessary fluid spills onto and into the SECTOR Imager. Any spills onto the instrument
should be promptly cleaned using either water, 70% ethanol, 1% bleach in water, or a mild detergent. Choose a cleaning solvent that
is appropriate for the nature of the spill. Lint-free cleaning wipes are recommended for this cleaning.
Any of the outside surfaces of the SECTOR Imager can be cleaned. In addition, accessible regions of the stackers and elevators can be
cleaned. The stackers should only be cleaned when the power is disconnected.
put hands into these regions while the instrument is powered-up.
If chemical reagents are spilled inside the light tight enclosure of the SECTOR Imager, contact MSD
instructions.
7.2.1 Adapter and Stack Tube Cleaning
Spills on single plate adapters or stack tubes should be promptly cleaned to prevent a build-up of crystalline debris or dried salts that
could interfere with their operation. In particular, plates may not load correctly if the latch movement of these devices is compromised.
The instrument should be turned off and unplugged for all cleaning processes.
When the stack tubes are removed, the plate elevator and doors to the instrument pose a pinch hazard. Do not
for
Clean dirty latch mechanisms by soaking the latches in warm water (approximately 104°F/40°C) with a small amount of residue-free
detergent for 15 minutes. Rinse the latches thoroughly with running water, tip and/or shake gently to remove excess liquid, and allow
Maintenance 43
Page 44

to fully air dry. If there is any residue remaining, soak the latches in a 70% alcohol solution (isopropanol or ethanol in water) for 15
Scientific and Technical
Support.
Scientific and Technical Support
NOTE:
Scientific and
Technical Support
minutes; shake out the excess, and allow to air dry completely. If plate-loading problems persist, contact
7.3 Instrument Decontamination
Contact MSD
The SECTOR Imager must be decontaminated prior to shipping the instrument back to MSD. Contact MSD
prior to shipping for instructions and requirements.
for a detailed protocol for instrument decontamination.
Maintenance 44
Page 45

8
Appendix
45
Page 46

Table 8:1
Table 8:1: Troubleshooting guide
Symptom/Error message
on screen
Possible Cause
Corrective Action
Instrument or computer does
Loose or disconnected power
Ensure that the cables connecting the instrument and/or computer to the external power
No voltage at outlet
Test the outlet by connecting a different electrical device to the outlet.
One or more fuses activated
Fuse locations and specifications for the instrument are shown in Section 8.2.4: Power
Requirements
The plate passes through the
The instrument was unable to read
Verify a bar code is smoothly affixed to the side of the plate. Then, select the appropriate
Error 515 General error
Windows security settings,
Click OK to continue.
Incompatible anti-virus software has
Disable the antivirus program temporarily to see if that is the issue. There are several
Error 515 General error
The Windows theme has changed.
Click OK to continue.
Error 515 General error
The Plate Data History (database) is
Click OK to continue.
Scientific and Technical Support.
Appendix 8
8.1 Troubleshooting Guide
Refer to
Workbench.
below to troubleshoot hardware and operating errors. The software version may be found in Help About
not power on
instrument without being
read. The status window
jumps from 1% to 100%.
The instrument failed to read
the plate after clicking the
Run button.
The instrument failed to
initialize after clicking the
instrument icon.
cable(s)
the barcode on the plate. The bar
code may be damaged, smudged,
marked, or otherwise unreadable.
networking parameters, or the
instrument name has changed.
been installed on the instrument
computer.
source are plugged in properly.
.
plate type from the pull-down menu, and read the plate again.
Determine whether your IT department has made any changes to the instrument computer
recently.
methods:
1) Exclude the file: C:\Program Files\MSD Discovery
Workbench\lib\prefs.properties from scanning.
2) Disable real-time scanning.
3) Uninstall the antivirus program and use a different one.
Restore the default Windows theme. Please check whether your IT department has made
any changes to the instrument computer recently.
The MsdDebug file (DISCOVERY WORKBENCH v3) or sysinfo file (DISCOVERY
WORKBENCH v4) contains a software log that can be used to diagnose the problem. The
log will contain errors such as .JCodedException: Error creating plugin: unknown and
CreatePluginAction$1 doWork:-1 and
lifesci.usersrv.ipr.IPRReader$iprReaderVetoCloseController vetoClose:-1.
The error was noted while
reading a plate, or during
data collection, the
instrument read a partial plate
as a full plate.
in an inconsistent state.
DISCOVERY WORKBENCH v3 only
1)The software log will contain an error similar to: .ProcessView$PartialPlateSelectListener
itemStateChanged:-1. For assistance, contact
Appendix 46
Page 47

Symptom/Error message
on screen
Possible Cause
Corrective Action
Error 515 General error
The Plate Data History (database) is
Click OK to continue.
Instrument
Service
Error 515 General error
The PDF generator is overburdened
Click OK to continue.
Error 515 General error
Several situations can generate Error
Click OK to continue.
Error 5216 Unable to locate
An inventory file has become
Perform the following steps:
Scientific and Technical Support.
Error 5451 Unable to read
The instrument serial cable is
A beige, 9-pin cable should be plugged into the COM port 1 on the back of the computer.
Error 6106 Instrument
The instrument or computer has
Perform the following steps:
Error 7254 Hardware fault
A fault was detected in the camera or
Check that all connections are tight, particularly the thick cable that runs from the SECTOR
Instrument Service
The error was noted while
reading a plate or during data
analysis.
The PDF generator failed to
create the report.
The error was noted during
data analysis or while saving
information to the Plate Data
History (database).
full.
by large amounts of data, such as
when reading 10-spot plates or
analyzing multiplex plates in an
experiment.
DISCOVERY WORKBENCH v3 only
515 during data analysis. For
example:
A process was cancelled before
completion, or
The text in the note section of the
plate layout is too long, or
Sample or plot curve names are too
long or contain too many numbers.
DISCOVERY WORKBENCH v3 only
Backup and clear the database. For DISCOVERY WORKBENCH v3, contact
for instructions on backing up and clearing the database. For DISCOVERY
WORKBENCH v4, instructions on backing up and clearing the database may be found in
the DISCOVERY WORKBENCH User Guide.
The software log will contain a message such as: Could not allocate space for object
'PIDTable' .....in database 'LCPRSchema' because the 'PRIMARY' filegroup is full.
Print the PDF file in parts using the Report Selection Mode. To access this mode:
1) Open the experiment.
2) Right-click the experiment name.
3) Select Report Selection Mode. A check box will appear next to each element in
the analysis.
4) Deselect a subset of elements to be included in the PDF report.
As long as the plate was read, you can retrieve the data with the following actions:
• Reduce the text in the note section of the plate layout.
• Ensure that each text field does not contain more than 9 numbers. For
example, shorten Sx379 2012-04-24 1638400 to Sx379 16384.
• Avoid using invalid characters (#, ?, \, etc.) in text fields.
file
serial device
initialization failed
corrupted.
DISCOVERY WORKBENCH v3 only
disconnected or attached to the
incorrect COM port.
experienced a communications
failure.
camera controller. This error can be
caused by a blown fuse internal to
the camera power supply, a fault
with the PCI card, or a disconnected
taxi cable.
1) Completely close DISCOVERY WORKBENCH.
2) Go to C:\Program Files\MSD DISCOVERY WORKBENCH\Data and look for a file
called SECTORHTSInventory.ini (SECTOR Imager 6000) or
SECTORHTS24Inventory.ini (SECTOR Imager 2400/2400A).
3) If the file does not exist look for SECTORHTSInventory.ini.bak (SECTOR Imager
6000) or SECTORHTS24Inventory.ini.bak (SECTOR Imager 2400/2400A).Once
you locate this file remove the .bak extension
4) Restart DISCOVERY WORKBENCH.
If the problem persists, contact
The COM port 2 should be vacant. The SECTOR Imager 6000 has a black cable and a
beige cable. The SECTOR Imager 2400/2400A has two beige cables. Please verify that the
thinner beige cable is in SECTOR 2400 COM port 1.
1) Shut down the computer
2) Shut down the SECTOR Imager
3) Restart the computer
4) Restart the SECTOR Imager.
Imager to the PCI card in the back of the computer. If no loose cables can be found and the
instrument still fails to function after restarting, contact
for assistance.
Appendix 47
Page 48

Symptom/Error message
on screen
Possible Cause
Corrective Action
Error 7460 Instrument
A Windows service has not started
Perform the following steps:
Instrument Service
Error 7461 Instrument not
The camera has not reached the
Check the camera cooling status (Tools Status) The temperature should be dropping
Scientific and Technical
Support
Error 8605
One or more files could not be
Generally, this error can be resolved by restarting the system:
Error 8704 The
The Windows service has not
It may take up to five minutes for this service to start after the computer is started. If the
Error 8906 Invalid Plate Type
The software failed to recognize the
Check to see if Bar Code Update for MSD DISCOVERY WORKBENCH has been installed at
Scientific and Technical Support
A discontinued plate or a plate
Discontinued plates cannot be run. In addition, plates made for SECTOR PR instruments
Error 9460 Instrument timed
Communication between the
Check the cables attached to the instrument and computer to make sure they are correct
Instrument Service.
Operation Timed Out
ready when starting a plate
run.
or has been interrupted.
DISCOVERY WORKBENCH v3 only
proper temperature for operation.
The SECTOR Imager 2400/2400A
and SECTOR Imager 6000 cameras
will cool to -25
respectively, before the instrument
becomes operational.
°C and -35°C,
1) Close DISCOVERY WORKBENCH.
2) Right click My Computer on the Desktop and select Manage.
3) In the Computer Management dialog box under services and Applications, click
Services.
4) Find MSSQL$MESOSCALE1 in the Services list.
5) Right click MSSQL$MESOSCALE1 and then click Start or Restart.
6) If Startup type is not Automatic, then select Automatic.
Restart DISCOVERY WORKBENCH.
If the problem persists:
1) Shut down the computer.
2) Shut down the SECTOR Imager
3) Restart the computer
4) Restart the SECTOR Imager.
5) Restart DISCOVERY WORKBENCH.
If the issue is still not resolved, contact
log files that are in the following locations:
1) Event log: Go to C:\Program Files\MSD Discovery Workbench\log. Send the file
with the word "Events" in it.
2) Software log: Go to C:\Program Files\MSD Discovery Workbench\log. Send all
the files beginning with the word "Workbench."
toward the operating temperature.
Wait up to 60 minutes for the camera to stabilize at the correct temperature. This is a
normal function of turning on the instrument.
Restart the software. Check the temperature again. Contact MSD
if the camera temperature is not dropping.
. We may need the instrument
ERR_EL_CACHE_SAVE_FAI
LED
MSSQL$Mesoscale1 or SQL
Server (MESOSCALE2)
service has not started
written to the log.
DISCOVERY WORKBENCH v3 only
started.
barcode on the MSD plate.
DISCOVERY WORKBENCH v3 only
configuration exclusive to another
instrument was used.
1) Shut down the SECTOR Imager and the instrument computer for 30 seconds.
2) Start the computer and then start the SECTOR Imager.
3) Wait for five minutes and then launch DISCOVERY WORKBENCH.
If the problem persists:
1) Click Start and select Settings then Control Panel.
2) Go to Administrative Tools and click Event Viewer.
3) Right-click Application and select Properties. A dialog window will appear.
4) Increase the log size 2-fold.
5) Log off and then log back into Windows.
error is caused because DISCOVERY WORKBENCH was launched before the service
started, then restarting the software will resolve it.
If the service has been interrupted:
1) Right-click My Computer on the desktop and select Manage. In the Computer
Management window under Services and Applications, click Services.
2) In the alphabetical list of services, right-click MSSQL$MESOSCALE1 for
DISCOVERY WORKBENCH v3 or SQL Server (MESOSCALE2) for DISCOVERY
WORKBENCH v4 and select Restart.
the following location: START Menu Settings Control Panel Add or Remove
Programs. If it has not, contact
Update program.
are incompatible with SECTOR Imager instruments, and older SECTOR Imager 6000 plates
are incompatible with the SECTOR Imager 2400.
to obtain the Bar Code
out
instrument and the computer has
been interrupted.
and seated securely.
Contact
C:\Program Files\MSD DISCOVERY WORKBENCH\log
Customers may be asked to provide log files from the folder
Appendix 48
Page 49

Symptom/Error message
on screen
Possible Cause
Corrective Action
Error 9706 Client already
Multiple sessions of DISCOVERY
Close all instances of DISCOVERY WORKBENCH software. This could take up to a minute
Error 9711 Unable to
Loose cables prevent
Check the integrity of all cables going into the SECTOR instrument and the desktop
Communication between the
Restart the computer.
Error 9901, 9902
The instrument lost communication
Ensure that both the instrument and computer are powered on and all power and
puter USB cable by plugging the USB cable into a different USB port on the instrument
Scientific and Technical Support
Error 11668 Audit Event
The software was unable to add an
Perform the following steps:
NOTE:
Date and time setting on instrument
Change the date and time setting on the instrument computer to the current date and time.
Error 11685 Audit Event
The instrument session manager is
Perform the following steps:
NOTE:
has a session
connect to the instrument
server
Communications failure
WORKBENCH are running at the
same time.
DISCOVERY WORKBENCH v3 only
communication between the
instrument and computer.
instrument and computer has been
interrupted.
with the computer.
if the Windows Task Manager is used to close the program. Restart the software.
computer.
Restart the communication service by navigating in Windows to Control Panel
Administrative Tools Services. Right-click the service MSSQL$Mesoscale1 for
DISCOVERY WORKBENCH v3 or SQL Server (MESOSCALE2) for DISCOVERY
WORKBENCH v4 and select either Restart or Start.
communications cables connected and secure.
Close DISCOVERY WORKBENCH and restart the computer.
If restarting does not correct the problem, then switch the location of the instrument-tocom
computer.
1) Turn off the SECTOR Imager.
2) Wait 30 seconds.
3) Turn on the SECTOR Imager.
4) Restart the computer.
5) Wait five minutes before starting the MSD DISCOVERY WORKBENCH software.
If the problem is not resolved, contact
.
Issue
Issue
event to the Windows event log.
DISCOVERY WORKBENCH v3 only
is incorrect.
DISCOVERY WORKBENCH v3 only
unable to write to the Windows
event log.
DISCOVERY WORKBENCH v3 only
1) Right-click My Computer, select Manage and then click Event Viewer.
2) Right-click Application.
3) Select Properties to open the System Properties window. Check either Overwrite
events as needed or Overwrite events older than <xx> days (enter the maximum
number of days for keeping older events).
Setting the system log to overwrite will result in a loss of data. MSD
recommends archiving the log periodically.
4) Click OK.
5) Right-click System and repeat the Properties settings in step 3.
6) Click OK.
7) Log off and then log back into Windows.
1) Right-click My Computer, select Manage, and click Event Viewer.
2) Right-click Application.
3) Select Properties to open the System Properties window. Check either Overwrite
events as needed or Overwrite events older than <xx> days (enter the maximum
number of days for keeping older events).
Setting the system log to overwrite will result in a loss of data. MSD
recommends archiving the log periodically.
4) Click OK.
5) Right-click System and then repeat the Properties settings in step 3.
6) Click OK.
7) Log off and then log back into Windows.
Appendix 49
Page 50

8.2 Specifications
NOTE:
Table 8:2 Scientific performance
SECTOR Imager 6000
SECTOR Imager 2400/2400A
Standard Signal Levels
Dynamic Range
Electronic Noise
8.2.1 SECTOR Imager
All performance information including standard signal levels, detection limits, dynamic range, and instrument noise
is based on 150 µL read volumes in 96-well MULTI-ARRAY plates using standard plate read parameters.
Unless noted, specifications apply to all models of the SECTOR Imager 2400/2400A and the SECTOR Imager 6000.
8.2.2 Scientific Performance
Signals generated by Free TAG, 15,000 [Cat # R94AA]
Signals generated by PQ Low Control [Cat # R92TE-2]
Standard Deviation Dark Noise (depends on plate type)
12,000–18,000 counts
25–100 counts
106 106
0–16 counts 0–16 counts
8.2.3 Environmental Specifications
Suggested Operational Temperature Range 20–26 °C (68–78 °F)
Suggested Operational Humidity Range 10–80% non-condensing
Storage Temperature Range 5–40°C (41–104 °F)
Storage Humidity Range 5–85% non-condensing
Ambient Light <2000 Lux
8.2.4 Power Requirements
SECTOR Imager 2400/2400A (models 1250/1251)
Voltage 100–240 V~ 50/60 Hz
12,000–18,000 counts
25–100 counts
Current 3.7–2.0 A
SECTOR Imager 6000 (model 1200)
Voltage 100 / 120 / 220 / 240 V~ 50/60 Hz
Current 3.3 / 2.7 / 1.5 / 1.4 A
SECTOR Imager 6000 (model 1201)
Voltage 100–240 V~ 50/60 Hz
Current 3.5A–2.8A @ 100–240 V~
Class I, Installation (Overvoltage) Category II Device
Appendix 50
Page 51

Fuses
Main Fuses F1 and F2:
Internal Fuse F3:
Scientific and Technical Support
Scientific and Technical Support
Electrical fuses are only accessible by MSD service engineers and are not user-serviceable. The information below is provided for
reference.
SECTOR Imager 6000 (model 1201) and SECTOR Imager 2400/2400A (models 1250/1251)
T4.0 A, 250 V, 100–240 V~
SECTOR Imager 6000 (model 1200)
T4.0 A, 250 V, 100/120 V~
T2.5 A, 250 V, 220/240 V~
SECTOR Imager 6000 (model 1200 only)
T0.8 A, 250 V
8.2.5 SECTOR Imager Physical Dimensions
Size 26.8 in x 30.5 in x 33.9 in (68.1 cm x 77.5 cm x 86.1 cm)
Weight for SECTOR Imager 2400/2400A: 140 lbs (64 kg)
Weight for SECTOR Imager 6000: 150 lbs (68 kg)
8.2.6 Plate Standard Read Volume (per Well)
96-well MULTI-ARRAY Plates 150 µL
384-well, MULTI-ARRAY Plates 40 µL
1536-well, MULTI-ARRAY Plates 4–6 µL
8.2.7 Custom Bar Code Compatibility*
Code 39
Code 128
*Contact MSD
Recognition of additional codes is possible but has not been tested.
for information on proper label, font size, and location of custom bar code on plate.
8.2.8 Plate Specifications
MSD MULTI-ARRAY and MULTI-SPOT plates are designed to comply with the mechanical dimensions of the proposed standards of
the Society of Biomolecular Screening. Contact MSD
The MULTI-ARRAY and MULTI-SPOT plate bar code labels conform to the ANSI/AIM BC1—1995: Uniform Symbology
Specification—Code 39 format.
for further details.
8.3 Regulatory and Safety Certifications
The SECTOR Imager 6000 and the SECTOR Imager 2400/2400A have been tested to comply with applicable regulatory standards: TUV
(Canada, US), TUV-GS, CE approved, CB Certification.
Regarding EN61326 Electrical Equipment for Measurement, Control, and Laboratory Use—EMC Requirements. (EMCD) Annex B:
• SECTOR Imager 6000 (model 1200 only) and SECTOR Imager 2400/2400A: These units are designed for operation in a
controlled electromagnetic environment. Transmitters of RF energy such as mobile (cellular) telephones should not be used
in close proximity.
Appendix 51
Page 52

Regarding FCC Rules, Part 15, Subpart B, as a Class A digital device:
Scientific and Technical Support
instrumentservice@mesoscale.com.
• This equipment has been tested and found to comply with the limits for a Class A digital device, pursuant to Part 15 of FCC
rules. These limits are designed to provide reasonable protection against harmful interference when the equipment is
operated in a commercial environment. The equipment generates, uses, and can radiate radio frequency energy and, if not
installed and used in accordance with the instruction manual, may cause harmful interference to radio communications.
Operation of this equipment in a residential area is likely to cause harmful interference in which case, users will be required
to correct the interference at their own expense.
Regarding Industry Canada Interference-Causing Equipment Standard:
• This Class A digital apparatus complies with Canadian ICES-003.
• Cet appareil numérique de la Classe A est conforme à la norme NMB-003 du Canada.
Contact MSD
with inquiries about the regulatory compliance of MSD instrumentation.
8.3.1 WEEE Compliance
For all inquiries regarding recycling of shipping materials, instrument disposal, and WEEE-related issues, please contact an MSD
instrument service specialist at 301.947.2057 or
Appendix 52
Page 53

8.4 Symbols and Labels
Table 8:3 Symbols and labels
Symbol/Label
Description
V
A
~
or
or
Consult accompanying documentation/written warning
Device contains high voltages
Pinch Hazard Warning
Accessible fuse with rating
Class 2 Laser Warning
Electrostatic Sensitive Device
Volts
Amps
Alternating Current
On
Off
Halt plate motion system
European Compliance Mark Indicates that the device complies with applicable European Directives
USB I/O Port Symbol and Reference Designation
Camera Controller Serial I/O Port Symbol and Reference Designation
Bar Code Reader RS-232 I/O Port Symbol and Reference Designation
External Stop or Pause Control I/O Port Symbol
Appendix 53
Page 54

9
Technical Support
54
Page 55

scientificsupport@mesoscale.com
Customer Service
customerservice@mesoscale.com
Scientific and Technical Support
scientificsupport@mesoscale.com
Instrument Service
instrumentservice@mesoscale.com
Technical Support 9
MSD provides excellent and timely support for all authorized users of SECTOR Imagers. We welcome and carefully consider all bug
reports and suggestions for improvements to future versions. We will work with you to resolve any problems you may encounter.
9.1 Bug Reports and Suggestions
Please send comments or feedback on the software—including bug reports, unresolved error codes, feature requests, or design
change requests—to an MSD Scientific and Technical Support specialist.
9.2 Problems Running SECTOR Imagers
If you encounter an error report that you cannot resolve, please provide us with as much of the following information as possible:
• The error code and text in the error dialog box
• What you were doing when the error occurred
• How can the error be reproduced?
• If requested by MSD Scientific Support, a copy of the SysInfoOutput.txt file located in C:\sysinfo
To generate the report file, first run the SysInfo.exe diagnostic tool located in:
(WinXP/Win7-32 bit) C:\Program Files\MSD DISCOVERY WORKBENCH\bin
(Win7-64 bit) C:\Program Files (x86)\MSD DISCOVERY WORKBENCH\bin
Email this information to
affecting your work, please mark it URGENT and we will respond as quickly as possible.
. Someone will contact you within two business days. If the error is
9.3 How to Contact Us
Meso Scale Diagnostics, LLC, company headquarters is located at:
1601 Research Boulevard
Rockville, Maryland 20850 USA
+1 240-314-2600
Our website is www.mesoscale.com.
+1 240-314-2795
+1 240-314-2798
+1 301-947-2057
Technical Support 55
Page 56

Technical Support 9-2
 Loading...