

Page 1
Installation Instructions
NetBright® High Performance Security Light
MBN3000
What is included per light:
• 3 screws & 3 anchors
• Mounting bracket
What you need to install:
• 4 D-cell alkaline batteries
• 1 screwdriver (Phillips)
Tips:
•
Use only new alkaline D- Cell batteries with 1.5V rating.
•
Do not mix old and new batteries. If batteries are not new, it may cause the light to malfunction.
•
Install batteries with polarity in correct position.
•
Light may activate when bat teries are inserted. Simply take light into a dark room,
allow batteries to settle, then test activation.
•
If your light will not turn o, it means that it is time to replace the batteries.
• 1 screwdriver (athead)
• Drill (1/4” drill bit for dr ywall installation)
Spotlight Features:
Motion/Light Sensor: The light instantly turns on when
it detects motion from up to 30 feet away. The light
sensor conser ves battery life by preventing the light from
activating in daylight.
Auto Shut-o: Light shuts o automatically af ter
20 seconds if no motion is detected.
Bright LED: 500 lumens cover up to 800 sq ft.
Durable, Weather Resistant: Tight seals and UV resistant
material allow the light to work in all weather conditions.
Multiple Lights: Spotlights will activate simultaneously
when any spotlight within the network detects motion.
They will deactivate simultaneously if no motion is
detected in the group.
NOTE: Light sensor only allows light to activate in darkness. We recommend you test in a dark room or closet.
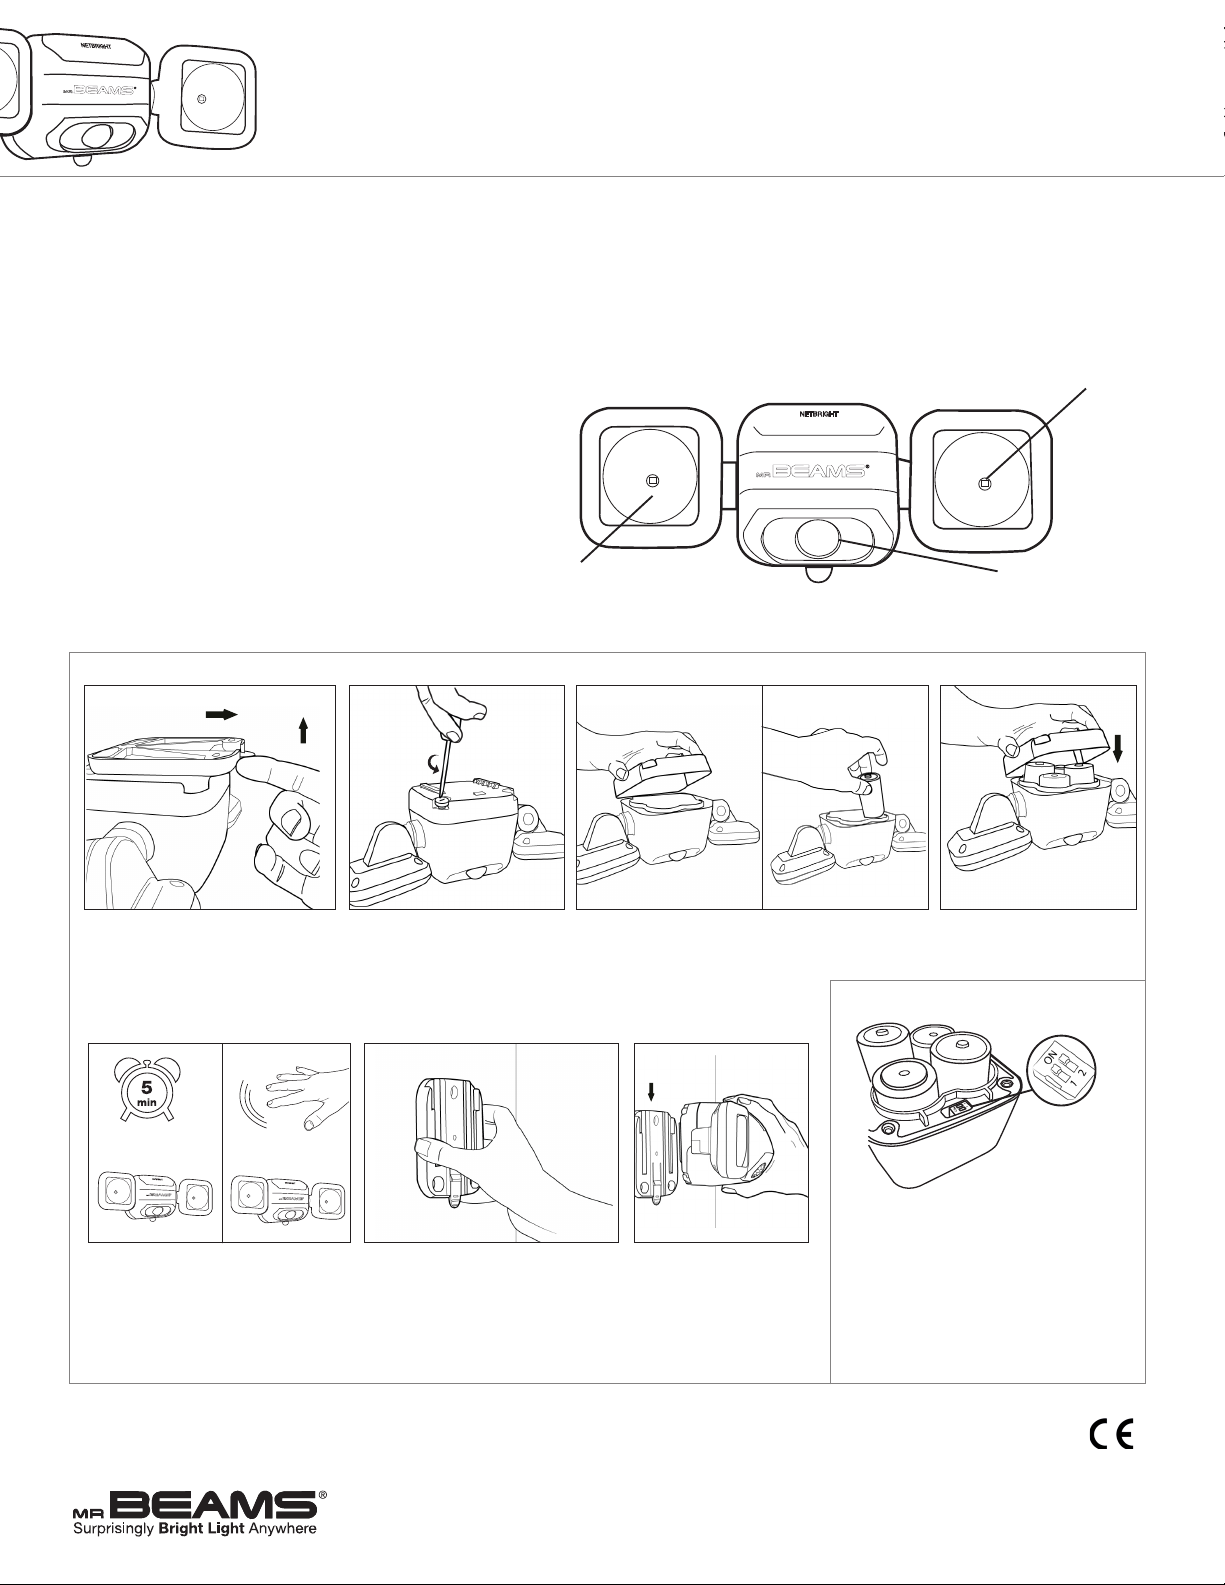
LED Light
LED Light
Motion & L ight
Sensor
1. To remove the back plate from the
light, use your nger to push up on the
mounting bracket tab. This will unlock
the bracket. Then slide the bracket
down o the back of the light.
5. Before mounting your light, test
the motion sensor in a dark closet or
bathroom. Close the light in the dark
room and leave for up to 5 minutes.
When you re-enter the room, the light
should activate with motion.
Battery Caution:
1) Do not mix ol d and new b atter ies
2) Do not mix alkali ne, sta ndard (c arbo n-zinc) or r echargeable (nicke l cadmi um) or
(nickel m etal hyd ride) ba tteries
3) Do not di spose o f batte ries in re
4) Batte ries should be r ecycled or dis posed o f as per st ate and l ocal gu ideli nes
2. Use a screwdriver to loosen
the four screws on the back
plate. The screws will not come
out all the way.
6. Determine mounting location for the
light. Place the mounting plate on the
surface so that the tab is pointing down
and mark the pilot holes for dry wall.
Use a drill to inser t the anchors, then
line up the mounting plate with the
holes and drill screws in.
3. Lift the battery lid o the back of the light. Insert 4
D-Cell batteries with the at ends against the springs.
Setting up lights to a net work
After inser ting the batteries, choose
a channel for your spotlights with
the dipswitches next to the batter y
7. Line up the light with the
mounting plate and slide the
light into the grooves.
compartment. Ensure all units are on the
same channel by matching dipswitches.
* Lights set to t he same channel t hat
are within 15 0 ft range of e ach other
will activate as one network. Light will
work with all other N etBright® lights
from Mr Beams®
* Visit our website to view installation video.
* 1 year limited warranty. Visit site for details.
4. Replace the bat tery lid and
make sure the screws are
twiste d in tightly.
www.mrbeams.com
600 Beta Drive , Unit 100, Mayel d Villa ge, OH 44143
877.298.9082
 Loading...