

Page 1
Installation Instructions
LED Spotlight
MB360XT
Thank you for purchasing the Mr Beams
®
Wireless Spotlight. We are committed to
eliminating darkness using the latest in
Light-Emitting Diodes (LEDs). LEDs are the most
ecient and durable light sources available. We
are certain that your light will contribute to a safer
Tips:
•
•
•
•
batteries to settle, then test activation.
•
environment and provide light where you need it at
a very reasonable cost.
What is included per light:
• 1 Wireless Spotlight
• Mounting Base
• 3 Screws
• 3 Anchors
What you need to install:
• 1 Small Screwdriver
• 3 D-Cell Alkaline Batteries
Spotlight Features:
Motion/Light Sensor: Light instantly turns on when it detects
motion from up to 30 feet away. The light sensor conserves battey
life by preventing the light from activating in daylight.
Auto Shut-o: Light shuts o automatically after 20 seconds if no
motion is detected.
Bright LED: 200 Lumens covers up to 600 sq ft.
Durable, Weather Resistant: Tight seals and UV resistant material
allow the light to work in all weather conditions.
Use only new alkaline D-Cell bat teries with 1.5V rating.
Do not mix old and new batteries. If batterie s are not new, it may cause the light to malfunction.
Install batteries with polarity in correct position.
Light may activate when batteries are inserted. Simply take light into a dark room. Allow
If your light will not turn o, it means that it is time to replace the bat teries.
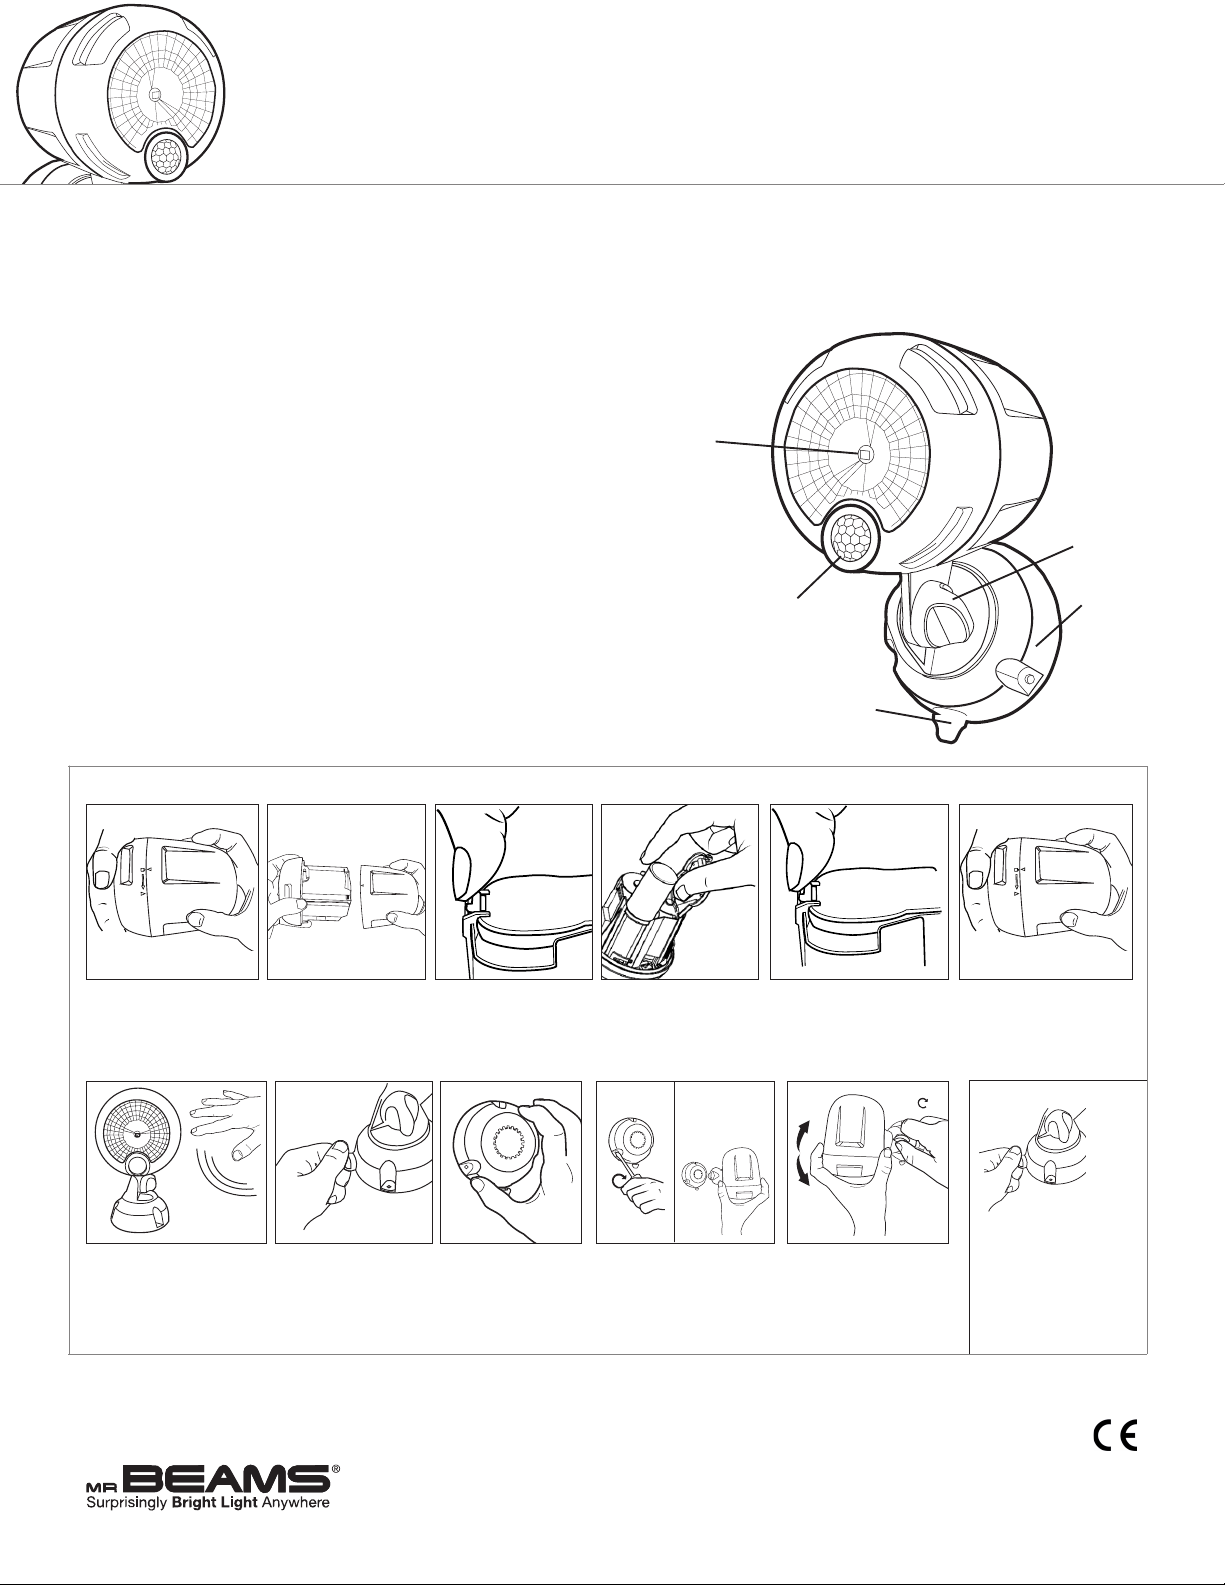
LED Light
Knuckle Screw
Mounting Base
Motion &
Light Sensor
Mounti ng Base
Thumb Screw
NOTE: Light sensor only allows Spotlight to activate in darkness. We recommend you test in a dark room or closet.
1. Remove the face of the
light by rotating counterclock wise as shown above.
7. Test the motion sensor
in a dark room for up to 5
minutes. When you re-enter
the room, the light should
activate with motion.
Battery Caution:
1) Do not mix ol d and new ba tteri es
2) Do not mix Alkali ne, Stan dard (Ca rbon-Zinc) or Recharge able (N ickel Cad mium) or (Ni ckel Met al Hydride) batte ries
3) Do not di spose of batter ies in r e
4)Batteries s hould be recycle d or disp osed of as per stat e and local guide lines
www.mrbeams.com
2. Pull face out from
cup to reveal battery
compartment.
8. Remove mounting
base by turning
thumbscrew counter
clock wise. Pull
mounting base o stem
of light.
3. Push in batter y door
tab and lift up to release.
9. Determine
mounting location
and mark the pilot
holes. Use a drill to
inser t anchors before
screwing in the base.
4. Inser t 3 D-cell
batteries with correct
polarity. Make sure the
at ends of the batteries
are against the springs.
10. Drive the screws
through the holes on
mounting base. Insert the
stem back into mounting
base and tighten the
thumbscrew.
5. Attach battery door by
matching the tabs to the
rectangular holes and then
push down on front until
the tab clicks into place.
11. Loosen the knuckle
screw located on the stem
of the light, to point the
light in desired direction.
Then tighten the screw to
secure position.
* Visit our website to view installation video.
* 1 year limited warranty. Visit site for details.
600 Beta Drive, M ayel d Villa ge, Unit 100 , Maye ld, OH 44143
6. Match arrows then turn
clock wise. Make sure
unit is securely closed
to activate weatherproof
seal.
Changing Batteries
When changing the
batteries, remove
the stem of the light
by twisting o the
thumbscrew. Note:
never change batteries
on ladder; doing so can
result in injury.
877.298.9082
 Loading...