


|
|
|
|
|
|
|
|
|
|
|
|
|
|
|
|
|
|
|
|
|
|
|
|
|
|
|
|
|
|
|
|
|
|
|
|
|
|
|
|
|
|
|
|
|
|
|
|
|
|
|
|
|
|
|
|
|
|
|
|
|
|
|
|
|
|
|
|
|
|
|
|
|
|
|
|
|
|
|
|
|
|
|
|
|
|
|
|
|
|
|
|
|
|
|
|
|
|
|
|
|
|
|
|
|
|
|
|
|
|
|
|
|
|
|
|
|
|
|
|
|
|
|
|
|
|
|
|
|
|
|
|
|
|
|
|
|
|
|
|
|
|
|
|
|
|
|
|
|
|
|
|
|
|
|
|
|
|
|
|
|
|
|
|
|
|
|
|
|
|
|
|
|
|
|
|
|
|
|
|
|
|
|
|
|
|
|
|
|
|
|
|
|
|
|
|
MO |
N |
|
|
, NLX20D/WH |
N |
|||||||
MODELS N 2/White, NLS13/BLACK |
N |
|
|
D/BLACK, N |
ed |
|||||||||||||
|
|
|
|
|
|
|
|
|
|
|||||||||
|
|
|
|
|
|
|
|
|
|
|
|
|
|
|
|
|
|
|
|
|
|
|
|
|
|
|
|
|
|
|
|
|
|
|
|
|
|
|
|
|
|
|
|
|
|
|
|
|
|
|
|
|
|
|
|
|
|
|
|
|
|
|
|
|
|
|
|
|
|
|
|
|
|
|
|
|
|
|
|
|
|
|
|
|
|
|
|
|
|
|
|
|
|
|
|
|
|
|
|
|
|
|
|
|
|
|
|
|
|
|
|
|
|
|
|
|
|
|
|
|
|
|
|
|
|
|
|
|
|
|
|
|
|
|
|
|
|
|
|
|
|
|
|
|
|
|
|
|
|
|
|
|
|
|
|
|
|
|
|
|
|
|
|
|
|
|
|
|
|
|
|
|
|
|
|
|
|
|
|
|
|
|
|
|
|
|
|
|
|
MODELS N |
, NL12 |
N |
, NL13 |
HITE |
MO |
N |
LACK |
|
N |
H
LACK
I |
ion Ma nual |
M |
Instruct ions |
M R . CO F FEE® COFFEEMAKER |
C A FE T IÈR E M |
||
Mal d e Instrucc ione s
C A FE T ERA MR . CO F FEE®

IMPORTANT SAFEGUARDS
When using electrical appliances, basic safe |
cautions should always b |
followed to reduce |
||||||||||||
the risk of fire, electric sh |
and/or injury to persons, including the following: |
|
||||||||||||
1. |
R |
|
|
|
ONS BEF |
USING THE MACH |
|
|
|
|
||||
2 |
D |
not touch hot surface Us |
handles or knobs. |
|
|
|
|
|
||||||
3 |
To prote |
gainst electric shock, do not immer |
d, plugs o ma |
in water |
|
|||||||||
|
or other liq |
|
|
|
|
|
|
|
|
|
|
|
|
|
4 |
C |
|
vision is necessary when this applian |
s used by or near children. |
||||||||||
5 |
U |
g from outlet when Coffeemak |
|
e and bef |
cleaning. |
|
|
|||||||
|
A |
|
efore putting o |
o |
taki |
ff p |
s and be e cl |
|
|
liance. |
|
|||
6 |
D |
not operate any appliance with a da |
a |
|
ug or after the appl |
e m |
tions |
|||||||
|
or has been dama |
|
ma |
ner. R |
this app |
ce onl |
to the n |
Au |
rized |
|||||
|
S |
vic C |
|
xamination, repair or a |
m nt. |
|
|
|
|
|
||||
7 |
The use of accessory attachmen |
|
mme |
by Sunb |
m ma |
cause haza |
njuries. |
|||||||
8 |
D |
not use outdoors. T |
C |
|
m |
is for household use only. |
|
|
|
|||||
9 |
Do not let cord hang ove |
edge of table o |
coun |
op or to touch hot s |
|
|
|
|||||||
1 |
Do not place this appliance on or near a hot gas o ele |
c b |
r o i |
a heated ove |
|
|||||||||
11. |
To disconnect, rem v plug f |
|
wall out |
|
|
|
|
|
|
|||||
1 |
Do not use applian |
for other than its intended use. |
|
|
|
|
|
|||||||
1 |
Us |
on a h |
, f |
v |
surface only, to avo nterruption of air flow underneath the appliance. |
|||||||||
1DECANTER USE AND CARE
Br |
age m occur if the following instructions are not followed: |
|
|
||||||||
Use only decanters specifically designed for MR. COFFEE® mo |
|
|
|
||||||||
A. This dec |
r i |
designed for use with your MR. COFFEE® C ffeem |
a herefore |
||||||||
|
must never be used on a rangetop or in any oven I |
DING A MICROWAVE. |
|||||||||
B. Do not set a hot decanter on a wet or cold sur |
|
|
|
|
|||||||
C. Do not use a c |
ed decanter or a deca |
with a loose o w |
ned handle. |
||||||||
D. Do not clean the decanter w |
eansers, steel wool pads or other abrasive mat als. |
||||||||||
E. |
Di |
d decanter imm |
|
v |
boiled dry. |
|
|
|
|||
F. |
Avoid sharp blows, s |
hes or rough handling. |
|
|
|
||||||
1WARNING: To reduce the risk of fire or electric shock, do no remove any serv covers. No user serviceable parts inside. Repair should be done by authorized
per |
ing the bottom service |
ill void the warranty. |
|
THIS UNIT IS FOR HOUSEHOLD USE ONLY |
|
1

|
|
|
SP |
CORD SE T INSTRUC TIONS |
||
1. |
A short power supply cord is provided to reduce t hazards r |
ng from b ming |
||||
|
entangled in or tripping over a l |
|
|
|||
2. |
An exte |
n cord may be purchased and used if care is exercised in s u |
||||
3. |
If an extension cord is used, the marked e |
trical rating of the extension cord must be |
||||
|
at least 10 amps and 120 volts. The resul g extended cord must be arranged so that |
|||||
|
it will not drape over the countertop or tabletop where it can be pulled on by children |
|||||
|
or t |
|
ver accidentally. |
|
|
|
|
Thi |
appliance has a polarized plug (one blade is wider than the othe . |
||||
|
To reduce th risk of e |
tri shock, th |
wi l fit in a polarized outlet onl |
|||
|
one |
a |
If the plug does not fit fully in the ou let, reve |
the plug. If i still |
||
|
d |
no |
fit, contact a q |
fied electr |
ian. Do not mo fy the plug in any wa |
|
For Service
•In the US, Call 1-800 MR CO FEE (1-800-672-6333)
•In Canada, Call 1-800-667-8623
|
|
|
|
|
|
|
|
TO ASSIST US IN SE |
YOU, PLE |
HAVE THE MODEL NU |
|||
|
(NL1 NL12D, NL13, NL13D, NLS12, NLS13, N |
NLX20D, |
||||
|
N |
LX26, N |
D, N |
OR NLX33) |
|
|
|
|
AND DATE OF PUR |
AVAILABLE. |
|
||
|
|
|
|
|||
|
|
|
|
|
|
|
|
PL |
DO NOT RETURN THIS APP |
TO YOUR STORE. |
|||
|
All repairs must be made by Sunbeam® o |
by anAu |
Mr. Coffee® Service Center. |
|||
P |
all us for assistance or for the locat |
the nearest Autho d Mr. Coffee® Service Center. |
||||
|
We w |
e your q |
t |
commen s or suggestions. |
||
|
P |
clude your complete nam address and telephone number |
||||
|
|
so we can reach you if nece sary. |
|
|||
SAVE THESE INSTRUC TIONS
2
|
|
|
|
|
|
|
INT |
ION |
|
|||||||
CONGRATULATIONS! You are the owner of a MR. COFFEE® C |
maker. |
|||||||||||||||
P |
e read all o |
the instructions in this manua |
care |
fore you begin to use |
||||||||||||
t |
ppliance. P |
r ca |
aintenance will ensure t |
ong life of this appliance |
||||||||||||
and its trouble-free ope |
Save these instructions and refer t them often for cleaning |
|||||||||||||||
and care tips. |
DIA |
PA |
|
|||||||||||||
|
|
|
|
|
|
|
||||||||||
|
|
|
|
|
|
|
|
|
|
|
|
|
MR. COFFEE® |
|||
|
|
|
|
|
|
|
RE |
|
|
|
|
|
|
|
|
DEC ER: N |
|
|
|
|
|
|
|
|
|
|
|
|
|
|
|
||
|
|
|
|
|
|
|
|
|
|
|
|
|
|
|
|
|
|
|
|
|
|
|
|
|
|
|
|
|
|
|
|
|
|
|
|
|
|
|
|
|
|
|
|
|
|
|
|
|
|
|
|
|
|
|
|
|
|
|
|
|
|
|
|
|
|
|
|
|
|
|
|
|
|
|
|
|
|
|
|
|
|
|
|
|
|
|
|
|
|
|
|
|
|
|
|
|
|
|
|
|
|
|
|
|
|
|
|
|
|
|
|
|
|
|
|
|
|
|
|
|
|
|
|
|
|
|
|
|
|
|
|
|
|
|
|
|
|
|
|
|
|
|
|
|
|
|
|
|
|
|
|
|
|
|
|
|
|
|
|
|
|
|
|
|
|
|
|
|
|
|
|
|
|
|
|
|
|
|
|
|
|
|
|
|
|
|
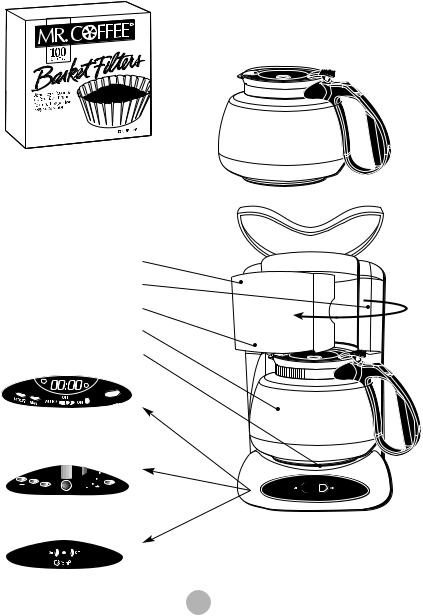
FOR BETTER TASTING TE ND COFFEE
USE 8-12 CUP MR. CO FEE®
BRA FILTERS.
DU COVER 
REMOVA BLAC BREW BASK
WATER RE ERVOIR
SWI OUT BREW BASK
DECA ER
WA PLATE
NLX20, NLX20 /WH E
NLX , NLX23D LAC
NLX 6/RE
|
|
|
11:20 |
|
Off |
|
|
|
|
|
|
|
|
|
|
|
|
|
On |
Pre s |
Hour |
|
|
|
|
|
|
Auto |
|
Ho |
|
|
|
|
1-4 |
S |
|||
|
|
Min. |
_ |
+ |
|
|
|||
|
|
|
|
Cl |
|
||||
|
|
|
|
|
Warmer Temp |
|
|
|
|
NLX3 H E
NLX /BLA K
N |
, N |
/WHITE, |
N |
, N |
/BLACK |
N , N / LAC
3
OP USE
BEFO FIRST USE
Before using your Coffeemaker for the first time, wash decanter/lid and removable brew
ba |
(black) using a mild, non- |
rgent and water. R |
h t oughly. |
F |
Ste s 4 – 6 (Bre |
) using water, to clean the inside. |
|
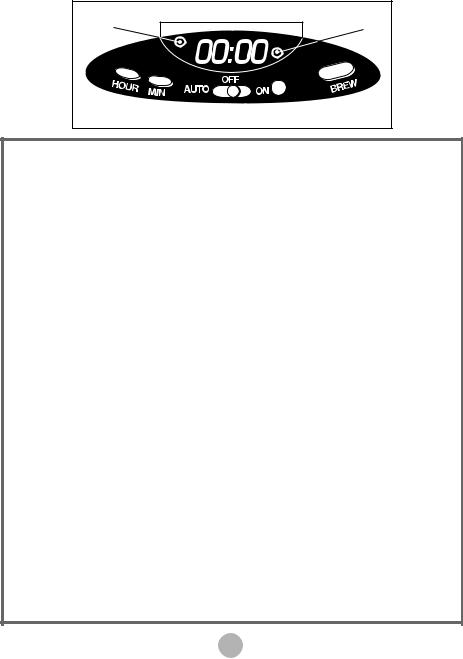
PM |
CL |
DI |
|
OFF |
|
|
|
||
HO |
MI |
AUTO/OFF |
IN |
BR |
SET |
SET |
ON SWIT |
LI |
BUTTON |
SETTING CLOCK AND TIMER |
||||
(N |
NLX20D, NLX23, NLX23D, NLX26) |
|||
NOTE: Yo do not have to set your clock before the C |
eemaker will op |
rate. |
||||||
P |
p |
|
ide the control lever |
the “on po |
ion. The g |
|||
light will illuminate. |
|
|
|
|
|
|
||
|
|
|
SETTING T E CL CK |
|
|
|
||
1. Turn the AUTO/ FF |
|
switch to “OFF.” |
|
|
|
|
||
2. P |
po |
|
to your electrical outlet. The c |
k display will flash |
||||
until you set the time. |
|
|
|
|
|
|||
3. A |
y p |
d hold the H |
R” and “MI |
TE” buttons u l you reach |
||||
the current time. T |
|
“P indicator light in the displa |
will illuminate to |
|||||
indicate PM time |
|
|
|
|
|
|
|
|
|
PRESETTING T E BREWING TI |
|
|
|||||
1. P |
ss and hold the “ |
W button while setting the desired b |
me with the |
|||||
“H |
R and “ |
TE” buttons. T |
“PM indica |
t i t |
displ |
ill |
||
illuminate to indicate P |
time. |
|
|
|
|
|
BREWING AUTO |
ATIC LLY AT THE PR |
TI E |
||
1. F |
Step 1 – 5 in the “BREWING” Se |
. |
|
||
2. P |
P ESS LD |
|
. The “ TO” indicator light should illuminate. |
||
3. B |
will begin at the p |
. Th c |
ee will remain hot in |
||
the decanter for 2 hours. To keep your coffee hot for an additional 2 hours, |
|||||
p |
the “ EL C |
. The “ON” indicator ligh s |
ld illuminate. |
||
45

IMPORTANT: RESETTING AUTO BREW AT T |
PRE-SET TIME |
|
|
The programmable timer will not automatically brew the next day if left in the “A |
|||
position after its last use. This is a safety feature. If the “OFF” indica |
t in t lower |
||
right hand corner of the clock d |
ate |
reset “AUTO BREW” by turning the |
|
control switch to “OFF”, then to “AUTO.” (M |
NLX20, NLX23, NLX20D, NLX23D, NLX26 Only) |
||
SETTING CLOCK AND TIM
(N
NOTE: You do not have to set your clock before t Co feemaker w operate.
Plug in the power cord, press SELECT on |
o turn t Co feemaker o |
The |
|||
“O |
|
ight will illuminate and the clock will stop flashing, but it will not keep t |
|||
|
|
SETTING THE CLOCK |
|
|
|
1. P |
ower cord into your electrical outlet. The clock display will flash |
||||
|
until you set the time. |
|
|
|
|
2 |
|
y press and hold the “H |
M NU |
ons un |
ach |
|
the current time. |
|
|
|
|
3 |
he “P indicator light in the display w |
uminate to indicate PM ti |
|
||
|
|
PRESETTING THE BR |
NG TIME |
|
|
1. You must first set the clock to the correct time before setting the Auto brew.
2. P |
ss the PRESS |
OLD button, then alternately press the HOUR |
||
and MIN |
e time y |
t the C |
feemaker |
|
to start brewing. The Auto indicator light will flash during this time. |
||||
3. P |
ss the PRESS |
OLD button again to turn off the fl |
ng light. |
|
If the Auto light is not flashing, pressing the HOUR or M NUTE buttons w hange the clock time.
BRE |
AUT |
C LLY AT THE PR |
TIME |
|
1. Follow S |
s 1 – 5 in the “Brewing” Se |
|
||
2. P |
PRESS |
O D button. The “AUTO” indicator light should |
||
illuminate. |
|
|
|
|
3. B |
will begin at the preset time. The coffee will remain hot in |
|||
the decanter for 2 hours. To keep your coffee hot for an additional 2 hours, press the “SEL C “ON ator ligh should illuminate.
5

BRE WING COFFEE
If the clock display is flashing, refer to Section “ |
ng the Clock” be |
e continui . |
|||||||
1. |
O |
|
w |
- ut bre |
ba |
u left. Insert a MR. COFFEE® f |
r into the |
||
|
re |
o |
b black inner b |
w ba |
|
|
|
|
|
2. |
Add desired am unt of coffee, referring to the C |
fee Me |
u me C |
|
|||||
|
Shake lightly to level c |
. |
|
|
|
|
|||
3. |
B |
su |
|
filter is centered b |
closing the b |
w basket. |
|
||
4. |
F |
|
canter w |
water to desired capacity as marked on the side o t |
|||||
|
de |
|
. (1 cu |
= 5 o |
|
|
|
|
|
5. P ur the w |
|
cup m |
s in |
wat |
voir. NOTE: Fo |
e |
and accur |
illing, refer to |
|
serv |
. Pla |
e em |
decanter onto the warm plate. |
||
6 |
Turn you Coffeem |
w |
“O |
. When t offee stops flow |
the b |
w |
||||
|
c |
m |
. |
|
|
|
|
|
|
|
7 |
arefu |
|
o e the bl |
|
b w b |
and discard the used grounds a |
filter. |
|||
|
R |
bl |
re b |
|
d repl |
. NO |
: R mo |
e decanter from the warm |
||
|
plate b |
|
|
wivel ba |
. This wi l preve |
the dr stop valv from |
||||
cthe decanter lid.
8. To ma another pot of coffee, repeat Steps 1 – 7.
9. Turn your C |
|
|
when the d anter is empty. |
|
|
|
|||
WARNING: To a |
oid risk of personal inj |
m |
to property as a result of ov |
w, |
|||||
b |
u |
canter is sq arely centered und |
the brew ba |
uri |
|
||||
b w |
. Bre |
ed c |
round |
n brew b |
and decanter, |
||||
are v |
. H |
e wi care to avo |
calding. If brew b |
ve w |
|
||||
or if b |
w ba |
|
|
anter dur |
brew c |
, do not open |
|||
or han |
ba |
. U |
u Co feema |
|
and wait for conten |
to cool |
|
||
b |
|
andling. |
|
|
|
|
|
|
|
6
 Loading...