

Page 1

Please Read These Instructions
Before Using Your Mower
Operating Instructions
for model
Multiclip 501SP Lawnmower
with Mountfield RM45 engine
Product Code:
291502148/BQ
These instructions are an addition to and should be read in
conjunction with the Operator Manual enclosed with this mower
Call our Helpline if you have any problems:-
0845 600 2912
Open from 9:00am to 5:00pm Monday to Saturday
10.00am to 4.00pm on Sunday
Page 2
Thank you for purchasing a Mountfield lawnmower. This machine will give you many years of safe and
reliable service if operated in accordance with these instructions. Please read and understand these
Operating Instructions before using your mower, failure to do so could result in personal injury
or damage to the equipment.
NEVER TIP THE MOWER FORWARDS OR ON ITS SIDE AS THIS WILL FLOOD THE CYLINDER AND AIR
FILTER WITH OIL. To access the underside, lift the front wheels by lowering the handle until it rests on the
ground.
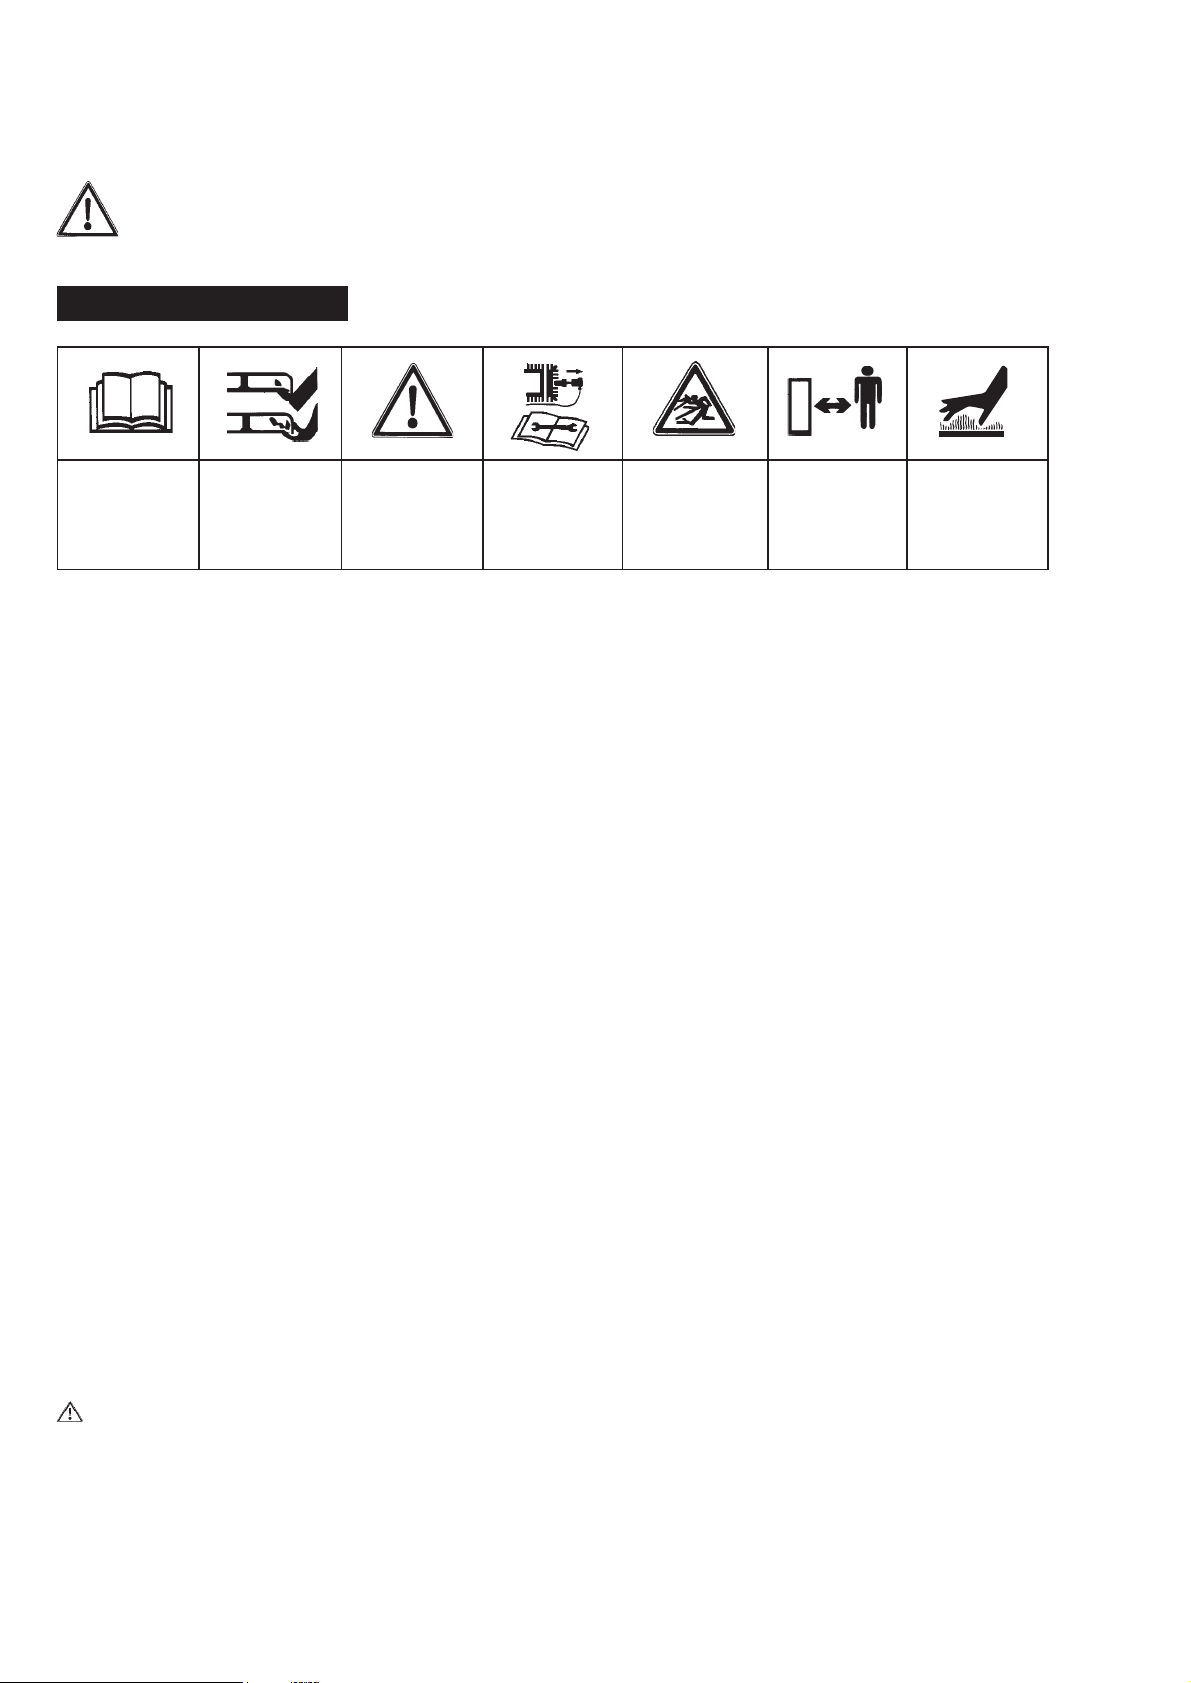
SAFETY PRECAUTIONS
Read these
instructions
before using
your mower.
Keep hands and
feet well away
from the cutter
blade.
Warning!
Remove the
spark plug lead
before working
on the mower.
Beware of
objects that may
be thrown up by
the blade.
Keep children,
bystanders and
pets away from
the work area.
Warning!
Hot surfaces
The following safety precautions must be observed at all times. Please read them very carefully.
GENERAL
• Know how to stop your mower quickly in an emergency. Understand all the controls and how they operate.
• Do not allow children or anyone who is unfamiliar with these instructions to use the mower. Local regulations
may restrict the age of the operator.
• Keep children, pets and other bystanders well away from the work area.
• Never put your hands, feet or any implement under the cutter deck. The cutter blade will continue to rotate for
some time after the engine is switched off.
STOP THE ENGINE AND DISCONNECT THE SPARK PLUG LEAD
• Before carrying out any adjustments, cleaning, inspection or maintenance.
• If your mower is damaged or vibrates excessively. Ensure the machine is in a safe working condition before it
is restarted.
• Before clearing any blockage.
STOP THE ENGINE
• Whenever you leave the mower unattended.
• Before refilling with petrol or oil.
PREPARATION
• Wear sturdy footwear and long trousers when using the mower. Never go barefoot or wear open sandals.
Avoid loose clothing that may snag on moving parts.
• Check the work area and remove any stones or other debris that may be thrown up by, or cause damage to, the
cutter blade.
• Before use ensure that the mower is in a safe working condition. Inspect the cutter blade for damage; check
safety devices and guards; check that all nuts, bolts and screws are secure.
• Never use the machine without a silencer; or with a faulty silencer.
FUEL SAFETY
WARNING! – PETROL IS HIGHLY FLAMMABLE AND EXPLOSIVE UNDER CERTAIN CONDITIONS.
• Store petrol in a cool place and only in containers specifically designed for the purpose.
• Refuel outdoors only, with the engine stopped. DO NOT SMOKE while refuelling.
• After refuelling, replace the fuel tank cap and the petrol container cap securely.
• Never remove the fuel tank cap, or add petrol, when the engine is hot or when it is still running.
• If any petrol is spilt do not attempt to start the engine. Move the mower away from the area, clean up the
spillage and allow the fumes to dissipate before starting the engine.
Page 3
OPERATION
• Do not operate the engine in a confined space. Exhaust fumes contain CARBON MONOXIDE, an odourless and
POISONOUS gas.
• Mow only in daylight or good artificial light.
• Check the oil and fuel levels before starting the engine.
• Disengage the engine brake and drive clutch before starting the engine.
• Start the engine in accordance with the instructions and with feet well away from the cutter blade.
• Do not tilt the mower when starting the engine.
• Do not change the engine settings. If adjustments are necessary, contact your dealer.
• Operate the machine at a comfortable walking pace, never run behind the mower.
• Avoid operating the machine on wet grass whenever possible.
• Take care when working on slopes. Mow across the slope, never up and down, and exercise caution when
changing direction. Do not use the mower on slopes of more than 20 degrees.
• Exercise extreme caution when reversing or pulling the mower towards you.
• Stop the cutter blade when crossing surfaces other than grass and when transporting the mower to and from the
work area.
• Never pick up or carry the mower when the engine is running.
STORAGE & MAINTENANCE
• To reduce the risk of fire, keep the mower and petrol storage areas free of grass, leaves and grease.
• Check the mower and grass collector regularly to ensure the machine is in a safe working condition. Replace any
worn or defective parts. Only use genuine replacement parts.
• Store the mower in a dry, secure place out of the reach of children and well away from any fire hazard.
• Allow the engine to cool before storage. If the fuel tank has to be drained, this should be done outdoors.
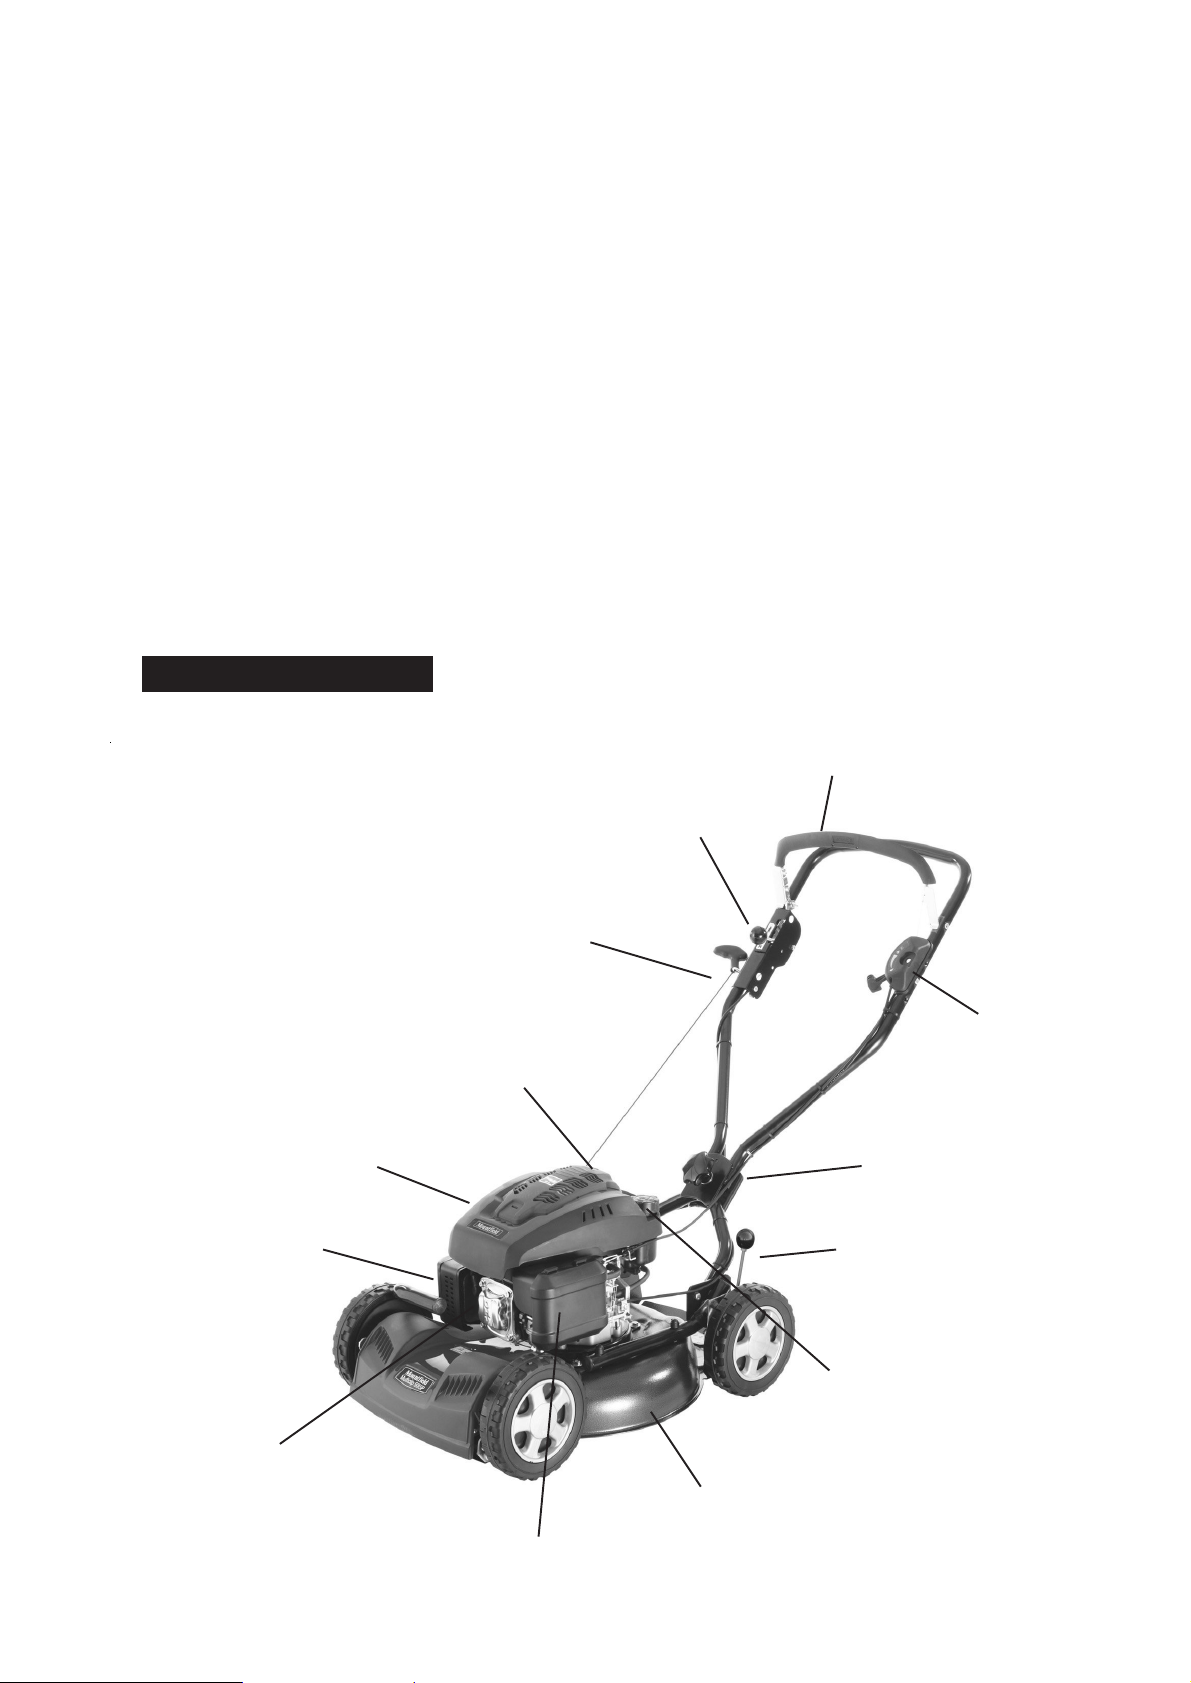
KNOW YOUR MOWER
Engine
Exhaust
Pull Cord & Guide
Oil Filler Cap/Dipstick
(located at rear of engine)
Operator Presence
Control (OPC)
Lever
Drive Clutch
Lever
Throttle Control
Handle
Securing Knob
Height of Cut Adjuster
Spark Plug
Fuel Filler Cap
(located at rear of
engine)
Cutter Deck
Air Filter
Page 4

HOW TO GET MOWING
Y our Mountfield lawnmower does not contain petrol or oil and these must be added before use. Running
the mower with insufficient oil can cause serious damage to the engine and will invalidate your
warranty.
NEVER TIP THE MOWER FORWARDS OR ONTO ITS SIDE AS THIS WILL FLOOD THE CYLINDER
AND AIR FILTER WITH OIL.
T o access the underside of the machine lift the front wheels by lowering the handle to the ground.
Carefully remove the mower from the carton and read these Operating Instructions. An Owner’s Manual
for the engine is also included, please read this before starting the engine.
HANDLE ASSEMBL Y (Figure 1)
• Fit the upper part of the handle (1) to the lower part (2) using the knob (3) and washer (4) supplied.
• Engage the Operator Presence Control (OPC) lever to release the engine brake. Pull the starter cord (5), fit it into
the cord guide (6) and tighten the cord guide fixing nut (7).
• Use the cable ties (8) to fit the OPC cable and clutch cable to the handle assembly . T ake care that the cables will
not impair adjustment of the handles.
• Before starting work check that the lower handle securing screws (9) and the adjusting knob (3) are fully tight-
ened.
Figure 1
HANDLE ADJUSTMENT (Figure 2)
• The upper part of the handle (1) can be offset to either side
to facilitate working near walls or hedges.
• Loosen the knob (3) move the upper handle to the desired
position and retighten the knob.
Figure 2
Page 5

ST ARTING YOUR MOWER
Read and understand the Safety Precautions before using your mower.
• Put Mountfield 4-stroke, or an SAE 10W-30 oil, in the oil filler (Figure 3). Do not overfill, the oil tank capacity is
0.55 litre. Mountfield oil, part number MX855, is available from any Mountfield stockist or B&Q store.
• Fill the fuel tank with UNLEADED petrol. Use only clean, fresh petrol - stale fuel may contain deposits that will
clog the carburettor. Do not overfill, the petrol level should be below the bottom of the fuel tank neck..
• Ensure that the spark plug lead is securely connected to the spark plug.
Pull Cord
Handle
Oil Filler Cap/
Dipstick
Exhaust
Figure 3
• Move the throttle control to the “Choke” positiion (Figure 4).
• Pull and hold the Operators Presence Control (OPC) lever against the handle to disengage the engine brake.
THE ENGINE WILL NOT START, OR CONTINUE TO RUN, UNLESS THE OPC LEVER IS HELD AGAINST
THE HANDLE.
• Pull the starter cord with a strong smooth pull. Do not remove the pull cord from the guide.
• When the engine starts move the throttle control from “Choke” to the “Fast” position.
NOTE: Using the choke is usually unnecessary when starting a warm engine. However , in cool weather it may still be
necessary to use the choke to start the engine.
Fuel Filler Cap
Air Filter
Spark Plug
Figure 4
ENGAGING THE DRIVE (Figure 5)
• The forward drive is operated by moving the clutch control lever (1)
towards the operator. Do not engage the drive unless the engine is
running.
• T o dis-engage the drive move the lever towards position “N”.
• Releasing the Operator Presence Control (OPC) lever automati-
cally moves the drive lever (1) to position “N” stopping forward movement.
STOPPING YOUR MOWER
• Move the throttle control lever to the “Slow” (tortoise) position.
• Release the Operators Presence Control (OPC) lever; this will
engage the engine brake and operate the ignition safety cut out device.
HEIGHT OF CUT ADJUSTMENT (Figure 6)
This mower has a MULCHING system which cuts the grass into fine
particles which are blown down into the base of the turf to decompose.
There are no grass clippings left to be collected.
T o obtain the best result s from your mower:
• operate the mower with the engine running at a high speed (full
throttle)
• do not cut the grass when it is wet
• cut no more than 1/3 off the length of the grass at a time
• ensure the underside of the cutter deck is kept clear of grass debris
• always use a sharp cutter blade
Figure 5
Figure 6
T o adjust the height of cut:
• stop the engine and disconnect the spark plug.
• put the mower on a level surface.
• adjust the cutting height lever (1) by pulling outwards and moving into the required position.
Page 6

BEFORE EACH USE
• Always ensure that the mower is in a safe working condition. Inspect the cutter blade for damage; check safety
devices and guards; check that all nuts, bolts and screws are secure.
• Check the oil level as follows:
a ) Remove the oil filler cap and wipe the dipstick clean (Figure 7).
b) Insert the dipstick into the filler neck and tighten down again.
Remove the dipstick and check the oil level; oil should be at the MAX
mark. The oil tank capacity is about 0.55 litre or 18 fluid oz.
c) If the oil level is low add Mountfield oil part number MX855 or a
SAE 10W-30 oil, to the upper limit on the dipstick. Do not overfill; the
oil level should not be above the FULL mark.
• Fill the fuel tank with unleaded petrol. Do not overfill; the level should
be below the bottom of the fuel tank neck.
MAINTENANCE
Stop the engine and disconnect the spark plug lead before working on the machine. DO NOT TIP
THE MOWER FORW ARD OR ONTO ITS SIDE AS THIS WILL FLOOD THE CYLINDER AND AIR FIL TER
WITH OIL. To access the underside of the machine, lift the front wheels by lowering the handle
until it rests on the ground.
CUTTER BLADE
Examine the cutter blade regularly for wear or damage.
• A slightly worn blade can be re-sharpened by your local dealer .
• If the blade is damaged it should be replaced. Replacement blade kits
are available from your Mountfield stockist. If in doubt refer to your
dealer, or telephone 0845 600 2912.
Figure 7
CLUTCH (Figure 8)
• Once or twice a year clean the area around the transmission and drive
belt.
• Remove the guard (1) by unscrewing the screws (2) and releasing the
couplings (3).
• Using a brush or compressed air carefully remove any grass and dirt
from aound the transmission and drive belt.
• Always refit the guard (1).
ENGINE
An engine manufacturer’s Owner’s Manual is supplied with your mower.
Please read this, it provides detailed information on engine operation,
maintenance and battery care. Repair work other than routine maintenance,
should be carried out by an authorised dealer.
STORAGE
A little time spent on your mower after use will ensure many years of reliable mowing. T o access the underside of the
cutter deck, ensure the spark plug lead is disconnected, then lift the front wheels by lowering the handle until it rests
on the ground. Do not tip the mower onto its side, as this will flood the air filter with oil.
AFTER EACH USE
• Remove any grass pulp from the underside of the cutter deck using a non-metallic instrument such as a piece of
wood. Take care not to damage the paintwork.
• Examine the cutter blade for any damage. A damaged blade may upset the balance of your mower and cause
excessive vibration, if in doubt refer to your dealer .
• The upper handle can be removed and folded down to reduce the amount of storage space required. T ake care
not to trap any of the operating cables when removing or refitting the handle.
• S tore the mower in a clean, dry area well away from any naked flames, sparks or heat source.
Figure 8
LONG TERM - If you are not using your mower for more than 28 days.
• Give the machine a thorough clean, paying particular attention to the underside of the cutter deck.
• Lubricate all moving parts.
• At the end of the season, empty the fuel tank either by running the mower out of fuel or tip the machine backwards
and onto the back right wheel to drain the fuel into a suitable container . Drain the carburettor by loosening the
drain screw , retighten the drain screw.
Page 7

N O I T U L O SM E L B O R P
C hec k th ere i s a mple clea n, fr esh f uel in th e tan k.
En gine w ill not start
C hec k the cutter bl ade is no t fouling the gro und preven ting free rota tion .
C he ck the Operators Pre sence C ontrol (OP C) leve r is f ully rele ased.
En gine w ill not stop
Re mov e sp ark plug le ad to stop eng ine using insul ated gl oves and refe r t o d eal er.
Stop th e en gine an d dis connec t the spar k plu g lea d using hea t resista n t glove s.
C hec k blade a ttach men t bo lt is tight.
Fa il ure to cut gr as s prop erly
C hec k con dition of bl ad e. If s erious ly w orn or dama ged repl ace with a new one .
Stop th e en gine an d dis connec t the spar k plu g lea d using hea t resista n t glove s.
C hec k and ma ke s ure there i s no build up o f g ras s inside the ca sing.
C he ck to en sure th e engine is r unn ing a t the correc t spe ed, ( a pproximat ely 300 0rpm ).
Raise the height of cut to inc rease airow.
Do not cu t more than one third o the length of the grass at any one time.
Fa il ure to col lect grass pro perly
Ma chin e vi brates e xc ess i ve ly
This will ce rtain ly in dica te th at th e b lade ha s be co me badly d a mag ed. St op the e ngi ne, disc onnect the
sp ark p lug lea d and e xamine the blad e asse mb ly. Refe r t o yo ur lo cal d ealer.
FAULT FINDING
CERTIFICATE OF CONFORMITY
EC DECLARATION OF CONFORMITY
The company ................................................... GGP ITALY SPA - Via del Lavoro, 6
31033 Castelfranco V.to (TV) ITALY
Certify that the lawnmower, walk behind with
combustion engine ...........................................
Widht of cut .....................................................
Engine ..............................................................
Tested by .........................................................
Conforms to the specications of directives .....
Conformity assessment procedure followed ......
Measured sound power level ............................
Guaranteed sound power level .........................
Reference to harmonised standards..................
Sound pressure level at the ear measured in compli-
ance with 81/1051/EEC ..............................................
Viration level at the handle (EN 1033) .......................
Castelfranco Veneto (TV) - ITALY 01-10-2008
Multiclip 501SP type MCS 504 TR
48 cm
GGP • WBE 0702
SNCH, 11 route de Luxembourg
L-5230 SANDWEILER
98/37/EEC
89/336/EEC ~ 2004/108/EC - 2000/14/EC
ANNEX VI
93 dB(A)
94 dB(A)
EN 836 - EN 292-2- EN 1033 - EN ISO 3767
EN ISO 14982
79 dB(A)
9,5 m/s
2
S. Ferrari (General Manager)
Page 8

Guarantee
Service Record
1st Service 2nd Service
:ecivreS fo etaD:ecivreS fo etaD
:euD ecivreS txeN:euD ecivreS txeN
:erutangiS s’relaeD:erutangiS s’relaeD
:pmatS s’relaeD:pmatS s’relaeD
GGP UK Limited undertakes to provide a full guarantee against defective materials or workmanship
for two years from the date of purchase subject to the mower receiving an annual service.
If the machine is used for commercial purposes; i.e. for hire; or by contractors, caravan sites or
similar users, this guarantee period shall be 90 days.
If any part or parts are found to be defective within the guarantee period, GGP UK Limited, via their
authorised dealer, will effect the repair or replacement at no charge to the owner providing that the
fault is reported direct to the dealer. All repairs must be carried out by an authorised Mountfield
dealer. Delivery and collection
under the terms of this guarantee.
This guarantee is not transferable. Proof of purchase will be required in the event of a claim.
This guarantee does not apply to the routine replacement of parts that are subject to normal wear and
tear – or to normal service and maintenance parts. This guarantee does not cover faults caused by
neglect or misuse.
The engine manufacturer guarantees the engine fitted to this machine.
of the machine is the owner’s responsibility and not covered
This guarantee is in addition to, and does not detract from, the contractual rights of the owner under
statute or common law.
On delivery of your new Mountfield mower, we suggest
that you complete the box to the right.
The information for your machine is on the serial
number label, which is fixed on the cutter deck at the
base of the handles. You will be asked for these details
if you
have any problems or require spare parts.
Please keep your receipt, proof of purchase will be
required in the event of a claim.
Unit 8, Bluewater Estate, Bell Close, Plympton, Plymouth, Devon, PL7 4JH, England.
GGP UK LIMITED
Part Number 171503945/0
 Loading...