

Page 1
FCC Statements
Moultrie Products
MCG-13201
A-30iA-30
Note: changes and modifications not expressly approved by the party responsible could void the user’s authority to operate this device.
This device complies with Part 15 of the FCC Rules. Operation is subject to the following two conditions: (1) This device may not cause harmful interference, and (2) this device must accept any
interference received, including interference that may cause undesired operation.
NOTE: THE MANUFACTURER IS NOT RESPONSIBLE FOR ANY RADIO OR TV INTERFERENCE CAUSED BY UNAUTHORIZED MODIFICATIONS TO THIS
EQUIPMENT. SUCH MODIFICATIONS COULD VOID THE USER’S AUTHORITY TO OPERATE THE EQUIPMENT.
NOTE: This device complies with the limits for a Class B digital device, pursuant to Part 15 of the FCC Rules. These limits are designed to provide reasonable
residential installation. This device generates,
communications. However, there is no guarantee that interference
determined by turning the equipment o and on, the user is encouraged to try to correct the interference by one or more of the following measures:
- Reorient or relocate the receiving antenna.
- lncrease the separation between the equipment and receiver.
- Connect the equipment into an outlet on a circuit dierent from that to which the receiver is connected.
- Consult the dealer or an experienced radio/TV technician for help.
uses, and can radiate radio frequency energy and, if not installed
will not occur in a particular installation. If this device does cause harmful interference to radio or television reception, which can be
Moultrie Products
MCG-13202
and used in accordance with the instructions, may cause harmful interference to radio
Moultrie Products
MCG-13212
A-35
protection against harmful interference in a
Instructions for A-Series Digital Game Cameras
THANK YOU for your purchase of an A-Series Digital Game Camera. Please read this booklet before using the unit. If you should
have any questions about this product or any other Moultrie product, please contact us using the information on the back of
this booklet. Please register your camera at www.moultriefeeders.com/warranty to activate your warranty.
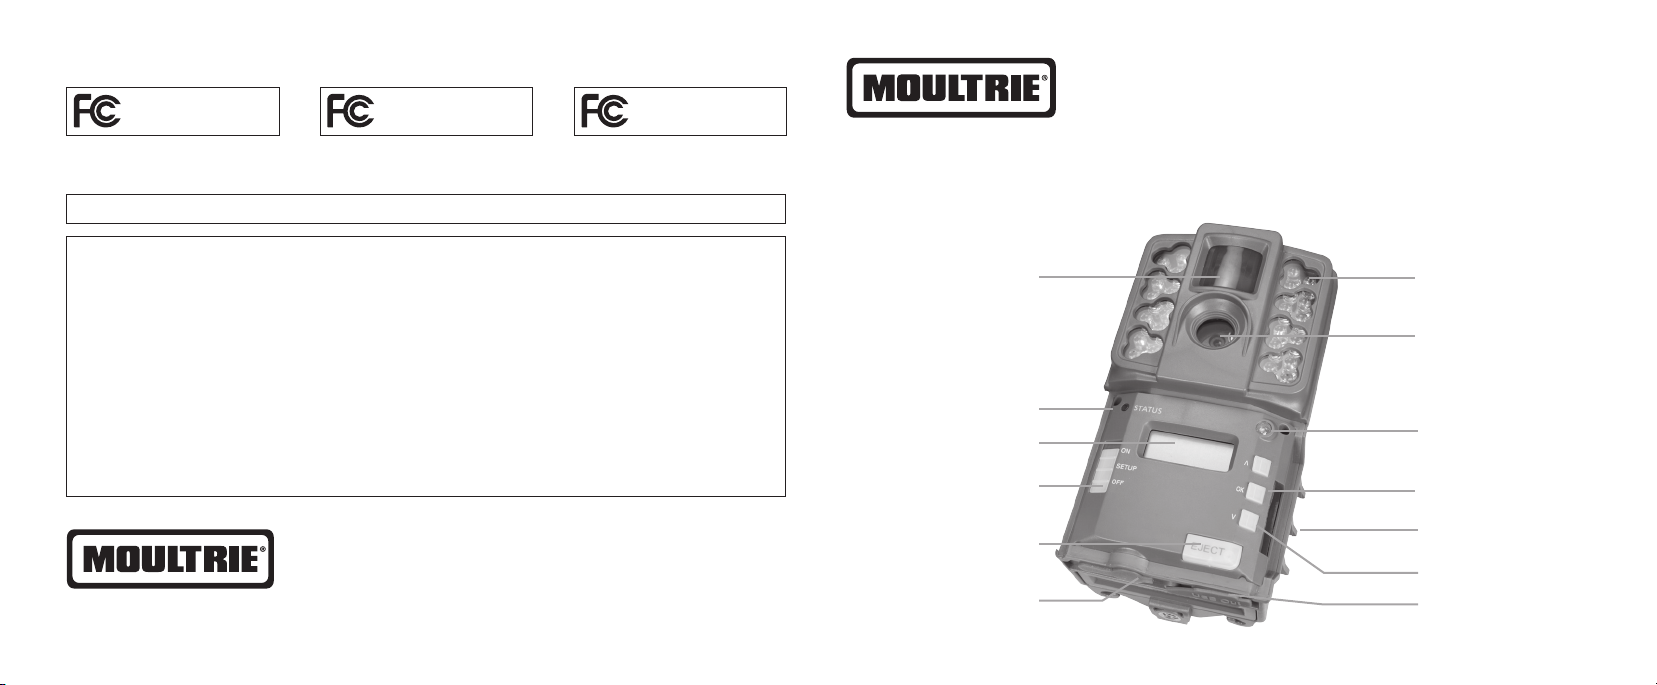
Motion Sensor
Status Indicator
LCD Display
Infrared LED Flash
Camera Lens
Light Sensor
www.moultriefeeders.com
PRADCO Ou tdoor Brand s • 3280 Highway 31, Ste B • Caler a, AL 35040
12012016 / MCG-13201 • MCG-13202 • MCG-13212
Mode Selector Switch
Release for
Battery Compartment
External Power Port
OK Button
SD Card Slot
Up/Down Buttons
Micro USB Port
Page 2

QUICK START INSTRUCTIONS
A
Important Battery lnformation
Battery Installation
Open the c amera cover and inst all 8 AA Alkaline or Li thium batterie s. Make sure that the (+ and -) polar ities match the pol arities indica ted inside
the battery chamber.
Note: Anyt ime you load or unloa d batteries, make su re that the camera i s OFF. If using 12V DC Power Panel P lug, do not remove inter nal batteries .
Insert SD Card
You will need to op en the front cover to i nsert an SD memor y card. You can inser t a
SD Card up to 32 GB (not in cluded). Insert t he SD card in the direc tion indicate d on the
card, unt il you hear an audible cl ick.
Note: Camer a will not operate wi thout an SD memor y card installed . Ultra/turbo SD
cards are not recommended.
- Only use Alk aline or Lithium ba tteries. We recom mend the use of Energ izer batteries .
- Do not mix ol d and new batterie s. Always replace ALL t he batteries at t he same time.
- When the ca mera is not in use, plea se remove the batte ries.
Moultrie Limited Warranty
This prod uct has been thor oughly tested and i nspected bef ore shipment. It is gu aranteed from de fects in mater ial and workmanshi p from the
date of purc hase for 2 years. Und er this limited guar antee we agree to repla ce or repair free of c harge any part or p arts which have be en found to
be defec tive in original m aterial or workman ship. Should you requ ire in-warrant y service, call o ur Customer Ser vice Departme nt. If your problem
cannot be a ddressed over the t elephone, we may need yo u to send us your defec tive produc t plus proof of purc hase.
You must regis ter your camera at w ww.moultriefeeders.com/warranty to acti vate your 2-year warran ty.
Troubleshooting
Please visit www.moultriefeeders.com/contact-us for troubleshooting and helpful tips.
Returns and Repairs
Power ON
Slide the Mode Swit ch to the Setup position. Th e battery level w ill appear on the
LCD Display. The ca mera has powered up.
2 7
Please visit http://www.moultriefeeders.com/return-policy and complete the fo rm or our Service D epartment wi ll gladly answer any que stions
you have. Call 80 0-653-3334, Monday - Friday, 8:0 0 AM to 5:00 PM CST.
MOULTRIE MOBILE® COMPATIBILITY
Your camera is co mpatible with ou r Moultrie Mobile® ce llular service w hen combined with t he Field Modem MV1. Please v isit www.moultriemobile.com
for more information.
Page 3

CAMERA SETUP (cont.)
B
Setting Camera ID
Use the Up/Dow n buttons to choose between nine dierent numbers (1-9) to help identify
your came ras (i.e. “CAMERA 3” will b e marked on the info s trip given 3 was se lected).
Press OK to lock in your se lection and move t o the next selec tion.
Reset Picture Count/Erase Images/Format Card
You can reset t he picture count o n the camera. Use th e Up/Down buttons to ch oose
betwe en Yes or No. Pres s the OK button to conr m the selectio n. “Yes” will reset
le number t o start from 0 001 and erase all ima ges stored on th e SD card.
NOTE: This w ill also format yo ur SD card for use i n your camera.
Mounting with a Strap
Close cover a nd place camera on a tr ee or pole approxi mately 3 ft. high.
Hi
Thread the m ounting strap th rough the mountin g strap slots on th e back
of the came ra and secure.
Hint: If you are moun ting camera to cover a t rail, face the came ra down
the trail t ilted at a slight downw ard angle.
Face the camer a north or south t o avoid over exposure f rom the sun.
Clear bru sh away from camera f ront to avoid false t riggers from t he wind.
Eyelet
Hi
SET
TIME
SET
DATE
SET
OPTIONS
HOUR
MONTH
DETECTION
DELAY
OK
OK OK
OK
CAPTURE
MODE
MINUTE
DAY
OK
CAMERA
ID
NO
Trail
YES
OK
AM/PM
OK
YEAR
OK
DELETE/
OK
FORMAT SD
Trail
Mounting
Strap
36
Page 4

CAMERA SETUP
B
Power ON
Slide the power switch to the ON position. The battery level will appear on the LCD Display
for 2 seconds.
Hi
After 2 seconds, the camera will display the countdown. When the countdown timer reaches
“00”, the display will turn o and the camera will OK Capture Mode.
Hi
If the camera detects that the battery level is 15% or below, the Low Battery screen will
appear and the unit will turn o.
Hi
To begin modifying the camera settings, slide the switch to the SETUP position. The camera will display the currently set time. Use the UP and DOWN
arrow keys to change the currently ashing option. Once setting is adjusted to the desired option, press OK to lock in the setting and move to the next
eld/option.
Note: while in SETUP mode, the motion sensor will detect movement and illuminate the STATUS LED on the front of the camera for ~1 second.
You can use this feature to ensure camera is properly aimed to detect movement in the desired target area.
99
09
Setting Time and Date
While the camera is in the Setup mode, the LCD display will show the time.
Press the OK button and the selection will ash. Use the U P/Dow n buttons to
change the s election. Pre ss the OK button to lock i n the selection an d move to
the nex t selection. Re peat the process to s et the year, month and day.
Detection Delay Setting
Detection Delay determines the number of minutes between pictures when
an animal is de tected and rema ins in range. Press th e OK button. Use the
Up/Down but tons to choose bet ween (0, 15, 30 sec, 1 or 5 min). Press OK to
lock in your s election and m ove to the next sel ection.
Setting Capture Mode
Use the Up/Dow n buttons to choos e between 5 die rent modes:
1 Photo/Low Re solution, 1 Photo/ High Resolution , 3 Photos/Low Resol ution,
3 Photos/H igh Resolution an d High/Low Video. Pr ess OK to lock in your sel ection
and move to the n ext select ion.
The on-s creen icons fo r each mode are sh own to the right:
AM
Hi
AM
Hi
Lo
1
Hi
1
Lo
Hi
Hi
Lo
1 Photo, Low Re solution
1 Photo, High Resolution
3 Photos, L ow Resoluti on
3
3 Photos, High Resolution
3
High Resolution Video
Low Resolution Video
4 5
 Loading...