

Page 1

AUSTIN n°3 27/04/06 15:40 Page a1
Page 2
AUSTIN n°3 27/04/06 15:40 Page a3
Page 3

11
Thank you for showing confidence in our product range. Please read these instructions carefully.
SAFETY SYSTEM
This appliance is fitted with two safety mechanisms. To start the juice machine, the pulp collector (I) must be
correctly in position and the cover (E) must be properly secured by the clamp (J). Opening the clamp (J) or
removing the pulp collector (I) will stop the juice machine. At the end of a cycle, place the switch (K) in the “0”
position and wait until the sieve stops completely before removing the cover.
SAFETY INSTRUCTIONS
- Always check the sieve (F) before use.
- Never use the juice machine if the sieve is broken or damaged or if there is visible cracking or crazing or
the sieve is torn. If there is any evident damage to the sieve, contact an Approved Service Centre. Handle
the sieve with care (sharp edges).
- For your safety, this appliance is compliant with applicable standards and regulations:
* Low Voltage Directive
* Electromagnetic Compatibility Directive
* Regulations governing materials in contact with food
* Environment: Plastics Directive, 2002/95/EC
- Check that the supply voltage shown on the rating plate of the appliance matches that of your electrical
system. Any connection error will invalidate the guarantee.
- Never place or use this appliance on a hotplate or near an open flame (gas cooker).
- Do not immerse the motor unit or put it under running water.
- If the supply cord is damaged, it must be replaced by the manufacturer, an approved after-sales service or a
similarly qualified person, in order to avoid any danger.
- Always use this product on a solid , stable work surface that is not subject to water splashes. Do not turn it
over.
- Never dismantle your appliance. Apart from the usual care and cleaning, the appliance requires no
maintenance on your part.
- The juice machine must be unplugged:
* if there is a problem or fault during operation,
* before assembly, disassembly or cleaning,
- Never pull on the supply cord to unplug the appliance.
- Only use an extension after checking that it is perfect condition.
-A domestic appliance must not be used:
* if it has fallen on the floor,
* if it is damaged or incomplete.
- In such a case, or for any other repair YOU MUST contact an Approved Service Centre.
- This product has been designed for domestic use only. Any commercial use, inappropriate use or failure to
comply with the instructions, the manufacturer accepts no responsibility and the guarantee will not apply.
- This appliance is not designed to be used by persons (including children) of reduced physical, sensorial or
mental capacity or persons with no experience or knowledge, unless they are instructed and supervised in
- The use of the appliance by a person responsible for their safety.
- Young children must be supervised to ensure that they do not play with the appliance.
- Only use original accessories and components. We cannot accept any responsibility if this is not the case.
- Never put your fingers or any other object in the filler tube while the appliance is in operation. Always use
the pusher provided for the purpose.
- Never open cover before the sieve (F) has ceased rotating.
- Do not remove the pulp collector (I) while the appliance is running.
- Always unplug the appliance after use.
AUSTIN n°3 27/04/06 15:40 Page 11
Page 4

12
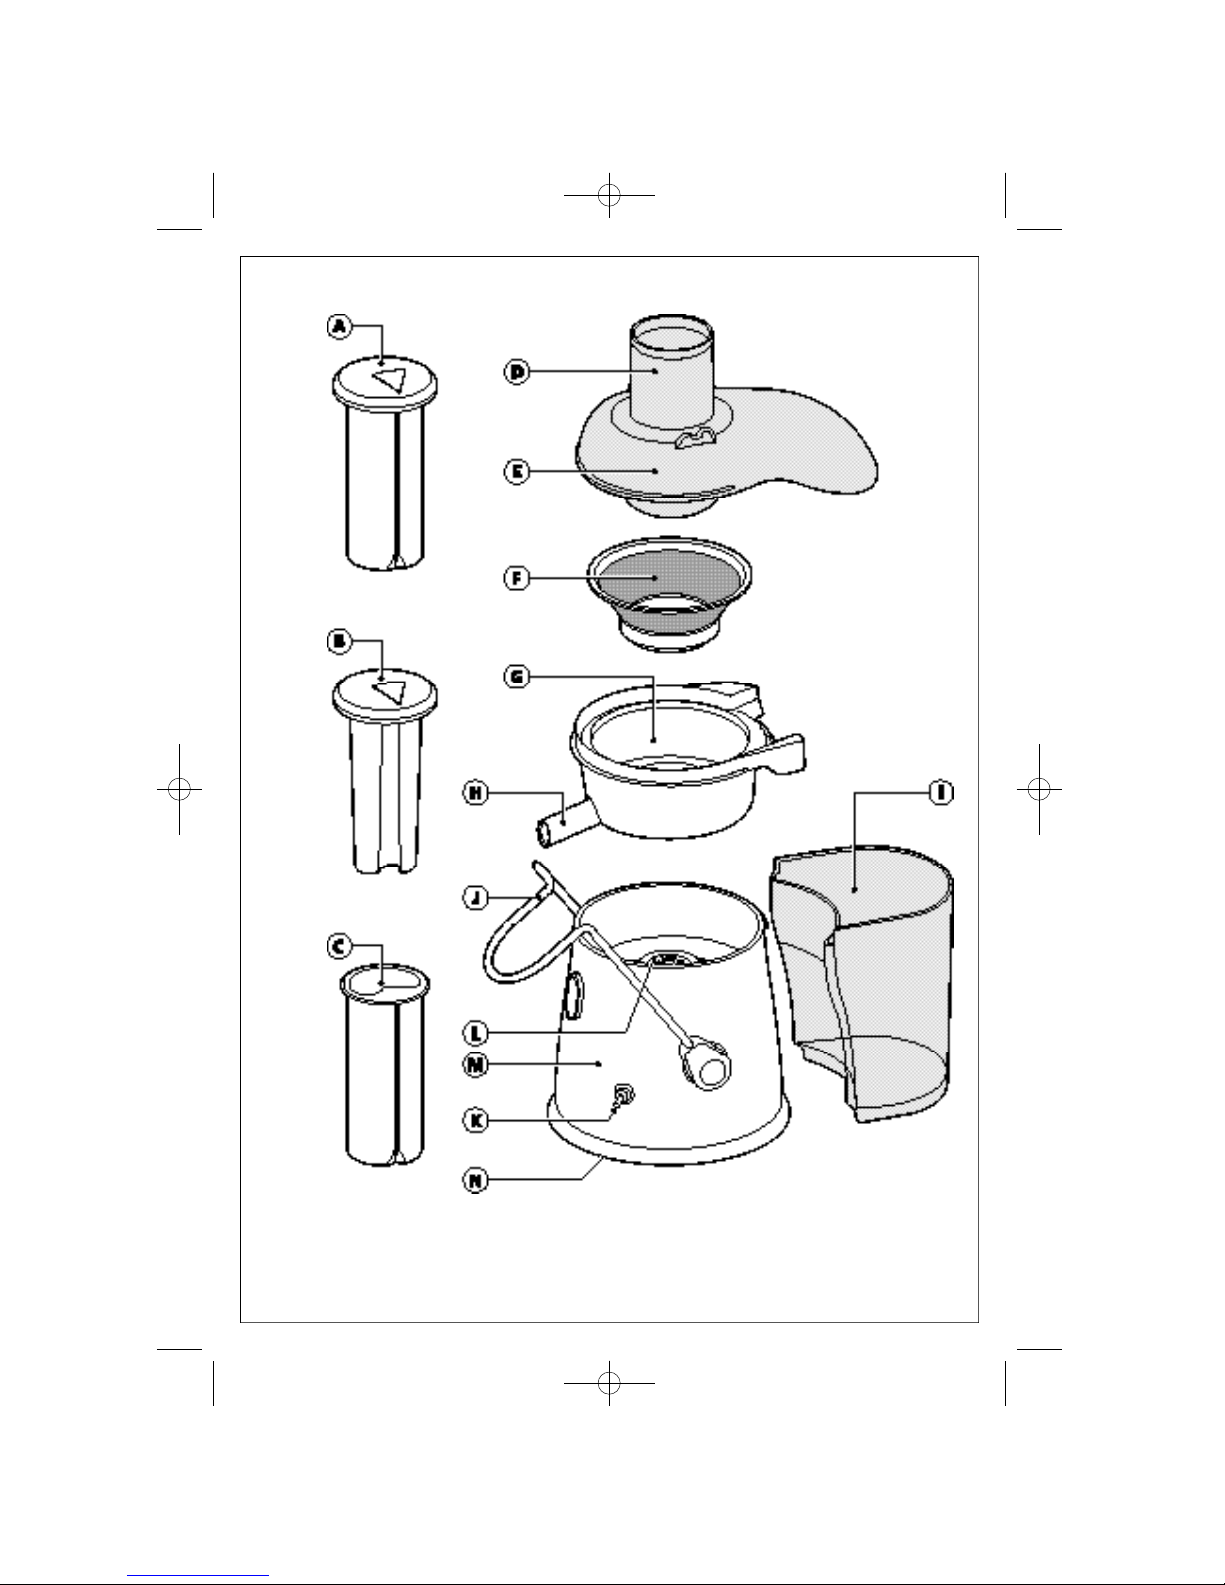
DESCRIPTION OF THE APPLIANCE
A Large pusher
B Small pusher
C Reducer for small pusher
D Feed tube
E Cover
F Sieve
G Juice collector
H Pouring spout
I Pulp collector
J Clamp
K Switch
L Drive shaft
M Motor unit
N Cord-tidy
O Brush
BEFORE USE
We recommend that you wash the removable parts (parts A, B, C, E, F, G & I) after unpacking the appliance (see chapter CLEANING AND CARE).
Unpack the appliance and then place it on a solid , stable work surface, slip back the clamp (J), remove the
reducer for the small pusher (C), the cover (E), take out the protective card on the sieve (F) then remove
the sieve (F) and the juice collector (G).
STARTING
Fit the pulp collector (I) on the rear of the appliance, tipping it forward slightly to
slide the collector under the safety device.
Fit the juice collector (G) in the appliance, tipping it slightly forward to pass the
pouring spout (H) through the hole provided.
Place the sieve (F) in the juice collector (G). Ensure that the sieve is correctly
clipped onto the drive shaft (L) (audible click).
Fit the cover on the juice collector (E) on the juice collector (G), ejection spout
to the rear.
AUSTIN n°3 27/04/06 15:40 Page 12
Page 5

13
Click the clamp (J) into place over the cover (E).
Position a glass or other receptacle under the pouring spout (H) in front of the
appliance.
Plug in the appliance: You can use the cord-tidy (N) to adjust the length of the
cord.
Which pusher to use?
Ingredients
Apples
Pears
Carrots
Cucumbers
Pineapple
Grapes
Tomatoes
Celery
Recommended pusher
A (large pusher)
B (small pusher) + C
(reducer for small pusher)
A
A
B + C
B + C
B + C
B + C
A
B + C
Approx. weight
(in kg)
1
1
1
1 (about 2 cucumbers)
1
1
1.5
1.5
Quantity of juice
obtained in cl (*)
1 glass = 200ml
(approximately)
65
60
60
60
30
45
90
95
(*) The quality and quantity of juice varies greatly according to the date of harvest and the particular variety of
fruit or vegetable. The quantities of juice indicated above are therefore approximate.
- Never use the small pusher (B) without its reducer (C).
- Slide the reducer (C) into the feed tube (D), aligning the groove in the reducer with the small ridge in the
feed tube then lock it in the direction indicated.
- Start the appliance using the switch (K):
- Insert the fruit or vegetables through the feed tube (D).
- The fruit and vegetables must be inserted while the motor is running.
- Do not press too hard on the pusher. Do not use any other utensil. NEVER push with the fingers.
- When you have finished, stop the appliance, using the switch (K) and wait for the sieve (F) to
stop completely.
- When the pulp collector (I) is full, or the flow of juice slows, empty the collector and clean the sieve (F).
Choosing the wrong pusher may cause the appliance to vibrate abnormally.
AUSTIN n°3 27/04/06 15:40 Page 13
Page 6

14
USEFUL ADVICE
- Wash the fruit carefully before stoning.
- You do not need to remove the skin or peel. You only need to peel fruit with thick (and bitter) skin: citrus
fruit, pineapple (remove the centre stalk).
- Certain types of apples, pears, tomatoes etc. will fit in the feed tube whole, thanks to the “Direct Fruit
System” (74 mm maximum diameter), so choose the appropriate type of fruit or vegetable.
- It is difficult to extract juice from bananas, avocados, blackberries, figs, aubergines and strawberries.
- The juice machine should not be used for sugar cane and excessively hard or fibrous fruit.
- Choose fresh, ripe fruit and vegetables, they will yield more juice. This appliance is suitable for such fruit as
apples, pears, oranges, grapes, pomegranates and pineapple and such vegetables as carrots, cucumbers,
tomatoes, beetroot and celery.
- If you centrifuge over-ripe fruit, the basket will be blocked more quickly.
- Important: All juice must be consumed immediately. On contact with air, it is very quickly oxidised, which
can change taste, colour and, above all, nutritional value. Apple and pear juices quickly turn brown. Add a
few drops of lemon juice to slow this discoloration.
CLEANING AND CARE
- All removable parts may be cleaned in the dishwasher.
- This appliance is easier to clean immediately after use.
- Do not use scouring pads, acetone, alcohol (spirit) etc. to clean the appliance.
- The sieve must be handled with care. Avoid any mishandling that may damage it. Change your
sieve at the first sign of wear or damage.
- Clean the motor unit with a damp cloth.
- The sieve (F) can be cleaned with the aid of the brush (O).
WHAT TO DO IF YOUR APPLIANCE DOES NOT WORK?
PROBLEM
The appliance does not
work.
The appliance is giving off
a smell or is very hot to
the touch, is smoking or
making an abnormal noise
CAUSES
The plug is not inserted correctly:
The switch is not at “1”
The pulp collector (I) is not correctly fitted
The cover (E) is not properly clamped
The sieve (F) is not correctly fitted
The quantity of food being processed is too
great
SOLUTIONS
Connect the appliance to a
socket with the correct
voltage. Operate the switch
Check the fitting of the pulp
collector (I)
Check that the cover (E) is
properly fitted and clamped
Check the fitting of the sieve
(F)
Leave the appliance to cool
and reduce the quantity to be
processed
AUSTIN n°3 27/04/06 15:40 Page 14
Page 7

15
HELPLINE:
If you have any product problems or queries, please contact our Customer Relations Team first for expert
help and advice:
0845 602 1454 - UK
(01) 461 0390 - Ireland
or consult our website - www.moulinex.co.uk
ELECTRICAL AND ELECTRONIC PRODUCTS AT END OF LIFE
Environment protection first !
Your appliance contains valuable materials which can be recovered or recycled.
Leave it at a local civic waste collection point.
AUSTIN n°3 27/04/06 15:40 Page 15
 Loading...