

Page 1
Page 2

Français p. 3
English p. 9
Deutsch p. 15
Nederlands p. 21
Español p. 27
Português p. 32
Italiano p. 37
Dansk p. 43
Norsk p. 48
Svenska p. 53
Suomi p. 58
Türkçe p. 63
´‡‡‡‡‡d°‡‡‡‡‡‡w
p. 68
Page 3
A
A1
A2
A3*
A4*
A5
B
B1
C1
C
II
J1
H
G
J
D
E
F
K*
K2
K1
* selon modèle - depending on model - abhängig vom Modell - afhankelijk van het model - según modelo - consoante modelo - a seconda
del modello - afhængig af model - på enkelte modeller - beroende på modell - mallista riippuen - Modele bağldr -
•ºV «∞Luœ¥q
Page 4
1 2 3
4 5 6
7 8 9
10 11 12
Page 5

Page 6
FRANÇAIS
Nous vous remercions d’avoir choisi un appareil de la gamme Moulinex.
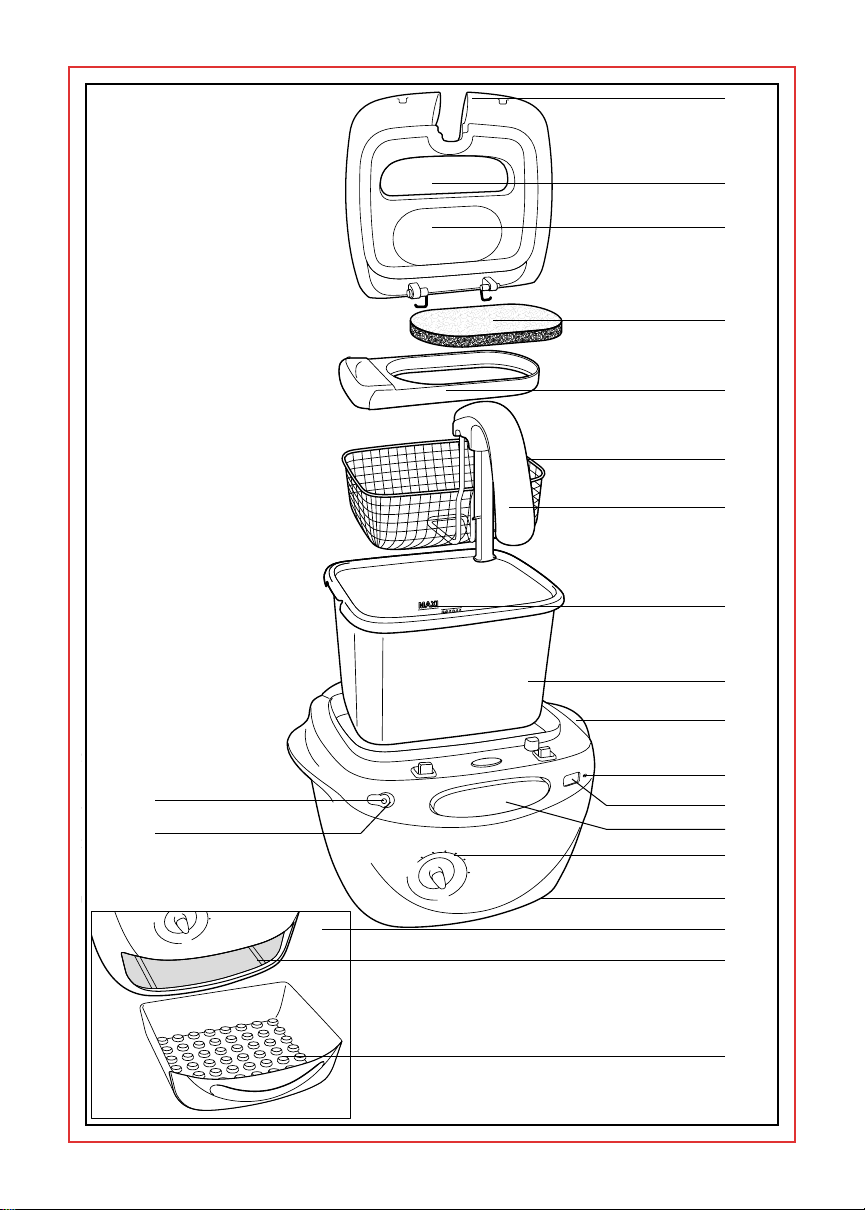
Description
Familiarisez-vous avec les différents éléments de votre friteuse. Dépliez le volet de la
couverture. Les chiffres cerclés correspondent aux numéros des dessins et les lettres aux
différents éléments.
A Couvercle à ouverture automatique
A1 Hublot en verre
A2 Zone de filtration des odeurs
A3 Filtre anti-odeur avec témoin de satura-
tion (selon modèle)
A4 Cartouche au charbon actif avec
témoin de saturation (selon modèle)
A5 Tiroir “Clean Express”
B Panier
B1 Poignée du panier
C Cuve amovible avec revêtement
anti-adhérent
C1 Repères Mini et Maxi du remplissage
de cuve
D Touche d’ouverture du couvercle
E Sélecteur de température
F Range cordon
G Bouton marche/arrêt
H Voyant de régulation de température
I Poignées de transport
J Minuteur électronique (selon modèle)
J1 Touche de réglage
K Maintien au chaud (selon modèle)
K1 Plat de maintien au chaud
K2 Logement du plat
Conseils de sécurité
- Lisez attentivement le mode d’emploi
avant la première utilisation de votre
appareil : une utilisation non conforme
au mode d’emploi dégagerait Moulinex
de toute responsabilité.
- Ne laissez pas l’appareil (en
fonctionnement ou à l’arrêt) à la
portée des enfants sans surveillance.
Ne laissez pas les enfants utiliser
seuls la friteuse. L’utilisation de cet
appareil par des personnes
handicapées doit être faite sous
surveillance.
-
Vérifiez que la tension d’alimentation de
votre appareil corresponde à celle de votre
installation, et que votre compteur
électrique supporte au moins 10 ampères.
Toute erreur de branchement annule la
garantie.
- Branchez impérativement votre appareil
sur une prise de courant reliée à la
terre. Le non respect de cette obligation
peut provoquer un choc électrique et
entraîner éventuellement des lésions
graves. Il est indispensable pour votre
sécurité que la prise de terre
corresponde aux normes
d’installation électrique en vigueur
dans votre pays. Si votre installation
ne comporte pas de prise de courant
reliée à la terre, il est impératif que
vous fassiez intervenir, avant tout
branchement, un organisme agréé qui
mettra en conformité votre installation
électrique.
- Votre appareil est destiné uniquement à
un usage domestique et à l’intérieur de
votre habitation.
- N’utilisez pas votre appareil s’il ne
fonctionne pas correctement ou s’il a été
endommagé. Dans ce cas, adressezvous à un centre service agréé Moulinex
(voir liste dans le livret service).
- Toute intervention autre que le
nettoyage et l’entretien usuel par le
client doit être effectuée par un centre
service agréé Moulinex.
- Débranchez l’appareil dès que vous
cessez de l’utiliser et lorsque vous le
nettoyez.
- Ne mettez pas l’appareil, le câble
d’alimentation ou la fiche dans l’eau ou
tout autre liquide.
- Ne laissez pas pendre le câble
d’alimentation à portée de mains des
enfants. Tenez toujours les enfants
éloignés.
- Le câble d’alimentation ne doit jamais
être à proximité ou en contact avec les
parties chaudes de votre appareil, près
d’une source de chaleur ou sur un
angle vif.
- Si le câble d’alimentation ou la fiche sont
endommagés, n’utilisez pas votre
appareil. Afin d’éviter tout danger, faites-
3
Page 7

les obligatoirement remplacer par un
centre service agréé Moulinex (voir liste
dans le livret service).
- Pour votre sécurité, n’utilisez que des
accessoires et des pièces détachées
Moulinex adaptés à votre appareil.
- Installez votre friteuse sur un plan de
travail éloigné d’une source de chaleur,
de tous risques de projections d’eau et
résistant à la chaleur.
- Un système de sécurité empêche le
fonctionnement de votre friteuse en cas
d’absence de la cuve amovible.
- Ne faites jamais fonctionner votre
friteuse sans avoir remis la cuve
amovible remplie de la quantité
nécessaire de corps gras.
-
La friteuse est protégée par un dispositif
de sécurité thermique qui, en cas de
surchauffe accidentelle, coupe
automatiquement l’alimentation électrique.
- Ne déplacez jamais votre friteuse en
fonctionnement, lorsque le corps gras
est encore chaud. L’huile peut vous
brûler très grièvement.
- Utilisez les poignées de transport (I)
pour déplacer votre friteuse.
- Attendez impérativement que le corps
gras soit refroidi pour enlever la cuve
amovible.
- N’obstruez jamais la zone de filtration
des odeurs (A2) située sur le couvercle
avec votre main ou un objet quelconque
(torchon, plat, assiette,etc.), vous
risqueriez de vous brûler.
Vérifiez que le niveau du corps gras
soit au-dessus du “mini” indiqué dans
la cuve (C1).
- L’huile et la graisse sont des produits
inflammables. Si toutefois le corps gras
prenait feu, débranchez la prise,
couvrez l’appareil avec son couvercle
ou un plat pour étouffer la flamme, mais
n’utilisez jamais d’eau.
Avant la première utilisation
Déballez votre appareil et conservez votre
bon de garantie situé sur l’emballage, puis
lisez attentivement la notice d’utilisation.
Enlevez le sachet de protection de la
cartouche au charbon actif (A4) et
positionnez-le dans le tiroir (A5).
Introduisez l’ensemble dans le
couvercle de la friteuse.
Ouvrez le couvercle (A) en appuyant sur
la touche d’ouverture (D).
Retirez le panier (B) en soulevant la
poignée (B1).
Lavez le panier avec de l’eau chaude
savonneuse, rincez et essuyez
soigneusement.
Retirez la cuve en la soulevant
verticalement et lavez-la. Rincez,
essuyez et replacez-la.
Branchez l’appareil.
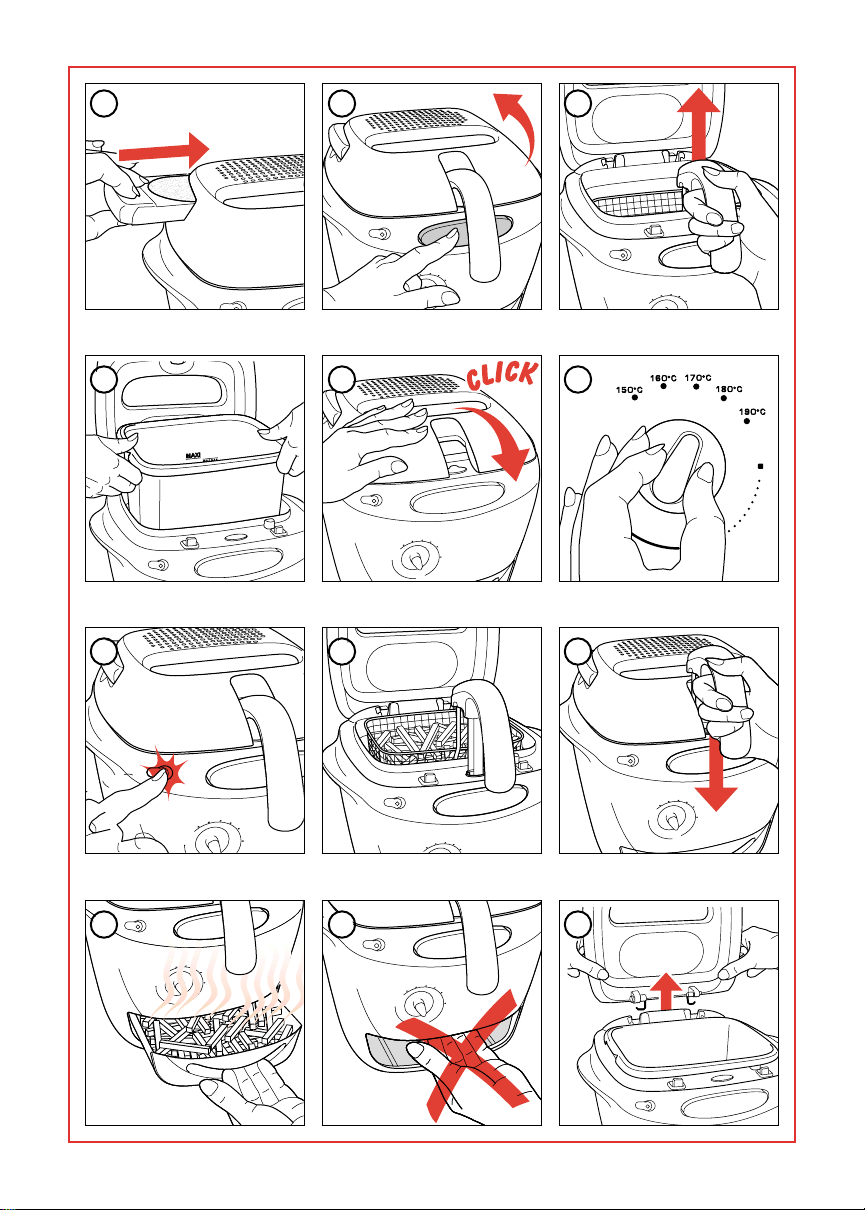
Utilisation
MISE EN PLACE DE L’HUILE OU DE
LA GRAISSE
Ouvrez le couvercle (A) en appuyant sur
la touche d’ouverture (D).
Enlevez le panier (B) en soulevant la
poignée (B1).
Si vous utilisez de l’huile, versez l’huile
dans la cuve amovible (C) jusqu’au
niveau Maxi soit 1,8 à 2 litres. Ne
dépassez pas le niveau "Maxi" indiqué
dans la cuve amovible.
Le niveau de l’huile doit toujours être
entre les niveaux Maxi et Mini.
Si vous utilisez des pains de graisse,
coupez 1575 g - 1750 g de graisse en
morceaux, faites-les fondre dans une
casserole puis versez-les dans la cuve
amovible (C).
Ne faites jamais fondre les pains de
graisse dans le panier, ni dans la cuve.
Placez le sélecteur de température (E)
sur la position 150°C pour la faire
fondre.
Fermez le couvercle en appuyant
jusqu’au clic de verrouillage.
Branchez l’appareil.
Appuyez sur le bouton marche/arrêt (G).
RÉALISATION D’UNE FRITURE
Réglez le sélecteur de température (E)
sur la position choisie (voir tableaux de
cuisson). Le voyant de régulation de
température (H) s’allume.
Le temps de préchauffage du corps
gras est de 15 minutes.
Ouvrez le couvercle (A) en appuyant sur
la touche d’ouverture (D).
Placez les aliments dans le panier (B).
Replacez-le en position d’égouttage.
Fermez le couvercle.
Abaissez lentement le panier dans le
corps gras en le retirant de la position
égouttage.
4
Page 8

Si votre friteuse est équipée d’un
minuteur (J) :
Appuyez sur la touche du minuteur,
l’affichage "00" s’allume (J1).
Continuez à appuyer jusqu’au temps
désiré (voir tableaux de cuisson).
Après avoir relâché la touche, le
décompte commence (clignotement de
l’affichage).
En cas d’erreur, remettez le minuteur à
"00" en maintenant la touche enfoncée
et recommencez.
Lorsque le temps de cuisson est écoulé,
un signal sonore retentit. Pour arrêter le
signal appuyez sur la touche.
Attention : Le minuteur signale la fin
du temps de cuisson mais n’arrête
pas la friteuse.
L’affichage du minuteur se coupe
automatiquement.
En fin de cuisson, remontez le panier et
positionnez-le en position égouttage.
N’oubliez pas d’éteindre votre friteuse, en
ramenant le sélecteur de température sur
"
■" puis en appuyant sur le bouton
marche/arrêt.
Ouvrez le couvercle et servez.
Remarques :
Si vous devez faire plusieurs fritures de
suite, attendez à chaque fois que le
voyant (H) soit éteint avant de mettre
les aliments dans le corps gras.
Pour éviter tous risques de brûlure ne
mettez pas les mains au-dessus de la
zone de filtration des odeurs (A2).
TRAITEMENT DES ODEURS
La cartouche anti-odeur au charbon
actif (modèles AKE3 - AKE4 - AKE5)
lutte efficacement contre les odeurs et
les graisses.
Selon la nature et le poids des aliments
à frire, il reste performant de 30 à
40 utilisations.
Lorsque le témoin de saturation, visible
sur le couvercle, passe du rose au gris
clair, changez le filtre.
Le filtre anti-odeur (modèles AKE1 –
AKE2) reste performant de 10 à
15 utilisations.
Lorsque le témoin de saturation, devient
rouge, changez le filtre.
Changement du filtre
Attendez le refroidissement de la friteuse.
Retirez le tiroir "Clean Express" (A5),
retournez-le au-dessus de la poubelle :
le filtre tombera.
Mettez le nouveau filtre dans le tiroir,
face noire en dessous.
Changement du corps gras
Débranchez votre friteuse.
Attendez que le corps gras ait
complètement refroidi.
Retirez le couvercle de la friteuse.
Prenez la cuve et versez le contenu par
un angle dans un récipient d’une
capacité adaptée.
Filtrez le corps gras : retirez les petits
morceaux d’aliments à l’aide d’une
écumoire non métallique. Vous pouvez
conserver le corps gras dans la friteuse
ou dans un contenant hermétique
séparé. Filtrez le corps gras après
chaque utilisation à l’aide d’un papier
filtre (disponible aux centres de service
agréés). Les débris qui se détachent
des aliments ont tendance à brûler et/ou
à entraîner une altération plus rapide du
corps gras. À la longue, cela augmente
les risques d’inflammation. Vous devez
donc filtrer régulièrement la matière
grasse.
Maintien au chaud (selon
modèle)
Le plat (K1) est prévu pour garder au
chaud les aliments qui viennent d’être
frits dans l’appareil. Il vous permet donc
de réaliser et de servir un plat chaud
composé (par exemple : nuggets de
poulet et frites…) ou deux portions de
frites. Lorsque la première cuisson est
terminée, sortez le plat de son logement
(K2). Versez-y le contenu du panier (B)
et répartissez-le dans le plat (K1).
Important : ne mettez jamais d’essuietout dans le plat. Remettez le plat dans
son logement (K2).
Effectuez la deuxième cuisson. Lorsque
celle-ci est terminée, servez tous les
aliments en même temps. Nous vous
conseillons de toujours faire les frites
fraîches en dernier.
Attention : ne mettez jamais votre main
à l’intérieur du logement (K2),
notamment pour le transport, car vous
risqueriez de vous brûler.
5
Page 9

Conseils pratiques
1. Les corps gras
Ne faites jamais fonctionner votre
friteuse sans corps gras.
Employez toujours un corps gras
supportant des températures élevées.
Ne mélangez jamais des corps gras de
natures différentes.
Changez le corps gras lorsqu’il devient
brun (toutes les 8 à 12 fritures suivant
les cuissons réalisées).
Important : Avant chaque utilisation,
percez des trous dans le corps gras
solide avec une spatule non métallique
jusqu’au fond de la cuve afin de permettre
le passage, sous forme de vapeur, de l’eau
emprisonnée sous la graisse.
2. Préparation des aliments à frire
Quelle que soit la recette, les aliments
doivent être parfaitement secs : vous
éviterez les débordements et
prolongerez la durée d’utilisation du
corps gras.
Dans le cas de préparation à base de
pommes de terre (frites, chips, pommes
pailles), après les avoir coupées, lavezles à l’eau froide pour éliminer l’amidon.
Elles ne colleront plus entre elles.
Essuyez-les soigneusement.
Dans le cas de préparation à base
d’aliments surgelés, avant la cuisson,
éliminez les cristaux de glace qui les
recouvrent en secouant le panier audessus de l’évier.
3. La cuisson
Evitez de surcharger le panier, vous
provoqueriez une baisse de température
trop importante du bain de friture qui
rendrait la préparation trop grasse.
La capacité de votre friteuse est limitée
à :
- 1 kg de frites fraîches
- 750 g de frites surgelées
Pour un résultat optimum, nous vous
conseillons d’utiliser :
- 550 g de frites fraîches
- 400 g de frites surgelées
Evitez de laisser votre bain de friture en
chauffe inutilement : votre huile durera
plus longtemps.
Ne laissez pas vos préparations cuites
dans le panier en position égouttage trop
longtemps, les vapeurs pourraient les
ramollir et éliminer leur aspect croustillant.
Tableaux de cuisson
Les temps de cuisson sont donnés à
titre indicatif. Vous les ajusterez en
fonction de vos goûts.
Températures et temps de cuisson
Produits frais
Préparation Tempéra- Temps
ture Maxi (min)
Frites (capacité limite 190°C 13 - 15
de sécurite) 1000g
Frites (capacité 190°C 9 - 11
recommandée pour
un résultat optimum) 550g
Filets de cabillaud 180°C 8 - 10
Morceaux de 190°C 2 - 3
camembert frits
Morceaux de 180°C 5 - 6
poulet panés
Filets de poisson 160°C 6 - 8
Chicken kiev 180°C 12 -14
Poulet frit en quartier 180°C 15 - 20
Champignons 150°C 6 - 8
Oignons 160°C 3 - 4
Croquettes de 190°C 9 - 10
pommes de terre
Donuts 170°C 6 - 8
Œufs 170°C 8 - 10
Beignets de pommes 170°C 6 - 8
Pour les surgelés réglez le sélecteur (E)
en position ***. Vous ajusterez
également les temps de cuisson en
fonction des quantités et de vos goûts.
Poids et temps de cuisson
Produits surgelés
Préparation Quantité Temps
(min)
Frites (capacité limite 750 g 11 - 13
de sécurite)
Frites (quantité 400 g 6 - 7
recommandée pour
un résultat optimum)
Pommes noisettes 500 g 8 - 10
Alphabites 16 pièces 3 - 4
Beignets de poulet 12 pièces 4 - 5
Croquettes de poisson 8 pièces 4 - 5
Croquettes de 8 - 10 5 - 6
pommes de terre pièces
Poisson pané (cabillaud) 2 pièces 8 - 10
Champignons 16 pièces 4 - 5
Croquettes de 8 pièces 5 - 6
poisson pané
Oignons 6 - 8 pièces 3 - 4
Beignets aux crevettes 12 pièces 4 - 5
6
Page 10

Nettoyage
Débranchez l’appareil et laissez-le
refroidir.
Nettoyez l’extérieur de la friteuse avec
un chiffon humide. N’utilisez ni tampon
abrasif ni alcool.
Ne trempez jamais l’appareil dans
l’eau et ne le lavez jamais à l’eau
courante.
Lavez le panier et le couvercle au lavevaisselle ou à l’eau chaude additionnée
d’un produit à vaisselle, rincez et
essuyez.
Profitez du changement de matière
grasse pour nettoyer votre cuve
amovible au lave vaisselle ou à l’eau
chaude additionnée d’un produit à
vaisselle. Rincez puis essuyez.
N’utilisez jamais de tampon abrasif,
d’objet métallique ou de poudre à
récurer. Vous risqueriez d’endommager
le revêtement de la cuve.
Des rayures à l’intérieur de la cuve
amovible ou des brunissements à
l’extérieur peuvent apparaître
naturellement en cas d’utilisation intensive.
Entretien
Attendez le refroidissement de la
friteuse pour la manipuler.
Le minuteur
Si votre minuteur ne fonctionne plus,
faites-le vérifier par un centre service
agréé Moulinex (voir liste dans le livret
service).
La pile usagée doit être remise dans le
circuit de récupération en vigueur dans
votre pays.
Accessoires
Vous pouvez acheter auprès de votre
revendeur ou d’un centre service agréé
Moulinex, les accessoires suivants :
- Filtre anti-odeur ref. : DA8.
- Cartouche au charbon actif ref. : DA9.
Protection de l’environnement
Votre appareil est prévu pour fonctionner
durant de longues années. Toutefois, le
jour où vous envisagerez de remplacer
votre friteuse, n’oubliez pas de penser à
la contribution que vous pouvez apporter
à la protection de l’environnement.
Apportez votre appareil à votre centre
local de réception des déchets.
Si votre appareil ne fonctionne
pas, que faire ?
Vérifiez tout d’abord le branchement.
Ensuite vérifiez si un des cas décrits dans
le tableau suivant peut en être la cause.
Conseils pratiques
Problèmes Causes Remèdes
Trop d’odeur. Le filtre anti-odeur Remplacez le filtre
La vapeur Le couvercle n’est Assurez vous que
s’echappe au- pas bien fermé. le couvercle est
dessous du verrouillé correctecouvercle. ment.
Débordement La friteuse est rem- Vérifiez le niveau
d’huile. plie au-dessus de d’huile à l’ intérieur
est saturé. (voir traitement
Le corps gras est Changez l’huile ou
détérioré. le corps gras.
Le corps gras n’est Utilisez de l’huile
pas approprié à la ou de la graisse de
cuisson. bonne qualité. Ne
Le filtre anti-odeur Remplacez le filtre
est saturé. (voir traitement des
Les joints sont dé- Consultez votre
fectueux. détaillant ou un
la limite maxi. de la cuve amo-
Aliments surchargés Séchez complèted’eau plongés dans ment les aliments.
l’huile chaude.
Dépassement des 1000g maxi frites
quantités recom- fraîches ou 750 g
mandées. de frites surgelées.
Le panier est Changez-le.
déformé. Consultez votre
L’huile est trop Le thermostat est
chaude. défectueux.
des odeurs).
mélangez pas des
huiles ou des
graisses de qualités
différentes.
odeurs).
centre agréé
Moulinex.
vible.
détaillant ou un
centre agréé
Moulinex.
Consultez votre
détaillant ou un
centre agréé
Moulinex.
7
Page 11

Les aliments Température de Réglez le sélecteur
ne dorent pas. cuisson trop basse. sur la température
Surcharge du Ne faites pas frire
panier avec trop des quantités aud’aliments. dessus du poids
L’huile n’est pas Thermostat défecassez chaude. tueux. Consultez
Les frites, pom- Aliments non lavés Lavez bien les
mes paille, chips plongés dans l’huile pommes de terre
collent entre chaude. séchez les
elles. soigneusement.
Le bain d’huile Première mise en Consultez votre
ne chauffe pas. chauffe sans corps détaillant ou un
Votre minuteur Pile usagée. Consultez votre
ne fonctionne plus. détaillant ou un
gras dans la cuve. centre agréé Mou-
Le positionnement Repositionnez la
de la cuve n’est cuve amovible.
pas correct.
de cuisson
correcte.
indiqué.
votre détaillant ou
un centre agréé
Moulinex.
linex.
centre agréé
Moulinex.
8
Page 12

ENGLISH
Thank you for choosing an appliance from the Moulinex range.
Description
Firstly, you should familiarise yourself with the various parts of your fryer. Unfold the cover
of the leaflet. The circled figures correspond to the numbers of the drawings and the letters
to the various parts.
A Lid with automatic opening
A1 Glass window
A2 Odour filtration zone
A3 Anti-odour filter with saturation indicator
(depending on model)
A4 Charcoal cartridge with saturation indi-
cator (depending on model)
A5 “Clean Express” drawer
B Basket
B1 Basket handle
C Removable bowl
C1 Min. and Max. oil level markers
D Lid release button
E Temperature selector
F Cord storage
G On/Off switch with light indicator
H Temperature regulation indicator
I Carrying handles
J Timer (depending on model)
J1 Setting button
K Keep warm function (depending on
model)
K1 Keep warm and serving dish
K2 Dish housing
Safety recommendations
- Please read the instructions for use
carefully before using your appliance
for the first time: any use which does
not conform to these instructions will
absolve Moulinex from all liability.
- Never leave the appliance (whether or
not it is in use) within reach of
children without supervision. Never
allow children to use the fryer on their
own. The use of this appliance by
disabled persons must only occur
under supervision.
- Check that the voltage rating of your
appliance corresponds to that of your
household electrical supply.
This appliance is manufactured to
conform with current safety regulations
and requirements as well as directives:
- 72/23/CEE modified by 93/68/CC,
- 89/336/CEE modified by 93/68/CEE.
Any connection error will render the
guarantee null and void.
- It is essential that your appliance is
connected by means of an earthed plug.
Non-compliance with this obligation can
cause an electric shock and may lead to
serious injury. It is vital for your own
safety that the earth socket
corresponds to the electrical
installation standards in force in your
country. If your system does not include
an earthed socket, it is vital that you
call in an approved body before plugging
in the appliance, in order to bring your
electrical system up to standard.
- This product has been designed for
domestic use only. Any commercial use,
inappropriate use or failure to comply
with the instructions, the manufacturer
accepts no responsibility and the
guarantee will not apply.
- Never use your appliance if it is not
working correctly, or if it has been
damaged. If this happens, contact an
approved Moulinex service centre (see
list in service booklet).
- Any intervention other than cleaning and
normal maintenance must be carried
out by an approved Moulinex service
centre.
- Unplug your appliance as soon as you
have stopped using it and when you are
cleaning it.
- Never put the appliance, the power cord
or the plug into water or any other liquid.
- Never allow the power cord to hang
down within reach of children. Always
keep it well away from children.
- The power cord must never be in close
proximity to or in contact with the hot
parts of your appliance, close to a
source of heat or rest on sharp edges.
- If the power cord or the plug are
damaged, do not use your appliance. To
avoid any risk, they must be replaced by
an approved Moulinex service centre
(see list in service booklet).
9
Page 13

- For your own safety, use only
accessories and spare parts which are
suitable for your appliance.
- Place your fryer on a stable, flat work
surface which is well away from any
source of heat and from any risk of water
splashes and which is heat-resistant.
- A safety cut-out switch prevents your
fryer from working if the removable bowl
is not in place.
- Never operate your fryer without putting
in the removable bowl filled with the
necessary amount of oil or fat.
- The fryer is protected by a thermostatic
safety device which automatically cuts
off the electrical power in the event of
accidental over-heating.
- Never move your fryer while it is in use
or the oil is still hot. Hot oil can cause
very serious burns.
- Use the carrying handles (I) to move the
fryer.
- It is essential that you wait until the oil
has cooled down before removing the
bowl.
- Never obstruct the odour filtration zone
(A2) located on the lid with your hand
or any other object whatsoever (cloth,
dish, plate, etc.), as you run the risk of
being burnt.
Check that the level of the oil is
above the “min” level indicated in the
bowl (C1).
- Oil and fat are flammable products. If
the oil or fat catches fire, unplug the
appliance, cover it with its own lid or a
damp cloth to stifle the flame, but never
use water.
Before first use
Unpack your fryer and keep your proof
of purchase, then read the instructions
for use carefully.
Remove the protective wrapper from the
Charcoal cartridge (depending on
model) (A4) and place the filter in the
drawer (A5).
Insert the whole unit into the lid of the
fryer.
Open the lid (A) by pressing on the
release button (D).
Remove the basket (B) by lifting the
handle (B1).
Wash the basket with hot water and
washing up liquid, rinse and dry carefully.
Take out the bowl by raising it vertically
and wash it. Rinse, dry and replace it.
Plug in the appliance.
Using the appliance
ADDING OIL OR FAT
Open the lid (A) by pushing on the lid
release button (D).
Remove the basket (B) by raising the
handle (B1).
If you are using oil, pour the oil into the
removable bowl (C) up to the Maxi level,
which is about 1.8 to 2 litres. Never
exceed the "maxi" level indicated in
the removable bowl.
If you use solid vegetable fat, take 1575 g
- 1750 g of fat, cut into pieces and melt it
in a separate pan then pour it in the bowl.
Or, set the temperature selector (E) on
the position 150°C to melt the fat.
Never melt the blocks of fat in the
basket. The oil level must always be
between the “mini” and “maxi” levels.
Close the lid until you hear a “click”.
Plug in the fryer.
Press the On/Off switch (G).
FRYING FOOD
Set the temperature selector (E) to the
required setting (see cooking charts).
The temperature regulator light (H)
comes on.
Preheating the oil will take 15 minutes.
Open the lid (A) by pushing on the
release button (D).
Raise the basket (B) using the handle
(B1) and place it in the draining
position.
Remove the basket from the bowl.
Place the food in the basket (B).
Put the basket back in the draining
position.
Close the lid.
When the oil has reached the correct
temperature, slowly lower the basket
into the oil from the draining position
If your fryer is fitted with a timer:
Press the button and the display "00"
will light up (J1).
Continue to press the button until the
required time appears (see cooking
charts).
Once you let go of the button the count
down will commence (the display will
flash).
10
Page 14

If you make an error, reset the timer to
"00" by holding down the button for a
few seconds, and start again.
When the cooking time is up, a timer will
beep. To stop it, press the button.
Note: The timer signals the end of the
cooking time but does not turn off the
fryer.
The timer display switches off automatically.
When the cooking is finished, raise the
basket and place it in the draining position.
Don’t forget to switch off your fryer, by
returning the selector to “■” then by
pressing the On/Off switch
Open the lid and serve the food.
Notes:
If you need to fry several lots of food in
succession, wait until the temperature
regulator light (H) has gone out before
putting the next batch of food into the oil.
To avoid any risk of burns, never put your
hands above the odour filtration zone (A2).
DEALING WITH ODOURS
The activated carbon anti-odour
cartridge (models AKE3 - AKE4 AKE5) is highly effective against odours
and grease. Depending on the type and
weight of foods being fried, it will remain
effective for 30 to 40 uses.
When the saturation indicator, turns from
pink to light grey, change the filter.
The anti-odour filter (models AKE1 AKE2) remains effective for 10 to 15 uses.
When the saturation indicator, turns red,
change the filter.
Changing the filter
Wait until the fryer has cooled down.
Take out the “Clean Express” drawer (A5),
and turn it upside down while holding it
over the bin: the filter will fall out.
Place the new filter into the drawer with
the black side facing upwards.
Changing the oil
Unplug the fryer.
Wait until the oil is lukewarm.
Remove the lid of the fryer.
Hold the bowl and empty the oil into a
large container.
Filtering the oil:- Remove small pieces of
food with a non-metallic skimmer. You
may store the oil or fat in the fryer, or in
a separate airtight container.
Filter the oil after each use with a filter
paper (available from approved service
centres). Crumbs that break away from
foods tend to burn and alter the quality
of the oil more rapidly. Over time this
increases the risk of catching fire. For
this reason, filter the oil regularly.
Keep warm function (according to
model)
The dish (K1) is designed so that food
which has just been fried can be kept
warm prior to serving (for example:
chicken nuggets and chips) or two
helpings of chips.
When the first fry is done.
Remove the dish from its housing (K2).
Empty the contents of the basket (B) into
the dish (K1) and distribute it evenly.
Important: Never use paper kitchen
towel to line the bottom of the dish.
Put the dish back into place (K2).
Fry the second portion of food.
When the food is ready, serve
everything at the same time.
We advise you to prepare fresh chips last.
Caution: Never put your hand into the
dish housing (K2), specially when
moving the fryer, you might get burnt.
Practical tips
1. Oil or fat
Never operate your fryer without oil.
Always use a good quality vegetable oil
which can withstand high temperatures.
Do not mix different types of oils.
Change the oil when it becomes brown
(every 8 to 12 uses, depending on the
cooking done). If using sunflower oil
ensure the oil is changed after every
5 uses.
Important: if using solid fat, before each
use, make holes in the solid fat with a
non-metallic spatula in the bottom of the
bowl, in order to allow any water
trapped under the fat to escape in the
form of steam.
2. Preparing foods for frying
No matter what the recipe, food must be
perfectly dry: this will prevent
overflowing and extend the life of the oil.
When dishes include raw potatoes
(chips, crisps and potato straws), wash
them in cold water to get rid of the
starch. This will stop them from sticking
together. Dry them carefully and
11
Page 15

thoroughly with paper kitchen towel.
When preparing frozen foods, before
cooking, remove any ice crystals on the
food by shaking the basket of food to
be fried over the sink.
3. Cooking
Do not overfill the basket, or you will
cause the temperature of the hot oil to
drop too much, and this will make the
food greasy and soggy.
The capacity of your fryer is limited to:
- 1 kg of fresh chips
- 750 g of frozen chips
For best results, we advise that you use:
- 550 g of fresh chips
- 400 g of frozen chips
Do not leave your fryer heating
unnecessarily: your oil will last longer.
Do not leave your cooked foods in the
basket in the draining position for too
long, as the steam may soften them and
make them soggy.
Cooking charts
Cooking times are given by way of
indication. You can adjust them
according to your own taste.
Temperatures and cooking times
Fresh products
Fresh foods Max tempe- Time
rature (min)
Chips maximum 190°C 13 - 15
quantity 1000g
Chips quantity 190°C 9 - 11
recommended for
best results 550g
Battered cod fillet 180°C 8 - 10
Breaded camembert 190°C 2 - 3
wedges
Breaded chicken strips 180°C 5 - 6
Breaded plaice fillet 160°C 6 - 8
Chicken Kiev 180°C 12 -14
Fried chicken 180°C 15 - 20
(leg portion)
Fried whole mushrooms 150°C 6 - 8
Fried onion rings 160°C 3 - 4
Potato or chicken 190°C 9 - 10
croquettes
Ring doughnuts 170°C 6 - 8
Scotch eggs 170°C 8 - 10
Apple fritters 170°C 6 - 8
For frozen foods, set the temperature
selector (E) to setting *** (190°C). You
will also need to adjust the cooking time
as a function of the quantities and of
your own tastes.
Weight and cooking time
Frozen products
Frozen foods Max. weight Time
Chips maximum 750 g 11 - 13
quantity
Chips quantity 400 g 6 - 7
recommended for
best results
American style thin 500 g 8 - 10
cut chips
Alphabites 16 pieces 3 - 4
Chicken nuggets 12 pieces 4 - 5
Fish fingers 8 pieces 4 - 5
Potato croquettes 8 - 10 pieces 5 - 6
Battered cod fillets 2 pieces 8 - 10
Breaded Mushrooms 16 pieces 4 - 5
Breaded Fish nuggets 8 pieces 5 - 6
Fried onion rings 6 - 8 pieces 3 - 4
Breaded Scampi 12 pieces 4 - 5
(g) (min)
Cleaning
Unplug your appliance and allow it to
cool down.
Clean the exterior of the fryer with a
damp cloth. Do not use an abrasive pad
or any abrasive or alcohol based
cleaning products.
Never immerse the appliance in water
and never wash it under running water.
Wash the basket and the lid in the
dishwasher or in hot water with washing
up liquid, rinse and dry.
When you change the oil, take the
opportunity to clean your removable
bowl in the dishwasher or in hot water
with washing up liquid. Rinse and dry.
Never use a scouring pad, any metallic
object or scouring powder. You will risk
damaging the non-stick coating of the
bowl.
Damage to the bowl by not
following these guidelines is not covered
in the guarantee.
Scratches inside the removable bowl or
brown marks on the exterior may appear
naturally if you use the appliance frequently.
Maintenance
Allow the fryer to cool down before
handling it.
The timer (depending on model)
If your timer does not work, have it
checked by an approved Moulinex
service centre (see list in service booklet).
The used battery should be disposed of
via the recycling system in force in your
country.
12
Page 16

Accessories
The following accessories are available
from your retailer or from an approved
Moulinex service centre:
Anti-odour filter ref.: DA8.
Charcoal cartridge with saturation
indicator ref: DA9.
Protection of the environment
Your appliance has been designed to
work for many years. However, when
finally you decide to replace your fryer,
please think of what you can do to help
to protect the environment by disposing
of it at your local waste disposal centre.
What to do if your appliance
does not work?
First, check the connection.
Then check whether one of the causes
listed in the following table might be the
reason.
Practical advice
Problems Causes Solutions
Excessive odour. Anti-odour filter Replace filter (see
Steam is escaping The lid is not closed Ensure the lid is
from under the lid. properly. correctly locked.
Oil overflows. The fryer has been Check oil level
is saturated. dealing with odours).
The oil has Change the oil or
deteriorated. fat.
The fat is not Use good quality
appropriate for this oil or fat. Do not
type of cooking. mix oils or fats of
The anti-odour filter Replace the filter
is saturated. (see dealing with
The gasket is Wipe it, or
faulty. replace it
filled beyond the inside the removamax. limit ble bowl.
Too much water on Dry the food
the food when it comppletely
was immersed in and lower gently
hot cooking oil. into the oil.
Recommended Check that the
quantities have basket is not too
been exceeded. full. Do not exceed
different qualities.
odours).
if it is damaged.
the maximum
recommended
quantities.
Basket misshapen. Change the basket.
The oil is too hot. Consult an
Mixture of different Empty, clean and
oils/fats. fill the bowl with
Not changing the Change the oil
oil often enough. regularly (at least
Using the wrong every 10-20 uses,
oil. more if using
Food does not Cooking tempera- Set the selector
become golden ture too low. to the correct
and remains soft. cooking
Basket overloaded Do not fry
with too much food. quantities greater
The oil is not hot Defective ther-.
enough. mostat Consult an
The food is too As a test, try
thick and contains a longer cooking
a lot of water. time. Cut food into
Chips, potato Unwashed food Wash the potatoes
straws crisps immersed in the oil. well and dry them
stick together. carefully.
The oil does not First heating made Consult an
heat up. without oil in bowl. approved Moulinex
The bowl is not in Reposition the
Vision through the Not cleaning the To ensure good
viewing window is window often visibility, clean the
not clear. enough or using an window by wiping it
The timer no Battery is spent. Consult an
longer works approved Moulinex
(depending on service centre.
model).
the correct position. removable bowl.
inappropriate cloth. with a sponge and
Consult an
approved Moulinex
service centre.
approved Moulinex
service centre.
one type of oil.
sunflower oil).Use
a good quality
blended vegetable
oil/fat.
temperature.
than the weights
indicated.
approved Moulinex
service centre.
smaller pieces.
service centre.
a little lemon juice.
13
Page 17

HELPLINE
If you have any problems or queries,
please call our Customer Relations team
first for expert help and advice on:
0845 602 1454 (UK - calls charged at
local rate)
(01) 4751947 (Ireland)
Any repairs must be carried out only by
an approved Service Centre using
original spare parts.
14
Page 18

Août 2003
Réf. : 5065749
Conception et réalisation : ADHOC’S - 3391
 Loading...