

Page 1
AA
A
A1
A5A4A3A2
11
3
7
4
6
2
A
B
A
I
J
K
L
B
C
D
G
A
E
F
H
A4a
A4b
L2
L3aL3bL3c
L3
L3dL3eL3f
L1
I2I1
a
b
c
e
d
b
B
a
A
B
A
A
a
b
c
J1J2
5
Page 2
5
Français p. 6
English p. 9
Deutsch S. 13
Nederlands p. 17
Español p. 21
Português p. 24
Italiano p. 28
Dansk s. 31
Norsk s. 35
Svenska s. 38
Suomi s. 41
ΕλληνικÀ σ. 45
Türkçe s. 49
56
Page 3
Nous vous remercions d’avoir choisi un appareil de la gamme Moulinex.
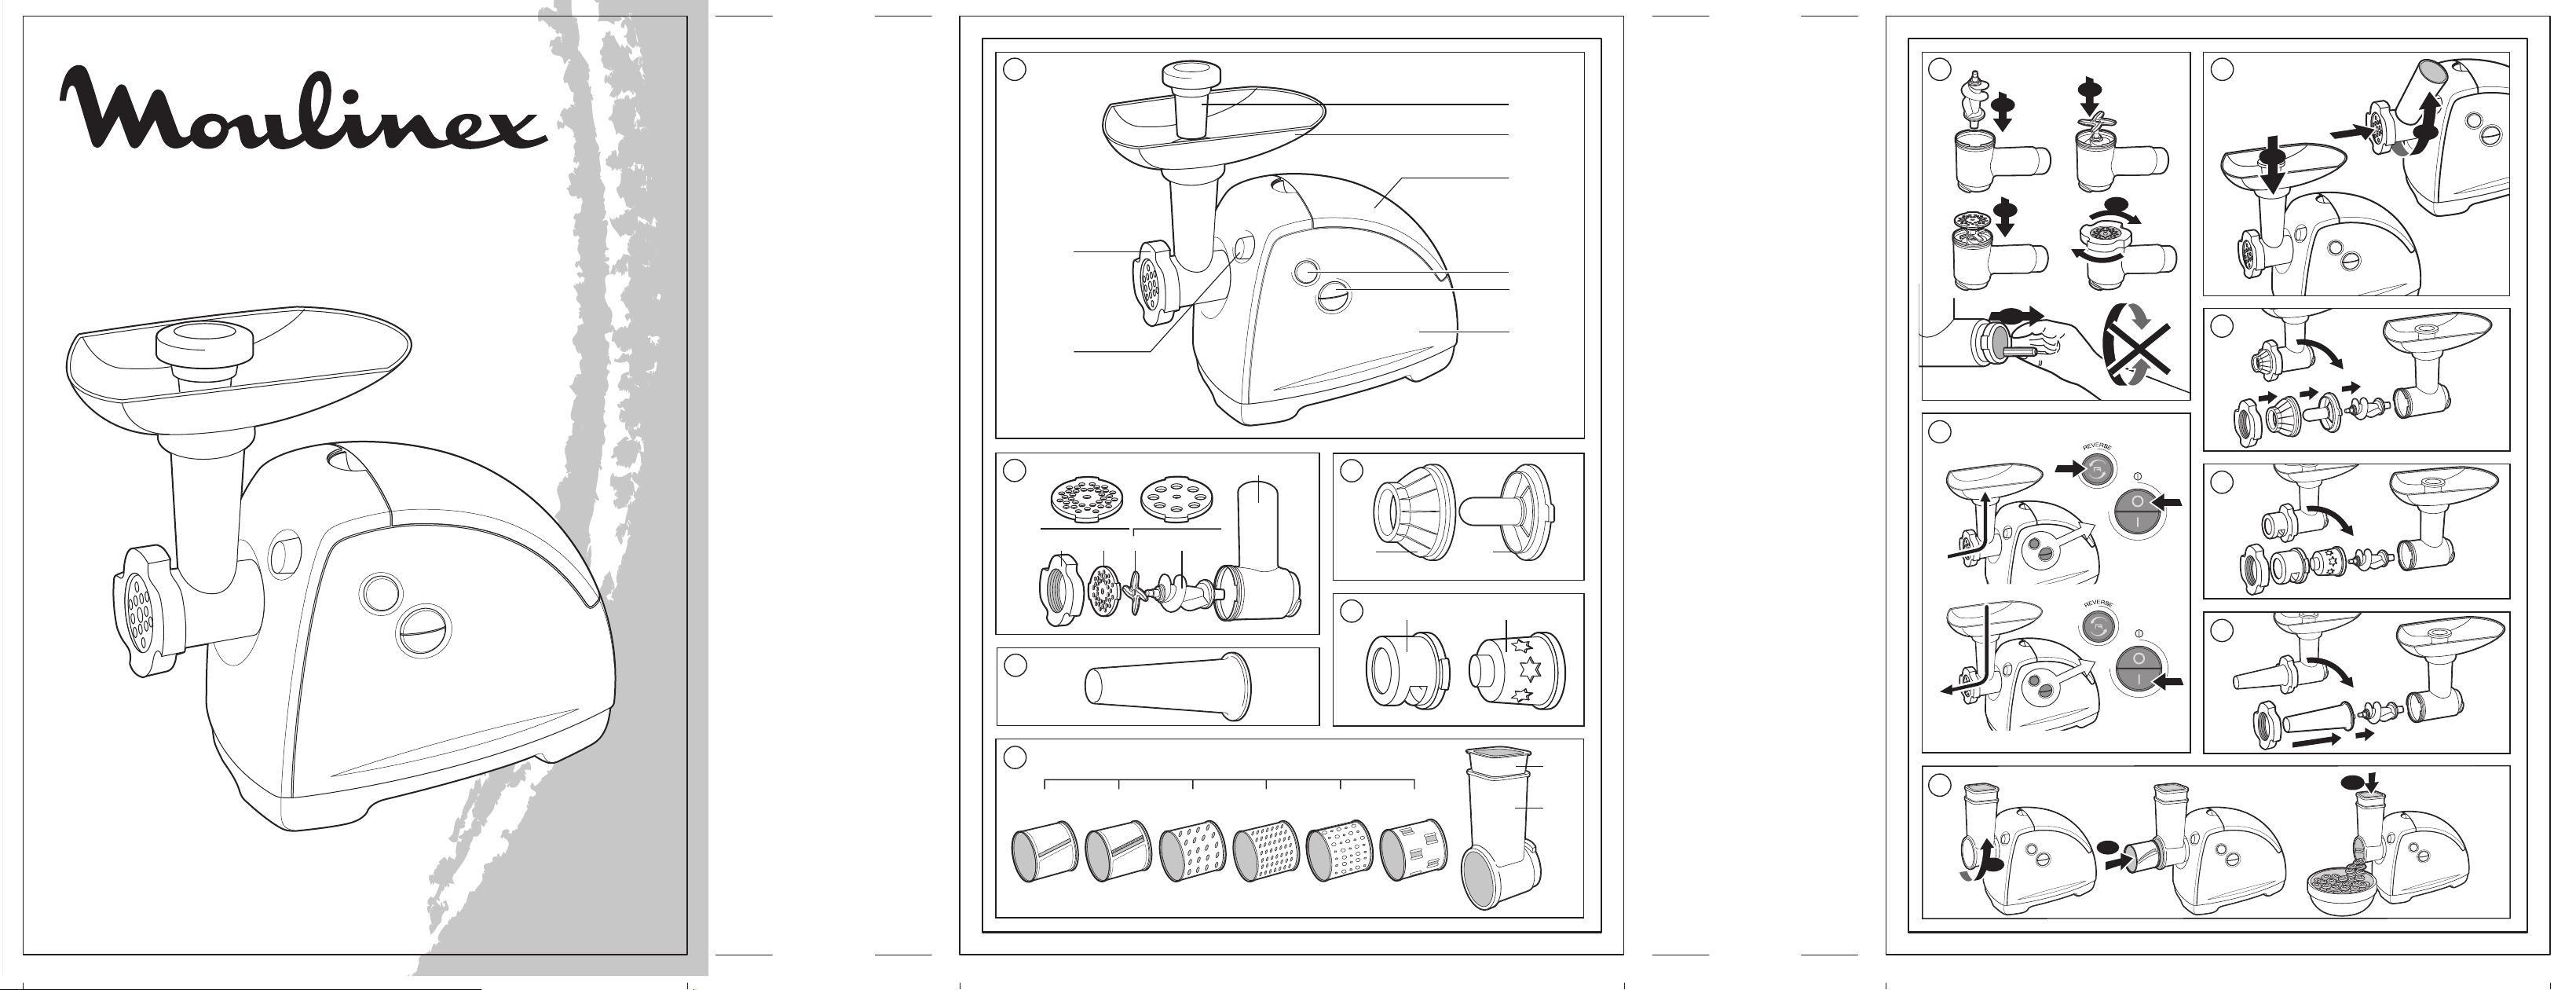
Description
A Tête hachoir amovible
A1 Corps
A2 Vis
A3 Couteau inox auto-affûtable
A4 Grilles
A4a Grille petits trous : haché fin
A4b Grille gros trous : haché gros
A5 Ecrou
B Plateau amovible
C Poussoir à viande
D Capot de rangement des
accessoires
E Bouton de déverrouillage de la tête
hachoir
F Touche Marche/Arrêt (0 - I)
G Touche « Reverse » (marche arrière
momentanée)
H Bloc moteur
I Accessoire à kebbe (selon modèle)
I1 Embout de filière
I2 Bague
J Filière à biscuits (selon modèle)
J1 Support
J2 Moule
K Entonnoir à saucisses (selon
modèle)
L Coupe-légumes (selon modèle)
L1 Magasin
L2 Poussoir
L3 Tambours (selon modèle)
L3a Tambour tranché
L3b Tambour tranché en forme
L3c Tambour râpé gros
L3d Tambour râpé fin
L3e Tambour à parmesan
L3f Tambour à glace
- Vérifiez que la tension d’alimentation de
votre appareil correspond bien à celle de
votre installation électrique.
Toute erreur de branchement annule la garantie.
- Votre appareil est destiné uniquement à un
usage domestique culinaire, à l’intérieur de
la maison et sous surveillance.
- Utilisez votre appareil sur une surface plane,
propre et sèche.
- Ne laissez pas pendre de cheveux longs,
d’écharpe ou de cravate au dessus des accessoires en fonctionnement.
- Débranchez votre appareil dès que vous
cessez de l’utiliser, lorsque vous le nettoyez
et lors de la mise en place ou du retrait des
accessoires.
- N’utilisez pas votre appareil s’il ne fonctionne
pas correctement ou s’il a été endommagé.
Dans ce cas, adressez-vous à un centre service agréé Moulinex (voir liste dans le livret
service).
- Toute intervention autre que le nettoyage et
l’entretien usuel par le client doit être effectuée par un centre service agréé Moulinex.
- Si le câble d’alimentation ou la fiche sont
endommagés, n’utilisez pas l’appareil. Afin
d’éviter tout danger, faites-les obligatoirement remplacer par un centre service agréé
Moulinex (voir liste dans le livret service).
- Ne mettez pas l’appareil, le câble d’alimentation ou la fiche dans l’eau ou tout autre
liquide.
- Ne laissez pas le câble d’alimentation pendre à portée de mains des enfants.
- Le câble d’alimentation ne doit jamais être
à proximité ou en contact avec des parties
chaudes, près d’une source de chaleur ou
sur angle vif.
- Pour votre sécurité, n’utilisez que des accessoires et des pièces détachées Moulinex
adaptés à votre appareil.
Conseils de sécurité
- Lisez attentivement le mode d’emploi
avant la première utilisation de votre appareil : une utilisation non conforme au
mode d’emploi dégagerait Moulinex de
toute responsabilité.
- Ne laissez pas l’appareil à la portée des
enfants sans surveillance. L’utilisation de
cet appareil par des jeunes enfants ou
des personnes handicapées doit être
faite sous surveillance.
Avant une première
utilisation
Lavez tous les accessoires et essuyez-les
aussitôt soigneusement.
Mise en service
TÊTE HACHOIR
. Montage de la tête hachoir
1
- Prenez le corps (A1) par la cheminée en pla-
1a
çant l’ouverture la plus large vers le haut.
6
Page 4

Introduisez ensuite la vis (A2) (axe long en
premier) dans le corps (A1).
1b
- Emboîtez le couteau (A3) sur l’axe court en
mettant les arêtes tranchantes vers l’extérieur.
1c
- Placez la grille choisie (A4a ou A4b) sur le
couteau (A3) en faisant correspondre les 2
ergots avec les 2 encoches du corps (A1).
1d
- Vissez, à fond sans bloquer, l’écrou (A5) sur
le corps (A1).
- Vérifiez le montage. L’axe ne doit ni avoir
1e
de jeu, ni pouvoir tourner sur lui-même. Dans
le cas contraire, recommencez les opérations précédentes.
2
. Mise en place de la tête hachoir sur l’appareil
- Face au bloc moteur débranché, présentez
2a
la tête hachoir cheminée inclinée vers la
droite. Engagez la tête hachoir à fond sur le
bloc moteur.
- Ramenez la cheminée à la verticale jusqu’au
blocage.
2b
- Engagez le plateau amovible (B) sur les ergots de la cheminée.
Branchez l’appareil. Il est prêt à l’emploi.
. Utilisation
- Préparez toute la quantité d’aliments à hacher. Eliminez les os, les cartilages et les
nerfs.
- Coupez la viande en morceaux (2 x 2 cm
environ) et placez-les sur le plateau (B).
- Placez un récipient sous la tête hachoir.
- Appuyez sur la position « I » de la touche
(F).
- Introduisez la viande dans la cheminée morceau par morceau à l’aide du poussoir (C).
- Ne poussez jamais avec les doigts ou tout
autre ustensile.
- N’utilisez pas votre appareil plus de 15 minutes lorsque vous hachez de la viande.
Astuce: en fin d’opération, vous pouvez passer quelques petits morceaux de pain afin de
faire sortir tout le hachis.
3
Que faire en cas d’engorgement ?
- Arrêtez le hachoir en appuyant sur la position « 0 » de la touche (F).
- Appuyez ensuite quelques secondes sur la
touche « Reverse » (G) afin de dégager les
aliments.
- Appuyez sur la position « I » de la touche
(F) pour continuer le hachage.
Important : attendez l’arrêt complet de l’appa-
reil avant d’actionner la commande « Marche»
(F) ou la commande « Reverse » (G).
Recettes :
Nota : Pour les recettes qui nécessitent une
puissance élevée (600 W environ), le temps
d’utilisation ne doit pas dépasser 20 secondes.
Exemple de recette : Mouton aux pois cassés.
150g de mouton, 90 g de pois cassés, 60 g de
farine, 30 g d’eau, 1 oignon moyen, 2 gousses
d’ail, sel, poivre.
Dans un récipient, mélangez les pois cassés
et la farine puis ajoutez l’eau progressivement
pour obtenir un mélange régulier.
Le poussoir étant dans la cheminée, versez ce
mélange sur le plateau.
Mettez l’appareil en marche et poussez doucement le mélange dans la cheminée avec le
poussoir.
Coupez l’oignon, l’ail et la viande en petits
morceaux.
Ajoutez-les au hachis, versez dans une casserole avec 0,8 litre d’eau, le sel et le poivre et
faites cuire doucement pendant une heure.
Couvrez après avoir écumé.
ACCESSOIRE À KEBBE (SELON MODÈLE)
. Montage
4
- Mettez la vis (A2) en place dans le corps
4a
(A1) de la tête hachoir (A).
- Placez l’embout de filière (I1) sur la tête (A)
4b
en faisant correspondre les deux ergots
avec les deux encoches de la tête hachoir.
- Positionnez la bague (I2) sur l’embout de
4c
filière (I1), puis l’écrou (A5) et vissez-le très
fort.
- Placez la tête ainsi montée sur le bloc mo-
teur comme indiqué en 2A.
Remarque : cet accessoire s’utilise sans grille
ni couteau.
FILIÈRE A BISCUITS (SELON MODÈLE)
. Montage
5
- Mettez la vis (A2) en place dans le corps
(A1) de la tête hachoir (A).
- Placez le moule (J2) dans le support (J1).
- Faites correspondre les deux ergots du support (J1) avec les deux encoches de la tête
hachoir (A).
- Vissez à fond, sans bloquer, l’écrou (A5) sur
le corps (A1).
- Placez la tête ainsi montée sur le bloc moteur comme indiquée en 2A.
Remarque :
Cet accessoire s’utilise sans grille ni couteau.
. Utilisation
- Préparez la pâte.
Vous obtiendrez de meilleurs résultats avec
une pâte un peu molle.
7
Page 5

- Choisissez le dessin en faisant correspondre la flèche et la forme choisie.
- Approvisionnez jusqu’à ce que vous ayez
obtenu la quantité de biscuits désirée.
ENTONNOIR À SAUCISSES (SELON MODÈLE)
Cet accessoire qui s’adapte sur la tête hachoir
(A) vous permet de réaliser des saucisses de
toutes sortes adaptées à vos goûts personnels.
. Montage
6
- Mettez la vis (A2) en place dans le corps
(A1) de la tête hachoir (A).
- Positionnez l’entonnoir (K), puis l’écrou (A5)
et vissez-le très fort.
- Placez la tête ainsi montée sur le bloc moteur comme indiqué en 2A.
Remarque : cet accessoire s’utilise sans grille,
ni couteau.
. Utilisation
- Cet accessoire est à utiliser une fois que
vous avez haché votre viande et que vous
avez assaisonné votre hachis selon votre
goût.
- Après avoir laissé le boyau tremper dans de
l’eau tiède pour qu’il retrouve son élasticité,
enfilez-le sur l’entonnoir (K) en laissant dépasser 5 cm environ.
- Remplissez de hachis la cheminée du corps
(A1) de la tête hachoir (A), mettez en marche et appuyez avec le poussoir de façon à
amener le hachis juste à l’extrêmité de l’entonnoir.
- Arrêtez l’appareil.
- Faites un nœud avec les 5 cm de boyau qui
dépassent. Repoussez le nœud sur
l’extrêmité de l’entonnoir pour éviter d’emprisonner de l’air dans le boyau.
- Remettez en marche et continuez à approvisionner en hachis. Le boyau se remplit.
Pour éviter que le boyau ne se tende excessivement, ne faites pas de trop grosses saucisses.
- Ce travail se fera plus facilement à deux :
l’un approvisionnant le hachis et l’autre maintenant le boyau qui se remplit.
- Quand tout le hachis est passé, arrêtez l’appareil, retirez le boyau restant sur l’entonnoir et faites un nœud.
- Donnez aux saucisses la longueur désirée
en pinçant et en tournant le boyau de place
en place.
COUPE-LÉGUMES (SELON MODÈLE)
. Montage
7
- Face au bloc moteur (H) débranché, présen-
7a
tez le magasin (L1) en l’inclinant vers la
droite.
- Enfoncez la tige dépassant du magasin (L1)
dans l’axe du bloc moteur.
- Ramenez la cheminée vers la gauche jusqu’à la verticale.
- Prenez le tambour choisi (L3) et présentez-
7b
le dans le magasin en le faisant légèrement
tourner pour qu’il s’engage bien jusqu’au
fond de son logement.
- Vérifiez le montage.
- N’utilisez pas la touche « Reverse » (G)
avec le coupe-légumes.
. Utilisation
7c
- Préparez toute la quantité d’aliment.
- Placez un récipient sous le magasin (L1).
- Branchez l’appareil. Mettez en marche en
appuyant sur la position « I » de la touche
(F).
- Placez les aliments dans la cheminée du
magasin (L1) et appuyez avec le poussoir
(L2). Approvisionnez régulièrement.
- Ne poussez jamais avec les doigts ou tout
autre ustensile.
- Ne mettez pas les doigts à l’intérieur des
tambours pendant le fonctionnement.
Nettoyage
- Avant tout nettoyage, débranchez votre appareil.
- Pressez le bouton de déverrouillage (E) puis
inclinez l’ensemble (tête hachoir (A) + pla-
teau (B) ou coupe-légumes (L)) vers la droite
pour l’enlever du bloc moteur (H).
- Pour démonter la tête hachoir, ôtez le plateau (B) de la cheminée, dévissez l’écrou
(A5), retirez la grille (A4), le couteau (A3) et
la vis (A2).
- Manipulez les parties tranchantes avec précaution.
- Lavez toutes les pièces à l’eau chaude savonneuse, rincez-les et essuyez-les soigneusement.
- La grille (A4) et le couteau (A3) doivent res-
ter gras. Enduisez-les d’huile.
- Ne laissez jamais pénétrer d’humidité dans
le bloc moteur (H). Essuyez-le simplement
avec un chiffon légèrement humide.
- Ne mettez pas la tête hachoir (A) au lavevaisselle, c’est à dire le corps (A1), la vis
(A2), le couteau (A3), les grilles (A4) et
l’écrou (A5).
8
Page 6

Si votre appareil ne
fonctionne pas, que faire ?
- Vérifiez le branchement.
Votre appareil ne fonctionne toujours
pas ? Adressez-vous à un centre service
agréé Moulinex (voir liste dans le livret service).
Accessoires
Vous pouvez acheter chez votre revendeur
habituel ou dans un centre service agréé
Moulinex (voir liste dans le livret service) les
accessoires suivants :
0693286 Grilles petits trous (A4a)
5775632 Grille gros trous (A4b)
5775689 Accessoire kebbe (I)
0926063 Couteau (A3)
0672582 Entonnoir à saucisses (K)
5947301 Coupe-légumes : magasin
(L1) + poussoir (L2) + Tambours (L3a + L3d)
5775308 Tambour tranché (L3a)
5985774 Tambour tranché en forme
(L3b)
5775306 Tambour râpé gros (L3c)
5775307 Tambour râpé fin (L3d)
5775305 Tambour à parmesan (L3e)
5775309 Tambour à glace (L3f)
0672587 Filière à pâte
0672585 Support filière
Thank you for choosing an appliance from the
Moulinex range.
Description
A Removable mincer head
A1 Body
A2 Feed screw
A3 Self-sharpening, stainless steel cutter
A4 Meat screens
A4a Small-hole screen: fine mince
A4b Large-hole screen: coarse
mince
A5 Nut
B Removable hopper tray
C Meat pusher
D Accessory storage cover
E Mincer head release button
F On/Off button (0 - I)
G “Reverse” button (run briefly in
reverse)
H Motor unit
I Kebbe accessory (depending on
model)
I1 Kebbe making end
I2 Ring
J Biscuit maker attachment
(depending on model)
J1 Support
J2 Mould
K Sausage filler tube (depending on
model)
L Vegetable cutter (depending on
model)
L1 Body
L2 Pusher
L3 Drums (depending on model)
L3a Slicer drum
L3b Shape cutter drum
L3c Coarse grater drum
L3d Fine grater drum
L3e Parmesan grater drum
L3f Ice drum
Safety instructions
- Carefully read the instructions before
using your appliance for the first time;
any use which does not conform to the
instructions for use will absolve Moulinex
from any liability.
- Do not leave the appliance within reach
of unsupervised children. The use of this
9
Page 7

appliance by children or by disabled
persons must be supervised at all times.
- Check that the power rating of the appliance
does in fact match that of your mains supply.
Any connection fault invalidates the
guarantee.
Wiring instructions for U.K and Ireland
only :
APPLIANCES WITH FITTED PLUG
Important : For your convenience this appliance
is supplied complete with a plug incorporating
a 3 amp fuse.
In the event of replacing a fuse in the plug
supplied, a 3 amp fuse approved by ASTA to
BS1362 must be used.
If the socket outlets are not of the 13A BS 1363
type, and therefore do not accept the plug
connected to this appliance, cut off the plug if
moulded type or remove the plug if connected
by screw terminals.
When the plug is a moulded type and this is cut
off from the appliance, the connected wires
are a shock hazard. Do not under any
circumstances connect a cut off plug into the
electrical socket outlet. The cut off plug must
be disposed of in a safe manner that prevents
any form of connection.
If the fuse cover is detachable, never use the
plug with the cover omitted. Replacement
covers can be obtained from your service
agent.
Fit the appropriate plug according to the instructions in paragraph "Fitting a plug". With
alternative plugs a 5 amp fuse must be fitted
either in the plug or adaptor or at the main fuse
box.
APPLIANCES WITHOUT FITTED PLUG
FITTING A PLUG - IMPORTANT
The wires in the mains lead are coloured in
accordance with the following code:
GREEN & YELLOW : EARTH
BLUE : NEUTRAL
BROWN : LIVE
As the colours in the mains lead of this
appliance may not correspond with the
coloured markings identifying the terminals in
your plug, proceed as follows:
The wire which is coloured GREEN & YELLOW
must be connected to the terminal in the plug
which is marked with the letter ‘E’ or by the
earth symbol or coloured green or green
and yellow. The wire which is coloured BLUE
must be connected to the terminal which is
marked with the letter ‘N’ or coloured black.
The wire which is coloured BROWN must be
connected to the terminal which is marked
with the letter ‘L’ or coloured red.
This appliance is manufactured to conform to
the Low Voltage Electrical Equipment (Safety)
Regulations 1989 and is designed to comply
with BS 3456. It complies with the requirements
of the EEC Directive (89/336/EEC).
- Your appliance is intended only for indoor,
domestic use, for culinary purposes. Do not
leave it running unsupervised.
- Use your appliance on a level, clean and dry
surface.
- Do not allow long hair, scarves, ties etc. to
dangle over accessories during operation.
- Disconnect your appliance as soon as you
have finished using it, for cleaning and when
fitting or removing accessories.
- Do not use your appliance if it is not working
correctly or if it has been damaged. If this is
the case, contact a Moulinex approved
service centre (see list in service booklet).
- Any work on the appliance other than normal
care and cleaning by the customer must be
carried out by a Moulinex approved service
centre.
- If the supply cable or the plug is damaged,
do not use the appliance. To avoid any risk,
these must be replaced by a Moulinex
approved service centre (see list in the
service booklet).
- Do not place the appliance, the supply cable
or the plug in water or in any other liquid.
- Do not allow the supply cable to hang down
within reach of children.
- The supply cable must never be close to or
in contact with the hot parts of your appliance
or any other source of heat and should be
kept away from sharp edges.
- For your own safety, use only the Moulinex
accessories and spare parts that are suitable
for your appliance.
Before first use
Wash all the accessories and dry them
carefully, at once.
10
Page 8

Using your appliance for
the first time
MINCER HEAD
. Assembling the mincing head
1
- Take the body (A1) by the feed tube, holding
1a
the wider opening uppermost. Insert the feed
screw (A2) (long shaft first) into the body
(A1).
- Fit the cutter (A3) onto the short shaft with
1b
the cutting edges facing outwards.
1c
- Fit the chosen screen (A4a or A4b) on the
cutter (A3), locating the two lugs in the
corresponding notches in the body (A1).
1d
- Screw the nut (A5) home on the body (A1)
without locking it.
- Check the assembly. The shaft should have
1e
no play, neither should it be able to turn on
its own. Otherwise, repeat the assembly
procedure.
. Fitting the mincing head on the appliance
2
- Facing the motor unit, which should be
2a
disconnected, insert the mincer head with
the feed tube inclined to the right. Push the
mincer head home in the motor unit.
- Turn the mincer head until it latches with the
feed tube in the vertical position.
2b
- Engage the removable hopper tray (B) with
the lugs on the feed tube.
Connect the appliance. It is ready for use.
. Using
- Prepare all of the foodstuffs to be minced.
Remove bones and gristle.
- Cut the meat into pieces (about 1 inch
square) and put them in the hopper tray (B).
- Place a bowl beneath the mincer head.
- Press position “I” of button (F).
- Push the meat, piece by piece, down the
feed tube, using the pusher (C).
- Never push with the fingers or any other
implement.
- Do not use your appliance continuously for
more than 15 minutes when mincing meat.
Tip: you can follow up the meat with a few
small pieces of bread to clear any meat
remaining in the machine.
3
What should you do if the machine is
clogged?
- Stop the mincer by pressing position “0” of
button (F).
- Then press the “Reverse” button (G) for a
few seconds to release the jam.
- Press position “I” of button (F) to continue
mincing.
Important: wait until the appliance has stopped
completely before pressing the “On” (F) or
“Reverse” (G) button.
Recipes:
Note: For recipes requiring a high power (about
600 W), the appliance should not be run
continuously for more than 20 seconds.
Recipe example: Mutton with split peas.
150 g mutton, 90 g split peas, 60 g flour, 30 g
(ml) water, 1 medium onion, 2 cloves of garlic,
salt and pepper.
In a bowl, mix the split peas and the flour and
then add the water slowly to obtain a smooth
mixture.
With the pusher in the feed tube, pour this
mixture into the hopper tray.
Start the appliance and gently push the mixture
down the feed tube with the pusher.
Cut the onion, garlic and meat into small
pieces.
Add them to the minced mixture, turn into a
saucepan with 800 ml water, add salt and
pepper and simmer for one hour.
Skim and cover.
KEBBE ACCESSORY (DEPENDING ON MODEL)
. Assembly
4
- Insert the feed screw (A2) in the body (A1)
4a
of the mincer head (A).
4b
- Fit the kebbe making end (I1) to the head
(A), locating the two lugs in the two notches
in the mincer head.
4c
- Fit the ring (I2) over the kebbe making end
(I1), followed by the nut (A5), which must be
well tightened.
- Fit the assembled mincer head on the motor
unit as shown in 2A.
Note: This accessory is used without meat
screen and cutter.
BISCUIT MAKER ATTACHMENT (DEPENDING ON
MODEL)
. Assembly
5
Insert the feed screw (A2) in the body (A1) of
the mincer head (A).
- Fit the mould (J2) in the support (J1).
- Locate the two lugs on the support (J1) in
the two notches in the mincer head (A).
- Screw the nut (A5) home on the body (A1)
without locking.
11
Page 9

- Fit the assembled mincer head on the motor
unit as shown in 2A.
Note:
This accessory is used without meat screen
and cutter.
. Using
- Prepare the dough.
You will obtain the best results with a slightly
soft dough.
- Choose the shape by lining up the arrow with
the chosen shape.
- Keep feeding dough until you have obtained
the desired number of biscuits.
SAUSAGE FILLER TUBE (DEPENDING ON MODEL)
This accessory, which can be fitted on the
mincer head (A), enables you to make any
kind of sausage to your personal taste.
. Assembly
6
- Insert the feed screw (A2) in the body (A1)
of the mincer head (A).
- Place the filler tube (K) in position, followed
by the nut (A5), which must be firmly
tightened.
- Fit the assembled mincer head on the motor
unit as shown in 2A.
Note: This accessory is used without meat
screen and cutter.
. Using
- This accessory is for use once you have
minced your meat and seasoned your mince
to taste.
- After soaking the sausage skin in tepid water
to make it supple, thread it onto the filler tube
(K) leaving about 5 cm (2 in.) hanging over
the end.
- Fill the feed tube of the body (A1) of the
mincer head (A) with your prepared sausage
meat; start the appliance and press down
with the pusher until the meat shows at the
end of the filler tube.
- Stop the appliance.
- Make a knot in the overhanging end of the
sausage skin. Push the knot up against the
end of the filler tube to avoid any air being
trapped in the sausage skin.
- Start the appliance again and keep up the
supply of sausage meat. The sausage skin
will fill with meat. To avoid overstretching the
sausage skin, do not make your sausages
too fat.
- This job is more easily done by two people,
one to feed the meat and the other to support
and control the sausage skin.
- When all the sausage meat has been used,
stop the appliance, pull the remaining
sausage skin off the filler tube and tie a knot.
- Set the length of your sausages by pinching
and twisting the skin at the desired intervals.
VEGETABLE CUTTER (DEPENDING ON MODEL)
7
. Assembly
7a
- Facing the motor unit (H), which should be
disconnected, hold the body of the vegetable
cutter (L1) with the feed tube inclined to the
right.
- Push the protruding shaft of the body (L1)
into the shaft of the motor unit.
- Turn the cutter body anticlockwise until it
latches with the feed tube in the vertical
position.
7b
- Take the chosen drum (L3) and insert it in
the body, turning it slightly so that it engages
fully in its fitting.
- Check the assembly.
- Do not use the “Reverse” button (G) with
the vegetable cutter.
. Using
7c
- Prepare all of the foodstuffs to be processed.
- Place a bowl beneath the body (L1).
- Connect the appliance. Start the appliance
by pressing position “I” of button (F).
- Place the food in the feed tube of the body
(L1) and press down with the pusher (L2).
Keep up a regular supply of food.
- Never push with the fingers or any other
implement.
- Do not insert your fingers in the drum with
the appliance running.
Cleaning
- Before cleaning, disconnect your appliance.
- Press the release button (E) and turn the
assembly (mincer head (A) + hopper tray
(B) or vegetable cutter (L)) clockwise to
release it from the motor unit (H).
- To dismantle the mincer head, take off the
hopper tray (B) from the feed tube, unscrew
the nut (A5), remove the meat screen (A4),
the cutter (A3) and the feed screw (A2).
- Handle the cutting parts with care.
- Wash all the parts in hot, soapy water, rinse
and carefully wipe them dry.
- The meat screen (A4) and the cutter (A3)
must remain greased. Coat them with oil.
12
Page 10

- Never allow water to penetrate the motor unit
(H). Simply wipe it with a slightly damp cloth.
- Do not put the mincer head (A) in the
dishwasher; this applies to the body (A1),
the feed screw (A2), the cutter (A3), the meat
screens (A4) and the nut (A5).
What to do if your appliance
does not work
- Check the electrical connection.
Your appliance still does not work? If this is
the case, contact a Moulinex approved service
centre (see list in service booklet).
Accessories
From your usual retailer or a Moulinex approved
service centre (see list in service booklet), you
can buy the following accessories.
0693286 Small-hole screen (A4a)
5775632 Large-hole screen (A4b)
5775689 Kebbe accessory (I)
0926063 Cutter (A3)
0672582 Sausage filler tube (K)
5947301 Vegetable cutter: body (L1) +
pusher (L2) + drums (L3a +
L3d)
5775308 Slicer drum (L3a)
5985774 Shape cutter drum (L3b)
5775306 Coarse grater drum (L3c)
5775307 Fine grater drum (L3d)
5775305 Parmesan grater drum (L3e)
5775309 Ice drum (L3f)
0672587 Biscuit maker attachment
0672585 Biscuit maker support
Wir freuen uns, dass Sie ein Gerät von
Moulinex gewählt haben und danken Ihnen
für Ihr Vertrauen.
Beschreibung
A Abnehmbarer Fleischwolf
A1 Gehäuse
A2 Schnecke
A3 Selbstschleifendes Edelstahlmesser
A4 Lochscheiben
A4a Lochscheibe mit kleinen
Löchern: Feingehacktes
A4b Lochscheibe mit großen
Löchern: Grobgehacktes
A5 Mutter
B Abnehmbare Einfüllschale
C Stopfer
D Deckel des Zubehörfachs
E Knopf zur Entriegelung des
Fleischwolfs
F Ein/Aus-Schalter (0 - I)
G „Reverse”-Knopf (kurzzeitiger
Rückwärtslauf)
H Motorblock
I Kebbe-Vorsatz (je nach Modell)
I1 Vorsatzhalter
I2 Ring
J Spritzgebäck-Vorsatz (je nach
Modell)
J1 Halter
J2 Tülle
K Wurstfülltrichter (je nach Modell)
L Gemüseschneider (je nach Modell)
L1 Einfülltrichter
L2 Stopfer
L3 Trommeln (je nach Modell)
L3a Scheibenschneidetrommel
L3b Julienne-Trommel
L3c Trommel zum Grobraspeln
L3d Trommel zum Feinschnetzeln
L3e Parmesan-Trommel
L3f Eistrommel
Sicherheitshinweise
- Lesen Sie di e Ge b r a u chsanw ei sung
sorgfältig vor der ersten Inbetriebnahme
Ih res Gerät e s durch: unsachgemäße
Verw endung entbindet Moulinex von
jeglicher Haftung.
- Lassen Sie das Gerät nicht in Reichweite
von unbeaufsichtigten Kindern. Nehmen
Sie das Gerät nicht unüberwacht in
Gegenwart von Kleinkindern und
Behinderten in Betrieb.
13
 Loading...