

Page 1
Notice La Moulinette NEW bis 26/08/05 9:04 Page A1
Page 2
Notice La Moulinette NEW bis 26/08/05 9:04 Page A3
1 2 3
D
C
B
G
F
E
H
A
4
M
L
K
H
A
Q
P
O
J
I
N
H
Page 3

Notice La Moulinette NEW bis 26/08/05 9:04 Page A4
5 6 7
8
11
9
10
12
Page 4

Notice La Moulinette NEW bis 26/08/05 9:04 Page 4
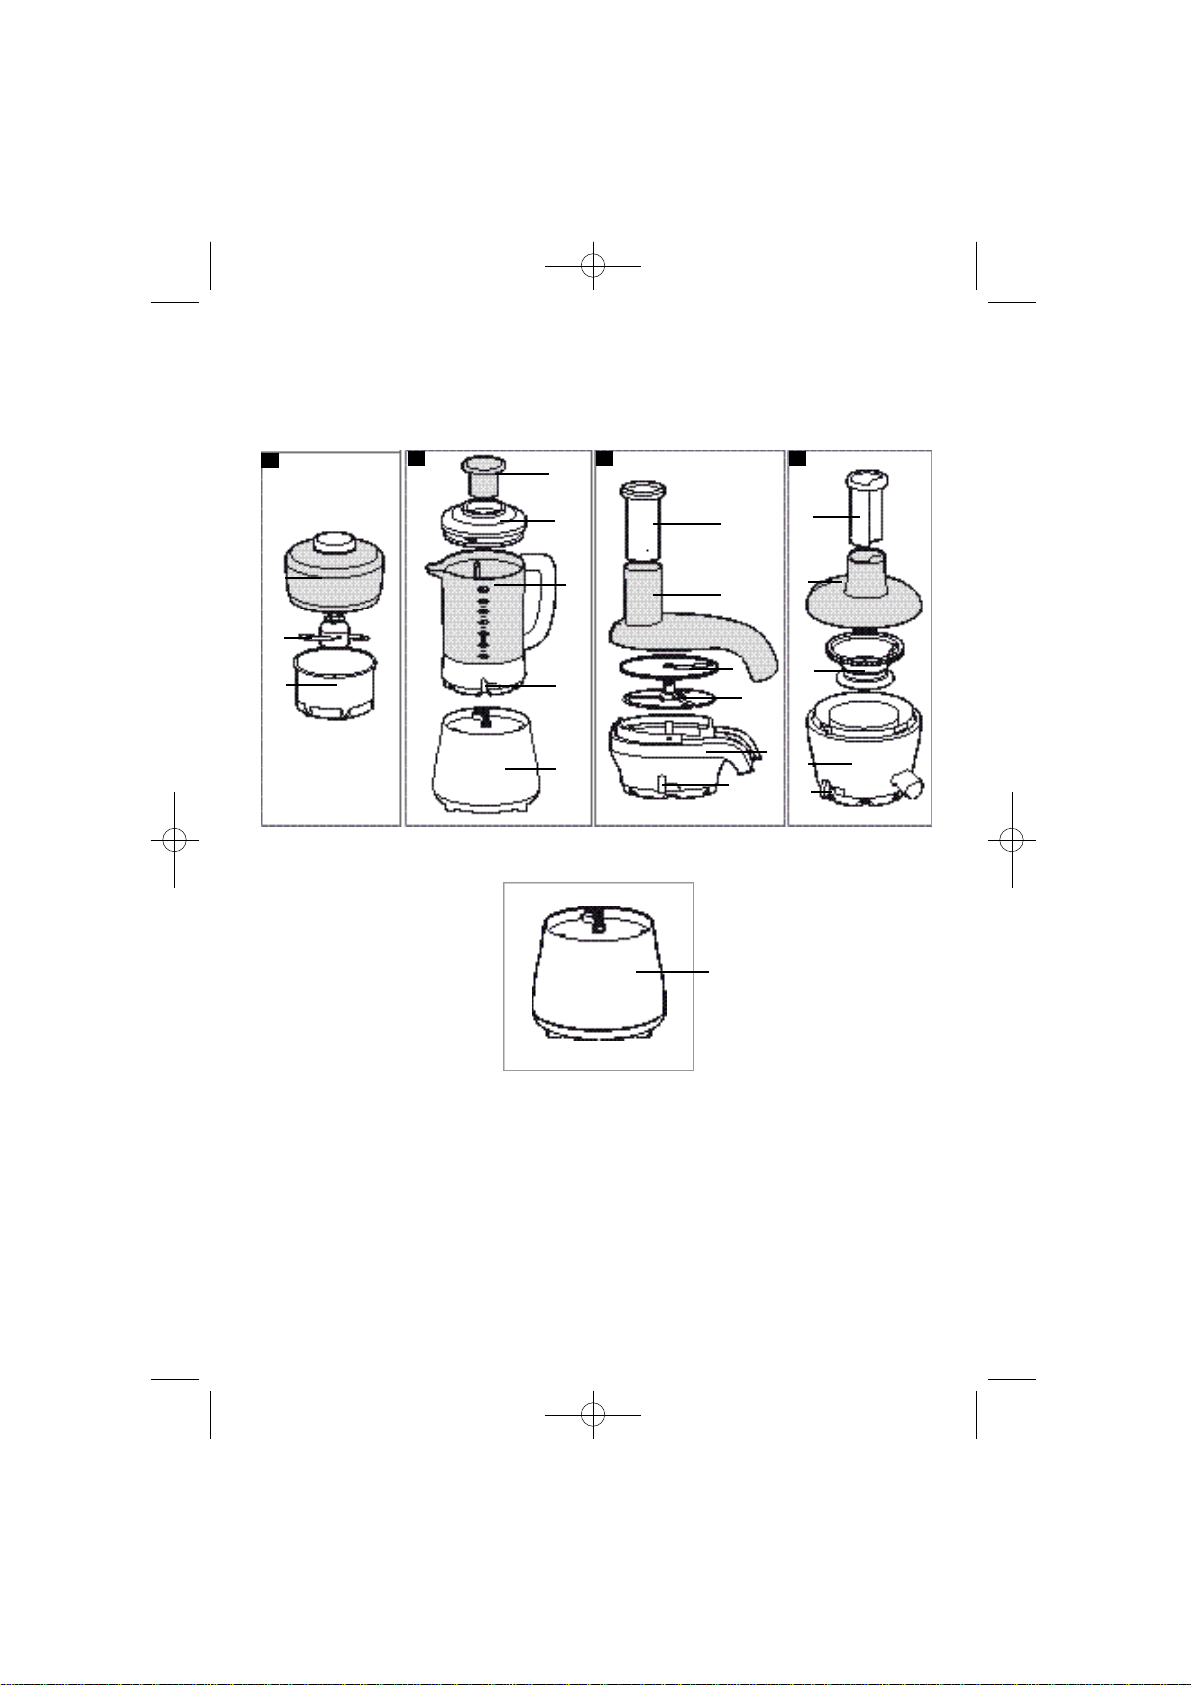
Description
A Motor base
B Grinder/mincer bowl
C Blades
D Lid
E Blender jug
F Blender jug lid
G Measuring cap
H On/Off button
I Vegetable cutter unit
J Feed disc
K Vegetable cutter disc
L Vegetable cutter lid
M Vegetable cutter pusher
N Juicing unit
O Filter
P Juicer lid
Q Juicer pusher
Safety instructions
- Read the user manual carefully before
first using your appliance. Moulinex
may not be held responsible for any
use that does not comply with the operating instructions.
- Young children and severely disabled
persons must only use the appliance
under surveillance of a responsible
adult.
- Check that your appliance's power supply
rating corresponds to your mains electrical
supply.Any error in connection negates
the guarantee.
- This product has been designed for
domestic use only. Any commercial use,
inappropriate use or failure to comply with
the instructions, the manufacturer accepts
no responsibility and the guarantee will not
apply.
- Disconnect the appliance as soon as you
stop using it and when cleaning.
- Do not use the appliance if it does not run
correctly or if it has been damaged.
- Any intervention other than cleaning or
normal maintenance by the customer must
be performed by a Moulinex approved
centre.
- Do not put the motor base (A), power supply cord or plug in water or any other
liquid.
- Do not use the appliance if the power supply cord or the plug are damaged. Avoid
taking risks and have them replaced by a
Moulinex approved centre (see after-sale
booklet).
- Never use the centrifuge if the lid or filter
are damaged. To avoid any risk of the centrifuge filter breaking, replace it as soon as
it shows signs of wear or damage. See
that is replaced every 2 years on average
for daily use.
Bringing into service
Before first use, wash and dry the parts that
will come into contact with food.
Processor shredder function
(according to model)
- Place the motor base (A) on the table.
- Do not connect the processor yet.
- Place the grinder/mincer bowl (B) on the
motor base (A) and lock it by turning
anti-clockwise until it slots into place.
- Fit the blades (C) on the central axis inside the grinder/mincer bowl (B) and press
down on the button until you hear a click
to tell you it is locked in place.
- Handle the blades (C) with care. It is
extremely sharp.
- Cut the food up into pieces before placing
it in the grinder/mincer bowl (B).
- Fit the lid (D) to the grinder/mincer bowl
(B). Now you can connect the processor.
- Press down on the lid to start the processor immediately .
- To stop it, release pressure on the lid and
the appliance will stop at once.
- Never remove the lid until the blades (C)
has come to a complete stop.
- Unplug the appliance each time after use
and before any cleaning operation.
- To remove the blades (C) , first take the
grinder/mincer bowl (B) in one hand and
press down on the blades button with your
thumb.
- Now remove the blades (C) from inside
the grinder/mincer bowl (B) before serving
your preparation.
1
5
6
4
Page 5

Notice La Moulinette NEW bis 26/08/05 9:04 Page 5
Hints
- Important: you will obtain a better shredding consistency by using pulses.
- Press for the time you need to get the
shredding consistency you want.
- To obtain a finer hash or slice, use the
spatula to release food that has become
stuck during shredding and distribute
evenly inside the grinder/mincer bowl (B).
- Over time, the blades (C) can become
blunt. In that case, replace it.
A new blade = better performance.
- Let the appliance cool for 2 minutes before
using again. Never use empty
Recommended times:
Ingrédients
Parsley
Onions
Shallots
Garlic
Rusks
Almonds
Hazelnuts
Walnuts
Parmesan
cheese
Meat
Maximum
Quantity
20 g
250 g
150 g
140 g
50 g
250 g
200 g
150 g
100 g
330 g
Maximum
Time
6 s
12 s
9 s
10 s
5 s
9 s
12 s
10 s
10 s
6 s
Blender jug function (according to
model)
- Place the blender jug (E) on the work surface. All handling operations must be performed with the blender jug placed on the
work surface, never fitted to the motor
base (A) .
- Put the ingredients to be blended in the
blender jug (E), pouring in liquids first.
- Fit the lid (F) to the blender jug (E). Never
place the blender jug (E) on the motor
base (A) without its lid (F).
- To fit the blender jug (E), position it with its
lid on the motor base (A) and turn until it
slots correctly into position .
- Plug in the appliance and start up by
turning the On/Off button (H) to the right
7
to “I” . and use it over periods of 30
seconds only.
7
- To stop the appliance, move the On/Off
button (H) to the left to “0”.
- Never put your fingers or any other object
in the blender jug when the appliance is
running.
- Do not operate the blender jug without its
lid equipped with the measuring cap.
- Do not operate the blender jug empty.
- Wait until the appliance has come to a
complete stop before removing the blender
jug.
CAUTION : Never pour or blend ingredients
into blender jug if their temperature is above
80°C (175°F). When blending hot ingredients, move your hands away from lid and
cap to avoid any risk of burn.
Vegetable cutting function
(according to model)
- Use the vegetable cutting disc (K) to grate
(face A) and slice (face B).
- Position the vegetable cutter unit (I) on the
motor base (A) and turn it until it slots into
place correctly.
- Fit the feed disc (J) and then the vegetable
cutter disc (K) onto the vegetable cutter
3
unit (I) . .
- Lock the lid (L) from left to right on the
vegetable cutter unit (I) ..
- Place a small bowl or jug under the outlet
- Plug in the appliance.
- Start up by moving the On/Off button (H)
- Caution: If the lid is not fitted correctly, the
- Remove the pusher (M).
- Once the motor has started to run, gently
- Push the food in with the pusher (M)
- To stop the appliance, turn the On/Off but-
5
9
spout . .
to the right to “I”.
On/Off button (H) will not engage and the
appliance will not operate (Moulinex safety
system). For the same reason, you cannot
remove the lid while the vegetable cutter is
running.
introduce the vegetables into the funnel of
the lid (L).
without forcing. Do not use any other utensil for this purpose. Above all, never push
using your fingers.
ton (H) back to the left to “0”.
8
Page 6

Notice La Moulinette NEW bis 26/08/05 9:04 Page 6
Juicing function (according to model)
- Place the motor base (A) on the work surface.
- Do not yet plug in your centrifuge.
- Position the juicing unit (N), filter (O) and
lid (P) on the motor base (A) and turn until
it slots into place correctly .
- Cut the fruit into pieces and place a glass
under the pouring spout ..
- Plug in the appliance.
- Start up by turning the On/Off button (H) to
the right (“I” position). If the lid (P) is not fit-
ted correctly, the On/Off button (H) will not
engage and the appliance will not operate
(Moulinex safety system).
- Now introduce the fruit and vegetables
through the funnel of the lid (P) exerting
gentle pressure with the pusher (Q). Never
use your fingers or any other tool.
- To stop the appliance, turn the On/Off button (H) to the left (position "0").
- Do not blend more than 5 times x 0.5 kg of
fruit without allowing your equipment to
cool down.
- Important notice: stop the equipment and
discard the pulp when full.
- Wait for the filter to come to a complete
stop before opening the lid.
- Unplug the appliance each time after use
and before any cleaning operation.
Hints
- For thick-skinned fruits, remove the stones
or cores and take out and discard the central part of pineapples.
- Some fruits and vegetables cannot be juiced, e.g. bananas, avocado pears, blackberries, etc.
- Grapes, quinces and gooseberries: for better yield clean the filter every 300 gr.
- You can prepare juices from various fruits
and vegetables without cleaning the juicer
every time; the tastes will not mix.
- Drink all fruit juices soon after they are
made. Add lemon juice to keep them for a
few hours.
41110
- Empty out the water and dry.
- Clean the motor base (A) with a moist
sponge (never put it under water).
- Wash the vegetable cutter unit (I) and jui-
cer (N) under running water.
- Never use bleach or a scouring pad on the
filter basket (O). Clean it immediately after
use with a sponge or a soft brush (toothbrush type).
- You can wash all other accessories in the
dishwasher (top basket)
- Over time the strong coloured natural juices from food such as carrots and beetroot
may stain the plastic parts of the juicer –
this is normal. These parts may be cleaned by soaking them in mild bleach (non
abrasive) straight after use.
Power cord storage
To store the cord or adjust its free length,
push into the recess in the motor base
12
(A) .
Accessories
You can customise your appliance and get
the following accessories from your usual
retailer of a Moulinex approved centre:
- grinder/mincer bowl Ref. A10F01
- blender jug Ref. A 10F02
- vegetable cutter Ref. A 10F03
- juicer Ref. A10F04
Electrical or electronic
product at end of service life
Environment protection first !
Your appliance contains valuable
materials which can be recovered
or recycled.
Cleaning
- For optimum cleaning of the blender jug
(E), fill it with a little warm water, fit the lid
and run it for a few seconds.
Leave it at a local civic waste
collection point.
6
 Loading...