

Page 1
EN
Page 2
c
d
e
f
b
a
l
k
g
h
i
j
m
Page 3
1b/c
1e
1d
2a
2b/c
1
2
1
2
1
1
2
3
MAX
1,5l
1
2
2
1a
1
3
3
2
Page 4
2d
3a
3b
3c
4
1
2
1
2
1
2
Page 5

7
EN
SAFETY INSTRUCTIONS
THE ACCESSORIES CONTAINED IN THE MODEL YOU HAVE BOUGHT ARE
REPRESENTED ON THE LABEL LOCATED ON THE TOP OF THE PACKAGING.
You can customise your appliance and obtain the accessories described
in these instructions from your usual retailer or an approved service centre.
• Read the instructions for use carefully
before using your appliance for the
first time. This product has been designed for domestic use only. Any commercial use, inappropriate use or failure to comply with the instructions, the
manufacturer accepts no responsibility and the guarantee will not apply.
• Check that the power voltage for your
appliance corresponds to that of your
mains installation.
•
A
ny connection error renders the
guarantee invalid.
This appliance is
designed for household use inside the
house.
• This appliance is not intended for use
by persons (including children) with
reduced physical, sensory or mental
capabilities, or lack of experience and
knowledge, unless they have been given supervision or instruction concerning use of the appliance by a person
responsible for their safety.
• Children must be supervised to ensure
that they do not play with the appliance.
• Always use your appliance on a flat,
stable, heat-resistant work surface.
• Do not leave your appliance unattended whilst in operation.
• Always unplug your appliance from
the mains as soon as you have finished using it (even in the event of a
power outage) and when you clean
it.
• Do not use your appliance if it is not
operating correctly or if it has been
damaged. If this occurs, contact an
authorised service centre (see list in
service booklet).
• All repair work other than cleaning
and basic maintenance by the customer must be done by an approved
centre (see list in service booklet).
• Never put the appliance, the power
cord or the plug in water or any other
liquid.
• Do not leave the power cord within
reach of children.
• The power cord must never be close to
or in contact with the hot parts of your
appliance or close to a heat source or
a sharp edge.
• If the power cord or the plug is damaged, do not use your appliance. To
avoid any danger, it is imperative that
you have them replaced by an approved service centre (see list in the
service booklet).
• For your safety, only use accessories
and spare parts that correspond to
your appliance, sold by an approved
service centre.
• Handle the chopping blade (e), blen-
der blade (i), and spice/coffee grinder (m) very carefully when emptying
the bowl and during cleaning: they
are extremely sharp. Danger of injury
from improper use of the device.
• You must necessarily place the knife
(e) inside the chopping bowl (f) before filling the latter with the ingredients
you want to mix. You must also remove
the knife (e) before emptying the
chopping bowl (f) once the ingredients are mixed.
• Do not activate your appliance while
it is empty.
• Do not use the chopper accessory to
make liquid recipes.
Page 6
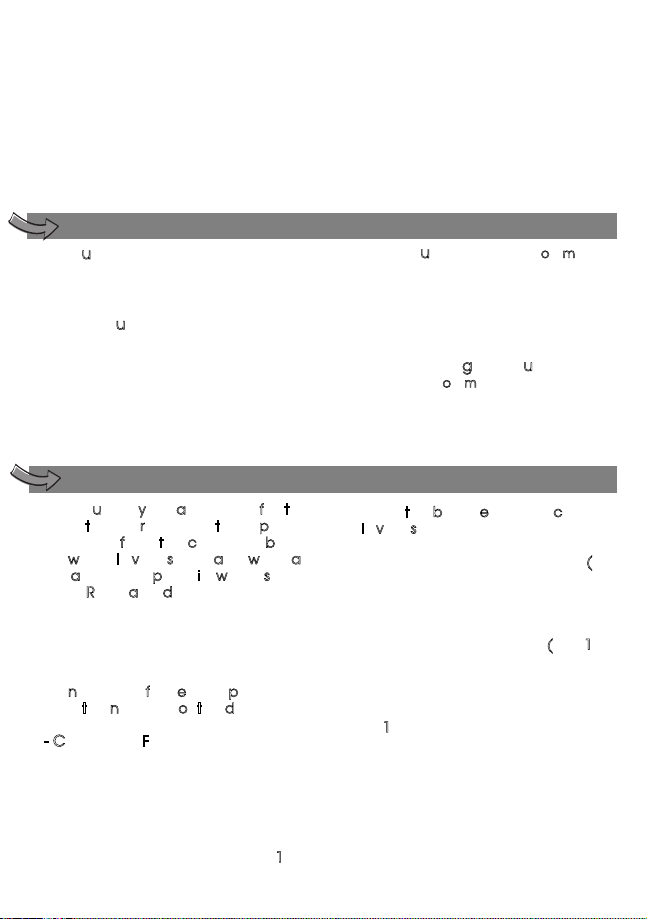
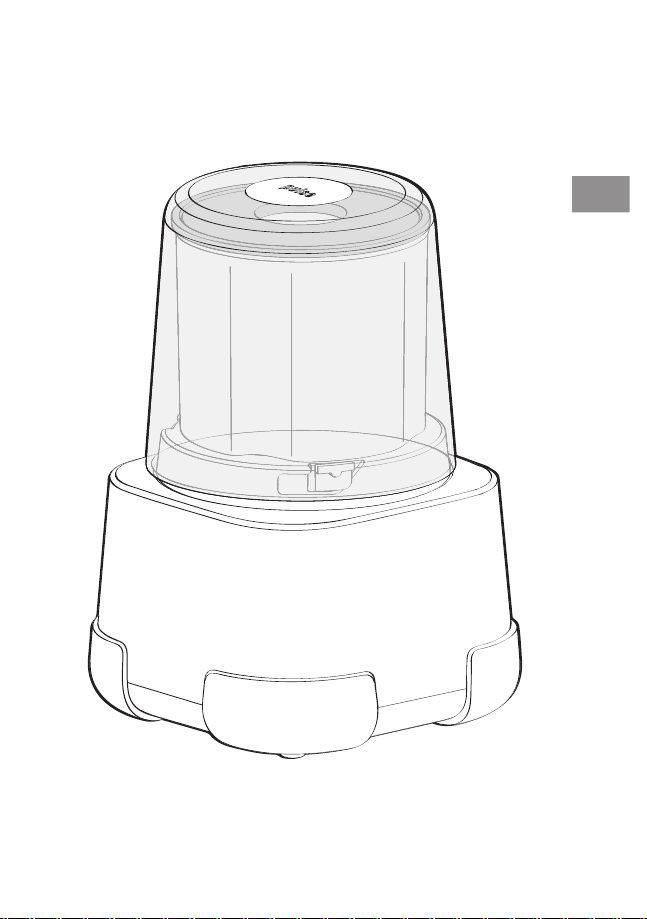
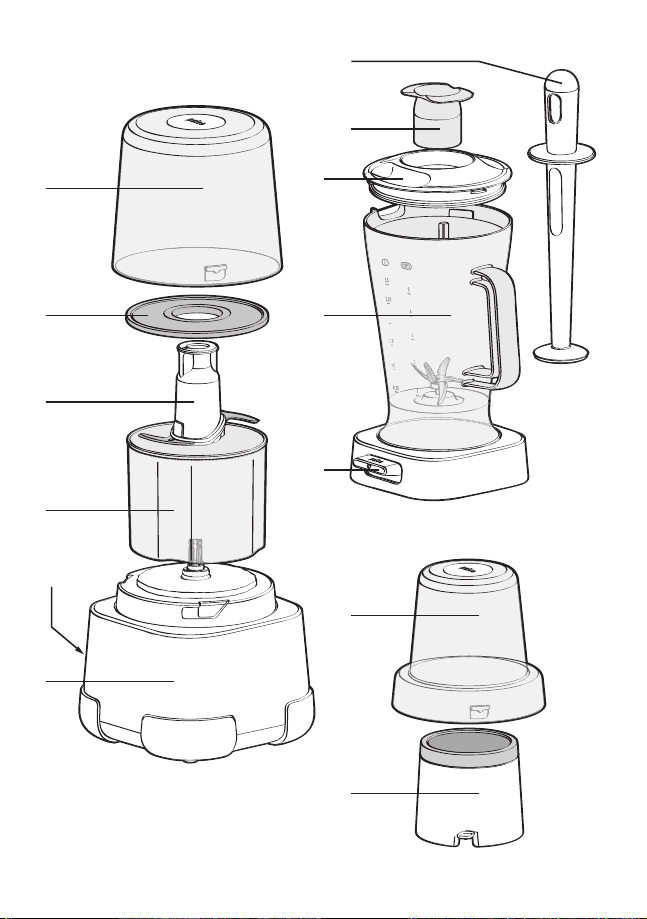
DESCRIPTION
USING FOR THE FIRST TIME
Motor unit
a
Motor unit
b
Power and storage
C
hopping unit
c
Lid
d
Seal cover
e
Chopping blade
f
Chopper bowl
B
lender unit
(depending on model)
g
Measuring cap
h
Lid
i
Blender jug
j
Starting button (Pulse)
k
Pestle
S
pice/coffee grinder unit
(depending on model)
l
Lid
m
Bowl with stainless steel tub
•
B
efore using your appliance for the
first time, remove the plastic
protection from the chopping blade
(e) which is very sharp and wash all
the accessory parts in warm soapy
water. Rinse and dry.
• Use the motor unit
(
a)
on a work
surface that is flat, clean and dry.
• Do not plug in your Chopping Unit until
all of the accessories have been
assembled.
T
he numbers for each paragraph
match the numbers of the diagrams.
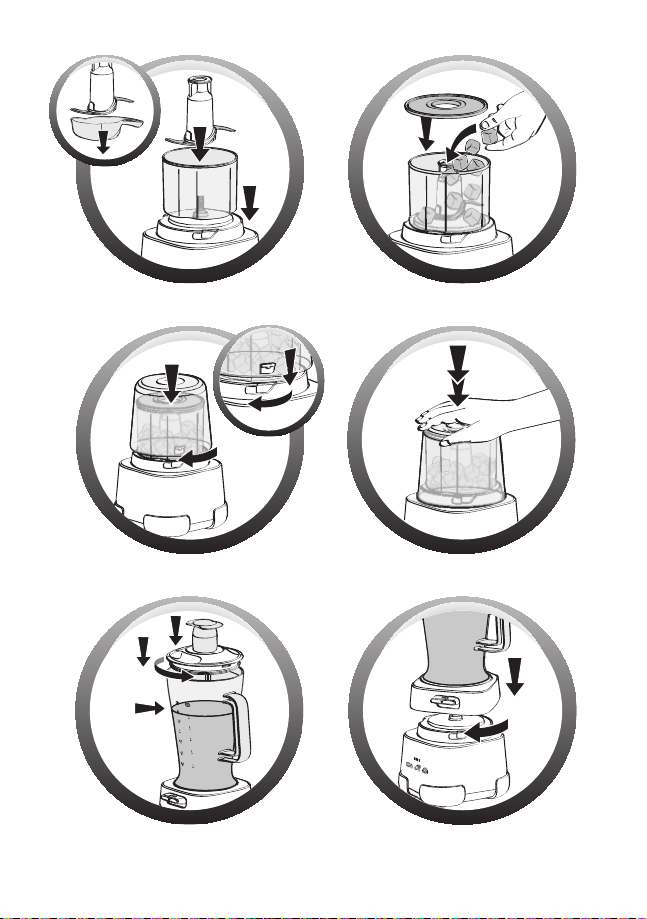
1 - CHOPPING FUNCTION
• Place the chopper bowl
(
f)
on the
motor unit
(
a)
.
• Remove the plastic protection around
the knife blades (e), then place them
inside the chopper bowl (f) making
sure to secure them safely
(
Fig. 1.a)
.
H
andle the blade extremely carefully.
It is very sharp.
• Then place the food, cut into 2-cm
pieces, in the chopper bowl
(
f) (Fig.
1.b)
.
• To avoid any spillages (semi-liquid
mixtures, foods to be reduced to
powder, etc), place the seal cover
(
d)
over the chopper bowl
(
f) (Fig. 1.c)
.
When making semi-liquid mixtures, fill
your chopper bowl only half full.
• Place the lid
(
c)
on the chopper bowl
(
f)
and turn it slightly to the left to lock it
(
Fig. 1.d)
.
• Now you can plug in your Chopper Unit
to the mains.
• For your safety, your device is equipped
with an anti-overheating system. If the
appliance is used in excess of its
capacity (with too many ingredients of
for too long a time) it will stop
automatically. Unplug the appliance
• Always use the blender
(
i)
with its lid
on
(
h)
.
• Never touch moving parts, wait for the
blender to stop completely before removing the accessories.
• Do not use the accessories as a
container (freezing – cooking – heat
sterilisation).
• Do not place the accessories in a
microwave oven.
• Do not allow long hair, scarves, ties,
etc. to dangle over the blender while
it is working.
8
Page 7

9
from the mains, let it cool for about 30
minutes and then continue using it
making sure to decrease the amount
of ingredients in the bowl and to
respect the use times indicated in the
performance table.
• Press on the lid
(
c)
to start the
appliance
(
Fig. 1.e)
.
• To stop the appliance, stop pressing the
lid
(
c)
: the appliance switches off
automatically.
• Never remove the lid
(
c)
until the blade
(
e)
has completely stopped.
• Unplug the appliance after each use
and before cleaning it.
• Your blade is fitted with a self-locking
system. To remove the blade
(
e)
, gently
rotate it holding it at its top, and then
pull it upwards, while maintaining the
chopper bowl
(
f)
with the other hand.
• You can now safely empty your
chopper bowl
(
f)
.
Practical advice:
Important:
you will chop your food
better if you operate the appliance in
brief pulses.
• Depending on how fine you want it
chopped, vary the amount of time you
press.
• For a finer mince or slice, use the
spatula to remove the food sticking to
the walls and distribute it evenly inside
the chopper bowl
(
f)
.
• The blade
(
e)
can get blunter after
prolonged use. For the best results, don't
hesitate to replace it.
• After use, leave the appliance to cool
down for 2 minutes.
• Do not use when empty.
Ingredients
Max. quantity
Max. time
Parsley
30 g
8 s
Onions
300 g
14 s
(using
pulses)
Shallots
250 g
14 s
(using
pulses)
Garlic
200 g
12 s
Rusks
85 g
15 s
Almonds
300 g
12 s
Hazelnuts
300 g
14 s
Walnuts
250 g
12 s
Parmesan
100 g
10 s
Tender meat
(pieces of first
category)
350 g
12 s
Tough meat
(pieces of third
category or
cheap cuts)
300 g
12 s
For better results, mix the ingredients
manually with a spatula during the cycle.
Semi-liquid mixtures
Stewed fruit
260 g 12 s
Baby food
230 g
15 s
• For very hard meat as lamb
shoulder, please use 200 g per
cycle of 10 s.
• Wait 2 min between each cycle.
Recommended processing times for
Chopping the performances of your
blender:
Page 8

2 - BLENDER FUNCTION
(
depending on model)
• Place the blender jug
(
i)
on the table.
Whenever handling the appliance, the
blender jug must always be set on the
table, never on the motor unit
(
a)
.
• Place the ingredients you wish to mix
inside the blender bowl (i) pouring first
the liquids and then the solid
ingredients, without exceeding the
maximum level:
- 1.5 ℓ for thick mixtures.
- 1 ℓ for liquid mixtures.
• Put on the lid
(
h)
, fitted with the
measuring cap
(
g)
, and lock it by
turning it anticlockwise
(
Fig. 2.a)
.
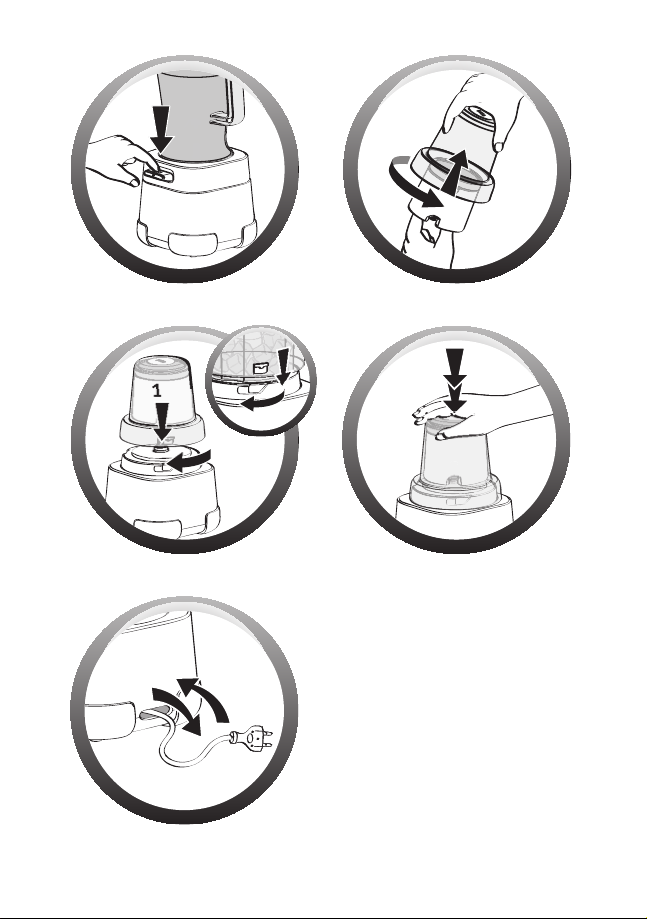
• Place the blender jug
(
i)
on the motor
unit
(
a)
, positioning the "Pulse" button
(
j)
slightly to the right of the front of the
motor unit panel
(
a) (Fig. 2.b)
. Turn the
blender jug
(
i)
clockwise to lock it: you
need to align the square base of the
blender jug
(
i)
with square base of the
motor unit
(
a) (Fig. 2.c)
.
• Plug in the appliance and switch it on
by pressing the Pulse button
(
j) (Fig.
2.d)
.
• To stop the appliance, release the Pulse
button
(
j)
. Wait until the blades have
stopped spinning completely before
removing the blender jug
(
i)
from the
motor unit
(
a)
.
• Never fill the blender jug
(
i) with a
boiling liquid.
Allow boiling liquids to
cool before processing. Caution: when
blending hot food, keep your hands
away from the lid and cap to avoid any
risk of burns.
• Always use the blender jug
(
i)
with its
lid on
(h)
.
• Do not use the blender jug
(
i)
with dry
products only (hazelnuts, almonds,
peanuts, sugar etc.).
• To add ingredients while the appliance
is working, remove the measuring cap
(
g)
from the lid and add the
ingredients through the feeder hole.
T
ips:
• When mixing, if the ingredients stick to
the sides of the jug, stop the machine
and unplug it. Remove the blender jug
(
i)
from the motor unit
(
a)
. Using a
spatula, scrape the mixture onto the
blade. Never put your hands or fingers
into the jug or near the blade.
Y
ou can:
- prepare finely blend smooth soups,
creams, stewed fruit, milkshakes,
cocktails.
- prepare all kinds of liquid mixtures
(pancakes, doughnuts, clafoutis,
batters).
• The pestle
(
k)
makes it possible to make
mixtures smoother and pack them
down (in particular thick mixtures, e.g.:
hummus, guacamole), in the blender
jug. To use the pestle, push it through
the central hole in the lid
(
h)
of the
blender jug. While the appliance is
working, push the food towards the
blades using the pestle.
ATTENTION: Never use the pestle (k)
without the lid (h) or it could touch
the blades.
3 - COFFEE/SPICE GRINDER
FUNCTION (depending on
model)
• Add the ingredients to be ground into
the coffee/spice grinder bowl
(
m)
.
• Position the bowl
(
m)
under the lid
(
l)
and lock it by turning it clockwise. When
you hear a click, the unit is properly
locked
(
Fig. 3.a)
.
• Place the bowl + lid unit on the motor
unit
(
a)
and turn it slightly to the left to
lock it
(
Fig. 3.b)
.
• Now you can plug your appliance in.
• Press down on the lid
(
l)
to start it up
(
Fig. 3.c)
.
• To stop the grinder, stop pressing on the
lid
(
l)
: the appliance switches off
automatically.
• Never remove the lid
(
l)
until the blade
has completely stopped.
10
Page 9

11
Ingredients
Quantity
Processing
Time
(using pulses)
Dried apricots
120 g
5 sec
Star anise
10 g
35 sec
Coffee beans
60 g
30 sec
Cardam om
20 g
40 sec
Cumin
20 g
30 sec
Paprika pepper
10 g
35 sec
Peppercorns
20 g
35 sec
4 - CORD LENGTH ADJUSTMENT
For more comfortable use or easy
storage, you can reduce the length of
the power cord by pushing it inside the
motor unit
(
a)
through the opening at
the back
(
b) (Fig. 4)
.
CLEANING
• Unplug the appliance.
• For easier cleaning, rinse the
accessories quickly after use.
• Wash and dry the accessories: they are
all dishwasher safe or can be washed
by hand with warm water and washing
up liquid, with the exception of the
motor unit
(
a)
. The motor unit should be
wiped with a damp sponge.
• Pour hot water with a few drops of
washing-up liquid into the blender jug
(
i)
. Close the lid
(
h)
with the measuring
cap
(
g)
. Place the bowl on the motor
unit
(
a)
and press a few times on the
"Pulse" button
(
j)
. Unplug the device.
Rinse the bowl.
-
T
he blades are extremely sharp
accessories. Handle them with
care.
Tip:
In the event that your accessories
are coloured by the food (carrots,
oranges, etc.), rub them with a cloth
dipped in a little sunflower oil and then
clean them as usual.
• Unlock the coffee/spice grinder from
the motor unit
(
a)
by turning it to the
right and lift it off the motor unit
(
a)
.
• To empty the coffee/spice grinder
bowl, unlock it by turning it to the left
while at the same time holding the lid
(
l)
down with the other hand.
STORAGE
Do not store your blender in a damp environment.
Page 10
12
WHAT DO I DO IF MY APPLIANCE DOESN'T WORK?
ACCESSORIES
DISPOSAL OF THE APPLIANCE AND ITS PACKAGING
MATERIALS
END OF LIFE ELECTRICAL AND ELECTRONIC PRODUCTS
If your appliance does not work,
check:
• that it is properly plugged in.
• that each accessory is locked.
Your appliance still isn't working?
Contact an approved service centre
(see the list in the service booklet).
The packaging is comprised
exclusively of materials that
present no danger for the
environment and which
may therefore be disposed
Environmental protection first!
Your appliance contains a lot of recoverable or recyclable
material.
Leave it at a local civic waste collection point so that it can
be recycled.
You can customise your appliance
and obtain the following accessories
from your usual retailer or an
approved service centre:
of in accordance with the recycling
measures in force in your area.
For disposal of the appliance itself,
please contact the appropriate
service of your local authority.
- Chopping blade
- Blender jug
- Pestle
- Coffee/spice grinder
Page 11

Page 12

Page 13

Page 14

Page 15

Page 16

96
Page 17

Ref. 0828768
EN
p. 7 - 12
 Loading...