

Page 1
12-CUP COFFEE MAKER
043-0461-0
CAFETIÈRE DE 12 TASSES
www.moulinex.ca
EN FR
USER GUIDE
GUIDE DE L’UTILISATEUR
If you have any questions or concerns please call our Moulinex
toll-free number at 1-888-670-6681.
Si vous avez des questions ou des préoccupations, veuillez
appeler notre numéro sans frais Moulinex au 1-888-670-6681.
Page 2

Page 3

contents
important safeguards
product diagram
operating your coffee maker
care and cleaning
04
06
07
11
importantes mises en garde
diagramme du produit
fonctionnement de la cafetière
entretien et nettoyage
14
16
17
22
contenu
Page 4

4
EN
When using electrical appliances, basic safety precautions
should always be followed including the following:
1. READ all instructions.
2. DO NOT touch hot surfaces. Please Use handles or knobs.
3. To protect against fire, electric shock and injury to persons,
DO NOT immerse cord, plug, or the coffeemaker in water or other
liquids.
4. Close supervision is necessary when any appliance is used by or
near children.
5. ALWAYS UNPLUG coffeemaker from power outlet before cleaning,
and when storing. Allow unit to cool before putting on or taking
off parts, cleaning or storing.
6. DO NOT operate any appliance with a damaged cord or plug, or
after the appliance malfunctions or has been dropped or damaged
in any manner. Return appliance to the nearest authorized service
facility for examination, repair or adjustment.
7. The use of accessory attachments not recommended by the
ap pliance manufacturer may result in fire, electric shock or injury
to persons.
8. DO NOT use outdoors.
9. NEVER let the cord hang over the edge of a table or counter or
touch hot surfaces.
10. DO NOT place coffeemaker on or near a hot gas or electric burner,
or in a heated oven.
11. DO NOT use this coffeemaker for anything other than its
IMPORTANT SAFEGUARDS
Page 5

5
EN
intended use.
12. The carafe is designed for use only with this coffeemaker.
13. Scalding may occur if the lid is removed during the brewing
cycles. ALWAYS keep the lid on the carafe when in use.
14. A short power supply cord is provided to reduce risks resulting
from becoming entangled in or tripping over a longer cord.
15. DO NOT set a hot container on wet or cold surface.
16. DO NOT use a cracked container or a container having a loose or
weakened handle
17. DO NOT clean container with cleansers, steel wool pads, or other
abrasive material.
18. The container is designed for use with this appliance, it must
never be used on a range top.
19. This appliance is for Household Use Only.
Toll free number for Moulinex: 1-888-670-6681
Page 6
6
EN
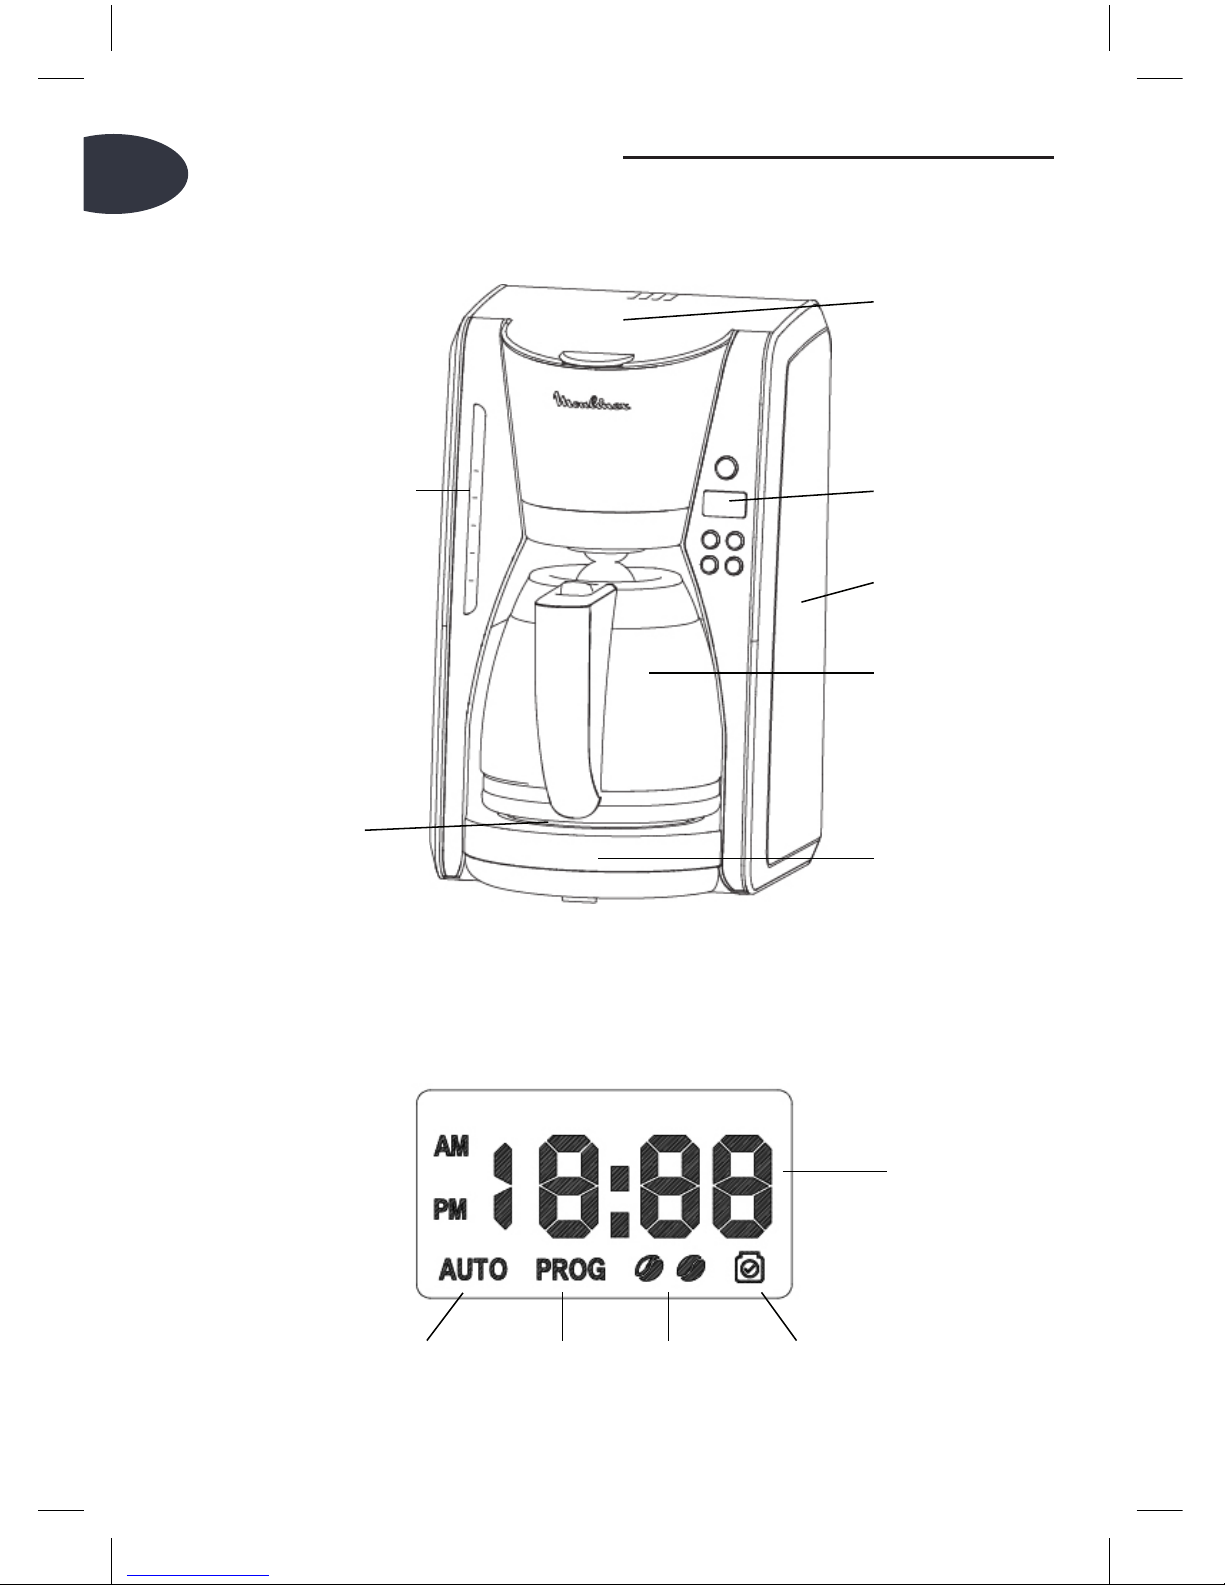
PRODUCT DIAGRAM
LCD MONITOR
COFFEE MAKER
Time
Self CleaningStrengthProgramAuto Brewing
Water reservoir
window
Warning
plate
Top cover
LCD display
Housing
Carafe
Base
Page 7

7
EN
OPERATING YOUR COFFEE MAKER
Before Use
1. Wash the brew basket , the permanent gold-tone filter, the
carafe and the carafe lid in either the top rack of your dishwater
or by hand in warm, sudsy water.
2. The exterior of the coffeemaker, the control panel area and the
warming plate should only be cleaned with a soft damp cloth
3. To clean inside of the reservoir, raise the cover and allow it to
rest in the open position. Wipe surfaces with a damp cloth and
close the cover
4. After all parts are washed for the first time, pour water up to
the 12 cup level mark in the water reservoir. Brew it through the
coffeemaker as instructed in brewing, but do not add coffee
grounds to the filter. When done, turn off the coffeemaker and
discard the water from the carafe.
Note: Never clean the warming plate unless it is completely
cool. Do not use abrasive cleansers or scouring pads when
cleaning your coffeemaker. Never immerse the coffeemaker in
water or any liquid.
Coffee Brewing
1. Open the top cover
2. Use the carafe to fill the water tank of the coffeemaker to the
desired level with cold water. There is a gauge mark 4 to 12 cups
on the front of water on both the coffeemaker’s water tank and on
the carafe. These marks indicate the amount of cold water needed
Page 8
8
EN
for each cup of coffee. The amount of brewed coffee will differ
slightly due to the coffee grinds absorbing some water
3. Place either the permanent gold-tone filter or a paper filter into
the brew basket.
4. Add ground coffee. The amount of coffee you use is a matter of
personal taste (we recommend one heaping tablespoon for every
two cups). Try different amounts of ground coffee per cup until
you brew your perfect cup of coffee. You can also try using the
paper filter along with the gold-tone filter.
5. Close the cover. Place carafe on the warming plate and plug in the
appliance. The display window illuminates blue and the
coffeemaker emits a long beep to let you know the clock is not
set. The clock will display the default time of AM 12:00. The clock
does not have to be set to brew coffee. To set the clock time, see
SETTING THE CLOCK, TIMER AND AUTO-BREWING.
6. The default setting of coffeemaker is for regular strength,
indicat ed by icon . You can choose bold strength by pressing
strength button. The icon “ ” light and strength button
indicator will illuminate to show it is under bold strength mode.
7. Turn on the coffeemaker by pushing in the Brew/stop button.
The Brew/stop indicator will illuminate to show the coffeemaker
is brewing. After a few seconds, hot water will flow into the filter
to brew coffee. When the water stops flowing, brewing is
complete, and the coffeemaker automatically switches to the
warming mode. For delayed brewing, see SETTING THE CLOCK,
TIMER AND AUTO-BREWING.
Page 9

9
EN
8. When you have poured out all the coffee in the carafe, press
Brew/stop button to turn off the appliance, and remove the carafe
from the warming plate.
Note: If the coffeemaker is not turned off, it will
automatically shut itself off after two hours.
Setting the Clock, Timer
Use the Hour and Min buttons to set the clock
1. When the coffeemaker is first plugged in, the clock will display
the default time of AM 12:00.
2. Press the Hour button to change the setting to any hour number
between AM:1-12 and PM:1-12hour
3. Press the Min button to change the setting to any minute
between 0 and 59
4. You can make the hours and minutes move more quickly in the
clock display by holding the buttons down
5. The clock will begin keeping time at the moment the Hour and
Min button are released.
Automatic Brewing(Delayed Brewing)
1. Press Prog/Auto button for a few seconds, and the icon “PROG”
will light.
2. Set the time you wish the coffeemaker to begin brewing by
pressing the”Hour” and “Min” buttons. Be sure to set the correct
designation of AM or PM. Once you have set the correct time to
Page 10

10
EN
begin the automatic brewing and the clock has returned to the
time of day.
3. Set up the taste strength by pressing the strength button. The
default setting of coffeemaker is for regular strength, indicated by
icon . You can choose bold strength by pressing strength
button. The icon “ ” light and strength button indicator will
illuminate to show it is under bold strength mode.
4. Within 5 seconds of no operation, the icon “PROG” will light
off, exiting the setting up process.
5. After setting up, press Prog/Auto button to start auto brewing .
The icon “AUTO” light and Prog/Auto button indicator will
illuminate, and other buttons will lose operation function.
6. When brewing is finished, the icon “AUTO” will light off.
Note: The auto brew can be cancelled at any time by pressing
Prog/Auto button again or Brew/stop button.
Cleaning the coffeemaker and changing the charcoal filter
Mineral deposits from water can clog your coffeemaker. We suggest to
change the filter once a month.
Change the filter
1. Open the cover of reservoir, and pull out the water filter.
2. Open the water filter, pull out the old charcoal, discard and
re place with a new one.
Page 11

11
EN
3. Place the water filter with new charcoal into reservoir.
Self Cleaning
1. Pour white vinegar into water reservoir up to the 6-cup level
2. Add cold water up to the 12-cup line
3. Press the button “Hour” and “Min” at same time. The icon will
light. The appliance enter into self-cleaning. When the icon
light off, the cleaning is completed.
4. Refill reservoir with cold water and press the “Brew/Stop” to run
brew cycle. You may want to repeat again to eliminate any vinegar
smell/taste.
Always unplug the coffeemaker outlet before cleaning. The exterior of
the coffeemaker, the control panel area and the warming plate should
only be cleaned with a soft damp cloth.
Warning: Never immerse the coffeemaker in water or any liquid
Do not clean the warming plate unless it is completely cool. Do not
use abrasive cleaners or scouring pads.
To clean the inside of the water reservoir, raise the top cover and allow
it to rest in the open position. Pull the water spreader hose out from
under the guide on the underside of the cover, wipe surfaces with a
CARE AND CLEANING
Page 12

12
EN
damp cloth, replace water spreader hose under guide, and close cover.
Do not use abrasive or scouring pads.
Carafe Care
A damage carafe may result in possible burns from a hot liquid. To
avoid damages:
1. Do not allow all liquid to evaporate from the carafe while on the
warming plate and never heat the glass carafe when empty .
2. Discard the carafe if chipped, cracked, or damaged in any manner
3. Never use abrasive scouring pads or cleansers; they will scratch
and weaken the glass
4. Do not place the carafe on or near a gas or electric burner, in a
heated oven, or in a microwave oven
5. Avoid rough handling and sharp blows
6. Do not set a hot carafe down on a wet or cold surface.
Any other service should be preformed by an authorized service
representative.
Page 13

13
EN
Page 14

FR
14
Lorsque vous utilisez un appareil électrique, des consignes
de sécurité élémentaires doivent toujours être observées et
en particulier les suivantes :
1. LIRE toutes les instructions.
2. NE PAS toucher les surfaces chaudes. Utiliser les poignées ou les
boutons.
3. Pour se protéger des chocs électriques, NE PAS immerger le cor
don, la prise ou la cafetière dans l’eau ni dans tout autre liquide.
4. Une surveillance étroite est nécessaire lorsque l’appareil est utilisé
par ou à proximité des enfants.
5. TOUJOURS DÉBRANCHER la cafetière de la prise électrique avant
de la nettoyer, et pour la ranger. La laisser refroidir avant d’ajouter
ou d’enlever des pièces et avant de la nettoyer ou de la ranger.
6. NE PAS utiliser un appareil électrique avec un cordon
d’alimentation ou une prise endommagé, quand l’appareil
fonctionne mal ou a été échappé, ou s’il a été endommagé de
quelque manière que ce soit. Retourner tout appareil défectueux
au centre de service agréé le plus près afin qu’il soit examiné,
ajusté ou réparé.
7. L’utilisation d’accessoires non recommandés par le fabricant peut
causer un incendie, un choc électrique ou des blessures.
8. NE PAS utiliser à l’extérieur.
9. NE JAMAIS laisser pendre le cordon d’une table ou d’un comptoir
ni entrer en contact avec des surfaces chaudes.
10. NE PAS placer la cafetière sur ou près d’un brûleur à gaz ou élect
IMPORTANTES MISES EN GARDE
Page 15

FR
15
rique, ni dans un four chaud.
11. NE PAS utiliser la cafetière pour un usage autre que celui pour
lequel elle a été conçue.
12. La carafe est conçue pour être utilisée uniquement avec cette
cafetière.
13. Des brûlures peuvent survenir si le couvercle est retiré pendant
le cycle de percolation. TOUJOURS garder le couvercle sur la
carafe pendant l’utilisation.
14. Cet appareil est muni d’un cordon d’alimentation court afin de ré
duire les risques que celui-ci ne s’emmêle ou que l’on puisse
trébucher dessus.
15. NE PAS déposer un contenant chaud sur une surface mouillée ou
froide.
16. NE PAS utiliser un contenant fêlé ou dont la poignée est affaiblie
ou lâche.
17. NE PAS nettoyer le contenant avec des nettoyants abrasifs, de la
laine d’acier ou tout autre produit abrasif.
18. Le contenant est conçu pour être utilisé avec cet appareil et ne
doit jamais être utilisé sur une cuisinière.
19. Cet appareil est conçu pour une utilisation
domestique seulement.
Ligne sans frais Moulinex : 1-888-670-6681
Page 16

FR
16
DIAGRAMME DU PRODUIT
Affichage ACL
Fenêtre du
axréservoir d’eau
Plaque
chauffante
Couvercle
Affichage ACL
Socle
Carafe
Base
Heure
Démarrage
automatique
Programmation
Force du café
Auto-nettoyage
CAFETIÈRE
Page 17

FR
17
FONCTIONNEMENT DE LA CAFETIÈRE
Avant la première utilisation
1. Lavez le porte-filtre, le filtre permanent doré, la carafe et son
couvercle soit dans le panier supérieur du lave-vaisselle, soit à la
main dans une eau tiède savonneuse.
2. L’extérieur de la cafetière, le panneau de commande et la plaque
chauffante ne doivent être lavés qu’à l’aide d’un linge doux
humide.
3. Pour nettoyer l’intérieur du réservoir, soulevez le couvercle et
laissez-le en position levée, essuyez les surfaces à l’aide d’un linge
humide et refermez le couvercle.
4. Une fois que vous aurez lavé toutes les pièces pour la première
fois, versez de l’eau dans le réservoir pour atteindre la marque de
12 tasses indiquée sur le réservoir. Faites faire un cycle de perco
lation complet tel qu’indiqué dans la section « Préparation du
café », sans mettre de café dans le filtre. Une fois cela terminé,
éteignez la cafetière et jetez l’eau de la carafe.
Note : Ne nettoyez jamais la plaque chauffante avant qu’elle
ne soit complètement refroidie. N’utilisez pas de nettoyants
ou de tampons abrasifs pour nettoyer la cafetière. N’immergez
jamais la cafetière dans l’eau ni dans tout autre liquide.
Préparation du café
1. Soulevez le couvercle.
2. Utilisez la carafe pour remplir le réservoir d’eau de la cafetière
jusqu’au niveau désiré, avec de l’eau froide. Il y a des indicateurs
de niveau de 4 à 12 tasses sur le devant du réservoir d’eau et de la
Page 18

FR
18
cafetière. Ces indicateurs montrent la quantité d’eau froide
nécessaire pour préparer le nombre correspondant de tasses de
café. La quantité de café préparé sera quelque peu différente de la
quantité d’eau versée car la mouture en absorbe une partie.
3. Placez soit le filtre permanent doré ou un filtre papier dans le
porte-filtre.
4. Ajoutez du café moulu. La quantité de café utilisée dépend de
vos goûts personnels (nous vous recommandons d’utiliser une
cuillère à soupe comble par 2 tasses). Essayez différentes quan
tités de café moulu par tasse jusqu’à ce que vous trouviez le par
fait équilibre pour vous. Vous pouvez aussi essayer d’utiliser un
filtre papier avec le filtre permanent doré.
5. Refermez le couvercle. Placez la carafe sur la plaque chauffante
et branchez l’appareil. L’écran clignote en bleu et la cafetière émet
un long bip sonore pour indiquer que l’horloge n’est pas
programmée. L’horloge affiche l’heure par défaut « AM 12:00 ». Il
n’est pas nécessaire de la programmer pour utiliser la cafetière.
Pour la programmer, consultez la section PROGRAMMER L’HEURE,
LA MINUTERIE ET LE DÉMARRAGE AUTOMATIQUE.
6. Le paramètre par défaut de la cafetière est un café de force
normale, indiqué par le symbole . Vous pouvez choisir un café
corsé en appuyant sur la touche de la force du café. Le symbole
« » et l’indicateur de la force du café s’allument pour indiquer
que la cafetière est programmée pour un café corsé.
7. Allumez la cafetière en appuyant sur la touche marche/arrêt. La
touche marche/arrêt s’allume pour indiquer que la cafetière effec
Page 19

FR
19
tue la percolation. Après quelques secondes, de l’eau chaude
s’écle dans le filtre à café. Lorsque l’eau cesse de s’écouler, la per
colation est terminée et la cafetière passe automatiquement en
mode réchaud. Pour programmer un démarrage différé, consultez
la section PROGRAMMER L’HEURE, LA MINUTERIE ET LE DÉMARRAGE
AUTOMATIQUE.
8. Lorsque la carafe est vide, appuyez sur la touche marche/arrêt
pour éteindre la cafetière; retirez la carafe de la plaque
chauffante.
Note : Si vous n’éteignez pas la cafetière, elle s’éteint
automa tiquement après un délai de 2 heures.
Programmer l’heure et la minuterie
Utilisez les touches « Hour » (heure) et « Min » (minutes) pour
régler l’heure
1. La première fois que la cafetière est branchée, l’horloge affiche
l’heure par défaut « AM 12:00 ».
2. Appuyez sur la touche « Hour » pour changer l’heure et la régler
à l’heure courante, soit entre AM:1-12 (pour l’avant-midi) et
PM:1-12 (pour l’après-midi).
3. Appuyez sur la touche « Min » pour régler les minutes, soit entre
0 et 59.
4. Vous pouvez faire défiler les heures et les minutes plus rapidement
en maintenant la touche enfoncée.
5. Une fois que les touches « Hour » et « Min » sont relâchées,
Page 20

FR
20
l’horloge est à l’heure.
Démarrage automatique (démarrage différé)
1. Appuyez sur la touche « Prog/Auto » quelques secondes; le
symbole « PROG » s’allume.
2. Entrez l’heure à laquelle vous désirez que la cafetière démarre en
appuyant sur les touches « Hour » et « Min ». Assurez-vous de
bien sélectionner AM ou PM. Une fois l’heure programmée,
l’horloge affiche de nouveau l’heure courante.
3. Sélectionnez la force du café en appuyant sur la touche de la force
du café. Le paramètre par défaut est un café de force normale,
indiqué par le symbole . Vous pouvez choisir un café corsé
en appuyant sur la touche de la force du café. Le symbole « »
et l’indicateur de la force du café s’allument pour indiquer que la
cafetière est programmée pour un café corsé.
4. Si aucune commande n’est sélectionnée pendant un délai de 5
secondes, le symbole « PROG » s’éteint pour sortir du processus de
programmation.
5. Une fois la programmation terminée, appuyez sur la touche
« Prog/Auto » pour activer le mode de démarrage automatique.
Les symboles « AUTO » et « Prog/Auto » s’allument.
6. Une fois la percolation terminée, le symbole « AUTO » s’éteint
ainsi que le symbole « Prog/Auto ».
Note : Le démarrage automatique peut être annulé en tout temps
en appuyant sur la touche « Prog/Auto » ou sur la touche
Page 21

FR
21
marche/arrêt.
Nettoyer la cafetière et changer le filtre à charbon
Les dépôts minéraux de l’eau peuvent obstruer votre cafetière. Nous
vous suggérons de changer le filtre une fois par mois.
Changer le filtre
1. Ouvrez le couvercle du réservoir et retirez le filtre à eau.
2. Ouvrez le filtre à eau et retirez le charbon usé. Jetez-le et
remplacez-le par un neuf.
3. Replacez le filtre à eau dans le réservoir.
Auto-nettoyage
1. Versez du vinaigre blanc dans le réservoir de la cafetière jusqu’à la
marque de 6 tasses.
2. Ajoutez de l’eau froide jusqu’a la marque de 12 tasses.
3. Appuyez simultanément sur les touches « Hour » et « Min ». Le
symbole s’allume. La cafetière passe en mode auto-nettoyage.
Lorsque le symbole s’éteint, le nettoyage est terminé.
4. Remplissez le réservoir d’eau froide et appuyez sur la touche
marche/arrêt pour faire un cycle de percolation. Vous pouvez
répéter le processus pour éliminer tout goût ou odeur de vinaigre.
Page 22

FR
22
NETTOYAGE ET ENTRETIEN
Débranchez toujours la cafetière avant de la nettoyer. L’extérieur de
la cafetière, le panneau de commande et la plaque chauffante doivent
être nettoyés uniquement à l’aide d’un linge doux humide.
Avertissement : N’immergez jamais la cafetière dans l’eau ou dans tout
autre liquide. Ne nettoyez pas la plaque chauffante à moins qu’elle ne
soit complètement refroidie. N’utilisez pas de nettoyants ou de
tampons abrasifs.
Pour nettoyer l’intérieur du réservoir d’eau, levez le couvercle et
laissez-le en position levée. Retirez le tuyau d’écoulement de l’eau
de son réceptacle sous le couvercle, essuyez les surfaces intérieures
à l’aide d’un linge humide, puis remettez le tuyau en place. Fermez le
couvercle. N’utilisez pas de nettoyants ou de tampons abrasifs.
Entretien de la carafe
Une carafe endommagée peut causer des brûlures dues au liquide
chaud. Pour éviter de l’endommager :
1. Ne laissez pas tout le liquide s’évaporer de la carafe lorsqu’elle
est sur la plaque chauffante et ne laissez jamais une carafe vide
sur la plaque chauffante.
2. Jetez la carafe si elle est fêlée, craquée ou endommagée de
quelque façon que ce soit.
3. N’utilisez pas de nettoyants ou de tampons abrasifs; ils peuvent
égratigner et fragiliser le verre.
Page 23

FR
23
4. Ne placez pas la carafe sur ou près d’un brûleur à gaz ou
électrique, dans un four chaud ni au four à micro-ondes.
5. Évitez de manipuler la carafe de façon brutale et de la cogner.
6. Ne déposez pas une carafe chaude sur une surface froide ou
humide.
Tout autre entretien doit être effectué par un représentant d’un centre
de service agréé.
Page 24

SAVE THESE INSTRUCTIONS
Toll-free number for Moulinex: 1-888-670-6681
CONSERVER CES INSTRUCTIONS
Ligne sans frais Moulinex : 1-888-670-6681
www.moulinex.ca
 Loading...