

Page 1
SERIES TWO-WAY RADIO
0
User's Guide
-1
@6864110R04@
6864110R04-A
Models XU1100, XU2100, XU2600,
XV1100, XV2100, and XV2600
Page 2

Introduction
Introduction
2
For a copy of a large-print version of this guide, or for product-related questions,
please contact:
1-800-448-6686 in the USA
1-800-461-4575 in Canada
1-888-390-6456
on your TTY (Text Telephone)
On the web, please refer to: www.motorola.com/radios/professional
Thank you for purchasing a Motorola
Motorola’s 70 plus years of experience as a world leader in the designing and
manufacturing of communications equipment. The XSeries radios provide cost-
effective communications for businesses such as retail stores, restaurants, schools,
construction sites, manufacturing, property and hotel management and more.
Motorola professional two-way radios are the perfect communications solution for all
of today’s fast-paced industries.
Note: Please read this manual carefully to ensure you know how to properly
operate the radio before use.
Package Contents
•Radio
• Swivel Belt Holster
• NiMH Battery
• 10-Hour Charger
• User's Guide
• Accessory Brochure
•Warranty Card
• Drop-In Charging Tray (not included with all models)
Motorola, the Stylized M Logo, and all other trademarks indicated as such herein are
Trademarks of Motorola, Inc.
£
Reg. U.S. Pat. & Tm. Off. © 2001, 2002 Motorola, Inc. All rights reserved.
£
XSeries Radio. Your radio is a product of
Introduction
X
1
Page 3

Contents
4
Advanced Features .........................39
Troubleshooting ............................. 41
Use and Care.................................... 44
Frequencies and Bandwidths......... 45
Verifying the M-Series Frequency
and Code Setting ........................ 51
Motorola Limited Warranty .............53
Software Copyright Notice..............61
Patent Notice..................................61
Export Law Assurances..................62
Index .................................................64
Introduction...................................1
FCC Licensing Information..........5
Safety and General Information ..7
Getting Started............................15
Installing the Swivel Belt
Holster ..................................16
Installing the Nickel-Metal
Hydride Battery .....................17
Charging the XSeries Radio ....18
Turning Your Radio On or Off ...19
Adjusting the Volume ................19
Using the Radio ........................19
Understanding the Display........21
Battery and Charging Options ..22
NiMH Battery.............................22
Alkaline Batteries ......................22
Charging with the Drop-in
Charging Tray........................23
Reading the Battery Meter ........24
Battery Life................................24
XTN Series Factory Defaults ....25
Talking and Receiving................26
Signal Strength Indicator/Channel
Busy.......................................26
Talk Range................................26
Keypad Lock............................. 27
Hands-Free Use/VOX .............. 27
With Compatible VOX
Accessories........................... 27
Without Accessories................. 28
Setting VOX Sensitivity ............ 28
Monitoring a Channel ............... 29
Scanning ................................. 29
Programming Features...............31
Entering Programming Mode ....31
Programming a Channel ..........32
Programming the Frequency.....32
Programming the Interference
Eliminator Code......................33
Assigning Channels
to Presets ..............................33
Programming the Scramble
Feature...................................34
Programming Bandwidth ..........34
Programming the Available
Channel .................................35
Programming Call Tones ..........35
Programming Microphone
Gain........................................36
Editing the Scan List .................36
Cloning ......................................37
3
Page 4

FCC Licensing Information
FCC Licensing Information
6
FCC
Changes or modifications not expressly approved by Motorola may void the user’s
authority granted by the FCC to operate this radio and should not be made. To
comply with FCC requirements, transmitter adjustments should be made only by or
under the supervision of a person certified as technically qualified to perform
transmitter maintenance and repairs in the private land mobile and fixed services as
certified by an organization representative of the user of those services.
Replacement of any transmitter component (crystal, semiconductor, etc.) not
authorized by the FCC equipment authorization for this radio could violate FCC
rules.
Note: Use of this radio outside the country where it was intended to be distributed
is subject to government regulations and may be prohibited.
XSeries professional two-way radios operate on radio frequencies that are
regulated by the Federal Communications Commission (FCC). In order to transmit
on these frequencies, you are required to have a license issued by the FCC.
Application is made available on FCC Form 601 and Schedules D, H, and
Remittance Form 159.
To obtain these FCC forms please request document 000601
forms and instructions. If you wish to have the document faxed, mailed or have
questions, please use the following contact information.
Faxed
contact the Fax-On-
Demand system at:
1-202-418-0177
Before filling out your application, you must decide which frequency(ies) you can
operate on. See Frequencies and Bandwidths.
For questions on determining your radio frequency, please call Motorola Product
Services at: 1-800-448-6686.
call the FCC forms
Mailed
hotline at:
1-800-418-FORM
1-800-418-3676
regarding FCC license
contact the FCC at:
Or: http://www.fcc.gov
which includes all
Questions
1-888-CALL-FCC
1-888-225-5322
FCC Licensing Information
FCC
5
Page 5

Safety and General Information
Safety and General Information
8
Exposure to Radio Frequency Energy
Your Motorola radio is designed to comply with the following national and
international standards and guidelines regarding exposure of human beings to radio
frequency electromagnetic energy:
• United States Federal Communications Commission, Code of Federal
Regulations; 47 CFR part 2 sub-part J
• American National Standards Institute (ANSI) / Institute of Electrical and
Electronic Engineers (IEEE) C95. 1-1992
• Institute of Electrical and Electronic Engineers (IEEE) C95.1-1999 Edition
• National Council on Radiation Protection and Measurements (NCRP) of the
United States, Report 86, 1986
• International Commission on Non-Ionizing Radiation Protection (ICNIRP)
1998
• Ministry of Health (Canada) Safety Code 6. Limits of Human Exposure to
Radio Frequency Electromagnetic Fields in the Frequency Range from 3 kHz
to 300 GHz, 1999
• Australian Communications Authority Radiocommunications
(Electromagnetic Radiation - Human Exposure) Standard 1999 (applicable
to wireless phones only)
To assure optimal radio performance and make sure human exposure to radio
frequency electromagnetic energy is within the guidelines set forth in the above
standards, always adhere to the following procedures:
Important Information on Safe and Efficient Operation
Read This Information Before Using Your Radio
The information provided in this document supersedes the general safety
information contained in user guides published prior to July 2000. For information
regarding radio use in a hazardous atmosphere please refer to the Factory Mutual
(FM) Approval Manual Supplement or Instruction Card, which is included with radio
models that offer this capability.
This device complies with Part 15 of the FCC Rules. Operation is subject to the
following two conditions: (1) this device may not cause harmful interference, and (2)
this device must accept any interference received, including interference that may
cause undesired operation.
RF Operational Characteristics
Your radio contains a transmitter and a receiver. When it is ON, it receives and
transmits radio frequency (RF) energy. The XSeries VHF radios operate in the
frequency range of 151-158 MHz, the XSeries UHF radios operate in the
frequency range of 461-469 MHz. When you communicate with XU1100 or XV1100
radios the output power level is 1.0 watt, with other XSeries radios the output
power level is 2.0 watts.
Transmit and Receive Procedure
Your two-way radio contains a transmitter and a receiver. To transmit (talk), you must
push the Push-to-Talk button; to receive (listen), release the Push-to-Talk button.
Safety and General Information
7
Page 6

Portable Radio Operation and EME Exposure
Safety and General Information
10
Approved Accessories
For a list of approved Motorola accessories refer to the Two-Way Radio section of
www.motorola.com/store.
Electromagnetic Interference/Compatibility
Note: Nearly every electronic device is susceptible to electromagnetic interference
(EMI) if inadequately shielded, designed or otherwise configured for
electromagnetic compatibility.
Facilities
To avoid electromagnetic interference and/or compatibility conflicts, turn off your
radio in any facility where posted notices instruct you to do so. Hospitals or health
care facilities may be using equipment that is sensitive to external RF energy.
Aircraft
When instructed to do so, turn off your radio when on board an aircraft. Any use of a
radio must be in accordance with applicable regulations per airline crew instructions.
Medical Devices
Pacemakers
The Advanced Medical Technology Association recommends that a minimum
separation of 6 inches (15 centimeters) be maintained between a handheld wireless
radio and a pacemaker. These recommendations are consistent with the
independent research by, and recommendations of the U.S. Food and Drug
Administration.
Antenna Care
Use only the supplied or an approved replacement antenna. Unauthorized
antennas, modifications, or attachments could damage the radio and may violate
FCC regulations.
DO NOT hold the antenna when the radio is “IN USE.” Holding the antenna
affects the effective range.
Two-Way Radio Operation
When using your radio as a traditional two-way radio, hold the radio in a vertical
position with the microphone two to three inches (5. 0 to 7.5 cm) away from the lips.
Body-Worn Operation
To maintain compliance with FCC/Health Canada RF exposure guidelines, if you
wear a radio on your body when transmitting, always place the radio in a Motorola
supplied or approved clip, holder, holster, case, or body harness for this
product. Use of non-Motorola-approved accessories may exceed FCC RF
exposure guidelines. If you do not use a body-worn accessory, ensure the radio
and its antenna are at least one inch (2.5 cm) from your body when
transmitting.
Data Operation
When using any data feature of the radio, with or without an accessory cable,
position the radio and its antenna at least one inch (2.5 cm) from the body.
Safety and General Information
9
Page 7

Persons with pacemakers should:
Safety and General Information
12
Operational Warnings
For Vehicles with an Air Bag
Do not place a portable radio in the area over an air bag or in the air bag deployment
area. Air bags inflate with great force. If a portable radio is placed in the air bag
deployment area and the air bag inflates, the radio may be propelled with great force
and cause serious injury to occupants of the vehicle.
Potentially Explosive Atmospheres
Turn off your radio prior to entering any area with a potentially explosive
atmosphere, unless it is a radio type especially qualified for use in such areas as
“Intrinsically Safe.” Do not remove, install, or charge batteries in such areas. Sparks
in a potentially explosive atmosphere can cause an explosion or fire resulting in
bodily injury or even death.
Note: The areas with potentially explosive atmospheres referred to above include
fueling areas such as below decks on boats, fuel or chemical transfer or
storage facilities, areas where the air contains chemicals or particles, such
as grain, dust or metal powders, and any other area where you would
normally be advised to turn off your vehicle engine. Areas with potentially
explosive atmospheres are often but not always posted.
Blasting Caps and Areas
To avoid possible interference with blasting operations, turn off your radio when you
are near electrical blasting caps, in a blasting area, or in areas posted: “Turn off twoway radio.” Obey all signs and instructions.
• ALWAYS keep the radio more than six inches (15 centimeters) from their
pacemaker when the radio is turned ON.
• not carry the radio in the breast pocket.
• use the ear opposite the pacemaker to minimize the potential for
interference.
• turn the radio OFF immediately if you have any reason to suspect that
interference is taking place.
Hearing Aids
Some digital wireless radios may interfere with some hearing aids. In the event of
such interference, you may want to consult your hearing aid manufacturer to discuss
alternatives.
Other Medical Devices
If you use any other personal medical device, consult the manufacturer of your
device to determine if it is adequately shielded from RF energy. Your physician may
be able to assist you in obtaining this information.
Safety and General Use While Driving
Check the laws and regulations on the use of radios in the area where you drive.
Always obey them. When using your radio while driving, please:
• Give full attention to driving and to the road.
• Use hands-free operation, if available.
• Pull off the road and park before making or answering a call if driving
conditions so require.
Safety and General Information
11
Page 8

Operational Cautions
Safety and General Information
14
4. Never alter the AC cord or plug provided with the unit. If plug will not fit the
outlet, have proper outlet installed by a qualified electrician. An improper
condition can result in a risk of electric shock.
5. To reduce risk of damage to cord or plug, pull the plug rather than the cord when
disconnecting charger from AC receptacle.
6. To reduce the risk of electric shock, unplug the charger from the outlet before
attempting any maintenance or cleaning.
7. Use of an attachment not recommended or sold by Motorola may result in a risk
of fire, electric shock, or personal injury.
8. Make sure that the cord is located so that it will not be stepped on, tripped over,
or subjected to damage or stress.
9. An extension cord should not be used unless absolutely necessary. Use of an
improper extension cord could result in a risk of fire and/or electric shock. If an
extension cord must be used, make sure:
• That the pins on the plug of the extension cord are the same number, size
and shape as those on the plug of the charger.
• That the extension cord is properly wired and in good electrical condition,
and
• That the cord size is18 AWG for lengths up to 100 feet, and 16 AWG for
lengths up to 150 feet.
The supply cord of this charger cannot be replaced. If the cord is damaged,
call Motorola Product Services at:
1-800-448-6686 (USA.)
1-800-461-4575 (Canada)
1-888-390-6456 TTY (Text Telephone)
Antennas
Do not use any portable radio that has a damaged antenna. If a damaged
antenna comes into contact with your skin, a minor burn can result.
Batteries
All batteries can cause property damage and/or bodily injury such as burns if a
conductive material such as jewelry, keys, or beaded chains touch exposed
terminals. The conductive material may complete an electrical circuit (short circuit)
and become quite hot. Exercise care in handling any charged battery, particularly
when placing it inside a pocket, purse, or other container with metal objects.
Charging Safety Instructions
Before using the battery charger, read all instructions and cautionary markings on:
1. the battery
2. the battery charger, and
3. the radio using the battery.
Caution: To reduce the risk of injury, charge only the rechargeable battery. Other
types of batteries may burst, causing personal injury and damage.
Save these Instructions
1. Do not expose the charger to rain or snow.
2. Do not operate the charger if it has received a sharp blow, or has been dropped
or damaged in any way.
3. Do not disassemble the charger if it has received a sharp blow, or has been
dropped or damaged in any way.
Safety and General Information
13
Page 9

Getting Started
Getting Started
16
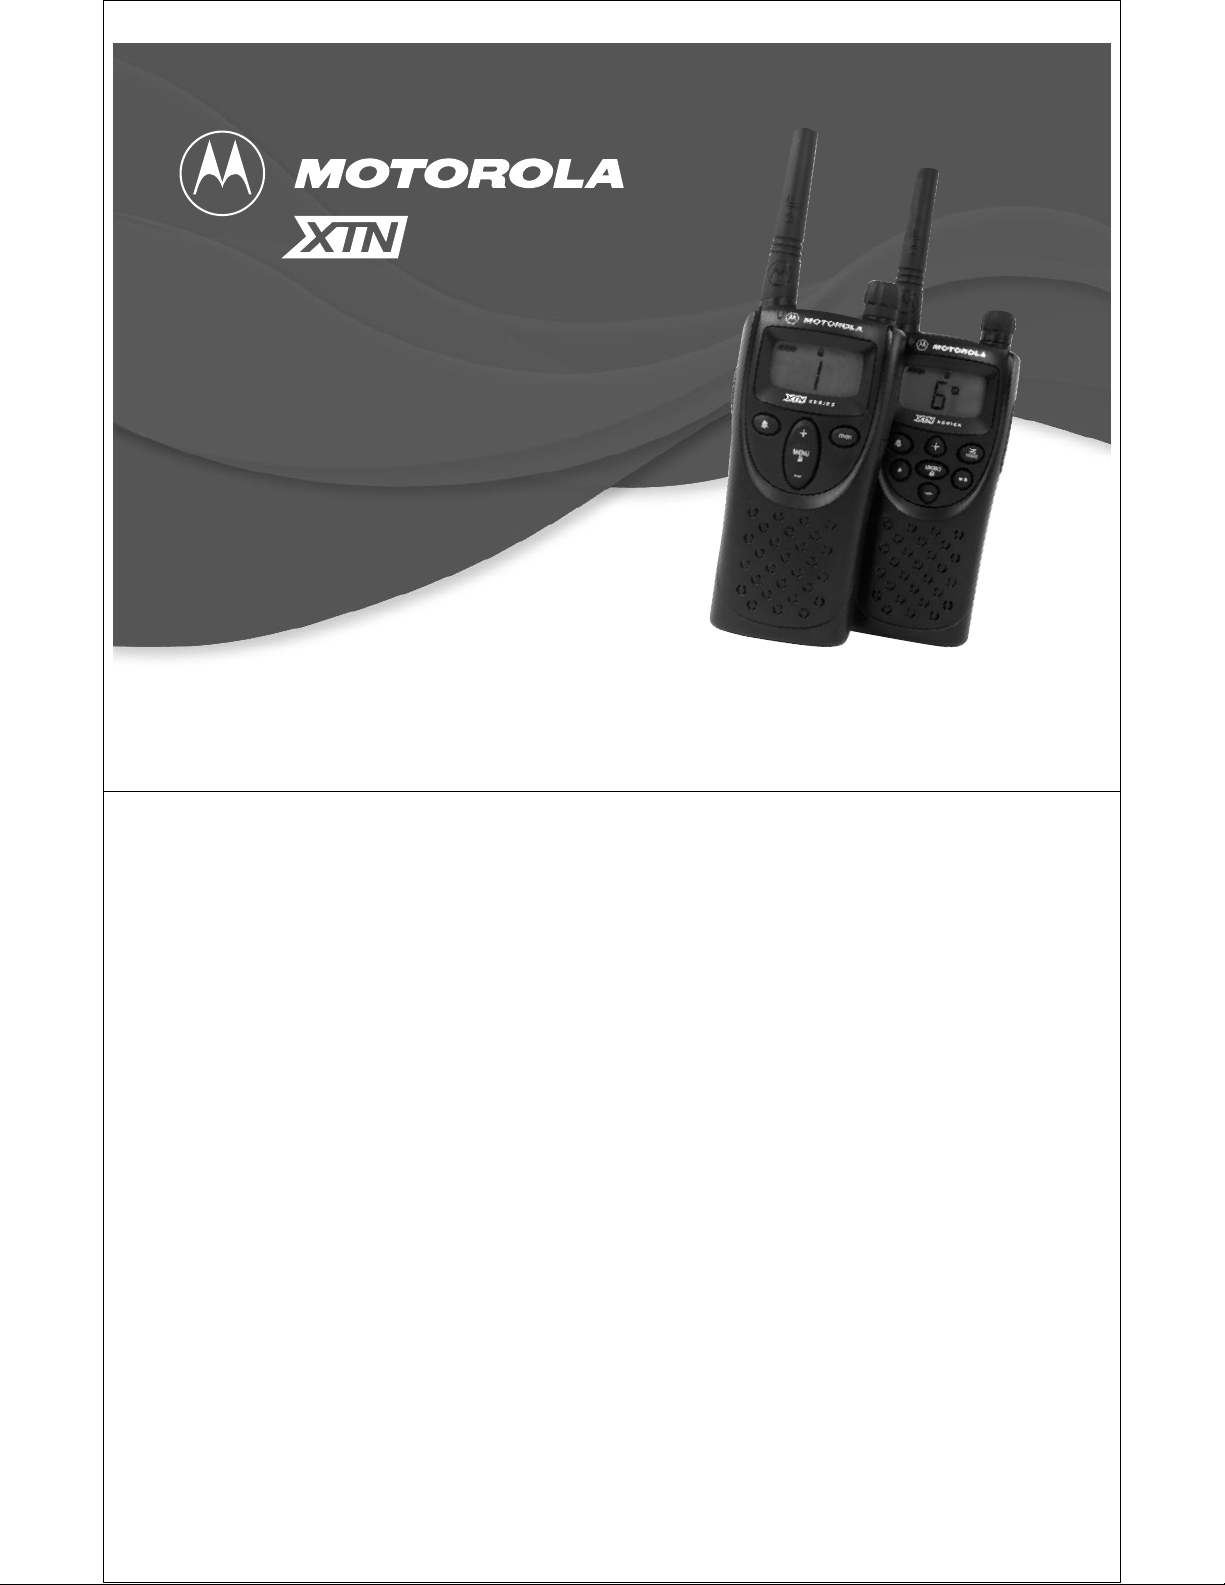
Installing the Swivel Belt Holster
1. Slide the bottom of radio into the holster until it snaps into
place.
2. To remove, push the tab above the battery door and pull the
radio from holster.
Note: In case of loss, please contact your point-of-sale or call
1-800-448-6686 to request replacement part number
NNTN4106AR.
53821 Swivel
Belt Holster
This User’s Guide covers several XSeries models, and may detail some
features your radio does not have. Your model number is shown on the back of the
radio above the battery door, and tells you the following information:
Transmit
Model Number
Model
XU1100 UHF 1 1
XU2100 UHF 2 1
XU2600 UHF 2 6
XV1100 VHF 1 1
XV2100 VHF 2 1
XV2600 VHF 2 6
Scan 6-channel models only
Location
Frequency
Band
Power
(Watts)
Number of
Channels
Getting Started
Scramble 2-watt models only
X
15
Page 10
Installing the Nickel-Metal Hydride Battery
Getting Started
18
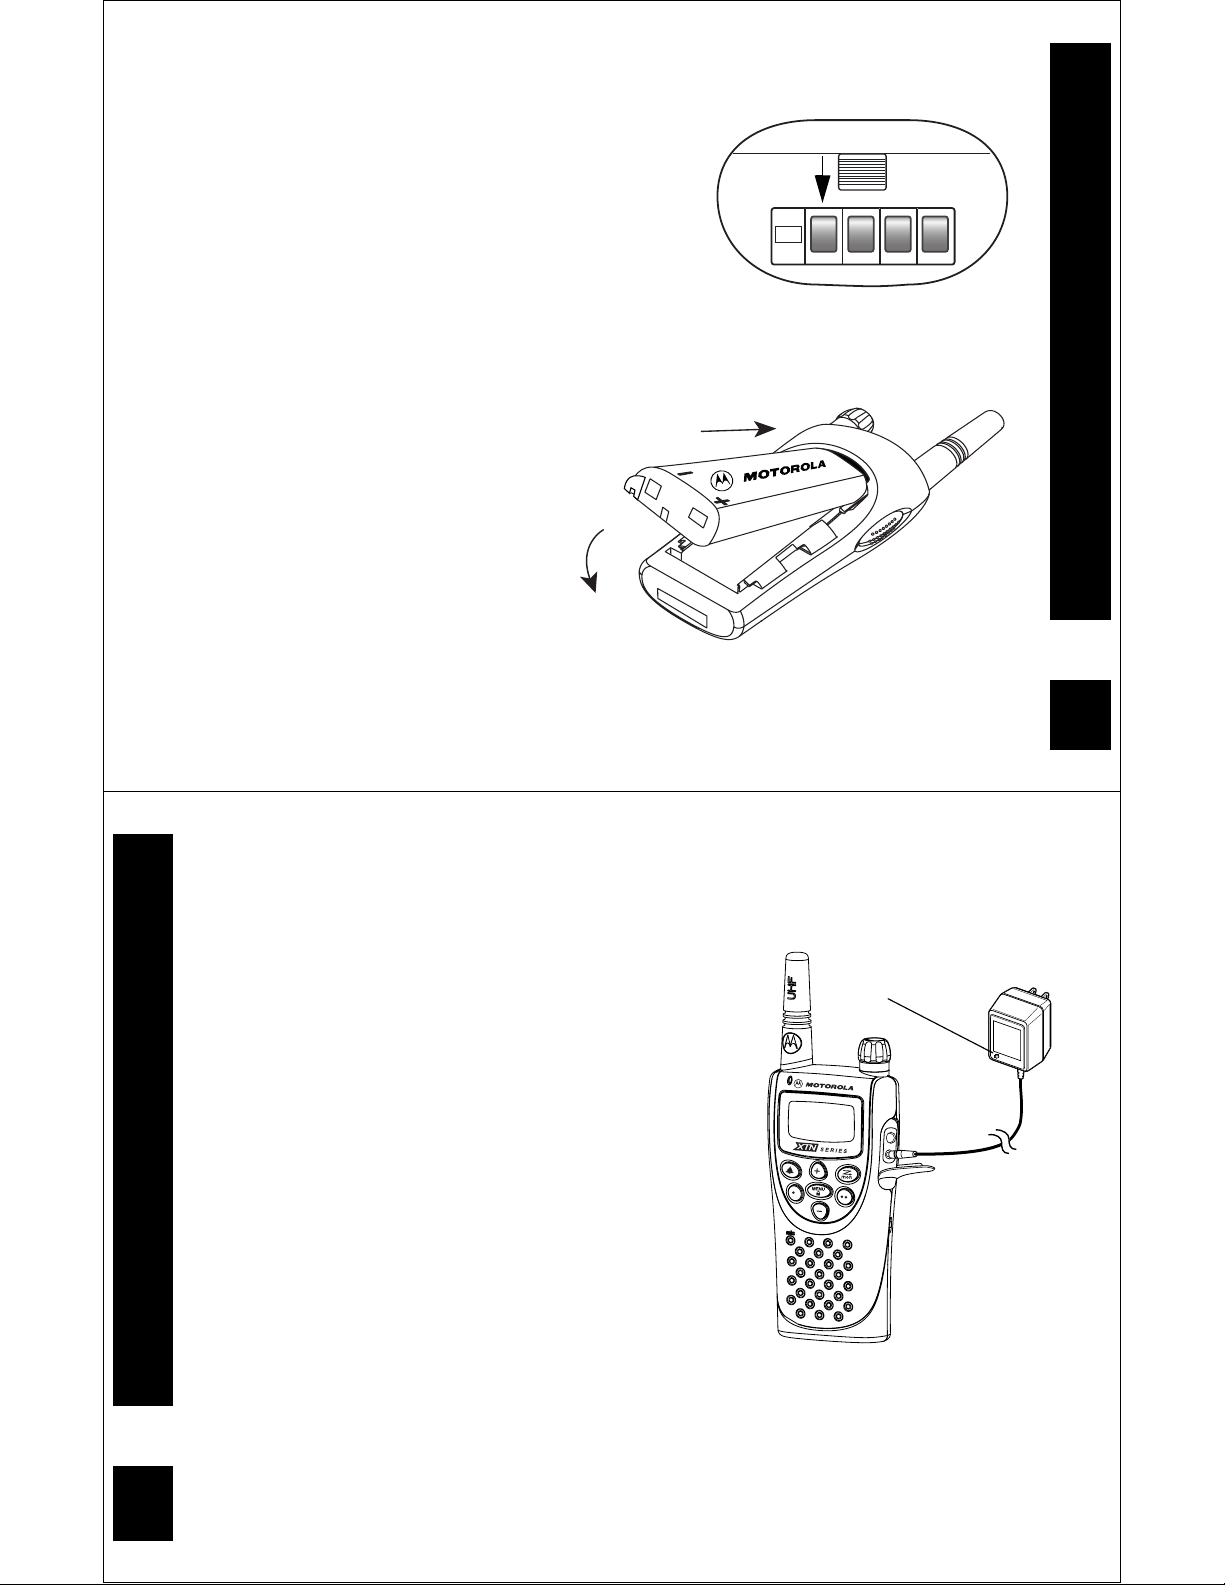
Charging the XSeries Radio
Charge the NiMH battery for 16 hours before using
it for the first time. It will only need up to eight hours
of charging thereafter.
1. Make sure the radio is off.
2. Lift the accessory cover and plug the 53874
charger (NNTN4077) into the lower jack.
3. Plug the charger into a power outlet. The light
on the charger glows during charging.
Note: For optimum battery life, do not charge the
battery for prolonged periods after it is fully
charged. Charging the battery over the
weekend is acceptable.
If the radio is on while charging, additional
time is required to charge the battery.
Use only the charger supplied with the
radio, or other XSeries power
accessories. See “Battery and Charging
Options” on page 22.
Light
Your radio is powered by an NiMH
battery, which provides up to 15 hours*
of usage. Before you install the battery,
mark the date in the "INSTALL DATE"
section with a permanent marker. As in
vehicles, all rechargable batteries lose
capacity over time.
1. Push and hold down the ribbed
latch on the bottom of the radio
toward the contacts, then slide and
lift the battery door off.
2. With the Motorola logo side up, and
the charge contacts facing the
bottom of the radio, insert the top of
the battery into the radio.
3. Push the battery up and into the
battery compartment to fit tightly
into place.
4. Slide and snap the battery door into
place.
*Based upon 5% transmit/ 5% receive/
90% standby (standard duty cycle).
2
Ribbed
Latch
1
Getting Started
X
17
Page 11
Turning Your Radio On or Off
c
Getting Started
20
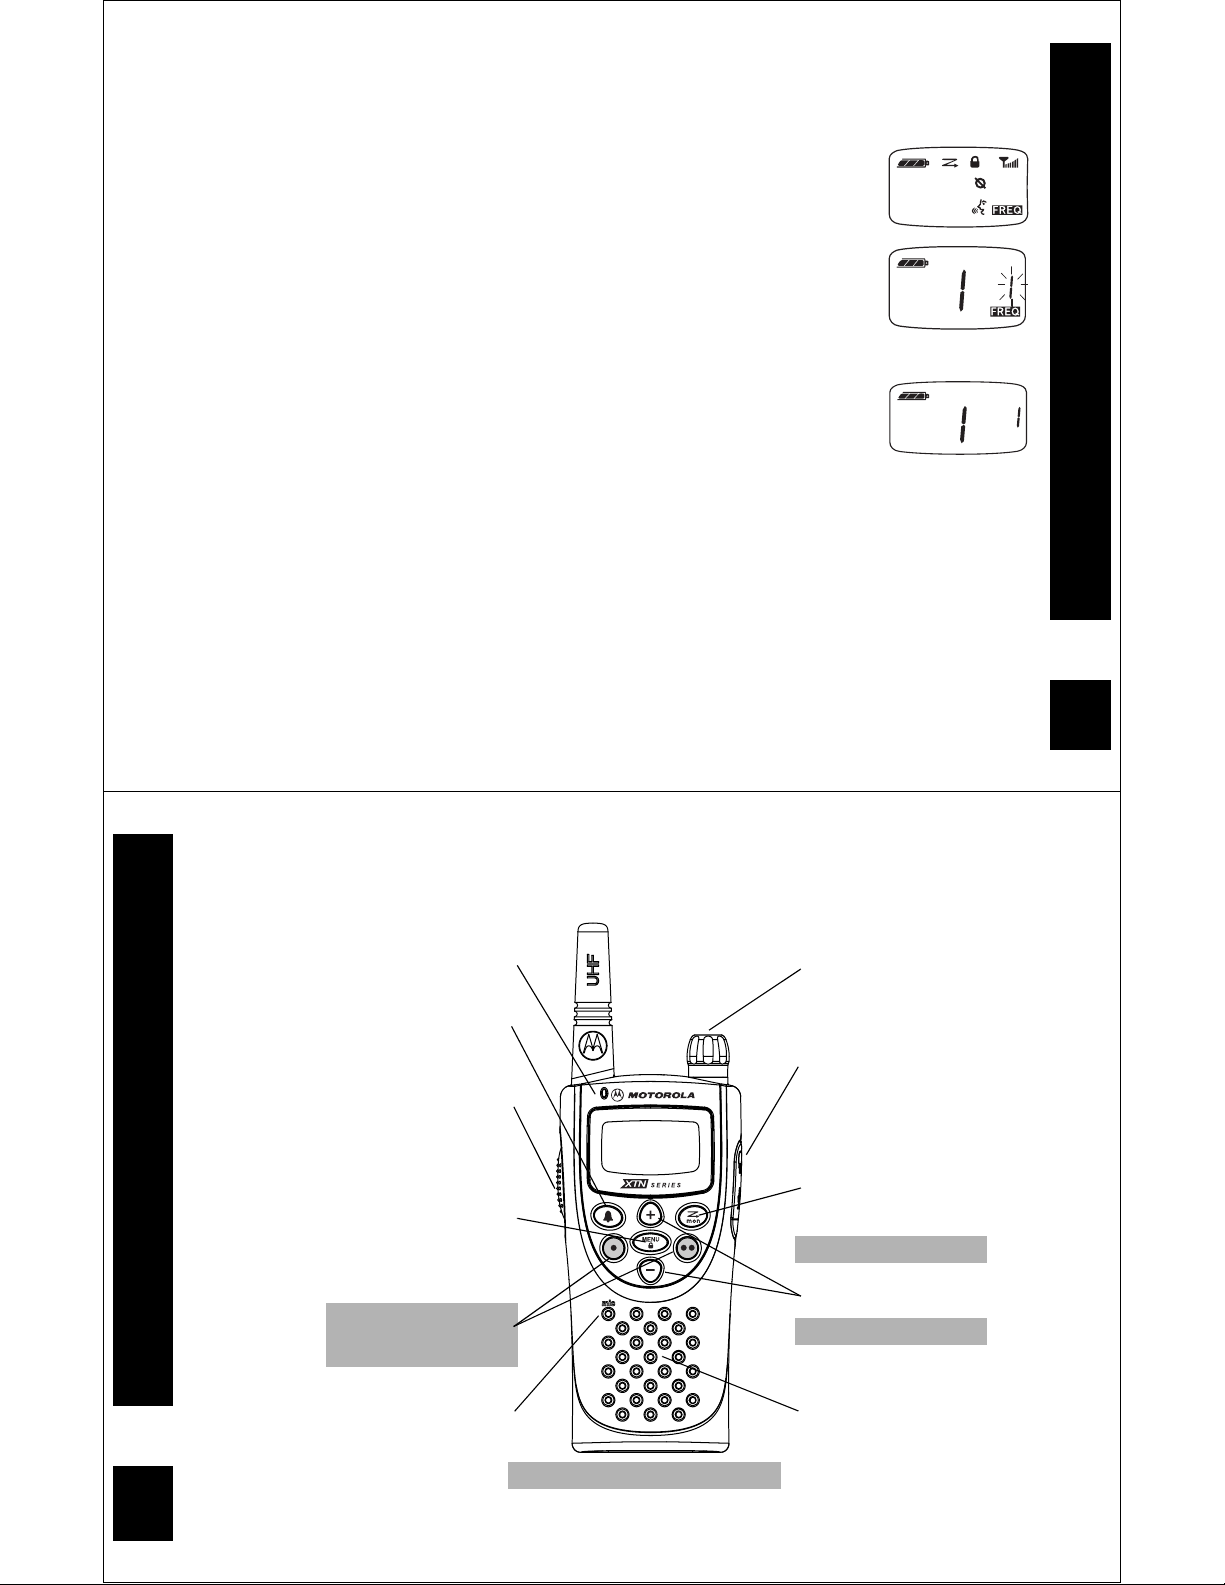
Basic Operation
Indicator Light
Use B to:
Transmit call tone
Use M to:
Ta lk
Exit a menu
Use \to:
Lock the keypad
Scroll through available menus
Use T /
S to:
*Access presets
Microphone
Use P to:
Turn power on/off
Adjust radio volume
Use Accessory Jack
for:
Radio plug-in charging
Audio accessories
Use J to:
Monitor the frequency
Turn scan on/off*
Use [ and ] to:
Change channels*
Change menu settings
Speaker
*
XU2600 and XV2600 only
Turn P clockwise for On or counterclockwise for Off.
The radio chirps and the display briefly shows all features and display
segments of your XTN Series radio.
Then the radio displays the current channel (larger number in the
k
188
218
center) and the frequency assigned to that channel (on right).
The interference eliminator code displays briefly. Then the current
channel remains displayed.
The transmit light on the front left of the radio flashes every three
seconds when the radio is on.
Frequency
Adjusting the Volume
You can set the volume by turning P.
Note: Do not hold the radio too close to your ear when adjusting the
volume or if it is at a high setting.
Code
Using the Radio
1. Press and hold Q to check for channel activity. If you hear static, the channel is
clear to use. Do not transmit if someone is speaking on the channel. Press Q
again to stop monitoring the channel.
2. Press and hold Mand speak into the microphone. To maximize clarity, hold the
radio two-to-three inches away from your mouth.
Note: The transmit light on the front left of the radio lights red when transmitting.
3. Release M and listen for messages.
Getting Started
X
19
Page 12

Understanding the Display
Battery and Charging Options
22
Battery and Charging Options
You have several battery and charging options on your XSeries Two-Way Radio.
NiMH Battery
See “Installing the Nickel-Metal Hydride Battery” on page 17.
Alkaline Batteries
Your radio can also use 4 AA batteries; alkaline cells provide up to 24
hours* of radio use.
1. Push the ribbed latch on the bottom of the radio away from the
battery door.
2. Slide and lift the battery door off.
3. Place the AA batteries matching the markings in the compartment.
4. Slide and snap the battery door into place.
5. Press \ until A or n flashes.
6. Press [or ] to select A for alkaline batteries, or n for
rechargeable AA cells.
Note: This menu does not appear if the Motorola NiMH Battery is in
use.
*Please refer to the diagram and Battery Life on page 24.
A
Scan
(XU2600, XV2600 Only)
Keypad Lock
Battery Meter
Programming
Mode
1
Channel
Scramble
(2-Watt Models Only)
Signal Strength
Frequency and Interference
Eliminator Code
Frequency Indicator
Getting Started
VOX/Microphone Gain
X
21
Page 13

Charging with the Drop-in Charging Tray
Battery and Charging Options
24
Reading the Battery Meter
The battery meter located in the upper left corner of display indicates how much
battery power you have remaining.
Battery Life
Battery Type 3 Bars 2 Bars 1 Bar Flashing
db c m
NiMH 100%-85% 85%-25% 25%-10% Final 10%
AA Alkaline 100%-75% 75%-40% 40%-10% Final 10%
Watts NiMH Alkaline
2 13 Hours 22 Hours
1 15 Hours 24 Hours
(Not included with all models)
1. Place the drop-in charging tray on a flat
surface.
2. Insert the plug of the 10-hour charger
into the jack of the drop-in charging tray.
3. Plug the charger into a power outlet.
Insert the battery or radio into the tray with
the Motorola logo or radio front facing the
front of the charger and the contacts facing
down.
Note: To extend battery life, do not
overcharge. Charging the battery
over the weekend is acceptable.
If the radio is on while charging, it
will take longer to fully charge.
Use only the charger supplied with
the radio, or other XSeries power accessories.
You can charge only one radio or battery at a time.
Tips: The radio can remain in the holster while charging.
Drop-in
charging tray
10-Hour charger
Battery and Charging Options
X
23
Page 14

XTN Series Factory Defaults
Talking and Receiving
26
Talking and Receiving
Signal Strength Indicator/Channel Busy
Note: Obstacles that block the signal path may affect the strength of the incoming
signal.
Talk Range
The radio displays w when activity is on the frequency, and the
transmit light flashes at a faster rate of once per second.
When receiving, the display will show w and a signal strength from
1 (weakest) through 6 (strongest).
This can help determine when a
radio is moving out of range.
Model
Industrial Multi-Level Outdoor
Inside steel/concrete
industrial buildings
Inside multi-level
buildings
Flat ground with no
obstructions
UHF 2W Up to 250,000 Sq. Ft. Up to 20 Floors Up to 6 Miles
UHF 1W Up to 200,000 Sq. Ft. Up to 15 Floors Up to 5 Miles
VHF 2W Up to 180,000 Sq. Ft. Up to 10 Floors Up to 6 Miles
VHF 1W Up to 150,000 Sq. Ft. Up to 8 Floors Up to 5 Miles
1
6
Your XTN radio is programmed at the factory to the following settings. If you need to
change settings, refer to Programming Features on page 31.
UHF VHF
Channel Frequency Bandwidth Frequency Bandwidth
1 225.0325.0
2 825.0425.0
3 525.0125.0
4 625.0225.0
5 10 12.5 10 25.0
6 12 12.5 12 25.0
• Code: On (1)
• Call Tone: Off (0)
• VOX: Off (0)
• Scramble: Off (0)
To restore your radio to factory default programming, turn the radio on while holding
the
and \for three seconds.
M
Battery and Charging Options
X
25
Page 15

Keypad Lock
Talking and Receiving
28
Without Accessories
You can operate the Motorola XU2600 and XV2600 radios hands-free without a VOX
accessory.
1. Enable VOX by pressing M while turning the radio on. g displays.
2. You can disable VOX operation temporarily by pressing
M
, g will flash.
3. A short press of M will re-enable VOX.
4. To disable VOX, turn radio off then back on.
Setting
VOX Sensitivity
You can adjust the sensitivity of your radio’s accessory or microphone during VOX
operation (XU2600 and XV2600) to suit different operating environments. These
menus appear only if the VOX feature is in use, which is indicated by g.
1. Press
\
until g appears. The radio also displays which VOX sensitivity you are
setting:
H = External VOX (with audio accessory)
I = Internal VOX (without accessory; XU2600 and XV2600 only)
2. Press [ or ] to select the sensitivity level.
0 = Off (VOX with accessories only, default settings)
1 = Low sensitivity
2 = Medium sensitivity
3 = High sensitivity
3
H
External VOX
1. To maintain settings and lock keypad, press and hold \for three seconds.
2. To unlock, press and hold \for three seconds.
Hands-Free Use/VOX
Motorola XTN radios can operate hands-free (VOX) when used with compatible VOX
accessories. A short delay occurs between when you start talking and the radio
transmits.
With Compatible VOX Accessories
1. Turn radio off.
2. Open accessory cover.
3. Insert plug of audio accessory firmly into accessory jack.
4. Turn radio on. Radio displays: g. If flashing and for
initial use, please refer to "Setting Vox Sensitivity" on
page 28.
5. Lower radio volume BEFORE placing accessory near ear.
6. To transmit, speak into accessory microphone and to
receive, stop talking.
7. You can disable VOX operation by pressing Mor
removing the audio accessory.
Note: To order accessories, refer to: www.motorola.com/radios/professional,
call 1 (800) 448-6686, or contact your point of purchase.
Talking and Receiving
X
27
Page 16

Monitoring a Channel
Talking and Receiving
30
Scan Advancement / Nuisance Delete
Scan has several temporary features to make it easier to use.
Scan Advancement allows you to “skip” a busy channel to check for other activity.
• Press ] to begin scanning again, but only temporarily.
Nuisance delete allows you to temporarily remove a channel from your scan list, it
will return the next time you use the scan feature.
• Press and hold [ to temporarily remove a channel from the scan list.
Check for channel activity.
1. Press and hold Q. You will hear static if the channel is clear
and w0 will display.
2. Press
Scanning (XU2600 and XV2600 only)
You can scan up to six channels and frequencies. When the radio detects activity, it
stops scanning and locks in on the active channel. This allows you to talk and listen
to the person transmitting without changing channels.
1. To start scanning, briefly press
through channels. When the radio detects channel activity, it stops on that
channel and displays the signal strength indicator and the channel. You can talk
to the person(s) transmitting without having to switch channels by pressing
you press
selected before you activated scan.
2. To stop scanning, briefly press J.
If no transmission occurs within five seconds, scanning resumes.
To scan a channel without interference eliminator codes, change the code for your set
channel to 0 before you press and release
Note: When you press J, you hear all traffic, but may not be able to transmit back
because the other person(s) may be using codes.
again to release.
Q
while the radio is scanning, the radio transmits on the channel you
M
. Your radio displays h and begins to scroll
J
.
J
M
.
If
Talking and Receiving
X
29
Page 17

Programming Features
Programming Features
32
Programming a Channel (XU2600 and XV2600 only)
Each channel has its own Frequency, Interference Eliminator Code, Scramble Code,
and Bandwidth Settings.
Program each channel separately.
1. Select the channel that you will be programming.
2. The channel number flashes. l and code displays
alternately.
3. Press [ or ] to select the desired channel.
4. Press and hold M to exit k, or press
\
to continue.
Programming the Frequency
Sets the frequency that your radio will use. As you are matching your
XTN radio to existing Spirit M-Series radios, enter Programming
Mode as necessary, refer to page 34.
1. Press \to display l. The frequency flashes.
2. Press [ or ] to select the desired frequency (See
“Frequencies and Bandwidths” beginning on page 45).
3. Press and hold M to exit k, or press
\
to continue.
6
You can change the following features by entering the programming mode (k).
To talk with someone on your two-way radios, these settings must match:
• Channel (XU2600 and XV2600 only)
• Frequency
• Interference Eliminator Code
• Scramble code
• Bandwidth (for optimal clarity)
You can also use k to set the following:
• Call tones
• Microphone Gain
• Scan List (XU2600 and XV2600 only)
• Available channels (XU2600 and XV2600 only)
Note: You cannot enter kwhile a VOX accessory is plugged into the radio.
Entering Programming Mode
You must enter Programming Mode to change your communication settings.
1. Press and hold
radio. The radio beeps and displays k.
M
for three seconds while turning on your
J
1
Programming Features
X
31
Page 18

Programming the Interference Eliminator Code
5
Programming Features
34
Programming the Scramble Feature
(2-watt models only)
The scramble feature garbles the transmission for anyone listening without
the same scramble setting. It does not guarantee confidentiality, but it increases
privacy. The scramble feature is set individually for each channel.
1. Enter Programming Mode as necessary, refer to “Entering Programming Mode”
on page 31.
2. Press \ until e displays.
3. Press [ or ] to s
elect 1,2, or
3. Factory default is set to Off: 0.
When you exit k, e displays.
4. Press and hold M to exit k.
Programming Bandwidth (when FCC allowable)
Some frequencies have selectable channel spacing, which must
match other radios for optimal radio quality. Bandwidth settings are
programmed for each channel.
1. Enter Programming Mode as necessary, refer to “Entering
Programming Mode” on page 31.
2. Press \ until K displays.
3. If D/C flashes, press
[
or
]
to select D (25.0 kHz) or C (12.5 kHz)
bandwidth. (See “Frequencies and Bandwidths” beginning on page 45). If D/C
does not flash, then you cannot select the bandwidth for this frequency.
e
0
K
C
The Interference Eliminator Code helps minimize interference by
providing you with code combinations, which filter out static, noise,
and unwanted messages.
1. Enter Programming Mode as necessary, refer to “Entering
Programming Mode” on page 31.
Interference
Eliminator
Code
0107
2. Press \ until the Interference Eliminator Code display number
begins to flash.
3. Press [ or ] to select the desired Code (See “Interference Eliminator Codes”
beginning on page 48).
4. Press and hold M to exit k, or press
to continue.
\
Assigning Channels to Presets (XU2600 and XV2600 only)
Presets allow you to easily switch to more frequently-used channels.
1. Enter Programming Mode as necessary, refer to “Entering Programming Mode”
on page 31.
2. Press [ or ] to select the desired channel.
3. Press and hold T or S to assign that channel to a preset, radio beeps to
confirm. All of the channel settings are assigned to that preset button.
4. Press and hold M to exit k, or press
to continue.
\
Programming Features
X
33
Page 19

4. Press and hold M to exit k.
Programming Features
36
2. Press
\
until E displays.
3. Press [ or ] to hear and select the call tone you want.
Note: The default is set to 0 (off) or you may choose 1
,2, or
3 to choose a
distinctive call tone.
4. Press and hold M to exit k.
Once enabled, press B to transmit the call tone to others.
Programming Microphone Gain
The sensitivity of your radio’s microphone can be adjusted to suit different users or
operating environments.
1. Enter Programming Mode as necessary, refer to “Entering Programming Mode”
on page 31.
2. Press
\
until g and
? (Gain) display.
3. Press [ or ] to select the sensitivity level.
3 = High sensitivity, for quiet environments
2 = Medium sensitivity, the default setting
1 = Low sensitivity, for loud environments
4. Press and hold M to exit k.
Editing the Scan List (XU2600 and XV2600 only)
To avoid hearing transmissions from unnecessary channels while scanning and to
decrease scan time, you can edit the scan list to skip unneeded channels.
3
?
Note: Spirit GT radios operate at 12.5 kHz. The M Series radios may operate at
25.0 kHz or 12.5 kHz bandwidth if selectable. If you have questions on radio
use, call 1-800-448-6686.
Programming the Available Channel (XU2600 and XV2600 only)
For applications requiring fewer channels, you can reduce the number of available
channels from 6. Older XTN radios may not have this feature. Call 1-800-448-6686
for more information.
1. Enter Programming Mode as necessary, refer to “Entering Programming Mode”
on page 31.
2. Press \ until = appears.
3. Press [ or ] to select the number of channels you want available.
4. Press and hold M to exit k.
Note: Programming settings for channels made unavailable are retained by the
radio.
Programming Call Tones
Your radio can transmit call tones to other radios in your group so
you can alert them that you are about to talk. The default is set to 0
(off) or you may choose 1
,2, or
3 to choose a distinctive call tone.
E
1. Enter Programming Mode as necessary, refer to “Entering
Programming Mode” on page 31.
Programming Features
X
35
Page 20

1. Enter Programming Mode as necessary, refer to “Entering Programming Mode”
Programming Features
38
3. Turn on the target radio and place it directly behind the source
radio in the MUC.
4. Press and hold Q on the source radio. The source radio enters
Cloning Mode and transmits its settings to the target radio. Either
W for pass or N for fail appears on the source radio and the target
radio displays all icons if cloning was successful.
5. Turn the target radio off and back on again to use.
6. To clone additional radios, repeat steps 3 and 5.
7. Exit k on the source radio by holding down M.
Note: You can clone only one radio at a time.
The MUC does not need to be plugged in for Cloning feature to work.
Radios must be of the same band; UHF or VHF. Also, multi-channel models
can clone to single-channel radios, but only the first channel is cloned.
Target radio
k
218
188
S
ource radio
on page 31.
2. Press \ until h displays and the channel and Y or n flashes.
3. Press [ or ] to increase or decrease the channel.
4. Press
to display either:
J
Y to include the channel
n to exclude the channel
5. Press and hold M to exit k.
Cloning
You can duplicate XSeries radio settings from one radio to another by using the
optional accessory 53879 Multi-Unit Charger (MUC). Please refer to the MUC User's
Guide included with this accessory.
1. To enter the Programming Mode on the source radio, press and hold
M
Q for
three seconds while turning on your radio. The radio beeps and displays k.
2. Place the source radio in one of the front pockets of the MUC.
Programming Features
X
37
Page 21

Advanced Features
Advanced Features
40
Turn Battery Save on/off
Decreases attack time, which is the brief period of
time between when the radio receives a
transmission on its frequency and broadcasts
audio. Turning Battery Save off decreases battery
life by approximately 20%.
M Q [
On
Toggle Phase Shift
Changes your phase shift for optimal
communication with other Motorola radios.
180° XTN Series (factory default), M Series,
Spirit M-Series, and Radius SP21
240° Spirit HP and Radius SP50
M B
180°
Restore Factory Defaults
Returns your radio to its original factory settings to
verify proper operation. Refer to page 25 for factory
default settings.
M \
---
To Do This
Press this Key
While Turning
On the Radio
Default
Setting
You can set the following features by pressing and holding additional button(s) while
you turn on your radio.
Press this Key
To Do This
Turn Keypad Tones on/off
You can disable keypad beeps for silent menu
operation.
Turn End-of-Transmission Tone on/off
When enabled, your two-way radio transmits a tone
when you finish transmitting. It’s like saying “Roger”
or “Over.”
Note: If Keypad Tones are off, you will not hear the
end-of-transmission tone but it is
transmitted (if enabled).
While Turning
On the Radio
[
]
Default
Setting
On
Off
Advanced Features
X
39
Page 22

Troubleshooting
Troubleshooting
42
Limited talk
range
Steel and/or concrete structures, heavy foliage, buildings or
vehicles decrease range. Check for clear line of sight to improve
transmission. See “Talk Range” on page 26.
Wearing radio close to body such as in a pocket or on a belt
decreases range. Change location of radio.
Message not
received
Confirm radios have the same Channel, Frequency, Interference
Eliminator Code and Scramble Code settings, depending upon
model. See “Programming Features” on page 31.
Recharge, replace and/or reposition batteries.
Move to another location. Obstructions and operating indoors, or
in vehicles may decrease range.
Verify that the radio is not in Scan mode. See “Scanning
(XU2600 and XV2600 only)” on page 29.
Heavy static or
interference
Radios are too close, they must be at least five feet apart.
Radios are too far apart or obstacles are interfering with
transmission.
Keypad locked
Unlock by holding \ for three seconds.
Symptom Try This:
Symptom Try This:
Recharge or replace battery 53871 battery (NTN8971 or
NNTN4190). Reposition or replace alkaline batteries. For Nickel-
No Power
Metal Hydride batteries, “Installing the Nickel-Metal Hydride
Battery” on page 17 or “Battery and Charging Options” on
page 22.
Message not
transmitted
Hearing other
noises or
conversation on
a channel
Poor Audio
Quality
Make sure M is completely pressed while transmitting.
Recharge, replace and/or reposition batteries.
Verify the transmit light is illuminated while speaking.
Frequency or Interference Eliminator Code may be in use,
change on all radios if possible. See “Programming the
Interference Eliminator Code” on page 33.
Scramble Code is On (2-watt models only), and/or setting does
not match other radios’ settings. See “Programming the
Scramble Feature” on page 34.
Bandwidth of radios does not match. See “Programming
Bandwidth (when FCC allowable)” on page 34.
Troubleshooting
X
41
Page 23

Symptom Try T his:
Use and Care
44
Use and Care
If the radio is submerged in water...
Use a soft damp cloth
to clean the exterior.
Do not immerse
in water.
Do not use alcohol or
cleaning solutions.
Turn radio off and
remove batteries.
Dry with soft cloth.
Do not use radio until
completely dry.
XX
X
Low batteries
Charger light
does not come
on
Low battery
meter reading
although new
batteries are
installed
Cannot activate
VOX
Cannot enter
k
mode
Recharge or replace battery or batteries. Extreme operating
temperatures affect battery life. See “Battery Life” on page 24.
Reinsert radio/battery.
Clean battery/charger contacts.
Verify that the charging pin is inserted correctly.
AA cells installed in radio, remove and replace with NiMH battery.
Verify that the radio is set to the correct battery type (Single-cell
batteries only). See “Alkaline Batteries” on page 22.
Feature not set and on. See “Hands-Free Use/VOX” on page 27.
Sensitivity set to 0. See “Setting VOX Sensitivity” on page 28.
Unplug any audio accessories and retry.
Troubleshooting
X
43
Page 24

Frequencies and Bandwidths
46
UHF Frequencies
Display
Number
Frequency
(MHz)
Bandwidth
Display
Number
Frequency
(MHz)
Bandwidth
1 464.5000 12.5/25.0 15 461.1875 12.5
2 464.5500 12.5/25.0
16 461.2125 12.5
3 467.7625 12.5
17 461.2375 12.5
4 467.8125 12.5
18 461.2625 12.5
5 467.8500 12.5/25.0
19 461.2875 12.5
6 467.8750 12.5/25.0
20 461.3125 12.5
7 467.9000 12.5/25.0
21 461.3375 12.5
8 467.9250 12.5/25.0
22 461.3625 12.5
9 461.0375 12.5
23 462.7625 12.5
10 461.0625 12.5
24 462.7875 12.5
11 461.0875 12.5
25 462.8125 12.5
12 461.1125 12.5
26 462.8375 12.5
13 461.1375 12.5
27 462.8625 12.5
14 461.1625 12.5
28 462.8875 12.5
The charts on the next few pages provide frequency information. These charts are
useful when using Motorola X Series two-way radios with other business radios.
Frequency Display Number is identical to Spirit M, GT and S-Series frequency
position (where applicable).
VHF Frequencies
Display
Number
1 151.6250 25.00 16 151.8650 25.00
2 151.9550 25.00
3 154.5700 25.00
4 154.6000 25.00
5 151.7000 12.5/25.0
6 151.7600 12.5/25.0
*7 151.8200 12.5/25.0
*8 151.8800 12.5/25.0
*9 151.9400 12.5/25.0
10 151.5125 25.00
11 151.6550 25.00
12 151.6850 25.00
13 151.7150 25.00
14 151.7450 25.00
15 151.7750 25.00
Frequency
(MHz)
Bandwidth
Display
Number
17 151.8950 25.00
18 151.9250 25.00
19 152.7000 25.00
20 154.4900 25.00
21 154.5150 25.00
22 154.5275 25.00
23 154.5400 25.00
24 154.6000 25.00
25 154.6550 25.00
26 158.4000 25.00
27 158.4075 25.00
Frequency
(MHz)
*Note: Due to FCC regulations,
these frequencies transmit
at only 1 watt.
Bandwidth
X
45
Page 25

UHF Frequencies (Continued)
48
Interference Eliminator Codes
Carrier Squelch (0) disables interference eliminator codes.
Display
Number
Code
(Hz)
Display
Number
Code
(Hz)
Display
Number
Code
(Hz)
1 67.0 14 107.2 27 167.9
2 71.9 15 110.9 28 173.8
3 74.4 16 114.8 29 179.9
4 77.0 17 118.8 30 186.2
5 79.7 18 123.0 31 192.8
6 82.5 19 127.3 32 203.5
7 85.4 20 131.8 33 210.7
8 88.5 21 136.5 34 218.1
9 91.5 22 141.3 35 225.7
10 94.8 23 146.2 36 233.6
11 97.4 24 151.4 37 241.8
12 100.0 25 156.7 38 250.3
13 103.5 26 162.2
Display
Number
Frequency
(MHz)
29 462.9125 12.5 43 466.2625 12.5
30 464.4875 12.5
31 464.5125 12.5
32 464.5375 12.5
33 464.5625 12.5
34 466.0375 12.5
35 466.0625 12.5
36 466.0875 12.5
37 466.1125 12.5
38 466.1375 12.5
39 466.1625 12.5
40 466.1875 12.5
41 466.2125 12.5
42 466.2375 12.5
Bandwidth
Display
Number
44 466.2875 12.5
45 466.3125 12.5
46 466.3375 12.5
47 466.3625 12.5
48 467.7875 12.5
49 467.8375 12.5
50 467.8625 12.5
51 467.8875 12.5
52 467.9125 12.5
53 469.4875 12.5
54 469.5125 12.5
55 469.5375 12.5
56 469.5625 12.5
Frequency
(MHz)
Bandwidth
X
47
Page 26

Digital Interference Eliminator Codes
50
84 346 97 465 110 632
85 351 98 466 111 654
86 364 99 503 112 662
87 365 100 506 113 664
88 371 101 516 114 703
89 411 102 532 115 712
90 412 103 546 116 723
91 413 104 565 117 731
92 423 105 606 118 732
93 431 106 612 119 734
94 432 107 624 120 743
95 445 108 627 121 754
96 464 109 631
Digital Interference Eliminator Codes (Continued)
Display
Number
Digital
Code
Display
Number
Digital
Code
Display
Number
Digital
Code
Display
Number
39 023 54 115 69 223
40 025 55 116 70 226
41 026 56 125 71 243
42 031 57 131 72 244
43 032 58 132 73 245
44 043 59 134 74 251
45 047 60 143 75 261
46 051 61 152 76 263
47 054 62 155 77 265
48 065 63 156 78 271
49 071 64 162 79 306
50 072 65 165 80 311
51 073 66 172 81 315
52 074 67 174 82 331
53 114 68 205 83 343
Digital
Code
Display
Number
Digital
Code
Display
Number
Digital
Code
X
49
Page 27

Verifying the M-Series Frequency and Code Setting
Motorola Limited Warranty
52
Motorola Limited Warranty
for the United States and Canada
What Does this Warranty Cover?
Subject to the exclusions contained below, Motorola, Inc. warrants its telephones,
pagers, and consumer and professional two-way radios (excluding commercial,
government or industrial radios) that operate via Family Radio Service or General
Mobile Radio Service, Motorola-branded or certified accessories sold for use with
these Products (“Accessories”) and Motorola software contained on CD-ROMs or
other tangible media and sold for use with these Products (“Software”) to be free from
defects in materials and workmanship under normal consumer usage for the
period(s) outlined below. This limited warranty is a consumer's exclusive remedy,
and applies as follows to new Motorola Products, Accessories and Software
purchased by consumers in the United States or Canada, which are accompanied by
this written warranty:
The XSeries Two-Way radio replaces the Spirit M-Series radio. The factory
default settings for both radios are identical. However, existing radios may have been
programmed to different settings. To program your XSeries radio to talk with an
M-Series radio, verify or change your M-Series settings as follows.
1. Press and hold M while you turn on the radio to enter programming mode.
The radio announces current frequency for that channel. For example: “frequency one.”
2. If desired, press M to scroll through the frequencies.
The radio announces each frequency as you scroll. For example: “two...three...”
3. Release M when you reach the desired frequency.
4. Press Q to select and save the frequency setting.
The radio announces current code setting. For example: “code two nine”
5. Press M to scroll through the codes.
The radio announces each code as you scroll. For example: “three zero...three one”
6. Release M when you reach the desired code.
7. Press Q to select and save the code setting.
X
51
Page 28

Products and Accessories
Motorola Limited Warranty
54
Exclusions
Normal Wear and Tear. Periodic maintenance, repair and replacement of parts due
to normal wear and tear are excluded from coverage.
Batteries. Only batteries whose fully charged capacity falls below 80% of their rated
capacity and batteries that leak are covered by this limited warranty.
Abuse & Misuse. Defects or damage that result from: (a) improper operation,
storage, misuse or abuse, accident or neglect, such as physical damage (cracks,
scratches, etc.) to the surface of the product resulting from misuse; (b) contact with
liquid, water, rain, extreme humidity or heavy perspiration, sand, dirt or the like,
extreme heat, or food; (c) use of the Products or Accessories for commercial
purposes or subjecting the Product or Accessory to abnormal usage or conditions; or
(d) other acts which are not the fault of Motorola, are excluded from coverage.
Use of Non-Motorola Products and Accessories. Defects or damage that result
from the use of Non-Motorola branded or certified Products, Accessories, Software
or other peripheral equipment are excluded from coverage.
Unauthorized Service or Modification. Defects or damages resulting from service,
testing, adjustment, installation, maintenance, alteration, or modification in any way
by someone other than Motorola, or its authorized service centers, are excluded from
coverage.
Products Covered Length of Coverage
Products and Accessories as defined
above, unless otherwise provided for
below.
Decorative Accessories and Cases.
Decorative covers, bezels,
PhoneWrap™ covers and cases.
Professional Two-way Radio
Accessories.
Products and Accessories that are
Repaired or Replaced.
One (1) year from the date of purchase
by the first consumer purchaser of the
product unless otherwise provided for
below.
Limited lifetime warranty for the
lifetime of ownership by the first
consumer purchaser of the product.
One (1) year from the date of purchase
by the first consumer purchaser of the
product.
The balance of the original warranty
or for ninety (90) days from the date
returned to the consumer, whichever is
longer.
Motorola Limited Warranty
53
Page 29

Altered Products. Products or Accessories with (a) serial numbers or date tags that
Motorola Limited Warranty
56
Software NOT Embodied in Physical Media. Software that is not embodied in
physical media (e.g. software that is downloaded from the internet), is provided “as
is” and without warranty.
Who is Covered?
This warranty extends only to the first consumer purchaser, and is not transferable.
What Will Motorola Do?
Motorola, at its option, will at no charge repair, replace or refund the purchase price
of any Products, Accessories or Software that does not conform to this warranty. We
may use functionally equivalent reconditioned/refurbished/pre-owned or new
Products, Accessories or parts. No data, software or applications added to your
Product, Accessory or Software, including but not limited to personal contacts,
games and ringer tones, will be reinstalled. To avoid losing such data, software and
applications please create a back up prior to requesting service.
have been removed, altered or obliterated; (b) broken seals or that show evidence of
tampering; (c) mismatched board serial numbers; or (d) nonconforming or
non-Motorola housings, or parts, are excluded form coverage.
Communication Services. Defects, damages, or the failure of Products,
Accessories or Software due to any communication service or signal you may
subscribe to or use with the Products Accessories or Software is excluded from
coverage.
Software
Products Covered Length of Coverage
Software. Applies only to physical defects in
the media that embodies the copy of the
software (e.g. CD-ROM, or floppy disk).
Exclusions
Software Embodied in Physical Media. No warranty is made that the software will
meet your requirements or will work in combination with any hardware or software
applications provided by third parties, that the operation of the software products will
be uninterrupted or error free, or that all defects in the software products will be
corrected.
Ninety (90) days from the date of
purchase.
Motorola Limited Warranty
55
Page 30

How to Obtain Warranty Service or Other Information?
Motorola Limited Warranty
58
What Other Limitations Are There?
ANY IMPLIED WARRANTIES, INCLUDING WITHOUT LIMITATION THE IMPLIED
WARRANTIES OF MERCHANTABILITY AND FITNESS FOR A PARTICULAR
PURPOSE, SHALL BE LIMITED TO THE DURATION OF THIS LIMITED
WARRANTY, OTHERWISE THE REPAIR, REPLACEMENT, OR REFUND AS
PROVIDED UNDER THIS EXPRESS LIMITED WARRANTY IS THE EXCLUSIVE
REMEDY OF THE CONSUMER, AND IS PROVIDED IN LIEU OF ALL OTHER
WARRANTIES, EXPRESS OF IMPLIED. IN NO EVENT SHALL MOTOROLA BE
LIABLE, WHETHER IN CONTRACT OR TORT (INCLUDING NEGLIGENCE) FOR
DAMAGES IN EXCESS OF THE PURCHASE PRICE OF THE PRODUCT,
ACCESSORY OR SOFTWARE, OR FOR ANY INDIRECT, INCIDENTAL, SPECIAL
OR CONSEQUENTIAL DAMAGES OF ANY KIND, OR LOSS OF REVENUE OR
PROFITS, LOSS OF BUSINESS, LOSS OF INFORMATION OR DATA,
SOFTWARE OR APPLICATIONS OR OTHER FINANCIAL LOSS ARISING OUT OF
OR IN CONNECTION WITH THE ABILITY OR INABILITY TO USE THE
PRODUCTS, ACCESSORIES OR SOFTWARE TO THE FULL EXTENT THESE
DAMAGES MAY BE DISCLAIMED BY LAW.
USA Phones 1-800-331-6456
Two-Way Radios 1-800-448-6686
Pagers 1-800-548-9954
Canada All Products 1-800-461-4575
TTY TTY 1-888-390-6456
For Accessories and Software, please call the telephone number designated
above for the product with which they are used.
You will receive instructions on how to ship the Products, Accessories or Software,
at your expense, to a Motorola Authorized Repair Center. To obtain service, you must
include: (a) a copy of your receipt, bill of sale or other comparable proof of purchase;
(b) a written description of the problem; (c) the name of your service provider, if
applicable; (d) the name and location of the installation facility (if applicable) and,
most importantly; (e) your address and telephone number.
Motorola Limited Warranty
57
Page 31

Some states and jurisdictions do not allow the limitation or exclusion of
Software Copyright Notice
60
Software Copyright Notice
The Motorola products described in this manual may include copyrighted Motorola
and third party software stored in semiconductor memories or other media. Laws in
the United States and other countries preserve for Motorola and third party software
providers certain exclusive rights for copyrighted software, such as the exclusive
rights to distribute or reproduce the copyrighted software. Accordingly, any
copyrighted software contained in the Motorola products may not be modified,
reverse-engineered, distributed, or reproduced in any manner to the extent allowed
by law. Furthermore, the purchase of the Motorola products shall not be deemed to
grant either directly or by implication, estoppel, or otherwise, any license under the
copyrights, patents, or patent applications of Motorola or any third party software
provider, except for the normal, non-exclusive, royalty-free license to use that arises
by operation of law in the sale of a product.
Patent Notice
This product is covered by one or more of the following United States patents.
5896277 5894292 5864752 5699006 5742484 D408396 D399821 D387758
D389158 5894592 5893027 5789098 5734975 5861850 D395882 D383745
D389827 D389139 5929825 5926514 5953640 6071640 D413022 D416252
D416893 D433001
incidental or consequential damages, or limitation on the length of an implied
warranty, so the above limitations or exclusions may not apply to you. This
warranty gives you specific legal rights, and you may also have other rights
that vary from state to state or from one jurisdiction to another.
Laws in the United States and other countries preserve for Motorola certain exclusive
rights for copyrighted Motorola software such as the exclusive rights to reproduce
and distribute copies of the Motorola software. Motorola software may only be copied
into, used in, and redistributed with, the Products associated with such Motorola
software. No other use, including without limitation disassembly of such Motorola
software or exercise of the exclusive rights reserved for Motorola, is permitted.
ITC02-159
Motorola Limited Warranty
59
Page 32

Export Law Assurances
Index
62
A
Audio accessories ................................... 27
Adjust volume................................... 19, 20
Advanced features ................................. 39
Alkaline batteries .................................... 22
B
Bandwidth............................................... 34
Basic operations...................................... 20
Battery
Alkaline ........................................... 22
Install........................................ 22
Charge
Alkaline .................................... 18
NiMH ....................................... 18
Meter................................................ 24
C
Call display ............................................. 35
Channel
Activity ............................................ 29
Charger
Drop-in ............................................ 23
Multi-unit......................................... 37
Plug-in ............................................. 23
Charging ................................................. 19
Cloning.................................................... 37
Code
Interference eliminator..................... 33
D
Diagram
Function ...........................................20
Drop-in charger .......................................23
E
End-of-transmission tone ........................39
External VOX ...................................28, 36
F
FCC licensing information........................5
Frequency
Setting ..............................................32
Functions.................................................20
H
Hands-free use...................................28, 36
I
Information
Safety .................................................7
Install
Alkaline batteries .............................22
NiMH battery...................................17
Interference eliminator code ...................33
This product is controlled under the export regulations of the United States of
America and Canada. The Governments of the United States of America and
Canada may restrict the exportation or re-exportation of this product to certain
destinations. For further information contact the U.S. Department of Commerce or
the Canadian Department of Foreign Affairs and International Trade.
Export Law Assurances
61
Page 33

Internal VOX.....................................28, 36
Index
64
U
Use and care............................................ 44
User guide
Large-print......................................... 2
V
VOX
External............................................ 27
Internal .............................................28
Sensitivity level..........................28, 36
W
Warranty .................................................52
Website
Accesories........................................ 27
Introduction ...............................................1
K
Keepad tones ...........................................39
L
Licensing information
FCC ....................................................5
M
Meter
Battery..............................................24
Microphone gain ...............................28, 36
Monitor signal strength .....................26, 29
M-Series ......................................32, 40, 51
O
Obstacles .................................................26
Operating radio........................................19
P
Plug
Audio................................................27
Plug-in charger ........................................18
Product-related questions ..........................2
Programming mode .................................31
R
Radio
Clean ................................................44
Diagram ........................................... 20
Display............................................. 24
Functions and settings ..................... 21
Off ................................................... 19
On .................................................... 39
Operating ......................................... 26
Out of range..................................... 26
Range
Talking............................................. 26
S
Safety information .................................... 7
Scan......................................................... 42
Scan list................................................... 29
Sensitivity ......................................... 28, 36
Setting
Battery type ..................................... 37
Call tone .......................................... 35
Channel............................................ 32
Scramble code ................................. 34
VOX sensitivity level ................ 28, 36
Signal strength indicator ................... 26, 29
T
Talk range ............................................... 26
Index
63
Page 34

XSeries Programming Quick Reference
XSeries Programming Quick Reference
Radio On Visual \as needed, then
[
or
]
*Available
Channels
Press \ until = displays.
Press [ or ] to select number of
available channels.
Call Tone
Choose1, 2, 3, or
0 = Off (default).
Microphone
Gain
Choose:
1 Low Sensitivity
2 Medium Sensitivity
3 High Sensitivity
*Scan List
Press [ or ] to select channel,
then choose Y (yes) to include or
n (no) to exclude by pressing
J
.
*depending upon model
6
=
E
?
Y
Function Appearance
Press & hold
*Channel
Frequency
Interference
Eliminator
Code
*Scramble
Code
Bandwidth
Qfor 3 sec. and turn on radio. k displays.
M
Use [or] for
2
\
Press
change, press
*depending upon model
1 through 6.
until
l displays. To
[or]
.
*depending upon model
1
K
Appears after
for each channel.
Press \ until e displays. Must
e
be set to same code for all radios.
Press \ until K displays. Press
or
[
]
or C (12.5 kHz).
C
Note: If bandwidth is not flashing,
it is not selectable on the
chosen frequency.
l shows. Set
to select D (25.0 kHz)
Page 35

• Extend Your Productivity
Provides a cost-effective solution
to onsite communication needs.
Designed for heavy duty, everyday
industrial use. Well suited for
construction, manufacturing,
security, property management,
retail, and more.
• Rugged MOTOROLA Quality
Shock/drop/temperature tested
to meet Motorola's high standards.
• Weather/Dust Resistant
Designed to meet IP-54 rating
• Designed to meet Military
Specs
810 C, D, E & F
• Dependable Indoor/Outdoor
Coverage
Will provide a communication
range* of up to 250,000 sq. ft.
or 20 floors and up to 6 miles.
*Range will vary based on
terrain and conditions and
model selected.
• Simple and Easy to Operate
Allows one-to-one or group
communication at the pus of
a button. You can even
customize the number of
channels you want to operate
on (XU2600 and XV2600).
With no phone numbers to
dial, plus the Manager Lock
feature, there's little to no
training needed for your staff
to be fully up to speed.
• Cost Efficient
No monthly fees to pay and no
service contracts. Compatible
with Motorola Spirit
®
radios
and M Series audio
accessories.
• Cloning Capability
• Business Exclusive Frequencies
Frequencies set aside exclusively
for business-only use. FCC License
is required.
• 38 PL Codes, 83 Digital PL Codes
• Hands-Free Mode (VOX)
Advanced voice activation (VOX)
lets you talk hands-free;
XV2600 and XU2600 models do not
require accessories.
• Voice Compression Technology
Helps provide better sound at
longer distances.
• 1-Year Limited Warranty
For details, please call:
1-800-448-6686.
Radio Specification Chart
tion Ch
Transmit Power:
Alkaline Battery Life:
NiMH Battery Life:
tion Ch
1 or 2 Watts
Approximately 24 hrs 1W/22 hrs 2W
Approximately 15 hrs 1W/13 hrs 2W
• Accessories for XTN Series
Brochure included - Convenient audio, power and charging accessories are available from your
point-of-sale or www.motorola.com
/radios/professional
MOTOROLA, the Stylized M Logo, XTN Series and all other trademarks indicated as such herein are trademarks of Motorola, Inc. ® Reg. U.S. Pat. & Tm.
Off. All other product or service names are the property of their respective owners.
©
2001, 2002 Motorola, Inc. All rights reserved. Printed in the U.S.A.
FCC
License Required
@XTNXTN@
Motorola® XTN Series
Proof of Purchase
PWARNING CHOKING HAZARD
SMALL PARTS
Not for children under 3 years.
This product is not intended to be used
as a toy or plaything.
 Loading...