

Page 1

CONTENTS
ENGLISH
SAFETY AND GENERAL INFORMATION 1
Transmit and Receive Procedure 1
Radio Operation and EME Exposure 1
Electromagnetic Interference/Compatibility 2
Safety and General 2
Operational Warnings 3
Operational Cautions 3
YOUR NEW RADIO 5
Batteries 5
How To Install The NiMH Battery 5
How To Install AA Batteries 5
How To Charge The NiMH Battery Pack Using The Rapid Charger
Charger Indicator Lights 5
How To Fit and Remove the Holster 6
BEFORE YOU CAN TALK 7
Channels And Codes 7
How To Turn Your Radio On And Off 7
The Battery Meter 7
Monitor And Signal Strength Indicator 7
How To Speak To Another Person 7
PROGRAMMING MODE 8
A. Channels 8
B. Interference Eliminator Codes 8
C. Voice Scrambling Codes 8
D. Manager Lock 8
E. Assigning Channels To Pre-Set Buttons 8
FEATURES (NORMAL MODE) 9
How To Change Channels 9
Call Tones 9
Hands Free Use (VOX) 9
Microphone And VOX Sensitivity 9
Scan 10
5
How to Edit the Scan List 10
Keypad Lock 10
End-Of-Transmission Tone 11
Keypad Tones 11
How to Reset The Factory Settings 11
Cloning 11
BackLight 11
Time-Out Timer 11
FURTHER INFORMATION 11
Talk Range 11
Troubleshooting 12
Specifications 13
Warranty Information 13
Copyright Information 15
APPROVED ACCESSORIES 16
Page 2

SAFETY AND GENERAL INFORMATION
IMPORTANT INFORMATION ON SAFE AND EFFICIENT OPERATION
READ THIS INFORMATION BEFORE USING YOUR RADIO
The information provided in this document supersedes the general safety
information contained in user guides published prior to June 2001. For
information regarding radio use in a hazardous atmosphere please refer
to the Factory Mutual (FM) Approval Manual Supplement or Instruction
Card, which is included with radio models that offer this capability.
TRANSMIT AND RECEIVE PROCEDURE
Your two-way radio contains a transmitter and a receiver. To transmit
(talk), you must push the PTT button; to receive (listen), you must release
the PTT button.
RADIO OPERATION AND EME EXPOSURE
Your Motorola radio is designed to comply with the following national and
international standards and guidelines regarding exposure of human
beings to radio frequency electromagnetic energy (EME):
• United States Federal Communications Commission, Code of Federal
Regulations; 47 CFR part 2 sub-part J
• American National Standards Institute (ANSI) / Institute of Electrical and
Electronic Engineers (IEEE) C95. 1-1992
• Institute of Electrical and Electronic Engineers (IEEE) C95.1-1999 Edition
• National Council on Radiation Protection and Measurements (NCRP) of
the United States, Report 86, 1986
• International Commission on Non-Ionizing Radiation Protection (ICNIRP)
1998
• Ministry of Health (Canada) Safety Code 6. Limits of Human Exposure to
Radiofrequency Electromagnetic Fields in the Frequency Range from 3
kHz to 300 GHz, 1999
• Australian Communications Authority Radiocommunications
(Electromagnetic Radiation - Human Exposure) Standard 2001.
• ANATEL, Brasil Regulatory Authority, Resolution 256 (April 11, 2001)
"additional requirements for SMR, cellular and PCS product
certification."
To assure optimal radio performance and make sure human exposure to
radio frequency electromagnetic energy is within the guidelines set forth
in the above standards, always adhere to the following procedures:
Two-way Radio Operation
When using your radio, hold the radio in a vertical position
with the microphone one to two inches (2.5 to 5 centimeters)
away from the lips.
Body-worn Operation
To maintain compliance with FCC RF exposure guidelines, if you wear a
radio on your body when transmitting, always place the radio in a
Motorola approved clip, holder, holster, case, or body harness for this
product. Use of non-Motorola-approved accessories may exceed FCC RF
exposure guidelines. If you do not use a Motorola approved body-worn
accessory and are not using the radio in the intended use positions
along side of the head in the phone mode or in front of the face in the
two-way radio mode, then ensure the antenna and radio is kept the
following minimum distances from the body when transmitting:
• Phone or Two-way radio mode: one inch (2.5 centimeters)
1 English
Page 3

Antenna Care
Use only the supplied or an approved replacement antenna. Unauthorized
antennas, modifications, or attachments could damage the radio and may
violate FCC regulations.
DO NOT hold the antenna when the radio is "IN USE." Holding the
antenna affects call quality and may cause the radio to operate at a
higher power level than needed.
Approved Accessories
For a list of approved Motorola accessories look in the appendix or
accessory section of your radio’s User Guide.
ELECTROMAGNETIC INTERFERENCE/COMPATIBILITY
NOTE: Nearly every electronic device is susceptible to electromagnetic
interference (EMI) if inadequately shielded, designed or otherwise
configured for electromagnetic compatibility.
Facilities
To avoid electromagnetic interference and/or compatibility conflicts, turn
off your radio in any facility where posted notices instruct you to do so.
Hospitals or health care facilities may be using equipment that is sensitive
to external RF energy.
Aircraft
When instructed to do so, turn off your radio when on board an aircraft.
Any use of a radio must be in accordance with applicable regulations per
airline crew instructions.
Medical Devices
• Pacemakers
The Health Industry Manufacturers Association recommends that a
minimum separation of 6 inches (15 centimeters) be maintained between
a handheld wireless radio and a pacemaker. These recommendations are
consistent with those of the U.S. Food and Drug Administration..
Persons with pacemakers should:
• ALWAYS keep the radio more than 6 inches (15 centimeters) from their
pacemaker when the radio is turned ON.
• not carry the radio in the breast pocket.
• use the ear opposite the pacemaker to minimize the potential for
interference.
• turn the radio OFF immediately if you have any reason to suspect that
interference is taking place.
• Hearing Aids
Some digital wireless radios may interfere with some hearing aids. In the
event of such interference, you may want to consult your hearing aid
manufacturer to discuss alternatives.
• Other Medical Devices
If you use any other personal medical device, consult the manufacturer of
your device to determine if it is adequately shielded from RF energy. Your
physician may be able to assist you in obtaining this information.
SAFETY AND GENERAL
Use While Driving
Check the laws and regulations on the use of radios in the area where
you drive. Always obey them.
When using your radio while driving, please:
• Give full attention to driving and to the road.
• Use hands-free operation, if available.
• Pull off the road and park before making or answering a call if driving
conditions so require.
2 English
Page 4

OPERATIONAL WARNINGS
OPERATIONAL CAUTIONS
FOR VEHICLES WITH AN AIR BAG
Do not place a portable radio in the area over an air bag or in the air bag
deployment area. Air bags inflate with great force. If a portable radio is
placed in the air bag deployment area and the air bag inflates, the radio
may be propelled with great force and cause serious injury to occupants
of the vehicle.
POTENTIALLY EXPLOSIVE ATMOSPHERES
Turn off your radio prior to entering any area with a potentially explosive
atmosphere, unless it is a radio type especially qualified for use in such
areas as "Intrinsically Safe" (for example, Factory Mutual, CSA, UL, or
CENELEC). Do not remove, install, or charge batteries in such areas.
Sparks in a potentially explosive atmosphere can cause an explosion or
fire resulting in bodily injury or even death.
NOTE: The areas with potentially explosive atmospheres referred to above
include fueling areas such as below decks on boats, fuel or chemical
transfer or storage facilities, areas where the air contains chemicals or
particles, such as grain, dust or metal powders, and any other area where
you would normally be advised to turn off your vehicle engine. Areas with
potentially explosive atmospheres are often but not always posted.
BLASTING CAPS AND AREAS
To avoid possible interference with blasting operations, turn off your radio
when you are near electrical blasting caps, in a blasting area, or in areas
posted: "Turn off two-way radio." Obey all signs and instructions.
ANTENNAS
Do not use any portable radio that has a damaged antenna. If a damaged
antenna comes into contact with your skin, a minor burn can result.
BATTERIES
All batteries can cause property damage and/ or bodily injury such as
burns if a conductive material such as jewelry, keys, or beaded chains
touch exposed terminals. The conductive material may complete an
electrical circuit (short circuit) and become quite hot. Exercise care in
handling any charged battery, particularly when placing it inside a pocket,
purse, or other container with metal objects.
3 English
Page 5

CHARGER SAFETY INSTRUCTIONS
Before using the battery charger, read all instructions and cautionary
markings on:
1. the battery
2. the battery charger, and
3. the radio using the battery.
Caution: To reduce the risk of injury, charge only (E)NTN8971 or
(E)NNTN4190 rechargeable batteries. Other types of batteries may burst,
causing personal injury and damage.
SAVE THESE INSTRUCTIONS
1. Do not expose the charger to rain or snow.
2. Do not operate the charger if it has received a sharp blow, or has been
dropped or damaged in any way.
3. Do not disassemble the charger if it has received a sharp blow, or has
been dropped or damaged in any way.
4. Never alter the AC cord or plug provided with the unit. If the plug will
not fit the AC outlet, have proper outlet installed by a qualified
electrician. An improper condition can result in a risk of electric shock.
5. To reduce the risk of damage to the cord or plug, pull by the plug rather
than the cord when disconnecting the charger from the AC receptacle.
6. To reduce the risk of electric shock, unplug the charger from the AC
outlet before attempting any maintenance or cleaning.
7. Use of an attachment not recommended or sold by Motorola may result
in a risk of fire, electric shock, or personal injury.
8. Make sure the cord is located so that it will not be stepped on, tripped
over or subjected to damage or stress
9. An extension cord should not be used unless absolutely necessary. Use
of an improper extension cord could result in a risk of fire and/or
electric shock. If an extension cord must be used, make sure:
• That the pins on the plug of the extension cord are the same number,
size and shape as those on the plug of the charger.
• That the extension cord is properly wired and in good electrical
condition, and
• That the cord size is 18 AWG (1mm
(30 metres) and 16 AWG (1.3mm
2
) for lengths up to 100 feet
2
) for lengths up to 150 feet (45 metres).
10. The supply cord of this charger cannot be replaced. If the cord is
damaged, call Motorola Product Services:
Within the UK: 01256 484100
Outside the UK: +44 1256 484100
4 English
Page 6

YOUR NEW RADIO
Motorola XTN446 two-way radios operate on PMR446 frequencies,
and can be used in any country where PMR446 frequencies are
authorized, subject to applicable regulations.
Please refer to the diagrams and tables on the inside front cover of
this manual.
Batteries
Your radio is powered by a Nickel-Metal Hydride (NiMH)
rechargeable battery pack or by 4 AA batteries. Please refer to
page 13 for battery life information.
How To Install The NiMH Battery
1. Slide the ribbed latch on the bottom of the radio away from the
battery door and towards the contacts
2. Slide the door towards the bottom of the radio and lift off
3. Position the battery, with the Motorola logo side facing up and the
battery contacts towards the bottom of the radio, into the top of the
battery compartment.
B
4. Firmly press the battery up and into the battery compartment.
5. Slide and snap the battery door into place.
How To Install AA Batteries
Warning
This product is intended to be powered by the designated Motorola
rechargeable pack (NTN8971 or NNTN4190) or by primary AA
Alkaline cells ONLY. Other AA cells (such as NiMH or NiCd) are not
suitable, as product damage or personal injury could occur in the
unlikely event that a continuous short circuit is applied to the
charging contacts located on the bottom of the unit.
1. Remove the battery door
2. Insert the 4 AA batteries, ensuring that the correct polarity is
observed.
3. Slide and snap the battery door into place.
How To Charge The NiMH Battery Pack Using The Rapid Charger
(IXPN4000 or IXPN4001)
The NiMH battery pack can be charged whilst in the radio or on its
own. To get maximum use from the battery, charge overnight (16
hours) before you use it for the first time. Subsequent charges will
only require up to 3 hours of charging time.
1. Plug the power supply into the charger pocket
C
2. Plug the power supply into an AC outlet.
3. Place the radio (including the battery), or the NiMH battery pack
only, in the pocket
D
Note: The charge time will be extended, and the battery meter will be
inaccurate, if the radio is left on while charging.
Charger Indicator Lights
Red: Rapid charge mode (up to 2 hours)
Flashing Green: Trickle charge mode after rapid charge (1 hour)
Green: Charging complete
Flashing Red: The charger is waiting for the battery
voltage/temperature to be within the permitted
rapid charge range
No Indication Radio or battery not properly inserted in the
charger pocket
Note: If you notice the LED flashing red for more than a minute, the
battery is faulty and should be replaced.
5 English
Page 7

How To Fit And Remove The Swivel Belt Holster
Your radio comes supplied with a swivel belt holster, which does not
need to be removed before placing the radio in a rapid or multi-way
charger.
1. To fit the holster: slide the radio base first into the holster and snap
the clip at the top of the holster into place on the radio.
E
2. To remove the radio from the holster: push back on the top of
the holster until the clip detaches from the radio and slide the
radio out.
6 English
Page 8
BEFORE YOU CAN TALK
Ensure you read this manual carefully
Channels And Codes
Your radio has 8 channels, 121 Interference Eliminator codes (IE
codes – 38 Tone PL Codes and 83 Digital PL Codes – see inside cover
for details) and 3 Voice Scrambling codes (VS codes). It is always
possible to be overheard or to have interference from others whilst
using your radio, but the large number of channel/code combinations
available help to reduce this.
The Battery Meter
The batter meter located in the top left hand corner of the display
indicates how much battery power you have remaining.
Battery Type 3 Bars 2 Bars 1 Bar Flashing
dbcm
NiMH Pack 100%-85% 85%-25% 25%-10% Final 10%
Alkaline AA cells 100%-70% 70%-40% 40%-10% Final 10%
Note: If you are in a group and you wish to talk to each other, all
radios must be set to the same channel, IE code and VS code. If
you experience interference and need to change channels and
codes, ensure that you change the settings of all radios in your
group. See k below.
How To Turn Your Radio On And Off
1. Turn the P knob clockwise until a click is heard and adjust the
1
volume to a comfortable level. The LED will flash red, the display
2
will briefly show all LCD segments and an audible alert will be
A
heard (unless the Alert tones are disabled).
2. To turn your radio off, turn the P knob anti-clockwise until a click
is heard.
3. The LED on the top left of the radio flashes every three seconds
when the radio is on.
Caution: Do not hold the radio, or an audio accessory, too close to
your ear when the volume is at a high setting. This could
damage your hearing.
7 English
Note: Remove batteries before storing your radio for extended
periods. Batteries corrode over time and may cause permanent
damage to your radio.
Monitor And Signal Strength Indicator
It is good radio etiquette to monitor the channel for activity before you
transmit, to ensure that you do not interrupt other users already on
the channel.
1. Press and hold J until p appears in the display and the LED on
8
the front of the radio starts to flash once per second.
2. The p icon has a number below it, which shows the strength of
any incoming signal from 0 (weakest) to 6 (strongest). You will hear
static if the channel is clear to use.
How To Speak To Another Person
1. Check channel activity as described above.
2. To maximize clarity, hold radio 5.0 to 7.5cms from your mouth.
3. Press M and speak into the radio. The red LED glows continuously
3
when transmitting.
4. To receive a message, release M.
Page 9
k PROGRAMMING MODE
Your radio has a separate programming mode to enable you to
change feature settings, which do not need to be changed frequently.
There are five features settings that you can change in this menu.
1. To select Programming Mode, switch on the radio while holding
down the M and J buttons for three seconds. The radio will
emit a short burst of tones and the k icon will show in the left
hand side of the display.
2. When you have finished programming, press M for two seconds
to exit k.
A. Channels
Press ] or [ to select a channel for configuration.
7/10
B. Interference Eliminator Codes
1. Select the channel on which you wish to change the IE code.
5
2. Press \ once - the IE code will begin flashing.
3. Use ] or [ to select the required code. (code 0 disables the IE
code for the channel, which is also called 'carrier squelch mode').
4. Press M briefly to exit the menu, or for two seconds to exit
k.
C. Voice Scrambling Codes
This feature gives you additional privacy. Anyone who is listening on
the same channel and IE code will hear distorted speech, unless they
have a VS code that matches yours.
1. Select the channel on which you wish to set up the VS code.
2. Press \ until e shows in the display, next to the channel number.
3. Use ] or [ to select the required code. (code 0 disables the VS
code for the channel).
4. Press M briefly to exit the menu, or for two seconds to exit k.
D. Manager Lock
This feature allows you to disable the channel change, menu and
scan functions. M, B and Monitor can still be used. Unlike Keypad
4
Lock, this feature cannot be turned off by using \.
1. Press \ until f shows in the display.
2. Use ] or [ to choose Y (to activate) or n (to deactivate). The f
icon remains in the display when Y is chosen.
E. Assigning Channels To Pre-Set Buttons
1. Select the channel which you want to assign to a Pre-Set button.
2. Press and hold T or S until the radio beeps to confirm
6/9
assignment.
8 English
Page 10

FEATURES (NORMAL MODE)
How To Change Channels
Press ] or [ to select the desired channel.
Briefly pressing T or S will change the channel to the one which
has been pre-set to that button.
Call Tones
Your radio can transmit call tones to other radios in your group so you
can alert them that you are about to talk. Once the call tone is set,
press B to transmit the call tone to others. There are three unique
call tones to choose from, or you can choose to turn the call tones
off.
1. To set the call tones, press \until E shows in the display.
2. Choose a call tone from the three available. If you choose 0 then
the call tones are off.
3. Press M briefly to exit.
Hands Free Use (VOX)
This feature allows you to activate your radio’s transmitter by using
your voice instead of pressing the M button. You can use the radio
alone, in hands free mode, or use a Motorola authorised optional
audio accessory.
Note: When using audio accessories with your radio, we recommend
that the volume level be kept at a comfortable listening level.
Before you place the accessory on your head or in your ear,
turn your radio's volume down.
How To Use The VOX Feature Without An Accessory
1. Switch on your radio with M pressed. g will appear in the display
to indicate that the VOX feature is active.
2. To transmit, speak into the microphone. To receive,
stop talking.
3. To exit hands free mode temporarily, briefly press M. The g icon
will flash.
4. Briefly press M to re-enter hands free mode.
How To Use The VOX Feature With An Accessory
1. Switch off your radio.
2. Open the accessory cover and insert the audio accessory into the
accessory jack.
3. Switch on your radio. The g icon will appear in the display to
indicate that the VOX feature is active. If the g icon is flashing,
VOX is disabled in the Sensitivity menu (see below – change
setting to 1, 2, or 3 to enable VOX operation).
4. To transmit, speak into the accessory microphone. To receive,
stop talking.
5. To exit hands free mode, press M.
Note: There will be a brief delay between when you start talking and
the radio going to transmit, and a longer delay between when
you stop talking and the radio going back to receive, to allow
for speech pauses.
Microphone And VOX Sensitivity
The sensitivity of your radio's microphone and VOX can be adjusted
to cater for loud or quiet environments, and for users who speak
loudly or softly.
9 English
Page 11

1. To change the sensitivity, press the \button twice (the large
setting number will flash and the display shows the g icon and the
sensitivity type you are setting:
? - Microphone Gain
H - VOX with audio accessory
I - VOX without audio accessory
2. Use ] and [ to choose from the three available sensitivity
settings:
1 - If you speak loudly, or are in a noisy environment.
2 - Suitable for most applications.
3 - if you speak softly, or are in a quiet environment.
3. You can then talk to the person on the new channel and IE code by
pressing M.
4. Scanning will resume after 5 seconds of inactivity on the channel.
5. If you press M while the radio is scanning, the radio will transmit
on the channel that was selected before you activated the scan
feature.
6. To stop scanning, briefly press J.
Scan Advance
This allows you to 'skip' a channel during scan, so you can continue
to check for other activity. When the radio locks on an active channel
during scan, press ] to resume scanning.
To disable VOX operation (VOX with audio accessories only), select 0
Scan
This feature allows you to monitor other channels. When the radio
detects activity, it stops scanning and locks in on the active channel.
This allows you to listen and talk to the person transmitting without
having to change channel.
When you activate scan, it will search each of your 8 channels using
the IE code you have selected for each channel. If you want to scan
without IE codes (carrier squelch scan), start scanning on a channel
which has the IE Code set to 0. You can also programme your radio to
scan specific channels by turning the other channels off in the scan
list.
1. To start scanning, briefly press J. The h icon shows in the
display and the large channel number begins to scroll through the
channels.
2. When channel activity is detected, scanning will be suspended, and
the display will show the number of the channel and the IE code.
Nuisance Channel Delete
This feature temporarily deletes any 'nuisance' channels from your
scan list. When your radio locks on a 'nuisance' channel during scan,
press [ to temporarily remove the channel from the scan list. The
channel will be put back in the scan list when you exit scan.
How To Edit The Scan List
1. Press \ until h appears on the display. The channel number will
flash and the IE code number will be replaced with a flashing Y or n.
2. Use ] or [ to select the required channel.
3. Use J to select either Y to include the channel in the scan list or
n to exclude the channel from the scan list.
4. Press M briefly to exit.
Keypad Lock
This feature allows you to disable the keypad in the same way as
Manager Lock, but the keypad can be locked and unlocked more
easily.
10 English
Page 12

To lock or unlock the keypad, press and hold the \ button for three
seconds. The radio will emit a short burst of tones and f will appear
in, or disappear from, the display.
End-Of-Transmission Tone
When enabled, your radio transmits a unique tone when you finish
transmitting, and also sounds the tone locally on your radio.
To enable or disable the end-of-transmission tone, press and hold the
up ] button whilst switching on your radio.
Keypad Tones
Every time you press a button on your radio it beeps to confirm,
unless this feature is turned off.
To enable or disable the keypad tones, press and hold the down [
button whilst switching on your radio. This feature also controls the
local sounding of the end-of-transmission tone and call tones,
although these tones are still transmitted.
How to Reset The Factory Settings
Switch on the radio while holding down the M and \ buttons for
three seconds. The radio will emit a short burst of tones and the
factory settings will be restored.
Cloning
The cloning feature is available with a Multi Unit Charger (MUC)
IXPN4002 (UK 3-pin version) or IXPN4003 (European 2-pin version).
This enables you to copy your radio's settings to other radios. Please
refer to the user manual supplied with your MUC.
BackLight
Your radio has a backlit display. As the radio is switched on, and
when you press any button, apart from M and B, the display will
light up for approximately four seconds.
Time-Out Timer
The radio will emit a warning tone and will stop transmitting if M is
pressed for more than 60 continuous seconds or VOX transmission is
active for more than 60 continuous seconds.
FURTHER INFORMATION
Talk Range
XTN446 radios have been designed to maximize performance and
improve transmission range in the field. It is recommended that you
do not use the radios closer than 1.5 meters apart, to avoid
interference.
Talk range depends on the terrain. It will be affected by concrete
structures, heavy foliage and by operating radios indoors or in
vehicles.
Optimal Range Medium Range Minimal Range
Optimal range occurs in flat, open areas with up to 5 kilometres of
coverage. Medium range occurs when buildings and trees are in the
way. Minimal range occurs when dense foliage and mountains
obstruct the communication path.
11 English
Page 13

Troubleshooting
Problem Solution
No Power Reposition or replace AA batteries. Recharge or replace NiMH battery pack.
Message Not Transmitted Make sure the M is completely pressed as you transmit. Reposition and/or replace batteries
Message Not Received Confirm radios have the same channel and IE and VS code settings. Make sure M is not inadvertently being
pressed. Reposition and/or replace batteries. Obstructions, operating indoors, or in vehicles may interfere with
communication. Change your location. Check to make sure volume is turned up.
Message scrambled VS code setting doesn’t match other radios; all radios must use the same VS code.
Hearing Other Conversation or Confirm Interference Eliminator code is set, (active settings are 1-121). Shared channel or Interference Eliminator
Noise on a channel code may be in use, try another.
Limited Talk Range Steel/concrete structures, heavy foliage, and use in buildings and in vehicles will decrease range, check for clear
line of sight to improve transmission. Wearing radio close to body such as in a pocket or on a belt will decrease
range, change location of radio.
Heavy Static or Interference Radios too close together. Radios must be at least 1.5 metres apart, increase your distance. Radios too far apart.
Obstacles interfere with transmission. Talk range is up to 3 kilometres in clear, unobstructed conditions.
Cannot change channel Make sure radio is unlocked.
Low batteries Recharge NiMH battery pack or replace AA batteries. Extreme operating temperatures will affect the life of the
battery.
Keypad Locked Unlock by pressing \ for three seconds. Ensure Manager Lock is off.
Cannot Activate VOX Feature not set and on. Sensitivity is set to 0.
Motorola Product Services If the radio still doesn’t work properly, contact your place of purchase.
12 English
Page 14

Specifications
Description Specifications
Channels 8
Codes 121
Operating Frequency 446.00625-446.09375 MHz
Talk Range Up to 5 kilometres
Power Source
4 AA Alkaline Batteries or NiMH Battery pack.
Battery Life*: AA** NiMH
5% transmit, 5% receive
and 90% standby 36hrs 24hrs
Talk Time 6.5hrs 5.0hrs
Standby 64hrs 40hrs
* Typical
** With premium quality alkaline cells.
Warranty Information
Motorola guarantees to you, the original purchaser, the Personal
Communicator and accessories which you have purchased from an
authorised Motorola dealer. Retailer or distributor (the "Products"), to
be in conformance with the applicable Motorola specifications
current at the time of manufacture for a term of one [1] years from
date of purchase of the Product(s) (Warranty Term).
You must inform Motorola of the lack of conformity to the applicable
specifications of any of the Products within a period of two (2) months
from the date on which you detect a defect in material, workmanship
or lack of conformity and in any event within a term not to exceed the
Warranty Term, by submitting the Product for service to Motorola or
the distributor. Motorola shall not be bound by Product related
statements not directly made by Motorola.
A list of the Motorola call centre numbers is enclosed with this
product.
During the Warranty term, Motorola will, at its discretion and without
extra charge, as your exclusive remedy, repair or replace your
product which does not comply with this warranty; or failing this, to
reimburse the price of the product but reduced to take into account
the use you have had of the product since it was delivered. This
warranty will expire at the end of the Warranty Term.
This is the complete and exclusive warranty for a Motorola Personal
Communicator and accessories and in lieu of all other warranties,
terms and conditions, whether express or implied.
Where you purchase the product other than as a consumer, Motorola
disclaims all other warranties, terms and conditions express or
implied, such as fitness for purpose and satisfactory quality.
In no event shall Motorola be liable for damages in excess of the
purchase price nor for any incidental special or consequential
damages* arising out of the use or inability to use the Product, to the
full extent such may be disclaimed by law.
This Warranty does not affect any statutory rights that you may have
if you are a consumer, such as a warranty of satisfactory quality and
fit for the purpose for which products of the same type are normally
used under normal use and service, nor any rights against the seller
of the Products arising from your purchase and sales contract.
(*) including without limitation loss of use, loss of time,
inconvenience, commercial loss, lost profits or savings.
13 English
Page 15

How to Get Warranty Service?
In most cases the authorised Motorola retailer which sold your
Motorola Personal Communicator and original accessories will
honour a warranty claim and/or provide warranty service.
Alternatively, for further information on how to get warranty service
please contact Motorola’s call centre at the telephone numbers
below for your country.
In order to claim the warranty service you must return the Personal
Communicator to Motorola or the distributor. The Product should also
be accompanied by a label with your name, address, telephone
number; and a description of the problem.
In order to be eligible to receive warranty service, you must present
your receipt of purchase or a comparable substitute proof of
purchase bearing the date of purchase. The Personal Communicator
should also clearly display the serial number. Such information is
contained with the Product.
Conditions
This warranty will not apply if the type or serial numbers on the
Product have been altered, deleted, removed, or made illegible.
Motorola reserves the right to refuse free-of-charge warranty service
if the requested documentation can not be presented or if the
information is incomplete, illegible or incompatible with the factory
records.
guaranteed for the balance of the original warranty time period. The
Warranty Term will not be extended. All original accessories,
batteries, parts, and Personal Communicator equipment that have
been replaced shall become the property of Motorola. Motorola does
not warrant the installation, maintenance or service of the products,
accessories, batteries or parts.
Motorola will not be responsible in any way for problems or damage
caused by any ancillary equipment not furnished by Motorola, which
is attached to or used in connection with the Products, or for
operation of Motorola equipment with any ancillary equipment and all
such equipment is expressly excluded from this warranty.
When the Product is used in conjunction with ancillary or peripheral
equipment not supplied by Motorola, Motorola does not warrant the
operation of the Product/peripheral combination and Motorola will
not honor any warranty claim where the Product is used in such a
combination and it is determined by Motorola that there is no fault
with the Product. Motorola specifically disclaims any responsibility
for any damage, whether or not to Motorola equipment, caused in any
way by the use of the Personal Communicator, accessories and
peripherals (specific examples include, but are not limited to:
batteries, chargers, adapters, and power supplies) when such
accessories and peripherals are not manufactured and supplied by
Motorola.
Repair, at Motorola's option, may include the replacement of parts or
boards with functionally equivalent, reconditioned or new parts or
boards. Replaced parts, accessories, batteries, or boards are
14 English
Page 16

What Is Not Covered By The Warranty
This warranty is not valid if the defects are due to damage, misuse,
tampering, neglect or lack of care and in case of alterations or repair
carried out by unauthorised persons.
1. Defects or damage resulting from use of the Product in other than
its normal and customary manner.
2. Defects or damage from misuse, accident or neglect.
3. Defects of damage from improper testing, operation, maintenance,
adjustment, or any alteration or modification of any kind.
4. Breakage or damage to aerials unless caused directly by defects in
material or workmanship.
5. Products disassembled or repaired in such a manner as to
adversely affect performance or prevent adequate inspection and
testing to verify any warranty claim.
6. Defects or damage due to range.
7. Defects or damage due to moist, liquid or spills of food.
8. All plastic surfaces and all other externally exposed parts that are
scratched or damaged due to customer normal use.
9. Products rented on a temporary basis.
10. Periodic maintenance and repair or replacement of parts due to
normal wear and tear
Note: The talk-time, stand-by time and total life cycle of a Motorola
rechargeable battery for your Personal Communicator will
depend on usage conditions. As a consumable product, the
specifications indicate that you should be able to obtain
optimum performance for your Motorola Personal
Communicator within the first six months from date of purchase
and up to (200) charges.
The warranty for Motorola rechargeable batteries becomes void if (i)
the batteries are charged other than by Motorola approved battery
chargers specified for the charging of the battery, (ii) any of the seals
on the battery are broken or show evidence of tampering, (iii) the
battery is used in equipment or service other than the equipment for
which it is specified.
Copyright Information
The Motorola products described in this manual may include
copyrighted Motorola programs, stored semiconductor memories or
other media. Laws in the United States and other countries preserve
for Motorola, certain exclusive rights for copyrighted computer
programs, including the exclusive right to copy or reproduce in any
form, the copyrighted Motorola programs. Accordingly, any
copyrighted Motorola computer programs contained in the Motorola
products described in this manual may not be copied or reproduced
in any manner without express written permission of Motorola.
Furthermore, the purchase of Motorola products shall not be deemed
to grant either directly or by implication, estoppel, or otherwise, any
license under the copyrights, patents or patent applications of
Motorola, except for the normal non-exclusive royalty free license to
use that arises by operation of law in the sale of a product.
For more information call:
Within the UK: 01256 484100
Outside the UK: +44 1256 484100
, MOTOROLA are trademarks of Motorola Inc.
© 2002 Motorola Inc.
15 English
Page 17
APPROVED ACCESSORIES
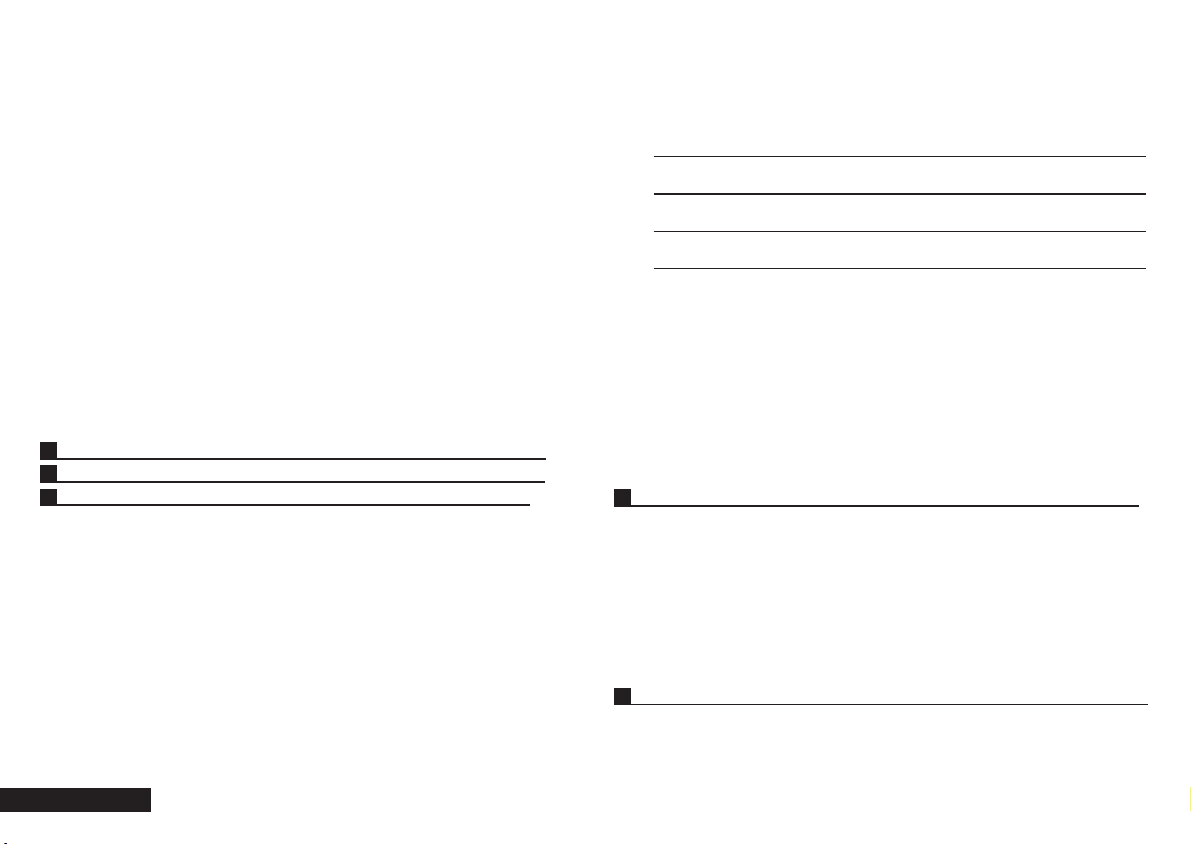
Remote Speaker Microphone
(HMN9026)
Lapel or collar mounted combined
speaker/microphone with PTT switch,
allows hands-on radio operation without
removing radio from belt or carry case.
VOX Headset With Swivel Microphone
(ENMN4002)
Comfortable, lightweight headset helps to
eliminate background noise. Use with the
VOX feature on your radio for hands-free
operation.
Earpiece with Microphone and PTT
(HMN9025)
Discreet, lightweight earpiece with lapel
or collar mounted microphone and PTT
switch. Allows clear communication with
minumum disturbance or interference.
VOX Earpiece With Microphone
(HMN9039)
Lightweight earpiece adapts to fit
comfortably around your ear. Use with the
VOX feature on your radio for hands-free
operation.
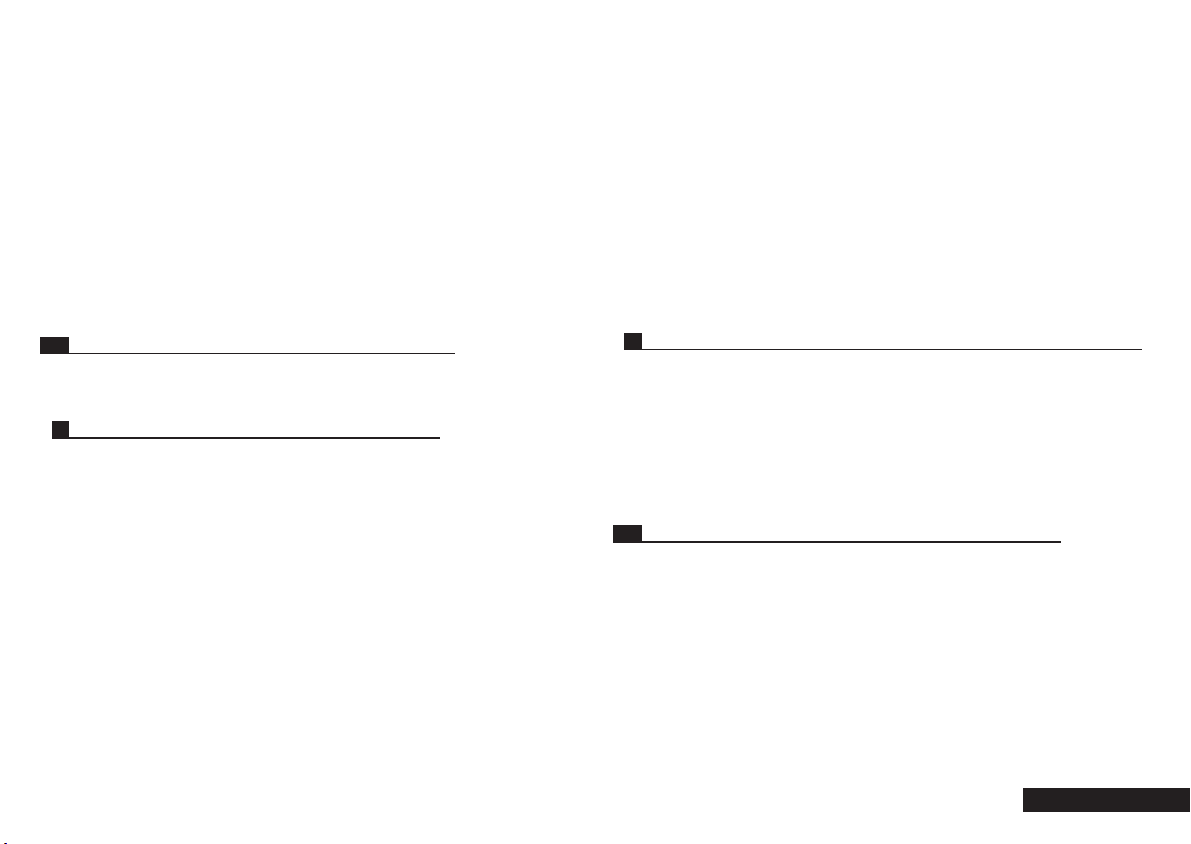
Leather Carry Case
(NNTN4020)
Robust leather case with protective
window for the display. Can also be used
as a secure holster for the radio when
worn on the belt.
Waterproof Bag
(ENLN4042)
Clear plastic waterproof bag offers
protection from the elements and
submersion while still enabling your radio
to be operated. A must for watersports
fans.
16 English
Page 18
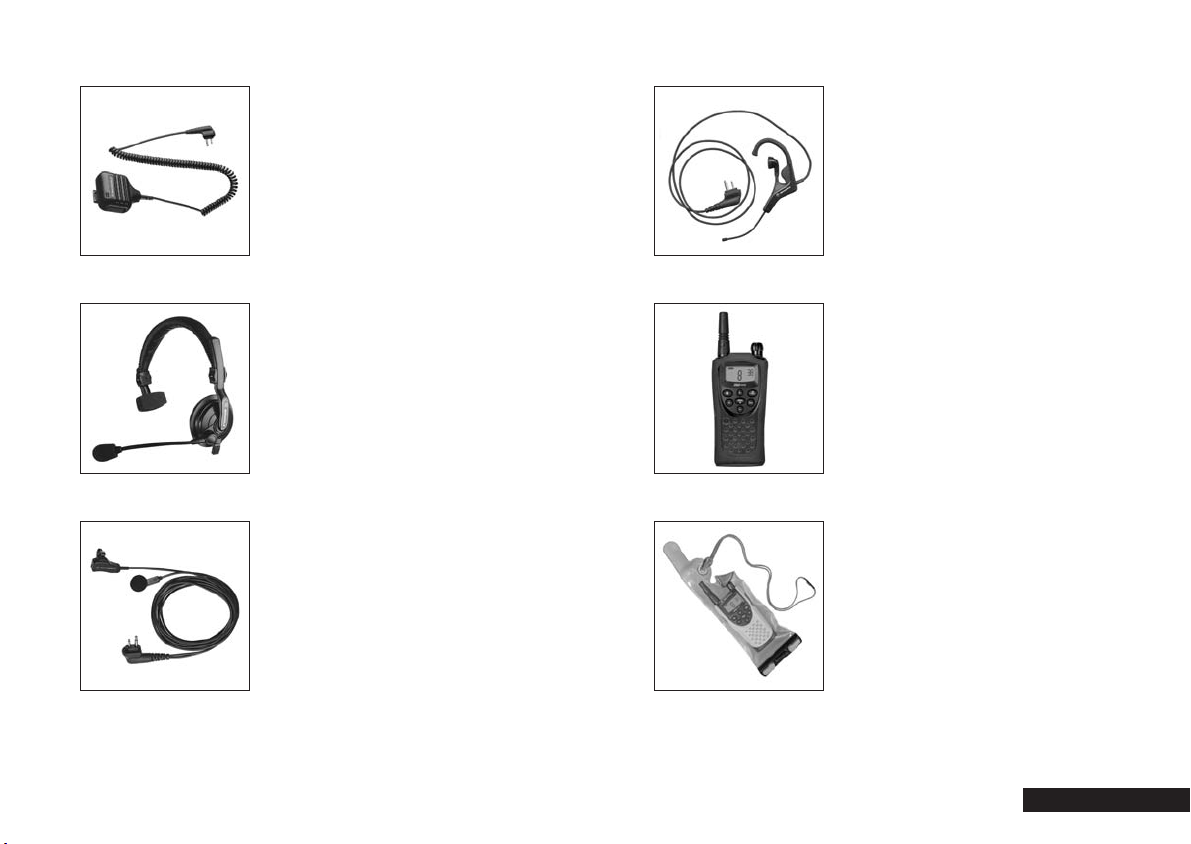
Euro 2hr Drop In Charger
(IXPN4001)
Fast, convenient recharging
Euro Multi-Unit Charger
(IXPN4003)
For charging and cloning up to six radios
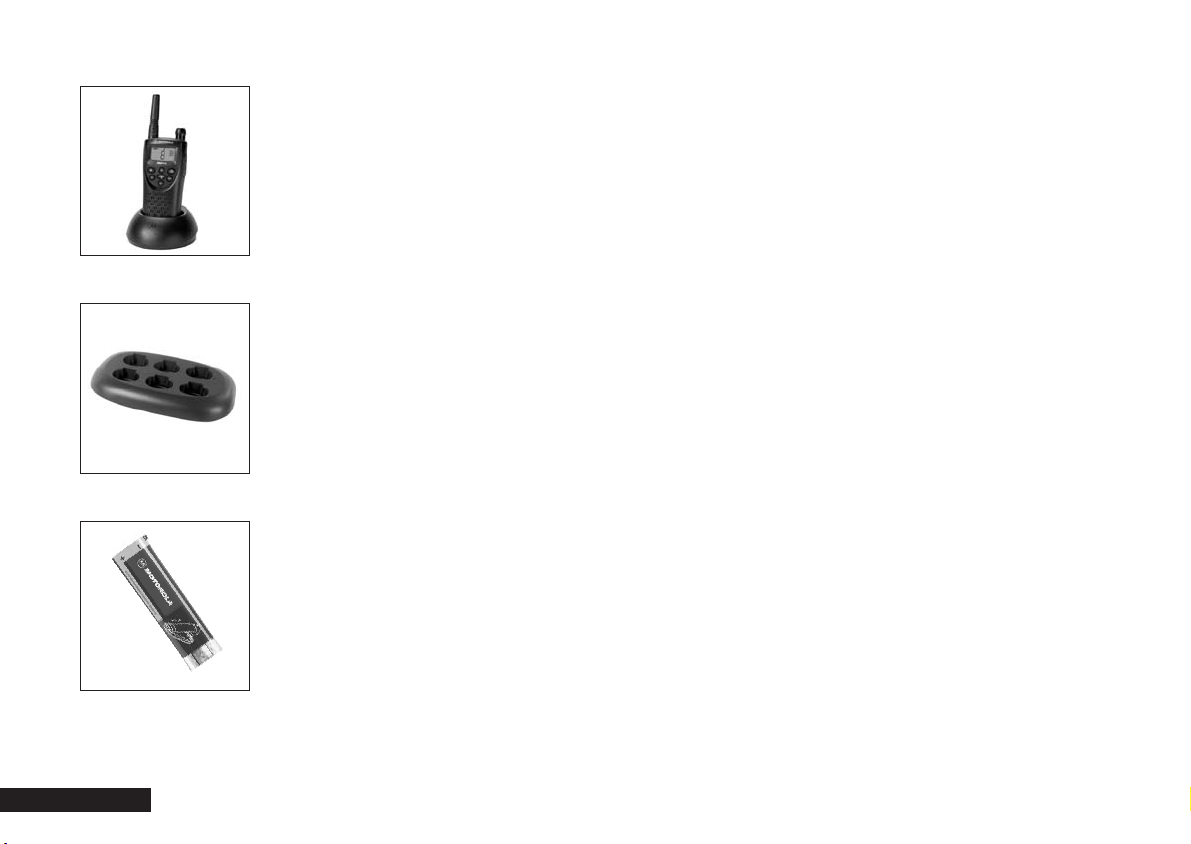
NiMH Rechargeable Battery Pack
(NTN8971 or NNTN4190)
It is always nice to know you have good
back-up. A rechargeable battery pack have one spare for those busy times.
17 English
Page 19

SOMMAIRE
FRANÇAIS
SÉCURITÉ ET INFORMATIONS GÉNÉRALES 1
Caractéristiques de l’utilisation de l'énergie électromagnétique haute
fréquence (RF) 2
Utilisation de la radio et exposition à l’énergie électromagnétique 2
Brouillage/compatibilité électromagnétique 3
Sécurité et informations générales 3
Avertissements lors du fonctionnement 3
Précautions lors du fonctionnement 4
VOTRE NOUVELLE RADIO 5
Batteries 5
Comment Installer Le Pack Batterie NiMH 5
Comment Installer Les Piles Type AA 5
Comment Recharger Le Pack Batterie NiMH en Utilisant Le Chargeur
Rapide 5
Voyants Lumineux Du Chargeur 6
Comment Mettre En Place et Retirer Le Passant De Ceinture
Pivotant 6
AVANT QUE VOUS NE PUISSIEZ PARLER 7
Canaux et Codes 7
Comment Mettre Votre Radio En Marche et Comment L’arrêter 7
L’indicateur De Niveau De Batterie 7
Voyant Lumineux Moniteur et Force Du Signal 7
Comment Parler À Une Autre Personne 8
MODE DE PROGRAMMATION 9
A. Canaux 9
B. Codes D’élimination D’interférences 9
C. Codes De Brouillage De Sons Vocaux 9
D. Verrouillage Gestionnaire 9
E. Affectation De Canaux À Des Boutons Pré-Programmés 9
OPTIONS (MODE NORMAL) 10
Comment Changer Les Canaux 10
Sonneries D’appel 10
Utilisation Mains Libres (VOX) 10
Sensibilité Du Microphone et Sensibilité VOX 11
Balayage (Scan) 11
Comment Éditer La Liste de Balayage (Scan) 12
Verrouillage du Clavier 12
Bip de Fin D’émission 12
Tonalités Du Clavier 12
Comment Réinitialiser Les Programmations Faites À L’usine 12
Clonage 12
Rétroéclairage 12
Temporisateur De Dépassement Du Temps Imparti 13
INFORMATIONS SUPPLÉMENTAIRES 13
Portée De La Conversation 13
Dépistage Des Pannes 14
Caractéristiques Techniques 15
Garantie 16
Informations Sur Le Copyright 18
ACCESSOIRES APPROUVÉS 19
Page 20

SÉCURITÉ ET INFORMATIONS GÉNÉRALES
INFORMATIONS IMPORTANTES SUR LA SÉCURITÉ ET POUR UN
FONCTIONNEMENT EFFICACE
LISEZ CES INFORMATIONS AVANT D’UTILISER VOTRE RADIO
Les informations fournies dans ce document ont préséance sur les
informations générales de sécurité contenues dans les guides de
l’utilisateur publiés avant juin 2001. Pour plus d’informations sur
l’utilisation de la radio dans des atmosphères dangereuses, veuillez
vous reporter au guide d’approbation ou à la carte d’instructions
publiés par la Factory Mutual (FM) et qui sont inclus avec les modèles
de radio dotés de cette capacité.
CARACTÉRISTIQUES DE L’UTILISATION DE L'ÉNERGIE
ÉLECTROMAGNÉTIQUE HAUTE FRÉQUENCE (RF)
Votre portatif est un émetteur-récepteur. Pour transmettre (parler)
vous devez appuyer sur le bouton de conversation (PTT) ; pour
recevoir (écouter), vous devez le relâcher. Lorsque la radio est en
cours de transmission, elle produit de l'énergie électromagnétique
haute fréquence (RF); elle n’en produit pas lors de réception ou
lorsqu’elle est hors tension.
UTILISATION DE LA RADIO ET EXPOSITION À L’ÉNERGIE
ÉLECTROMAGNÉTIQUE
La radio de Motorola a été conçue en conformité avec les normes et
directives suivantes établies par les organismes nationaux et
internationaux, relatives à l’exposition des êtres humains à l’énergie
électromagnétique (RF) (EME):
• Federal Communications Commission des États-Unis, Code des lois
fédérales; 47 CFR partie 2 sous-partie J
• American National Standards Institute (ANSI)/Institute of Electrical
and Electronic Engineers (IEEE) C95. 1-1992
• Institute of Electrical and Electronics Engineers (IEEE) (Édition 1-1999,
C95)
• National Council on Radiation Protection and Measurements (NCRP)
des États-Unis, Rapport 86, 1986
• International Commission on Non-Ionizing Radiation Protection
(ICNIRP) 1998
• Ministère de la Santé (Canada) Limites d’exposition humaine aux
champs de radiofréquences électromagnétiques dans la gamme de
fréquences de 3 kHz à 300 GHz : Code de sécurité 6,1999.
• Australian Communications Authority Radiocommunications
Standard 2001 (Radiofréquence électromagnétique – exposition
humaine)
• ANATEL, Autorité de regulation brésilienne , Resolution 256 ( 11 Avril
2001) "additional requirements for SMR, cellular and PCS product
certification."
Pour assurer le fonctionnement optimal de la radio et une exposition
à l’énergie électromagnétique RF conforme aux directives définies
dans les normes ci-dessus, veuillez suivre les procédures
d’utilisation définies ci-après :
Utilisation du talkie-walkie
Lorsque vous utilisez votre radio comme indiqué cidessus, maintenez-la en position verticale et placez le
microphone à environ 2,5 à 5 cm (1 à 2 pouces) de votre
bouche.
Utilisation avec un accessoire de port
Afin de respecter les règlements de la FCC relativement à l'exposition
de l'énergie électromagnétique RF, si vous portez un appareil sur vous
1 Français
Page 21

lors d’une transmission, utilisez-le toujours avec une pince, une
housse ou un harnais de transport fourni ou approuvé par Motorola
pour ce produit. L'utilisation d'accessoires non approuvés par
Motorola peut excéder les normes de la FCC relativement à
l'exposition l'énergie électromagnétique RF. Si vous n'utilisez pas un
accessoire de port approuvé par Motorola, et que vous n’utilisez pas
la radio dans une position classique, soit sur le côté de la tête en
mode téléphonique ou devant le visage en mode talkie-walkie,
assurez-vous que l’antenne et la radio respectent les distances
minimales suivantes par rapport à votre corps lors d’une
transmission:
• Mode téléphonique ou talkie-walkie : 2,5 centimètres
(1 pouce)
Entretien de l’antenne
Utilisez seulement l’antenne fournie ou une antenne de
remplacement approuvée. L’utilisation d'une antenne non autorisée,
toute modification ou l'ajout d'accessoires risquent d'endommager la
radio ou d’enfreindre les règlements de la FCC.
NE PRENEZ PAS l’antenne entre à pleine main lorsque la radio est «
EN COURS D’UTILISATION ». Le fait de tenir l’antenne réduit la qualité
de l’appel et pourrait faire fonctionner la radio à un niveau de
puissance supérieur à celui qui est nécessaire.
BROUILLAGE/COMPATIBILITÉ ÉLECTROMAGNÉTIQUE
REMARQUE: La plupart des appareils électroniques sont susceptibles
au brouillage électromagnétique (EMI) en cas de protection, de
conception ou de configuration inadéquate relativement à la
compatibilité électromagnétique.
Emplacements
Pour éviter les perturbations par rayonnement électromagnétique,
éteignez votre appareil dans les endroits où on vous avise de le faire.
Les hôpitaux et les centres de soins utlisent des équipements
sensibles aux sources externes d’énergie RF.
Avion
Éteignez votre appareil à bord d’un avion, lorsqu’on vous le demande.
Toute utilisation d’un appareil de radio doit respecter les règlements
applicables à la compagnie d’aviation et les consignes de l’équipage.
Équipement médical
• Stimulateurs cardiaques
La Health Industry Manufacturers Association (Association des
fabricants d’équipements médicaux) recommande de tenir un portatif
à 15 cm (6 pouces) minimum d’un stimulateur cardiaque afin d’éviter
de possibles brouillages de ce dernier. Ces recommandations
concordent avec celles de la U.S. Food and Drug Administration.
Accessoires approuvés
Pour une liste des accessoires approuvés par Motorola, consultez
l’annexe ou la section des accessoires du Guide de l’utilisateur de
votre radio
Les personnes qui portent un stimulateur cardiaque doivent:
• TOUJOURS maintenir la radio à plus de 15 cm (6 pouces) de leur
stimulateur cardiaque lorsque la radio est mise sous tension ;
• éviter de transporter le portatif dans une poche sur la poitrine
• placer le portatif au niveau de l’oreille opposée au stimulateur
cardiaque afin de réduire la possibilité de brouillage ;
2 Français
Page 22

• ÉTEINDRE la radio immédiatement s'elles ont des raisons de
soupçonner la présence de brouillage.
• Appareils auditifs
Certaines radios peuvent entraîner le brouillage de certains appareils
auditifs. Si tel est le cas, vous pouvez consulter le fabricant de
l’appareil auditif pour discuter d’autres solutions possibles.
• Autres appareils médicaux
En cas d’utilisation de tout autre appareil médical personnel, veuillez
consulter le fabricant de l’appareil pour déterminer s’il est
suffisamment protégé contre les sources externes d’énergie RF. Votre
médecin peut vous aider à obtenir ces informations.
SÉCURITÉ ET INFORMATIONS GÉNÉRALES
Utilisation au volant d’un véhicule
Vérifiez les lois et les règlements en vigueur relatifs à l’utilisation des
radios dans les zones où vous devez conduire. Respectez-les toujours
rigoureusement. Lorsque vous utilisez la radio en conduisant, veuillez:
• concentrer toute votre attention sur la conduite et sur la route;
• utiliser la fonction mains libres, si possible ;
• vous ranger sur l’accotement avant de faire un appel ou d’y
répondre si les conditions de conduite sont particulièrement
mauvaises.
sac gonflable de sécurité et que ce dernier se déploie, la radio risque
d’être propulsée avec beaucoup de force et d’occasionner de graves
blessures aux occupants du véhicule.
MILIEUX POTENTIELLEMENT DÉFLAGRANTS
Éteignez le portatif avant de pénétrer dans un milieu potentiellement
déflagrant, sauf si la radio est de type « à sécurité intrinsèque »
spécialement conçu pour l’utilisation dans un tel milieu (par exemple,
Approuvé par Factory Mutual, CSA, UL ou CENELEC). Évitez d’enlever,
de remplacer ou de recharger les piles dans un tel milieu. La
production d’étincelles dans un milieu potentiellement déflagrant
risque de déclencher une explosion ou un incendie pouvant entraîner
des blessures, voire la mort.
REMARQUE: Les milieux potentiellement déflagrants auxquels il est
fait référence sont notamment les zones d'approvisionnement en
carburant situées sous le pont d'une embarcation, les installations de
transfert ou d'entrepos de carburant ainsi que les milieux dont
l'atmosphère peut comprendre des produits chimiques ou des
particules, comme le grain, la poussière ou les poudres métalliques,
ainsi que toute autre zone où il vous est généralement demandé
d'arrêter le moteur de votre véhicule. Les milieux potentiellement
déflagrants sont habituellement, mais pas toujours, clairement
identifiés.
AVERTISSEMENTS LORS DU FONCTIONNEMENT
VÉHICULES DOTÉS DE SACS GONFLABLES DE SÉCURITÉ
Ne placez pas de radio portative dans la zone au-dessus du sac
gonflable de sécurité ou dans la zone de déploiement de ce dernier.
Un sac gonflable de sécurité se déploie avec beaucoup de force. En
effet, si la radio portative est installée dans la zone de déploiement du
3 Français
ZONE DE DYNAMITAGE ET DE DÉTONATEURS
Éteignez le portatif lorsque vous vous trouvez à proximité de
détonateurs électriques ou dans une zone de dynamitage afin d’éviter
de déclencher une explosion, ou lorsque vous vous trouvez dans un
endroit où il est indiqué : « éteignez les émetteurs-récepteurs ».
Respectez tous les panneaux et toutes les instructions.
Page 23

PRÉCAUTIONS LORS DU FONCTIONNEMENT
ANTENNES
N’utilisez pas de radio portative dont l’antenne est endommagée.
Vous risquez de vous brûler légèrement si votre peau entre en contact
avec une antenne endommagée.
PILES
Toutes les piles peuvent être à l’origine de dommages ou de blessures
si un objet conducteur (par exemple, un bijou, des clés ou une
chaînette à billes) entre en contact avec les bornes dénudées. L’objet
conducteur risque alors d’établir un circuit électrique (court circuit) et
de devenir très chaud. Faites preuve d’extrême prudence lorsque
vous manipulez une pile chargée, en particulier lorsque vous la
glissez dans une de vos poches de vêtement, dans votre sac ou dans
tout autre récipient contenant des objets métalliques
INSTRUCTIONS DE SÛRETÉ DE CHARGEUR
Avant d’utiliser le chargeur, veuillez lire toutes les instructions et les
notices de sécurité qui se trouvent sur
1. la batterie
2. le chargeur, et
3. la radio dans laquelle est utilisée la batterie.
Attention: Pour réduire le risque de blessures, ne rechargez que les
piles rechargeables (batteries)
(E)NTN8971 ou (E)NNTN4190. Les autres
types de piles (alcalines) risquent d’exploser et d’entraîner des
blessures et des détériorations.
VEUILLEZ CONSERVER CES INSTRUCTIONS
1 N’exposez pas le chargeur a la pluie ou a la neige.
2 N’utilisez pas le chargeur s’il a reçu un coup brutal ou s’il est tombé
ou qu’il s’est détérioré d’une façon quelconque.
3 Ne démontez pas le chargeur s’il a reçu un coup brutal ou s’il est
tombé ou qu’il s’est détérioré d’une façon quelconque.
4 Ne modifiez jamais le cordon secteur AC et la fiche qui
accompagnent l’appareil. Si la fiche ne convient pas pour la prise,
faites installer une prise adéquate par un électricienelectricien
compétent, pour éviter les risques de chocs électriques.
5 Pour réduire le risque de détérioration du cordon ou de la fiche, tirez
la fiche plutôt que le cordon pour débrancher le chargeur de la prise
secteur.
6 Pour réduire le risque de chocs électriques, débranchez le chargeur
de la prise avant de procéder à tout entretien ou nettoyage de
l’appareil.
7 L’utilisation d’un accessoire qui n’est pas recommandé ou vendu par
Motorola peut entraîner un risque d’incendie, de choc électrique ou
de blessure.
8. Assurez vous que le cordon est placé de telle manière qu’il ne sera
pas endommagé..
9. Une rallonge ne devra être utilisée qu’en cas d’absolue nécessité.
L’utilisation d’un cordon inadapté peut occasionner des risques
d’incendie et/ou des chocs électriques. Si une rallonge doit être
utilisée, il faut vous assurer:
• Que les embouts de la prise de la rallonge sont en même nombre,
forme et taille que celle de la prise du chargeur.
• Que la rallonge est en bon état électrique et que les connections
sont correctes.
• Que les dimensions sont 18 AWG (1mm
mètres et 16 AWG (1.3mm
2
) pour une longueur de 45 mètres.
2
) pour une longueur de 30
10. Le cordon de raccordement du chargeur ne peut être remplace.
S’il est endommagé, le renvoyer au Service après vente des
Produits de Motorola.
01 49 46 85 97 (depuis la France)
+33 1 49 46 85 97 (depuis l’etranger)
4 Français
Page 24

VOTRE NOUVELLE RADIO
Les radios Motorola XTN446 fonctionnent sur des fréquences
PMR446 et peuvent être utilisées dans tout pays où des fréquences
PMR446 sont autorisées, sous réserve toutefois des réglementations
applicables.
Veuillez vous reférer aux schémas et aux tableaux situés à l’intérieur
de la page de garde de ce manuel.
Batteries
Votre radio est alimentée par un pack batterie rechargeable Nickel
metal-hydride (NiMH) ou par 4 piles type AA. Veuillez vous reporter à
la page 15 pour des informations sur la durée de vie des batteries.
Comment Installer Le Pack Batterie NiMH
1. Faites Glisser le verrou à rainure situé au bas de la radio vers les
contacts en l’éloignant du capot arrière.
2. Glissez le capot vers le bas de la radio et soulevez-le.
3. Maintenir la batterie, avec le logo de Motorola tourné vers le haut
et les contacts de la batterie tournés vers le bas de la radio, dans
le haut du logement pour batterie.
B
4. Pressez fermement la batterie vers le haut et à l’intérieur du
logement de la batterie.
5. Faites glisser et remettez le capot de la batterie en place jusqu’à ce
qu’un déclic se fasse entendre.
Comment installer Les Piles Type AA
que les piles rechargeables NiMH ou NiCd) ne sont pas appropriées,
car il y aurait un risque de destruction du produit ou des blessures
corporelles de l’utilisateur au cas peu probable où un court-circuit
continu serait appliqué aux contacts de charge situés au fond de
l'unité.
1. Retirez le capot de la batterie
2. Insérez les 4 piles AA, en vous assurant que la polarité correcte est
observée.
3. Glissez le capot de la batterie en place jusqu’au déclic.
Comment Recharger Le Pack Batterie NiMH En Utilisant Le
Chargeur Rapide (IXPN4000 ou IXPN4001)
Le pack batterie NiMH peut être chargé avec la radio ou séparément.
Pour obtenir un usage maximal de la batterie, chargez-la une nuit
(16 heures) avant de l’utiliser pour la première fois. Les charges
ultérieures ne nécessiteront que 3 heures au plus de temps de
charge.
C
1. Branchez l’alimentation sur le socle du chargeur
2. Branchez l’alimentation sur la prise secteur.
3. Placez la radio (y compris la batterie) ou l’ensemble batterie NiMH
dans le socle
D
Remarque: Le temps de charge sera prolongé et l’indicateur de
niveau de batterie sera incorrect si la radio est laissée en
marche durant la charge.
Attention Danger
Il a été prévu que ce produit soit UNIQUEMENT alimenté par
l’ensemble batterie rechargeable Motorola (NTN8971 ou NNTN4190)
ou par des piles alcalines type AA. D’autres éléments type AA (telles
5 Français
Page 25

Voyants Lumineux Du Chargeur
Rouge: Mode de charge rapide (jusqu’à 2 heures)
Vert clignotant: Mode de charge de maintien après une charge
rapide (1 heure)
Vert: Charge terminée
Rouge clignotant: Le chargeur attend que la tension de sortie
et/ou température de la batterie se trouvent
dans la plage de charge rapide préconisée
premise
Aucune indication La radio ou la batterie n’est pas correctement
insérée dans le socle du chargeur
Remarque: Si vous remarquez que la LED rouge clignote pendant
plus d’une minute, la batterie est défectueuse et devra
être remplacée.
Comment Mettre En Place Et Retirer Le Passant De Ceinture
Pivotant
Votre radio est fournie avec une gaine pivotante accrochable à un
passant de ceinture pivotant, qui n’a pas besoin d’être retirée avant
de placer la radio dans un chargeur simple ou multi-cases.
1. Pour installer le passant: glissez la base de la radio dans le passant
d’abord, puis pressez le clip situé sur la partie supérieure du
passant pour maintenir la radio.
E
2. Pour retirer la radio du passant: relevez la partie supérieure du
passant jusqu’à ce que le clip se détache de la radio et glissez
doucement la radio pour la faire sortir.
6 Français
Page 26
AVANT QUE VOUS NE-PUISSIEZ PARLER
Veillez à avoir lu attentivement ce manuel.
3. La LED située sur la partie supérieure gauche de la radio clignote
toutes les trois secondes lorsque la radio est en marche.
Canaux et Codes
Votre radio a 8 canaux, 121 codes d’élimination d’interférences
(Codes IE – 38 codes de tonalité PL et 83 codes numériques PL – voir
l’intérieur de la couverture pour plus de détails) et 3 codes de
brouillage de sons vocaux (codes Voice Scrambling VS). Il est
toujours possible d'être entendu ou d'avoir des interférences
provenant d’autres personnes lorsque vous utilisez votre radio, mais
le grand nombre de combinaisons de canaux et de codes disponibles
permettent de les diminuer.
Remarque: Si vous êtes dans un groupe et que vous souhaitez parler
entre vous, toutes les radios doivent être programmées
sur le même canal, le même code IE et le même code VS.
En présence d’interférences et si vous avez besoin de
changer de canaux et de codes, veillez à changer les
programmations de toutes les radios de votre groupe.
Voir k ci-dessous.
Comment Mettre Votre Radio En Marche Et Comment L’arrêter
1. Tournez le bouton P dans le sens des aiguilles d'une montre
1
jusqu'à ce qu'un déclic se fasse entendre et réglez le volume sur
2
un niveau confortable. La LED clignotera de couleur rouge,
A
l'afficheur montrera brièvement tous les segments de l'affichage à
cristaux liquides et une alerte sonore se fera entendre (à moins que
les sonneries d’alerte soient invalidées).
2. Pour arrêter votre radio, tournez le bouton P dans le sens
contraire des aiguilles d'une montre jusqu'à ce qu'un déclic se
fasse entendre.
Prudence: Ne tenez pas la radio ou un accessoire audio trop près de
votre oreille quand le volume est réglé sur un niveau élevé.
Ceci pourrait endommager votre audition.
L’indicateur De Niveau De Batterie
L’indicateur de niveau de batterie situé dans l’angle supérieur gauche
de l’afficheur vous indique la quantité de charge qu’il vous reste.
Type de la batterie 3 Segments 2 Segments 1 Segment Clignotant
dbcm
Pack batterie NiMH 100%-85% 85%-25% 25%-10% Derniers 10%
Piles AA alcalines 100%-70% 70%-40% 40%-10% Derniers 10%
Remarque: Retirez les batteries/piles avant de ranger votre radio
pendant des périodes de temps prolongées. Les batteries
et/ou les piles se corrodent avec le temps et peuvent
causer un endommagement permanent de votre radio.
Voyant Lumineux Moniteur Et Force Du Signal
Il est conseillé lorsque l’on utilise une radio de surveiller le canal pour
en déterminer l'activité avant de transmettre pour s'assurer que vous
n'interrompez pas d'autres utilisateurs déjà sur le canal.
1. Appuyez sur le J et maintenez-le enfoncé jusqu’à ce qu’un p
8
apparaisse sur l’affichage et que la LED à l’avant de la radio
commence à clignoter une fois par seconde.
2. Sous l’icône p se trouve un numéro montrant le niveau de tous
les signaux entrants. Celle-ci va de 0 (signal le plus faible) à 6
7 Français
Page 27

(signal le plus fort). Vous entendrez des parasites lorsque le canal
sera libre.
Comment Parler À Une Autre Personne
1. Vérifiez l’activité du canal comme décrit ci-dessus.
2. Pour maximiser la clarté, maintenez la radio à une distance de 5 à
7,5 cms de la bouche.
3. Appuyez sur M et parlez dans la radio. La LED rouge est allumée
3
de façon continue durant la transmission.
4. Pour recevoir un message, relâchez le bouton M.
8 Français
Page 28

MODE DE PROGRAMMATION k
Votre radio est dotée d’un mode de programmation distinct pour vous
permettre de changer les paramètres des fonctions qui n'ont pas
besoin d'être changés fréquemment. Ce menu comporte cinq
paramètres de fonctions que vous pouvez changer.
1. Pour sélectionner le Mode de programmation, mettez la radio en
marche tout en maintenant les boutons M et J enfoncés
pendant trois secondes. La radio émettra une courte séquence de
tonalités et l’icône k apparaîtra du côté gauche de l’afficheur.
2. Une fois que vous avez terminé la programmation, appuyez sur M
pendant deux secondes pour quitter le mode de programmation
k.
A. Canaux
Appuyez sur ] ou sur [ pour sélectionner un canal à configurer.
7/10
B. Codes D’élimination D’interférences
1. Sélectionnez le canal sur lequel vous souhaitez changer le code IE.
2. Appuyez sur \ une fois – le code IE commencera à clignoter.
3. Utilisez ] ou [ pour sélectionner le code requis. (Le code 0
5
supprime le code IE du canal. Ce canal est alors en mode
“porteuse pure” (Carrier Squelch).
4. Appuyez brièvement sur le bouton M pour sortir du menu ou
pendant deux secondes pour sortir de k.
1. Sélectionnez le canal sur lequel vous souhaitez programmer
le code VS.
2. Appuyez sur \ jusqu’à ce qu’un e apparaisse sur l’affichage,
à côté du numéro du canal.
3. Utilisez ] ou [ pour sélectionner le code requis. (Le code 0
supprime le code VS sur ce canal). Le canal est alors “en clair”.
4. Appuyez brièvement sur le bouton M pour sortir du menu ou
pendant deux secondes pour quitter le mode de programmation
k.
D. Verrouillage Gestionnaire
Cete option vous permet d’invalider le changement de canal, le menu
et les fonctions de channel. Les fonctions M, B et Moniteur peuvent
4
toujours être utilisées. Contrairement à la fonction Verrouillage clavier,
cette option ne peut pas être désactivée en utilisant \.
1. Appuyez sur \ jusqu’à ce qu’un f apparaisse sur l’affichage.
2. Utilisez ] ou [ pour choisir Y (pour activer) ou n (pour
désactiver). L’icône f restera sur affichée lorsque Y est choisi.
E. Affectation De Canaux À Des Boutons Pré-Programmés
1. Sélectionnez le canal auquel vous souhaitez affecter un bouton
pré-programmé.
2. Appuyez sur T ou S et maintenez les boutons enfoncés jusqu’à ce
6/9
que la radio émette un bip pour confirmer l’affectation.
C. Codes De Brouillage De Sons Vocaux
Cette option vous donne plus de secret. Toute personne écoutant sur
le même canal et utilisant le code IE entendra un discours déformé, à
moins d’avoir un code VS assorti au vôtre.
9 Français
Page 29

OPTIONS (MODE NORMAL)
Comment Changer Les Canaux
Appuyez sur ] ou sur [ pour sélectionner le canal souhaité.
Le fait d’appuyer brièvement sur le bouton T ou S changera le
canal en celui qui a été pré-programmé sur ce bouton.
Sonneries D’appel
Votre radio peut transmettre des sonneries d’appel à d’autres radios
de votre groupe pour que vous puissiez les prévenir que vous êtes sur
le point de parler. Une fois la sonnerie d’appel définie, appuyez sur le
bouton B pour la transmettre à d’autres. Vous avez le choix entre
trois sonneries d’appel distinctes ou vous pouvez choisir aussi de
désactiver les sonneries d’appel.
1. Pour définir les sonneries d’appel, appuyez sur \ jusqu’à ce
qu’un E apparaisse sur l’afficheur.
2. Choisissez une sonnerie d’appel parmi les trois sonneries
disponibles. Si vous choisissez 0, les sonneries d’appel seront
désactivées.
3. Appuyez brièvement sur le bouton M pour sortir.
Utilisation Mains Libres (VOX)
Cette option vous permet d'activer votre émetteur radio en utilisant
votre voix au lieu d'appuyer sur le bouton M. Vous pouvez utiliser la
radio à elle seule en mode mains libres ou avoir recours à un
accessoire audio facultatif agréé par Motorola.
Remarque: Lors de l’utilisation d’accessoires audio avec votre radio,
nous recommandons que le niveau sonore soit maintenu à
un niveau d’écoute confortable. Avant de placer
l'accessoire sur la tête ou dans l’oreille, baissez le volume
de votre radio.
Comment Utiliser La Fonction VOX Sans Accessoire
1. Mettez votre radio en marche tout en appuyant sur le bouton M.
g apparaîtra sur l’affichage pour indiquer que la fonction VOX est
active.
2. Pour émettre, parlez dans le microphone. Pour recevoir, arrêtez
de parler.
3. Pour sortir temporairement du mode mains libres, appuyez
brièvement sur le bouton M. L’icône g se mettra à clignoter.
4. Appuyez brièvement sur le bouton M pour entrer de nouveau en
mode mains libres.
Comment Utiliser La Fonction VOX Avec Un Accessoire
1. Arrêtez votre radio.
2. Ouvrez le cache-connecteur d’accessoires et insérez l’accessoire
audio dans la prise pour accessoires.
3. Mettez votre radio en route. L’icône g apparaîtra sur l’afficheur
pour indiquer que la fonction VOX est active. Si l’icône g clignote,
la fonction VOX est invalidée dans le menu Sensibilité (voir cidessous – changez le paramètre en 1, 2 ou 3 pour valider la
fonction VOX).
4. Pour émettre, parlez dans le microphone de l’accessoire. Pour
recevoir, cessez de parler.
5. Pour quitter le mode mains libres, appuyez sur le bouton M.
Remarque: Il y aura un bref temps d’attente entre le moment où vous
commencerez à parler et la radio passant en mode
d’émission et un temps d’attente plus long quand vous
cesserez de parler et que la radio retournera en mode de
réception pour tenir compte des pauses de la parole.
10 Français
Page 30

Sensibilité Du Microphone Et Sensibilité VOX
La sensibilité du microphone et de la fonction VOX de votre radio peut
être ajustée pour prendre en compte des environnements bruyants ou
silencieux et des utilisateurs parlant fort ou doucement.
1. Pour changer la sensibilité, appuyez sur le bouton \ deux fois.
(Le grand numéro correspondant à la définition de la sensibilité
clignotera) et sur l’affichage apparaîtra l’icône g et le type de
sensibilité que vous définissez :
? – Gain du microphone
H – Fonction VOX avec l’accessoire audio
I – Fonction VOX sans l’accessoire audio
2. Utilisez ] et [ pour choisir entre les trois définitions de la
sensibilité disponibles :
1 Si vous parlez à haute voix ou dans un environnement bruyant.
2 Convient à la plupart des applications.
3 Si vous parlez doucement ou que vous êtes dans un environnement
silencieux.
Pour invalider le fonctionnement de la fonction VOX (VOX avec les
accessoires audio uniquement), sélectionnez 0.
Balayage
Cette fonction vous permet de scruter d'autres canaux. Quand la
radio détecte une activité, elle cesse le balayage et se synchronise
sur le canal actif. Ceci vous permet d'écouter et de parler à la
personne qui appelle sans avoir à changer de canal.
Quand vous activez la fonction de balayage, la radio balayera chacun
de vos 8 canaux en utilisant le code IE que vous avez choisi pour
chaque canal. Si vous souhaitez faire un balayage sans code IE
(balayage en “porteuse pure” (Carrier Squelch), commencez le
balayage sur un canal dont le code IE est programmé sur 0. Vous
pouvez également programmer votre radio pour qu’elle balaye des
canaux spécifiques en désactivant les autres canaux dans la liste de
balayage.
1. Pour commencer un balayage, appuyez brièvement sur J. L’icône
h apparaît sur l’afficheur et le grand numéro de canal se met à
défiler en passant par tous les canaux.
2. Dès lors qu’une activité est détectée sur le canal, le balayage est
temporairement interrompu et sur l’affichage apparaît le numéro du
canal et le code IE.
3. Vous pouvez alors parler à la personne se trouvant sur le nouveau
canal et ayant le code IE en appuyant sur le bouton M.
4. Le balayage reprendra après 5 secondes d’inactivité sur le canal.
5. Si vous appuyez sur le bouton M tandis que la radio est en train
d’effectuer un balayage, la radio émettra sur le canal qui a été
choisi avant que vous n’activiez la fonction de balayage.
6. Pour arrêter le balayage, appuyez brièvement sur le bouton J.
Forçage du balayage
Cette fonction vous permet de “sauter” un canal durant un balayage,
vous pouvez ainsi continuer à scruter les canaux pour voir quelles en
sont les activités. Lorsque la radio se verrouille sur un canal actif
pendant le balayage, appuyez sur ] pour reprendre le balayage.
Suppression Des Canaux De Nuisance
Cette fonction supprime temporairement tous les canaux de
''nuisance” de votre liste de balayage. Quand votre radio se verrouille
sur un canal de “nuisance” pendant le balayage, appuyez sur [pour
supprimer temporairement le canal de la liste de Scan. Le canal sera
remis dans la liste de Balayage lorsque vous sortirez du Balayage.
11 Français
Page 31

Comment Éditer La Liste De Balayage
1. Appuyez sur \ jusqu’à ce qu’un h apparaisse sur l’affichage.
Le numéro du canal clignotera et le numéro du code IE sera
remplacé par un Y ou un n clignotant.
2. Utilisez ] ou [ pour sélectionner le canal requis.
3. Utilisez J pour sélectionner soit Y pour inclure le canal dans
la liste de balayage, soit n pour exclure le canal de la liste de
balayage.
4. Appuyez brièvement sur le bouton M pour sortir de la liste de
balayage (Scan).
Verrouillage Du Clavier
Cette fonction vous permet d’invalider le clavier de la même façon
que la fonction Verrouillage gestionnaire, mais le clavier peut être
verrouillé et déverrouillé plus facilement.
Pour verrouiller ou déverrouiller le clavier, appuyez sur le bouton \
pendant trois secondes et maintenez-le enfoncé. La radio émettra
une courte séquence de tonalités et f apparaîtra ou disparaîtra de
l’afficheur.
Bip De Fin D’émission
Lorsque la fonction est validée, votre radio transmet un bip une fois
que vous aurez terminé l’émission et le bip retentit également
localement sur votre radio.
Pour valider ou invalider le bip de fin d’émission, appuyez sur le
bouton haut ] et maintenez-le enfoncé tout en mettant votre radio
en marche.
Tonalités Du Clavier
Chaque fois que vous appuyez sur un bouton de votre radio, il émet
un bip pour confirmer, sauf si cette fonction est invalidée.
Pour valider ou invalider les tonalités du clavier, appuyez sur le
bouton bas [ et maintenez-le enfoncé tandis que vous mettez votre
radio en marche. Cette fonction contrôle également le retentissement
local du bip de fin d’émission et des sonneries d’appel, bien que ces
sonneries soient de toute façon transmises.
Comment Réinitialiser Les Programmations Faites À L’usine
Mettez la radio en marche tout en maintenant les boutons M et \
enfoncés pendant trois secondes. La radio émettra une courte
séquence de tonalités et les programmations effectuées en usine
seront rétablies.
Clonage
La fonction de clonage est disponible avec un chargeur à unités
multiples Multi-Unit Charger - (MUC) IXPN4002 (version RU à 3
broches) ou IXPN4003 (version européenne à 2 broches). Ceci vous
permet de copier les paramètres de votre radio sur d’autres radios.
Veuillez vous reporter au Manuel Utilisateur fourni avec votre MUC.
Rétroéclairage
Votre radio a un affichage rétroéclairé. Lorsque la radio est mise en
route et que vous appuyez sur un bouton quelconque excepté les
boutons M et B, l’affichage s’allumera pendant approximativement
quatre secondes.
12 Français
Page 32

Temporisateur De Dépassement Du Temps Imparti
La radio émettra une tonalité d’avertissement et cessera de
transmettre si le bouton M est pressé continuellement pendant plus
de 60 secondes ou que la transmission VOX est active pendant plus
de 60 secondes en continu.
INFORMATIONS SUPPLÉMENTAIRES
Portée De La Conversation
Les radios XTN446 ont été conçues pour maximiser les performances
et améliorer la portée de la transmission sur le terrain. Il est
recommandé que vous n’utilisiez pas les radios à une portée
inférieure à 1,5 mètre l’une de l’autre afin d’éviter les interférences.
La portée de la conversation dépend du terrain. Elle sera affectée par
les structures en béton, les feuillages denses et par l’utilisation de
radios à l’intérieur de bâtiments ou dans des véhicules.
Portée optimale Portée moyenne Portée minimale
Une portée optimale se produit dans des terrains découverts plats
bénéficiant de jusqu'à 5 kilomètres de couverture. Une portée
moyenne intervient lorsque des bâtiments et des arbres entravent la
réception. Une portée est définie comme étant minimale lorsqu’un
feuillage dense et des montagnes obstruent le chemin de
communication.
13 Français
Page 33

Dépistage Des Pannes
Problème Solution
Aucune alimentation Repositionnez ou remplacez les piles AA. Rechargez ou remplacez le pack batterie NiMH.
Message pas transmis Assurez-vous que le bouton M est complètement enfoncé alors que vous transmettez. Repositionnez et/ou
remplacez les batteries.
Message pas reçu Vérifiez que les radios ont les mêmes définitions de canaux et de codes IE et VS. Assurez-vous que le bouton M
n’a pas été pressé par mégarde. Repositionnez et/ou remplacez les piles. Des obstructions, l’utilisation de la
radio dans des bâtiments ou dans des véhicules peuvent interférer avec la communication. Changez de site.
Vérifiez le volume pour vous assurer qu’il a été augmenté.
Message brouillé La définition du code VS ne correspond pas à celle d’autres radios; toutes les radios doivent utiliser le même
code VS.
Entendant une autre Vérifiez que le code d’élimination des interférences est défini, (les paramètres actifs vont de 1 à 121). Il est
conversation ou du bruit possible que le code du canal partagé ou le code d’élimination des interférences soit en cours d’utilisation,
sur un canal essayez dans ce cas un autre code.
Portée de conversation limitée Les structures en acier/béton, les feuillages denses et l'utilisation de la radio dans des bâtiments et dans des
véhicules diminueront la portée, vérifiez donc que vous êtes en visibilité directe pour améliorer la transmission.
Le port de la radio près du corps comme dans une poche ou sur une ceinture diminuera la portée ; il conviendra
donc de changer l’emplacement de la radio.
Beaucoup d’électricité Radios trop proches l’une de l’autre. Les radios doivent être à au moins 1,5 mètres de distance, augmentez votre
statique ou d’interférences distance. Les radios sont trop loin l’une de l’autre. Les obstacles interfèrent avec la transmission. La portée de
la conversation est de jusqu'à 3 kilomètres en conditions claires et dégagées.
Impossibilité de changer de canal Assurez-vous que la radio est déverrouillée.
14 Français
Page 34

Problème Solution
Batteries déchargées Rechargez le pack batterie NiMH ou remplacez les piles AA. Des températures d’utilisation extrêmes affecteront
la durée de vie de la batterie.
Clavier verrouillé Déverrouillez en appuyant sur \ pendant trois secondes. Assurez-vous que la fonction Verrouillage
gestionnaire est désactivée.
Impossibilité d’activer la Fonction non définie et activée. La sensibilité est définie comme étant 0.
fonction VOX
Services produits Motorola Si la radio ne fonctionne toujours pas correctement, contactez votre point de vente.
Caractéristiques Techniques
Description Spécifications
Canaux 8
Codes 121
Fréquence de service 446,00625-446,09375 MHz
Portée de la conversation Jusqu’à 5 kilomètres
Source d’alimentation 4 piles alcalines AA ou une
batterie NiMH.
Longévité de la batterie* AA** NiMH
5% en transmission, 5% en réception
et 90% en veille 36 heures 24 heures
Durée de la conversation 6,5 heures 5,0 heures
Veille 64 heures 40 heures
* Typique
** Avec des cellules alcalines de la meilleure qualité.
15 Français
Page 35

Garantie
Motorola garantit à l’acheteur que l’émetteur-récepteur et les
accessoires (ci-après les « Produits ») qu’il a acquis auprès d’un
revendeur agréé Motorola sont conformes aux spécifications
Motorola en vigueur au moment de leur fabrication, pour une période
standard de garantie d’un an à compter de la date d’achat des
Produits (ci-après « Période de garantie »).
En cas de défaut de conformité de l’un des Produits par rapport aux
spécifications applicables, vous devez en informer Motorola, en
remettant le Produit au Centre de Service Après Vente Agréé
Motorola le plus proche, dans un délai de deux mois à compter de la
découverte du défaut, et en tout état de cause avant l’expiration de la
Période de Garantie. Motorola ne sera pas liée par des prises de
position relatives aux Produits qui ne proviennent pas directement
d’elle-même.
Une liste de numéros « Centres d’Appel de Motorola » est fournie
avec ce Produit.
Pendant la Période de Garantie, Motorola assurera, à ses frais et à sa
seule convenance, la réparation ou le remplacement du Produit
défectueux, l’une ou l’autre de ces deux solutions constituant
l’intégralité de votre dédommagement. A défaut de réparer ou de
remplacer le Produit, Motorola remboursera le prix d’achat du
Produit, déduit d’un montant correspondant à l’usage du Produit
depuis son acquisition. Le présent engagement expire à la fin de la
Période de Garantie.
Le présent engagement constitue l’intégralité de la garantie portant
sur un portatif et ses accessoires, et est exclusif de toute autre
forme de réparation, explicite ou implicite.
Motorola exclut expressément toute autre forme de garantie légale
ou contractuelle et notamment l’aptitude du Produit à satisfaire les
besoins de l’acheteur, sous réserve toutefois des dispositions
applicables aux consommateurs.
La responsabilité de Motorola ne saurait être engagée pour les
dommages indirects, (incluant notamment la perte d’usage, la perte
de temps, la perte de bénéfices ou la perte financière), résultant du
fait du Produit, et sa responsabilité ne saurait en toute hypothèse
excéder le prix d’achat du Produit.
Cette garantie ne saurait priver un acheteur ayant la qualité de
consommateur des recours légaux dont il peut se prévaloir en cette
qualité.
Comment bènèficier de la garantie
Dans la plupart des cas, le service de garantie sera assuré par le
revendeur agréé Motorola qui aura vendu votre portatif Motorola et
ses accessoires. Le service de garantie peut également être assuré
par un Centre de Service Après Vente Agréé Motorola proche de
chez vous. Si vous souhaitez des informations complémentaires, vous
pouvez appeler le « Centre d’Appel »
Motorola dont le numéro est indiqué ci-après pour votre pays. Pour
pouvoir prétendre au service de garantie, vous devez remettre
l’émetteur-récepteur. Si vous vous adressez à un Centre de Service
Après Vente Agréé Motorola, le Produit doit être accompagné des
informations suivantes: vos nom, adresse, numéro de téléphone, et
description du problème.
Afin de bénéficier de la garantie, vous devez produire un reçu ou tout
document établissant la date de l’achat du Produit. L’émetteurrécepteur doit également comporter clairement les informations
16 Français
Page 36

suivantes, qui sont fournies avec le Produit : numéro de série
(Original compatible electronic serial number, [ESN]).
Conditions
La présente garantie ne sera pas applicable si le type ou les numéros
de série du Produit ont été effacés, enlevés, ou sont illisibles, ou si le
marquage du téléphone a été altéré de toute autre façon. Motorola se
réserve le droit de refuser d’assurer gratuitement le service de
garantie si les documents ou les éléments requis ne peuvent pas être
présentés, ou si les renseignements fournis sont incomplets, illisibles,
ou incompatibles avec les informations en provenance de l’usine de
fabrication.
La réparation peut comprendre, à la seule convenance de Motorola,
le remplacement de circuits ou de cartes avec des circuits ou des
cartes fonctionnant de façon équivalente, neufs ou reconditionnés.
Les circuits, accessoires, batteries ou cartes remplacés sont garantis
jusqu’à la fin de la Période de Garantie initiale, étant précisé que
cette Période de Garantie ne sera pas prolongée. Tous les éléments
originaux qui ont été remplacés (accessoires, batteries, circuits,
portatif) deviennent la propriété de Motorola. Motorola ne garantit
pas l’installation, la maintenance ou le service après-vente des
produits, accessoires, batteries ou circuits.
Motorola ne sera en aucun cas responsable de dysfonctionnements
ou de dommages causés par un équipement non fourni par Motorola
attaché au Produit, ou utilisé en connexion avec celui-ci, ou du
dysfonctionnement d’un Produit Motorola connecté à un équipement
non Motorola, tout équipement de ce type étant expressément exclu
de la présente garantie.
Lorsque le produit est utilisé en association avec des équipements ou
des périphériques non Motorola, Motorola ne garantit pas le bon
fonctionnement de l’association Produit/périphérique, et sa garantie
ne pourra dans ce cas être mise en jeu pour autant que le
dysfonctionnement ne provienne pas du Produit Motorola. Motorola
n’est en aucun cas responsable de dommages, qu’ils soient ou non
causés par un équipement Motorola, en cas d’utilisation d’un portatif,
d’accessoires et de batteries (incluant de façon non limitative les
batteries, chargeurs, adaptateurs), lorsque ces accessoires et
batteries ne sont pas fabriqués et fournis par Motorola.
Exclusions de garantie
La présente garantie n’est pas valable lorsque le dysfonctionnement
provient d’une mauvaise utilisation, négligence, manque de soin,
mauvaise manipulation, ou dans tous les cas d’intervention effectuée
par des personnes non agréées. La garantie est exclue dans les cas
suivants :
1. Utilisation du Produit autre que dans des conditions normales et
habituelles
2. Mauvaise utilisation, accident, négligence
3. Pannes provenant de méthode de test, d’une utilisation,
maintenace ou dépannage inadapté, ainsi que de toute
modification de quelque sorte que ce soit.
4. Dommage aux antennes, sauf si causé directement par un défaut
de fabrication ou de main d’oeuvre
5. Produits désassemblés ou réparés de façon à en dégrader le mode
opératoire ou à empêcher l’essai ou l’inspection nécessaire à la
vérification d’une réclamation de garantie
17 Français
Page 37

6. Toute gêne provenant de l’utilisation de la fréquence radio
(disponibilité, brouillage.)
7. Dommage dû à l’humidité ou la projection de nourriture
8. Rayure ou dommage aux surfaces plastiques ou tous éléments
exposés à l’extérieur résultant de l’usage normal par le client
9. Produits loués de façon temporaire
10. Maintenance périodique, réparation ou remplacement qui après
un usage normal.
Remarque: La durée en temps de parole, en veille, et le cycle de vie
total d’une batterie rechargeable Motorola pour portatif
dépendra des conditions d’usage. S’agissant d’un
consommable, les spécifications indiquent que vous
devriez obtenir une performance optimale pour votre
portatif Motorola pendant les six premiers mois de l’achat
et pour environ 200 charges.
La garantie des batteries rechargeables Motorola est nulle de plein
droit si (i) la batterie est chargée au moyen d’un chargeur non
approuvé par Motorola, (ii) l’un quelconque des sceaux de la batterie
est cassé ou a été manifestement manipulé, (iii) la batterie est utilisée
avec tout autre élément que le portatif pour lequel elle a été
spécifiée.
Informations sur le copyright
Les produits Motorola décrits dans ce manuel peuvent incorporer des
programmes exclusifs à Motorola enregistrés sur semi-conducteurs,
mémoires ou autres supports. La loi des Etats-Unis et d’autres pays
maintient certains droits exclusifs à Motorola pour les programmes
informatiques dont Motorola détient les droits d’auteur, y compris le
droit exclusif de copier ou de reproduire ces programmes Motorola
sous une forme quelconque. Conformément, tous les programmes
informatiques exclusifs à Motorola qui sont incorporés aux produits
Motorola décrits dans ce manuel ne peuvent pas être copiés ou
reproduits de façon quelconque sans l’autorisation écrite expresse
de Motorola. En outre, l’achat de produits Motorola ne confère
aucunement, que ce soit directement, par implication, par force
obligatoire ou autre, de licence en vertu des droits d’auteurs, brevets
et brevets déposés de Motorola, à l’exception de la licence gratuite
non exclusive normale d’utilisation qui découle de l’opération de la loi
sur la vente d’un produit.
Pour tous renseignements complémentaires, veuillez contacter le:
01 49 46 85 97 (depuis la France)
+33 1 49 46 85 97 (depuis l’étranger)
, Motorola sont des marques commerciales de Motorola, Inc.
Talkabout est une marque commerciale de Motorola, Inc.
© 2002 Motorola, Inc.
18 Français
Page 38

ACCESSOIRES APPROUVÉS
Microphone/haut-parleur déporté
(HMN9026)
Microphone/haut-parleur cravate ou
monté sur le col avec commutateur PTT
permettant une utilisation main-libre sans
enlever la radio de la ceinture ou de l’étui
de transport.
Micro-casque à commande vocale
VOX avec microphone pivotant
(ENMN4002)
Micro-casque anti-bruit confortable, de
poids léger. Utilisez avec la fonction VOX
de votre radio pour une utilisation mainlibre.
Oreillette avec microphone et PTT
(HMN9025)
Oreillette discrète, de poids léger avec
microphone cravate ou monté sur le col et
commutateur PTT. Permet d’obtenir des
communications claires avec un minimum
de perturbations ou d’interférences.
Oreillette VOX avec microphone
(HMN9039)
Oreillette de poids léger adaptable pour
tenir confortablement autour de votre
oreille. Utilisez avec la fonction VOX sur
votre radio pour une utilisation main-libre.
Etui de transport en cuir
(NNTN4020)
Etui de transport en cuir robuste avec
fenêtre de protection pour l’affichage.
Peut également être utilisée comme
housse de sécurité pour la radio
lorsqu’elle est portée sur la ceinture.
Housse étanche
(ENLN4042)
Housse étanche en plastique transparent
offrant une protection contre les éléments
extérieurs et l’immersion tout en
permettant à votre radio d’être utilisée. Un
accessoire indispensable pour les
fanatiques de sports nautiques.
19 Français
Page 39

Chargeur à insertion automatique Euro
- recharge la batterie en 2 heures
maximum (IXPN4001)
Recharge rapide et pratique.
Chargeur multi-cases Euro
(IXPN4003AR)
Pour la mise en charge et le clonage de
jusqu’à six radios.
Ensemble de batteries rechargeables
au nickel métal hybride
(NTN8971 ou NNTN4190)
Il est toujours bon de savoir que vous
avez une bonne batterie de secours.
Grâce à l’ensemble de batteries
rechargeables, vous avez une batterie de
rechange pour les périodes de grande
activité.
20 Français
Page 40

INHALT
DEUTSCH
WICHTIGE SICHERHEITSHINWEISE UND ALLGEMEINE
INFORMATIONEN 1
Übertragung Und Empfang 1
Betrieb Des Sprechfunkgeräts Und Elektromagnetische Strahlung 1
Elektromagnetische Störungen/Verträglichkeit 2
Wichtige Sicherheitshinweise Und Allgemeine Informationen 3
Warnhinweise Für Den Betrieb 3
Vorsichtsmaßnahmen für den Betrieb 4
IHR NEUES SPRECHFUNKGERÄT 5
Batterien 5
Installieren Des NiMH-Akkus 5
Installieren Der AA-Batterien 5
Laden Des NiMH-Akkus Mit Dem Schnell-Lader 5
Anzeigen Des Laders 6
Einsetzen In Den Und Herausnehmen Aus Dem Schwenkbaren
Gürtelhalfter 6
BEVOR SIE SPRECHEN KÖNNEN 7
Kanäle Und Codes 7
Ein Und Ausschalten Des Sprechfunkgeräts 7
Batteriezähler 7
Überwachungs Und Signalstärkeanzeige 7
Kommunizieren Mit Anderen Personen 8
PROGRAMMIERMODUS 9
A. Kanäle 9
B. Entstörungscodes 9
C. Sprachverschleierungscodes 9
D. Manager-Sperre 9
E. Bestimmte Taste Mit Kanälen Belegen 9
FUNKTIONEN (NORMALMODUS) 10
Ändern Des Kanals 10
Ruftöne 10
Freisprechbetrieb (VOX) 10
Mikrofon Und VOX-Empfindlichkeit 11
Scan 11
Bearbeiten Der Scan-Liste 12
Tastensperre 12
Sendungsende-Ton 12
Tastentöne 12
Zurücksetzen Auf Werkseinstellungen 12
Cloning 12
Hinterlicht 13
Sendezeit-Timer 13
WEITERE INFORMATIONEN 13
Übertragungsreichweite 13
Störungsbeseitigung 14
Technische Daten 15
Garantieleistungen 16
Copyrightinformationen 19
ZUGELASSENES ZUBEHÖR 20
Page 41

WICHTIGE SICHERHEITSHINWEISE UND ALLGEMEINE INFORMATIONEN
WICHTIGE HINWEISE FÜR DEN SICHEREN UND EFFIZIENTEN
BETRIEB
LESEN SIE DIESE INFORMATIONEN VOR DER ERSTEN
VERWENDUNG IHRES SPRECHFUNKGERÄTS.
Die in diesem Dokument enthaltenen Angaben ersetzen die
allgemeinen Sicherheitsinformationen, die in den vor dem Juni 2001
herausgegebenen Bedienungsanleitungen enthalten waren.
Informationen über die Benutzung des Sprechfunkgeräts in explosionsgefährdeten Bereichen sind dem Ergänzungsband zum Handbuch
„Factory Mutual (FM) Approval" oder der Anleitungskarte zu
entnehmen, die zusammen mit Sprechfunkgeräten bereitgestellt
werden. Diese Funktionalität – FM - ist nicht für jedes Gerät
vorhanden.
ÜBERTRAGUNG UND EMPFANG
Ihr Zweiweg-Sprechfunkgerät besitzt einen Sender und einen
Empfänger. Zum Senden (Sprechen) wird die Sprechtaste (PTT)
gedrückt, zum Empfangen (Hören) muss die Sprechtaste (PTT)
losgelassen werden.
BETRIEB DES SPRECHFUNKGERÄTS UND ELEKTROMAGNETISCHE
STRAHLUNG
Aufgrund seiner Bauart entspricht Ihr Motorola-Sprechfunkgerät den
folgenden nationalen und internationalen Normen und Richtlinien zur
Belastung von Personen mit elektromagnetischer Strahlung im
Hochfrequenzbereich:
• United States Federal Communications Commission, Code of Federal
Regulations; 47 CFR Teil 2 Unterabschnitt J (Bundes-
Fernmeldekommission der USA, Codex der Bestimmungen)
• American National Standards Institute (ANSI) / Institute of Electrical
and Electronic Engineers (IEEE) C95. 1-1992 (BundesNormenausschuss der USA; Verband der amerikanischen Elektround Elektronikingenieure)
• Institute of Electrical and Electronic Engineers (IEEE) C95. Ausgabe
1-1999 (Verband der amerikanischen Elektro- und
Elektronikingenieure)
• National Council on Radiation Protection and Measurements (NCRP)
of the United States, Bericht 86, 1986 (Nationaler Rat der Vereinigten
Staaten zum Strahlenschutz und zur Strahlenmessung)
• International Commission on Non-Ionizing Radiation Protection
(ICNIRP) 1998 (Internationale Kommission zum Schutz gegen nichtionisierende Strahlung)
• Ministry of Health (Canada) Safety Code 6. Limits of Human
Exposure to Radiofrequency Electromagnetic Fields in the
Frequency Range from 3 kHz to 300 GHz, 1999 (Sicherheitskodex 6
des kanadischen Gesundheitsministeriums. Grenzwerte für die
Belastung von Personen mit elektromagnetischen Feldern im
Hochfrequenzbereich von 3 kHz bis 300 GHz)
• Australian Communications Authority Radiocommunications
(Electromagnetic Radiation - Human Exposure) Standard 2001.
(Australische Kommunikationsbehörde – Funkverkehr
(Elektromagnetische Strahlung – Gefährdung von Personen); Norm
2001 – nur für drahtlose Telefone zutreffend)
• ANATEL, Brasil Regulatory Authority, Resolution 256 (April 11, 2001)
"additional requirements for SMR, cellular and PCS product
certification" (Brasilische Regulierungsbehörde, Entschluss 256 (11.
April 2001), „zusätzliche Anforderungen für die Zertifizierung von
SMR, Zellulartelefonie- und PCS-Produkten")
1 Deutsch
Page 42

Um die optimale Leistung des Sprechfunkgeräts zu gewährleisten und
um sicherzustellen, dass die Belastung von Personen mit
elektromagnetischer Strahlung im Hochfrequenzbereich sich
innerhalb der Grenzwerte bewegt, die in den oben aufgeführten
Normen genannt werden, ist immer den folgenden Verfahren Folge zu
leisten:
Betrieb des Zweiweg-Sprechfunkgeräts
Bei der Benutzung halten Sie Ihr Sprechfunkgerät in einer
senkrechten Stellung, wobei das Mikrofon 2,5 bis 5
Zentimeter von den Lippen entfernt ist.
Betrieb des an der Bekleidung befestigten Sprechfunkgeräts
Um den FCC RF-Richtlinien für Strahlungsbelastung zu entsprechen,
muss ein an der Bekleidung befestigtes Sprechfunkgerät immer mit
einen von Motorola für dieses Produkt zugelassenen Clip, Halter,
Gürtelhalfter, Etui oder Körperhalfter benutzt werden. Die Benutzung
von nicht von Motorola genehmigtem Zubehör kann dazu führen, dass
die FCC RF-Richtlinien für die Strahlungsgrenzwerte überschritten
werden.Dies gilt insbesondere, wenn kein von Motorola zugelassenes
Zubehör zur Befestigung an der Bekleidung genutzt wird.
Während des Sprechfunkbetriebs muss sichergestellt werden, dass
Antenne und Sprechfunkgerät beim Senden den folgenden
Mindestabstand vom Körper haben:
• Zweiweg-Sprechfunkbetrieb: 2,5 Zentimeter
Antennenpflege
Es darf nur die gelieferte oder eine zugelassene Ersatzantenne
verwendet werden. Nicht von Motorola zugelassene Antennen,
Änderungen oder Zusatzausstattungen könnten das Sprechfunkgerät
beschädigen und gegen die FCC-Bestimmungen verstoßen.
Antenne NICHT FESTHALTEN, während das Sprechfunkgerät IN
BENUTZUNG ist. Dies beeinträchtigt die Übertragungsqualität und
kann dazu führen, dass das Sprechfunkgerät unnötig mit einer
höheren Sendeleistung arbeitet.
Zugelassenes Zubehör
Eine Liste der von Motorola zugelassenen Zubehörteile finden Sie im
Anhang oder im Abschnitt „Zubehör" der Bedienungsanleitung für Ihr
Sprechfunkgerät.
ELEKTROMAGNETISCHE STÖRUNGEN / VERTRÄGLICHKEIT
HINWEIS: Fast jedes elektronische Gerät ist für elektromagnetische
Störungen (EMB) empfänglich, wenn es unzureichend abgeschirmt,
unzulänglich konzipiert oder auf andere Weise nicht ausreichend für
die elektromagnetische Verträglichkeit konfiguriert wurde.
Einrichtungen des Gesundheitswesens usw.
Bitte schalten Sie Ihr Sprechfunkgerät in jeder Einrichtung ab, in der
Sie durch Hinweisschilder hierzu aufgefordert werden, um
elektromagnetische Störungen und/ oder Verträglichkeitskonflikte zu
vermeiden. In Krankenhäusern oder Einrichtungen des
Gesundheitswesens können Geräte und Ausstattungen genutzt
werden, die gegen externe Hochfrequenz-Energie anfällig sind.
Flugzeuge
Wenn Sie hierzu aufgefordert werden, schalten Sie Ihr
Sprechfunkgerät an Bord eines Flugzeugs ab. Jede Benutzung eines
Sprechfunkgeräts muss in Übereinstimmung mit den geltenden und
von den Mitarbeitern der Fluggesellschaft bekannt gegebenen
Bestimmungen erfolgen.
2 Deutsch
Page 43

Medizinische Geräte
• Schrittmacher
Die „Health Industry Manufacturers Association" (Verband der
Hersteller von Medizinprodukten) empfiehlt, dass ein Mindestabstand
von 15 Zentimetern zwischen einem handgehaltenen drahtlosen
Sprechfunkgerät und einem Herzschrittmacher eingehalten wird. Diese
Empfehlungen stimmen mit denjenigen der „U.S. Food and Drug
Administration" (US-Amt für Lebensmittel- und Arzneimittel-Kontrolle)
überein.
Personen mit implantiertem Herzschrittmacher sollten:
• das eingeschaltete Sprechfunkgerät JEDERZEIT mehr als 15
Zentimeter vom Schrittmacher entfernt halten.
• das Sprechfunkgerät nicht in der Brusttasche tragen.
• um das Störungsrisiko des Schrittmachers minimal zu halten, immer
das dem Schrittmacher gegenüberliegende Ohr benutzen.
• das Sprechfunkgerät sofort ausschalten wenn der Verdacht besteht,
dass es zu einer Störung gekommen ist.
• Hörgeräte
Einige digitale Sprechfunkgeräte können die Funktion von Hörgeräten
beeinflussen. Im Fall einer solchen Störung sollten Sie zum Abklären
von Alternativen mit dem Hersteller Ihres Hörgeräts Kontakt
aufnehmen.
• Weitere medizinische Geräte
Wenn Sie irgendein anderes persönliches medizinisches Gerät
benutzen, erkundigen Sie sich bitte beim Hersteller Ihres Geräts, ob es
hinreichend gegen Hochfrequenz-Energie abgeschirmt ist. Ihr Arzt/Ihre
Ärztin kann Ihnen möglicherweise beim Einholen dieser Angaben
behilflich sein.
WICHTIGE SICHERHEITSHINWEISE UND ALLGEMEINE
INFORMATIONEN
Benutzung während des Autofahrens
Sie sind dafür verantwortlich, sich darüber zu informieren, welche
gesetzlichen und sonstigen Bestimmungen über die Benutzung von
Sprechfunkgeräten in den Ländern gelten, in denen Sie fahren, und
diese zu befolgen.
Wenn Sie Ihr Sprechfunkgerät während der Fahrt benutzen:
• Lassen Sie sich beim Fahren nicht ablenken und schenken Sie dem
Verkehrsgeschehen Ihre volle Aufmerksamkeit .
• Nutzen Sie, falls verfügbar, den Freisprechbetrieb.
• Wenn die Verkehrsbedingungen dies erforderlich machen, sollten Sie
einen Parkplatz aufsuchen, bevor Sie einen Anruf tätigen oder
entgegennehmen.
WARNHINWEISE FÜR DEN BETRIEB
FAHRZEUGE MIT AIRBAG
Ein Sprechfunkgerät darf nicht im Bereich über einem Airbag oder im
Aktionsbereich des Airbags abgelegt werden. Bei der Auslösung von
Airbags werden große Kräfte freigesetzt. Sollte ein Sprechfunkgerät
sich im Aktionsbereich des Airbags befinden, während dieser
aufgeblasen wird, könnte das Sprechfunkgerät mit enormer Wucht
durch die Luft geschleudert werden und Fahrzeuginsassen schwere
Verletzungen zufügen.
EXPLOSIONSGEFÄHRDETE BEREICHE
Vor dem Betreten eines Bereichs mit explosionsgefährdeter
Umgebungsluft müssen Sie Ihr Sprechfunkgerät abschalten, es sei
denn es handelt sich um ein Gerätemodell , das speziell für die Nutzung
als „eigensicher" (z. B. Factory Mutual, CSA, UL, oder CENELEC)
ausgelegt wurde. In solchen Bereichen dürfen die Batterien weder
3 Deutsch
Page 44

entfernt, noch eingesetzt noch aufgeladen werden. Funken in einem
explosionsgefährdeten Bereich können eine Explosion oder einen
Brand auslösen, was zu Körperverletzungen – potentiell sogar mit
Todesfolge – führen kann.
HINWEIS: Zu den oben angeführten Bereichen mit explosionsgefährdeten Atmosphären können zählen: für die Kraftstoffversorgung genutzte
Bereiche an Bord von Booten (unter Deck), Einrichtungen für das
Verladen oder Lagern von Kraftstoffen oder Chemikalien, Bereiche, in
denen die Luft chemische Stoffe oder Partikel enthält, wie
beispielsweise Getreide, Staub oder Metallpulver, sowie jeder andere
Bereich, in dem normalerweise darauf hingewiesen wird, dass der
Motor eines Fahrzeugs abgestellt werden muss. Bereiche mit explosionsgefährdeter Umgebungsluft sind meistens, jedoch nicht immer, als
solche gekennzeichnet.
SPRENGKAPSELN UND SPRENGBEREICHE
Um mögliche Störungen von Sprengarbeiten auszuschließen, müssen
Sie Ihr Sprechfunkgerät in der Nähe elektrischer Sprengkapseln, in
Sprengbereichen oder in Bereichen abschalten, in denen durch
Schilder hierzu aufgefordert wird. Allen Schildern und Anleitungen
muss Folge geleistet werden.
VORSICHTSMAßNAHMEN FÜR DEN BETRIEB
ANTENNEN
Ein tragbares Sprechfunkgerät mir beschädigter Antenne darf nicht
benutzt werden. Bei Kontakt mit der Haut kann eine beschädigte
Antennen eine leichte Verbrennung verursachen.
BATTERIEN
Alle Batterien können Sachschäden und/oder Verletzungen
verursachen. Beispielsweise können Verbrennungen auftreten, wenn
leitfähige Gegenstände wie Schmuck, Schlüssel oder Ketten
freigelegte Batterieklemmen berühren. Das leitfähige Material kann
einen elektrischen Stromkreis schließen (Kurzschluss) und recht heiß
werden. Aufgeladene Batterien müssen immer sehr vorsichtig
gehandhabt werden, vor allem, wenn sie in die Hosentasche, eine
Handtasche oder ein anderes Behältnis mit Metallgegenständen gelegt
werden.
4 Deutsch
Page 45

ANLEITUNG ZUR SICHEREN BENUTZUNG DES LADEGERÄTS
Vor Benutzung des Batterieladegeräts lesen Sie bitte alle Anleitungen
und Sicherheitshinweise auf:
1. der Batterie
2. dem Batterieladegerät und
3. dem Sprechfunkgerät, in dem Sie die Batterie benutzen.
Vorsicht! Um die Verletzungsgefahr einzugrenzen, dürfen nur
aufladbare Akkus vom Typ (E)NTN8971 oder (E)NNTN4190 genutzt
werden. Andere Akkus könnten platzen und Personen– und
Sachschäden verursachen.
DIESE ANLEITUNG BITTE GUT AUFBEWAHRT WERDEN
1. Das Ladegerät nicht Regen oder Schnee aussetzen.
2. Das Ladegerät nicht verwenden, wenn es einem harten Schlag
ausgesetzt, fallen gelassen oder auf andere Weise beschädigt
wurde.
3. Das Ladegerät nicht zerlegen. Funktioniert es nicht
ordnungsgemäß, bringen Sie es innerhalb von 90 Tagen zu Ihrem
Händler zurück. Ein unsachgemäßer Wiederzusammenbau kann
elektrische Schläge und Brandgefahren zur Folge haben.
4. Das mit dem Gerät gelieferte Wechselstromkabel oder der Stecker
dürfen auf keinen Fall auswechselt werden. Sollte der Stecker nicht
in die Steckdose passen, muss von einem qualifizierten Elektriker
eine korrekte Steckdose installiert werden. Ein nicht
ordnungsgemäßer Zustand kann zu einem elektrischen Schlag
führen.
5. Um die Gefahr einer Beschädigung des Kabels oder Steckers
herabzusetzen, muss beim Trennen des Ladegeräts aus der
Steckdose immer Zug auf den Stecker und nicht auf das Kabel
ausgeübt werden.
6. Um die Gefahr eines elektrischen Schlags herabzusetzen, muss das
Ladegerät von der Steckdose getrennt werden, bevor irgendwelche
Wartungs- oder Reinigungsarbeiten durchgeführt werden.
7. Die Benutzung eines Zubehör- oder Anschlussteils, das nicht von
Motorola empfohlen oder angeboten wird, kann zu einem Brand,
elektrischen Schlag oder zu Personenschäden führen.
8. Es ist sicherzustellen, dass das Kabel so verlegt wird, dass
Personen nicht darauf treten oder darüber stolpern können oder
dass das Kabel weder Beschädigung noch Belastungen ausgesetzt
wird.
9. Ein Verlängerungskabel sollte nur benutzt werden, wenn dies
unvermeidbar ist. Die Benutzung eines ungeeigneten
Verlängerungskabels kann zu einem Brand und/oder einem
elektrischen Schlag führen. Muss ein Verlängerungskabel benutzt
werden, ist sicherzustellen, dass:
• die Stifte des Steckers des Verlängerungskabels die gleiche
Anzahl, Größe und Form aufweisen wie dies bei dem am Kabel des
Ladegeräts montierten Stecker der Fall ist;
• das Verlängerungskabel ordnungsgemäß verdrahtet wurde und
sich in gutem elektrischen Zustand befindet und
• das Verlängerungskabel bei Längen bis zu 30 Metern auf 18 AWG
2
) und für Längen bis zu 45 Metern auf 16 AWG (1.3mm2)
(1mm
dimensioniert ist.
10. Das Netzkabel dieses Ladegeräts kann nicht ersetzt werden. Bei
einer Beschädigung des Kabels setzen Sie sich bitte mit Motorola
Product Services in Verbindung:
Innerhalb Großbritanniens: 06128 70 2146
Außerhalb Großbritanniens: +49 6128 70 2146
5 Deutsch
Page 46

IHR NEUES SPRECHFUNKGERÄT
Motorola XTN446 Zweiweg-Sprechfunkgeräte nutzen PMR446
Frequenzen. Sie können in allen Ländern verwendet werden, wo
PMR446 Frequenzen je nach geltenden Bestimmungen zugelassen
sind.
Bitte ziehen Sie auch die Abbildungen und Tabellen auf der
Umschlaginnenseite dieser Anleitung zu Rate.
Batterien
Das Sprechfunkgerät kann mit einem aufladbaren Nickel-MetallHydrid-Akku (NiMH) oder mit vier Batterien vom Typ AA betrieben
werden. Hinweise zur Lebensdauer der Batterien finden Sie auf
Seite 15.
Installieren Des NiMH-Akkus
1. Die geriffelte Klinke an der Unterseite des Sprechfunkgeräts vom
Batteriedeckel weg und zu den Kontakten hin schieben.
2. Den Batteriedeckel zur Unterseite des Sprechfunkgeräts schieben
und abnehmen.
3. Den Akku mit dem Motorola-Logo nach oben und den Kontakten
nach unten weisend oben in das Batteriefach einlegen.
B
4. Den Akku fest nach oben und in das Batteriefach drücken.
5. Den Batteriedeckel aufschieben und fest andrücken, bis er
einrastet.
Installieren Der AA-Batterien
NiMH oder NiCd) sind nicht geeignet, da es zu Schäden am Produkt
oder zu Personenverletzungen kommen kann, falls der
unwahrscheinliche Fall eintritt, dass die Ladekontakte an der
Geräteunterseite ständig kurzgeschlossen sind.
1. Den Batteriedeckel entfernen.
2. Die vier AA-Batterien einlegen und dabei auf die richtige Polung
achten.
3. Den Batteriedeckel aufschieben und fest andrücken, bis er
einrastet.
Laden Des NiMH-Akkus Mit Dem Schnell-Lader (IXPN4000 oder
IXPN4001)
Der NiMH-Akku kann gesondert aufgeladen werden oder auch
während er sich im Sprechfunkgerät befindet. Um eine maximale
Akkuleistung zu gewährleisten, sollte dieser vor dem ersten Einsatz
über Nacht (16 Stunden) geladen werden. Alle folgenden
Ladevorgänge erfordern nur 3 Stunden Ladezeit.
1. Das Netzteil an das Ladefach anschließen.
C
2. Das Netzteil an eine Netzsteckdose anschließen.
3. Das Sprechfunkgerät (mit darin befindlichem Akku) oder nur den
NiMH-Akku in das Ladefach einlegen.
D
Hinweis: Die Ladezeit wird verlängert und der Batteriezähler wird
ungenau, wenn das Sprechfunkgerät während des
Ladevorgangs eingeschaltet bleibt.
WARNUNG
Dieses Produkt darf NUR mit dem angegebenen aufladbaren
Motorola-Akku (NTN8971 oder NNTN4190) oder mit primären
Alkalizellen vom Typ AA betrieben werden. Andere AA-Zellen (z. B.
6 Deutsch
Page 47

Anzeigen Des Laders
Rot: Schnelllademodus (bis zu 2 Stunden)
Grün blinkend: Erhaltungsladung nach Schnellladung (1 Stunde)
Grün: Ladevorgang beendet
Rot blinkend: Lader wartet, bis sich die Batteriespannung/
Temperatur im zulässigen Schnellladebereich
befindet
Keine Anzeige: Sprechfunkgerät oder Akku nicht richtig in das
Ladefach eingelegt
Hinweis: Wenn die LED länger als eine Minute blinkt, ist der
Akku defekt und muss ausgewechselt werden.
Einsetzen In Den Und Herausnehmen Aus Dem Schwenkbaren
Gürtelhalfter
Im Lieferumfang des Sprechfunkgeräts ist ein schwenkbares
Gürtelhalfter enthalten, das nicht entfernt werden muss, bevor das
Sprechfunkgerät in einen Schnell- oder Mehrgerätelader eingelegt
wird.
1. Einsetzen in das Halfter: Das Sprechfunkgerät zuerst mit dem
unteren Teil in das Halfter einstecken und den oben am Halfter
befindlichen Clip in das Sprechfunkgerät eindrücken.
E
2. Herausnehmen aus dem Halfter: Den oben am Halfter befindlichen
Clip zurückschieben, bis er sich vom Gerät löst, und dann das
Sprechfunkgerät herausziehen.
7 Deutsch
Page 48

BEVOR SIE SPRECHEN KÖNNEN
Lesen Sie diese Anleitung bitte aufmerksam durch
Kanäle Und Codes
Ihr Sprechfunkgerät hat 8 Sprechkanäle, 121 Entstörungscodes
(IE-Codes – 38 Ton-PL-Codes und 83 digitale PL-Codes – Einzelheiten
siehe Umschlaginnenseite) und 3 Sprachverschlüsselungscodes
(VS-Codes). Die Möglichkeit, dass bei Benutzung des
Sprechfunkgeräts mitgehört wird oder dass Interferenzen auftreten,
besteht immer. Mit Hilfe der Vielzahl an Kanal-/Codekombinationen
können Sie diese Möglichkeit jedoch reduzieren.
Hinweis: Um mit anderen Sprechfunkgeräten in einer Gruppe zu
kommunizieren, müssen alle Geräte in der jeweiligen
Gruppe die gleichen Einstellungen für Sprachkanal,
Entstörungscode und Sprachverschlüsselungscode haben.
Wenn Interferenzen auftreten und Sie die Kanäle und Codes
ändern müssen, achten Sie darauf, dass alle
Sprechfunkgeräte in der Gruppe die gleichen Einstellungen
haben. Siehe k unten.
Ein Und Ausschalten Des Sprechfunkgeräts
1. Den Knopf P im Uhrzeigersinn drehen, bis ein Klicken zu hören
1
ist, und die Lautstärke wie gewünscht einstellen. Die LED blinkt rot,
2
am Display erscheinen kurzzeitig alle Segmente und ein
A
akustischer Alarm ertönt (sofern die Alarmtöne nicht deaktiviert
wurden).
2. Das Sprechfunkgerät ausschalten, indem Knopf P entgegen dem
Uhrzeigersinn gedreht wird, bis ein Klicken zu hören ist.
3. Die LED oben links am Sprechfunkgerät blinkt alle drei Sekunden,
wenn das Gerät eingeschaltet ist.
Vorsicht: Halten Sie das Sprechfunkgerät oder ein Zubehörteil nicht
zu nahe am Ohr, wenn die Lautstärke hoch eingestellt ist. Das kann zu
Gehörschäden führen.
Batteriezähler
Der oben links im Display angeordnete Batteriezähler zeigt an, wie
viel Batterieleistung noch vorhanden ist.
Batterietyp 3 Balken 2 Balken 1 Balken Blinkt
dbcm
NiMH-Akku 100%-85% 85%-25% 25%-10% letzte 10%
Alkalizellen Typ AA 100%-70% 70%-40% 40%-10% letzte 10%
Hinweis: Nehmen Sie die Batterien bitte heraus, bevor das
Sprechfunkgerät für längere Zeit gelagert wird. Batterien
korrodieren mit der Zeit und können dauerhafte Schäden an
Ihrem Sprechfunkgerät verursachen.
Überwachungs Und Signalstärkeanzeige
Professionalität beim Sprechfunk bedeutet, dass Sie den Kanal auf
Aktivität prüfen, bevor Sie senden, um andere Benutzer nicht zu
unterbrechen.
1. Taste J drücken und halten, bis am Display das Symbol p
8
angezeigt wird und die LED an der Gerätevorderseite einmal pro
Sekunde blinkt.
2. Unter dem Symbol p erscheint eine Ziffer. Diese zeigt die Stärke
des Empfangssignals von 0 (schwächste) bis 6 (stärkste) an. Wenn
der Kanal zur Nutzung frei ist, hören Sie ein Rauschen.
8 Deutsch
Page 49

Kommunizieren Mit Anderen Personen
1. Die Aktivität auf dem aktuellen Kanal wie oben beschrieben
überprüfen.
2. Für größte Deutlichkeit das Sprechfunkgerät 5,0 bis 7,5 cm vom
Mund entfernt halten.
3. Taste M drücken und in das Sprechfunkgerät sprechen. Beim
3
Senden leuchtet die rote LED konstant.
4. Um einen Funkspruch zu empfangen, die Taste M loslassen.
9 Deutsch
Page 50

k PROGRAMMIERMODUS
Das Sprechfunkgerät hat einen gesonderten Programmiermodus zum
Ändern der Funktionseinstellungen. Solche Änderungen sind nicht oft
notwendig. Das Menü ermöglicht die Änderung von fünf
Funktionseinstellungen.
1. Um den Programmiermodus auszuwählen, das Sprechfunkgerät
einschalten und gleichzeitig die Tasten M und J drei Sekunden
lang gedrückt halten. Das Gerät gibt eine kurze Tonfolge ab und
links am Display erscheint das Symbol k.
2. Um nach dem Programmieren den Modus k zu verlassen,
zwei Sekunden lang die Taste M drücken.
A. Kanäle
Mit Taste ] oder [ den Kanal auswählen, der konfiguriert werden
7/10
soll.
B. Entstörungscodes
1. Den Kanal wählen, auf dem der Entstörungscode geändert
werden soll.
2. Einmal Taste \ drücken - der Entstörungscode beginnt
5
zu blinken.
3. Mit Tasten ]oder [ den gewünschten Code wählen. (Code 0
deaktiviert den Entstörungscode für den Kanal, er wird auch als
„trägerabhängiger Rauschmodus" bezeichnet).
4. Durch kurzes Drücken von Taste M das Menü schließen oder
zwei Sekunden lang Taste M drücken, um Modus k zu
beenden.
C. Sprachverschleierungscodes
Mit dieser Funktion wird eine zusätzliche Anonymität für den
Sprechfunkverkehr gewährleistet. Wird auf diesem Kanal mit dem
gleichen Entstörungscode mitgehört, ist die Sprache verzerrt, es sei
denn, der Mithörer benutzt den gleichen Sprachverschleierungsode.
1. Den Kanal wählen, auf dem der Sprachverschleierungscode
angewendet werden soll.
2. Taste \ drücken, bis am Display neben der Kanalnummer das
Symbol e angezeigt wird.
3. Mit Tasten ]oder [ den gewünschten Code wählen. (Code 0
deaktiviert den Entstörungscode für den Kanal).
4. Durch kurzes Drücken von Taste M das Menü schließen oder
zwei Sekunden lang Taste M drücken, um Modus k
zu beenden.
D. Manager-Sperre
Diese Funktion ermöglicht die Deaktivierung der Kanaleinstellungs-,
Menü- und Scanfunktion. Tasten M, B und Überwachung sind
4
auch weiterhin verfügbar. Im Unterschied zur Tastensperre kann
diese Sperrfunktion mit Taste \ nicht ausgeschaltet werden.
1. Taste \ drücken, bis am Display das Symbol f erscheint.
2. Mit Tasten ]oder [ aktivieren (Y) oder deaktivieren (n). Das
Symbol f wird am Display solange angezeigt, wie Y gewählt ist.
E. Bestimmte Taste Mit Kanälen Belegen
1. Den Kanal, dem eine Taste zugewiesen werden soll, einstellen.
2. Taste T oder S drücken und halten, bis das Sprechfunkgerät die
6/9
Tastenbelegung durch einen Piepton bestätigt.
10 Deutsch
Page 51

FUNKTIONEN (NORMALMODUS)
Ändern Des Kanals
Mit den Tasten ] oder [ den gewünschten Kanal einstellen.
Durch kurzes Drücken von Taste T oder S wird der Kanal
eingestellt, der dieser Taste zugewiesen worden ist.
Ruftöne
Das Sprechfunkgerät kann an die anderen Sprechfunkgeräte der
Gruppe Ruftöne senden. Damit können die anderen Benutzer in
Kenntnis gesetzt werden, dass Sie beabsichtigen, einen Funkspruch
zu senden. Wenn der Rufton eingestellt ist, wird er durch Drücken von
Taste? B an die anderen Teilnehmer gesendet. Drei verschiedene
Ruftöne stehen zur Auswahl. Die Ruftöne können aber auch
abgeschaltet werden.
1. Um die Ruftöne einzustellen, die Taste \ drücken, bis am Display
das Symbol E erscheint.
2. Einen der drei verfügbaren Ruftöne auswählen. Durch Auswahl von
0 werden die Ruftöne abgeschaltet.
3. Das Menü durch kurzes Drücken von Taste M schließen.
Freisprechbetrieb (VOX)
Bei Verwendung dieser Funktion aktiviert der Ton Ihrer Stimme die
Übertragung des Sprechfunkgeräts. Die Taste M muss nicht
gedrückt werden. Das Sprechfunkgerät kann eigenständig im
Freisprechbetrieb benutzt werden oder auch mit einem optionalen
Audio-Zubehör von Motorola.
Hinweis: Wenn optionales Audio-Zubehör mit Ihrem Sprechfunkgerät
verwendet wird, empfehlen wir, die Lautstärke auf einem
komfortablen Hörniveau zu halten. Bevor Sie das Zubehör
am Kopf oder im Ohr anbringen, muss die Lautstärke niedrig
eingestellt werden.
Anwenden Der VOX-Funktion Ohne Zubehör
1. Das Sprechfunkgerät mit gedrückter Taste M einschalten. Am
Display erscheint das Symbol g und zeigt an, dass die VOXFunktion aktiviert ist.
2. Zum Senden eines Funkspruchs einfach in das Mikrofon sprechen.
Zum Empfangen nur mit dem Sprechen aufhören.
3. Um den Freisprechbetrieb vorübergehend zu beenden, kurz die
Taste M drücken. Das Symbol g blinkt.
4. Kurz die Taste M drücken, um wieder in den Freisprechbetrieb zu
wechseln.
Anwenden Der VOX-Funktion Mit Zubehör
1. Das Sprechfunkgerät ausschalten.
2. Den Zubehördeckel öffnen und das Audio-Zubehör an die Buchse
anschließen.
3. Das Sprechfunkgerät einschalten. Am Display erscheint das
Symbol g und zeigt an, dass die VOX-Funktion aktiviert ist. Wenn
das Symbol g blinkt, ist VOX im Menü Empfindlichkeit deaktiviert
(siehe nachstehende Einstellungen 1, 2 oder 3 zur Aktivierung des
VOX-Betriebs).
4. Zum Senden eines Funkspruchs einfach nur in das ZubehörMikrofon sprechen. Zum Empfangen nur mit dem Sprechen
aufhören.
5. Um den Freisprechbetrieb zu beenden, die Taste M drücken.
11 Deutsch
Page 52

Hinweis: Um Sprechpausen zu gewährleisten, gibt es eine kurze
Verzögerung zwischen Sprechbeginn und
Funkspruchsendung und eine etwas längere Verzögerung
zwischen Sprechbeendigung und automatischer
Umschaltung des Sprechfunkgeräts auf Empfang.
Mikrofon Und VOX-Empfindlichkeit
Ja nachdem, ob das Sprechfunkgerät in lauter oder leiser Umgebung
benutzt wird und ob der Sprecher eine laute oder leise Stimme hat,
lässt sich die Empfindlichkeit des Gerätemikrofons und der VOXFunktion einstellen.
1. Zum Einstellen der Empfindlichkeit die Taste \zweimal drücken
(die große Ziffer der Einstellung blinkt und am Display erscheint das
Symbol g sowie die einzustellende Art der Empfindlichkeit:
? - Mikrofonverstärkung
H - VOX mit Audio-Zubehör
I - VOX ohne Audio-Zubehör
2. Mit den Tasten ] und [ eine der drei möglichen Einstellungen
wählen:
1 - Wenn Sie laut sprechen oder sich in einer geräuschvollen
Umgebung befinden.
2 - Eignet sich für die meisten Anwendungen.
3 - Wenn Sie eine leise Stimme haben oder sich in einer ruhigen
Umgebung aufhalten.
Zur Deaktivierung des VOX-Betriebs (nur VOX mit Audio-Zubehör) 0
wählen.
Scan
Diese Funktion gestattet die Überwachung anderer Kanäle. Wenn das
Sprechfunkgerät eine Kanalaktivität feststellt, wird der Scan
abgebrochen und der aktive Kanal wird eingestellt. Auf diese Weise
können Sie mit der anderen Person kommunizieren, ohne den Kanal
ändern zu müssen.
Bei Aktivierung des Scans wird jeder der 8 Kanäle mit dem dafür
eingestellten Entstörungscode abgesucht. Soll der Scan ohne
Entstörungscode erfolgen (trägerabhängiger Rauschsperren-Scan),
wird mit einem Kanal angefangen, für den der Entstörungscode auf 0
eingestellt wurde. Das Sprechfunkgerät kann so programmiert
werden, dass nur bestimmte Kanäle gescannt werden. In dem Fall
deaktivieren Sie in der Scan-Liste die anderen Kanäle.
1. Um den Scan zu starten, kurz die Taste J drücken. Das Symbol
h erscheint am Display und die große Kanalnummer durchläuft die
verfügbaren Kanäle.
2. Wird eine Kanalaktivität festgestellt, erfolgt eine Unterbrechung
des Scans und am Display erscheinen die Kanalnummer und der
Entstörungscode.
3. Sie können nun mit der Person auf dem neuen Kanal und
Entstörungscode sprechen, nachdem Sie die Taste M drücken.
4. Nach 5 Sekunden Inaktivität auf dem Kanal wird der Scan
fortgesetzt.
5. Wird während des Scans die Taste M gedrückt, sendet das
Sprechfunkgerät auf dem Kanal, der vor der Aktivierung der ScanFunktion eingestellt war.
6. Durch kurzes Drücken der Taste J wird der Scan beendet.
12 Deutsch
Page 53

Scan Fortsetzen
Diese Funktion ermöglicht das „Überspringen" eines Kanals während
eines Scans, sodass auf weitere Aktivität geprüft werden kann. Wenn
das Sprechfunkgerät während des Scans auf einem aktiven Kanal
Halt macht, kann der Scan durch Drücken der Taste ] fortgesetzt
werden.
Störkanal Löschen
Mit dieser Funktion kann ein „Störkanal" vorübergehend aus der
Scan-Liste gelöscht werden. Wenn das Sprechfunkgerät während
des Scans auf einem „Störkanal" Halt macht, kann dieser Kanal durch
Drücken von Taste [ vorübergehend aus der Scan-Liste entfernt
werden. Der Kanal wird bei Beenden der Scan-Funktion wieder in die
Scan-Liste gesetzt.
Bearbeiten Der Scan-Liste
1. Die Taste \drücken, bis am Display das Symbol herscheint.
Die Kanalnummer blinkt und anstelle der Entstörungscodenummer
wird ein blinkendes Y oder n angezeigt.
2. Mit den Tasten ] oder [ den gewünschten Kanal auswählen.
3. Mit Taste JYeinstellen, um den Kanal in die Scan-Liste
aufzunehmen oder n einstellen, um den Kanal aus der Scan-Liste
zu löschen.
4. Zum Beenden kurz die Taste M drücken.
Tastensperre
Mit Hilfe dieser Funktion kann die Tastatur auf die gleiche Weise wie
mit der Manager-Sperre deaktiviert werden, sie lässt sich jedoch
leichter sperren bzw. freigeben.
Zum Sperren oder Freigeben der Tastatur die Taste \drei
Sekunden lang gedrückt halten. Das Sprechfunkgerät gibt eine kurze
Tonfolge ab und am Display erscheint das Symbol f bzw. es wird vom
Display gelöscht.
Sendungsende-Ton
Ist diese Funktion aktiviert, überträgt das Sprechfunkgerät nach Ende
des Funkspruchs einen Meldeton und gibt diesen auch vom Gerät ab.
Zum Aktivieren bzw. Deaktivieren des Sendungsende-Tons die Taste
] beim Einschalten des Sprechfunkgeräts gedrückt halten.
Tastentöne
Bei jedem Tastendruck am Sprechfunkgerät ertönt zur Bestätigung
ein Piepton, sofern diese Funktion nicht deaktiviert wurde. Um die
Tastentöne zu aktivieren bzw. deaktivieren, die Taste [ beim
Einschalten des Sprechfunkgeräts gedrückt halten. Diese Funktion
steuert auch den lokalen Bestätigungston nach dem Ende einer
Sendung sowie die Ruftöne, wenngleich diese weiterhin gesendet
werden.
Zurücksetzen Auf Werkseinstellungen
Beim Einschalten des Sprechfunkgeräts die Tasten M und \ drei
Sekunden lang gedrückt halten. Das Gerät gibt eine kurze Tonfolge ab
und wird auf die Werkseinstellungen zurückgesetzt.
Cloning
Die Cloning-Funktion ist mit dem Mehrgeräte-Lader (MUC) IXPN4002
(GB 3-polig) oder IXPN4003 (Europa 2-polig) verfügbar. Sie gestattet
es, die Einstellungen eines Sprechfunkgeräts auf andere
Sprechfunkgeräte zu kopieren. Nähere Einzelheiten dazu sind der
Bedienungsanleitung des MUC zu entnehmen.
13 Deutsch
Page 54

Hinterlicht
Das Sprechfunkgerät ist mit einem hinterleuchteten Display
ausgestattet. Beim Einschalten des Geräts und beim Drücken einer
Taste (außer M und B) leuchtet das Display etwa vier Sekunden
lang auf.
Sendezeit-Timer
Das Sprechfunkgerät gibt einen Warnton ab und stoppt das Senden,
wenn die Taste M länger als 60 Sekunden kontinuierlich gedrückt
wird oder wenn die VOX-Übertragung länger als 60 Sekunden aktiv ist.
WEITERE INFORMATIONEN
Übertragungsreichweite
Das XTN446 Sprechfunkgerät wurde für bestmögliche Leistung und
Übertragungsreichweite im Feld konstruiert. Wir empfehlen, dass Sie
einen Abstand von mindestens 1,5 Metern zwischen Geräten aufrecht
erhalten, da sich sonst Störgeräusche ergeben können.
Die Übertragungsreichweite hängt von der Einsatzumgebung ab. Sie
wird durch Betonbauten, dichte Bewaldung und bei Gebrauch der
Geräte in Gebäuden und Fahrzeugen beeinträchtigt.
Optimale Reichweite Mäßige Reichweite Geringe Reichweite
Eine optimale Reichweite - bis zu 5 Kilometern - ergibt sich in ebenen,
freien Umgebungen. Gebäude und Bäume auf der Übertragungsstrecke
reduzieren die Reichweite. Sind dichte Bewaldung oder Berge im Weg,
ist die Reichweite stark eingeschränkt.
14 Deutsch
Page 55

Störungsbeseitigung
Problem Abhilfe
Keine Stromversorgung AA-Batterien umpositionieren oder auswechseln. NiMH-Akku aufladen oder auswechseln.
Funkspruch nicht gesendet Sicherstellen, dass die Taste M beim Senden fest gedrückt wird. Batterien umpositionieren und/oder
auswechseln.
Funkspruch nicht empfangen Nachprüfen, dass an den Sprechfunkgeräten dieselben Kanal- und Entstörungscodenummern eingestellt sind.
Darauf achten, dass die Taste M nicht aus Versehen gedrückt wird. Batterien umpositionieren und/oder
auswechseln. Hindernisse sowie Anwendung in Räumen oder Fahrzeugen können die Kommunikation
beeinträchtigen. Ändern Sie Ihren Standort. Die Lautstärkeeinstellung überprüfen.
Funkspruch verschleiert Einstellung des Verschleierungscodes stimmt nicht mit den anderen Sprechfunkgeräten überein; an allen
Sprechfunkgeräten muss der gleiche Verschleierungscode verwendet werden.
Hören anderer Geräusche oder Nachprüfen, dass der Entstörungscode eingestellt ist (aktive Einstellungen sind 1-121). Es kann sein, dass der
Störgeräusche auf einem Kanal Kanal oder Entstörungscode bereits genutzt wird - einen anderen versuchen.
Begrenzte Reichweite Stahl- und Betonkonstruktionen, dichtes Laubwerk und Anwendung in Gebäuden und Fahrzeugen verkürzen die
Reichweite. Sorgen Sie für freie Sicht zum Empfänger, um die Sprechfunkübertragung zu verbessern. Das Tragen
des Sprechfunkgeräts nahe am Körper, z. B. in der Tasche eines Kleidungsstücks, verkürzt die Reichweite - das
Sprechfunkgerät umpositionieren.
Starkes Rauschen oder Störsignale Sprechfunkgeräte zu nahe beieinander. Die Sprechfunkgeräte müssen mindestens 1,5 m voneinander entfernt
sein - den Abstand vergrößern. Sprechfunkgeräte zu weit entfernt. Hindernisse stören die Übertragung. Die
Reichweite beträgt bei klaren, unbeeinträchtigten Bedingungen bis 3 km.
Kanal kann nicht geändert werden Sicherstellen, dass die Sperrfunktion nicht aktiviert ist.
15 Deutsch
Niedrige Batterieladung Den NiMH-Akku aufladen oder die AA-Batterien auswechseln. Extreme Einsatztemperaturen wirken sich auf die
Batterielebensdauer aus.
Page 56

Problem Abhilfe
Tastatur gesperrt Tastatur freigeben, indem 3 Sekunden lang die Taste \ gedrückt wird. Kontrollieren, dass die Manager-Sperre
deaktiviert ist.
VOX kann nicht aktiviert werden Funktion nicht eingestellt und aktiviert. Empfindlichkeit auf 0 eingestellt.
Motorola Produktservice Wenn das Sprechfunkgerät immer noch nicht korrekt funktioniert, wenden Sie sich bitte an die Verkaufsstelle.
Technische Daten
Beschreibung Technische Daten
Kanäle 8
Codes 121
Betriebsfrequenz 446.00625-446.09375 MHz
Reichweite Bis zu 5 Kilometer
Stromversorgung 4 Alkalibatterien Typ AA oder NiMH-Akku
Batterielebensdauer* AA** NiMH
5% Senden, 5% Empfangen
und 90% Standby 36 h 24 h
Sprechzeit 6,5 h 5,0 h
Standby 64 h 40 h
* Typische Werte
** Mit Alkalizellen bester Qualität
16 Deutsch
Page 57

Garantieleistungen
Während der regulären Garantiezeit von einem (1) Jahr ab Kaufdatum
(Garantiezeit) garantiert Motorola dem Erwerber, daß der bei einem
autorisierten Motorola Händler oder Distributor erworbene Personal
Communicator mit Zubehör ("das Produkt") den jeweils zur Zeit der
Herstellung gültigen Motorola Spezifikationen entspricht.
Sollte das Produkt diesen Spezifikationen nicht entsprechen, ist der
Erwerber verpflichtet, Motorola innerhalb von 2 Monaten nach
Feststellung des Fehlers im Material, in der Verarbeitung oder der
Nichterfüllung der Spezifikationen und in jedem Fall vor Ablauf der
Garantiezeit zu unterrichten und das defekte Produkt zur Reparatur
zum nächstgelegenen, autorisierten Motorola Reparaturdienst zu
bringen. Motorola ist an keinerlei Produktangaben gebunden, die
nicht direkt von Motorola stammen.
Eine Liste der Telefonnummern des Motorola Kundendienstes, über
die auch der für Sie nächstgelegene, autorisierte Motorola
Reparaturdienst in Erfahrung gebracht werden kann, liegt diesem
Produkt bei.
Während der Garantiezeit besteht der Garantieanspruch
ausschließlich darin, daß das defekte Produkt kostenfrei und nach
der Entscheidung von Motorola entweder repariert oder
ausgetauscht wird oder, falls dies nicht möglich ist, der vom Erwerber
gezahlte Kaufpreis abzüglich einer Gebühr für die Nutzung des
Produktes seit Lieferung zurückerstattet wird. Diese
Garantieleistungen enden mit Ablauf der Garantiezeit.
Dies sind die vollständigen und ausschließlichen Garantieleistungen
für Motorola Personal Communicator mit Zubehör, die alle sonstigen
expliziten oder impliziten Garantieleistungen, Bedingungen oder
Bestimmungen ersetzen.
Falls es sich bei dem Erwerber nicht um einen Endverbraucher
handelt, lehnt Motorola alle sonstigen Garantieleistungen ab.
Motorola haftet unbegrenzt nur für Vorsatz- und grobe Fahrlässigkeit.
In allen anderen Fällen übernimmt Motorola keinerlei Haftung für
Schäden, die den Kaufpreis übersteigen und haftet auch nicht für
mögliche Folgeschäden, wie entgangene Gewinne, Datenverlust oder
Betriebsunterbrechung.
Diese Garantie hat keine Auswirkungen auf Ansprüche, die
Endverbrauchern gesetzlich zustehen, wie beispielsweise die
Gewährleistung zufriedenstellender Qualität und Eignung für den
bestimmungsgemäßen Zweck. Diese Garantie berührt nicht die
Ansprüche des Erwerbers gegen den Verkäufer aus dem Kaufvertrag.
Inanspruchnahme Der Garantieleistungen
In den meisten Fällen wird der autorisierte Motorola Händler, bei dem
Sie den Motorola Personal Communicator mit Originalzubehör
erworben haben, die Garantieansprüche akzeptieren und/oder
entsprechende Garantieleistungen anbieten. Sie können ebenfalls
den Garantieservice des nächstgelegenen Motorola
Reparaturdienstes in Anspruch nehmen.
Sollten Sie zusätzlichen Fragen haben, wenden Sie sich bitte an Ihren
autorisierten Motorola Händler, bei dem Sie den Motorola Personal
Communicator erworben haben, an den Motorola Kundendienst Ihres
Landes unter den unten angegebenen Telefonnummern.
Im Falle der Inanspruchnahme der Garantieleistungen ist der defekte
Personal Communicator Motorola oder dem Distributor vorzulegen.
Bei Zusendung oder Lieferung des defekten Geräts an einen von
Motorola autorisierten Reparaturdienst muß das Produkt mit Ihrem
Namen, Ihrer Adresse, Ihrer Telefonnummer versehen sein und eine
Fehlerbeschreibung beigefügt werden.
17 Deutsch
Page 58

Damit Sie unsere Garantieleistungen in Anspruch nehmen können,
müssen Sie die Kaufrechnung oder einen vergleichbaren
Kaufnachweis vorlegen, aus dem das Kaufdatum hervorgeht. Auf dem
Personal Communicator müssen ebenfalls die Seriennummer als
Referenz sichtbar sein. Diese Informationen sind dem Produkt zu
entnehmen.
Bedingungen
Garantieansprüche können nicht berücksichtigt werden, falls die
Typen oder Seriennummer des Produktes entfernt, verändert oder
unlesbar gemacht worden ist. Motorola behält sich deshalb das
Recht vor, den kostenlosen Garantieservice zu verweigern, falls die
erforderliche Dokumentation nicht oder nur unvollständig vorgelegt
werden kann, unlesbar oder nicht in Übereinstimmung mit den Daten
des Herstellers ist.
Im Falle einer Reparatur des Produktes werden, nach Entscheidung
von Motorola, die defekten Einzelteile oder Chipkarten mit ihrer
Funktionsweise nach gleichwertigen, reparierten oder neuen
Einzelteilen oder Chipkarten ausgetauscht. Garantie für
ausgetauschte Einzelteile, Zubehörteile, Akkus oder Chipkarten wird
nur für die Dauer der ursprünglichen Garantiezeit übernommen. Die
ursprüngliche Garantiezeit verlängert sich dadurch nicht. Alle
ausgetauschten Originalteile (Zubehörteile, Akkus, Einzelteile oder
Personal Communicator) gehen in das Eigentum von Motorola über.
Motorola übernimmt keine Garantie für Installation, Wartung und
Service im Zusammenhang mit dem Produkt, einschließlich Akkus,
Zubehör- oder Einzelteilen.
Motorola übernimmt keinerlei Haftung für Schäden durch nicht von
Motorola vertriebene Zusatzgeräte (beispielsweise Akkus,
Ladegeräte, Adapter, Netzteile, etc.), die an das Produkt
angeschlossen oder zusammen mit dem Produkt verwendet werden.
Jegliche nicht von Motorola vertriebene Zusatzgeräte werden
ausdrücklich von dieser Garantie ausgeschlossen. Ebenso übernimmt
Motorola keine Garantie für den störungsfreien Betrieb der Produkte
in Verbindung mit derartigen Zusatzgeräten.
Garantieausschluss
Diese Garantie gilt nicht für Fehler durch Beschädigung, Mißbrauch,
unsachgemäße Handhabung, wegen Änderungen oder Reparaturen
am Produkt durch nicht autorisierte Personen. Die Garantie ist
ebenfalls ausgeschlossen bei:
1. Fehlern oder Beschädigungen, die durch unsachgemäße oder
unübliche Verwendung des Produktes verursacht worden sind.
2. Fehlern oder Beschädigungen, die auf Mißbrauch, Unfall oder
Versäumnis zurückzuführen sind.
3. Fehlern oder Beschädigungen wegen unsachgemäßen Betriebs
oder Testens, unkorrekter Wartung, Installation, Anpassung oder
Modifikationen.
4. Bruch oder Beschädigung der Antenne, sofern dies nicht direkt auf
Material- oder Verarbeitungsfehler zurückzuführen ist.
5. Produkten, die so zerlegt oder repariert worden sind, daß sie den
Betrieb des Produktes oder eine angemessene Untersuchung und
Fehleranalyse zur Feststellung des Garantieanspruches unmöglich
machen.
6. Fehlern oder Beschädigungen im Zusammenhang mit Reichweite.
18 Deutsch
Page 59

7. Fehlern oder Beschädigungen wegen Feuchtigkeit, Eindringen von
Flüssigkeiten oder verschütteten Lebensmitteln.
8. Plastikgehäusen oder sonstigen Außenflächen, die durch normale
Benutzung verkratzt oder beschädigt sind.
9. Produkten, die über einen beschränkten Zeitraum gemietet sind.
10. Verschleißteile.
Anmerkung: Die Lebensdauer des Akkus Ihres Sprechfunkgerät,
sowie Sprech- und Standby-Zeiten hängen von den örtlichen
Empfangsbedingungen ab. In den Spezifikationen ist angegeben, daß
Sie in den ersten 6 Monaten ab Kaufdatum mit der optimalen
Leistungsfähigkeit Ihres Motorola Sprechfunkgerät rechnen können
und daß der Akku bis zu zweihundert (200) Mal aufgeladen werden
kann.
Die Garantieleistung für wiederaufladbare Motorola Akkus erlischt, a)
wenn die Ladegeräte von Motorola nicht für die Ladung der
betreffenden Akkus als geeignet anerkannt sind, b) die
Versiegelungen der Akkus zerbrochen oder beschädigt sind, c) die
Akkus in einem anderen Gerät oder zu einem anderen Zweck als in
einem Sprechfunkgerät verwendet worden sind.
Copyrightinformationen
Die in dieser Anleitung beschriebenen Produkte von Motorola
enthalten eventuell urheberrechtlich geschützte, in
Halbleiterspeichern oder anderen Medien gespeicherte Programme.
In den Vereinigten Staaten und anderen Ländern verfügt Motorola
über gewisse gesetzliche Rechte bezüglich urheberrechtlich
geschützter Computerprogramme, einschließlich dem exklusiven
Recht, die urheberrechtlich geschützten Motorola-Programme zu
kopieren oder vervielfältigen. Dementsprechend ist es untersagt,
urheberrechtlich geschützte Motorola-Computerprogramme, die in
den in dieser Anleitung beschriebenen Produkten enthalten sind, auf
irgendeine Weise zu kopieren oder zu vervielfältigen, soweit nicht
ausdrücklich schriftlich zugestanden. Darüber hinaus stellt der Kauf
dieses Motorola-Produkts nicht eine im Rahmen von Motorolas
Urheberrechts oder Motorolas Patente oder Patentanmeldungen
gewährte Lizenz dar, sei diese ausdrücklich oder stillschweigend,
durch Verwirkung oder anderweitig, außer der normalen,
nichtexklusiven, gesetzlich durch den Verkauf eines Produkts
entstehende gebührenfreien Lizenz für den Gebrauch.
Für weitere Informationen wenden Sie sich bitte an:
Service-Hotline
Deutschland: 06128 70 2146
International: +49 6128 70 2146
, und MOTOROLA sind Warenzeichen der Motorola Inc.
Talkabout
ist ein Warenzeichen der Motorola, Inc.
© 2001 Motorola, Inc.
19 Deutsch
Page 60

ZUGELASSENES ZUBEHÖR
Abgesetztes Lautsprecher-Mikrofon
(HMN9026)
Am Revers oder am Kragen zu befestigende
Kombination von Lautsprecher/Mikrofon mit
PTT-Schalter. Erlaubt den Betrieb des
Sprechfunkgeräts, ohne dass dieses vom
Gürtel entfernt oder aus der Tragetasche
genommen werden muss.
VOX Headset mit schwenkbarem
Mikrofon (ENMN4002)
Das komfortable, leichte Headset hilft bei
der Unterdrückung von
Hintergrundgeräuschen. Zur Benutzung
mit der VOX-Funktion des
Sprechfunkgeräts im Freisprechbetrieb.
Ohrknopf mit Mikrofon und PTT
(HNM9025)
Unauffälliger, leichter Ohrknopf mit am
Revers oder Kragen zu befestigendem
Mikrofon und PTT-Schalter. Ermöglicht
deutliche Verständigung mit minimalen
Störungen oder Interferenzen.
VOX Ohrknopf mit Mikrofon
(HMN9039)
Der leichte Ohrbügel lässt sich Ihrem Ohr
bequem anpassen. Zur Benutzung mit der
VOX-Funktion des Sprechfunkgeräts im
Freisprechbetrieb.
Tragetasche aus Leder
(NNTN4020)
Robuste Tasche aus Leder mit
Schutzfenster für das Display. Kann auch
zum sicheren Tragen des
Sprechfunkgeräts am Gürtel verwendet
werden.
Wasserdichte Hülle
(ENLN402)
Die wasserdichte Hülle aus
transparentem Kunststoff schützt das
Sprechfunkgerät, während der Benutzung
vor Regen, Nässe und Eintauchen in
Wasser. Ein Muss für Anhänger des
Wassersports.
20 Deutsch
Page 61

2 Stunden-Einsteck-Ladegerät,
Europa (IXPN4001)
Schnelles und bequemes Aufladen
Multi-Ladegerät, Europa
(IXPN4003AR)
Zum Aufladen und Synchronisieren von
bis zu sechs Sprechfunkgeräten
Aufladbarer NiMH-Akku
(NTN8971 oder NNTN4190)
Ein gutes Backup ist beruhigend. Halten
Sie für den Hochbetrieb einen
aufladbaren Ersatzakku bereit.
21 Deutsch
Page 62

CONTENIDOS
ESPAÑOL
INFORMACIÓN GENERAL Y SOBRE SEGURIDAD 1
Características Operacioneales De (RF) 1
Operación Del Radio Y Exposición La EME 1
Interferencia Electromagnética/Compatibilidad 2
Información General Y Sobre Seguirdad 3
Advertencias Sobre La Operación 3
Precauciones De Operación 3
SU NUEVA RADIO 5
Baterías 5
Instalación De La Batería NiMH 5
Instalación De Las Pilas AA 5
Recarga De La Batería NiMH Utilizando El Cargador Rápido 5
Luces Indicadoras Del Cargador 6
Cómo Ajustar Y Remover El Accesorio De Transporte Giratorio
Para Cinturón 6
ANTES DE PODER HABLAR 7
Canales Y Códigos 7
Cómo Encender Y Apagar La Radio 7
El Medidor De Batería 7
Monitor E Indicador De Potencia De Señal 7
Para Hablar A Otra Persona 8
MODO DE PROGRAMACIÓN 9
A. Canales 9
B. Códigos De Eliminación De Interferencia 9
C. Códigos De Distorsión De Voz 9
D. Sistema De Bloqueo 9
E. Asignación De Canales A Los Botones De Pre-Programación 9
FUNCIONES (MODO NORMAL) 10
Cambio De Canales 10
Tonos De Llamadas 10
Uso Manos Libres (VOX) 10
Sensibilidad Del Micrófono Y Del VOX 10
Escán 11
Cómo Editar La Lista De Escán 12
Bloqueo Del Teclado 12
Tono De Fin De Transmisión 12
Tonos Del Teclado 12
Cómo Volver A Fijar Los Ajustes De Fábrica 12
Clonación 12
Luz De Fondo 12
Temporizador 12
MÁS INFORMACIÓN 13
Alcance De Transmisión 13
Solución De Problemas 14
Especificaciones 15
Información De Garantía Limitada 15
Información Del Copyright 18
ACCESORIOS APROBADOS 19
Page 63

INFORMACIÓN GENERAL Y SOBRE SEGURIDAD
INFORMACIÓN IMPORTANTE PARA UNA OPERACIÓN EFICIENTE Y
SEGURA.
LEA ESTA INFORMACIÓN ANTES DE UTILIZAR EL RADIO
La información proporcionada en este documento sustituye la
información general sobre seguridad que contienen las guías del
usuario publicadas antes de junio de 2001. Para obtener información
relacionada con la utilización del radio y atmósferas peligrosas,
consulte las publicaciones Factory Mutual (FM) Approval Manual
Supplement o Instruction Card, que se incluye con los modelos de
radio que ofrecen esta capacidad.
CARACTERÍSTICAS OPERACIONEALES DE (RF)
Para transmitir (hablar) debe presionar el botón PTT; para recibir
(escuchar) debe liberar el botón PTT. Cuando el radio está
transmitiendo, genera energía de radiofrecuencia (RF); cuando está
recibiendo o está apagado, no genera energía de RF.
OPERACIÓN DEL RADIO Y EXPOSICIÓN LA EME
Los productos de radio Motorola cumplen con las siguientes normas
y recomendaciones nacionales e internacionales relacionadas con la
exposición de seres humanos a la energía electromagnética de
radiofrecuencia:
• Comisión Federal de Comunicaciones (FCC, Federal Communications
Commission) de los Estados Unidos, Código de Regulaciones
Federales; 47 CFR parte 2 sección J.
• Instituto Nacional Americano de Normas de los Estados Unidos
(ANSI - American National Standards Institute) / Instituto de
Ingenieros Eléctricos y Electrónicos (IEEE, Institute of Electrical and
Electronics Engineers). 1-1992
1 Español
• Instituto de Ingenieros Eléctricos y Electrónicos (IEEE, Institute of
Electrical and Electronics Engineers) (C95.1 – Edición 1999).
• Consejo Nacional de los Estados Unidos para la Protección contra
la Radiación y Mediciones de Radiación (NCRP, National Council on
Radiation Protection and Measurements), Informe 86, 1986.
• Comisión Internacional para la Protección contra la Radiación No
Ionizante (ICNIRP, International Commission on Non-Ionizing
Radiation Protection) 1998.
• Ministerio de Salud (Canadá). Código de Seguridad 6. Límites de la
exposición de seres humanos a los campos electromagnéticos de la
radiofrecuencia en el rango de frecuencias de 3 kHz a 300 GHz,
1999.
• Norma para las Comunicaciones de Radio (Exposición de seres
humanos a la radiación electromagnética) de la Entidad de
Comunicaciones de Australia 2001.
• ANATEL, Brasil Regulatory Authority, Resolution 256 (April 11, 2001)
"additional requirements for SMR, cellular and PCS product
certification."
Para asegurar un rendimiento óptimo del radio, y para garantizar que
la energía de radiofrecuencia se mantenga dentro de los límites
establecidos en las normas antes mencionadas, deberán cumplirse
los siguientes procedimientos:
Operación De Radios Bidireccionales
Cuando utilice el radio, sosténgalo en posición vertical
con el micrófono a una distancia de 2,5 a 5 centímetros
(una a dos pulgadas) de los labios.
Operación de la unidad ajustada a lcuerpo
Para cumplir con las recomendaciones de la FCC en cuanto a la
exposición a la RF, si utiliza un radio ajustado al cuerpo, durante la
transmisión, siempre coloque el radio en un sujetador para cinturón,
Page 64

estuche, arnés para estuche y arnés para el cuerpo proporcionado
por Motorola. Si se utilizan accesorios no aprobados por Motorola se
puede exceder los límites de exposición a RF establecidos en las
recomendaciones de la FCC. Si no está utilizando accesorios para
uso ajustado al cuerpo de Motorola y no está utilizando el radio en
las posiciones de uso paralelo a la cabeza en el modo telefónico y
enfrente a la cara en el modo de radio de dos vías, asegúrese de
mantener la antena y el radio a las siguientes distancias mínimas
del cuerpo al transmitir:
• Modo telefónico o de radio de dos vías: 2,5 centímetros (una
pulgada)
Cuidado De La Antena
Use únicamente la antena suministrada o una aprobada. El
reemplazo, las modificaciones o conexiones de antenas no
autorizadas pueden causar daños al teléfono y violar las regulaciones
de la FCC.
Mientras la unidad esté "EN USO", NO sujete la antena con la mano.
Tocar la antena afecta la calidad de la comunicación y puede causar
que el radio opere a un nivel de energía mayor que el necesario.
Accesorios aprobados
Para obtener una lista de accesorios aprobados por Motorola busque
en el apéndice o en la sección de accesorios de la Guía de usuario
de la radio.
INTERFERENCIA ELECTROMAGNÉTICA/COMPATIBILIDAD
NOTA: Casi todos los dispositivos electrónicos son susceptibles a la
interferencia electromagnética (EMI) si no cuentan con el debido
blindaje o si no están diseñados o configurados de manera que sean
compatibles con este tipo de señales electromagnéticas.
Edificaciones
Para evitar la interferencia electromagnética y/o problemas de
compatibilidad, apague el radio en todo sitio donde haya letreros que
así lo establezcan. Por ejemplo, los hospitales y establecimientos de
asistencia médica podrían estar usando aparatos sensibles a la
energía de RF externa.
Aeronaves
Cuando esté a bordo de un avión, apague el radio cuando se le
indique. Si usa el radio, deberá hacerlo de conformidad con las
regulaciones de la línea aérea y las instrucciones de la tripulación.
Aparatos Médicos
• Marcapasos
La Asociación de Fabricantes de la Industria de la Salud recomienda
mantener una distancia mínima de 15 cm (6 pulg.) entre un radio
inalámbrico de mano y un marcapasos. Estas recomendaciones están
en concordancia con las recomendaciones de la Administración de
drogas y alimentos de los EE. UU.
Las personas que utilicen marcapasos deben seguir las
recomendaciones que se presentan a continuación:
• Mantener SIEMPRE el radio a una distancia aproximada de 15 cm (6
pulg.) o más del marcapasos cuando esté ENCENDIDO el radio.
• No colocar el radio dentro de un bolsillo de camisa.
• Utilizar el oído opuesto al marcapasos para minimizar posibles
interferencias.
• APAGAR el radio inmediatamente si cree que se está generando
interferencia.
2 Español
Page 65

• Aparatos auditivos
Algunos radios inalámbricos digitales pueden interferir con ciertos
aparatos auditivos. En caso de que exista interferencia, puede
consultar con el fabricante del aparato auditivo para buscar posibles
alternativas.
• Otros dispositivos médicos
Si utiliza cualquier otro dispositivo médico, consulte con el fabricante
del dispositivo para determinar si está protegido adecuadamente
contra la energía de RF externa. Su médico podría ayudarle a obtener
esta información.
INFORMACIÓN GENERAL Y SOBRE SEGUIRDAD
Uso Al Manejar
Consulte las leyes y reglamentos para el uso de radios en las zonas
donde conduce. Obedézcalas siempre.
Cuando utilice el radio mientras maneja:
• Preste atención al camino mientras conduce.
• Use la función de manos libres, si está disponible.
• Salga del camino y estacione antes de hacer o contestar una
llamada, si las condiciones del manejo lo requieren.
ADVERTENCIAS SOBRE LA OPERACIÓN
PARA VEHÍCULOS EQUIPADOS CON BOLSA DE AIRE
No coloque un radio portátil en el área encima de la bolsa de aire o
en el área de despliegue de la bolsa de aire. Las bolsas de aire se
inflan con gran fuerza. Si un radio portátil se coloca en el área de
despliegue de la bolsa de aire y ésta se infla, es posible que el radio
salga disparado con gran fuerza y que produzca lesiones graves a los
ocupantes del vehículo.
ENTORNOS POTENCIALMENTE EXPLOSIVOS
Apague el radio cuando esté en una atmósfera potencialmente
explosiva, a menos que el radio sea del tipo específicamente
calificado para el uso en tales áreas como "Intrínsecamente Seguro"
(por ejemplo, aprobado por Factory Mutual, CSA o UL). No retire,
instale ni cargue baterías en estas áreas. Las chispas en atmósferas
potencialmente explosivas pueden desencadenar una explosión o
incendio, y ocasionar lesiones o inclusive la muerte.
NOTA: Entre las áreas con entornos potencialmente explosivos
mencionadas anteriormente se encuentran las áreas con
combustible, por ejemplo las áreas debajo de la cubierta de barcos;
instalaciones de transferencia y almacenamiento de combustible y
productos químicos; áreas donde el aire contiene productos químicos
o partículas tales como polvo, granos o polvos metálicos; y cualquier
otra área donde se le aconseja apagar el motor de su vehículo. En las
áreas con atmósferas potencialmente explosivas hay generalmente
señales de precaución, aunque no siempre es así.
ÁREAS DE VOLADURAS Y EXPLOSIVOS
Para evitar una posible interferencia con las operaciones de
detonación, apague el radio cuando esté cerca de detonadores
eléctricos, en un área de detonaciones o donde haya letreros
"Apague el radio bidireccional". Respete todas las señales e
instrucciones.
PRECAUCIONES DE OPERACIÓN
ANTENAS
No utilice radios portátiles que tengan la antena dañada. Si una
antena dañada hace contacto con la piel, podría producir una
pequeña quemadura.
3 Español
Page 66

BATERÍAS
Todas las baterías pueden causar daños materiales, lesiones o
quemaduras si un material conductor, por ejemplo, joyas, llaves o
cadenas, hace contacto con los terminales expuestos. El material
podría cerrar un circuito eléctrico (cortocircuito) y tornarse muy
caliente. Manipule con cuidado las baterías cargadas, especialmente
cuando las lleve dentro de un bolsillo, cartera o envases que
contengan objetos metálicos.
INSTRUCCIONES DE SEGURIDAD DEL CARGADOR
Antes de utilizar el cargador de baterías, lea todas las instrucciones y
notas de precaución en:
1. la batería
2. el cargador de baterías, y
3. en la radio que usa la batería.
Precaución: Para reducir el riesgo de sufrir lesiones, cargue
solamente (E)NTN8971 o (E)NNTN4190, las baterías recargables
listadas. Otros tipos de baterías pueden explotar, provocando
lesiones personales y daños.
GUARDE ESTAS INSTRUCCIONES
1. No exponga el cargador a lluvia o nieve.
2. No utilice el cargador si ha recibido un golpe brusco, se ha caído o
se ha dañado en modo alguno.
3. No desarme el cargador si ha recibido un golpe brusco, se ha
caído o se ha dañado en modo alguno.
4. No modifique nunca el cable y enchufe de AC provisto con la
unidad. Si el enchufe no encaja en la toma, pida a un electricista
titulado que instale una toma correcta. Una instalación incorrecta
puede presentar el peligro de sacudida eléctrica.
5. Para reducir el riesgo de causar daños al cable o al enchufe, tire
del enchufe en lugar de hacerlo del cable al desconectar el
cargador del receptáculo de AC.
6. Para reducir el riesgo de sufrir una sacudida eléctrica, desenchufe
el cargador de la toma antes de intentar cualquier mantenimiento o
limpieza.
7. El uso de un accesorio no recomendado o vendido por Motorola
podría resultar en un riesgo de incendio, sacudida eléctrica, o
lesión personal.
8. Asegúrese que el cable está colocado de forma que no se doble o
se presione con algo que pueda producir roturas o arrancamiento.
9. Una extensión de cable no debe ser usada a menos que sea
absolutamente necesario. El uso de una extensión inadecuada
puede resultar en un riesgo de incendio o descarga eléctrica.
Si debe usar una extensión, asegúrese que:
• Los pines del enchufe de la extensión son idénticos en número,
tamaño y colocación que los del conector del cargador
• Que el cable de la extensión está en correcto estado y en buenas
condiciones eléctricas, y
2
• Que la sección del cable es 18 AWG (1mm
2
hasta 30 metros y 16 AWG (1.3mm
) para longitudes de hasta 45
) para longitudes de
metros.
10. El cable de alimentación de este cargador no puede ser
reemplazado. Si el cable está dañado contacte con el distribuidor
de Motorola o llame a:
Desde dentro de España: 91 400 2038
Desde fuera de España: +34 91 400 2038
4 Español
Page 67

SU NUEVA RADIO
Instalación De Las Pilas AA
Los transmisores-receptores de radio Motorola XTN446 operan en
frecuencias PMR446, y pueden utilizarse en cualquier país donde las
frecuencias PMR446 estén autorizadas, sujeto a las regulaciones
pertinentes.
Por favor, refiérase a los diagramas y tablas que hay en el interior de
la portada de este manual.
Baterías
Su radio funciona con una batería recargable de hidruro metálico de
níquel (NiMH), o 4 pilas AA. En la página 15 encontrará información
sobre el tiempo que duran las baterías.
Instalación De La Batería NiMH
1. Deslice, de la parte inferior de la radio, el seguro nervado en
dirección opuesta a la puerta de la batería y hacia los contactos
2. Deslice la puerta hacia la parte inferior de la radio y quítela
3. Sitúe la batería con el logotipo de Motorola hacia arriba y los
contactos de la batería hacia la parte inferior de la radio,
metiéndola en la parte superior del compartimiento de la batería
B
4. Presione firmemente la batería hacia arriba y adentro del
compartimiento de la batería
5. Deslice y cierre firme la puerta de la batería en su lugar.
Advertencias Sobre
Este producto está diseñado para que funcione con la designada
batería recargable de Motorola (NTN8971 o NNTN4190) o SÓLO con
pilas alcalinas AA de calidad. Otras pilas AA (como NiMH o NiCd) no
son apropiadas, ya que el producto se puede dañar o podrían sufrirse
heridas personales, en el inesperado caso que, un continuo corto
circuito, se produzca en el contacto de carga situado en la parte
inferior de la unidad.
1. Quite la puerta de la batería
2. Inserte las 4 pilas AA, asegurándose que se observen las correctas
polaridades
3. Deslice y cierre firmemente la puerta de la batería hasta su lugar
Recarga De La Batería NiMH Utilizando El Cargador Rápido
(IXPN4000 o IXPN4001):
La batería NiMH puede cargarse en la radio o sola. Para obtener el
mayor uso de la batería, cárguela durante la noche (16 horas) antes
de usarla por primera vez. Tras esto, las cargas requerirán sólo 3
horas.
1. Conecte la fuente de alimentación al alojamiento del cargador
C
2. Conecte la fuente de alimentación a la toma de red
3. Coloque la radio (incluyendo la batería), o sólo la batería NiMH en
el alojamiento
D
Nota: El tiempo de carga se extenderá y el contador de la batería
será inexacto si la radio se deja encendida mientras se carga.
5 Español
Page 68

Luces Indicadoras Del Cargador
Roja: Modo de carga rápida (hasta 2 horas)
Intermitente Verde: Modo de carga lenta después de la carga
rápida (1 hora)
Verde: Carga completa
Intermitente Rojo: El cargador está a la espera del
voltaje/temperatura de la batería para estar
dentro del campo de carga rápida
Sin Indicación: Radio o batería insertada incorrectamente en
el cargador
Nota: Si nota que el LED (diodo electroluminiscente) intermitente rojo
dura por más de un minuto, significa que la batería está
averiada y hay que cambiarla.
Cómo Ajustar Y Remover El Accesorio De Transporte Giratorio
Para Cinturón
Su radio viene equipada con un accesorio de transporte giratorio
para cinturón, que no es necesario quitar antes de colocar la radio en
una carga rápida o combinada.
1. Para poner el accesorio: deslice la base de la radio en la funda y
presione el clip, situado en la parte superior del accesorio, de
modo que calce debidamente en su lugar, en la radio.
E
2. Para sacar la radio del accesorio: empuje hacia atrás en la parte
superior del accesorio, hasta que quite el clip de la radio y deslice
la radio fuera.
6 Español
Page 69

ANTES DE PODER HABLAR
Asegúrese de leer cuidadosamente este manual
Canales Y Códigos
Su radio tiene 8 canales, 121 códigos de eliminación de interferencia
(códigos IE – 38 códigos de tonos PL y 83 códigos digitales PL - ver
en el interior de la portada para más detalles) y 3 códigos de
distorsión de voz (códigos VS). Siempre existe la posibilidad de ser
escuchado o tener interferencias de otras personas mientras usa su
radio, pero la cantidad de combinaciones de canales/códigos
disponibles ayudan a reducir esta situación.
Nota: Si se encuentra en un grupo y desean hablarse, todas las
radios deben ajustarse al mismo canal, códigos IE y VS. Si tiene
interferencia y necesita cambiar los canales y códigos,
asegúrese que cambió los ajustes de todas las radios en el
grupo. Ver k, más adelante.
Cómo Encender Y Apagar La Radio
1. Gire el botón P en el sentido del reloj hasta que escuche un clic
1
y ajuste el volumen a un nivel agradable. El LED destellará rojo, la
2
visualización mostrará brevemente todos los segmentos LCD y se
A
escuchará una alarma sonora (a menos que los tonos de la Alarma
estén desconectados).
2. Para apagar la radio, gire el botón P en el sentido contrario del
reloj hasta que se escuche el clic.
3. El LED en la parte superior izquierda de la radio destella cada tres
segundos cuando la radio está encendida.
Precaución: No mantenga la radio o un accesorio de audio muy
cerca de su oído cuando el volumen esté muy alto. Esto podría dañar
su oído.
El Medidor De Batería
El medidor de batería, situado en la esquina superior izquierda de la
pantalla, indica hasta qué punto está cargada la batería.
Tipo de batería 3 Barras 2 Barras 1 Barra Destello
dbcm
NiMH 100%-85% 85%-25% 25%-10% 10% final
Pilas alcalinas AA 100%-70% 70%-40% 40%-10% 10% final
Nota: Retire las pilas antes de guardar su radio por periodos
extensos. Las pilas se corroen con el pasar del tiempo, y
pueden causar daños permanentes a su radio.
Monitor E Indicador De Potencia De Señal
Antes de transmitir, es aconsejable monitorizar el canal para
comprobar si hay actividad, y asegurarse de que no interrumpirá a
otros usuarios en el canal.
1. Presione y mantenga J hasta que aparezca p, en la
8
pantalla y el LED del frontal de la radio comience a destellar una vez
por segundo.
2. El icono p tiene un número debajo, que señala la fuerza de
cualquier señal entrante de 0 (la más débil) a 6 (la más fuerte).
Escuchará un sonido estático si el canal está disponible para usar.
7 Español
Page 70

Para Hablar A Otra Persona
1. Compruebe la actividad en el canal como se describe
anteriormente.
2. Para maximizar la claridad, mantenga la radio a 5,0 a 7,5cms. de su
boca.
3. Presione M y hable por la radio. El LED rojo destella
3
constantemente mientras transmite.
4. Para recibir un mensaje, suelte M.
8 Español
Page 71

k MODO DE PROGRAMACIÓN
La radio tiene un modo de programación separado para permitirle
que ajuste las funciones de la radio, que no necesitan cambiarse
frecuentemente. Hay cinco ajustes de funciones que puede cambiar
en este menú.
1. Para seleccionar Modo de Programación encienda la radio
mientras sujeta los botones M y J por tres segundos. La radio
emitirá una corta señal de los tonos y aparecerá el icono k al
lado izquierdo de la pantalla.
2. Cuando termine de programar, presione M por dos segundos para
salir de k.
A. Canales
Presione ] o [ para seleccionar un canal de configuración.
7/10
B. Códigos De Eliminación De Interferencia
1. Seleccione el canal donde desea cambiar los códigos IE.
2. Presione una vez \ - el código IE comenzará a destellar
5
intermitentemente
3. Utilice ] o [ para seleccionar el código deseado. (el código 0
desactiva el código IE para el canal, que comúnmente se denomina
"modo de silenciamiento por portadora"
4. Presione M brevemente para salir del menú o por dos segundos
para salir de k.
1. Seleccione el canal en el cual desea fijar el código VS.
2. Presione \ hasta que la e aparezca en la pantalla al lado del
número del canal.
3. Utilice ] o [ para seleccionar el código deseado. (el código 0
desactiva el código VS del canal).
4. Presione M brevemente, para salir del menú o por dos segundos
para salir de k.
D. Sistema De Bloqueo
Esta función le permite desactivar las funciones de cambio de canal,
menú y escán. M, B y el Monitor pueden seguir utilizándose. Al
4
contrario del Bloqueo del Sistema de teclado, esta función no puede
cancelarse utilizando \.
1. Presione \ hasta que la f aparezca en la pantalla.
2. Utilice ] o [ para escoger Y (para activar) o n (para
desactivar). El icono f permanece cuando se elige la Y.
E. Asignación De Canales A Los Botones De Pre-Programación
1. Seleccione el canal que desea asignar para el botón de PreProgramación.
2. Presione y mantenga T o S hasta que la radio emita la señal que
6/9
confirma la asignación.
C. Códigos De Distorsión De Voz
Esta función le da mayor privacidad. Cualquiera que esté escuchando
en el mismo canal y código IE, podrá escuchar voces distorsionadas,
a menos que tengan un código VS que se iguale al suyo.
9 Español
Page 72

FUNCIONES (MODO NORMAL)
Cambio De Canales
Presione ] o [ para seleccionar el canal deseado.
Brevemente, presionando T o S cambiará de canal al pre-
seleccionado en ese botón.
Tonos De Llamadas
La radio puede transmitir tonos de llamadas a otras radios en el
grupo, por lo que puede alertarlos que está a punto de hablar. Una
vez que el tono de llamada esté fijado, presione B para transmitir el
tono de llamada a otros. Existen tres únicos tonos de llamadas para
elegir o puede escoger cancelar los tonos de llamadas.
1. Para fijar los tonos de llamada, presione \ hasta que E
aparezca en la pantalla.
2. Escoja el tono de llamada entre los tres disponibles. Al elegir 0 se
cancelan los tonos de llamadas.
3. Presione brevemente M para salir.
Uso Manos Libres (VOX)
Esta función le permite activar su transmisor de radio utilizando la voz
en vez de presionando el botón M. Puede utilizar la radio sola, en el
modo manos libres, o utilizar un accesorio de audio opcional,
autorizado, de Motorola.
Cómo Utilizar La Función VOX Sin Un Accesorio
1. Encienda su radio con la M presionada. Aparecerá g en la
pantalla para indicar que la función VOX está activa.
2. Para transmitir, hable en el micrófono. Para recibir, pare de hablar.
3. Para desconectar el modo manos libres temporalmente, presione
brevemente M. El icono g destellará intermitentemente.
4. Presione brevemente M, para reconectar el modo manos libres.
Cómo Utilizar El Dispositivo VOX Con Un Accesorio
1. Apague su radio
2. Abra la cubierta del accesorio e inserte el accesorio de audio en el
conector de accesorios
3. Encienda la radio. El icono g aparecerá en la pantalla para indicar
que la función VOX está activada. Si el icono g está intermitente,
VOX está desactivada en el menú de Sensibilidad (véase más
adelante – cambie ajustes a 1, 2, 3 para permitir la operación
VOX).
4. Para transmitir, hable en el micrófono del accesorio. Para recibir,
pare de hablar.
5. Para salir del modo manos libres, presione M.
Nota: Habrá una breve demora entre el momento en que hable y en el
que la radio transmita, y mayor demora entre el momento en
que deje de hablar y en que la radio esté lista para recibir. Esto
permitirá pausas al hablar.
Nota: Cuando utilice accesorios de audio con su radio,
recomendamos que el volumen se mantenga a un nivel auditivo
adecuado. Antes de colocar el accesorio en su cabeza u oído,
baje el volumen de la radio.
Sensibilidad Del Micrófono Y Del VOX
Lae sensibilidad del micrófono y del VOX de la radio, pueden
ajustarse según sea el entorno, ruidoso o silencioso, así como para
usuarios que hablen fuerte o suavemente.
10 Español
Page 73

1. Para cambiar la sensibilidad, presione dos veces el botón \ (el
número de ajuste, de tamaño grande, destellará intermitentemente)
y la pantalla mostrará el icono g y el nivel de sensibilidad que está
fijando:
? - Ganancia del micrófono
H - VOX con accesorio de audio
I - VOX sin accesorio de audio
2. Utilice ] o [ para escoger entre los niveles de sensibilidad
disponibles:
1 - Si habla fuerte o si está en un lugar bullicioso
2 - Adecuado para la mayoría de las aplicaciones
3 - Si habla suavemente o está en un entorno silencioso
Para desactivar la operación VOX (VOX sólo con accesorios
de audio), seleccione 0.
Escán
Esta función le permite monitorizar otros canales. Cuando la radio
detecta actividad, deja de rastrear y se detiene en el canal activo.
Esto le permite escuchar y hablar con la persona, transmitiendo sin
tener que cambiar de canal.
Cuando activa el escán, buscará cada uno de los 8 canales, usando
el código IE que seleccionó para cada canal. Si desea rastrear sin los
códigos IE (escán de silenciamiento por portadora), comience a
rastrear en el canal que tiene el Código IE posicionado en 0. Puede
también programar su radio para rastrear canales específicos,
apagando los otros canales en la lista del escán.
1. Para comenzar el escán, presione brevemente J. El icono h
aparecerá en la pantalla y el número mayor de canal comenzará a
desplazarse por los canales.
2. Cuando se detecte actividad de canales, el escán se suspenderá y
la pantalla mostrará el número de canales y el código IE,.
3. Tras esto, puede hablar con la persona en el nuevo canal y código
IE, presionando M.
4. El escán volverá a comenzar después de 5 segundos de inactividad
en el canal.
5. Si presiona M mientras la radio está rastreando, la radio
transmitirá en el canal que seleccionó antes de activar la función
escán.
6. Para detener el escán, brevemente presione J.
Avance de Escán
Esto permite ‘saltar’ un canal durante el escán, de modo que puede
continuar verificando si hay otra actividad. Cuando la radio se
detiene en un canal de actividad durante el escán, presione ] para
continuar el rastreo.
Eliminación De Canal "No Deseado"
Esta función elimina temporalmente cualquier canal "no deseado" de
su lista de escán. Cuando su radio se detiene en un canal "no
deseado" durante el rastreo, presione [ para quitar temporalmente
el canal de su lista de escán. El canal regresará a la lista de escán
cuando se salga de la actividad de rastreo.
11 Español
Page 74

Cómo Editar La Lista De Escán
1. Presione \ hasta que aparezca la h en la pantalla. El número
del canal destellará intermitente y el número del código IE se
reemplazará con el destello de la Y o n.
2. Utilice ] o [ para seleccionar el canal deseado.
3. Utilice J para seleccionar Y para incluir el canal en la lista de
escán o n para excluir el canal de la lista.
4. Presione M brevemente para salir.
Bloqueo De Teclado
Esta función le permite desconectar el teclado de la misma manera
que el Sistema de Bloqueo, pero el teclado puede ser bloqueado y
desbloqueado más fácilmente.
Para bloquear o desbloquear el teclado, presione y mantenga el
botón \ por tres segundos. La radio emitirá una corta señal de
tonos y la f aparecerá en la pantalla o desaparecerá de la misma.
Tono De Fin De Transmisión
Al activarlo, la radio transmitirá un tono singular cuando termina de
transmitir, y también transmitirá el tono localmente en su radio.
Para activar o desactivar el tono de fin de transmisión, presione y
mantenga el botón ] superior, mientras enciende la radio.
Tonos Del Teclado
Cada vez que presiona un botón en su radio, ésta emite una señal de
confirmación, a menos que esta función no esté conectada.
Para activar o desactivar los tonos del teclado, presione y mantenga
el botón [ mientras enciende su radio. Esta función controla
también los sonidos locales de los tonos de fin de transmisión y los
tonos de llamada, si bien, estos tonos aún se transmiten.
Cómo Volver A Fijar Los Ajustes De Fábrica
Encienda la radio mientras presiona los botones M y \ por tres
segundos. La radio emitirá una corta señal de tonos y los ajustes de
fábrica se restaurarán.
Clonación
La función de clonación está disponible con un cargador multiunidad
(MUC) IXPN4002 (versión UK 3-pin) o IXPN4003 (versión Europea 2pin). Esto le permite copiar sus ajustes a otras radios. Refiérase al
manual del usuario provisto con su MUC.
Luz De Fondo
Su radio tiene pantalla con luz de fondo. Al encender la radio,
presione cualquier botón menos M y B, la pantalla se iluminará
por aproximadamente cuatro segundos.
Temporizador
La radio emitirá un tono de alerta y detendrá la transmisión si se
presiona M por más de 60 segundos continuos, o si la transmisión
VOX está activa por más de 60 segundos continuos.
12 Español
Page 75

MÁS INFORMACIÓN
Alcance De Transmisión
Las radios XTN446 han sido diseñadas para maximizar su
funcionamiento y mejorar el alcance de transmisión en campo
abierto.. Es recomendable que no utilice las radios más cerca de 1,5
metros, para evitar interferencias.
El alcance de transmisión depende del terreno. Puede ser afectado
por estructuras de hormigón, denso follaje y utilizando las radios en
interiores o en vehículos.
Alcance óptimo Alcance medio Alcance mínimo
El alcance óptimo ocurre en terrenos planos y superficies abiertas
con hasta 5 kilómetros cobertura. El alcance medio se dá cuando hay
edificios y árboles. El alcance mínimo ocurre cuando densos follajes
y montañas obstruyen la vía de comunicación.
13 Español
Page 76

Solución De Problemas
Problema Solución
Sin alimentación Reposicione o cambie las pilas AA. Recargue o cambie la batería NiMH.
Mensaje no transmitido Asegúrese que M esté completamente presionado al transmitir. Reposicione y/o cambie baterías.
Mensaje no recibido Confirme que las radios estén en el mismo canal y ajustes de códigos IE y VS. Asegúrese que no se ha
presionado M inadvertidamente. Reposicione y/o cambie baterías. Los obstáculos, el funcionamiento en
interiores o en vehículos, pueden interferir en la comunicación. Cambie su posición. Asegúrese de haber subido
el volumen.
Mensajes distorsionados Los ajustes de códigos VS no se ajustan a otras radios, todas las radios deben utilizar el mismo código VS.
Escuchando otra conversación Confirme que el código de eliminación de interferencia esté fijado (los ajustes activos son de 1-121).
o ruido en el canal Puede estar en uso el código de eliminación de interferencia o canal compartido. Pruebe otro.
Alcance de transmisión limitado Estructuras de acero/hormigón, densos follajes y el uso en edificios y vehículos disminuirán el alcance, verifique
en un lugar despejado para obtener una señal clara, y mejorar así la transmisión. El llevar la radio muy cerca del
cuerpo, ej. en un bolsillo o en el cinturón, disminuirá el alcance, cambie la radio de lugar.
Fuerte estatismo o interferencia Radios demasiado juntas una de otra. Las radios deben estar por lo menos 1,5 metros separadas, aumente la
distancia. Radios demasiado separadas. Obstáculos interfieren en la transmisión. El alcance de transmisión es
hasta de 3 kilómetros en condiciones despejadas y sin obtáculos.
Imposibilidad de cambiar canal Asegúrese que la radio no esté bloqueada.
Baterías casi descargadas Recargue la batería NiMH o cambie las pilas AA. Temperaturas extremas afectarán la duración de la batería.
Bloqueo del sistema de teclado Quite el seguro presionando \ por tres segundos. Asegúrese que el sistema de bloqueo esté desconectado.
Imposibilidad para activar VOX Función no fijada ni activada. El nivel de sensibilidad está fijado en 0.
Reparación de productos Motorola Si aún la radio aún no funciona adecuadamente, contacte con el lugar donde realizó la compra.
14 Español
Page 77

Especificaciones
Descripción Especificaciones
Canales 8
Códigos 121
Frecuencia operacional 446.00625-446.09375 MHz
Alcance de transmisión Hasta 5 kilómetros
Fuente de alimentación 4 pilas alcalinas AA o batería
NiMH.
Duración de la batería/pilas* AA** NiMH
5% transmisión, 5% recepción
y 90% reserva 36hrs 24hrs
Tiempo de conversación 6.8hrs 4.8hrs
Reserva 63hrs 40hrs
* Típica
** Con células alcalinas de primera calidad.
Información De Garantía Limitada
Motorola garantiza al comprador original que el Comunicador
Personal y los accesorios que ha comprado a un distribuidor
autorizado Motorola (los "Productos") son conformes con las
especificaciones aplicables de Motorola en vigor en el momento de
su fabricación, por un plazo de garantía estándar de [1] año desde la
fecha de compra del/de los Producto/s (Plazo de Garantía Limitada).
Deberá informar a Motorola de la falta de conformidad con las
especificaciones aplicables de cualquiera de los Productos en un
plazo de dos (2) meses desde la fecha en que detecte un defecto en
el material, en el acabado o falta de conformidad, y en cualquier caso
en un plazo que no exceda del Plazo de Garantía Limitada, mediante
entrega del Producto para su revisión al Centro de Reparaciones
Autorizado de Motorola más cercano o al distribuidor autorizado
Motorola. Motorola no quedará obligada por las comunicaciones
relacionadas con el Producto que no hayan sido realizadas
directamente por Motorola.
Adjunto a este Producto se incluye una relación de los números de
Centros de Atención Motorola.
Durante el Plazo de Garantía Limitada, Motorola, a su discreción y sin
cargo adicional, como indemnización exclusiva, reparará o sustituirá
el Producto que no se ajuste a la presente garantía; o, en su defecto,
reembolsará hasta el importe del precio de compra pagado por el
Producto por el comprador original, pero reducido al tener en cuenta
el uso que se haya hecho del Producto desde que fue entregado. Esta
garantía expirará al término del Plazo de Garantía Limitada.
15 Español
Esta es la garantía completa y exclusiva para el comunicador
personal y los accesorios Motorola, en sustitución de cualesquiera
Page 78

otras garantías y cualesquiera otros términos y condiciones, tanto
expresos como tácitos.
Siempre que se compre el producto en condición distinta a la de
consumidor, Motorola excluye todas las demás garantías y los demás
términos y condiciones expresos o tácitos tales como idoneidad y
calidad satisfactoria.
En ningún caso Motorola será responsable por daños superiores al
precio de compra, ni de cualesquiera daños* incidentales, especiales
o indirectos derivados del uso del Producto o de la incapacidad de
usar el mismo, en la medida en que ello pueda ser excluido
legalmente.
La presente Garantía Limitada no afecta a ningún derecho
establecido legalmente que pueda tener como consumidor, tal como
la garantía de calidad satisfactoria e idoneidad para el propósito para
el cual los productos del mismo tipo se usan normalmente en
condiciones normales de uso y servicio, ni cualesquiera derechos
contra el vendedor de los Productos que deriven de su contrato de
compraventa.
(*) incluyendo, sin limitación, pérdida de uso, pérdida de tiempo,
inconvenientes, pérdida comercial, daños emergentes, lucros
cesantes o pérdida de ahorros.
¿Cómo Obtener Servicio En Garantía?
En la mayoría de los casos, el distribuidor autorizado Motorola que
vendió su comunicador personal y los accesorios originales Motorola
hará frente a las reclamaciones en garantía y/o prestará el servicio
en garantía. También podrá Vd. recibir el servicio en garantía del
Centro de Reparaciones Autorizado de Motorola que tenga más
próximo.
Si necesita información adicional, póngase en contacto con el
distribuidor autorizado Motorola que le vendió su comunicador
personal Motorola o con el Centro de Atención de Motorola, en los
números de teléfonos para su país indicados más abajo.
Para solicitar el servicio en garantía deberá entregar el comunicador
personal. Cuando el Producto se envíe o entregue a cualquier Centro
de Reparaciones Autorizado, deberá ir acompañado de una etiqueta
con su nombre, dirección y número de teléfono y la descripción del
problema.
Para poder tener derecho al servicio en garantía, deberá presentar
su recibo de compra o una prueba sustitutoria comparable de la
compra, donde conste la fecha de la misma. El comunicador ha de
mostrar también claramente el número de serie como número de
referencia. Esta información viene con el Producto.
Condiciones
La presente garantía limitada no será aplicable si el modelo o los
números de serie que aparecen en el Producto han sido borrados,
eliminados, se han hecho ilegibles o si la etiqueta del comunicador
ha sido modificada de cualquier otra forma. Motorola se reserva el
derecho de rechazar un servicio en garantía gratuito si no se
presenta la documentación exigida o si la información es incompleta,
ilegible o incompatible con los registros de fábrica.
16 Español
Page 79

La reparación podrá incluir, a elección de Motorola, la sustitución de
piezas o placas por piezas o placas funcionalmente equivalentes,
reparados o nuevos. Los accesorios, piezas, baterías o placas
sustituidos estarán garantizados durante el resto del plazo de
garantía original. El Plazo de Garantía Limitada no se ampliará. Todos
los accesorios, baterías, piezas y equipo del comunicador personal
originales que hayan sido sustituidos pasarán a ser propiedad de
Motorola. Motorola no garantiza la instalación, el mantenimiento o la
revisión de los productos, accesorios, baterías o piezas.
Motorola no será responsable, bajo ningún concepto, de los
problemas o daños causados por cualquier equipo auxiliar que no
haya sido suministrado por Motorola y que esté incluido en los
Productos o que se use en relación con los mismos, o del
funcionamiento del equipo Motorola con cualquier equipo auxiliar,
excluyéndose expresamente tal equipo de la presente garantía.
Cuando se use el Producto junto con un equipo auxiliar o periférico
que no haya sido suministrado por Motorola, ésta no garantizará el
funcionamiento de la combinación Producto/periférico, ni hará frente
a ninguna reclamación de garantía si el Producto se usa con tal
combinación y Motorola determina que no existe ningún defecto en
el Producto. Motorola rechaza específicamente toda responsabilidad
por daños a equipos ya sean Motorola o no, causados de cualquier
modo por el uso del comunicador personal, de los accesorios y de los
periféricos (los ejemplos específicos comprenden, sin limitación,
baterías, cargadores, adaptadores y fuentes de alimentación) cuando
tales accesorios y periféricos no sean fabricados y suministrados por
Motorola.
¿Qué No Cubre La Garantía Limitada?
La presente garantía limitada no es válida si los defectos se deben a
daño, mal uso, alteración, negligencia o descuido y en caso de
modificaciones o reparaciones realizadas por personas no
autorizadas.
1. Defectos o daños derivados del uso del Producto que no sea el
normal y habitual.
2. Defectos o daños debidos a mal uso, accidente o negligencia.
3. Defectos o daños debidos a verificaciones, utilización,
mantenimiento o ajuste impropios, o a alteraciones o
modificaciones de cualquier clase.
4. Roturas o daños de las antenas a menos que éstos sean causados
directamente por defectos en los materiales o en el acabado.
5. Productos desmontados o reparados de tal forma que perjudiquen
el rendimiento o impidan la adecuada inspección y realización de
pruebas con el objeto de verificar toda reclamación en garantía.
6. Defectos o daños debidos al alcance.
7. Defectos o daños debidos a humedad, líquidos o alimentos.
8. Todas las superficies de plástico y todas las demás piezas externas
arañadas o dañadas por el uso normal del cliente.
9. Productos alquilados de forma temporal. Mantenimiento periódico
y reparación o sustitución de piezas debido al uso y desgaste
normales.
10. Mantenimiento periodico y reparacion o sustitucion de piezas
debido al uso y desgaste normales.
17 Español
Page 80

Nota: El tiempo de llamada, el tiempo en espera y el ciclo total de
vida de una batería recargable Motorola para su radio dependerán
de las condiciones de uso. Como producto de consumo, las
especificaciones indican que se puede obtener un rendimiento
óptimo de su radio Motorola dentro de los seis primeros meses a
partir de la fecha de compra y hasta haber realizado (200?) cargas.
La garantía de las baterías recargables Motorola será nula si (i) las
baterías se cargan con cargadores que no sean los cargadores
homologados de Motorola especificados para la carga de baterías,
(ii) alguno de los sellos de la batería está roto o muestra indicios de
violación, y (iii) se utiliza la batería en un equipo o servicio que no
sea el equipo del radio para el cual ha sido especificada.
Información Del Copyright
Los productos Motorola descritos en este manual podrán incluir
programas registrados, almacenados en memorias de
semiconductores u otros medios. Las leyes de los Estados Unidos y
otros países conservan para Motorola, algunos derechos exclusivos
correspondientes a programas informáticos registrados, incluyendo
el derecho exclusivo de copiar o reproducir en cualquier forma, los
programas registrados de Motorola. Por consiguiente, ningún
programa informático registrado de Motorola contenido en los
productos Motorola descritos en este manual podrá copiarse o
reproducirse de manera alguna sin el consentimiento expreso escrito
de Motorola. Asimismo, la compra de productos Motorola no se
considerará como que otorga directa o implícitamente, por exclusión,
o de otra manera, ninguna licencia al amparo de los derechos de
autor, patentes o solicitudes de patente de Motorola, salvo en lo que
se refiere a la licencia de uso libre de derechos normal que surge en
la operación legal de la venta de un producto.
Para más información llame al:
Desde dentro de España: 91 400 2038
Desde fuera de España: +34 91 400 2038
, MOTOROLA son marcas comerciales de Motorola, Inc.
Talkabout es una marca comercial de Motorola, Inc.
© 2001 Motorola, Inc.
18 Español
Page 81

ACCESORIOS APROBADOS
Micrófono altavoz remoto
(HMN9026)
Combinación de altavoz y micrófono con
interruptor PTT, para llevar sobre la
solapa o al cuello. Le permite hacer
funcionar la radio sin tener que sacarla
del cinturón o de la cartuchera.
VOX casco con auriculares con
micrófono giratorio (ENMN4002)
Casco cómodo, ligero que ayuda a
eliminar los ruidos del entorno.
Operación manos libres con la
característica VOX en su radio.
Auricular con micrófono y PTT
(HMN9025)
Auricular discreto, ligero con micrófono e
interruptor PTT para llevar sobre la solapa
o al cuello. Favorece la comunicación
clara con el mínimo de interferencia.
Auricular VOX con micrófono
(HMN9039)
Auricular ligero adaptable a su
comodidad en torno al oído. Operación
manos libres con la característica VOX
en su radio.
Cubierta de cuero
(NNTN4020)
Cubierta de cuero resistente con
ventanilla protectora de visualización.
Puede llevarse como cartuchera segura
para la radio cuando se lleva en el
cinturón.
Bolsa impermeable
(ENLN4042)
La bolsa impermeable transparente
ofrece protección de los elementos y es
sumergible mientras la radio funciona.
Obligatoria para aquellos dedicados a los
deportes acuáticos.
19 Español
Page 82

Cargador de inserción Euro 2hr
(IXPN4001)
Carga rápida y conveniente.
Cargador de unidades múltiples Euro
(IXPN4003AR)
Para la carga y sincronización de hasta
seis radios.
Batería recargable NiMH
(NTN8971 ó NNTN4190)
La tranquilidad de contar con un
repuesto. La batería recargable es muy
necesaria en los casos donde hay mucha
actividad.
20 Español
Page 83

INDICE
ITALIANO
INFORMAZIONI GENERALI E DI SICUREZZA 1
Procedura Di Trasmissione E Ricezione 1
Esposizione Alle Onde Elettromagnetiche A Radiofrequenza 1
Compatibilità/Disturbi Elettromagnetici 2
Informazioni Di Carattere Generale E Di Sicurezza 3
Avvertenze Per L’uso 3
Precauzioni Operative 3
OPERAZIONI PRELIMINARI 5
Batterie 5
Come Inserire La Batteria Al NiMH 5
Come Inserire Le Pile Stilo (AA) 5
Come Caricare La Batteria Al NiMH Con Il Caricabatterie Rapido 5
Spie Sul Caricabatterie 6
Inserimento E Rimozione Dall’astuccio 6
PRIMA DELLA CONVERSAZIONE 7
Canali E Codici 7
Come Accendere E Spegnere La Radio 7
Segnalatore Di Carica Della Batteria 7
Indicatore Visivo Di Attività Canale Ed Intensità Segnale 7
Come Iniziare La Trasmissione 7
MODALITÀ PROGRAMMAZIONE 8
A. Canali 8
B. Codici Soppressione Radiodisturbi 8
C. Codici Criptaggio Voce 8
D. Esclusione Selettiva Funzione 8
E. Attribuzione Canali Ai Pulsanti Predefiniti 8
FUNZIONI (MODALITÀ NORMALE) 9
Canali 9
Segnali Di Chiamata 9
Funzionamento In Viva Voce (VOX) 9
Sensibilità Microfono E VOX 10
Ricerca Canali 10
Come Modificare L’elenco Dei Canali Da Cercare 11
Esclusione Tastiera 11
Segnale Di Fine Trasmissione 11
Segnali Utilizzo Tastiera 11
Come Ripristinare Le Impostazioni Di Fabbrica 11
Duplicazione Delle Impostazioni 11
Retroilluminazione Del Display 11
Timer Segnalazione Tempo Scaduto 11
INFORMAZIONI SUPPLEMENTARI 12
Portata Della Radio 12
Individuazione E Risoluzione Dei Problemi 13
Dati Tecnici 14
Informazioni Sulla Garanzia 15
Informazioni Sui Diritti D’autore 17
ACCESSORI APPROVATI 18
Page 84

INFORMAZIONI GENERALI E DI SICUREZZA
INFORMAZIONI IMPORTANTI SUL FUNZIONAMENTO SICURO ED
EFFICIENTE.
LEGGERE QUESTE INFORMAZIONI PRIMA DI USARE LA RADIO.
Le informazioni riportate nel presente documento sostituiscono le
informazioni sulla sicurezza riportate nei manuali d’uso pubblicati
prima del giugno 2001. Per informazioni sull’utilizzo della radio in
ambienti pericolosi, si rimanda alla lettura della scheda informativa o
del documento integrativo al manuale approvato dalla Factory Mutual
(FM), in dotazione con tutti i modelli che offrono questa capacità.
PROCEDURA DI TRASMISSIONE E RICEZIONE
Questa ricetrasmittente contiene un trasmettitore e un ricevitore. Per
trasmettere (parlare), premere il pulsante PTT; per ricevere
(ascoltare) rilasciare il pulsante PTT.
ESPOSIZIONE ALLE ONDE ELETTROMAGNETICHE A
RADIOFREQUENZA
La radio Motorola è stata realizzata in ottemperanza alle normative
nazionali e internazionali sull’esposizione degli esseri umani alle onde
elettromagnetiche a radiofrequenza:
• Commissione Federale per le Telecomunicazioni degli Stati Uniti,
Codice delle Disposizioni federali; 47 CFR parte 2 e sotto-parte J
• Istituto Nazionale Americano di Standardizzazione (ANSI) / Istituto
degli ingegneri elettrotecnici ed elettronici (IEEE) C95. 1-1992
• Istituto degli ingegneri elettrotecnici ed elettronici (IEEE) C95. 1Edizione 1999
• Comitato Nazionale Americano per la Protezione e la Misurazione
delle Radiazioni (NCRP), Resoconto 86, 1986
• Consiglio Internazionale per la Protezione dalle Radiazioni non
ionizzanti (ICNIRP) 1998
• Codice sulla sicurezza 6 del Ministero della Sanità (Canada). Valori
massimi di esposizione ai campi elettromagnetici a radiofrequenza
nelle frequenze comprese fra 3 kHz e 300 GHz, 1999.
• Authority Australiana sulle Radiocomunicazioni (Esposizione a
radiazioni elettromagnetiche) Standard 2001
• ANATEL, Authority di Regolamentazione Brasiliana, Risoluzione 256
(11 aprile 2001) "requisiti supplementari per la certificazione di
prodotti SMR, cellulari e PCS."
Al fine di ottenere le prestazioni ottimali della radio e di assicurare
che l’esposizione del corpo alle onde elettromagnetiche a
radiofrequenza sia conforme ai limiti previsti dalle normative di cui
sopra, osservare sempre le istruzioni indicate qui di seguito:
Utilizzo Della Radio Ricetrasmittente
Quando si utilizza l’unità come una tradizionale radio
ricetrasmittente, mantenerla nell’assetto verticale, con il
microfono a 5 - 7,5 cm dalle labbra.
Utilizzo Della Radio Indossata
Al fine di assicurare la conformità alle normative imposte dalla FCC
relative all’esposizione alle onde elettromagnetiche a radiofrequenza,
quando si trasmette con la radio indossata, utilizzare sempre un
gancio, astuccio, custodia o cintura approvati dalla Motorola.
L’utilizzo di accessori non approvati dalla Motorola può provocare il
superamento dei limiti previsti dalle suddette normative. Qualora
non si utilizzi un accessorio per custodire la radio, verificare che
durante la trasmissione la radio e l’antenna siano tenute alle
seguenti distanze minime dal corpo:
1 Italiano
Page 85

• Modalità telefono o ricetrasmissione: 2,5 centimetri
Manutenzione Dell’antenna
Utilizzare esclusivamente l’antenna in dotazione o un’antenna
approvata.
L’utilizzo di antenne e accessori non approvati o l’esecuzione di
modifiche non approvate possono danneggiare la radio e violare le
disposizioni previste dalla FCC.
NON afferrare l’antenna quando la radio è "IN USO". Tenendo
l’antenna in mano si pregiudica la qualità della chiamata e può
accadere che la radio funzioni ad un livello di potenza superiore al
necessario.
Aeromobili
Quando si è a bordo di un aeromobile, spegnere la radio quando si
viene invitati a farlo dagli assistenti di volo. L’uso della radio deve
rispettare le normative pertinenti di cui alle istruzioni per l’equipaggio.
Apparecchi Medicali
• Pace-maker
L’Associazione dei costruttori di apparecchi medicali consiglia di
mantenere sempre una distanza di almeno 15 centimetri fra una radio
portatile e un pace-maker, in ottemperanza agli esiti delle ricerche
indipendenti condotte sugli apparecchi tecnologici portatili.
Le persone che hanno un pace-maker devono:
Accessori approvati
Per un elenco degli accessori Motorola approvati, consultare
l’appendice o la sezione sugli accessori della Guida utente della
radio.
COMPATIBILITÀ/DISTURBI ELETTROMAGNETICI
NOTA: Quasi tutti gli apparecchi elettronici sono soggetti a disturbi
elettromagnetici qualora non vengano opportunamente schermati,
progettati o configurati al fine di assicurarne la compatibilità
elettromagnetica.
Locali Pubblici
Onde evitare disturbi elettromagnetici e/o assicurare la compatibilità
con altri apparecchi, spegnere sempre la radio nei locali pubblici che
espongono avvisi in tal senso. Gli ospedali o i locali destinati
all’assistenza sanitaria possono contenere apparecchi sensibili ad
onde elettromagnetiche a radiofrequenza esterne.
• SEMPRE tenere la radio ad almeno 15 centimetri di distanza dal
pace-maker a radio ACCESA.
• Non custodire la radio nel taschino.
• Ascoltare la radio dall’orecchio dal lato opposto a quello del
pace-maker onde evitare di provocare disturbi al funzionamento
dello stesso.
• Qualora si osservino disturbi di funzionamento del pace-maker,
SPEGNERE immediatamente la radio.
• Apparecchi acustici
Alcune radio digitali portatili provocano radiodisturbi ad alcuni
apparecchi acustici. In questo caso, rivolgersi al fabbricante
dell’apparecchio acustico per discutere eventuali alternative.
• Altri apparecchi medicali
Qualora si utilizzi un altro apparecchio medicale personale, rivolgersi
al fabbricante dell’apparecchio stesso per sincerarsi che sia
opportunamente schermato dalle onde elettromagnetiche a
radiofrequenza. Consultare eventualmente il proprio medico.
2 Italiano
Page 86

INFORMAZIONI DI CARATTERE GENERALE E DI SICUREZZA
Uso Durante La Guida
Informarsi sulle normative e sulle disposizioni vigenti sull’uso di radio
nell’area in cui si guida ed osservarle.
Quando si utilizza la radio mentre si guida un veicolo, osservare le
seguenti istruzioni:
• Concentrarsi sulla guida e sulla strada.
• Inserire la funzione viva voce quando si desidera utilizzare la radio
durante la guida.
• Accostare e parcheggiare il veicolo prima di effettuare o di
rispondere a una chiamata qualora le condizioni di guida lo
richiedano.
AVVERTENZE PER L’USO
VEICOLI DOTATI DI AIR BAG
Non posizionare la radio portatile sopra l’air bag o nell’area di
gonfiaggio dello stesso. Gli air bag si gonfiano con grande forza.
Qualora l’air bag venga attivato e la radio portatile si trovi nell’area di
gonfiaggio dell’air bag, la radio può essere scaraventata con violenza
e provocare gravi infortuni al conducente o ai passeggeri.
AMBIENTI DEFLAGRANTI
Spegnere la radio prima di entrare in aree deflagranti, a meno che la
radio sia abilitata all’utilizzo in tali aree (se, ad esempio, è omologata
Factory Mutual, CSA o UL). Non togliere, inserire o cambiare le
batterie in aree deflagranti. La formazione di scintille in aree
deflagranti può provocare esplosioni od incendi, con conseguenti
infortuni anche mortali.
NOTA: Le aree deflagranti menzionate nel paragrafo di cui sopra
comprendono: aree destinate al rifornimento di carburante, come nei
piani inferiori di imbarcazioni, nei locali destinati alla movimentazione
e alla conservazione di carburante e prodotti chimici, negli ambienti
in cui sono presenti sostanze chimiche, pulviscolo di cereali o polveri
di metallo, nonché nelle aree che espongono avvisi che invitano gli
automobilisti a spegnere il motore. In genere, le aree deflagranti sono
segnalate, ma non necessariamente.
DETONATORI ED AREE DESTINATE AD ESPLOSIONI
Onde evitare di disturbare le operazioni di abbattimento con esplosivi,
spegnere la radio in prossimità di detonatori elettrici o nelle aree
destinate ad esplosioni che presentano avvisi con la dicitura:
"Spegnere le radio ricetrasmittenti". Leggere gli avvisi ed osservare le
istruzioni riportate.
PRECAUZIONI OPERATIVE
ANTENNE
Non utilizzare una radio portatile la cui antenna sia danneggiata.
L’eventuale contatto con la pelle di un’antenna danneggiata può
provocare leggere ustioni.
BATTERIE
Tutte le batterie possono provocare danni alle cose e/o infortuni alle
persone; possono ad esempio provocare ustioni qualora i morsetti
esposti della batteria vengano a contatto con materiali conduttivi
come gioielli, chiavi o collane. I materiali conduttivi possono
provocare la chiusura di un circuito elettrico (cortocircuito), con
conseguente surriscaldamento. Prestare la massima attenzione
durante il maneggio di una batteria, in particolare quando la batteria
3 Italiano
Page 87

è custodita in una tasca, un borsellino o in un altro contenitore che
contenga oggetti di metallo.
ISTRUZIONI PER LA SICUREZZA DEL CARICABATTERIE
Prima di usare il caricabatterie, leggere le relative istruzioni e le
avvertenze riportate su:
1. la batteria
2. il caricabatterie e
3. la radio che usa la batteria.
Attenzione: Al fine di minimizzare il rischio di infortuni, ricaricare
esclusivamente batterie ricaricabili (E)NTN8971 o (E)NNTN4190.
L’utilizzo di altri tipi di batterie può provocarne l’esplosione e
conseguenti danni alle cose e infortuni alle persone.
CONSERVARE QUESTE ISTRUZIONI
1. Non esporre il caricabatterie a pioggia o neve.
2. Non utilizzare il caricabatterie qualora sia caduto o sia stato urtato
con violenza o presenti danni anche di lieve entità.
3. Non smontare il caricabatterie qualora sia caduto o sia stato urtato
con violenza o presenti danni anche di lieve entità.
4. Non manomettere il cavo e la spina c.a. in dotazione con il
caricabatterie. Qualora la spina non si inserisca nella presa c.a.,
affidare ad un elettricista qualificato l’incarico di installare una
presa c.a. La presenza di una condizione elettrica impropria può
provocare scosse elettriche.
5. Per ridurre il rischio di danneggiare il cavo o la spina, afferrare la
spina e non il cavo quando si stacca il caricabatterie dalla presa
c.a.
6. Per ridurre il rischio di scosse elettriche, prima di eseguire
interventi di manutenzione o pulizia scollegare il caricabatterie
dalla presa c.a.
7. L’utilizzo di un accessorio non approvato o venduto dalla Motorola
può provocare incendi, scosse elettriche o infortuni.
8. Sincerarsi che il cavo sia disposto in maniera tale che nessuno vi
possa inciampare e che non sia soggetto a danni o tensioni.
9. Non usare prolunghe salvo ove sia assolutamente necessario. L’uso
di una prolunga non adeguata può portare al rischio di incendio e/o
scossa elettrica. Se occorre utilizzare una prolunga, sincerarsi che:
• Gli spinotti della prolunga corrispondano in numero, dimensione e
forma agli spinotti del caricabatterie.
• La prolunga sia cablata correttamente e in buone condizioni
elettriche.
2
• Le dimensioni del cavo siano di 18 AWG (1mm
2
e 16 AWG (1.3mm
) per tratti fino a 45m.
) per tratti fino 30m
10. Il cavo di alimentazione di questo caricabatterie non può essere
sostituito. In caso di danneggiamento, contattare il Servizio di
assistenza per prodotti Motorola:
Italy: 02 522071
Altri paesi: +39 02 522071
4 Italiano
Page 88

OPERAZIONI PRELIMINARI
Come Inserire Le Pile Stilo (AA)
Le radio ricetrasmittenti Motorola XTN446 funzionano su frequenze
PMR446 e possono essere utilizzate in qualsiasi paese del mondo che
autorizzi l’uso delle frequenze PMR446, in ottemperanza alle
normative vigenti.
Si rimanda alla visione degli schemi e delle tabelle riportate nella
copertina del presente manuale.
Batterie
La radio è alimentata da una batteria ricaricabile al nichel-metal
idruro (NiMH) o da 4 pile stilo. Per informazioni sull’autonomia delle
batterie, vedi pagina 14.
Come Inserire La Batteria Al NiMH
1. Far scorrere la chiusura zigrinata presente sul fondo della radio
lontano dal coperchio e verso i contatti.
2. Far scorrere il coperchio verso il fondo della radio ed estrarlo.
3. Inserire la batteria, con la grafica Motorola rivolta verso l’alto e i
contatti della batteria rivolti verso il fondo della radio, nella parte
superiore del vano portabatterie.
B
4. Spingere con decisione la batteria verso l’alto ed inserirla nel vano
portabatterie.
5. Far scorrere e bloccare in posizione il coperchio del vano
portabatterie.
AVVERTENZE
Il presente prodotto deve essere alimentato ESCLUSIVAMENTE dalla
batteria ricaricabile Motorola (NTN8971 o NNTN4190) e da pile stilo
alcaline. Non è consentito l’impiego di altri tipi di pile stilo (ad
esempio al NiMH o al NiCd) perché l’eventuale formazione di
cortocircuito, per quanto improbabile, sui contatti in corso di ricarica
situato sul fondo dell’apparecchio può provocare danni alle cose e
infortuni alle persone.
1. Asportare il coperchio del vano portabatterie
2. Inserire le 4 pile stilo, verificando che la polarità sia corretta.
3. Far scorrere e bloccare in posizione il coperchio del vano
portabatterie.
Come Ricaricare La Batteria Al NiMH Con Il Caricabatterie
Rapido (IXPN4000 o IXPN4001)
La batteria al NiMH può essere ricaricata quando è inserita nella
radio o meno. Al fine di assicurare la durata massima della batteria,
caricarla per una notte (16 ore) prima di utilizzarla per la prima volta.
Le ricariche successive prevedono un tempo di ricarica massimo di 3
ore.
1. Inserire l’alimentatore nella tasca prevista sul caricabatterie
C
2. Inserire l’alimentatore nella presa per c.a.
3. Inserire la radio (compresa la batteria), o solo la batteria al NiMH
nella tasca prevista sul caricabatterie
D
5 Italiano
Nota: Il mancato spegnimento della radio durante la ricarica prolunga
la durata del tempo di ricarica e l’imprecisione dell’indicatore
visivo della carica della batteria.
Page 89

Spie Sul Caricabatterie
Rossa: Carica rapida (fino a 2 ore)
Verde lampeggiante: Carica lenta dopo la carica rapida (1 ora)
Verde: Carica ultimata
Rossa lampeggiante: Il caricabatterie è in attesa che la
tensione/temperatura della batteria rientri
nei limiti previsti per la ricarica rapida
Nessuna segnalazione Inserimento errato della radio o della
batteria nella tasca del caricabatterie
Nota: L’accensione della spia LED a luce intermittente per più di un
minuto indica che la batteria è difettosa e va sostituita.
Inserimento E Rimozione Dall’astuccio
La radio prevede la dotazione di un astuccio orientabile per cintura,
che non prevede la rimozione della radio prima di inserire
quest’ultima in un caricabatterie rapido o plurifunzione.
1. Come inserire la radio nell’astuccio: far scorrere la base della radio
nell’astuccio e bloccare in posizione sulla radio il gancio situato
nella parte superiore dell’astuccio.
E
2. Come sfilare la radio dall’astuccio: agire sulla parte superiore
dell’astuccio fino a quando il gancio si stacca dalla radio ed
estrarre la radio.
6 Italiano
Page 90

PRIMA DELLA CONVERSAZIONE
Leggere attentamente il presente manuale.
Canali E Codici
La radio è dotata di 8 canali, 121 codici di soppressione disturbi (IE)
(codici IE – 38 codici PL acustici e 83 codici PL digitali– per ulteriori
ragguagli, vedi l’interno della copertina) e 3 codici di criptaggio voce
(codici VS). Durante l’uso della radio, può succedere di essere
ascoltati o disturbati da altre radio, ma il vasto numero di abbinamenti
canale/codice disponibili consente di ridurre l’evenienza di questo
problema.
Nota: Quando si desidera conversare con un gruppo di persone,
occorre predisporre tutte le radio sul medesimo canale, codice
IE e codice VS. In presenza di disturbi, sarà necessario
cambiare i codici e i canali di tutte le radio nel gruppo. Vedi il
punto k qui di seguito.
Come Accendere E Spegnere La Radio
1. Girare la manopola P in senso orario fino a quando si avverte un
1
clic e regolare a piacimento il volume. La spia LED si accende a
2
luce intermittente e il display visualizza per un breve periodo tutti i
A
segmenti LCD e viene emesso un segnale acustico (a meno che
non si sia disabilitata la funzione Segnali acustici).
2. Per spegnere la radio, girare la manopola P in senso antiorario
fino a quando si avverte un clic.
3. La spia LED sulla parte superiore sinistra della radio si accende a
luce intermittente ogni tre secondi quando la radio è accesa.
Avvertenza: Non tenere la radio o un accessorio audio troppo vicino
alle orecchie a volume alto, onde evitare di danneggiare l’udito.
Segnalatore Di Carica Della Batteria
Il segnalatore della carica della batteria si trova nell’angolo superiore
sinistro dello schermo ed indica la carica della batteria.
Tipo di batteria 3 barrette 2 barrette 1 barrette Luce intermittente
d bcm
Batteria al NiMH 100% - 85% 85% - 25% 25% - 10% Ultimo 10%
Pile stilo alcaline 100% - 70% 70% - 40% 40% - 10% Ultimo 10%
Nota: Togliere le batterie qualora non si preveda di utilizzare la radio
per lunghi periodi di tempo. Col tempo, le batterie sono soggette
a corrosione e possono danneggiare la radio.
Indicatore Visivo Di Attività Canali Ed Intensità Segnale
È buona norma controllare l’attività del canale prima di procedere alla
trasmissione, al fine di evitare di interrompere la conversazione di
altri utenti che utilizzano il medesimo canale.
1. Premere e tenere premuto J fino a quando p appare sul
8
display e la spia LED sul frontale della radio si accende a luce
intermittente ogni secondo.
2. Sotto il simbolo p c’è un numero, che indica l’intensità di
eventuali segnali in entrata, da 0 (più debole) a 6 (più forte). Il
canale può essere utilizzato quando è libero.
Come Iniziare La Trasmissione
1. Verificare l’attività del canale osservando le istruzioni di cui sopra.
2. Al fine di assicurare la massima nitidezza della conversazione,
tenere la radio a 5 - 7,5 cm di distanza dalla bocca.
3. Premere M ed iniziare a parlare nella radio. A trasmissione in
3
corso, la spia LED si accende a luce costante.
4. Per ricevere un messaggio, rilasciare il tasto M.
7 Italiano
Page 91

k MODALITÀ PROGRAMMAZIONE
La radio è dotata di una funzione di programmazione che consente di
cambiare i valori predisposti in fabbrica per le funzioni della radio,
che non devono comunque essere cambiati spesso. Le funzioni
modificabili dal menu sono cinque, indicate qui di seguito.
1. Per selezionare la Modalità programmazione, accendere la radio e
tenere premuti i pulsanti M e J per tre secondi. La radio emette
una serie di segnali acustici ed appare il simbolo k sul lato
sinistro del display.
2. A programmazione ultimata, premere M per due secondi per
uscire dalla modalità k.
A. Canali:
Agire su ] o [ per selezionare un canale da configurare.
7/10
B. Codici Di Soppressione Radiodisturbi
1. Selezionare il canale per il quale si desidera cambiare il codice IE.
2. Premere una volta \ - il codice IE comincia a lampeggiare.
5
3. Agire su ] o [ per selezionare il codice richiesto. (il codice
code 0 disattiva il codice IE per il canale selezionato. Questa
modalità è anche nota come ‘modalità di soppressione della
portante’).
4. Premere M per uscire dal menu o tenerlo premuto per due
secondi per uscire dalla modalità k.
C. Codici Di Criptaggio Voce
Questa funzione garantisce ulteriormente la riservatezza della
conversazione. Gli eventuali utenti che trasmettono sul medesimo
canale e codice ascolteranno la conversazione, che risulterà però
criptata, a meno che abbiano impostato lo stesso codice VS.
1. Selezionare il canale su cui si desideri impostare il codice VS.
2. Premere \ fino a quando appare e sul display accanto al
numero del canale.
3. Agire su ] o [ per selezionare il codice desiderato.(il codice 0
disattiva il codice VS per il canale).
4. Premere M per uscire dal menu o tenerlo premuto per due
secondi per uscire dalla modalità k.
D. Esclusione Selettiva Funzioni
Questa funzione consente di disattivare la funzione di cambio canale,
le funzioni disponibili dai menu e di ricerca canali. Sono comunque
disponibili le funzioni M, B e Verifica attività. A differenza della
4
funzione Esclusione tastiera, questa funzione può essere attivata o
disattivata tramite \.
1. Premere \ fino a quando f appare sul display.
2. Agire su ] o [ per selezionare Y (per attivare) o n (per
disattivare). Il simbolo f rimane sul display quando si seleziona Y.
E. Attribuzione Canali Ai Pulsanti Predefiniti
1. Selezionare il canale a cui si desidera attribuire il pulsante
predefinito.
2. Premere e tenere premuto T o S fino a quando viene emesso un
6/9
segnale acustico, che conferma l’attribuzione del canale.
8 Italiano
Page 92

FUNZIONI (MODALITÀ NORMALE)
Canali
Agire su ] o [ per selezionare il canale desiderato.
Premere T o S per cambiare il canale a quello predefinito per quel
pulsante.
Segnali Di Chiamata
La radio può trasmettere segnali di chiamata ad altre radio nel gruppo
per segnalare l’imminente trasmissione. Una volta predisposto il
segnale di chiamata, premere B per trasmetterlo ad altre radio. I
segnali di chiamata disponibili sono tre; volendo, è possibile
disattivare i segnali di chiamata.
1. Per impostare i segnali di chiamata, premere \ fino a quando
appare E sul display.
2. Scegliere un segnale di chiamata dei tre disponibili. La selezione di
0 disattiva i segnali di chiamata.
3. Premere M per uscire dal menu.
Funzionamento In Viva Voce (VOX)
Questa funzione consente di attivare il trasmettitore della radio con la
voce anziché tramite la pressione del pulsante M. È possibile
utilizzare la radio nella modalità viva voce senza accessori oppure
acquistare un accessorio audio approvato dalla Motorola.
Nota: Quando si utilizzano accessori audio con la radio, si consiglia di
mantenere il volume ad un livello di ascolto soddisfacente.
Prima di avvicinare l’accessorio alla testa o alle orecchie,
abbassare il volume della radio.
Come Utilizzare La Funzione VOX Senza Accessorio Audio
1. Accendere la radio con il pulsante M premuto. Appare sul display
la lettera g per indicare che la funzione VOX è abilitata.
2. Per trasmettere, parlare nel microfono.
Per ricevere, interrompere la conversazione.
3. Per uscire provvisoriamente dalla modalità viva voce, premere M.
Lampeggia sullo schermo il simbolo g.
4. Premere M per rientrare nella funzione viva voce.
Come Utilizzare La Funzione VOX Con Accessorio Audio
1. Spegnere la radio.
2. Aprire il coperchio dell’accessorio ed inserire l’accessorio audio
nell’apposito jack.
3. Accendere la radio. Il simbolo g compare sul display per indicare
l’abilitazione della funzione VOX. La visualizzazione del simbolo g a
luce intermittente indica che la funzione VOX è disattivata nel menu
Sensibilità (vedi qui di seguito – cambiare i valori a 1, 2, o 3 per
attivare la funzione VOX).
4. Per trasmettere, parlare nel microfono dell’accessorio. Per
ricevere, interrompere la conversazione.
5. Per uscire dalla funzione viva voce, premere M.
Nota: Si noterà una breve pausa tra l’inizio della conversazione e
l’inizio della trasmissione radio e una pausa più lunga tra la fine
della conversazione e l’inizio della ricezione. Entrambe sono del
tutto normali.
9 Italiano
Page 93

Sensibilità Del Microfono E VOX
È possibile regolare la sensibilità del microfono e della funzione VOX
della radio in funzione del grado di rumorosità degli ambienti in cui si
utilizza la radio e dell’intensità della voce degli interlocutori.
1. Per variare la sensibilità, premere due volte il pulsante \ (la
cifra più grande lampeggia e appare sul display il simbolo g e il
tipo di sensibilità in corso d’impostazione):
? - Valore di guadagno del microfono
H - VOX con accessorio audio
I - VOX senza accessorio audio
2. Agire su ] e [ per scegliere uno dei tre valori di sensibilità
disponibili:
1 - Per conversare a voce alta o in ambienti rumorosi.
2 - Indicato per la maggior parte delle condizioni di utilizzo.
3 - Per conversare a voce bassa o in ambienti silenziosi.
Per disattivare la funzione VOX (funzione VOX solo con accessori
audio), selezionare 0.
Ricerca Canali
Questa funzione consente di controllare l’attività sui canali. Quando la
radio rileva la presenza di attività sui canali, interrompe la funzione di
ricerca e si blocca sul canale attivo per consentire all’utente di
ascoltare la persona che trasmette senza dover cambiare canale.
Quando si attiva la funzione di ricerca canali, il ricetrasmittente
provvede a verificare tutti gli 8 canali tramite il codice IE selezionato
per ciascun canale. Qualora si desideri effettuare la ricerca senza
codici IE (soppressione della portante), iniziare la ricerca su un
canale per il quale il codice IE è stato impostato su 0. È anche
possibile programmare la radio in modo che effettui la ricerca di
canali particolari disattivando gli altri canali nell’elenco dei canali da
cercare.
1. Per iniziare la ricerca, premere brevemente J. Il simbolo h
appare sul display e viene iniziata la ricerca dei canali, indicati dal
numero canale grande.
2. Quando viene rilevata l’attività su un canale, la funzione di ricerca
viene interrotta e il display visualizza il numero del canale e il
codice IE.
3. È possibile conversare con la persona sintonizzata sul nuovo
canale e codice IE premendo M.
4. La funzione di ricerca viene ripresa dopo 5 secondi di inattività sul
canale.
5. La pressione del pulsante M durante la funzione di ricerca fa sì
che la radio trasmetta sul canale selezionato prima di avere
attivato la funzione di ricerca.
6. Per interrompere la funzione di ricerca canali, premere
brevemente J.
Ricerca Selettiva
Consente di ‘saltare’ un canale durante la ricerca per proseguire la
ricerca degli altri canali. Quando la radio trova un canale in uso,
premere ] per riprendere la ricerca.
Eliminazione Canali Indesiderati
Questa funzione consente di eliminare dall’elenco di ricerca i canali
indesiderati. Quando la radio trova un canale indesiderato durante la
funzione di ricerca, premere [ per eliminare provvisoriamente il
canale dall’elenco. Il canale eliminato viene rimesso nell’elenco
quando si esce dalla funzione ricerca canali.
10 Italiano
Page 94

Come Modificare L’elenco Dei Canali Da Cercare
1. Premere \ fino a quando appare il simbolo h sul display. Il
numero del canale lampeggia e il numero del codice IE viene
sostituito dal simbolo lampeggiante Y o n.
2. Agire su ] o [ per selezionare il canale desiderato.
3. Agire su J per selezionare Y per inserire il canale nell’elenco
canali o n per escluderlo dall’elenco.
4. Premere M brevemente per uscire dalla funzione.
Esclusione Tastiera
Questa funzione consente di disattivare la tastiera ed è simile alla
funzione Esclusione selettiva funzioni, ma l’operazione di esclusione e
ripristino della tastiera è più semplice.
Per escludere e ripristinare il funzionamento della tastiera, premere e
tenere premuto il pulsante \ per tre secondi. La radio emette una
serie di segnali acustici e il simbolo f compare o scompare dal
display.
Segnale Di Fine Trasmissione
Quando questo segnale è attivato, la radio provvede a trasmettere un
segnale univoco alla fine della trasmissione, nonché ad emettere un
segnale acustico sull’apparecchio stesso.
Per attivare o disattivare il segnale acustico di fine trasmissione,
premere e tenere premuto il pulsante su ] quando si accende la
radio.
Segnali Utilizzo Tastiera
Ogni volta che si preme un pulsante sulla radio, viene emesso un
segnale acustico per segnalare la pressione dei pulsanti, a meno che
la funzione non sia stata disattivata.
Per attivare o disattivare i segnali di utilizzo tastiera, premere e
tenere premuto il pulsante giù [ quando si accende la radio. Questa
funzione provvede anche a controllare l’emissione dei segnali di fine
trasmissione o di chiamata sull’apparecchio, anche se questi segnali
vengono comunque trasmessi ad altre radio.
Come Ripristinare Le Impostazioni Di Fabbrica
Accendere la radio e tenere premuti contemporaneamente i pulsanti
M e \ per tre secondi. La radio emette una serie di segnali
acustici e provvede a ripristinare le impostazioni effettuate in
fabbrica.
Duplicazione Delle Impostazioni
Questa funzione è disponibile con il caricabatterie plurifunzione
(MUC) IXPN4002 (versione inglese a 3 spinotti) o IXPN4003 (versione
europea a 2 spinotti). La funzione consente di duplicare su altre
ricetrasmittenti le impostazioni effettuate in fabbrica. Per ulteriori
informazioni, consultare il manuale in dotazione con il caricabatterie
MUC.
Retroilluminazione Del Display
La radio è dotata di un display retroilluminato. Una volta accesa la
radio e premuto un pulsante qualsiasi, ad eccezione dei pulsanti M
e B, il display si illumina per circa quattro secondi.
Timer Segnalazione Tempo Scaduto
La radio emette un segnale acustico e interrompe la trasmissione
quando si preme il pulsante M per più di 60 secondi consecutivi o
quando la trasmissione VOX è attiva per più di 60 secondi consecutivi.
11 Italiano
Page 95

INFORMAZIONI SUPPLEMENTARI
Portata Della Radio
Le radio XTN446 sono realizzate all’insegna del rendimento e della
portata ottimali. Onde evitare radiodisturbi, si consiglia di non
utilizzare due radio a meno di 1,5 metri di distanza.
La portata della radio dipende dal tipo di terreno e risulta ridotta in
presenza di fabbricati e di folta vegetazione e dall’uso della stessa al
chiuso o all’interno di veicoli.
Portata ottimale Portata media Portata minima
La portata ottimale, di 5 chilometri al massimo, si ottiene su terreni in
piano e privi di ostacoli. La portata media si ottiene in presenza di
fabbricati ed alberi. La portata minima si verifica in presenza di folta
vegetazione e di montagne, che ostacolano la propagazione dei
segnali.
12 Italiano
Page 96

Individuazione E Risoluzione Dei Problemi
Problema Soluzione
Assenza di alimentazione Riposizionare o sostituire le pile stilo. Ricaricare o sostituire la batteria NiMH.
Mancata trasmissione Verificare di avere premuto a fondo il pulsante M durante la trasmissione. Riposizionare e/o sostituire
del messaggio le batterie.
Mancata ricezione del messaggio Confermare che le radio siano sintonizzate sul medesimo canale e codice IE e VS. Sincerarsi che il pulsante M
non sia stato premuto per errore. Riposizionare e/o sostituire le batterie. Gli ostacoli, l’utilizzo in ambienti chiusi o
all’interno di veicoli influiscono negativamente sulla comunicazione. Cambiare area. Verificare che il volume sia
sufficientemente alto.
Messaggio criptato Il codice VS non corrisponde a quello impostato sulle altre radio; tutte le radio devono usare il medesimo
codice VS.
Atre conversazioni o rumori Verificare che sia impostato il codice Soppressione radiodisturbi, (i valori attivi sono 1-121). Può darsi che altre
su un canale radio utilizzino i medesimi canali o codici di Soppressione radiodisturbi; cambiarli.
Portata ridotta La presenza di strutture di acciaio/calcestruzzo o di foreste e l’utilizzo dell’apparecchio nei fabbricati e nei
veicoli ne riduce la portata; verificare che l’area non presenti ostacoli al fine di migliorare la trasmissione.
Qualora si tenga la radio in tasca o sulla cintura, la portata risulta ridotta; cambiare la posizione.
Presenza di forte elettricità Le radio sono troppo vicine. La distanza minima deve essere 1,5 metri; aumentare la distanza. Le radio sono
statica o radiodisturbi troppo lontane. La presenza di ostacoli pregiudica la qualità della trasmissione. La portata ottimale si ottiene
all’aperto in aree prive di ostacoli.
Impossibile cambiare canale Verificare che la radio non sia bloccata.
Scarica imminente batteria Ricaricare la batteria al NiMH o sostituire le pile stilo. La presenza di temperature molto alte o molto basse
pregiudica la durata della batteria.
13 Italiano
Page 97

Problema Soluzione
Tastiera bloccata Sbloccarla premendo \ per tre secondi. Verificare che Esclusione selettiva funzioni sia disattivata.
Mancata attivazione della La funzione non è impostata o non è attivata. La sensibilità è impostata su 0.
funzione VOX
Servizi di assistenza tecnica Motorola Qualora la radio non funzioni debitamente dopo la consultazione della tabella di cui sopra, contattare il
punto di vendita.
Dati Tecnici
Descrizione Dati tecnici
Canali 8
Codici 121
Frequenza di esercizio 446.00625 - 446.09375 MHz
Portata dell’apparecchio Fino a 5 chilometriAlimentazione
4 pile stilo alcaline o batteria al NiMH.
Autonomia della batteria *: Stilo** NiMH
5% trasmissione, 5% ricezione
e 90% in standby 36 ore 24 ore
Autonomia di conversazione 6,5 ore 5,0 ore
Stand-by 64 ore 40 ore
* Tipica
** Con pile alcaline di qualità superiore.
14 Italiano
Page 98

Informazioni Sulla Garanzia
Motorola garantisce all’acquirente originale che il Personal
Communicator e gli accessori acquistati da un rivenditore o
distributore Motorola autorizzato (i "Prodotti"), sono conformi alle
pertinenti specifiche Motorola valide al momento di fabbricazione,
per un periodo di un [1] anno dalla data di acquisto del(i) Prodotto(i)
(Periodo di Garanzia).
L’utente si impegna a informare Motorola dell’inosservanza delle
specifiche pertinenti di uno o più Prodotti entro un periodo di due (2)
anni dalla data in cui si è rilevato un difetto di materiale, lavorazione o
mancanza di conformità, o comunque entro un periodo non superiore
al Termine di Garanzia, inoltrando il Prodotto a Motorola o al
distributore per la manutenzione. Motorola non sarà vincolata da
dichiarazioni relative al Prodotto che non siano direttamente
espresse dalla casa medesima.
Si allega a questo Prodotto una lista di numeri dei Call Centre
Motorola.
Durante il Periodo di Garanzia, Motorola si impegnerà a propria
discrezione e gratuitamente, a riparare o sostituire il Prodotto qualora
questo non soddisfi la presente Garanzia o, ove ciò non dovesse
essere possibile, a rimborsare il prezzo del Prodotto a una
percentuale commensurata all’uso che l’utente ha fatto dello stesso
dal momento della consegna. Questa garanzia scadrà al termine del
Periodo di Garanzia.
La presente costituisce la garanzia completa ed esclusiva per un
Personal Communicator e per i rispettivi accessori Motorola e
sostituisce tutte le altre garanzie e condizioni espresse o implicite.
Se si acquista il prodotto in altra veste che quella di consumatore,
Motorola nega tutte le altre garanzie e condizioni espresse o
implicite, quali idoneità allo scopo e qualità soddisfacente.
In nessuna circostanza Motorola sarà responsabile di danni di
portata superiore al prezzo di acquisto né di danni* incidentali,
speciali o indiretti derivanti dall’uso del Prodotto, o dall’incapacità di
usare il medesimo, entro i limiti consentiti dalla legge.
Questa Garanzia non condiziona alcun diritto statutario di cui l’utente
può godere in veste di consumatore, come la garanzia di qualità
soddisfacente e idoneità allo scopo per il quale Prodotti dello stesso
tipo vengono utilizzati normalmente in normali condizioni d’impiego e
manutenzione, né condiziona altri diritti nei riguardi del rivenditore dei
Prodotti derivanti dal contratto di acquisto e vendita del consumatore.
(*) inclusi, senza limitazione, perdita di uso, perdita di tempo,
incomodo, perdita commerciale, perdita di utili o risparmi.
Come ricevere l’assistenza prevista dalla Garanzia?
Nella maggior parte dei casi, il concessionario Motorola autorizzato
che ha venduto il Personal Communicator Motorola e i relativi
accessori originali, onererà un reclamo in garanzia e/o fornirà
l’assistenza prevista dalla garanzia. Per ulteriori informazioni su come
ricevere l’assistenza sotto garanzia, contattare il Motorola ai numeri
di telefono internazionali riportati di seguito.
Per ricevere l’assistenza sotto garanzia, l’utente deve restituire il
Personal Communicator alla Motorola o al distributore. Il Prodotto
deve essere inoltre accompagnato da un’etichetta recante nome,
indirizzo, numero di telefono del richiedente e una descrizione del
problema.
15 Italiano
Page 99

Per ricevere la suddetta assistenza occorre inoltre presentare la
ricevuta di acquisto o una prova di acquisto comparabile recante la
data dell’acquisto. Sul Personal Communicator deve inoltre essere
chiaramente visibile il numero di serie.Tali informazioni sono
contenute nel Prodotto.
Condizioni
Questa garanzia non sarà ritenuta valida qualora il tipo o i numeri di
serie indicati sul Prodotto siano stati modificati, cancellati, rimossi o
resi illeggibili. Motorola si riserva il diritto di rifiutare il servizio di
assistenza gratuita nel caso in cui le documentazioni richieste non
vengano presentate o le informazioni risultino incomplete, illeggibili o
incompatibili con i dati di fabbrica.
Il servizio di riparazione può, a discrezione di Motorola, includere la
sostituzione di componenti o schede con componenti o schede
funzionalmente equivalenti, nuove o rimesse a nuovo. I componenti,
gli accessori, le batterie o le schede sostituite sono garantite per la
parte rimanente del periodo di garanzia originale. Il Periodo di
Garanzia non verrà esteso. Tutti gli accessori, le batterie ed i
componenti originali e l’apparecchiatura Personal Communicator che
sono stati sostituiti diventeranno proprietà di Motorola. Motorola non
garantisce l’installazione, la manutenzione o l’assistenza per Prodotti,
accessori, batterie o componenti.
Motorola non sarà responsabile in alcun modo di problemi o danni
causati da eventuali apparecchiature ausiliarie non fornite da
Motorola, che siano collegate ai, o utilizzate con, i Prodotti, o per il
funzionamento delle apparecchiature Motorola con eventuali
apparecchiature ausiliarie; tali apparecchiature sono tutte
espressamente escluse dalla presente garanzia.
Quando il Prodotto viene utilizzato congiuntamente ad
apparecchiature ausiliarie o periferiche non fornite da Motorola,
Motorola non garantisce il funzionamento della combinazione
Prodotto/periferiche e non onererà alcuna richiesta in garanzia nel
caso il Prodotto sia utilizzato in tale combinazione e sia stato stabilito
da Motorola che il Prodotto è privo di difetti. Motorola nega in modo
specifico qualsiasi responsabilità per eventuali danni, ad
apparecchiature Motorola e non, provocati dall’uso del Personal
Communicator, degli accessori e delle periferiche (esempi specifici
includono, ma non sono limitati a: batterie, caricabatteria,
trasformatori e alimentatori, qualora tali accessori e periferiche non
siano fabbricati o forniti da Motorola.
Cosa Non Copre La Garanzia
Questa garanzia non è valida se i guasti sono dovuti a danni, uso
improprio o negligenza e in caso di modificazioni o riparazioni
eseguite da persone non autorizzate.
1. Difetti o danni derivanti dall’uso anomalo o inconsueto del Prodotto.
2. Difetti o danni derivanti da uso improprio, incidente o negligenza.
3. Difetti da danni derivanti da collaudo, funzionamento,
manutenzione, regolazione o qualsiasi alterazione o modificazione
di qualsiasi tipo.
4. Rotture o danni alle antenne salvo siano provocate direttamente da
materiali o lavorazioni difettose.
5. Prodotti smontati o riparati in modo tale da pregiudicare in modo
avverso il loro rendimento o da impedire un’ispezione e una verifica
adeguate volte a corroborare la validità del reclamo.
6. Difetti o danni dovuti alla portata.
7. Difetti o danni dovuti a umidità, liquidi o versamenti di prodotti
alimentari.
16 Italiano
Page 100

8. Tutte le superfici di plastica e tutte le altre parti esposte all’esterno
che risultino graffiate o danneggiate in conseguenza del normale
utilizzo da parte del cliente.
9. Prodotti affittati su base temporanea.
10. Manutenzione e riparazione periodiche o sostituzioni di
componenti dovuti alla normale usura.
Inoltre, l’acquisto di Prodotti Motorola non sarà considerato tale da
garantire, per via diretta o implicita, per preclusione o in altra
maniera, alcuna licenza ai sensi dei diritti d’autore, brevetti o
richieste di brevetti di Motorola, salvo per la normale licenza d’uso
non esclusiva ed esente da royalties prevista dalla legge per la
vendita di un Prodotto.
Nota: Il tempo di conversazione, il tempo di stand-by time e il ciclo
utile totale di una batteria ricaricabile Motorola per il Personal
Communicator dipenderanno dalle condizioni di utilizzo. Come
Prodotto di consumo, le specifiche indicano che l’utente
dovrebbe ottenere le prestazioni ottimali per il Personal
Communicator Motorola entro i primi sei mesi dalla data di
acquisto e fino a 200 cariche.
La garanzia per le batterie ricaricabili Motorola diventa nulla se (i) le
batterie vengono caricate tramite dispositivi diversi dai caricabatteria
approvati da Motorola, (ii) i sigilli delle batterie vengono rotti o
mostrano segni di manomissione, (iii) la batteria viene utilizzata in
apparecchiature diverse da quelle per le quali è stata specificata.
Informazioni Sui Diritti D’autore
I Prodotti Motorola descritti in questo manuale possono includere
programmi, memorie di semiconduttori o altri supporti Motorola
protetti da diritti d’autore. Le Leggi degli Stati Uniti e di altri paesi
tutelano per Motorola alcuni diritti esclusivi sui programmi informatici
protetti da diritti d’autore, compreso il diritto esclusivo di copiare o
riprodurre in qualsiasi formato i programmi Motorola protetti da diritti
d’autore. Di conseguenza, gli eventuali programmi informatici
Motorola protetti da diritto d’autore contenuti nei Prodotti Motorola,
descritti in questo manuale, non possono essere copiati o riprodotti in
alcuna maniera senza il permesso espresso scritto di Motorola.
Per maggiori informazioni, chiamare:
Italia: 02 522071
Altri paesi: +39 02 522071
, MOTOROLA sono marchi di Motorola Inc.
© 2001 Motorola Inc.
17 Italiano
 Loading...