

Page 1

User's Guide
DIGITAL WIRELESS TELEPHONE
Page 2

Page 3
Welcome
Welcome to the world of Motorola digital wireless
communications! We are pleased that you have chosen the
Motorola
V
™ 280 wireless phone.
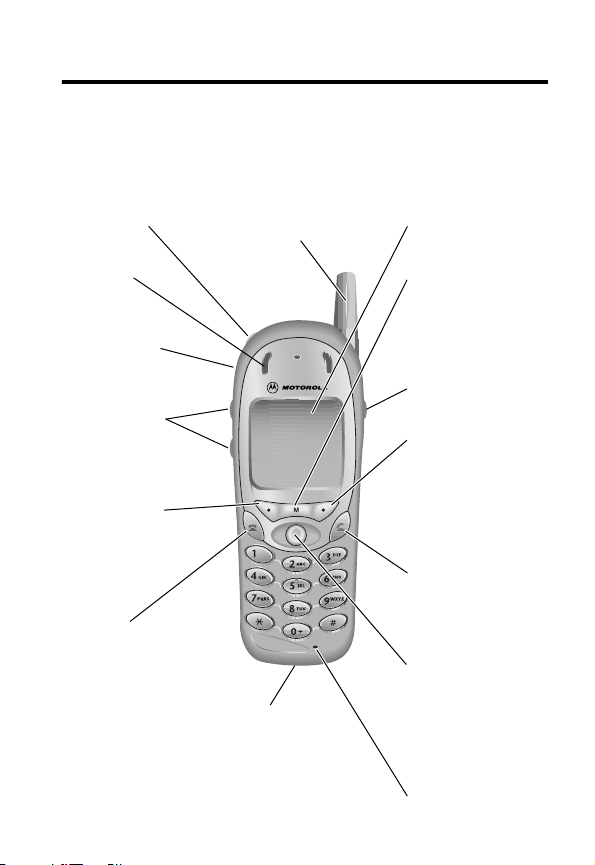
Power Key
Earpiece
Headset Jack
Insert headset
accessory.
Volume Keys
Adjust earpiece
and ringer volume.
Left Soft Key
Perform functions
identified by left
display prompt.
End Key
End phone calls,
exit menu system.
Antenna
Accessory
Connector Port
Insert charger and
phone accessories.
Display
Menu Key
Voice Key
Record voice notes,
phonebook and
shortcut names.
Right Soft Key
Perform functions
identified by right
display prompt.
Send Key
Send and answer
calls, view recent
dialed calls list.
4-Way
Navigation Key
Scroll through
menus and lists,
set feature values.
Microphone
1
Page 4

Personal Communications Sector
600 North U.S. Highway 45
Libertyville, Illinois 60048
1-800-331-6456 (United States)
1-888-390-6456 (TTY/TDD United States)
1-800-461-4575 (Canada)
www.motorola.com
www.motorola.ca
(United States)
(Canada)
MOTOROLA, the Stylized M Logo and all other trademarks indicated as
such herein are trademarks of Motorola, Inc. ® Reg. U.S. Pat. & Tm. Off.
TrueSync, Sidekick, Starfish and the Stylized Starfish Logo are registered
trademarks of Starfish Software, Inc., a wholly owned independent
subsidiary of Motorola, Inc. All other product or service names are the
property of their respective owners.
© 2001 Motorola, Inc. All rights reserved. Printed in the U.S.A.
Software Copyright Notice
The Motorola products described in this manual may include
copyrighted Motorola and third party software stored in semiconductor
memories or other media. Laws in the United States and other countries
preserve for Motorola and third party software providers certain
exclusive rights for copyrighted software, such as the exclusive rights to
distribute or reproduce the copyrighted software. Accordingly, any
copyrighted software contained in the Motorola products may not be
modified, reverse-engineered, distributed, or reproduced in any manner
to the extent allowed by law. Furthermore, the purchase of the
Motorola products shall not be deemed to grant either directly or by
implication, estoppel, or otherwise, any license under the copyrights,
patents, or patent applications of Motorola or any third party software
provider, except for the normal, non-exclusive, royalty-free license to use
that arises by operation of law in the sale of a product.
Manual number: 6809437A01-O
Cover number: 8988485L01-O
2
Page 5

✂
Main Menu
• Recent Calls
• Received Calls
• Dialed Calls
• Notepad
• Call Times
• Call Cost
• Service Dial
• Fixed Dial
• Phonebook
• Datebook
• Quick Dial
• Radio
• Messages
• Voicemail
• Text Msgs
• Browser Alerts
• Info Services
• Quick Notes
• Outbox
• Drafts
• Shortcuts
• Voice Notes
• SIM Applications
• Browser
• Calculator
• Games
• Settings
(see next page)
Note:
This is the standard phone
menu layout. You or your service
provider may have changed the
menu layout or changed some
feature names. Not all features
may be available for all users.
For example, the
Radio
feature
on the main menu (left) is
displayed only when the optional
FM Stereo Radio Headset
accessory is plugged into the
accessory connector port on your
phone (see phone illustration,
page 1).
Shortcuts
Change display zoom:
Press M, then
press and hold
M
Lock/unlock keypad:
Press M
*
Display my phone number:
Press M
#
Go to dialed calls list:
Press
N
Exit menu system:
Press
O
Menu Map
3
Page 6

Settings Menu
✂
• Ring/Vibrate
• Alert
Alert
Detail
•
• My Tones
• Call Forward
• Voice Calls
• Fax Calls
• Data Calls
• Cancel All
• Forward Status
• Phone Status
• My Tel. Numbers
• Credit Info/Available
• Active Line
• Battery Meter
• Other Information
• Connection
• IrDA Link
• Browser Setup
• In-Call Setup
• In-Call Timer
• Call Cost Setup
• My Caller ID
• Talk and Fax
• Answer Options
• Call Waiting
• Security
• Phone Lock
• Lock Keypad
• Lock Application
• Fixed Dial
• Call Barring
• SIM Pin
• New Passwords
• Other Settings
• Personalize
• Main Menu
• Keys
• Greeting
• Quick Dial
• Initial Setup
• Time and Date
• 1-Touch Dial
• Auto Redial
• Backlight
• Zoom
• Scroll
• Animation
• Language
• Battery Save
• Contrast Setting
• DTMF
• Master Reset
• Master Clear
• Network
• Car Settings
• Headset
4
Page 7

Contents
Menu Map. . . . . . . . . . . . . . . . . . . . . . . . . . . . . . . . . . . . . . 3
About This Guide . . . . . . . . . . . . . . . . . . . . . . . . . . . . . . . 10
Safety and General Information. . . . . . . . . . . . . . . . . . . 12
Getting Started . . . . . . . . . . . . . . . . . . . . . . . . . . . . . . . . 19
What’s in the Box? . . . . . . . . . . . . . . . . . . . . . . . . . . . . . 19
Installing the SIM Card . . . . . . . . . . . . . . . . . . . . . . . . . . 19
Installing the Battery . . . . . . . . . . . . . . . . . . . . . . . . . . . . 21
Removing the Battery . . . . . . . . . . . . . . . . . . . . . . . . . . . 22
Charging the Battery . . . . . . . . . . . . . . . . . . . . . . . . . . . . 23
Turning Your Phone On . . . . . . . . . . . . . . . . . . . . . . . . . . 24
Sending a Call . . . . . . . . . . . . . . . . . . . . . . . . . . . . . . . . . 25
Ending a Call . . . . . . . . . . . . . . . . . . . . . . . . . . . . . . . . . . 25
Receiving a Call . . . . . . . . . . . . . . . . . . . . . . . . . . . . . . . . 26
Displaying Your Phone Number . . . . . . . . . . . . . . . . . . . . 26
About Your Phone . . . . . . . . . . . . . . . . . . . . . . . . . . . . . . 27
Display . . . . . . . . . . . . . . . . . . . . . . . . . . . . . . . . . . . . . . 27
Changing the Zoom Setting . . . . . . . . . . . . . . . . . . . . . . . 30
Volume Keys . . . . . . . . . . . . . . . . . . . . . . . . . . . . . . . . . . 30
4-Way Navigation Key . . . . . . . . . . . . . . . . . . . . . . . . . . . 31
Battery Use . . . . . . . . . . . . . . . . . . . . . . . . . . . . . . . . . . . 31
Sending and Receiving Calls. . . . . . . . . . . . . . . . . . . . . . 33
Redialing a Number . . . . . . . . . . . . . . . . . . . . . . . . . . . . . 33
Using Automatic Redial . . . . . . . . . . . . . . . . . . . . . . . . . . 33
Caller ID . . . . . . . . . . . . . . . . . . . . . . . . . . . . . . . . . . . . . 34
Returning an Unanswered Call . . . . . . . . . . . . . . . . . . . . . 35
Dialing an Emergency Number . . . . . . . . . . . . . . . . . . . . . 35
Entering Numbers in the Notepad . . . . . . . . . . . . . . . . . . 36
Muting the Ring or Vibrate Alert . . . . . . . . . . . . . . . . . . . . 36
5
Page 8

Contents
Terminating an Incoming Call . . . . . . . . . . . . . . . . . . . . . 37
Dialing With Speed Dial . . . . . . . . . . . . . . . . . . . . . . . . . . 37
Dialing With 1-Touch Dial . . . . . . . . . . . . . . . . . . . . . . . . 38
Dialing a Number In a Text Message . . . . . . . . . . . . . . . . 38
Additional Dialing Features . . . . . . . . . . . . . . . . . . . . . . . 39
Using Features While On a Call . . . . . . . . . . . . . . . . . . . 42
Using Call Waiting . . . . . . . . . . . . . . . . . . . . . . . . . . . . . . 42
Making a Conference Call . . . . . . . . . . . . . . . . . . . . . . . . 43
Transferring a Call . . . . . . . . . . . . . . . . . . . . . . . . . . . . . . 44
Additional On-Call Features . . . . . . . . . . . . . . . . . . . . . . . 45
Using the Menu . . . . . . . . . . . . . . . . . . . . . . . . . . . . . . . . 46
Navigating to a Feature . . . . . . . . . . . . . . . . . . . . . . . . . . 46
Selecting a Feature Option . . . . . . . . . . . . . . . . . . . . . . . . 47
Entering Feature Information . . . . . . . . . . . . . . . . . . . . . . 48
Entering Text. . . . . . . . . . . . . . . . . . . . . . . . . . . . . . . . . . . 51
Choosing a Text Mode . . . . . . . . . . . . . . . . . . . . . . . . . . . 51
Tap Method . . . . . . . . . . . . . . . . . . . . . . . . . . . . . . . . . . . 52
Symbol Mode . . . . . . . . . . . . . . . . . . . . . . . . . . . . . . . . . 55
Predictive Text Entry with iTAP™ Software . . . . . . . . . . . . 56
Menu Feature Descriptions. . . . . . . . . . . . . . . . . . . . . . . 61
Recent Calls . . . . . . . . . . . . . . . . . . . . . . . . . . . . . . . . . . . 77
Viewing the Received Calls or Dialed Calls List . . . . . . . . . 77
Using the Notepad . . . . . . . . . . . . . . . . . . . . . . . . . . . . . 80
Viewing and Resetting Call Timers . . . . . . . . . . . . . . . . . . 81
Viewing and Resetting Call Costs . . . . . . . . . . . . . . . . . . . 83
Phonebook . . . . . . . . . . . . . . . . . . . . . . . . . . . . . . . . . . . . 85
Fields in a Phonebook Entry Form . . . . . . . . . . . . . . . . . . 85
Storing a Phonebook Entry . . . . . . . . . . . . . . . . . . . . . . . 86
Recording a Voice Name For a Phonebook Entry . . . . . . . . 89
6
Page 9

Contents
Dialing a Phonebook Entry . . . . . . . . . . . . . . . . . . . . . . . . 90
Editing a Phonebook Entry . . . . . . . . . . . . . . . . . . . . . . . . 91
Deleting a Phonebook Entry . . . . . . . . . . . . . . . . . . . . . . . 92
Copying Phonebook Entries Between the Phone and SIM Card
. . . . . . . . . . . . . . . . . . . . . . . . . . . . . . . . . . . . . . . . . . . . 92
Checking Phonebook Capacity . . . . . . . . . . . . . . . . . . . . . 95
Synchronizing with TrueSync Software . . . . . . . . . . . . . . . 96
Setting Up the Phonebook . . . . . . . . . . . . . . . . . . . . . . . . 96
Datebook. . . . . . . . . . . . . . . . . . . . . . . . . . . . . . . . . . . . . . 98
Week View . . . . . . . . . . . . . . . . . . . . . . . . . . . . . . . . . . . 98
Day View . . . . . . . . . . . . . . . . . . . . . . . . . . . . . . . . . . . . . 99
Event View . . . . . . . . . . . . . . . . . . . . . . . . . . . . . . . . . . 100
Storing a New Event . . . . . . . . . . . . . . . . . . . . . . . . . . . 101
Changing Event Information . . . . . . . . . . . . . . . . . . . . . 102
Copying an Event . . . . . . . . . . . . . . . . . . . . . . . . . . . . . 103
Deleting an Event . . . . . . . . . . . . . . . . . . . . . . . . . . . . . 104
Radio . . . . . . . . . . . . . . . . . . . . . . . . . . . . . . . . . . . . . . . . 105
Turning the Radio On and Off . . . . . . . . . . . . . . . . . . . . 105
Tuning a Station . . . . . . . . . . . . . . . . . . . . . . . . . . . . . . 105
Storing a Preset . . . . . . . . . . . . . . . . . . . . . . . . . . . . . . . 106
Selecting a Preset . . . . . . . . . . . . . . . . . . . . . . . . . . . . . 106
Sending and Receiving Calls With the Radio On . . . . . . . 106
Messages—Voicemail . . . . . . . . . . . . . . . . . . . . . . . . . . 108
Storing Your Voicemail Number . . . . . . . . . . . . . . . . . . . 108
Receiving a New Voicemail Message . . . . . . . . . . . . . . . 108
Listening to a Voicemail Message . . . . . . . . . . . . . . . . . . 109
Messages—Text . . . . . . . . . . . . . . . . . . . . . . . . . . . . . . . 110
Setting Up the Text Message Inbox . . . . . . . . . . . . . . . . . 110
Receiving a Text Message . . . . . . . . . . . . . . . . . . . . . . . 112
Reading, Locking, or Deleting a Text Message . . . . . . . . . 112
7
Page 10

Contents
Sending a Text Message . . . . . . . . . . . . . . . . . . . . . . . . 114
Sending a Text Message to More Than One Person . . . . . 115
Sending a Quick Note Text Message . . . . . . . . . . . . . . . . 117
Sending a Quick Note to More than One Person . . . . . . . 118
Viewing the Status of Sent Text Messages . . . . . . . . . . . 120
Shortcuts. . . . . . . . . . . . . . . . . . . . . . . . . . . . . . . . . . . . . 121
Standard Shortcuts . . . . . . . . . . . . . . . . . . . . . . . . . . . . 121
User-Settable Shortcuts . . . . . . . . . . . . . . . . . . . . . . . . . 121
Creating a Shortcut . . . . . . . . . . . . . . . . . . . . . . . . . . . . 122
Using Shortcuts . . . . . . . . . . . . . . . . . . . . . . . . . . . . . . . 124
Voice Notes. . . . . . . . . . . . . . . . . . . . . . . . . . . . . . . . . . . 125
Recording a Voice Note . . . . . . . . . . . . . . . . . . . . . . . . . 125
Viewing the Voice Notes List . . . . . . . . . . . . . . . . . . . . . 126
Playing a Voice Note . . . . . . . . . . . . . . . . . . . . . . . . . . . 127
Locking and Unlocking a Voice Note . . . . . . . . . . . . . . . 129
Deleting a Voice Note . . . . . . . . . . . . . . . . . . . . . . . . . . 130
Micro-Browser . . . . . . . . . . . . . . . . . . . . . . . . . . . . . . . . 131
Starting a Micro-Browser Session . . . . . . . . . . . . . . . . . . 131
Interacting With Web Pages . . . . . . . . . . . . . . . . . . . . . . 132
Calculator . . . . . . . . . . . . . . . . . . . . . . . . . . . . . . . . . . . . 133
Calculating Numbers . . . . . . . . . . . . . . . . . . . . . . . . . . . 133
Converting Currency . . . . . . . . . . . . . . . . . . . . . . . . . . . 135
Games . . . . . . . . . . . . . . . . . . . . . . . . . . . . . . . . . . . . . . . 136
Selecting and Starting a New Game . . . . . . . . . . . . . . . . 136
Ending a Game . . . . . . . . . . . . . . . . . . . . . . . . . . . . . . . 137
Playing a Game . . . . . . . . . . . . . . . . . . . . . . . . . . . . . . . 137
Adjusting Your Settings. . . . . . . . . . . . . . . . . . . . . . . . . 141
Ring/Vibrate . . . . . . . . . . . . . . . . . . . . . . . . . . . . . . . . . 141
Reminders . . . . . . . . . . . . . . . . . . . . . . . . . . . . . . . . . . . 148
8
Page 11

Contents
Call Forwarding . . . . . . . . . . . . . . . . . . . . . . . . . . . . . . . 149
Reordering Menu Items . . . . . . . . . . . . . . . . . . . . . . . . . 151
Customizing a Soft Key Function . . . . . . . . . . . . . . . . . . 151
Hands-Free Use . . . . . . . . . . . . . . . . . . . . . . . . . . . . . . . 152
Data and Fax Calls . . . . . . . . . . . . . . . . . . . . . . . . . . . . . 155
Connecting Your Phone to an External Device . . . . . . . . . 155
Sending a Data or Fax Call . . . . . . . . . . . . . . . . . . . . . . . 159
Receiving a Data or Fax Call . . . . . . . . . . . . . . . . . . . . . . 160
Sending a Talk then Fax Call . . . . . . . . . . . . . . . . . . . . . . 161
Security . . . . . . . . . . . . . . . . . . . . . . . . . . . . . . . . . . . . . . 162
Assigning a New Code or Password . . . . . . . . . . . . . . . . 162
If You Forget a Code or Password . . . . . . . . . . . . . . . . . . 163
Locking and Unlocking Your Phone . . . . . . . . . . . . . . . . 164
Locking and Unlocking Your Keypad . . . . . . . . . . . . . . . . 165
Barring Calls . . . . . . . . . . . . . . . . . . . . . . . . . . . . . . . . . 165
Protecting the SIM Card . . . . . . . . . . . . . . . . . . . . . . . . . 166
Troubleshooting . . . . . . . . . . . . . . . . . . . . . . . . . . . . . . . 168
Specific Absorption Rate Data . . . . . . . . . . . . . . . . . . . 177
Additional Health and Safety Information . . . . . . . . . 180
Warranty . . . . . . . . . . . . . . . . . . . . . . . . . . . . . . . . . . . . . 189
Export Law Assurances . . . . . . . . . . . . . . . . . . . . . . . . . 197
Index . . . . . . . . . . . . . . . . . . . . . . . . . . . . . . . . . . . . . . . . 198
Wireless Phone Safety Tips . . . . . . . . . . . . . . . . . . . . . . 211
9
Page 12

About This Guide
Using Your Phone’s Features
This user guide introduces you to the many features in your
Motorola V phone. A reference guide for your
phone is also available that explains the phone’s features in
more detail. To obtain a copy of the reference guide or another
copy of this user guide, see the Motorola Web site at:
http://motorola.com/consumer/manuals
http://www.motorola.ca/manuals
or contact the Motorola Customer Call Center at
1-800-331-6456 in the United States or 1-800-461-4575 in
Canada.
Navigating To a Menu Feature
You can access many of your phone’s features through the menu
system. This guide shows you how to navigate to a specific menu
feature as follows:
(United States)
(Canada)
Find the Feature
The > symbol means that you should scroll to and select the
feature. This example shows that you must press
and select Recent Calls, then scroll to and select Dialed Calls
to view the dialed calls list.
10
M > Recent Calls
> Dialed Calls
M, scroll to
Page 13

About This Guide
Optional Features
Features marked with this label are optional network,
SIM card, and/or subscription-dependent features.
These features may not be offered by all service
providers in all geographical areas. Contact your
service provider for information about availability.
Optional Accessories
Features marked with this label require the use of an
optional Motorola Original™ accessory.
11
Page 14

Safety and General Information
IMPORTANT INFORMATION ON SAFE AND EFFICIENT
OPERATION. READ THIS INFORMATION BEFORE USING YOUR
PHONE.
RF Operational Characteristics
Your phone contains a transmitter and a receiver. When it is ON,
it receives and transmits radio frequency (RF) energy. The phone
operates in the frequency range of 1850 MHz to 1910 MHz in
digital mode.
When you communicate with your phone, the system handling
your call controls the power levels at which your phone
transmits. The output power level typically may vary over a range
from 0.0 watts to 0.89 watts in digital mode.
Exposure To Radio Frequency Energy
Your Motorola phone is designed to comply with the following
national and international standards and guidelines regarding
exposure of human beings to radio frequency electromagnetic
energy (EME):
• United States Federal Communications Commission, Code
of Regulations; 47 CFR part 2 sub-part J
• American National Standards Institute (ANSI) / Institute of
Electrical and Electronic Engineers (IEEE) C95. 1-1992
• Institute of Electrical and Electronic Engineers (IEEE)
C95.1-1999 Edition
12
Page 15

Safety and General Information
• National Council on Radiation Protection and
Measurements (NCRP) of the United States, Report 86,
1986
• International Commission on Non-Ionizing Radiation
Protection (ICNIRP) 1998
• Ministry of Health (Canada) Safety Code 6. Limits of Human
Exposure to Radiofrequency Electromagnetic Fields in the
Frequency Range from 3 kHz to 300 GHz, 1999
• Australian Communications Authority
Radiocommunications (Electromagnetic Radiation-Human
Exposure) Standard 1999
To assure optimal phone performance and make sure human
exposure to radio frequency electromagnetic energy is within the
guidelines set forth in the above standards, always adhere to the
following procedures:
Portable Phone Operation and EME
Exposure
Antenna Care
Use only the supplied or an approved replacement
antenna. Unauthorized antennas, modifications, or
attachments could damage the phone and may violate FCC
regulations.
Do NOT hold the antenna when the phone is in use.
Holding the antenna affects call quality and may cause the
phone to operate at a higher power level than needed.
13
Page 16

Safety and General Information
Phone Operation
When placing or receiving a phone call, hold your phone as you
would a wireline telephone. Speak directly into the
microphone.
Body-Worn Operation
To maintain compliance with FCC/Health Canada RF exposure
guidelines, if you wear a phone on your body when transmitting,
always place the phone in a Motorola-supplied or approved
clip, holder, holster, case, or body harness for this
product. Use of non-Motorola-approved accessories may
exceed FCC/Health Canada RF exposure guidelines. If you do
not use a body-worn accessory, and are not holding the
phone in the normal use position at the ear, ensure the
phone and its antenna are at least one inch
(2.5 centimeters) from your body when transmitting.
Data Operation
When using any data feature of the phone, with or without an
accessory cable, position the phone and its antenna at
least one inch (2.5 centimeters) from your body.
Approved Accessories
For a list of approved Motorola accessories, visit our website at
www.motorola.com
14
.
Page 17

Safety and General Information
Electromagnetic Interference/
Compatibility
Note: Nearly every electronic device is susceptible to
electromagnetic interference (EMI) if inadequately shielded,
designed, or otherwise configured for electromagnetic
compatibility.
Facilities
To avoid electromagnetic interference and/or compatibility
conflicts, turn off your phone in any facility where posted notices
instruct you to do so. Hospitals or health care facilities may be
using equipment that is sensitive to external RF energy.
Aircraft
When instructed to do so, turn off your phone when on board an
aircraft. Any use of a phone must be in accordance with
applicable regulations per airline crew instructions.
Medical Devices
Pacemakers
The Advanced Medical Technology Association recommends that
a minimum separation of 6 inches (15 centimeters) be
maintained between a handheld wireless phone and a
pacemaker. These recommendations are consistent with the
independent research by, and recommendations of, the United
States Food and Drug Administration.
15
Page 18

Safety and General Information
Persons with pacemakers should:
• ALWAYS keep the phone more than six inches
(15 centimeters) from your pacemaker when the phone is
turned ON.
• NOT carry the phone in the breast pocket.
• use the ear opposite the pacemaker to minimize the
potential for interference.
• turn OFF the phone immediately if you have any reason to
suspect that interference is taking place.
Hearing Aids
Some digital wireless phones may interfere with some hearing
aids. In the event of such interference, you may want to consult
your hearing aid manufacturer to discuss alternatives.
Other Medical Devices
If you use any other personal medical device, consult the
manufacturer of your device to determine if it is adequately
shielded from RF energy. Your physician may be able to assist
you in obtaining this information.
Safety and General
Use While Driving
Check the laws and regulations on the use of phones in the area
where you drive. Always obey them.
When using your phone while driving, please:
• give full attention to driving and to the road.
16
Page 19

Safety and General Information
• use hands-free operation, if available.
• pull off the road and park before making or answering a
call if driving conditions so require.
Operational Warnings
For Vehicles With an Air Bag
Do not place a portable phone in the area over an air bag or in
the air bag deployment area. Air bags inflate with great force. If
a portable phone is placed in the air bag deployment area and
the air bag inflates, the phone may be propelled with great force
and cause serious injury to occupants of the vehicle.
Potentially Explosive Atmospheres
Turn off your phone prior to entering any area with a potentially
explosive atmosphere, unless the phone is a model specifically
identified as being “Intrinsically Safe.” Do not remove, install, or
charge batteries in such areas. Sparks in a potentially explosive
atmosphere can cause an explosion or fire resulting in bodily
injury or even death.
Note: The areas with potentially explosive atmospheres referred
to above include fueling areas such as below decks on boats,
fuel or chemical transfer or storage facilities, areas where the air
contains chemicals or particles, such as grain, dust, or metal
powders, and any other area where you would normally be
advised to turn off your vehicle engine. Areas with potentially
explosive atmospheres are often but not always posted.
17
Page 20

Safety and General Information
Blasting Caps and Areas
To avoid possible interference with blasting operations, turn OFF
your phone when you are near electrical blasting caps, in a
blasting area, or in areas posted: “Turn off two-way radio.” Obey
all signs and instructions.
Operational Cautions
Antennas
Do not use any portable phone that has a damaged
antenna. If a damaged antenna comes into contact with your
skin, a minor burn can result.
Batteries
All batteries can cause property damage and/or bodily injury
such as burns if a conductive material such as jewelry, keys, or
beaded chains touches exposed terminals. The conductive
material may complete an electrical circuit (short circuit) and
become quite hot. Exercise care in handling any charged battery,
particularly when placing it inside a pocket, purse, or other
container with metal objects.
18
ITC01-065
Page 21
Getting Started
What’s in the Box?
Your digital wireless phone typically comes equipped with a
battery and a charger. Other accessory options can customize
your phone for maximum performance and portability.
To purchase Motorola Original™ accessories, please contact the
Motorola Customer Call Center at 1-800-331-6456 in the
United States or 1-800-461-4575 in Canada.
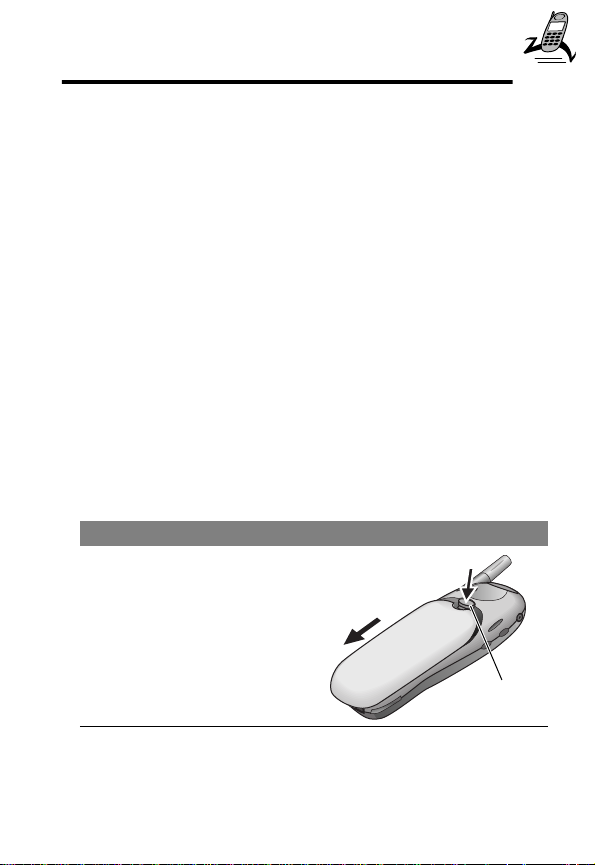
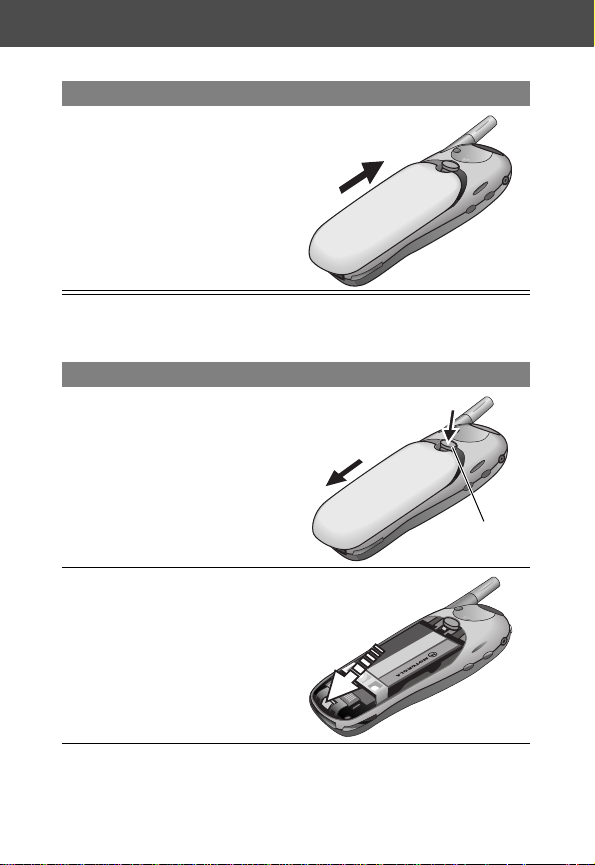
Installing the SIM Card
Your SIM (Subscriber Identity Module) card contains your phone
number, service details, and phonebook/message memory. It is
stored in a recess in the battery compartment.
Caution: Do not bend or scratch your SIM card. Avoid exposing
your SIM card to static electricity, water, or dirt.
Do This
1
If the phone’s battery
door is already in place,
push down the battery
door release latch, then
slide the door down and
lift off.
Release
latch
19
Page 22
Getting Started
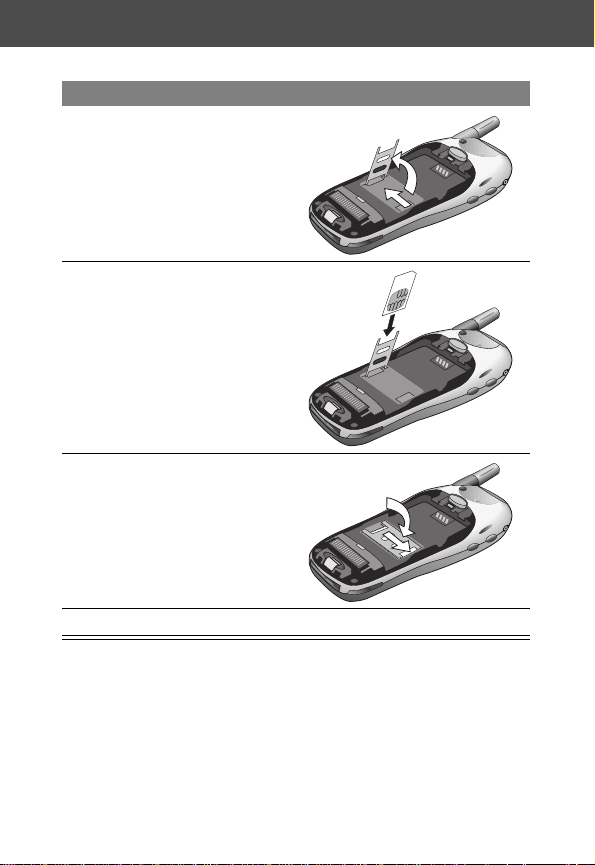
Do This
2
Slide the SIM card door
to the left and lift open.
3
Insert the SIM card into
the SIM card door with
the notch in the upper
right corner and the gold
plate facing down.
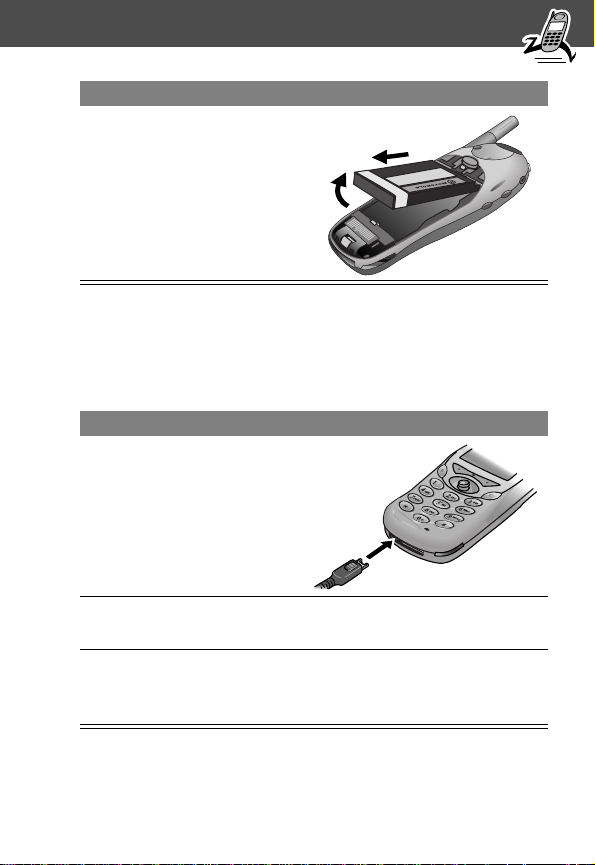
4
Close the SIM card door
and slide it to the right to
lock the SIM card in
place.
5
Install the battery as described in the following section.
20
Page 23
Getting Started
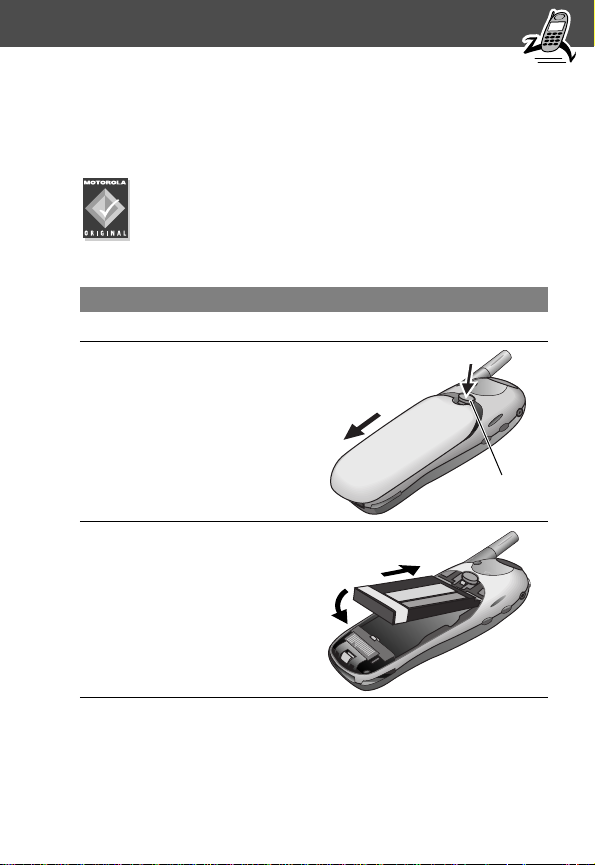
Installing the Battery
Before you can use your phone, you need to install and charge
the battery.
Your phone is designed to be used only with Motorola
Original batteries and accessories. We recommend that
you store batteries in their protective cases when not
in use.
Do This
1
Remove the battery from its protective clear plastic case.
2
If the phone’s battery
door is already in place,
push down the battery
door release latch, then
slide the door down and
lift off.
3
Insert the battery, printed
arrow first, into the
battery compartment and
push down.
Release
latch
21
Page 24
Getting Started
Do This
4
Replace the battery door,
then slide the door up
until it clicks into place.
Removing the Battery
Do This
1
Push down the battery
door release latch, then
slide the door down and
lift off.
2
Pull down the battery
release latch.
Release
latch
22
Page 25
Getting Started
Do This
3
Pull up on the battery
and remove it from the
phone.
Charging the Battery
Before you can use your phone, you need to install and charge
the battery.
Do This
1
Plug the travel charger
into your phone with the
release tab facing up.
2
Plug the other end of the travel charger into the
appropriate electrical outlet.
3
When your phone indicates that the battery is fully
charged (Charge Complete), press the release tab and
remove the travel charger.
23
Page 26
Getting Started
Note: When you charge the battery, the battery level indicator in
the upper right corner of the display shows how much of the
charging process is complete. See the “Battery Level Indicator”
item on page 29.
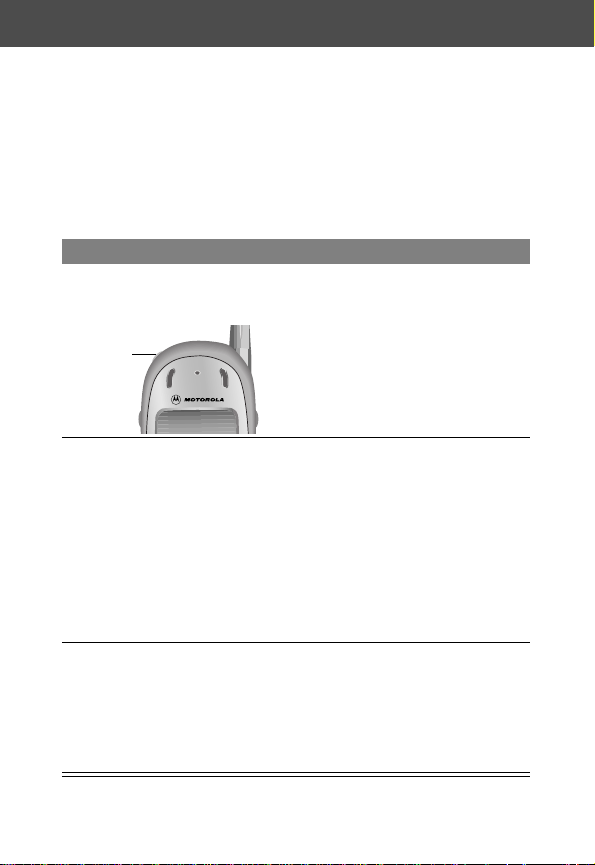
Turning Your Phone On
Do This To
1
Press and hold P
(the power key)
Power
key
2
If necessary, enter
your SIM card PIN
code and press
OK (+)
3
If necessary, enter
your four-digit unlock
code and press
OK (+)
turn on your phone
unlock your SIM card
Caution: If you enter an
incorrect PIN code three times in
a row, your SIM card is disabled
and your phone displays the
message
information, see “Protecting the
SIM Card” on page 166.)
unlock your phone
The unlock code is originally set
to 1234. (For more information,
see “Locking and Unlocking Your
Phone” on page 164.)
SIM Blocked. (For more
24
Page 27

Getting Started
Sending a Call
To call a number, your phone must be turned on, have a SIM
card inserted, be unlocked, and have a network connection with
adequate signal strength.
Press To
1
keypad keys dial the phone number (up to 32
digits)
Tip: If you make a mistake, press
DELETE (-) to delete the last digit,
or press and hold DELETE (-) to
clear all digits.
2
N (send key)
Note: You can make an emergency call even when the phone is
locked, or when a SIM card is not inserted. See “Dialing an
Emergency Number” on page 35.
Ending a Call
Press To
O (end key)
send the call
end the call
25
Page 28

Getting Started
Receiving a Call
To receive a call, your phone must be turned on, have a SIM card
inserted, and have a network connection with adequate signal
strength. If your phone is locked, you must unlock the phone to
answer the call.
Note: Your phone cannot receive calls when your SIM card is
locked.
When you receive a call, your phone rings and/or vibrates and
displays an incoming call message.
Press To
N or ANSWER (+)
Displaying Your Phone Number
From the idle display:
Press To
M # see your phone number
Note: Your phone number must be programmed on your SIM
card in order to use this feature.
answer the call
26
Page 29

About Your Phone
See page 1 for a diagram of your phone that describes basic
phone components.
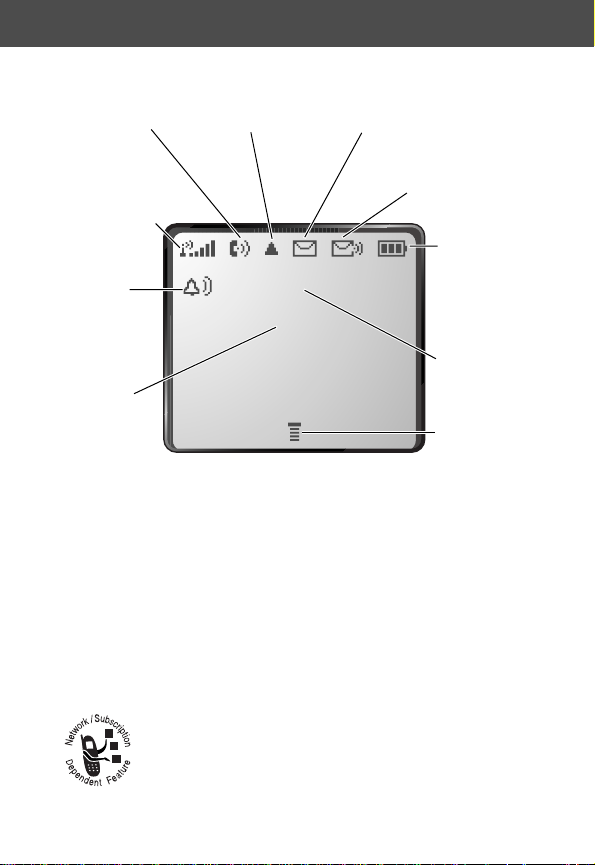
Display
The top section of the display shows phone status indicators. The
following illustration shows some of the common indicators that
you may see at the top of the display when using your phone.
Messages, phone numbers, and menu options appear in the
middle of the display. Text labels at the bottom corners of the
display show the current soft key functions. A e (menu) indicator
in the bottom center of the display indicates that you can open
the main menu or a feature sub-menu to see more options. For
more information about the soft key and menu key labels, see
“Using the Menu” on page 46.
Some of the phone functions described in this guide must be
performed from the idle display. The term
the standard display that you see when your phone is on and
ready to use, when you are
system.
not
on a call or using the menu
idle display
refers to
27
Page 30
About Your Phone
➋
In Use
Indicator
➊
Signal
Strength
Indicator
➓
Alert
Setting
Indicator
➒
GPRS
Indicator
➊ Signal Strength Indicator Shows the strength of your
phone’s connection with the network.
➌
Roam
Indicator
12:00am
GPRS
➍
Message Waiting
Indicator
➎
Voice Message
Waiting Indicator
➏
Battery
Level
Indicator
➐
Clock
➑
Menu
Indicator
Strong
You cannot send or receive calls when the “no signal” indicator
is displayed.
➋ In Use Indicator Appears when a call is in progress.
28
5 4 3 2 1 j
➌ Roam Indicator Appears when your phone uses
another network system outside your home network.
When you leave your home network area, your
phone
roams
or seeks another network.
No signal
Page 31

About Your Phone
➍ Message Waiting Indicator Appears when
your phone receives a text message.
➎ Voice Message Waiting Indicator Appears
when you receive a voicemail message.
➏ Battery Level Indicator Shows the amount of charge left
in your battery. The more segments visible, the greater the
charge.
High
Recharge your battery as soon as possible when you see the
Low Battery warning message.
Note: When you charge the battery, the battery level indicator
instead shows how much of the charging process is complete.
See “Charging the Battery” on page 23.
➐ Clock Shows the current time.
➑ Menu Indicator Indicates that you can press M to open
a menu. See “Using the Menu” on page 46.
that you are in a call; it simply indicates that you are registered
on the network via a GPRS connection.
E D C B
➒ GPRS Indicator Indicates that a GPRS packet
data connection is active. This type of connection may
be used by your service provider to allow faster data
transfer speeds. The GPRS indicator does not mean
Empty
29
Page 32

About Your Phone
➓ Alert Setting Indicator Shows the current selected alert
profile. The default alert setting is a ringer.
Loud ring
w
Vibrate
y
Silent
t
Soft ring
x
Ring and vibrate
u
Changing the Zoom Setting
You can set your phone’s display to show either six lines or four
lines of text plus soft key labels. Six lines of text display more
information, while four lines increase text size.
To change the display view, press M once, then press and
hold M again within two seconds of the first press.
You can also adjust the zoom setting from the menu. See the
“Zoom” item on page 73.
Volume Keys
Use the upper and lower
volume keys to adjust your
phone’s earpiece and
ringer volume, and to
mute the incoming call
alert.
When Press To
you are in a call volume keys increase or decrease
Volume
keys
earpiece speaker
volume
30
Page 33

About Your Phone
When Press To
the idle display is
showing
You can also use the volume keys to scroll up or down through
menus and lists.
To change keypad volume, see “Customize an Alert Profile” on
page 142.
4-Way Navigation Key
The 4-way navigation key
is a joystick that you use
to move through the
menu. It lets you adjust feature settings by pressing the key in
the desired direction.
Tip: Down and up are your primary movements within menus.
Right and left are available for shortcuts (advancing through
choices), datebook, adjusting settings (such as contrast or key
volume), and when entering or editing text.
volume keys increase or decrease
ringer volume
4-way
navigation
key
Battery Use
Caution: To prevent injuries or burns, do not allow metal
objects to contact or short-circuit the battery terminals.
To maximize your battery’s performance:
• Always use Motorola Original™ batteries and battery
chargers. The phone warranty does not cover damage
31
Page 34

About Your Phone
caused from using non-Motorola batteries and/or battery
chargers.
• New batteries or batteries that have been stored for long
periods of time may require a longer charge time.
• Maintain the battery at or near room temperature when
charging.
• Do not expose batteries to temperatures below -10°C
(14°F) or above 45°C (113°F). Always take your phone with
you when you leave your vehicle.
• When you do not intend to use a battery for a while, store it
uncharged in a cool, dark, dry place, such as a refrigerator.
• Over extended periods of time, batteries gradually wear
down and require longer charging times. This is normal. If
you charge your battery regularly and notice a decrease in
talk time or an increase in charging time, then it is probably
time to purchase a new battery.
• The more you talk on the phone or use phone features (like
sending text messages), the less standby time your battery
has.
The rechargeable batteries that power this product
must be disposed of properly and may need to be
recycled. Refer to your battery’s label for battery type.
Contact your local recycling center for proper disposal methods.
Never dispose of batteries in a fire because they may explode.
32
Page 35

Sending and Receiving Calls
For basic instructions on how to send a call, end a call, and
receive a call, see pages 25–26 of the “Getting Started” section.
This chapter describes features that help you send and receive
calls with your phone. For information about other call-related
phone functions, see “Recent Calls” on page 77 and “Data and
Fax Calls” on page 155.
Redialing a Number
You can redial a previously dialed phone number, whether the
call was connected or busy. From the idle display:
Press To
1
N
2
S
3
N
Using Automatic Redial
If you receive a busy signal, your phone displays the message
Call Failed.
When automatic redial is turned on, your phone automatically
makes a number of redial attempts until the call goes through.
When the call goes through, your phone rings or vibrates one
time, displays the message Redial Successful, and then
connects the call.
go directly to the dialed calls list
scroll to the entry you want to call
redial the highlighted number
33
Page 36

Sending and Receiving Calls
You must turn on automatic redial to use this feature. See the
“Auto Redial” item on page 73 to turn on automatic redial.
When automatic redial is turned off, you can manually activate
the feature to redial a phone number. When you hear a busy
signal and see the Call Failed message:
Press To
N or RETRY (+)
Caller ID
The
calling line identification
you see who is calling before you answer.
• If the caller’s name is stored in your phonebook, the phone
automatically displays the name. Otherwise, the phone
displays the caller’s phone number.
• If caller ID information is not available, your phone displays
the message Incoming Call.
activate automatic redial
(caller ID) feature lets
34
Page 37

Sending and Receiving Calls
Returning an Unanswered Call
Your phone keeps a record of your unanswered calls. When you
cannot answer a call, your phone displays:
• the T (missed call) indicator
• the message X Missed Calls, where X is the total number
of missed calls
Press To
1
VIEW (+) see the received calls list, with the
most recent call at the top
2
S
3
N
Dialing an Emergency Number
Your service provider programs one or more emergency phone
numbers (such as 911) that you can call under any
circumstances. You can dial and call the emergency number even
when your phone or keypad is locked, when you are prompted to
enter a code or password, when the SIM card is not inserted in
your phone, or when the SIM card is blocked or disabled.
Note: Emergency numbers vary by country. Your phone’s
emergency number(s) may not work in all locations.
scroll through the list and select a call
that you want to return
send the call
35
Page 38

Sending and Receiving Calls
To call the emergency number at any time:
Press To
1
keypad keys dial the emergency number (such as
911)
2
N
Entering Numbers in the Notepad
Your phone stores the most recent string of digits entered on the
keypad in a temporary memory location called the
These digits can be the last phone number that you called, or a
phone number that you simply entered but did not call. These
digits remain in the notepad even when you turn off the phone.
You can use the notepad to store a phone number that you
intend to call later (such as a phone number told to you by the
other party during a call). To retrieve these digits, see “Using the
Notepad” on page 80.
Muting the Ring or Vibrate Alert
You can mute your phone’s incoming call alert before answering
the call.
While the phone is ringing or vibrating:
call the emergency number
notepad
.
Press To
either volume key turn off the ring or vibration alert
To specify a ring or vibration type, see “Ring/Vibrate” on
page 141.
36
Page 39

Sending and Receiving Calls
Terminating an Incoming Call
While the phone is ringing or vibrating:
Press To
O or IGNORE (-)
Depending on your phone settings and the type of subscription
you have with your service provider, the call may be forwarded to
another number, or the calling party may hear a busy signal.
Dialing With Speed Dial
The
speed dial
minimal number of keypresses.
Whenever you store an entry in your phonebook, the entry is
assigned a unique speed dial number. If you know the speed dial
number for the phonebook entry you want to call, you can use
the speed dial feature.
Press To
1
keypad keys enter the one-, two-, or three-digit
2
# submit the number
3
N
feature lets you dial any phonebook entry with a
cancel the incoming call
speed dial number for the entry you
want to dial
call the entry
To make an entry in the phonebook or view an existing entry’s
speed dial number, see “Storing a Phonebook Entry” on
page 86.
37
Page 40

Sending and Receiving Calls
Dialing With 1-Touch Dial
You can call phonebook entries 1 through 9 with the push of a
single key. Just press and hold the one-digit speed dial number
for one second.
To store entries in locations 1 through 9 in the phonebook, see
“Storing a Phonebook Entry” on page 86.
Note: You must specify which phone number list you want to
use with this feature: phone memory phonebook, or SIM card
phonebook. See “1-Touch Dial Preference” on page 97.
Dialing a Number In a Text Message
If you receive a text message with an embedded
phone number, you can dial the number directly.
Note: You must set up the text message inbox before
you can receive text messages. See “Setting Up the
Text Message Inbox” on page 110.
Find the Feature
Press To
1
S
2
M open the Text Msg Menu
3
S
4
SELECT (+) dial the number in the message
If the message contains more than one phone number, press S
to scroll to a number and then press SELECT (+) to dial.
38
M > Messages > Text Msgs
scroll to the message with the
number
scroll to Call Back
Page 41

Sending and Receiving Calls
Additional Dialing Features
In addition to pressing numbers on your keypad, you can insert
numbers or characters and send calls in a variety of ways.
To dial the local international access code:
Do This To
Press 0 for two
seconds
While dialing (with digits visible in the display):
Do This To
Press M
> Attach Number
Press M
> Hide ID/Show ID
Press M
> Send Message
Press M
> Talk Then Fax
insert the international access code
for the country from which you are
calling
attach a number from the phonebook
or recent calls list to the end of the
digits you entered
Hide (or show) your caller ID for the
next call.
create a text message addressed to
the number entered
talk and then send a fax to the same
phone number within the same call
39
Page 42

Sending and Receiving Calls
Do This To
Press M and then
scroll to and select
one of the following:
• Insert Pause
(to insert a p)
• Insert Wait
(to insert a w)
• Insert 'n'
(to insert an n)
insert a special character when
making a call that requires you to dial
and send additional digits (for
example, to make a calling card call,
or to retrieve messages from an
answering machine):
• Pause tells your phone to wait
until the call connects before it
automatically sends the next
digit(s) in a series.
• Wait tells your phone to wait
until the call connects, and then
to prompt you for confirmation
before it sends the next digit(s).
• 'n' tells your phone to prompt you
for a number before dialing the
call. The number you enter is
inserted into the dialing sequence
in place of the
n character.
40
Page 43

Sending and Receiving Calls
You can also call numbers using these features:
Do This To Call
Press and release the voice key
on the right side of your phone
and say the entry’s name (in
two seconds).
Voice
key
a phone number using the
voice dial feature
See “Recording a Voice
Name For a Phonebook
Entry” on page 89.
Press M > Service Dial
>
entry to call
Press M > Fixed Dial
>
entry to call
Press M > Recent Calls
> Received Calls
or
Dialed Calls
>
entry to call
a service dial number
programmed on the SIM
card
a fixed dial number
a missed call or a number
from a call you recently
dialed or received
41
Page 44

Using Features While On a Call
Using Call Waiting
If you subscribe to call waiting, an alert tone sounds
while you are on a call to indicate that you have
received a second call.
To put the first call on hold and answer the second call:
Press To
1
N
2
SWITCH (+)
or
LINK
(-)
To end the first call and answer the second call:
Press To
1
O
2
N
answer the new call
switch back to the first call
Note: You can press SWITCH (+) at
any time to switch between calls.
connect the two calls
end the current call
Your phone rings to signal the new
call.
answer the new call
42
Page 45

Using Features While On a Call
You must activate call waiting in order to use the feature. See the
“Call Waiting” item on page 71 to activate call waiting.
Making a Conference Call
To talk to more than one person on a call, you can
make a conference call. Call the first person, call the
second person, then link the two calls.
Press To
1
keypad keys dial the first person’s number
2
N
3
HOLD (+)
(if available)
or
M > Hold
4
keypad keys dial the next person’s number
5
N
6
LINK (-) connect the two calls
7
O
call the number
put the first call on hold
Your phone displays a l (flashing
phone) indicator next to the call on
hold.
call the number
Your phone displays a W (active call)
indicator next to the new active call.
end the entire call
43
Page 46

Using Features While On a Call
Transferring a Call
While you are on a call, you can transfer the call to another
phone by first talking to the person who answers the other
phone, or by directly transferring the call.
Announce the Call Transfer
You can talk to the person who answers the other phone before
you transfer the call, to tell them whom you are transferring.
Find the Feature
Press To
1
keypad keys enter the phone number where you
2
N
3
M open the menu
4
S
5
SELECT (+) select Transfer
6
OK (+) confirm the transfer
44
M > Hold
are transferring the call
dial the phone number
Speak to the person who answers the
target phone.
scroll to Transfer
Your phone displays the message
Transfer: Complete when the call
is transferred. You can hang up the
phone when you see this message.
Page 47

Using Features While On a Call
Do Not Announce the Call Transfer
You can directly transfer a call without talking to the person who
answers.
Find the Feature
Press To
1
keypad keys enter the phone number where you
2
N
M > Transfer
are transferring the call
dial the phone number
Your phone displays the message
Transfer: Complete when the call
is transferred. You can hang up the
phone when you see this message.
Additional On-Call Features
While you are on a call, you can perform the following tasks:
Do This To
Press HOLD (+) (if available)
or
Press M > Hold
Press M > My Tel. Numbers see your phone number
put a call on hold
Your phone displays a
l (flashing phone)
indicator to indicate that
the call is on hold.
45
Page 48

Using the Menu
Navigating to a Feature
You can access many of your phone’s features by using these
keys to move through the menu system:
Menu Key
Enter the menu
system, or open
a sub-menu, when
e
appears in the
bottom center of
Volume Keys
Scroll up or
down through
menus and lists.
Left Soft Key
Left Soft Key
Perform the
Perform the
function shown
function shown
in the lower left
in the lower left
corner of the
corner of the
display (usually
display (usually
EXIT
or
BACK
or
BACK
).
).
EXIT
End Key
Exit the menu
system without
making changes,
return to the
idle display.
Main Menu
) Recent Calls
) Service Dial
) Fixed Dial
) Phonebook
) Datebook
)EXIT) ) SELECT
the display.
Right Soft Key
Perform the
function shown
in the lower right
corner of the
display (usually
SELECT
the
highlighted
menu item).
4-Way
Navigation Key
Scroll up or down
through menus
and lists. Scroll
left or right to
cycle through and
set the value of
the highlighted
menu item.
46
Page 49

Using the Menu
This guide shows you how to navigate to a specific menu feature
as follows:
Find the Feature
The > symbol means that you should scroll to and select the
feature. This example shows that you must press M, scroll to
and select Recent Calls, then scroll to and select Dialed Calls
to see the dialed calls list.
M > Recent Calls
> Dialed Calls
Selecting a Feature Option
Some features require you to select an item from a list:
Dialed Calls
Press
BACK
(-)
to go back to
the previous
screen.
A sub-menu is
available. Press
M
the sub-menu.
10) John Smith
9) Lisa Owen
8) Adda Thomas
7) Jackson Bradshaw
6) John Smith
BACK VIEW
to open
e
Press
details of the highlighted item.
STORE
store the item in your phonebook.
VIEW
(+) to view
(+) appears if you can
Highlighted
item
47
Page 50

Using the Menu
Select an item by highlighting it. Use one of the following
approaches:
• Press S to scroll up or down to the item you want.
• In a numbered list, press a number key to highlight the
item.
• In an alphabetized list, press a key multiple times to cycle
through the letters on the key and highlight the closest
matching list item.
Entering Feature Information
Features such as the phonebook and datebook require you to
enter information to fill in an entry’s details:
Press
S
to
scroll down
to additional
items.
Press
CANCEL
without making changes.
DONE
(-) appears when you
enter or edit information. Press
DONE
(-) to save your changes.
48
Entry Details
Name:John Smith
No.:2125551212
Type:Work
Voice Name:
Speed No.:2
$
CANCEL CHANGE
(-) to exit
Press
to edit the selected
information.
Highlighted
item
CHANGE
(+)
Page 51

Using the Menu
• Enter numbers or text with the keypad. (See “Entering Text”
on page 51.)
• When an item has a list of possible values, press S to the
left or right to scroll through and select a value.
• When an item has a list of possible numeric values, press a
number key to set the value.
• If you enter or edit information and then decide that you do
not want to save your changes, press O to exit without
saving.
The message center lets you compose and send text messages.
(See “Entering Text” on page 51.) A
where the text will appear:
Flashing
cursor
indicates
insertion
point.
Msg:
CANCEL BROWSE
e
flashing cursor
shows you
Press
BROWSE
(+)
to view and
insert a name,
number, or
message from
previously
stored
information.
Press
CANCEL
to exit without
making changes.
(-)
Press
M
to open the
sub-menu.
49
Page 52

Using the Menu
When you enter text, the flashing cursor changes to a
cursor
, and the soft key functions change:
Block
cursor
indicates
current
highlighted
character.
After two
seconds,
the block cursor reverts to
a flashing cursor and moves
to the next position.
Msg:
T
DELETE OK
e
Press
DELETE
delete the character to the
left of the insertion point.
(-) to
block
Press
OK
(+)
to accept
and store
the text.
50
Page 53

Entering Text
Various text entry methods make it easy for you to enter names,
numbers, and text messages on your phone.
You can enter all characters (letters, numbers, and symbols)
using the standard tap method. Other text modes let you easily
enter numbers and symbols, or insert text already stored on your
phone. Finally, a predictive text mode lets you enter text
messages with a minimum of keypresses.
Choosing a Text Mode
To activate a text mode, press M from any text entry screen
and select the text mode from the Entry Method menu:
iTAP Let the phone predict each word as you enter it,
then choose the word from a list (see “Predictive
Text Entry with iTAP™ Software” on page 56).
Tap Method Enter characters one at a time by pressing the
key for the letter, number, or symbol (see “Tap
Method” on page 52). This is the standard mode
for entering text on your phone.
Numeric Enter only the number that appears on each key.
Symbol Enter symbols only (see “Symbol Mode” on
page 55).
Browse Browse through your phonebook and recent
calls lists to select a name or number to enter.
Note: The text mode you select remains active until you change
it by selecting another mode.
51
Page 54

Entering Text
Tap Method
Tap method is the default standard mode for entering text on
your phone.
To activate tap method from any text entry screen, press M
and select the Tap Method menu option.
To enter text using the tap method:
Do This To
1
Press a number
key one or more
times
2
Continue to press
number keys
3
Press OK (+) accept and store the text when you
cycle through the characters
associated with the key and select
the character you want (see the
“Character Chart” on page 54).
enter the rest of the characters in the
text message
are finished
52
Page 55

Entering Text
General Text Entry Rules
Use the keypad to enter letters, numbers, symbols, and other
characters with the tap method. Press the same key repeatedly
to cycle through available characters (see the “Character Chart”
on page 54):
Press a number
key to enter text
at flashing cursor
location.
Press navigation
Press a number
key as many times
as necessary to
enter the desired
character.
)Msg:
)
)CANCEL) ) BROWSE
key up or down
to change
character in
block cursor to
uppercase or
lowercase.
Press and hold
a number key to
cycle between
tap method and
numeric text
entry mode.
Press navigation
key left or right
to move flashing
cursor to the
left or right in
text message.
53
Page 56

Entering Text
• If you do not press a key for two seconds, the character in
the block cursor is accepted, and the cursor moves to the
next position.
• The first character of every sentence is capitalized unless
you manually change it. (Press S down to force the
character to lowercase while it is highlighted by the block
cursor.)
Character Chart
Use this chart as a guide for entering spaces, numbers, letters,
symbols, and other characters with the tap method.
1
space
. 1 ? ! , @ _ & : ; " - ( ) '
¿ ¡ % £ $ ¥
2
3
4
5
6
7
8
9
0 + - 0 x * / \ [ ] = > < # §
a b c 2 ä å á à ã α β ç
d e f 3 δ é è ê φ
g h i 4 í γ
j k l 5 λ
m n o 6 ñ ö ø ó ò ô õ ω
p q r s 7 π β σ
t u v 8 θ ü ú ù
w x y z 9 ξ ψ
54
Page 57

Entering Text
Symbol Mode
Your phone provides an alternate way to find and enter symbol
characters in a text message. You can view and select from a
variety of available symbols.
To activate symbol mode from any text entry screen, press M
and select the Symbol menu option.
To enter a symbol in symbol mode:
Do This To
1
Press a number
key one time
2
Press S
or
Press the number
key multiple times
3
Press
SELECT (+)
display its symbol options (see the
“Symbol Chart” on page 56)
The symbols associated with the key
you pressed are shown at the bottom
of the display. If necessary, press
other keypad keys to find the symbol
you want.
highlight the symbol you want
add the highlighted symbol to the
text area at the top of the display
55
Page 58

Entering Text
Symbol Chart
Use this chart as a guide for entering symbols in symbol mode.
1
2 @ _ \
3 / : ;
4 " & '
5 ( ) [ ] { }
6 ¿ ¡ ~
7 < > =
8
9 # % *
0 + - x * / =
space
. ? ! , @ _
& : ; " - ( ) ' ¿
¡ % £ $ ¥
$ £ ¥
> < # §
Predictive Text Entry with iTAP™ Software
iTAP™ software provides a predictive text entry method that lets
you enter the letters of a word using only one keypress per letter.
You must activate iTAP software prior to entering letters. You can
do this from any text entry screen by pressing M to open the
Entry Method menu and selecting the iTAP menu option.
56
Page 59

Entering Text
Enter Words
To enter a word with iTAP software:
Do This To
1
Press a number
key one time
2
Press number keys
(one per letter)
3
When you have
entered all the
letters of the
word, press S
4
Press
SELECT (+)
enter the first letter of the word
The letters associated with the key
you pressed are shown at the bottom
of the display.
enter the rest of the word
Alternative words and letter
combinations are shown at the
bottom of the display based on the
keys you press. These word choices
are updated with each keypress.
locate and highlight the word you
want
add the highlighted word to the text
area at the top of the display
A space is automatically inserted
after the word.
57
Page 60

Entering Text
For example, to spell the word “act,” press 2 2 8. The
display shows:
Flashing
cursor
indicates
insertion
point.
Msg:
Cat Act Bat Abu
DELETE SELECT
Press
DELETE
clear the last letter entered.
(-) to
}
Press S to
scroll and see
additional
word choices.
Press
SELECT
to insert the
highlighted
word at the
insertion point.
Enter Novel Words
You may enter a word that is not in the iTAP software dictionary.
If you enter all the letters of a word but the word is not
displayed:
Do This To
1
Press DELETE (-) one
or more times
2
Press S
delete one or more letters until
you see a letter combination
that matches the start of the
word
highlight the letter or letter
combination
(+)
58
Page 61

Entering Text
Do This To
3
Press SELECT (+),
then press S to the
left
4
Continue entering
letters and highlighting
letter combinations
Punctuation
The iTAP software automatically adds a space after each word.
When you enter punctuation, this space is removed. To enter
punctuation with iTAP software:
Press To
1 or 0 enter punctuation or other characters
Capitalization
The first word of a sentence is automatically capitalized, with
following words in lowercase. To set or adjust character
capitalization with iTAP software:
shift the text entry cursor to the
left and “lock” the selected
portion of the word
spell the word
as shown in the “Character Chart”
on page 54
Press To
S up or down
change the words to initial character
capitalized, all uppercase characters,
or all lowercase characters
59
Page 62

Entering Text
Enter Numbers
To enter a number with iTAP software:
Do This To
1
Enter the first digit
and then highlight
it
2
Press number keys add digits to the number
3
Press
SELECT (+)
Delete Letters and Words
Place the cursor to the right of the text that you want to delete,
and then do the following:
Do This To
Press DELETE (-) delete one letter at a time
Continue to hold
DELETE (-)
put the iTAP software in number
entry mode
enter the number at the insertion
point
delete the entire message
60
Page 63

Menu Feature Descriptions
This chapter describes all of your phone’s features in order of the
menu map shown on pages 3–4. Some descriptions also include
page numbers where you can find more detailed information.
If you would like to learn more about a specific feature, a
reference guide for your phone is also available. To obtain a copy
of the reference guide or another copy of this user guide, see the
Motorola Web site at:
http://motorola.com/consumer/manuals
http://www.motorola.ca/manuals
or contact the Motorola Customer Call Center at
1-800-331-6456 (United States) or 1-800-461-4575 (Canada).
Main Menu
R
ECENT CALLS
Received Calls
View a list of recently received calls. See “Viewing the
Received Calls or Dialed Calls List” on page 77.
Dialed Calls
View a list of recently dialed calls. See “Viewing the
Received Calls or Dialed Calls List” on page 77.
M > Recent Calls
M > Recent Calls
(United States)
(Canada)
> Received Calls
> Dialed Calls
61
Page 64

Menu Feature Descriptions
Notepad
M > Recent Calls
> Notepad
Call or store the last number entered on the keypad. See
“Entering Numbers in the Notepad” on page 36, and
“Using the Notepad” on page 80.
Call Times
M > Recent Calls
> Call Times
View call timers that track time spent on your last call,
dialed calls, received calls, all calls since reset, and all calls
total. See “Viewing and Resetting Call Timers” on page 81.
Call Cost
M > Recent Calls
> Call Cost
View call cost information. Your network may
provide current credit information, and can
provide cost information about the amount spent on your
last call, dialed calls, received calls, and all calls total. See
“Viewing and Resetting Call Costs” on page 83.
S
ERVICE DIAL
M > Service Dial
Dial pre-programmed numbers stored on your
SIM card. Your service provider can program your
SIM card with phone numbers for services such as
taxi companies, restaurants, and hospitals.
F
IXED DIAL
M > Fixed Dial
Dial or edit numbers in the fixed dial list.
When you activate the fixed dial feature, users
can only call the numbers in the fixed dial list. To activate
fixed dial, see the “Fixed Dial” item on page 71.
62
Page 65

Menu Feature Descriptions
Fixed dial list entries can be any length. If there is a fixed
dial entry for the digits 555, users can call any number that
starts with 555.
You must enter your SIM PIN2 code to edit fixed dial
entries. In the fixed dial list, you can create, edit, delete, and
sort entries just like in the phonebook list. Fixed dial list
entries are stored on your SIM card and do not have Type
or Voice Name fields.
Note: Employers can use fixed dial to limit employees’
phones to a predefined list of numbers, country codes, or
other prefixes.
P
HONEBOOK
D
ATEBOOK
Q
UICK DIAL
M > Phonebook
Store names and numbers as entries in your phonebook,
then call numbers by selecting them from the phonebook
list. See “Phonebook” on page 85.
M > Datebook
Use the datebook calendar to schedule and review your
appointments. See “Datebook” on page 98.
M > Quick Dial
Dial pre-programmed numbers stored on your
phone. Your service provider may program your
phone with one or more quick dial numbers, such
as the customer service number. You can call them by
selecting them from the quick dial list.
Note: Your service provider may use a different name for
this feature.
63
Page 66

Menu Feature Descriptions
R
ADIO
Listen to FM radio stations with the optional
Motorola Original™ FM Stereo Radio Headset
accessory. This menu feature is displayed only
when the FM Stereo Radio Headset is plugged into the
accessory connector port on your phone. See “Radio” on
page 105.
M
ESSAGES
Adjust message settings, view and manage the
various types of messages your phone can receive
and/or send:
Voicemail Listen to your recorded voice
Text Msgs Send and receive text messages. See
Browser Alerts Read alert messages received by your
Info Services Read information services messages
Quick Notes Select and send pre-written messages
M > Radio
M > Messages
messages. See “Messages—
Voicemail” on page 108
“Messages—Text” on page 110
micro-browser
(subscription-based broadcast
messages, such as stock updates,
news, and weather reports) that you
have received
from the quick notes list. See “Sending
a Quick Note Text Message” on
page 117
64
Page 67

Menu Feature Descriptions
Outbox View all outgoing text messages,
delivered and undelivered
Drafts Store and edit text messages that you
have written but not sent
S
HORTCUTS
V
OICE NOTES
SIM A
M > Shortcuts
Create keypad or voice shortcuts to menu features. See
“Shortcuts” on page 121.
M > Voice Notes
Use the voice key to record messages and phone calls. See
“Voice Notes” on page 125.
Note: Recording phone calls is subject to varying state and
federal laws regarding privacy and recording of
conversations.
PPLICATIONS
M > SIM Applications
Access information and applications stored on
your SIM card.
Your SIM card may contain applications that process your
outgoing calls, text messages, and other events. Contact
your service provider for details.
B
ROWSER
M > Browser
Access Web pages and run Web-based
applications. The micro-browser delivers WAP
(Wireless Application Protocol) pages from your
service provider directly to your phone. See
“Micro-Browser” on page 131.
65
Page 68

Menu Feature Descriptions
C
ALCULATOR
Use your phone as a calculator or currency converter. See
“Calculator” on page 133.
G
AMES
Play games on your phone. See “Games” on page 136.
Settings Menu
R
ING/VIBRATE
Alert
Select a ring or vibration alert profile for incoming calls and
messages. See “Ring/Vibrate” on page 141.
Alert Detail
Change details about the current alert profile.
represents the name of the alert profile. See
“Ring/Vibrate” on page 141.
My Tones
Create custom alert tones for your phone. See “Use the My
Tones Feature” on page 143.
M > Calculator
M > Games
M > Settings
> Ring/Vibrate
> Alert
M > Settings
> Ring/Vibrate
>
Alert
Detail
M > Settings
> Ring/Vibrate
> My Tones
Alert
66
Page 69

Menu Feature Descriptions
C
ALL FORWARD
Set options for forwarding incoming voice, data,
and/or fax calls to another phone number. See
“Call Forwarding” on page 149.
P
HONE STATUS
My Tel. Numbers
View, enter, and edit information about your
name and phone number.
Credit Info
View the credit available, its expiration date, and
the date of the last deposit. (This feature is available only if
you subscribe to a prepay option.)
Credit Available
View the credit available. (This feature is available
only if you subscribe to the advice-of-charge feature.)
Active Line
Change the active phone line to send and receive
calls from either of the available numbers. (This feature is
available only for dual-line enabled SIM cards.)
M > Settings
> Call Forward
M > Settings
> Phone Status
> My Tel. Numbers
M > Settings
> Phone Status
> Credit Info
M > Settings
> Phone Status
> Credit Available
M > Settings
> Phone Status
> Active Line
67
Page 70

Menu Feature Descriptions
Battery Meter
M > Settings
> Phone Status
> Battery Meter
View a detailed battery charge meter.
Other Information
M > Settings
> Phone Status
> Other Information
View your phone’s feature specifications (if available from
the service provider).
C
ONNECTION
Connect your phone to a computer or hand-held
device to send and receive data and fax calls on
the connected device. See “Data and Fax Calls” on
page 155.
IrDA Link
M > Settings > Connection
> IrDA Link
Set up a wireless infrared connection. See “Establish an
Infrared Connection” on page 157.
B
ROWSER SETUP
M> Settings
> Browser Setup
Adjust the micro-browser’s network connection
settings, or create a new network connection
profile.
IN-C
ALL SETUP
Set the features that are active during a call, such as the
in-call timer, call waiting, and call answering options.
68
Page 71

Menu Feature Descriptions
In-Call Timer
M > Settings
> In-Call Setup
> In-Call Timer
Adjust call timer display and beep settings. You can set your
timer to beep at a selected interval during your calls. (60
seconds is the default.) You can also turn on or off a display
timer during calls as follows:
Time Display the elapsed time for the
current call
Cost Display the cost of the
current call (if you subscribe
to a call cost option or
advice-of-charge)
Total Cost
Display the cost of all calls
since the last time you reset
the timer (if you subscribe to
a call cost option or
advice-of-charge)
Credit Available Display how much credit you
have left (if you subscribe to
a call cost option or
advice-of-charge)
Off No in-call timer display
Call Cost Setup
Adjust call cost settings.
M > Settings
> In-Call Setup
> Call Cost Setup
69
Page 72

Menu Feature Descriptions
You can assign a credit limit so that your phone displays
your remaining credit during calls. Your phone notifies you
when you approach your limit, and ends the call when you
reach it.
Your phone network expresses cost in the amount of units
used, but this feature lets you tell your phone how to
translate the units to a currency.
My Caller ID
Activate and deactivate the display of your phone
number as an ID when you call someone.
Talk and Fax
Activate and deactivate the talk/fax service.
Use this feature prior to making a call when you want to
talk and then send or receive a fax—all to the same phone
number and within the same call.
You can also use the talk then fax feature to send a fax
during a call. See “Sending a Talk then Fax Call” on
page 161.
Answer Options
Turn call answering options on or off:
M > Settings
> In-Call Setup
> My Caller ID
M > Settings
> In-Call Setup
> Talk and Fax
M > Settings
> In-Call Setup
> Answer Options
Multi-Key Answer by pressing any key
70
Page 73

Menu Feature Descriptions
Call Waiting
M > Settings
> In-Call Setup
> Call Waiting
Activate and deactivate call waiting.
When call waiting is activated and another call arrives while
you are on a call, call waiting can play a tone to notify you
of the new call. See “Using Call Waiting” on page 42.
S
ECURITY
Phone Lock
M > Settings > Security
> Phone Lock
Lock and unlock your phone. See “Locking and Unlocking
Your Phone” on page 164.
Lock Keypad
M > Settings > Security
> Lock Keypad
View instructions on how to lock and unlock your keypad.
See “Locking and Unlocking Your Keypad” on page 165.
Lock Application
M > Settings > Security
> Lock Application
Lock and unlock specific phone applications (such as
phonebook or datebook). When an application is locked,
users must enter the unlock code to use the application.
Fixed Dial
M > Settings
> Security
> Fixed Dial
Restrict outgoing calls to numbers on the fixed
dial list. See “Fixed Dial” on page 62.
71
Page 74

Menu Feature Descriptions
Call Barring
M > Settings > Security
> Call Barring
Restrict incoming and outgoing calls. See “Barring Calls”
on page 165.
SIM PIN
M > Settings > Security
> SIM PIN
Switch SIM card protection on and off, so users must enter
the SIM card PIN code when they turn on the phone or
insert a SIM card. See “Protecting the SIM Card” on
page 166.
New Passwords
M > Settings > Security
> New Passwords
Change your unlock code (originally set to 1234) or your
security code (originally set to 000000). See “Assigning a
New Code or Password” on page 162.
O
THER SETTINGS
Personalize
M > Settings
> Other Settings
> Personalize
Set several personal phone options:
Main Menu
Change the order of the main menu.
(See “Reordering Menu Items” on
page 151.)
Keys
Change the functions of the soft keys
in the idle display. (See “Customizing
a Soft Key Function” on page 151.)
72
Page 75

Menu Feature Descriptions
Greeting
Change the text displayed
when you turn on your
phone
Quick Dial
Initial Setup
Change quick dial number(s)
M > Settings
> Other Settings
> Initial Setup
Set many basic phone options:
Time and Date Set the phone’s time and date
1-Touch Dial Assign the 1-touch dial feature to
numbers 1 through 9 in your phone
memory phonebook or SIM card
phonebook. (See “1-Touch Dial
Preference” on page 97.)
Auto Redial Use this option to turn on or turn off
the automatic redial feature. When
you turn on automatic redial, your
phone automatically redials calls that
fail due to busy conditions. (See
“Using Automatic Redial” on
page 33.)
Backlight Set the amount of time that the
display backlight remains on, or turn
off the backlight to conserve battery
power
Zoom Switch between six lines (Zoom Out)
and four lines (Zoom In) of display text
73
Page 76

Menu Feature Descriptions
Scroll Force the cursor to stop or wrap
around when it reaches the top or
bottom of a list in the display
Language Set the language for phone menus
Battery Save Adjust the phone’s power usage
characteristics to conserve power
Contrast
Setting
DTMF Your phone can send a number to the
Master Reset Reset all options back to their original
Adjust the contrast setting for your
display
network as dual tone multi-frequency
(DTMF) tones. DTMF tones are used to
communicate with automated systems
that require you to enter a number
such as a code, password, or credit
card number. Use this option to set
DTMF tones to be long, short, or off.
factory settings
code, security code, and lifetime timer
except
for the unlock
74
Page 77

Menu Feature Descriptions
Master Clear Reset all options back to their original
factory settings
code, security code, and lifetime timer,
and
clear all user settings and entries
except
for information on the SIM card
Note: This option
user-entered information
your phone’s memory, including
phonebook and datebook entries.
Once you erase the information, it
cannot be recovered.
except
for the unlock
erases all
stored in
Network
View and adjust your phone’s network settings.
Your service provider registers your phone to a network. You
can view information about the current network, change
how your phone searches for a network, specify your
preferred networks, change your phone’s frequency settings
for different geographical regions (1900 MHz or 900/1800
MHz), and activate alerts that indicate when a call is
dropped or network registration changes.
Car Settings
Adjust hands-free car kit settings.
M > Settings
> Other Settings
> Network
M > Settings
> Other Settings
> Car Settings
75
Page 78

Menu Feature Descriptions
You can set your phone to route calls directly to the car kit
when it detects a connection, and automatically answer
calls after two rings. See “Hands-Free Use” on page 152.
Note: The use of wireless devices and their accessories may
be prohibited or restricted in certain areas. Always obey the
laws and regulations on the use of these products.
Headset
Set your phone to automatically answer calls after
two rings when connected to a headset. See “Hands-Free
Use” on page 152.
M > Settings
> Other Settings
> Headset
76
Page 79

Recent Calls
You can use the recent calls menu to view received calls or dialed
calls, retrieve the last number stored in the notepad, and view or
reset call times and costs.
Viewing the Received Calls or Dialed Calls List
Your phone keeps lists of the numbers from calls you recently
received and dialed, even if the calls did not connect. The lists
are sorted from newest to oldest entries. The oldest entries are
deleted as new ones are added. Each entry tells you the person’s
number (or name, if available) and whether the call connected or
not. You can call, store, or delete the numbers on these lists.
Shortcut: Press N to go directly to the dialed calls list from the
idle display.
To open the recent calls menu:
Find the Feature
Press To
1
S
2
SELECT (+) select Received Calls or
3
S
M > Recent Calls
scroll to Received Calls or
Dialed Calls
Dialed Calls
scroll to an entry you want to call,
store, or delete
Note: < means the call connected.
77
Page 80

Recent Calls
Press To
4
N call the entry’s number
Tip: Press and hold N for two
seconds to send the entry number as
DTMF tones. To activate DTMF tones,
see the “DTMF” item on page 74.
or
+ view the entry’s details if View
appears above the + key, or store
the entry’s details in the phonebook if
Store appears above the + key
or
M open the Last Calls Menu to
perform other procedures as
described in the following list
The Last Calls Menu includes the following options:
Option Description
Store Create a phonebook entry with the
selected number in the No. field. (This
option is not available if STORE appears
above the + key, or if the number is
already stored as a phonebook entry.)
Delete
Delete All
Delete the entry. (This option is not
available if DELETE appears above the key.)
Delete all entries in the current list.
78
Page 81

Recent Calls
Option Description
Hide ID/Show ID Hide (or show) your caller ID for the next
call.
Send Message Create a new text message, with the
selected number in the Tel No. field. See
“Sending a Text Message” on page 114.
Add Digits Add digits to the end of the selected
number.
Attach Number Attach another number from the
phonebook or recent calls list to the end of
the selected number.
Send Tones Send the selected number to the network
as DTMF tones, for credit card calling or
password entry. (This option is available
only during an active call.)
To activate DTMF tones, see the “DTMF”
item on page 74.
Talk then Fax Tell the network you want to call
and talk to someone, and then
send a fax—all to the same
number in the same call. See
“Sending a Talk then Fax Call” on
page 161.
79
Page 82

Recent Calls
Using the Notepad
Your phone uses a notepad to store the most recent string of
digits entered—either for a phone number that you called or for
a number that you entered but did not call.
To call the number, create a phonebook entry, or perform other
operations with the number stored in the notepad:
Find the Feature
Press To
N
or
M
or
STORE
(+)
80
M > Recent Calls > Notepad
call the number
open the Dialing Menu (to attach a
number or insert a special character).
See “Additional Dialing Features” on
page 39.
create a new phonebook entry, with
the notepad number copied into the
No. field. See “Storing a Phonebook
Entry” on page 86.
Page 83

Recent Calls
Viewing and Resetting Call Timers
Your phone tracks and records call times. Use the recent calls
menu to view and reset a call timer.
Network connection time
you connect to your service provider's network to the moment
you end the call by pressing O. This time includes busy signals
and ringing.
The amount of network connection time you track on
your resettable timer may not equal the amount of time
for which you are billed by your service provider. For
billing information, please contact your service provider
directly.
You can view the approximate network connection time elapsed
during the following calls:
Timer Description
Last Call Time spent on the last call dialed or
Dialed Calls Total time spent on dialed calls since the
Received Calls Total time spent on calls received since the
All Calls Total time spent on dialed and received
Lifetime Total time spent on all calls on this phone.
is the elapsed time from the moment
received. You cannot reset this timer.
last time you reset this timer.
last time you reset this timer.
calls since the last time you reset this
timer.
You cannot reset this timer.
81
Page 84

To view a call timer:
Recent Calls
Find the Feature
Press To
1
S
2
SELECT (+) view the recorded time
To reset the call timer:
Press To
1
RESET (+) reset the time (if available)
2
YES (-) confirm the reset
M > Recent Calls
> Call Times
scroll to the timer you want to view
82
Page 85

Recent Calls
Viewing and Resetting Call Costs
Your phone network can provide the following cost
information:
Cost Tracker Description
Credit
Available
Expiration Date Date that the available credit expires
Last Deposit Amount of the last deposit (available only
Last Call Amount spent on the last call you dialed
Dialed Calls Amount spent on calls you dialed since the
Received Calls Amount spent on calls you received since
Amount of your credit remaining.
For GSM advice-of-charge, this is only
available if you set a credit limit.
Note: Your phone receives cost
information from the advice-of-charge
feature or third-party prepay software.
(available only with a subscription to a
prepay option).
with a subscription to a prepay option).
or received. You cannot reset this cost
tracker.
last time you reset this cost tracker.
the last time you reset this cost tracker.
83
Page 86

Recent Calls
Cost Tracker Description
All Calls Amount spent on all dialed and received
calls since the last time you reset this cost
tracker.
You can reset this value separate from
Dialed Calls and Received Calls, so
Dialed Calls plus Received Calls may
not equal All Calls.
To view a cost tracker:
Find the Feature
Press To
1
S
2
SELECT (+) view the recorded cost
To reset the cost tracker:
Press To
1
RESET (+) reset the cost (if available)
2
OK (-) enter your PIN2 code to confirm the
84
M > Recent Calls
> Call Cost
scroll to the cost tracker you want to
view
reset
Page 87

Phonebook
You can store a list of names and phone numbers in your
phone’s electronic phonebook. You can view these entries and
call them directly from your phone.
To see the list of names stored in your phonebook, press
M > Phonebook from the idle display. Scroll to a name and
press VIEW (+) to view details of the phonebook entry as
shown in the following display.
Fields in a Phonebook Entry Form
Voice Name
indicates a recorded
voice name
Type
indicator
identifies
number
type:
$
Work
U
Home
S
Main
h
Mobile
Z
Fax
p
Pager
Note: Phonebook entries stored on the SIM card do not have
Type or Voice Name information.
indicator
Entry’s
Name
$*Carlo Emrys
01543372151410
Speed No.15# (P)
BACK EDIT
Return
to list
Press
the
Menu
e
M
to open
Phonebook
Edit
entry
Entry’s phone
number
Entry’s speed
dial number
(P)
indicates
entry stored
in phone
memory.
(S)
indicates
entry stored
in SIM
memory.
85
Page 88

Phonebook
Storing a Phonebook Entry
A phone number is required for a phonebook entry. All other
information is optional.
You can store a phonebook entry on your phone or on the
SIM card. Entries with a speed dial number from 1 to 500 are
stored on the phone. To store a phonebook entry on your SIM
card, assign a speed dial number of 501 or higher to the entry
when you create it. The total number of entries you can store on
the SIM card is dependent on your service provider.
Shortcut: Enter a phone number in the idle display, then press
STORE (+) to create a phonebook entry with the number in the
No. field. Go directly to step 1 in the following procedure to
enter additional information and store the entry.
Note: You can also use the following procedure to store a fixed
dial entry by scrolling to and selecting Fixed Dial.
Enter Information
Find the Feature
Press To
1
CHANGE (+) select Name
2
keypad keys enter a name for the phonebook
3
OK (+) store the name
4
CHANGE (+) select No.
5
keypad keys enter the phone number
86
M > Phonebook
M > New
entry (see “Entering Text” on
page 51)
Page 89

Phonebook
Press To
6
OK (+) store the phone number
7
CHANGE (+) select Type
Note: This option is not available for
entries stored on a SIM card.
8
S
9
SELECT (+) select the number type
10
RECORD (+)
or
Go to step 11 if
you do not want
to record a voice
name for the
entry
11
S
12
CHANGE (+) select Speed No. if you want to
scroll to the type of phone number
record a voice name for the entry, if
desired
See “Recording a Voice Name For a
Phonebook Entry” on page 89.
Note: This option is not available for
entries stored on a SIM card.
scroll to Speed No., the number to
speed dial
The next available speed dial number
is assigned to a new phonebook
number by default.
change it
the entry
87
Page 90

Phonebook
Press To
13
keypad keys enter a different speed number, if
desired
Note: Entries with a speed dial
number from 1 to 500 are stored on
the phone. Entries with a speed dial
number of 501 or higher are stored
on the SIM card.
14
OK (+) save the modified speed number
If your chosen speed number is
already assigned to another entry,
you are asked if you want to replace
that entry.
15
SELECT (+) select MORE if you want to create
another entry with the same Name
Note: You must enter a name and
number to use this option.
Complete Phonebook Entry
When you are finished entering information for a phonebook
entry:
Press To
DONE (-) store the entry and return to the
phonebook list
88
Page 91

Phonebook
Recording a Voice Name For a Phonebook Entry
You can record a voice name when you create a new phonebook
entry, or when you edit a previously stored phonebook entry. This
lets you use voice dial to call the number without dialing (see
“Voice Dial” on page 91).
Note: You cannot record a voice name for an entry stored on a
SIM card.
Tip: Make your voice recording in a quiet location. Hold the
phone about four inches (10 centimeters) from your mouth, and
speak directly into the phone’s microphone in a normal tone of
voice.
Find the Feature
Do This To
1
Press S
2
Press VIEW (+) display the entry’s detailed view
3
Press EDIT (+) edit the phonebook entry
4
Press S
5
Press RECORD (+) begin the recording process
M > Phonebook
scroll to the entry that needs a
voice name
scroll to Voice Name
The phone displays Press Voice
Key then say name
.
89
Page 92

Phonebook
Do This To
6
Press and release the
voice key on the right
side of your phone and
say the entry’s name (in
two seconds)
7
Press the voice key and
repeat the name
Dialing a Phonebook Entry
You can use the phonebook list, voice dial, speed dial, or
1-touch dial to call a number stored in your phonebook. To use
speed dial, see “Dialing With Speed Dial” on page 37. To use
1-touch dial, see “Dialing With 1-Touch Dial” on page 38.
Phonebook List
To call a number in the phonebook list:
record the voice name
The phone displays Press Voice
Key then REPEAT name
confirm the voice name
The phone displays Trained:
Voice Name.
.
Find the Feature
Press To
1
S
2
N
90
M > Phonebook
scroll to the entry you want to call
send the call
Page 93

Phonebook
Voice Dial
To call a number using voice dial:
Do This Result
Press and release the
voice key on the right
side of your phone and
say the entry’s name (in
two seconds).
Editing a Phonebook Entry
You can edit a phonebook entry stored on your phone or the SIM
card.
Notes:
• If you change an entry’s speed dial number, the entry is
moved to the new speed dial location and the original entry
is deleted. Entries with a speed dial number from 1 to 500
are stored on the phone. Entries with a speed dial number
of 501 or higher are stored on the SIM card.
• You can also use the following procedure to edit a fixed dial
entry by scrolling to and selecting Fixed Dial.
Your phone goes to the entry in
the phonebook list, repeats the
voice name, waits two seconds,
then automatically dials the call.
Find the Feature
Press To
1
S
2
VIEW (+) display the entry’s detailed view
3
EDIT (+) edit the phonebook entry
M > Phonebook
scroll to the entry you want to edit
91
Page 94

Phonebook
Edit a phonebook entry or fixed dial entry by following the
procedures described in “Storing a Phonebook Entry” on
page 86.
Deleting a Phonebook Entry
To delete a phonebook entry:
Find the Feature
Press To
1
S
2
M open the Phonebook Menu
3
S
4
SELECT (+) select Delete
5
YES (-) confirm the deletion
M > Phonebook
scroll to the entry you want to delete
scroll to Delete
Copying Phonebook Entries Between the Phone and SIM Card
You can copy one or more phonebook entries from your phone
to the SIM card or from the SIM card to your phone.
Notes:
• This procedure copies the original entry to a new location. It
does
not
delete the original entry.
• The SIM card cannot store Type and Voice Name data for
entries. If you try to copy an entry with a type or voice name
to the SIM card, the phone asks you for confirmation before
dropping this information and copying the entry.
92
Page 95

Phonebook
Copy a Single Entry
To copy a single phonebook entry from your phone to the SIM
card or from the SIM card to your phone:
Find the Feature
Press To
1
S
2
M open the Phonebook Menu
3
S
4
SELECT (+) select Copy Entry
5
keypad keys edit the speed dial number on the
6
OK (+) approve the copy to the speed dial
M > Phonebook
scroll to the entry you want to copy
Note: Entries with a speed dial
number from 1 to 500 are stored on
the phone. Entries with a speed dial
number of 501 or higher are stored
on the SIM card.
scroll to Copy Entry
The phone displays the Copy To
form, with the next available speed
dial number.
Copy To form
number
The phone displays the Stored
message. You can now delete the old
phonebook entry, if desired.
93
Page 96

Phonebook
Copy Multiple Entries
To copy multiple phonebook entries from your phone to the SIM
card or from the SIM card to your phone:
Find the Feature
Press To
1
M open the Phonebook Menu
2
S
3
SELECT (+) select Copy Entries
4
S
5
CHANGE (+) select From (start)
6
keypad keys enter the first (lowest) speed dial
7
OK (+) store the number and return to the
8
S
9
CHANGE (+) select From (end)
M > Phonebook
scroll to Copy Entries
The phone displays the Copy Entries
form.
scroll to From (start)
number in the range of entries that
you want to copy
Note: Entries with a speed dial
number from 1 to 500 are stored on
the phone. Entries with a speed dial
number of 501 or higher are stored
on the SIM card.
Copy Entries form
scroll to From (end)
94
Page 97

Phonebook
Press To
10
keypad keys enter the last (highest) speed dial
number in the range of entries that
you want to copy
11
OK (+) store the number and return to the
Copy Entries menu
12
S
13
CHANGE (+) select To (start)
14
keypad keys enter the first (lowest) new speed dial
15
OK (+) store the number and return to the
16
DONE (-) copy the entries
Checking Phonebook Capacity
You can check phonebook capacity to see how much space is left
for storing phonebook entries on your phone and on the SIM
card. For entries stored on the phone, your phone displays a
memory meter that shows how much memory space remains to
store phonebook and datebook entries. For the SIM card, your
phone lists the number of phonebook entries used and the
number available.
To check phonebook capacity for your phone or SIM card:
scroll to To (start)
number for the entries’ new location
Copy Entries menu
The phone displays the
Copied Entries message. You can
now delete the old entries, if desired.
Find the Feature
M > Phonebook
95
Page 98

Phonebook
Press To
1
M open the Phonebook Menu
2
S
3
SELECT (+) select Phone Capacity or
Synchronizing with TrueSync Software
You can synchronize phonebook entries between your
phone and computer or hand-held device with Starfish
TrueSync® software, a Motorola accessory product. See
the TrueSync user guide for more information.
Note: TrueSync software is designed to synchronize with basic
features of many popular Personal Information Management
(PIM) software and hardware products.
scroll to Phone Capacity or
SIM Capacity
SIM Capacity
Your phone displays the phone
memory meter, or the number of SIM
card phonebook entries available.
Setting Up the Phonebook
You can specify the sort order for your phonebook entries and
the location of your 1-touch dial entries.
Phonebook List Sort Preference
You can set up your phone to sort your phonebook list by speed
dial number (the standard), name, or voice dial.
96
Page 99

Phonebook
Tip: The voice dial sort is identical to the name sort, except that
the entries with voice name tags appear first.
Find the Feature
Press To
1
M open the Phonebook Menu
2
S
3
SELECT (+) select Setup
4
S
5
CHANGE (+) select Sort by
6
S
7
SELECT (+) select the entry you want
M > Phonebook
scroll to Setup
scroll to Sort by
scroll to the entry you want
1-Touch Dial Preference
Your phone lets you specify whether your 1-touch dial entries are
located on the phone or the SIM card:
Find the Feature
Press To
1
S
2
CHANGE (+) select 1-Touch Dial
3
S
4
SELECT (+) select the list you want
M > Settings
> Other Settings
> Initial Setup
scroll to 1-Touch Dial
scroll to the list you want
97
Page 100

Datebook
The datebook is a calendar that lets you schedule and organize
events such as appointments and meetings. You can review your
schedule of events for the week or by the day, and have the
datebook play a reminder alarm for specific events.
Note: You must set the correct time and date in order to use the
datebook. Use the Time and Date feature (see page 73) to set
the time and date.
To schedule or review events in the datebook:
Find the Feature
M > Datebook
Week View
When you open the datebook, your phone displays a calendar
for the week. Lines or filled boxes under each day indicate
scheduled events.
Untimed
event
12 hour
window
Exit the
datebook
Full day (12-hour)
event scheduled
98
{ 15 NOV-21 NOV }
S M T W T F S
EXIT VIEW
e
Press M to open
the
Datebook Menu
Days of week
(press
left or right
to select)
One-hour
event
Go to
selected
day
S
 Loading...