

Page 1
Page 2

Contents
Introduction................................................ 1
Getting Started
Installing/Replacing the Battery.............. 2
Control Buttons....................................... 4
Turning Your Pager On........................... 5
Turning Your Pager Off........................... 6
Using the Features Menu ....................... 7
Message-Status Screen ......................... 9
Backlight .... ........... .......... ........... .......... . 10
Receiving/Read ing
Personal Messages ........................ 10
Display Zoom ....................................... 12
Time and Date
Setting the Time and Date.................... 13
Alerts
Setting the Incoming Message Alert .... 15
Locking/Unlocking Message s
Lock/Unlock a Message .......................17
Deleting Messages
Delete a Single Message..................... 18
Delete all Messages............................. 18
Pager Alarms
Set a One-Time Alarm ......................... 19
Set the Alarm to Alert Daily.................. 21
Message Alarms
Set a One-Time Message Alarm.......... 22
Set a Daily Message Alarm.................. 24
Private Time
Set Private Time................................... 25
Maildrop/Information Service Option
Information Services Alerts .................. 27
Notebooks
Storing Personal and Information Services
Messages in Your Notebooks ........ 31
Deleting Messages from
Your Notebooks .............................. 31
Features.................................................... 33
Care and Use............................................ 36
Page 3

Congr a tula t io ns on pu rch asi ng a V700 W o rd Mes sa ge FLEX pag er. Your
new pager provides exciting capabilities in messaging and can become a
vital part of y our b u sine ss an d pe rso na l li f e . The pag er ’s four-lin e di splay
and expanded functionality incorporates many of the most advanced
electronic, communications and wireless technologies available.
The V700 Word Message FLEX pager uses FLEX
technology extends battery life up to four times longer than ordinary pagers
and improves the ability to receive messages.
These compact pagers integrate messaging and time keeping features in a
package that is convenient to carry. Full understanding of what this product
offers begins with reading this user’s guide. This user’s guide includes a
detac hab le qu ic k re f er en ce ca rd on th e ba c k cov e r.
®
technology. FLEX
INTRODUCTION
1
Page 4

Effective Use of Your Pager
Y o ur p ager ca n hel p yo u ke ep in contact with ev ery one i mportant to y ou. B y
giving your pager number to your business associates, family, and friends,
you can be contacted whenever needed.
If you have a cellular phone, give your pager number instead of your
cellul ar n umb er. Then you can de ci de who to call bac k on y ou r cel lu l ar
phone wit h out paying for inc omi ng call s.
Battery Information
Y ou r page r is desig ned to oper ate wit h a single AA-size alkaline b attery (car bon
zinc batt eries ar e not r eco mmen ded). See th e d ia gra m on t he fo llo w ing page
for th e b at tery doo r locat ion .
Installing/Replacing the Battery
T o in st al l or r epl ace th e ba t tery, hold the pa ge r f ac e do wn and proc ee d as
follows:
GETTING STARTED
➊ Unlock the battery door by sliding the door latch away from the battery
door.
2
Page 5
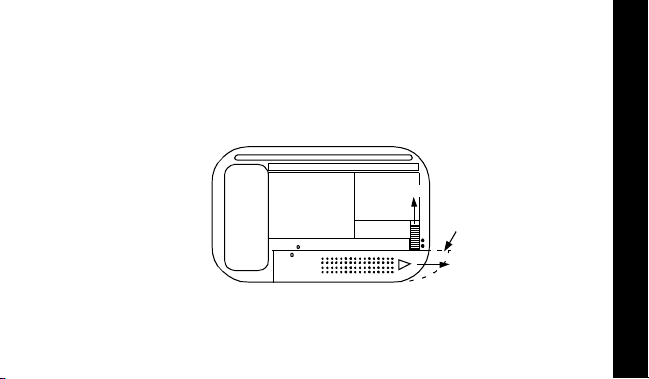
➋ Slide t he bat t ery door i n th e d ire ct io n of th e a rro w (t o wa rd th e out er
edge).
➌ Lift th e ba t tery do or a w a y fr o m th e h ous ing t o r em ov e it .
➍ Lift the battery out of the battery compartment, taking note of the
positive (+) and negative (-) markings on th e ba t tery an d the p ag er
housing.
➊
Ì
V700 Word mess ag e F L EX pager
Battery Replacement (rear view)
➌
➋
GETTING STARTED
3
Page 6
T o install a new battery, reverse this procedure, taking note of the positive
(+) and nega ti v e (-) markings.
CAUTION
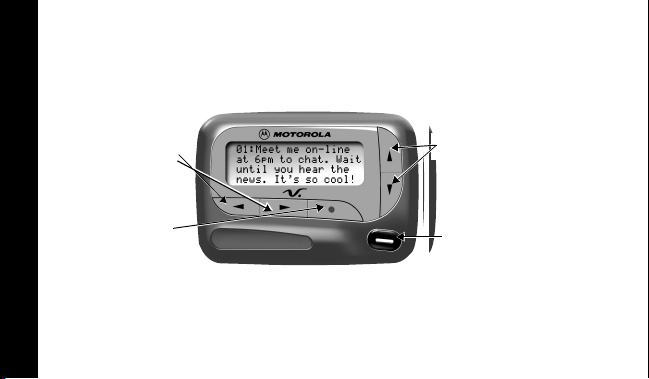
Control Buttons
: Do not insert the ba ttery bac kwar ds or all me ssages will be er ased.
Left/Right
Directional
Buttons
Up/Down
Directional Buttons
GETTING STARTED
4
H
I
Features/
Select Button
Left/Right
Directional
Buttons
Read/Escape/
Pow e r On Bu tto n
Used to navigate through the Features menu
and through your messages.
Page 7

Features/Select
K
J
F
G
Button
Read/
Power On
Up/Down
Directional
Buttons
Used to display the Features menu, to select
a pager feature, and to activate your
selection.
Used to turn the pager on and to read
messages.
Use to navigate through time, alarm, date
setting features and to navigate through
messages.
Tu rning Your Pager On
Press J. A start-u p sc re en is mo me nt aril y di sp la y ed and y our p ag er
activates the currently selected alert.
Note:
Press any button to stop the alert.
GETTING STARTED
5
Page 8
Private Time
Power On
Musical
Alarm
_
N
P
Q
Example of the Standby Screen
When the pager is on and no activity is taking place, the Standby screen is
displa y ed . Th e St an dby sc re en disp lays the powe r- on indi ca to r N and may
displa y ot he r pag er stat u s in di cato r s .
Turning Your Pa ger Off
➊ Press K to display the Features menu.
➋ Press H to move the cursor to q.
➌ Press K.
GETTING STARTED
➍ Press K again to turn the pager off.
Your pager is no w off and th e sc reen is bl an k.
TURN PAGER OFF?
is displayed.
6
Page 9

Sending a Test Page to Yourself
It’s a goo d i de a t o test y ou r pag er an d servic e b y se nd in g a p age to
your sel f . St art b y u si ng th e p hone n umb er, web site , or e mai l ad dres s ( a nd
a PIN, if required) your service provider gave you, then enter a short
message. If you are sending a word message from a phone, an operator
will assist you; otherwise, press the phone buttons to enter a numeric
message or type a message and send it. While you are waiting for the
messag e to rea ch yo ur page r , ref er t o page10
read a message. If your pager does not receive the mes s age within a few
minut es, contact your service pr ovider. After you’ve tested t he pager, read
the rest of this guide to learn about the many useful features of your new
pager.
for information about how to
Using the Features Menu
The Features menu provides access to the many features of your pager
through the use of symbols and pr ompts.
GETTING STARTED
7
Page 10

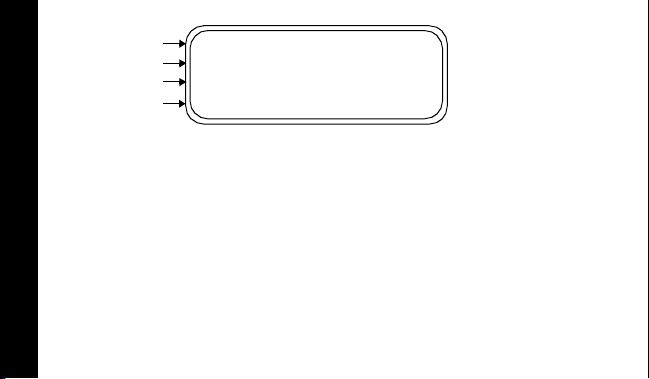
➊ Press K to display the Features menu. When the Features menu is
initially displayed a flas hes to in di ca te the lo ca ti o n of th e cu r sor.
mmmmmmomm u
VVjV
ESCAPE
v L 1 r q a A C g d u Z
l
Example of Fully Displayed Features Menu
u
➋ Press H or I to move the cursor within the Features menu.
As you move through the Features menu, the pager feature symbols
flash to indicate the present location of the cursor. To exit from the
Features menu without making any changes press
Note:
GETTING STARTED
Some symbols may not display on your pager, depending upon your
pager’s feature s an d w he the r it has mes s ag es .
J.
8
Page 11

Message-Status Screen
The Mess age- s tat us sc ree n sh ows th e cur rent st atu s of yo ur me ssa ges .
For example, unread messages are indicated by a flashing
locked messages are indicated by g.
The Mes sage- s ta tus sc r een al so dis pl a ys th e t im e an d date an d an y
activated pager settings. The Message-status screen can be accessed by
pressing H, I, G, or F from the Standby screen.
mgmmomm
VjV
P
(
Q 3:15PM 09/05/99
Example of the Message -Status Screen
m symbol,
GETTING STARTED
9
Page 12

Backlight
In low- lig ht con dit io ns , the pa ge r ’ s ba c kl ig ht au t omati ca ll y t urns on
whenever a button is pressed. Y ou can manually turn the backlight on or off
at any tim e b y pr e ss in g an d ho ldin g
automa tically turns off when the pager returns to the Standby screen.
K for two seconds. The backlight
Receiving/Reading Personal Messages
Your pager can r ecei v e up t o 19 per s on al mess ag es . When a me ss age is
received, your pager alerts according to the current alert setting (musical,
vibrate, or no message alert). A new message is indicated by a flashing
symbol. When a message is selected t he symbol changes to o.
Reading an Incoming Message
➊ Press any button to stop the alert.
➋ Press J to display your message.
A flashing t in the right corner of th e screen indicates the message is
GETTING STARTED
continued on an additional screen(s).
➌ Press J to read the next screen.
10
m
Page 13

Reading a Stored Message
➊ From the Message-status screen press H or I to move the cursor to
the mes sag e y ou w a nt to re ad .
➋ Press J to read the message.
Message Reading Features
• Press G to rea d a me ss a ge line by line.
• Press and hol d
• Press F to go back to the first screen of the message.
• Press H or I while reading a message to read the prev ious or next
message.
Note:
When an unread message exists, your pager gives a periodic
reminder alert until all unread messages are read, or for up to 30 minutes.
A flas hing N on the Standby screen indicates that you have unread
messages.
J for automatic message scrolling, screen by screen.
11
GETTING STARTED
Page 14

Message Preview
This feature allows you to scan the first line of you r messages.
➊ Press J .
➋ Use the H and I buttons to move the cursor through your
messages.
Note:
Previewing an unread message does not remove the unread
message status from the message.
Display Zoom
When this feature is turned on, the standard 4-line display is converted to a
2-line display. The characters are enlarged vertically, increasing message
readability.
To Enable Display Z oom:
➊ From the Features menu, press H to move the cursor to 1.
➋ Press K. Display zoom is now active.
GETTING STARTED
All new and stored messages including notebook messages are displayed
in a 2-line format. Pager prompts are not enlarged in the zoom mode.
12
Page 15

To Disable Display Zoom
➊ From the Features menu, press H to move the cursor to 4.
➋ Press K. Display zoom is now turned off.
Setting the Time and Date
➊ From th e F eat ur es menu, p ress H to move the cursor to v.
➋ Press K to display the Set-time-and-alarm screen.
➌ Press I to move the cursor to the hour digit.
➍ Press F or G to adju st th e ho ur.
➎ Repeat s teps 3 a nd 4 to ad ju st t h e minu t es , A M/ PM/ 24 h r . , mo nt h, day,
and year.
13
TIME AND DATE
Page 16

➏ Press K to activate the time and date setting.
zv 03:15PM 09/05/99z
c12:00A M --/--/--
SET TIME
Example of Set- Time Screen
If y ou move the cursor past the last symbol in the row ( far right), it
automa ticall y wra ps ar ound to t he fir st symb ol in the begi nnin g of the sa me
row (far left).
Note:
To exit from any scree n without making ch anges, press J .
TIME AND DATE
14
Page 17

Setting the Incoming Message Alert
You can set your pager’s incoming message alert to a musical alert, a
vibrating a lert, a chirp (short beep) alert, a chirp alert with vibration, or no
messag e alert (completely silent).
Note:
Priority messages always have an musical alert.
Setting a Musical Alert
➊ From the Features menu, press H to move the cursor to s.
➋ Press K.
When P is displayed on the Standby screen, your pager is in the musical
alert mode.
Setting the Alert Pattern
You can set your pager to alert musical with a standard alert (1), one of
seven musical (pleasing) alerts (2-8), a chirp alert (j), or a chirp and
vibrate alert (|). Y ou can also select no message alert (r).
Your pager must be in the musical alert mode (P displayed in the Standby
screen) to select an alert pattern.
ALERTS
15
Page 18

➊ From the Features menu, press H to move the cursor to l.
➋ Press K to display the Cho ose alert menu.
➌ Press H or I to mo v e the cu rs or t o the de si red al ert. T he page r gi ve s
a sample of each al ert as y ou mo ve through the sele ct io ns .
➍ Press K to activa te y our se le cti on. T he pag er gi v es a sampl e of th e
alert to confirm your selection.
Setting a Silent (Vibrate) Alert
Note:
If P is not displayed in the Standby screen, your pager is already in
the vibrate alert mode.
➊ From the Features menu, press H to move the cursor to r.
➌ Press K to activ ate t he vibr at e alert. The page r vibr ate s to conf irm y our
ALERTS
selectio n. Th e P symbol is removed from the Standby screen.
16
Page 19

Locking and Unlocking Messages
Up to 10 messages can be locked to prevent them from being deleted or
from being r eplaced when memory is full.
When a messa ge is l oc k ed, th e m symbol is repl aced by the g symbol
indicating the message is locked.
To Lock or Unlock a Message
➊ From the Message-status screen, press H or I to select t he messa ge
you wa nt to lo c k or unlo c k.
➋ Press K .
➌ Press I to move the cursor to g to lock the message, or h to unlock
the message.
➍ Press K.
T o lock or unlock a message while reading it, follow steps 2 through 4
above while the message is displayed.
17
LOCK/UNLOCK MESSAGES
Page 20

Deleting Messages
This feature allows you to delete unlocked and un-alarmed messages.
To Delete a Single Message
➊ From the Message-status screen, press H or I to se lect t he me ssa ge
you want to delete.
➋ Press K .
➌ Press I to move the cursor to A.
➍ Press K.
DELETE MESSAGE?
is displayed.
➎ Press K again to delete the message.
To Delete a Message while Reading It
Follow steps 2 through 5 above while the message is displayed.
To Delete All Unlocked, Un-alarmed and Read Messages
➊ From the Features menu, press I to move the cursor to C.
➋ Press K.
DELETING MESSAGES
➌ Press K. All unlocked, un-alarmed and read messages ar e deleted.
Note:
DELETE ALL MESSAGES?
Notebook messages are not deleted with this feature.
is displayed.
18
Page 21

Pager Alarm
Your pager has an alarm that can be set for a specific time and date, or a
specific time on a daily basis.
At the selected alarm time, your pager alerts. If the alarm times passes
without being acknowledged, Q flashes until any button is pressed.
To Set a One-Time Alarm
➊ From the Features menu, press H to move the cursor to v.
➋ Press K. The Set-ti me-and-alarm screen is displayed.
➌ Press G. The Set-alarm screen is displayed.
zv 03:15PM 09/05/99z
zc15:30PM 09/05/99z
SET ALARM
Example of Set-Alarm Screen for a Specific Time and Date
PAGER ALARM
19
Page 22

The al arm symbol shows the cu rrent alarm status. cis displayed if the
alarm is turned on, e is displayed if the alarm is turned off.
➍ Press I to move the cu rsor t o the a la rm symbol .
➎ Press F or G until c is displayed.
➏ Press I to mov e the curs or to the ho ur di git s .
➐ Press F or G to adjust th e ho ur di gi t s.
➑ Repeat steps 6 and 7 to adjust the minutes, AM/PM/24 hr., and date.
➒ Press K to activate your selection. The Q symbol is displayed on the
Standby screen.
Note:
To exit from any scree n without making ch anges, press J.
PAGER ALARM
20
Page 23

To Set the Alarm to Alert Daily
➊ Follow steps 1 through 8 in “To Set a One-Time Alarm” to set the alarm
time.
➋ When setting the date in step 8, press G until you see double dashes for
the month, day, and year (--/--/--).
zv 03:15PM 09/05/99z
zc15:30PM --/--/--z
SET ALARM
Example of Set-Alarm Screen for a Daily Alert
➌ Press K to activat e your select ion. The alarm is now set to alert e very
day at the specified time and Q is displayed on the Standby screen.
Note:
T o exit from any screen without making changes, press J.
21
PAGER ALARM
Page 24

Message Alarms
This feature allows you to set a one-time or daily alarm for a selected
personal message. You can set an alarm for up to five personal messages.
When a message alarm is set, b replaces m in the Message-status
screen. At the time the alarm sounds, m is again displayed unless the
alarm is set to alert daily. Press
alarm is set. If the alarm times passes without being acknowledged, b
flashes until the message is read.
To Set a One-time Message Alarm
J to displa y t he mess age for which the
➊ From the Message-status screen, press H or I to select the mess age
you want to alarm.
➋ Press K.
➌ Press I to move the cursor to d.
MESSAGE ALARMS
22
Page 25

➍ Press K. The Set-message-alarm screen is displayed.
zv 03:15PM 05/05/7z
z
c15:30PM 09 /05/99z
SET ALARM
Example of Set - Message - Alarm S creen
The alarm symbol shows the current alarm status. c is displayed if the
message alarm is turned on, e is displayed if the message alarm is
turned of f .
➎ Press F or G until c is displayed.
➏ Press I to move the cursor to the hour digits.
MESSAGE ALARMS
23
Page 26

➐ Press F or G to adjust th e ho ur di gi t s.
➑ Repeat steps 6 and 7 to adjust the minutes, AM/PM/24 hr., and date.
➒ Press K to activate your selection.
You can also se t a me ssa ge al arm w hile r eadi ng th e me ssag e b y following
steps 2 thr o ugh 9 ab o v e .
To Set a Daily Message Alarm
➊ Follo w step s 1 t hrou gh 8 to set t he me ss age alarm t im e.
➋ When sett ing the d ate in step 8, pre ss G unti l yo u see doub le das he s for
the mont h, day, an d y ear (-- /- - /--) .
➌ Press K to ac tivate your selection. The alarm is now set to alert every
day at this specified time.
Note:
To exit from any scree n without making ch anges, press J.
MESSAGE ALARMS
24
Page 27

Private Time
You can select a time period during which your pager is completely silent.
Your pager still receives messages but is does not alert. The pager alerts
only if an alarm expires or a priority message is received.
To Set Private Time
➊ From the Features menu, press H to move the cursor to 3.
➋ Press K.
When the Private-time screen is first displayed, the cursor is at the flashing
symbol on the far left, 3 indicates private time is turned on,
private time is turned off.
ON OFF
3 3:15PM 5:00PM
Example of Set Private-Time Screen
µindicates
25
PRIVATE TIME
Page 28

➌ Press and release G until 3 is displayed.
➍ Press I to move the cu rs or t o th e hour d ig it.
➎ Press F or G to adjust th e ho ur di gi t .
➏ Repeat steps 4 and 5 to adjust the on and off time setting.
➐ Press K to activ a te yo ur se le ct ion .
The sym bo l _ is displayed in the Standby screen when private time is
turned o n.
Note:
If the on time is equal to the off time, private time is not turned on.
To Disable Private Time
➊ Press K.
➋ Press H to move the cursor to 3.
➌ Press K.
PRIVATE TIME
➍ Press and release G until µis displayed.
➎ Press K to disable private time.
Note:
To exit from any scree n without making ch anges, press J.
26
Page 29

Maildrop/Info rm atio n S e rvice Option
Your pager is capable of receiving maildrop messages, also known as
information services. Information Services messages are received and
read the same way as personal messages and the icon indicators are
located on the second row of the display.
mgmmomm
VjV
P (
Q 3:15PM 09/05/99
Example of Informati on Servi ces Indi cators
INFORMATION SERVICES
27
Page 30

Information Services Alerts
When this option is turned on, you can set your pager to alert when
informa t ion se rvic es mess ag es a re r eceived.
•A V in the information services message area indicates the alert is
for that information services. A j indicates the alert is
information services.
• If the pager’s incoming message alert is set to silent (vibrate), all
information services with the alert set to on (j), produce a 2-second
vibration when a information services message is received.
• If the pager’s incoming message alert is set to musical, the information
services alert can be set to either the standard alert, one of the seven
pleasing alerts, a chirp alert, a chirp and vibrate alert, or no message
alert via the Choose-alert menu. The length of the information servic es
alert is 2 seconds.
• If the pager’s incoming message alert is set to no message alert,
information services alerts cannot be set and all information services
symbols are automatically displayed as V.
INFORMATION SERVICES
on
for that
28
off
Page 31

Turning Individual Information Services Alerts On and Off
➊ Fro m the Mes sage-s tat us screen , pre ss H, I, or G to move the cursor
to the des ir ed in formation services .
➋ Press K.
➌ Press I to move the cursor to j alert on or k alert off.
➍ Press K to turn the information services alert on or off.
Selecting a Information Services Alert
➊ Fro m the Mes sage-s tat us screen , pre ss H, I, or G to move the cursor
to the des ir ed in formation services .
➋ Press K.
➌ Press I to move the cursor to j.
➍ Press K. The choose alerts menu is displayed.
➎ Press H or I to move the cursor to the desired alert.
➏ Press K to activate the alert. The pa ger gives a sample of the alert,
unles s no message alert is selected.
29
INFORMATION SERVICES
Page 32

Notebooks
Your pager has t wo noteb oo k ar eas , a pe rson al not ebo ok for storing
personal mes sa ges , and a i nformation services note bo ok f or st orin g
informa tio n se rvic e messa ge s . Not ebo ok me ss age s are in dicat e d b y
Per sonal messa ges are indi cated o n the first row of the displ ay. Inf ormatio n
Services messages are indicated on the second row of the display.
mmm u
VjVj u
3:15PM 09/05/ 99
Personal Message
Notebook
Information
Services Message
Example of Notebook Locations
NOTEBOOKS
30
u.
Page 33

Storing Personal and Information Services Messages in Your Notebooks
➊ Fro m the Me ssa ge -st atu s scr een , pr e s s F , G, H, or I to move th e
cu rsor to t h e per son al or in f orma t ion se rvic es mess ag e y ou w ant t o
move into the notebook.
➋ Press K.
➌ Press I to move the cursor to u.
➍ Press K. The message is now in the notebook.
Deleting Messages from Your Notebooks
➊ From the Me ssag e-st atu s scre en press F , G, H, or I to move the cursor
to the note boo k f rom whe re y ou w a nt to de le te a messa ge.
➋ Press J to display a list of the notebook messages.
31
NOTEBOOKS
Page 34

➌ Press F or G to scroll through the list until Ku is displayed at the
beginn ing of t he noteb oo k me ssa ge yo u wa nt to de le te .
zuPick me up for school
Lets meet at the mall
Check out Web site
Example of Notebook Screen in Delete Mode
➍ Press K to display the Features menu.
➎ Press I to move the cursor to A.
➏ Press K.
➐ Press K to delete the message.
NOTEBOOKS
DELETE MESSAGE?
is displayed.
➑ Repeat steps 3 through 7 for each message you want to delete.
Note:
Notebook messages are deleted one at a time. If all messages are
delet ed from a notebook, the u symbol is removed from the display.
32
Page 35

Message Storage
Your pager can st ore up to 19 personal messages in memory.
Note:
Stored messages differ from locked messages. They can be
deleted or overwritten when memory is full and a new message comes in.
Automatic Message Deletion
If all 19 message slots are full and a new message is received, the oldest,
unloc k e d, un - al armed, an d previously read mes sag e is auto ma ti ca ll y
deleted when a new message is received. When the message memory is
full, n is displayed.
Note:
T o prevent specific messages from being deleted, lock them. Then
you can delete all other messages you no longer need to prev ent the
overflow condition.
Out of Range
If your pager has this feature, and if you are outside your paging coverage
T is displayed. As long as T is displayed, your pa ger cann ot
area,
receive messages.
33
FEATURES
Page 36

Key Click
If this feature is turned on, and the pager is in the musical mode, a “click” is
emitted when any of the pager’s buttons a re pressed. The click is no t
emitted when the pager is in the vibrat e mode.
Duplicate Message
If the same mes sag e i s rece ived more than once ,
is displayed at the beginning of the new message. The new duplicate
message replaces the older duplicat e message and contains the latest
time and date stamp.
DUPLICATE MESSAGE
Errored Data Indicator
The symb ol 7 is displayed if a potentially errored character is received. The
indicator alternately flas hes with a “best guess” of the errored character.
FEATURES
Alphanumeric and Long Numeric Missing Fragment Indicators
If part of a me ssage has not been re cei ve d @ or ? is displayed in
place of the mi ss in g ch ara ct ers .
34
Page 37

Battery Gauge
A battery gau ge indicator keeps you informed of the battery level. The
indicators are listed on the card attached to the back cover.
Cleaning Your Pager
To clean smudge s an d gri me from the ex te rior of y our p ag er, use a soft,
non-ab r as iv e clo th mo ist e ne d in a mi ld soa p an d wa te r sol uti on . Us e a
second cloth moistened in clean water to wipe the surface clean. Do not
immerse in water. Do not use alcohol or other cleaning solutions.
Questions?
If you have any questions about the use of your Motorola pager call
1-800-548-9954 or 1-800-793-7834 (TTY) in the U.S. If you have questions
about your paging service, contact your paging service provider. For
inf ormation about other Motorola products, please visit o ur web site at
www.motorola.com
35
FEATURES
Page 38

Care and Maintenance
The V700 Word Message FLEX pagers are durable, reliable, and can
provide years of dependable service; however, they are precision
electronic products. Water and moisture, excessive heat, and extreme
shock may damage the pager. Do not expose your pager to these
conditions. If repair is required, the Motorola Service Organization, staffed
with specially trained technicians, offers repair and maintenance facilities
throughout the world.
You can protect your pager purchase with an optional extended warranty
covering parts and la bor. For more information about warranties, please
contact either your pagi ng service provider, retailer, or Motorola, Inc.
at 1-800-548-9954. For repairs, call Motorola, Inc. at 1-800-548-9954 in the
U.S . or 1- 800-3 23- 9685 in C anad a. In th e U. S ., to con tact Moto rola, Inc. on
your TTY, call 1-800-793-7834.
CARE AND USE
36
Page 39

FCC In fo rmation
This device complies with part 15 of the FCC Rules. Operation is subject to the
following two conditions: (1) This device may not cause harmful interference, and (2)
this device must accept any interference received, including interference that may
cause undesired operation.
This equipment has been tested and found to comply with the limits for a Class B
digital device, pursuant to part 15 of the FCC Rules. These limits are designed to
provide reasonable protection against harmful interference in a residential installation.
This equipment generates, uses and can radiate radio frequency energy and, if not
installed and used in accordance with the instructions, may cause harmful
interference to radio communications. However, there is no guarantee that
interference will not occur in a particular installation.
If this equipment does cause harmful interference to radio or television reception,
which can be determined by turning the equipment off and on, the user is encouraged
to try to correct the interference by one or more of the following measures:
• Reorient or relocate the receiving antenna.
• Increase the separation between the equipment and receiver.
• Connect the equipment into an outlet on a circuit different from that to which the
receiver is connected.
• Consult the dealer or an experienced radio/TV technician for help.
37
FCC COMPLIANCE
Page 40

ONE (1) YEAR STANDARD LIMITED WARRANTY AND PROVISIONS (U .S.A. ONLY)
Motorola warrants the pager against defects in material and workmanship under normal use and service
for the period of time s pecified below . T his e xpres s w arranty is e xten ded by Motorol a, 1500 Gateway Blvd.,
Boynton Beach, Florida 33426 to t he original end us er purchas er only and is not assi gnable or transf erab l e
to any other party.
This warranty sets forth the full extent of MOTOROLA’s responsibilities regarding the pager. Repair,
replacement, or refund of the purchase price, at MOTOROLA’s option, is the exclusive remedy. THIS
WARRANTY IS GIVEN IN LIEU OF ALL OTHER WARRANTIES, EXPRESS OR IMPLIED, INCLUDING
WITHOUT LIMITATION, IMPLIED WARRANTIES OF MERCHANTABILITY AN D FITNESS FOR A
PARTICULAR PURPOSE. THIS WARRANTY IS LIMITED TO THE DURATION CHOSEN. IN NO EVENT
SHALL MOTOROLA BE LIABLE FOR DAMAGES IN EXCESS OF THE PURCHASE PRICE OF THE
MOTOROLA PAGER, FOR ANY LOSS OF USE, LOSS OF TIME, INCONVENIENCE, COMMERCIAL
LOSS, LOST PROFITS OR SAVINGS OR OTHER INCIDENTAL, SPECIAL OR CONSEQUENTIAL
DAMAGES ARISING OUT OF THE USE OR INABILITY TO USE SUCH PRODUCT, TO THE FULL
EXTENT SUCH MAY BE DISCLAIMED BY LAW.
Motorola pagers are shipped from the f actory with a standard limi ted warr anty of one(1) year on parts and
labor from date of purchase b y the original end user purc haser , bas ed on proof of p urchas e. In the e vent of
a defect, malfunction, or failure to conform to specifications during the warranty period, Motorola, at its
option, will either repair, replace or refund the purchase price of the pager. Repair, at Motorola’s option,
may include the replacement of parts or boards with functionally equivalent reconditioned or new parts or
boards. Replaced parts and boards are warranted for the balance of the original warranty period.
(continued)
Page 41

LIMITED WARRANTY AND PROVISIONS (U.S.A. ONLY) continued
All parts and boards removed in the replacement process shall become the property of Motorola.
This warranty does not cover defects, malfunctions, performance failures or damages to the unit
resulting from use in other than its normal and customary manner, misuse, accident or neglect, the
use of non-conforming parts, or improper alterations or repairs. This warranty does not cover wear
and tear on cover s or hou sings , nor the co v erage o r rang e ov er whi ch the pager will rec eive s ign als.
For information on how to receive service on Motorola pagers or covered accessories, call
1-800-548-9954 or 1-800-793-7834 (TTY).
Pager warranty will be VO ID if any of the following conditions occur:
• Pagers that are incomplete such as those in which boards or components are missing and/or
incompatible.
• Pagers whose serial numbers do not match on the boards, or pagers in which the board serial
numbers don’t match the housing.
• Pagers that have been opened by, or had work performed by, anyone other than a Motorola
authorized pager service center.
• Pagers received with non-conforming or non-Motorola housings or parts.
Flat rate repair fees apply to pagers and accessories not covered under warranty.
STATE LAW RIGHTS
SOME STATES DO NOT ALLOW THE EXCLUSION OR LIMITATION OF INCIDENTAL OR
CONSEQUENTIAL DAMAGES, OR LIMITATION ON HOW LONG AN IMPLIED WARRANTY
LASTS, THEREFORE THE ABOVE LIMITATIONS OR EXCLUSIONS MAY NOT APPLY. This
warranty gives you specific legal rights and you may also have other rights which vary from state to
state.
Page 42

NOTES
Page 43

Personal Numb e rs
Use the spaces provided below to write down your pager and personal
identification number (PIN), and the number of your service provider.
Additional spaces h ave been provided to write down the pager and PIN
of your family and friends.
Service Provider Pager Number and PIN
Family and Friends Pager Number and PIN
Page 44

This Motorola product is manufactured under one or more Motorola U.S.
patent s. Thes e pa t ent n um bers ar e l iste d in si de th e ho us ing of th is
product . Oth er U.S. patents for this produ ct are pe nd in g.
are trademarks or registered trademarks of Motorola, Inc.
© 1999 by Motorola, Inc. All Rights Reserved.
1500 Gateway Blvd., Boynton Beach, FL 33426-8292
t, Motorola and F
Personal Communications Sector
Printed in U.S.A. 9/99
6881035B30-O
CARE AND USE
@6881035B30@
Page 45

V700 Word Message FLEX Pager Quick Reference Card
Turning Your Pager On
Press J.
Turning Your Pager Off
➊ F rom the Features Menu, press H to
mov e t h e cursor to
q.
➋ Press K twice.
Features Menu
Provides access to the features
described in this quick reference card and
in y ou r user’s guide.
➊ Press K.
➋ Press H or I to move within the
Features menu.
Receiv ing /R ea di ng Me ss ag es
➊ Press any button to stop the alert.
➋ Press J to display your message.
➌ Press J to view the next screen.
Locking and Unlocking Messages
➊ From the Message-status screen,
press
H or I to select t he me ssage
you want to unlock/unlock.
➋ Press K.
➌ Press I to move the cursor to g
lock or h unlock.
➍ Press K.
Deleting Messages
➊ From the Message-status screen,
H or I to select the message
press
you w ant to delete.
➋ Press K.
➌ Press I to move the cursor to A.
➍ Press K twice.
Page 46

Setting the Time and Date
➊ From the Featu re s men u, pr ess H to
move the cursor to
v.
➋ Pr ess K.
➌ P ress I to move the cursor to the hour
digit.
➍ Press F or G to adjust the hour.
➎ Repeat steps 3 and 4 to adjust the
minutes, AM/PM/24 hr., month, day,
and year.
➏ Press K to activate th e se tting.
Setting Alarms
➊ From the Featu re s men u, pr ess H to
move the cursor to
v.
➋ Pr ess K.
➌ Press G.
➍ Press I to move the cursor to the
alarm symbol.
➎ Pr ess F or G until c is displayed.
➏ F ollow steps 3 through 6 in
to set t he a larm t i me .
Date
T o turned off the alarm, in step 5 above,
press
F or G until eis displayed.
To set a message alarm:
Time and
➊ With the message displayed, press K.
➋ Press I to move the cursor to d.
➌ Pr ess F or G until c is displayed.
➍ F ollow steps 3 through 6 in
Time and Date
Note:
To set a daily pager or message
alarm, press
displayed for the mon th, day, and year
(--/--/--).
.
G until double dashes are
Setting the
Page 47

Storing Messages in Your Notebooks
➊ F rom the message-status screen,
press
F , G, H, or I to move the cursor
to the message you want to move into
the not ebo ok .
➋ Press K.
➌ Press I to move the cursor to u.
➍ Press K to store the message.
Private Time On
➊ F rom the Features menu, press H to
mov e t h e cursor to
3.
➋ Press K.
➌ Press and release G until 3 is
displayed.
➍ F ollow steps 3 and 4 in
theTime and Date
times.
Setting
to set the on and o ff
➎ Press K to activate your selection.
To turn private time off, in step 4 above,
press and release
G until µ is displayed.
To Turn On/Turn Off Display Zoom
➊ From the Features menu, press H to
move the cursor to
4 turned off.
1 turned on or
➋ Press K.
Pager Symbols
N Power On
P Musica l Alert Mode on
_ Private Time turned on
Q Alarm turned on
Page 48

Message Status Symbols
g Locked Message
j Information Services Alert Turned On
V Information Services Alert T urned Off
m P ersonal Message
n Memory Full
b Alarmed Message
u Notebook
Features Menu Symbols
l Choose Alert
v Set Time and Alarm
3 Se t Pri v a te T i me
1 Display Zoom On
4 Display Zoom Off
r Set Vibrate Alert
s Set Musical Alert
2 Turn Pager Off
a Escape (to Message-status screen)
A Delete Message
INTRODUCTION
C Delete All Messages
g Lock Message
h Unlock Message
j Turn Information Services Alert On
k Turn Information Services Alert Off
d Set Message Alarm
u Add to Notebook
Other Symbols
t Message Continuation
y 24 Hour Time
w AM Time
x PM Time
c Turned On Alarm
e Turned Off Alarm
3 Pr ivate Time Turned O n
µ P ri vate Time Turned Of f
, Low Battery Indicator
+ 1/4 Battery Indicator
* 1/2 Battery Indicator
) 3/4 Battery Indicator
( Full Battery Indicator
D Out of Range
S Truncated Message
7 Errored Data Indicator
@ Alphanumeric Missing Fragment
Indicator
? Long Numeric Missing Fragment
Indicator
 Loading...