

Page 1
Contents
Introduction............................................... 1
Getting Started
Installing/Replacing the Battery............. 2
Control Buttons...................................... 4
Turning Your Pager On.......................... 6
Turning Your Pager Off.......................... 6
Sending a Test Page to Yourself............ 7
Backlight................................................ 7
Using the Features Menu...................... 8
Time and Date
Setting the Time and Date..................... 9
Alerts
Setting the Alert................................... 11
Setting the Alert Pattern....................... 12
Personal Messages
Receiving/Reading Personal
Messages ....................................... 13
Locking and Unlocking Messages
To Lock or Unlock a Message .............. 15
Deleting Messages
To Delete Messages
using the Features Menu ................ 16
To Delete all Unlocked,
Un-alarmedand Read
Messages ....................................... 16
Pager Alarms
To Set the Alarm for a Specific
Time and Date................................ 17
To Setthe Alarm to AlertDaily .............18
Setting the Message Alarm.................. 19
Pager Auto On/Off
Setting Auto On/Off ............................. 21
Maildrop/Information Services
To Turn a Maildrop Alert On and Off..... 24
Notebooks
MovingMessages to
Your Notebooks.............................. 25
Features................................................... 27
Use and Care ........................................... 29
Congratulations on purchasing your V700 Word Message Pager by
Motorola. Your new pager provides exciting capabilities in messaging and
can become a vital part of your business and personal life. The pager’s
four-linedisplay and expanded functionality incor porate s many of the most
advancedelectronic,communications and wireless technologies available.
It is reliable, convenient, and des igned for easy operation.
These operating instructions explain how to use your pager and provide
helpful suggestions for first-time and experienced users.
These compact pagers integrate messaging and time keepingfeatures in a
packagethat is convenient to carry.Full understanding of what this product
offers begins with readingthis user’sguide.
This user’sguide includesa detachable quick reference card on the
back cover.
Effective Use of Your Pager
Yourpager can help you keepin contact with everyoneimportantto you. By
giving your pager number to your business associates, family, and friends,
you can be contacted whenever needed.
If you have a cellular phone, give your pager number instead of your
cellular number. Then you can decide who to call back on your cellular
phone without paying for incoming calls.
Battery Information
Yourpager isdesigned tooperate witha single AA-sizealkaline battery
(carbon zinc batteries are not recommended).See the diagram on thefollowing
pagefor thebattery door locatio n.
Installing/Replacing the Battery
INTRODUCTION
1
To install or replace the battery, hold the pager face down and proceed as
follows:
GETTING STARTED
Unlock the battery door by sliding the door latch away from the battery
door.
2
Page 2
Slide the batterydoor in the direction of the arrow (toward the outer
edge).
Lift the battery door away from the housing to r emove it.
Lift the battery out of the battery compartment, taking note of the
positive (+) and negative (-) markings on the battery and the pager
housing.
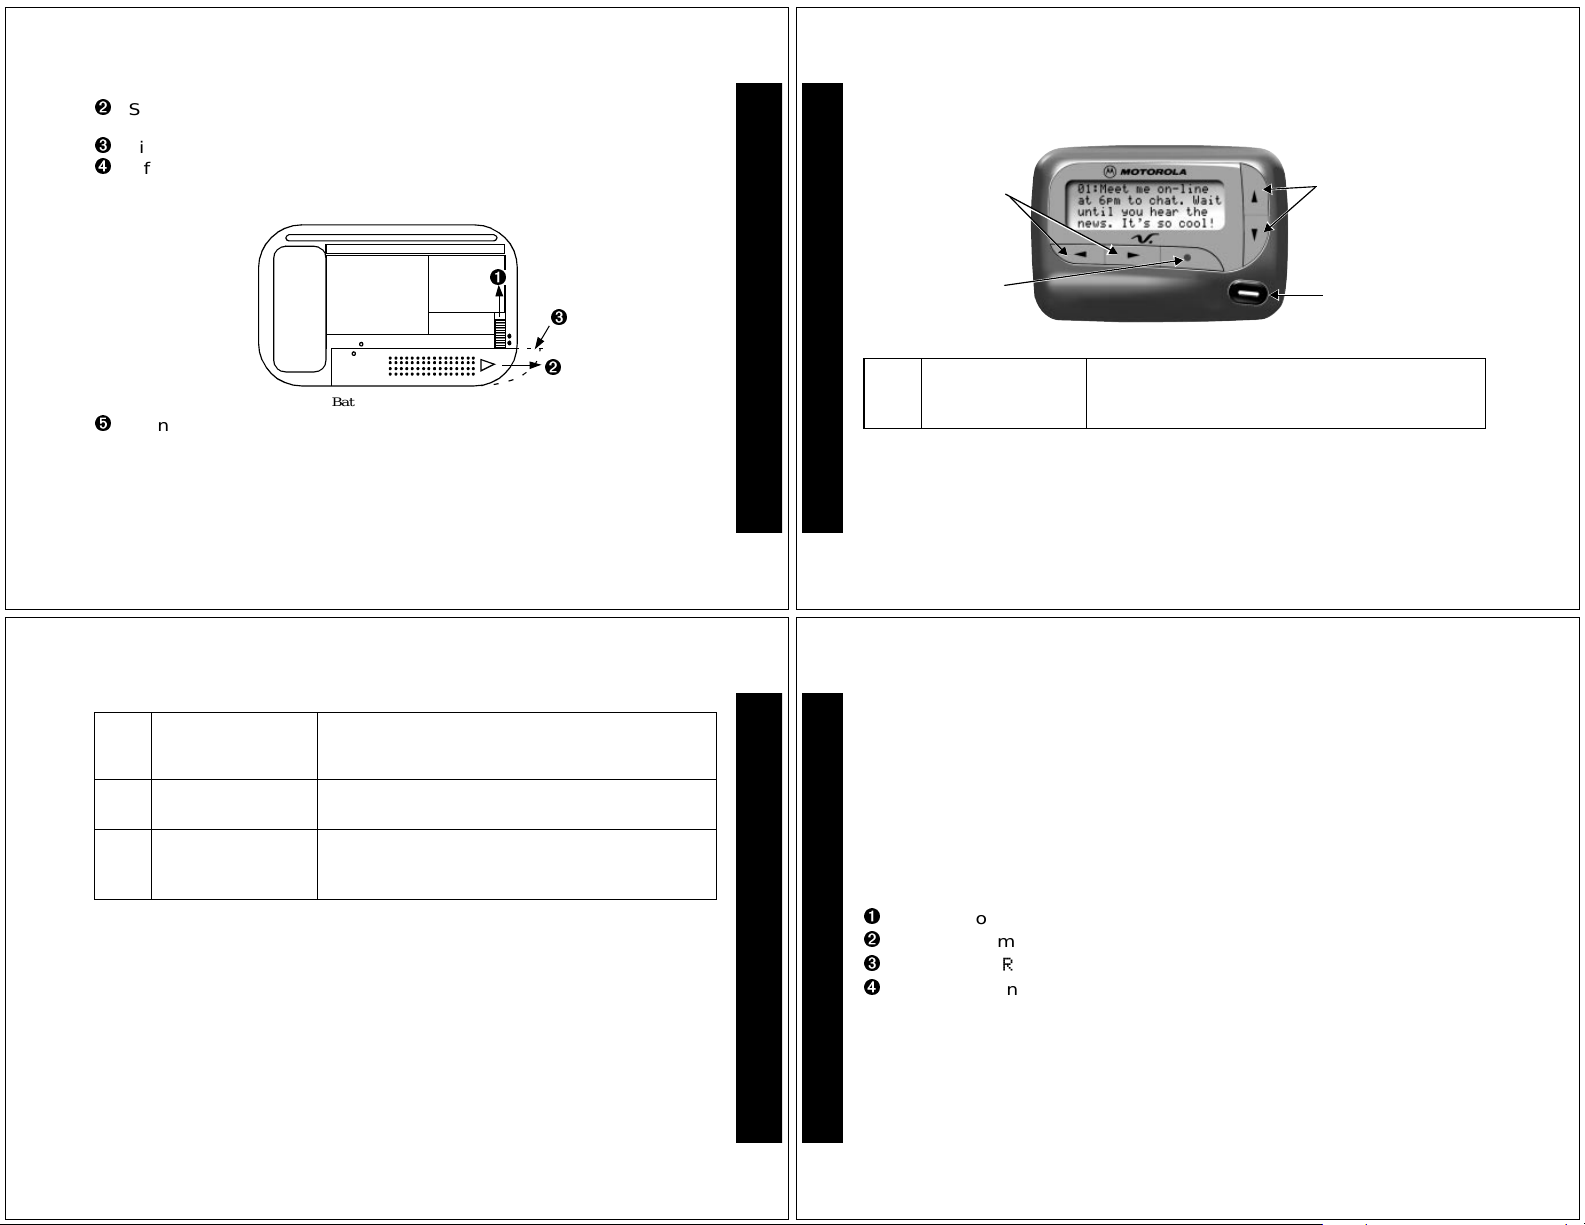
Control Buttons
Left/Right
Directional
Buttons
Up/Down
Directional Buttons
Ì
V700 Battery Replacement (rear view)
To install a new battery, reversethis procedure, taking note of the
positive (+) and negative (-) markings.
Caution:
erased.
K Feature/Select
J Read/
Do not insert the battery backwards or all messages will be
Used to display the Features menu, to select
Button
Power On
F
G
Up/Down
Directional
Buttons
a pager feature, and to activate your
selection.
Used to turn the pager on and to read
messages.
Use to navigate through time, alarm, date
setting features and to navigate through
messages.
Features/
Select Button
H
I
GETTING STARTED
3
GETTING STARTED
4
Left/Right
Directional
Buttons
Used to navigate through the Features menu
and thr ough your messages.
Read/Escape/
Power On Button
Turning Your Pager On
Press Ë.
Your pager alertsand shows
and date are shown at the bottom of the display.
When the pager is on and no activity is taking place, the Standby screen is
displayed.The Standby screen displays the power-on indicator N and may
display other pager status indicators.
ë in the left column of the display. The time
Turning Your Pager Off
Press K to display the Features menu.
Press H to move the cursor to q.
TURN PAGER OFF?
is displayed.
GETTING STARTED
Press K.
Press K again to turnthe pager off.
Your pager is now off and the screen is blank.
GETTING STARTED
5
6
Page 3

Sending a Test Page to Yourself
It's a good idea to test your pager and ser viceby sending a page to
yourself.Startby using the phone number, web site, or email address (and
a PIN, if required) your service provider gave you, then enter a short
message. If you are sending a word message from a phone, an operator
will assist you; otherwise, press the pho ne buttons to enter a numeric
message or type a messageand send it. While you are waiting for the
message to reach your pager,referto pag e 13 for information about how to
read a message. If your pager does not receive the message within a few
minutes, contact your service provider.After you've tested the pager, read
the rest of this guide to learn about the many useful features of your new
pager.
Backlight
The pager’s backlightilluminates in low-light conditions when any button is
pressed. You can manually turn the backlight on or off at any time by
pressing and holding
off when the pager return s to the Standby screen.
K for two seconds. The backlight automatically turns
Using the Features Menu
Press K to display the Features menu.
The Features menu gives you access to the many features of your pager
through a series of sy mbols and prompts. For example,when the Features
menu is first displayed, the a flashes, indicating the pr esent position of
the cursor.
Choose
Alert
Set Time
and Alarm
Set
Auto
Messages
On/Off
ESCAPE
Delete All
Set
Message
Alarm
AddTo
Note-
book
È Ñ å É ó ò ï ñ í Ö 
GETTING STARTED
7
GETTING STARTED
8
Set Audible/
VibrateAlert
Turn
PagerOff
Escape
(tostatus
screen)
Features Menu Example
Delete
Message
Lock/
Unlock
Message
Note:
The icons displayed on your Features menu depend on the status
of the pager and whether or not you have messages in memory.
Note:
To exit from the Features menu without making any changes,
J.
press
Setting the Time and Date
PressK to display the Features menu.
Press ä to move the cursor to Ñ.
Press K to display the set-timescreen.
PressI to move the cursorto the hour digit.
Press F or G to adjust the hour.
Press I to move the curs or to the minute digit.
Press F or G to adjust the minute.
Repeat the processfor each set of digits: AM/PM/24 hr.,mon th/day/
year.
Press K to activate the time and date setting.
Ñ 22:23ô01/01/97
à 0:00ô--/--/--
SET TIME
Exampleof Set-TimeScr een
If you move the cursorpast the last symbol in the row (far right), it
automaticallywraps around tothe first symbol in the beginning of the same
row (far left).
Note:
To exit from any screen without making changes, press J.
TIME AND DATE
9
TIME AND DATE
10
Page 4
Setting the Alert
The aler t can be set as either audible or vibrate.
Press K to display the Features menu.
Press H to move the cursor to É or Œ.
É symbol is displayed if the pager is in the vibrate mode, prompting
The
you to enter the audible mode, if desired. The
pageris in the audible alert mode, prompting youtoenter the vibrate mode,
if desired.
Press K to select the desired alertmode.
If the selected mode is audible (
selected mode is vibrate (
vibrates.
É), your pager emits a short chirp. If the
Œ) and your pager has a vibrator,your pager
Πsymbol is displayed if the
11
ALERTS
Setting the Alert Pattern
Note:
The pager must be in the audible alert mode to select the alert
pattern.
Your pager has a standard alert (1), seven different pleasing (musical)
alerts (2-8) , and a chirping alert(j). You can also select no alert(r).
To change your alert:
Press K to display the Features menu.
Press H to move the cursor to l, then press K.
Press H or I to move the cursor to the desired alert.
The pager gives a sample of each alertwhen scrolling through the
selections.
ALERTS
Press K to activate the alert.
1 2 3 4 5 6 7 8 j r
PLEASING ALERT
Exampleof the AlertP atter nScreen
12
Receiving/Reading Personal Messages
When a messageis received, your pager alerts and displays a flashing m
symbol.
Press any button to stop the alert.
Press Ë to display your message.
The pager automa tically stores the message and the time and date it is
received.
Aflashingt at thebottom r ight cornerof thescreenindicates the message
you are reading continues beyond the four lines of the display.
Press Ë to read the next screen.
13
PERSONAL MESSAGES
Press G to read your message line by line or press and hold J to
rapidly scroll through your message, screen by screen.
If more than one messageexists, press
you want to read. The symbol
Press
Ë to display your message. While reading yourm essages, you can
ä or ã to view the previous or next message.
press
Aflashing
read. The pager alerts at predetermined intervals to remind you of any
unread messages. Your pager can store up to 19 personal messages in
memory.
ë symbol indicates you have a mess age that has not been
Ó indicates the location of the message.
ä or ã to select the message
PERSONAL MESSAGES
14
Page 5

Locking and Unlocking Messages
Up to 10 messages can be locked in memory,preventing them from being
deleted or replaced when memoryis full.
To Lock or Unlock a Message
Press Ë.
Press H or I to select the message you want to lock or unlock.
Press K.
Press I tomovethecursortolock(g)orunlock(h).
Press K to lock or unlock the message.
The symbol g or h is displayed,indicating the status of the message.
15
LOCK/UNLOCK MESSAGES
Deleting Messages
You can delete an unlocked and un-alarmedmessagewhile you are
viewing the message or through the Features menu.
To Delete Messages using the Features Menu
Pressä or ã to select t he message you want to delete from memory.
Press K to display the Features menu.
Press ã to move the cursor to ï.
Press K to receive confirmation of the request.
Press K to delete the mes sage.
To Delete all U nlocked, Un-alarmed and Read M essages
Press K to display the Features menu.
Press ã to move the cursor to ñ.
Press K twice.
All unlocked, un-alarmed and read messages are now deleted.
DELETING MESSAGES
Note:
Personal and maildrop notebooks are not deleted with this feature.
16
Setting the Alarm
The alarm on yourpager can be set for a specific timeand date,or it can be
used as a daily alar m .
To Set the Alarm for a Specific Time and Date
Press K to display the Features menu.
Press H to move the cursor to v.
Press K to display the set-time-and-alarmscreen.
Press G to move the cursor to Ö.
Ñ 22:23ô01/01/97
à 0:00ô--/--/--
SET ALARM
Exampleof Set-Time-an d-Alar mScreen
The alarm symbol shows the current alarm status. cis displayed if the
alarm is set, e is displayed if the alarm is not set.
17
PAGER ALARMS
Press I to move the cursor to Ö.
Press F or G to turn the alarm on or off.
Press I to move the cursor to the hour digit.
Press F or G to adjust the hour digit.
Repeat steps 6 and 7 to adjust the minutes, AM/PM/24 hr., and date.
Press K to activate your selection. The Ö symbol is displayed on the
Standby screen.
At the selected time, your pager emits a 12-second audible alertevenif t he
pager is in the vibrate mode.
To Set the Alarm to Aler t Daily
Followthe steps previously described, except when setting the date, press
G for the date entries until a blank month, day, and year (- -/--/--) is
displayed.The alarm is now set to alert every day at this s pecified time.
PAGER ALARMS
Note:
If the alarm expires without being acknowledged, the Ö symbol
flashes until any button is pressed.
Note:
To exit from any screen without making changes, press J.
18
Page 6

Setting the Message Alarm
This feature allows you to set a one-time or daily alarm for a selected
personal message. Youcan set an alarm for up to five personal messages.
To Set a One-time Message Alarm
Press Ë.
Press H or I to select the message you want to alarm.
Press K.
Press I to move the cursor to d.
Press K to display the set-message-alarm screen.
When the screenis first displayed, the cursor is at the far left position.
The symbol defines the alarm status—either alarmon (c)oralarmoff
Ã).
(
From the set-message-alarm screen, follow the same steps described
in Setting the Alarm.
PAGER ALARMS
To Set a Daily Message Alarm
Followthe instructions above to set the alarm time, then follow the
instructions in “To Set the Alarm to Alert Daily” under Setting the Alarm.
The
b symbol replaces the m symbol when the m essage alarm is set.
At the selected time, your pagers vibrates or emits a 12-second alert,
depending on the current alertmode.
Ë to displaythe message forwhich the alarm is set.
Press
Note:
If the alarm expires without being acknowledged, the Ö flashes until
the message is read.
PAGER ALARMS
19
SettingAutoOn/Off
To set your pager to tur n on and off automatically.
Press K to display the Features menu.
Press ä to move the cursor to å.
Press K to display the auto on/off screen.
When the screen is first displayed,the cursor is at the farthest left position.
The on (
å)oroff(õ) symbol indicates the current status.
ON OFF
õ 0:00ô 0:00ô
Exampleof Auto On/Off Screen
20
Press F or G to select å or õ.
Press ã to move the cursor to the hourdigit. The Auto On time is
displayedon the left and the Auto Off time is displayed on the right.
Press F or G to adjust the hour.
Repeat the proces s for each set of digits for both the on time and the
off time (hour, minute, AM/PM if your pager is set to display time in the
12 hour mode).
Press K to activate auto on/off.
å symbol is displayed if the au to on/off feature is set to on. If the on
The
time is equal to the off time, the pager do es not enable the auto on/off
feature.
PAGER AUTO ON/OFF
PAGER AUTO ON/OFF
21
22
Page 7

Maildrop/Information Services
If your pager hasmaildrop (Information Services),m essagesare received
and read the same way as personal messages and the icon indicators are
located on the second row of the display. Maildrop messages are located
on the second row of the display.
m m
(
Í
5:01 01/01/97
Example of Maildrop/InformationService Message Area
You can set your pager to alert when maildrop messages are received.
• Each individual maildrop can have the a lert set to on or off. However, a
maildrop must contain a message to turn the alert on or off.
•AV in the maildrop message area indicates the alert is
maildrop. A j indicates the alert is
VÕV
on
for that maildrop.
off
for that
• If the pager alert is set to audible, the maildrop alert is a single chirp. If
• Pleasing (musical) alerts cannot be set for maildrop mes sages.
To Turn a Maildrop Alert On and Off
If the alertis currently on for that maildrop, the alertoff symbol (Ì)is
displayedin the Features menu giving you the option of turning it off. If the
alert is currently off for that maildrop, the aler t on symbol (Õ)is displayed in
the Features menu giving you the option of turning it on.
MAILDROP MESSAGES
MAILDROP MESSAGES
the pager alert is set to vibrate, the maildrop alert is a short vibration. If
the pager alert is s et to No Message Aler t, there is no audible or vibrate
maildrop alert.
Press Ë.
Press H, I,orG to move the cursorto the desired maildrop.
Press K to display the Features menu.
Press I to move the cursor to the alerton (j)oralertoff(k)symbol.
Press K to select the desired maildrop alert m ode.
Moving Messages to Your Notebooks
Your pager has two notebook areas: a personal notebook for storing
personal messages, and a maildrop (Information Services)notebook for
storing information service messages, (refer to “Maildrop/Information
Services” on page 23).
To Store a Message in your Personal Notebook
Press Ë.
Pressä or ã tomovethecursor toselect the message you want to
move into your personal notebook.
Press K to display the Features menu.
Press ã to move the cursor to ¶.
Press K to move the message into your personal notebook.
The ¶ symbol is shown in the top right-hand cor ner of the display.
23
NOTEBOOKS
24
To Store a Message in the Maildrop (Information Service) Notebook
Followthesame procedure a s described forstoring personal notebook
messages.
The ¶ symbol is shown in the second row,r ight-han d corner of the display.
Deleting Messages f rom Your Notebooks
Pressã to movethe cursor to ¶.
Press Ë to display a list of notebook messages.
Press F or G to scroll through the list until K is displayedatthe notebook
message you want to delete.
Press K to display the Features menu.
NOTEBOOKS
Press ã to move the cursor toï.
Press K to confirm the delete r equest.
Press K to delete the message.
Repeat these steps to delete eachmessage.
25
26
Page 8

Features
Battery Gauge
The battery gauge indicator is located on the stat us screen and keeps you
informed of the battery energy level. The five indicators range from full to
( (full), ) (3/4),* (1/2), + (1/4), and , (low).
low:
Key Click
With this option enable,and the pager is in the audible or vibrate mode, a
“click” is emitted whenevera button is pressed. The click is not heard when
the pager is in the no alert (completely silent) mode.
Duplicate Message
If the same message is received more than once, DUPLICATE MESSAGE is
displayedat the beginning of the new message. The new message
contains the latest time and date stamp.
FEATURES
OutofRange
With this option,T is displayed when your pager is locatedoutside of your
paging coverage area.T is no longer displayed when you returnto your
coveragearea.
Errored Data Indicator
The ú symbol displays when potentially corruptdata is received. The
indicator alternates with the corrupted character.
Maildrop History
When this option is enabled, the pager stores up to four historyfiles per
maildrop (Information Services) slot selected. When a new maildrop
message is received on a specific slot, the existing message is “pushed”
into the historyarea and the new message is stored in the maildrop slot.
FEATURES
When a fifth history file is received, the oldesthistor y file is deleted.
Your pager can store up to 19 personal messages in memory.
27
Cleaning Your Pager
To clean smudges and grime from the exterior of your pager, use a soft,
non-abrasive cloth moistened in a mild soap and water solution. Use a
second cloth moistened in clean water to wipe the surface clean. Do not
immerse in water.Do not use alcoholor other cleaning solutions.
Questions?
If you have any questions about the use of your Motorola pager call
1-800-548-9954 or 1-800-793-7834 (TTY) in the U.S.If youhave questions
about your paging service, contact your paging se rvice provider.For
information about other Motorola products, please visit our web site at
www.motorola.com.
29
USE AND CARE
28
Care and Maintenance
The V700 pagersare durable, reliable,and can provide years of
dependable service; however, they are precision electronic products.
Waterandmoisture, excessiveheat,and extreme shock may damage the
pager.Do not expose your pager to these conditions. If repair is required,
the Motorola Service Organization, staffed with specially trained
technicians, offers repair and maintenance facilities throughout the world.
You can protect your pager purchase with an optional extended warranty
covering parts and labor. For more information about warranties, please
contact either your paging service provider,retailer, or Motorola, Inc.
at1-800-548-9954.Forrepairs, call Motorola, Inc.at 1-800-548-9954 in the
U.S.or 1-800-323-9685 in Canada. In the U.S., to contact Motorola, Inc. on
your TTY, call 1-800-793-7834.
USE AND CARE
Patent Information
This Motorola productis manufactured under one or more Motorola U.S.
patents. These patent numbers are listed inside the housing of this
product. Other U.S. patents for this product are pending.
30
Page 9

FCC Information
This devicecomplies with part 15 of the FCC Rules. Operation is subject to the
following two conditions: (1) This device may not cause harmful interference,
and (2) this device mustacceptany interferencereceived,including interference
that maycause undesired operation.
This equipmenthas been tested and found to comply with the limits for a Class
B digital device,pursuantto part 15 of the FCCR ules. Theselimits are designed
to provide reasonable protection against har mful interference in a residential
installation.This equipment generates,uses and can radiate radio frequency
energyand, if not installed and used in accordance with the instructions, may
cause harmful interferenceto radio communications. However, there is no
guaranteethat interference will not occur in a particularinstallation.
If this equipment does cause har mful interference to radio or television
reception,which can be determined by turning the equipmentoff and on, the
user is encouragedto tr y to correct the interference by one or more of the
following measures:
• Reorient or relocate the receiving antenna.
• Increase the separation between the e quipment and receiver.
• Connect the equipment into an outlet on a circuit different from that to which
the receiver is connected.
• Consult the dealer or an experienced radio/TV technician for help.
31
FCC INFORMATION
ONE (1) YEAR STANDARD LIMITED WARRANTY AND PROVISIONS (U.S.A. ONLY)
Motorola warrants the pager against defects in material and workmanship under normal use and servicefor
the period of time specified below. This express warranty is extendedby Motorola, 1500 GatewayBlvd.,
Boynton Beach, Florida 33426 to the original end user purchaser only and is not assignable or transferable
to any other party.
This warranty sets forth the full extent of MOTOROLA's responsibilities regarding the pager. Repair,
replacement, or refund of the purchase price, at MOTOROLA's option, is the exclusive remedy. THIS
WARRANTY IS GIVEN IN LIEU OF ALL OTHER WARRANTIES, EXPRESS OR IMPLIED, INCLUDING
WITHOUT LIMITATION, IMPLIED WARRANTIES OF MERCHANTABILITY AND FITNESS FOR A
PARTICULAR PURPOSE. THIS WARRANTY IS LIMITED TO THE DURATION CHOSEN. IN NO EVENT
SHALL MOTOROLABE LIABLE FOR DAMAGES IN EXCESS OF THE PURCHASE PRICE OF THE
MOTOROLAPAGER, FOR ANY LOSS OF USE, LOSS OF TIME, INCONVENIENCE, COMMERCIAL
LOSS, LOST PROFITS OR SAVINGS OR OTHER INCIDENTAL,SPECIAL OR CONSEQUENTIAL
DAMAGESARISING OUT OF THE USE OR INABILITYTO USE SUCH PRODUCT,TO THE FULL
EXTENT SUCH MAYBE DISCLAIMED BY LAW.
Motorola pagers are shipped from the factory with a standard limited warranty of one (1) year on parts and
labor from date of purchase by the original end user purchaser, based on proof of purchase. In the event of
a defect,malfunction, or failure to conform to specifications during the warranty period, Motorola, at its
option, will either repair, replace or refund the purchase price of the pager. Repair, at Motorola'soption, may
includethe replacement of parts or boards with functionally equivalent reconditioned or new parts or boards.
Replaced parts and boards are warrantedfor the balance of the original warranty period.
(continued)
LIMITED WARRANTY AND PROVISIONS (U.S.A. ONLY) continued
All partsand boards removed in the replacement process shall become the property of Motorola. This
warranty does not cover defects, malfunctions, performance failures or damages to the unit resulting from
use in other than its normaland customary manner,misuse, accident or neglect, the use of non-conforming
parts, or improper alterations or repairs. This warranty does not cover wear and tear on covers or housings,
nor the coverage or range over which the pager will receive signals.
For information on how to receive service on Motorola pagers or covered accessories, call
1-800-548-9954 or 1-800-793-7834 (TTY).
Pager warranty will be VOID if any of the following conditions occur:
• Pagersthat are incomplete such as those in which boards or components are missing and/or incompatible.
• Pagerswhose serial numbers do not match on the boards, or pagers in which the board serial
numbers don’t match the housing.
• Pagersthat havebeen opened by,or had work performed by, anyone other than a M otorola
authorized pager service center.
• Pagersreceived with non-conforming or non-Motorola housings or parts.
Flat rate repair fees apply to pagers and accessories not coveredunder warranty.
STATE LAW RIGHTS
SOME STATES DO NOT ALLOW THE EXCLUSION OR LIMITATIONOF INCIDENTAL OR
CONSEQUENTIAL DAMAGES, OR LIMITATION ON HOW LONG AN IMPLIEDWARRANTY LASTS,
THEREFORE THE ABOVE LIMITATIONS OR EXCLUSIONS MAY NOT APPL Y. This warranty gives you
specific legal rights and you may also have other rights which vary from state to state.
NOTES
Page 10

Personal Numbers
Use the s paces provided below to write down your pager and personal
identification number (PIN), and the number of your serviceprovider.
Additional spaces have been provided to wr ite down the pager and PIN of
your family and friends.
NOTES
NOTES
Service Provider Pager Number and PIN
Family and Friends Pager Number and PIN
PERSONAL NUMBERS
t, Motorola, and V700 are trademarks
or registered trademarks of Motorola, Inc.
Reg. U.S. Pat & Tm. Off.
© 1999 by Motorola, Inc.
All Rights Reserved.
Personal Communications Sector
1500 Gateway Blvd.
Boynton Beach, FL 33426-8292
Printed in U.S.A. 9/99
6881035B35-O
@6881035B35@
Page 11

V700 Quick Reference Card
Pager Status Symbols:
(Left column)
ë Power On
Í Audible Alert Mode
AutoOn/Off
Ö Alarm
Message Status Symbols:
(Top two rows of display)
í LockedMessage
Õ Maildrop Indicator (Alert On)
V MaildropIndicator (Alert Off)
ü Message In Memory Indicator
é Memory Full Indicator
Ö AlarmedMessage
Function Menu Symbols:
(Bottom row of display)
È Choose Alert
Ñ SetTime and Alarm
å Set Auto On/Off
É Set AudibleAlert
Ç Set Vibrate Alert
ó Turn PagerOff
ò Escape (to status screen)
ï Delete Message
ñ Delete All Messages
í Lock Message
ì Unlock Message
Õ Maildrop Indicator (AlertOn)
Ì Maildrop Indicator (Alert Off)
Ö Set Message Alarm
¶ Addto Notebook
Other Symbols:
å Enter Auto On/Off Menu and Auto
On/Off Enabled
õ AutoOn/Off Disabled
ô 24 Hour Time
AM AM Time
PM PM Time
à Alarm Off
c Alarm On
Ç NoMessage Alert(On ChooseAlert
Menu)
Õ Chirping Alert (On Choose Alert
Menu)
( Full Battery Gauge
, Low Battery Gauge
T OutofRange
Ü Message Continuation
Truncated Message
ú Errored Data Indicator
Turning Your Pager On
Press J.
Turning Your Pager Off
From the Features Menu, pressH to
move the cursor to
Press K twice.
Features Menu
Provides access to the features
describedin thisquickreferencecard and
in your user’sguide.
Press K.
Press H or I to move withinthe
Functionmenu.
Receiving/Reading Messages
Press any button to stop the alert.
Press J to display yourmessage.
Press J to view the next screen.
q.
Locking and Unlocking Messages
Press J.
Press H or I to select the messa ge
you want to unlock/unlock.
Press K.
Press I to move the cursor to lock
g or unlock h.
Press K.
Deleting Messages
Press J.
Press H orI to select the message
you want to delete.
Press K.
Press I to move the cursor to A.
Press K twice.
Setting the Time and Date
Fromthe Features menu, press H to
movethecursorto v.
PressK.
Press I to move the cursorto the hour
digit.
Press F or G to adjust the hour.
Repeat steps3 and 4 to adjust the
minutes, AM/PM/24 hr., month, day ,
and year.
Press K to activate thesetting.
Setting Alarms
Fromthe Features menu, press H to
movethe cursorto v.
Press K.
Press G to movethe cursor to d.
Press I to movethe cursor to the
alarm symbol.
Press F or G until c is displayed.
Followsteps 3 through 6 in
to set the alarm time.
Date
To turn off the alarm, in step 5 above,
press F or G until e is displayed.
Time and
Toset a message alarm:
With the message displayed, pressK.
Press I to move the cursor to d.
Press F or G until c is displayed.
Followsteps 3 through 6 in
Timeand Date
Note:
To set a daily pager or message
alarm, press
displayed for the month, day,and year
(--/--/--).
.
G until double dashes are
Setting the
Storing Messages in Your
Notebooks
Press J.
Press F,G,H,orI to move the cursor
tothe message you want to move into
the notebook.
Press K.
Press I to move the cursor to u.
Press K to store the message.
 Loading...