

Motorola TC75 Quick Start Manual
TC75
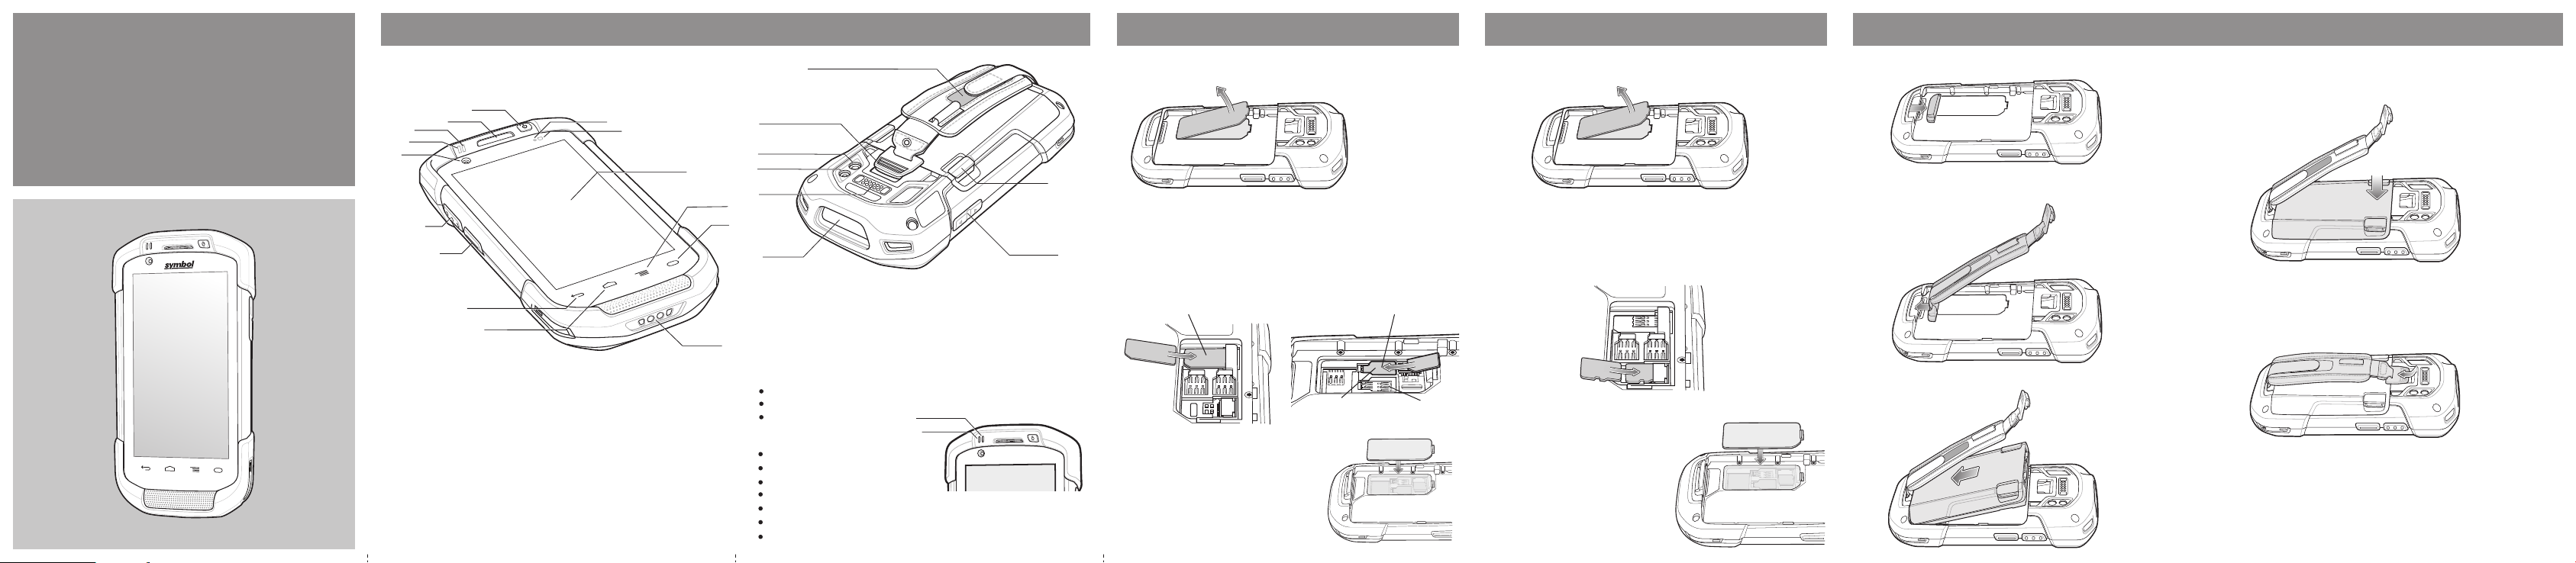
QUICK START
FEATURES
Note: Remove protective shipping film that covers the touch screen, exit
window and camera window before using.
SIM/SAM CARD INSTALLATION
23
1. Lift the access door.
SD CARD INSTALLATION
1. Lift the access door.
HANDSTRAP AND BATTERY INSTALLATION
1. Remove hand strap filler plate.
4. Rotate the battery down into the battery compartment and press the battery
down until it snaps into position.
GUIDE
11
12
13
14
15
1
2
3
10
9
8
4
1 Scan Button
2 PTT Button (programmable)
3 Back Button
4 Home Button
5 Power Input
6 Search Button
7 Menu Button
8 Touch Screen
9 Light Sensor
10 Proximity Sensor
11 Power Button
12 Receiver
13 Charging/Notification LED
14 Data Capture LED
15 Front-facing Camera
Note 1: To reset the TC75, press and hold the Power button until the menu
appears and then select Reset.
16
17
18
19
7
6
20
16 Hand Strap Mounting Point
17 Rear-facing Camera
18 Camera Flash
5
19 Interface Connector
20 Exit Window
21 Volume Button
22 Battery Release Latch
23 Hand Strap
22
2. Insert the SIM/SAM card into the card holder. Push the card all the way into the
card holder.
NOTE :
21
Proper position of the SIM/SAM card — the card connector (i.e., gold contacts)
should be facing down. Nano Slot 1 is default slot for SIM card. Goto Settings to
configure the default SIM slot, if enabled by your system administrator.
2. Insert the microSD card into the card holder. Push the card all the way into the
card holder.
NOTE :
Proper position of the microSD card — the card connector (i.e., gold contacts) should
be facing down.
2. Insert the hand strap plate into the handstrap slot.
SIM or SAM Card Nano SIM Card
2
5. Place the hand strap clip into the hand strap attachment slot and pull down to lock into
place.
3
Notifications
Data Capture LED:
Green: Good Decode
Red: Data capture in process
Blue: Application notification
Charging\Notification LED:
Slow blinking amber: Battery charging
Solid green: Fully charged
Fast blinking amber: Charging error
Slow blinking red: Charging aged battery
Solid red: Fully charged aged battery
Fast blinking red: Charging error aged battery
Slow blinking blue: Application notification
Charging/Notification
Data Capture
3. Replace the access door. Ensure that it
is properly seated.
Nano Slot 1
(default)
Nano Slot 2
3. Replace the access door. Ensure that it is
properly seated.
3. Insert the bottom of the battery into the battery compartment.
6. Lift the hand strap ribbon off the hook material.
4
7. Slide the pad and adjust the ribbon for best fit.
8. Press the ribbon down to secure to hand strap.
BATTERY INSTALLATION
BATTERY REPLACEMENT
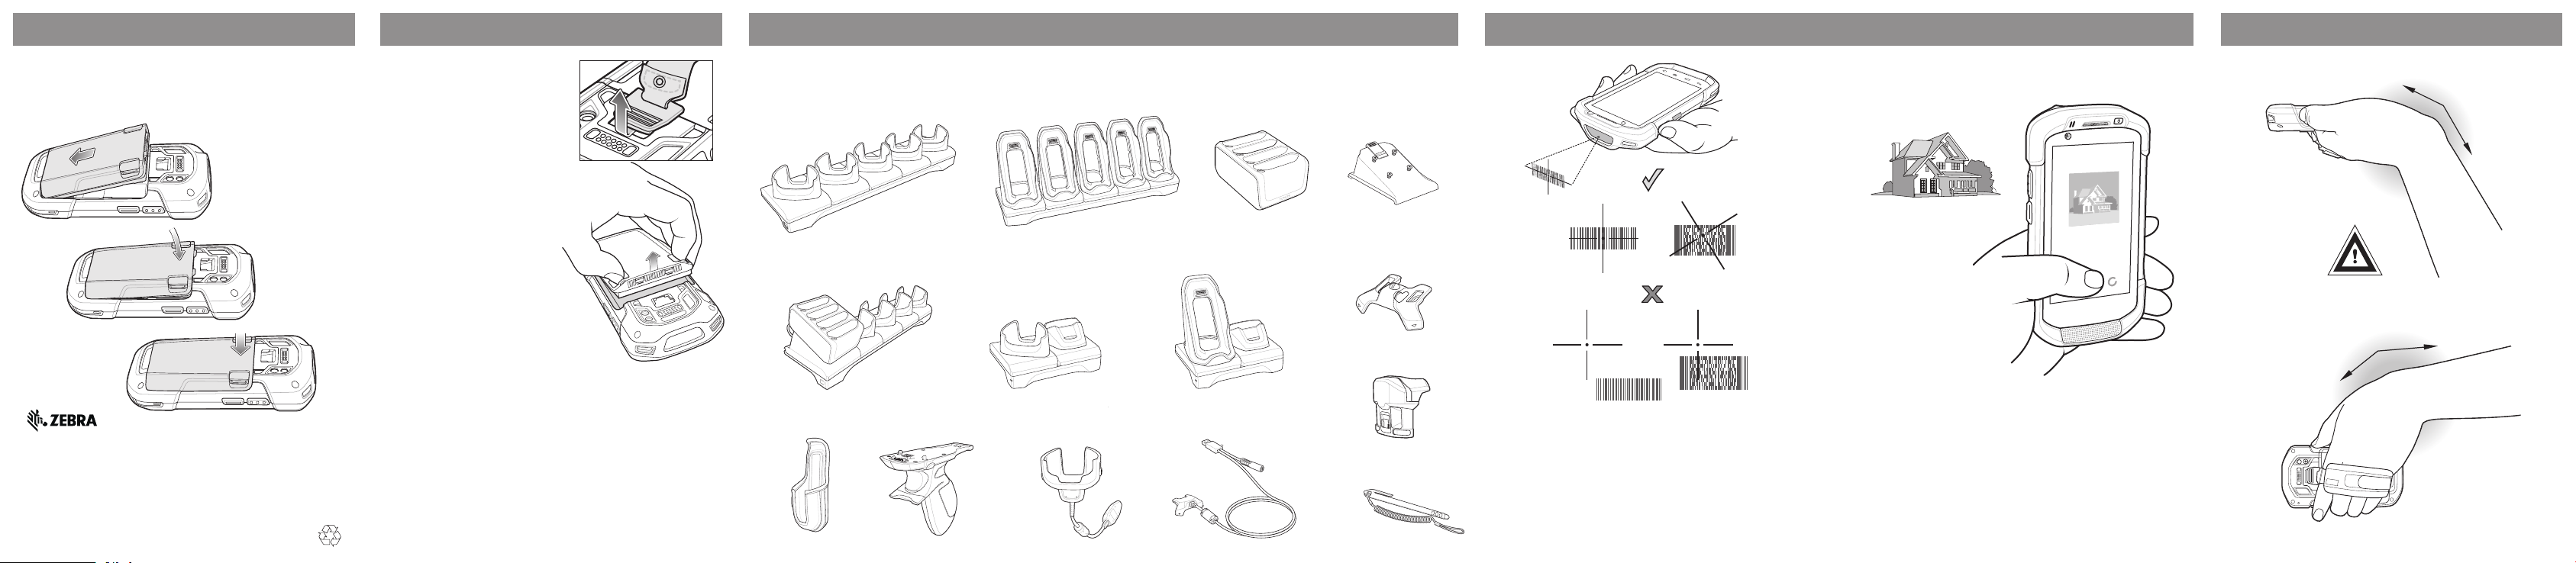
ACCESSORIES
DATA CAPTURE OPTIONS
AVOID EXTREME WRIST ANGLES
1. Insert the bottom of the battery into the battery compartment.
2. Rotate the battery down into the battery compartment.
3. Press the battery down until it snaps into position.
Zebra Technologies Corporation
Lincolnshire, IL, U.S.A.
Zebra and the stylized Zebra head are trademarks of ZIH Corp., registered in many
jurisdictions worldwide. All other trademarks are the property of their respective
owners. The Symbol logo is a registered trademark of Symbol Technologies, Inc., a
Zebra Technologies company.
© 2015 ZIH Corp and/or its affiliates. All rights reserved.
@MN001727A02@
MN001727A02 Rev. A — May 2015
1. Remove any accessory
attached to the device.
2. Press the Power button until
the menu appears.
3. Touch Battery Swap.
4. Touch Enter Battery Swap
Mode.
5. Touch Continue. The Data
Capture LED lights red.
6. Wait for the LED to turn off.
7. Unlatch the hand strap. Push
the hand strap clip up toward
the top of the TC75 and then lift.
8. Press the battery release
latches in and lift the battery
from the TC75.
9. Insert the bottom of the battery
into the battery compartment.
10. Rotate the battery down into
the battery compartment.
11. Press the battery down until it
snaps into position.
12. Place the hand strap clip into
the hand strap attachment slot
and pull down to lock into
place.
13. Press the Power button to turn
on the TC75.
For more information, see the TC75 User Guide and the TC75 Integator
Guide available at: http://www.zebra.com/support.
5-Slot Charge Only Cradle
5-Slot Charge Only Cradle
with Battery Charger
Holster
Trigger Handle
5-Slot Ethernet Cradle
2-Slot Charge
Only Cradle
Charging Cable Cup
4-Slot Battery
Charger
2-Slot USB/Ethernet Cradle
Snap-On USB Cable
Battery
Charger Adapter
Audio Adapter
Magnetic Stripe Reader
Stylus
with Tether
Imaging
1. Ensure that an application is open and a text field is in focus
(text cursor in text field).
2. Point the exit window at the bar code.
3. Press and hold the Scan button.
4. The red laser aiming pattern turn on to assit in aiming.
When the TC75 decodes the bar code the Data Capture LED
light green and a beep sounds.
5. Release the Scan button.
Camera Photo
1. Open the Camera application.
2. Point the TC75 camera at an object.
3. Touch the on-screen shutter button.
AVOID EXTREME
WRIST ANGLES
 Loading...