

Motorola Talkabout T82C Owner's Manual
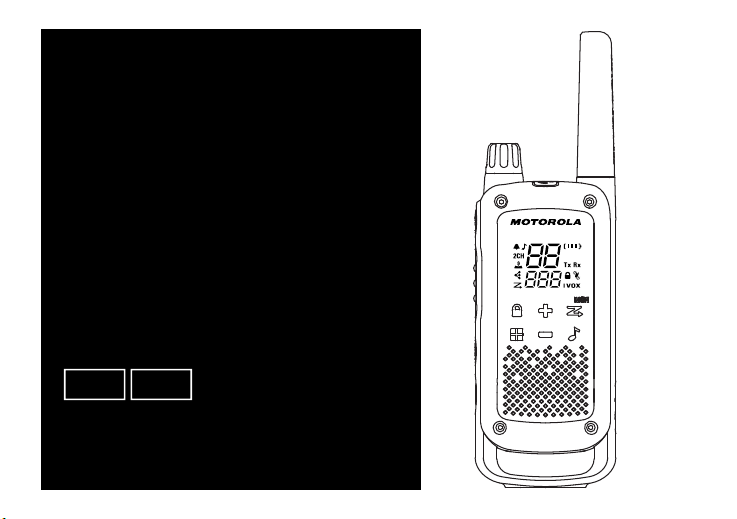
Talkabout T82C
OWNER’S MANUAL
B
en-US
zh-CN


RF ENERGY EXPOSURE AND PRODUCT SAFETY GUIDE FOR PORTABLE TWO-WAY RADIOS
ATT ENT ION!
Before using this product, read the RF Energy Exposure and
Product Safety Guide that ships with the radio which
contains instructions for safe usage and RF energy
awareness and control for compliance with applicable
standards and regulation.
Package Contents
Package Content
Radio
Belt clip
Battery
Power Supply
Charger Tray
Owner’s manual
T82C
1
1
1
1
1
1
Frequency Chart
Channel Frequency
1 409.75000 8 409.83750 15 409.92500
2 409.76250 9 409.85000 16 409.93750
3 409.77500 10 409.86250 17 409.95000
4 409.78750 11 409.87500 18 409.96250
5 409.80000 12 409.88750 19 409.97500
6 409.81250 13 409.90000 20 409.98750
7 409.82500 14 409.91250
Features and Specifications
• 20 analog channels
• 121 Sub-Codes (38 CTCSS Codes and 83 DCS codes)
• iVOX/VOX
• Easy Pairing
• LED Flashlight
• 20 Selectable Call Tone Alerts
• Segmented LED Display
• Roger Tone
• Micro USB Connector for charging
• Battery Indicator Bar
• Channel Monitor
• Channel Scan
• Dual Channel Monitor
• Keypad Lock
• Auto Squelch Control
• Auto Repeat (Scrolling)
• Battery Low Alert
• Keypad Tone (On/Off)
• Silent Mode (Vibrate Alert)
• Emergency Features
• IP Rating: IPx2
• Power Source: NiMH battery Pack/3 x AA Alkaline
batteries
• Battery Life: Up to 18 hours (Typical battery life, 5/5/90
profile. Actual observed runtimes may vary).
Note: Range may vary depending on environmental a nd/or topographical
conditions.
(MHz)
Channel Frequency
(MHz)
Channel Frequency
(MHz)
1
English
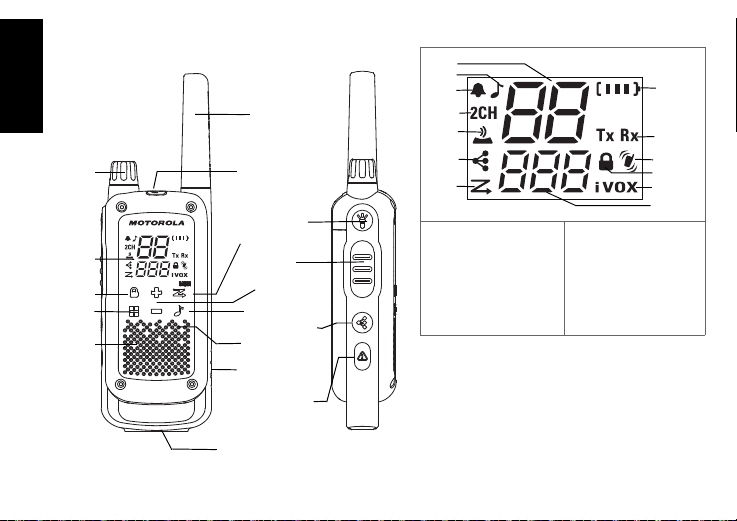
Radio Control Buttons and Display
Note: The radio screen dims 5 seconds after the last button is
pressed. LED blinks and the radio screen turns off after
another 5 seconds for battery saving purposes. Press any
button (except Flashlight button) to resume the display.
1. Channel [1–20]
2. Call Tone [Off, 1–20]
3. Roger Tone [On/Off]
4. Dual Channel Monitor
5. Keypad Tone [On/Off]
6. Easy Pairing
7. Scan Indicator
8. Battery Indicator
[3 Battery Levels]
9. Status [Transmit/
Receive]
10. Vibrate Alert [On/Off]
11. Keypad Lock
12. iVOX [Off, L1, L2, L3]
VOX [Off, L1, L2, L3]
13. Sub-Code [0–121]
2
3
4
5
1
6
7
8
9
11
13
10
12
Volu me/
Power
Knob
Menu
Lock
Screen
Speaker
Flashlight Button
Micro-USB
Charging Port
Easy Pairing Button
Microphone
Emergency Button
Call Tone
Scroll
Scan/Monitor
PTT Button
Accessory Port
Antenna
Space for Personalization
Stickers
English
2

Installing the Batteries
Each radio can either use a NiMH rechargeable battery pack
or three units of AA Alkaline Battery, and beeps when the
batteries are low.
1. Make sure your radio is turned OFF.
2. With the back of the radio facing you, push the latch to
the left to unlock the battery door.
3. Insert the battery pack with the and signs facing you
for NiMH battery pack. Observe polarity.
For AA Alkaline batteries, insert the batteries. Observe
polarity.
4. Close the battery door and push the latch to the right to
lock the battery door.
Radio Battery Meter
The number of bars (0–3) on the Radio Battery icon shown
indicates the charge remaining in the battery. When the radio
battery meter shows one segment left, the radio chirps
periodically or after releasing the PTT button (Low Battery
Alert).
Battery Capacity Maintenance
1. Charge the NiMH batteries once every 3 months when
not in use.
2. Remove the battery from the radio for storage purposes.
3. Store the NiMH batteries in a temperature between
-20 °C to 35 °C and in low humidity. Avoid damp
conditions and corrosive materials.
Using the Micro-USB Charger
The micro-USB charger allows you to charge your NiMH
battery pack.
1. Power off your radio before start charging.
2. Plug the micro-USB cable into the micro-USB charging
port on your radio. Connect the other end of the microUSB charger to wall power outlet.
3. An empty battery will be fully charged in 8 hours.
4. The battery indicator bar moves up and down while
charging.
Using the Charging Cradle
1. Make sure your radio is turned OFF.
2. Connect the AC adapter to the micro-USB port of the
charging cradle.
3. Place the charging cable on a stable surface.
4. Place the radio in the charging cradle with the keypad
facing forward.
5. The radio battery indicator bar moves up and down while
charging.
Note: Motorola Solutions recommends to power OF F your radio while
charging. However, if power is ON while charging, you may not be
able to transmit a message if the battery is completely empty.
Allow time for the battery to charge to one bar before attempting to
transmit a message.
When moving between hot and cold temperatures, do not charge
the NiMH battery pack until the temperature accl imates (usually
about 20 minutes).
For optimal battery life, remove the radio from the charger within
16 hours. Do not store the radio while connected to the charger.
Turning your Radio On and Off
To turn your radio ON, turn the rotary knob clockwise.
To turn your radio OFF, turn the rotary knob
counterclockwise.
3
English
Setting the Volume
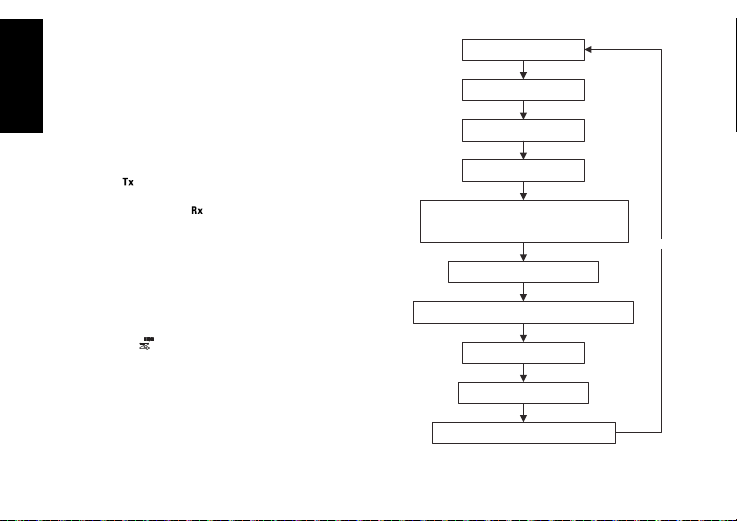
Menu Key
Menu Key
Menu Key
Menu Key
Menu Key
Menu Key
Menu Key
Menu Key
Menu Key
Menu Key
Two Way Mode
Channel (1-)
Sub-Code (0-121)
Call Tone (Off, 1-20)
Vibrate Alert (On/Off)
Keypad Tones (On/Off)
Roger Tones (On/Off)
Dual Watch Channel (1-8)
Dual Watch Sub-Code (0-121)
Internal Voice Operated Transmission/
Voice Operated Transmission
(iVOX,VOX) (Off, L1,L2,L3)
English
To increase the volume, turn the rotary knob clockwise.
To decrease volume, turn the rotary knob counterclockwise.
Do not hold the radio close to your ear. If the volume is set to
an uncomfortable level, it could hurt your ear.
Talking and Listening
All radios in your group must be set to the same channel and
Sub-Code in order to communicate.
1. Hold your radio 2–3 cm from your mouth.
2. Press and hold the PTT button while speaking. The
3. Release the PTT button to receive incoming calls. The
For maximum clarity, hold the radio 2 to 3 cm away and
avoid covering the microphone while talking.
Talk Range
Your radio is designed to maximize performance and
improve transmission range. Ensure the radios are at least 5
feet apart when in use.
Monitor Button
Press and hold Scan/Monitor for 3 seconds to enter
Monitor mode and listen for weak signals on the current
channel. You can also listen to the volume level of the radio
when you are not receiving. This allows you to adjust the
volume, if necessary.
Push-to-Talk Time-out Timer
To prevent accidental transmissions and save battery life,
the radio emits a continuous warning tone and stops
transmitting if you press the PTT button for 60 seconds
continuously.
4
Transmit icon appears on the display.
radio displays receive icon.
Menu Options

Selecting the Channel
The channel is the frequency of the radio uses to transmit.
1. Press Menu until the channel number starts to flash.
2. Press or to change the channel. Long press on
these keys allows you to scroll through the channels
rapidly to browse the codes.
3. Press the PTT button to exit menu or Menu to continue
set up.
Selecting the Sub-Code
Sub-Codes help minimize interference by blocking
transmissions from unknown sources. Your radio has 121
Sub-Codes.
To set the code for a channel:
1. Press Menu until the code starts to flash.
2. Press or to select the code. You can hold down the
button to speed up scrolling through the codes.
3. Press the PTT button to exit menu or Menu to continue
set up.
Setting and Transmitting Call Tones
Your radio can transmit different call tones to other radios in
your group. Your radio has 20 call tones for you to choose
from.
To set a call tone:
1. Press Menu until the Call Tone icon appears. The
current call tone setting flashes.
2. Press or to change and listen to the call tone.
3. Press the PTT button to exit menu or Menu to continue
set up.
In order to transmit your call tone to other radios, set up the
same channel and Sub-Code on your radio and press Call
Ton e .
Easy Pairing
The Easy Pairing feature allows a group of radio users to
program all their radios to the same Channel and Sub-Code
settings quickly and simultaneously. Any one radio within the
group can be designated as the “Leader’s radio” and have
it’s Channel and Sub-Code settings transmitted to and
copied by all the other radios in the group (Members’ radios).
1. Pick any one of the radios as the “Leader’s radio”. On this
radio, program the Channel and Sub-Code to the desired
settings.See “Selecting the Channel” and “Selecting the
Sub-Code” sections in this user manual.
2. To copy the channel and Sub-Code combination to all the
other “Members’ radios”, press and hold the button on
the Members’ radios until you hear a beep. Release the
button after the beep, and wait for the transmission from
the Leader’s radio.
Note:
• You will see the icon blinking on the display. This confirms that
the radio is in Easy Pairing mode waiting to receive the Channel
and Sub-Code settings from the Leader’s radio. All Members’
radios remain in this mode for 3 minutes.
• A group with many radios should have all users take this step at the
same time, so all radios can be programmed in one go.
3. On the Leader’s radio , press and hold down the button
until you hear a double beep.
Note:
• At the double beep, this radio’s Channel and Sub-Code settings
will be transmitted, which will be received a nd copied by all the
other (Members’) radios.
• The Leader’s radio must make this transmiss ion when all the
Members’ radios are still in the Easy Pairing mode, otherwis e the
transmission will not be picked up.
5
English

• On the Leader’s radio, user must remember not t o release the
English
button on the first (single) beep, otherwise this radio will become
another Member’s radio. If that happens, you can p ress PTT to
escape, and retry the steps described in #3 again.
Internal Voice Operated Transmission/ Voice Operated Transmission ( / )
Transmission is initiated by speaking into the microphone of
the radio/audio accessory instead of pushing the PTT
button.
L3 = High Sensitivity for quiet environments
L2 = Medium Sensitivity for most environments
L1 = Low Sensitivity for noisy environments
1. Press Menu until the icon appears on the
display. When audio accessory is connected, the
icon will be shown. The current setting (Off, L1–L3)
flashes.
2. Press or to select the sensitivity level.
3. Press the PTT button to exit menu or Menu to continue
set up.
Note: When using iVOX/VOX, there will be a short del ay.
Dual Channel Monitor
Enables you to scan the current channel and another
channel alternately.
To set another channel and start Dual Channel Monitor:
1. Press Menu until the Dual Channel Monitor icon
appears. The Dual Channel Monitor icon flashes.
2. Press or to select the channel then press Menu.
3. Press or to select the Sub-Code.
4. Press the PTT button or wait until time out to activate
Dual Channel Monitor. The screen will alternate between
home channel and Dual Channel Monitor channel.
6
5. To end Dual Channel Monitor, press Menu .
Note: If you set the same channel and Sub-Code as the current channel,
Dual Channel Monitor does not work.
Silent Mode
Silent Mode (Vibrate Alert) notifies you that your radio is
receiving a message. This is useful in noisy environments.
The Vibrate Alert is triggered when you received a call. The
Vibrate Alert is triggered again if there is no activity within 30
seconds after the previous call.
1. Press Menu until the Vibrate Alert icon is displayed.
The current setting will flash.
2. Press or to change the setting to On/Off.
3. Press the PTT button to exit menu or Menu to continue
set up.
Keypad Tones
You may enable or disable the keypad tones. You will hear
the key tone each time a button is pushed.
1. Press Menu until the Keypad Tone icon appears.
The current setting On/Off will flash.
2. Press either or to turn On/Off.
3. Press the PTT button to confirm or Menu to continue
set up.
Roger Tone
You can set your radio to transmit a unique tone when you
finish transmitting. It is like saying “Roger” or “Over” to let
others know you have finished talking.
1. P ress Menu un til the Roger Tone icon appears. The
current setting On/Off flashes.
2. Press or to turn On or Off.
 Loading...