

Motorola TALKABOUT KEM-ML36100, TALKABOUT User Manual
Two-Way Radio
User’s Guide
Display Scr een Gui de
For More Information
For further informati on, you may call M otorola a t 1-800-638-5119
(U.S. and Cana da), e-mail us at giantint l@ca llcenter.com or visit
us on the Internet at www.moto rola.c om.
MC Series
Safety and G eneral Info rmation
Important Inf ormation on Safe and Efficient
Operation
Read This Inf ormation Before Using Your Ra dio.
The information provided in this document supers edes the general
safety information in u ser guides published prior to December 1, 2002.
Transmit and Receive Proced ure
Your two-way radi o contains a transmitter a nd a receiver. To
control your e xposure a nd ensure complia nce with the
general population/ u ncontrolled environment ex posure
limits, always ad here to the following p rocedure:
•
Transmit no more than 50% of the time.
• To receive calls, releas e the Pus h to Talk (PTT) button.
• To transmit (talk), press the PTT button.
Transmitting 50% of the time, or le ss, is important because
the radio generates measurable RF en ergy exposu re only
when transmittin g (in terms of measuring standards
compliance).
Exposure to Radio Frequency Energy
Your Motorola tw o-way radio complies with the f ollowing RF
energy ex posure standards a nd guidelines:
• United States Federal Communicati ons Commission, Code
of Federal Re gulations; 47CFR part 2 sub-part J.
• American Nati onal Standards Institute (ANSI)/Insti tute of
Electr ical and Ele ctronic Engineers (IE EE) C95. 1- 1992.
• Institute of Electri cal and Electroni cs Engineers (IEEE)
C95.1-1999 Editi on.
• International Commission on Non-Ionizing Radi ation
Protection (ICNIRP) 1998.
• Ministry of Hea
lth (Canada) Safety Code 6. Limit s of Human
Exposure to Rad iofrequen cy Electromagneti c Fields in th e
Frequency Range from 3 KHz to 300 GHz, 1999.
• Australian Communicati ons Authority
Radiocommunications (El ectromagnetic Radiation—Human
Exposure) Standard, 2003.
•
ANATEL ANNEX to Resolution No . 303 of July 2, 2002 “Regulation of
limitation of exposure to electrical, magne tic and electroma gnetic
field s in the radio frequency range between 9 KHz and 300GHz”.
To ensure optimal radio performance and make sure hu man
exposure to ra dio freq uency electromagnetic energy is with in the
guidelines set for th in the above standard s, always adhere to the
following pr ocedures.
Portable Radio Operation and EME Exposu re
Antenna Care
Use only the supplied or a n approved replaceme nt antenna.
Unauthorized antennas, modifi cations, or attachments coul d dama ge
the rad io and
may violate FCC reg ulations.
Do NOT hold the antenna when the radi o is “IN USE.” Hold ing the
antenna a ffec ts its effective range .
Body-Worn Oper ation
To maintain compliances with FCC/Heal th Canada RF e xposure
guidelines if you wea r a radio on your bo dy when transmitting
always pl ace the radi o in a Motorola- supplied or app roved clip
holder, holste r, case or body har ness for this pr oduc t. Use of
non-Motorola-approved accessori es may ex ceed FCC/Health Canada
RF exp osure guid elines.
If you do not us e one of th e Motorola- supplied o r approved
body-worn accessories and a re n ot using the radio hel d in the
normal use position,
ensure the radio and its antenna are at
leas t 1 inch (2.5 cm) fro m your body when t ransmitting
.
Data Opera tion
If applicable, when using any data fe
atur e of the ra dio with or
without an ac cessory cab le,
position the radio and its an tenna
at lea st one inc h (2.5 cm) from the body
.
Approved A ccessories
For a list of appro ved Motorola a ccessories, visit our We b site at
www.motorola .com.
Electromagnetic Interference/Compatibil ity
Note:
Nearly every el ectronic device is su sceptibl e to
electromagne tic interference (EMI ) if inadequat ely shielde d,
designed or othe rwise configured for electromagnetic compatibility.
This device complie s with Part 15 of the FCC Rul es.
Operation is subject to the following t wo condi tions:
1. Th is device may not cause harmful in terference; and
2. Th is device must acce pt a ny interfe rence received , including
interfer ence that may cause undesired operat ion.
IC Canad a
The te rm "IC
:" before the equipment certifica tion number only
signifies that the Indust ry Canada tec hnical spe cifications were me t.
Facilitie s
To avoid electr omagnet ic interfe rence a nd/or compatibility co nflicts,
turn off your radio in any f acility whe re post ed notices in struct you
to do so. Hosp itals or health care facilitie s may be using equipment
that is sensitive to ext ernal RF energy.
Aircraft
When instructed to do so, tur n off your ra dio when onbo ard an
aircraft. Any us e of a radio mu st be in accordance with applica ble
regulations pe r airline crew in structions.
Medical Devices – Pacem aker s
The Advanced Medi cal Technology Association recommends that a
minimum separati on of 6 inches (15 cm) be maintained between a
handheld wirele ss radio and a pacema ker. These reco
mmendations
are consistent with the indep ende nt resea rch by and
recommendations of the U .S. Food and Drug Administration.
People with pacem akers should :
• ALWAYS keep the radio more than 6 inches (15 cm) from their
pacemaker when the radio is turned ON.
• Not carry the radio in the breast pocket.
• Us e the ear opposite the pacema ker to minimize the potential for
interfer ence.
• Turn the radi o OFF immedi ately if there is any reason to suspect
that interference is taking place.
Medical Devices – Heari ng Aid s
Some digi tal wireless rad ios may interfere wit h some hearing a ids.
In the event of such inte rfer ence, you may wa nt to consult your
hearing ai d manufactu rer to disc uss altern atives.
Medical Devices – Other
If you use any ot
her person al medical d evice, con sult the
manufacture r of you r device t o determine if it is adeq uately shield ed
from RF energ y. Your physician may be a ble to assist you in
obtaining this inform ation.
Safety and G eneral Use While Driving
Check the laws and regulati ons regarding the u se of radios in the
area where yo u drive, and a lways obey them. If yo u do us e your
radio while driving, please:
• Give full attention to driving and to the road.
• Us e hands-free operation, if a vailable.
• Pull off the road and park before making or answering a call if
driving condi tions so req uire.
The use of a two-way radio while engaged in activities r equiring
concentration may cause distrac tion o r otherwise impair your a bility
to safely p articipate in such act ivities. Always use technology safely.
Do
not place a por table radio in the ar ea over an air bag or in th e air
bag deployment area. Air bags inflate with great force. If a po rtable
radio is place d in t he air bag de ployment area and the a ir bag
inflates, the radio may be propelled with great force an d cause
serious inj ury to occupants of the vehic le.
Potentia lly Expl osive Atmosp heres
Turn off your radio pr ior to entering any area with a potentially
expl osive atmo sphere. Only radio types that are e specially qual ified
should be used in such areas as “Intrinsically Safe.” Do not rem ove,
install o r charge ba tteries in such areas. Sparks in a potentially
explosive atmo sphere can cause an explo sion or fire resulting in
bodily injury or e ven
death.
Note:
The ar eas with potentia lly expl osive atmo spheres refer red to
above include fueling areas such as bel ow decks on boats, fuel or
chemical tr ansfer or sto rage facilities, ar eas where the a ir contains
chemicals or p articles (such a s grai n, dust or metal po wders ) and
any ot her area wher e you would nor mally be advised t o turn off yo ur
vehicl e engine. Areas with potentially ex plosive atmos pheres are
ofte n—but not always—posted .
Blasting C aps and Areas
To avoid possible int erfere nce with bl asti ng ope rations, tu rn off your
radio when you are ne ar e lectri cal blasting caps, in a bla sting a rea,
or in areas posted “Turn off t wo-way radi os.” Obey a ll signs and
instruction s.
Operational Cauti ons
Antennas
Do not use any portable radio t hat has a damage d an tenna.
If
a damaged antenna comes into contact with your skin , a minor bu rn
can result .
Batteries
All batteries can caus e propert y damage and/or bodily inj ury such as
burns if a conductive material— like jewel ry, keys or beaded chains—
touch exposed terminals. Th e conduct ive materia l may complete an
electrical circuit (short circuit) and be come q uite hot. Exerc ise care
in handling any charged battery, particul arly when placing it in side a
pocket, purse or other container with metal objects .
Exercise care when removing NiMH or AA batterie s. Do not use
sharp or conductive too ls to remov e ei ther of these batteries .
Battery Charg er Saf ety Instructio ns:
Save these I nstructions
1. Do n ot expose the charger to rain or snow.
2. Do n ot opera te or disassemble t he c harger if it has rece ived a
sharp blow, or has been drop ped or damaged in an y way.
3. Ne ver al ter the AC cord or plug provided with the unit. If the plug
will not fit the ou tlet, ha ve the prope r ou tlet installed by a
qualified e lectrici an. An improper condi tion can result in a risk of
electric shock.
4. To reduce the risk of damage to the cord or plug, pull the plug
rather than the cord when disconnecting the charger from the AC
receptacle.
5. To reduce the risk of e lectric shock , unplug the charger from the
outlet be fore attempt ing any ma intenance or cleaning.
6. Use of an attachme nt not recommended o r sold by Motorola ma y
result in a risk of fire, elect ric shock or personal inj ury.
7. Make sure the cord is located so i
t will not be stepped on,
tripped ov er or subjected to damage or stress.
8. An e xtension cord should not be u sed unle ss absolutely
nece ssary. Use o f an imprope r extension cord could result in a
risk of a fire and/or electric shock. If an e xtension cord mu st be
used, mak e sure that:
• The p ins on the pl ug of the e xtension cord are the same
number, size and shape as thos e on the plug of the charger.
• The e xtension cord is properly wired and in good electri cal
cond ition.
• The e xtension cord s ize is 18 AWG for lengths up to 100 feet,
and 16 AWG for lengths up to 150 feet.
9. The supply cord of the AC adaptor cannot be replaced. If the cord
is damaged, call cust omer service at 1- 800-638-5119 (U.S . and
Canada).
FCC Licensing I nformation
Your Motorola radio operates on General Mobile Radio Service
(GMRS) frequencies and is subj ect to the Rul es and Regulati ons of
the Federal C ommunica tions Commission (FCC ). The FCC re quires
that all operators using GMRS frequencies obtain a radio licens e
befo re operating their eq uipment. To obtain the FCC forms, plea se
visit the FCC’s Web sit e at wirele ss.fcc.gov/uls/i ndex.htm?job=home
to source form 605 an d 159, which in clude all the instructi ons you
will need.
If you wish to ha ve the do cument faxed or ma iled, or if yo u have
questi ons, ple ase use th e following c ontact infor mation:
For a fax: For mail service: If you h ave questions
Contact the Fax-On Call the FCC about the FCC License:
Demand system Forms Hotline Call the FCC
1-202-418-0177 1-800-418-FO RM 1-888-CALL-FCC
(3676) (225-5322)
Changes or modi fications no t ex pressly approved by Mot orola may
void the use r’s authority gra nted b y the FCC to o pera te this ra dio and
should not be made. To com ply with FCC re quirements, tran smitter
adjust ments should be made only by or under the supervision of a
person certified as t echn ically qua lified to perform transmitter
maintena nce and re pairs in the private la nd mobile and fixed
services as certif ied by an organization repres entative of the user of
those services. Re placement of any t ransmitter component (cr ystal,
semiconductor, etc.) not authorized b y the FCC equipment
authorization for this radi o could violate FCC rul es.
Note:
Use o f this radio outside the country where it wa s intended to be
distributed is subject to government regul
ations and may be pro hibited.
Getting Start ed
Installing th e Batteries
Each radio can use either 1 NiMH rechargeable battery pack or 3 AA
alkaline batteri es and beeps when the batteries are low.
Installing NiMH Rechargeable Battery Pack
1. Tur n the radio off.
2. With the back of the radio faci ng you, lift the battery cov er latch
up and remove the cover.
3. Remo ve the battery pack from the cl ear pla stic bag (do not
disassem ble or unwrap the battery pack).
4. Insert the NiMH battery pack with the diagram faci ng you.
5. Repo sition the batte ry cover and pr ess down to sec ure.
Installing th e Three AA Alkaline Batte ries
1. Tu rn the radi o off.
2. With the back of the radio faci ng you, lift the battery cov er latch
up and remove the cover.
3. Insert the three AA a lkaline batteries with + and - polarit y as
shown inside .
4. Repo sition the batte ry cover and pr ess down to sec ure.
Radio Battery Meter
The radio b atte ry icon sh ows the battery ch arge level, from
full to empty . Wh en the radio has one seg ment left,
the radio chi rps periodicall y or after releasing ( Low Ba ttery
Alert).
Removing th e NiMH Battery Pack (Option al Accessory )
1. Tu rn the radi o off.
2. With the back of the radi o facing you, lift the battery latch up to
release the batt ery cover and re move th e cove r.
3. Gently rem ove the NiMH battery.
4. R eposition the battery cove r and press down t o secur e.
Removing th e Three AA Batteries
1. Tur n the radio off.
2. With the back of the radio faci ng you, lift the battery latch up to
release the batt ery co
ver and rem ove the cover.
3. Gently remo ve each battery by easing each battery out
individua lly.
4. Repo sition the batte ry cover and pre ss down to sec ure.
Notes
• Ex ercise care when rem oving NiMH or AA batteries. Do not u se
shar p or co nductive tools to remove eith er of these batter ies.
• Remo ve the batt eries before storing your radio fo r exten ded
periods of time . Batteries corrode o ver time and may ca use
permanen t dama ge to your radio.
Using the Battery Charg er
The battery charger provides drop- in cha rging convenien ce for
NiMH batterie s and can be placed on any flat s urface, such a s a
desk or work bench. Charge the NiMH battery ov ernigh t (at least 16
hours) before using it for the
fir st time. After the in itial charg e, an
empty batter y is fully charged within 14 hours.
1. Fo llow the steps above t o install a NiMH Battery Pack .
2. Pl ug the AC power supply cord into the jack on the desk stand.
3. Pl ug the AC power supply into a standard wall outlet.
4. With a ra dio faci ng forward, slide it into one of the charg ing
pockets.
5. When charging the battery charg er, the red lig ht on the charger
base will glow co ntinuously.
Notes
• The light will rema in red after the NiMH battery pac k is fully
charged .
• When mo ving between hot and cold tem peratures, do not cha rge
the NiMH battery pack until the battery temperature acclimates
(usually about 20 min utes).
• For optimal battery life, remov e the radio or battery from t he
charger within 16 ho urs. Do
not st ore th e radio wh ile connected
to the charg er.
• Turn radio off while in charging tray.
Attaching and Remo ving the Belt Cl ip
1. Attach bel t clip to pock et or belt strap.
2. Align the belt clip post with the hole in the back of the radio.
3. Gently push until the clip c licks in place.
To Remove
1. Push down on the release tab at the top of the belt clip to release
the catch.
2. Pull the bel t clip awa y from the back of the radi o.
Turning Your Radio On and Off
Turn clockwise to turn the radio on and count erclockwise to
turn t he radi o off.
1. In the ON positi on, the radio chirps and brief ly shows all feature
icons ava ilable o n the radio.
2. Th e disp lay scr een then shows the cu rren t chan nel, code and all
fea
tures that are enabl ed.
Setting the Volume
Press and hold for three seconds while rotating until you
reach a comforta ble listening level.
1. Rotate cl ockwise to increase the vo lume .
2. Rotate counterclockwise to decrease the vol ume.
Do not hold t he r adio close to your ear. If the volume is set to an
uncomfortab le level, it could hurt you r ear.
Talking a nd Listening
To communicate, a ll radios in your group must be set to the same
channel an d Interfer ence E liminator Co de.
1. To talk, press and hold .
2. When you are fi nished talking, release .
For maximum cla rity, hold the radio two to three inc hes away from
your mouth and speak di rectly into the microphone . Do not cover the
microphone while talking.
Talk Range
Your radio is designed to maximize perf ormance and improv e
transmission range. Do no t use the rad ios closer than f ive feet apar t.
Monitor Button
Pressing and hold ing for three seconds allows you to liste n to
the volum e level of the radio when you ar e not r eceiving. This allows
you to adju st the volum e, if necessary. You can also press to
check for activi ty on the current channel before you talk.
Push-to-Talk Timeout Timer
To prevent acci dental tr ansmissions an d save batte ry life, the radio
emits a continuo us warn ing tone and stops tra nsmitting if you press
for 60 continuous se cond s.
KEM-ML3610 0
Menu Optio ns
Selecting the Chan nel
Your radi o has 22 channels. The channel is t he frequency the radio
uses to transmit. Chan nels 8-14 are FRS 0.5 wa tt only and all other
channe ls are G MRS. (See t
he "Channels and Frequenci es" table o n
overleaf for details.)
1. With the radio on , press . When the radi o is on a 0.5 wat t
channel, displays. Wh en the radio is on a 1 watt chan nel,
displays. The curre nt c hannel flashes.
2. Pres s or and se lect an unuse d or qui et channel .
3. Pres s to save the c hannel sett ing or to continue set up.
Selecting the Int erference El iminator Code
Interference Eliminator Codes help minimi ze interference by blocking
transmissions from unknown sources. Codes 1 – 38 are the standard
analog codes that appear on other FRS/GMRS radios. 0 is the off
position, no code s are enable d.
To set the code for a chan nel:
1. Pres s until the cod e st arts to fla sh.
2. Pres s or to se lect the code.
3.
Press to sav e the code setti ng or to continue set up.
You c an set a differe nt code for each channel using this procedure.
An extended press of or allows you to scroll through the
Interference Codes rapidly so you can quickly reach the code you want.
Note:
You must set the Interfere nce Eliminato r Code to 0 on a radio
that use s Interferenc e Eliminator Codes t o communicate with r adios
that do not have Interference Eliminat or Codes. Sele ct 0 for “no
tone, no c ode” and OFF will fla sh on your radio’s displ ay.
Setting an d Transmitting Call Tones
Your radi o can transmit differ ent call tones to othe r radios in your
group so you c an a lert them that you wan t to talk. Your radio has
5 call tones.
To set a call tone:
1. With the radi o on, press thr ee times until the cu rrent call tone
setting (0 - 5 ) flas hes and CA displays .
2. Pre
ss or to chang e and hear the call tone.
3. Pres s to set the new call tone or to con tinue set up.
To transmit your call tone t o other radios set to the same channel
and Inter ference Eliminator Co de as your radio, pr ess .
Note:
Setting the call to 0 disables the call tone feature.
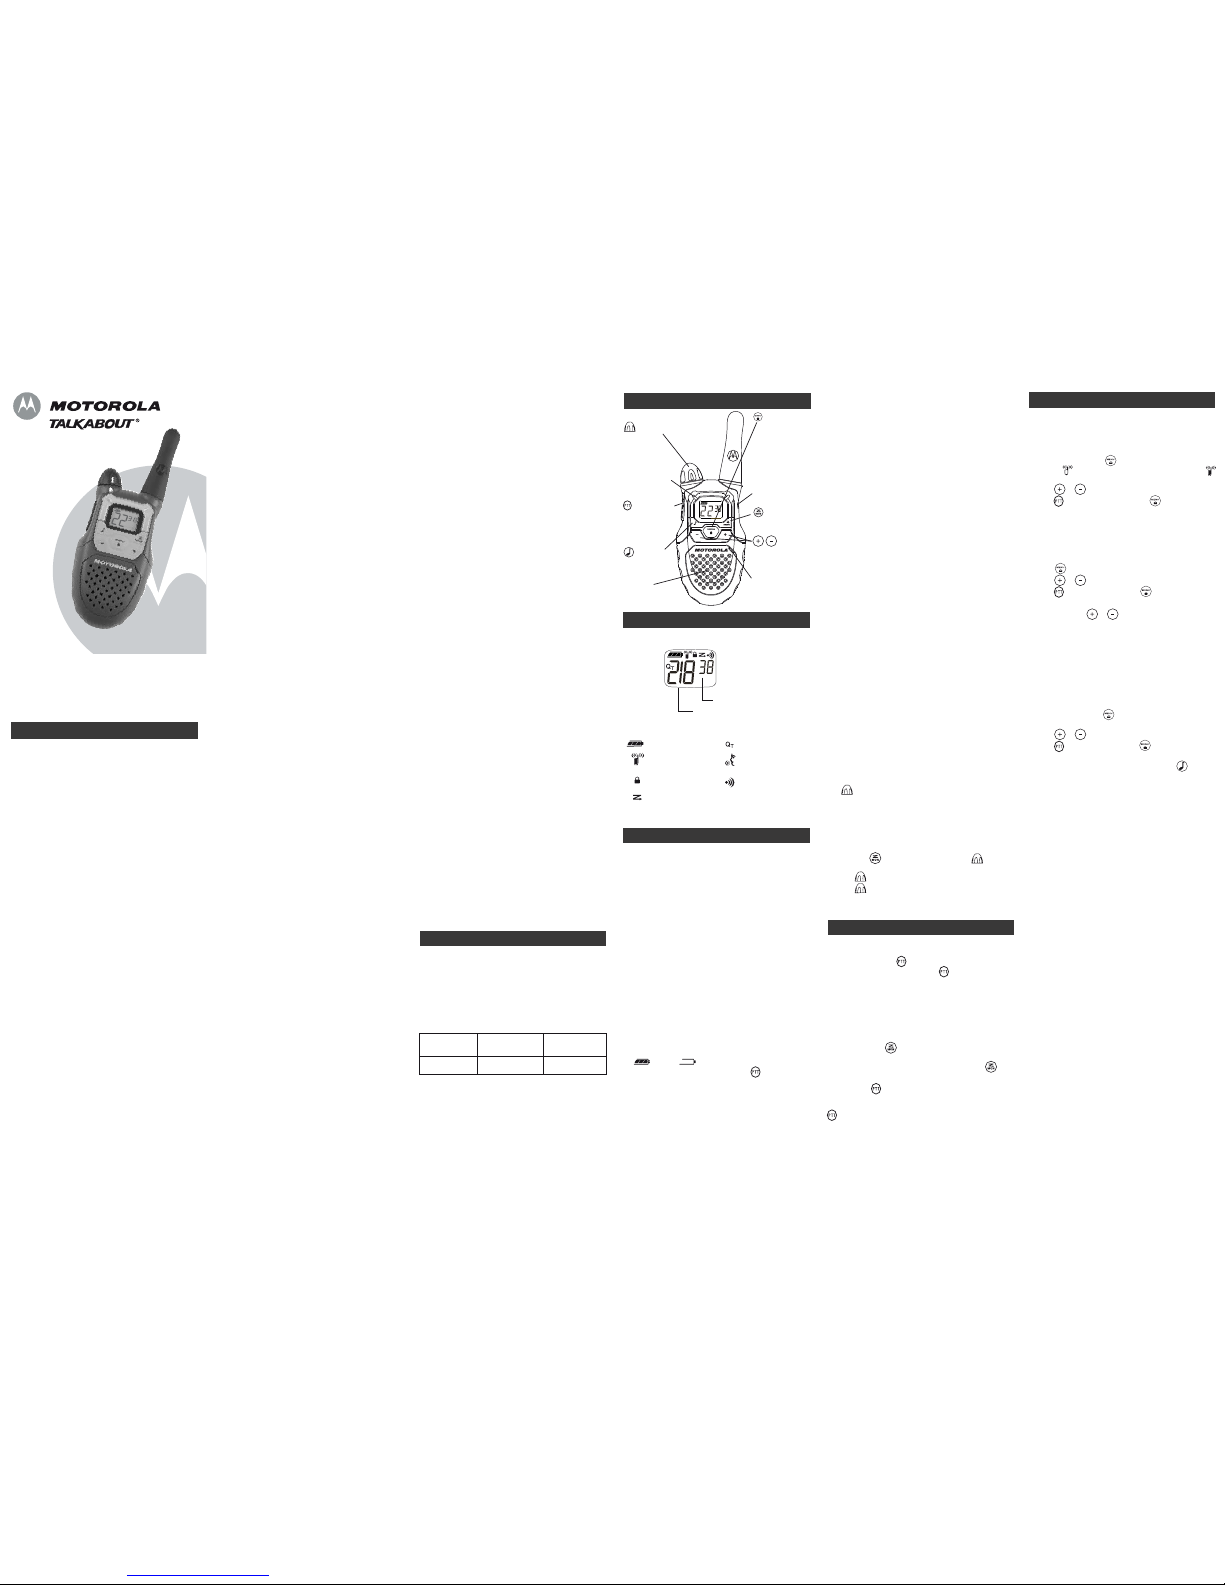
MC Series
Numbers
for Codes
Numbers for
Channel, Call Tone
- Batter y Meter
- Chan nel Power
Indicator
- Lock
- Scan
- Noise Filterin g
- Hands-Free
(VOX)
- Talk Confirmation
Tone (Roger Beep)
Menu/Loc k
Accessory Jack
Scan/Monitor
Scroll
Micropho ne
Control Bu ttons
Volume
Call Tone
Speaker
LED indicator
Push-to-Talk
(PTT)
Warranty
Consumer Two-Way Radio Products and Accessories
purchased in the United States or Canada.
What Does this Warranty Cover?
Subject to the exclusions contained to the right, Giant International
Ltd. warrants the Motorola branded consumer two-way radios that
operate via Family Radio Service or General Mobile Radio Service
that it manufactures (“Products”), the Motorola branded or certified
accessories sold for use with these Products that it manufactures
(“Accessories”) to be free from defects in materials and
workmanship under normal consumer usage for the period(s)
outlined below. This limited warranty is a consumer’s exclusive
remedy, and applies as follows to new Motorola branded Products
and Accessories manufactured by Giant International Ltd., and
purchased by consumers in the United States or Canada, which are
accompanied by this written warranty:
Menu Options (continued)
QT Noise Filtering
The QT noise-filtering feature helps to ensure uninterrupted
communication with other Motorola radios that have this feature.
This feature also filters out unwanted transmissions from other
radios. This is useful in places where there is heavy radio traffic,
such as amusement parks or ski resorts.
Note:
QT noise filtering is not available when the radio is scanning.
To turn Q
T
noise filtering on or off:
1. Press until displays.
2. Press or until Y displays to turn noise filtering on, or
until – displays to turn noise filtering off.
3. Press to confirm your selection.
To transmit to a radio that has Q
T
noise filtering turned on:
1. Select the same channel and Interference Eliminator Code as the
other radio.
2. Press to send a call tone. This allows your voice to pass
through the Q
T
noise filter on the receiving radio.
3. Press and speak normally.
Note:
If you skip step 2, the beginning of your message may not be
heard on the receiving radio. For a 30-second period, starting after
the last transmission, all transmissions received on the selected
channel and code will pass through the Q
T
noise filter.
Transmitting a Talk Confirmation Tone
Your radio will transmit a unique tone when you finish transmitting.
It is like saying “Roger” or “Over” to let others know you are
finished talking.
1. To turn Talk Confirmation off, press and hold while you turn
your radio on. The Talk Confirmation call tone will not display.
2. To turn Talk Confirmation back on, turn your radio off and then
back on while pressing and holding . The Talk Confirmation
call tone will be displayed.
Use With Accessories (PTT)
You can use optional headset accessories. MC Series radios are
compatible with PTT accessories. VOX headsets will require use of
the radios button to talk.
Many accessories (sold separately) are available for your radio.
For more information, visit our Web site at www.motorola.com or
shop.giantintl.com.
Special Features
Keypad Lock
To avoid accidentally changing your radio settings:
1. Press and hold until displays.
2. When in lock mode, you can turn the radio on and off, adjust the
volume, receive, transmit, send a call tone, and monitor
channels. All other functions are locked.
To unlock the radio, press and hold until is no longer
displayed.
Scanning Channels
Use scan to search the 22 channels for transmissions from unknown
parties, to find someone in your group who has accidentally
changed channels, or to quickly find unused channels for your own
use.
To start Scanning:
1. Briefly press the key. The scan will appear in the
display, and the radio will begin to scroll through the channel and
code combinations.
2. When the radio detects channel activity matching the channel
and code combination, it stops scrolling and you can hear the
transmission.
3. To respond and talk to the person transmitting, press within
five seconds after the end of the transmission.
4. The radio will resume scrolling through the channels five
seconds after the end of any received activity.
5. To stop scanning, briefly press the key.
Scanning Notes:
1. If you press while the radio is scrolling through inactive
channels, the transmission will be on the “home channel”, that
is, the channel (and Interference Eliminator Code) your radio was
set to when you started the scan. Scanning will resume five
seconds after the end of your transmission. You may press the
key to stop scanning at any time.
2. If the radio stops on an undesired transmission, you may
immediately resume the scan by briefly pressing or .
3. If the radio repeatedly stops on an undesired transmission, you
may temporarily remove that channel from the scan list by
pressing and holding or for three seconds. You may
remove more than one channel in this way.
4. To restore the removed channel(s) to the scan list, turn the radio
off and then back on, or exit and re-enter the scanning mode by
pressing .
5. You cannot remove the home channel from the scan list.
6. In Advanced Scan, the detected code will only be used for one
transmission. You must note the code, exit scan, and set that
detected code on that channel to permanently use the detected
code.
Products Covered
Products and Accessories
as
defined above, unless otherwise
provided for below.
1.
Consumer Two-Way Radio
Accessories.
2.
Products and Accessories
that are Repaired or
Replaced.
Length of Coverage
One (1) year
from the date of
purchase by the first consumer
purchaser of the product unless
otherwise provided for below.
1.
Ninety (90) days
from the
date of purchase by the first
consumer purchaser of the
product.
2.
The balance of the original
warranty or for ninety (90)
days
from the date returned to
the consumer, whichever is
longer.
Exclusions
Normal Wear and Tear.
Periodic maintenance, repair and
replacement of parts due to normal wear and tear are excluded from
coverage.
Batteries.
Only batteries whose fully charged capacity falls below
80% of their rated capacity and batteries that leak are covered by this
limited warranty.
Abuse & Misuse.
Defects or damage that result from: (a) improper
operation, storage, misuse or abuse, accident or neglect, such as
physical damage (cracks, scratches, etc.) to the surface of the
product resulting from misuse; (b) contact with liquid, water, rain,
extreme humidity or heavy perspiration, sand, dirt or the like, extreme
heat, or food; (c) use of the Products or Accessories for commercial
purposes or subjecting the Product or Accessory to abnormal usage
or conditions; or (d) other acts which are not the fault of Motorola or
Giant International Ltd., are excluded from coverage.
Use of Non-Motorola branded Products and Accessories.
Defects or damage that result from the use of Non-Motorola branded
or certified Products, Accessories, or other peripheral equipment are
excluded from coverage.
Unauthorized Service or Modification.
Defects or damages
resulting from service, testing, adjustment, installation, maintenance,
alteration, or modification in any way by someone other than
Motorola, Giant International Ltd. or its authorized service centers,
are excluded from coverage.
Altered Products.
Products or Accessories with (a) serial numbers
or date tags that have been removed, altered or obliterated; (b)
broken seals or that show evidence of tampering; (c) mismatched
board serial numbers; or (d) nonconforming or non-Motorola branded
housings, or parts, are excluded from coverage.
Communication Services.
Defects, damages, or the failure of
Products or Accessories due to any communication service or signal
you may subscribe to or use with the Products or Accessories is
excluded from coverage.
Patent and Copyright Information
Manufactured, distributed or sold by Giant International Ltd., official
licensee for this product. Motorola, the Motorola logo trademarks
and the Motorola trade dress are owned by Motorola, Inc. and are
used under license from Motorola, Inc. Please contact Giant
International Ltd. at 1-800-638-5119 for questions/comments,
warranty, support, or service related to this product. MOTOROLA and
the Stylized M Logo are registered in the U.S. Patent & Trademark
Office. All other product or service names are the property of their
respective owners. © Motorola, Inc. 2010. All rights reserved.
What Other Limitations Are There?
ANY IMPLIED WARRANTIES, INCLUDING WITHOUT LIMITATION THE
IMPLIED WARRANTIES OF MERCHANTABILITY AND FITNESS FOR A
PARTICULAR PURPOSE, SHALL BE LIMITED TO THE DURATION OF THIS
LIMITED WARRANTY, OTHERWISE THE REPAIR, REPLACEMENT, OR
REFUND AS PROVIDED UNDER THIS EXPRESS LIMITED WARRANTY IS
THE EXCLUSIVE REMEDY OF THE CONSUMER, AND IS PROVIDED IN
LIEU OF ALL OTHER WARRANTIES, EXPRESS OR IMPLIED. IN NO
EVENT SHALL MOTOROLA OR GIANT INTERNATIONAL LTD. BE LIABLE,
WHETHER IN CONTRACT OR TORT (INCLUDING NEGLIGENCE) FOR
DAMAGES IN EXCESS OF THE PURCHASE PRICE OF THE PRODUCT OR
ACCESSORY, OR FOR ANY INDIRECT, INCIDENTAL, SPECIAL OR
CONSEQUENTIAL DAMAGES OF ANY KIND, OR LOSS OF REVENUE OR
PROFITS, LOSS OF BUSINESS, LOSS OF INFORMATION OR OTHER
FINANCIAL LOSS ARISING OUT OF OR IN CONNECTION WITH THE
ABILITY OR INABILITY TO USE THE PRODUCTS OR ACCESSORIES TO
THE FULL EXTENT THESE DAMAGES MAY BE DISCLAIMED BY LAW.
Some states and jurisdictions do not allow the limitation or exclusion
of incidental or consequential damages, or limitation on the length of
an implied warranty, so the above limitations or exclusions may not
apply to you. This warranty gives you specific legal rights, and you
may also have other rights that vary from state to state or from one
jurisdiction to another.
Who is covered?
This warranty extends only to the first consumer purchaser, and is not
transferable.
What will GIANT INTERNATIONAL LTD. do?
GIANT INTERNATIONAL LTD., at its option, will at no charge repair,
replace or refund the purchase price of any Products or Accessories
that does not conform to this warranty. We may use functionally
equivalent reconditioned/ refurbished/ pre-owned or new Products,
Accessories or parts.
How to Obtain Warranty Service or Other Information?
To obtain service or information, please call:
USA Two-Way Radios Canada Two-Way Radios
1-800-638-5119 1-800-638-5119
giantintl@callcenter.com giantintl@callcenter.com
For Accessories
, please call the telephone number designated
above for the product with which they are used.
You will receive instructions on how to ship the Products or
Accessories at your expense, to a GIANT INTERNATIONAL LTD.
Authorized Repair Center. To obtain service, you must include: (a) a
copy of your receipt, bill of sale or other comparable proof of
purchase; (b) a written description of the problem; (c) the name of
your service provider, if applicable; (d) the name and location of the
installation facility (if applicable) and, most importantly; (e) your
address and telephone number.
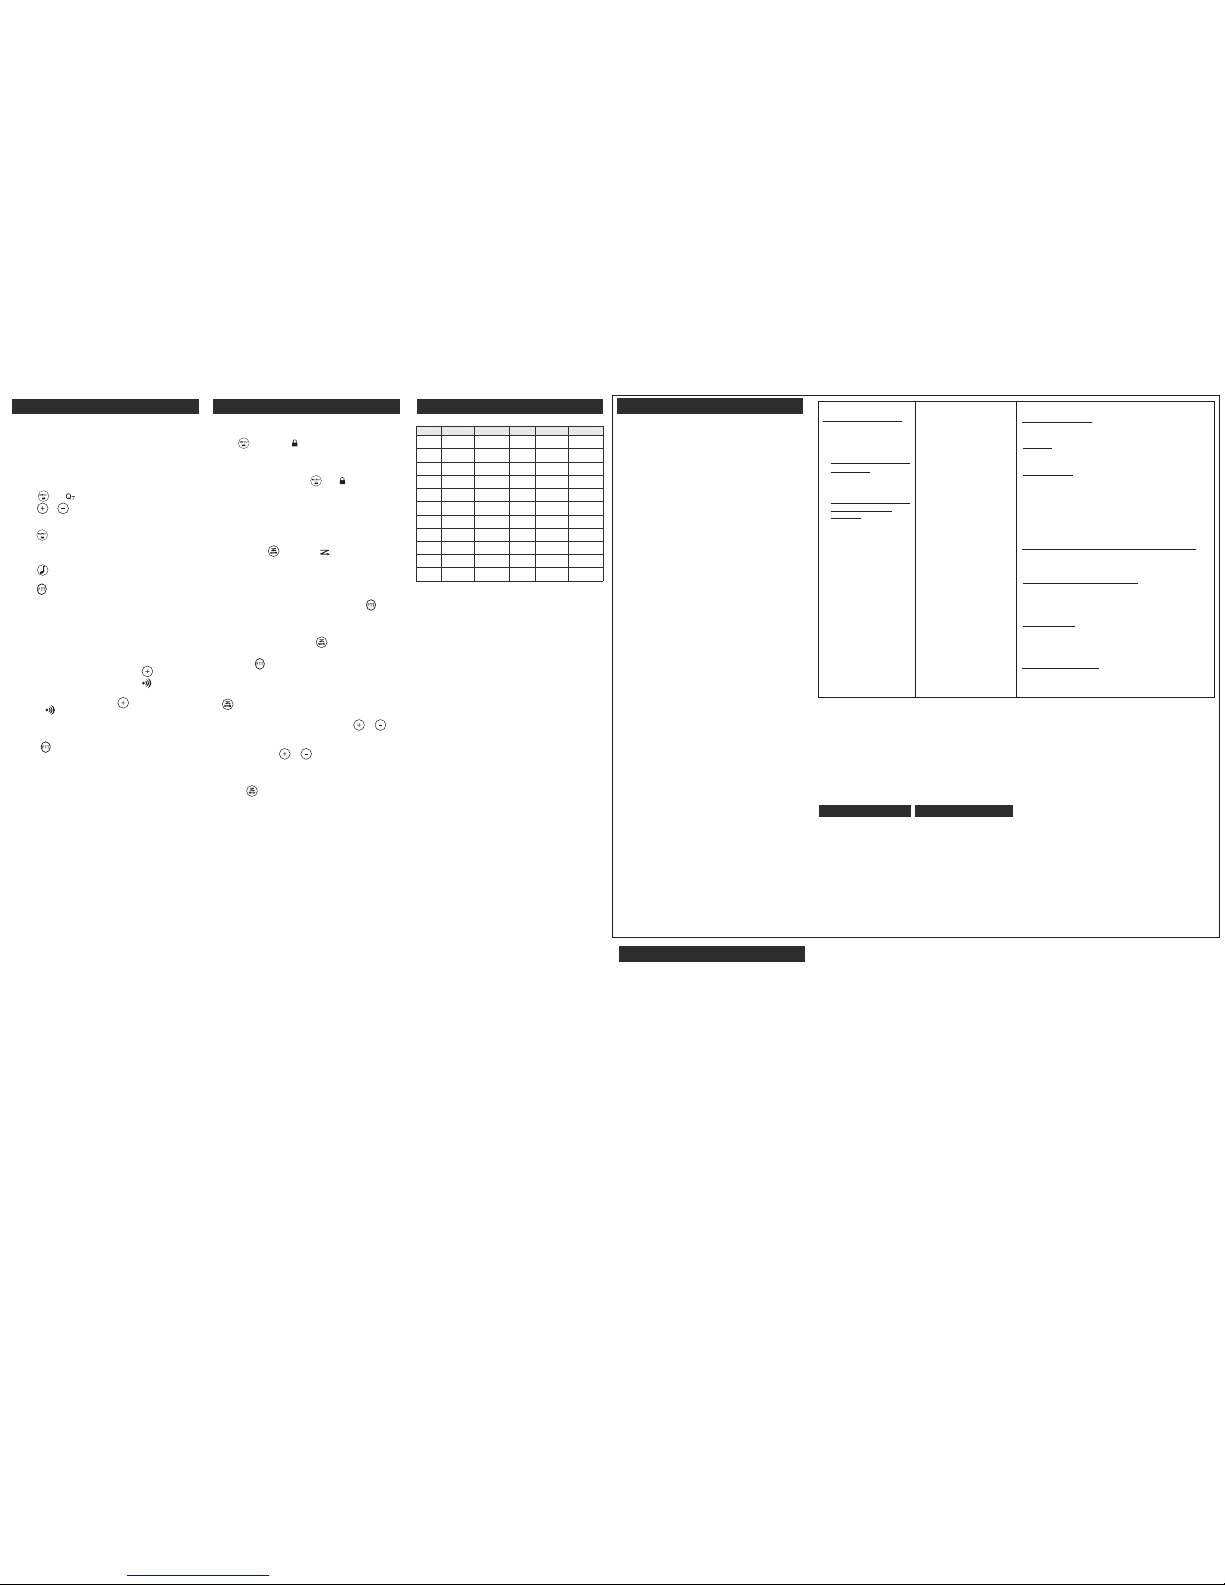
Channels and Frequencies
Channel Frequency Description Channel Frequency Description
1 462.5625 MHz GMRS/FRS 12 467.6625 MHz FRS
2 462.5875 MHz GMRS/FRS 13 467.6875 MHz FRS
3 462.6125 MHz GMRS/FRS 14 467.7125 MHz FRS
4 462.6375 MHz GMRS/FRS 15 462.5500 MHz GMRS
5 462.6625 MHz GMRS/FRS 16 462.5750 MHz GMRS
6 462.6875 MHz GMRS/FRS 17 462.6000 MHz GMRS
7 462.7125 MHz GMRS/FRS 18 462.6250 MHz GMRS
8 467.5625 MHz FRS 19 462.6500 MHz GMRS
9 467.5875 MHz FRS 20 462.6750 MHz GMRS
10 467.6125 MHz FRS 21 462.7000 MHz GMRS
11 467.6375 MHz FRS 22 462.7250 MHz GMRS
MC Series
 Loading...