

Motorola T80, T80 EXTREME, T81 HUNTER OWNER'S MANUAL [ml]
T80/T80
EXTREME/T81
HUNTER
OWNER'S MANUAL
en
de-DE fr-FR it-IT es-ES
pt-PT
no-NO hu pl ru
nl-NL da sv fi
uk


RF ENERGY EXPOSURE AND PRODUCT
SAFETY GUIDE FOR PORTABLE TWOWAY RADIOS
ATTENTION!
Before using this product, read the RF Energy Exposure and
Product Safety Guide that ships with the radio which contains
instructions for safe usage and RF energy awareness and
control for compliance with applicable standards and regulation.
Package Contents
Package Content T80 T80
Radio 2 2 4 1
Belt clip 2 2 4 1
2-slot charging cradle 1 1 2 1
AC adaptor 1 1 - 1
AC- Y-adaptor - - 1 Battery support
brackets
Rechargeable NiMH
battery pack
2242
2242
Headset - 2 4 1
Landyard - 2 4 1
Owner’s manual 1 1 1 1
Car Charger - - - 1
Extreme
T80
Extreme
Quad
T81
Hunter
Frequency Chart
Ch. Freq. (MHz) Ch. Freq. (MHz) Ch. Freq. (MHz)
1 446.00625 4 446.04375 7 446.08125
2 446.01875 5 446.05625 8 446.09375
3 446.03125 6 446.06875
Features and Specifications
• 8 PMR Channels
• 121 Sub-Codes (38 CTCSS Codes & 83 DCS codes)
• Up to 10 km Range*
• Internal VOX Circuitry
• LED Torch
• 10 Selectable Call Tone Alerts
• Backlit LCD Display
• Roger Beep
• Up Timer
• Room Monitor
• Battery Charger
• Battery Level Meter
• Channel Monitor
• Channel Scan
• Dual Watch
• Keypad Lock
• Auto Powe rO ff
• Auto Squelch Control
• Auto Repeat (Scrolling)
• Battery Save
• Battery Low Alert
• Battery Low Sleep
• Tone (On/Off)
• Direct Call (Caller ID Call)
• Group Call
• Silent Mode
• All Call
• Auto Channel Change
• IP Rating : IPX2 (for T80), IPX4 (for T80 Extreme, T81 Hunter)
• Power Source: NiMH battery Pack/4 AAA Alkaline batteries
• Battery Life: 16 Hours (under typical use conditions)
*Range may vary depending on environmental and/or topographical
conditions.
English
1
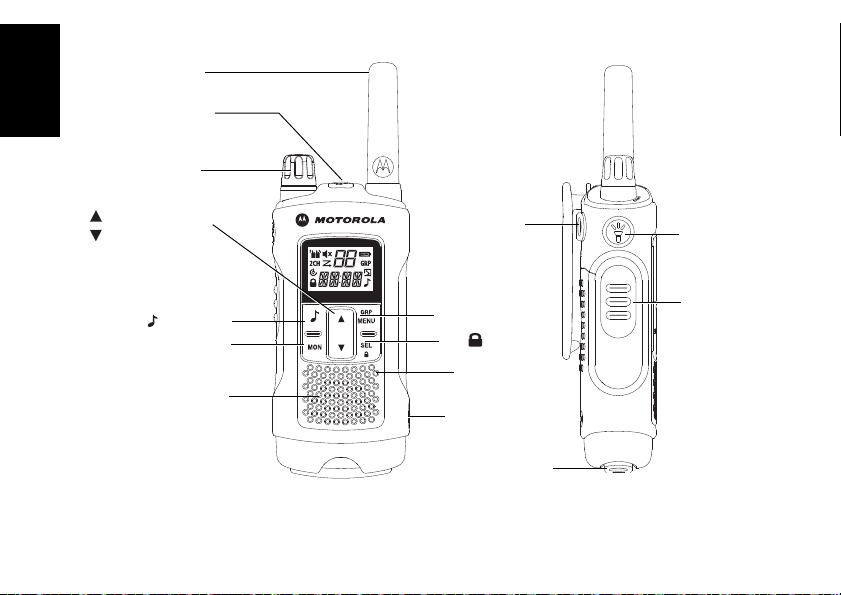
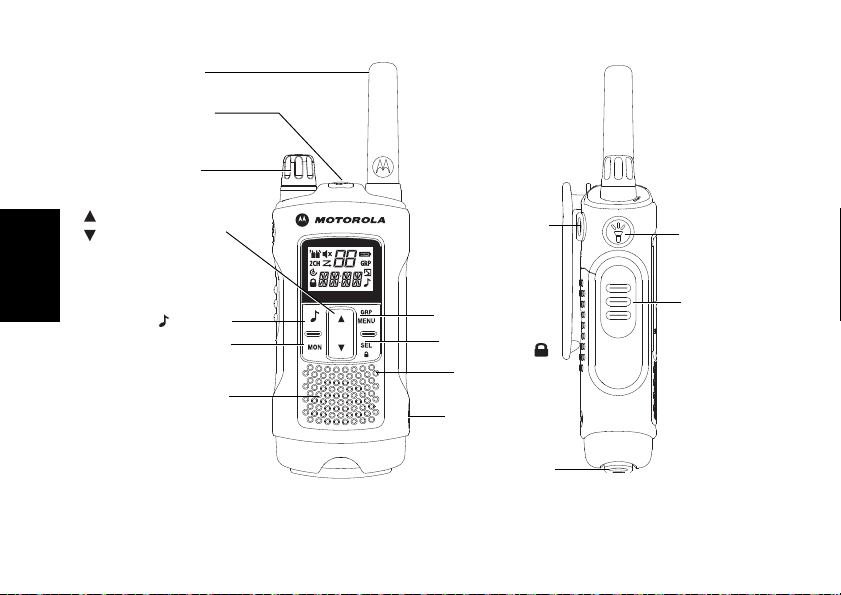
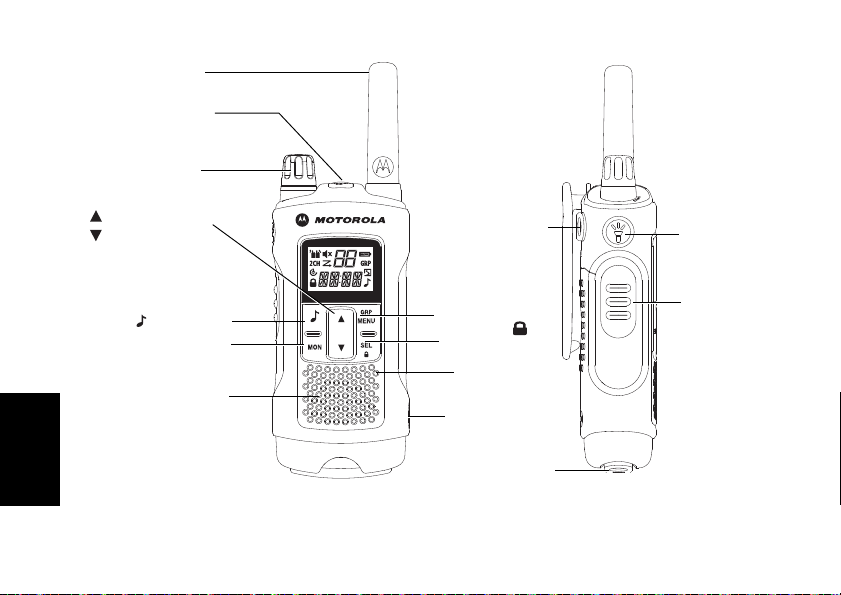
Control and Functions
Antenna
PTT
(Push-To-Talk)
Button
Headset jack
(Headset not included)
Up/Down Menu
Navigation Button
(Call) Button
MON (Monitor) Button
Speaker
Microphone
SEL/ (Select/Lock)
Button
GRP/MENU(Menu/
Group) Button
DC IN 9 V Jack
Volume Knob with
Power Switch
LED Torch
Button
Top Lanyard Bar
Bottom Lanyard Bar
English
Note : Radio depicted is T80 Extreme. Also applicable for T80, T81 Hunter radios.
2
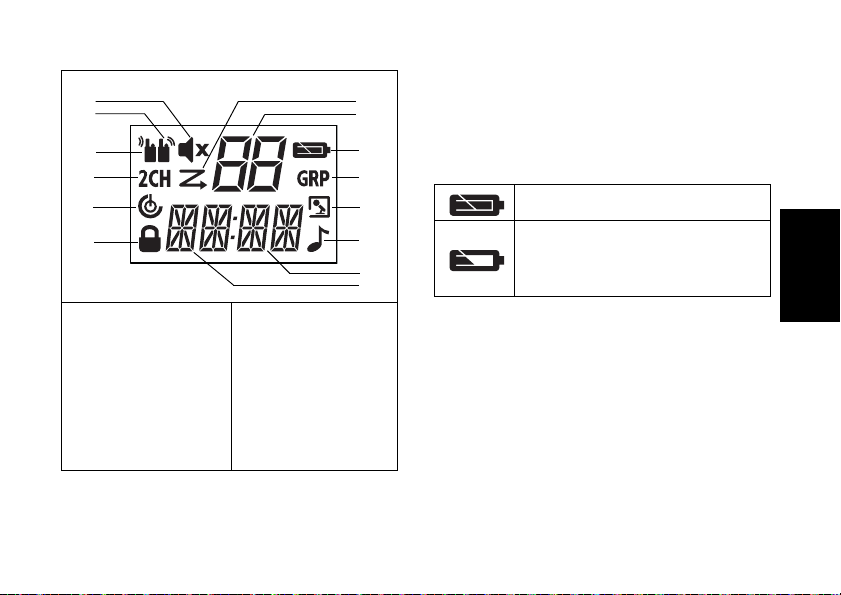
Display Installing the Battery
2
3
4
5
1
6
7
8
9
10
11
12
13
14
1. Make sure your radio is turned OFF.
2. For T80: To remove the battery compartment door, press the
tab at the bottom of the compartment door.
For T80 Extreme and T81 Hunter : To remove the battery
compartment door, use a coin to wedge the battery door
open.
3. Install the NiMH batteries into the battery compartment.
4. Replace the battery compartment door.
Caution: Risk of explosion if battery is replaced by an
incorrect type. Dispose used batteries according
to the instructions.
English
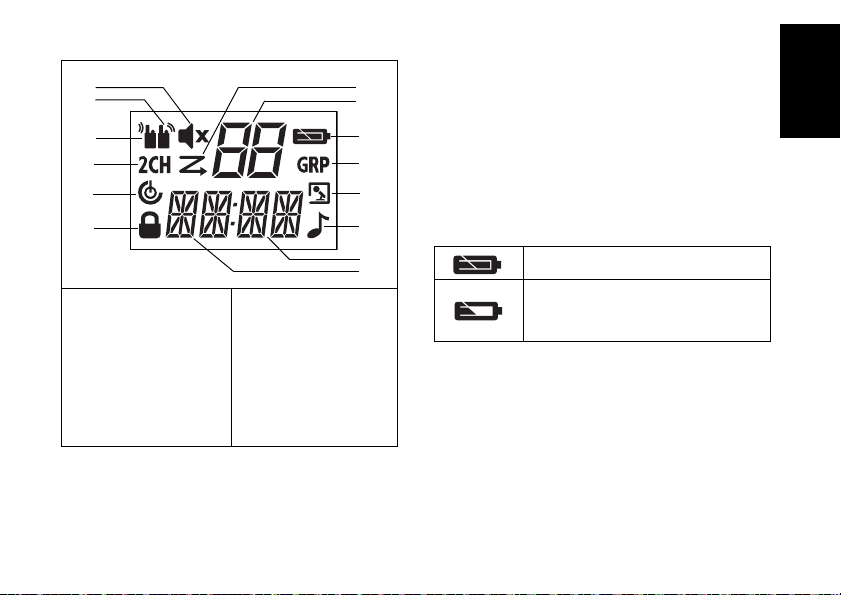
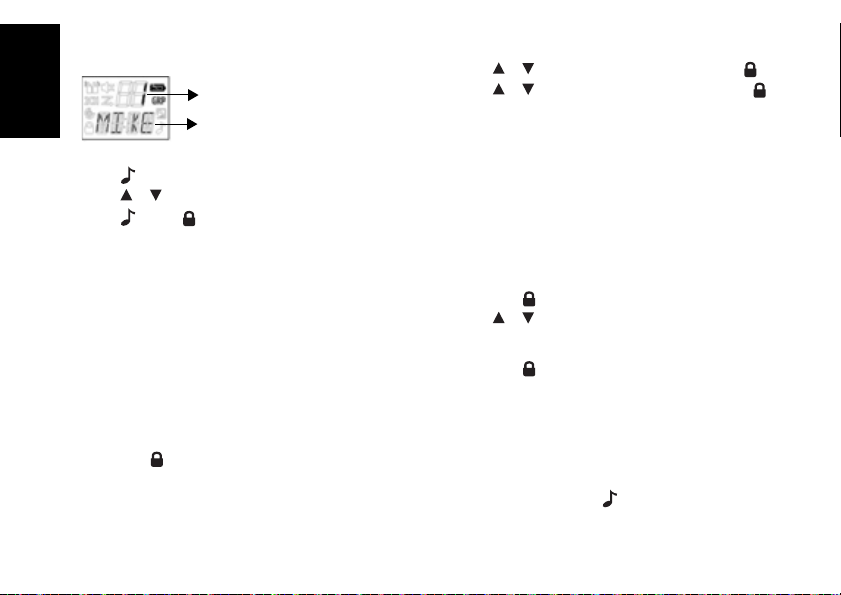
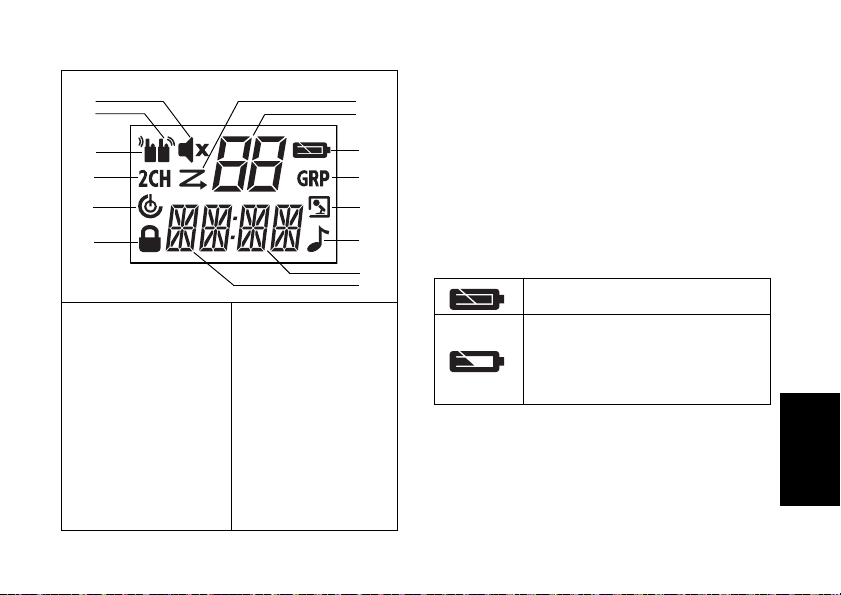
Battery Level and Low Battery Alert
Indicates that the battery is fully charged.
Blinks when battery is low; charge the radio
1. Silent Indicator
2. Transmit Indicator
3. Receive Indicator
4. Dual Watch Indicator
5. Auto Power Off
Indicator
6. Key Lock Indicator
7. Scan Indicator
8. Channel Indicator
9. Battery Level Meter
10. Group Indicator
11. VOX/Room Monitor
Indicator
12. Call Indicator
13. Sub-code
(Group ID/Code)
Indicator
14. Colon (for Up Timer)
Battery Capacity Maintenance
1. Charge the batteries at least once every 3 months when not
in use.
2. Remove the battery from the radio after using for storage
purpose.
3. Store the batteries in temperatures between -20 °C to 35 °C
and in low humidity. Avoid damp conditions and corrosive
materials.
Charging the Radio
Direct Charging :
1. Make sure your radio is turned OFF.
or replace batteries immediately.
(The alert tone sounds every 5 seconds for
30 seconds when the battery is low.)
3

2. Connect the AC adapter to the radio’s DC IN 9 V. Connect
the other end of the AC adapter to a vehicle accessory
power outlet.
3. Charge the battery pack for 14 hours.
Using the Charging Cradle:
1. Make sure your radio is turned OFF.
English
2. Connect the AC adapter to the DC IN 9 V of the charging
cradle.
3. Place the charging cradle on a stable surface.
4. Place the radio in the charging cradle with the keypad facing
forward.
5. LED indicator will illuminate and remain illuminated as long
as the radio is in the charger.
Note: Charge the battery pack for 14 hours.
Using the Battery Support Bracket :
1. Remove the rechargeable NiMH battery pack from the radio.
2. Place the battery support bracket into the charging cradle.
3. Install the NiMH battery pack into the charging cradle.
Ensure that the charging contacts are correctly aligned.
4. LED indicator will illuminate and remain illuminated as long
as the radio is in the charger.
Note: Charge the battery pack for 14 hours.
Basic Radio Operations
Read this reference guide completely before attempting to
operate the unit.
Turning your Radio On/Off
To turn your radio ON, turn the rotary knob clockwise.
To turn your radio OFF, turn the rotary knob counterclockwise.
Adjusting the Volume
Increase volume by turning the rotary knob clockwise.
To decrease volume, turn the rotary knob counterclockwise.
4
Adjusting the Sound (Key Beeps)
Your radio emits a beep each time one of the buttons is pressed
(except the PTT and button).
Press and hold the button while turning the radio ON to
switch the sound ON/OFF.
Navigating through the Menu
Your radios has two Menu functions: Select Menu and Common
Menu.
1. To enter the Select Menu, press the SEL/ button.
2. To enter the Common Menu, press the MENU/GRP button.
3. Additional presses of the SEL/ button or MENU/GRP
button will advance you through the Menu.
4. To exit the Menu function, do one of the following:
a. Press the MENU/GRP button,
b. Press the PTT button
c. Wait 10 seconds until the unit automatically returns to
“Normal” mode.
Talking on Your Radio
1. Hold your radio 5–8 cm from your mouth.
2. Press and hold the PTT button while speaking. The icon
appears on the display.
3. Release the PTT button. You can now receive incoming
calls. When you do, the icon appears on the display. To
respond, repeat procedure from step 1.
Note: When you continue to transmit for 60 seconds, the
radio emits TX Time Out tone and the icon flashes.
The radio will stop transmitting.
In order to speak to someone, both your radios must
be set to the same channel and Sub-Code. Refer to
“Selecting a Channel and a Sub-Code”.
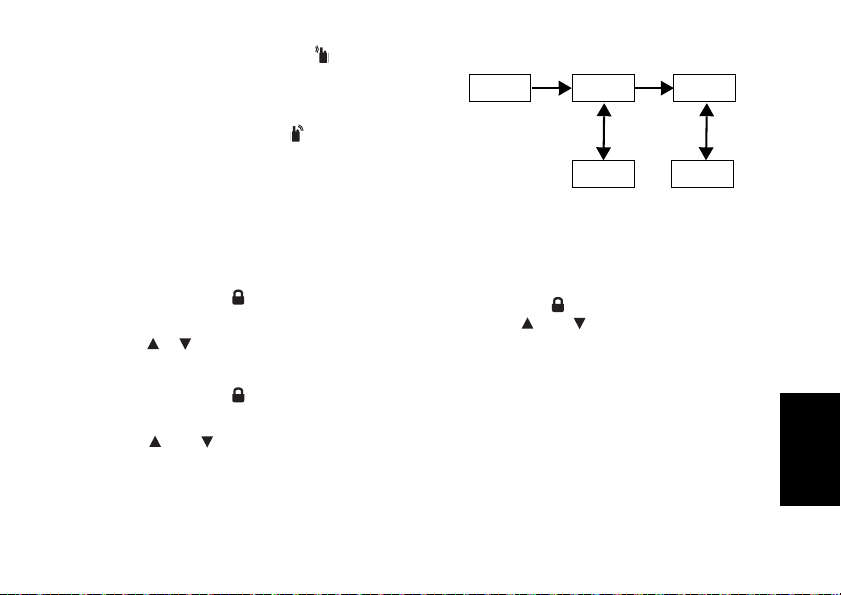
Selecting a Channel and a Sub-Code
Normal
Channel Sub-code
1–8 0–121
To select a Channel:
1. Press SEL/ button to enter Select Menu. Advance until
the Channel indicator blinks.
2. Press or to the required channel.
To select a Sub-code :
1. Press SEL/ button to enter Select Menu. Advance until
the Sub-code indicator blinks.
2. Press or to the required Sub-code.
3. Press Exit to exit the Select Menu.
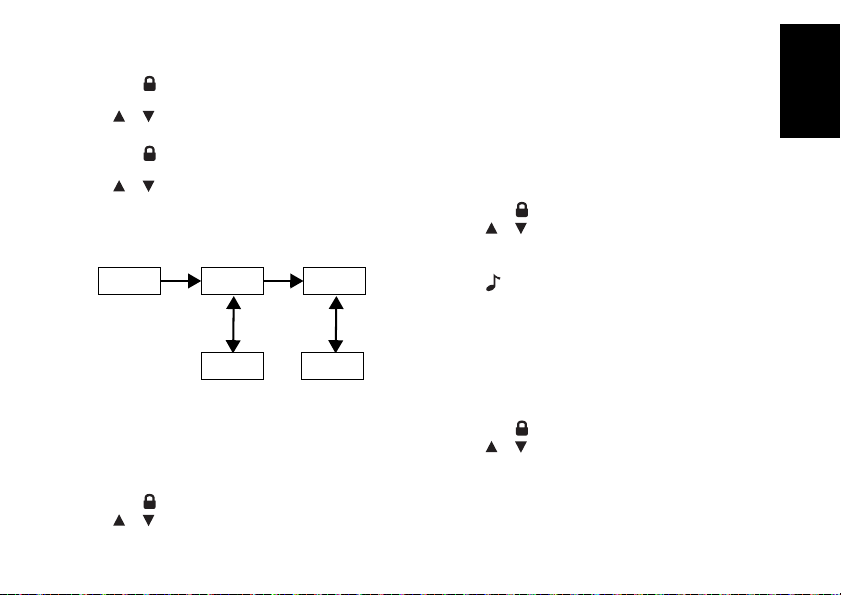
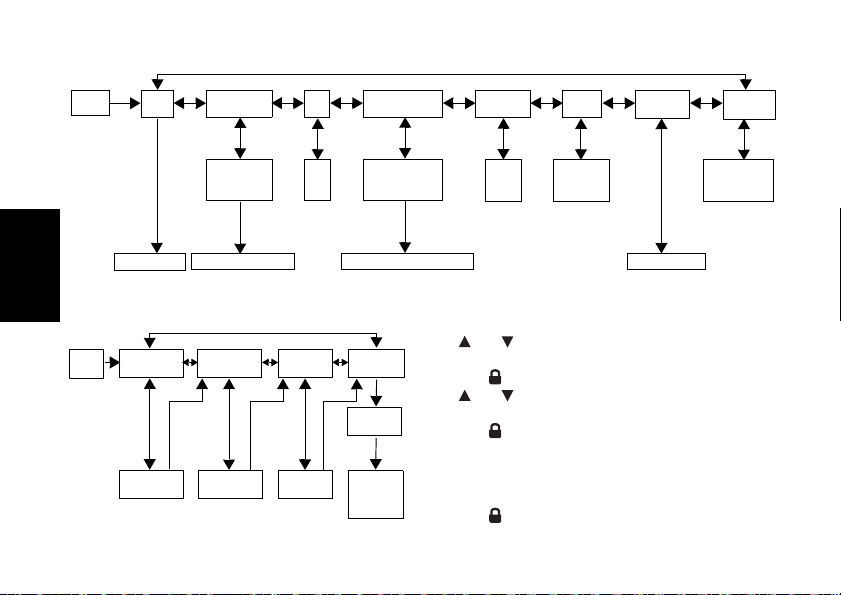
Select Menu
Your radio navigates through the Select Menu as follows:
Voice Operated Transmission (VOX)
Transmission is initiated by speaking into the microphone of the
radio instead of the pushing the PTT button.
To select the VOX level:
1. MENU/GRP button to enter Common Menu. Advance and
select “VOX”.
2. Press SEL/ to select.
3. Press or to the desired VOX sensitivity level.
4. Press Exit to exit the Select Menu.
Note: Level “N”(OFF) disables VOX. Levels 1-5 set the
sensitivity of the VOX circuit. Use level 1 in quiet
environments, and use level 5 in very noisy
environments. You can find the appropriate
sensitivity level by speaking into the microphone. If
the radio flashes, your voice is accepted.
Transmitting a Call Tone
Your radio is equipped with 10 selectable call tones.
To select a call tone:
1. Press MENU/GRP button to enter Common Menu. Advance
to “TONE”.
2. Press SEL/ to select.
3. Press or to the desired call tone.
4. Press Exit to exit the Common Menu.
To transmit the selected call tone :
1. Press to transmit the selected call tone. The selected
tone will automatically be transmitted for a fixed length of
time.
2. PTT to cancel Call Tone.
Auto Power Off
Auto Power Off feature allows you to set the time that the radio
turns off automatically.
1. Press MENU/GRP button to enter Common Menu. Advance
until “PWR” and the current Auto Power Off time blinks.
2. Press SEL/ to select.
3. Press or to select the time from ON, 1H, 2H, and 3H.
4. Press Exit to exit the Menu.
English
5
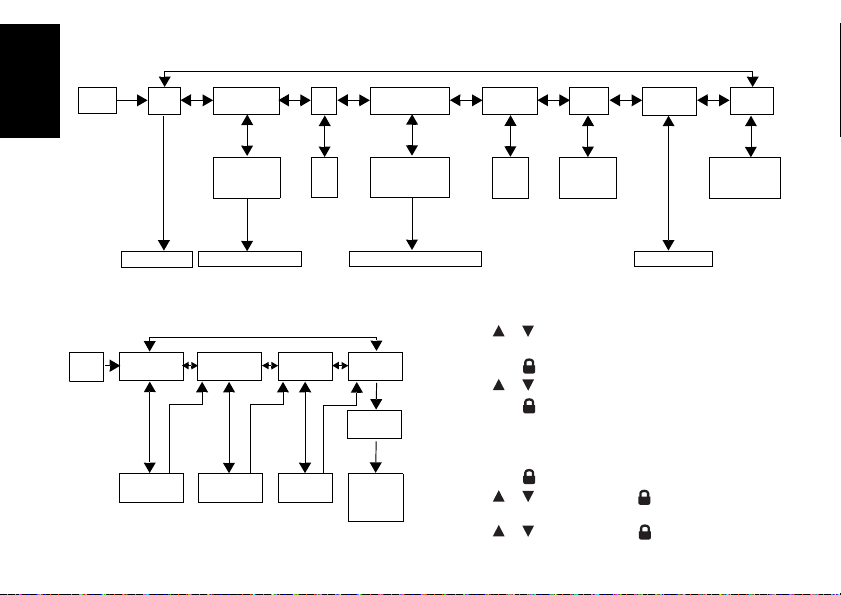
Common Menu
Up Timer Mode
Select the
Sensitivity
(1–5)
Normal
SCAN
2CH
(Dual Watch)
VOX
ROOM
(Room Monitor)
TONE
(Call Tone)
SLNT
(Silent)
TIME
(Up Timer)
PWR
(Power)
Select the
Channel and
Sub-Code
Dual Watch Mode
Off
1–5
Scan Mode
1–10
“N” or “Y”
Select the ON/
1H/2H/3H
Room Monitor Mode
Normal
“GRP”
(Group Mode)
“CODE”
(Group Code)
“RING”
(Ring Tone)
“ID”
(ID Setting)
“N” or “Y” 0–121 1–10
ID Number
1-16
ID Name
Up to 4
Characters
“Y”
Your radio navigates through Common Menu as follows:
English
Group Menu
6
1. Press and hold MENU/GRP to enter GROUP MENU.
2. Press or to proceed to each menu (GRP/CODE/RING/
ID).
3. Press SEL/ to select.
4. Press or to proceed to desired condition or number.
5. Press SEL/ to select.
6. Press MENU/GRP to exit.
Set Group Mode
1. Press and hold MENU/GRP to enter GROUP MENU.
2. Press SEL/ to control Group Mode.
3. Press or to “Y”. Press SEL/ to go to Group Menu
and Group Code Setting.
4. Press or to “N”. Press SEL/ to exit from Group
Menu.

Set Group Code
1. Press or to choose the Group Code.
2. Press SEL/ to complete Group Code setting.
3. The radio enters “Ring Tone Setting Menu”
4. Press MENU/GRP to go back to Group Menu.
Set Ring Tone
The user selects Ring Tone for a Direct Call. Ring Tones are the
same as Call Tones.
1. Press or to select a Ring Tone.
2. The selected Ring Tone sounds.
Set ID
Each radio in the group needs to be set with an ID. The user
can set an ID name of up to four (4) characters.
1. Press or to select an ID number.
2. If the ID is already taken, USED is seen. If USED is not
shown, then the ID is available.
3. Press SEL/ to advance to setting ID Name.
Set ID Name
The ID Name appears on the other radio’s display when you
make an All Call or a Direct Call. The ID Name also appears on
the other radio’s display when they are placing a Direct Call.
When no ID name is set, the unit number appears.
1. Press or to select a character that blinks on the
display.
2. Press SEL/ to select and move to the next character.
3. Press SEL/ to register the ID number and ID Name.
Note: The radio cancels selected ID Number and entered ID
Name, then exits from Group Menu when MENU/GRP
button is pressed.
Channel Setting in Group Mode
To set Auto Channel Change in Group Mode:
1. Press MENU/GRP to enter Group Mode.
2. Press SEL/ to enter Channel Setting.
3. Press or to “Auto Channel Change Setting”.
4. Press SEL/ to select.
A channel number blinks and “ALL” is seen.
5. Press or to select the channel.
6. Press SEL/ or to transmit Auto Channel Change
command.
7. Press MENU/GRP to return to Channel Setting in Group
Mode.
To set Manual Channel in Group Mode:
1. Press MENU/GRP to enter Group Mode.
2. Press SEL/ to enter Channel Setting.
3. Press or to “Manual Channel Setting”.
4. Press SEL/ to select.
A channel number blinks and “MY” is seen.
5. Press or to select the channel manually.
6. Press SEL/ to exit from Manual Channel setting.
7. Press MENU/GRP to return to Channel Setting in Group
Mode.
Set All Call
1. Press MENU/GRP to enter Group Mode.
2. Press to enter All/ Direct Call Setting.
3. Press or to select All Call Transmission. “SYNC” is
seen.
4. Press SEL/ or to exit this setting and transmit All Call.
All Call Tone sounds. and blinks while transmitting.
English
7
5. MENU/GRP to exit.
The ID Number for Direct Call
The ID Name
Set Direct Call
English
1. Press MENU/GRP to enter Group Mode.
2. Press to enter All/Direct Call Setting.
3. Press or to select an ID Number.
4. Press or SEL/ to transmit Direct Call Command.
The selected Call Tone sounds. The display shows TX
icon and CALL icon while transmitting.
5. Press MENU/GRP to go back to All/Direct Call setting.
Features on Your Radio
Channel Scan Mode
Enables your radio to scan for active channels. When activity is
detected, your radio lands (stays) on that channel for 2 seconds
(5 seconds for VOX ON without headset). To transmit on that
channel, press the PTT button. When activity on the landed
channel ends, your radio continues scanning to other channels.
To turn the channel scan ON:
1. Press MENU/GRP to enter Common Menu. Advance to
”SCAN”.
2. Press SEL/ to turn ON channel scan.
3. Press MENU/GRP or PTT to turn OFF Scan mode.
Dual Watch Mode
Enables your radio to scan the current channel and another
channel alternately.
To set another channel and start Dual Watch:
8
1. Press MENU/GRP to enter Common Menu. Advance to
“2CH”.
2. Press or to select the channel, then press SEL/ .
3. Press or to select the Sub-code, then press SEL/ .
4. The radio starts to Dual Watch.
Note: If you set the same channel and Sub-code as the
current channel, Dual Watch doesn’t work.
5. Press MENU/GRP to turn the Dual Watch mode OFF. Room Monitor
Enables your radio to detect voice/noises (according to the
sensitivity level set) and transmit back to the listening radio
without pushing the PTT button. The monitoring radio is not
able to receive any transmissions in this mode.
To turn Room Monitor ON:
1. Press MENU/GRP to enter Common Menu. Advance to
“ROOM”.
2. Press SEL/ to select.
3. Press or to the desired room monitor sensitivity level.
Note: Use level 1 in quiet environments. Use level 5 in very
noisy environments.
4. Press SEL/ to turn ON room monitor.
Press MENU/GRP to turn OFF Room Monitor.
Note: When the voice/noise in the monitored room
continues for more than 60 seconds, the monitoring
radio stop monitoring for 5 seconds, and resumes.
Silent Mode
Silent mode mutes all incoming calls. The backlight of the radio
blinks when there’s an incoming call. If the call is not answered,
the backlight turns off and the blinks until there is no signal.
The T80/T80 Extreme radio will vibrate when there is a missed
call.
The silent mode is disabled for 15 seconds when you
transmit, receive, or press any other buttons.
To turn silent mode ON:
1. Press MENU/GRP to enter Common Menu.
2. Select “SLNT”.
3. Press SEL/ to select.
4. Press to turn Silent Mode ON. “Y” is displayed on the
Channel Indicator. appears.
5. Press to turn Silent Mode OFF. “N” is displayed on the
Channel Indicator. disappears.
Up Timer
Enables your radio to time up to 59 minutes 59 seconds. You
then received incoming calls in this mode.
To use up timer:
1. Press MENU/GRP to enter Common Menu. Advance to
“TIME”.
2. Press SEL/ to select the Up Timer.
3. Press SEL/ to start the Up Timer.
4. Press SEL/ to pause the Timer.
Press SEL/ to ON/OFF the Timer.
5. Press MENU/GRP or PTT to stop or reset up timer.
Note: If a call is received, the ID Name is indicated and then
the radio returns to timer mode and the Call Icon
blinks.
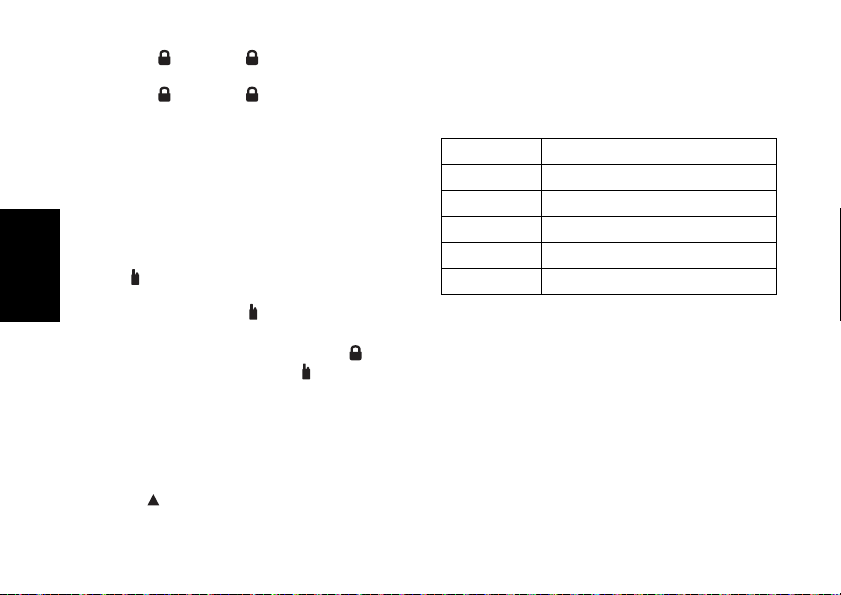
Key Lock
Press and hold SEL/ until /”LOCK” appears to lock the
keypad.
Press and hold SEL/ until /”UNLK” disappears to unlock
the keypad.
LCD Backlight
The LCD display will automatically illuminate for 10 seconds
after any button is pressed (except for PTT).
Monitor Mode
Enables your radio to listen for weak signals on the current
channel.
To turn the Monitor Mode ON:
1. Press the MON button for brief listening. The icon blinks.
2. Press and hold the MON button for 2 seconds for continuous
listening. The icon continues to blink.
To turn the Monitor Mode OFF:
Press the MON, MENU/GRP, or SEL/ button to return to
“Normal” mode. The icon stops blinking.
Roger Beep
Sounds to indicate the end of a PTT or VOX transmission. It
can be heard through the speaker when Key Beep is on. It
cannot be heard through the speaker if Key Beep is turned off.
Press and hold the button while turning the radio ON to turn
the Roger Beep ON. Repeat the step to turn Roger Beep OFF.
LED Torch
Your radio has a built-in LED Torch.
The LED Torch indicator remains on until the button is released.
Approved Accessories
NNTN8870_R Consumer Earbud
NNTN8868_R Consumer Headset
IXTN4011_ XTR Headset
English
9
Approved Accessories
XPN4016_ UK Adapter
I
IXPN4017_ EU Adapter
English
IXNN4002_ NiMH Battery
Warranty Information
The authorized Motorola Solutions dealer or retailer where you
purchased your Motorola Solutions two-way radio and/or
original accessories will honour a warranty claim and/or provide
warranty service.
Please return your radio to your dealer or retailer to claim your
warranty service. Do not return your radio to Motorola
Solutions.
In order to be eligible to receive warranty service, you must
present your receipt of purchase or a comparable substitute
proof of purchase bearing the date of purchase. The two-way
radio should also clearly display the serial number. The
warranty will not apply if the type or serial numbers on the
product have been altered, deleted, removed, or made illegible.
What Is Not Covered By The Warranty
• Defects or damage resulting from use of the Product in other
than its normal and customary manner or by not following
the instructions in this user manual.
• Defects or damage from misuse, accident or neglect.
• Defects of damage from improper testing, operation,
maintenance, adjustment, or any alteration or modification of
any kind.
• Breakage or damage to aerials unless caused directly by
defects in material or workmanship.
10
• Products disassembled or repaired in such a manner as to
adversely affect performance or prevent adequate inspection and testing to verify any warranty claim.
• Defects or damage due to range.
• Defects or damage due to moisture, liquid or spills.
• All plastic surfaces and all other externally exposed parts
that are scratched or damaged due to normal use.
• Products rented on a temporary basis.
• Periodic maintenance and repair or replacement of parts
due to normal usage, wear and tear.
Copyright Information
The Motorola Solutions products described in this manual may
include copyrighted Motorola Solutions programs, stored
semiconductor memories or other media. Laws in the United
States and other countries preserve for Motorola Solutions,
certain exclusive rights for copyrighted computer programs,
including the exclusive right to copy or reproduce in any form,
the copyrighted Motorola Solutions programs.
Accordingly, any copyrighted Motorola Solutions computer
programs contained in the Motorola Solutions products
described in this manual may not be copied or reproduced in
any manner without express written permission of Motorola
Solutions. Furthermore, the purchase of Motorola Solutions
products shall not be deemed to grant either directly or by
implication, estoppel, or otherwise, any license under the
copyrights, patents or patent applications of Motorola Solutions,
except for the normal non-exclusive royalty free license to use
that arises by operation of law in the sale of a products.
MOTOROLA, MOTO, MOTOROLA SOLUTIONS and the
Stylized M logo are trademarks or registered trademarks of
Motorola Trademark Holdings, LLC and are used under license.
All other trademarks are the property of their respective owners.
© 2012 and 2016 Motorola Solutions, Inc. All rights reserved.

HANDBUCH ZUR HFENERGIESTRAHLUNG UND
PRODUKTSICHERHEIT FÜR TRAGBARE
FUNKGERÄTE
ACHTUNG!
Bevor Sie dieses Produkt verwenden, lesen Sie das Handbuch
zur HF-Energiestrahlung und Produktsicherheit, das im
Lieferumfang des Funkgeräts enthalten ist. Das Handbuch
enthält Anweisungen für die sichere Verwendung sowie
Informationen zum Gefahrenbewusstsein und zur
Risikovermeidung gemäß anwendbaren Normen und
Vorschriften.
Packungsinhalt
Packungsinhalt T80 T80
Radio 2 2 4 1
Gürtelclip 2241
Ladestation mit
2 Steckplätzen
AC-Adapter 1 1 - 1
AC- Y-Adapter - - 1 Akkuhalterungen
Aufladbare NiMH-Akkus 2 2 4 2
Headset - 2 4 1
Schlüsselband - 2 4 1
Benutzerhandbuch 1 1 1 1
Kfz-Ladegerät - - - 1
1121
2242
Extreme
T80
Extreme
T81
Hunter
Frequenztabelle
Kan. Freq. (MHz) Kan. Freq. (MHz) Kan. Freq. (MHz)
1 446.00625 4 446.04375 7 446.08125
2 446.01875 5 446.05625 8 446.09375
3 446.03125 6 446.06875
Funktionen und technische Daten
• 8 PMR-Kanäle
• 121 Subcodes (38 CTCSS-Codes und 83 DCS-Codes)
• Bis zu 10 km Serie*
• Interne VOX-Schaltung
• LED-Taschenlampe
• 10 wählbare Ruftonwarnungen
• LCD-Anzeige mit Hintergrundbeleuchtung
• Roger-Signalton
•Up-Timer
• Raummonitor
• Akkuladegerät
• Akkustandanzeige
• Kanalüberwachung
• Kanalsuche
•Dual Watch
• Tastensperre
• Automatische Abschaltung
• Automatische Steuerung zur Rauschunterdrückung
• Automatische Wiederholung (Bildlauf)
• Akkusparfunktion
• Alarm für niedrigen Akkustand
• Standby für niedrigen Akkustand
•Ton (Ein/Aus)
• Direktanruf (Anrufer-ID-Anruf)
• Gruppenanruf
• Lautlosmodus
•Alle
• Automatischer Kanalwechsel
• IP-Bewertung: IPX2 (für T80), IPX4 (für T80 Extreme, T81
Hunter)
• Stromversorgung: NiMH-Akkus/4 AAA-Alkalibatterien
• Akkubetriebsdauer: 16 Stunden (unter normalen
Nutzungsbedingungen)
* Reichweite kann je nach Umwelt- bzw. topografischen
Bedingungen unterschiedlich ausfallen.
Deutsch
1
Steuerung und Funktionen
Antenne
Sprechtaste
(PTT)
Headset-Buchse
(Headset nicht im
Lieferumfang enthalten)
Menünavigationstaste
nach oben bzw. unten
Anruftaste
Monitortaste (MON)
Lautsprecher
Mikrofon
Auswahl- und
Sperrtaste (SEL/ )
Menü- und
Gruppentaste
(GRP/MENU)
DC-Eingangsbuchse
9 V
Lautstärkeregler
mit Power SW
Tas te für LEDTaschenlampe
Oben Trageband Bar
Unten Trageband Bar
Deutsch
Hinweis: Beim dargestellten Funkgerät handelt es sich um das T80 Extreme. Gilt auch für das T80, T81 Hunter Funkgerät.
2
Display
2
3
4
5
1
6
7
8
9
10
11
12
13
14
Für T80 Extreme und T81 Hunter: Verwenden Sie zum
Entfernen der Klappe des Batteriefachs eine Münze.
3. Setzen Sie die NiMH-Batterien in das Batteriefach ein.
4. Bringen Sie die Klappe des Batteriefachs wieder an.
Vorsicht: Bei falsch eingesetzten Akkus besteht
Explosionsgefahr. Entsorgen Sie gebrauchte
Akkus gemäß den Anweisungen.
Akkustandanzeige und Hinweis auf leere Batterien
Zeigt an, dass der Akku vollständig geladen ist.
Blinkt, wenn Akku fast leer ist. Laden Sie das
Funkgerät auf, oder setzen Sie sofort einen
neuen Akku ein.
(Der Signalton ertönt alle 5 Sekunden
30 Sekunden lang, wenn der Akku fast leer ist.)
1. Lautlosanzeige
2. Übertragungsanzeige
3. Empfangsanzeige
4. Dual Watch-Anzeige
5. Automatische
Abschaltungsanzeige
6. Tastensperranzeige
7. Suchanzeige
8. Kanalanzeige
Einlegen des Akkus
1. Vergewissern Sie sich, dass das Funkgerät auf AUS steht.
2. Für T80: Drücken Sie zum Entfernen der Klappe des
Batteriefachs auf die Lasche unten am Batteriefach.
9. Akkustandanzeige
10. Gruppenanzeige
11. VOX/RaummonitorAnzeige
12. Anrufanzeige
13. Subcode
(Gruppen-ID/Code)Anzeige
14. Doppelpunkt (für UpTimer)
Aufrechterhaltung der Akkukapazität
1. Laden Sie die Akkus mindestens einmal alle drei Monate auf,
wenn sie nicht verwendet werden.
2. Zur Aufbewahrung entfernen Sie den Akku nach der
Verwendung aus dem Funkgerät.
3. Bewahren Sie die Akkus bei Temperaturen zwischen -20 °C
bis 35 °C und niedriger Luftfeuchtigkeit auf. Vermeiden Sie
Feuchtigkeit und Ätzstoffe.
Aufladen des Funkgeräts
Direktes Laden:
1. Vergewissern Sie sich, dass das Funkgerät auf AUS steht.
2. Schließen Sie das Netzteil an die Radio-DC IN 9V. Stecken
Sie das andere Ende des Netzteils in eine FahrzeugZubehör-Steckdose.
3. Laden Sie die Akkus 14 Stunden.
Deutsch
3

Unter Verwendung der Ladestation:
1. Vergewissern Sie sich, dass das Funkgerät auf AUS steht.
2. Schließen Sie den AC-Adapter an den DC-Eingang 9 V der
Ladestation an.
3. Legen Sie die Ladestation auf eine stabile Oberfläche.
4. Setzen Sie das Funkgerät mit der Tastatur nach vorne in die
Ladestation ein.
5. Die LED-Anzeige leuchtet dauerhaft auf, solange sich das
Funkgerät in der Ladestation befindet.
Hinweis: Laden Sie den Akku für 14 Stunden.
Verwenden der Akkuhalterung:
1. Entnehmen Sie die aufladbaren NiMH-Akkus aus dem
Funkgerät.
2. Setzen Sie die Akkuhalterung in die Ladestation ein.
3. Setzen Sie den NiMH-Akku in die Ladestation ein. Überprüfen
Sie, ob die Ladekontakte richtig ausgerichtet sind.
4. Die LED-Anzeige leuchtet dauerhaft auf, solange sich das
Funkgerät in der Ladestation befindet.
Deutsch
Hinweis: Laden Sie den Akku für 14 Stunden.
Grundlegende Funktionen des Funkgeräts
Lesen Sie diese Anleitung vollständig durch, bevor Sie das
Gerät in Betrieb nehmen.
Ein-/Ausschalten des Funkgeräts
Um das Funkgerät einzuschalten, drehen Sie den Drehknopf im
Uhrzeigersinn.
Um das Funkgerät auszuschalten, drehen Sie den Drehknopf
gegen den Uhrzeigersinn.
Anpassen der Lautstärke
Erhöhen Sie die Lautstärke durch Drehen des Drehknopfs im
Uhrzeigersinn.
Drehen Sie zum Verringern der Lautstärke den Drehknopf
gegen den Uhrzeigersinn.
4
Anpassen des Tons (Tastentöne)
Das Funkgerät gibt einen Signalton aus, sobald eine der Tasten
gedrückt wird (mit Ausnahme der PTT- und der -Taste).
Halten Sie beim Einschalten des Funkgeräts die -Taste
gedrückt. Dadurch wird der Ton ein- bzw. ausgeschaltet.
Navigieren durch das Menü
Das Funkgerät verfügt über zwei Menüfunktionen:
„Menüauswahl“ und „Allgemeines Menü“.
1. Drücken Sie zum Aufrufen von „Menüauswahl“ die Taste
SEL/ .
2. Drücken Sie zum Aufrufen von „Allgemeines Menü“ die
Tas t e MENU/GRP.
3. Durch weiteres Betätigen der Taste SEL/ oder MENU/
GRP bewegen Sie sich im Menü fort.
4. Um die Menüfunktion zu verlassen, führen Sie einen der
folgenden Schritte aus:
a. Drücken Sie die Taste MENU/GRP.
b. Drücken Sie die Taste PTT.
c. Warten Sie 10 Sekunden lang, bis das Gerät
automatisch in den Modus „Normal“ zurückkehrt.
Sprechen auf dem Funkgerät
1. Halten Sie das Funkgerät 5 bis 8 cm von Ihrem Mund entfernt.
2. Halten Sie die Taste PTT gedrückt, während Sie sprechen.
Das Symbol erscheint auf dem Display.
3. Lassen Sie die Taste PTT los. Sie können jetzt eingehende
Anrufe annehmen. Dabei erscheint das Symbol auf dem
Display. Um zu antworten, wiederholen Sie Schritt 1.
Hinweis: Wenn Sie fortfahren und 60 Sekunden lang
übertragen, gibt das Funkgerät einen TXZeitüberschreitungston aus, und das Symbol
blinkt. Das Funkgerät unterbricht die Übertragung.

Damit ein Gespräch möglich ist, müssen beide
Normal
Kanal Subcode
1–8 0–121
Funkgeräte auf denselben Kanal und denselben
Subcode eingestellt sein. Lesen Sie bitte unten
unter „Auswählen eines Kanals und eines
Subcodes“ nach.
Auswählen eines Kanals und eines Subcodes
So wählen Sie einen Kanal aus:
1. Taste SEL/ zum Öffnen von „Menüauswahl“. Fahren Sie
fort, bis die Kanalanzeige blinkt.
2. oder , um zum gewünschten Kanal zu gelangen.
So wählen Sie einen Subcode aus:
1. Taste SEL/ zum Öffnen von „Menüauswahl“. Fahren Sie
fort, bis die Subcodeanzeige blinkt.
2. oder , um zum gewünschten Subcode zu gelangen.
3. Verlassen Sie die Menüauswahl.
Menüauswahl
Das Funkgerät navigiert folgendermaßen durch die Menüauswahl:
Sprachgesteuerte Übertragung (VOX)
Die Übertragung wird durch Sprechen in das Mikrofon des
Funkgeräts und nicht durch Drücken der Taste PTT ausgelöst.
So wählen Sie die VOX-Stufe aus:
1. Drücken Sie die Taste MENU/GRP, um „Allgemeines Menü“
2. SEL/ zur Auswahl.
aufzurufen. Fahren Sie fort, und wählen Sie „VOX“ aus.
3. oder , um zur gewünschten VOX-Empfindlichkeitsstufe
zu gelangen.
4. Verlassen Sie die Menüauswahl.
Hinweis: Stufe „N“ (AUS) deaktiviert VOX. Stufen 1 – 5 legen
die Empfindlichkeit der VOX-Schaltung fest.
Verwenden Sie Stufe 1 in ruhigen Umgebungen
und Stufe 5 in sehr lauten Umgebungen. Ermitteln
Sie die angemessene Empfindlichkeitsstufe, indem
Sie in das Mikrofon sprechen. Wenn das Symbol
blinkt, wird Ihre Stimme akzeptiert.
Übertragen eines Ruftons
Das Funkgerät verfügt über 10 auswählbare Ruftöne.
So wählen Sie einen Rufton aus:
1. Drücken Sie die Taste MENU/GRP, um „Allgemeines Menü“
aufzurufen. Gehen Sie bis „TON“.
2. SEL/ zur Auswahl.
3. oder , um zum gewünschten Rufton zu gelangen.
4. Verlassen Sie „Allgemeines Menü“.
So übertragen Sie den ausgewählten Rufton:
1. zum Übertragen des ausgewählten Ruftons. Der
ausgewählte Ton wird automatisch für einen festen Zeitraum
übertragen.
2. PTT zum Abbrechen des Ruftons.
Automatische Abschaltung
Mit der Funktion zum automatischen Abschalten können Sie
den Zeitpunkt einstellen, zu dem das Funkgerät automatisch
abgeschaltet wird.
1. Drücken Sie die Taste MENU/GRP, um „Allgemeines Menü“
aufzurufen. Gehen Sie bis Netz, und die aktuelle Zeit zum
automatischen Abschalten blinkt.
2. SEL/ zur Auswahl.
3. oder , um die Zeit aus EIN, 1 Stunde, 2 Stunden und
3 Stunden auszuwählen.
4. Verlassen Sie das Menü.
Deutsch
5
Allgemeines Menü
Up-Timer-Modus
Wählen Sie die
Empfindlichkeit
(1–5)
Normal
SUCHE
2 Kanäle
(Dual Watch)
VOX
ROOM
(Room Monitor)
Ton
(Rufton)
SLNT
(Still)
Zeit
(Timer)
PWR
(Power)
Kanal und
Subcode
auswählen
Dual Watch-Modus
Aus
1–5
Suchmodus
1–10
„N“ oder
„J“
EIN/1 Std./
2 Std./3 Std.
auswählen
Raummonitormodus
Normal
"GRP"
(Group Modus)
"Code"
(Gruppencode)
"Ring"
(Klingelton)
"ID" (-ID-
Einstellung)
„N“ oder „J“ 0–121 1–10
ID Number
1-16
ID Namen
mit bis zu
4 Zeichen
„J“
Das Funkgerät navigiert folgendermaßen durch „Allgemeines Menü“:
Deutsch
Gruppenmenü
6
1. Drücken und halten Sie MENU/GRP gedrückt, um
„GRUPPENMENÜ“ aufzurufen.
2. oder , um mit den einzelnen Menüs fortzufahren
(GRP/CODE/RING/ID).
3. SEL/ zur Auswahl.
4. oder , um mit der gewünschten Bedingung oder
5. SEL/ zur Auswahl.
Nummer fortzufahren.
6. MENU/GRP zum Verlassen.
Festlegen des Gruppenmodus
1. Drücken und halten Sie MENU/GRP gedrückt, um
„GRUPPENMENÜ“ aufzurufen.
2. SEL/ zur Steuerung von „Gruppenmodus“.

3. oder auf „J“. SEL/ , um zu „Gruppenmenü“ und
„Gruppencodeeinstellung“ zu wechseln.
4. oder auf „N“. SEL/ zum Verlassen von
„Gruppenmenü“.
Einstellen des Gruppencodes
1. oder , um den Gruppencode auszuwählen.
2. SEL/ , um die Gruppencodeeinstellung vorzunehmen.
3. Das Funkgerät öffnet das Menü für Klingeltoneinstellungen.
4. MENU/GRP, um zum Gruppenmenü zurückzukehren.
Festlegen des Klingeltons
Der Benutzer kann den Klingelton für einen Direktanruf
auswählen. Klingeltöne und Ruftöne sind gleich.
1. oder , um einen Klingelton auszuwählen.
2. Der ausgewählte Klingelton ertönt.
Einstellen der ID
Für die einzelnen Funkgeräte der Gruppe ist eine ID einzurichten.
Der Benutzer kann einen ID-Namen mit maximal (4) Zeichen
festlegen.
1. oder , um eine ID-Nummer auszuwählen.
2. Wenn die ID bereits vergeben ist, wird VERWENDET
angezeigt. Wird VERWENDET nicht angezeigt, ist die ID
verfügbar.
3. SEL/ , um zur Einstellung des ID-Namens zu gelangen.
Einstellen des ID-Namens
Der ID-Name erscheint auf dem Display des anderen
Funkgeräts, wenn Sie einen Anruf des Typs „Alle“ oder
„Direktanruf“ tätigen. Der ID-Name wird auch auf dem Display
des anderen Funkgeräts angezeigt, wenn dort ein Direktanruf
getätigt wird. Wurde kein ID-Name festgelegt, wird die
Gerätenummer angezeigt.
1. oder , um ein Zeichen auszuwählen, das dann auf dem
Display blinkt.
2. SEL/ zum Auswählen und zum Wechseln zum nächsten
Zeichen.
3. SEL/ zum Registrieren der ID-Nummer und des IDNamens.
Hinweis: Das Funkgerät storniert die ausgewählte ID-
Nummer und den eingegebenen ID-Namen und
verlässt dann das Gruppenmenü, wenn die Taste
MENU/GRP gedrückt wird.
Kanaleinstellung im Gruppenmodus
So legen Sie den automatischen Kanalwechsel im
Gruppenmodus fest:
1. MENU/GRP zur Eingabe des Gruppenmodus.
2. SEL/ zur Eingabe der Kanaleinstellung.
3. oder zur Eingabe der Einstellung „Automatischer
Kanalwechsel“.
4. SEL/ zur Auswahl.
Eine Kanalnummer blinkt, und „ALLE“ wird angezeigt.
5. oder zur Auswahl des Kanals.
6. SEL/ oder zur Übertragung des Befehls zum
automatischen Kanalwechsel.
7. MENU/GRP zur Rückkehr zur Kanaleinstellung des
Gruppenmodus.
So stellen Sie den manuellen Kanal im Gruppenmodus ein:
1. MENU/GRP zur Eingabe des Gruppenmodus.
2. SEL/ zur Eingabe der Kanaleinstellung.
3. oder für „Manuelle Kanaleinstellung“.
4. SEL/ zur Auswahl.
Eine Kanalnummer blinkt, und „MEINE“ wird angezeigt.
Deutsch
7

5. oder zur manuellen Kanalauswahl.
ID-Nummer für Direktanruf
ID-Name
6. SEL/ zum Verlassen der Einstellung „Manueller Kanal“.
7. MENU/GRP zur Rückkehr zur Kanaleinstellung des
Gruppenmodus.
Einstellen von „Alle“
1. MENU/GRP zur Eingabe des Gruppenmodus.
2. zur Eingabe der Einstellung „Alle/Direktanruf“.
3. oder , um die Einstellung „Übertragung für alle“
einzugeben. „SYNC“ wird angezeigt.
4. SEL/ oder , um diese Einstellung zu verlassen und die
Übertragung für „Alle“ einzustellen.
Signalton für „Alle“ ertönt. und blinkt während der
Übertragung.
5. MENU/GRP zum Verlassen.
Einstellen von „Direktanruf“
Deutsch
1. MENU/GRP zur Eingabe des Gruppenmodus.
2. zur Eingabe der Einstellung „Alle/Direktanruf“.
3. oder , um eine ID-Nummer auszuwählen.
4. oder SEL/ zum Übertragen des Befehls für
Direktanrufe.
Der ausgewählte Rufton ertönt. Auf dem Display werden
während der Übertragung das TX-Symbol und das ANRUFSymbol angezeigt.
5. MENU/GRP, um zur Einstellung „Alle/Direktanruf“
8
zurückzukehren.
Funktionen und Merkmale des Funkgeräts
Kanalsuchmodus
Ermöglicht, dass das Funkgerät nach aktiven Kanälen suchen
kann. Wenn Aktivität festgestellt wird, bleibt das Funkgerät
2 Sekunden lang auf diesem Kanal (5 Sekunden bei VOX EIN
ohne Headset). Drücken Sie zum Übermitteln auf diesem Kanal
die Taste PTT. Wenn die Aktivität auf dem gelandeten Kanal
endet, sucht das Funkgerät auf anderen Kanälen weiter.
So schalten Sie die Kanalsuche EIN:
1. Drücken Sie die Taste MENU/GRP, um „Allgemeines Menü“
aufzurufen. Gehen Sie bis „SUCHE“.
2. SEL/ , um die Kanalsuche auf EIN zu setzen.
3. MENU/GRP oder PTT zum Ausschalten des Suchmodus.
Dual Watch-Modus
Ermöglicht die abwechselnde Suche des aktuellen Kanals und
eines anderen Kanals.
So legen Sie einen anderen Kanal fest und starten Dual Watch:
1. Drücken Sie die Taste MENU/GRP, um „Allgemeines Menü“
aufzurufen. Gehen Sie bis „2K“.
2. oder , um den Kanal auszusuchen, und drücken Sie
dann SEL/.
3. oder , um den Subcode auszusuchen, und drücken Sie
dann SEL/.
4. Das Funkgerät beginnt mit Dual Watch.
Hinweis: Wenn Sie denselben Kanal und denselben
Subcode einstellen, funktioniert Dual Watch
nicht.
5. MENU/GRP zum Ausschalten des Dual Watch-Modus.

Raummonitor
Ermöglicht es, dass das Funkgerät Sprache bzw. Geräusche
erkennt (gemäß der eingestellten Empfindlichkeitsstufe) und
zurück an das abhörende Funkgerät überträgt, ohne dass die
PTT-Taste gedrückt werden muss. Das überwachende
Funkgerät kann in diesem Modus keine Übertragungen erhalten.
So schalten Sie den Raummonitor EIN:
1. Drücken Sie die Taste MENU/GRP, um „Allgemeines Menü“
aufzurufen. Gehen Sie bis „RAUM“.
2. SEL/ zur Auswahl.
3. oder , um zur gewünschten RaummonitorEmpfindlichkeitsstufe zu gelangen.
Hinweis: Verwenden Sie Stufe 1 in ruhigen Umgebungen.
Verwenden Sie Stufe 5 in sehr lauten
Umgebungen.
4. SEL/ , um Raummonitor auf EIN zu setzen.
MENU/GRP, um Raummonitor auf AUS zu setzen.
Hinweis: Wenn die Sprache bzw. Geräusche im
überwachten Raum länger als 60 Sekunden
andauern, hält das überwachende Funkgerät die
Überwachung 5 Sekunden lang an und setzt sie
dann fort.
Lautlosmodus
Im Lautlosmodus werden alle eingehenden Anrufe
stummgeschaltet. Die Hintergrundbeleuchtung des Funkgeräts
blinkt bei einem eingehenden Anruf. Wird der Anruf nicht
entgegengenommen, schaltet sich die Hintergrundbeleuchtung
aus und blinkt, bis kein Signal vorhanden ist. Das T80Funkgerät vibriert bei einem entgangenen Anruf.
Der Lautlosmodus wird 15 Sekunden lang deaktiviert,
wenn eine Übertragung stattfindet, Daten eingehen oder
eine andere Taste gedrückt wird.
So schalten Sie den Lautlosmodus EIN:
1. Drücken Sie die Taste MENU/GRP, um „Allgemeines Menü“
aufzurufen.
2. Wählen Sie „LAUTL.“ aus.
3. SEL/ zur Auswahl.
4. zum Einschalten des Lautlosmodus. Auf der
Kanalanzeige erscheint „J“. wird angezeigt.
5. zum Ausschalten des Lautlosmodus. Auf der
Kanalanzeige erscheint „N“. wird nicht mehr angezeigt.
Up-Timer
Ermöglicht es dem Funkgerät, bis zu 59 Minuten und
59 Sekunden zu stoppen. In diesem Modus können Sie
eingehende Anrufe empfangen.
So verwenden Sie den Up-Timer:
1. Drücken Sie die Taste MENU/GRP, um „Allgemeines Menü“
aufzurufen. Gehen Sie bis „ZEIT“.
2. SEL/ zum Auswählen des Up-Timers.
3. SEL/ zum Starten des Up-Timers.
4. SEL/ zum Anhalten des Timers.
SEL/ zum Ein- oder Ausschalten des Timers.
5. Menu/GRP oder PTT zum Anhalten oder Zurücksetzen des
Up-Timers.
Hinweis: Wenn ein Anruf eingeht, wird der ID-Name
angegeben. Anschließend wechselt das
Funkgerät in den Timer-Modus, und das
Anrufsymbol blinkt.
Deutsch
9
Tastensperre
Halten Sie SEL/ gedrückt, bis /„SPERREN“ angezeigt
wird, um das Tastenfeld zu sperren.
Halten Sie SEL/ gedrückt, bis /„ENTSPERREN“ nicht
mehr angezeigt wird, um das Tastenfeld zu entsperren.
LCD-Hintergrundbeleuchtung
Das LCD-Display wird automatisch 10 Sekunden lang
beleuchtet, nachdem eine beliebige Taste gedrückt wurde
(außer PTT).
Monitormodus
Ermöglicht es Ihnen, auf dem aktuellen Kanal auf schwache
Signale zu achten.
So schalten Sie den Monitormodus EIN:
1. Drücken Sie die Taste MON, um kurzzeitig abzuhören. Das
Symbol wird angezeigt.
2. Halten Sie die MON-Taste 2 Sekunden lang gedrückt, um
Deutsch
kontinuierlich abzuhören. Das -Symbol blinkt weiterhin.
So schalten Sie den Monitormodus AUS:
Drücken Sie die Taste MON, MENU/GRP oder SEL/ , um
zum Modus „Normal“ zurückzukehren. Das -Symbol hört auf
zu blinken.
Roger-Signalton Ertönt, um darauf hinzuweisen, dass das Ende einer PTT- oder
VOX-Übertragung erreicht ist. Der Ton kann über den
Lautsprecher gehört werden, wenn die Tastentöne
eingeschaltet sind. Er kann nicht über den Lautsprecher gehört
werden, wenn die Tastentöne ausgeschaltet sind.
Halten Sie die -Taste gedrückt, während Sie das Funkgerät
einschalten. Dadurch wird der Roger-Signalton ein- bzw.
ausgeschaltet. Wiederholen Sie den Schritt, um den RogerSignalton auszuschalten.
10
LED-Taschenlampe
Ihr Funkgerät verfügt über eine integrierte LED-Taschenlampe.
Die LED-Taschenlampenanzeige bleibt so lange aktiviert, bis
die Taste losgelassen wird.
Genehmigtes Zubehör
NNTN8870_R Ohrstöpsel für Verbraucher
NNTN8868_R Headset für Verbraucher
IXTN4011_ XTR-Headset
IXPN4016_ Adapter für Großbritannien
IXPN4017_ Adapter für die EU
IXNN4002_ NiMH-Akku
Garantieinformationen
Der autorisierte Motorola Solutions Händler oder Vertriebspartner,
bei dem Sie Ihr Motorola Solutions Sprechfunkgerät und/oder das
Originalzubehör gekauft haben, nimmt Garantieansprüche
entgegen und/oder bietet die entsprechenden Garantieleistungen.
Bringen Sie bitte Ihr Sprechfunkgerät zu Ihrem Motorola
Solutions Händler oder Vertriebspartner, um Ihre
Garantieleistungen in Anspruch zu nehmen. Senden Sie das
Sprechfunkgerät nicht zum Hersteller Motorola Solutions ein.
Damit Sie die Garantieleistungen in Anspruch nehmen können,
müssen Sie den Kaufbeleg oder einen vergleichbaren
Kaufnachweis vorlegen, aus dem das Kaufdatum hervorgeht.
Auf dem Sprechfunkgerät muss außerdem die Seriennummer
deutlich erkennbar sein. Die Garantieansprüche werden
hinfällig, wenn die Typen- oder Seriennummern auf dem
Produkt geändert, entfernt oder ungültig gemacht wurden.

Garantieausschluss
• Defekte oder Schäden, die sich aus unsachgemäßer oder
unüblicher Handhabung oder Nichtbefolgung der in diesem
Handbuch vorgegebenen Anweisungen ergeben.
• Defekte oder Schäden, die auf Missbrauch, Unfall oder
Versäumnis zurückzuführen sind.
• Defekte oder Schäden, die auf nicht ordnungsgemäßes
Testen, Betreiben, Warten, Einstellen oder auf irgendwelche
Änderungen und Modifikationen zurückzuführen sind.
• Bruch oder Beschädigung der Antennen, sofern dies nicht
direkt auf Material- oder Verarbeitungsfehler zurückzuführen
ist.
• Produkte, die so zerlegt oder repariert worden sind, dass sie
den Betrieb des Produkts oder eine angemessene
Untersuchung und Prüfung zur Feststellung des
Garantieanspruches unmöglich machen.
• Defekte oder Schäden aufgrund der Reichweite.
• Defekte oder Schäden aufgrund von.
Feuchtigkeitseinwirkungen und Eindringen von Flüssigkeiten.
• Alle Kunststoffoberflächen und alle anderen freiliegenden
Teile, die durch normale Nutzung zerkratzt oder beschädigt
sind.
• Produkte, die über einen beschränkten Zeitraum gemietet
sind.
• Regelmäßige Wartung und Reparatur oder Auswechseln
von Teilen aufgrund normaler Nutzung,
Verschleißerscheinungen und Abnutzung.
Urheberrechtshinweise
Die in diesem Handbuch beschriebenen Motorola SolutionsProdukte können durch Copyright geschützte Programme von
Motorola Solutions enthalten, die in Halbleiterspeichern oder
anderen Medien gespeichert sind. Nach den für Motorola
Solutions geltenden Gesetzen der USA und anderer Staaten
sind bestimmte ausschließliche Rechte an urheberrechtlich
geschützten Computerprogrammen, einschließlich des
ausschließlichen Rechts der Vervielfältigung oder Reproduktion
in beliebiger Form, den urheberrechtlich geschützten Motorola
Solutions-Programmen vorbehalten.
Entsprechend dürfen keine in den Produkten von Motorola
Solutions enthaltenen, durch Copyright geschützten
Computerprogramme, die in dieser Bedienungsanleitung
beschrieben werden, in irgendeiner Form kopiert oder
reproduziert werden, ohne dass hierfür eine ausdrückliche
schriftliche Genehmigung von Motorola vorliegt. Darüber
hinaus werden mit dem Kauf von Produkten von Motorola
Solutions weder ausdrücklich noch stillschweigend, durch
Rechtsverwirkung oder auf andere Weise Lizenzen unter dem
Copyright, dem Patent oder den Patentanwendungen von
Software von Motorola Solutions ausgegeben, außer der
Nutzung von normalen, nicht ausschließlich erteilten,
gebührenfreien Lizenzen, die sich aus der Anwendung der
Gesetze beim Verkauf eines Produkts ergeben.
MOTOROLA, MOTO, MOTOROLA SOLUTIONS und das
stilisierte M-Logo sind Marken oder eingetragene Marken von
Motorola Trademark Holdings, LLC und werden unter Lizenz
verwendet. Alle anderen Marken sind das Eigentum ihrer
jeweiligen Inhaber.
© 2012 und 2016 Motorola Solutions, Inc. Alle Rechte
vorbehalten.
Deutsch
11

12
HINWEIS
Deutsch

SÉCURITÉ DES PRODUITS ET EXPOSITION RF POUR LES RADIOS PROFESSIONNELLES PORTATIVES
ATTENTION !
Avant d'utiliser ce produit, lisez le guide Sécurité des produits et
exposition RF fourni avec la radio. Il contient des instructions de
fonctionnement relatives à la sécurité et à l'exposition aux RF,
ainsi que des informations sur le contrôle de conformité aux
normes et réglementations applicables.
Contenu de la boîte
Contenu de la boîte T80 T80
Radio 2241
Clips de ceinture 2 2 4 1
Station de chargement à
2 positions
Adaptateur secteur 1 1 - 1
Y-Adaptateur secteur - - 1 Supports de batterie 2 2 4 2
Batteries NiMH
rechargeables
Casques - 2 4 1
Sangles - 2 4 1
Guide d'utilisation 1 1 1 1
Kit Chargeur - - - 1
1121
2242
Extreme
T80
Extreme
T81
Hunter
Tableau de fréquences
Canal Fréq. (MHz) Canal Fréq. (MHz) Canal Fréq. (MHz)
1 446.00625 4 446.04375 7 446.08125
2 446.01875 5 446.05625 8 446.09375
3 446.03125 6 446.06875
Fonctions et spécifications
• 8 canaux PMR
• 121 sous-codes (38 codes CTCSS et 83 codes DCS)
• Distance maximale de 10 km *
• Circuit VOX interne
• Lampe à DEL
• 10 tonalités d’appel au choix
• Écran LCD rétroéclairé
• Tonalité de confirmation
• Programmateur
• Système de surveillance de l'environnement
• Chargeur de batterie
• Niveau de la batterie
• Contrôle des canaux
• Balayage des canaux
• Double veille
• Verrouillage clavier
• Arrêt automatique
• Réglage silencieux automatique
• Répétition automatique (défilement)
• Économie d'énergie de la batterie
• Alerte de batterie faible
• Mise en veille lorsque la batterie est faible
• Tonalité (marche/arrêt)
• Appel direct (numéro de l'appelant)
• Appel de groupe
• Mode Silencieux
• Tous les appels
• Changement de canal automatique
• Classification IP : IPX2 (modèle T80), IPX4 (modèle
T80 Extreme, T81 Hunter)
• Source d'alimentation : batterie NiMH / 4 piles alcalines AAA
• Autonomie de la batterie : 16 heures (dans des conditions
normales d'utilisation)
* La portée peut varier selon l'environnement et/ou la topographie.
Français
1
Commandes et fonctions
Antenne
Bouton PTT
(Push-To-Talk)
Prise casque
(Casque non inclus)
Boutons de
navigation du
menu déroulant
Bouton (appel)
Bouton SURV (Surveillance)
Haut-parleur
Microphone
Bouton SÉL/
(sélection/
verrouillage)
Bouton GRP/MENU
(groupe/menu)
Prise CC 9 V
Bouton de volume
et d'alimentation
Bouton de la
lampe à DEL
Barre sangle supérieure
Barre sangle inférieure
Français
Remarque : l'illustration représente la radio T80 Extreme. Ses caractéristiques s'appliquent également au modèle T80, T81 Hunter.
2
Afficheur Installation de la batterie
2
3
4
5
1
6
7
8
9
10
11
12
13
14
1. Assurez-vous que la radio est ÉTEINTE.
2. Modèle T80 : pour retirer le couvercle du compartiment de la
batterie, appuyez sur la languette située en bas.
Modèle T80 Extreme et T81 Hunter : pour retirer le
couvercle du compartiment de la batterie, utilisez une pièce
de monnaie pour maintenir le couvercle ouvert.
3. Installez la batterie NiMH dans le compartiment prévu à cet
effet.
4. Replacez le couvercle du compartiment.
Attention : la batterie risque d'exploser si elle n'est pas
correctement remplacée. Mettez les batteries
usagées au rebut selon les instructions fournies.
Niveau de la batterie et alerte de batterie faible
Indique que la batterie est chargée.
1. Indicateur du mode
Silencieux
2. Indicateur de
transmission
3. Indicateur de réception
4. Indicateur de la fonction
de double veille
5. Indicateur de la fonction
d'arrêt automatique
6. Indicateur du
verrouillage des
touches
7. Indicateur de lecture
8. Indicateur du canal
9. Niveau de la batterie
10. Indicateur de groupe
11. Indicateur du système
de surveillance de
l'environnement/VOX
12. Indicateur d'appel
13. Indicateur
de sous-code (ID/code
du groupe)
14. Deux-points (pour le
programmateur)
Clignote lorsque la batterie est faible.
Chargez la radio ou remplacez la batterie
immédiatement.
(La sonnerie d'alerte retentit toutes les
5 secondes pendant 30 secondes lorsque
le niveau de la batterie est faible.)
Maintenance de la capacité des batteries
1. Chargez les batteries au moins une fois tous les 3 mois,
même lorsque vous ne les utilisez pas.
2. Après utilisation, retirez la batterie de la radio en vue de son
stockage.
3. Conservez les batteries dans des environnements secs, à
des températures comprises entre -20 °C et 35 °C. Évitez les
environnements humides et les substances corrosives.
Français
3

Chargement de la radio
Chargement direct :
1. Assurez-vous que la radio est ÉTEINTE.
2. Branchez l’adaptateur secteur à l’entrée 9 V CC de la radio.
Connectez l’autre extrémité de l’adaptateur secteur à la
prise d'alimentation pour accessoire d'un véhicule.
3. Chargez la batterie pendant 14 heures.
Utilisation de la station de chargement :
1. Assurez-vous que la radio est ÉTEINTE.
2. Connectez l'adaptateur secteur à la prise CC 9 V de la
station de chargement.
3. Placez la station de chargement sur une surface stable.
4. Disposez la radio dans la station de chargement avec le
clavier orienté vers l'avant.
5. L'indicateur s'allume et reste allumé aussi longtemps que la
radio est connectée au chargeur.
Remarque : chargez la batterie pendant 14 heures.
Utilisation du support de batterie :
1. Retirez la batterie NiMH rechargeable de la radio.
2. Placez le support de batterie dans la station de chargement.
3. Disposez la batterie NiMH dans la station de chargement.
Assurez-vous que les contacts de charge sont correctement
alignés.
4. L'indicateur s'allume et reste allumé aussi longtemps que la
radio est connectée au chargeur.
Remarque : chargez la batterie pendant 14 heures.
Fonctionnement de base
Lisez le présent guide de référence dans son intégralité avant
Français
d'utiliser la radio.
Mise sous/hors tension de la radio
Pour mettre votre radio sous tension, tournez le bouton dans le
sens des aiguilles d'une montre.
4
Pour mettre votre radio hors tension, tournez le bouton dans le
sens inverse.
Réglage du volume
Augmentez le volume en tournant le bouton dans le sens des
aiguilles d'une montre.
Pour le baisser, tournez-le dans le sens inverse.
Réglage du son (bips des touches)
Votre radio émet un bip à chaque fois que l'un des boutons est
actionné (à l'exception des boutons PTT et ).
Appuyez de façon prolongée sur le bouton tout en allumant
la radio pour activer ou désactiver le son.
Navigation dans le menu
Vos radios disposent de deux menus : le menu de sélection et
le menu courant.
1. Pour accéder au menu de sélection, appuyez sur le bouton
SÉL/ .
2. Pour accéder au menu courant, appuyez sur le bouton
MENU/GRP.
3. Appuyez plusieurs fois sur le bouton SÉL/ ou MENU/
GRP pour parcourir le menu.
4. Pour quitter le menu, effectuez l'une des opérations
suivantes :
a. Appuyez sur le bouton MENU/GRP.
b. Appuyez sur le bouton PTT.
c. Attendez 10 secondes jusqu'à ce que l'appareil revienne
automatiquement en mode Normal.
Communication à l'aide de la radio
1. Maintenez la radio à u ne distance de 5 à 8 cm de votre bouche.
2. Appuyez de façon prolongée sur le bouton PTT lorsque
vous parlez. L'icône s'affiche à l'écran.
3. Relâchez le bouton PTT. Vous pouvez désormais recevoir
Normal
Canal Sous-code
1–8 0–121
des appels entrants. Dans un tel cas, l'icône apparaît sur
l'écran. Pour répondre, répétez la procédure à partir de
l'étape 1.
Remarque : si vous poursuivez la transmission pendant
Sélection d'un canal et d'un sous-code
Pour sélectionner un canal, procédez comme suit :
1. Appuyez sur le bouton SÉL/ pour accéder au menu de
2. Les touches ou vous permettent d'accéder au canal
Pour sélectionner un sous-code, procédez comme suit :
1. Appuyez sur le bouton SÉL/ pour accéder au menu de
2. Appuyez sur ou sur pour accéder au sous-code de
3. Quittez le menu de sélection.
60 secondes, la radio émettra une tonalité de
mise en veille TX et l'icône clignotera. La
radio stoppera la transmission.
Pour parler à quelqu'un, les deux radios
doivent être définies sur le même canal et le
même sous-code. Reportez-vous à la section
« Sélection d'un canal et d'un sous-code » cidessous.
sélection. Parcourez le menu jusqu'à ce que l'indicateur de
canal clignote.
souhaité.
sélection. Parcourez le menu jusqu'à ce que l'indicateur de
sous-code clignote.
votre choix.
Menu de sélection
Votre radio parcourt le menu de sélection de la façon suivante :
Transmission vocale (VOX)
La transmission est engagée lorsque vous parlez dans le
microphone de la radio au lieu d'appuyer sur le bouton PTT.
Pour sélectionner le niveau VOX, procédez comme suit :
1. Appuyez sur le bouton MENU/GRP pour accéder au menu
courant. Parcourez le menu, puis sélectionnez VOX.
2. Appuyez sur SÉL/ .
3. Appuyez sur ou sur pour accéder au niveau de
sensibilité VOX de votre choix.
4. Quittez le menu de sélection.
Remarque : le niveau N (DÉSACTIVÉ) désactive la
fonction VOX. Les niveaux 1 à 5 définissent la
sensibilité du circuit VOX. Utilisez le niveau 1
dans des environnements calmes et le
niveau 5 dans des environnements très
bruyants. Vous pouvez déterminer le niveau
de sensibilité approprié en parlant dans le
microphone. Si l'icône clignote, cela signifie
que votre voix est acceptée.
Français
5

Transmission d'une tonalité d'appel
Votre radio est équipée de 10 tonalités d'appel sélectionnables.
Pour sélectionner une tonalité d'appel, procédez comme suit :
1. Appuyez sur le bouton MENU/GRP pour accéder au menu
courant. Parcourez le menu jusqu'à l'option TONALITÉ.
2. Appuyez sur SÉL/ .
3. Appuyez sur ou sur pour accéder à la tonalité d'appel
de votre choix.
4. Quittez le menu courant.
Pour transmettre la tonalité d'appel sélectionnée, procédez
comme suit :
1. Appuyez sur pour transmettre la tonalité d'appel
sélectionnée. La tonalité choisie sera automatiquement
transmise pendant une période déterminée.
2. Appuyez sur PTT pour annuler la tonalité d'appel.
Arrêt automatique
La fonction d'arrêt automatique vous permet de définir le délai
après lequel la radio s'arrêtera automatiquement.
1. Appuyez sur le bouton MENU/GRP pour accéder au menu
courant. Parcourez le menu jusqu'à l'option ALIM. Le délai
actuel sélectionné pour l'arrêt automatique clignote.
2. Appuyez sur SÉL/ .
3. Appuyez sur ou sur pour sélectionner le délai :
ACTIVÉ, 1H, 2H et 3H.
4. Quittez le menu.
Français
6
 Loading...