

Page 1
Model T5583
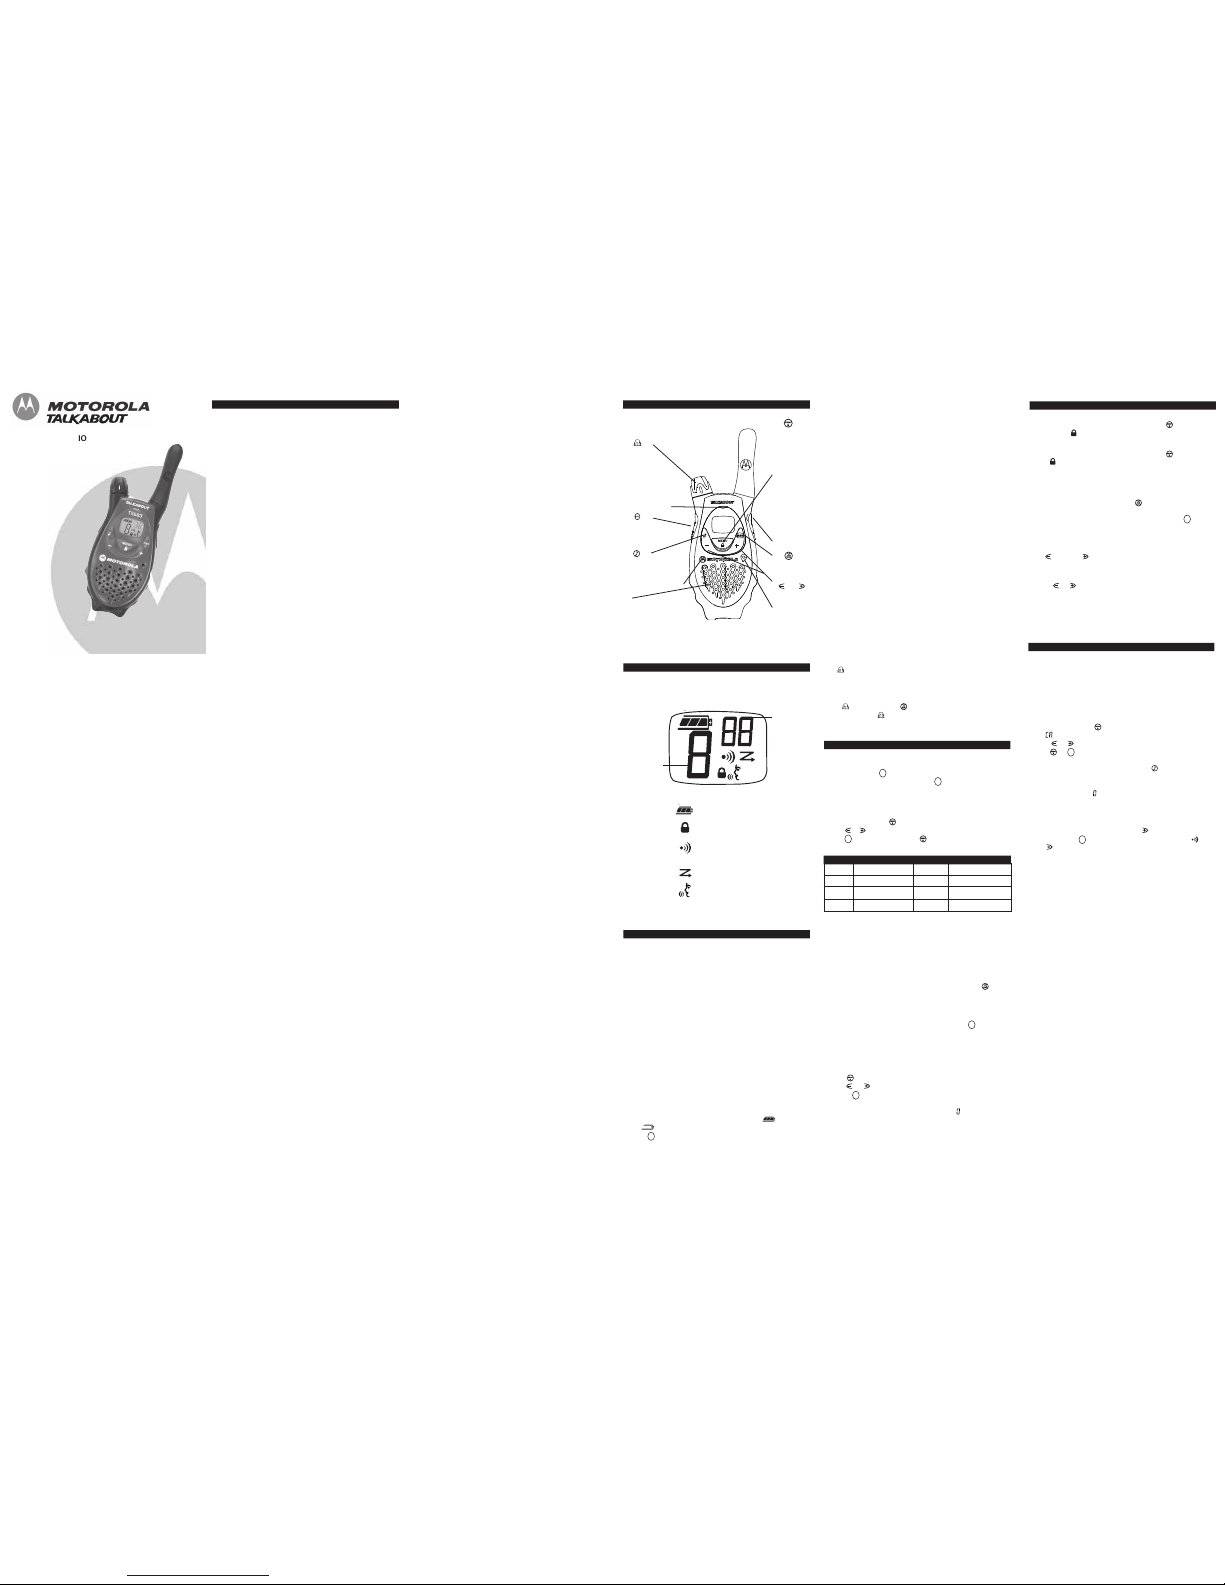
Control Buttons
KEM-PK15560-02A
Display Screen Guide
Getting Started
Talking and Listening
Installin g the AA Batterie s
Your radi o uses 3 AA Alkal ine batte ries.
1. With t he back o f the ra dio facin g you, li ft the ba ttery lat ch up to release
the b attery co ver and remove th e cover.
2. Insert 3 AA Alk aline ba tteries a s shown o n the ins ide of th e battery
compa rtment.
3. Reposi tion the battery cover and press do wn to sec ure.
Note: The T5583 mo del radi os can us e a NiMH rechargea ble batte ry instea d
of 3 AA A lkaline b atteries . A recha rgeable b attery up grade kit , is avai lable
for these radios.
Installin g the NiM H Batter y Pack
1. Follow step 1 a bove to remove th e battery cover.
2. Remove the batt ery pack from the clear pl astic bag .
Do no t disasse mble or unwrap th e battery pack.
3. Insert the NiMH battery pack so the metal contacts on the s ide of th e
batte ry are fa cing out ward from the radi o to conn ect with the conta cts
on th e battery door.
4. Reposi tion the battery cover and press do wn to sec ure.
Battery M eter
The batte ry icon s hows the battery charge le vel, from full t o
empty . When th e battery is empty , the rad io chirps periodic ally aft er
releasing . The rad io powers off when the volt age drops below a
predeterm ined leve l to pro tect the rechargea ble batte ry.
Note: Rem ove the b atteries before s toring yo ur radio for exten ded perio ds of
time. Bat teries co rrode ov er time a nd may ca use perma nent dama ge to
your radi o.
Using the Desk Sta nd Charg er (Optio nal Acces sory)
The desk stand cha rger pro vides dro p-in char ging conv enience f or NiMH b atteries
and can b e placed on any f lat surfa ce, such as a desk or workb ench. Cha rge the
NiMH batt ery overn ight (at least 16 hours) b efore usi ng it for the firs t time.
After the initial charge, an empty battery i s fully c harged wi thin 14 h ours.
1. Turn t he radio off and remove th e battery cover.
2. Remove the batt ery pack from the clear pl astic bag . Do not disassem ble or
unwra p the bat tery pac k.
3. Insert the NiMH battery pack so the metal contacts on the s ide of th e batter y
are f acing out ward fro m the rad io to con nect with the cont acts on t he
batte ry door.
4. Reposi tion the battery cover and press do wn to sec ure.
5. Plug t he AC pow er suppl y into th e plug on the desk stand.
6. Plug t he AC pow er suppl y into a standard wall outl et.
7. Remove the batt ery pock et insert s from th e charger pockets.
8. With a radio fa cing for ward, sli de it int o one of the charg ing pocke ts.
Notes
• The lig ht on the chargin g base wi ll glow c ontinuous ly when r adio/batt ery
is in serted.
• When mo ving betw een hot and cold temperatu res, do n ot charge the batt ery
until the batt ery temp erature a cclimates (usually about 20 minutes) .
• For opt imal batt ery life , remove the radio or batte ry from t he charge r within
16 ho urs. Do n ot store the radi o in the charger.
Attaching the Belt Clip
1. Align the belt clip pos t with th e hole in the back of the r adio.
2. Gently push unt il the c lip click s into pl ace.
Removing the Belt Clip
1. Push d own on th e releas e tab at the top o f the bel t clip to release the catc h.
2. Pull t he belt c lip away from the back of the radio .
Turning Y our Radio On and Off
Turn clockw ise to t urn the r adio on a nd counte rclockwis e to turn the rad io
off. The radio chi rps and the displ ay briefl y shows a ll featur e icons a vailable on
your radi o.
Setting t he Volume
Rotate whil e holdin g down unti l you rea ch a comf ortable
listening level. R otate cloc kwise to increase the volum e or coun terclock wise
to decrea se the vo lume.
To commun icate, al l radios in your group mus t be set to the sa me channe l
and Inter ference E liminato r Code.
To talk, press and hold . Hold the radi o 2 to 3 inches aw ay from y our mout h
when talk ing. When you fin ish talki ng, relea se (press to talk),
release t o listen.
Talk Rang e
Your radi o is desi gned to maximize performan ce and im prove tra nsmission range.
Do not us e the rad ios clos er than 5 feet apa rt.
Checking the Chann el Befor e Transmi tting
Your radi o has mul tiple ch annels sh ared on a "take tu rns" basi s. For
uninterru pted comm unicatio n, do not talk on a channel if someo ne else i s
currently talking on it.
To check for activ ity on a channel before yo u talk, p ress and hold .
If you he ar static , the ch annel is clear to use.
Push to T alk Timeo ut Timer
To preven t acciden tal tran smissions and save battery life, the radio em its a
continuou s warning tone an d stops t ransmitti ng if you press for 60
continuou s seconds .
PTT
PTT
PTT
PTT
PTT
PTT
T5583
TWO-WAY RADIO
USER’S GUIDE
®
Use to:
• Select menu options
• Exit the menu (when
pressed
while in a
menu)
• Lock and unlock the
keypad (when held
down
and not in a
menu)
Accessory Jack
Use to:
• Scan
Use and to:
• Scroll through menus
Microphone
Alerts
Alerts
Channel B usy Indic ator
When a ch annel is busy, th e LED fla shes twic e per sec ond.
Setting a nd Transm itting C all Tones
Your radi o can tra nsmit di fferent c all tones to other radios i n your gr oup so yo u
can alert them tha t you wa nt to tal k.
To set a call tone :
1. With t he radio on, pres s 3 times. The curre nt call t one setti ng flash es
and dis plays.
2. Press or to change and hear the call tone.
3. Press or to set th e new cal l tone.
To tr ansmit yo ur call tone to o ther radi os set to the same channel and
Inter ference E liminato r Code as your rad io, press .
Notes
• The T55 83 model has 10 c all tones .
• Setting the call tone to di sables th e call to ne featur e.
Transmitt ing a Tal k Confir mation To ne
You can s et your r adio to transmit an unique tone whe n you fin ish trans mitting.
It's like saying R oger or Over to l et others know you are fini shed talk ing.
• To turn talk con firmatio n on, pre ss and ho ld while yo u turn th e radio on.
When you relea se after t ransmitti ng, your call tone transmit s
and di splays.
• To turn talk con firmatio n off, tu rn your r adio off and then back on
while pressing and hol ding .
Use to:
• Turn radio on/off
• Adjust volume
LED Indicator Light
Use to:
• Talk
• Save a setting
Use to:
• Transmit call tone
Removable front cover
Spea
ker
T5583
Channel Frequency (MHz) Channel Frequency (MHz)
1 446.00625
2 446.01875
3 446.03125
4 446.04375
7 446.08125
6 446.06875
5 446.05625
8 446.09375
PTT
Interfere nce Elimi nator Co de
Interfere nce Elimi nator Co des help minimize interfere nce by pr oviding y ou with
a choice of code c ombinati ons.
To set th e code fo r a chan nel:
1. Press u ntil the code sta rts to fl ash.
2. Press or to select the code .
3. Press to save th e code se tting.
You can s et a diff erent co de for ea ch channe l using t his proce dure.
Note: You must set the Int erference Eliminat or Code t o on an FRS ra dio that
uses Inte rference Eliminat or Codes to commun icate wit h other F RS radios that
do not ha ve Interf erence E liminator Codes.
PTT
Special Features
Locking t he Keypad
To avoid accidenta lly chan ging your radio se ttings, p ress and ho ld for 3
seconds o r until d isplays. You can t urn the r adio on a nd off, a djust th e
volume, r eceive, t ransmit, send a c all tone, and moni tor chann els. All other
functions are lock ed. To u nlock the radio, p ress and hold for 3 seconds
or until is no long er displa yed.
Scanning Channels
Use scann ing to mo nitor ch annels an d codes f or transm issions o r to find
someone i n your gr oup who has accid entally c hanged ch annels.
To start scanning, briefly press an d release . The scan indicato r
displays . When th e radio detects c hannel ac tivity, i t stops s canning a nd you
can hear the trans mission. To respo nd to the transmit ting, pre ss within
5 seconds .
Advanced Scan
If the ra dio stops scannin g on a ch annel you do not w ant to li sten to, briefly
press and re lease or to resume s canning f or the ne xt active channel .
Removing Channels from the Scan Lis t (Nuisan ce Delete Feature)
To remove a channe l so the radio do es not st op on it while sca nning, pr ess
and hold or f or at lea st 3 seco nds, then release. This tem porarily
removes t he channe l from t he scan l ist.
To restor e the cha nnel, tu rn the ra dio off a nd then b ack on.
Note:You cannot re move the channel your radi o was set to when you start ed
the scan (called y our home channel) .
–Battery Meter
Numbers
for
Channel,
Call
Tone
Numbers
for
Codes
–Scan
–Hands-Free
(Vox/iVox)
–Lock
– Talk Confirmation Tone
(Roger Beep)
Safety and General Information
Important Information on Safe and E fficient Opera tion
Read This Information Before Using Your Radio.
The infor mation pr ovided i n this do cument su persedes the gener al
safety in formation in user guides p ublished prior to December 1, 2002.
Transmit and Receive P rocedure
Your two- way radio contain s a trans mitter an d a recei ver. To c ontrol
your expo sure and ensure c ompliance with the general
populatio n/uncontr olled en vironment exposure limits, always ad here to
the follo wing proc edure:
• Transm it no mor e than 5 0% of the time.
• To rec eive call s, relea se the PT T button.
• To tra nsmit (ta lk), pre ss the Pu sh to Tal k (PTT) b utton.
Transmitt ing 50% o f the ti me, or le ss, is im portant b ecause th e radio
generates measurab le RF en ergy expo sure only when tra nsmitting (in
terms of measuring standar ds compli ance).
Exposure to Radio Freq uency Energy
Your Moto rola two- way radi o complie s with th e
following RF energ y exposu re standa rds and g uidelines :
• United States F ederal c ommunicat ions Comm ission, C ode of Fe deral
Regulatio ns; 47CFR part 2 sub-part J
• Americ an Nation al Stand ards Inst itute (AN SI)/Insti tute of E lectrical
and Elect ronic Eng ineers ( IEEE) C95 . 1-1992
• Instit ute of El ectrical and Elec tronics E ngineers (IEEE) C9 5.1-1999
Edition
• Intern ational C ommissio n on Non- Ionizing Radiation Protecti on
(ICNIRP) 1998
• Minist ry of Hea lth (Can ada) Safe ty Code 6 . Limits of Human Exposure
to Radio frequency Electro magnetic Fields in the Freq uency Ran ge
from 3 KH z to 300 GHz, 199 9
• Austra lian comm unicatio ns Author ity Radio communic ations
(Electrom agnetic R adiation —Human Ex posure) S tandard, 2003
• ANATAL ANNEX to Resolut ion No. 3 03 of Jul y 2, 2002 “Regulat ion of
limitatio n of expo sure to electrica l, magnet ic and el ectromagn etic
fields in the radi o freque ncy range between 9 KHz and 300GHz” and
“Attachme nt to res olution #303 from July 2, 2002”
To assure optimal radio pe rformance and make sure hum an exposu re
to radio frequency electro magnetic energy is within t he guidel ines set
forth in the above standar ds, alway s adhere to the fo llowing
procedure s.
Portable Radio Operati on and EME Ex posure
Antenna C are
Use only the suppl ied or a n approve d replace ment ante nna.
Unauthori zed anten nas, mod ification s, or att achments could dam age
the radio and may violate regulatio ns.
Do NOT ho ld the an tenna wh en the ra dio is “I N USE.” H olding th e
antenna a ffects th e effect ive range .
Body-Worn Operati on
To mainta in compli ances wi th RF exp osure gui delines, if you we ar a
radio on your body when tr ansmittin g, always place th e radio i n a
Motorola- supplied or appro ved clip, holder, holster, case or b ody
harness f or this p roduct. Use of No n-Motorol a-approve d accesso ries
may excee d RF expo sure gui delines.
If you do not use one of t he Motoro la-suppli ed or app roved bod y-worn
accessori es and ar e not us ing the r adio held in the n ormal use
position, e nsure the radio an d its ant enna are at least 1 inch ( 2.5 cm)
from your body whe n transm itting.
Battery C harger S afety Ins tructions :
Save thes e Instruc tions
1. Do not expose t he charg er to rai n or snow .
2. Do not operate or disas semble th e charger if it ha s receive d a sharp
blow, or has been dropped or damage d in any way.
3. Never alter the AC cord or plug provided with the unit. If the plug will
not fit t he outlet , have t he proper outlet i nstalled by a qual ified
electrici an. An im proper c ondition can resul t in a ri sk of ele ctric
shock.
4. To red uce the r isk of d amage to the cord or plug, pull the plug rath er
than the cord when disconn ecting th e charger from the AC recep tacle.
5. To red uce the r isk of e lectric s hock, unp lug the c harger fr om the ou tlet
before at tempting any main tenance o r cleanin g.
6. Use of an attac hment no t recomme nded or s old by Mo torola ma y
result in a risk o f fire, electric shock or personal injury.
7. Make s ure the c ord is l ocated so it will not be st epped on, tripped over
or subjec ted to da mage or stress.
8. An ext ension co rd shoul d not be used unle ss absolu tely nece ssary.
Use of an improper extensi on cord c ould resu lt in a r isk of a fire
and/or el ectric sh ock. If an extens ion cord must be u sed, make sure
that:
• The pi ns on the plug of the exte nsion cor d are the same num ber, size
and shape as those on the plug of t he charge r.
• The ex tension c ord is p roperly w ired and in good e lectrical conditio n.
• The co rd size i s 18 AWG for leng ths up to 100 feet , and 16 AWG for
lengths u p to 150 feet.
9. The su pply cord of this charger cannot be replaced . If the cord is
damaged, please re fer to w arranty s ection.
Potential ly Explo sive Atmo spheres
Turn off your radi o prior to enteri ng any ar ea with a potentia lly explo sive
Safety an d Genera l Use Dur ing Activ ity
The use o f a two-w ay radio while en gaged in activitie s requiri ng concen tration
may cause distract ion or o therwise impair yo ur abilit y to safe ly partic ipate in
such acti vities. Always u se techno logy safe ly.
atmospher e. Only r adio typ es that a re especi ally qual ified sho uld be
used in s uch areas as “Int rinsicall y Safe.” Do not re move, ins tall or
charge ba tteries i n such a reas. Spa rks in a potential ly explos ive
atmospher e can cau se an ex plosion o r fire re sulting i n bodily injury or
even deat h.
Note: The areas with pot entially explosiv e atmosph eres refe rred to
above inc lude fuel ing area s such as below de cks on bo ats, fuel or
chemical transfer or stora ge facili ties, are as where the air c ontains
chemicals or parti cles (su ch as gra in, dust or metal powders) and any
other are a where y ou would normally be advis ed to tur n off you r vehicle
engine. A reas with potenti ally expl osive atm ospheres are often —but not
always—po sted.
Blasting Caps and Areas
To avoid possible interfer ence with blasting operatio ns, turn off your
radio whe n you are near el ectrical blasting caps, in a blastin g area, o r in
areas pos ted “Turn off two -way radi os.” Obey all sign s and ins tructions .
Operation al Cautions
Antennas
Do not us e any por table ra dio that has a dam aged ante nna. I f a damag ed
antenna c omes into contact with you r skin, a minor bu rn can re sult.
Batteries
All batte ries can cause pr operty da mage and/ or bodily injury s uch as
burns if a conduct ive mate rial—like jewelry, keys or beaded ch ains—
touch exp osed term inals. T he conduc tive mate rial may complete an
electrica l circuit (short circuit) and becom e quite h ot. Exerc ise care in
handling any charg ed batte ry, parti cularly w hen placi ng it ins ide a
pocket, p urse or o ther con tainer wi th metal objects.
Data Oper ation
If applic able, whe n using any data feature o f the rad io with o r without
an access ory cable , position the radio a nd its an tenna at least one
inch (2.5 cm) from the bod y.
Approved Accessori es
For a lis t of appr oved Mot orola acc essories, visit ou t Web sit e at
www.motor ola.com.
Electromagnetic Interference/Compatibility
Note: Nearly ever y electro nic devic e is susc eptible t o electro magnetic
interfere nce (EMI) if inad equately shielded, designed or other wise
configure d for ele ctromagn etic comp atibility . Operati on is sub ject to t he
following two cond itions:
1. This d evice may not cau se harmfu l interfe rence; an d
2. This d evice mus t accept any inte rference received, includin g
interfere nce that may caus e undesir ed operat ion.
Facilitie s
To avoid electroma gnetic i nterferen ce and/or compatib ility con flicts,
turn off your radi o in any facility where po sted noti ces instr uct you t o
do so. Ho spitals o r health care fac ilities m ay be usi ng equipm ent that is
sensitive to exter nal RF e nergy.
Aircraft
When inst ructed to do so, turn off your radi o when on board on aircraft.
Any use o f a radio must be in accor dance wit h applica ble regul ations
per airli ne crew i nstructi ons.
Medical D evices – Pacemake rs
The Advan ced Medic al Techn ology Ass ociation recommend s that a
minimum s eparation of 6 in ches (15 cm) be ma intained between a
handheld wireless radio an d a pacem aker. The se recomm endations are
consisten t with th e indepe ndent res earch by and recom mendation s of
the U.S. Food and Drug Adm inistrati on.
People wi th pacema kers sho uld:
• ALWAYS keep the radio m ore than 6 inches (15 cm) f rom their
pacemaker when the radio i s turned ON.
• Not ca rry the r adio in the breas t pocket.
• Use th e ear opp osite th e pacemak er to min imize the potentia l for
interfere nce.
• Turn t he radio OFF imme diately i f there i s any rea son to su spect tha t
interfere nce is ta king pla ce.
Medical D evices – Hearing Aids
Some digi tal wirel ess radi os may in terfere w ith some hearing a ids. In
the event of such interfer ence, you may want to consu lt your h earing
aid manuf acturer t o discus s alterna tives.
Other Med ical Dev ices
If you us e any oth er perso nal medic al device , consult the manu facturer
of your d evice to determin e if it i s adequat ely shiel ded from RF energy .
Your phys ician may be able to assis t you in obtaining this inf ormation.
Safety and General Use While Driving
Check the laws and regulat ions rega rding the use of r adios in the area
where you drive, a nd alway s obey th em. If yo u do use your radi o while
driving, please:
• Give f ull atten tion to driving a nd to the road.
• Use ha nds-free operatio n, if ava ilable.
• Pull o ff the ro ad and p ark befor e making or answer ing a cal l if driv ing
condition s so requ ire.
Do not pl ace a por table ra dio in th e area ov er an air bag or i n the air
bag deplo yment are a. Air b ags infla te with g reat forc e. If a p ortable
radio is placed in the air bag depl oyment ar ea and th e air bag inflates ,
the radio may be p ropelled with gre at force and cause serious injury to
occupants of the v ehicle.
PTT
For Mor e Information
For furth er inform ation, y ou may ca ll:
Alcom Ele ctronics Pte LTD
37, Kalla ng Puddin g Road,
Blk-B Ton g Lee Bui lding,
#05-08, S ingapore 349315
PH: (65) 6841 2668 , FAX: (65) 6841 2628
E-MAIL: s upport@al com.com. sg
Setting a Channel
Your radi o has 8 c hannels. Channels 1-8 are .5 watt.
1. With t he radio on, pres s . The curr ent chann el flashe s.
2. Press or to s et the ch annel.
3. Press to c onfirm y our selec tion or to co ntinue se t up.
Channels and Frequ encies
Page 2
There are many acc essories (sold se parately) availabl e for you r radio. For more
informati on, conta ct the p lace of p urchase.
Using Aud io Access ories
1. Turn t he radio off. Plu g the acc essory co nnector i nto the j ack.
2. Turn t he radio on. Lowe r the vol ume befor e placing the acce ssory on your
head or in you r ear.
3. Press whi le rotat ing to adjus t the vol ume to a comfortab le
leve l.
4. To tra nsmit, pr ess and spe ak into t he access ory micro phone, if any.
5. To rec eive, rel ease .
Hands-fre e Use wit h Access ories (VO X)
Voice act ivation ( VOX) all ows you t o talk ha ndsfree w hen used with opti onal
accessori es connec ted to t he radio. See the Motorola Talkabout access ory
brochure for avail able VOX accessor ies.
1. Turn t he radio off.
2. Insert the plug of the audio acc essory fi rmly into the acce ssory jac k.
3. Turn t he radio on. display s.
4. Lower the radio volume before pl acing the accessor y on your head or in
your ear.
5. To tra nsmit, sp eak into accessor y microph one. Ther e is a sh ort delay between
the t ime you s tart tal king and when the radio tra nsmits.
6. To rec eive, sto p talkin g.
To turn V OX off, p ress or remo ve the au dio acces sory.
Handsfree Use With out Acce ssories ( iVox)
You can u se the iV ox featu re to tra nsmit han dsfree wi thout the need for any
voice act ivation ( VOX) acc essories. Once iVO X is turn ed on, th e radio d etects
your voic e and tra nsmits w hen you s peak.
1. Turn t he radio off.
2. Turn t he radio on while pressing . displ ays.
3. To tem porarily disable iVox, pre ss . fla shes inte rmittentl y.
4. To tur n off iVo x, turn the radio off.
Setting t he Sensit ivity Le vel
Adjusting the radi o’s sens itivity l evel help s minimiz e the pos sibility of uninte nded
noises tr iggering a transm ission an d helps t he radio pick up s oft voice s.
1. Press un til display s.
2. Press or to s elect the sensitiv ity level :
Note: Whe n you con nect a V OX access ory, the radio is automatic ally set to
the last chosen se nsitivit y level.
=High Sen sitivity
for quiet environm ents
= Medium Sensitivi ty
for most environme nts
= Low Sen sitivity
for noisy environm ents
Accessories
PTT
PTT
PTT
PTT
PTT
®
Manuf actur ed, d istri buted and sold by G iant Inter natio nal L td., offic ial
licen see o f the Equi pment . Mot orola , th e Mot orola logo trad emark s and
the M otoro la tr ade d ress are o wned by M otoro la, I nc. a nd ar e use d und er
licen se fr om Mo torol a, In c. Al com E lect ronic s Pte Ltd. is t he lo cal
distr ibuto r of the E quipm ent i n Sin gapo re. P lease cont act t he cu stome r
servi ce ho tline at ( 65) 6 841 2 668 f or q uesti ons/c ommen ts, w arran ty is sues,
suppo rt, o r ser vice relat ed to the Equi pment . MOT OROLA and the S tyliz ed
M Log o are regi stere d in the U .S. P aten t & T radem ark O ffice . All othe r
produ ct or serv ice n ames are t he pr oper ty of thei r res pecti ve ow ners.
© Moto rola, Inc. 2006 .
Warranty
Limited Warranty for Personal Communication
Products, Accessories and Software purchased in
Singapore
What Does t his Wa rranty Cover?
This Limit ed Wa rrant y is a con sumer ’s e xclus ive r emedy , and appl ies a s
follo ws to new Motor ola b rande d pro duct s, ac cesso ries and s oftwa re
manuf actur ed, d istri buted and sold by G iant Inter natio nal L td. A lcom is
the l ocal distr ibuto r in Singa pore, and warr ants Motor ola T wo-Wa y Rad io
Produ cts a nd Ac cesso ries (coll ectiv ely "Equi pment ') pu rchas ed in
Singa pore again st de fects in m ateri al a nd wo rkman ship under norm al us e
and s ervic e, fo r the foll owing peri ods of ti me:
Proof of P urcha se: Y ou ar e req uired to provi de pr oof o f pur chase as a
condi tion of re ceivi ng wa rrant y ser vice s. Yo u are enti tled to a
repla cemen t or repai r acc ordin g to the terms and condi tions of t his
Limit ed Wa rrant y if your produ ct is fou nd to be f aulty with in th e
Warra nty P eriod . Thi s Lim ited Warra nty exten ds to the origi nal p urcha ser
only and i s not tran sfera ble.
Alcom
Electronics Pte Ltd.
Hotline
: (65) 6841 2668
Singapore
Patent and Copyright Information
You w ill r eceiv e ins truct ions on ho w to ship the Equip ment, at y our
expen se, t o an autho rized repa ir ce ntre . To obtai n war ranty serv ice, you
must provi de Al com E lectr onics with : (a ) a c opy o f you r pur chase rece ipt,
bill of sa le or othe r com parab le pr oof of pu rchas e for the Equip ment; (b) a
writt en de scrip tion of th e pro blem; (c) the name and l ocati on of the
insta llati on fa cilit y (if appl icabl e) a nd (e ) you r pos tal a ddres s and cont act
telep hone numbe r. A lcom Elect ronic s wi ll be the sole deter minan t as to
wheth er th e Equ ipmen t is defec tive.
Who i s cov ered?
This Limit ed Wa rrant y app lies only to t he or igina l con sumer purc haser of t he
Equip ment, and is no t tra nsfer able.
What will Alcom Elec troni cs do ?
Alcom Elec troni cs, a t its opti on, w ill at no char ge ei ther repai r, o r rep lace
any d efect ive E quipm ent d uring the appl icabl e War ranty Peri od. A lcom
Elect ronic s may use funct ional ly eq uiva lent, reco nditi oned, refu rbish ed,
pre-o wned or ne w Equ ipmen t or parts at its d iscre tion. No d ata, softw are o r
appli catio ns ad ded t o Equ ipmen t, in clud ing b ut no t lim ited to pe rsona l
conta cts, games and ringe r ton es, w ill be re insta lled. To a void losin g suc h
data, soft ware and a pplic ation s, cu stom ers a re ad vised to c reate a ba ck up
prior to r eques ting servi ce.
How d o we obtai n War ranty Serv ice o r Ot her I nform ation ?
To ob tain warra nty s ervic e or infor mati on, p lease call :
What Other Limi tatio ns Ar e The re?
TO TH E EXT ENT P ERMIT TED B Y LAW , ALL COND ITION S, WA RRANT IES AND
TERMS NOT EXPRE SSLY CONTA INED IN TH IS LI MITED WARR ANTY ARE
EXCLU DED.
ANY I MPLIE D WAR RANTI ES, I NCLUD ING W ITHOU T LIM ITATI ON TH E IMP LIED
WARRA NTIES OF M ERCHA NTABI LITY AND F ITNES S FOR A PA RTICU LAR
PURPO SE, S HALL BE LI MITED TO T HE DU RATIO N OF THIS LIMIT ED WA RRAN TY,
OTHER WISE THE R EPAIR , REP LACEM ENT, OR RE FUND AS PR OVIDE D UND ER
THIS EXPRE SS LI MITED WARR ANTY IS TH E EXC LUSIV E REM EDY O F TH E
CONSU MER, AND I S PRO VIDED IN L IEU O F ALL OTHE R WAR RANTI ES, E XPRES S
OF IM PLIED . IN NO EV ENT S HALL MOTOR OLA. GIANT INTE RNATI ONAL LTD. OR
ALCOM ELEC TRONI CS PT E LTD BE L IABLE , WHE THER IN CO NTRAC T OR TORT
(INCL UDING NEGL IGENC E) FO R DAM AGES IN EX CESS OF TH E PUR CHASE PRI CE
OF TH E EQU IPMEN T, OR ANY SOFTW ARE, OR FO R ANY INDI RECT, INCI DENTA L,
SPECI AL OR CONS EQUEN TIAL DAMAG ES OF ANY KIND, OR L OSS O F REV ENUE
OR PR OFITS , LOS S OF BUSIN ESS, LOSS OF IN FORMA TION OR DA TA, SOFTW ARE
OR AP PLICA TIONS OR O THER FINAN CIAL LOSS ARISI NG OU T OF OR IN
CONNE CTION WITH THE ABILI TY OR INAB ILITY TO U SE TH E EQU IPMEN T, O R
ANY S OFTWA RE, T O THE FULL EXTE NT TH ESE D AMAGE S MAY BE D ISCLA IMED
BY LA W.
Some state s and juri sdict ions do no t al low t he li mitat ion o r exc lusio n
of in ciden tal o r con seque ntial dama ges, or l imita tion on th e len gth o f
an im plied warr anty, so t he ab ove l imit ation s or exclu sions may not
apply to y ou. T his L imite d War ranty giv es yo u spe cific lega l rig hts,
and y ou ma y als o hav e oth er ri ghts that vary from stat e to state or
from one j urisd ictio n to anoth er.
Laws in th e Uni ted S tates and other cou ntrie s pre serve for Motor ola c ertai n
exclu sive right s for copy right ed Mo toro la so ftwar e suc h as the e xclus ive
right s to repro duce and d istri bute copi es of the Motor ola s oftwa re.
Motor ola s oftwa re ma y onl y be copie d in to, u sed i n, an d red istri buted with ,
the E quipm ent a ssoci ated with such Moto rola softw are. No ot her u se,
inclu ding witho ut li mitat ion d isass embl y of such Motor ola s oftwa re or
exerc ise o f the excl usive righ ts re serv ed fo r Mot orola , is permi tted.
Products Covered
Equip ment as de fined abov e, un less
other wise provi ded f or be low.
1. D ecora tive Acces sorie s and
Cases . Dec orati ve co vers,
bezel s, Ph oneWr ap co vers and
cases .
2. C onsum er Tw o-Way Radi o
Acces sorie s.
3. P roduc ts an d Acc essor ies t hat
are R epair ed or Repl aced.
Warra nty Pe riod
One ( 1) ye ar fr om th e dat e of
purch ase b y the orig inal consu mer
purch aser of th e Equ ipmen t unl ess
other wise provi ded f or be low.
1. L imite d lif etime warr anty for
the l ifeti me of owne rship by t he
origi nal c onsum er pu rchas er of
the d ecora tive acces sory or
case.
2. T hirty (30) days from the date
of pu rchas e by the o rigin al
consu mer p urcha ser o f the
consu mer t wo-wa y rad io
acces sory.
3. T he ba lance of t he or igina l
warra nty o r for thir ty (3 0)
days from the d ate t he pr oduc ts
or ac cesso ries are r eturn ed to
the c onsum er, w hiche ver p eriod
is lo nger.
Exclusions
Norma l We ar a nd Te ar
: Per iodi c ma inten ance , and rep air a nd
repla ceme nt o f par ts d ue to nor mal w ear and tear, are not cove red b y th is
Limit ed W arra nty.
Batte ries : Mo torol a su pplie d ba tteri es w ill be re plac ed fr ee o f ch arge
withi n th e fi rst s ix ( 6) mo nths of t he d ate of pu rcha se of the Equi pmen t if
the c apac ity of th e ba tteri es f alls belo w 80 % of thei r rat ed c apac ity, or i f
the b atte ries deve lop a lea k.
Abuse & M isus e: De fect s or dama ge th at r esul t fro m: ( a) im prop er
opera tion , st orage , mi suse or a buse, acc iden t or negl ect, such as p hysi cal
damag e (c rack s, sc ratc hes, etc. ) to the surf ace o f th e Equ ipme nt r esult ing
from misu se; (b) c onta ct wi th l iquid , wa ter, rain , ex treme hum idit y or
heavy per spir ation , sa nd, d irt or th e li ke, extre me h eat, or f ood; (c) use of
the E quip ment for comm ercia l pu rpose s or sub jecti ng t he Eq uipm ent t o
abnor mal usag e or cond ition s; o r (d) oth er a cts w hich are not the fault of
Motor ola, Gia nt In tern ation al L td. O r Al com Elect roni cs, a re n ot co vere d
by th is L imit ed Wa rran ty.
Use o f No n-Mo torol a br anded Pro ducts and Acc essor ies: Defe cts or
damag e th at r esult fro m the use of N on-M otor ola b rand ed or cer tifie d
produ cts, acc essor ies, soft ware or o ther per ipher al e quipm ent are n ot
cover ed b y th is Li mite d War rant y.
Unaut hori zed Servi ce o r Mod ific ation : De fect s or dama ges r esul ting
from serv ice, test ing, adju stme nt, i nsta llat ion, main tenan ce, alte ratio n, o r
modif icat ion in an y wa y by some one o ther tha n Mot orol a, Gi ant
Inter nati onal Ltd. , Al com E lect ronic s or the ir au thor ized serv ice c entr es,
are n ot c over ed by thi s Lim ited Warr anty .
Alter ed E quip ment: Equ ipmen t wi th (a ) se rial numb ers or da te t ags t hat
have been rem oved, alt ered or o blite rate d; ( b) br oken seal s or sea ls th at
show evid ence of t ampe ring; (c) mism atch ed b oard seri al nu mber s; or (d)
nonco nfor ming or n on-M otoro la b rande d ho usin gs, o r pa rts, are not
cover ed b y th is Li mite d War rant y.
Commu nica tion Serv ices :
Defe cts, dam age, or f ailur e of the Equi pmen t
due t o an y co mmuni cati on se rvic e or sign al y ou ma y su bscri be t o or use
with the Equi pment are not cove red b y th is L imite d Wa rrant y.
Equip ment Pur chase d Ou tside of Singa pore :
This Lim ited Warr anty
does not exte nd to any Equi pmen t whi ch w as p urcha sed outsi de o f
Singa pore .
 Loading...