

Page 1

A
TM
THE UNION OF
PAGING AND CELLULAR
TECHNOLOGIES
User’s Guide
1
Page 2

INTRODUCTION
Your RSVP Numeric Display Pager turns any Motorola MicroTAC™ or retail pocket personal cellular telephone into the
ultimate personal communicator. RSVP also features a
removable and rechargeable, ultra-thin, Nickel-MetalHydride cellular battery.
RSVP slides onto the back of your phone in place of the
existing battery unit, providing the control and convenience of
a pager and a phone in a single unit.
RSVP allows you to manage your cellular phone traffic, return
calls at your convenience, screen calls , e xtend phone battery
life, and even remain accessible while your phone is turned
off.
Paging Features Summary:
●
Eight numeric message slots
●
Displays time of day
●
Message time stamping
●
Programmable alarm
●
Retains messages while with reminder alert
●
12-digit numeric display
●
Backlit display
●
Musical alert
●
Vibrate or audible mode
turned off and when
replacing battery
Battery Features Summary:
Fits any Motorola
●
Battery is detachable
●
MicroTAC or retail pocket from pager unit
personal cellular telephone
Powerful and small enough to carry in
●
Spare batteries are
●
environmentally friendly a shirt pocket
Nickel-Metal-Hydride
One hour talk time,
●
battery eight hours standby
USING THIS GUIDE
This user’s guide describes the following:
●
How to remove your
cellular phone’s existing pager in top operating
battery condition
●
Set up and operate your
pager battery and optional
2
●
Maintain your RSVP
●
Use the RSVP cellular
charger adapter
Page 3
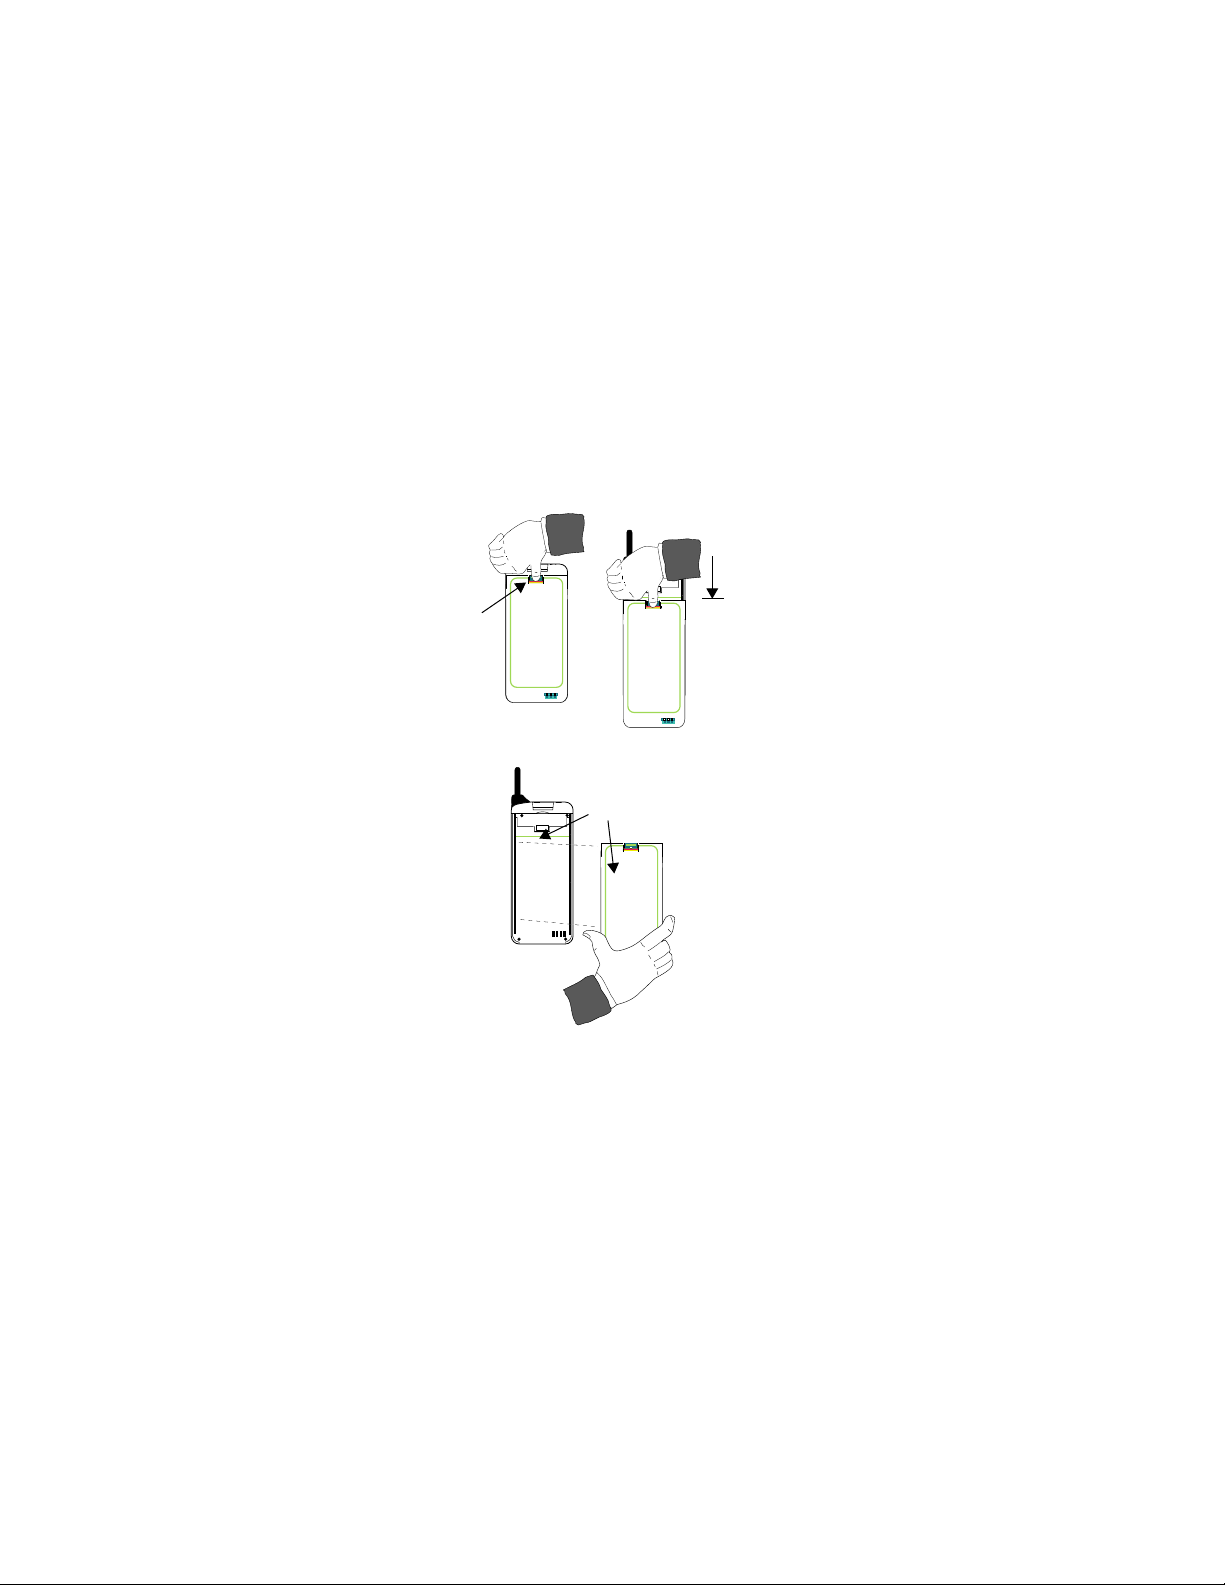
PROCEDURE FOR CONNECTING YOUR NEW
RSVP PAGER TO YOUR CELLULAR PHONE
Remove battery from any Motorola MicroTAC or retail pocket
personal cellular telephone in the following manner:
Slide
②
battery
downward
against
stop
①
Press and
hold down
battery
release
t
t
③
Lift battery
off cellular
phone
t
3
Page 4
4
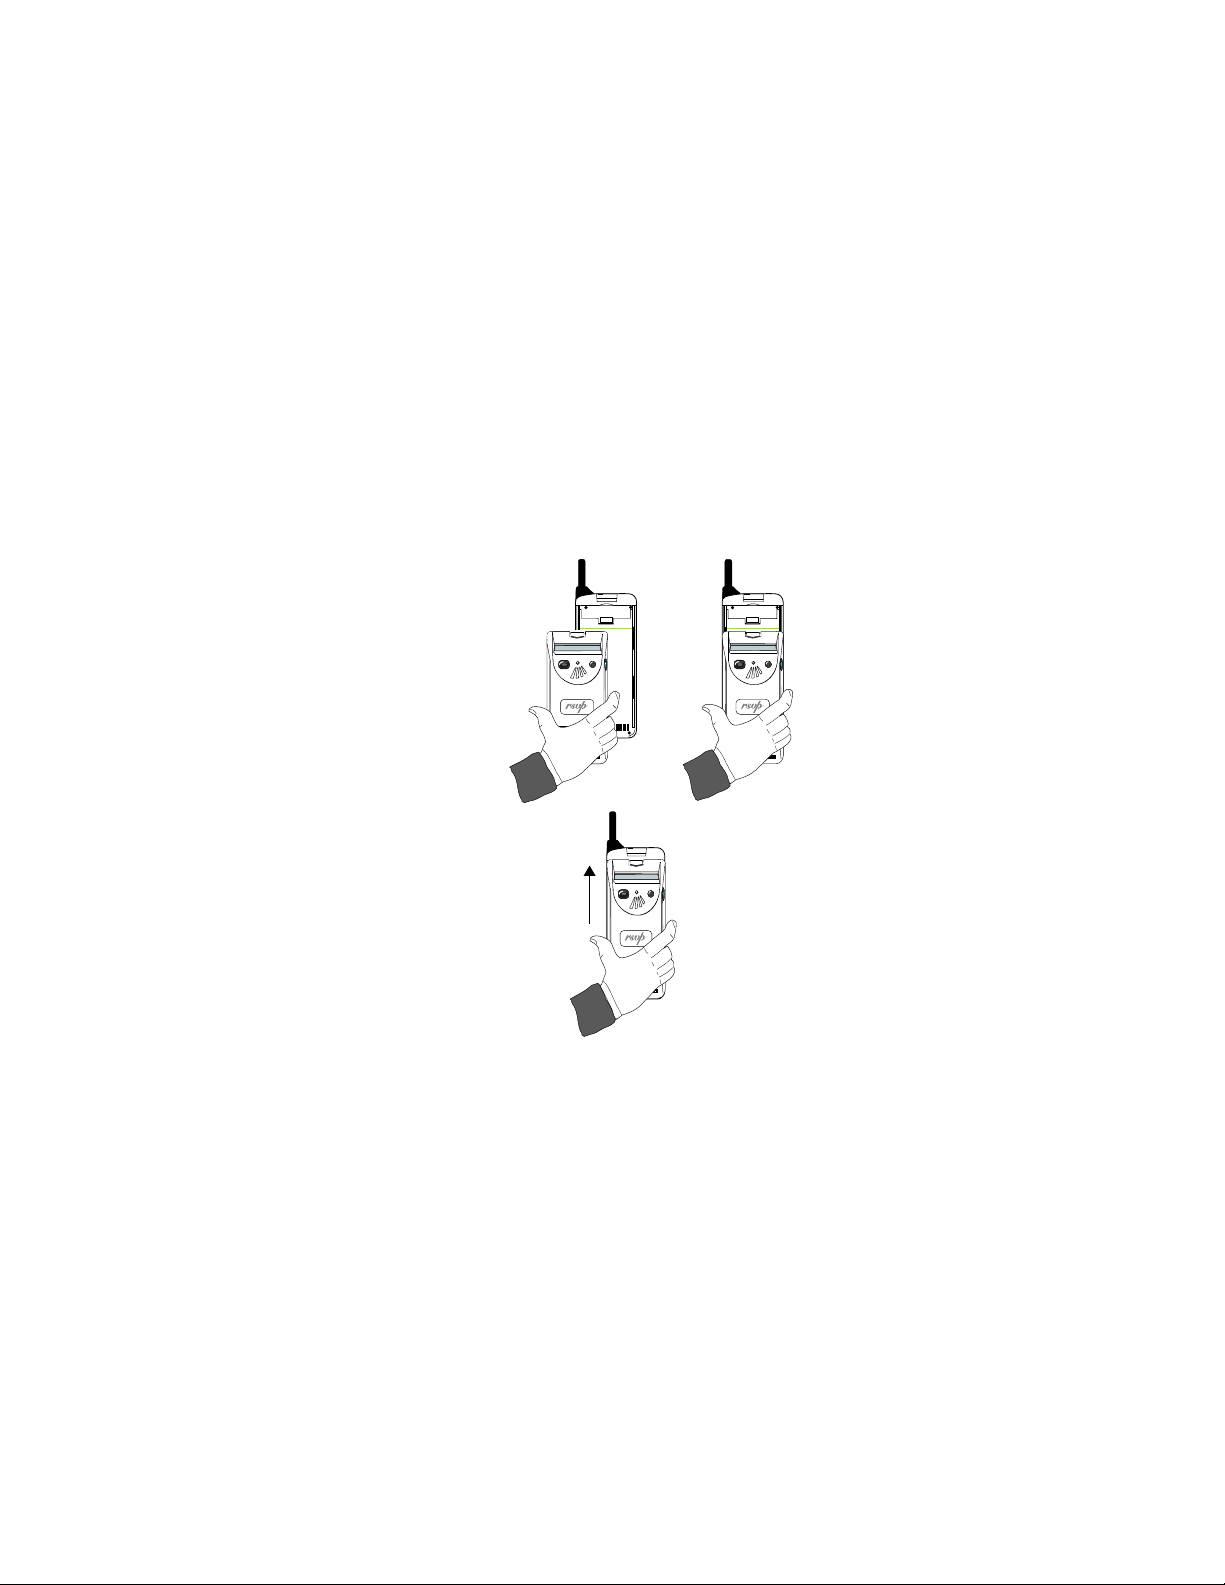
Note: Ensure the Nickel-Metal-Hydride battery is fully
charged and installed in the RSVP pager before performing
this procedure.
Install your RSVP pager in place of the cellular phone battery
in the following manner:
Set RSVP
②
①
Position RSVP
with display
end toward
phone
antenna
onto mounting
slide approximately
one inch below
battery release
③
Slide RSVP
up until pager
into placesnaps
PAGING SERVICE ACTIVATION
Paging service providers require certain procedures for activating your RSVP pager. Contact your service provider to
activate paging service.
Page 5

/
CONTROLS AND DISPLAY INDICATORS
The locations and descriptions of the RSVP pager controls
and display indicators are shown below:
Display
On/Read/
Select
Button
(W)
Pager Display:
Alarm
Indicator
Alert
Mode
Indicator
Message
Slot
Number
\ =
[
1:
10:47a
Time
of Day
12:48p
Alert/Backlight
Indicator
Backlight/Reset
Button (●)
Menu/Lock
Button
(X)
Battery Charger
Programmer
Contacts
Message
Lock
Indicator
B
Continuing
Message
Indicator
Message
Time
Stamp
5
Page 6

1.
2.
3.
TURNING YOUR PAGER ON
Press
W
that it is on.
The time of day and the “Alert Mode” indicator, silent (
audible (
to turn your pager on. Your pager will alert indicating
[
D
), is displayed.
) or
READING MESSAGES
The RSVP pager can receive up to eight 20-character messages. When a message is received, the pager alerts with an
audible or a vibrate alert, and a flashing alert indication.
Press any button to stop the alert. Display your message as
follows:
Press the
Messages that contain more than 12 characters are continued on a second screen. The (
screen exists.
Press
the second screen is automatically displayed after one
minute.
The last screen of your message displays the message slot
number and the time the message was received.
If a message is left unread, the pager emits a reminder alert
every two minutes, and the number of unread messages is
displayed.
The pager automatically returns to the main status display
after approximately eight seconds.
W
button to display your message.
B
) indicator means a second
W
to advance to the second screen. If not selected,
TURNING ON THE BACKLIGHT
In low light conditions, press ● on the display backlight.
Press ● again to turn off backlight or allow it to turn off automatically.
RESET
Pressing the ● button twice always resets the pager back to
the main display menu.
6
Page 7

1.
2
1.
2.
1.
2.
3.
4.
5.
CHANGING ALERT MODES
Press
X
depending on the current mode.
. To change the alert mode, press
For your pager to vibrate, it must be in the “silent” mode.
. Either “Silent?” or “Audio?” is displayed,
W
.
TURNING YOUR PAGER OFF
Press
X
Press
With the pager off, the clock is shown on the display, but not
the “Alert Mode” indicator.
until the “PAGER OFF?” prompt is displayed.
W
to turn the pager off.
SETTING THE ALARM
Your pager’s alarm can be set to alert you to a certain time of
day. Set the alarm as follows:
Press
X
Press
To move to the next digit, press
each digit, press
(On/Off, hours, minutes, AM/PM).
Press
Press the ● button twice to return to the main display
menu.
The
turned on. At the selected time, the alarm vibrates or emits a
unique 20-second alert and “ALARM” is displayed.
Press any button to stop the alarm alert.
until “SET ALARM?” appears on your display.
W
to select alarm on/off sequence.
X
. Repeat this process for each field
W
to turn the alarm on or off.
\
indicator appears on the display when the alarm is
W
. To advance through
SETTING THE TIME
Set the displayed time as follows:
Press
X
once.
Press
Press
Repeat process for each field (hours, minutes, AM/PM).
Press the ● button twice to return to the main display
menu.
until “SET TIME?” is displayed. Then press
X
until desired hour appears.
W
to move to the next digit.
W
1.
1.
2.
3.
4.
5.
7
Page 8

LOCKING AND UNLOCKING MESSAGES
Locked messages cannot be erased or overwritten by new
messages when memory is full. Also, they are not lost while
replacing the battery. Up to four messages may be locked at
one time. Lock your messages as follows:
(
L
Press
X
on the display to indicate your message is protected.
To unlock your message, press
locked message.
while reading your message. A lock
X
while reading the
)
appears
ERASING MESSAGES FROM MEMORY
Press
X
Press
messages.
The “ERASE ALL?” prompt is displayed if there are readunlocked messages in memory.
until “ERASE ALL?” appears on the display.
W
. This erases all of your read-unlocked
BATTERY FEATURES
The RSVP pager features a removable and rechargeable
Nickel-Metal-Hydride cellular battery unit. RSVP replaces
your cellular phone’s battery and provides charging contacts
in an identical location. Your existing cellular charger may be
used to charge your cellular/pager unit, or with the optional
adaptor, you may also charge a spare battery in your cellular
charger.
1.
2.
1.
2.
8
Page 9

BATTERY REPLACEMENT
Remove RSVP from your cellular telephone and replace the
RSVP battery as shown below:
ress release
hen slide pager
ownward away
rom antenna
Turn pager over,
③
insert tip of ball
pen under release
and pry up on
release, then lift
battery out of
pager
①
Release
②
Lift pager
away from
cellular
Install your new battery in the reverse order of removal.
9
Page 10

CHARGING YOUR BATTER Y
Your battery may be charged while attached to your cellular
phone or separately using the optional adapter shown in the
following illustration:
Place battery
into adapter
Cellular phone
with RSVP and
battery
with
or
battery
and insert into
chargerRSVP
RSVP
battery
Adapter
Charger has
two charging
locations
Refer to the charger manufacturer’s instructions for specific
use of your charger.
PROPER CARE
The RSVP pager is durable, reliable, and can provide many
years of dependable service, but it is a precision electronic
product. Water and moisture, excessive heat, and extreme
shock may cause damage to the pager. Avoid exposing your
pager to these conditions.
10
Page 11

CLEANING YOUR RSVP PAGER
To clean smudges and grime from the exterior of your RSVP
pager as well as your cellular phone, use a soft, non-abrasive
cloth moistened in a mild soap and water solution. Rinse the
surface using a second cloth moistened in clean water. Do
not use alcohol or other cleaning solutions.
REPAIR AND MAINTENANCE
Your RSVP pager properly handled is capable of many years
of trouble-free service. However, should it ever require service, Motorola’s Service Organization, staffed with specially
trained technicians, offers conveniently located repair and
maintenance facilities throughout the world.
PATENT INFORMATION
This Motorola product is manufactured under one or more
Motorola U. S. patents. A listing of these patents is provided
on the inside surface of the battery compartment. Other U. S.
patents covering this product are pending.
11
Page 12

© Copyright 1995, Motorola, Inc. All Rights Reserved. Motorola Derivative Technologies Division,
3301 Quantum Blvd., Boynton Beach, FL 33426, Printed in U.S.A. 10/95, t , Motorola, MicroTAC,
and RSVP are trademarks or registered trademarks of Motorola, Inc.
Contents of this manual subject to change without notice
12
Page 13

13
 Loading...