

Page 1

motorola.com
MX240a
Wireless Instant Messenger
6881041B80-A User's Guide >
Page 2
Welcome
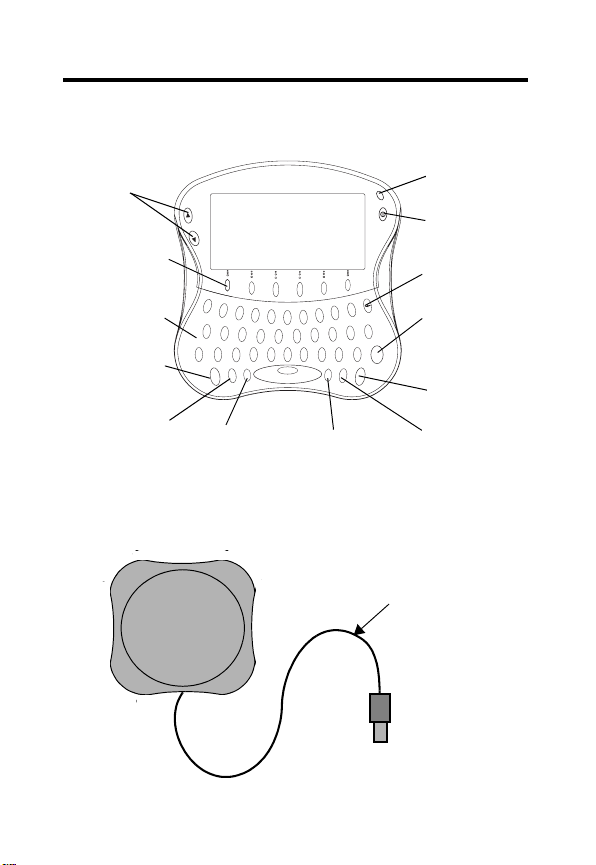
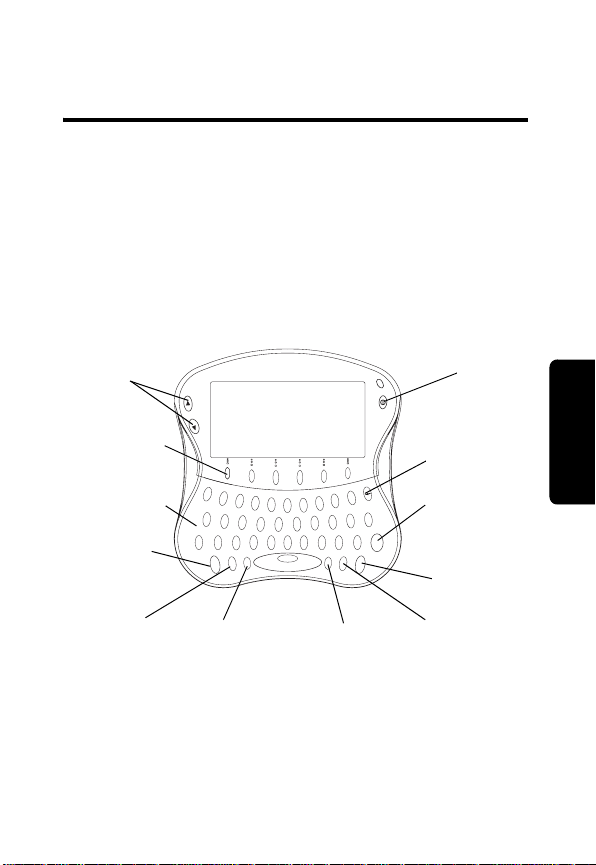
Handheld Unit
Up/Down
Scroll Keys
1
Status Light
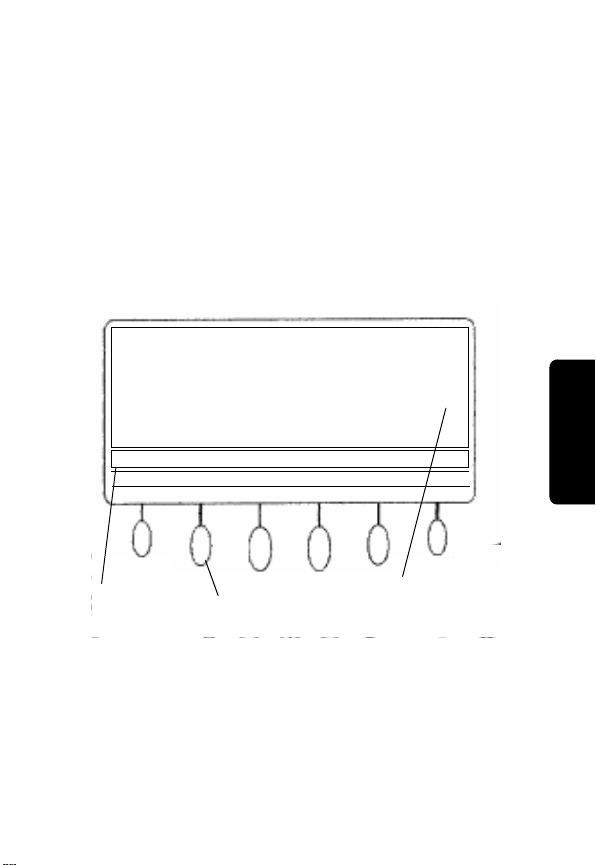
6 Option Keys
Keyboard
Who’s On?
Key
Menu Key
Base Unit
LCD Screen
1
2
Q
3
w
E
_
*
+
A
S
D
!
$
%
’
Z
X
V
C
M
E
CAP
who’s
N
on?
U
Caps Key
4
5
R
T
F
&
B
Base
=
G
warn
space
6
Y
<
N
0
9
8
P
7
O
I
U
\
H
>
M
"
J
#
,.
SYM
(
K
@
B
Y
E
020688a
:
)
;
L
/
SEND
?
TALK
Symbol Key
USB
Cable
USB Connector
Power Key
Backspace
Key
Send Key
Talk Key
Bye Key
Welcome
1
Page 3

MOTOROLA and the Stylized M Logo are registered in the
US Patent & Trademark Office. All other product or service names are
the property of their respective owners.
Microsoft and Windows are registered trademarks of Microsoft
Corporation. Windows Me and Windows XP are trademarks of
Microsoft Corporation.
© Motorola, Inc. 2002, 2003
Manual Number: 6881041B80-A
Software Copyright Notice
The Motorola products described in this manual may include
copyrighted Motorola and third party software stored in semiconductor
memories or other media. Laws in the United States and other
countries preserve for Motorola and third party software providers
certain exclusive rights for copyrighted software, such as the exclusive
rights to distribute or reproduce the copyrighted software. Accordingly,
Welcome
any copyrighted software contained in the Motorola products may not
be modified, reverse-engineered, distributed, or reproduced in any
manner to the extent allowed by law. Furthermore, the purchase of the
Motorola products shall not be deemed to grant either directly or by
implication, estoppel, or otherwise, any license under the copyrights,
patents, or patent applications of Motorola or any third party software
provider, except for the normal, non-exclusive, royalty-free license to
use that arises by operation of law in the sale of a product.
2
Page 4

Contents
Welcome . . . . . . . . . . . . . . . . . . . . . . . . . . . . . . . . . . . . .1
Handheld Unit . . . . . . . . . . . . . . . . . . . . . . . . . . . . . . . .1
Base Unit . . . . . . . . . . . . . . . . . . . . . . . . . . . . . . . . . . . 1
FCC and Interference Information. . . . . . . . . . . . . . . . .5
Important Safety Information. . . . . . . . . . . . . . . . . . . . .7
Getting Started . . . . . . . . . . . . . . . . . . . . . . . . . . . . . . .10
Overview . . . . . . . . . . . . . . . . . . . . . . . . . . . . . . . . . . 10
Service Requirements . . . . . . . . . . . . . . . . . . . . . . . . 10
Computer Requirements . . . . . . . . . . . . . . . . . . . . . . 10
What’s in the Box? . . . . . . . . . . . . . . . . . . . . . . . . . . .11
Installing the Battery . . . . . . . . . . . . . . . . . . . . . . . . . .12
Charging the Battery . . . . . . . . . . . . . . . . . . . . . . . . . 12
Status Light Indicator . . . . . . . . . . . . . . . . . . . . . . . 13
Installation and Setup. . . . . . . . . . . . . . . . . . . . . . . . . .15
Software Installation . . . . . . . . . . . . . . . . . . . . . . . . . .15
Hardware Installation . . . . . . . . . . . . . . . . . . . . . . . . .17
Handheld Power-Up and Registration . . . . . . . . . .17
PC Setup . . . . . . . . . . . . . . . . . . . . . . . . . . . . . . . . . . 19
Menu Configuration . . . . . . . . . . . . . . . . . . . . . . . . . .20
Connections . . . . . . . . . . . . . . . . . . . . . . . . . . . . . . 20
Alerts . . . . . . . . . . . . . . . . . . . . . . . . . . . . . . . . . . . 21
Options . . . . . . . . . . . . . . . . . . . . . . . . . . . . . . . . . . 22
Security . . . . . . . . . . . . . . . . . . . . . . . . . . . . . . . . . . 23
To set up security: . . . . . . . . . . . . . . . . . . . . . . . . . .23
Diagnostics . . . . . . . . . . . . . . . . . . . . . . . . . . . . . . . 24
Buddy List . . . . . . . . . . . . . . . . . . . . . . . . . . . . . . . .26
3
Page 5

Using Your MX240a Handheld. . . . . . . . . . . . . . . . . . . 27
Navigating the Menus . . . . . . . . . . . . . . . . . . . . . . . . 27
Handheld Key Functions . . . . . . . . . . . . . . . . . . . . 28
Option Keys . . . . . . . . . . . . . . . . . . . . . . . . . . . . . . 29
Available AOL Smileys . . . . . . . . . . . . . . . . . . . . . . 30
Entering Text . . . . . . . . . . . . . . . . . . . . . . . . . . . . . 30
Status Icons . . . . . . . . . . . . . . . . . . . . . . . . . . . . . . 31
Power Up and Logon a Handheld Unit . . . . . . . . . . . 32
Welcome Screen . . . . . . . . . . . . . . . . . . . . . . . . . . 32
Who’s Online Now Screen . . . . . . . . . . . . . . . . . . . 34
Sending and Receiving a Message . . . . . . . . . . . . . . 35
Sending a Warning . . . . . . . . . . . . . . . . . . . . . . . . . . 36
Incoming Chat Request . . . . . . . . . . . . . . . . . . . . . . . 36
Main Menu Screen . . . . . . . . . . . . . . . . . . . . . . . . . 37
Logoff Your IM Service . . . . . . . . . . . . . . . . . . . . . . 37
Invite Buddies to a Chat Session . . . . . . . . . . . . . . 37
Set Your Away Message . . . . . . . . . . . . . . . . . . . . 38
Register With a Base . . . . . . . . . . . . . . . . . . . . . . . 39
Changing Handheld Setup . . . . . . . . . . . . . . . . . . . 39
Beeps/LCD/Alerts Screen . . . . . . . . . . . . . . . . . . . 40
To Power Down Your MX240a Unit . . . . . . . . . . . . . . 40
Troubleshooting. . . . . . . . . . . . . . . . . . . . . . . . . . . . . . 41
Warranty . . . . . . . . . . . . . . . . . . . . . . . . . . . . . . . . . . . . 42
License Agreement for AOL® Instant Messenger™
Software . . . . . . . . . . . . . . . . . . . . . . . . . . . . . . . . . . . . 48
4
Page 6

FCC and Interference
Information
This device complies with Part 15 of the FCC Rules. Operation
is subject to the following two conditions:
• This device may not cause harmful interference; and
• This device must accept any interference received, including
interference that may cause undesired operation.
This equipment has been tested and found to comply with the
limits for a Class B digital device, pursuant to Part 15 of the FCC
Rules. These limits are designed to provide reasonable
protection against harmful interference in a residential
installation.
This equipment generates, uses, and can radiate radio
frequency energy and, if not installed and used in accordance
with the instructions, may cause harmful interference to radio
communications. However, there is no guarantee that
interference will not occur in a particular installation.
If this equipment does cause harmful interference to radio or
television reception, which can be determined by turning the
equipment on and off, the user is encouraged to try to correct the
interference with one or more of the following measures:
• Reorient or relocate the receiving antenna (that is, the
antenna for the radio or television that is “receiving” the
interference).
• Reorient or relocate and increase the separation between the
telecommunications equipment and the receiving antenna.
• Connect the telecommunications equipment into an outlet on
a circuit different from that to which the receiving antenna is
connected.
If these measures do not eliminate the interference, please
consult your dealer or an experienced radio/television technician
for additional suggestions. Also, the Federal Communications
Commission has prepared a helpful booklet, “How to Identify
and Resolve Radio/TV Interference Problems.” This booklet is
5
Page 7

available from the U.S. Government Printing Office,
Washington, D.C. 20402. Please specify stock number 004-00000345-4 when ordering copies.
The FCC requires this product to be serviced only by Motorola or
its authorized service agents. Changes or modifications not
expressly approved by Motorola could void not only the user's
authority to operate the equipment, but also the limited warranty.
6
Page 8

Important Safety
Information
Follow these safety precautions to reduce the risk of fire, electric
shock and injury to persons or property.
1. Keep all slits and openings of the equipment unblocked. Do
not set the equipment on a heating register or over a
radiator. Ensure that proper ventilation is provided at the
installation site.
2. Do not use while wet or while standing in water.
3. Do not use this product near water (for example, near a bath
tub, kitchen sink, or swimming pool).
4. Do not allow anything to rest on the power cord. Place the
power cord so that it will not be walked on.
5. Never insert objects of any kind into the product slits as that
may result in fire or shock.
6. Do not disassemble this product. If service or repair work is
required, contact the Motorola address found in the back of
this user’s guide.
7. Do not overload wall outlets and extension cords.
8. Avoid using during an electrical storm. Use a surge protector
to protect the equipment.
Unplug this equipment immediately if:
• The power cord or plug is damaged or frayed.
• Liquid has been spilled into the product.
• The product has been exposed to rain or water.
• The product has been dropped or damaged.
• The product exhibits a distinct change in performance.
Installation Guidelines
1. Read and understand all instructions and save them for
future reference.
2. Follow all warnings and instructions marked on the product.
3. Do not install this product near a bath tub, sink, or shower.
7
Page 9

4. Operate this product using only the power source indicated
on the marking label. If you are unsure of the power supply to
your home, consult your dealer or local power company.
5. Do not place this product on an unstable cart, stand, or table.
This product may fall, causing serious damage to the
product.
6. Adjust only those controls that are covered by the operating
instructions. Improper adjustment of other controls may
result in damage and will often require extensive work to
restore the product to normal operation.
7. Clean this product with a soft, damp cloth. Do not use
chemicals or cleaning agents to clean.
8. Use only the power supply that came with this unit. Using
other power supplies may damage the unit.
9. To avoid interference to nearby appliances, do not place the
base on or near a TV, microwave oven, or VCR.
Battery Safety Instructions
• Do not burn, disassemble, mutilate, or puncture the battery.
The battery contains toxic materials that could be released,
resulting in injury.
•
Caution:
There is a risk of explosion if you replace the battery
with an incorrect battery type. Use only the battery that came
with the product or an authorized replacement recommended
by the manufacturer.
• Keep batteries out of the reach of children.
• Remove batteries if storing over 30 days.
• Do not dispose of batteries in fire, which could result in
explosion.
• The rechargeable batteries that power this product
must be disposed of properly and may need to be
recycled. Refer to your battery’s label for battery type.
Contact your local recycling center for proper disposal
methods.
8
Page 10

Battery Charger Safety Instructions
Save these Instructions
1. Do not expose the charger to rain or snow.
2. Do not operate or disassemble the charger if it has received
a sharp blow, or has been dropped or damaged in any way.
3. Never alter the AC cord or plug provided with the unit. If plug
will not fit the outlet, have proper outlet installed by a qualified
electrician. An improper condition can result in a risk of
electric shock.
4. To reduce risk of damage to cord or plug, pull the plug rather
than the cord when disconnecting charger from AC
receptacle.
5. To reduce the risk of electric shock, unplug the charger from
the outlet before attempting any maintenance or cleaning.
6. Use of an attachment not recommended or sold by Motorola
may result in a risk of fire, electric shock, or personal injury.
7. Make sure that the cord is located so that it will not be
stepped on, tripped over, or subjected to damage or stress.
8. An extension cord should not be used unless absolutely
necessary. Use of an improper extension cord could result in
a risk of fire and/ or electric shock. If an extension cord must
be used, make sure that:
•
The pins on the plug of the extension cord are the same
number, size and shape as those on the plug of the
charger.
•
The extension cord is properly wired and in good
electrical condition.
•
The cord size is 18 AWG for lengths up to 100 feet, and
16 AWG for lengths up to 150 feet.
9. The supply cord of this charger cannot be replaced. If the
cord is damaged, call Motorola Product Services at
1-800-353-2729 in the USA or 1-888-390-6456 TTY (Text
Telephone).
9
Page 11

Getting Started
Overview
Your MX240a Wireless Instant Messenger is a shortrange, portable device that allows you to simultaneously
send and receive instant messages (IMs) and participate
in chat sessions over the Internet, both in and around your
home, from a single PC.
Service Requirements
In order to use the MX240a, you must have:
Getting Started
•
A personal computer connected to the Internet (see
“Computer Requirements” below).
•
An AOL Instant Messenger (AIM) account. You can
obtain an AIM account by visiting:
http://www.aim.com
Computer Requirements
The minimum PC requirements for proper operation are:
•
Windows 98SE, Windows ME, Windows 2000
Desktop, or Windows XP Home and Professional
•
Pentium 266 MHz processor or equivalent
•
64 Megabytes of memory
•
20 Megabytes of available disk space
•
Powered USB port (version 1.1 or later)
•
Modem or broadband Internet connection
10
Page 12
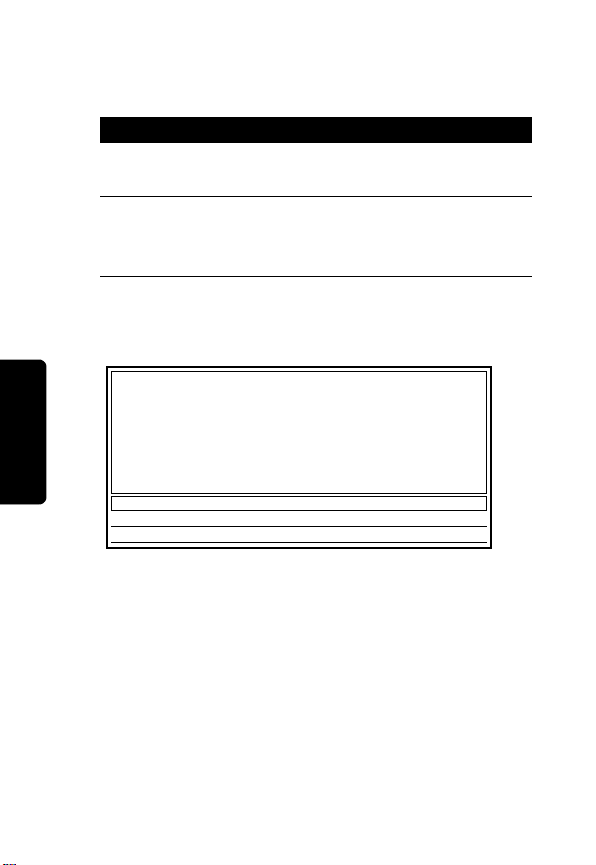
What’s in the Box?
Your MX240a includes:
•
One handheld unit
•
One base unit with USB connector
•
Rechargeable battery and battery charger
•
CD-ROM
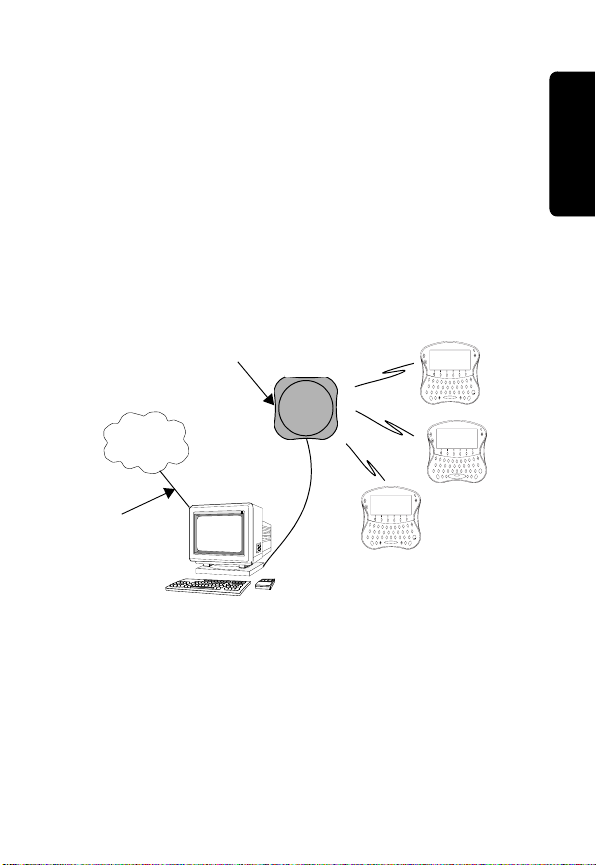
You can add handheld units that will work with your single
base unit (refer to following typical MX240a configuration).
Getting Started
Base Unit
Internet
USB
Broadband
or Modem
Connection
Note: One base is capable of operating
with up to seven handhelds simultaneously.
1
1
2
Q
3
4
w
5
E
R
T
!
@
#
$
%
A
S
D
F
G
_
-
=
+
’
Z
X
B
V
C
M
E
space
who’s
N
on?
U
1
1
2
Q
3
4
w
E
R
_
*
+
A
S
D
!
$
%
’
Z
X
V
C
M
E
CAP
who’s
N
on?
1
1
2
Q
3
4
w
E
R
!
@
#
A
S
D
_
-
+
’
Z
X
V
C
M
E
who’s
N
on?
U
U
0
9
8
P
5
7
6
O
I
T
U
Y
:
)
(
&
$
%
*
;
L
K
J
H
F
G
>
=
/
<
\
"
SEND
M
,.
N
B
?
B
space
Y
TALK
E
020688-O
Handheld Units
0
9
8
P
7
6
O
I
U
Y
:
)
(
&
*
;
L
K
J
H
>
/
<
\
"
SEND
M
N
,.
?
B
Y
TALK
E
020688-O
0
9
8
P
5
7
6
O
I
T
U
Y
:
)
(
-
\
=
"
;
L
K
F
J
H
G
>
&
/
<
#
@
SEND
M
N
,.
B
?
warn
B
SYM
Y
TALK
E
space
020688a
11
Page 13
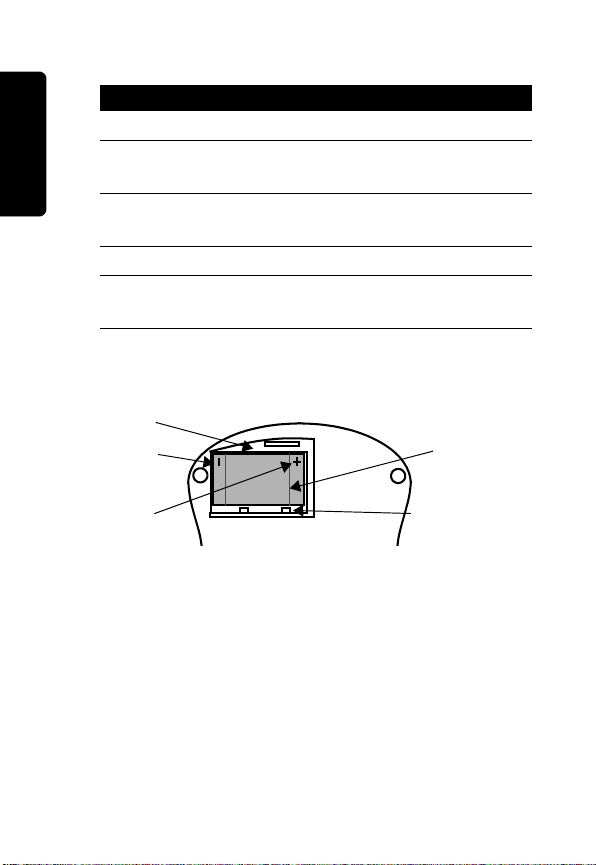
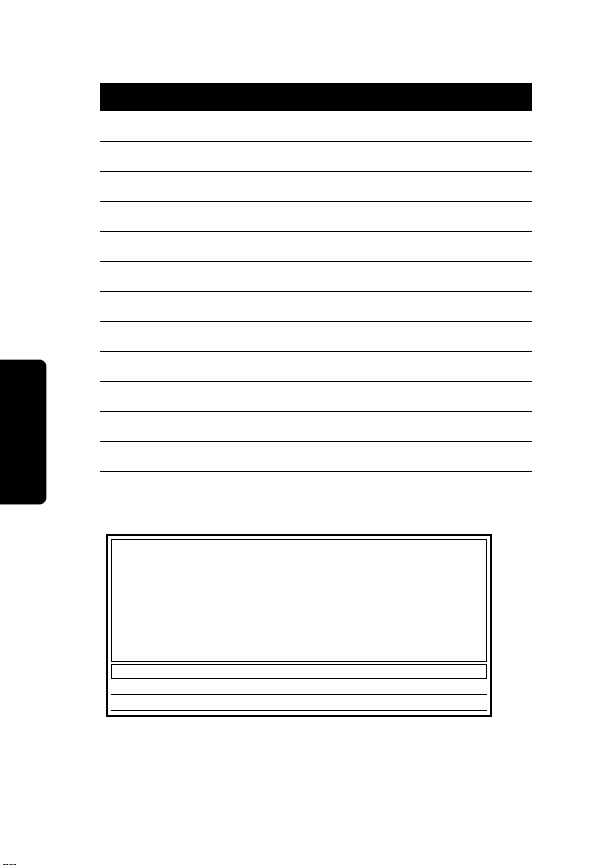
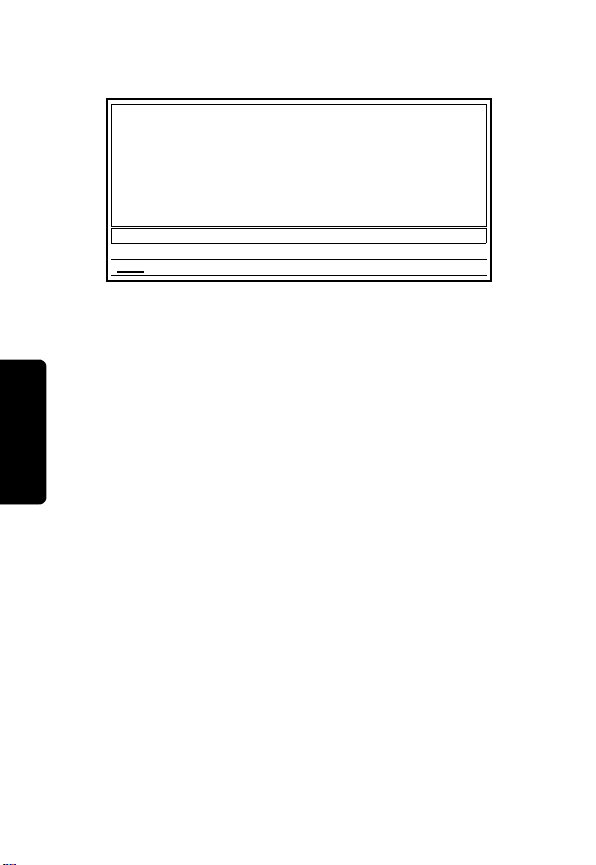
Installing the Battery
Action
1
Remove the battery from the packaging.
2
With the handheld unit face down, lift the battery
cover up at the top and remove it.
3
Ensure proper polarity alignment between the
battery and the battery compartment.
4
Insert the battery into the battery compartment.
5
Insert the tabs on the battery cover into the unit
slots and snap it into place.
Getting Started
Battery Compartment
Minus
Polarity
Plus
Polarity
Handheld (back view)
Battery Cover
Tab Slots
Charging the Battery
Charge the battery for 16 hours before using the MX240a
handheld for the first time. After first use, the battery will be
fully charged within 10 hours. You may use the handheld
while the battery is charging.
12
Battery
Page 14

Note:
The base unit does not contain a battery. It receives
its power from the USB port.
Action
1
Plug the charger into the charging connector at
the back of the handheld unit.
2
Plug the other end of the charger into an
electrical outlet.
Status Light Indicator
The status LED glows red when the battery is charging.
The status LED flashes red and a low battery indicator
displays on the screen when there is approximately
10 minutes of operational use remaining in the handheld
unit.
Battery Performance
•
Always use Motorola Original batteries and battery
chargers. The warranty does not cover damage
caused from using non-Motorola batteries and/or
battery chargers.
•
Some batteries perform best after several charge and
discharge cycles.
•
New batteries or batteries that have been stored for
long periods of time may require a longer charge time.
•
Maintain the battery at or near room temperature
when charging.
•
Do not expose batteries to temperatures below –10°C
(14°F) or above 45°C (113°F).
Getting Started
13
Page 15

•
When you do not intend to use the battery for a while,
store it uncharged in a cool, dark, dry place, such as a
refrigerator.
•
Over extended periods of time, batteries gradually
wear down and require longer charging times. This is
normal. If you charge your battery regularly and notice
a decrease in usage time or an increase in charging
time, then it is probably time to purchase a new
battery.
The rechargeable batteries that power this product
must be disposed of properly and may need to be
recycled. Refer to your battery’s label for battery
type. Contact your local recycling center for proper
Getting Started
disposal methods. Never dispose of batteries in a fire
because they may explode.
14
Page 16

Installation and Setup
To use your MX240a unit, the software and hardware must
be properly installed on your computer. Before you begin
installation, make sure your computer meets the minimum
requirements (see page 10).
Software Installation
Action
1
Insert the MX240a software CD-ROM into your
PC’s CD tray.
2
The Setup Wizard screen opens. Read the
instructions on the screen and click Next. If the
Setup Wizard screen does not open
automatically, click Start on the Windows toolbar
and select Run from the menu. At the prompt,
type the drive letter of your CD-ROM followed by
setup.exe, then click OK. For example, type:
D:\setup.exe
3
The License Agreement screen opens. Read
each document, click “I Agree”, and click Next
each time to agree to the terms.
Installation and Setup
15
Page 17

Installation and Setup
Action
4
The User Information screen opens. Enter your
name and organization and click Next.
Note:
if you are using Windows 2000 or
Windows XP, you may be asked whether you
want to allow shared access to the MX240a
application. Based on your selection, you can
restrict access to the administrator only or allow
access to anyone who uses the computer.
5
The Select Installation Folder screen opens. A
location to install the software will be suggested.
If this is the location you want, click Next. If you
want to use a different location, click Browse,
navigate to the desired location, and click OK.
Then click Next.
6
The Options screen opens. Read the option
descriptions and make any changes. When
finished, click Next.
7
The Confirm Installation screen opens. Click
Next.
8
The Installation Complete screen opens. Click
Finish to complete the installation.
9
Remove the CD-ROM and restart your computer.
If you selected the option for a shortcut to be created, you
will see the MX240a icon on your desktop. Double click the
icon to launch the application.
If you do not see the MX240a icon on your desktop, click
Start on the Windows taskbar and select MX240a in the
Programs list to launch the application.
16
Page 18

Hardware Installation
Action
1
Plug the USB connector at the end of the base
unit cable into an unused USB port on your
computer.
2
Place the base unit in any convenient location
away from your computer to prevent interference.
When the base is connected and the PC MX240a software
is running, a green icon ( ) appears in the taskbar status
area.
If the base is disconnected from your computer, a red icon
( ) appears in the taskbar status area. If neither icon
appears, launch the MX240a software.
Note:
The handheld unit is portable and therefore is not
hardwired to the base unit or your computer.
Handheld Power-Up and Registration
To register the handheld unit to the base unit:
Action
1
Ensure the MX240a software is running on your
PC and the base is connected. To check this,
look for the green icon ( ) in the taskbar status
area of your computer screen.
2
Press and hold ª to turn on the handheld unit.
The Welcome screen displays and the power on
alert sounds.
Installation and Setup
17
Page 19

Action
3
If you are prompted to enter the base ID, skip this
step and proceed to step 4.
If you are not prompted to enter the base ID,
press Menu
.
When the Menu screen appears,
press the option key below Regstr to register the
base.
4
Enter your base ID and press Send. The ID is a
6-character code located on the bottom of the
base unit (see page 18).
5
When the Registration screen opens on your
computer, enter a name for your handheld unit
and click Accept.
Note:
If you are registering a handheld that was last
registered to a different base, after step 1 press Menu
then select the Regstr option.
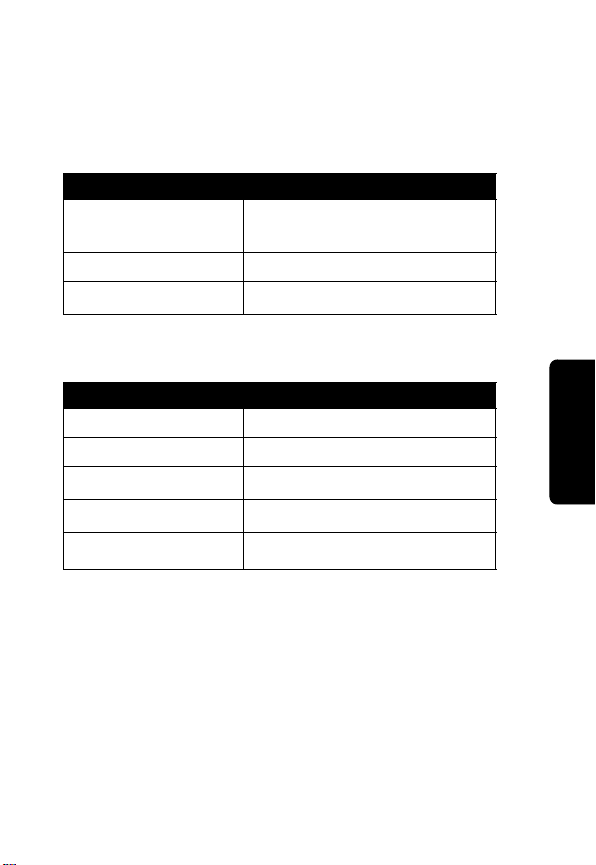
Location of your Base
Installation and Setup
BASE ID: XXXXXX
Unit’s ID
USB
Cable
,
18
Base Unit
(rear view)
USB Connector
Page 20

PC Setup
After your handheld unit is registered to your base unit,
configure the software options for your MX240a unit.
Action
1
Click on the MX240a shortcut icon on your
computer desktop to start the MX240a program
if it is not already running.
If you do not see the MX240a icon on your
desktop, click Start on the Windows taskbar and
select MX240a in the Programs list to launch the
application if it is not already running.
2
Right click the MX240a unit icon that appears in
the status area on the taskbar of your computer.
3
Select Setup from the shortcut menu.
4
From the pulldown list select either Default to set
up all your active handheld units or select the
name of the handheld unit you want to set up.
Click OK.
5
The Setup for (unit name) menu appears
containing the list of configurable areas for your
handheld.
Installation and Setup
Note:
To obtain help, click the Help button.
19
Page 21

Menu Configuration
The configurable items in the menu are:
•
Connections
•
Alerts
•
Options
•
Security
•
Diagnostics
•
Buddy List
Connections
To choose the proper connection for your MX240a unit:
Action
1
Click the Connections tab.
2
Under Internet Connection, click Modem or Local
Area Network (LAN).
3
Under Modem Connections, click “Automatically
Dial Internet Connection” or “Require Manual
Installation and Setup
Dialing of Internet Connection” (typically
Automatically Dial is selected).
4
If your system uses a proxy server, check the
appropriate box and enter the requested
information.
5
When all information has been entered, click
Apply.
Note:
You can customize the way the MX240a will dial up
the Internet through your PC. To do this, click the Help
button to open the online help screen. The article
20
Page 22

“Connecting to the Internet” and the tips in the “Common
Problems” section contain valuable information.
Alerts
The MX240a has the following alert types:
•
Power On (this alert is not available for user
configuration)
•
New Message
•
Contact Online
•
Contact Offline
•
Message Sent
•
Service Disconnected
•
Service Connected
•
Out of Range
•
Return to In-Range
•
Enter Sleep Mode
To customize the alerts for your MX240a unit:
Action
1
Highlight the alert you want to change and click
Browse.
2
Select a different sound file and click Open.
3
Click the blue Play button to hear the alert you
have selected.
4
Click the red Stop button to stop the play.
5
Increase or decrease the volume of an alert by
clicking the slider bar left or right.
Installation and Setup
21
Page 23

The alert sound you have selected can be modified by
clicking on Music Editor. This option allows you to modify
the play rate, scale, note duration, and volume of an alert.
If you do not want to hear any sound for a given alert,
highlight the alert and click the box labeled “Disable Alert
on Handheld”. When you are satisfied with your selection,
click OK.
Options
You can control who can send you instant messages. To
do this, you first must log into AOL Instant Messenger
(AIM):
•
Connect to the Internet through your Internet service
provider.
•
Click the Options tab.
•
Click on AOL Instant Messenger in the Select a
Service box.
•
Enter your screen name and password.
To control who can send you instant messages, click the
desired options under the Options tab:
Installation and Setup
•
Allow All Users to Contact me
•
Allow Only Users on my Buddy List to Contact me
•
Block All Users
If you would like to allow only a specific list of screen names
to send you instant messages, select the Allow Only Users
Below option. Then click the Add Name button and enter a
screen name. It will then appear in the box.
If you would like to block only a specific list of screen
names from sending you instant messages, select the
22
Page 24

Block Only the Users Below option. Then click the Add
Name button and enter a screen name. It will then appear
in the box.
You can also select or deselect the following checkboxes:
•
Show Accept Message Dialogue for Buddies not on
my Buddy List
•
Show Announcements when users enter/leave
•
Block incoming chat invitations
Security
To set up security:
Action
1
Click the Security tab.
2
Select the name of a registered handheld.
3
Click -----> to move it to the Deactivated list, or
click <----- to move it to the Active list.
or
Click Remove to remove the selected handheld
completely.
Note:
Deactivating a handheld renders it
temporarily inoperative but device settings are
retained. Removing a handheld deletes the
device settings. Once removed, a handheld must
be re-registered with the base to resume
operation.
Installation and Setup
23
Page 25

To deactivate all handhelds for a period of time, click the
“Disable Handhelds Beginning At” box. Then select a time
from the first pulldown list and a duration from the second
pulldown list. During the time period specified, all
handhelds are deactivated.
Diagnostics
To test your Internet connection:
Action
1
Make sure you are connected to the Internet,
then click the Diagnostics tab.
2
Click the Start Test button. A login dialog box
opens.
3
Select a service to test (in this case, AOL Instant
Messenger). A login dialog box opens.
4
Enter your AOL screen name and password,
then click OK.
Note:
Make sure your computer is “On Line” and
that your handheld unit is powered up.
Installation and Setup
Pass or Fail Test Results indicate the status of important
connections. A green box indicates the connection is
operation properly. A red box indicates the connection is
not operating.
24
Page 26
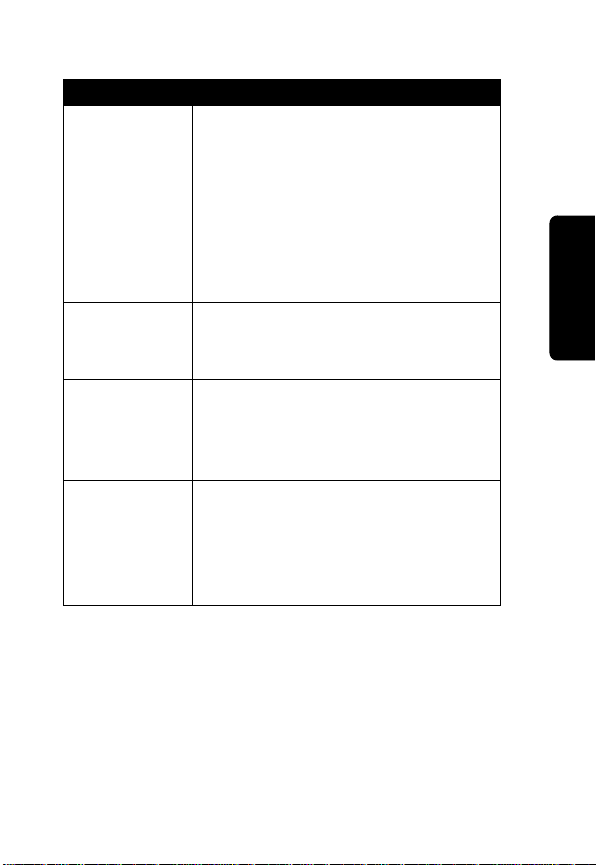
When a connection fails:
Failed Check
Internet
Connection
Base to
Handheld
Link
USB Link Make sure the base cable is plugged
IM Network
Service
If you are using a modem, make
sure it is connected to the Internet. If
you are using a LAN or broadband
connection, make sure the
connection is functioning. If you are
using a firewall or proxy server,
make sure the system is configured
properly.
Make sure the handheld is charged,
turned on, and registered with the
base unit.
into the computer’s USB port. If you
are using a USB Hub, make sure it is
a “powered” Hub.
Make sure you log in with the correct
user name and password. Try to
access using the AOL Instant
Messenger to test the Network
Service.
Installation and Setup
25
Page 27

Buddy List
To manage your Buddy List:
Action
1
Click the Buddy List tab.
2
Select a service to test (in this case, AOL Instant
Messenger). A login display box opens.
3
Enter your AOL screen name and password,
then click OK. Your screen name’s Buddy List
displays.
4
Click the +Buddy button to add a new buddy.
5
Click the +Group button to add a new group.
Organize your buddies into 5 or fewer groups for
optimal display on your handheld. Never assign
the same buddy to more than one group.
6
Select a buddy or group and click the xRemove
button to delete them from your list.
Note:
You can also manage your Buddy List through AOL
Instant Messenger (AIM) on your PC. Changes you make
Installation and Setup
to your Buddy List through the MX240a software will be
reflected when you log on to the regular AIM client and
vice versa.
26
Page 28
Using Your MX240a Handheld
Make sure your computer is logged on to your Internet
service provider and the battery in the MX240a handheld
unit is fully charged.
Navigating the Menus
Up/Down
Scroll Keys
Option Keys
Keyboard
Who’s On?
Key
Menu Key
1
2
Q
3
w
E
_
*
+
A
S
D
!
$
’
Z
X
C
M
E
CAP
who’s
N
on?
U
Caps Key
1
4
5
7
6
R
T
U
Y
-
\
=
F
H
G
>
&
<
%
M
N
B
V
warn
space
Symbol Key
8
I
"
J
#
,.
SYM
9
O
(
K
@
B
Y
E
020688a
Power Key
Backspace
Key
0
P
)
L
/
?
TALK
:
;
SEND
Send Key
Using Your MX240a Handheld
Talk Key
Bye Key
27
Page 29

Handheld Key Functions
•
Power Key (ª)—press and hold longer than 1 second
to turn power on or off.
•
Up/Down Keys (
only (see page 30).
•
6 Option Keys—select various options.
•
Menu Key—press to access options such as login and
logoff, chat, register with a base, and set LCD contrast
and alert volume.
•
Backspace Key (¡)—affects Send Text area only;
press to delete incorrect text entry.
•
Who’s On? Key—press to switch to Who’s Online
Now screen.
•
Talk Key—press to switch to Talk screen.
•
Bye Key—press to remove the selected IM session.
•
Sym Key (™)—press to enter numbers or symbols
shown on the keys above the letters; also to display
Smileys above option keys (see page 30). Press
activate symbols.
twice to lock symbols on;
locked on until you press
•
Send Key—press to send information.
¢©
)—use to scroll main text area
5
displays on the screen. Press ™
6
displays. Symbols remain
™
again.
™
to
28
Using Your MX240a Handheld
•
Cap Key (®)—press to enter capital letters; also to
display Smileys above Option keys (see page 30)
Press
®
once to capitalize the next letter entered. 3
displays on the screen. Press
®
twice to lock caps on
Page 30
and 4 displays on the screen. Caps remain locked on
until you press
®
again.
Option Keys
When you press ® or ™, 3 or 5 displays on the screen. In
addition, Smileys are displayed above each option key.
To send a Smiley, press the corresponding option key. The
Smiley’s text equivalent appears in the Send Text Area as
shown in the following screen.
5
:):(
Talking to johnfast
bcadef
Using Your MX240a Handheld
Send Text
Area
Press Option Keys
to Insert Smileys
Indicates
Symbol Mode
29
Page 31
Available AOL Smileys
Smiley Meaning
a
b
c
d
e
f
h
j
k
n
o
p
Entering Text
Main Text Area
Smiling
Winking
Frowning
Sticking-out tongue
Yelling
Kissing
Laughing
Foot-in-mouth
Embarrassed
Crying
Lips-are-sealed
Cool
Send Text Area
Option Key Label Area
The Entering Text screen shows the areas where you can
Using Your MX240a Handheld
enter text. Unlike typical keyboard text entry, with the
MX240a unit, you enter text via thumb typing.
30
Status/Query Text Line
Page 32
Status Icons
There are 2 types of status icons that appear on your
screen.
•
Buddy status icons:
Status Icon Description
1
2
7
•
Device status icons:
Status Icon Description
3
4
5
6
8
Buddy is online using a
mobile device
Buddy is idle
Buddy is away
Capitals
Capitals Locked
Symbols
Symbols Locked
Alert Tone Off
Using Your MX240a Handheld
31
Page 33
Power Up and Logon a Handheld
Unit
Action
1
Make sure the battery in the handheld unit is fully
charged.
2
Press and hold ª until the unit powers on. The
Welcome screen displays and the Power On
alert sounds.
Welcome Screen
Welcome!
MX240a V1.0
Copyright 2002
Motorola
Patents Pending
Select a service
AIM
To logon a handheld unit:
•
If your handheld can see an active base that you
previously registered with, you are asked to select a
service. Push the option key below AIM, then login
using your AIM screen name and password.
•
If your handheld cannot see an active base that you
previously registered with, you will see a message
Using Your MX240a Handheld
stating that it could not contact the base. Move closer
32
Page 34

to the base and press the Exit option to try to connect
again.
•
If you have previously registered with this base and
still cannot see the base, refer to “Troubleshooting” on
page 39.
If the base is operating and you have not previously used
that base:
Action
1
Press Menu to enter the Setup screen.
2
Press Regstr to register with the base.
3
When prompted, enter the 6-character ID printed
on the bottom of the base and press Send.
4
A dialog box opens asking you to accept the
registration request from the handheld. Click the
Accept button in the dialog box.
5
If you are prompted to select a service, press the
option key below AIM.
6
Enter your screen name on the Send Text line
and press Send.
7
Enter your password and press Send. The Who’s
Online Now screen displays.
Using Your MX240a Handheld
33
Page 35
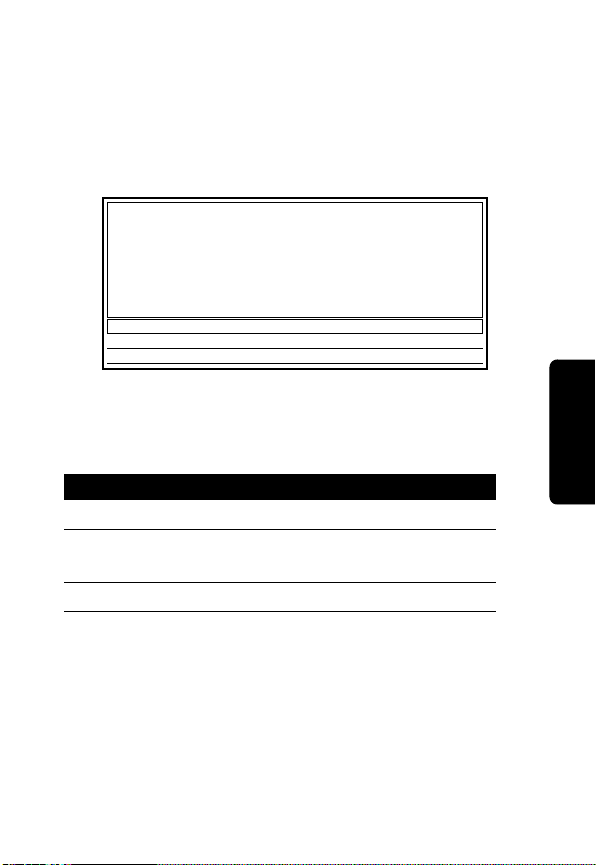
Who’s Online Now Screen
Who s Online Now
1>buddy A
2>buddy B
3>Buddy C
4>buddy D
Press a number key to talk
group
The Who’s Online Now screen shows all of your buddies
from your Buddy List who are currently online.
Notes:
•
Only buddies who are currently online are displayed
on the Who’s Online Now screen.
•
If no buddies in a group are online, no group is shown
on the option keys.
•
A total of 60 online buddies can be spread across all
groups.
•
Only the first 13 characters of the buddy name are
displayed.
34
Using Your MX240a Handheld
•
The buddy status is shown next to the buddy name. 7
indicates the person is away and
1
indicates a mobile
device is being used.
Page 36

Sending and Receiving a Message
To send messages to a buddy:
Action
1
Select the buddy you want to talk to from the
Who’s Online Now list by pressing the number
associated with the name.
2
The Talk screen displays. The line below the text
entry area will show you who you are talking to
and their warning level.
3
The first 6 characters of each buddy name are
displayed at the bottom of the screen above the
option keys. The buddy’s name you selected is
underlined.
4
Enter the message and press Send. The Send
Message alert sounds. You are now in a private
chat with the buddy you selected.
Note:
To add a Smiley to your message, press ™
or
®
to display the available Smileys, then press
the option key under the Smiley you want to
include. Double press
™
or ® to lock them on.
Using Your MX240a Handheld
35
Page 37

To receive messages from a buddy:
Action
1
When your buddy responds with a message, the
New Message alert sounds and the LED flashes
green if you are not in the IM session.
Note:
While you are in a private chat and you
receive another message, the name of the buddy
sending the new message appears above an
option key. To switch between conversations,
press the option key below the name of the
buddy you want to talk to.
2
Press Talk to talk to your buddies.
3
Press Who’s On? to see which of your buddies is
online.
4
Press Talk to switch back to your conversation.
5
When the screen fills with text, up/down arrows
are displayed. To see more text, scroll up or
down by pressing
6
Press BYE to end the currently selected IM
session.
¢
or ©.
Sending a Warning
To send a warning to the person you are talking to, press
and release
™
, then press and release Space.
Incoming Chat Request
When you receive an incoming chat request you will be
Using Your MX240a Handheld
asked to Join Chat with <
36
screen name
>. You will be
Page 38
given the option of Yes or No on two of the option keys.
Press the option key below your desired choice. If you do
not respond to the chat invitation, it will be declined after a
short time.
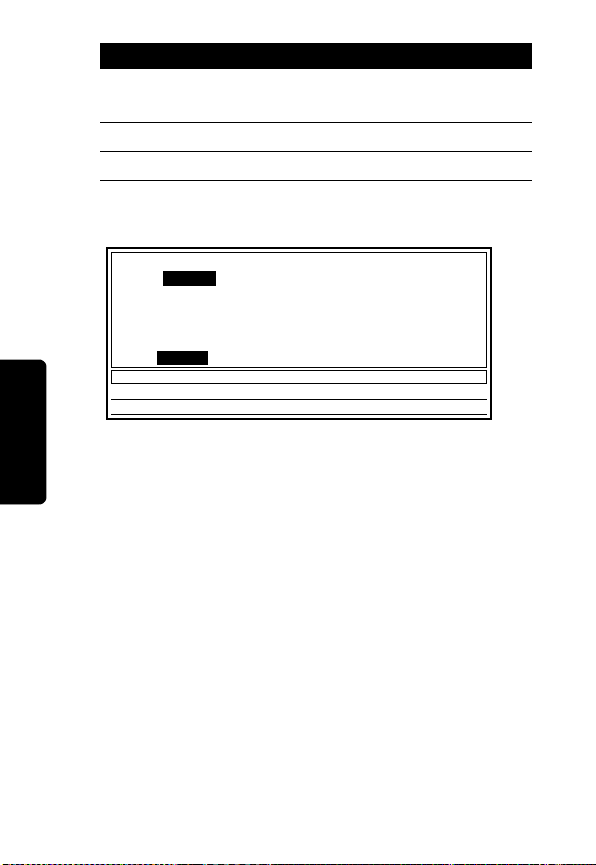
Main Menu Screen
Logoff- Logoff from the service
Add- Add Buddies to a Chat
Away- Set Your Away Message
Regstr- Register with a Base
Setup- Change Beeps/LCD/Alerts
Exit- Exit this menu
Choose an option
Logoff Invite Away
Regstr
Setup Exit
Logoff Your IM Service
To logoff your handheld from the IM service:
Action
1
Press Menu to display the Main Menu.
2
Press Logoff. The handheld logs off and the
display returns to the Main Menu.
3
Press Exit.
Using Your MX240a Handheld
Invite Buddies to a Chat Session
You can talk to up to six of your buddies at the same time
by adding them to your chat session.
37
Page 39

To add buddies to a chat session:
Action
1
Press Menu to display the Main Menu.
2
Press Invite.
3
Press Curren to add buddies to your current chat
session, or New to add buddies to a new chat
session.
4
Enter the number of each buddy you want to add
to the chat session and press Send.
Set Your Away Message
Action
1
Press Menu to display the Main Menu.
2
Press Away.
3
Enter the number of the Away message you
want.
4
Press Add if no Away messages were previously
stored or if you want to add a new message.
5
Enter your Away message (for example, Went to
the Mall) and press Send. A buddy who sends
you a message automatically receives your Away
message.
Note:
You can store a maximum of 5 Away
messages. The message is shortened if it is
longer than 29 characters.
6
Press ImBack when you return. If a buddy sent
Using Your MX240a Handheld
you a message while you were away, the status
LED flashes green.
38
Page 40

Action
7
Press Talk to display the Talk screen and read
the message.
To delete your Away message:
Action
1
Press Menu to display the Main Menu.
2
Press Away.
3
Press Delete.
4
Enter the number associated with the Away
message you want to delete.
5
Press Exit to return to the Main Menu.
6
Press Exit again.
Register With a Base
To register a handheld unit with a base or to re-register a
handheld unit to a new base, see page 16.
Changing Handheld Setup
To modify the alert volume, LCD contrast, and key beeps:
Action
1
Press Menu to display the Main Menu.
2
Press Setup.
3
Press Vol-/Vol+ to decrease or increase the
volume.
4
Press Beeps to turn key beeps on or off.
Using Your MX240a Handheld
39
Page 41
Action
5
Press Light or Dark to increase or decrease the
display contrast.
6
Press Exit to return to the Main Menu.
7
Press Exit again.
Beeps/LCD/Alerts Screen
Alert Volume Key Beeps
Off ‘’’’’’’______Max Off
LCD Contrast
Light ______________Dark
Adjust Your Beeps/LCD/Alerts
Vol- Vol+ Beeps Dark ExitLight
To Power Down Your MX240a Unit
Press ª for 2 seconds.
40
Using Your MX240a Handheld
Page 42

Troubleshooting
Your MX240a unit comes with a diagnostic program
installed. However, the following error messages may
appear while you are installing or using your MX240a
unit:
Error Message Action
Can’t find base Make sure your PC software is
running and the base unit is
plugged into the USB port of the
PC.
Incorrect User
Name or Password
Entered
Your network
connection has
been lost
Network connection
could not be
reestablished
Re-enter User Name or
Password. Make sure
not locked on.
Program will attempt to
reconnect; if service is restored,
you will be returned to where you
were when disconnected.
Try again later to reconnect.
®
or ™ is
Troubleshooting
41
Page 43

Warranty
MOTOROLA LIMITED WARRANTY FOR PERSONAL
COMMUNICATION PRODUCTS, ACCESSORIES AND
SOFTWARE PURCHASED IN THE UNITED STATES OR CANADA
What Does this Warranty Cover?
Subject to the exclusions contained below, Motorola, Inc. warrants its
telephones, pagers, messaging devices, and consumer two-way
radios that operate via Family Radio Service or General Mobile
Radio Service (“Products”), Motorola-branded or certified
accessories sold for use with these Products (“Accessories”) and
Motorola software contained on CD-Roms or other tangible media
and sold for use with these Products (“Software”) to be free from
defects in materials and workmanship under normal consumer
usage for the period(s) outlined below. This limited warranty is a
consumer's exclusive remedy, and applies as follows to new
Motorola Products, Accessories and Software purchased by
consumers in the United States or Canada, which are accompanied
by this written warranty:
42
Page 44

Products Covered Length of Coverage
Products and Accessories
as defined above, unless
otherwise provided for
below.
Decorative
and Cases. Decorative
covers, bezels,
PhoneWrap™ covers and
cases.
Monaural Headsets.
buds and boom headsets
that transmit mono sound
through a wired connection.
Consumer Two-Way Radio
Accessories
Products and Accessories
that are Repaired or
Replaced
EXCLUSIONS
Normal Wear and Tear. Periodic maintenance, repair and
replacement of parts due to normal wear and tear are excluded from
coverage.
Batteries.
80% of their rated capacity and batteries that leak are covered by this
limited warranty.
Accessories
Ear
Only batteries whose fully charged capacity falls below
One (1) year from the date of
purchase by the first consumer
purchaser of the product unless
otherwise provided for below.
Limited lifetime warranty for the
lifetime of ownership by the first
consumer purchaser of the
product.
Limited lifetime warranty for the
lifetime of ownership by the first
consumer purchaser of the
product.
Ninety (90) days from the date of
purchase by the first consumer
purchaser of the product.
The balance of the original
warranty or for ninety (90) days
from the date returned to the
consumer, whichever is longer.
43
Page 45

Abuse & Misuse. Defects or damage that result from: (a) improper
operation, storage, misuse or abuse, accident or neglect, such as
physical damage (cracks, scratches, etc.) to the surface of the
product resulting from misuse; (b) contact with liquid, water, rain,
extreme humidity or heavy perspiration, sand, dirt or the like,
extreme heat, or food; (c) use of the Products or Accessories for
commercial purposes or subjecting the Product or Accessory to
abnormal usage or conditions; or (d) other acts which are not the
fault of Motorola, are excluded from coverage.
Use of Non-Motorola Products and Accessories.
damage that result from the use of Non-Motorola branded or certified
Products, Accessories, Software or other peripheral equipment are
excluded from coverage.
Unauthorized Service or Modification.
resulting from service, testing, adjustment, installation,
maintenance, alteration, or modification in any way by someone
other than Motorola, or its authorized service centers, are excluded
from coverage.
Altered Products.
or date tags that have been removed, altered or obliterated; (b)
broken seals or that show evidence of tampering; (c) mismatched
board serial numbers; or (d) nonconforming or non-Motorola
housings, or parts, are excluded from coverage.
Communication Services.
Products, Accessories or Software due to any communication
service or signal you may subscribe to or use with the Products,
Accessories or Software is excluded from coverage.
Products or Accessories with (a) serial numbers
Defects, damages, or the failure of
Defects or damages
Defects or
44
Page 46

Software
Products Covered Length of Coverage
Software.
to physical defects in the
media that embodies the
copy of the software (e.g.
CD-ROM, or floppy disk).
Exclusions
Software Embodied in Physical Media. No warranty is made that
the software will meet your requirements or will work in combination
with any hardware or software applications provided by third parties,
that the operation of the software products will be uninterrupted or
error free, or that all defects in the software products will be
corrected.
Software NOT Embodied in Physical Media.
embodied in physical media (e.g. software that is downloaded from
the internet), is provided “as is” and without warranty.
Who is Covered?
This warranty extends only to the first consumer purchaser, and is
not transferable.
What will Motorola Do?
Motorola, at its option, will at no charge repair, replace or refund the
purchase price of any Products, Accessories or Software that does
not conform to this warranty. We may use functionally equivalent
reconditioned/refurbished/pre-owned or new Products, Accessories
or parts. No data, software or applications added to your Product,
Accessory or Software, including but not limited to personal contacts,
games and ringer tones, will be reinstalled.
Applies only
Ninety (90) days
date of purchase
Software that is not
from the
45
Page 47

To avoid losing such data, software and applications please create a
back up prior to requesting service.
How to Obtain Warranty Service or Other Information
USA
Canada
TTY
For
designated above for the product with which they are used.
You will receive instructions on how to ship the Products,
Accessories or Software, at your expense, to a Motorola Authorized
Repair Center. To obtain service, you must include: (a) a copy of your
receipt, bill of sale or other comparable proof of purchase; (b) a
written description of the problem; (c) the name of your service
provider, if applicable; (d) the name and location of the installation
facility (if applicable) and, most importantly; (e) your address and
telephone number.
What Other Limitations Are There?
ANY IMPLIED WARRANTIES, INCLUDING WITHOUT LIMITATION
THE IMPLIED WARRANTIES OF MERCHANTABILITY AND
FITNESS FOR A PARTICULAR PURPOSE, SHALL BE LIMITED TO
THE DURATION OF THIS LIMITED WARRANTY, OTHERWISE
THE REPAIR, REPLACEMENT, OR REFUND AS PROVIDED
UNDER THIS EXPRESS LIMITED WARRANTY IS THE
EXCLUSIVE REMEDY OF THE CONSUMER, AND IS PROVIDED
IN LIEU OF ALL OTHER WARRANTIES, EXPRESS OR IMPLIED.
IN NO EVENT SHALL MOTOROLA BE LIABLE, WHETHER IN
CONTRACT OR TORT (INCLUDING NEGLIGENCE) FOR
Phones
Pagers
1-800-548-9954
Two-Way Radios
and Messaging Devices
All Products 1-800-461-4575
TTY 1-888-390-6456
Accessories
and
1-800-331-6456
Software
, please call the telephone number
1-800-353-2729
46
Page 48

DAMAGES IN EXCESS OF THE PURCHASE PRICE OF THE
PRODUCT, ACCESSORY OR SOFTWARE, OR FOR ANY
INDIRECT, INCIDENTAL, SPECIAL OR CONSEQUENTIAL
DAMAGES OF ANY KIND, OR LOSS OF REVENUE OR PROFITS,
LOSS OF BUSINESS, LOSS OF INFORMATION OR DATA,
SOFTWARE OR APPLICATIONS OR OTHER FINANCIAL LOSS
ARISING OUT OF OR IN CONNECTION WITH THE ABILITY OR
INABILITY TO USE THE PRODUCTS, ACCESSORIES OR
SOFTWARE TO THE FULL EXTENT THESE DAMAGES MAY BE
DISCLAIMED BY LAW.
Some states and jurisdictions do not allow the limitation or exclusion
of incidental or consequential damages, or limitation on the length of
an implied warranty, so the above limitations or exclusions may not
apply to you. This warranty gives you specific legal rights, and you
may also have other rights that vary from state to state or from one
jurisdiction to another.
Laws in the United States and other countries preserve for Motorola
certain exclusive rights for copyrighted Motorola software such as
the exclusive rights to reproduce and distribute copies of the
Motorola software. Motorola software may only be copied into, used
in, and redistributed with, the Products associated with such
Motorola software. No other use, including without limitation
disassembly of such Motorola software or exercise of the exclusive
rights reserved for Motorola, is permitted.
47
Page 49

License Agreement for AOL®
Instant Messenger™ Software
The AOL Instant Messenger software (the "Software") is provided to
you free of charge, "AS IS," subject to the terms and conditions of
this License Agreement (the "Agreement"). Please read this
Agreement in full before using the Software. ONLY INDIVIDUALS
WHO HAVE AGREED TO THE TERMS AND CONDITIONS OF
THIS AGREEMENT MAY USE THE SOFTWARE AND ACCESS
THE AOL INSTANT MESSENGER SERVICE (THE "SERVICE").
BY CLICKING BELOW, YOU AGREE TO USE THE SOFTWARE
AND SERVICE AS PROVIDED IN THIS AGREEMENT.
1. Limited License. Subject to the terms and conditions of this
Agreement, AOL grants you a limited, non-exclusive license to use the
Software to access the Service only as an authorized user of such Service.
2. Restrictions on Use. You may not create or use any software other
than the Software provided by AOL to enter your screen name and
password or to access the Service, without the express written
authorization of AOL. You may not modify, reverse engineer, decompile or
disassemble the Software or in any way ascertain, decipher, or obtain the
communications protocol for accessing the Service. You may not adapt,
alter, modify, translate, or create derivative works of the Software without
the express written authorization of AOL. You may not block, disable or
otherwise affect any advertising, advertisement banner window, links to
other sites and services, or other features that constitute an integral part of
the Software and Service. You may not incorporate, integrate or otherwise
include the Software or any portion thereof (including the communications
protocols) into any software, program or product that communicates,
accesses, or otherwise connects with the Service or any other instant
messaging, Internet, or online service.
48
Page 50

You further agree to abide by all laws and regulations in effect
regarding your use of the Software and Service and agree to
indemnify AOL, its officers, agents, employees and directors for any
damages incurred as a result of a violation of this paragraph. Finally,
you may not authorize or assist any third party to do any of the things
described in this paragraph.
3. Additional Terms. You acknowledge that there may be features or
additional services made available on the Service for a fee. If you choose to
utilize such features or services, you agree to be bound by any additional
terms and conditions governing the use of such features or services.
4. Your Representations. You represent and warrant that you have the
adequate legal capacity to enter into this Agreement. You further represent
and warrant that you will use the Software only for lawful purposes and in
accordance with this Agreement, and that you will not use the Software to
violate any law, regulation or ordinance or any right of AOL or any third
party, including, without limitation, any right of privacy, publicity, copyright or
trademark.
5. Terms of Use and Privacy Policy. This Service participates in the
Netscape Network. If you become a member of the Netscape Network, then
the Netscape Network Member Agreement and Privacy Policy (the
"Netscape Network Policies") govern your use of this Service. You can view
these policies at http://about.netscape.com/Networkprivacy/index.html and
http://about.netscape.com/Networkterms/index.html. If you are not a
member of the Netscape Network, then the AOL.com Terms of Use and
privacy policy (the "AOL Policies") govern your use of this Service. You can
view these policies at http://www.aol.com/copyright.html and http://
www.aol.com/info/privacy.html. Both AOL and the Netscape Network
reserve the right to terminate your license to the Software and your access
to the Service without notice, if, in either AOL or the Netscape Network's
sole discretion, there has been a violation of the AOL Policies or the
Netscape Network Policies, whichever are applicable to you.
49
Page 51

6. Termination. Should you breach this Agreement, your right to use the
Software shall terminate immediately and without notice. You may also
terminate this Agreement by simply discontinuing use of the Software. In
the event of any termination of this Agreement, the restrictions on your use
of the Software as set forth in Paragraph 2 ("Restrictions on Use") shall
survive such termination, and you agree to be bound by those terms.
7. No support by AOL. You understand that you use the Software and
Service at your own risk and that AOL provides no assistance or support for
your use of the Software or Service.
8. Disclaimer of Warranty. THE SOFTWARE IS PROVIDED "AS IS,"
WITHOUT WARRANTIES OF ANY KIND, EITHER EXPRESS OR
IMPLIED, INCLUDING WITHOUT LIMITATION WARRANTIES THAT THE
SOFTWARE IS (A) FREE OF DEFECTS OR ERRORS, (B) VIRUS FREE,
(C) ABLE TO MEET ANY REQUIREMENTS OF YOU OR ANYONE ELSE,
(D) ABLE TO OPERATE ON AN UNINTERRUPTED BASIS, (E)
MERCHANTABLE, (F) FIT FOR A PARTICULAR PURPOSE OR (G) NONINFRINGING, UNLESS SUCH WARRANTIES ARE LEGALLY INCAPABLE
OF EXCLUSION. AOL SHALL HAVE NO LIABILITY WITH RESPECT TO
USE OF THE SOFTWARE.
9. Limitation of Liability. NEITHER AOL, ITS EMPLOYEES,
DISTRIBUTORS, SUPPLIERS, DIRECTORS, NOR AGENTS SHALL BE
LIABLE FOR ANY INDIRECT, INCIDENTAL, CONSEQUENTIAL,
SPECIAL, OR EXEMPLARY DAMAGES, INCLUDING BUT NOT LIMITED
TO LOST PROFITS AND LOST DATA, IN ANY WAY ARISING OUT OF OR
RELATING TO THIS AGREEMENT, EVEN IN THE EVENT SUCH PARTY
HAS BEEN ADVISED AS TO THE POSSIBILITY OF SUCH DAMAGES.
BECAUSE SOME STATES OR JURISDICTIONS DO NOT ALLOW THE
EXCLUSION OR THE LIMITATION OF LIABILITY FOR CONSEQUENTIAL
OR INCIDENTAL DAMAGES, IN SUCH STATES OR JURISDICTIONS,
AOL'S LIABILITY SHALL BE LIMITED TO THE EXTENT PERMITTED BY
LAW.
50
Page 52

10. No Trademark License. No license is granted to you in this Agreement,
either expressly or implicitly, to use any trademark, service mark, names, or
logos of AOL, including America Online, AOL, AOL Instant Messenger,
Instant Messenger, AIM and the Running Man logo. AOL owns all
intellectual property in the Software and the proprietary AOL name space
database, including but not limited to AOL components and algorithms and
access to the Service server complex. AOL and the Netscape Network, if
applicable, owns all customer data collected through the Service
registration process.
11. Injunctive Relief. You acknowledge that the Software contains AOL's
proprietary and confidential information, and that disclosure of such
information or misuse of the Software will give rise to irreparable injury to
AOL, inadequately compensable in damages. Accordingly, AOL may seek
and obtain injunctive relief against the breach or threatened breach of the
foregoing undertakings, in addition to any other legal remedies that may be
available.
12. Construction. If any part of the Agreement is held invalid or
unenforceable, that portion shall be construed to reflect the parties' original
intent, and the remaining portions remain in full force and effect. The laws
of the Commonwealth of Virginia, excluding its conflicts-of-law rules, govern
this Agreement, and you expressly agree that jurisdiction for any claim or
dispute arising from the use of the Software resides in the federal and state
courts of the Commonwealth of Virginia.
51
 Loading...