

Page 1
Some of the contents in this manual may differ
from your phone depending on the software of
the phone or your service provider.
©2008 AT&T Knowledge Ventures All rights
reserved. Subsidiaries and affiliates of AT&T Inc.
provide products and services under the AT&T brand.
TM
MOTORAZR2
User Guide
V9x
Page 2

Page 3
HELLOMOTO
The MOTO
pictures, music, and videos without opening the flip. The external display also shows you alerts for new text
messages, calendar events, or missed calls. Precision craftsmanship delivers the best of beauty and dependability
in a thin device!
The Perfect Mobile Form
rock-solid physique is lean and provocative.
Interaction Attraction
( see page 70), music (
AT&T Mobile Music™ Portfolio
streaming music, ringtones, and music videos (see page 59).
Your Personal Paparazzi
removable microSD memory (page 87), and keep every precious moment in high definition.
For more information: To learn even more about your phone’s features, see the Web tutorial online at
www.motorola.com/support/v9
RAZR
2™ V9x mixes a slim design with media power. The large external display lets you open your
—Sculpted, contoured and molded into the perfect form—the MOTO
—When your phone is closed, touch keys on the external display let you open pictures
[
see page 61), or videos (csee page 72).
—Listen to your music, discover the latest songs, music news, concert updates,
—Use the 2 Megapixel camera to capture video & still images (page 68), store them on
.
RAZR
2V9x
1
Page 4
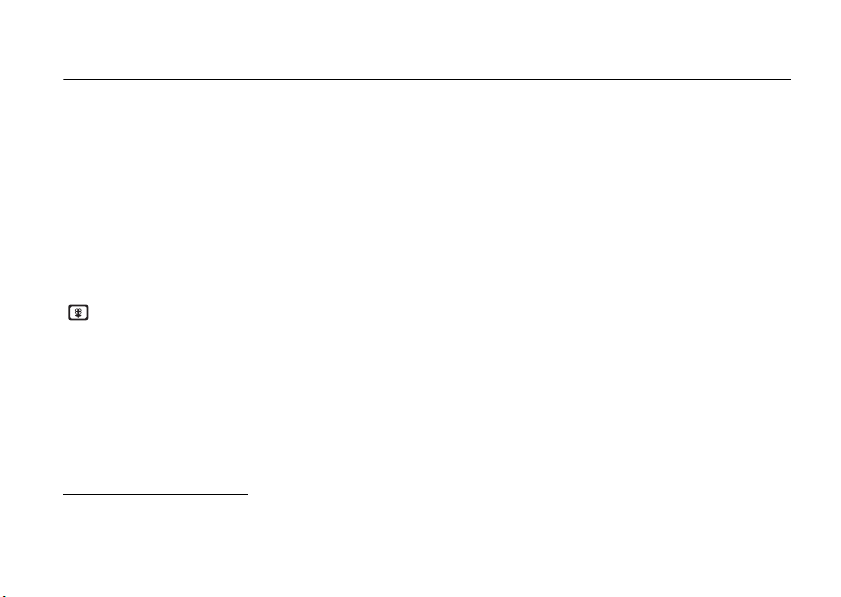
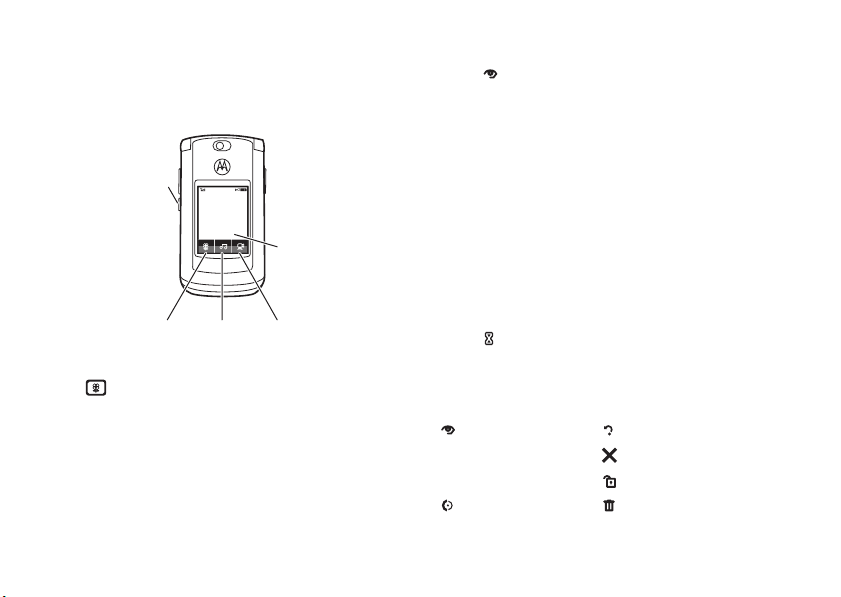
Here’s a quick anatomy lesson.
Open menus, select menu items.
Navigate menus.
Left Soft Key
Volume Keys
Right Soft Key
Open the camera (press when the phone
is open, hold when the phone is closed).
MEdia Net
Smart Key
Press to dial & answer calls.
Open Cellular Video.
Turn on/off, hang up, exit menus.
Hold to use voice dial.
Press and hold to call voicemail.
Clear/Back Key
Did you know:
processor that’s 10 times faster than the original RAZR phone. A processor this fast in a phone this slim may cause
the phone to feel a bit warm at times when in use, especially when engaged in activities that take advantage of its
Your phone helps you perform tasks quickly and efficiently, thanks to a powerful 512 MHz
Press and hold to change ring to vibrate
and back.
Microphone
2
Page 5
processing power, such as when listening to music, watching videos, or surfing the Web.
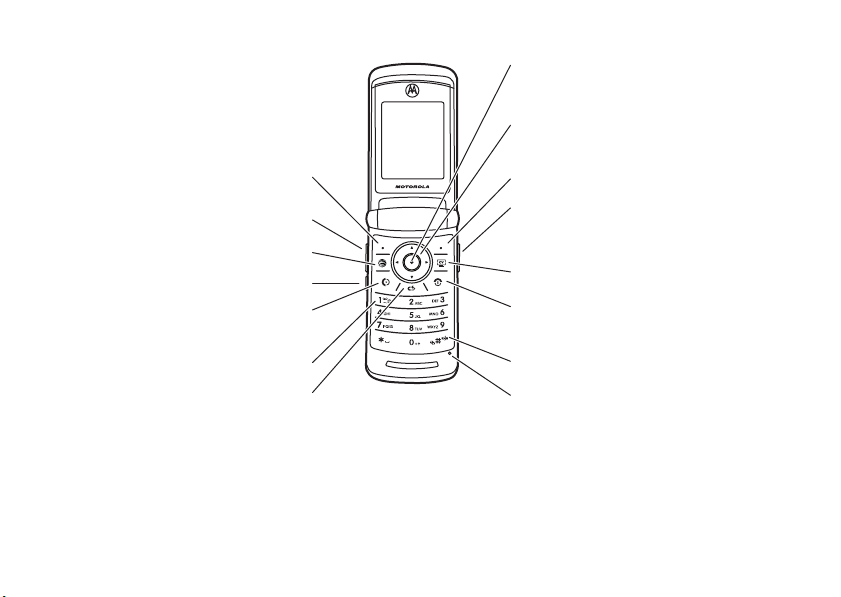
Battery Charging Indicator
Volume Keys
Open ring style menu or adjust camera
zoom when flip is closed.
Camera Lens
®
Bluetooth
Connection Indicator
Camera Key
Smart Key
Scroll through ring style menu. Hold the
smart key to lock or unlock all side keys.
External Display
Use the Touch Keys, Smart Key, and
Volume Keys to access your pictures,
Accessory Connector Port
music, and videos.
Insert battery charger
& phone accessories.
See pictures. Play music.
Touch Keys: After you press the
[
or c keys on the external display, use the V v display keys to scroll to
Play videos.
items, and use the smart key to go back. Special icon keys appear in the external display when you receive a text
message, miss a call, or when an alarm or event reminder occurs.
3
Page 6
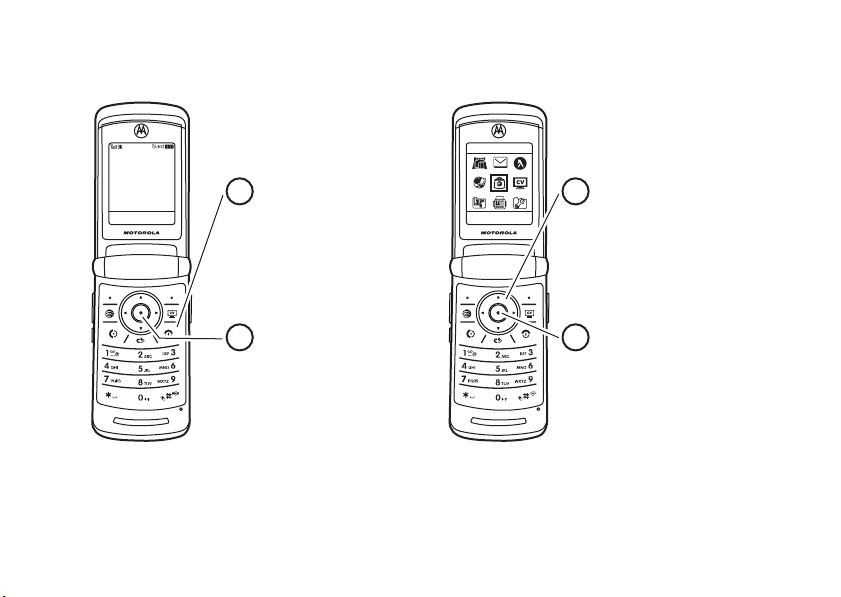
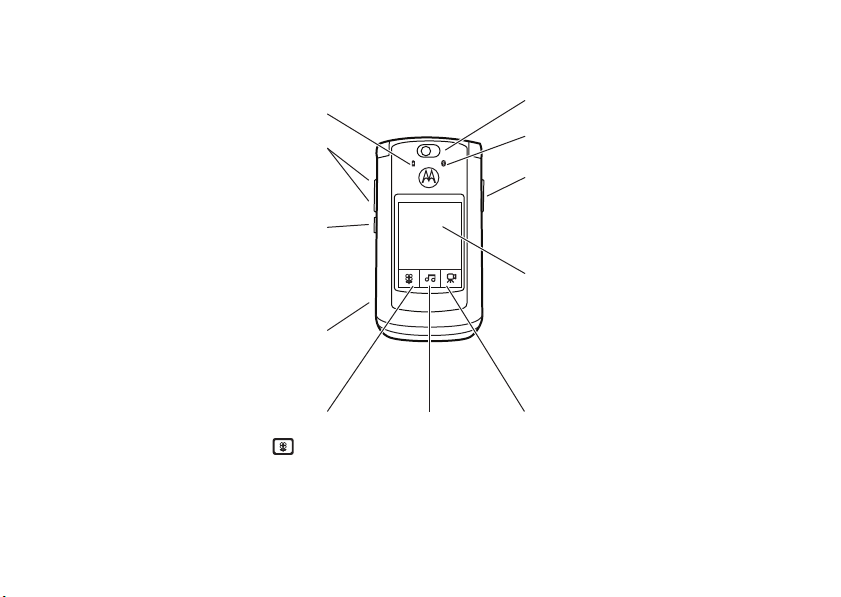
Home Screen Main Menu
Press the Navigation Key
up, down, left, or right
(
S
) to highlight a menu
feature.
3
Press the
Center Key (
s)
to
select it.
4
Options Main Menu
Options
Back
AT&T Mall
Press and hold the
Power Key O
for a few
seconds or until the
display lights up to turn
on your phone.
1
Press the
Center Key (
s
) to open
the
Main Menu
.
2
AT& T
12:00pm
To change your home screen shortcuts and your main menu appearance, see page 36.
4
Page 7

Motorola, Inc.
Consumer Advocacy Office
1307 East Algonquin Road
Schaumburg, IL 60196
www.hellomoto.com
Note:
Do not ship your phone to the above address. If you need to return
your phone for repairs, replacement, or warranty service, please contact
the Motorola Customer Support Center at:
1-800-331-6456 (United States)
1-888-390-6456 (TTY/TDD United States for hearing impaired)
1-800-461-4575 (Canada)
Certain mobile phone features are dependent on the capabilities and
settings of your service provider’s network. Additionally, certain features
may not be activated by your service provider, and/or the provider’s
network settings may limit the feature’s functionality. Always contact your
service provider about feature availability and functionality. All features,
functionality, and other product specifications, as well as the information
contained in this user’s guide are based upon the latest available
information and are believed to be accurate at the time of printing.
Motorola reserves the right to change or modify any information or
specifications without notice or obligation.
MOTOROLA and the Stylized M Logo are registered in the US Patent &
Trademark Office. All other product or service names are the property of
their respective owners. The Bluetooth trademarks are owned by their
proprietor and used by Motorola, Inc. under license. America Online, AOL,
the America Online & Design logo, the AOL & Design logo, and the Triangle
Logo, are registered trademarks of America Online, Inc. in the United
States and/or other countries. Instant Messenger and Buddy List are
trademarks of America Online, Inc. Java and all other Java-based marks
are trademarks or registered trademarks of Sun Microsystems, Inc. in the
U.S. and other countries. Microsoft, Windows and Windows Me are
registered trademarks of Microsoft Corporation; and Windows XP is a
trademark of Microsoft Corporation.
AT&T, AT&T logo and Your World. Delivered. are trademarks of AT&T
Knowledge Ventures.
© 2008 Motorola, Inc. All rights reserved.
Caution:
Changes or modifications made in the radio phone, not expressly
approved by Motorola, will void the user’s authority to operate the
equipment.
Software Copyright Notice
The Motorola products described in this manual may include copyrighted
Motorola and third-party software stored in semiconductor memories or
other media. Laws in the United States and other countries preserve for
Motorola and third-party software providers certain exclusive rights for
copyrighted software, such as the exclusive rights to distribute or
reproduce the copyrighted software. Accordingly, any copyrighted software
contained in the Motorola products may not be modified,
reverse-engineered, distributed, or reproduced in any manner to the extent
allowed by law. Furthermore, the purchase of the Motorola products shall
not be deemed to grant either directly or by implication, estoppel, or
otherwise, any license under the copyrights, patents, or patent applications
of Motorola or any third-party software provider, except for the normal,
non-exclusive, royalty-free license to use that arises by operation of law in
the sale of a product.
Manual Number: 6809519A35-A
5
Page 8

contents
menu map . . . . . . . . . . . . . . . . 8
Use and Care . . . . . . . . . . . . . 10
get started . . . . . . . . . . . . . . . 11
about this guide . . . . . . . . . 11
SIM card . . . . . . . . . . . . . . . 12
install or remove a
memory card . . . . . . . . . . . 12
battery. . . . . . . . . . . . . . . . . 13
turn it on & off. . . . . . . . . . . 17
make a call . . . . . . . . . . . . . 17
answer a call. . . . . . . . . . . . 17
store a phone number . . . . 18
call a stored phone
number . . . . . . . . . . . . . . . . 18
your phone number . . . . . . 19
caller ID. . . . . . . . . . . . . . . . 41
emergency calls . . . . . . . . . 41
contents
6
basics . . . . . . . . . . . . . . . . . . . 20
display . . . . . . . . . . . . . . . . . 20
volume . . . . . . . . . . . . . . . . 22
navigation key . . . . . . . . . . . 23
smart key . . . . . . . . . . . . . . 23
external display . . . . . . . . . . 23
touch keys . . . . . . . . . . . . . . 24
voice commands. . . . . . . . . 25
handsfree speaker. . . . . . . . 27
codes & passwords. . . . . . . 28
lock & unlock phone . . . . . . 28
lock & unlock external
keys. . . . . . . . . . . . . . . . . . . 29
tips & tricks . . . . . . . . . . . . . . 30
voicemail . . . . . . . . . . . . . . . 42
Video Share calls. . . . . . . . . 43
personalize . . . . . . . . . . . . . . . 31
audio style . . . . . . . . . . . . . . 31
talking phone . . . . . . . . . . . . 32
time & date . . . . . . . . . . . . . 33
wallpaper . . . . . . . . . . . . . . . 34
screen saver . . . . . . . . . . . . 34
themes . . . . . . . . . . . . . . . . 35
display appearance . . . . . . . 35
shortcuts . . . . . . . . . . . . . . . 36
phone software updates . . . 36
more personalizing . . . . . . . 37
calls . . . . . . . . . . . . . . . . . . . . . 39
turn off a call alert . . . . . . . . 39
recent calls . . . . . . . . . . . . . 39
redial . . . . . . . . . . . . . . . . . . 40
handsfree . . . . . . . . . . . . . . 45
answer options . . . . . . . . . . 45
Page 9

call times . . . . . . . . . . . . . . . 46
more calling. . . . . . . . . . . . . 47
text entry . . . . . . . . . . . . . . . . 51
iTAP® mode . . . . . . . . . . . . 52
tap and tap extended
modes . . . . . . . . . . . . . . . . . 53
numeric mode . . . . . . . . . . . 54
symbol mode . . . . . . . . . . . 54
messages . . . . . . . . . . . . . . . . 55
text messages. . . . . . . . . . . 55
instant messaging . . . . . . . . 56
more messages . . . . . . . . . 57
entertainment . . . . . . . . . . . . 59
AT&T Mobile Music™
portfolio . . . . . . . . . . . . . . . . 59
browser . . . . . . . . . . . . . . . . 65
photos . . . . . . . . . . . . . . . . . 68
videos . . . . . . . . . . . . . . . . . 71
fun & games . . . . . . . . . . . . 73
tools. . . . . . . . . . . . . . . . . . . . . 78
address book . . . . . . . . . . . . 78
personal organizer . . . . . . . . 83
AT&T GPS &
Yellowpages.com. . . . . . . . . 86
connections . . . . . . . . . . . . . . 87
manage your memory
card . . . . . . . . . . . . . . . . . . . 87
cable connections . . . . . . . . 88
Bluetooth® wireless . . . . . . 89
service & repairs. . . . . . . . . . . 95
SAR Data. . . . . . . . . . . . . . . . 96
European Union
Conformance . . . . . . . . . . . . 98
Safety Information . . . . . . . 100
Industry Canada Notice . . . 104
FCC Notice . . . . . . . . . . . . . 104
Warranty . . . . . . . . . . . . . . . 105
Hearing Aids . . . . . . . . . . . . 108
WHO Information . . . . . . . . 109
Registration . . . . . . . . . . . . . 110
Export Law . . . . . . . . . . . . . . 110
Recycling Information . . . . . 110
Perchlorate Label . . . . . . . . . 111
Privacy and Data
Security . . . . . . . . . . . . . . . . . 111
Driving Safety. . . . . . . . . . . . 112
index . . . . . . . . . . . . . . . . . . . 114
contents
7
Page 10

main menu
AT&T GPS
• AT&T Navigator
• Where
e
Messaging
• Create Message
• Message Inbox
•IM
•Voicemail
• Outbox
• Templates
•Drafts
• Browser Msgs
• Create Voice Message
Yellowpages.com Mobile
Ë
MEdia Net
Á
AT&T Mall
• Shop Tones
• Shop Games
• Shop Graphics
• Shop Multimedia
• Shop Applications
• Shop Videos
W
Cellular Video
menu map
8
menu map
Ã
My Stuff
• AT&T Music
• Music Player
• Shop Music
•MusicID
•XM Radio
• Music Videos
• The Buzz
• Community
• Music Apps
• Media Finder
•Music
•Pictures
• Videos
•Voice Notes
• Ring Tones
• Wallpapers
• Games & Apps
•Tools
• Recent Calls
• Calendar
•Alarm Clock
•World Clock
• Dialing Services
• Calculator
•Camera
• Video Camera
• Voice Record
=
Address Book
}
Settings
• (see next page)
To change your home screen shortcuts
and your main menu appearance, see
page 36.
Page 11

settings menu
l
Personalize
• Home Screen
•Voice Dial Setup
•Skin
• Greeting
• Wallpaper
• Screen Saver
• Sound Settings
Ç
Themes
• Shop Themes
• [New Theme]
t
Audio
•Style
• (style) Detail
L
Connection
• Bluetooth® Link
•USB Settings
H
Call Forward *
•Voice Calls
• Cancel All
• Forward Status
• Push to Call Fwd Number *
U
In-Call Setup
• Date and Time
• In-Call Timer
• My Caller ID
• Answer Options
• Call Waiting
•MSG Alert
•Hearing Aid
* dependent on your network
Z
Initial Setup
]
Software Update
m
Phone Status
S
Headset
J
Car Settings
• Time and Date
• Speed Dial
• Display Timeout
• Backlight
• Charging Lights
• TTY Setup
•Scroll
• Text Marquee
• Language
• Brightness
•DTMF
• Video Share
• Master Reset
• Master Clear
• My Tel. Numbers
• Battery Meter
• User Accounts
• Download Location
• Storage Devices
• Other Information
• Auto Answer
• Ringer Options
• Voice Dial
• Auto Answer
• Auto Handsfree
• Power-off Delay
• Charger Time
%
Airplane Mode
• Airplane Mode
• Prompt at Power Up
j
Network *
• Service Tone
• Call Drop Tone
u
Security
• Phone Lock
• External Key Lock
• Lock Application
• Hide/Show Private Entries *
• Fixed Dial
• Restrict Calls *
• SIM PIN
• SIM PIN2
• New Passwords
• Certificate Mgmt *
c
Java™ Settings
• Installed Applications
• Java System
• Delete All Apps
• App Vibration
• App Volume
á
Web Access
•MEdia Net
• Bookmarks
• Stored Pages
•History
•Go To URL
•Browser Setup
• Web Sessions
menu map
9
Page 12
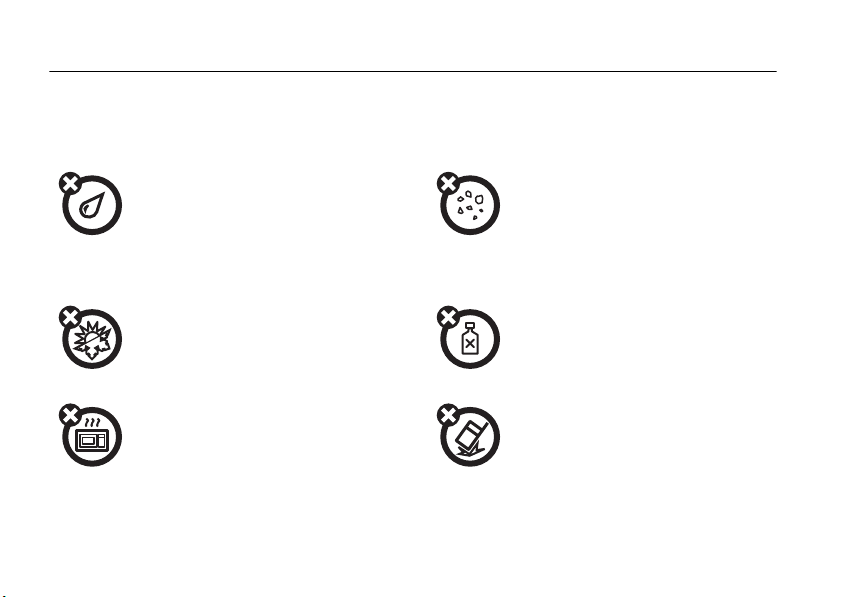
Use and Care
Use and Care
To care for your Motorola phone, please keep it away from:
liquids of any kind dust and dirt
Don’t expose your phone to water, rain,
extreme humidity, sweat, or other moisture. If
it does get wet, don’t try to accelerate drying
with the use of an oven or dryer, as this may
damage the phone.
extreme heat or cold cleaning solutions
Avoid temperatures below 0°C/32°F or
above 45°C/113°F.
microwaves the ground
Don’t try to dry your phone in a microwave
oven.
Use and Care
10
Don’t expose your phone to dust, dirt, sand,
food, or other inappropriate materials.
To clean your phone, use only a dry soft cloth.
Don’t use alcohol or other cleaning solutions.
Don’t drop your phone.
Page 13
get started
CAUTION:
Before using the
phone for the first time, read the
Important Safety and Legal
Information
included in the grayedged pages at the back of this
guide.
about this guide
This guide shows how to open a menu feature as
follows:
Find it:
This means that, from the home screen:
1
s >e Messaging
Press the center keys to open the menu.
>
Create Message
2
Press the navigation keyS to scroll to
e Messaging
to select it.
3
Press the navigation keyS to scroll to
Create Message
to select it.
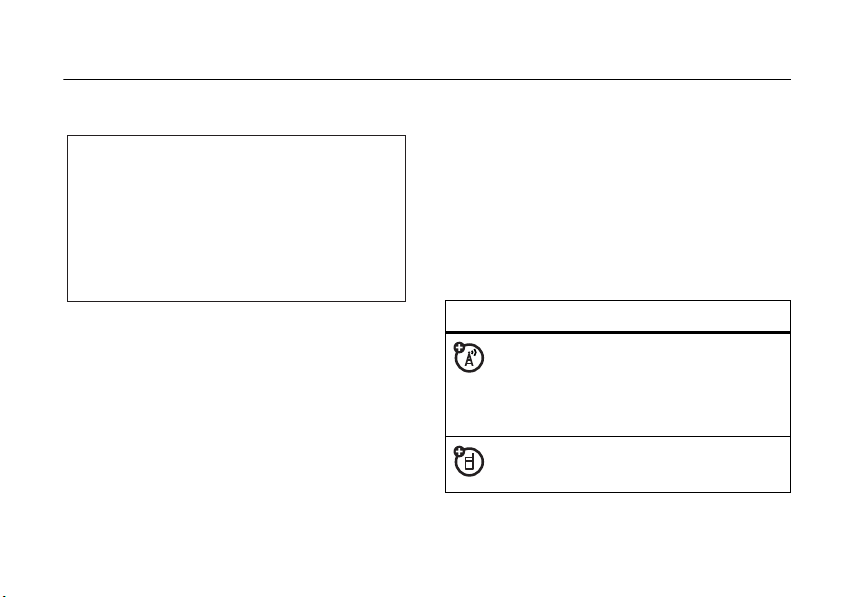
symbols
, and press the center keys
, and press the center keys
This means a feature is network, SIM card,
or subscription dependent and may not be
available in all areas. Contact your service
provider for more information.
This means a feature requires an optional
accessory.
get started
11
Page 14
SIM card
12
Caution:
away from static electricity, water, and dirt.
Yo u r Subscriber Identity Module (SIM) card contains
personal information like your phone number and
address book entries. It can also contain your
voicemail, text message, and Internet access settings.
If you put your SIM card in another phone, that phone
uses your phone number.
To insert and use a
Turn off your phone and remove your battery
before you install or remove a SIM card.
12
Don’t bend or scratch your SIM card. Keep it
memory card
, see page 87.
get started
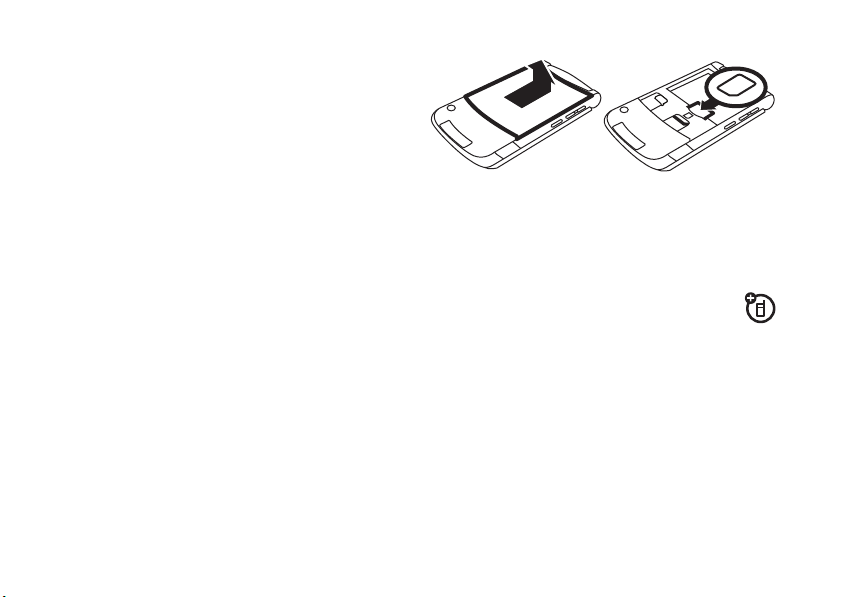
install or remove a memory card
You can use a removable microSD memory
8GB
card (up to
retrieve multimedia objects (such as photos and
sounds).
) with your phone to store and
Page 15
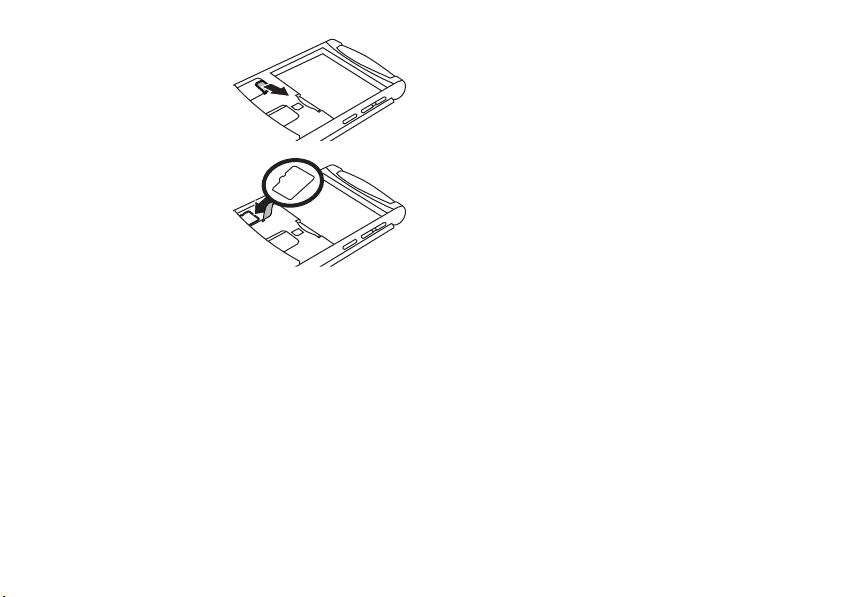
1
Remove the
battery door
(see page 16).
2 To install the
memory card
make sure the
memory card’s‘
metal contacts are
facing down, lift up
the rubber memory
card grommet, and slide the top of the memory
card under the metal band.
To remove the memory card
grommet and slide the card back out of the
holder.
3
Replace the battery door.
,
, lift up the rubber
battery
battery use & safety
IMPORTANT: HANDLE AND STORE BATTERIES
PROPERLY TO AVOID INJURY OR DAMAGE.
Most battery issues arise from improper handling of
batteries, and particularly from the continued use of
damaged batteries.
DON’Ts
• Don’t disassemble, crush, puncture, shred,
or otherwise attempt to change the form of
your battery.
• Don’t let the phone or battery come in
contact with water.
phone’s circuits, leading to corrosion. If the
phone and/or battery get wet, have them
checked by your carrier or contact Motorola,
even if they appear to be working properly.
Water can get into the
get started
13
Page 16

• Don’t allow the battery to touch metal
objects.
If metal objects, such as jewelry, stay
in prolonged contact with the battery contact
points, the battery could become very hot.
• Don’t place your battery near a heat
Excessive heat can damage the
source.
phone or the battery. High temperatures can
cause the battery to swell, leak, or
malfunction. Therefore:
•
Do
not
dry a wet or damp battery with an
appliance or heat source, such as a hair
dryer or microwave oven.
•
Avoid leaving your phone in your car in
high temperatures.
DOs
• Do avoid dropping the battery or phone.
Dropping these items, especially on a hard
surface, can potentially cause damage.
get started
14
• Do contact your service provider or
Motorola if your phone or battery has
been damaged from dropping or high
temperatures.
IMPORTANT: USE MOTOROLA ORIGINAL
PRODUCTS FOR QUALITY ASSURANCE AND
SAFEGUARDS.
authentic Motorola batteries from non-original or
counterfeit batteries (that may not have adequate
safety protection), Motorola provides holograms on its
batteries. Consumers should confirm that any battery
they purchase has a “Motorola Original” hologram.
Motorola recommends you always use
Motorola-branded batteries and chargers.
mobile devices are designed to work with Motorola
batteries. If you see a message on your display such
Invalid Battery
as
•
To aid consumers in identifying
or
UnabletoCharge
Remove the battery and inspect it to confirm
that it has a “Motorola Original” hologram;
, take the following steps:
Motorola
Page 17

•
If there is no hologram, the battery is not a
Motorola battery;
•
If there is a hologram, replace the battery and
retry charging it;
•
If the message remains, contact a Motorola
Authorized Service Center.
Important:
damage to the phone caused by non-Motorola
batteries and/or chargers.
Warning:
may present a risk of fire, explosion, leakage, or other
hazard.
PROPER AND SAFE BATTERY DISPOSAL AND
RECYCLING
Proper battery disposal is not only important for
safety, it benefits the environment. Consumers may
recycle their used batteries in many retail or service
Motorola’s warranty does not cover
Use of a non-Motorola battery or charger
provider locations. Additional information on proper
disposal and recycling may be found on the Web:
•
www.motorola.com/recycling
•
www.rbrc.org/call2recycle/
Disposal:
in accordance with local regulations. Contact
your local recycling center or national
recycling organizations for more information on how to
dispose of batteries.
Warning:
they may explode.
Promptly dispose of used batteries
Never dispose of batteries in a fire because
(in English only)
get started
15
Page 18
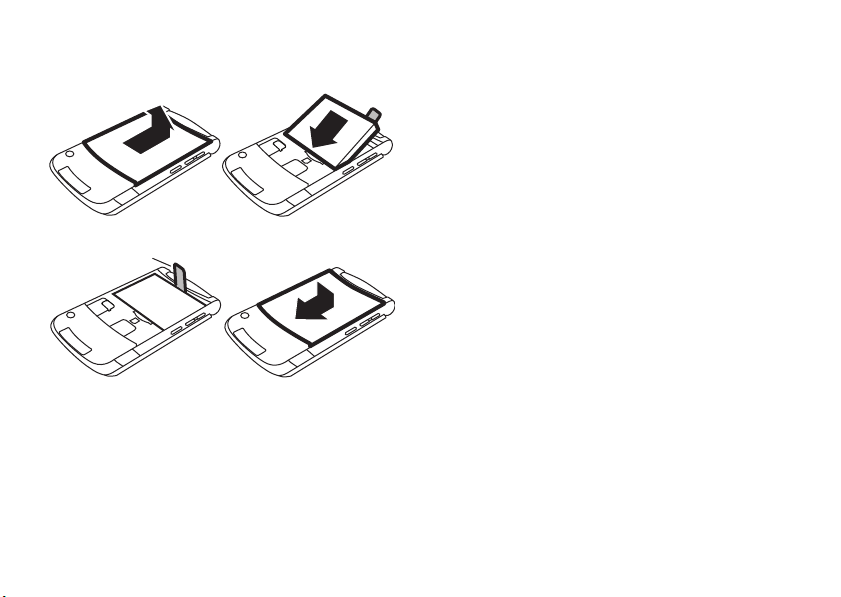
battery installation
Battery Removal
Ta b
12
3
Make sure that the
Battery Removal Tab
sticks out from under
the battery.
16
get started
4
battery charging
Notes for charging your phone’s battery:
When charging your battery, keep it near room
•
temperature. Never expose batteries to
temperatures below 0°C (32°F) or above 45°C
(113°F) when charging.
•
New batteries are not fully charged.
•
New batteries or batteries stored for a long
time may take more time to charge.
•
Motorola batteries and charging systems have
circuitry that protects the battery from
damage from overcharging.
Page 19
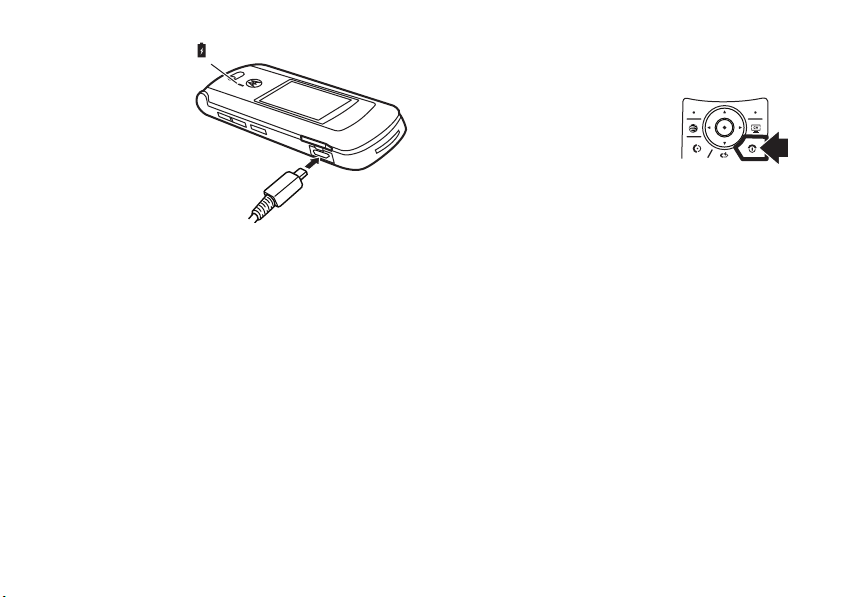
Plug the battery
Battery Charging Indicator
charger into your
phone and an
electrical outlet.
Your phone might
take several
seconds to start
charging the
battery. When
finished, your display shows
The battery charger shipped with this device is
designed for Motorola 3G mobile phones. Other
chargers might take longer to charge your battery,
or cause your calls to fail during charging.
turn it on & off
Caution:
code when you turn them on. If you enter an incorrect
PIN code three times before the correct code, your
Some phones ask for your SIM card PIN
Charge Complete
SIM Blocked
SIM card is disabled, and your display shows
Contact your service provider.
To turn on your phone
O
for a few seconds or until
hold
the keypad or display lights up. If
prompted, enter your eight-digit
SIM card PIN code and/or four-digit unlock code.
To turn off your phone
.
seconds.
, press and
, press and hold O for a few
.
make a call
To m ake a ca l l
To hang up,
, enter a phone number and pressN.
close the flip or pressO.
answer a call
To answer a call
vibrates, just open the flip or press
close the flip or press
when your phone rings and/or
N
.
To hang up,
O
.
get started
17
Page 20

store a phone number
call a stored phone
You can store a phone number in your
1
Enter a phone number in the home screen.
2
Press the
Select
3
Enter a name and other details for the phone
number. To select a highlighted item, press the
center key
4
Press the
edit
To
page 79.
To store a new
From the home screen, press
Scroll to
contact’s name and
18
Store
Create New Contact
Done
or
delete
Address Book
Create Contact
get started
key.
, if necessary.
s
.
key to store the number.
a stored
Address Book
entry with an
and select it. Enter the new
Email
information.
Address Book
entry, see
email
s>= Address Book
:
address:
.
number
Find it:
1
2
Note:
memory or on your SIM card. To choose which
contacts you see, press
press
SIM Card
have a
contacts, go back to the home screen and press
>
>
s >= Address Book
Scroll to the address book entry.
Shortcut:
to enter the first letters of an entry you want. For
example, press
that start with “L.”
Press N to call the entry.
= Address Book
Store Contacts To >PhoneorSIM Card
In the address book, press keypad keys
5
three times to go to entries
You can show contacts stored in your phone’s
Options>View
, or
Phone Contacts
Name
and
s>= Address Book
. You can select
. Contacts on the SIM card only
Number
. To choose where you store
, then press
Phone & SIM Card
Options >Setup
.
, then
,
s
Page 21

your phone number
From the home screen, press the clear key (
#
, then select
then
Tip:
Want to see your phone number while you’re on a
call? Press
You can edit the name and phone number
stored on your SIM card. From the home
screen, press
key, press the
know your phone number, contact your service
provider.
Options>My Tel. Number
Line 1
to see your number.
(#
, select an entry, press the
Options
key, and select
.
Edit
. If you don’t
View
get started
19
Page 22
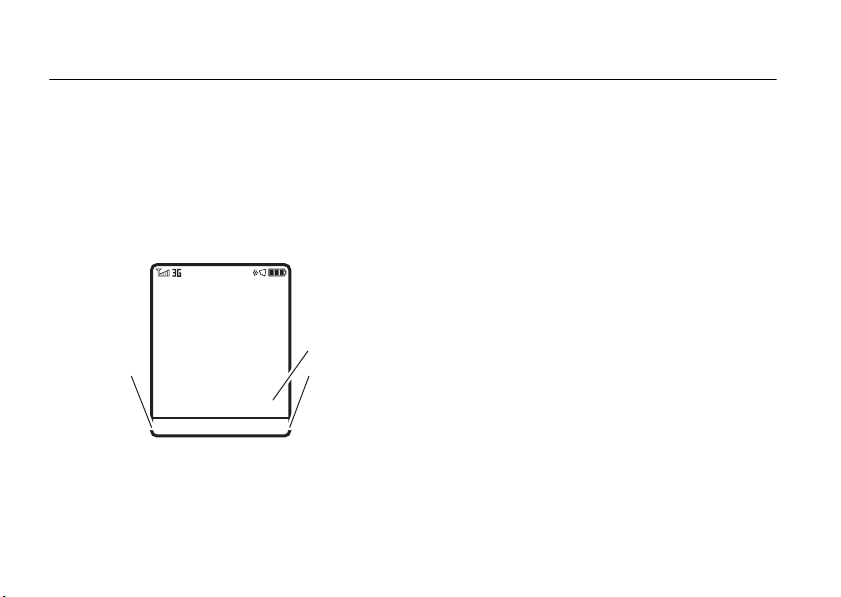
basics
Clock
Right Soft Key
Label
Left Soft Key
Label
AT&T
12:00
Options Main Menu
See page 2 for a basic phone diagram.
display
The home screen appears when you turn on the
phone.
Note:
Your home screen might look different from the
one shown, depending on your service provider.
20
basics
To dial a number from the home screen, press number
N
keys and
Press
to open basic menu features. To change your home
screen shortcuts, see page 36.
Press the center key
Labels show the current soft key functions. For soft
key locations, see page 2.
.
S
up, down, left, or right in the home screen
s
to open the menu. Soft Key
Page 23
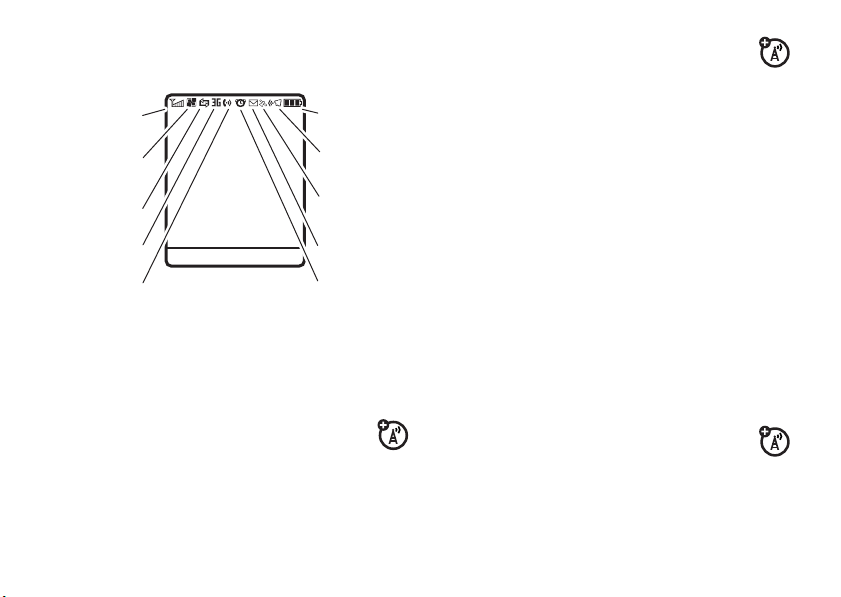
Status indicators can show at the top of the home
4. Network
7. Message
6. Reminder
5. Active
Line
9. Audio
8. Location
10. Battery
Level
3. Data
2. GPRS
1. Signal
Strength
12:00
Options Main Menu
screen:
3 Data Indicator –
status.
Shows connection
1 Signal Strength Indicator –
the strength of the network connection. You can’t
make or receive calls when
2 GPRS Indicator –
high-speed General Packet Radio Service
(GPRS) network connection is available
or in use
*
.
Shows when a
Vertical bars show
1
or 0 appears.
B
L/K
N/M
S/T
R/Q
P
8
O
4 Network Indicator –
your phone is using a 3G network.
,
secure/unsecure packet data
transfer
secure/unsecure application
connection
secure/unsecure Circuit Switch
Data (CSD) call
USB connect/transfer
auto answer
High-Speed Downlink Packet
Access (HSDPA) data transfer
Bluetooth® connection is active
Shows D when
basics
21
Page 24
5 Active Line Indicator –
indicate an active call, or
call forwarding to
6 Reminder Indicator –
set an alarm, or an alert for a calendar event.
z
Shows
7 Message Indicator –
receive a new message. Indicators can
include:
8 Location Indicator –
location services are available
active
9 Audio Indicator –
22
when a Java™ application is active.
É
text or MMS message
voice & text message
ê
.
õ
loud ring
ô
soft ring
Î
vibrate
basics
Shows hto
g
if you set
All Calls
.
Showsl when you
Shows when you
Ë
Shows when
ë
or
Shows the audio style setting.
Ì
vibrate & ring
ö
vibrate then ring
Í
silent
voice message
10 Battery Level Indicator –
battery charge level. Recharge the battery when
your display shows
Vertical bars show the
Low Battery
.
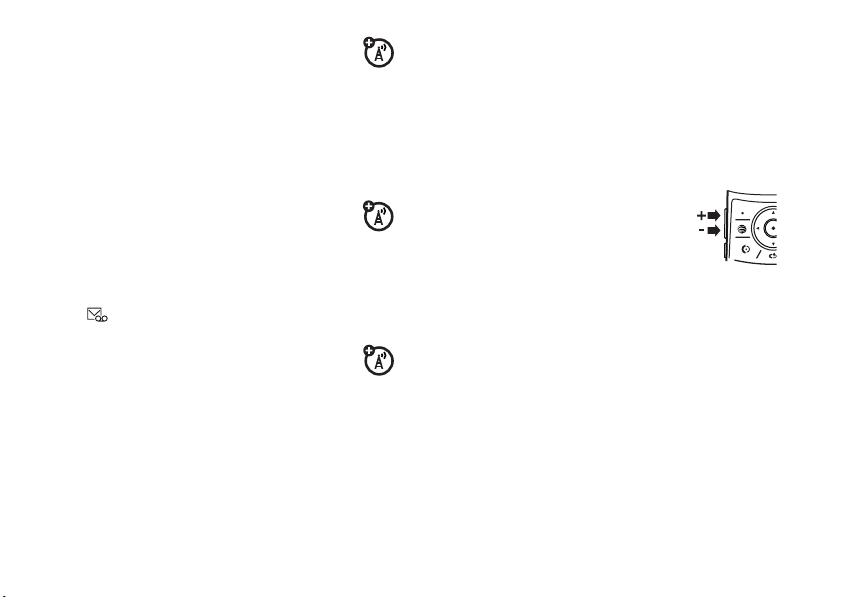
volume
Press the Volume keys to:
•
turn off an incoming call alert
•
change the earpiece volume
during calls
•
change the ringer volume from the home
screen
Tip:
Sometimes silence really is golden. That’s
why you can quickly set your ringer to
Silent
by holding the down Volume key while
you are in the home screen. You can also
Vibrate
switch to
home screen.
or back by holding # in the
Vibrate
or
Page 25

To change your ringer volume when your phone is
closed, see page 23.
navigation key
Press the navigation keyS up,
down, left, or right to scroll to items in
the display. When you scroll to an
s
item, press the center key
select it.
to
smart key
The smart key gives you another way to do things. For
example, when you scroll to a menu item, you can
press the smart key to select it (instead of pressing
s
the center key
same thing as pressing the center key
smart key, see page 2. To change what the smart key
does in the home screen, see page 38.
). The smart key usually does the
s
. To find the
external display
When you close your phone, the external display
shows the date, status indicators, and notifications for
incoming calls and other events. For a list of phone
status indicators, see page 21. Some status indicators
do not appear in the external display.
set phone audio style in external
display
1
Press a Volume key to see
2
Press the Volume keys to scroll to the style you
want.
3
Press the smart key to select the style.
Audio
styles.
basics
23
Page 26
touch keys
12:00
Date
See photos.
Smart Key
Press to light a
dark display or go
back in a menu.
Hold to
lock/unlock your
external keys.
Play music. Play videos.
External Display
Touch keys appear on your external display when you
close your phone:
Press the touch keys until you feel a slight vibration to
[
open pictures (see page 70),
page 61), or
Tip:
stay active even when you open and close your
phone.
hold
24
c
videos (see page 72).
Programs that you open in the external display
To close programs in the external display
the middle touch key.
basics
music (see
Special touch keys appear in your display for:
• missed calls:
browse through the list of missed calls, and
place a call through your phone’s speaker, or
through a headset. To end a call, press and
hold the smart key. If you open the flip after
placing a call through the speakerphone,
Options >Speakerphone Off
press
speaker.
•>new text messages:
to read your message. You must open your flip
to reply to text messages.
• alarms and event reminders:
touch keys to read them.
Here are some other touch keys you’ll see:
view/open cancel
%
yes no
[OK]
,
OK/select unlock
call delete
Use the touch keys to
to turn off the
Use the touch keys
Use the
Page 27
Note:
To prevent accidental key presses, your touch
keys automatically lock when you close your phone. To
unlock them, hold the smart key. To change how long
your phone waits to lock the keys, see page 29.
voice commands
use voice commands
1
Press and holdN to open the list of voice
commands.
Your phone prompts you to say a command.
2
Say a voice command from the list (replace
555-1212 with a phone number, and replace John
Smith with a contact name):
voice commands
“
Call
555-1212”
Call
John Smith”
“
voice commands
“
Send Email
Send Voice Note
“
Send Voice Note
“
“
Send Message
Send Message
“
Lookup
“
“
Go to Voicemail
Go to Camera
“
Go to Redial
“
“
Go to Received Calls
Check Status
“
Your phone tells you its battery strength, network
signal strength, and whether its coverage is normal
or roaming.
John Smith”
555-12 12”
John Smith”
555-1212”
John Smith”
John Smith”
”
”
”
”
”
basics
25
Page 28
voice commands
Check Battery
“
Check Signal
“
Check Network
“
“
Check My Phone Number
Turn Prompts Off
“
Your phone turns off the sound on your voice
command prompts (such as “Say a command.”).
To turn prompts on again, say “
Your phone confirms by saying “Voice prompts on.”
Tips:
You can say a contact’s name and number
•
type together. For example, say “Call John
Smith Mobile” to call the Mobile number
stored for John Smith.
26
”
”
”
”
“
Turn Prompts On
basics
•
Speak numbers at a normal speed and
volume, pronouncing each digit distinctly.
Don’t pause between digits.
•
For voice command help, press and holdN
to open the list of voice commands, then
Help
.
press
set up voice commands
You can change voice command settings.
1
.”
Press and hold N to open the voice command
list.
2
Press
Settings
.
Page 29
3
Choose one of the settings below:
handsfree speaker
voice command settings
Choice Lists
Sensitivity
Digit Dialing
Sound
About
Turn choice lists on or off. Your
phone uses choice lists to confirm
voice commands by asking “Did
you say…” followed by a choice
list item.
Make your phone more or less
likely to reject a voice command.
Train your phone to recognize how
you say digits.
Adjust the sound settings for your
voice commands.
See voice command software
information.
You can use your phone’s handsfree speaker to make
calls without holding the phone to your ear.
To turn the handsfree speaker on during a call, press
Speaker
the
Your display shows
end the call.
Note:
phone is connected to a handsfree car kit or headset,
or if your phone is closed.
Tip:
Messaging, MEdia Net
press
key (if available), or
Spkrphone On
The handsfree speaker won’t work when your
During a call, you can open your
browser,
Options >Select App
Options>Speakerphone On
until you turn it off or
Calendar
, or
.
Address Book
My Stuff
basics
.
,
. Just
27
Page 30

codes & passwords
lock & unlock phone
Your phone’s four-digit
1234
. The six-digit
000000
. If your service provider didn’t change these
codes, you should change them:
Find it:
s >} Settings
You can also change your
If you forget your unlock code:
prompt, try entering 1234 or the last four digits of your
phone number. If that doesn’t work, press
enter your six-digit security code instead.
If you forget other codes:
code, SIM PIN code or PIN2 code, contact your
service provider.
basics
28
unlock code
security code
is originally set to
>
Security >New Passwords
SIM PIN2
or
At the
If you forget your security
is originally set to
Private Entries Code
Enter Unlock Code
s
.
and
You can lock your phone to keep others from using it.
To lock or unlock your phone, you need the four-digit
unlock code.
manually lock
To
s>} Settings
Press
then enter your four-digit unlock code.
automatically lock
To
it off: Press
Automatic Lock >On
>
code.
Note:
You can make emergency calls on a locked
phone (see page 41). A locked phone still rings or
vibrates for incoming calls or messages,
need to unlock it to answer
your phone:
>
Security >Phone Lock >Lock Now
your phone whenever you turn
s>} Settings
, then enter your four-digit unlock
>
Security >Phone Lock
.
,
but you
Page 31

lock SIM card or applications
lock & unlock external
features
SIM PIN
Caution:
times before the correct code, your SIM card is
disabled and your display shows
Lock or unlock the SIM card:
s>} Settings
lock feature
s>} Settings
Enter your unlock code to open a list of applications
(such as
Locked
If you enter an incorrect PIN code three
SIM Blocked
>
Security >SIM PIN
>
Security >Lock Application
Messaging
). Select an application and choose
to lock it.
.
keys
When your phone is closed, your external keys lock to
prevent accidental key presses.
To change how long your phone waits before it
automatically locks your external keys:
s>} Settings
> time interval or
Note:
If you choose
external keys by holding the smart key.
To
unlock
(the key below your Volume keys).
>
Security >ExternalKeyLock >Timer
Off
.
Off
, you can still manually lock your
your external keys,
hold the smart key
basics
29
Page 32

tips & tricks
In the home screen (shown on page 20):
To … D o th is …
change audio
style
see your
recent calls
store a phone
number
tips & tricks
30
Press the Volume keys up or
down. With your phone closed,
press a Volume key to see your
audio style, press the smart key
to change it, then press a Volume
key to store the change.
PressN to see a list of recent
calls, then press
switch to
Missed Calls
Enter a phone number, then
Store
press
*or#
Dialed Calls, Received Calls
.
.
to
,or
To … Do t hi s…
check your
voicemail
return to the
home screen
open the
navigator
Press and hold 1 to check your
voicemail.
In a menu, message, or other
screen, press
return to the home screen.
Press the
AT&TNavigator
open
AT&TNavigator
about
To change your smart key
shortcut, see page 36.
O
to cancel and
smart key
. For details
, see page 86.
once to
Page 33

personalize
audio style
Each audio style profile uses a different set of sounds
or vibrations for incoming calls and other events. Here
are the profiles you can choose:
õ Loud Ì Vibe & Ring
ô Soft ö Vibe then Ring
Î Vibrate Í Silent
The audio style profile’s indicator appears at the top of
your home screen. To choose your profile:
Find it:
Shortcut:
home screen
With your
s>} Settings
To change your audio style profile from the
, just press the Volume keys up or down.
phone closed
>
Audio >Style:
, press a Volume key to see
style name
your audio style profile, press the smart key to change
it, then press a Volume key to store the change.
Tip:
Do you get a lot of text messages? If you don’t
want to hear incoming message alerts during phone
calls, press
can choose to hear message alerts during
Voice Calls
s>} Settings
, or
All Calls
(both voice and video calls).
>
In-Call Setup >MSG Alert
No Calls
. You
,
change alerts in an audio style
You can change the alerts for incoming calls and other
events. Your changes are saved in the current audio
style profile.
Find it:
s>} Settings
Note:
Style represents the current audio style. You
can’t set an alert for the
>
Audio
> style
Silent
audio style setting.
personalize
Detail
31
Page 34

1
Scroll to
Calls
(or
Line 1
or
Line 2
for dual-line phones),
Change
then press the
2
Scroll to an alert type (such as
Vibration Pattern
of alerts.
3
Scroll to the alert you want, then press the
center key
s
key to change it.
), then press the
.
Sound, Music
Open
, or
key to see a list
To turn talking phone on or off:
Press
s>} Settings
Talking Phone >On
>
To choose what your phone speaks:
phone turned on, press
Sound Settings >Talking Phone Settings
>
options on or off:
or
>
Off
.
Personalize >Sound Settings
s>} Settings
. You can turn these
With talking
>
Personalize
Your phone can use song files
an alert.
up to 300 kb in size
for
talking phone
When you receive a call, your phone can “speak” the
caller’s name or number instead of ringing. Your phone
can also “speak” as you scroll through your address
book or enter digits in the home screen.
Note:
use
32
your
If you turn on
Ring Style
personalize
Talking Phone
for incoming calls.
, your phone
does not
options
Incoming
Caller ID
Contact List
Entries
Your phone speaks the name for
incoming callers stored in your
address book, or speaks the phone
number for other callers.
Note:
If you turn this on, your phone
does not use the ring sound
Audio
style for incoming calls.
Your phone speaks names as you
scroll through your address book.
in your
Page 35

options
Keypad Digits
Note:
(to speak incoming calls and address book entries) and
Key Volume
Your phone speaks digits as you enter
them in the home screen.
Your phone uses your
(to speak digits as you enter them).
Audio
style’s
Ring Volume
time & date
Your phone can automatically update your time zone,
time, and date. It uses the time and date for the
calendar.
synchronize
To
with the network: Press
InitialSetup >Time and Date >Autoupdate >Time & Time Zone
>
If you don’t want your phone to automatically update
your time zone, choose
the time zone, time, and date
s>} Settings
Time Only
instead.
.
Your phone uses the time zone city to adjust for
Daylight Savings Time (DST). Some cities have unique
DST rules. For example, if you choose “Chicago” and
then travel to Mexico City, the phone will still not
switch Time Zones because both cities are in the
GMT-6 time zone. However, Mexico City has unique
Autoupdate
to
Time Only
InitialSetup
DST rules, so you should change
and select “Mexico City.”
manually set
To
Autoupdate
off
Time and Date >Time Zone
>
in the time zone list, enter the first letter of its name
by pressing keypad keys.
Tip:
To choose three time zones for easier access,
s>Ã My Stuff
press
World Clock
open
MapView
the time zone, time, and date, turn
, then: Press s>
, you can press the
of time zones.
} Settings
, time or date. To jump to a city
>
Tools >World Clock
>
. When you
Options
key to see the
personalize
33
Page 36

To choose an
screen, press
Clock
>
.
analog or digital
s>} Settings
clock for your home
>
Personalize >Home Screen
wallpaper
Set a photo, picture, or animation as a wallpaper
(background) image in your home screen.
Note:
Your theme can also set your wallpaper
(page 35).
Find it:
s>} Settings
>
Personalize >Wallpaper
screen saver
Set a photo, picture, or animation as a screen saver.
The screen saver appears when the flip is open and no
activity is detected for a specified time.
Note:
Yo u r theme can also set your screen saver
(page 35).
Tip:
This feature helps save your screen, but not your
battery. To extend battery life, turn off the screen
saver.
Find it:
s>} Settings
>
Personalize >Screen Saver
options
Picture
Layout
34
Press S up or down to select a
None
picture, or select
Select
Center
to center the image in the
Tile
display,
the display, or
image across the display.
to repeat the image across
for no wallpaper.
Fit-to-screen
to stretch the
personalize
options
Picture
Delay
Press S up or down to select a
graphic, picture, or Java™ screen saver,
None
or select
Select the length of inactivity before the
screen saver appears.
for no screen saver.
Page 37

themes
display appearance
A phone theme is a group of image and sound
files that you can apply to your phone. Most
themes include a wallpaper image, screen saver
image, and ring tone. Your phone may come with
some themes, and you can download more.
apply
a theme, press s>
To
> theme.
preview
To
scroll to the theme, and press
To
>
To
s>} Settings
and press
a theme, press s>
shop for a new theme
Themes >Shop Themes
delete themes you downloaded
Options>DeleteorDelete All
>
.
Themes
} Settings
>
} Settings
Options>Preview
, press s>
, scroll to the theme,
} Settings
, press
.
Themes
>
Themes
.
To choose a phone
your phone’s display: Press
Skin
. Your theme can also set your phone skin
>
(page 35).
To set your display
,
InitialSetup >Brightness
>
To save battery life, your keypad
when you’re not using your phone. The backlight turns
on when you open the flip or press any key. To set
how long your phone waits before the backlight turns
off:
s>} Settings
Press
To save battery life, the
you’re not using your phone. The display turns back on
when you open the flip or press any key. To set how
long your phone waits before the display turns off:
s>} Settings
Press
skin
that sets the look and feel of
s>} Settings
brightness
.
: Press s>
backlight
>
InitialSetup >Backlight
display
can turn off when
>
InitialSetup >Display Timeout
personalize
>
Personalize
} Settings
turns off
.
.
35
Page 38

shortcuts
In the home screen, you can press the
navigation key, soft keys, or smart key as
shortcuts
the features that these keys open. For key locations,
see page 2.
Find it:
>
36
to your favorite features. You can change
Home Keys
options
Icons
Up, Down, Left
Right
s>w Settings
Show or hide your navigation key
shortcut icons in the home screen.
,
Choose the features that open when
you press the navigation key up,
down, left, or right in the home
screen.
>
Personalize >Home Screen
personalize
options
Smart Key
Choose the feature that opens when
you press the smart key in the home
screen.
phone software updates
Sometimes we think of ways to make your
phone’s software faster or more efficient after
you’ve purchased your phone. To check for updates:
Find it:
Note:
book entries or other personal entries.
If your
software update to you, your phone asks you
whether to
you postponed, press
>
s>} Settings
Software updates do not affect your address
service provider or Motorola sends
Install
it now or
Install Update
.
>
Software Update
Postpone
it. To install an update
s>} Settings
>
a
Software Update
Page 39

more personalizing
features
hearing aids
If you have a hearing aid set to Telecoil mode, you
can optimize your phone’s earpiece sound for your
hearing aid:
s>} Settings
Tip:
Did you change your mind? During a call, you
can press
language
Set menu language:
s>} Settings
>
In-Call Setup >Hearing Aid >Telecoil On
Options
then choose
>
InitialSetup >Language
Telecoil On
or
Telecoil Off
features
scroll
Set the scroll bar to
lists:
s>} Settings
text marquee
Set the speed for scrolling text in your
display:
.
s>} Settings
activate ringer IDs
Activate ringer IDs assigned to address book
entries and categories:
s>} Settings
ring volume
Up/Down
or
WrapAround
>
Initial Setup >Scroll
>
Initial Setup >Text Marquee
>
Audio
> style
Detail >Ringer IDs
in menu
s>} Settings
>
Audio
> style
Detail >Ring Volume
personalize
37
Page 40

features
keypad volume
features
master reset
s>} Settings
reminders
Set a reminder for when you have not responded to
an incoming call, message, or other event:
s>} Settings
show/hide menu icons
Show or hide menu feature icons in the
home screen:
s>} Settings
Icons
>
change home keys
Change features for the navigation key and
smart key in the home screen:
s>} Settings
38
>
Audio
>
Audio
>
Personalize >Home Screen >Home Keys
>
Personalize >Home Screen >Home Keys
personalize
> style
> style
Detail >Key Volume
Detail >Reminders
Reset all options
code, and lifetime timer:
s>} Settings
master clear
Caution:
have entered
entries)
(including photos and sounds) stored in your
phone’s memory. After you erase the information,
you can’t recover it.
s>} Settings
network settings
See network information and adjust network
settings:
s>} Settings
except
unlock code, security
>
InitialSetup >Master Reset
Master clear
and content you have downloaded
erases all information you
(including address book and calendar
>
InitialSetup >Master Clear
>
Network
Page 41

calls
To make and answer calls, see page 17. To voice dial,
see page 25.
turn off a call alert
You can press the Volume keys to turn off a call alert
before answering the call.
recent calls
Your phone keeps lists of incoming and outgoing calls,
even for calls that didn’t connect. The most recent
calls are listed first. The oldest calls are deleted as
new calls are added.
Find it:
to
PressN, then press *or# to switch
Dialed Calls, Received Calls
,or
Missed Calls
Scroll to an outgoingL or incomingM call.
%
next to a call means the call connected.
A
•
To call the number, press N.
•
To see call details (like time and date), press
s
the center key
•
To see the following options, press
options
Filter by
Store
.
Select all, dialed, received, or
missed calls.
Create an address book entry
with the number in the
Store
does not appear if the
number is already stored.
No.
calls
Options
field.
:
39
Page 42

options
Delete
Delete All
Show ID / Hide ID
Send Message
Send Voice Msg
Add Digits
Attach Number
Send Tones
40
calls
Delete the entry.
Delete all entries in the list.
Hide or show your caller ID for
the next call.
Open a new text message with
To
the number in the
Record and send a voice
message to the number.
Add digits after the number.
Attach a number from the
address book or recent calls lists.
Send the number to the network
as DTMF tones.
Note:
This option appears only if
enter digits during a call
you
field.
.
options
Notepad
Call Times
Open the number in a text editor.
Open your call time
information.
redial
1
Press N from the home screen to see a list of
recent calls.
2
Scroll to the entry you want to call, then press
N
.
If you hear a
you can press
number. When the call goes through, your phone
rings or vibrates one time, shows
and connects the call.
busy signal
N
or the
, and you see
Retry
key to redial the
RedialSuccessful
Call Failed
,
,
Page 43

caller ID
Calling line identification (caller ID) shows the
phone number for an incoming call in your
external and internal displays.
Your phone shows the caller’s name and picture when
Incoming Call
they’re stored in your address book, or
when caller ID information isn’t available.
You can set your phone to play a different ringer ID for
an entry stored in your address book (see page 79).
To show or hide
person you call, enter the phone number and press
Options>Hide ID/Show ID
your phone number
.
from the next
emergency calls
Your service provider programs one or more
emergency phone numbers, such as 911 or 112, that
you can call under any circumstances, even when your
phone is locked or the SIM card is not inserted.
Note:
Emergency numbers vary by country. Your
phone’s preprogrammed emergency number(s) may
not work in all locations, and sometimes an
emergency call cannot be placed due to network,
environmental, or interference issues.
1
Press the keypad keys to dial the emergency
number.
2
Press N to call the emergency number.
AGPS & emergency calls
When you make an emergency call, your
phone can use Assisted Global Positioning
System (AGPS) satellite signals to tell the emergency
response center your approximate location.
The AGPS feature has limitations, so always tell the
emergency response center your best knowledge of
your location. Remain on the phone for as long as the
emergency response center instructs you.
calls
41
Page 44

AGPS
might not work
local emergency response center does not process
AGPS location information. For details, contact your
local authorities.
If your phone cannot find strong AGPS satellite
signals, the location of the nearest cell tower in
contact with your phone is automatically provided to
the emergency response center.
Your phone can also use your location to help with other
programs (such as programs that provide directions).
for emergency calls if your
AGPS performance tips
For best results:
•
Go outside and away from underground
locations, covered vehicles, structures with
metal or concrete roofs, tall buildings, and
foliage. Indoor performance might improve if you
move closer to windows, but some window sun
shielding films can block satellite signals.
calls
42
•
Move away from radios, entertainment
equipment, and other electronic devices that
might interfere with or block AGPS satellite
signals.
voicemail
Your network stores the voicemail messages
you receive. To listen to your messages, call
your voicemail number.
Note:
Your service provider may include additional
information about using this feature.
receive
When you
shows the voicemail message indicator
New Voicemail
To
check
voicemail messages:
Find it:
a voicemail message, your phone
. Press the
s >e Messaging
Call
key to listen to the message.
>
Voicemail
Ë
and
Page 45

Shortcut:
to check your voicemail.
Your phone may prompt you to store your voicemail
phone number. If you don’t know your voicemail
number, contact your service provider.
Note:
(number) character in this number. If you want to store
a voicemail number with these characters, create an
address book entry for it. Then you can use the entry
to call your voicemail.
From the home screen, press and hold 1
You can’t store a p (pause), w (wait), or n
Video Share calls
If you call someone who has a 3G video phone,
you can see each other while you talk. Video
calls work only when your phone is on a
Note:
Next to your phone’s external lens is a
camera on indicator
. This can blink when your
3G network
camera is on, to let people around you know that they
might be in your photo or video.
make a Video Share call
1
Start a normal voice call with another phone that
supports 3G video calls.
Note:
If Video Share calls are available,
appears over the right soft key.
2
Press the
the caller. Your phone starts using the
speakerphone
connected. During the call:
•
.
•
Share Video
key to start sharing video with
, unless you have a headset
Press
Stop Video
to change the call to a voice call
with the speakerphone on.
If you accept another
your phone changes this Video Share call to a
voice call.
incoming voice call
Share Video
,
calls
43
Page 46

•
If you accept another
call
, your phone ends this call.
3
To end the call, press O.
incoming Video Share
answer a Video Share call
When you receive a Video Share call, your phone
shows the name or number of the caller.
To accept the call
To continue the call but stop sharing video,
Stop Video
press
To hang up,
and start sharing video, press
.
close the flip or press O.
Accept
record a Video Share call
Note:
Recording of phone calls is subject to varying
State and Federal laws regarding privacy and recording
of phone conversations. Always obey the laws and
regulations on the use of this feature.
calls
44
You can record a Video Share call as a video
clip. During a Video Share call:
1
Press the camera key on the right side of your
phone to start recording the call.
Your phone displays
video and incoming and outgoing audio.
2
.
Press the camera key again to stop recording the
call and store the video clip.
The recording stops automatically if the call ends
or you reach your video capture or memory limit.
To view the video clip from the home screen,
s>Ã My Stuff
press
All Videos
> video name.
>
Note:
Video recording requires video compatibility
with the other caller’s video phone.
Recording
>
. It records incoming
Media Finder >Videos
Page 47

handsfree
Note:
The use of wireless phones while driving may
cause distraction. Discontinue a call if you can’t
concentrate on driving. Additionally, the use of
wireless devices and their accessories may be
prohibited or restricted in certain areas. Always obey
the laws and regulations on the use of these products.
features
speakerphone
Activate the speakerphone during a call:
Speaker
Press the
Options>Speakerphone On
auto answer
Automatically answer calls when connected
to a car kit or headset:
key (if available), or
.
(car kit or headset)
features
voice dial
Enable voice dial with headset send/end key:
s>} Settings
auto handsfree
Automatically route calls to a car kit when
connected:
s>} Settings
(headset)
>
Headset >Voice Dial
(car kit)
>
Car Settings >Auto Handsfree
answer options
You can use different ways to answer an incoming call.
To turn on or turn off an answer option:
s>} Settings
>
Car Settings
or
Headset >Auto Answer
calls
45
Page 48

Find it:
s>} Settings
options
Multi-key
Open to Answer
>
In-Call Setup >Answer Options
Answer by pressing any key on
the keypad, with the flip open.
Answer by opening the flip.
call times
Network connection time
the moment you connect to your service provider’s
network to the moment you end the call by pressing
O
. This time includes busy signals and ringing.
The amount of network connection time you track
on your resettable timer may not equal the
amount of time for which you are billed by your
service provider. For billing information, contact
your service provider.
calls
46
is the elapsed time from
features
call times
Show call timers:
N
Press
in-call timer
Show time information during a call:
, press the
s>} Settings
in-call date and time display
Show the current date and time during voice
calls:
s>} Settings
Options
key, then >
>
In-Call Setup >In-Call Timer
>
In-Call Setup >Date and Time
Call Times
Page 49

more calling
features
attach a phone number
Dial an area code or prefix for an address
book number, then press
notepad
PressN, then press
•
To call the number, press N.
•
To create an address book entry with the
number in the
•
To open the
insert a special character, press
Options >Attach Number
Options>Notepad
No.
field, press the
Dialing Menu
to attach a number or
.
Store
Options
.
key.
.
features
international calls
If your phone service includes international
0
dialing, press and hold
international access code (indicated by
press the keypad keys to dial the country code and
phone number.
hold a call
Press
Options>Hold
mute a call
Press the
all active calls on mute.
to put all active calls on hold.
Mute
key (if available) or
to insert your local
+
). Then,
Options>Mute
to put
calls
47
Page 50

features
call waiting
features
conference call
When you’re on a call, you’ll hear an alert if
you receive a second call.
N
Press
To turn the call waiting feature on or off, press
s>} Settings
48
to answer the new call.
•
To switch between calls, press the
Options>Switch
•
To connect the two calls, press the
•
To end the call on hold, press
Options>End Call On Hold
key.
.
>
In-Call Setup >Call Waiting >OnorOff
calls
Link
key.
During a call:
Options >New Call
Press
then press
Link
key.
the
automatic call forwarding
Set up or cancel automatic call forwarding:
s>} Settings
Choose
Voice Calls
cancel forwarding.
.
You can set how long your phone waits before it
forwards a call. In the
Detailed
, then set
>
seconds.
. Dial the new call’s number,
N
. When the person answers, press
>
Call Forward
to set up forwarding, or
Voice Calls
menu, choose
Delay
to 5, 10, 15, 20, 25or30
Cancel All
Forward
to
Page 51

features
manual call forwarding
features
restrict calls
You can set your phone to forward an
incoming call only when you press a key.
To set the number where your phone forwards the
calls:
s>} Settings
and enter the phone number
To choose which key you press to forward incoming
calls:
s>} Settings
select one of the key presses in the list, and then
select
>
Call Forward >Push to Call Fwd Number
>
Personalize >Home Screen >Home Keys
Push to Call Forward
,
,
Restrict outgoing or incoming calls:
s>} Settings
your unlock code (see page 28)
Tell your phone to allow
from your
TTY calls
Set up your phone for use with an optional
TTY device:
s>} Settings
>
Address Book
>
Security >Restrict Calls
All, None
, or only the calls
.
Initial Setup >TTY Setup
, then enter
calls
49
Page 52

features
fixed dial
features
quick dial
When you turn on fixed dialing, you can call
only numbers stored in the fixed dial list.
Turn fixed dialing on or off:
s>} Settings
Use the fixed dial list:
s>Ã My Stuff
service dial
Your service provider might give you phone
numbers for taxi companies or other services.
These phone numbers are stored on your SIM card.
To see t h e m :
s>Ã My Stuff
50
calls
>
Security >Fixed Dial
>
Tools >Dialing Services >Fixed Dial
>
Tools >Dialing Services >Service Dial
Dial preprogrammed phone numbers:
s>Ã My Stuff
DTMF tones
Activate DTMF tones:
s>} Settings
To send DTMF tones during a call, just press
number keys or scroll to a number in the address
book or recent calls lists and press
send data
Connect your phone to the device, then
place the call through the device application.
receive data
Connect your phone to the device, then
answer the call through the device application.
>
Tools >Dialing Services >DialAT&T
>
InitialSetup >DTMF
Options>Send Tones
.
Page 53

text entry
For text
indicator
descriptions,
see following
section.
Flashing
cursor
indicates
insertion point.
Before you
enter text,
press the
Cancel
key to
cancel the
message.
Press the
Options
key to open the
Msg
Options Cancel
ÂÆ
SMS:0
Some features let you enter text. Press # in a text entry view to select an entry
mode:
entry modes
Û
or ÔYo u r
Ú
or ÕYo u r
à Numeric
Ä Symbol
To set your primary and secondary text entry modes,
Options>Text Setup
press
Primary Text
Primary
text entry mode can be set to
any iTAP®
to any iTAP
to
entry mode.
or
Secondary Text
Û
Secondary
text entry mode can be set
Ú
None
if you don’t want a secondary
mode enters numbers only.
mode enters symbols only.
in a text entry view and select
.
or tapÔ mode.
or tapÕ mode, or set
text entry
51
Page 54

iTAP® and tap mode tips
•
Press 0 in a text entry view to change text
case to all capital letters (
Á
), or next letter capital (Â).
(
•
To enter numbers quickly, just hold a number
key until the number appears. Now, you’re in
numeric mode. To change back to iTAP or Tap
mode, just hold a key again.
•
Press 1 to enter punctuation or other
characters.
•
Press S to move the flashing cursor to enter
or edit message text.
•
Press ( to delete the character to the left of
the cursor. Hold
•
To cancel your message, press O.
text entry
52
á
(
to delete the word.
), no capitals
iTAP® mode
Press # in a text entry view to switch to iTAP mode.
Û
If you don’t see
set iTAP mode as your primary or secondary text entry
mode.
iTAP mode lets you enter words using one keypress
per letter. The iTAP software combines your
keypresses into common words and predicts each
word as you enter it.
or Ú, press
Options>Text Setup
to
Page 55

For example, if you press
ÁÚ
Send To
Prog ram
Options
Msg
SMS:7
Press
Options
key to open
message
options.
Press
S
right to accept
Program
.
Press
*
to
enter a space
at the cursor.
Hold S up or
down to see a
list of word
options.
Press
Send To
key when the
message is complete.
display shows:
7764
, your
tap and tap extended modes
Press # in a text entry view to switch to tap mode.
ÂÔ
or
ÂÕ
If you don’t see
Options>Text Setup
or secondary text entry mode.
to set tap mode as your primary
, press
If you want a different word (such as
pressing keypad keys to enter the remaining letters.
Tip:
text entry display, you can press
Text Tutorial
>
Don’t worry if you forget how iTAP works. In a
to see an explanation.
Progress
), continue
Options>Text Setup
To enter text in
repeatedly to cycle through the letters and number on
the key. Repeat this step to enter each letter. The
Tap Extended
more special characters and symbols.
Tap
mode, press a keypad key
mode works the same way, but includes
text entry
53
Page 56

For example, if you press 7 one time, your display
Msg
ÁÔ
SMS:6
Character
displays at
insertion point.
After you enter
text, press the
Send To
key to
enter
recipients.
Press the
Options
key to
open message
options.
Your phone
suggests a
word. Press
S
right to accept
it, or press
*
to enter a space
at the cursor.
Options Send To
P age
shows:
numeric mode
Press # in a text entry view until you see Ã.
Press the number keys to enter the numbers you
want.
The first character of every sentence is capitalized. If
necessary, press
lowercase before the cursor moves to the next
position.
text entry
54
S
down to change the character to
Shortcut:
temporarily switch to numeric mode from iTAP® or
Tap modes. Press the number keys to enter the
numbers you want. Enter a space or hold a number
key to change back to text entry.
You can press and hold a number key to
symbol mode
Press # in a text entry view until your display shows
a list of symbols. Scroll to the symbol you want, then
s
press the center key
#
press
again.
. To close the symbol list,
Page 57

messages
text messages
A text message can contain text and pictures,
sounds, or other media objects. You can add
multiple pages to a message, and you can put text and
media objects on each page. You can send a message
to other compatible phones or to email addresses.
To create a group mailing list, see page 81.
send a text message
Shortcut:
up to quickly open a new message.
Find it:
From the home screen, you can press S
s >e Messaging
>
Create Message
1
Press keypad keys to enter text on the page
(for details about text entry, see page 51).
To insert a
on the page, press the center key
select
and the file.
2
When you finish the message, press the
Send To
3
Scroll to a recipient and press the center keys.
Repeat to add other recipients.
To enter a
the
4
To
picture, sound, or other object
Insert
. Scroll to and select the file type
key.
new
number or email address, press
Options
key and select
send
the message, press the
Enter Number
s
or
Send
and
Enter Email
key.
.
messages
55
Page 58

receive a text message
When you receive a message, your phone
plays an alert, and the display shows
with a message indicator, such as
Read
key to open the message.
To see all of your text messages:
Find it:
s>e Messaging
If a multimedia message contains media objects:
•
Photos, pictures, and animations show as you
read the message.
•
A sound file plays when its slide shows. Use
the Volume keys to adjust the sound volume.
•
Attached files are added to the end of the
message. To open an attachment, scroll to the
file indicator/filename and press the
Play
(image),
book vCard, calendar vCalendar entry, or
unknown file type).
messages
56
>
key (sound), or
New Message
É
. Press the
Message Inbox
Open
View
key (address
instant messaging
key
features
log in
s>e Messaging
Select your IM service provider, then log in.
add contacts
After you log in:
Scroll to a contact, then press
Add Contact
>
start conversation
Press
Options>Send Msg To
recipient’s IM ID.
log out
Press
Options>Sign Out
>
IM
Options>Manage
and enter the contact’s information.
and enter the
.
Page 59

more messages
For basic text message features, see page 55.
Your phone reads message settings from the USIM
card. If you put another USIM card in your phone, your
phone sends and receives messages for the phone
number on the new card.
features
send voice message
s>e Messaging
To record the voice message, press the
speak, then press the
voice recording into a message and lets you enter
email addresses or phone numbers of the recipients.
use a message template
s>e Messaging
Multimedia Templates
Select a template to create a new message based
on the template.
>
Create Voice Message
Stop
key. Your phone inserts the
>
Templates >Text Templates
Record
key,
or
features
read and manage messages
s>e Messaging
Icons next to each message indicate if it is read>
or unread
message has an attachment
or is locked
To see options like
scroll to a message and press
To open a message, press
Options
to use or store any phone numbers,
email addresses, Web sites, or files in the message.
>
Message Inbox
<
. Icons can also indicate if the
=
, might be SPAM?,
9
, urgent!, or low priority↓.
Reply, Delete, Call, Forward
Options
s
. Then, you can press
, or
Lock
,
.
messages
57
Page 60

features
access email
You can use Mobile Email to check your
email on Windows® Live, Hotmail®, AOL®, AIM®,
Yahoo! Mail, and more.
In the home screen, press
Select your service and follow the prompts to sign in.
browser messages
Read messages received by your
micro-browser:
s>e Messaging
store message objects
Go to a multimedia message page, or scroll
to an object in a message. Then:
Options>Store
Press
store.
messages
58
Options >Mobile Email
>
Browser Msgs
and select the object you want to
features
print message over Bluetooth®
connection
You can use a Bluetooth wireless connection to
send a message from your phone to a printer.
s>e Messaging
Scroll to the message you want to print and press
Options>Print
You cannot print message
Bluetooth connections, see page 89.
store text messages on your SIM card
To store incoming text messages on your
SIM card, press:
s>e Messaging
Message Setup >Text Msg Setup >Default Storage >SIM Card
>
.
>
Message Inbox, Outbox
Templates
, then press
,or
Drafts
. For more about
Options>Setup
Page 61

entertainment
AT&T Mobile Music™ portfolio
AT&T Mobile Music™ is the ultimate,
integrated, on-the-go music experience.
Wherever you go, AT&T Mobile Music will connect
you to your music with a touch of a button. You can
listen to your music, discover the latest songs, music
news, concert updates, digital radio, ringtones, and
watch the latest music videos. For more details,
www.att.com/mobile-music
see
music player
Your phone can play and store MP3, WMA,
and AAC song files (for details, see page 63).
.
You can use an optional removable memory card with
your phone to store more songs (see page 12).
Find it:
s>Ã My Stuff
Press S up or down to scroll to an option, and press
the center key
the menu:
options
All Songs
s
Show and play individual songs.
Note:
appear in the
not have any
information stored, so they don’t
appear in those lists.
>
AT&TMusic >Music Player
to select it. Press( to return to
All of your phone’s songs
Songs
list. Some songs do
Artist, Album
entertainment
, or
Genre
59
Page 62

options
Recently
Played
Playlists
Artists
Albums
Genres
Composers
When music is playing
• To control the music player
60
Show and play recently played songs.
Create or play a playlist (see page 61).
Select an artist to show or play their
songs.
Select an album to show or play its
songs.
Select a type of music to show or play
songs.
Select a composer to show or play
their songs.
with the phone open:
press the center key
play/ pause / , press
left for previous , or press
entertainment
s
to
S
S
right for next . HoldSleft or right to
rewind or fast forward.
• To change the volume
volume keys on the left side of your phone.
• To close the music player
music playing, press
the hidden music player, press
select the song again. To stop the music,
O
press
• If you receive a call
resumes after the call.
You can use
to listen to music files you store on your phone (see
page 89).
Tip:
,
You can listen to tunes on your way. Use
airplane mode to make your phone safe to use with a
wired headset, even while you’re on a plane. See
page 77.
.
Bluetooth® A2DP stereo headphones
, press the
and leave the
Options >Hide
, the music pauses, then
. To reopen
S
down and
Page 63

play music with your phone closed
Display Keys
Play, pause, skip, rewind, or
fast forward your songs.
Volume Keys
Control volume or select menu
items.
Smart Key
Open the music player menu.
Hold the smart key to lock or
unlock side keys.
Song
Artist
00:05/03:00
Touch keys appear on your external display when you
close your phone (to unlock them, hold the
smart key
1
).
Press the[touch key to open your music
player.
3
Press
[OK]
to play the song.
• Play or pause –
• Skip to another song –
Press and release
• Rewind or fast forward the current song –
x
Hold
•Change volume –
• Lock/unlock the keys –
Pressy.
x
or z.
Press the Volume keys.
or z.
Hold the smart key.
2
Press
vV
to scroll to a song.
• Go back –
smart key.
the middle touch key.
• If you receive a call
resumes after the call.
To go back one screen, press the
create a playlist
Find it:
s>Ã My Stuff
Playlists >[Create New Playlist]
>
To close the music player, hold
, the music pauses, then
>
AT&TMusic >Music Player
entertainment
61
Page 64

1
Select a song list, such as
shows a list of song titles.
2
Scroll to each song you want and press the
s
center key
3
Press the
4
Enter a name for the playlist.
5
Press the OKkey to store the name and the
playlist.
To hear your playlist, highlight it under
the center key
to select it.
Done
key to store the list.
s
twice.
All Songs
. Your display
Playlists
and press
music sources
shop music
Find it:
s>Ã My Stuff
launches the browser to a page where you
Shop Music
can purchase music and ring tones from third-party
stores, and personalization content from AT&T.
entertainment
62
>
AT&TMusic >Shop Music
stream music
Find it:
XM Radio
radio on your mobile phone. Get access to
commercial-free music, the latest Hip Hop, R&B,
Rock, Jazz, Country anywhere you go.
Note:
and you are responsible for all data charges incurred.
AT&T strongly recommends that you subscribe to a
MEdia Max
addition
for the MEdia Max package.
s>Ã My Stuff
lets you listen to dozens of channels of digital
XM Radio
application uses a large amount of data,
data bundle with unlimited MEdia Net
to this purchase. Call AT&T at 611 to sign up
>
AT&TMusic >XM Radio
copy music from a computer
To copy music from your computer to your
phone, you need a:
• microSD memory card
a card, see page 12 or for card details, see
page 87).
, up to
8GB
(to install
in
Page 65

•USB data cable
•
computer with
program
and a
(for details, see page 88).
music files
in these formats,
that manages them:
music file formats sampling rate
AAC+, Extended AAC+ up to 128 kbps
WMA up to 192 kbps
MP3, AAC up to 256 kbps
Note:
You can copy Windows® Media DRM
protected songs from your computer to your
phone (Indirect License Acquisition). However,
your phone cannot download DRM protected
songs over the air (Direct License Acquisition).
To copy songs from your computer onto your memory
card:
1 Insert the microSD memory card
into your
phone (see page 12).
2 Disconnect the cable
connected. Then, press
Connection >USB Settings >Default Connection >Media Sync
>
If you leave your
from your phone, if it is
s>} Settings
Default Connection
set to
Media Sync
you can skip this step in the future.
3 Connect the
USB cable
to your
phone and to
a USB port
on your
computer.
Your phone should show
USB: Media Sync
, and your
computer should indicate that it found a new
device.
Note:
When your phone is connected to a
computer, you can only access the memory card
through the computer.
.
,
entertainment
63
Page 66

4 On your computer
software (such as Windows® Media Player, or
software from your music download service). The
music manager software should show an icon for
your phone’s memory card.
To transfer your songs using
Windows® Media Player (version 11):
Click on the “Sync” tab.
Click on songs and drag them to the “Sync” list.
Press “Start Sync” to transfer the songs in the
list. You can only transfer songs that you own.
For details, see the software instructions.
To transfer your songs using most other music
manager software
to the icon for your phone’s memory card.
You can only transfer songs that you own.
For details, see the software instructions.
entertainment
64
, open your music manager
, click on songs and drag them
5
When you are finished transferring songs,
disconnect the cable from your phone and
computer.
Once you have these, see page 88 to copy music from
your computer to your phone’s memory card.
music ID
Ever wonder what song is playing? Now you will
MusicID
know!
what song it is! It knows more than 3 million songs of
most types of music, so use it as much as you want
for one monthly fee! Use it in a bar, at the movies,
in the car… anywhere music is playing.
Find it:
Choose the
toward the speaker so it can hear the music.
listens to a sample of the music, analyzes the sample,
then shows you the song title and artist.
will listen to music playing and tell you
s>Ã My Stuff
ID song!
>
AT&TMusic >MusicID
option, then hold your phone
MusicID
Page 67

music videos
Find it:
Music Videos
into the Music Video section of
you have access to music videos from the latest
artists, as well as programming from AT&T, MTV, VH1,
and CMT, among others. Simply click on a video and
begin watching!
s>Ã My Stuff
launches a browser that takes you directly
>
AT&TMusic >Music Videos
W
. From this menu,
music news
Find it:
The Buzz
music industry news and information, including charts,
news, and concert locations.
s>Ã My Stuff
launches a Java™ application that gives you
>
AT&TMusic >The Buzz
music community
Find it:
s>Ã My Stuff
>
AT&TMusic >Community
Community
launches the browser to a user community
where you can interact with your friends and the
community, as well as review artist fan sites.
music applications
Find it:
s>Ã My Stuff
launches the browser to an area where you
Music Apps
can purchase music-related applications from AT&T’s
Media Mall
. This folder includes applications that are not
part of the core AT&T Mobile Music offering, such
as Podcasting, non-preloaded streaming apps, and
music games.
>
AT&TMusic >Music Apps
browser
You can use your phone’s HTML browser to check
your favorite Web sites, or download files and
applications to your phone. You can even check an
Internet-based email account.
entertainment
65
Page 68

To
launch
the browser, just press@.
To
scroll
through Web pages, pressS
select
up/down/left/right. To
s
press
To
enter the Web address (URL), then press
Tip:
phone browsers. Their URLs start with “wap”
(rather than “www”).
To
>
To
>
Tip:
>
open your phonebook, scroll to the page name, and
press
Speed Dial
66
. To return to the previous page, press
go to a Web page
Some pages are specially designed for mobile
bookmark
Page >Bookmark Page
go to a bookmarked
Bookmark
Page >Save URL asContact
the current Web page, press
, then select the page name.
For even faster access to the page, press
N
. You cannot save URL contacts in the
list.
entertainment
a link, scroll to it and
, press
Options >Open >Web Address
OK
.
Web page, press
. Then, to go to the page, just
Options >Open
.
Options
Back
Options
To
enter text
scroll to the text entry field, press the center key
to open it, then enter text as described on page 51.
.
browser keypad shortcuts:
,
Tip:
call or open your
Just press
on pages that show a text entry field,
1, 7, 4
•
•
2
Go to the
•
3, 9
•
5
Go to your
•
8
Turn
•
*
Switch to
•
#
Make the page width
•
0
Turn on/off
through the page without highlighting links.
While your browser is open, you can make a new
Options >Open >Swap
Zoom
in, out, or reset zoom.
top
of the page.
Page up
or page down.
home page
images
on or off.
full-screen
ScanPage
, which lets you scroll
Address Book, Messaging, Calendar
.
.
display and back.
fit your screen
, or
My Stuff
s
.
.
Page 69

To
exit
the browser, press
Options >Exit
.
Note:
Some file formats are not supported.
check your email
You can use your browser to check a Web-based email
account (like Hotmail, Gmail, or Yahoo).
launch
To
1
2
the browser, just press@.
Press
Options >Go to Page
Enter the Web address for your Web-based email
account, then press
Web-based email access, contact your email
provider.
.
OK
. For questions about
download files in the browser
To
download
application to your phone, go to the page that links to
the file, scroll to the link, and select it.
a media file, theme, or Java™ game or
You can choose where to store the files you download:
s>} Settings
Memory CardorPhone (Memory Card
>
memory card is inserted).
If you go to a Web site that provides
, your browser can play the videos without
video
downloading them onto your phone.
>
Phone Status >DownloadLocation
only appears when a
streaming
browser settings
To
change your browser preferences
browser open, press
To turn Web page graphics on or off, select
To change how much the page moves each time you
S
press
To
press
>
up or down, select
clear the browser history, cache, or cookies
s>} Settings
Clear History, Reset Cache
Options >Browser Setup >Preferences
>
Web Access >Browser Setup
, or
Clear Cookies
entertainment
Page Scroll
with the
Images
.
.
.
,
67
Page 70

Your phone reads browser settings from the USIM
card. When you remove the USIM card, your phone
clears the browser cache. To edit your settings, press
s>} Settings
>
Web Access >Web Sessions
.
photos
take & store or send photos
Your camera lens is on the back of your phone when
the phone is open.
wipe the lens clean with a dry cloth before you
take a picture.
To get the clearest pictures,
1
Press s >
viewfinder.
Camera
Mode (photo
or video)
Press S
up or down to
view camera
settings.
Press left or
right to
change.
à My Stuff
Timer
>
Camera
to see the camera
232
Zoom
1x
BackOptions
Remaining
photos
Resolution
Storage
(phone or
memory card)
Focus point
68
entertainment
Open the camera menu.
Exit the
camera.
Page 71

2
Press the center keys to take the photo in the
viewfinder. You can:
•
Press the
If you press
picture over a Bluetooth® connection
(see page 92).
•
Press the
message.
Your phone might tell you that this is a
Multimedia Msg
other phones or networks do not support
picture messages. Press the
the message.
•
Press ( to discard the photo and return to
the active viewfinder.
Options
key to store the photo.
Options >Print
Send
, since it has a picture in it. Some
, you can print the
key to send the photo in a
Yes
key to send
Before you capture the photo, you can press
open the camera menu:
options
Go To Pictures
Go To Video Mode
Auto-Timed Capture
Camera Setup
Switch Storage
Device
Free Space
See stored pictures and photos.
Switch to the video camera.
Set a timer for the camera to take
a photo.
Open the setup menu to adjust
photo settings.
Choose to store pictures on
your phone or a memory
card.
See how much memory remains.
Note:
Your service provider may
store some content in user
memory before you receive the
phone.
Options
to
entertainment
69
Page 72

self portrait
If you close your phone while the viewfinder is active,
the external display shows the image. Press the
Volume keys to zoom, or press the smart key to
capture and store the image.
see stored photos
Find it:
s>Ã My Stuff
All Pictures
>
To
center key
Options >View Full Screen
regular view).
see photos with your phone closed
Touch keys appear on your external display when you
close your phone (to unlock them, hold the
smart key
70
> picture name
see
a picture, scroll to it and press the
s
. To see it at full display size, press
).
entertainment
>
Media Finder >Pictures
(press any key to return to the
1
Press the touch key to open your pictures.
2
Press
vV
to scroll to a picture.
3
Press
[OK]
to open the picture.
• Play slideshow –
key.
• Skip back or forward –
touch keys.
• Lock/unlock the side keys –
smart key.
•Go back –
smart key.
the middle touch key.
Press the middle touch
Press the end or
Hold the
To go back one screen, press the
To close the photo viewer, hold
Page 73

videos
Zoom
1x
51
Press S up or down to view camera settings. Press left or
right to change.
Open the video
camera menu.
Exit the
camera.
Options Back
Camera
Mode (photo
or video)
Minutes
remaining
Storage (phone
or memory
card)
record a video
Your camera lens is on the back of your phone, when your
phone is open.
clean with a dry cloth before you capture a video.
Press s >
viewfinder.
To get the clearest videos, wipe the lens
à My Stuff
>
Video Camera
to see the video
Note:
The number of minutes remaining is an
estimate.
Tip:
If you want to send your video in a message, the
MMS
video length must be set to
Options>Video Camera Setup >Video Length >MMS
1
Press the center keys to start recording the
video in the viewfinder.
2
Press the
You can:
•
•
Stop
key to stop recording the video.
Press the
or preview the video.
Press the
message.
Enter text and press
recipient address and press the
center key
to enter a new number. To send the message,
press the
Options
Send
key to send the video in a
s
to select it. Press the
Send
key.
. To set length, press
.
key to store, discard,
Send To
, then scroll to a
entertainment
Options
key
71
Page 74

Note:
Some other phones or networks do not
support messages with videos.
•
Press ( to discard the video and return to
the active viewfinder.
1
Press thectouch key to open your videos.
2
Press
vV
to scroll to a video list, or choose a
site to watch streaming video.
3
Press
[OK]
to play a video.
play stored video clips
Your phone can play video files that are up to
256 kbps.
Find it:
s>Ã My Stuff
All Videos
> video name
>
Scroll to a video and press the center key
it. Once it’s playing, you can press
to see the video at the full display size (press any key
to return to the regular view).
play videos with your phone closed
Touch keys appear on your external display when you
close your phone (to unlock them, hold the
smart key
72
).
entertainment
>
Media Finder >Videos
Options>Play Full Screen
s
to play
• Play or pause –
• Skip to another video –
Press and release
• Rewind or fast forward the current video –
x
Hold
• Change volume –
• Lock/unlock the side keys –
smart key.
•Go back –
smart key.
the middle touch key.
Pressy.
x
or z.
or z.
Press the Volume keys.
Hold the
To go back one screen, press the
To close the video player, hold
Page 75

Tip:
Videos play in landscape mode in the external
display. To change whether the top of the video is on
the left or right side of your phone,
s>Ã My Stuff
press
Options >Videos Setup >Full Screen >Left
>
Media Finder >Videos
or
Right
.
, then press
watch videos online
You can use
from your favorite programs, breaking news
stories, sports, and more. Cellular Video is available
with a MEdiaNet subscription, wherever 3G service is
available.
Just press
CellularVideo
Z
to launch
to watch video clips
CellularVideo
.
fun & games
Note:
Icons next to a picture, sound, or other object
9
can indicate if the file is locked (
®
your phone
For basic information on the camera, see page 68.
features
start micro-browser
Just press @.
Your phone reads micro-browser settings from the
USIM card. When you remove the USIM card, your
phone clears the browser cache. To edit your
settings, press
Web Sessions
>
or on your memory card (©).
s>} Settings
.
), or if it is stored on
>
Web Access
entertainment
73
Page 76

features
micro-browser keypad shortcuts
features
download objects from Web page
1, 7, 4
2
Go to the
3, 9
5
Go to your
8
Turn
*
Switch to
#
Make the page width
0
Turn o n / o ff
through the page without highlighting links.
enter text on a Web page
To enter text on a Web page, scroll to a text entry
field, press the center key
then enter text as described on page 51.
74
Zoom
in, out, or reset zoom.
top
of the page.
Page up
or page down.
home page
images
on or off.
full-screen
ScanPage
, which lets you scroll
entertainment
.
display and back.
fit your screen
s
to
open the field
.
Download a picture, sound, or other object
from a Web page:
@
Press
to the link, and select it.
go to a Web page URL address
If you know the URL of a page you want to see,
open the micro-browser and press
>
Tip:
phone micro-browsers. Their URLs start with
“wap” (rather than “www”).
,
, go to the page that links to the file, scroll
Options >Open
Web Address
, then enter the URL.
Some pages are specially designed for mobile
Page 77

features
store and use Web page bookmarks
features
change micro-browser preferences
If you find a page you will want to visit again, you
can save a link to it by pressing
Bookmark Page
>
Then, to go to the page again, open the browser
and press
Tip:
Page >Save URL as Contact
>
just open your address book, scroll to the page
name, and press
contacts in the
.
Options >Open >Bookmark
For even faster access to the page, press
N
. You cannot save URL
Speed Dial
Options >Page
.
. Then, to go to the page,
list.
Options
With the micro-browser open, press
Browser Setup >Preferences
>
To turn Web page graphics on or off, select
To change how much the page moves each time
you press the navigation key
Page Scroll
select
Web sessions
A Web Session stores settings that your
phone uses to access the Internet. To select or
create a Web session:
s>} Settings
.
S
.
>
Web Access >Web Sessions
entertainment
Options
Images
up or down,
.
75
Page 78

features
clear micro-browser history
features
start game or application
Clear the micro-browser’s history, cache, or
cookies:
s>} Settings
Clear History, Reset Cache
>
download game or application
You can download a Java™ game or
application the same way you download pictures or
other objects:
@
Press
to the link, and select it.
76
>
Web Access >Browser Setup
, or
Clear Cookies
, go to the page that links to the file, scroll
entertainment
Start a Java™ game or application:
s>Ã My Stuff
application, press the center key
Note:
To install and run games stored on your
memory card, press
[Install New]
>
manage certificates
Enable or disable Internet access certificates
stored on your phone:
s>} Settings
Certificates are used to verify the identity and
security of Web sites when you download files or
share information.
>
Games & Apps
.
>
Security >Certificate Mgmt
, scroll to the game or
s
s>Ã My Stuff
>
Games & Apps
Page 79

features
airplane mode
You can switch your phone to airplane mode to
prevent it from communicating with the network.
This lets you use games or other applications while
you are on an airplane, without interfering with
airplane communications.
Note:
Your phone cannot make Bluetooth®
connections when
s>} Settings
You can make the airplane mode option appear
whenever you turn on your phone:
s>} Settings
Airplane Mode
>
Airplane Mode >Airplane Mode >On
>
Airplane Mode >Prompt At Power Up >On
is on.
entertainment
77
Page 80

tools
address book
To store and call address book entries, see page 18.
features
assign a speed dial key to an address book entry
You can assign the keys 1 through 9 to
address book entries. Then, when you press and
hold a key, your phone calls the entry.
Note:
Your service provider might assign some
1
keys, such as
can only speed dial the address book entries stored
on your phone (not on your SIM card).
s >= Address Book
Press
book entry. Then, press
pick a speed dial key.
tools
78
for your voicemail number. You
and scroll to the address
Options >AddtoSpeedDial
and
features
use the speed dial key for an address book entry
To
use a speed dial key
address book entry, just press and hold the key
while in your home screen.
edit your speed dial keys
s>= Address Book
Speed DialList
>
that you assigned to an
, then press
Options>Setup
Page 81

features
edit or delete an address book entry
features
set ringer ID for an address book entry
Edit a number stored in the address book:
s >= Address Book
entry, and press
Delete Contact
Shortcut:
to enter the first letters of an entry you want. You
can also press
other categories.
, or other options.
, scroll to the address book
Options
. You can select
In the address book, press keypad keys
*
and# to see the entries in
Edit Contact
,
Assign a ring alert (ringer ID) to an entry:
s>= Address Book
Options>Edit Contact >Ringer ID
Note:
The
stored on the SIM card. To copy an entry from SIM
to phone memory, see page 81.
Tip:
The ring alerts you can choose are stored in
s My Stuff
must be 300 KB or smaller.
To activate ringer IDs:
s>} Settings
> entry, then press
> ringer name
Ringer ID
option isn’t available for entries
>
Media Finder >Ring Tones
>
Audio
> style
. Ring alert files
Detail >Ringer IDs >On
tools
79
Page 82

features
set picture ID for an address book entry
features
set category for an address book entry
Assign a photo or picture to show when you receive
a call from an entry:
s>= Address Book
Options>Edit Contact >Picture
Note:
The
stored on the SIM card. To copy an entry from SIM
to phone memory, see page 81.
set picture ID view for address book
Show entries as a text list, or with picture caller ID
photos:
s>= Address Book
View by
> view name
>
tools
80
> entry, then press
> picture name
Picture
option isn’t available for entries
, then press
Options>Setup
s>= Address Book
Options>Edit Contact >Category
When you open your address book, press
*or#
set category view for address book
s>= Address Book
Category
> category name
>
You can show
category (
category you create.
Shortcut:
press
Business, Personal, General, VIPs
*or#
> entry, then press
> category name
to see your categories.
, then press
All
entries, entries in a predefined
When you open your address book,
to see your categories.
Options >Filter by
), or entries in a
Page 83

features
create group mailing list
Note:
The
Message List
option only appears if you have
Message List
entries stored on your phone. A
include entries stored on the SIM card. To copy
entries from SIM to phone memory, see page 81.
You can put several address book entries in a group
mailing list, then send a message to the list. To
create a list:
s>= Address Book
Message List
>
sort address book list
Set the order in which entries are listed:
, then press
cannot
Options>Create New
features
copy one address book entry
Copy an entry from the phone to the SIM card, or
from the SIM card to the phone:
s>= Address Book
Options>Copy to SIM Card
copy multiple address book entries
Copy multiple address book entries between the
phone and SIM card:
s>= Address Book
Options>Select Multiple to
Copy SIM to Phone
, scroll to the entry, press
or
Copy to Phone
, then press
, and select
Copy Phone to SIM
or
s>= Address Book
Options>Setup>Sort by>First Name
, then press
or
Last Name
tools
81
Page 84

features
send address book entry to another device
Send an address book entry to another phone,
computer, or device:
s>= Address Book
Options>Share >Contact
For more information about copying files to another
device, see page 91.
, scroll to the entry, press
features
print address book entry over Bluetooth®
connection
You can use a Bluetooth wireless connection to
send an address book entry from your phone to a
printer.
s>= Address Book
Scroll to the entry you want to print, and press
Options>Select Multiple to>Print
.
82
tools
You cannot print a
Bluetooth connections, see page 89.
Message List
. For more about
Page 85

personal organizer
features
set alarm
s>Ã My Stuff
turn off alarm
When an alarm happens: To turn off the alarm,
press the
To set an eight-minute delay, press the
Note:
The
already powered on when the alarm sounds.
add new calendar event or task
Your calendar can store events (with a start and end
time that can repeat) or tasks (with a due date).
s>Ã My Stuff
s
press
Create New Task
>
Tools >Alarm Clock
Disable
key or O.
Snooze
key is available only if the phone is
>
Tools >Calendar
, press
Options>Create New Event
, scroll to the day,
or
Snooze
key.
features
see calendar event or task
See or edit event or task details:
s>Ã My Stuff
s
press
Tip:
Keeping up with life can be tough work. To see
a list of your upcoming events or tasks, open the
calendar and press
Organized Tasks
change calendar settings
s>Ã My Stuff
Options>Setup
You can choose the
you open your calendar, and you can show or hide
Tasks On DayView
the
if it is turned off when a calendar alert occurs.
>
Tools >Calendar
Options >View >Organized Events
.
>
Tools >Calendar
Default View
that appears when
. You can tell your phone to
, scroll to the day,
or
, then press
Power On
tools
83
Page 86

features
event reminder
When an event reminder happens:
View
To see reminder details, press the
To close the reminder, press the
send calendar event to another device
Send a calendar event to another phone, computer,
or device:
s>Ã My Stuff
s
press
84
>
Tools >Calendar
, scroll to the event, press
tools
key.
Back
key.
, scroll to the day,
Options>Send
features
print calendar month, week, or day over
Bluetooth® connection
You can use a Bluetooth wireless connection to
send a calendar month, week, or day from your
phone to a printer.
s>Ã My Stuff
Go to the month, week, or day view and press
Options>Print
For more about Bluetooth connections, see
page 89.
.
>
Tools >Calendar
Page 87

features
create voice record
features
play voice record
s>Ã My Stuff
Options >Create New >Voice Note
>
Press the center keys to start and stop the
recording.
Note:
Recording phone calls is subject to varying
state and federal laws regarding privacy and
recording of conversations. Always obey the laws
and regulations on the use of this feature.
>
Media Finder >Voice Notes
, then press
Play a voice record:
s>Ã My Stuff
All Voice Notes
>
the center key
calculator
s>Ã My Stuff
currency converter
s>Ã My Stuff
Options>Exchange Rate
Enter exchange rate, press the OKkey, enter
amount, and press
>
Media Finder >Voice Notes
, scroll to the voice record, and press
s
>
Tools >Calculator
>
Tools >Calculator
Options>Convert Currency
, then press
.
tools
85
Page 88

AT&T GPS & Yellowpages.com
For GPS performance tips, see page 42.
AT&T Navigator
AT&TNavigator
turn-by-turn voice and on-screen driving directions,
navigates around traffic congestion with automatic
re-routing. Plus you can locate and navigate to
restaurants, Wi-Fi hotspots, and more, from more
than 10 million business listings.
Find it:
Note:
adaptor and an antenna mounted on a window
without heavy UV sun protection.
For details
visit
86
, with GPS-enabled directions, gives you
s
>
AT&TGPS >AT&TNavigator
AT&T Navigator performs best with a vehicle
about
AT&TNavigator
www.wireless.att.com/source/uconnect/navigator/
, contact AT&T or
tools
Where widgets
Where
widgets help you quickly find local weather, gas
stations, stores, restaurants, and more. You can add or
remove widgets to match your favorite searches.
Find it:
Tip:
For details
visit
s
>
AT&TGPS >Where
To clos e
Where
, pressO.
about
Where
,
www.wireless.att.com/source/uconnect/where/
Yellowpages.com Mobile
Yellowpages.com Mobile
get step-by-step directions to or from your saved
locations (including your home or from recent
searches). Then, save your favorites and access them
on the go from wherever you happen to be.
Find it:
Tip:
To clos e
For details
.
www.yellowpages.com/products/yp_mobile
visit
lets you find a business and call it or
s
>
Yellowpages.com Mobile
Yellowpages.com Mobile
about
Yellowpages.com Mobile
, pressO.
,
Page 89

connections
manage your memory card
You can use a removable microSD memory
8GB
card (up to
retrieve multimedia objects (such as photos and
sounds).
Note:
If you download a copyrighted file and store it
on your memory card, you can use the file only while
your memory card is inserted in your phone. You
cannot send, copy, or change copyrighted files.
see the files
To
your phone, open a file list, such as
page 70). Icons can indicate if a file is stored in your
phone memory (
) with your phone to store and
stored on your memory card and on
Pictures
(see
®
) or on your memory card (©).
To copy or move a file from your phone to your
memory card, highlight it in the list and press
Options>Manage >CopyorMove >Memory Card
copy or move some copyrighted files.
copy files
To
computer, you can use a cable connection (see
page 88) or a Bluetooth connection (see page 91).
To see your
and other information about the card:
Find it:
1
2
between your memory card and a
memory card name, available memory,
s >} Settings
Press S to scroll to the memory card that is
installed.
Press the center keys to see the memory card
information. Your phone stores any content that
>
Phone Status >Storage Devices
. You cannot
connections
87
Page 90

you add, like ring tones or games, in user
memory. Your service provider may store some
content in user memory before you receive
the phone.
or
Press
Options
lets you
to see the
Format
or
Storage Device
Rename
the memory card.
menu, which
cable connections
Yo u r
phone has
a micro USB port
so you can
connect it to a
computer to
transfer data.
connections
88
Note:
Motorola Original USB data cables
and supporting software may be sold
separately. Check your computer or
hand-held device to determine the type
of cable you need. To make
connected computer, make or answer the call through
the device application.
data calls
through a
connect your memory card to a
computer
You can use a cable connection to access your phone’s
memory card with a PC.
Note:
When your phone is connected to a computer,
you can only access the memory card through the
computer.
On your phone:
Disconnect the cable
connected, then press
USB Settings >Default Connection >Memory Card
>
from your phone, if it is
s>} Settings
>
.
Connection
Page 91

This directs the USB connection to your memory card.
Connect the cable
USB port on your computer. Then follow these steps:
to your phone and to an available
On your computer:
1
Open your “My Computer” window, where your
phone’s memory card appears as a “Removable
Disk” icon.
2
Click on the “Removable Disk” icon to access the
files on your phone’s memory card.
3
To store the desired files (up to
memory card, drag and drop them as follows:
audioorringfiles:
screen savers:
wallpapers:
video clips:
Note:
Your phone may not play MP3 files that
have a bit rate higher than 128 kbps. If you try to
download or play one of these files, your phone
> mobile > audio
> mobile > picture
> mobile > picture
> mobile > video
8GB
) onto the
might show you an error or ask you to delete the
file. Ring alert files must be 300 KB or smaller.
4
When you finish, disconnect your phone by
selecting the “Safely Remove Hardware” icon in
the system tray at the bottom of your computer
screen. Then disconnect the “USB Mass Storage
Device.”
5
Disconnect the cable from your phone and
computer.
On your phone:
To return to
s>} Settings
Data Connection
>
Data
as your USB default connection, press
>
Connection >USB Settings >Default Connection
.
Bluetooth® wireless
Your phone supports Bluetooth wireless connections.
You can connect your phone with a Bluetooth headset
or car kit to make handsfree calls. You can also
connections
89
Page 92

connect your phone with a phone or computer that
supports Bluetooth connections to exchange files.
You can use Bluetooth A2DP stereo headphones to
listen to music files you store on your phone.
Note:
The use of wireless phones while driving may
cause distraction. Discontinue a call if you can’t
concentrate on driving. Additionally, the use of
wireless devices and their accessories may be
prohibited or restricted in certain areas. Always obey
the laws and regulations on the use of these products.
For maximum Bluetooth security
always connect Bluetooth devices in a safe, private
environment.
, you should
use a headset or handsfree car kit
Before you try to connect your phone with a
handsfree device
ready
in pairing or bonding mode (see the user’s
guide for the device).
90
, make sure the device is on and
connections
Find it:
>
Shortcut:
Options
Your phone lists the devices it finds within range.
1
2
3
When your phone is connected, the
Bluetooth indicator
You cannot play some copyrighted files over a
Bluetooth connection.
Shortcut:
your phone can automatically connect to a handsfree
device you have used before. Just turn on the device,
s>} Settings
Bluetooth Link >[Add Audio Device]
From the home screen, you can also press
>
Bluetooth Link >[Add Audio Device]
Scroll to a device in the list and press the
center key
Press the
If necessary, enter the device passkey (such as
0000
s
YesorOK
) and press the OKkey.
When your phone’s Bluetooth power is on,
>
Connection
to look for devices.
.
key to connect to the device.
O
appears in the home screen.
Page 93

or move it near the phone. If the device doesn’t
connect, turn it off and back on. During a call, you can
press
Options>Use Bluetooth
handsfree device you have used before.
Tip:
Want to know more about your headset or car kit?
For specific information about a device, refer to the
instructions that came with it. For more
Bluetooth support, see:
www.motorola.com/support/Bluetooth
to connect to a headset or
copy files to another device
You can copy a media file, address book entry,
calendar event, or Web Bookmark from your
phone to a computer or other device.
Note:
You can’t copy some copyrighted objects.
1
On your phone, scroll to the object that you want
to copy to the other device.
2
Press
Options
, then select:
•
Send >via Bluetooth
•
Share >NumberorContact >Use Bluetooth
book entries.
•
Send >with Bluetooth
3
Select a recognized device name, or
to search for the device where you want to copy
the file.
If your phone could not copy the file to the other
, make sure the device is on and
device
discoverable mode (see the user’s guide for the
device). Also, make sure the device is not busy with
another similar Bluetooth connection.
Note:
Once you connect your phone to a Bluetooth
device, that device can start similar Bluetooth
connections with your phone. Your display shows the
Bluetooth indicator
Bluetooth connection. To change a device’s
setting, see page 94.
for media files.
for address
for calendar events.
[Look For Devices]
ready
O
at the top when there is a
in
Access
connections
91
Page 94

receive files from another device
If you do not see the Bluetooth indicatorO
at the top of your phone display, turn on your
phone’s Bluetooth feature by pressing
Connection >Bluetooth Link >Setup >Power >On
>
1
Place your phone near the device, and send the
file from the device.
If your phone and the sending device don’t
recognize each other, place your phone in
discoverable mode so the sending device can
locate it: press
Bluetooth Link >Find Me
>
2
Press the
file from the other device.
Your phone notifies you when file transfer is complete.
If necessary, press the
connections
92
s>} Settings
.
Accept
key on your phone to accept the
Save
key to save the file.
s>} Settings
.
>
Connection
send files to a printer
You can use a Bluetooth connection to send a
picture, message, address book entry, or
calendar view from your phone to a printer.
Note:
You cannot print message
Mailing List
book
1
2
.
On your phone, scroll to the object that you want
to print, then press
calendar, you can print the month, week, or day.
Tip:
If you see it, you can print it. After you
capture a picture in the camera, you can press the
Options
key and select
If available, choose additional objects or print
options.
Options>Print >Bluetooth
Print
.
Templates
or an address
. In the
Page 95

3
Select a recognized printer name listed in the
Printers
menu, or
printer where you want to print the object.
Note:
print, select
Always use this option to print 4x6 photos.
[Look For Devices]
If you see
Service Not Supported
Options>Manage>Copy >Bluetooth
to search for the
when you try to
instead.
advanced Bluetooth features
A device is recognized after you connect to it once
(see page 90).
features
make phone visible to other device
Allow a Bluetooth device to discover your
phone:
s>} Settings
>
Connection >Bluetooth Link >Find Me
features
connect to recognized device
Connect your phone to a recognized
handsfree device:
s>} Settings
> device name
drop connection with headset or handsfree
device
s>} Settings
Audio Devices
>
Scroll to the device name and press the
switch to headset or handsfree device during call
During a call, press
switch to a recognized headset or car kit.
Your phone connects automatically or shows a list of
devices you can select.
>
Connection >Bluetooth Link >Audio Devices
>
Connection >Bluetooth Link
Options>Use Bluetooth
Drop
to
key.
connections
93
Page 96

features
play sound files on a recognized headset
features
copy
Media Finder
object to device
While playing a sound file, press
Options>Listen Via Bluetooth
recognized headset.
Your phone connects automatically, or shows a list
of devices you can select.
You cannot play some copyrighted files over a
Bluetooth connection.
move
Media Finder
Caution:
object from your phone.
Scroll to the object, press
>
move some copyrighted files.
94
Moving an object
Move
, select the device name. You cannot
connections
to switch to a
object to device
deletes
Options>Manage
the original
Scroll to the object, press
Copy
, select the device name. You cannot
>
copy some copyrighted files.
edit device properties
s>} Settings
Device History
>
Scroll to the device name and press the
center key
Note:
connects to your phone. You can choose
(always connects),
connecting),
set Bluetooth options
s>} Settings
Setup
>
>
s
.
The
Access
setting can restrict how this device
Just Once, Never
>
Options>Manage
Connection >Bluetooth Link
Always Ask
(asks you before
, or
Custom
.
Connection >Bluetooth Link
Automatic
Page 97

service & repairs
If you have questions or need assistance, we’re here
to help.
www.motorola.com/support
Go to
select from a number of customer care options.
You can also contact the Motorola Customer Support
Center at 1-800-331-6456 (United States),
1-888-390-6456 (TTY/TDD United States for hearing
impaired), or 1-800-461-4575 (Canada).
, where you can
service & repairs
95
Page 98

Specific Absorption Rate Data
SAR Data
This model wireless phone meets the
government’s requirements for exposure to
radio waves.
Your wireless phone is a radio transmitter and receiver. It is
designed and manufactured not to exceed limits for exposure to
radio frequency (RF) energy set by the Federal Communications
Commission (FCC) of the U.S. Government and by the Canadian
regulatory authorities. These limits are part of comprehensive
guidelines and establish permitted levels of RF energy for the
general population. The guidelines are based on standards that
were developed by independent scientific organizations through
periodic and thorough evaluation of scientific studies. The
standards include a substantial safety margin designed to assure
the safety of all persons, regardless of age or health.
The exposure standard for wireless mobile phones employs a unit
of measurement known as the Specific Absorption Rate, or SAR.
The SAR limit set by the FCC and by the Canadian regulatory
authorities is 1.6 W/kg.
standard operating positions accepted by the FCC and by Industry
Canada with the phone transmitting at its highest certified power
level in all tested frequency bands. Although the SAR is
determined at the highest certified power level, the actual SAR
SAR Data
96
1
Tests for SAR are conducted using
level of the phone while operating can be well below the
maximum value. This is because the phone is designed to operate
at multiple power levels so as to use only the power required to
reach the network. In general, the closer you are to a wireless
base station, the lower the power output.
Before a phone model is available for sale to the public in the U.S.
and Canada, it must be tested and certified to the FCC and Industry
Canada that it does not exceed the limit established by each
government for safe exposure. The tests are performed in
positions and locations (e.g., at the ear and worn on the body)
reported to the FCC and available for review by Industry Canada.
The highest SAR value for this model phone when tested for use at
the ear is 0.61 W/kg, and when worn on the body, as described in
this user guide, is 0.79 W/kg. The SAR value for this product in its
data transmission mode (body-worn use) is 0.33 W/kg. (Body-worn
measurements differ among phone models, depending upon
available accessories and regulatory requirements).
While there may be differences between the SAR levels of various
phones and at various positions, they all meet the governmental
requirements for safe exposure. Please note that improvements to
this product model could cause differences in the SAR value for
later products; in all cases, products are designed to be within the
guidelines.
2
Page 99

Additional information on Specific Absorption Rates (SAR) can be
found on the Cellular Telecommunications & Internet Association
(CTIA) Web site:
http://www.phonefacts.net
or the Canadian Wireless Telecommunications Association (CWTA)
Web site:
http://www.cwta.ca
1. In the United States and Canada, the SAR limit for mobile phones used
by the public is 1.6 watts/kg (W/kg) averaged over one gram of tissue.
The standard incorporates a substantial margin of safety to give
additional protection for the public and to account for any variations in
measurements.
2. The SAR information includes the Motorola testing protocol,
assessment procedure, and measurement uncertainty range for
this product.
SAR Data
97
Page 100

European Union Directives Conformance Statement
Product
Approval
Number
IMEI: 350034/40/394721/9
Type: MC2-41H14
European Union Conformanc e
•
•
The above gives an example of a typical Product Approval Number.
You can view your product’s Declaration of Conformity (DoC)
to Directive 1999/5/EC (the R&TTE Directive) at
www.motorola.com/rtte
Approval Number from your product’s label in the “Search” bar on
the Web site.
98
Por la presente, Motorola declara que este
producto cumple con:
The essential requirements and other relevant provisions
of Directive 1999/5/EC
All other relevant EU Directives
- to find your DoC, enter the product
European Union Conformance
 Loading...