

Page 1
MOTONAV
User’s Guide
™
TN20/TN30
Page 2

welcome
Your MOTO
route with GPS accuracy. Features and benefits
include:
NAV
™ TN20/TN30 helps you find the best
• Hear directions and street names
street names and turn-by-turn directions in
clear, easy to understand voice, eliminate
second-guessing when making a turn. You can
feel as confident as you would in your own
neighborhood.
• Save time and gas
avoid getting lost. Your MOTO
TN20/TN30 helps you find the best route with
GPS accuracy. If you miss your turn, it will
show you how to get back on track. Select
between fastest and shortest modes, or
bypass tolls, if you prefer.
—Get there quickly and
NAV
—Spoken
• Find what you need
restaurant, nearest bank, or see what’s
available along your route. Search over a
million businesses and other points of interest
to find destinations while in-town or away.
• Make handsfree calls (TN30 only)
with your compatible Bluetooth® enabled
phone for handsfree calls. It works as a
speakerphone, displays caller ID on the
screen, and automatically mutes turn-by-turn
voice prompts while a call is in progress.
Navigation and handsfree calling helps you
keep your hands on the wheel, and eyes on
the road.
—Locate your favorite
—Connect
1
Page 3

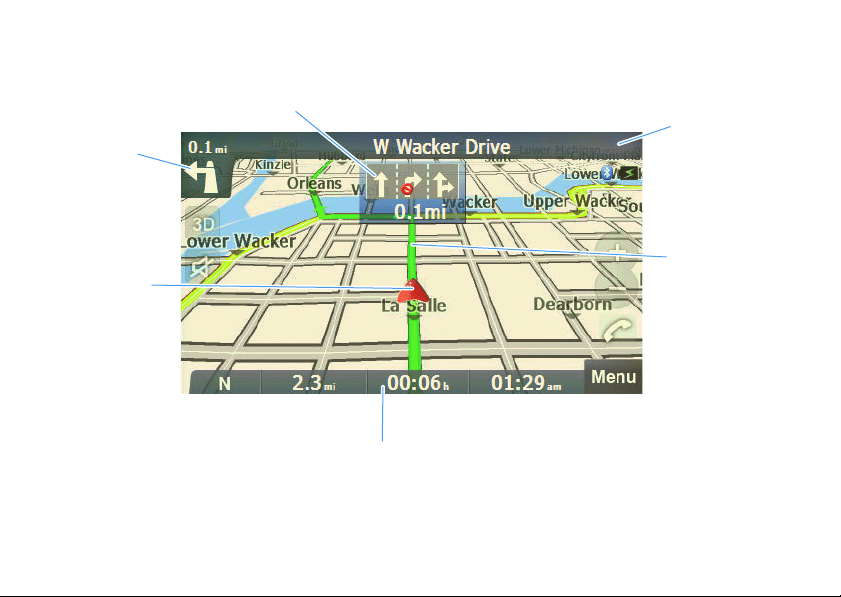
Map View Screen
2
3
4
5
6
7
1
8
9
Map Control Icons
Here’s a quick guide for using the map view screen icons to control operation.
2
2
Page 4

1 Tap to view a smaller area in more detail.
Tap to view a larger area in less detail.
2 Tap to display main menu screen.
3
4
5 Heading indicator.
6 Current street indicator (if GPS connection). If not, tap to display
7 (TN30 only) Tap to make a handsfree call.
8
9 (TN30 only) Indicates Bluetooth on
/
/
///
Tap to change map view display (3D or 2D).
Tap to adjust/mute/unmute volume.
GPS Information screen.
Battery indicator:
Connected to power source / Full / Partial / Low.
3
Page 5
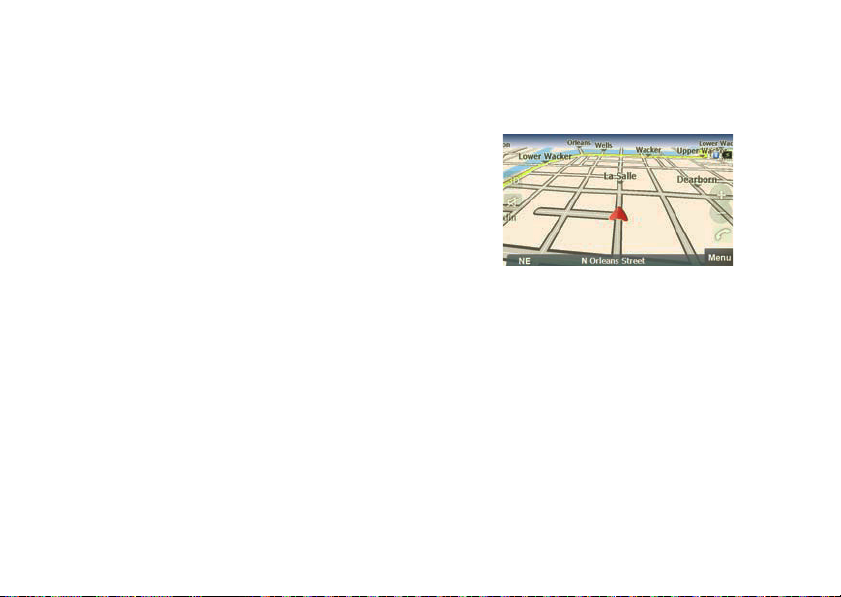
Route Screen
Here’s a quick guide for using the map view screen to view and control route information.
lane information
next
turn
next
street
bar
current
location
route status bar
route
4
Page 6

Tap the
route status bar
•
travel distance, time remaining, and estimated time of arrival,
•
current street name, or
•
current speed and altitude.
next street bar
Tap the
•
display driving directions,
•
view route map overview, or
•
cancel route.
next turn icon
Tap the
The
lane information icon
to switch between viewing:
to display route menu to:
to repeat audio turn instructions.
displays all turns at an intersection.
5
Page 7

Motorola, Inc.
Consumer Advocacy Office
1307 East Algonquin Road
Schaumburg, IL 60196
www.motorola.com
www.motorola.com/motonav
1-877-MOTOBLU (Motorola Bluetooth support)
1-800-331-6456 (United States)
1-888-390-6456 (TTY/TDD United States for hearing impaired)
1-800-461-4575 (Canada)
The use of wireless devices and their accessories may be
prohibited or restricted in certain areas. Always obey the laws and
regulations on the use of these products.
All features, functionality, and other product specifications, as well
as the information contained in this user’s guide are based upon
the latest available information and are believed to be accurate at
the time of printing. Motorola reserves the right to change or
modify any information or specifications without notice or
obligation.
MOTOROLA and the Stylized M Logo are registered in the US
Patent & Trademark Office. The Bluetooth trademarks are owned
by their proprietor and used by Motorola, Inc. under license.All
other product or service names are the property of their respective
owners.
© 2008 Destinator is a registered trademark of Intrinsyc Software
International, Inc. Unauthorized duplication is a violation of all
applicable laws. Other names and brands mentioned herein may
6
be the property of their respective owners. Patents pending.
Map data: © 1993 – 2007 NAVTEQ. All rights reserved.
© 2008 Motorola, Inc. All rights reserved.
Software Copyright Notice
The Motorola products described in this manual may include
copyrighted Motorola and third-party software stored in
semiconductor memories or other media. Laws in the United
States and other countries preserve for Motorola and third-party
software providers certain exclusive rights for copyrighted
software, such as the exclusive rights to distribute or reproduce
the copyrighted software. Accordingly, any copyrighted software
contained in the Motorola products may not be modified,
reverse-engineered, distributed, or reproduced in any manner to
the extent allowed by law. Furthermore, the purchase of the
Motorola products shall not be deemed to grant either directly or
by implication, estoppel, or otherwise, any license under the
copyrights, patents, or patent applications of Motorola or any
third-party software provider, except for the normal, non-exclusive,
royalty-free license to use that arises by operation of law in the
sale of a product.
Manual Number: 68000201366-A
Bluetooth QD ID: B014454
Page 8

Warning:
Traffic laws and current traffic conditions must always
be observed and take precedence over the instructions issued by
the navigation system. The user should be aware of situations
where current traffic conditions and the instructions from the
navigation system may be in conflict.
The use of the navigation system does not relieve the user of
his/her responsibilities. The user is ultimately responsible for the
vehicle under his/her control and should be aware of the
surroundings at all times. For traffic safety reasons, it is
recommended that routes should be planned in a stationary
vehicle before starting a trip.
MOTOROLA IS NOT RESPONSIBLE FOR ANY DIRECT, INDIRECT,
INCIDENTAL, CONSEQUENTIAL, EXEMPLARY, SPECIAL, OR
PUNITIVE DAMAGES, OR OTHER DAMAGE ARISING OUT OF THE
USE OF, OR INABILITY TO USE, THIS PRODUCT. THIS INCLUDES
DAMAGE TO PROPERTY AND, TO THE EXTENT PERMITTED BY
LAW, DAMAGES FOR PERSONAL INJURY AND DEATH.
Laws in some areas prohibit the use of a cellular phone and other
devices when driving a motor vehicle. Please use the utmost care
in using your devices safely under all circumstances. It is the
responsibility of each user to be aware of and abide by any and all
local laws and ordinances, which may restrict the use of cellular
phones and other devices.
Your local law may prohibit attaching the Navigation Device to the
windshield. In such case, attach the mount to the enclosed plastic
disk and adhere it securely to a clean, smooth surface of your car.
Never position the device in a manner which blocks your view of
the road, interferes with the safe operation of the vehicle (e.g. do
not place on the steering wheel or in front of an air bag), or could
otherwise result in injury to the user. Always obey local laws and
restrictions concerning use of such products.
7
Page 9

contents
contents . . . . . . . . . . . . . . . . . . 8
get started . . . . . . . . . . . . . . . . 9
components . . . . . . . . . . . . . 9
initial setup . . . . . . . . . . . . . 10
turn on & off . . . . . . . . . . . . 10
power & charging . . . . . . . . 10
map view screen . . . . . . . . 11
main menu screen . . . . . . . 12
navigation . . . . . . . . . . . . . . 13
routes . . . . . . . . . . . . . . . . . . . 14
create a route . . . . . . . . . . . 14
manage a route. . . . . . . . . . 18
cancel a route . . . . . . . . . . . 21
use the keyboard . . . . . . . . 22
maps. . . . . . . . . . . . . . . . . . . . 24
map display controls . . . . . . 24
manage maps . . . . . . . . . . . 26
welcome
8
browse map . . . . . . . . . . . . 26
view GPS information . . . . . 28
install new maps . . . . . . . . . 29
settings. . . . . . . . . . . . . . . . . . 30
set your language . . . . . . . . 30
set your time zone . . . . . . . 30
set your units of measure . . 31
set keyboard type . . . . . . . . 31
set voice prompts . . . . . . . . 32
connect to your phone for
handsfree calls (TN30 only) . 32
manage paired phone list
(TN30 only) . . . . . . . . . . . . . 34
handsfree calls (TN30 only) . 37
answer a call . . . . . . . . . . . . 37
reject/ignore a call . . . . . . . . 37
make a call . . . . . . . . . . . . . 37
mute/unmute a call . . . . . . . 40
transfer a call . . . . . . . . . . . . 41
end a call . . . . . . . . . . . . . . . 41
display in call screen . . . . . . 41
Safety Information . . . . . . . . . 42
Driving Safety. . . . . . . . . . . . . 44
Industry Canada Notice. . . . . 46
FCC Notice . . . . . . . . . . . . . . . 46
Warranty . . . . . . . . . . . . . . . . . 47
Registration . . . . . . . . . . . . . . 51
Export Law . . . . . . . . . . . . . . . 51
Recycling Information . . . . . . 52
index . . . . . . . . . . . . . . . . . . . . 53
Page 10

get started
components
Take a moment before you get started to familiarize
NAV
indicator
light
charger
port
memory
card
slot
yourself with the components of your MOTO
TN30 and TN20.
MOTO
NAV
microphone
speaker (on
reverse side)
Reset
button
(on side)
TN30 components
touch display screen
Power button (on side)
MOTO
NAV
TN20 components
screen
speaker (on
reverse side)
touch display
charger
port
Power button (on side)
indicator
light
memory
card
slot (on
side)
Reset
button
(on side)
get started
9
Page 11

initial setup
Before you navigate with your TN20/TN30, you need
to perform the following initial setup steps:
1
Mount in your vehicle.
2
Apply power using car charger.
3
Turn on and configure initial settings.
4
Find satellite signal to obtain your location.
For details on performing these steps, see the Quick
Start Guide included in the box.
turn on & off
To turn on your TN20/TN30, press and hold the
button until the display becomes active.
Similarly, to turn off your TN20/TN30, press and hold
Power
the
10
button until the display becomes inactive.
get started
Power
To reset the TN20/TN30, press the
seconds, then press
You can also use a pin to press the
the TN20/TN30 is on.
Power
Power
button again to turn on.
Reset
power & charging
Your TN20/TN30 should be powered using the
included car charger. When you disconnect the
charger (or turn vehicle ignition off), it prompts you to
touch the screen to switch to battery power. If you do
not touch the screen, it will turn off after 30 seconds.
Tips:
If turning off theTN20/TN30 using the
•
button, it must also be powered on using the
Power
button.
•
If the TN20/TN30 turns off after disconnecting
the external power source, it turns back on
button for 8
button when
Power
Page 12
when external power is restored or if you use
Power
button.
•
If the TN20/TN30 is not used for more than 7
days, it enters a power saving mode that
Power
requires a
•
When operating on battery power, the
indicator light flashes in red when the battery
is low.
•
Using another charger to charge your
TN20/TN30 may not be as effective.
•
The included car charger will not power
Motorola phones.
button press to exit.
map view screen
When you turn on your TN20/TN30, you always see
the map view screen.
For details on using the map view screen, see pages 2
and 3.
To directly access the map view screen from all other
Map
menu screens, tap the
corner.
button in lower-right
get started
11
Page 13
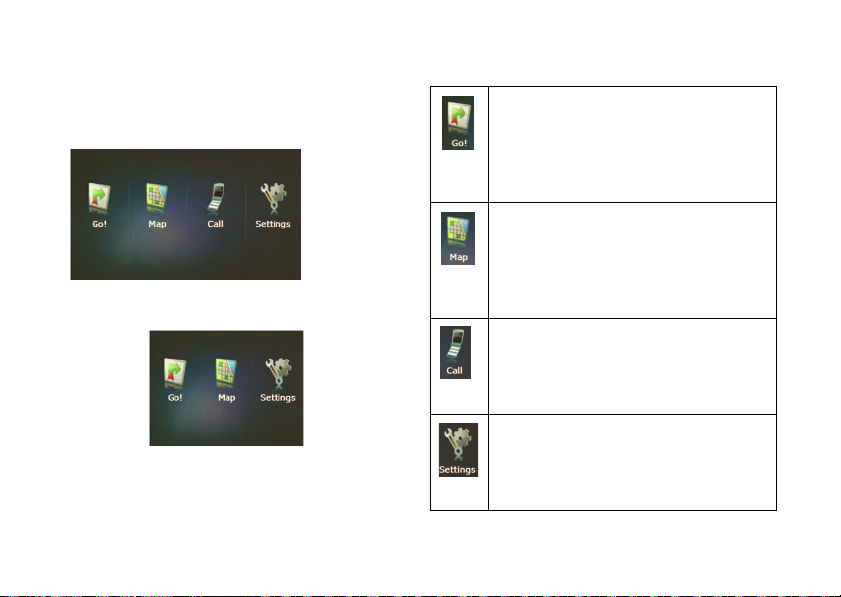
main menu screen
From the map view screen, tap the
access the main menu screen.
Menu
button to
From the main menu, you can access all TN20/TN30
operations:
Lets you create and manage destination
routes on your TN20/TN30.
12
get started
TN30
TN20
Displays map view screen with route and
map control options.
(TN30 only) Displays make a call screen.
Lets you configure TN20/TN30 options.
Page 14
navigation
To navigate around TN20/TN30 menus and text entry
screens, use the right and left arrows at the top:
previous
screen
go to map view screen
From a menu screen, you can easily return to the map
Map
view screen by tapping
in the lower-right corner.
next
screen
From the map view screen,
menu.
tap
Menu
to see the main
get started
13
Page 15

routes
create a route
go to an address
To create a route to an address:
From the main menu:
1
Ta p
Go!
.
2
Ta p
Address
. You see:
routes
14
Note:
To change state of destination, tap
and select new state. See “search and select
item” on page 22 for details on searching for a
selecting items using the keyboard screen.
3
Ta p
Address
.
4
Select destination address (city, street, and
address number). See “search and select item”
on page 22 for details on searching for and
selecting items using the keyboard screen.
Note:
To select the center of a city for a
destination (instead of a specific address), use the
City Center selection for the address.
5
Ta p Go to generate route. A route screen
appears.
Change
Page 16

go to an intersection
To create a route to an intersection:
From the main menu:
1
Tap
Go!
.
2
Tap
Address
. You see:
Note:
To change state of destination, tap
and select new state. See “search and select
item” on page 22 for details on searching using
the keyboard screen.
3
Tap
Intersection
4
Select destination intersection (city and streets).
See “search and select item” on page 22 for
.
Change
details on searching for and selecting items using
the keyboard screen.
5
Ta p Go to generate route. A route screen
appears.
go to location on map
To create a route to a location on the map:
From the map view screen:
1
Tap destination location on map. You see a pop-up
menu:
2
Ta p
Go There
route. A route screen appears.
from pop-up menu to generate
routes
15
Page 17

go to home location
To create a route to your home location:
Note:
To set your home location, see “set home
location” on page 20.
From the main menu:
1
Ta p
Go!
.
2
Ta p
Home
to generate route. A route screen
appears.
go to recent location
To create a route to a recent location:
From the main menu:
1
Ta p
Go!
.
2
Ta p
Recent Locations
3
Select location from list and tap OK.
routes
16
.
4
Ta p Go to generate route. A route screen
appears.
go to favorite location
To create a route to a favorite location:
Note:
To set a favorite location, see “set favorite
location” on page 21.
From the main menu:
1
Ta p
Go!
.
2
Ta p
My Locations
3
Select location from list and tap OK.
4
Ta p Go to generate route. A route screen
appears.
.
Page 18

go to a business or other point of
interest
To create a route to your favorite restaurant, nearest
gas station, or to see what is available along your
route:
1
Tap
Go!
.
2
Tap
Food, Fuel, Lodging and More
3
Select location to search near:
•
Tap
My Current Location
current location.
•
Tap
My Destination
destination.
to search near your route
. You see:
to search near your
•
Ta p
Another Location
location. To search for and select a specific
location, see “search and select item” on
page 22.
Once location is selected, you see:
4
Search for and select a business or other point of
interest:
•
To search for a business by category, tap a
category icon (or
categories) to search for and select a
business.
to search near another
More Places
for more
routes
17
Page 19

•
To search for a business by name, tap
Place
to search for and select a business.
5
Ta p Go to generate route. A route screen
appears.
Spell
manage a route
select route options
To select route type (quickest, shortest), and road
types to avoid when generating a route:
From the main menu:
1
Ta p
Settings
.
2
Ta p
Route
.
routes
18
3
Ta p
Road Settings
4
Select desired route type and tap right arrow. You
see:
5
Tap road types to avoid and tap OK. The route is
regenerated and appears on map screen.
. You see:
Page 20

create route detour
You can select a detour distance to instruct your
TN20/TN30 to calculate an alternate route. For
example, if you know there is traffic for the next three
miles, you can have your TN20/TN30 calculate a
detour that takes you off your current route and then
returns you back to that route after a distance of three
miles. To do this:
From the route screen:
1
Tap next street bar.
2
Tap
Create Detour
. You see:
3
Tap a detour distance button. The route is
regenerated and displayed on map view screen.
view route directions list
To view a driving directions list:
From the route screen:
1
Tap next street bar.
2
Ta p
Directions List
3
To view detail about a specific route step, select
the step and do the following:
•
Select
Next/Prior
map.
. You see:
Tu r n s
to view turn on map. Select
to view next or previous step on
routes
19
Page 21

•
Select
Avoid
to recalculate route to avoid
selected step.
•
Select
Route
to view overall route on map.
view route map overview
To view a map of the complete route:
From the route screen:
1
Tap next street bar.
2
Ta p
Route Overview
The distance and estimated time of arrival are
displayed at the bottom of the screen.
routes
20
. You see:
view route status information
To view route status information from the route
screen, tap the route status bar. You can switch
between the following details:
•
Travel distance, time remaining, and estimated
time of arrival
•
Current street location
•
Current speed and altitude
set home location
To set a home location:
From the main menu:
1
Ta p
Settings
.
Page 22

2
Tap
Home
. You see:
3
Search for and select an address (city, street, and
address number) by tapping
4
Tap OK.
Set Address
set favorite location
To set a favorite location:
From the map view screen:
1
Tap favorite location on map. You see a pop-up
menu:
2
Ta p
Save
from pop-up menu to save destination
.
under My Locations in Settings.
cancel a route
To cancel a route:
From the route screen:
1
Tap next street bar.
2
Ta p
Cancel Route
map view screen.
. The route is removed from the
routes
21
Page 23

use the keyboard
A keyboard screen is provided to search and select
items as well as enter text with your TN20/TN30.
search and select item
To search for and select from a list of items (such as
cities or streets), you can:
•
Ta p
See List
button to select from a complete
list of items.
routes
22
•
Using keyboard, begin entering item name. As
you select characters, matching items are
listed like shown:
OK
Tap an item to select it then tap
To redisplay keyboard, tap
To switch keyboard to display numbers or other
characters, tap
ABC>
button.
123>
button. To redisplay letters, tap
button.
Show Keyboard
button.
Page 24

text entry
To enter text (such as when saving a location), tap
keys to define entry.
OK
to save entry.
Tap
Note:
The selector field (displayed below the text
entry field) is provided for some text entry tasks. Use
this to select which folder to save item (in
Locations
under Settings).
My
routes
23
Page 25

maps
map display controls
zoom in and out on map
To zoom in to view a smaller area with more detail, tap
on map.
To zoom out to view a large area with less detail, tap
on map.
select map view
You can choose between two map views by tapping
the map view icon:
3D map view with forward direction at top
2D map view with forward direction at top
maps
24
select day/night map mode
To choose between day and night map mode:
Note:
To enable automatic day/night mode change,
ensure the
selected for map display options. See “select map
display options” on page 25 for details on
viewing/changing map display options.
From the main menu:
1
2
Automat ic Day /Ni ght Sw itch
Ta p
Settings
.
Ta p
Night View
the selected mode.
or
Day View
option is
. The map appears in
Page 26

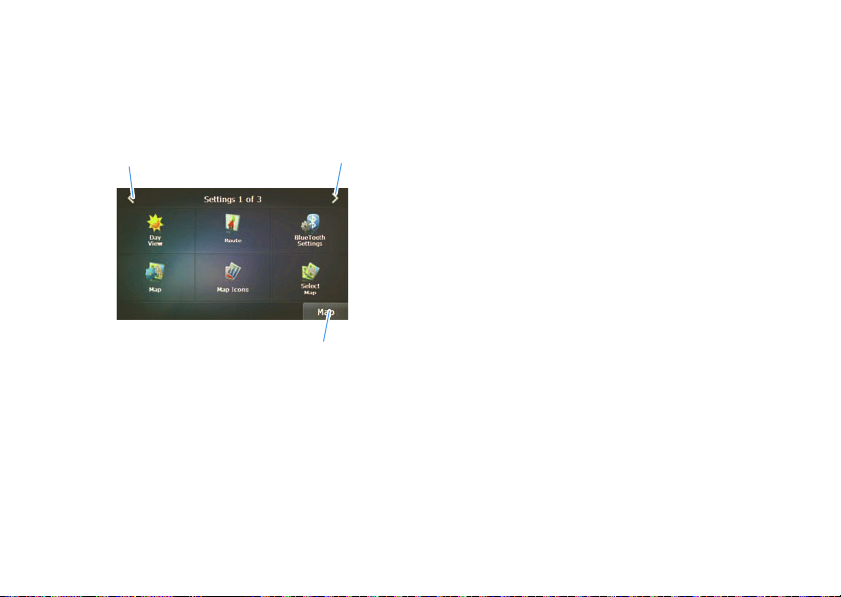
select map display options
To choose the items (buttons, bars, icons) displayed on
the map view screen:
From the main menu:
1
Tap
Settings
.
2
Tap
Map
. You see:
3
Tap checkbox to select/unselect map display
items.
4
Tap OK. The main menu screen appears.
select map display icons
To choose businesses and other icon types to display
on the map:
From the main menu:
1
Ta p
Settings
.
2
Ta p
Map Icons
3
Tap checkbox to select/unselect map icon types
to display.
4
Ta p OK. The main menu screen appears.
. You see:
maps
25
Page 27

manage maps
To select to use or delete a map in your TN20/TN30:
Note:
Regardless of which map you select, route
planning and navigation on major roads is possible
across all map regions in the continental United
States.
From the main menu:
1
Ta p
Settings
.
2
Ta p
Select Map
3
Do one of the following:
maps
26
. You see:
•
To select a map to use, tap map selection and
tap
OK
.
•
To refresh map list, tap
•
To permanently delete a map from your
TN20/TN30, tap
Delete
Refresh
.
.
browse map
browse from current location
To disconnect GPS and browse map from current
location:
From main menu:
1
Ta p
Settings
.
2
Ta p
Free Map Browsing
. You see:
Page 28

3
Tap
Ye s
to turn off GPS and place TN20/TN30 in
browse map mode. To exit browse mode and turn
on GPS, tap bottom bar.
browse from a specific location
To disconnect GPS and browse map from specific
location:
From main menu:
1
Tap
Go!
.
2
Tap
Address
. You see:
Note:
To change state of destination, tap
and select new state. See “search and select
Change
item” on page 22 for details on searching for a
selecting items using the keyboard screen.
3
Ta p
Address
.
4
Select address (city, street, and address number)
from which to browse. See “search and select
item” on page 22 for details on searching for and
selecting items using the keyboard screen.
Note:
To select the center of a city for a
destination (instead of a specific address), use the
City Center selection for the address.
5
Ta p
Start Point
window:
6
Ta p
Ye s
browse map mode. To exit browse mode and turn
on GPS, tap bottom bar.
. You see the following pop-up
to turn off GPS and place TN20/TN30 in
maps
27
Page 29

view GPS information
To view current GPS information:
From the main menu:
1
Ta p
Settings
.
2
Ta p
GPS Info
•
When you have a GPS connection, you see a
screen like shown below:
28
.
maps
•
When you do not have a GPS connection, you
see a screen like shown below.
To obtain a GPS connection, find a location
with a clear view of the sky and wait a few
minutes to obtain satellite GPS signal. The
screen is continuously updated to provide
current GPS connection status.
Page 30

install new maps
To install new maps onto your TN20/TN30, do the
following:
1
Insert SD card containing new maps into SD card
slot.
2
Press and hold
seconds to power down your TN20/TN30.
3
Press and hold
becomes active to turn on your TN20/TN30.
Maps are installed automatically.
Power
button for at least 8
Power
button until the display
29
Page 31

settings
set your language
4
Ta p OK.
To select the display and voice language for your
TN20/TN30:
From the main menu:
1
Ta p
Settings
.
2
Ta p
Language
3
Tap arrows to select languages for display and
voice prompts.
. You see:
30
set your time zone
To select the time zone for your TN20/TN30.
Note:
Time is automatically set from the GPS signal.
From the main menu:
1
Ta p
Settings
.
2
Ta p
Time
. You see:
Page 32

3
Tap arrows to select time zone.
4
To allow TN20/TN30 to adjust for daylight savings,
Adjust for Daylight Savings
tap
5
Tap OK.
checkbox.
set your units of measure
To select the preferred measurement units for your
TN20/TN30:
From the main menu:
1
Tap
Settings
.
2
Ta p
Units of Measure
3
Tap system units.
4
Ta p OK.
. You see:
set keyboard type
To change the type of TN20/TN30 keyboard:
From the main menu:
1
Ta p
Settings
.
31
Page 33

2
Ta p
Display
. You see:
3
Tap keyboard type to use.
4
Ta p OK.
2
Ta p
Prompts
. You see:
3
Tap checkbox to select/unselect a voice prompt.
4
Ta p OK.
set voice prompts
To enable/display specific TN20/TN30 voice prompts:
From the main menu:
1
Ta p
Settings
.
32
connect to your phone for handsfree calls (TN30 only)
From the main menu:
1
Turn off any Bluetooth devices previously paired
with your device.
Page 34

2
Turn on the Bluetooth feature on your Bluetooth
phone.
3
Tap
Settings
.
4
Tap
BlueTooth Settings
5
Tap
Pair Mode
6
Place phone in Bluetooth search mode.
. You see:
. You see:
7
Select
MOTONAV TN30
your phone.
8
Select OK or
phone.
9
If prompted, enter
When your device successfully pairs and connects
with your phone, you see a confirmation message:
After successfully pairing your TN30 and your
Bluetooth phone, you don’t need to repeat this
procedure. For each use, ensure that your device is
turned ON and that your phone’s Bluetooth feature is
ON.
Ye s
from search results on
to pair your device with your
0000
for passkey.
33
Page 35

manage paired phone list (TN30 only)
view paired phone list
From the main menu:
1
Turn off any Bluetooth devices previously paired
with your device.
2
Turn on the Bluetooth feature on your Bluetooth
phone.
3
Ta p
Settings
.
4
Ta p
BlueTooth Settings
34
. You see:
5
Ta p
Phone List
. You see:
delete paired phone from list
From the main menu:
1
Turn off any Bluetooth devices previously paired
with your device.
2
Turn on the Bluetooth feature on your Bluetooth
phone.
3
Ta p
Settings
.
Page 36

4
Tap
BlueTooth Settings
5
Tap
Phone List
6
Tap phone to delete, then tap
7
Tap
Ye s
TN30’s memory.
. You see:
to confirm deletion of phone from the
. You see:
Delete
connect/disconnect to/from phone
from list
From the main menu:
1
Turn off any Bluetooth devices previously paired
with your device.
2
Turn on the Bluetooth feature on your Bluetooth
phone.
3
Ta p
Settings
.
4
Ta p
BlueTooth Settings
.
. You see:
35
Page 37

5
Ta p
Phone List
6
Do one of the following:
•
To connect to a phone, tap phone to connect,
then tap
•
To disconnect from a connected phone, tap
phone to disconnect, then tap
. You see:
Connect
.
36
Disconnect
.
Page 38

handsfree calls (TN30 only)
These features are only available when a handset
device (such as your phone) is connected to the
NAV
MOTO
Once your TN30 is paired with your phone (see
“connect to your phone for handsfree calls (TN30
only)” on page 32for details on pairing), ensure that
your phone is turned ON and that your phone’s
Bluetooth feature is ON.
When connected, you see a message like shown:
TN30 via Bluetooth.
answer a call
To accept an incoming call, tap
Accept
.
reject/ignore a call
To reject/ignore an incoming call, tap
Ignore
.
make a call
You can place a handsfree call using the MOTO
TN30 in the following ways:
•
Dial a number from the MOTO
•
Use handset device's voice commands (if
supported by your phone).
•
Redial last number.
•
Use call history number.
•
Dial a number from the handset device.
NAV
TN30.
NAV
37
Page 39

make a call using dialing
From map view or main menu screen:
1
Ta p
Call
. You see:
2
Tap phone number you want to call.
3
Ta p
Dial
. You see:
38
When call is connected, the following appears:
make a call using phone voice
commands
From map view or main menu screen:
1
Ta p
Call
. You see:
2
Ta p
Voice Dial
.
Page 40

Follow prompts to place call. When call is
connected, the following appears:
make a call using redial
From map view or main menu screen:
1
Tap
Call
. You see:
2
Ta p
Redial
. You see:
When call is connected, you see the following
displayed:
make a call using recent call list
From map view or main menu screen:
39
Page 41

1
Ta p
Call
. You see:
2
Ta p
Recent Calls
3
Tap number you want to call, then tap
see:
. You see:
40
Dial
. You
When call is connected, you see the following
displayed:
make a call using phone
You can dial a handsfree call directly from your phone
in the normal manner.
mute/unmute a call
While on a call, you can mute/unmute the microphone
on your TN30.
•
To mute an active call, tap
view screen, or tap
Mute
Mute
on In Call screen.
on map
Page 42

•
To unmute an active call, tap
map view screen, or tap
screen.
Unmute
Unmute
on
on In Call
display in call screen
While on a call, you can move between the In Call
screen and map view screen.
transfer a call
While on a call, you can transfer the call between your
phone and TN30.
•
To transfer an active call from your TN30 to
your phone, tap
screen.
•
To transfer an active call from your phone to
your TN30, tap
screen.
Talk on Phone
Talk on TN30
on In Call
on In Call
end a call
To end an active call, tap
screen, or tap
End Call
End Call
on In Call screen.
on map view
To move from the map view screen to the In Call
screen, tap Display Call .
To move from the In Call screen to the map view
screen, tap upper left arrow.
41
Page 43

Safety and General Information
Safety Information
IMPORTANT INFORMATION ON SAFE AND EFFICIENT
OPERATION. READ THIS INFORMATION BEFORE USING
YOUR DEVICE.
Approved Accessories
Use of accessories not approved by Motorola, including but not
limited to batteries, antennas, and convertible covers, may cause
your mobile device to exceed RF energy exposure guidelines and
may void your mobile device’s warranty. For a list of approved
Motorola accessories, visit our Web site at:
www.motorola.com
Electromagnetic
Interference/Compatibility
Note:
Nearly every electronic device is susceptible to
electromagnetic interference (EMI) if inadequately shielded,
designed, or otherwise configured for electromagnetic
compatibility.
Facilities
Turn off your mobile device in any facility where posted notices
instruct you to do so. These facilities may include hospitals or
Safety Information
42
health care facilities that may be using equipment that is sensitive
to external RF energy.
Aircraft
When instructed to do so, turn off your mobile device when on
board an aircraft. Any use of a mobile device must be in
accordance with applicable regulations per airline crew
instructions.
Medical Devices
Hearing Aids
Some mobile devices may interfere with some hearing aids. In the
event of such interference, you may want to consult your hearing
aid manufacturer or physician to discuss alternatives.
Other Medical Devices
If you use any other personal medical device, consult the
manufacturer of your device to determine if it is adequately
shielded from RF energy. Your physician may be able to assist you
in obtaining this information.
Page 44

Batteries & Chargers
Your battery, charger, or mobile device may contain symbols,
defined as follows:
Symbol Definition
032374o
032376o
032375o
Important safety information follows.
Do not dispose of your battery or
mobile device in a fire.
Your battery or mobile device may
require recycling in accordance with
local laws. Contact your local
regulatory authorities for more
information.
Do not throw your battery or mobile
device in the trash.
Do not let your battery, charger, or
mobile device get wet.
Listening at full volume to music or
voice through a headset may damage
your hearing.
Use & Safety for Battery-Powered Accessories
•
Do not store or use your battery-powered accessory (such
as a Bluetooth® headset or other device) in temperatures
below -10°C (14°F) or above 60°C (140°F).
•
Do not recharge your accessory in temperatures below
0°C (32°F) or above 45°C (113°F).
•
Conditions inside a parked car can exceed this range. Do
not store your accessory in a parked car.
•
Do not store your accessory in direct sunlight.
•
Storing your fully charged accessory in high-temperature
conditions may permanently reduce the life of the internal
battery.
•
Battery life may temporarily shorten in low-temperature
conditions.
Safety Information
43
Page 45

Smart Practices While Driving
Driving Safety
Check the laws and regulations on the use of mobile
devices and their accessories in the areas where you drive.
Always obey them. The use of these devices may be
prohibited or restricted in certain areas. Go to
www.motorola.com/callsmart
Your mobile device lets you communicate by voice and
data—almost anywhere, anytime, wherever wireless service is
available and safe conditions allow. When driving a car, driving is
your first responsibility. If you choose to use your mobile device
while driving, remember the following tips:
• Get to know your Motorola mobile device and its
features such as speed dial and redial.
these features help you to place your call without taking
your attention off the road.
• When available, use a handsfree
device.
layer of convenience to your mobile device
with one of the many Motorola Original
handsfree accessories available today.
• Position your mobile device within easy reach.
able to access your mobile device without removing your
eyes from the road. If you receive an incoming call at an
44
Drive Safe, Call Smart
for more information.
If available,
If possible, add an additional
Be
Driving Safety
inconvenient time, if possible, let your voice mail answer
it for you.
• Let the person you are speaking with know you are
driving; if necessary, suspend the call in heavy
traffic or hazardous weather conditions.
snow, ice, and even heavy traffic can be hazardous.
• Do not take notes or look up phone numbers while
• Dial sensibly and assess the traffic; if possible,
• Do not engage in stressful or emotional
• Use your mobile device to call for help.
Jotting down a “to do” list or going through your
driving.
address book takes attention away from your primary
responsibility—driving safely.
place calls when your car is not moving or before
pulling into traffic.
moving, dial only a few numbers, check the road and your
mirrors, then continue.
conversations that may be distracting.
you are talking with aware you are driving and suspend
conversations that can divert your attention away from the
road.
other local emergency number in the case of fire, traffic
accident, or medical emergencies.*
If you must make a call while
Rain, sleet,
Make people
Dial 911 or
Page 46

• Use your mobile device to help others in
emergencies.
progress, or other serious emergency where lives are in
danger, call 911 or other local emergency number, as you
would want others to do for you.*
• Call roadside assistance or a special
non-emergency wireless assistance number when
necessary.
serious hazard, a broken traffic signal, a minor traffic
accident where no one appears injured, or a vehicle you
know to be stolen, call roadside assistance or other
special non-emergency wireless number.*
* Wherever wireless phone service is available.
If you see an auto accident, crime in
If you see a broken-down vehicle posing no
Driving Safety
45
Page 47

Industry Canada Notice to Users
Industry Canada Notice
Operation is subject to the following two conditions: (1) This
device may not cause interference and (2) This device must accept
any interference, including interference that may cause undesired
operation of the device. See RSS-GEN 7.1.5.
FCC Notice to Users
FCC Notice
The following statement applies to all products that have
received FCC approval. Applicable products bear the FCC
logo, and/or an FCC ID in the format FCC-ID:xxxxxx on the
product label.
Motorola has not approved any changes or modifications to this
device by the user. Any changes or modifications could void the
user’s authority to operate the equipment. See 47 CFR Sec. 15.21.
This device complies with part 15 of the FCC Rules. Operation is
subject to the following two conditions: (1) This device may not
cause harmful interference, and (2) this device must accept any
interference received, including interference that may cause
undesired operation. See 47 CFR Sec. 15.19(3).
This equipment has been tested and found to comply with the
limits for a Class B digital device, pursuant to part 15 of the FCC
Rules. These limits are designed to provide reasonable protection
against harmful interference in a residential installation. This
Industry Canada Notice
46
equipment generates, uses and can radiate radio frequency energy
and, if not installed and used in accordance with the instructions,
may cause harmful interference to radio communications.
However, there is no guarantee that interference will not occur in a
particular installation. If this equipment does cause harmful
interference to radio or television reception, which can be
determined by turning the equipment off and on, the user is
encouraged to try to correct the interference by one or more of the
following measures:
•
Reorient or relocate the receiving antenna.
•
Increase the separation between the equipment and the
receiver.
•
Connect the equipment to an outlet on a circuit different
from that to which the receiver is connected.
•
Consult the dealer or an experienced radio/TV technician
for help.
Page 48

Motorola Limited Warranty for the United States and
Canada
Warranty
What Does This Warranty Cover?
Subject to the exclusions contained below, Motorola, Inc. warrants
its telephones, pagers, messaging devices, and consumer and
professional two-way radios (excluding commercial, government
or industrial radios) that operate via Family Radio Service or
General Mobile Radio Service, Motorola-branded or certified
accessories sold for use with these Products (“Accessories”) and
Motorola software contained on CD-ROMs or other tangible media
and sold for use with these Products (“Software”) to be free from
defects in materials and workmanship under normal consumer
usage for the period(s) outlined below. This limited warranty is a
consumer's exclusive remedy, and applies as follows to new
Motorola Products, Accessories and Software purchased by
consumers in the United States or Canada, which are accompanied
by this written warranty:
Products and Accessories
Products Covered Length of Coverage
Products and
Accessories
defined above, unless
otherwise provided for
below.
Decorative
Accessories and
Cases.
covers, bezels,
PhoneWrap™ covers
and cases.
Monaural Headsets.
Ear buds and boom
headsets that transmit
mono sound through a
wired connection.
as
Decorative
One (1) year
purchase by the first consumer
purchaser of the product
unless otherwise provided for
below.
Limited lifetime warranty
for the lifetime of ownership
by the first consumer
purchaser of the product.
Limited lifetime warranty
for the lifetime of ownership
by the first consumer
purchaser of the product.
from the date of
Warran t y
47
Page 49

Products Covered Length of Coverage
Consumer and
Professional
Two-way Radio
Accessories.
Products and
Accessories that are
Repaired or
Replaced.
Exclusions
Normal wear and tear.
replacement of parts due to normal wear and tear are excluded
from coverage.
Batteries.
Only batteries whose fully charged capacity falls below
80% of their rated capacity and batteries that leak are covered by
this limited warranty.
Abuse & misuse.
(a) improper operation, storage, misuse or abuse, accident or
neglect, such as physical damage (cracks, scratches, etc.) to the
surface of the product resulting from misuse; (b) contact with
liquid, water, rain, extreme humidity or heavy perspiration, sand,
dirt or the like, extreme heat, or food; (c) use of the Products or
Accessories for commercial purposes or subjecting the Product or
Warran t y
48
Ninety (90) days
date of purchase by the first
consumer purchaser of the
product.
The balance of the original
warranty or for ninety (90)
from the date returned to
days
the consumer, whichever is
longer.
Periodic maintenance, repair and
Defects or damage that result from:
from the
Accessory to abnormal usage or conditions; or (d) other acts which
are not the fault of Motorola, are excluded from coverage.
Use of non-Motorola Products and Accessories.
damage that result from the use of Non-Motorola branded or
certified Products, Accessories, Software or other peripheral
equipment are excluded from coverage.
Unauthorized service or modification.
resulting from service, testing, adjustment, installation,
maintenance, alteration, or modification in any way by someone
other than Motorola, or its authorized service centers, are
excluded from coverage.
Altered products.
numbers or date tags that have been removed, altered or
obliterated; (b) broken seals or that show evidence of tampering;
(c) mismatched board serial numbers; or (d) nonconforming or
non-Motorola housings, or parts, are excluded from coverage.
Communication services.
Products, Accessories or Software due to any communication
service or signal you may subscribe to or use with the Products
Accessories or Software is excluded from coverage.
Products or Accessories with (a) serial
Defects, damages, or the failure of
Defects or damages
Defects or
Page 50

Software
Products Covered Length of
Software.
Applies only to
physical defects in the media that
embodies the copy of the
software (e.g. CD-ROM, or floppy
disk).
Exclusions
Software embodied in physical media.
that the software will meet your requirements or will work in
combination with any hardware or software applications provided
by third parties, that the operation of the software products will be
uninterrupted or error free, or that all defects in the software
products will be corrected.
Software NOT embodied in physical media.
not embodied in physical media (e.g. software that is downloaded
from the Internet), is provided “as is” and without warranty.
Coverage
Ninety (90) days
from the date of
purchase.
No warranty is made
Software that is
Who is Covered?
This warranty extends only to the first consumer purchaser, and is
not transferable.
What Will Motorola Do?
Motorola, at its option, will at no charge repair, replace or refund
the purchase price of any Products, Accessories or Software that
does not conform to this warranty. We may use functionally
equivalent reconditioned/refurbished/pre-owned or new Products,
Accessories or parts. No data, software or applications added to
your Product, Accessory or Software, including but not limited to
personal contacts, games and ringer tones, will be reinstalled. To
avoid losing such data, software and applications please create a
back up prior to requesting service.
How to Obtain Warranty Service or
Other Information
USA Phones
Canada All Products
TTY
1-800-331-6456
Pagers
1-800-548-9954
Two-Way Radios and Messaging
Devices
1-800-353-2729
1-800-461-4575
1-888-390-6456
Warran t y
49
Page 51

Accessories
For
telephone number designated above for the product with
which they are used.
You will receive instructions on how to ship the Products,
Accessories or Software, at your expense, to a Motorola
Authorized Repair Center. To obtain service, you must include: (a) a
copy of your receipt, bill of sale or other comparable proof of
purchase; (b) a written description of the problem; (c) the name of
your service provider, if applicable; (d) the name and location of the
installation facility (if applicable) and, most importantly; (e) your
address and telephone number.
and
Software
, please call the
What Other Limitations Are There?
ANY IMPLIED WARRANTIES, INCLUDING WITHOUT LIMITATION
THE IMPLIED WARRANTIES OF MERCHANTABILITY AND FITNESS
FOR A PARTICULAR PURPOSE, SHALL BE LIMITED TO THE
DURATION OF THIS LIMITED WARRANTY, OTHERWISE THE
REPAIR, REPLACEMENT, OR REFUND AS PROVIDED UNDER THIS
EXPRESS LIMITED WARRANTY IS THE EXCLUSIVE REMEDY OF
THE CONSUMER, AND IS PROVIDED IN LIEU OF ALL OTHER
WARRANTIES, EXPRESS OR IMPLIED. IN NO EVENT SHALL
MOTOROLA BE LIABLE, WHETHER IN CONTRACT OR TORT
(INCLUDING NEGLIGENCE) FOR DAMAGES IN EXCESS OF THE
PURCHASE PRICE OF THE PRODUCT, ACCESSORY OR SOFTWARE,
OR FOR ANY INDIRECT, INCIDENTAL, SPECIAL OR
CONSEQUENTIAL DAMAGES OF ANY KIND, OR LOSS OF
Warran t y
50
REVENUE OR PROFITS, LOSS OF BUSINESS, LOSS OF
INFORMATION OR DATA, SOFTWARE OR APPLICATIONS OR
OTHER FINANCIAL LOSS ARISING OUT OF OR IN CONNECTION
WITH THE ABILITY OR INABILITY TO USE THE PRODUCTS,
ACCESSORIES OR SOFTWARE TO THE FULL EXTENT THESE
DAMAGES MAY BE DISCLAIMED BY LAW.
Some states and jurisdictions do not allow the limitation or
exclusion of incidental or consequential damages, or
limitation on the length of an implied warranty, so the
above limitations or exclusions may not apply to you. This
warranty gives you specific legal rights, and you may also
have other rights that vary from state to state or from one
jurisdiction to another.
Laws in the United States and other countries preserve for
Motorola certain exclusive rights for copyrighted Motorola
software such as the exclusive rights to reproduce and distribute
copies of the Motorola software. Motorola software may only be
copied into, used in, and redistributed with, the Products
associated with such Motorola software. No other use, including
without limitation disassembly of such Motorola software or
exercise of the exclusive rights reserved for Motorola, is
permitted.
Page 52

Product Registration
Registration
Online Product Registration:
direct.motorola.com/hellomoto/ Motosupport/source/registration.asp
Product registration is an important step toward enjoying your new
Motorola product. Registering helps us facilitate warranty service,
and permits us to contact you should your product require an
update or other service. Registration is for U.S. residents only and
is not required for warranty coverage.
Export Law Assurances
Export Law
This product is controlled under the export regulations of the
United States of America and Canada. The Governments of the
United States of America and Canada may restrict the exportation
or re-exportation of this product to certain destinations. For further
information contact the U.S. Department of Commerce or the
Canadian Department of Foreign Affairs and International Trade.
Please retain your original dated sales receipt for your records. For
warranty service of your Motorola Personal Communications
Product you will need to provide a copy of your dated sales receipt
to confirm warranty status.
Thank you for choosing a Motorola product.
Registration
51
Page 53

Caring for the Environment by Recycling
Recycling Information
This symbol on a Motorola product means the product
should not be disposed of with household waste.
Disposal of your Mobile Device and
Accessories
Please do not dispose of mobile devices or electrical accessories
(such as chargers, headsets, or batteries) with your household
waste. These items should be disposed of in accordance with the
national collection and recycling schemes operated by your local or
regional authority. Alternatively, you may return unwanted mobile
devices and electrical accessories to any Motorola Approved
Service Center in your region. Details of Motorola approved
national recycling schemes, and further information on Motorola
recycling activities can be found at:
Disposal of your Mobile Device
Packaging and User’s Guide
Product packaging and user’s guides should only be disposed of in
accordance with national collection and recycling requirements.
Please contact your regional authorities for more details.
Recycling Information
52
www.motorola.com/recycling
Page 54

index
A
answer calls 37
B
Bluetooth
connect to your phone 32, 35
delete phone from paired list
34
disconnect from your phone
35
pairing and connecting with
your phone 32
view paired phone list 34
browse map 26
C
calls
answer 37
end 41
make 37
mute/unmute 40
reject/ignore 37
transfer to/from phone 41
cancel route 21
components
TN20 9
TN30 9
connect to your phone 32, 35
create route
to a business or other point of
interest 17
to an address 14
to an intersection 15
to favorite location 16
to home location 16
to location on map 15
to recent location 16
D
detour 19
disconnect from your phone 35
E
end a call 41
G
GPS status information 28
H
home location 16, 20
index
53
Page 55

I
install new maps 29
K
keyboard 22
search and select item 22
select type 31
text entry 23
L
lane information icon 5
language setting 30
list of directions 19
M
main menu screen 12
make a call 37
dial from phone 40
dial number 38
redial number 39
index
54
use recent number 39
use voice commands 38
manage route
create detour 19
route directions list 19
select route options 18
set home location 20
view map over view 20
view status information 20
map
browse from a specific location
27
browse from current location
26
display controls 24
select 26
select day/night mode 24
select display icons 25
select display items 25
select view (2D or 3D) 24
zoom in and out 24
map view screen 10
description 2
icons 3
route screen 4
maps
install new 29
measurement units setting 31
mute/unmute call 40
N
navigation 13
next street bar 5
next turn icon 5
P
power & charging 10
R
reject/ignore incoming call 37
route
Page 56

cancel 21
create 14
manage 18
save 22
route screen 4
route status bar 5
S
safety tips 44
save route 22
settings
keyboard type 31
language 30
measurement units 31
time zone 30
voice prompts 32
setup 10
T
time zone setting 30
transfer call to/from phone 41
turn on & off 10
V
voice prompts 32
index
55
Page 57

www.motorola.com
 Loading...